

World Class 3000 O2 Analyzer CENELEC with IFT 3000 Intelligent Field Transmitter-Rev 4.2
Table of contents
 Loading...
Rosemount World Class 3000 O2 Analyzer CENELEC with IFT 3000 Intelligent Field Transmitter-Rev 4.2 Manuals & Guides
Page 1

Instruction Manual
106-300NFX Rev. 4.2
January 2002
World Class 3000
Oxygen Analyzer (CENELEC)
with IFT 3000 Intelligent Field
Transmitter (CENELEC)
http://www.processanalytic.com
Page 2

ESSENTIAL INSTRUCTIONS
READ THIS PAGE BEFORE PROCEEDING!
Rosemount Analytical designs, manufactures and tests its products to meet many national and
international standards. Because these instruments are sophisticated technical products, you
MUST properly install, use, and maintain them to ensure they continue to operate within their
normal specifications. The following instructions MUST be adhered to and integrated into your
safety program when installing, using, and maintaining Rosemount Analytical products. Failure to
follow the proper instructions may cause any one of the following situations to occur: Loss of life;
personal injury; property damage; damage to this instrument; and warranty invalidation.
• Read all instructions prior to installing, operating, and servicing the product.
• If you do not understand any of the instructions, contact your Rosemount Analytical repre-
sentative for clarification.
• Follow all warnings, cautions, and instructions marked on and supplied with the product.
• Inform and educate your personnel in the proper installation, operation, and mainte-
nance of the product.
• Install your equipment as specified in the Installation Instructions of the appropriate In-
struction Manual and per applicable local and national codes. Connect all products to the
proper electrical and pressure sources.
• To ensure proper performance, use qualified personnel to install, operate, update, program,
and maintain the product.
• When replacement parts are required, ensure that qualified people use replacement parts
specified by Rosemount. Unauthorized parts and procedures can affect the product’s performance, place the safe operation of your process at risk, and VOID YOUR WARRANTY.
Look-alike substitutions may result in fire, electrical hazards, or improper operation.
• Ensure that all equipment doors are closed and protective covers are in place, except
when maintenance is being performed by qualified persons, to prevent electrical shock
and personal injury.
The information contained in this document is subject to change without notice.
Emerson Process Management
Rosemount Analytical Inc.
Process Analytic Division
1201 N. Main St.
Orrville, OH 44667-0901
T (330) 682-9010
F (330) 684-4434
e-mail: gas.csc@EmersonProcess.com
http://www.processanalytic.com
Page 3

HIGHLIGHTS OF CHANGES
Effective June, 1997 Rev. 4
Page Summary
--- General. Added snubber version of probe to manual. Text and art
changed as necessary to reflect new style of probe.
Effective February, 1998 Rev. 4.1
Page Summary
Page 2-2 Figure 2-1. Change calibration gas tube dimensions.
Page 3-10 Add note on test gas flowmeter.
Effective January, 2002 Rev. 4.2
Page Summary
Page 2-13 Updated Figure 2-8.
Page 2-14 Updated analog output current/voltage mode selection procedure.
Page 4

HIGHLIGHTS OF CHANGES
APPENDIX AX
Effective June, 1997 Rev. 2
Page Summary
-- General. Added snubber version of probe to manual. Text and art
changed as necessary to reflect new style probe.
Effective February, 1998 Rev. 2.1
Page Summary
Page A-12 Changed screw torque in paragraph A-3h.
Page 5

HIGHLIGHTS OF CHANGES
APPENDIX BX
Effective February, 1995 Rev. 1.1
Page Summary
B-3 Figure B-3. Updated for IB consistency.
Effective January, 1997 Rev. 1.2
Page Summary
Page B-2 Figure B-2. Added fuse locations.
Page B-5 Insert protective cover and ground lead warning.
Page B-8 Insert protective cover and ground lead warning.
Page B-11 Table B-2. Add expanded fuse specifications to replacement parts.
Page 6

HIGHLIGHTS OF CHANGES
APPENDIX DX
Effective February, 1995 Rev. 2
Page Summary
-- General. Updated appendix with new version of MPS.
Effective January, 1997 Rev. 2.1
Page Summary
Page D-5 Insert protective cover and ground lead warning.
Page D-7 Insert protective cover and ground lead warning. Add fuse
specifications and clarify fuse replacement.
Page D-11 Add fuse specifications to replacement parts
Page 7

HIGHLIGHTS OF CHANGES
APPENDIX EX
Effective February, 1995 Rev. 1.1
Page Summary
Page E-4 Figure E-2. Updated for IB consistency.
Page E-7 Figure E-4. Updated Flowchart.
Effective May, 1995 Rev. 1.2
Page Summary
Page E-4 Figure E-2. Added callout text “Heater Power Supply (Optional)”.
Effective January, 1997 Rev. 1.3
Page Summary
Page E-5 Insert protective cover and ground lead warning.
Page E-9 Insert protective cover and ground lead warning.
Page E-15 Added expanded fuse specifications to replacement parts
Page 8

HIGHLIGHTS OF CHANGES
APPENDIX JX
Effective January, 1997 Rev. 1.0
Page Summary
Page J-4 Insert warning concerning protective equipment covers and safety
ground leads.
Page J-11 Insert warning concerning protective equipment covers and safety
ground leads.
Page 9

World Class 3000
PREFACE.........................................................................................................................P1
Definitions ......................................................................................................................... P1
Safety Instructions ........................................................................................................... P2
1-0 DESCRIPTION ................................................................................................................ 1-1
1-1 Component Checklist Of Typical System (Package Contents) ....................................... 1-1
1-2 System Overview............................................................................................................. 1-1
2-0 INSTALLATION .............................................................................................................. 2-1
2-1 Oxygen Analyzer (Probe) Installation .............................................................................. 2-1
2-2 Intelligent Field Transmitter (IFT) Installation .................................................................. 2-9
2-3 Heater Power Supply Installation .................................................................................. 2-16
2-4 Multiprobe Test Gas Sequencer Installation ................................................................. 2-20
3-0 SETUP AND OPERATION ........................................................................................... 3-1
3-1 Overview.......................................................................................................................... 3-1
3-2 IFT with GUI and LDP Front Panel Controls and Indicators ........................................... 3-2
3-3 Help Key .......................................................................................................................... 3-2
3-4 Status Line....................................................................................................................... 3-3
3-5 Quick Reference Chart .................................................................................................... 3-3
3-6 Main Menu ....................................................................................................................... 3-3
3-7 Probe Data Sub-Menu .................................................................................................... 3-6
3-8 Calibrate O
3-9 Setup Sub-Menu.............................................................................................................. 3-6
3-10 System Calibration........................................................................................................... 3-9
ub-Menu ..................................................................................................... 3-6
2
Instruction Manual
106-300NFX Rev. 4.2
January 2002
TABLE OF CONTENTS
4-0 LDP OPERATION .......................................................................................................... 4-1
4-1 Overview.......................................................................................................................... 4-1
4-2 IFT with LDP Front Panel Controls and Indicators .......................................................... 4-1
4-3 LDP Displays ................................................................................................................... 4-1
4-4 LDP Defaults.................................................................................................................... 4-2
4-5 Calibration........................................................................................................................ 4-2
5-0 TROUBLESHOOTING .................................................................................................... 5-1
5-1 Overview.......................................................................................................................... 5-1
5-2 Special Troubleshooting Notes........................................................................................ 5-1
5-3 System Troubleshooting.................................................................................................. 5-2
6-0 RETURN OF MATERIAL .............................................................................................. 6-1
7-0 APPENDICES ................................................................................................................. 7-1
8-0 INDEX.............................................................................................................................. 8-1
9-0 DRAWINGS AND SCHEMATICS................................................................................. 9-1
Rosemount Analytical Inc. A Division of Emerson Process Management i
Page 10

Instruction Manual
106-300NFX Rev. 4.2
January 2002
Figure 1-1. Typical System Package ....................................................................................... 1-1
Figure 1-2. Typical System Installation .................................................................................... 1-5
Figure 1-3. World Class 3000 Typical Application with Intelligent Field Transmitters -
Figure 2-1. Probe Installation ...................................................................................................2-2
Figure 2-2. Orienting the Optional Vee Deflector ..................................................................... 2-7
Figure 2-3. Air set, Plant Air Connection.................................................................................. 2-8
Figure 2-4. Outline of Intelligent Field Transmitter ................................................................... 2-9
Figure 2-5. Power Supply Board Jumper Configuration ........................................................ 2-10
Figure 2-6. IFT Power Supply Board Jumpers....................................................................... 2-11
Figure 2-7. Wiring Layout for IFT 3000 (CENELEC approved) System without HPS............ 2-12
Figure 2-8. IFT Microprocessor Board Jumper Configuration................................................ 2-13
Figure 2-9. IFT Microprocessor Board Jumpers .................................................................... 2-14
Figure 2-10. Interconnect Board Jumper Configuration........................................................... 2-14
Figure 2-11. IFT Interconnect Board Output Connections ....................................................... 2-15
Figure 2-12. Outline of CENELEC Approved Heater Power Supply........................................ 2-16
Figure 2-13. Wiring layout for IFT 3000 (CENELEC approved) with HPS ............................... 2-17
Figure 2-14. CENELEC Approved Heater Power Supply Wiring Connections ........................ 2-19
Figure 2-15. Jumper Selection Label. ...................................................................................... 2-19
Figure 2-16. Jumpers on HPS Motherboard ............................................................................ 2-20
Figure 2-17. MPS Module ........................................................................................................ 2-21
Figure 2-18. MPS Gas Connections ........................................................................................ 2-22
Figure 2-19. MPS Electrical Connections ................................................................................ 2-23
Figure 3-1. IFT with GUI and LDP Front Panel ........................................................................ 3-2
Figure 3-2. Typical Calibration Setup..................................................................................... 3-11
Figure 3-3. Portable Rosemount Oxygen Test Gas Kit......................................................... 3-12
Figure 3-4. Typical Portable Test Calibration Setup .............................................................. 3-13
Figure 3-5. Typical Automatic Calibration System ................................................................. 3-15
Figure 4-1. IFT with LDP Front Panel ...................................................................................... 4-1
World Class 3000
LIST OF ILLUSTRATIONS
CENELEC Approved ............................................................................................. 1-6
LIST OF TABLES
Table 3-1. Sample HELP Messages....................................................................................... 3-2
Table 3-2. Main Menu .............................................................................................................3-3
Table 3-3. PROBE DATA Sub-Menu. ................................................................................... 3-3
Table 3-4. CALIBRATION O
Table 3-5. SETUP Sub-Menu ................................................................................................. 3-8
Table 3-6. Efficiency Constants .............................................................................................. 3-9
Table 4-1. LDP Defaults.........................................................................................................4-3
ii Rosemount Analytical Inc. A Division of Emerson Process Management
Sub-Menu ................................................................................ 3-7
2
Page 11
World Class 3000
The purpose of this manual is to provide information concerning the components, functions, installation and maintenance of this particular oxygen analyzer.
Some sections may describe equipment not used in your configuration. The user should
become thoroughly familiar with the operation of this module before operating it. Read
this instruction manual completely.
The following definitions apply to WARNINGS, CAUTIONS, and NOTES found throughout this
publication.
Instruction Manual
106-300NFX Rev. 4.2
January 2002
PREFACE
DEFINITIONS
Highlights an operation or maintenance
procedure, practice, condition, statement, etc. If not strictly observed, could
result in injury, death, or long-term
health hazards of personnel.
Highlights an essential operating procedure,
condition, or statement.
: EARTH (GROUND) TERMINAL
: PROTECTIVE CONDUCTOR TERMINAL
: RISK OF ELECTRICAL SHOCK
: WARNING: REFER TO INSTRUCTION BULLETIN
NOTE TO USERS
Highlights an operation or maintenance
procedure, practice, condition, statement, etc. If not strictly observed, could
result in damage to or destruction of
equipment, or loss of effectiveness.
NOTE
The number in the lower right corner of each illustration in this publication is a manual illustration number. It is not a part number, and is not related to the illustration in any technical
manner.
Rosemount Analytical Inc. A Division of Emerson Process Management P-1
Page 12

Instruction Manual
106-300NFX Rev. 4.2
January 2002
FOR THE WIRING AND INSTALLATION
The following safety instructions apply specifically to all EU member states. They should
be strictly adhered to in order to assure compliance with the Low Voltage Directive. NonEU states should also comply with the following unless superseded by local or National
Standards.
1. Adequate earth connections should be made to all earthing points, internal and external,
where provided.
2. After installation or troubleshooting, all safety covers and safety grounds must be replaced.
The integrity of all earth terminals must be maintained at all times.
3. Mains supply cords should comply with the requirements of IEC227 or IEC245.
World Class 3000
IMPORTANT
SAFETY INSTRUCTIONS
OF THIS APPARATUS
4. All wiring shall be suitable for use in an ambient temperature of greater than 75°C.
5. All cable glands used should be of such internal dimensions as to provide adequate cable
anchorage.
6. To ensure safe operation of this equipment, connection to the mains supply should only be
made through a circuit breaker which will disconnect all circuits carrying conductors during a
fault situation. The circuit breaker may also include a mechanically operated isolating switch.
If not, then another means of disconnecting the equipment from the supply must be provided
and clearly marked as such. Circuit breakers or switches must comply with a recognized
standard such as IEC947. All wiring must conform with any local standards.
7. Where equipment or covers are marked with the symbol to the right, hazardous voltages are likely to be present beneath. These covers should only be
removed when power is removed from the equipment — and then only by
trained service personnel.
8. Where equipment or covers are marked with the symbol to the right, there is a
danger from hot surfaces beneath. These covers should only be removed by
trained service personnel when power is removed from the equipment. Certain surfaces may remain hot to the touch.
9. Where equipment or covers are marked with the symbol to the right, refer to
the Operator Manual for instructions.
10. All graphical symbols used in this product are from one or more of the following standards: EN61010-1, IEC417, and ISO3864.
P-2 Rosemount Analytical Inc. A Division of Emerson Process Management
Page 13

World Class 3000
1
Instruction Manual
106-300NFX Rev. 4.2
January 2002
SECTION 1
DESCRIPTION
1-1 COMPONENT CHECKLIST OF TYPICAL
SYSTEM (PACKAGE CONTENTS)
A typical Rosemount World Class 3000 Oxygen
Analyzer (CENELEC approved) with IFT 3000
Intelligent Field Transmitter (CENELEC
approved) should contain the items shown in
Figure 1-1. Record the Part Number, Serial
Number, and Order Number for each component of your system in the table located on the
cover of this manual.
The IFT 3000, Oxygen Analyzer
(Probe), and probe abrasive shield are
heavy. Lifting and carrying procedures
should take account of this weight.
1-2 SYSTEM OVERVIEW
a. Scope
This Instruction Bulletin has been designed to
supply details needed to install, start up, operate, and maintain the Rosemount World Class
3000 Oxygen Analyzer (CENELEC approved)
with IFT 3000 Intelligent Field Transmitter
(CENELEC approved). The Intelligent Field
Transmitter (IFT) can be interfaced with one
World Class 3000 probe. The IFT provides all
necessary intelligence for controlling the probe
and optional MPS 3000 Multiprobe Gas
Sequencer.
1
3
1. Intelligent Field Transmitter
(CENELEC approved)
2. Instruction Bulletin
3. Multiprobe Test Gas
Sequencer (Optional)
4. Heater Power Supply
(CENELEC approved)(Optional)
5. Oxygen Analyzer (Probe)
(CENELEC approved)
6. System Cable
7. Mounting Plate with Mounting
Hardware and Gasket
8. Reference AIR set (optional)
R
O
S
E
M
O
U
N
T
8
7
6
Figure 1-1. Typical System Package
2
4
E
N
E
E
L
I
R
H
G
I
W
S
E
N
D
E
P
O
T
G
O
N
N
I
N
O
E
D
P
O
S
E
E
R
E
O
L
F
A
E
B
B
E
L
5
26030001
Rosemount Analytical Inc. A Division of Emerson Process Management Description 1-1
Page 14

Instruction Manual
106-300NFX Rev. 4.2
January 2002
World Class 3000
NOTE
The Rosemount encode sheets (Product Ordering Matrix) allow a customer
to order either the hazardous area version of the IFT 3000 or the nonhazardous area version. The hazardous area version has the symbol
"EExd" on the apparatus nameplate.
The non-hazardous area version does
not. Ensure that if you have received
the non-hazardous version that you do
not install it in a potentially explosive
atmosphere. This also applies to the
hazardous/non-hazardous versions of
the HPS 3000.
b. System Description
The Rosemount Oxygen Analyzer (Probe) is
designed to measure the net concentration
of oxygen in an industrial process; i.e., the
oxygen remaining after all fuels have been
oxidized. The probe is permanently positioned within an exhaust duct or stack and
performs its task without the use of a sampling system.
The equipment measures oxygen percentage by reading the voltage developed
across a heated electrochemical cell, which
consists of a small Yttria-stabilized, Zirconia
disc. Both sides of the disc are coated with
porous metal electrodes. When operated at
the proper temperature, the millivolt output
voltage of the cell is given by the following
Nernst equation:
EMF = KT log
10(P1/P2
) + C
Where:
is the partial pressure of the oxygen
1. P
2
in the measured gas on one side of the
cell,
2. P
is the partial pressure of the oxygen
1
in the reference gas on the other side,
3. T is the absolute temperature,
4. C is the cell constant,
5. K is an arithmetic constant.
For best results, use clean, dry, instrument air (20.95% oxygen) as a reference gas.
When the cell is at operating temperature,
and there are unequal oxygen concentrations across the cell, oxygen ions will travel
from the high partial pressure of oxygen
side to the low partial pressure side of the
cell. The resulting logarithmic output voltage
is approximately 50 mV per decade.
Because the magnitude of the output is
proportional to the logarithm of the inverse
of the sample of the oxygen partial pressure, the output signal increases as the
oxygen concentration of the sample gas
decreases. This characteristic enables the
oxygen analyzer to provide exceptional
sensitivity at low oxygen concentrations.
Oxygen analyzer equipment measures net
oxygen concentration in the presence of all
the products of combustion, including water
vapor. Therefore, it may be considered an
analysis on a "wet" basis. In comparison
with older methods, such as the Orsat
apparatus, which provides an analysis on a
"dry" gas basis, the "wet" analysis will, in
general, indicate a lower percentage of
oxygen. The difference will be proportional
to the water content of the sampled gas
stream.
c. System Configuration
The equipment discussed in this manual
consists of three major components: the
oxygen analyzer (CENELEC approved)
(probe), the intelligent field transmitter
(CENELEC approved) (IFT), and an optional heater power supply (CENELEC
approved) (HPS). The HPS is required
when the cable run between the electronics
and the probe exceeds 45 m (150 ft). There
is also an optional multiprobe test gas
sequencer (MPS), which can be used to
facilitate the automatic calibration of a
multiple probe configuration.
1-2 Description Rosemount Analytical Inc. A Division of Emerson Process Management
Page 15

World Class 3000
1
Instruction Manual
106-300NFX Rev. 4.2
January 2002
CENELEC approved probes are available in
three length options, giving the user the
flexibility to use an in situ penetration appropriate to the size of the stack or duct.
The options on length are 457 mm (18 in.),
0.91 m (3 ft), and 1.83 m (6 ft). The probe is
certified EExd IIB T1 [370°C (698°F)] to
CENELEC standards EN50014 and
EN50018.
The IFT contains electronics that control
probe temperature (in conjunction with the
optional HPS) and supply power, and provide isolated outputs that are proportional to
the measured oxygen concentration. The
oxygen sensing cell is maintained at a constant temperature by modulating the duty
cycle of the probe heater. The IFT accepts
millivolt signals generated by the sensing
cell and produces outputs to be used by
remotely connected devices. The IFT output
is isolated and selectable to provide
linearized voltage or current.
The heater power supply CENELEC
approved (HPS) can provide an interface
between the IFT and the probe. The HPS
contains a transformer for supplying proper
voltage to the probe heater. The unit is
certified EExd IIC T6 to CENELEC standards EN50014 and EN50018.
Systems with multiprobe and multiple IFT
applications may employ an optional MPS
3000 Multiprobe Test Gas Sequencer. The
MPS 3000 provides automatic test gas
sequencing for up to four probes and IFTs
to accommodate automatic calibration. The
MPS 3000 must be installed in a nonhazardous, explosive-free environment.
3. User friendly, menu driven operator
interface with context-sensitive on-line
help.
4. Field replaceable cell.
5. Analyzer constructed of rugged 316
LSS for all wetted parts.
6. The intelligent field transmitter (IFT)
can be located up to 45 m (150 ft) from
the probe when used without optional
heater power supply (HPS). When the
system includes the optional HPS, the
HPS can be located up to 45 m (150 ft)
from the probe and the IFT may be located up to 364 m (1200 ft) from the
HPS.
7. All electronic modules are adaptable to
120, 220, and 240 line voltages.
8. Five languages may be selected for
use with the IFT. These are:
English
French
German
Italian
Spanish
9. An operator can set up, calibrate, or
troubleshoot the IFT in one of two
ways:
(a) Optional General User Interface
(GUI). The GUI is housed within
the IFT electronics enclosure and
makes use of an LCD display and
keypad.
d. System Features
1. Unique and patented electronic cell
protection action that automatically
protects sensor cell when the analyzer
detects reducing atmospheres.
2. Output voltage and sensitivity increase
as the oxygen concentration decreases.
Rosemount Analytical Inc. A Division of Emerson Process Management Description 1-3
(b) Optional LED Display Panel (LDP).
The LED display and a limited
function keypad permit calibration
only.
Page 16

Instruction Manual
106-300NFX Rev. 4.2
January 2002
World Class 3000
e. Handling the Oxygen Analyzer
It is important that printed circuit
boards and integrated circuits are
handled only when adequate antistatic
precautions have been taken to prevent possible equipment damage.
The oxygen analyzer is designed for
industrial application. Treat each
component of the system with care to
avoid physical damage. The probe
contains components made from ceramics, which are susceptible to
shock when mishandled. See Safety
Data Sheets 1M03243, 1M03226, and
1M03296 for safety related information.
NOTE
Retain packaging in which the oxygen
analyzer arrived from the factory in
case any components are to be
shipped to another site. This packaging has been designed to protect the
product.
f. System Considerations
Once you have verified that you have all the
components, select mounting locations and
determine how each component will be
placed in terms of available power supply,
ambient temperatures, environmental considerations, convenience, and serviceability.
A typical system installation is illustrated in
Figure 1-2. Figure 1-3 shows a typical
system wiring. For details on installing the
individual components of the system,
refer to Section 2, Installation.
After selecting the probe mounting location,
provision should be made for a platform
where the probe can be easily serviced.
The intelligent field transmitter (IFT) can be
located up to 45 m (150 ft) cabling distance
from the probe when used without optional
heater power supply (HPS). When the system includes the optional HPS, the HPS can
be located up to 45 m (150 ft) cabling
distance from the probe and the IFT may be
located up to 364 m (1200 ft) cabling
distance from the HPS.
A source of instrument air is required at the
probe for reference gas use. Since the
probe is equipped with an in-place calibration feature, provision should be made for
connecting test gas tanks to the oxygen
analyzer when the probe is to be calibrated.
Prior to installation of your Rosemount
CENELEC approved World Class 3000
Oxygen Analyzer with Intelligent Field
Transmitter make sure that you have all of
the components necessary to make the
system installation. Ensure that all the components are properly integrated to make the
system functional.
1-4 Description Rosemount Analytical Inc. A Division of Emerson Process Management
If the test gas bottles will be permanently
hooked up, a check valve must be connected to the calibration gas fitting on the
probe junction box. This is to prevent
breathing of calibration gas line and subsequent gas condensation and corrosion. The
check valve is in addition to the stop valve
in the test gas kit or the solenoid valve in
the multiprobe test gas sequencer units.
Page 17

World Class 3000
1
Instruction Manual
106-300NFX Rev. 4.2
January 2002
CALIBRATION
INSTRUMENT
AIR SUPPLY
(REF. GAS)
FIELD TRANSMITTER
GAS
PRESSURE
REGULATOR
FLOWMETER
INTELLIGENT
EExd IIB T6
GASES
STACK
STANDARD
DUCT
OXYGEN
ANALYZER
EExd IIB T1
(370°C) (PROBE)
HEATER POWER
SUPPLY EExd IIC T6
ADAPTER
PLATE
LINE
VOLTAGE
}
GASES
OPTIONS
DUCT
*MULTIPROBE TEST
GAS SEQUENCER
(NON-HAZARDOUS AREA)
*NOTE: THE MPS 3000 MUST BE
INSTALLED IN A NON-HAZARDOUS
EXPLOSIVE FREE ENVIRONMENT.
ADAPTER
CALIBRATION
SUPPLY
INST. AIR
TEST GAS 1
TEST GAS 2
REFERENCE AIR
FIELD TRANSMITTER
STACK
PLATE
GAS
INTELLIGENT
EExd IIB T6
OXYGEN ANALYZER
EExd IIB T1 (370°C)
(PROBE)
HEATER POWER
SUPPLY EExd IIC T6
}
LINE
VOLTAGE
23800017
Figure 1-2. Typical System Installation
Rosemount Analytical Inc. A Division of Emerson Process Management Description 1-5
Page 18

Instruction Manual
106-300NFX Rev. 4.2
January 2002
Stack Thermocouple
(optional)
2-Conductor T/C
Wire [46 (150) max]
(optional)
(OPTIONAL)
Line Voltage
World Class 3000
4 Twisted Pair Plus 2 Twisted Pair
for Options [366 (1200) max]
Line Voltage
World Class 3000
Probe
World Class 3000
Probe
7-Conductor Cable
[46 (150) max]
2-Pneumatic Lines
by Customer
[91 (300) max]
HPS 3000
HPS 3000
Explosion Proof
Required only for
Hazardous Area
Applications, otherwise
use NEMA 4X.
Lengths Exceeding
150 feet.
(OPTIONAL)
*MPS 3000
TEST GAS
SEQUENCER
Modular Design
Up to 4 Probes
[HPS not required for lengths of less than 46 (150) max]
7-Conductor Cable
[46 (150) max]
Line Voltage
Test Gas
by
Customer
IFT 3000
Intelligent Field Transmitter
Line Voltage
100 to 120 Volt
220 to 240 Volt
5 Conductor
[305 (1000) max]
Line Voltage
Stack Thermocouple
(optional)
*NOTE 1:
NOTE 2:
2-Conductor T/C
Wire [46 (150) max]
(optional)
THE MPS 3000 MUST BE INSTALLED
IN A NON-HAZARDOUS EXPLOSIVE FREE
ENVIRONMENT.
ALL DIMENSIONS APPEAR IN METERS
WITH FEET IN PARENTHESES.
IFT 3000
Intelligent Field Transmitter
Line Voltage
100 to 120 Volt
220 to 240 Volt
P00003
Figure 1-3. World Class 3000 Typical Application
with Intelligent Field Transmitters - CENELEC Approved
1-6 Description Rosemount Analytical Inc. A Division of Emerson Process Management
Page 19

World Class 3000
2
Instruction Manual
106-300NFX Rev. 4.2
January 2002
SECTION 2
INSTALLATION
2-1 OXYGEN ANALYZER (PROBE)
INSTALLATION
Before probe installations, consult
probe Safety Data Sheet 1M03226.
The probe and probe abrasive shield
are heavy. Use proper lifting and
carrying procedures to avoid
personnel injury.
Install all protective equipment covers
and safety ground leads after installation. Failure to install covers and
ground leads could result in serious
injury or death.
a. Selecting Location
provides you with mechanical installation references.
2. Check the flue or stack for holes and
air leakage. The presence of this
condition will substantially affect the
accuracy of the oxygen reading.
Therefore, either make necessary
repairs or install the probe upstream
of any leakage.
3. Ensure that the area is clear of
obstructions internal and external that
will interfere with installation. Allow
adequate clearance for removal of
probe (Figure 2-1).
Do not allow the temperature of the
probe junction box to exceed 150°C
(302°F) or damage to the unit may
result. If the probe junction box temperature exceeds 150°C (302°F), the
user must fabricate a heat shield or
provide adequate cooling air to the
probe junction box.
1. The location of the probe in the stack
or flue is most important for maximum
accuracy in the oxygen analyzing process. The probe must be positioned so
that the gas it measures is representative of the process. Best results are
normally obtained if the probe is positioned near the center of the duct (40
to 60% insertion). A point too near the
edge or wall of the duct may not provide a representative sample because
of the possibility of gas stratification. In
addition, the sensing point should be
selected so that the process gas temperature falls within a range of 10° to
704°C (50° to 1300°F). Figure 2-1
Rosemount Analytical Inc. A Division of Emerson Process Management Installation 2-1
b. Mechanical Installation
1. Ensure that all components are available for installation of the probe. Check
the ceramic filter to ensure that it is not
damaged and that the system cable is
the required length.
2. The probe may be installed intact as it
is received. It is recommended that you
disassemble the adapter plate for each
installation.
3. Weld or bolt adapter plate (Figure 2-1)
onto the duct.
Page 20

Instruction Manual
106-300NFX Rev. 4.2
January 2002
World Class 3000
o
DIM
DIM
MM
DIMENSIONS
TABLE II. REMOVAL/INSTALLATION
DIN
"B"
755
"A"
459
(IN.)
1U05680G01
210
1209
(29.7)
913
(18.07)
18 IN. PROBES
1U05680G02
18
(8.25)
2126
(47.6)
1831
(35.95)
3 FT PROBES
1U05680G03
170
(0.708)
(83.7)
EXTERNAL EARTH
(72.09)
6 FT PROBES
(6.693)
(HARDWARE)
INTERNAL EARTH
VIEW B-B
(TERMINAL 6)
AT BOTTOM
(ROTATED 90 CCW)
INSTALL WITH CONNECTIONS
DIM "B"
REMOVAL ENVELOPE
200 (7.87)
B
110 (4.33)
1.57 (0.062)
THK GASKET
(P/N 1M03237H01)
ELECTRICAL
CONNECTION
B
BOTTTOM VIEW
DIM "A"
MM
(IN.)
DIMENSIONS
TABLE I. MOUNTING FLANGE
FLANGE
DIA
HOLE SIZE
DIA
4 HOLES EQ
SP ON B.C. DIA
PROCESS FLOW MUST BE IN
THIS DIRECTION WITH RESPECT
TO VEE SHIELD WHEN USING
OPTIONAL CERAMIC DIFFUSOR.
76 (3.0)
DIA MAX
CENELEC APPROVED WORLD CLASS PROBE WITH SNUBBER DIFFUSOR
A
23800006
VIEW A-A
INCHES IN PARENTHESES UNLESS
NOTE: DIMENSIONS ARE IN MILLIMETERS WITH
A
OTHERWISE INDICATED.
Figure 2-1. Probe Installation (Sheet 1 of 5)
2-2 Installation Rosemount Analytical Inc. A Division of Emerson Process Management
Page 21

World Class 3000
2
WITH INCHES IN PARENTHESES
UNLESS OTHERWISE INDICATED.
NOTE: DIMENSIONS ARE IN MILLIMETERS
DIM "D"
(REMOVAL
ENVELOPE)
378
(14.9)
DETAILS
SEE SHEET 1
FOR CONNECTION
Instruction Manual
106-300NFX Rev. 4.2
January 2002
ELECTRICAL
CONNECTION
CHECK
VALV E
REF, VENT,
AND CAL GAS
CONNECTIONS
DIM "D"
(REMOVAL
DIM
REMOVAL/INSTALLATION
MM
DIMENSIONS
769
(30.3)
ENVELOPE)
"C"
387
(15.3)
(IN.)
18 IN. PROBE 1U05680G04
SHIELD 1N04966H01
1224
2144
(48.2)
(84.4)
843
1762
(33.2)
(69.4)
3 FT PROBE 1U05680G05
SHIELD 1N04966H02
6 FT PROBE 1U05680G06
SHIELD 1N04966H03
DIM "C"
178
(7.00)
(P/N 4507C52H03)
1.52 (0.06) THK GASKET
FURNISHED IN
HARDWARE PACKAGE
SEAL HUB
DIFFUSOR/DUST
(P/N 1U05677G03)
ABRASIVE SHIELD INSTALLATION WITH CENELEC APPROVED WORLD CLASS 3000
23800007
Figure 2-1. Probe Installation (Sheet 2 of 5)
Rosemount Analytical Inc. A Division of Emerson Process Management Installation 2-3
Page 22

Instruction Manual
106-300NFX Rev. 4.2
January 2002
World Class 3000
o
DIM
DIM
MM
DIMENSIONS
TABLE II. REMOVAL/INSTALLATION
DIN
"B"
755
"A"
554
(IN.)
1U05680G01
210
1209
(29.7)
1008
(21.81)
18 IN. PROBES
1U05680G02
18
(8.25)
2126
(47.6)
1926
(39.68)
3 FT PROBES
1U05680G03
170
(0.708)
(83.7)
EXTERNAL EARTH
(75.83)
6 FT PROBES
(6.693)
(HARDWARE)
VIEW B-B
(TERMINAL 6)
INTERNAL EARTH
AT BOTTOM
(ROTATED 90 CCW)
INSTALL WITH CONNECTIONS
DIM "B"
REMOVAL ENVELOPE
200 (7.87)
B
110 (4.33)
1.57 (0.062)
THK GASKET
(P/N 1M03237H01)
ELECTRICAL
CONNECTION
B
BOTTTOM VIEW
DIM "A"
MM
(IN.)
DIMENSIONS
TABLE I. MOUNTING FLANGE
FLANGE
DIA
HOLE SIZE
DIA
4 HOLES EQ
SP ON B.C. DIA
OPTIONAL CERAMIC DIFFUSOR WITH VEE DEFLECTOR
PROCESS FLOW MUST BE IN
THIS DIRECTION WITH RESPECT
TO VEE SHIELD.
VIEW A-A
INCHES IN PARENTHESES UNLESS
NOTE: DIMENSIONS ARE IN MILLIMETERS WITH
OTHERWISE INDICATED.
76 (3.0)
DIA MAX
A
A
23800011
Figure 2-1. Probe Installation (Sheet 3 of 5)
2-4 Installation Rosemount Analytical Inc. A Division of Emerson Process Management
Page 23

World Class 3000
2
Instruction Manual
106-300NFX Rev. 4.2
January 2002
"A"
"A"
PROBE TO STACK
(NEW INSTALLATIONS)
TABLE IV. MOUNTING PLATE:
MOUNTING PLATE OUTLINE
ABRASIVE SHIELD TO STACK
(NEW INSTALLATIONS)
TABLE III. MOUNTING PLATE:
215
DIN
MM
DIMENSIONS
DIN
MM
DIMENSIONS
(IN.)
(IN.)
"A"
235
"A"
(8.5)
(9.25)
M-16x2
"B"
THREAD
100
(3.94)
"B"
DIA
170
(6.7)
"C"
DIA
M-20 x 2.5
"C"
THREAD
18 IN., 3 FT AND6FT
MOUNTING PLATE FOR
SEE SHEET 2.
ABRASIVE SHIELD INSTALLATIONS
MOUNTING PLATE FOR
CENELEC WORLD CLASS 3000
SEE SHEET 1.
PROBE INSTALLATIONS
"A"
AND NUTS, EQUALLY
SPACED ON "C" DIA B.C.
4 STUDS, LOCKWASHERS,
"B"
DIA
"C" DIA
82.5 (3.25)
WITH INCHES IN PARENTHESES
UNLESS OTHERWISE INDICATED.
"A"
"C"
NOTE: DIMENSIONS ARE IN MILLIMETERS
o
22.5
8 THREADED HOLES
189.992 (7.48) DIA B.C.
EQUALLY SPACED ON
P00006
Figure 2-1. Probe Installation (Sheet 4 of 5)
Rosemount Analytical Inc. A Division of Emerson Process Management Installation 2-5
Page 24

Instruction Manual
106-300NFX Rev. 4.2
January 2002
INSTALLATION FOR METAL
WALL STACK OR DUCT
CONSTRUCTION
World Class 3000
INSTALLATION FOR MASONRY
WALL STACK CONSTRUCTION
MTG HOLES
SHOWN ROTATED
o
22.5 OUT OF
TRUE POSITION
WELD OR BOLT
MOUNTING PLATE TO
METAL WALL OF STACK
OR DUCT. JOINT MUST
BE AIR TIGHT.
13 (0.50)
95 (3.75)
MIN DIA HOLE
IN WALL
STACK OR DUCT
METAL WALL
BOLT ADAPTOR
PLATE TO OUTSIDE
WALL SURFACE
FIELD WELD
PIPE TO
ADAPTOR PLATE
MTG HOLES
SHOWN ROTATED
o
22.5 OUT OF
TRUE POSITION
JOINT MUST
BE AIRTIGHT
OUTSIDE WALL
SURFACE
NOTE: ALL MASONRY STACK WORK AND JOINTS EXCEPT
MOUNTING PLATE NOT FURNISHED BY ROSEMOUNT.
ABRASIVE SHIELD MOUNTING
13 (0.50)
114 (4.50)
O.D. REF
PIPE 4.00 SCHED 40
PIPE SLEEVE (NOT
BY ROSEMOUNT)
LENGTH BY CUSTOMER
MASONRY
STACK WALL
WELD OR BOLT MOUNTING
PLATE TO METAL WALL
OF STACK OR DUCT.
JOINT MUST BE AIR TIGHT.
82.5 (3.25)
MIN DIA HOLE
IN WALL
STACK OR DUCT
METAL WALL
BOLT MOUNTING
PLATE TO OUTSIDE
WALL SURFACE
BE AIRTIGHT
OUTSIDE WALL
PROBE MOUNTING
JOINT MUST
SURFACE
FIELD WELD
PIPE TO
ADAPTOR PLATE
102 (4.0)
O.D. REF
PIPE 3.5 SCHED 40
PIPE SLEEVE (NOT
BY ROSEMOUNT)
LENGTH BY CUSTOMER
MASONRY
STACK WALL
P00007
Figure 2-1. Probe Installation (Sheet 5 of 5)
2-6 Installation Rosemount Analytical Inc. A Division of Emerson Process Management
Page 25

World Class 3000
2
Instruction Manual
106-300NFX Rev. 4.2
January 2002
4. If using the optional ceramic diffuser
element, the vee deflector must be correctly oriented. Before inserting the
probe, check the direction of flow of the
gas in the duct. Orient the vee deflector
on the probe so that the apex points
upstream toward the flow (Figure 2-2).
This may be done by loosening the
setscrews, and rotating the vee deflector to the desired position.
Retighten the setscrews.
5. In horizontal installations, the probe
cover should be oriented so that the
system cable drops vertically from the
probe cover. In a vertical installation,
the system cable can be oriented in
any direction.
6. If the system has an abrasive shield,
check the diffusion element dust seal
packings. The joints in the two packings must be staggered 180°. Also,
make sure that the packings are in the
hub grooves as the probe slides into
the 15° forcing cone in the abrasive
shield.
GAS FLOW
DIRECTION
VEE
APEX
FILTER
DEFLECTOR
CERAMIC
DIFFUSION
ELEMENT
VEE
DEFLECTOR
SETSCREW
23800008
Figure 2-2. Orienting the Optional Vee Deflector
7. Insert the probe through the opening in
the mounting flange and bolt the unit to
the flange.
8. Ensure that probe is properly earthed
by way of both the internal and external
points.
NOTE
If process temperatures will exceed
1000°F (538°C), use anti-seize compound on stud threads to ease future
removal of probe.
9. Ensure that the installation does not
obscure the messages on either the
probe nameplate or the junction box
lid.
Rosemount Analytical Inc. A Division of Emerson Process Management Installation 2-7
Page 26

Instruction Manual
106-300NFX Rev. 4.2
January 2002
World Class 3000
c. Reference Air Package
After the oxygen analyzing (probe) unit is
installed, connect the reference gas air set
to the probe cover. The reference gas air
set should be installed in accordance with
Figure 2-3.
d. Service Required.
1. Power input: 44 VAC from HPS 3000
or IFT 3000.
2. Compressed air: 68.95 kPa (10 psig)
minimum, 1551.38 kPa (225 psig)
0.125-27 NPT FEMALE
OUTLET CONNECTION
122.17 (4.81)
FLOW SET
POINT KNOB
1
2
OUTLET
30.22
(1.19)
DRAIN VALVE
maximum at 56.6 L/hr (2 scfh) maximum; supplied by one of the following
(less than 40 parts-per-million total hydrocarbons).
(a) Instrument air - clean, dry.
(b) Bottled standard air with step-down
regulator.
(c) Bottled compressed gas mixture
(20.95% oxygen in nitrogen).
(d) Other equivalent clean, dry, oil-free
air supply.
79.25 (3.12) MAX
3
57.15 (2.250)
50.80
(2.0)
38.10
(1.50)
0.25-18 NPT FEMALE
INLET CONNECTION
NOTE: DIMENSIONS ARE IN MILLIMETERS
WITH INCHES IN PARENTHESES.
215.90 MAX
(8.50)
2 MOUNTING HOLES
81.03 (3.19) LG
THROUGH BODY FOR
7.92 (0.312) DIA BOLTS
254 REF
(10.0)
6 (0.250) OD
TUBE COMPRESSION
FITTING (SUPPLIED BY WECO)
TO PROBE
JUNCTION BOX
6 (0.250) OD TUBING
(SUPPLIED BY CUSTOMER)
SCHEMATIC HOOKUP FOR REFERENCE AIR SUPPLY ON OXYGEN ANALYZER PROBE HEAD.
REF GAS SET
1 FLOWMETER 0.2-2.0 SCFH 771B635H02
2 2" PRESSURE GAGE 0-15 PSIG 275431-006
3 COMBINATION FILTER-REG. 0-30 PSIG 4505C21G01
COMPRESSED AIR SUPPLY
10-225 PSIG MAX PRESSURE
263C152G01
NOTE: DIMENSIONS ARE IN MILLIMETERS
WITH INCHES IN PARENTHESES.
Figure 2-3. Air set, Plant Air Connection
17300016
2-8 Installation Rosemount Analytical Inc. A Division of Emerson Process Management
Page 27

World Class 3000
2
2-2 INTELLIGENT FIELD TRANSMITTER (IFT)
INSTALLATION
The Rosemount Encode Sheet (Product Ordering Matrix) allows a customer
to order either the hazardous area version of the IFT 3000 or the nonhazardous area version. The hazardous area version has the symbol
"EExd" on the apparatus nameplate.
The non-hazardous area version does
not. Ensure that if you have the nonhazardous area version that you do
not install it in a potentially explosive
environment. This warning applies
equally to the hazardous area and
non-hazardous area versions of the
HPS 3000.
Instruction Manual
106-300NFX Rev. 4.2
January 2002
The IFT 3000 is heavy. Lifting and carrying procedures should take account
of this weight.
a. Mechanical Installation
The outline drawing of the IFT module
(CENELEC approved) in Figure 2-4 shows
mounting centers and clearances. The enclosure is designed to be mounted on a
wall. The IFT should be installed no more
than 364 m (1200 ft) from the optional HPS
or 45 m (150 ft) from the probe if HPS is not
installed in the system. Ambient temperature must be between 0°C and 50°C (32°F
and 122°F).
NOTE
Fuse specifications are included in
Figure 2-4.
Before IFT 3000 Installation, consult
Safety Data Sheet 1M03296.
310 (12.2)
270 (10.6)
EXTERNAL
EARTH
FUSES
INTERNAL
EARTH
350 (13.8)
NOTES: ALL DIMENSIONS ARE IN MILLIMETERS WITH INCHES IN PARENTHESES UNLESS
OTHERWISE INDICATED.
FUSES SHOWN (F3 THROUGH F6) ARE 5 AMP, ANTI-SURGE, TYPE T TO IEC127
(ROSEMOUNT PART NUMBER 1L01293H02). IF INTERNAL HEATER IS INSTALLED,
TWO ADDITIONAL 5 AMP FUSES (F1 AND F2) ARE USED.
320
(12.6)
18 (0.7)
350
(13.8)
300
(11.8)
225
(8.9)
35870001
Figure 2-4. Outline of Intelligent Field Transmitter
Rosemount Analytical Inc. A Division of Emerson Process Management Installation 2-9
Page 28

Instruction Manual
106-300NFX Rev. 4.2
January 2002
ALWAYS DISCONNECT LINE VOLTAGE
FROM INTELLIGENT FIELD TRANSMITTER
BEFORE CHANGING JUMPERS.
PROBE HEATER
VOLTAGE SELECTION
WORLD CLASS PROBE (44V)
LINE VOLTAGE
SELECTION
120 V.A.C.
220 V.A.C.
240 V.A.C.
JUMPER
(INSTALL)
JM8, JM7, JM1
JM6, JM5, JM2
JM6, JM5, JM1
JUMPER
CONFIGURATION
If you reconfigure the equipment for a line voltage other than the one marked on the serial
label and the mains filter of the power supply then you should change the marking on the
serial label and the mains filter to state the new line voltage.
World Class 3000
JUMPER
(INSTALL)
JM10
P00010
If incorrect heater voltage is selected, damage to the probe may occur. For HPS voltage
selection jumper, refer to Figure 2-15.
Figure 2-5. Power Supply Board Jumper Configuration
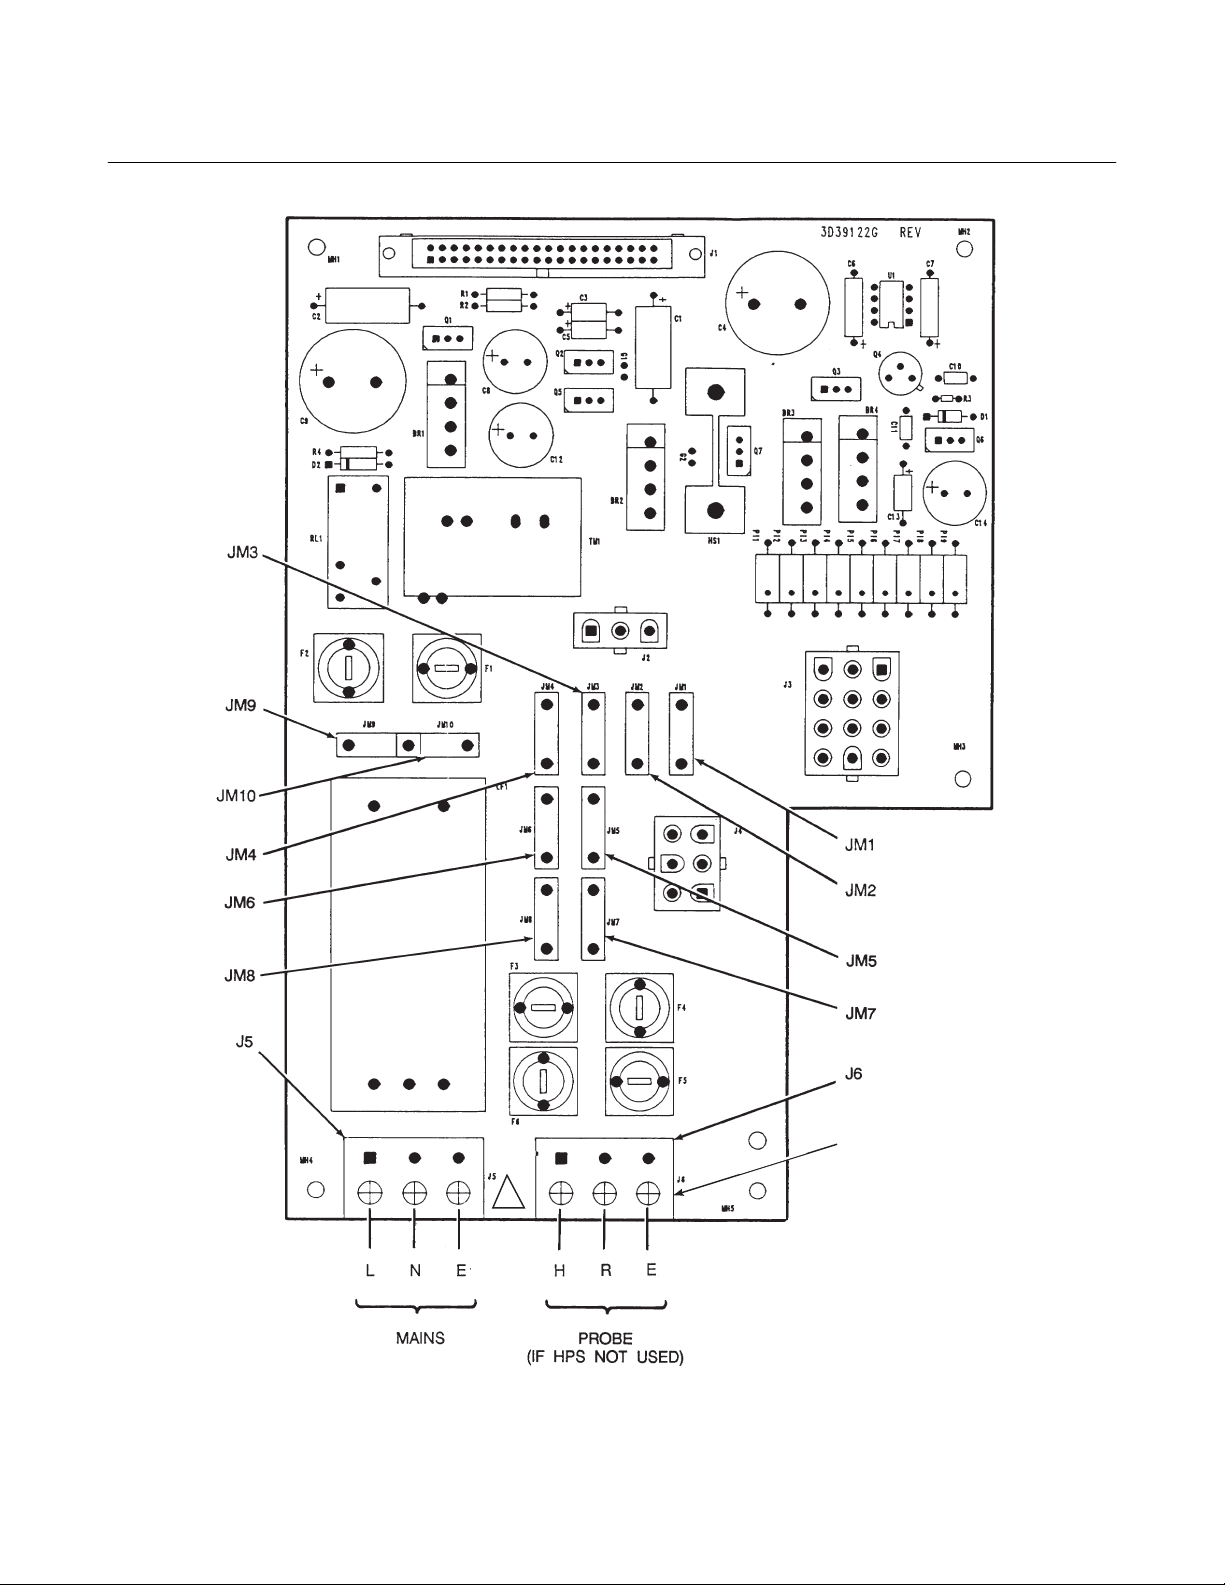
b. Electrical Connections
1. The IFT can be configured for 100,
120, 220, or 240 line voltages. For 120
Vac usage, install JM8, JM7, and JM1.
For 220 Vac usage, install jumpers
JM6, JM5, JM2 (refer to Figure 2-5 and
Do not install jumper JM6 on the microprocessor board, or JM1 on the interconnect board, if an HPS is
installed in the system. This will result
in system failure.
Figure 2-6).
3. The IFT must have JM6 on the microprocessor board (Figure 2-8 and Figure
If you reconfigure the equipment for a
line voltage other than the one marked
on the serial label and the mains filter
of the power supply you should
change the marking on the serial label
and the mains filter to state the new
line voltage.
2-9) and JM1 on the interconnect
board (Figure 2-10 and Figure 2-11)
installed if an HPS is not installed in
the system.
4. If an MPS is not used in the system,
wire jumper between CAL RET and NO
GAS must be installed on the interconnect board. Remove wire jumper if
2. The IFT can be configured to connect
directly to a probe or to an optional
MPS is installed in the system. Refer to
Figure 2-7, note 6.
HPS. The electrical connections for a
non-HPS equipped system should be
made as described in the electrical installation diagram, Figure 2-7.
5. The power cable should comply with
the safety regulations in the user's
country and should not be smaller than
16 gauge, 3 amp.
2-10 Installation Rosemount Analytical Inc. A Division of Emerson Process Management
Page 29
World Class 3000
2
Instruction Manual
106-300NFX Rev. 4.2
January 2002
THIS TERMINAL BLOCK
IS A 44VAC OUTPUT
SPECIFICALLY FOR
POWERING THE
!
WC 3000 PROBE.
P00011
Figure 2-6. IFT Power Supply Board Jumpers
Rosemount Analytical Inc. A Division of Emerson Process Management Installation 2-11
Page 30
Instruction Manual
106-300NFX Rev. 4.2
January 2002
PROBE INTERIOR
GN CELL -VE
OR CELL +VE
YE CHROMEL
RD ALUMEL
123456 78
RD
GN
WH
SM. BR
PROBE JUNCTION
BOX WIRING
GN
GN/YE
World Class 3000
3D3911BG REV
HEATER
}
BK
BK
BL
LG. BR
LINE
VOLTAGE
SECTION
120 V.A.C.
220 V.A.C.
240 V.A.C.
JUMPER CONFIGURATION
JUMPER
(INSTALL)
JM8, JM7, JM1
JM6, JM5, JM2
JM6, JM5, JM1
J1
3D39122G REV
POWER SUPPLYBOARD
ALWAYS DISCONNECT LINE VOLTAGE
FROM INTELLIGENT FIELD TRANSMITTER
BEFORE CHANGING JUMPERS.
PROBE HEATER
VOLTAGE SECTION
WORLD CLASS PROBE
218 PROBE
JUMPER
(INSTALL)
JM10
JM9
MICROPROCESSOR BOARD
J2
J3
J4
J1
3D39120G REV
INTERCONNECT BOARD
JM5JM6
WC 3000 PROBE
(CENELEC APPROVED)
NOTES
STACK TC WIRING AS REQUIRED
SPECIAL PROBE CABLE BETWEEN PROBE AND
IFT BY ROSEMOUNT (FITTED WITH EExd
GLANDS)
INSTALL JM1 ON INTERCONNECT BOARD
INSTALL JM6 ON MICROPROCESSOR BOARD
IF STACK TEMPERATURE NOT USED
IF MPS 3000 NOT USED
1 RELAY PER PROBE AVAILABLE FOR
CALIBRATION STATUS INDICATION
(48 V max, 100 mA max)
CABLE COLORS SHOWN HERE APPLY TO
ROSEMOUNT SUPPLIED SPECIAL CABLE FITTED
WITH EExd GLANDS
(P/N 1U03066)
J5 J6
H
L
EEN
LINE
VOLTAGE
LG. BR
BL
GN/YE
SHIELD
SM. BR
WH
GN
RD
INTELLIGENT FIELD
TRANSMITTER IFT3000
LINE OUT
ER
PROBE 1
J10
J11
J19 J20 J21 J22
PROBE 1
HI GAS
IN CAL
NC NC NCNC C C CCNONONONO
PROBE 2
MPS3000 MULTI GAS SEQUENCER (OPTIONAL)
CAL RET
CAL RET
NO GAS
LO GAS
HI GAS
IN GAS
SHIELD
5 CONDUCTOR SHIELDED CABLE
PER PROBE #16 AWG BY CUSTOMER
3D39064G REV
NO GAS
LO GAS
PROBE 2
IN CAL
HI GAS
PROBE 3
CAL RET
LO GAS
NO GAS
PROBE 4
PROBE 3
HI GAS
MPS TERMINATION BOARD
J5
J6
J7
SHIELD
STACK TC STACK TC +
J8
SHIELD
PROBE TC -
GN
RD
PROBE TC +
J9
SHIELD
WH
PROBE MV -
PROBEMV+
SM.BR
PROBE 4
NO GAS
LO GAS
HI GAS
IN CAL
CAL RET
NO GAS
IN CAL
CAL RET
J13 J14 J15 J16 J17 J18
JM1
J9
J8J7J6J5J4J3J2J1
LINE IN
LL
NN
LO GAS
L
LINE
VOLTAGE
N
J12
35870007
Figure 2-7. Wiring Layout for IFT 3000 (CENELEC approved) System without HPS
2-12 Installation Rosemount Analytical Inc. A Division of Emerson Process Management
Page 31

World Class 3000
2
Instruction Manual
106-300NFX Rev. 4.2
January 2002
JM7
JM7
CURRENT/VOLTAGE
SELECTOR SWITCH
SW1
J4
JM6
TO I/O
BOARD
JM6
TP5 TP6
TP4
+30VISO-C GNDC +5VISO-C
TP3
-15V
TP8
+5V
TP2
TP7
+15V
TP1
-5V
J1
TO POWER
SUPPLY CARD
J2
3D39513G REV
TO LDP CARD
J3
TO GUI CARD
Figure 2-8. IFT Microprocessor Board Jumper Configuration
29850004
Rosemount Analytical Inc. A Division of Emerson Process Management Installation 2-13
Page 32

Instruction Manual
106-300NFX Rev. 4.2
January 2002
World Class 3000
OUTPUT JUMPER
HPS
Probe (No HPS)
(See Figure 2-8 for jumper locations.)
Figure 2-9. IFT Microprocessor Board Jumpers
OUTPUT JUMPER
HPS
Probe (No HPS)
Figure 2-10. Interconnect Board Jumper
Configuration
6. Before supplying power to the IFT, verify that the jumpers have been properly
set in the IFT, Figure 2-5, Figure 2-8,
and Figure 2-10.
7. Terminal strip J5 on the power supply
board is used for supplying the IFT with
power. Terminal strip J6 on the power
supply board is used to supply the
probe heater with power if an HPS is
not used (Figure 2-6).
8. Ensure that the IFT 3000 is properly
earthed by way of both the internal and
external earthing hardware.
Remove JM6
Install JM6
Remove JM1
Install JM1
c. Analog Output and Relay Output
Connections
1. The microprocessor board has a
switch to select voltage or current operations. Figure 2-8 shows the switch
location. In voltage mode, output is 010 V. In the current mode, the output
can be configured from the setup menu
to be 0-20 mA or 4-20 mA.
2. The analog output and relay outputs
are programmed by the user as
needed. The analog output is typically
sent to recording equipment such as
chart recorders. Relay outputs are typically sent to annunciators.
3. Relays K1 and K2 are user configurable from the PROBE SETUP submenu (Table 3-5). Typically these are
used to indicate O
below specified tolerances. OK relay is
energized when unit is functioning
properly.
4. All wiring must conform to local and
national codes.
5. Connect the analog output and relay
outputs as shown in Figure 2-11.
values above or
2
9. Ensure that the installation does not
obscure the message on either the IFT
nameplate or the IFT lid.
2-14 Installation Rosemount Analytical Inc. A Division of Emerson Process Management
Page 33

World Class 3000
2
NOTES:
DENOTES SHIELD CONNECTION.
OK RELAY IS ENERGIZED WHEN
UNIT IS FUNCTIONING PROPERLY.
OK-NC
K1-NC
K2-NC
CAL INIT-2
CAL INIT-1
CALRET
NOGAS
LOGAS
HIGAS
INCAL
RELAY
RELAY+
AD590
AD590+
TRIAC
TRIAC+
Instruction Manual
106-300NFX Rev. 4.2
January 2002
24
24
23
22
21
20
19
18
17
16
15
14
13
12
11
10
9
8
-
7
6
-
5
4
3
2
-
1
OK-COM
OK-NO
23
22
K1-COM
K1-NO
21
K2-COM
20
19
K2-NO
18
17
16
15
14
13
12
ANOUT-
11
ANOUT+
10
9
STACK T/C
8
STACK T/C
7
6
PROBE T/C
5
4
PROBE T/C
3
2
PROBE MV
1
PROBE MV+
-
JM1
(UNDER
SHIELD)
730002
Figure 2-11. IFT Interconnect Board Output Connections
Rosemount Analytical Inc. A Division of Emerson Process Management Installation 2-15
Page 34

Instruction Manual
106-300NFX Rev. 4.2
January 2002
World Class 3000
2-3 HEATER POWER SUPPLY INSTALLATION
The Rosemount encode sheets (Product Ordering Matrix) allow a customer
to order either the hazardous area version of the HPS 3000 or the nonhazardous area version. The hazardous area version has the symbol
"EExd" on the apparatus nameplate.
The non-hazardous area version does
not. Ensure that if you have received
the non-hazardous version that you do
not install it in a potentially explosive
atmosphere. This also applies to the
hazardous/non-hazardous version of
the IFT 3000.
Before HPS installation, consult Safety
Data Sheet 1M03243.
264.0
(10.39)
253
(9.96)
233
(9.17)
EExd IIC T6
14.22 (0.56) DIA
MTG HOLE (2 PLS)
ENCLOSURE
120
(4.72)
NOTE: DIMENSIONS ARE IN MILLIMETERS
WITH INCHES IN PARENTHESES
UNLESS OTHERWISE INDICATED.
216.0
(8.50)
157
(6.18)
219005
a. Mechanical Installation
The outline drawing of the CENELEC approved heater power supply enclosure in
Figure 2-12, shows mounting centers and
clearances. The CENELEC approved enclosure is designed to be mounted on a wall
or bulkhead. The heater power supply
should be installed no further than 45 m
(150 ft) from the probe. The heater power
supply must be located in a location free
from significant ambient temperature
changes and electrical noise. Ambient temperature must be between 0° to 60°C (32°
to 140°F).
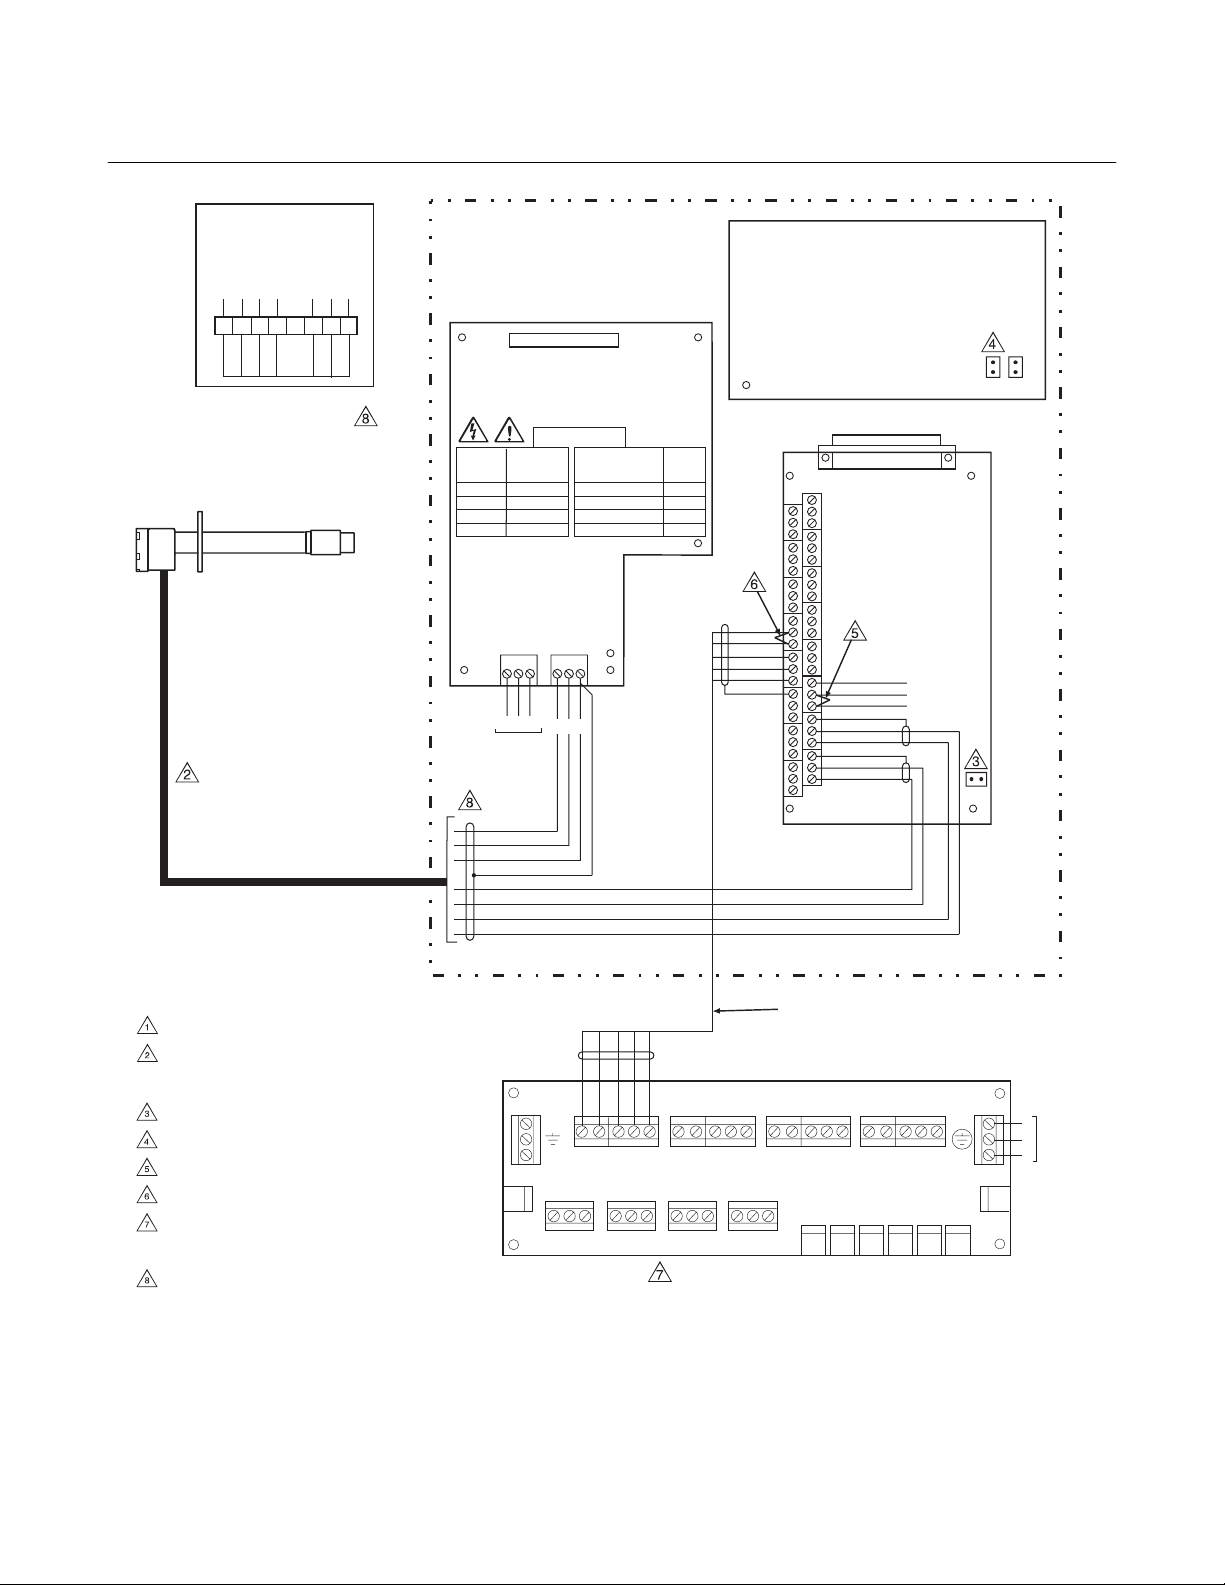
b. Electrical Connections
1. Electrical connections should be made
as described in the electrical installation diagram, Figure 2-13. The wiring
terminals are divided into two layers:
the bottom (FROM PROBE) terminals
should be connected first, the top
(FROM ELECTRONICS) terminals
should be connected last (Figure 2-14).
Each terminal strip has a protective
cover which must be removed when
making connections. To remove the
Figure 2-12. Outline of CENELEC Approved Heater
Power Supply
terminal covers, remove two slotted
screws holding cover in place. Always
reinstall terminal covers after making
connections.
2. Power Input: 120, 220 or 240 Vac. For
120 Vac usage, install jumpers JM4
and JM1 and remove JM5 if installed.
For 220 or 240 Vac usage, install
jumper JM5 and remove JM1 and JM4
if installed (see label, Figure 2-15).
If you reconfigure the equipment for a
line voltage other than the one marked
on the serial label and the mains filter
of the power supply then you should
change the marking on the serial label
and the mains filter to state the new
line voltage.
NOTE
Fuse specifications are shown in
Figure 2-14.
2-16 Installation Rosemount Analytical Inc. A Division of Emerson Process Management
Page 35

World Class 3000
2
Instruction Manual
106-300NFX Rev. 4.2
January 2002
PROBE INTERIOR
HEATER
GN CELL -VE
OR CELL +VE
YE CHROMEL
RD ALUMEL
GN
}
BK
BK
12345678
RD
WH
GN
SM. BR
PROBE JUNCTION
BOX WIRING
GN/YE
BL
LG. BR
WC PROBE 3000 CENELEC APPROVED
LINE VOLTAGE
SELECTION
120 V.A.C.
220/240 V.A.C.
PROBE HEATER
VOLTAGE SECTION
WORLD CLASS PROBE JM7
JUMPER
(INSTALL)
JM4, JM1
JM5
JUMPER
(INSTALL)
JUMPER
CONFIGURATIONS
NOTES
RELAY WIRE IS OPTIONAL; RELAY CAN BE PERMANENTLY
ENABLED WITH JUMPER IF NOT USED
STACK TC WIRING AS REQUIRED
ALL WIRES #16-#22 AWG TWISTED PAIR WITH SHIELD
BY CUSTOMER EXCEPT AS NOTED
SPECIAL PROBE CABLE BETWEEN PROBE AND HPS
BY ROSEMOUNT
REMOVE JM1 ON INTERCONNECT BOARD (IFT 3000)
REMOVE JM6 ON MICROPROCESSOR BOARD
IF RELAY WIRE OF NOTE 1 INSTALLED THEN REMOVE
JM2 ON HPS 3000
IF STACK TEMPERATURE NOT USED
IF MPS 3000 NOT USED
1 RELAY PER PROBE AVAILABLE FOR CALIBRATION
STATUS INDICATION (48 V max, 100 mA max)
CABLE COLORS SHOWN HERE APPLY TO ROSEMOUNT
SUPPLIED SPECIAL CABLE FITTED WITH EExd GLANDS
(P/N 1U03066)
ALWAYS DISCONNECT LINE VOLTAGE
FROM HEATER POWER SUPPLY AND
ANALOG ELECTRONICS (IF USED)
BEFORE CHANGING JUMPERS.
HEATER
POWER
REMOTE
ON
ELECTRONICS
SELECTION
NEW GENERATION
ELECTRONICS
JUMPER
REMOVE JM2
INSTALL JM2
JUMPER
REMOVE JM3, JM6
TOP
TRIAC RELAY
J9
+
+++
-
STACKTCANALOG
---
HEATER
BK
WH
2 TWISTED PAIR SHIELDED
#22 AWG BY CUSTOMER
(OPTIONAL)
A
PROBE
SM. BR CELL+
WH CELL -
RD HTR TC +
GN HTR TC -
BL
LG. BR
GN/YE
SHIELD
PROBE
MV
J8
+
-
BOTTOM
PROBE
MV
J3
+
-
STACK
TC
J2 J1
+
-
TC
PROBE
TC
+
PROBE
HEATER
RH
AD590
+
-
-
B
4 TWISTED PAIR SHIELDED
#22 AWG BY CUSTOMER
LINE
L
N
LINE
VOLTAGE
HPS 3000 INTERFACE MODULE
35870008
Figure 2-13. Wiring layout for IFT 3000 (CENELEC approved) with HPS (Sheet 1 of 2)
Rosemount Analytical Inc. A Division of Emerson Process Management Installation 2-17
Page 36

Instruction Manual
106-300NFX Rev. 4.2
January 2002
3D39118G
MICROPROCESSOR
BOARD
World Class 3000
5
JM6 JM5
LINE
VOLTAGE
SECTION
100 V.A.C.
120 V.A.C.
200 V.A.C.
220 V.A.C.
240 V.A.C.
J1
ALWAYS DISCONNECT LINE VOLTAGE
FROM INTELLIGENT FIELD TRANSMITTER
BEFORE CHANGING JUMPERS.
JUMPER CONFIGURATION
JUMPER
(INSTALL)
JM3, JM7, JM2
JM8, JM7, JM1
JM4, JM5, JM2
JM6, JM5, JM2
JM6, JM5, JM1
PROBE HEATER
VOLTAGE SECTION
3D39122G REV
POWER SUPPLYBOARD
JUMPER
NOT USED REMOVE
(INSTALL)
JM9, JM10
J2
J3
J4
J1
3D39120G REV
INTERCONNECT BOARD
J5
CAL RET
J5 J6
NOT USED
L
EN
LINE
VOLTAGE
A
NO GAS
LO GAS
HI GAS
IN CAL
SHIELD
RELAY –
RELAY +
SHIELD
AD590 –
AD590 +
SHIELD
TRIAC –
TRIAC +
J6
J7
J8
J9
SHIELD
STACK TC –
STACK TC +
SHIELD
PROBE TC –
PROBE TC +
SHIELD
PROBE MV –
PROBE MV +
JM1
B
INTELLIGENT FIELD
TRANSMITTER IFT 3000
PROBE 1
LINE OUT LINE IN
L
IN CAL
HI GAS
N
J10
NC C NO NC C NO NC C NO
J19
J11
J20 J21
PROBE 1
MPS3000 MULTIPROBE CALIBRATION GAS SEQUENCER (OPTIONAL)
J3
J2J1
PROBE 2 PROBE 3 PROBE 4
IN CAL
HI GAS
LO GAS
NO GAS
CAL RET
PROBE 2 PROBE 3
CAL RET
MPS TERMINATION BOARD
5 CONDUCTOR SHIELDED CABLE
PER PROBE #16 AWG BY CUSTOMER
3D390646 REV
LO GAS
NO GAS
NC C NO
J22
PROBE 4
IN CAL
HI GAS
CAL RET
PROBE 1
SOLENOID
J13 J14 J15 J16 J17 J18
NO GAS
PROBE 2
LO GAS
SOLENOID
PROBE 3
SOLENOID
HI GAS
IN CAL
PROBE 4
SOLENOID
J8J7J6J5J4
LO GAS
NO GAS
CAL RET
HIGH GAS
SOLENOID
LOW GAS
SOLENOID
L
N
SWITCH
PRESSURE
J12
J9
L
LINE
E
VOLTAGE
N
34990011
Figure 2-13. Wiring layout for IFT 3000 (CENELEC approved) with HPS (Sheet 2 of 2)
2-18 Installation Rosemount Analytical Inc. A Division of Emerson Process Management
Page 37

World Class 3000
2
Instruction Manual
106-300NFX Rev. 4.2
January 2002
SCREW
(2 PER COVER)
JM8
JM7
TERMINAL
COVERS
(PROVIDED)
INTERNAL
EARTHING
HARDWARE
EXTERNAL
EARTHING
HARDWARE
J7
JM4
JM5
JM2
1
JM
J2
FUSE
FUSES
FRONT VIEW SIDE VIEW
NOTE: FUSES SHOWN (F1 THROUGH F4) ARE 5 AMP, ANTI-SURGE,
TYPE T TO IEC127 (ROSEMOUNT PART NUMBER 1L01293H02).
TRANSFORMER
TERMINAL
STRIP (FROM
ELECTRONICS)
TERMINAL
STRIP
(FROM PROBE)
219006-1
Figure 2-14. CENELEC Approved Heater Power Supply Wiring Connections
ALWAYS DISCONNECT LINE VOLTAGE
FROM HEATER POWER SUPPLY AND
ANALOG ELECTRONICS (IF USED)
BEFORE CHANGING JUMPERS.
HEATER
POWER
*ON
REMOTE
ELECTRONICS
SELECTION
NEW GENERATION
ELECTRONICS
JUMPER
INSTALL JM2
REMOVE JM2
JUMPER
REMOVE JM3, JM6
219007
LINE VOLTAGE
SELECTION
120 V.A.C.
220/240 V.A.C.
PROBE HEATER
VOLTAGE SELECTION
*WORLD CLASS PROBE
(44V)
JUMPER
(INSTALL)
JM4, JM1
JM5
JUMPER
(INSTALL)
JM7
JUMPER
CONFIGURATIONS
Figure 2-15. Jumper Selection Label.
If you reconfigure the equipment for a line voltage other than the one marked on the serial label and the mains filter of the power supply then you should change the marking on the serial
label and the mains filter to state the new line voltage.
Rosemount Analytical Inc. A Division of Emerson Process Management Installation 2-19
Page 38

Instruction Manual
106-300NFX Rev. 4.2
January 2002
3. The power cable should comply with
safety regulations in the user's country
and should not be smaller than 16
gauge, 3 amp.
Before supplying power to the heater
power supply, verify that jumpers JM3
and JM6 are removed, and JM7 is installed. If relay wire (Figure 2-13, Note
1) is installed, JM2 must be removed
from HPS Motherboard (Figure 2-16).
4. Before supplying power to the heater
power supply, verify that the jumpers
on the motherboard, Figure 2-16, are
properly configured. Jumpers JM3,
JM6, should be removed and JM7
should be installed. Additionally, make
sure that the proper jumper for your
line voltage is installed, Figure 2-15. If
relay wire (Figure 2-13, note 1) is not
installed, JM2 should be installed on
the HPS Motherboard (Figure 2-16).
World Class 3000
Figure 2-16. Jumpers on HPS Motherboard
2-4 MULTIPROBE TEST GAS SEQUENCER
INSTALLATION
5. Ensure that the HPS 3000 is properly
earthed by way of both the internal and
external earthing points.
6. Ensure the installation does not obscure the messages on either the HPS
nameplate or HPS lid.
NOTE
Refer to Figure 2-8 and Figure 2-10 for
proper IFT jumper configuration. IFT
microprocessor and interconnect
board jumper configurations must be
set correctly in order for HPS to work
properly.
The MPS 3000 Multiprobe Test Gas
Sequencer must be installed in a nonhazardous, explosive-free environment.
NOTE
A Z-Purge option is available for the
MPS 3000. Appendix DX contains information concerning the Z-Purge.
a. Mechanical Installation
The outline drawing of the MPS module in
Figure 2-17 shows mounting centers and
clearances. The box is designed to be
mounted on a wall or bulkhead. The MPS
module should be installed no further than
91 m (300 ft) piping distance from the
probe, and no more than 303 m (1000 ft)
cabling distance from the IFT. Install the
MPS module in a location where the ambient temperature is between -30° and 71°C
(-20° and 160°F).
2-20 Installation Rosemount Analytical Inc. A Division of Emerson Process Management
Page 39

World Class 3000
2
304.80
(12.00)
254.00
(10.00)
Instruction Manual
106-300NFX Rev. 4.2
January 2002
304.80
(12.00)
LOWCAL
HIGHCAL
GASIN
GASIN
INSTR
AIR
355.60 (14.00) REF
b. Gas Connections
Figure 2-18 shows the bottom of the MPS
where the gas connections are made. 1/4
in. threaded fittings are used.
1. Connect the reference air supply to
INSTR. AIR IN. The air pressure
regulator valve is set at the factory to
PROBE1 PROBE 2 PROBE 3 PROBE4
TESTGAS
TESTGAS
TESTGAS
REFAIR
TESTGAS
OUT
OUT
OUT
REFAIR
REFAIR
OUT
OUT
OUT
REFAIR
OUT
OUT
21.34 (0.84)
49.78 (1.96)
78.49 (3.09)
106.93 (4.21)
133.35 (5.25)
140.72 (5.54)
Figure 2-17. MPS Module
DIMENSIONS ARE IN
NOTE:
MILLIMETERS WITH
INCHES IN PARENTHESES.
35870002
138 kPa (20 psi). If the reference air
pressure should need readjustment,
turn the knob on the top of the valve
until the desired pressure is obtained.
2. Connect the high O
test gas to HIGH
2
GAS. The test gas pressure should be
set at 138 kPa (20 psi).
Rosemount Analytical Inc. A Division of Emerson Process Management Installation 2-21
Page 40

Instruction Manual
106-300NFX Rev. 4.2
January 2002
DRAIN
PROBE 1 PROBE2 PROBE 3 PROBE4
LOW CAL
TEST GAS
TEST GAS
TEST GAS
HIGH CAL
GAS IN
INSTR
GAS IN
OUT
OUT
REF AIR
REF AIR
OUT
OUT
AIR
OUT
REF AIR
OUT
TEST GAS
OUT
REF AIR
OUT
Figure 2-18. MPS Gas Connections
World Class 3000
LINE IN
SIGNAL IN
35870003
Do not use 100% nitrogen as a low
(zero) gas. It is suggested that the low
gas be between 0.4% and 2.0% O2. Do
not use gases with hydrocarbon concentrations of more than 40 parts per
million. Failure to use proper gases
will result in erroneous readings.
3. Connect the low O2 test gas to LOW
GAS. The test gas pressure should be
set at 138 kPa (20 psi).
4. Connect the REF AIR OUT to the reference gas fitting on the probe junction
box.
5. Connect the TEST GAS OUT to the
calibration gas fitting on the probe
junction box.
6. If the MPS is configured for multiple
probes (up to four), repeat steps 4 and
5 for each additional probe.
A check valve is required for each
probe connected to an MPS to prevent
condensation of flue gas in the calibration gas lines. The check valve
must be located between the calibration fitting and the gas line.
c. Electrical Connections
Electrical connections should be made as
described in the electrical installation diagram, Figure 2-19. All wiring must conform
to local and national codes. The electrical
connections will exist only between the
electronics package and the MPS to enable
automatic and semiautomatic calibration. If
more than one probe system is being used,
the additional probes and electric packages
would be wired similarly to the first probe.
NOTE
MPS power supply fuse locations and
specifications are shown in Figure
2-19.
2-22 Installation Rosemount Analytical Inc. A Division of Emerson Process Management
Page 41

World Class 3000
2
Instruction Manual
106-300NFX Rev. 4.2
January 2002
Figure 2-19. MPS Electrical Connections
Rosemount Analytical Inc. A Division of Emerson Process Management Installation 2-23
Page 42
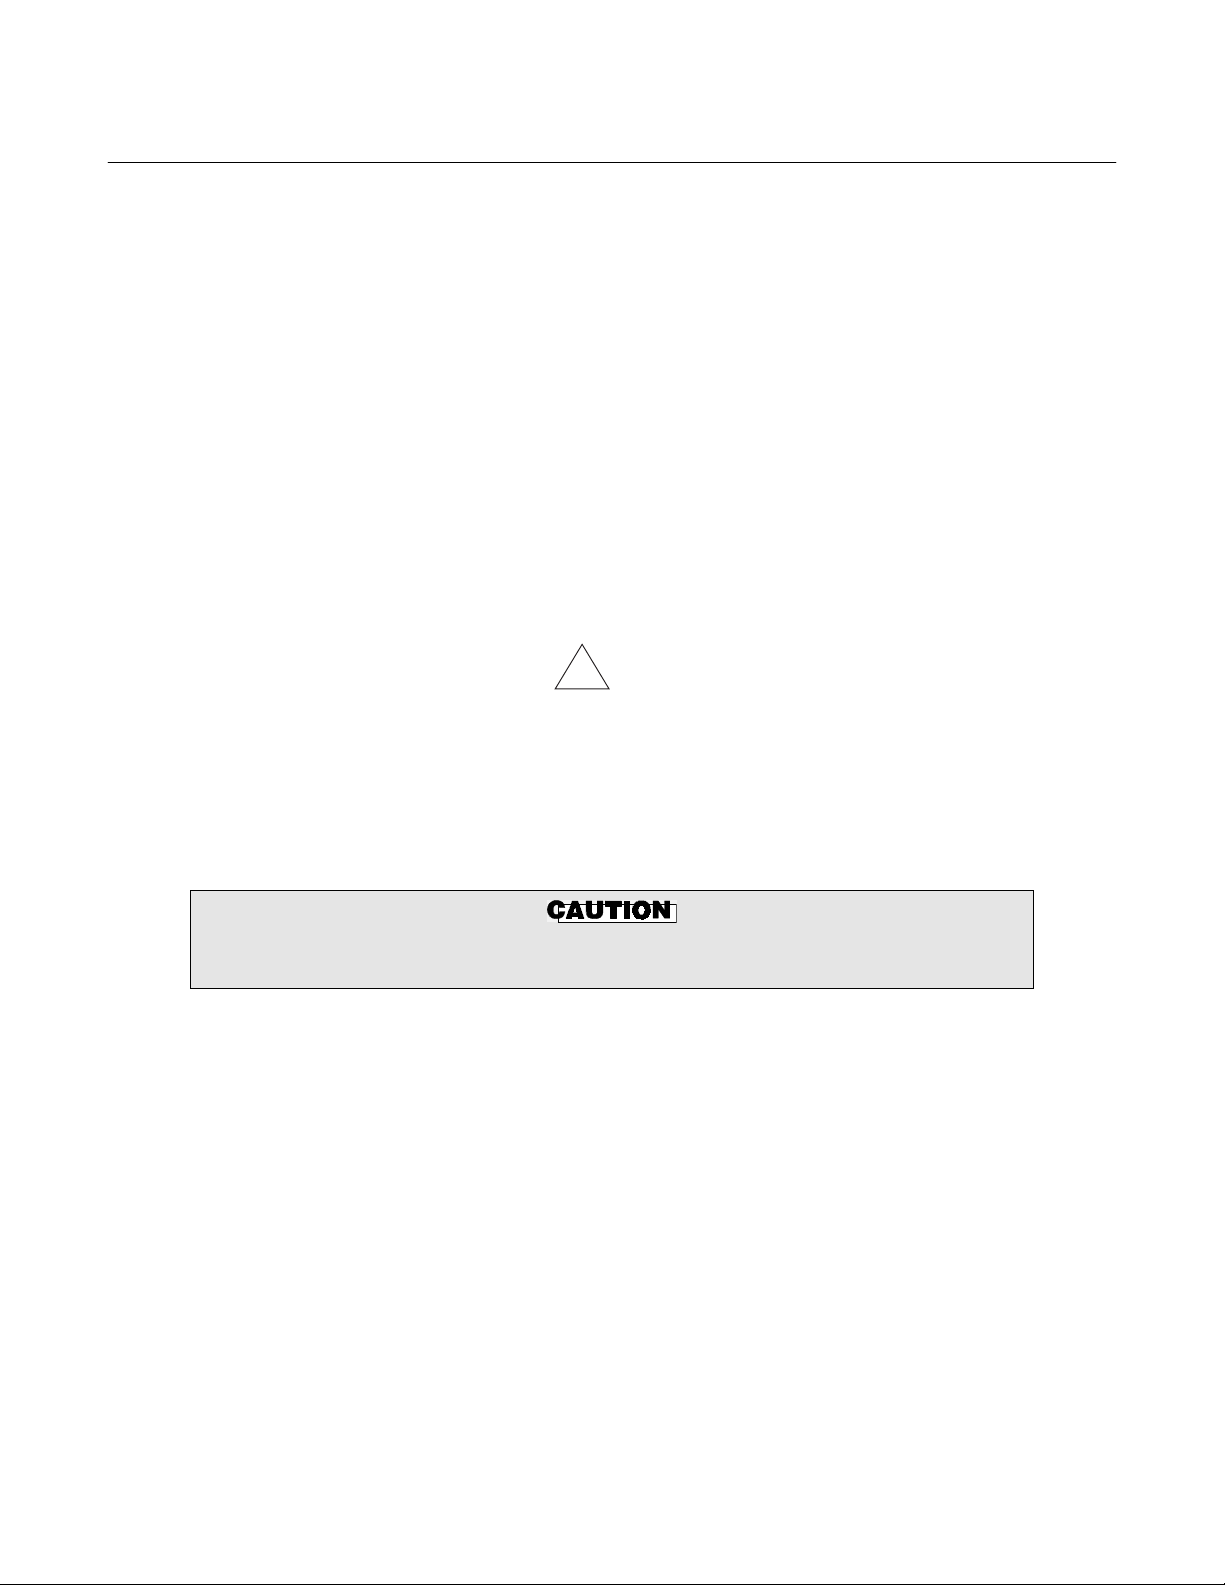
Instruction Manual
106-300NFX Rev. 4.2
January 2002
World Class 3000
1. Run the line voltage through the bulkhead fitting on the bottom of the MPS
where marked LINE IN, Figure 2-18.
Refer to Figure 2-19. Connect the line
voltage to the LINE IN terminal on the
MPS terminal board located inside the
unit. Tighten the cord grips to provide
strain relief.
2. The MPS can accommodate up to four
probes. The terminal strips on the MPS
termination board are marked PROBE
1, PROBE 2, PROBE 3, and PROBE 4.
NOTE
!
Upon completing installation, make sure that the probe is turned on and operating
prior to firing up the combustion process. Damage can result from having a cold
probe exposed to the process gases.
Select PROBE 1 if this is the first probe
and electronic package installed on the
MPS.
3. Make the connections from the MPS to
the IFT as shown in Figure 2-19. Run
wires from the MPS Termination Board
inside the unit through the bulkhead fitting on the bottom of the unit where
marked SIGNAL IN, Figure 2-18. After
the connections are made, tighten the
cord grips to provide strain relief.
During outages, and if possible, leave all probes running to prevent condensation and
premature aging from thermal cycling.
If the ducts will be washed down during outage, MAKE SURE to power down the
probes and remove them from the wash area.
2-24 Installation Rosemount Analytical Inc. A Division of Emerson Process Management
Page 43

World Class 3000
3
See Safety Data Sheet 1M03296 for safety related information.
Instruction Manual
106-300NFX Rev. 4.2
January 2002
SECTION 3
SETUP AND OPERATION
3-1 OVERVIEW
Ensure that the oxygen analyzer, heater power
supply, and intelligent field transmitter have
been properly connected. It is important to
check that grounding and screening of terminations are correctly made to prevent the introduction of ground loops. The IFT is equipped with
noise suppression circuitry on the power supply
and signal input lines. Proper grounding at installation will ensure accuracy of function.
The following five languages can be selected
within the IFT:
English Italian
French Spanish
German
The Intelligent Field Transmitter may be supplied with any one of three configurations.
These configurations are the blind version, display only version, and the deluxe version. The
three versions differ as follows.
a. Blind Version
HART connections must be made outside of the hazardous area. Because
the Hart option is not protected by energy limiting barriers, it must not be
interfaced from within a hazardous
area. The signal cables should be
routed outside the hazardous area and
the connections made external to the
hazardous area.
The blind version has no display and no
keypad. With this version, an external HART
communications device is required. Refer to
Appendix JX regarding the HART Communications option.
b. Display Only Version (LDP)
The display only version is also known as
the LED Display Panel (LDP) version. This
IFT contains a bright LED display and a
four-key pad. The LDP version provides for
calibration capability only.
c. Deluxe Version (GUI)
The deluxe version is also known as the
General User Interface (GUI) version. This
IFT contains an LED display, liquid crystal
display panel, and an eight-key pad that allows probe and electronics configuration,
calibration, and troubleshooting of the probe
and electronics.
This section of the manual deals with operator
controls and displays available with the GUI
equipped IFT. Operating parameters are listed
and instructions are included for viewing and
changing them.
Operating instructions for the IFT equipped with
the LDP and four membrane keys are included
in Section 4.
Any procedures not associated with normal operation are included in Section 2, Installation, or
Section 5, Troubleshooting.
Rosemount Analytical Inc. A Division of Emerson Process Management Setup and Operation 3-1
Page 44
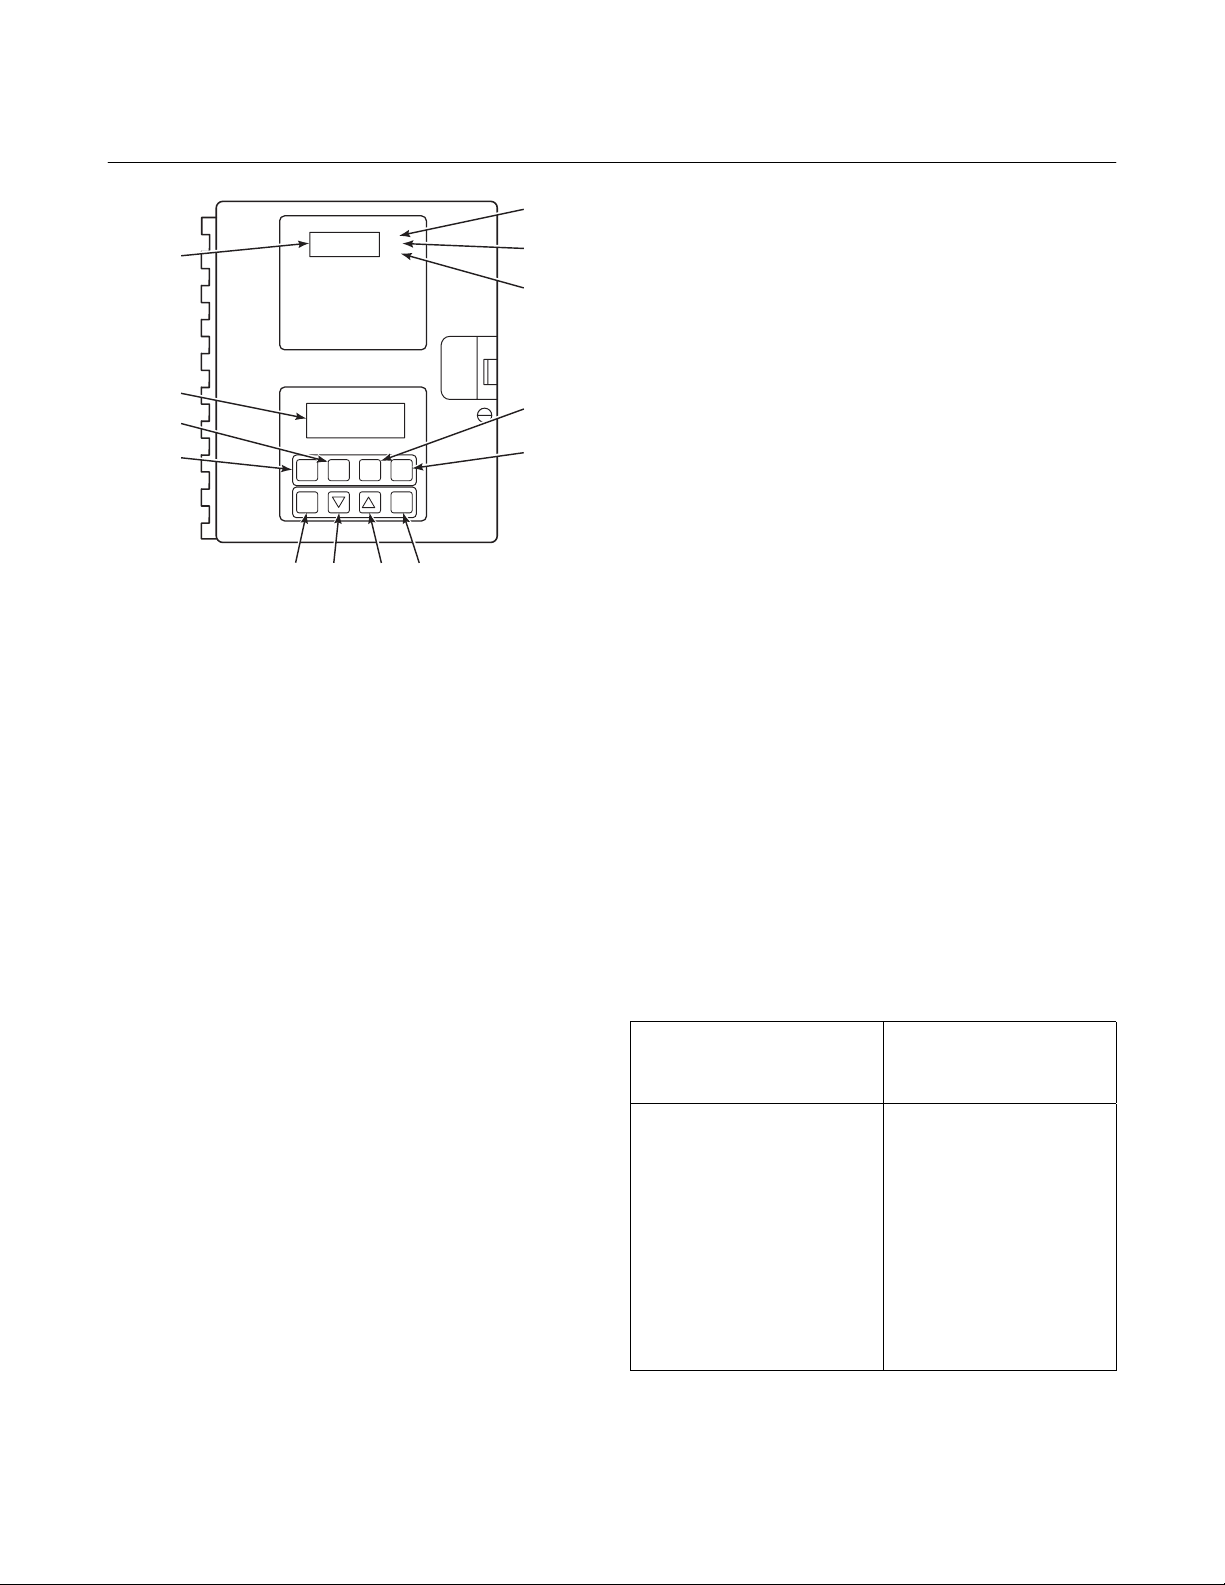
Instruction Manual
106-300NFX Rev. 4.2
January 2002
5
CAL
TGH
4
3
2
1
ESC
13 12 11 10
TGL
SETUP
CALHELP
DATA
ENTER
Figure 3-1. IFT with GUI and LDP Front Panel
3-2 IFT WITH GUI AND LDP FRONT PANEL
CONTROLS AND INDICATORS (See Figure
3-1.)
Fig. 3-1
Index
No.
Control/
LED Description
1 HELP Context sensitive HELP is
displayed when this key is
pressed.
2 DATA DATA key is used to access
DATA menu.
3LCD
Display
Top line displays system
status, menu and probe
number.
4LED
Display
Indicates current O
value (only in LDP equipped
units).
5 CAL Calibration in progress
indicator light (only in LDP
equipped units).
6 TGH High test gas indicator light.
High test gas is being used in
calibration process (only in
LDP equipped units).
7 TGL Low test gas indicator light.
Low test gas is being used in
calibration process (only in
LDP equipped units).
34990016
or test
2
6
7
8
9
World Class 3000
8 CAL CAL key used to access
CALIBRATE menu.
9 SETUP SETUP key used to access
SETUP menu.
10 ENTER The ENTER key is used to
select a lower level menu,
initiate calibration, or select a
parameter to change.
11
12
▲
▼
13 ESC The escape key is used to
3-3 HELP KEY
The HELP key will display explanatory information about a menu, sub-menu, or parameter that
the asterisk is next to when pressed. The HELP
key is not available during calibration routines.
Refer to Table 3-1 for sample HELP messages.
Table 3-1. Sample HELP Messages
MENU, SUB-MENU,
HELP OR
PARAMETER NAME MESSAGE
PROBE DATA Press ENTER key
CALIBRATE O
2
SETUP The SETUP menu
The increase key is used to
move the cursor (asterisk)
when scrolling through lists or
to increase a parameter
value.
The decrease key is used to
move the cursor (asterisk)
when scrolling through lists or
to decrease a parameter
value.
exit to a high level menu or to
abort a parameter change.
to access DATA
menu.
The CAL menu is
used to start calibration and view
calibration.
is used to configure
the IFT-3000.
3-2 Setup and Operation Rosemount Analytical Inc. A Division of Emerson Process Management
Page 45

World Class 3000
3
Instruction Manual
106-300NFX Rev. 4.2
January 2002
3-4 STATUS LINE
The top line of the LCD display (3, Figure 3-1) is
a status line that always displays system status,
menu name, and O
level. The system status
2
displays are:
a. OK - System is functioning correctly.
b. CAL - Calibration in progress.
c. C Err - Calibration error.
d. H Err - Heater error.
e. TGLow - Test gas is low.
f. HiO
- O
value is above the high alarm
2
2
limit.
- O
g. LoO
value is below the low alarm limit.
2
2
h. R Hi - Resistance is above the high limit.
i. Off - The probe has been turned off be-
cause the IFT cannot control the heater
temperature.
3-5 QUICK REFERENCE CHART
The quick reference chart on pages 3-4 and 3-5
is designed to help you determine how to get
where you want to be in the menu system. The
chart shows all the available menu and submenu options for the IFT. Follow the lines to
determine which choices to make. Moving down
a level on the chart is accomplished by use of
the ENTER key. To move up a level on the
chart, press the ESCAPE key.
3-6 MAIN MENU
When power is first applied to the IFT, the MAIN
menu (Table 3-2) is initially displayed. It is from
the MAIN menu that the PROBE DATA (Table
3-3), CALIBRATE O
(Table 3-4), and SETUP
2
(Table 3-5) menus can be accessed.
Table 3-2. Main Menu
MENU SELECTION DESCRIPTION
PROBE DATA Refer to Table 3-3.
CALIBRATE O
2
Refer to Table 3-4.
j. PRBE - The probe is disconnected, cold, or
SETUP Refer to Table 3-5.
leads are reversed.
Table 3-3. PROBE DATA Sub-Menu.
SUB-MENU
SELECTION PARAMETER DESCRIPTION
Process Data O
2
__%
Efficiency ENA/DIS
Stack Temp __DegC
O
value for the probe.
2
Enable/Disable efficiency display.
Stack temperature.
Diagnostic Data
Temperature Cell __DegC
Stack __DegC
Cold Junct __DegC
Voltages Cell __mV
Cell T/C __mV
Stk T/C __mV
Cold Jnt __mV
Output Values Analog __% FS
K1 State OFF/ON
K2 State OFF/ON
Cell temperature of the probe.
Stack temperature.
Cold junction temperature.
Cell voltage of the probe.
Cell thermocouple voltage of the probe.
Stack thermocouple voltage.
Cold junction voltage.
Analog output voltage.
Status of relay 1.
Status of relay 2
Rosemount Analytical Inc. A Division of Emerson Process Management Setup and Operation 3-3
Page 46
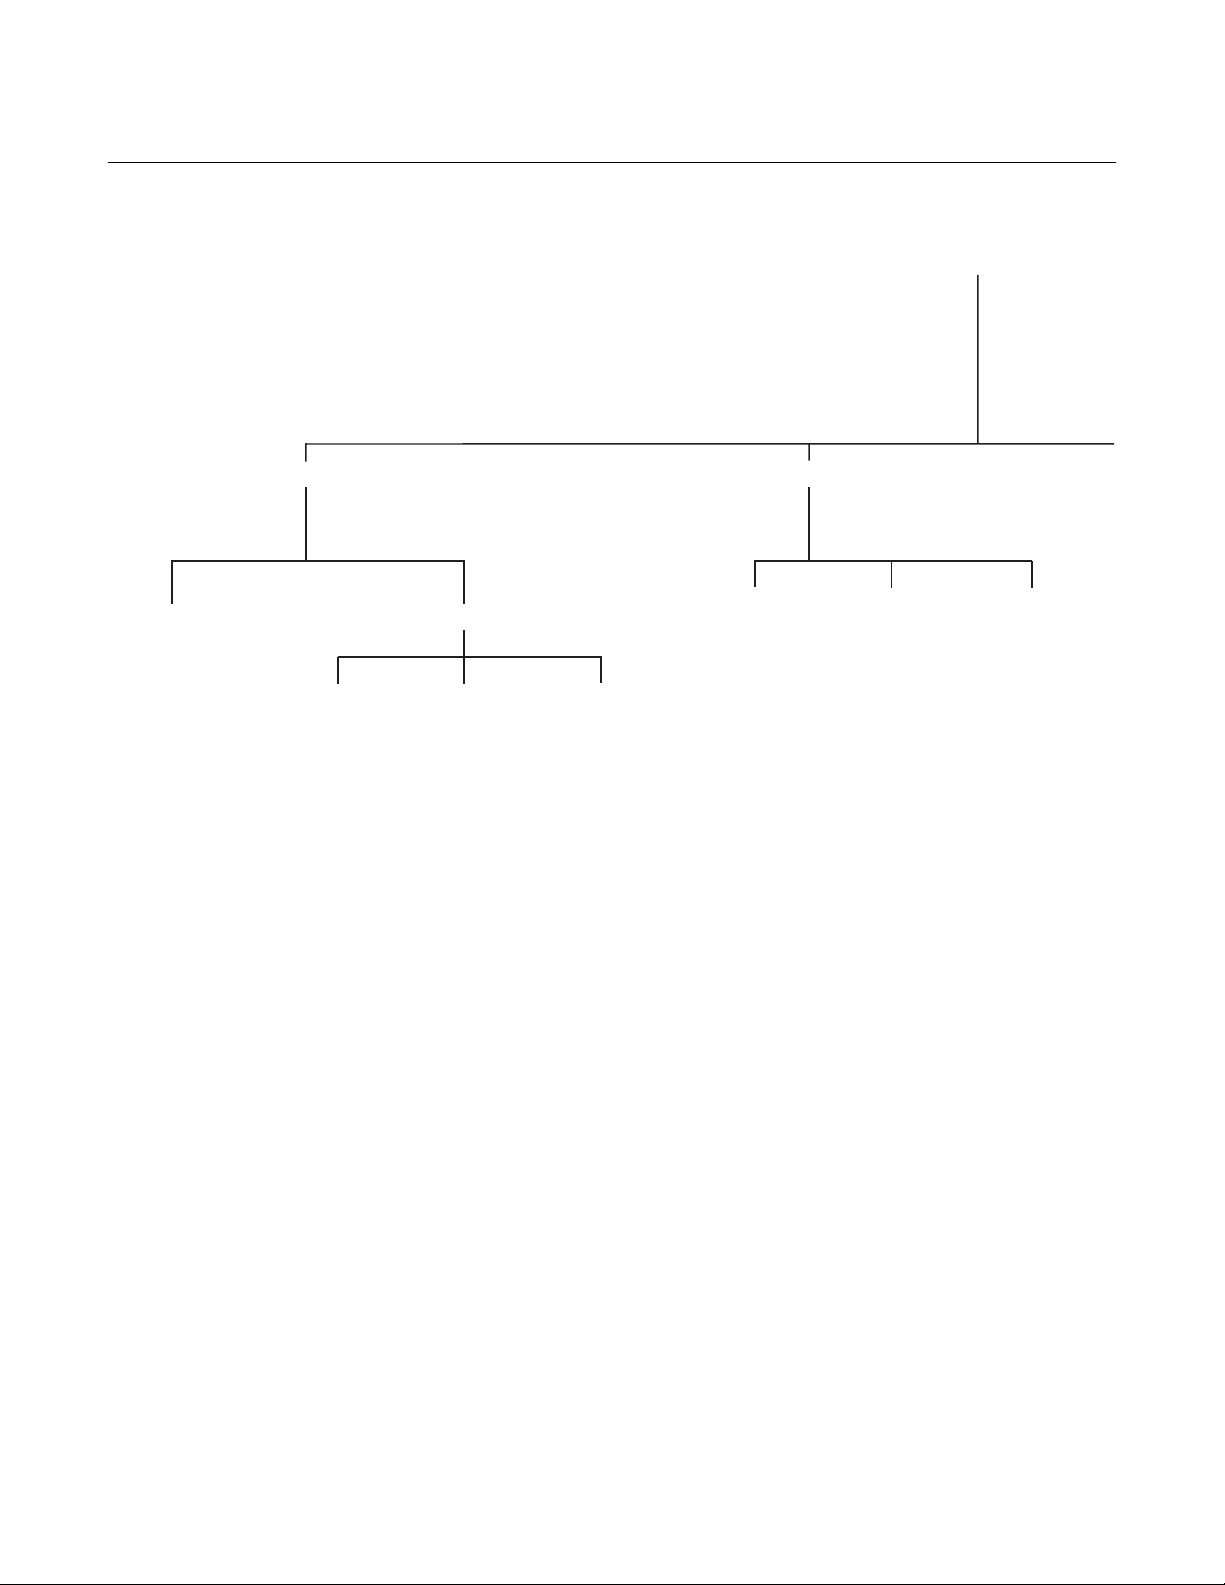
Instruction Manual
106-300NFX Rev. 4.2
January 2002
World Class 3000
QUICK REFERENCE CHART
MAIN MENU
A
PROBE DATA
PROCESS DATA DIAGNOSTIC DATA
O
2
EFFICIENCY
STACK TEMP
TEMPERATURE
CELL
STACK
COLD JUNCT
VOLTAGES
CELL
CELL T/C
STK T/C
COLD JNT
OUTPUT VALUES
ANALOG
K1 STATE
K2 STATE
CALIBRATE O
PERFORM
CALIBRATION
2
VIEW
CONSTANTS
SLOPE
CONSTANT
RESIST
CALIBRATION
STATUS
NEXT CAL
SLOPE
CONSTANT
RESIST
3-4 Setup and Operation Rosemount Analytical Inc. A Division of Emerson Process Management
Page 47
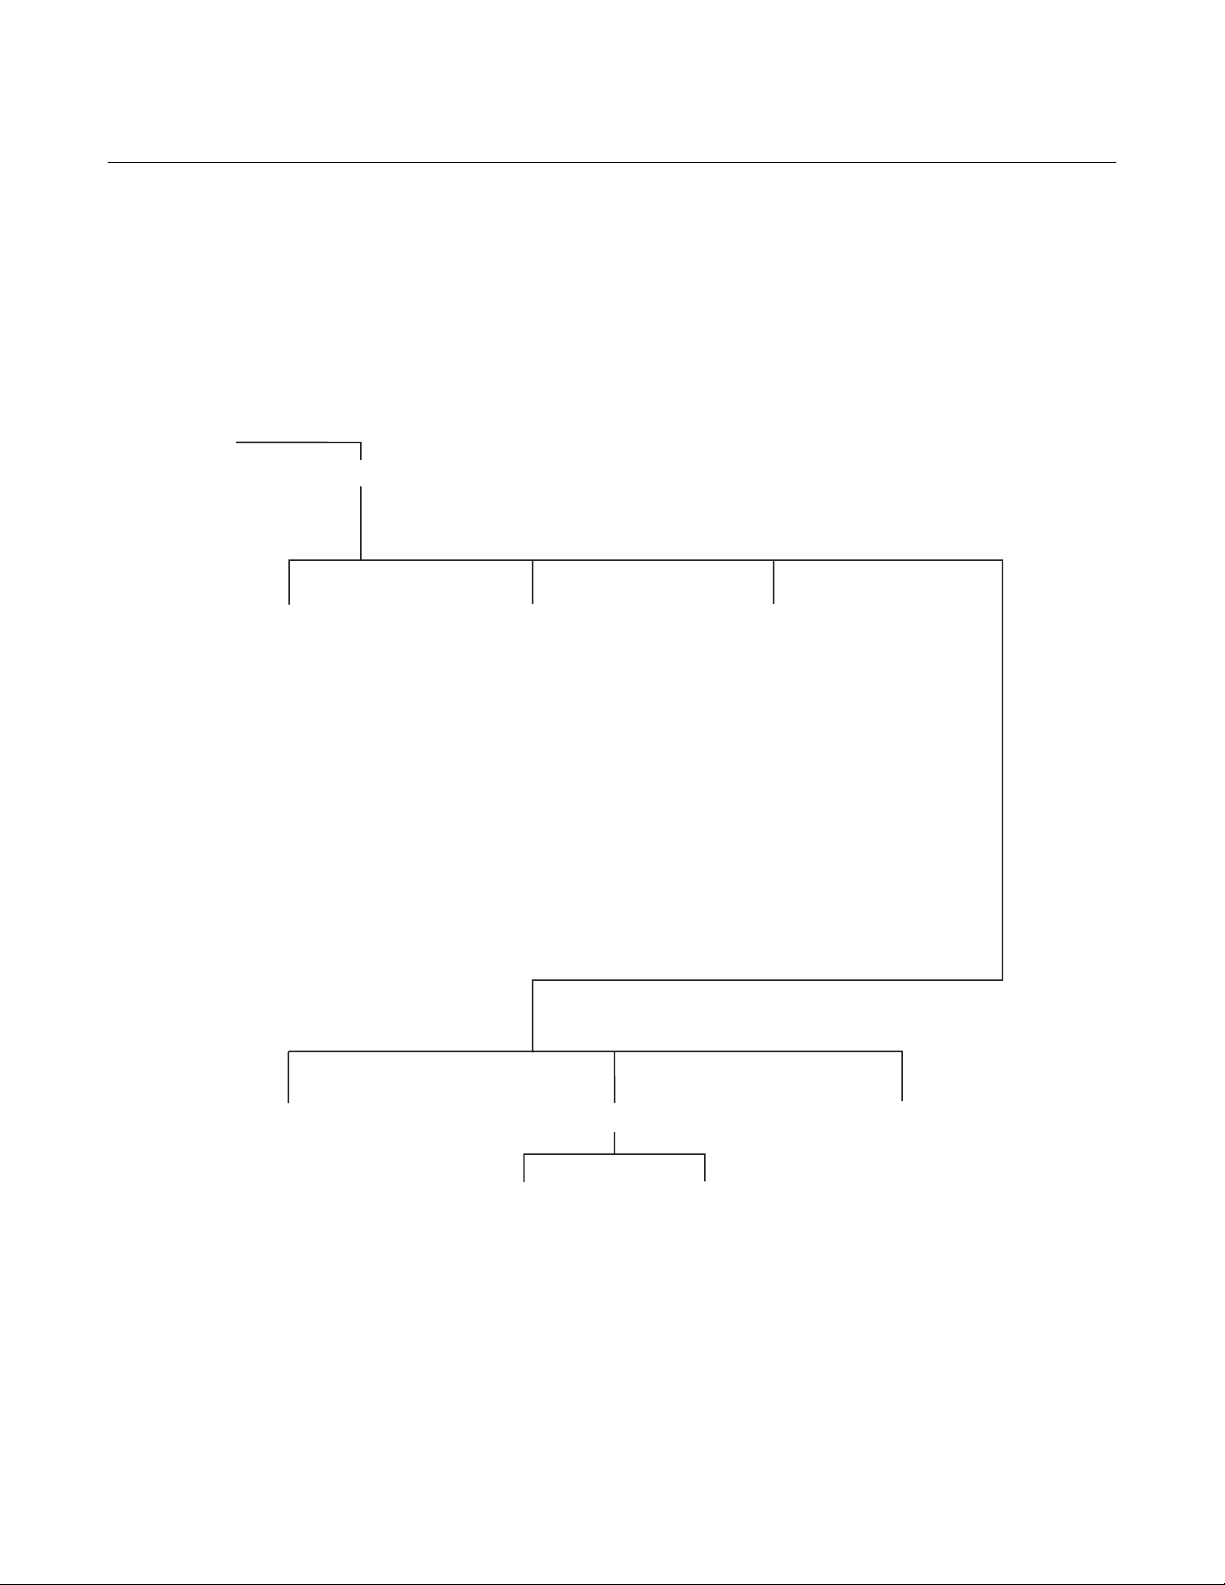
World Class 3000
3
A
SETUP
Instruction Manual
106-300NFX Rev. 4.2
January 2002
CALIBRATION
HIGH GAS
LOW GAS
AUTO CAL
OUTPUT TRACKS
CAL INTRVL
NEXT CAL
GAS TIME
PURGE TIME
RES ALARM
EFFICIENCY CALC
ENABLE CALC
K1 VALUE
K2 VALUE
K3 VALUE
O CALCULATION
SLOPE
CONSTANT
SET POINT
LOAD CONSTANTS
RELAY OUTPUT
K1 SETUP
EVENT 1
EVENT 2
EVENT 3
O ALARMS
K2 SETUP
EVENT 1
EVENT 2
EVENT 3
22
HI ALARM
LO ALARM
ALARM DB
ANALOG OUTPUTS
SOURCE
AOUT TYPE
Rosemount Analytical Inc. A Division of Emerson Process Management Setup and Operation 3-5
Page 48

Instruction Manual
106-300NFX Rev. 4.2
January 2002
World Class 3000
3-7 PROBE DATA SUB-MENU
The PROBE DATA sub-menu is a list of all the
parameters of the system as it is currently configured. To access the PROBE DATA submenu, press the DATA key at any time. The increase and decrease keys are used to scroll
through the list. The PROBE DATA sub-menu
can be viewed but not changed. The operator
must use the SETUP menu to change any of
the parameters.
There are two selections available on the
PROBE DATA sub-menu; Process Data and
Diagnostic Data. Refer to Table 3-3 for contents
of the sub-menu.
3-8 CALIBRATE O
The CALIBRATE O
SUB-MENU
2
sub-menu (Table 3-4) is
2
used to enter the calibration mode. To access
the CALIBRATE O
sub-menu, press the CAL
2
key at any time. The increase and decrease
keys are used to scroll through the list.
The CALIBRATE O
sub-menu has three selec-
2
tions available: Perform Calibration, View Constants, and Calibration Status. Refer to Table
3-4 for contents of the sub-menus.
Perform Calibration has two options depending
on how Auto Cal is selected in Probe Setup.
Refer to SETUP Setting in Table 3-4.
3-9 SETUP SUB-MENU
The SETUP sub-menu is used to enter all operator set variables into the system. To access
the SETUP sub-menu, press the SETUP key at
any time. To select the parameter to be
changed, move the cursor to the desired parameter using the arrow keys. Press ENTER to
select that parameter. To change the value for
that parameter, use the arrow keys to increase
or decrease the value. Press ENTER to save
changes.
There are six selections available on the
SETUP sub-menu: Calibration, O
O
Alarms, Efficiency Calc., Relay Outputs, and
2
Analog Outputs. Refer to Table 3-5 for the contents of the SETUP sub-menu.
NOTE
Dip shunt is to be set for voltage or
current operation. Refer to Figure 2-7.
Calculation,
2
3-6 Setup and Operation Rosemount Analytical Inc. A Division of Emerson Process Management
Page 49

World Class 3000
3
Instruction Manual
106-300NFX Rev. 4.2
January 2002
Table 3-4. CALIBRATION O2 Sub-Menu
SUB-MENU
SELECTION
Perform
Calibration
View
Constants
Calibration
Status
SETUP SETTING
(SEE TABLE 3-4) DISPLAY DESCRIPTION
Auto Cal in Probe
Setup is YES
Auto Cal in Probe
Setup is NO.
(N/A) Slope _____mV/D
(N/A) Slope _____
Press ENTER to start Auto Calibration. MPS will start calibration probe.
Starting Automatic Calibration
High Gas _____%O
Time Left 0:00
Cell mV ______mV Cell voltage of the probe.
Low Gas _____%O
Time Left 0:00
Cell mV ______mV Cell voltage of the probe.
Resistance Check
Time Left 0:00
Cell _____mV _____C Cell voltage and probe temperature.
Calibration Complete
Purging 0:00
Cell _____mV _____C Cell voltage and probe temperature.
Calibration Complete
Press ENTER to start Manual Calibration. Manual calibration sequence will begin
Switch ON high test gas. Press ENTER when
ready.
High gas ______%O
Press ENTER when O2 reading is stable.
Turn off high test gas and ON low test gas.
Press ENTER when ready.
Low gas ______%O
Press ENTER when O2 reading is stable.
Resistance Check Resistance check in progress.
Turn off low test gas.
Press ENTER when ready.
Press ENTER when probe has returned to
process.
Constant _____mV
Resist _____ohms
Next Cal XD XH Time until next calibration in number of
Constant _____
Resist _____
2
2
2
2
Value for high O
Amount of time necessary to complete
the current testing phase in min:sec.
Value for low O
Amount of time necessary to complete
the current testing phase in min:sec.
Resistance check in progress.
Gas lines are being purged of test gas.
when ENTER is pressed.
High O2 test gas value.
Low O2 test gas value.
Slope for probe.
Offset for probe.
Resistance for probe.
days and number of hours.
Status of the slope.
Status of the offset.
Status of the resistance.
test gas.
2
test gas.
2
Rosemount Analytical Inc. A Division of Emerson Process Management Setup and Operation 3-7
Page 50

Instruction Manual
106-300NFX Rev. 4.2
January 2002
Table 3-5. SETUP Sub-Menu
SUB-MENU SELECTION PARAMETERS DESCRIPTION
World Class 3000
Calibration High Gas ____%O
Low Gas ____%O
Auto Cal YES/NO
Output Tracks YES/NO
Cal Intrvl XD XH
Value of high O
2
Value of low O
2
If system has MPS, select YES or NO.
Select output tracks.
Select time between calibrations in number of
test gas.
2
test gas.
2
days and number of hours. (1 year max.)
Next Cal XH
Time until next calibration in number of hours.
(1 year max.)
Gas Time 0:00
Amount of time the test gases will be turned on
in number of minutes and seconds, allow
enough time for signal values to stabilize.
Purge Time 0:00
Res Alarm _______
O2 Calculation Slope ____ mV/D
Constant ____ mV
Set Point ____°C
Amount of time for gas lines to clear of test gas.
Resistance alarm set from 50 to 10,000 ohms.
Set value between 34.5 and 57.5.
Set value between -20.0 and +20.0 mV.
Set either 736 for World Class 3000 probes or
843 for 218 probes.
Ensure the correct voltage is selected when using HPS 3000 with either WC 3000 probes or
218 probes. Refer to Figure 2-14, Jumper Selection Label for proper voltage selections. If incorrect SET POINT is selected, damage to the probe may occur.
Load Constants Press ENTER to load constants from last
calibration.
O2 Alarms
Efficiency Calc.
Relay Outputs
K1 Setup
K2 Setup
Analog Outputs
Hi Alarm ____% O
Lo Alarm ____% O
Alarm DB ____% O
Enable Calc. YES/NO
K1 Value _____
K2 Value _____
K3 Value _____
Event 1 _____
Event 2 _____
Event 3 _____
Event 1 _____
Event 2 _____
Event 3 _____
Source
(EFF or O
) 0-100%
2
Aout Type 0-10V
Set value for high alarm limit.
2
Set value for low alarm limit.
2
Set value for alarm dead band.
2
Select YES to enable, NO to disable.
Set between 0.0000 and 1.0. Refer to Table 3-6.
Set between 0.0000 and 1.0. Refer to Table 3-6.
Set between 1.000 and 20.0. Refer to Table 3-6.
Set event to activate relay.
Set event to activate relay.
Set event to activate relay.
Set event to activate relay.
Set event to activate relay.
Set event to activate relay.
Source can be set to 0-1%, 0-5%, 0-10%, 0-
25%, 0-100% of O
, or 0-100% Efficiency
2
Aout Type can be set to 0-10 V, 0-20 mA, or
4-20 mA
3-8 Setup and Operation Rosemount Analytical Inc. A Division of Emerson Process Management
Page 51

World Class 3000
3
Instruction Manual
106-300NFX Rev. 4.2
January 2002
Table 3-6. Efficiency Constants
UNITED
STATES
CONSTANT
GAS OIL
K1 0.407 0.432 0.66 0.69
K2 0.0 0.0 0.0082 0.0051
K3 5.12 5.12 12.28 8.74
3-10 SYSTEM CALIBRATION
a. Overview
The primary purpose of an oxygen analyzer
is to give an accurate representation of the
percentage of O
in the gas stream. The
2
system should be calibrated periodically to
maintain an accuracy which may otherwise
reduce over time due to cell aging.
A requirement for calibration is a set of two
accurate test gases spanning the oxygen
range of most interest. For example, 0.4%
and 8% for a 0-10% oxygen range.
Under normal conditions the probe should
not need frequent calibration. Because calibration is necessary, the system can be
equipped with the optional MPS 3000 Multiprobe Test Gas Sequencer for fully automatic calibration at regular intervals.
Without an MPS, the probes must be calibrated manually (semi-automatically).
b. Probe Calibration
1. Previous Calibration Constants Functionality. Three sets of registers are
used to store calibration constants.
These are: Latest Calibration, Previous
Calibration, and Calculation. Only the
values in the Calculation registers are
used to calculate the oxygen value for
display and representation on the
analog output signal. These values
may be changed in two ways:
(a) The operator may change the Cal-
culation values by entering the
SETUP menu and then entering
EUROPE
GAS OIL
the O
Calculations sub-menu. The
2
operator may adjust the slope and
constant individually or reset both
to the values calculated during the
last good calibration. Simultaneously resetting both values is done
by selecting Load Constants and
pressing ENTER.
(b) The IFT will automatically change
the values after each successful
calibration.
The values in the Latest Calibration
registers are updated after every
complete calibration even if the calibration is not successful. If the calibration is successful, the values in the
Latest Calibration registers are copied
into the Previous Calibration registers.
This function is accomplished prior to
the update of the Latest Calibration
registers. The values from successful
calibrations are automatically loaded
into the Calculation registers for use in
future O
calculations. If a calibration
2
fails, the Previous Calibration registers
and Calculation registers retain their
existing values, while the Latest Calibration registers record the values of
the failed calibration.
2. Calibration Methods. There are three
calibration methods: manual (semiautomatic), manually initiated automatic, and fully automatic. Manual
(semiautomatic) calibration is done
without an MPS unit. Test gases are
switched on and off by the operator
and the IFT is sequenced through the
calibration procedure by the operator
with the front panel keyboard. The IFT
prompts the operator for the correct
action. Manually initiated automatic
calibration is done with an MPS. The
operator manually initiates the calibration at the IFT or through a remote
switch, and the IFT controls the operation of the MPS unit and the calibration
sequencing. Fully automatic calibration
requires no action from the operator.
The setup is the same as semiautomatic except the IFT automatically
Rosemount Analytical Inc. A Division of Emerson Process Management Setup and Operation 3-9
Page 52

Instruction Manual
106-300NFX Rev. 4.2
January 2002
World Class 3000
initiates the calibration at a fixed calibration interval. In this mode the operator can also manually initiate
calibrations between the intervals in
the same manner as semiautomatic
calibrations.
c. Manual (Semiautomatic) Calibration
1. Test Gases for Manual (Semiautomatic) Calibration. There are two options for supplying test gases to the
probe during semiautomatic calibration.
The first "A" uses refillable bottles and
adjustable 2-stage pressure regulators;
the second, "B" uses disposable bottles and a fixed single-stage regulator
to provide a mixed flow. Normally, the
first (method "A") will have a higher
cost and not be portable. The
second ("B") is less costly, portable,
and weighs about 4.54 kg (10 lbs).
Test Method "A" Fixed Tanks and
Manifolds.
(a) Required Equipment.
700 South Alameda Street
Los Angeles, California
90058
213/585-2154
767 Industrial Road
San Carlos, California 94070
415/592-7303
9950 Chemical Road
Pasadena, Texas 77507
713/474-4141
12054 S.W. Doty Avenue
Chicago, Illinois 60628
312/568-8840
603 Bergen Street
Harrison, New Jersey 07029
201/485-1995
255 Brimley Road
Scarborough, Ontario,
Canada
416/266-3161
SCOTT ENVIRONMENTAL
TECHNOLOGY, INC.
SCOTT SPECIALTY GASES
Do not use 100% nitrogen as a zero
gas. It is suggested that gas for the
zero be between 0.4% and 2.0% O2. Do
not use gases with hydrocarbon concentrations of more than 40 parts per
million. Failure to use proper gases
will result in erroneous readings.
1 Two tanks of precision cali-
bration gas mixtures. Recommended calibration gases
are nominally 0.4 percent and
8.0 percent oxygen in nitrogen.
Two sources of calibrated gas
mixtures are:
LIQUID CARBONIC GAS
CORP. SPECIALTY GAS
LABORATORIES
2600 Cajon Blvd.
San Bernardino, CA 92411
714/887-2571
TWX: 910-390-1159
1290 Combermere Street
Troy, MI 48084
314/589-2950
Route 611
Plumsteadville, PA 18949
215/766-8861
TWX: 510-665-9344
2616 South Loop West,
Suite 100
Houston, TX 77054
713/669-0469
2 A check valve is required at
the probe (between the calibration fitting and the gas line)
to prevent the migration of
process gases down the calibration gas line.
3-10 Setup and Operation Rosemount Analytical Inc. A Division of Emerson Process Management
Page 53

World Class 3000
3
Instruction Manual
106-300NFX Rev. 4.2
January 2002
3 Two, 2-stage pressure regu-
lators with stainless steel diaphragms for tanks. Maximum
output required: 138 kPa (20
psi).
4 One instrument air pressure
regulator: 138 kPa (20 psi)
maximum and a supply of
clean, dry instrument air.
5 Two zero-leakage shutoff
valves.
6 Miscellaneous oil-free tubing
and fittings.
(b) Calibration
1 A typical calibration setup is
shown in Figure 3-2. Care
must be taken that all fittings
are tight and free from oil or
other organic contaminants.
Small openings can cause
back diffusion of oxygen from
the atmosphere even though
positive pressures are maintained in the lines.
NOTE
The probe calibration gas fitting has a
seal cap which must be in place at all
times except during calibration.
In addition to the precision
calibration gas mixtures,
clean, dry, oil-free instrument
air should be used for calibration.
For optimum accuracy, this calibration
should be run with the process at
normal temperature and operating
conditions.
When the calibration gas line
exceeds 1.8 m (6 ft) in length
from the leak tight valves, a
check valve, Rosemount P/N
6292A97H02, should be installed next to the calibration
gas connection on the probe
to prevent breathing of the
line with the process gas and
subsequent gas condensation
and corrosion.
CALIBRATE
IN-PLACE
FITTING
FLOW METER
LEAK TIGHT
VALV ES
NOTE:
PROBE CALIBRATION GAS FITTING HAS A SEAL CAP THAT MUST
BE IN PLACE AT ALL TIMES EXCEPT DURING CALIBRATION.
PROBE
(END VIEW)
REFERENCE AIR
CONNECTION
5 SCFH
REG
0.4%
O
2
CHECK
VALV E
8.0%
O
2
Figure 3-2. Typical Calibration Setup
2 SCFH
REFERENCE
AIR
SET
INSTR.
AIR
IN
730013
Rosemount Analytical Inc. A Division of Emerson Process Management Setup and Operation 3-11
Page 54

Instruction Manual
106-300NFX Rev. 4.2
January 2002
World Class 3000
NOTE
Only set the test gas flowmeter upon
initial installation and after changing
the diffusion element. A slightly lower
test gas flow rate may indicate a
plugged diffusion element.
2 Set the test gas pressure
regulators and the flow meter
for a flow of 5 scfh at (20 psig)
138 kPa for both gases. The
reference gas should be
flowing as in normal operation.
3 Refer to paragraph 3-10d of
this section for Manual (Semiautomatic) Calibration setup
and procedure using the IFT.
4 Test gases will be switched
on and off using the shutoff
valves.
Test Method "B" Rosemount Oxygen
Test Gas and Service Kit.
(a) Required Equipment
2 Extra gas bottles are available
at:
Rosemount Analytical Inc.
Box 901
Orrville, Ohio 44667
U.S.A.
Rosemount Limited
Burymead Road
Hitchin, Herts. U.K.
Rosemount Italy
VIA Guido Cavalcanti 8
20127 Milan, Italy
Rosemount Spain
Saturnino Calleja 6
28002 Madrid, Spain
Rosemount France
165 Boulevard de Vallmy
92706, Colombes, France
Rosemount Part Number
3530B07G01 for probe 0.4%
oxygen in nitrogen in disposable bottle.
Do not use 100% nitrogen as a zero
gas. It is suggested that gas for the
zero be between 0.4% and 2.0% O2. Do
not use gases with hydrocarbon concentrations of more than 40 parts per
million. Failure to use proper gases
will result in erroneous readings.
1 Portable Rosemount Oxygen
Test Gas Kits (Figure 3-3),
Rosemount Part Number
TEST GAS
KIT #1
(P/N 6296A27G1)
6296A27G01, containing 8%
and 0.4% gases in a portable carrying case with regulator, built-in valve, hose and
hose connecting adapter to
the calibration gas connection.
35870004
Figure 3-3. Portable Rosemount
Oxygen Test Gas Kit
3-12 Setup and Operation Rosemount Analytical Inc. A Division of Emerson Process Management
Page 55

World Class 3000
3
Instruction Manual
106-300NFX Rev. 4.2
January 2002
Rosemount Part Number
3530B07G02 for probe 8%
oxygen in nitrogen in disposable bottle.
3 A check valve is required at
the probe (between the calibration fitting and the gas line)
to prevent the migration of
process gases down the calibration gas line.
(b) Calibration with a Portable Rose-
mount Oxygen Test Gases Kit.
1 A typical portable test calibra-
tion setup is shown in Figure
3-4. For Manual (semiautomatic) calibration, remove cap
plug from the calibrate-inplace fitting. The cap plug
must be retained to seal this
fitting after calibration is complete; failure to do so may
render the probe useless if
the system pressure is slightly
negative. The reference gas
should be flowing as in normal
operation.
2 Refer to paragraph 3-10d of
this section for Manual (Semiautomatic) Calibration setup
and procedure using the IFT.
3 Screw the push button regu-
lator with contents gage on to
the test gas of choice and inject the test gas by opening
the valve. Gas is on continuously when the valve is
opened.
d. Manual (Semiautomatic) Calibration
Procedure
Consult Safety Data Sheet 1M03296
before performing any work on the
CENELEC approved IFT 3000.
The following procedure relates to an operator initiated calibration selected at the
IFT by pressing the CAL key. The calibration is manually performed by the operator
upon data queues from the IFT. Any system
without an MPS 3000 Multiprobe Test Gas
Sequencer must follow these steps.
CALIBRATE
IN PLACE
CONNECTION
CHECK
VALV E
PUSHBUTTON
REGULATOR
WITH CONTENTS
GAGE - SET 5 SCFH
NOTE: PROBE CALIBRATION GAS
FITTING HAS A SEAL CAP THAT
MUST BE IN PLACE EXCEPT
DURING CALIBRATION.
REFERENCE
AIR
CONNECTION
TEST HOSE
CONNECTS
TO CHECK
VALV E
0.4
%
O
2
23800010
8.0
%
O
2
1. Press SETUP to display the SETUP
menu. Select PROBE CALIBRATION
sub-menu. Ensure that Auto Cal is disabled. Set the cursor on Auto Cal.
Press ENTER. Set Auto Cal to NO if
not already done.
2. Press the CAL key. Select PERFORM
CALIBRATION sub-menu. "Press ENTER to start Manual Calibration" will
appear on the LCD display. Press ENTER to start. Follow the data queues.
Refer to Table 3-4. CALIBRATE O
2
Menu.
Figure 3-4. Typical Portable Test Calibration Setup
Rosemount Analytical Inc. A Division of Emerson Process Management Setup and Operation 3-13
Page 56

Instruction Manual
106-300NFX Rev. 4.2
January 2002
World Class 3000
e. Fully Automatic Calibration
Consult Safety Data Sheet 1M03296
before performing any work on the
CENELEC approved IFT 3000.
1. Test Gases for Fully Automatic Calibration. For fully automatic calibration,
an MPS 3000 Multiprobe Test Gas Sequencer is required as well as the two
types of test gas.
Do not use 100% nitrogen as a zero
gas. It is suggested that gas for the
zero be between 0.4% and 2.0% O2. Do
not use gases with hydrocarbon concentrations of more than 40 parts per
million. Failure to use proper gases
will result in erroneous readings.
Two tanks of precision calibration gas
mixtures. Recommended calibration
gases are nominally 0.4 percent and
8.0 percent oxygen in nitrogen.
A typical automatic calibration system
is shown in Figure 3-5.
2. Fully Automatic Calibration Setup. In
order for the IFT system to calibrate
automatically, the following parameters
from the CALIBRATE sub-menu in the
IFT have to be entered. Refer to Table
3-5. SETUP Sub-Menu.
(a) Auto Cal YES/NO
Set to YES
Set the desired time between calibrations in number of days and
hours. (1 year max.)
(d) Next Cal. XD XH
Displays the time left to the start of
the next calibration. Set the desired time until the start of the next
calibration. If nothing is entered
here, the unit will automatically
enter the cal intrvl and count down
from that. (1 year max.)
(e) Gas Time 0:00
Set the amount of time for the test
gasses to be turned on in number
of minutes and seconds, allow
enough time for signal values to
stabilize.
(f) Purge Time 0:00
Set the amount of time for the gas
lines to clear in number of minutes
and seconds.
(g) Abort Time 0:00
Set the amount of time allowed
between key functions before the
calibration procedure is aborted in
number of minutes and seconds.
(h) Res Alarm _____
Set the desired resistance alarm
between 50 - 10000 ohms.
Once these parameters have been set,
the system will initiate calibration without operator intervention as set by the
CAL INTVL parameter.
(b) Output Tracks YES/NO
Set as desired to configure analog
output tracking.
(c) Cal Intrvl XD XH
3-14 Setup and Operation Rosemount Analytical Inc. A Division of Emerson Process Management
3. Manually Initiated Fully Automatic Calibration Procedure. The following procedure relates to an operator initiated
calibration, either by a remote switch
(CAL INIT on interconnect board) or
selected at the IFT by pressing the
CAL key using an MPS 3000 Multiprobe Gas Sequencer.
Page 57

World Class 3000
3
Instruction Manual
106-300NFX Rev. 4.2
January 2002
(a) Press SETUP to display the
SETUP sub-menu. Select Calibration. Ensure that Auto Cal is enabled. Set the cursor on Auto Cal.
Press ENTER. Set Auto Cal to
YES if not already done.
CHECK
VALV E
TEST GAS
PROBE
(END VIEW)
REFERENCE
AIR
HPS
PROBE
SIGNAL CONNECTIONS
(b) Press the CAL key. Select Perform
Calibration. "Press ENTER to start
Automatic Calibration" will appear
on the LCD display. Press ENTER
to start. Refer to Table 3-4. CALIBRATE O
Sub-Menu.
2
IFT
MPS
INSTRUMENT
AIR IN
NOTE: 1. THE MPS CAN BE USED WITH UP
TO FOUR PROBES. ONLY ONE PROBE
CAN BE CALIBRATED AT A TIME.
PROBE CALIBRATIONS MUST BE
SCHEDULED IN MULTIPLE PROBE
APPLICATIONS.
2. HPS OPTION SHOWN.
MPS-IFT
SIGNAL
CONNECTIONS
TEST GAS 1
(HIGH O )
2
TEST GAS 2
(LOW O )
2
730014
Figure 3-5. Typical Automatic Calibration System
Rosemount Analytical Inc. A Division of Emerson Process Management Setup and Operation 3-15
Page 58

Instruction Manual
106-300NFX Rev. 4.2
January 2002
World Class 3000
3-16 Setup and Operation Rosemount Analytical Inc. A Division of Emerson Process Management
Page 59

World Class 3000
4
Consult Safety Data Sheet 1M03296
before performing any work on the
CENELEC approved IFT 3000.
4-1 OVERVIEW
Ensure that the oxygen analyzer, heater power
supply (if included with the system), and intelligent field transmitter have been properly connected. It is important to check that grounding
and screening of terminations are correctly
made to prevent the introduction of ground
loops. The IFT is equipped with noise suppression circuitry on the power supply and signal input lines. Proper grounding at installation will
ensure accuracy of function.
This section of the manual deals with operator
controls and displays available for the IFT
equipped with LDP and four membrane keys.
Operating instructions for the GUI equipped IFT
are included in Section 3.
Any procedures not associated with normal operations are included in Section 2, Installation,
or Section 5, Troubleshooting.
1
2
SECTION 4
LDP OPERATION
4-2 IFT WITH LDP FRONT PANEL CONTROLS
AND INDICATORS (Figure 4-1.)
Fig. 4-1
Index
No.
1
2 CAL Calibration in progress
3 TGH High test gas indicator light.
4 TGL Low test gas indicator light.
5 ENTER The ENTER key is used to
6
7
8SEL
Instruction Manual
106-300NFX Rev. 4.2
Control/
LED Description
LED
Display
▲
▼
Indicates current O
gas value.
indicator light.
High test gas is being used in
calibration process.
Low test gas is being used in
calibration process.
initiate calibration or select a
test gas parameter to change.
The increase key is used to
increase the value of the test
gas parameters.
The decrease key is used to
decrease the value of the test
gas parameters.
The select key is used to
scroll through the list of
parameters.
January 2002
or test
2
CAL
TGH
TGL
8
ENTERSEL
3
4
5
4-3 LDP DISPLAYS
Consult Safety Data Sheet 1M03296
before performing any work on the
CENELEC approved IFT 3000.
7
6
The LDP equipped IFT contains four selectable
displays. The displays are selected by pressing
the SEL key. The display is advanced once
each time the SEL key is depressed and continually scrolls. The only parameters which the
34990019
Figure 4-1. IFT with LDP Front Panel
Rosemount Analytical Inc. A Division of Emerson Process Management LDP Operation 4-1
operator is permitted to change change are H
(high test gas) and L (low test gas). When a parameter is to be changed, press the ENTER
Page 60

Instruction Manual
106-300NFX Rev. 4.2
January 2002
World Class 3000
key. To change the parameter, the increase and
decrease arrows are depressed until the proper
value is displayed. Depress the ENTER key to
accept the new value, or the SEL key to abort
the change. The four displays are as follows:
a. O
2
The O2 selection will display the O2 value on
the LED display when ENTER key is depressed.
b. H
The high test gas display allows the value of
the high test gas parameter to be changed
for calibration purposes.
c. L
The low test gas display allows the value of
the low test gas parameter to be changed
for calibration purposes.
d. CAL
tion. Calibration must be manually initiated.
Information on test gases and hardware requirements may be found in paragraph
3-10, Calibration.
b. Manual Calibration
The following procedures relate to an operator initiated calibration. The calibration is
manually performed by the operator upon
data queues from the IFT. Any system without an MPS 3000 multiprobe test gas sequencer must follow these steps.
Consult Safety Data Sheet 1M03296
before performing any work on the
CENELEC approved IFT 3000.
1. Press the SEL key until CAL is shown
on the LED display.
2. Press ENTER. The CAL light is now
on. Turn on high test gas.
The calibration selection allows the operator
to initiate the calibration process when ENTER key is depressed.
4-4 LDP DEFAULTS
The LDP equipped IFT is programmed at the
factory with the defaults indicated in Table 4-1.
For a description of the defaults refer to Table
3-4. SETUP Sub-Menu.
4-5 CALIBRATION
a. Overview
The LDP equipped IFT is configured at the
factory for manual (semiautomatic) calibra-
3. Press ENTER. The TGH light is now
flashing.
4. When the value shown on the LED
display has stabilized, press ENTER.
Turn off high test gas.
5. Turn on low test gas. Press ENTER.
The TGL light is now flashing.
6. When the value shown on the LED
display has stabilized, press ENTER.
7. Turn off low test gas. Press ENTER.
8. All indicator lights are off. Calibration
complete.
4-2 LDP Operation Rosemount Analytical Inc. A Division of Emerson Process Management
Page 61

Instruction Manual
4
106-300NFX Rev. 4.2
World Class 3000
Table 4-1. LDP Defaults
PARAMETER DEFAULT PARAMETER DEFAULT
January 2002
Probe Calibration
High Gas
Low Gas
Auto Cal
Output Tracks
Cal Interval
Next Cal
Gas Time
Purge Time
Resistance Alarm
O2 Calculation
Slope
Constant
Htr Set Point
O2 Alarms
HI Alarm
LO Alarm
Alarm DB
8.0%
0.4%
NO
YES
OFF
Disabled
5:00 MIN
5:00 MIN
1000 ohms
____(value from calibration)
____(value from calibration)
736°C (when implemented)
30%
0.3%
0.0%
Efficiency Calc.
Enable Calc
K1 Value
K2 Value
K3 Value
Relay Outputs (K1)
Event 1
Event 2
Event 3
Relay Outputs (2)
Event 1
Event 2
Event 3
Analog Output
Source
Aout Type
NO
0.0
0.0
0.0
Heater Fail
Cal. Fail
INCAL
LO O
2
OFF
OFF
O
0-10%
2
4-20mA
Rosemount Analytical Inc. A Division of Emerson Process Management LDP Operation 4-3
Page 62

Instruction Manual
106-300NFX Rev. 4.2
January 2002
World Class 3000
4-4 LDP Operation Rosemount Analytical Inc. A Division of Emerson Process Management
Page 63

World Class 3000
5
Instruction Manual
106-300NFX Rev. 4.2
January 2002
SECTION 5
TROUBLESHOOTING
b. Electrical Noise
Consult Safety Data Sheet 1M03296
before performing any work on the
CENELEC approved IFT 3000.
Install all protective equipment covers
and safety ground leads after troubleshooting. Failure to install covers and
ground leads could result in serious
injury or death.
5-1 OVERVIEW
The system troubleshooting describes how to
identify and isolate faults which may develop in
the Oxygen Analyzer System. Refer to Probe,
IFT, HPS, and MPS Appendices.
5-2 SPECIAL TROUBLESHOOTING NOTES
a. Grounding
It is essential that adequate grounding precautions are taken when the system is being installed. A very thorough check must
be made at both the probe and electronics
to ensure that the grounding quality has not
degraded during fault finding. The system
provides facilities for 100% effective
grounding and the total elimination of
ground loops.
The IFT has been designed to operate in
the type of environment normally found in a
boiler room or control room. Noise suppression circuits are employed on all field terminations and main inputs. When fault finding,
the electrical noise being generated in the
immediate circuitry of a faulty system should
be evaluated. All cable shields must be
connected to earth.
c. Loose Integrated Circuits
The IFT uses a microprocessor and supporting integrated circuits. Should the electronics unit receive rough handling during
installation in a location where it is subjected to severe vibration, an Integrated
Circuit (IC) could work loose. The fault finding guides in paragraph 5-3a. and Table
E-2, Appendix EX, show the resulting variety of failure modes. It is recommended that
all IC's be confirmed to be fully seated before troubleshooting on the system begins.
d. Electrostatic Discharge
Electrostatic discharge can damage the IC's
used in the electronics unit. It is essential
before removing or handling the processor
board or the IC's used on it, that the user
ensure he/she is at ground potential.
Rosemount Analytical Inc. A Division of Emerson Process Management Troubleshooting 5-1
Page 64

Instruction Manual
106-300NFX Rev. 4.2
January 2002
World Class 3000
5-3 SYSTEM TROUBLESHOOTING
The IFT provides system failure information with
two different error message formats. The error
messages vary due to system configuration.
Refer to Appendix EX, IFT 3000 Troubleshooting.
a. GUI Equipped IFT
The status line of the GUI equipped IFT will
display one of ten conditions: OK, CAL
(calibration), C Err (calibration error), H Err
(heater error), TGLow (test gas low), HiO
(high O2 level), LoO2 (low O2 level), and
R Hi (high resistance level), Off and PRBE.
Refer to Table E-2, Appendix EX for additional troubleshooting information on the
GUI equipped IFT.
Consult Safety Data Sheet 1M03296
before performing any work on the
CENELEC approved IFT 3000.
1. OK - The system is operating
normally.
2. CAL - The system is currently
undergoing calibration.
3. C Err - An error was detected during
the calibration process.
4. H Err - There is a fault within the heater
system.
5. TGLow - There is no test gas pressure.
2
6. HiO
- The O2 value is above the high
2
alarm limit.
7. LoO
- The O2 value is below the low
2
alarm limit.
8. R Hi - The cell resistance is above the
high limit.
9. Off - The probe has been turned off
because the IFT cannot control the
heater temperature.
10. PRBE - The probe is disconnected,
cold, or leads are reversed.
5-2 Troubleshooting Rosemount Analytical Inc. A Division of Emerson Process Management
Page 65

World Class 3000
6
Instruction Manual
106-300NFX Rev. 4.2
January 2002
SECTION 6
RETURN OF MATERIAL
6-1 If factory repair of defective equipment is re-
quired, proceed as follows:
a. Secure a return authorization number from
a Rosemount Analytical Sales Office or
Representative before returning the equipment. Equipment must be returned with
complete identification in accordance with
Rosemount instructions, or it will not be accepted.
In no event will Rosemount be responsible
for equipment returned without proper
authorization and identification.
b. Carefully pack defective unit in a sturdy box
with sufficient shock absorbing material to
insure that no additional damage will occur
during shipping.
c. In a cover letter, describe completely:
1. The symptoms from which it was determined that the equipment is faulty.
2. The environment in which the equipment has been operating (housing,
weather, vibration, dust, etc.).
5. Complete shipping instructions for return of replacement or repaired equipment to you.
6. Reference the return authorization
number.
d. Enclose a cover letter and purchase order
and ship the defective equipment, according
to instructions provided in Rosemount Return Authorization, prepaid, to:
Rosemount Analytical Inc.
RMR Department
1201 N. Main Street
Orrville, Ohio 44667
If warranty service is requested, the defective unit will be carefully inspected and
tested at the factory. If failure was due to
conditions listed in the standard Rosemount
warranty, the defective unit will be repaired
or replaced at Rosemount's option, and an
operating unit will be returned to the customer in accordance with shipping instructions furnished in the cover letter.
3. The site from which equipment was
removed.
4. Whether warranty or nonwarranty
service is requested.
Rosemount Analytical Inc. A Division of Emerson Process Management Return of Material 6-1
For equipment no longer under warranty,
the equipment will be repaired at the factory
and returned as directed by your purchase
order and shipping instructions.
Page 66

Instruction Manual
106-300NFX Rev. 4.2
January 2002
World Class 3000
6-2 Return of Material Rosemount Analytical Inc. A Division of Emerson Process Management
Page 67

Instruction Manual
7
106-300NFX Rev. 4.2
World Class 3000
January 2002
SECTION 7
APPENDICES
APPENDIX AX. WORLD CLASS 3000 OXYGEN ANALYZER PROBE (CENELEC
APPROVED VERSION)
APPENDIX BX. HPS 3000 HEATER POWER SUPPLY FIELD MODULE (CENELEC
APPROVED VERSION)
APPENDIX DX. MPS 3000 MULTIPROBE TEST GAS SEQUENCER
APPENDIX EX. IFT 3000 INTELLIGENT FIELD TRANSMITTER
APPENDIX JX. HART COMMUNICATOR MODEL 275D9E IFT 3000 APPLICATIONS
Rosemount Analytical Inc. A Division of Emerson Process Management Appendices 7-1
Page 68

Instruction Manual
Appendix AX Rev. 2.1
February 1998
World Class 3000
NOTES:
1.
SEE SAFETY DATA SHEET 1M03226
FOR A LIST OF PROBE REPAIRS A
CUSTOMER MAY MAKE.
1
2
2.
ITEM B , CALIBRATION GAS TUBE, FITS
INTO HOLE A WHEN PROBE IS
ASSEMBLED.
4
5
6
3
NOT ALL PARTS SHOWN ARE AVAILABLE
3.
FOR PURCHASE SEPARATELY. FOR A LIST
OF AVAILABLE PARTS, SEE TABLE A-3.
7
9
10
B
8
A
13
1. Snubber Diffuser
2. Retainer Screw
3. Calibration Tube
Insert
4. Retainer
5. Cell and Flange
Assembly
6. Corrugated Seal
7. Probe Tube and Junction
Box Assembly
8. Tube Nut, Ferrule, and
Tie-Rap
9. Hose Clamp
10. Label
11. Terminal Block
12. Label Attaching Hardware
Mounting Plate
13. Gas Connection
14. Terminal Block Marker
15. Seal Cap
16. Terminal Block
17. V-Strut Assembly
16
18
19
20
18. Terminal Block Screw
19. Ground Wires
20. Junction Box Gasket
21. Hose
22. Junction Box Lid
APPENDIX AX
23. Probe Head Hardware
24. Cover Setscrew
17
15
22
14
21
23
12
11
E
N
E
E
L
I
R
H
G
I
W
S
E
N
D
E
P
O
T
G
O
N
N
I
N
O
E
D
P
O
S
E
E
R
E
O
L
F
A
E
B
B
E
L
24
19780003
Figure A-1. Oxygen Analyzer (Probe - CENELEC Approved) Exploded View
A-0 Appendices Rosemount Analytical Inc. A Division of Emerson Process Management
Page 69
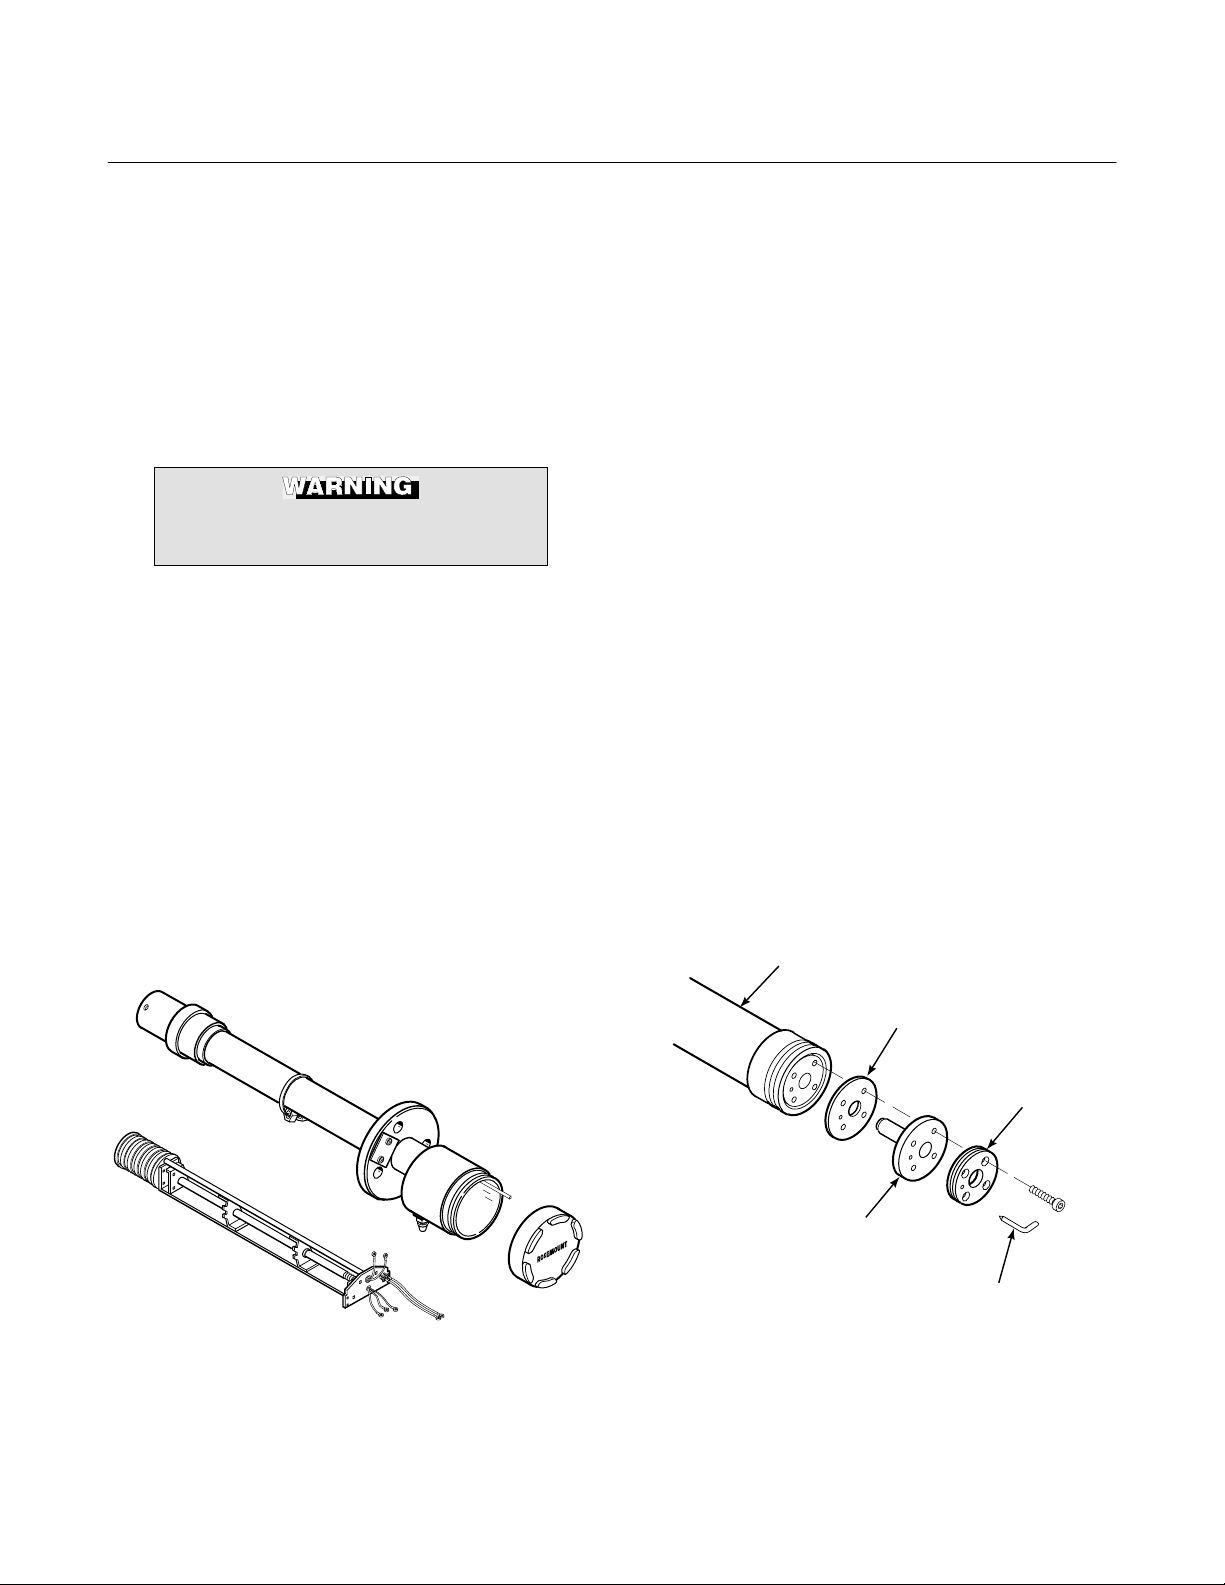
World Class 3000
AX
WORLD CLASS 3000 OXYGEN ANALYZER PROBE
(CENELEC APPROVED VERSION)
Instruction Manual
Appendix AX Rev. 2.1
February 1998
APPENDIX AX, REV. 2.1
DESCRIPTION
a. Cell and Flange Assembly
Consult Safety Data Sheet 1M03226 for
probe safety related information.
A-1 OXYGEN ANALYZER (PROBE) – GENERAL
The CENELEC approved Oxygen Analyzer
(Probe), Figure A-1 consists of three component
groups (Figure A-2): probe exterior, inner probe,
and probe head. Specifications for the
CENELEC approved probe are contained in
Table A-1.
A-2 PROBE ASSEMBLY EXTERIOR
Primary probe exterior components include a
flange-mounted zirconium oxide cell, mounted
on a tube assembly and protected by a flame
arrestor and snubber diffuser.
PROBE
EXTERIOR
The primary component in the cell and
flange assembly, Figure A-3, is a yttriastabilized zirconium oxide cell. It creates an
electrical signal when theoxygen level on
one side is out of balance with the oxygen
level on the other side. This signal is proportional to the difference in oxygen levels.
b. Probe Tube Assembly
Screws and a retainer ring secure the cell
and flange assembly, Figure A-3, to the
probe tube assembly. When in place, the
cell is inside the tube. The retainer ring is
high temperature chrome plated to prevent
galling and seizing. It is also coated with
anti-seize compound to help avoid seizing.
PROBE
TUBE
CORRUGATED
SEAL
RETAINER
JUNCTION
BOX
E
N
E
E
L
I
R
H
G
I
W
S
E
N
PROBE
INTERIOR
D
E
P
O
T
G
O
N
N
I
N
O
E
D
P
O
S
E
E
R
E
O
L
F
A
E
B
B
E
L
CELL AND
FLANGE
ASSEMBLY
CALIBRATION
19780004
TUBE INSERT
730009
Figure A-2. Main Probe Components
Figure A-3. Cell and Tube Assemblies
Rosemount Analytical Inc. A Division of Emerson Process Management Appendices A-1
Page 70

Instruction Manual
Appendix AX Rev. 2.1
February 1998
World Class 3000
Table A-1. Specifications for Oxygen Analyzing Equipment
1, 2
Probe lengths, nominal ................................................... 457 mm (18 in.), 0,91 m (3 ft), 1,83 m (6 ft),
depending on duct dimensions.
Temperature limits in process measurement area ......... 10-704°C (50-1300°F)
Standard/current output .................................................. 4-20 mA dc signal (factory set)
O
indication (Digital display and analog output) ............ 0.1% O2 or ±3% of reading, whichever is
2
greater using Rosemount test gases.
Cell speed of response ................................................... 1 millisecond
System speed of response ............................................. less than 3 seconds (amplifier output)
Resolution sensitivity ...................................................... 0.01% O
transmitted signal
2
Probe reference air flow.................................................. 56,6 L/hr (2 scfh) clean, dry, instrument quality
air (20.95% O
)
2
Calibration gas mixtures ................................................. Rosemount Hagan Test Gas Kit Part No.
6296A27G01 contains 0.4% O
2N2
Nominal and 8% O2N2 Nominal
Calibration gas flow......................................................... 141,6 L/hr (5 scfh)
Probe heater power supply............................................. 44 Vac from HPS 3000
HPS 3000 power requirement ........................................ 225 VA
Ambient operating temperature of probe junction box.... 0°-150°C (32°-302°F)
HPS 3000 ambient operating temperature ..................... 0°-50°C (32°-120°F)
Approximate shipping weights:
457 mm (18 in.) package...................................... 30 kg (66 lbs)
0,91 m (3 ft) package............................................ 40 kg (88 lbs)
1,83 m (6 ft) package............................................ 55 kg (121 lbs)
1
All static performance characteristics are with operating variables constant.
2
Temperatures over 537°C (1000°F) may affect the ease of field cell replaceability.
The tube assembly includes a flange which
mates with a stack-mounted flange. Studs
on the stack flange make installation easy.
There is also a tube to carry calibration gas
from the probe head to the process side of
the cell during calibration.
c. Flame Arrestor Diffuser
The flame arrestor diffuser, Figure A-4,
protects the cell from heavy particles and
isolates the cell from changes in temperature. The assembly consists of a flame arrestor and a snubber diffuser. The flame
arrestor and diffuser thread onto the probe
tube. Pin spanner wrenches (probe disas-
sembly kit 1L03825G01) are applied to
holes in the diffusion element hub to remove or install the diffuser assembly.
The Flame Arrestor and Flame Arrestor Hub are among the critical components in this type of protection
(Flameproof Enclosure Type ‘D'). See
Safety Data Sheet 1M03226.
Systems that use an abrasive shield require
a special flame arrestor and diffuser assembly with a hub that is grooved to accept
two dust seal gaskets.
A-2 Appendices Rosemount Analytical Inc. A Division of Emerson Process Management
Page 71

World Class 3000
AX
Instruction Manual
Appendix AX Rev. 2.1
February 1998
PIN
WRENCH
SNUBBER
DIFFUSOR
19780006
Figure A-4. Flame Arrestor Diffuser Assembly
d. Cell – General
The components which make up the cell are
machined to close tolerances and assembled with care to provide accurate oxygen
measurements. Any replacement requires
attention to detail and care in assembly to
provide good results.
Failure to follow the instructions in
this manual could cause danger to
personnel and equipment. Read and
follow instructions in this manual
carefully.
The oxygen probe includes an inner electrode for the cell assembly. It consists of a
platinum pad and a platinum/inconel composite wire which produces the cell constant
offset voltage described in the Nernst equation.
With this pad and wire, the constant will be
between -10 to +15 mV. The cell constant is
noted in the calibration data sheet supplied
with each probe.
HEATER
REFERENCE
GAS TUBE
CERAMIC
SUPPORT TUBE
V-ST RU T
P00005A
Figure A-5. Inner Probe Assembly
A-3 INNER PROBE ASSEMBLY
The inner probe assembly, Figure A-5, consists
of six main parts:
a. Ceramic support rod with four holes running
through the length. The holes serve as insulated paths for the cell signal wire and
thermocouple wires.
b. A heater that is helically wrapped on a
quartz support cylinder and insulated.
c. A chromel-alumel thermocouple which acts
as the sensing element for the temperature
controller. (Not visible in Figure A-4; located
within ceramic support rod.)
d. A platinum screen pad which forms electri-
cal contact with the inner electrode of the
electrochemical cell. (Not visible in Figure
A-5; located at end of ceramic support rod.)
The pad is attached to an inconel wire
which carries the signal to the terminal strip.
e. A V-strut assembly to give support to the
inner probe assembly.
Every probe should be calibrated and
checked after repair or replacement of cell,
pad and wire, heater, or thermocouple, or
after disassembly of the probe.
Rosemount Analytical Inc. A Division of Emerson Process Management Appendices A-3
f. A tube to carry reference gas to the cell.
Turn to Maintenance and Service for repair procedures for probe components.
Page 72

Instruction Manual
Appendix AX Rev. 2.1
February 1998
World Class 3000
TERMINAL
STRIP
CALIBRATION
GAS FITTING
VENT
REFERENCE
GAS FITTING
Figure A-6. Junction Box
A-4 JUNCTION BOX
The junction box, Figure A-6, is positioned at
the external end of the probe and contains a
terminal strip for electrical connections and fittings for reference and calibration gases. Fittings are for 0.250 inch stainless steel tubing.
The calibration fitting has a seal cap which must
remain in place except during calibration. A
tubing fitting is also supplied to be used with the
calibration gas supply during calibration.
If the calibration gas bottles will be permanently
hooked up to the probe, an optional check valve
is recommended to prevent condensation of flue
gas in the calibration lines.
During operation and calibration, reference gas
is supplied through the reference gas fitting to
the reference side of the cell. This gives the
system a known quantity of oxygen with which
to compare the oxygen level in the process gas.
Unlike the non-CENELEC World Class 3000
Probe, reference air must be used in conjunction with the CENELEC World Class 3000
probe.
P00006A
During calibration, two gases of different known
oxygen concentrations are injected one at a
time through the calibration gas fitting. Stainless
steel tubing delivers this gas to the process side
of the cell. In a healthy cell, the difference in
oxygen pressure from the process side to the
reference side of the cell will cause a millivolt
output proportional to the difference in oxygen
levels. The electronics unit can use the two
millivolt outputs caused by the two calibration
gases for either automatic or semi-automatic
calibration.
Do not attempt to remove a process
gas sample through either gas fitting.
Hot gases from the process would
damage gas hoses in the probe head.
A-5 CABLE ASSEMBLY
Cable used to interconnect apparatus must
conform to the applicable codes of practice in
the country of installation (example: BS4345 in
Great Britain). Rosemount can supply a cable
(P/N 1U03066) which is fitted with EExd IIC
barrier glands. The installer should note that on
some earlier versions of the cable, the glands,
although EExd IIC approved, are not of the barrier gland variety. These glands should not be
used. Rosemount can supply a gland kit for the
corresponding barrier gland (P/N 1U03066G07).
Each kit contains one pair of glands. The
Rosemount supplied cable is a 7 conductor
cable to connect the probe to the HPS 3000,
and to connect the HPS 3000 to the electronics
package. Standard length for this cable is 6 m
(20 ft), but lengths up to 45 m (150 ft) are available. The 7 conductors include 1 shielded pair
of wires for the cell millivolt signal, 1 shielded
pair of type K wires for the thermocouple, and 3
individual 16-gauge wires for the heater and for
ground. All metal shields are isolated at the
probe end and connect by drain wires to ground
at the electronics. The cable is suitable for use
in ambient temperatures up to 90°C (194°F).
A-4 Appendices Rosemount Analytical Inc. A Division of Emerson Process Management
Page 73

World Class 3000
AX
Instruction Manual
Appendix AX Rev. 2.1
February 1998
BC
A
GROUP NOTE
PARTS LIST
UNITS: INCHES
PARTS LIST
G03
1
G02
1
G01
GROUP
1
MAT'L CODE
PART NUMBER
OR REF DWG
1U05680G20
) PROBE 18"
SIZE-REFERENCE
INFORMATION
DEFINER
DWG
PART NAME
CENELEC
01
ITEM
NOTE
1
1
4507C26G07
4507C26G08
)3FT
)6FT
DWG
DWG
WORLD CLASS 3000
GAS PICK-UP
GAS PICK-UP
02
03
1
1
1
1
1
1
1
1
1
1
4507C26G09
1M03241H01
4507C51H03
1L03826G02
)9FT
DWG
DWG
DWG
DWG
GAS PICK-UP
ANALYZER HOUSING
MTG HARDWARE
ASSY HARDWARE
04
05
06
07
GAS TUBE PICK-UP
GROUP NOTE
3FT
A
GAS TUBE PICK-UP
6FT
B
CAL
GAS
ELECT
CABLE
REF
GAS
100
(3.93)
OF
FLOW
DIRECTION
VIEW ‘A-A'
REFERENCE AIR SUPPLY
CONNECTION BITE TYPE
FITTING (PARKER CPI) FOR
1.
NOTES:
0.250 O.D. TUBING. 2 SCFH
AT 3 PSIG MAX. CLEAN DRY
A
A
AIR REQUIRED. FITTING IS
LOCATED ON FAR SIDE.
CABLE
693.67
CALIBRATION AND PURGE
GAS CONNECTION. BITE
TYPE FITTING (PARKER CPI)
10 SCFH AT 32 PSIG MAX.
CALIBRATION GAS REQUIRED.
2.
(27.31)
REQUIRED
INSERTION
CLEARANCE
FOR PROBE
oo
LAG TO ENSURE GAS
TEMPERATURE DOES NOT
GO BELOW DEW POINT
3.
FLANGE
AND
REMOVAL
oo o o
WELD BY
CUSTOMER
RECOMMENDED 2 IN. THK
INSULATION. THERMAL CONDUCTIVITY
K EQUALS 0.5 FOR INSULATION.
DIMENSIONS ARE IN MILLIMETERS WITH INCHES
INSTALL WITH ANALYZER IN A VERTICALLY
OR EXCEED 500 C (932 F).
4.
GASKET
DOWNWARD DIRECTION ONLY.
AND
FLUE GAS OPERATING TEMPERATURE
RANGE 650 - 980 C (1200 - 1800 F).
5.
HARDWARE
6.
IN PARENTHESES UNLESS OTHERWISE INDICATED.
7.
GASKET
AND HARDWARE
584.0
Figure A-7. Bypass Probe Option
(23.0)
DRAIN
165.10
(6.50) REF
940 (37) REF ON 3 FT (4507C26G07)
1850 (73) REF ON 6 FT (4507C26G08)
1727.2 (68) REF ON 9 FT PICK-UP (4507C26G09)
825.5 (32.5) REF ON 3 FT AND6FTPICK-UP (4507C26G07 AND G08)
19780009
2770 (109) REF ON 9 FT (4507C26G09)
Rosemount Analytical Inc. A Division of Emerson Process Management Appendices A-5
Page 74

Instruction Manual
Appendix AX Rev. 2.1
February 1998
World Class 3000
A-6 PROBE OPTIONS
a. Abrasive Shield Assembly
The abrasive shield assembly (IB-106300NX Series, Figure 2-1) is a stainlesssteel tube that surrounds the probe assembly. The shield protects the probe against
particle abrasion and corrosive condensations, provides a guide for ease of insertion,
and acts as a probe position support, especially for longer length probes. The abrasive
shield assembly uses a modified flame arrestor and diffuser filled with dual dust seal
packing.
b. Bypass Probe Options
For processes where the flue gas exceeds
the maximum allowable temperature of
704°C (1300°F) a bypass sensor package
can be employed. The bypass system uses
an 18 inch probe mounted externally on the
stack or duct. The process or exhaust
gases are directed out to the probe through
an extension/return duct. The bypass arrangement does not require the use of aspiration air and the gas which flows past the
probe is returned to the stack or duct.
The bypass probe package is normally used
for process temperatures of 704°C (1300°F)
to 980°C (1800°F). "Inconel 600" has an
operating range up to 980°C (1800°F).
Overall dimensions and mounting details of
the bypass system are shown in Figure A-7.
TROUBLESHOOTING
Before conducting any work on the
probe, consult probe Safety Data
Sheet 1M03226.
Install all protective equipment covers
and safety ground leads after troubleshooting. Failure to replace covers
and ground leads could result in serious injury or death.
A-7 OVERVIEW
The probe troubleshooting section describes
how to identify and isolate operating faults
which may develop in the probe assembly.
A-8 PROBE TROUBLESHOOTING
a. Probe Faults
The three symptoms of probe failure are:
1. The system does not respond to
changes in the oxygen concentration.
2. The system responds to oxygen
changes but does not give the correct
indication.
3. The system does not give an acceptable indication of the value of the oxygen test gas being applied during
calibration.
b. Table A-2 provides a guide to fault finding
for the above symptoms.
c. Figure A-8 and Figure A-9 provide an alter-
nate approach to finding probe related
problems.
A-6 Appendices Rosemount Analytical Inc. A Division of Emerson Process Management
Page 75

World Class 3000
AX
SYMPTOM CHECK FAULT REMEDY
1. No response to
oxygen concentration
change when:
Instruction Manual
Appendix AX Rev. 2.1
February 1998
Table A-2. Fault Finding
Heater is cold and
TC mV output is less
than setpoint.
Heater is hot and
T/C mV output is at
setpoint ±0.2 mV.
2. System responds to
oxygen concentration
changes but does not
give correct indication.
Thermocouple continuity Thermocouple failure Replace thermocouple
or return probe to
Rosemount.
Heater cold resistance to
be 11 ohm - 14 ohm
Triac O/P to heater Failure of electronics Check HPS and
Recorder chart Recorder failure See Recorder Instruc-
Cell mV input to electronics and cell mV at probe
junction box
Heater failure Replace heater or return
probe to Rosemount.
electronics package.
tion Manual.
No cell mV at probe when
test gas applied
Probe cell mV OK but no
input to electronics
Cell mV satisfactory both
at probe junction box and
input to electronics failure of electronics
Replace cell or return
probe to Rosemount.
Check out cable
connection.
Check electronics
package.
Good response, with
incorrect indication.
3. Probe does not give
accurate indication of
applied test gas.
Rosemount Analytical Inc. A Division of Emerson Process Management Appendices A-7
Recorder or remote
indicator
System calibration Calibration error Recalibrate system.
Probe mounting and
condition of duct
Cell mV input to
electronics
Test gas input port Blocked port Clean port.
Ceramic diffusion element Diffusion element cracked,
Calibration error Recalibrate recorder or
indicator, reference
Recorder Instruction
Manual.
Air ingress into duct Stop air leaks or resite
probe.
Failure of electronics Check electronics
package.
Replace diffusion
broken, or missing
element.
Page 76
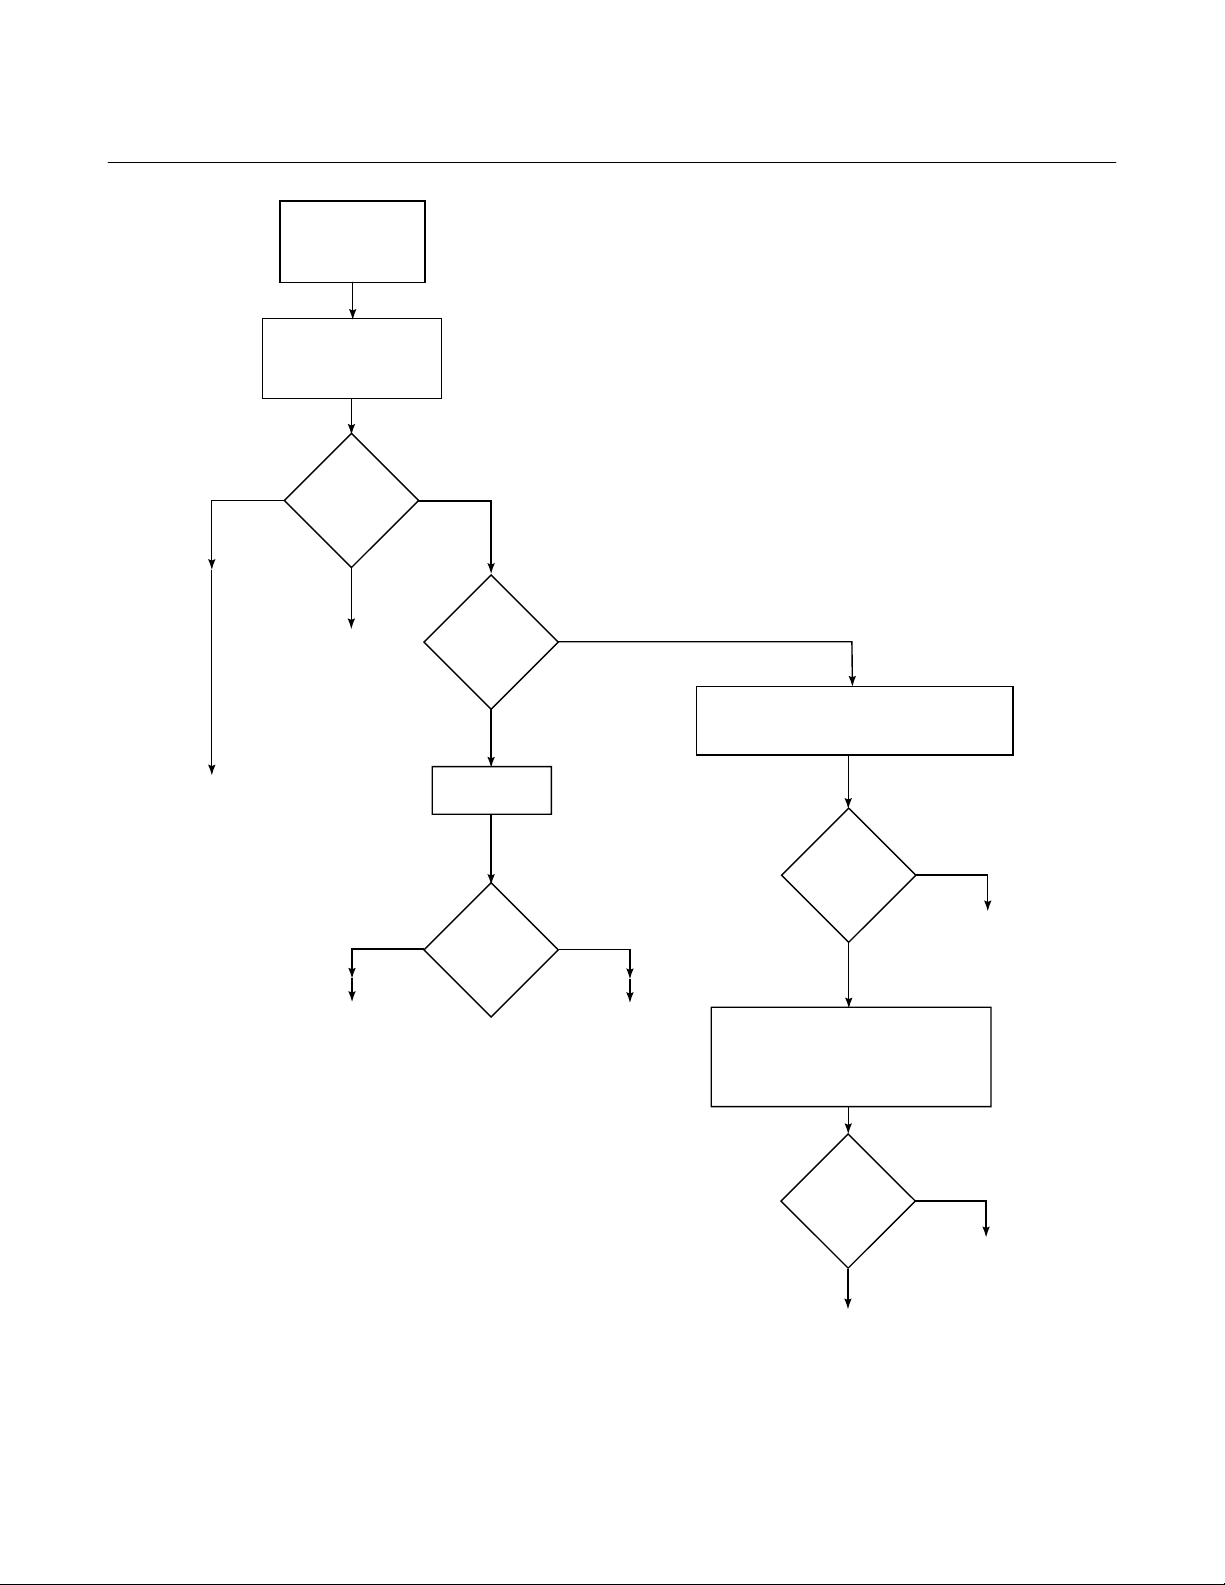
Instruction Manual
Appendix AX Rev. 2.1
February 1998
CHECK CELL MV
TERMINALS 1 & 2
IN PROBE
JUNCTION BOX
DOES CELL MV
CORRESPOND WITH
EXPECTED O
CONCENTRATION
World Class 3000
2
YES
MEANS LOW O OR
COMBUSTIBLES IS GAS
STREAM. RECONFIRM THE
O
CONCENTRATION
2
CHECK ELECTRONICS
AND CELL MV I/P
TO ELECTRONICS.
CHECK CABLE
PULL PROBE AND CHECK
FOR CRACKED DIFFUSION
ELEMENT OR CRACKED
CELL
?
NO - HIGH
2
OK
NO - ZERO OR
VERY LOW
?
LOW
CHECK CELL
RESISTANCE
?
ZERO
TOO HIGH
REPLACE CELL
CHECK THE CRIMP WHICH CONNECTS
THE INCONEL WIRE TO ITS EXTENSION
WIRE IN THE PROBE JUNCTION BOX.
BAD
?
GOOD
CONTACT
CHECK THAT PLATINUM WIRE IS
MAKING CONTACT WITH CELL. IF
THE PAD ASSEMBLY CAN BE
PUSHED FORWARD THEN THERE
WAS POOR CONTACT
CONTACT
REPLACE
CRIMP
BAD
?
GOOD
CONTACT
REPLACE
CELL
CONTACT
DISASSEMBLE AND
CHECK FOR BROKEN
CERAMICS RODS,
SPRING, OR OTHER
RESTRICTIONS.
P00009B
Figure A-8. Flowchart of Probe Related Problems, #1
A-8 Appendices Rosemount Analytical Inc. A Division of Emerson Process Management
Page 77

World Class 3000
AX
CHECK THERMOCOUPLE MV
AT TERMINALS 3 AND 4 IN
PROBE JUNCTION BOX.
IS IT ABOUT SETPOINT MV ±0,2 MV?
[THE MV MEASURED IS NOT YET COLD.
JUNCTION COMPENSATED, SO IT WILL
VARY BY -0,022 MV PER DEGREE
FAHRENHEIT RISE IN THE
TEMPERATURE OF THE ELECTRONICS
BOX LOCATION. NORMAL IS SETPOINT
MV AT 25°C (77 ).]°F
Instruction Manual
Appendix AX Rev. 2.1
February 1998
ALLOW ADDITIONAL TIME
1.
FOR TEMP CONTROL TO
SETTLE.
2.
COLD JUNCTION TEMP
AT ELECTRONICS BOX
MAY BE MUCH LOWER
THAN 25°C (77°F).
?
NO
IS IT HIGHER,
LOWER, OR
ZERO?
?
ZERO
YES
LOWERHIGHER
HEATER, THERMOCOUPLE AND
CONTROL ARE SATISFACTORY.
REFER TO HEATER POWER
SUPPLY TROUBLESHOOTING.
HEATER
THERMOCOUPLE
CIRCUIT
OPEN?
IS
NO
HEATER MAY BE DEAD. THERMOCOUPLE
YES
MAY BE READIN STACK TEMPERATURE.
1.
CHECK HEATER FUSE AND TRIAC
OUTPUT TO HEATER.
3.
CONFIRM MV VALUE ON
ELECTRONICS UNIT. IF OK,
RESOLVE DIFFERENCE
BETWEEN VOLTMETER AND
ELECTRONICS.
REPLACE CONTACT
AND THERMOCOUPLE
ASSEMBLY
2.
CHECK HEATER CONDITION.
TURN OFF POWER. RESISTANCE
BETWEEN TERMINALS 7 AND 8
SHOULD BE 11-14 OHMS.
RESISTANCE BETWEEN TERMINALS
6 AND 7 AND 6 AND 8 SHOULD
BE OPEN CIRCUIT. IF FAILED,
REPLACE STRUT.
P00009A
Figure A-9. Flowchart of Probe Related Problems, #2
Rosemount Analytical Inc. A Division of Emerson Process Management Appendices A-9
Page 78

Instruction Manual
Appendix AX Rev. 2.1
February 1998
World Class 3000
MAINTENANCE AND SERVICE
NOTE
!
Upon completing installation, make sure that the probe is turned on and operating prior to
firing up the combustion process. Damage can result from having a cold probe exposed to
the process gases.
During outages, and if possible, leave all probes running to prevent condensation and premature aging from thermal cycling.
If the ducts will be washed down during outage, MAKE SURE to power down the probes and
remove them from the wash area.
A-10 PROBE RECALIBRATION
Before carrying out any service or
maintenance on the probe, consult
Safety Data Sheet 1M03226.
When working on this equipment on
the laboratory bench, be aware that
the probe, probe tube, and flame arrestor hub can be hot [up to 370°C
(698°F)] in the region of the probe
heater.
Install all protective equipment covers
and safety ground leads after equipment repair or service. Failure to install covers and ground leads could
result in serious injury or death.
A-9 OVERVIEW
This section describes routine maintenance of
the oxygen analyzer probe. Spare parts referred
to are available from Rosemount. Probe disassembly kit 1LO3825G01 contains the required
spanner and hex wrenches. Refer to Replacement Parts of this appendix for part numbers
and ordering information.
The oxygen analyzer system should be calibrated when commissioned. Under normal
circumstances the probe will not require frequent calibration. When calibration is required,
follow the procedure described in the Instruction
Bulletin applicable to your electronics package.
A-11 CELL REPLACEMENT
This paragraph covers oxygen sensing cell
replacement. Do not attempt to replace the
cell until all other possibilities for poor performance have been considered. If cell replacement is needed, order cell
replacement kit, Table A-3.
The cell replacement kit contains a cell and
flange assembly, corrugated seal, calibration tube insert, setscrews, socket head cap
screws, and anti-seize compound. Items
are carefully packaged to preserve precise
surface finishes. Do not remove items from
packaging until they are ready to be used.
Spanner wrenches and hex wrenches
needed for this procedure are part of an
available special tools kit, Table A-3.
A-10 Appendices Rosemount Analytical Inc. A Division of Emerson Process Management
Page 79

World Class 3000
AX
Before carrying out this procedure,
consult Safety Data Sheet 1M03226.
Wear heat resistant gloves and clothing to remove probe from stack.
Normal operating temperatures of
diffuser and vee deflector are
approximately 316° to 427°C (600° to
800°F). They could cause severe
burns.
Do not remove cell unless it is certain
that replacement is needed. Removal
may damage cell and platinum pad. Go
through complete troubleshooting
procedure to make sure cell needs
replacement before removing it.
Instruction Manual
Appendix AX Rev. 2.1
February 1998
a. Follow the power down procedure outlined
in Safety Data Sheet 1M03226 and the official "Codes of Practice" for your country of
installation. Shut off and disconnect reference gas and calibration gas supplies from
probe junction box, Figure A-10. Wearing
heat resistant gloves and clothing, remove
probe assembly from stack carefully and
allow to cool to room temperature. Do not
attempt to work on unit until it has cooled to
a comfortable working temperature.
b. The vee deflector is an option used with the
ceramic diffuser. Figure A-11 shows a probe
with a snubber diffuser. If the probe has the
vee deflector, remove vee deflector and hub
setscrews and remove vee deflector. Use
spanner wrenches from probe disassembly
tools kit, Table A-3, to turn hub free from
probe tube. If applicable, inspect optional
ceramic diffusion element. If damaged, replace element.
CELL EXTENSION
WIRE (ORANGE)
THERMOCOUPLE WIRE (+)
(YELLOW CHROMEL)
GROUND WIRE
(GREEN)
EXTERNAL
EARTHING
HARDWARE
CALIBRATION
GAS FITTING
CABLE
REFERENCE
GAS FITTING
THERMOCOUPLE WIRE (-)
(RED ALUMEL)
GROUND WIRE
(GREEN)
HEATER WIRES
(BLACK)
INTERNAL EARTHING
TERMINAL (TERMINAL 6)
P00010A
Figure A-10. Cell Wiring Installation
Rosemount Analytical Inc. A Division of Emerson Process Management Appendices A-11
Page 80
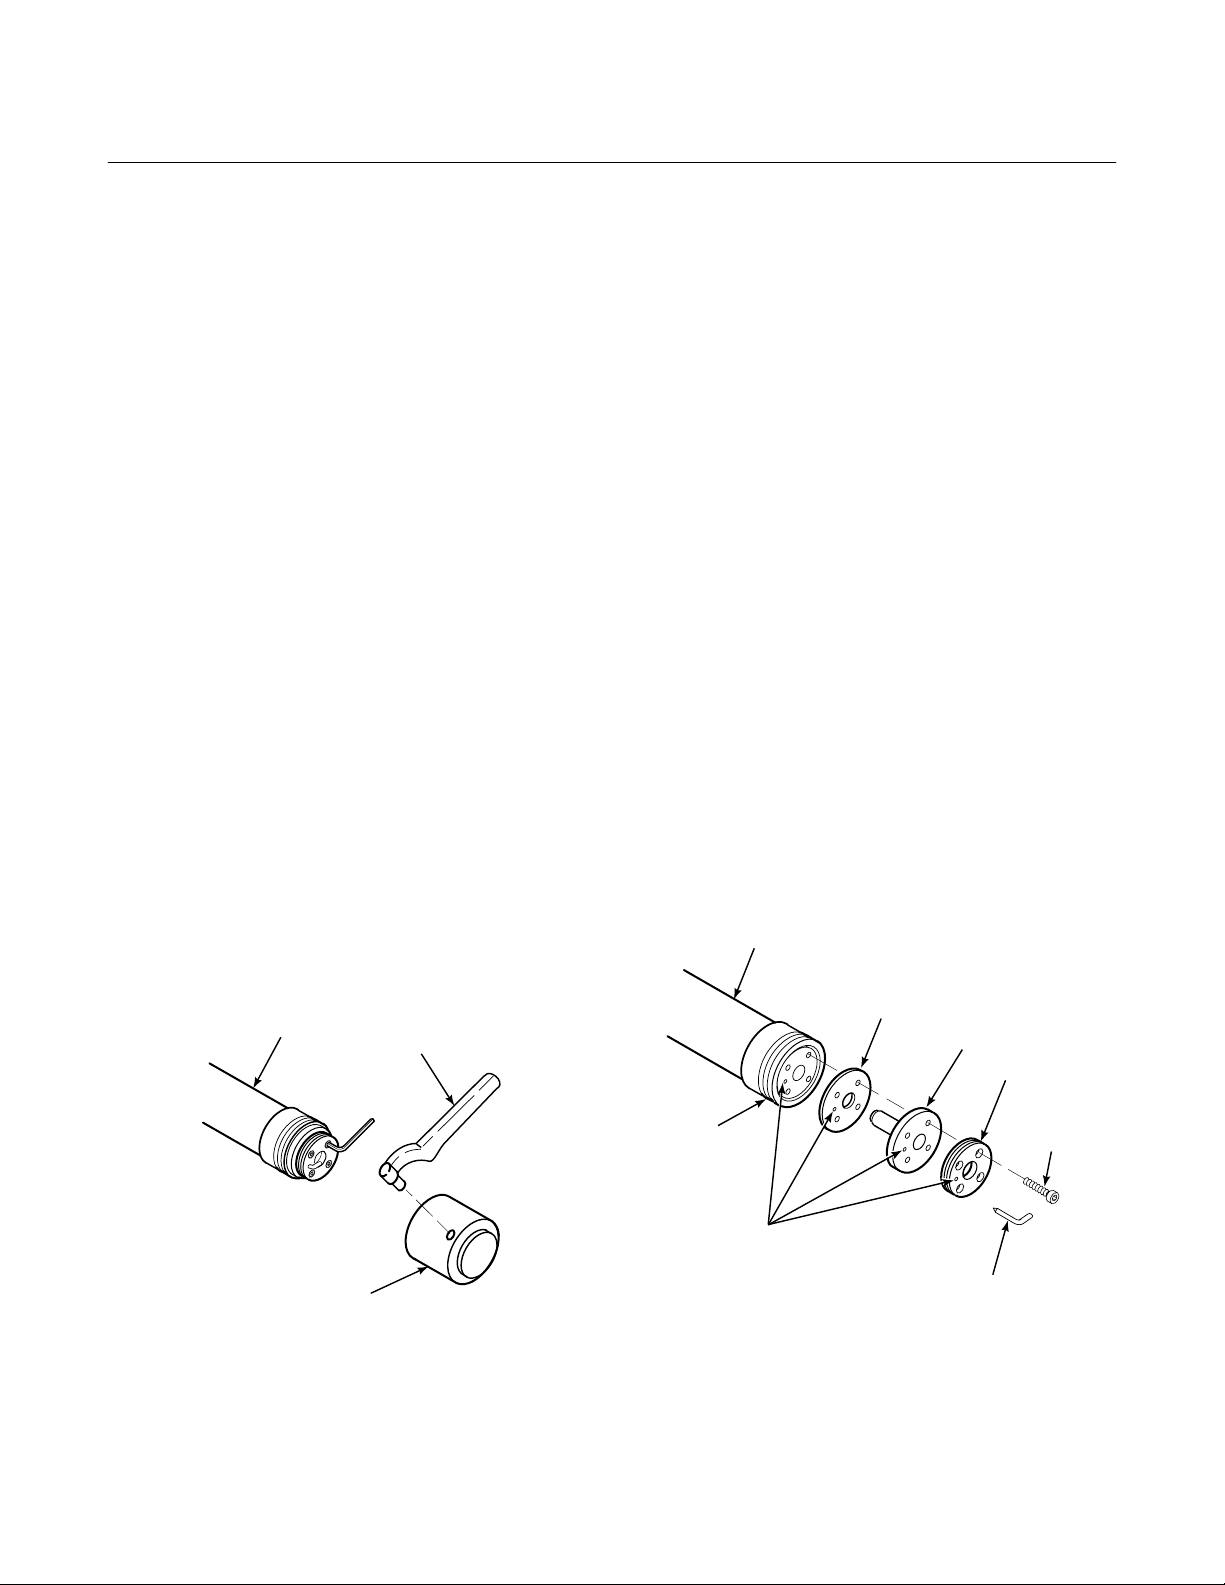
Instruction Manual
Appendix AX Rev. 2.1
February 1998
World Class 3000
c. Loosen 4 socket head screws from retainer.
Pull off retainer and calibration tube insert, Figure A-12. Discard calibration tube
insert.
d. Press the cell flange against the probe end
flange and twist through 90° in both the
clockwise and counterclockwise directions.
This breaks the bond between the cell and
the platinum pad. Once the bond is broken,
remove the cell.
e. View the platinum pad through the probe
end flange. Reform the platinum pad into a
shape to match the cell electrode by gathering in any loose strands which may have
become untidy. This may be done with a
small flat screwdriver.
f. Remove and discard corrugated seal. Clean
mating faces of probe tube and retainer.
Remove burrs and raised surfaces with
block of wood and crocus cloth.
g. Rub one or two drops of anti-seize com-
pound #3535B53G01 between fingers.
Smear on both sides of corrugated seal.
h. Install new calibration tube insert in retainer,
with the short arm of the tube insert penetrating the calibration gas passage in the
outer ring of the retainer. Assemble retainer,
cell and flange assembly, corrugated seal,
and probe tube. Make sure the calibration
tube insert lines up with the calibration gas
passage in each component. Firmly seat
the calibration tube insert in the assembly.
Apply a small amount of anti-seize compound to screw threads and use screws to
secure assembly. Torque to 4 N·m
(55 in-lbs).
i. To install snubber diffuser, apply anti-seize
compound to threads of probe tube, Figure
A-11, and snubber diffuser. Reinstall diffuser on probe tube. Using pin spanner
wrenches, torque to 14 N·m (10 ft-lbs).
j. If using the optional vee deflector and ce-
ramic hub, apply anti-seize compound to
threads of probe end flange, hub, and
setscrews. Reinstall hub on probe tube.
Using pin spanner wrenches, torque to
14 N·m (10 ft-lbs). Reinstall vee deflector,
orienting apex toward gas flow. Secure with
setscrews and anti-seize compound.
Torque to 2.8 N·m (25-in-lbs). Secure hub
retaining setscrew.
k. On systems equipped with an abrasive
shield, install dust seal gaskets, with joints
180° apart.
PROBE TUBE
(NOT INCLUDED KIT)
PROBE
TUBE
SNUBBER
DIFFUSOR
Figure A-11. Removal of Snubber Diffuser
A-12 Appendices Rosemount Analytical Inc. A Division of Emerson Process Management
PIN SPANNER
WRENCH
PROBE
END
FLANGE
CALIBRATION
TUBE PASSAGE
19780017
Figure A-12. Cell Replacement Kit
CORRUGATED
SEAL
FLANGE ASSEMBLY
CELL END
RETAINER
SOCKET
HEAD CAP
SCREW
CALIBRATION
TUBE INSERT
730010
Page 81

World Class 3000
AX
l. Reinstall probe and gasket on stack flange.
If there is an abrasive shield in the stack,
make sure dust seal gaskets are in place as
they enter 15° reducing cone.
m. Consult Safety Data Sheet 1M03226 then
turn power on to electronics and monitor
thermocouple output. It should stabilize at
29.3 mV ±0.2 mV. Set reference air flow at
56.6 L/hr (2 scfh). After probe stabilizes,
calibrate probe per Instruction Bulletin applicable to your electronics package. If new
components have been installed, repeat
calibration after 24 hours of operation.
Instruction Manual
Appendix AX Rev. 2.1
February 1998
Wear heat resistant gloves and clothing to remove probe from stack.
Normal operating temperatures of
diffuser and vee deflector are
approximately 316° to 427°C (600° to
800°F). They can cause severe burns.
Before carrying out this procedure,
consult Safety Data Sheet 1M03226.
A-12 CERAMIC DIFFUSION ELEMENT
REPLACEMENT
NOTE
This refers to ceramic diffuser element
only.
a. General
The diffusion element protects the cell from
particles in process gases. It does not normally need to be replaced because the vee
deflector protects it from particulate erosion.
In severe environments, the filter may be
broken or subject to excessive erosion. Examine the ceramic diffusion element whenever removing the probe for any purpose.
Replace if damaged.
Damage to the ceramic diffusion element
may become apparent during calibration.
Compare probe response with previous response. A broken diffusion element will
cause a slower response to calibration gas.
Hex wrenches needed to remove setscrews
and socket head screws in the following
procedure are available as part of a Probe
Disassembly Kit, Table A-3.
Do not remove cell unless it is certain
that replacement is necessary. Cell
cannot be removed for inspection
without damaging it.
b. Replacement Procedure
1. Follow the power down procedure outlined in Safety Data Sheet 1M03226
and the official "Codes of Practice" for
your country of installation. Disconnect
cable conductors and remove cable,
Figure A-10. Shut off and disconnect
reference gas and calibration gas supplies from probe junction box. Wearing
heat resistant gloves and clothing,
carefully remove probe assembly from
stack.
2. Loosen setscrews, Figure A-13, using
hex wrench from Probe Disassembly
Kit, Table A-3 and remove vee deflector. Inspect setscrews. If damaged, replace with stainless setscrews coated
with anti-seize compound.
3. On systems equipped with abrasive
shield, remove dual dust seal gaskets.
Rosemount Analytical Inc. A Division of Emerson Process Management Appendices A-13
Page 82

Instruction Manual
Appendix AX Rev. 2.1
February 1998
World Class 3000
4. Use spanner wrenches from Probe
Disassembly Kit, Table A-3, to turn hub
free from retainer.
5. Put hub in vise. Break out old ceramic
diffusion element with chisel along cement line and 9.5 mm (3/8 in.) pin
punch through cement port.
6. Break out remaining ceramic diffusion
element by tapping lightly around hub
with hammer. Clean grooves with
pointed tool if necessary.
7. Replace ceramic diffusion element,
using replacement kit in Table A-3.
This consists of a diffusion element,
cement, setscrews, anti-seize compound and instructions.
8. Test fit replacement ceramic diffusion
element to be sure seat is clean.
Do not get cement on ceramic diffusion element except where it touches
the hub. Any cement on ceramic diffusion element blocks airflow through
element. Wiping wet cement off of ceramic only forces cement into pores.
Also do not get any cement onto the
flame arrestor element.
9. Thoroughly mix cement and insert tip
of squeeze bottle into cement port. Tilt
bottle and squeeze while simultaneously turning ceramic diffusion element
into seat. Do not get any cement on
upper part of ceramic diffusion element. Ensure complete penetration of
cement around 3 grooves in hub. Cement should extrude from opposite
hole. Wipe excess material back into
holes and wipe top fillet of cement to
form a uniform fillet. (A Q-Tip is useful
for this.) Clean any excess cement
from hub with water.
PIN
WRENCH
RETAINER
OPTIONAL CERAMIC
DIFFUSION ELEMENT
SETSCREW
HUB
CEMENT
PORT
CEMENT
FILLET
VEE
DEFLECTOR
21240026
Figure A-13. Removal of Optional Ceramic
Diffuser and Vee Deflector
10. Allow filter to dry at room temperature
overnight or 1 to 2 hours at 93°C
(200°F).
11. Wipe a heavy layer of anti-seize compound onto the threads and mating
surfaces of the flame arrestor, diffusion
hub, and probe tube.
12. Assemble flame arrestor and diffusion
hub with two pin spanner wrenches.
Torque to 14 N·m (10 ft-lbs). Secure
with hub retaining setscrew.
13. On systems equipped with abrasive
shield, install dust seal gaskets with
joints 180° apart.
14. Reinstall vee deflector, orienting apex
toward gas flow. Apply anti-seize compound to setscrews and tighten with
hex wrench.
15. Reinstall probe on stack flange.
A-14 Appendices Rosemount Analytical Inc. A Division of Emerson Process Management
Page 83

World Class 3000
AX
Instruction Manual
Appendix AX Rev. 2.1
February 1998
16. Consult Safety Data Sheet 1M03226
then turn power on to electronics and
monitor thermocouple output. It should
stabilize at 29.3 mV ±0.2 mV. Calibrate
probe per Instruction Bulletin applicable to your electronics package.
A-13 REPLACEMENT OF CONTACT AND
THERMOCOUPLE ASSEMBLY
Use heat resistant gloves and clothing
when removing probe junction box
and inner probe assembly. Do not attempt to work on these components
until they have cooled to room temperature. Probe components can be as
hot as 800°C (1500°F). This can cause
severe burns.
Before carrying this procedure, consult Safety Data Sheet 1M03226.
a. Follow the cell removal procedure in para-
graph A-3, steps a, b, c, and d. Using heat
resistant gloves and clothing, remove cover
setscrew (24, Figure A-1) and junction box
lid (23). Squeezing tabs on hose clamps,
remove hoses from inner probe assembly,
Figure A-14. Remove 4 screws which secure the inner probe assembly to the junction box. Disconnect all inner probe
assembly wires from the terminal block
(Figure A-10). Pull inner probe assembly
free from junction box. Set on bench and
allow to cool to room temperature.
HOSE
CLAMP
PROBE
JUNCTION BOX
HOSE
BACKPLATE
MOUNTING
SCREW
P00013A
Figure A-14 Probe Junction Box Mechanical
Connections
HEATER
SCREWS
STRUT
CONTACT AND
THERMOCOUPLE
ASSEMBLY
GUIDE
LOOPS
SPRING
CLIP
b. Use a pencil to mark locations of spring
clips on ceramic rod, Figure A-15.
c. Pry or squeeze tabs on spring clips, and
pull contact and thermocouple assembly out
Figure A-15. Inner Probe Replacement (Heater,
V-Strut, and Backplate Assembly)
BACKPLATE
MOUNTING
HARDWARE
P00014A
of probe assembly. Retain spring clips and
spring; replace if damaged.
Rosemount Analytical Inc. A Division of Emerson Process Management Appendices A-15
Page 84

Instruction Manual
Appendix AX Rev. 2.1
February 1998
Be very careful when handling contact
and thermocouple assembly. The ce-
ramic rod in this assembly is fragile.
d. While very carefully handling new contact
and thermocouple assembly, lay old assembly next to new one. Transfer pencil
marks to new rod. Throw away old contact
and thermocouple assembly.
e. Carefully guide new contact and thermo-
couple assembly through V-strut assembly
leaf spring (3, Figure A-16), spring (8),
spring clips (9) (held open by squeezing
tabs), tube supports and heater support until spring clip reaches pencil mark.
World Class 3000
Do not bend wires closer than 6.4 mm (1/4
in.) from end of ceramic rod. Dress wires so
they do not touch sides of probe junction
box.
h. Reinstall the cell per paragraph A-11, steps
f, g, h, i, j, and k.
i. Consult Safety Data Sheet 1M03226 then
power up system. Monitor thermocouple
output. It should stabilize at setpoint mV
±0.2 mV. Recalibrate probe per Instruction
Bulletin applicable to your electronics package.
A-14 REPLACEMENT OF HEATER, V-STRUT
AND BACKPLATE ASSEMBLY (Inner
Probe Assembly; Includes Contact and
Thermocouple Assembly)
f. Slide assembled inner probe assembly into
junction box and probe tube. To align calibration gas tube with corresponding hole in
backplate (A, B, Figure A-1) insert scriber
through hole in backplate and into calibration gas tube. Secure with screws. Reinstall
hoses.
NOTE
The letter "A" is stamped inside the
junction box close to the calibration
tube. The calibration tube may fall
over towards the opposite side. If it
has, bring it back towards the letter
"A" before inserting the inner probe
assembly. Also note that there are
grooves cut in the heater plates that fit
over the calibration gas tube. Insert
inner probe assembly gently to avoid
kinking the calibration gas tube.
g. Connect color-coded wires to proper termi-
nals as shown in Figure A-10. Rosemount
recommends connecting the thermocouple
wires directly to the terminal strip. This is
because the junction of different metals at
the wires and lugs and at the lugs and the
terminal strip could act as additional thermocouple junctions. This could produce a
voltage that would affect the thermocouple
output signal.
Figure A-17 is a cross-sectional view of the
CENELEC approved oxygen analyzer (probe).
Use Figure A-17 and the following procedure to
replace heater, v-strut, and backplate assembly.
Before carrying out this procedure,
consult Safety Data Sheet 1M03226.
Use heat resistant gloves and clothing
when removing probe junction box
and inner probe assembly. Do not attempt to work on these components
until they have cooled to room temperature. Probe components can be as
hot as 800°C (1500°F). This can cause
severe burns.
a. Follow the cell removal procedure in para-
graph A-3, steps a, b, c, and d. Using heat
resistant gloves and clothing, remove cover
setscrew (24, Figure A-1) and junction box
lid (23). Squeezing tabs on hose clamps,
remove hoses from inner probe assembly,
Figure A-13. Remove 4 screws which secure the inner probe assembly to the junction box. Disconnect all inner probe
assembly wires from the terminal block
(Figure A-10). Pull inner probe assembly
free from junction box. Set on bench and
allow to cool to room temperature.
A-16 Appendices Rosemount Analytical Inc. A Division of Emerson Process Management
Page 85

World Class 3000
AX
Instruction Manual
Appendix AX Rev. 2.1
February 1998
12
1. Heater Ceramic Rod
2. Contact and Thermocouple
Assembly
3. Leaf Spring
Figure A-16. Heater, Strut, and Backplate Assembly (Inner Probe Assembly)
Not all parts shown are available for purchase separately. For a list of available parts,
see Table A-3.
1
36
3
5
POOO15A
4. Extension Wire
5. Ring Lug
6. Connector
7. Backplate
8
91011
4
73
6
8. Spring
9. Spring Clip
10. Strut
11. Heater
NOTE
5
89
74
211
1. Snubber Diffuser
2. Calibration Tube Insert
3. Socket Head Cap Screw
0.25 In.-28 x 0.63 (16 mm)
4. Cell and Flange Assembly
13
5. Corrugated Seal
6. Probe Tube Assembly
7. Gasket
8. Cover Head Assembly
9. Hose Clamp
10
12
19780022
10. Heater Strut
11. Retainer
12. Junction Box Setscrew
13. Flame Arrestor Hub Setscrew
Figure A-17. Oxygen Analyzer (Probe), Cross-Sectional View
Rosemount Analytical Inc. A Division of Emerson Process Management Appendices A-17
Page 86

Instruction Manual
Appendix AX Rev. 2.1
February 1998
World Class 3000
b. Slide new assembled inner probe assembly
into junction box and probe tube. To align
calibration gas tube with corresponding hole
in backplate (A, B, Figure A-1), insert
scriber through hole in backplate and into
calibration gas tube. Secure with screws.
Reinstall hoses.
NOTE
The letter "A" is stamped inside the
junction box close to the calibration
tube. The calibration tube may fall
over towards the opposite side. If it
has, bring it back towards the letter
"A" before inserting the inner probe
assembly. Also note that there are
grooves cut in the heater plates that fit
over the calibration gas tube. Insert
inner probe assembly gently to avoid
kinking the calibration gas tube.
c. Connect color-coded wires to proper termi-
nals as shown in Figure A-10. Rosemount
recommends connecting the thermocouple
wires directly to the terminal strip. This is
because the junction of different metals at
the wires and lugs and at the lugs and the
terminal strip could act as additional thermocouple junctions. This could produce a
voltage that would affect the thermocouple
output signal.
Do not bend wires closer than 6.4 mm
(1/4 in.) from end of ceramic rod. Dress
wires so they do not touch sides of probe
junction box.
d. Reinstall the cell per paragraph A-3, steps
f, g, h, i, j, and k.
e. Consult Safety Data Sheet 1M03226, then
power up system. Monitor thermocouple
output. It should stabilize at setpoint mV
±0.2 mV. Recalibrate probe per Instruction
Bulletin applicable to your electronics
package.
A-18 Appendices Rosemount Analytical Inc. A Division of Emerson Process Management
Page 87

World Class 3000
AX
Instruction Manual
Appendix AX Rev. 2.1
February 1998
REPLACEMENT PARTS
Table A-3. Replacement Parts for Probe
FIGURE and
INDEX No.
A-1, 13 3D39149G06
A-1, 13 3D39149G07
A-1, 13 3D39149G08
A-16, 2 3534B56G04
A-16, 2 3534B56G05
A-16, 2 3534B56G06
PART
NUMBER DESCRIPTION
1
1
1
2
2
2
1U03066G07V-Strut Assembly (18 in.)
V-Strut Assembly (3 ft)
V-Strut Assembly (6 ft)
Contact and Thermocouple Assembly (18 in.)
Contact and Thermocouple Assembly (3 ft)
Contact and Thermocouple Assembly (6 ft)
4847B61G19 Cell Replacement Kit (18 in.)
4847B61G20 Cell Replacement Kit (3 ft)
4847B61G21 Cell Replacement Kit (6ft)
4847B61G24 Cell Replacement Kit (No Inconel and Platinum Pad Assembly)
1U05677G01 Probe Disassembly Kit
A-11 1U05677G04 F/A Diffuser Hub Assembly (Snubber Diffuser)
1U05677G06 F/A Diffuser Hub Assembly (For use with Abrasive Shield)
6292A74G02 Ceramic Diffusion Element Replacement Kit
1N04966H02 Abrasive Shield Assembly (3 ft)
1N04966H03 Abrasive Shield Assembly (6 ft)
1M03241H01 90° Elbow for Bypass
A-7, 2 4507C26G07 Bypass Gas Pickup Tube (3 ft)
A-7, 3 4507C26G08 Bypass Gas Pickup Tube (6 ft)
A-7, 4 4507C26G09 Bypass Gas Pickup Tube (9 ft)
263C152G01 Reference Gas Air Set
771B635H01 Calibration Gas Rotameter
1L03650H01 F/A Diffusion Hub Setscrew
IB-106-300NFX Instruction Bulletin (IFT)
IB-106-300NCX Instruction Bulletin (CRE)
IB-106-300NEX Instruction Bulletin (Upgrade - CENELEC Digital Electronics)
1U03066G07 EExd Barrier Gland Kit (one pair of glands per kit)
1
V-Strut assembly includes contact and thermocouple assembly.
2
Contact and thermocouple assembly includes platinum pad and inconel wire.
NOTE
The replacement parts listed above must be obtained only from the manufacturer or
his agent.
Rosemount Analytical Inc. A Division of Emerson Process Management Appendices A-19
Page 88

Instruction Manual
Appendix AX Rev. 2.1
February 1998
World Class 3000
A-20 Appendices Rosemount Analytical Inc. A Division of Emerson Process Management
Page 89

World Class 3000
BX
HPS 3000 HEATER POWER SUPPLY FIELD MODULE
(CENELEC APPROVED VERSION)
Consult Safety Data Sheet 1M03243 for
safety related information.
B-1 DESCRIPTION
The Rosemount CENELEC approved HPS 3000
Heater Power Supply Field Module (Figure B-1)
acts as an interface between probe and electronics and supplies power to the probe heater.
The unit allows the use of probes with a number
of different electronics packages.
Instruction Manual
Appendix BX Rev. 1.2
January 1997
APPENDIX BX, REV. 1.2
DESCRIPTION
P00001B
Figure B-1. CENELEC Approved HPS 3000
Heater Power Supply Field Module
The CENELEC approved HPS 3000 is certified
EExd IIC T6 to CENELEC standards EN50014
and EN50018.
The heater power supply, Figure B-2, consists
of a motherboard, daughterboard, and a transformer for supplying correct voltage to the
probe heater. The mother- and daughterboards contain terminal strips for connecting
probe, electronics, and power supply.
The HPS is jumper configurable for 120, 220, or
240 Vac.
If you reconfigure the equipment for a
line voltage other than the one marked
on the serial label, then you should
change the marking on the serial label
to state the new line voltage.
B-2 THEORY OF OPERATION
The HPS 3000 Heater Power Supply may perform slightly different functions, depending upon
which electronics package with which it is used.
Figure B-3 shows a functional block diagram of
the unit. The HPS contains a transformer for
converting line voltage to 44 volts needed to
power the probe heater. The relay can be used
to remotely turn the probe on or off manually.
A triac module is used to turn the heater on or
off, depending on probe temperature.
When used with the CRE 3000 Control Room
Electronics or IFT 3000 Intelligent Field Transmitter, the HPS uses a cold junction temperature compensation feature. This allows for the
use of a less expensive cable between the HPS
and CRE or HPS and IFT. The HPS and electronics package can be located up to 364 m
(1200 ft) apart.
Rosemount Analytical Inc. A Division of Emerson Process Management Appendices B-1
Page 90

Instruction Manual
Appendix BX Rev. 1.2
January 1997
World Class 3000
TERMINAL
COVERS
(PROVIDED)
INTERNAL
EARTHING
HARDWARE
EXTERNAL
EARTHING
HARDWARE
SCREW
(2 PER COVER)
FRONT VIEW SIDE VIEW
TRANSFORMER
JM8
JM7
J7
JM4
JM5
JM2
1
JM
J2
Figure B-2. Heater Power Supply, Interior
TERMINAL
STRIP (FROM
ELECTRONICS)
TERMINAL
STRIP
(FROM PROBE)
P00002B
Table B-1. Specifications for Heater Power Supply
Power Supply .............................................................................. 110/115/220 VAC ± 10% at 50/60 Hz
Power Requirement .................................................................... 200 VA
Humidity Range........................................................................... 95% Relative Humidity
Ambient Temperature Range...................................................... 0° to 60°C (32° to 140°F)
Vibration ...................................................................................... 5 m/sec
2
, 10 to 500 xyz plane
External Electrical Noise ............................................................. Minimum Interference
Installation Category (Overvoltage Category)............................. IEC 664 Category II
Cabling Distance Between HPS 3000 and Probe....................... Maximum 45 m (150 ft)
Cabling Distance Between HPS 3000 and CRE 3000................ Maximum 364 m (1200 ft)
Cabling Distance Between HPS 3000 and IFT 3000.................. Maximum 364 m (1200 ft)
Approximate Shipping Weight..................................................... 20 kg (44 lbs)
B-2 Appendices Rosemount Analytical Inc. A Division of Emerson Process Management
Page 91

World Class 3000
BX
LINE
RELAY
TRIAC
TRANSFORMER
ZERO
CROSSING
DETECTOR
Instruction Manual
Appendix BX Rev. 1.2
January 1997
TRIACRELAY
TO HEATER
FROM
IFT
OR
CRE
AD590
PROBE TC
STACK TC
CELL MV
COLD
JUNCTION
TEMP.
Figure B-3. Heater Power Supply Block Diagram
The standard cable, between probe and HPS, is
thermocouple compensated. This prevents the
additional junctions between thermocouple and
cablefrom producing a voltage which would affect the thermocouple output signal. A temperature sensor in the HPS monitors the
temperature at the junction and sends a voltage
signal to the CRE and IFT. The CRE and IFT
uses this signal to compensate the probe thermocouple reading for the temperature at the
junction between the compensated and
uncompensated cables.
In operation, when connected to the CRE 3000
Control Room Electronics, line voltage passes
through the relay (when on) and is converted
into 44 volts by the transformer. If the probe
thermocouple indicates that the probe has
dropped below operating temperature, a signal
from the CRE triggers the triac. The triac then
supplies voltage to the probe heater, warming
the cell. Conversely, if the probe thermocouple
indicates that the probe heater has reached the
upper limit of operating temperature, the CRE
deactivates the triac, shutting off power to the
heater.
B-3 CONNECTIONS TO NEW GENERATION
ELECTRONICS (IFT 3000 AND CRE 3000)
Use the following information about input and
output connections if your system includes
CENELEC approved new generation
electronics.
PROBE TC
STACK TC
CELL
a. Probe Thermocouple
PBTC+ and PBTC- (J3 pins 4 and 5, J8 pins
3 and 4). This thermocouple provides feedback from the probe heater to the electronics.
b. Stack Thermocouple (Optional)
STTC+ and STTC- (J2 pins 1 and 2, J9 pins
5 and 6). The stack thermocouple is a thermocouple separate from the CENELEC approved World Class 3000 Probe. It is used
to measure stack temperature.
c. AD590
AD590+ and AD590- (J8 pin 5, J8 pin 6).
The AD590 is a temperature measuring device used to measure temperature inside
the CENELEC approved Heater Power
Supply HPS 3000.
d. Zirconium Cell
PBMV+ and PBMV- (J3 pins 1 and 2, J8
pins 1 and 2). The voltage signal from the
zirconium cell.
e. Probe Heater
44 Vac output (J2 pins 4, 5, and 6). The 44
Vac output to power the probe heater.
TO
PROBE
730004
Rosemount Analytical Inc. A Division of Emerson Process Management Appendices B-3
Page 92

Instruction Manual
Appendix BX Rev. 1.2
January 1997
World Class 3000
f. TRIAC
TRIAC+ and TRIAC- (J9 pins 1 and 2). The
signal by which the new generation electronics controls the triac of Heater Power
Supply HPS 3000. By controlling this triac,
the new generation electronics modulates
the 44 V waveform to the probe heater.
g. Relay
Relay+ and Relay- (J9 pins 3 and 4). By activating or deactivating this relay, the new
generation electronics can switch off or
switch on the 44 Vac from the Heater Power
Supply HPS 3000 to the probe heater. This
feature is jumper selectable (JM2).
h. Line Voltage
(J1 pins 1, 2, and 3). Jumper selectable
(JM1, JM4, and JM5) for 120 Vac or
220/240 Vac.
i. Shield (Cable Armour)
a. Probe Thermocouple
PBTC+ and PBTC- (J3 pins 4 and 5, J8 pins
3 and 4). This thermocouple provides feedback from the probe heater to the electronics.
b. Stack Thermocouple
(Optional) STTC+ and STTC- (J2 pins 1 and
2, J9 pins 5 and 6). The stack thermocouple
is a thermocouple separate from the
WC3000 probe. It is used to measure stack
temperature.
c. Zirconium Cell
PBMV+ and PBMV- (J3 pins 1 and 2, J8
pins 1 and 2). The voltage signal from the
zirconium cell.
d. Probe Heater
44 Vac out (J2 pins 4, 5, and 6). This is the
44 Vac output to power the probe heater.
The cable armour, as well as providing mechanical protection, acts as a shield. This
shield is directly connected to the Heater
Power Supply HPS 3000 housing through
the cable gland.
NOTE
When using the HPS 3000 with an existing electronics package, such as
Models 218, 218A, or 225, the electronics will not have the input/output
capacity to support all of the functions
mentioned in this section. Refer to Instruction Bulletin IB-106-300NEX.
B-4 CONNECTION TO OLD GENERATION
ELECTRONICS
Use the following information about input and
output connections if your system does not include CENELEC approved new generation
digital electronics:
e. Line Voltage Pins
This is a modulated 115 Vac from the old
generation electronics. Bridge rectifier
(BR1) converts this modulated 115 Vac to
the TRIAC+ and TRIAC- low voltage signal.
This signal controls the triac of the Heater
Power Supply HPS 3000. A modulated 44
Vac is thus sent to the probe heater.
f. Shield (Optional)
(J8 pin 7.) The PBMV+/PBMV- and the
PBTC+/PBTC- lines to the old generation
electronics may be shielded against electrical noise through these connections.
g. Shield (Cable Armour)
The cable armour, as well as providing mechanical protection, acts as a shield. This
shield is directly connected to the Heater
Power Supply HPS 3000 housing through
the cable gland.
B-4 Appendices Rosemount Analytical Inc. A Division of Emerson Process Management
Page 93

World Class 3000
BX
Instruction Manual
Appendix BX Rev. 1.2
January 1997
TROUBLESHOOTING
B-5 OVERVIEW
Before carrying out any work on the
CENELEC approved HPS 3000, consult
Safety Data Sheet 1M03243.
Install all protective equipment covers
and safety ground leads after troubleshooting. Failure to replace covers
and ground leads could result in serious injury or death.
The HPS 3000 troubleshooting section describes how to identify and isolate faults which
may develop in the HPS 3000 assembly.
B-6 HPS 3000 TROUBLESHOOTING
The HPS 3000 troubleshooting may overlap
with the probe in use in the system. Faults in
either system may cause an error to be displayed in the electronics package. Figure B-4
and Figure B-5 provide troubleshooting information.
Rosemount Analytical Inc. A Division of Emerson Process Management Appendices B-5
Page 94

Instruction Manual
Appendix BX Rev. 1.2
January 1997
SYMPTOM
World Class 3000
HEATER DOES NOT HEAT
UP (DOES NOT INCREASE
IN OUTPUT).
SET METER* FOR 50 VAC.
PLACE PROBES ON
TERMINAL BLOCK J2,
“FROM PROBE”, PROBE
HEATER.
METER INDICATES
PULSATING NOMINAL
44 VAC.
YES
DISCONNECT POWER FROM
HPS & PROBE ELECT. SET
METER ON RX1.
MEASURE RESISTANCE OF
HEATER BY PLACING
PROBES ON TERMINAL
BLOCK J2, “FROM PROBE”,
PROBE HEATER.
NO
SET METER TO 250 VAC.
PLACE METER PROBES ON
J9, “FROM ELECTRONICS”,
ANALOG HEATER.
METER SHOULD REGISTER
A PULSATING NOMINAL
115 VAC.
YES
DISCONNECT POWER TO
HPS AND PROBE
ELECTRONICS. CHECK
ALL FOUR FUSES IN HPS.
FUSES BLOWN IN HPS.
YES YES
CHECK THAT LINE VOLTAGE
IS CORRECT BY SELECTING
CORRECT JUMPERS
ACCORDING TO CHART ON
INSIDE OF HPS COVER.
NO
NO
CHECK FUSES IN PROBE
ELECTRONICS.
IF FUSES OK, POSSIBLE
PROBE ELECTRONICS TRIAC
FAILURE.
CHECK JUMPER JM2 IS
INSTALLED.
POSSIBLE TRIAC FAILURE.
REPLACE HPS
MOTHERBOARD.
RESISTANCE MEASURED
SHOULD BE NOMINALLY
12 OHMS.
*SIMPSON MODEL 260 OR EQUIVALENT MULTIMETER.
NO
REPLACE BLOWN FUSES.
HEATER IS OPEN.
REPLACE HEATER.
34990015
Figure B-4. HPS Troubleshooting Flowchart, #1
B-6 Appendices Rosemount Analytical Inc. A Division of Emerson Process Management
Page 95

World Class 3000
BX
SYMPTOM
HEATER OVERHEATS.
NOTE: ON INITIAL STARTUP THE
TEMPERATURE OF THE PROBE MAY
OVERHEAT TO A NOMINAL TEMP OF
800°C(480°F).
Instruction Manual
Appendix BX Rev. 1.2
January 1997
CHECK IF THE YELLOW WIRE IS CONNECTED
TO POSITIVE AND THE RED TO NEGATIVE
ON BOTH “FROM ELECTRONICS” AND “FROM
PROBE” TERMINAL BLOCKS. (MODELS 218
AND 225 ONLY)
YES
SET METER* ON 250 VAC SCALE.
CHECK “FROM ELECTRONIC”, ANALOG
HEATER TERMINALS IF THERE IS A
PULSATING NOMINAL 115 VAC ON J9.
YES
SET METER* ON 50 VAC SCALE.
NO
NO
CONNECT THE WIRING
ACCORDING TO THE
DECALS ON THE TERMINAL
COVERS.
IF THE VOLTAGE IS
CONSTANTLY ON, THEN
THE TRIAC IN THE PROBE
ELECTRONICS IS SHORTED.
CHECK “FROM PROBE”, TERMINALS AT
PROBE HEATER IF THERE IS A PULSATING
NOMINAL 44 VOLTS ON J2.
YES
CHECK PROBE ELECTRONICS SETPOINT
HAS BEEN CHANGED ACCORDING TO
APPLICABLE ELECTRONICS PACKAGE IB.
YES
CHECK IF PROBE HEATER VOLTAGE
SELECTION JUMPER JM7 INSTALLED
(REMOVE JM8).
*SIMPSON MODEL 260 OR EQUIVALENT MULTIMETER.
NO
IF THE VOLTAGE IS
CONSTANTLY ON, THEN
THE TRIAC MODULE IN
THE HPS IS SHORTED.
34990014
Figure B-5. HPS Troubleshooting Flowchart, #2
Rosemount Analytical Inc. A Division of Emerson Process Management Appendices B-7
Page 96

Instruction Manual
Appendix BX Rev. 1.2
January 1997
MAINTENANCE AND SERVICE
Consult Safety Data Sheet 1M03243
before performing any work on the
CENELEC approved HPS 3000.
Install all protective equipment covers
and safety ground leads after equipment repair or service. Failure to install covers and ground leads could
result in serious injury or death.
B-7 OVERVIEW
This section describes service and routine
maintenance of the HPS 3000 Heater Power
Supply Field Module. Replacement parts referred to are available from Rosemount. Refer
to Replacement Parts of this appendix for part
numbers and ordering information.
World Class 3000
b. Loosen setscrew (13, Figure B-6) retaining
HPS cover (14). Remove HPS cover.
c. Remove hex nut (2), flat washer (3), and
hex head bolt (4) that retain transformer to
mounting bracket.
d. Disconnect the 6-pin transformer wiring
harness connector from J7 on the HPS
motherboard (25). Disconnect the 2-pin
wiring harness connector from the jumper
that was selected to configure the HPS for
the proper voltage.
NOTE
The transformer connector is keyed
making connection possible in only
one direction.
e. Remove old toroidal transformer (11). Place
new transformer in position and reconnect
wiring harness connectors as noted in
step d.
B-8 FUSE REPLACEMENT
The heater power supply's motherboard (25,
Figure B-6) contains four identical 5 amp fuses
(24) (5 amp anti-surge, Type T to IEC127,
ROSEMOUNT Part No. IL01293H02). To check
or replace a fuse, simply unscrew the fuse
holder cap (23) with a flat head screwdriver and
remove fuse. After checking or replacing a fuse,
reinstall fuse holder cap.
B-9 TRANSFORMER REPLACEMENT
Consult Safety Data Sheet 1M03243
before performing any work on the
CENELEC approved HPS 3000.
a. Follow the power down procedure outlined
in safety data sheet 1M03243 and the official "Codes of Practice" for your country of
installation.
f. Place insulating disc (10) (one on either
side of transformer) and metal disc (12) on
transformer.
g. Tighten hex nut (2) and hex head bolt (4)
only enough to firmly hold transformer in
place.
h. Reinstall HPS cover (14) and secure with
setscrew (13).
B-10 MOTHERBOARD REPLACEMENT.
Consult Safety Data Sheet 1M03243
before performing any work on the
CENELEC approved HPS 3000.
a. Follow the power down procedure outlined
in safety data sheet 1M03243 and the official "Codes of Practice" for your country of
installation.
B-8 Appendices Rosemount Analytical Inc. A Division of Emerson Process Management
Page 97

World Class 3000
BX
Instruction Manual
Appendix BX Rev. 1.2
January 1997
NOTE:
NOT ALL PARTS SHOWN ARE
AVAILABLE FOR PURCHASE
SEPARATELY. FOR A LIST OF
AVAILABLE PARTS, SEE
TABLE B-2.
1
10
12
10
17
27
9
2
3
5
1. HPS Housing
2. Hex Nut
3. Flat Washer
4. Hex Head Bolt
5. Transformer
Mounting Bracket
6. Screw
7. Lockwasher
8. Flat Washer
8
7
6
9. Hex Standoff
10. Insulating Disc
11. Toroidal Transformer
12. Metal Disc
11
2-PIN
CONNECTOR
6-PIN
CONNECTOR
13. Setscrew
14. HPS Cover
15. O-Ring Seal
16. Slotted Screw
17. Lockwasher
18. Flat Washer
19. Terminal Strip Cover
(Probe)
20. Terminal Strip Cover
(Electronics)
4
21. HPS Daughterboard
PCB
22. Hex Stand Off
23. Fuse Holder Cap
24. Fuse
25. HPS Motherboard
PCB
26. Hex Nut
27. Hex Standoff
28. Earthing Hardware
18
17
26
17
27
28
18
22
21
18
25
18
18
20
17
18
16
19
24
17
22
16
18
23
17
15
16
14
13
P00007
Figure B-6. Heater Power Supply, Exploded View
Rosemount Analytical Inc. A Division of Emerson Process Management Appendices B-9
Page 98

Instruction Manual
Appendix BX Rev. 1.2
January 1997
World Class 3000
b. Loosen setscrew (13) retaining HPS cover
(14). Remove cover.
c. Disconnect transformer wiring harness con-
nectors as described in the previous paragraph from motherboard (25).
d. Remove slotted screw (16), lockwasher
(17), and flat washer (18) attaching terminal
strip covers (19) and (20). Remove terminal
strip covers.
e. Unplug ribbon cable from the receptacle on
the daughterboard (21). Take note of location of black and white wires connected to
pin 8 and pin 9 of terminal strip J8. Disconnect these wires from J8.
f. Unscrew stand offs (22) on either side of
the daughterboard. Remove daughterboard
(21).
g. Unscrew four stand offs (22) that support
the daughterboard.
h. Making a note of the location and color of
each wire, disconnect wires from terminal
strip on HPS motherboard (25).
i. Remove hex nut (26), lockwasher (17), and
flat washer (18) securing the HPS motherboard to the enclosure and transformer
mounting bracket (5).
j. Remove motherboard (25).
n. Plug ribbon cable back into receptacle on
daughterboard and reconnect black and
white wires. The black wire goes to pin 8
and the white to pin 9 of terminal block J8
on daughter board. Reinstall terminal covers.
o. Reconnect transformer wiring harness con-
nectors to motherboard. Note that in any
case, the transformer's connector is keyed
so that it can only be inserted one way.
p. Reinstall HPS cover (14) and secure with
setscrew (12).
B-11 DAUGHTERBOARD REPLACEMENT
Consult Safety Data Sheet 1M03243
before performing any work on the
CENELEC approved HPS 3000.
a. Follow the power down procedure outlined
in safety data sheet 1M03243 and the official "Codes of Practice" for your country of
installation.
b. Loosen setscrew (13, Figure B-6) retaining
HPS cover (14). Remove cover.
c. Remove slotted screw (16), lockwasher
(17), and flat washer (18) securing terminal
strip covers (19) and (20). Remove terminal
strip covers.
k. Position new motherboard on stand offs and
reinstall hex nut, lockwasher, and flat
washer removed in step i.
l. Reconnect wires to terminal strip in posi-
tions noted in step h. Cross check with wiring diagram shown on Figure 2-4 of the
main text (IB-106-300NX Series).
m. Reinstall four stand offs removed in step g.
Position daughterboard (21) on stand offs
and reinstall stand offs removed in step f.
B-10 Appendices Rosemount Analytical Inc. A Division of Emerson Process Management
d. Making a note of the location and color of
each wire, disconnect wires from the terminal strip on the daughterboard (21).
e. Unplug ribbon cable from receptacle on
daughterboard. Take note of location of
black and white wires connected to pin 8
and pin 9 of terminal strip J8. Disconnect
these wires from J8.
f. Unscrew two stand offs (22) from daughter-
board. Remove daughterboard (21).
Page 99

World Class 3000
BX
Instruction Manual
Appendix BX Rev. 1.2
January 1997
g. Position new daughterboard on four stand
offs (22) on motherboard (25). Reinstall the
stand offs removed in step f.
h. Plug ribbon cable back into receptacle on
daughterboard and reconnect black and
white wires. The black wire goes to pin 8
and the white wire to pin 9 of terminal block
J8 on daughterboard. Reinstall terminal
covers.
i. Reconnect wires to terminal strip in posi-
tions noted in step d. Cross check with wiring diagram shown on Figure 2-4 of the
main text (IB-106-300NX Series). Reinstall
terminal covers.
j. Reinstall HPS cover (14) and secure with
setscrew (13).
REPLACEMENT PARTS
Table B-2. Replacement Parts for Heater Power Supply
FIGURE and
INDEX No.
B-1 1U05667G01 CENELEC HPS 3000 (120V)
B-1 1U05667G03 CENELEC HPS 3000 (220V/240V)
B-6, 24 1L01293H02 Fuse 5A @ 250 Vac, anti-surge, case size; 5 x 20 mm, type T
B-6, 25 3D39080G02 Motherboard
B-6, 21 3D39078G01 Daughterboard
B-6, 11 1M02961G05 Toroidal Transformer (120V/240V)
PART
NUMBER DESCRIPTION
to IEC127, Schurter
IB-106-300NEX Instruction Bulletin Upgrade and Digital Electronics
IB-106-300NFX Instruction Bulletin (IFT)
IB-106-300NCX Instruction Bulletin (CRE)
NOTE
The replacement parts listed above must be obtained only from the manufacturer or
his agent.
Rosemount Analytical Inc. A Division of Emerson Process Management Appendices B-11
Page 100

Instruction Manual
Appendix BX Rev. 1.2
January 1997
World Class 3000
B-12 Appendices Rosemount Analytical Inc. A Division of Emerson Process Management
Loading...