

Page 1

Reference Manual
00809-0500-5100, Rev AC
May 2020
Rosemount™ TankMaster
Floating Roof Monitoring
™
Page 2

Page 3

Reference Manual
00809-0500-5100, Rev AC
Contents
1Section 1: Introduction
2Section 2: Overview
Contents
May 2020
1.1 Safety messages. . . . . . . . . . . . . . . . . . . . . . . . . . . . . . . . . . . . . . . . . . . . . . . . . . . . . . . . . . . . . . . . . . . 1
1.2 Manual overview . . . . . . . . . . . . . . . . . . . . . . . . . . . . . . . . . . . . . . . . . . . . . . . . . . . . . . . . . . . . . . . . . . 2
2.1 Introduction . . . . . . . . . . . . . . . . . . . . . . . . . . . . . . . . . . . . . . . . . . . . . . . . . . . . . . . . . . . . . . . . . . . . . . 3
2.1.1 Drain sump monitoring and hydrocarbon detection. . . . . . . . . . . . . . . . . . . . . . . . . . . . . . 3
2.2 System overview . . . . . . . . . . . . . . . . . . . . . . . . . . . . . . . . . . . . . . . . . . . . . . . . . . . . . . . . . . . . . . . . . . 4
2.2.1 Shell mounted installation at top of tank. . . . . . . . . . . . . . . . . . . . . . . . . . . . . . . . . . . . . . . . 4
2.2.2 Installation on tank roof . . . . . . . . . . . . . . . . . . . . . . . . . . . . . . . . . . . . . . . . . . . . . . . . . . . . . . 5
2.3 Installation procedure. . . . . . . . . . . . . . . . . . . . . . . . . . . . . . . . . . . . . . . . . . . . . . . . . . . . . . . . . . . . . . 8
3Section 3: Installation
3.1 Safety messages. . . . . . . . . . . . . . . . . . . . . . . . . . . . . . . . . . . . . . . . . . . . . . . . . . . . . . . . . . . . . . . . . . . 9
3.2 Installation considerations. . . . . . . . . . . . . . . . . . . . . . . . . . . . . . . . . . . . . . . . . . . . . . . . . . . . . . . . . 10
3.3 Mechanical installation . . . . . . . . . . . . . . . . . . . . . . . . . . . . . . . . . . . . . . . . . . . . . . . . . . . . . . . . . . . . 11
3.3.1 Installation on tank shell . . . . . . . . . . . . . . . . . . . . . . . . . . . . . . . . . . . . . . . . . . . . . . . . . . . . . 11
3.3.2 Installation on tank roof . . . . . . . . . . . . . . . . . . . . . . . . . . . . . . . . . . . . . . . . . . . . . . . . . . . . . 16
3.3.3 Tilt gauge position . . . . . . . . . . . . . . . . . . . . . . . . . . . . . . . . . . . . . . . . . . . . . . . . . . . . . . . . . . 19
3.3.4 Drain sump monitoring . . . . . . . . . . . . . . . . . . . . . . . . . . . . . . . . . . . . . . . . . . . . . . . . . . . . . . 20
3.3.5 Hydrocarbon detection . . . . . . . . . . . . . . . . . . . . . . . . . . . . . . . . . . . . . . . . . . . . . . . . . . . . . . 20
4Section 4: Configuration
4.1 Safety messages. . . . . . . . . . . . . . . . . . . . . . . . . . . . . . . . . . . . . . . . . . . . . . . . . . . . . . . . . . . . . . . . . . 21
4.2 Introduction . . . . . . . . . . . . . . . . . . . . . . . . . . . . . . . . . . . . . . . . . . . . . . . . . . . . . . . . . . . . . . . . . . . . . 22
4.2.1 Inventory calculations . . . . . . . . . . . . . . . . . . . . . . . . . . . . . . . . . . . . . . . . . . . . . . . . . . . . . . . 22
4.3 Floating roof monitoring setup . . . . . . . . . . . . . . . . . . . . . . . . . . . . . . . . . . . . . . . . . . . . . . . . . . . . . 23
4.3.1 TankMaster WinSetup workspace . . . . . . . . . . . . . . . . . . . . . . . . . . . . . . . . . . . . . . . . . . . . . 23
4.3.2 To enable floating roof monitoring. . . . . . . . . . . . . . . . . . . . . . . . . . . . . . . . . . . . . . . . . . . . 24
4.3.3 Shell mounted with level reference. . . . . . . . . . . . . . . . . . . . . . . . . . . . . . . . . . . . . . . . . . . . 26
4.3.4 Shell mounted without level reference . . . . . . . . . . . . . . . . . . . . . . . . . . . . . . . . . . . . . . . . 31
Contents
4.3.5 Roof mounted . . . . . . . . . . . . . . . . . . . . . . . . . . . . . . . . . . . . . . . . . . . . . . . . . . . . . . . . . . . . . . 33
4.3.6 Drain gauge. . . . . . . . . . . . . . . . . . . . . . . . . . . . . . . . . . . . . . . . . . . . . . . . . . . . . . . . . . . . . . . . 35
4.3.7 Hydrocarbon gauge . . . . . . . . . . . . . . . . . . . . . . . . . . . . . . . . . . . . . . . . . . . . . . . . . . . . . . . . . 36
4.3.8 Alarm setup . . . . . . . . . . . . . . . . . . . . . . . . . . . . . . . . . . . . . . . . . . . . . . . . . . . . . . . . . . . . . . . . 37
i
Page 4

Contents
May 2020
Reference Manual
00809-0500-5100, Rev AC
5Section 5: Operation
5.1 Introduction . . . . . . . . . . . . . . . . . . . . . . . . . . . . . . . . . . . . . . . . . . . . . . . . . . . . . . . . . . . . . . . . . . . . . 39
5.2 Tank view. . . . . . . . . . . . . . . . . . . . . . . . . . . . . . . . . . . . . . . . . . . . . . . . . . . . . . . . . . . . . . . . . . . . . . . . 39
5.3 Alarm limits. . . . . . . . . . . . . . . . . . . . . . . . . . . . . . . . . . . . . . . . . . . . . . . . . . . . . . . . . . . . . . . . . . . . . . 42
5.3.1 Floating roof alarm limits . . . . . . . . . . . . . . . . . . . . . . . . . . . . . . . . . . . . . . . . . . . . . . . . . . . . 43
5.4 Alarm disconnect. . . . . . . . . . . . . . . . . . . . . . . . . . . . . . . . . . . . . . . . . . . . . . . . . . . . . . . . . . . . . . . . . 44
5.5 Roof monitoring group view . . . . . . . . . . . . . . . . . . . . . . . . . . . . . . . . . . . . . . . . . . . . . . . . . . . . . . . 45
5.5.1 To create a group view . . . . . . . . . . . . . . . . . . . . . . . . . . . . . . . . . . . . . . . . . . . . . . . . . . . . . . 46
5.6 Roof monitoring historical data . . . . . . . . . . . . . . . . . . . . . . . . . . . . . . . . . . . . . . . . . . . . . . . . . . . . 48
5.6.1 Sample setup. . . . . . . . . . . . . . . . . . . . . . . . . . . . . . . . . . . . . . . . . . . . . . . . . . . . . . . . . . . . . . . 49
5.6.2 View setup . . . . . . . . . . . . . . . . . . . . . . . . . . . . . . . . . . . . . . . . . . . . . . . . . . . . . . . . . . . . . . . . . 50
5.7 Roof status . . . . . . . . . . . . . . . . . . . . . . . . . . . . . . . . . . . . . . . . . . . . . . . . . . . . . . . . . . . . . . . . . . . . . . 51
5.8 Alarm priority . . . . . . . . . . . . . . . . . . . . . . . . . . . . . . . . . . . . . . . . . . . . . . . . . . . . . . . . . . . . . . . . . . . . 56
6Section 6: Service and Troubleshooting
6.1 Safety messages. . . . . . . . . . . . . . . . . . . . . . . . . . . . . . . . . . . . . . . . . . . . . . . . . . . . . . . . . . . . . . . . . . 57
6.2 Troubleshooting . . . . . . . . . . . . . . . . . . . . . . . . . . . . . . . . . . . . . . . . . . . . . . . . . . . . . . . . . . . . . . . . . 58
AAppendix A: Commissioning Checklist
ii
Contents
Page 5

Reference Manual
NOTICE
00809-0500-5100, Rev AC
Title Page
May 2020
Rosemount™ TankMaster
™
Floating Roof Monitoring
Read this manual before working with the product. For personal and system safety, and for optimum
product performance, make sure you thoroughly understand the contents before installing, using, or
maintaining this product.
For equipment service or support needs, contact your local Emerson Automation Solutions
/Rosemount Tank Gauging representative.
Spare Parts
Any substitution of non-recognized spare parts may jeopardize safety. Repair, e.g. substitution of
components etc, may also jeopardize safety and is under no circumstances allowed.
Rosemount Tank Radar AB will not take any responsibility for faults, accidents, etc caused by
non-recognized spare parts or any repair which is not made by Rosemount Tank Radar AB.
The products described in this document are NOT designed for nuclear-qualified applications.
Using non-nuclear qualified products in applications that require nuclear-qualified hardware or
products may cause inaccurate readings.
For information on Rosemount nuclear-qualified products, contact your local Rosemount Sales
Representative.
Title Page
iii
Page 6

Title Page
May 2020
Reference Manual
00809-0500-5100, Rev AC
iv
Title Page
Page 7

Reference Manual
00809-0500-5100, Rev AC
Section 1 Introduction
Safety messages . . . . . . . . . . . . . . . . . . . . . . . . . . . . . . . . . . . . . . . . . . . . . . . . . . . . . . . . . . . . . . . . . . page 1
Manual overview . . . . . . . . . . . . . . . . . . . . . . . . . . . . . . . . . . . . . . . . . . . . . . . . . . . . . . . . . . . . . . . . . page 2
1.1 Safety messages
Procedures and instructions in this manual may require special precautions to ensure the safety of the
personnel performing the operations. Information that raises potential safety issues is indicated by a
warning symbol ( ). Refer to the safety messages listed at the beginning of each section before
performing an operation preceded by this symbol.
Failure to follow these installation guidelines could result in death or serious injury.
Make sure only qualified personnel perform the installation.
Use the equipment only as specified in this manual. Failure to do so may impair the protection
provided by the equipment.
Explosions could result in death or serious injury.
Verify that the operating environment of the transmitter is consistent with the appropriate
hazardous locations certifications.
Before connecting a hand held communicator in an explosive atmosphere, make sure the
instruments in the loop are installed in accordance with intrinsically safe or non-incendive field
wiring practices.
Do not remove the gauge cover in explosive atmospheres when the circuit is alive.
Electrical shock could cause death or serious injury.
Use extreme caution when making contact with the leads and terminals.
Introduction
May 2020
Introduction
Physical access
Unauthorized personnel may potentially cause significant damage to and/or misconfiguration of
end user’s equipment. This could be intentional or unintentional and needs to be protected against.
Physical security is an important part of any security program and fundamental to protecting your
system. Restrict physical access by unauthorized personnel to protect end user’s assets. This is true
for all systems used within the facility.
1
Page 8

Introduction
May 2020
1.2 Manual overview
This manual provides installation, configuration, and maintenance information for a Rosemount™
TankMaster
Gauging system with a Rosemount 2410 Tank Hub connected to supported level and temperature
measuring devices.
Typically, a Rosemount Tank Gauging Floating Roof Monitoring system is based on using Rosemount
3308 or Rosemount 5408 level transmitters for roof tilt monitoring. Rosemount 5900C radar gauges is
also an option. In addition to that, level gauges and temperature transmitters are used for standard level
measurements and inventory calculations.
Section 2: Overview provides a brief description of the Rosemount Tank Gauging floating roof
monitoring system and recommended installation procedure.
Section 3: Installation covers installation considerations and mechanical installation.
Section 4: Configuration describes how to configure a Rosemount Tank Gauging floating roof monitoring
system by using the Rosemount TankMaster software package.
Section 5: Operation describes how to operate the floating roof system by using various tank view
functions in the Rosemount TankMaster WinOpi program.
™
Floating Roof Monitoring system. The manual is based on a typical Rosemount Tank
Reference Manual
00809-0500-5100, Rev AC
Section 6: Service and Troubleshooting covers troubleshooting a Rosemount Tank Gauging floating roof
system.
Appendix A: Commissioning Checklist provides a list of installation and configuration actions to check
prior to putting the system in operation.
2
Introduction
Page 9

Reference Manual
00809-0500-5100, Rev AC
Section 2 Overview
Introduction . . . . . . . . . . . . . . . . . . . . . . . . . . . . . . . . . . . . . . . . . . . . . . . . . . . . . . . . . . . . . . . . . . . . . page 3
System overview . . . . . . . . . . . . . . . . . . . . . . . . . . . . . . . . . . . . . . . . . . . . . . . . . . . . . . . . . . . . . . . . . page 4
Installation procedure . . . . . . . . . . . . . . . . . . . . . . . . . . . . . . . . . . . . . . . . . . . . . . . . . . . . . . . . . . . . . page 8
2.1 Introduction
The floating roof monitoring function in Rosemount™ TankMaster detects whether a roof in a storage
tank is stuck, sinking, floating higher or lower than normal, covered by water or product, or is tilted.
TankMaster uses three to six tilt gauges to track inclination of a floating tank roof. Roof floating high/low
status may be monitored as well. The monitoring function is based on using Rosemount 3308 wireless
level transmitters mounted on the tank roof, or shell mounted free propagation radar level gauges
measuring distance to the tank roof.
Overview
May 2020
If roof inclination exceeds a maximum alarm limit, TankMaster triggers an alarm. Also, if the tank roof
floats higher or lower than normal, it may indicate that the roof is stuck or is about to sink. An alarm is
triggered in TankMaster if the floating roof passes high or low alarm limits.
One or two extra transmitters can be used to detect if the roof drain gets plugged or if there is any
hydrocarbons (product) present on the tank roof. The drain gauge can be either a Rosemount 3308
wireless transmitter providing an online level value of tank roof drain sump, or a wireless vibrating fork
which will act as a high level alarm switch.
Hydrocarbons may be detected by any hydrocarbon detection system which can provide a digital output
signal to be connected with a Rosemount 702 Wireless Discrete Transmitter.
The roof monitoring function is enabled by an option in the Rosemount TankMaster hardware key. Also,
in TankMaster WinSetup a tank must be configured as a Floating Roof Tank in order to be able to use the
floating roof monitoring function.
Level radars are installed at multiple points, spaced evenly around the perimeter of the roof. The
following installation options are available:
Shell mounted with/without level reference
Roof mounted
2.1.1 Drain sump monitoring and hydrocarbon detection
A drain gauge and/or a hydrocarbon gauge can be added to the floating roof monitoring system. The
drain gauge is installed in the drain sump and detects if the drain clogs and water does not run off.
Rosemount 3308 Wireless Guided Wave Radar or Rosemount 2160 Wireless Vibrating Fork can be used
for drain sump monitoring.
Overview
Installed at the floating roof, the hydrocarbon gauge detects potential hydrocarbons on the roof.
Typically, a Rosemount 702 Wireless Discrete Transmitter with Liquid Hydrocarbon Detection is used.
3
Page 10

Overview
A
B
C
D
A
A
May 2020
2.2 System overview
The floating roof monitoring function is based on using one of two tilt gauge installation options:
shell mounted at the top of the tank
on the tank roof
The shell mounted version is also suitable for fixed roof tanks with inner floating roof.
2.2.1 Shell mounted installation at top of tank
Three to six non-contacting level gauges are installed at the top of the tank. The gauges are mounted on
brackets and measure distance to reflector plate on top of the tank roof.
Roof tilt is monitored by comparing distance to the tank roof measured by the different tilt level gauges.
Tank roof floating high/low calculations can be done by comparing distance to floating roof with
distance to the product surface measured by a reference level gauge in a still-pipe.
Figure 2-1. Shell Mounted Tilt Gauges Installed at the Top of the Tank
Reference Manual
00809-0500-5100, Rev AC
A. Tilt gauge mounted on top of tank
B. Reflector
4
C. Reference gauge for product level measurements
D. Floating roof
Overview
Page 11

Reference Manual
A
B
C
D
A
A
00809-0500-5100, Rev AC
2.2.2 Installation on tank roof
Three to six tilt gauges are installed on the tank roof. Probes penetrate the tank roof measuring distance
from roof to product surface.
By comparing the distance to the product surface measured by each tilt gauge, both roof tilt and
buoyancy can be monitored.
Wireless Rosemount 3308 tilt gauges communicate with the host system via a repeater at the top of the
tank.
Figure 2-2. Roof Mounted Wireless Rosemount 3308 Transmitters
Overview
May 2020
Overview
A. Tilt gauge mounted on tank roof
B. Radar gauge for product level measurements
C. Floating roof
D. Repeater
5
Page 12

Overview
D
E
F
H
G
A
B
A
I
E
B
C
E
May 2020
Figure 2-3. Floating Roof Monitoring System with Shell Mounted and Roof Mounted Tilt Gauges
00809-0500-5100, Rev AC
Reference Manual
A. Tilt gauge F. Rosemount 2460 System Hub
B. Reference level gauge for product level measurements G. Emerson Wireless 1420 Gateway
C. Reflector H. Rosemount TankMaster host
D. Repeater I. Emerson Wireless 775 THUM Adapter
E. Rosemount 2410 Tank hub
6
Overview
Page 13

Reference Manual
00809-0500-5100, Rev AC
Overview
May 2020
Table 2-1. Floating Roof Tank Installation Characteristics
Shell mounted with/without level reference Roof mounted
Radar device Rosemount 5408 or 5900C non contacting radars Rosemount 3308 Wireless Guided Wave Radars
Number of radar devices Minimum three, maximum six Minimum three, maximum six
Installed at top of tank shell
Installation
Also suitable for fixed roof tanks with inner floating
roof
Level Measures distance to the floating roof Measures distance to the liquid
(1)
Directly on floating roof
Tilt
Roof floating
Possible alerts/alarms
Data transmission to
control room
1. Local site license may be required for compliance to frequency spectrum approval.
2. Requires level reference (inventory level gauge in still-pipe).
3. Requires drain sump gauge.
4. Requires hydrocarbon detection gauge.
Tracks tilt by comparing measured distance from
radars to the floating roof
Tracks roof floating high/low by referencing liquid
(2)
surface
Roof tilt
Roof floating high/low
Drain sump full with water
Hydrocarbons detected
(2)
(3)
(4)
Wired connection from level gauge to tank hub
Wired or wireless communication from tank hub to
control room
Tracks tilt by comparing measured distance to the
liquid
Tracks roof floating high/low by measuring
distance to the liquid
Roof tilt
Roof floating hight/low
Drain sump full with water
Hydrocarbons detected
(3)
(4)
Wireless communication
Overview
7
Page 14

Overview
2. Review mounting considerations for the devices
(“Installation considerations” on page 10).
5. Configure the devices.
4. Wire and power up the devices.
3. Install the devices
(“Mechanical installation” on page 11).
1. Make sure that a site plan is available with tank
tags, device tags, and device addresses.
6. Setup the floating roof monitoring function.
(“Configuration” on page 21).
May 2020
2.3 Installation procedure
Follow these steps for proper installation of the Rosemount TankMaster Roof Monitoring system:
Reference Manual
00809-0500-5100, Rev AC
8
Overview
Page 15

Reference Manual
00809-0500-5100, Rev AC
Section 3 Installation
Safety messages . . . . . . . . . . . . . . . . . . . . . . . . . . . . . . . . . . . . . . . . . . . . . . . . . . . . . . . . . . . . . . . . . . page 9
Installation considerations . . . . . . . . . . . . . . . . . . . . . . . . . . . . . . . . . . . . . . . . . . . . . . . . . . . . . . . . . page 10
Mechanical installation . . . . . . . . . . . . . . . . . . . . . . . . . . . . . . . . . . . . . . . . . . . . . . . . . . . . . . . . . . . . page 11
3.1 Safety messages
Procedures and instructions in this section may require special precautions to ensure the safety of the
personnel performing the operations. Information that raises potential safety issues is indicated by a
warning symbol ( ). Please refer to the following safety messages before performing an operation
preceded by this symbol.
Installation
May 2020
Failure to follow safe installation and servicing guidelines could result in death or serious injury.
Make sure only qualified personnel perform the installation.
Use the equipment only as specified in this manual. Failure to do so may impair the protection provided
by the equipment.
Do not perform any service other than those contained in this manual unless you are qualified.
To prevent ignition of flammable or combustible atmospheres, disconnect power before servicing.
Substitution of components may impair Intrinsic Safety.
Installation
9
Page 16

Installation
May 2020
3.2 Installation considerations
Verify that the tank roof is designed to allow tilt gauge installation according to requirements.
Ensure that roof mounted tilt gauges are installed properly to allow reliable measurements when the
roof tilts or sinks.
Ensure that shell mounted tilt gauges are installed at a sufficient distance from the highest roof
position.
See “Mechanical installation” on page 11 for instructions on how to install tilt gauges in a Rosemount
Tank Gauging system.
Note
Local site license may be required for compliance to frequency spectrum approval.
Reference Manual
00809-0500-5100, Rev AC
10
Installation
Page 17

Reference Manual
A
B
C
A
A
B
D
00809-0500-5100, Rev AC
3.3 Mechanical installation
The Floating Roof Monitoring system is based on using a number of tilt gauges which measure the
distance to the tank roof. There is also an option which is based on installing level gauges on the tank
roof in order to monitor the distance between tank roof and product surface. Throughout this manual
we will refer to these two versions:
Shell mounted
Roof mounted
3.3.1 Installation on tank shell
This option uses three to six tilt gauges mounted on brackets. It is recommended that tilt gauges are
mounted on a bracket arm and not a wide plate.
In case there is a level gauge for product level measurements as well, it can be used as a reference for tank
roof floating high/low calculations.
Figure 3-1. Floating Roof With Tilt Gauges on Top of Tank
Installation
May 2020
Installation
A. Tilt gauge mounted on top of tank
B. Reflector
C. Reference level gauge
D. Temperature transmitter
11
Page 18

Installation
A
B
D
C
E
E
May 2020
Reference Manual
00809-0500-5100, Rev AC
It is important that each tilt gauge is installed at a position where the roof and reflector can not come
into contact with the antenna.
Ensure that the bracket is long enough to fulfill minimum recommendations for distance from wall to tilt
gauge.
The tilt gauge should be installed at zero degrees vertical inclination as shown in “Inclination” on
page 15.
Figure 3-2. Installation Recommendations
12
A. Tilt gauge
B. Reflector (see “Reflector design” on page 13)
C. Antenna (see “Antenna orientation” on page 14)
D. Minimum distance 800 mm (31.5 in.)
E. Recommended free space 800 mm (31.5 in.). Minimum distance 500 mm (19.7 in.)
Installation
Page 19

Reference Manual
B
A
C
E
D
F
G
00809-0500-5100, Rev AC
Reflector design
Installation
May 2020
Shell mounted tilt gauges measure the distance to a reflector
(1)
placed on the tank roof. Ensure that the
reflector meets recommended design specifications in order to prevent contamination build-up. The
gap (B) between ridges will ensure that water and snow can drip off the reflector.
Note
It is recommended to regularly make visual inspections to verify that each reflector is placed in the right
position.
Figure 3-3. Reflector for Measuring Distance to Tank Roof
A. 130 mm (5.12 in.) E. 500 mm (19.7 in.)
B. 35 mm (1.4 in.) F. 1200 mm (47.2 in.)
C. 260 mm (10.2 in.) G. 780 mm (30.7 in.)
D. 40 mm (1.6 in.)
1. The reflector is designed for radar gauge using FMCW 10 GHz technology.
Installation
13
Page 20

Installation
B
A
C
Center of tank
Min 800 mm
(31.5 in.)
May 2020
Reference Manual
00809-0500-5100, Rev AC
Antenna orientation
Figure 3-4. Antenna Orientation with Rosemount 5900C Transmitter Head as Reference
A. Tilt gauge
B. Reflector (see “Reflector design” on page 13)
C. Tank wall
Figure 3-5. Antenna orientation for Rosemount 5408
90°
External ground screw
Tank wall
Tank wall
14
Installation
Page 21

Reference Manual
90°
B
A
90°
00809-0500-5100, Rev AC
Inclination
Make sure that the tilt gauge is vertically aligned with the reflector. This will ensure that maximum signal
strength is reflected back to the gauge.
Figure 3-6. Antenna Inclination
Installation
May 2020
Installation
A. Tilt gauge
B. Reflector (see “Reflector design” on page 13)
15
Page 22

Installation
A
B
C
D
A
A
May 2020
3.3.2 Installation on tank roof
Three to six tilt gauges can be installed on the tank roof allowing tilt and roof floating high/low
measurements. A repeater at the top of the tank ensures proper communication between the wireless
tilt gauges and the gateway.
Note
Make sure that battery power is regularly verified by, for example, using the gateway web interface.
Wireless network communication should be verified according to IEC 62591 (WirelessHART) standards
best practice.
Figure 3-7. Tilt gauges on Tank Roof
Reference Manual
00809-0500-5100, Rev AC
16
A. Tilt gauge mounted on tank roof; Rosemount 3308 Wireless Guided Wave Radar transmitter
B. Reference level gauge for product level measurements
C. Floating roof
D. Repeater
Installation
Page 23

Reference Manual
A
D
E
G
C
H
FF
B
00809-0500-5100, Rev AC
Free space
Make sure that there is free space underneath the probe when the roof has landed at the bottom of the
tank.
It is recommended that the nozzle is ventilated for pressure equalization. This will ensure that pressure
build-up is released in case the roof sinks. A flushing ring connection can be used in case the nozzle is not
ventilated.
Figure 3-8. Rosemount 3308 Installation on Tank Roof
Installation
May 2020
Installation
A. Rosemount 3308 tilt gauge
B. Free space
C. Probe
D. Nozzle
E. Pontoon
F. Roof support
G. Liquid
H. Floating roof
17
Page 24

Installation
B
A
F
G
D
C
E
May 2020
Reference Manual
00809-0500-5100, Rev AC
Geometry
It is important that the nozzle is high enough to ensure that the product surface does not reach the level
transmitter’s Blind Zone in case the roof tilts or sinks. Make sure that there is sufficient measuring range
margin as illustrated in Figure 3-9.
See the Rosemount 3308 Series Reference Manual
for more information on Blind Zones.
Normal Distance is a configuration parameter that designates the distance between the upper
reference point and the product surface when the tank roof floats freely and is horizontal with no tilt. A
deviation from Normal Distance indicates that the roof is stuck or sinking.
Prior to putting the Floating Roof Monitoring system in operation, it is recommended to hand dip each
tilt gauge nozzle in order to find the exact Normal Distance. This value will be needed in the Floating
Roof Monitoring setup as described in “Roof mounted” on page 33. The hand dip value allows you to
verify that the tilt gauge is measuring on the actual product surface.
Note
Make sure all roof monitoring alarm limits are configured inside the measuring range.
Figure 3-9. Blind Zone and Measuring Range
18
A. Rosemount 3308 tilt gauge
B. Blind Zone
C. Measuring range
D. Normal distance. This parameter is configured in the Floating Roof Monitoring Setup window (see “Normal
distance” on page 34).
E. Minimum nozzle height=200 mm
F. Floating roof
G. Liquid
Installation
Page 25

Reference Manual
A
B
MINIMUM 3 TILT GAUGES MAXIMUM 6 TILT GAUGES
00809-0500-5100, Rev AC
3.3.3 Tilt gauge position
It is recommended that the tilt gauges are installed in such a way that they are spread out evenly around
the tank roof as illustrated below. You may use a minimum of three tilt gauges. Up to six tilt gauges may
be used if required.
Figure 3-10. Position on Tank Roof
Installation
May 2020
A. Distance to tank wall
B. Tilt gauge
Installation
19
Page 26

Installation
May 2020
3.3.4 Drain sump monitoring
A Rosemount 3308 Wireless Guided Wave Radar or a Rosemount 2160 Wireless Vibrating Fork can be
used for drain sump monitoring.
Figure 3-11. Drain Sump Gauges
Reference Manual
00809-0500-5100, Rev AC
3.3.5 Hydrocarbon detection
A Rosemount 702 Wireless Discrete Transmitter with Liquid Hydrocarbon Detection can be used for
detecting hydrocarbons on the roof.
Figure 3-12. Hydrocarbon Gauge
20
Installation
Page 27

Reference Manual
00809-0500-5100, Rev AC
Section 4 Configuration
Safety messages . . . . . . . . . . . . . . . . . . . . . . . . . . . . . . . . . . . . . . . . . . . . . . . . . . . . . . . . . . . . . . . . . . page 21
Introduction . . . . . . . . . . . . . . . . . . . . . . . . . . . . . . . . . . . . . . . . . . . . . . . . . . . . . . . . . . . . . . . . . . . . . page 22
Floating roof monitoring setup . . . . . . . . . . . . . . . . . . . . . . . . . . . . . . . . . . . . . . . . . . . . . . . . . . . . . page 23
4.1 Safety messages
Procedures and instructions in this section may require special precautions to ensure the safety of the
personnel performing the operations. Information that raises potential safety issues is indicated by a
warning symbol ( ). Please refer to the following safety messages before performing an operation
preceded by this symbol.
Configuration
May 2020
Failure to follow safe installation and servicing guidelines could result in death or serious injury.
Make sure only qualified personnel perform the installation.
Use the equipment only as specified in this manual. Failure to do so may impair the protection provided
by the equipment.
Do not perform any service other than those contained in this manual unless you are qualified.
To prevent ignition of flammable or combustible atmospheres, disconnect power before servicing.
Substitution of components may impair Intrinsic Safety.
Configuration
21
Page 28

Configuration
May 2020
4.2 Introduction
It is important that configuration is properly prepared by providing the appropriate information that is
needed for setting up a Rosemount Tank Gauging system. For example, you will need tank geometry
parameters, antenna type for level gauges, Unit Id and Modbus communication addresses.
Prior to setting up a Rosemount TankMaster Floating Roof Monitoring system, all devices need to
be installed, wired, and configured according to the standard procedure.
The purpose of tank configuration is to associate level gauges and other devices to specific tanks. In a
Floating Roof Monitoring system you will need to configure reference gauge for level measurements as
well as tilt gauges for floating roof monitoring. Drain and Hydrocarbon gauges may also be used and
therefore need to be installed prior to setting up the floating roof monitoring system. Tank configuration
is part of the standard installation procedure for a Rosemount Tank Gauging system.
4.2.1 Inventory calculations
Note that for tilt gauge mounting type Shell mounted with Level Reference and Roof mounted you
will need to make sure that inventory calculations are setup. This is required for calculating floating roof
status such as Landed, Partially Landed, and Roof Floating High/Low.
For more information on setting up inventory calculations, see the Rosemount TankMaster WinOpi
Reference Manual
.
Reference Manual
00809-0500-5100, Rev AC
22
Configuration
Page 29

Reference Manual
A
B
B
00809-0500-5100, Rev AC
4.3 Floating roof monitoring setup
Prior to setting up the Floating Roof Monitoring function, make sure that reference level gauge and tilt
gauges are configured according to the standard procedure for Rosemount radar level gauges. Also, in
case drain gauge and/or hydrocarbon gauge will be used, you will have to install these devices too and
ensure that proper communication is established with the host computer system.
It is important that the roof floats horisontally in its normal position when setting up the roof monitoring
function. The roof must float freely and may not be stuck at the tank wall.
4.3.1 TankMaster WinSetup workspace
The WinSetup workspace shows installed tanks and devices. A Floating Roof tank with tilt gauges for roof
monitoring will appear as shown in Figure 4-1 below. Tilt gauges, as well as associated devices such as
level gauges and temperature transmitters, will be shown.
Figure 4-1. Associated devices and tilt gauges appear in the WinSetup workspace
Configuration
May 2020
Configuration
A. Tilt gauges
B. Level gauge and temperature transmitter associated with the tank
23
Page 30

Configuration
May 2020
4.3.2 To enable floating roof monitoring
The Floating Roof Monitoring function requires hardware key option Roof Monitoring Setup.
To enable Floating Roof Monitoring:
1. Open the Rosemount TankMaster WinSetup program.
2. In the WinSetup workspace, select the desired tank icon.
Reference Manual
00809-0500-5100, Rev AC
3. Click the right mouse button on the tank icon and select Floating Roof Monitoring.
4. In the Floating Roof Monitoring Setup window (see Figure 4-2 on page 25), select the Enable... check
box in the upper left-hand corner.
5. Select the mounting type that corresponds to your installation. Available options are:
shell mounted with reference gauge
shell mounted without reference gauge
roof mounted
6. Configure tilt gauges, drain gauge, and hydrocarbon gauge if available.
24
Configuration
Page 31

Reference Manual
00809-0500-5100, Rev AC
Figure 4-2. Floating Roof Monitoring Setup
Configuration
May 2020
The Floating Roof Monitoring Setup window lets you enable and configure the monitoring system.
Table 4-1. Floating Roof Monitoring Setup
Item Description
Shell, with reference level gauge
Mounting type
Tilt gauge Number of tilt gauges, tilt gauge source device.
Drain gauge Source, input, type.
Hydrocarbon gauge Source, input.
Alarm settings Roof tilt, Roof floating, Drain sump.
Shell, without reference level gauge
Roof mounted
Configuration
25
Page 32
Configuration
May 2020
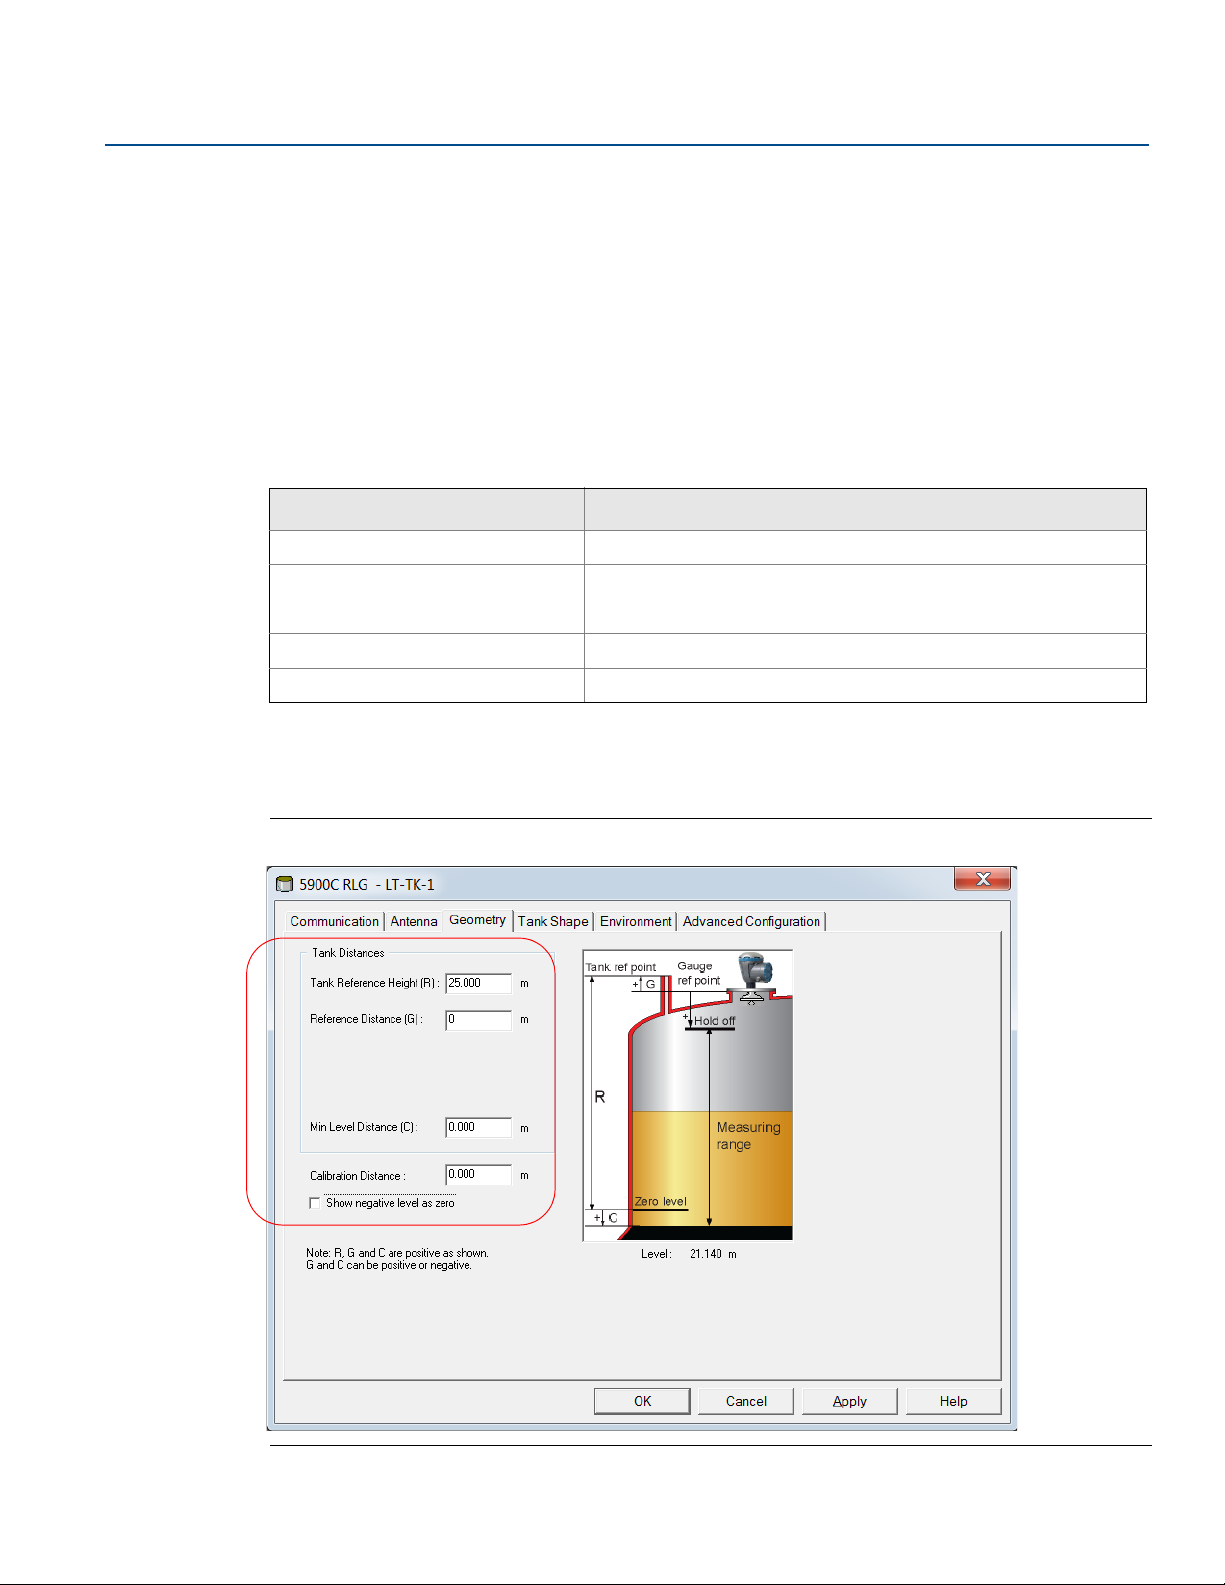
4.3.3 Shell mounted with level reference
This option includes tilt gauges and a level reference gauge. Prior to setting up the Floating Roof
Monitoring system, the reference gauge needs to be installed and configured according to the standard
procedure for Rosemount radar level gauges.
In case reference gauge tank geometry needs to be adjusted at a later stage, make sure that the floating
roof monitoring setup is updated as well.
For the tilt gauges you should use the same Tank Reference Height (R) as the Reference Level gauge.
Start by using the following parameter settings for the tilt gauges prior to setting up the floating roof
monitoring function.
Table 4-2. Initial Tank Geometry Parameters for Tilt Gauges
Parameter Value
Tank Reference Height (R) Same as for the Level Reference Gauge.
Gauge Reference Distance (G)
Minimum Level Distance (C) 0
0
This value will be changed later when setting up the floating roof
monitoring function.
Reference Manual
00809-0500-5100, Rev AC
Calibration Distance 0
These parameters may be changed at a later stage.
Figure 4-3 shows geometry settings configuration for the Rosemount 5900C. Basically the same
geometry settings are used for a Rosemount 5408 transmitter.
Figure 4-3. Example of Tank Geometry Settings for Rosemount 5900C
26
Configuration
Page 33

Reference Manual
00809-0500-5100, Rev AC
Floating Roof Monitoring Setup
Ensure that Floating Roof Monitoring is enabled. Select the Shell-Mounted with Level Reference
option.
Figure 4-4. Mounting Type
Configuration
May 2020
You may use three to six tilt gauges. Prior to setting up the Floating Roof Monitoring function, make sure
that the tilt gauges are properly installed and configured. Check that all tilt gauges are available and
appear in the Source drop-down list.
Since the tilt gauges may be installed at slightly different heights on the tank shell, in most cases the
measured distance to the reflector on the tank roof will differ. Make sure that each tilt gauge is calibrated
to show Difference equal to zero (Reference Distance - Actual Distance = 0), see “Calibration” on
page 28.
Figure 4-5. Tilt Gauge Configuration for Shell Mounted with Level Reference Gauge
Configuration
Number of tilt gauges
Ensure that number of tilt gauges corresponds to the actual number of tilt gauges installed on the tank
roof. You may use up to six tilt gauges.
27
Page 34

Configuration
May 2020
Reference Manual
00809-0500-5100, Rev AC
Source
For each tilt gauge, select the desired gauge from the Source drop-down list.
Verify that the selected tilt gauge corresponds to the actual gauge on the tank roof.
Calibration
Each tilt gauge needs to be calibrated prior to using the Floating Roof Monitoring function. This means
that Difference is set equal to zero (Reference Distance - Actual Distance = 0).
The Reference Level gauge measures distance to the product surface. Each shell-mounted tilt gauge
measures the distance to a reflector placed on the tank roof. Tilt gauges and reference level gauge may
be installed at different heights, in most cases the Actual Distance measured by a tilt gauge will differ
from the Reference Distance measured by the reference gauge. Roof floating and tilt calculations are
based on monitoring the difference between Actual Distance and Reference Distance. As long as the roof
floats horisontally in its normal position, the difference between Actual Distance and Reference Distance
will remain constant. If the roof gets stuck, sinks, or tilts, the difference will change.
Note
Prior to calibrating, ensure that the roof is floating in its normal stable position in the product liquid.
Ensure that it is not stuck on the tank wall. No filling or emptying may occur during the calibration
procedure.
Ensure that all gauges that will be used as tilt gauges are installed and available in the Source drop-down
list. For each tilt gauge, select the desired source device as illustrated in Figure 4-5 on page 27.
Reference distance is the distance from the Gauge Reference Point of the Reference Level Gauge to the
product surface.
Actual distance is the distance from the Tilt Gauge Reference Point to the reflector.
Difference is equal to the difference between Reference distance and Actual distance.
See Figure 4-7 on page 30 for more information on tank geometry.
Tilt gauge configuration
Configure the tilt gauges so that Difference = 0 when the floating roof is horizontal and floats at its
normal position:
1. In the Floating Roof setup window, check the Difference parameter. This value is equal to Reference
Distance - Actual Distance.
2. Click the right mouse button on the tilt gauge icon, and select Properties.
3. Select the Geometry tab.
4. In the Gauge Reference Distance (G) input field, enter the current value for the Difference parameter
which appears in the Floating Roof Monitoring Setup window.
5. Click the Apply button.
6. Wait a couple of minutes to allow the level gauge to settle.
28
7. In the Floating Roof Monitoring Setup window, check that Difference=0. If it is not you may need to
slightly adjust the Reference Distance (G) again.
Configuration
Page 35

Reference Manual
00809-0500-5100, Rev AC
An example of how to perform a calibration is illustrated in Figure 4-6.
The Gauge Reference Distance (G) parameter is used as a calibration offset in order to ensure that the
distance to the reflector (C) measured by the tilt gauge equals the distance to the product surface (L)
measured by the reference level gauge. This will compensate for different mounting positions of tilt and
reference level gauges, and for different position of reflector and product surface.
Figure 4-6. Reference Distance (G) Calibration for Tilt Gauge.
Configuration parameters Description
Configuration
May 2020
Example
Difference= 0.218
Difference= Reference Distance - Actual Distance
Reference Distance (G)
In TankMaster WinSetup, open the Properties/Geometry
tab for the tilt gauge and enter 0.218 for Reference
Distance (G).
Click Apply.
Difference = 0
After a short settling time, the Reference Distance and
Actual Distance should be equal, i.e. Difference = 0.
Configuration
29
Page 36

Configuration
G
C
A
R
L
B
H
D
May 2020
Reference Manual
00809-0500-5100, Rev AC
Figure 4-7. Tank Geometry for Tilt Gauge and Reference Level Gauge
A. Tilt gauge.
B. Reference level gauge.
C. Actual distance; distance from tilt gauge to reflector + Reference Distance (G)
D. Reference distance; distance from reference level gauge to product surface.
G. Gauge Reference Distance (G).
H. Gauge Reference Point for the level reference gauge.
L. Reflector.
R. Tank Reference Height (R).
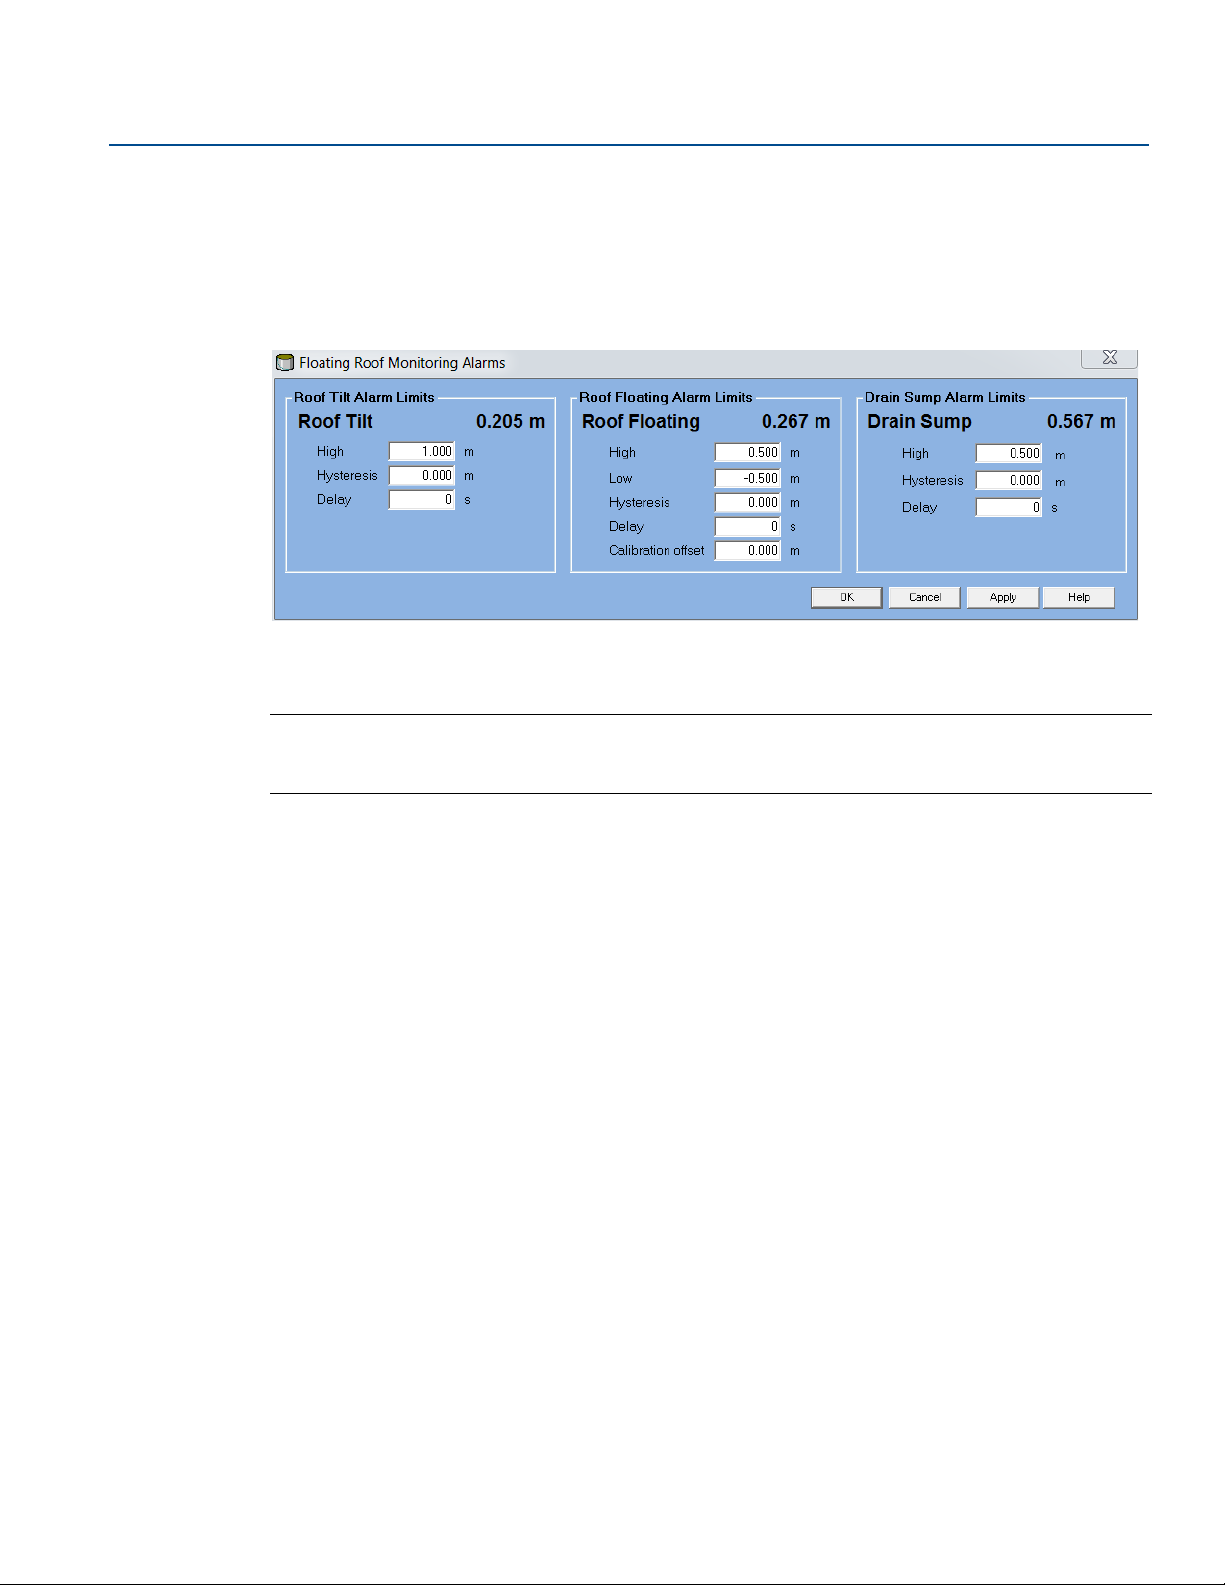
Alarm Setup
See “Alarm setup” on page 37 for information on how to configure alarm limits for roof tilt, roof floating
high/low, and drain sump.
30
Configuration
Page 37

Reference Manual
00809-0500-5100, Rev AC
4.3.4 Shell mounted without level reference
With this option, TankMaster WinSetup supports roof tilt monitoring only. Roof floating high/low can
not be calculated since no reference level gauge is available.
Prior to setting up the Floating Roof Monitoring system, the tilt gauges have to be installed and
configured according to the standard procedure for Rosemount radar level gauges.
Figure 4-8. Mounting Type
Configuration
May 2020
Tilt gauge configuration
You may use three to six tilt gauges. Prior to setting up the Floating Roof Monitoring function, make sure
that the tilt gauges are properly installed and configured. Check that all tilt gauges are available and
appear in the Source drop-down list.
Since the tilt gauges may be installed at slightly different heights on the tank shell, the measured
distance to the reflector on the tank roof will differ.
Figure 4-9. Tilt Gauge Configuration for Shell Mounted without Level Reference
Number of tilt gauges
Ensure that number of tilt gauges corresponds to the actual number of tilt gauges installed on the tank
roof. You may use up to six tilt gauges.
Source
Configuration
For each tilt gauge, select a gauge from the Source drop-down list.
31
Page 38

Configuration
May 2020
Reference Manual
00809-0500-5100, Rev AC
Calibration
Make sure that the tilt gauges are calibrated to show the same distance to the reflector in the Floating
Roof Monitoring Setup window. This distance is presented as the Actual distance.
1. In TankMaster WinSetup, open the Floating Roof Monitoring Setup window.
2. Check that all tilt gauges are up and running and present an Actual Distance.
3. Note Actual Distance for one of the tilt gauges as a reference.
4. In the TankMaster WinSetup workspace, right-click the device icon for the next tilt gauge.
5. Click Properties and select the Geometry tab.
6. Adjust Reference Distance (G) so the tilt gauge presents the same Actual Distance as the first one.
7. Repeat this procedure until all tilt gauges are configured.
Alarm Setup
See “Alarm setup” on page 37 for information on how to configure alarm limits for roof tilt.
32
Configuration
Page 39

Reference Manual
00809-0500-5100, Rev AC
4.3.5 Roof mounted
Rosemount 3308 transmitters are used as tilt gauges for mounting type Roof Mounted.
Prior to setting up the Floating Roof Monitoring system, the tilt gauges have to be installed and
configured according to the standard procedure for Rosemount radar level gauges.
Note
Ensure that Primary Variable (PV)=Distance for all Rosemount 3308 tilt gauges.
Figure 4-10. Configuration of Roof Mounted Tilt Gauges
Configuration
May 2020
Tilt gauge configuration
You may use three to six tilt gauges. Prior to setting up the Floating Roof Monitoring function, make sure
that the tilt gauges are properly installed and configured. Check that all tilt gauges are available and
appear in the Source drop-down list.
Figure 4-11. Configuration of roof mounted tilt gauges
Number of tilt gauges
Ensure that number of tilt gauges corresponds to the actual number of tilt gauges installed on the tank
roof. You may use up to six tilt gauges.
Source
For each tilt gauge, select a gauge from the Source drop-down list. Tilt gauges appear in the TankMaster
WinSetup workspace as shown in Figure 4-12 below.
Configuration
33
Page 40

Configuration
May 2020
Reference Manual
00809-0500-5100, Rev AC
Figure 4-12. Floating Roof Tank With Tilt Gauges
Normal distance
In the Normal Distance field, enter the actual distance value shown when the tank roof floats
horizontally in its normal position. This value will be used as a reference value for roof buoyancy
calculations. The Normal Distance value is the actual distance the tilt gauge measures to the product
surface when the roof floats horizontally in its normal position and without being tilted.
Figure 4-13. Calibrating Normal Distance for Roof Mounted Tilt Gauges
34
Alarm Setup
See “Alarm setup” on page 37 for information on how to configure alarm limits for roof tilt, roof floating
high/low, and drain sump.
Configuration
Page 41

Reference Manual
00809-0500-5100, Rev AC
4.3.6 Drain gauge
A drain gauge can be configured in the Floating Roof Monitoring system. Typically, a Rosemount 3308
transmitter or a wireless vibrating fork is used. Other suitable devices may be used as well and installed as
generic device in TankMaster WinSetup.
Click the check box to enable drain sump measurements. You may choose one of two types of drain
gauge as source device:
level gauge
On/Off switch
Figure 4-14. Enabling Drain Gauge
Configuration
May 2020
Figure 4-15. Drain Gauge Options
Table 4-3. Drain Gauge Configuration
Parameter Description
Source Level gauge or On/Off switch
Input PV, SV, TV, QV
Type Level or On/Off
Configuration
35
Page 42

Configuration
Enable Hydrocarbon Gauge
May 2020
4.3.7 Hydrocarbon gauge
Reference Manual
00809-0500-5100, Rev AC
A hydrocarbon detecting transmitter can be configured to detect possible product leakage into the
®
sump water from the tank roof drain. The transmitter must support WirelessHART
in order to be used in
the Floating Roof Monitoring system. Typically, a Rosemount 702 Wireless Discrete Transmitter with
Liquid Hydrocarbon Detection may be used.
Figure 4-16. Enabling Hydrocarbon Gauge
Figure 4-17. Hydrocarbon Gauge Options
36
Table 4-4. Hydrocarbon Gauge Configuration
Parameter Description
Source Select a wireless device
Input PV, SV, TV, QV
Type On/Off switch
Configuration
Page 43
Reference Manual
00809-0500-5100, Rev AC
4.3.8 Alarm setup
Requires hardware key option Roof Monitoring Setup.
To access the alarm settings:
1. In the Floating Roof Monitoring Setup window, click the Alarm Settings button:
2. Enter the desired alarm limits. Available options may vary depending on mounting type and whether
drain and hydrocarbon gauges are installed or not.
Configuration
May 2020
Note
When using roof mounted Rosemount 3308 transmitters, ensure that Blind Zones are considered when
specifying alarm limits (see Figure 4-18 on page 38).
Roof Tilt
This alarms is used for setting the maximum roof tilt that may be allowed. Hysteresis and delay can be
used to handle temporary movements that may exceed alarm limit for short periods of time.
Roof Floating
This option is available for Shell-mounted with Level Reference and for Roof Mounted installations.
Drain Sump
For drain gauge of level type, such as the Rosemount 3308 level transmitter, you may specify High alarm,
Hysteresis, and Delay time.
For drain gauge of On/Off type you may specify Delay time.
Alarm limits
The detailed view of the Roof Monitoring window (see “Tank view” on page 39) may be helpful as a tool to
find out how to set proper alarm limits for roof tilt and roof floating.
As the product level moves up and down, the History pane shows data of maximum roof tilt as well as
minimum and maximum deviation of roof floating position. This may give you an idea of the range of
roof tilt and floating positions, and provides useful input for specifying appropriate alarm limits.
Configuration
1. See “Floating roof alarm limits” on page 43 for a description of how to use the detailed view of the
Roof Monitoring window to find proper alarm limits.
2. Ensure that floating roof monitoring alarm limits are within the transmitter’s measuring range as
shown in Figure 4-18 on page 38.
37
Page 44

Configuration
B
A
D
C
E
F
May 2020
Reference Manual
00809-0500-5100, Rev AC
Figure 4-18. Alarm Limits and Measuring Range
A. Rosemount 3308 tilt gauge
B. Blind Zone
C. Measuring range
D. Normal distance
E. Roof Floating Low alarm zone
F. Roof Floating High alarm zone
38
Configuration
Page 45

Reference Manual
00809-0500-5100, Rev AC
Section 5 Operation
Introduction . . . . . . . . . . . . . . . . . . . . . . . . . . . . . . . . . . . . . . . . . . . . . . . . . . . . . . . . . . . . . . . . . . . . . page 39
Tank view . . . . . . . . . . . . . . . . . . . . . . . . . . . . . . . . . . . . . . . . . . . . . . . . . . . . . . . . . . . . . . . . . . . . . . . . page 39
Alarm limits . . . . . . . . . . . . . . . . . . . . . . . . . . . . . . . . . . . . . . . . . . . . . . . . . . . . . . . . . . . . . . . . . . . . . . page 42
Alarm disconnect . . . . . . . . . . . . . . . . . . . . . . . . . . . . . . . . . . . . . . . . . . . . . . . . . . . . . . . . . . . . . . . . . page 44
Roof monitoring group view . . . . . . . . . . . . . . . . . . . . . . . . . . . . . . . . . . . . . . . . . . . . . . . . . . . . . . . page 45
Roof monitoring historical data . . . . . . . . . . . . . . . . . . . . . . . . . . . . . . . . . . . . . . . . . . . . . . . . . . . . . page 48
Roof status . . . . . . . . . . . . . . . . . . . . . . . . . . . . . . . . . . . . . . . . . . . . . . . . . . . . . . . . . . . . . . . . . . . . . . page 51
Alarm priority . . . . . . . . . . . . . . . . . . . . . . . . . . . . . . . . . . . . . . . . . . . . . . . . . . . . . . . . . . . . . . . . . . . . page 56
5.1 Introduction
This chapter provides information about operating a Rosemount™ TankMaster™ Floating Roof Monitoring
system.
Operation
May 2020
5.2 Tank view
Tanks setup for Floating Roof Monitoring can be monitored in Rosemount TankMaster WinOpi. The
current roof status is easily accessible:
1. Ensure that Rosemount TankMaster WinOpi is up and running.
2. In the WinOpi workspace, click the right mouse button on the desired tank and select the Floating
Roof Monitoring option.
Operation
39
Page 46

Operation
May 2020
Reference Manual
00809-0500-5100, Rev AC
Figure 5-1. Floating Roof Monitoring Menu Option
The Floating Roof Monitoring window presents the current status and measurement data. Various status
options are presented in “Roof status” on page 51.
Figure 5-2. Floating Roof Monitoring
40
Pressing the More Details button shows tilt gauge data and historical data in the Roof Monitoring view.
Operation
Page 47

Reference Manual
00809-0500-5100, Rev AC
Figure 5-3. Roof Monitoring Detailed View
Operation
May 2020
Operation
41
Page 48

Operation
Roof Monitoring Alarm Limits
May 2020
5.3 Alarm limits
To configure alarm limits for a Rosemount Tank Gauging floating roof monitoring system:
1. Ensure that Rosemount TankMaster WinOpi program is up and running.
2. In the WinOpi workspace, select the desired tank.
3. Click the right mouse button and select Alarm Entry > Alarm Limits.
4. Click the Roof Monitoring Alarm Limits button to configure alarms for tilt, drain, and hydrocarbon
gauges. See Figure 5-5 and “Floating roof alarm limits” on page 43.
Figure 5-4. Alarm Limits Window in TankMaster WinOpi
Reference Manual
00809-0500-5100, Rev AC
42
Figure 5-5. Alarm Limits for Floating Roof Monitoring
Operation
Page 49

Reference Manual
A
B
C
00809-0500-5100, Rev AC
5.3.1 Floating roof alarm limits
Since each tank is unique, you will need to find proper floating roof alarm limits individually for each tank
roof. The detailed view of the Roof Monitoring window (see Figure 5-3 on page 41) may be helpful as a
tool to find out how to set proper alarm limits for roof tilt and roof floating.
As the product level moves up and down, the History pane shows maximum roof tilt as well as minimum
and maximum deviation of floating position. This may give you an idea of the range of roof tilt and roof
floating which can serve as useful input for specifying appropriate alarm limits.
Make sure that alarm limits are configured within the transmitter’s measuring range and that the
product surface does not reach the Blind Zone (see “Installation on tank roof” on page 16).
Figure 5-6. Detailed View in Roof Monitoring Window
Operation
May 2020
Operation
A. Graphical view of tank and tilt gauge positions
B. Current tilt gauge data. Value=distance to product surface. Difference=deviation from Normal Distance.
C. Historical tilt data
The Value column shows the current tilt value.
The Difference column shows the deviation between current tilt value and the calibrated value as
specified in the Floating Roof Setup window (see “Floating roof monitoring setup” on page 23).
43
Page 50

Operation
Roof Monitoring Alarm disconnect
May 2020
5.4 Alarm disconnect
The Alarm Disconnect window lets you disconnect various tank variable alarms as well as Floating Roof
Monitoring alarms such as Roof Tilt, Roof Floating, Drain Sump, and Hydrocarbon Detection alarms:
1. In the WinOpi workspace, select the desired tank.
2. Click the right mouse button and select Alarm Entry > Alarm Disconnect.
3. Check the alarms to be disconnected.
4. Click Apply to activate the disconnect function. Click OK to close the window.
Figure 5-7. Alarm Limits Window in TankMaster WinOpi
Reference Manual
00809-0500-5100, Rev AC
44
Operation
Page 51

Reference Manual
00809-0500-5100, Rev AC
5.5 Roof monitoring group view
In TankMaster WinOpi it is possible to create a specific group view for all tanks with roof monitoring
function enabled. You can design the group view to include any particular floating roof parameters that
you are interested in.
Figure 5-8. Group View for Floating Roof Monitoring
Operation
May 2020
Operation
45
Page 52

Operation
May 2020
5.5.1 To create a group view
1. Open the Rosemount TankMaster WinOpi program.
2. Open Tools>Options.
3. Select the Group Templates tab.
4. In the left-hand column, select View Group and click the Clone button.
Reference Manual
00809-0500-5100, Rev AC
46
5. Select the duplicated group template.
6. Click the Edit button. Now the Edit Group Template window appears.
Operation
Page 53

Reference Manual
00809-0500-5100, Rev AC
7. Under Menu Item you may enter a title to appear under the View>Group menu. Under View Title
you may type a title for the new group view.
Operation
May 2020
8. In the Available Parameters pane on the left-hand side, select the desired parameters to add to the
new group view. In the above example Roof Tilt, Roof Floating, Roof Drain, and Hydrocarbons are
selected. You may select several parameters at the same time by using the Shift or the Ctrl button
and clicking the left mouse button. Available parameters for floating roof monitoring are:
Roof Tilt
Roof Floating
Roof Drain
Hydrocarbons
Roof Status
9. Click the Select button to move the parameters to the Selected Parameters pane.
Operation
10.Click OK to close the Edit Group Template window.
11.Click OK to close the Options/Group Templates window.
47
Page 54

Operation
May 2020
5.6 Roof monitoring historical data
The Historical View window lets you view roof floating and roof tilt history.
Prior to viewing historical data you will have to specify which parameters and tanks to sample and start
the actual data sampling (Sample Setup). You will also have to configure how historical data is presented
(View Setup).
Figure 5-9. Historical View
Reference Manual
00809-0500-5100, Rev AC
48
The Sample Setup button lets you configure what tanks and parameters to be sampled.
The View Setup button lets you configure how tank parameters are displayed in the Historical View
window.
Operation
Page 55

Reference Manual
C
A
B
00809-0500-5100, Rev AC
5.6.1 Sample setup
The Sample Setup window lets you specify which parameters to sample for the Historical View. This is a
brief overview of sample setup. See the Rosemount TankMaster WinOpi reference manual
information.
Figure 5-10. Historical View Sample Setup
Operation
May 2020
for more
A. Server Setup
B. All Tanks
C. Tank Setup
Server setup
Allows you to select a TankMaster server.
All tanks
Allows you to select blocks and to configure sample interval and start time for all tanks.
Tank setup
Lets you select tank and blocks to be monitored, and to configure sample interval and start time for
individual tanks. In addition to the standard blocks, the following blocks are available for floating roof
monitoring:
Roof Floating
Roof Tilt
Roof Drain
Operation
49
Page 56

Operation
May 2020
Reference Manual
00809-0500-5100, Rev AC
Starting and stopping data sampling
You may start sampling all tanks at once by pressing the Start All button. In case you would like to start
the current tank only, press the Start Tank button.
Figure 5-11. Sampling Started
5.6.2 View setup
The View Setup window lets you configure how tank parameters are displayed in the Historical View
window. See the Rosemount TankMaster WinOpi reference manual
up presentation of historical data.
for more information on how to set
50
Operation
Page 57

Reference Manual
00809-0500-5100, Rev AC
5.7 Roof status
The Roof Monitoring window shows the current status of the floating tank roof. Each condition is
presented with an image and text that presents tilt, roof floating high/low, hydrocarbon, and drain
sump.
Table 5-1. Roof Status in Roof Monitoring Window
Operation
May 2020
Roof status
Good. Status OK.
Roof tilt exceeds alarm limits.
Roof might be stuck or one or several pontoons may be
damaged.
Operation
51
Page 58

Operation
May 2020
Reference Manual
00809-0500-5100, Rev AC
Roof status
Roof is floating lower than configured alarm limit.
There may be product or water on top of the roof, or pontoons
may be damaged.
52
Roof is floating higher than configured alarm limit. The roof
might be stuck.
Operation
Page 59

Reference Manual
00809-0500-5100, Rev AC
Operation
May 2020
Roof status
Product may have leaked to tank roof.
Operation
Drain Sump may be clogged.
53
Page 60

Operation
May 2020
Reference Manual
00809-0500-5100, Rev AC
Roof status
Incorrect configuration or invalid data from one or several
transmitters.
54
Roof partially landed.
Operation
Page 61
Reference Manual
00809-0500-5100, Rev AC
Operation
May 2020
Roof status
Roof landed.
Operation
55
Page 62

Operation
May 2020
5.8 Alarm priority
The various status options are displayed in an order that depends on their respective priority as listed in
Table 5-2.
Table 5-2. Alarm Priority for Floating Roof Status
Priority Status
1 Roof tilted
2 Roof Floating High/Low
3 Hydrocarbons Detected
4 Drain Sump Full
5 Unknown
6 Roof landed/partially landed
7 OK
Reference Manual
00809-0500-5100, Rev AC
56
Operation
Page 63

Reference Manual
00809-0500-5100, Rev AC
Service and Troubleshooting
Section 6 Service and Troubleshooting
Safety messages . . . . . . . . . . . . . . . . . . . . . . . . . . . . . . . . . . . . . . . . . . . . . . . . . . . . . . . . . . . . . . . . . . page 57
Troubleshooting . . . . . . . . . . . . . . . . . . . . . . . . . . . . . . . . . . . . . . . . . . . . . . . . . . . . . . . . . . . . . . . . . . page 58
6.1 Safety messages
Procedures and instructions in this section may require special precautions to ensure the safety of the
personnel performing the operations. Information that raises potential safety issues is indicated by a
warning symbol ( ). Please refer to the following safety messages before performing an operation
preceded by this symbol.
Failure to follow safe installation and servicing guidelines could result in death or serious injury:
Make sure only qualified personnel perform the installation.
Use the equipment only as specified in this manual. Failure to do so may impair the protection provided
by the equipment.
Do not perform any service other than those contained in this manual unless you are qualified.
May 2020
Explosions could result in death or serious injury:
Verify that the operating environment of the transmitter is consistent with the appropriate hazardous
locations certifications.
Before connecting a Field Communicator in an explosive atmosphere, make sure the instruments in the
loop are installed in accordance with intrinsically safe or non-incendive field wiring practices.
Do not remove the gauge cover in explosive atmospheres when the circuit is alive.
Service and Troubleshooting
57
Page 64

Service and Troubleshooting
May 2020
6.2 Troubleshooting
This troubleshooting chart covers issues related to floating roof monitoring. For other issues see the
reference manual for the respective device.
Table 6-1. Troubleshooting Chart
Symptom Possible cause Action
Reference Manual
00809-0500-5100, Rev AC
Alarm is not triggered as
expected
Roof floating low/high
reversed sign
Status “Unknown”
False High/Low alarms for
floating roof
Wireless network is slow and
unstable
Incorrect alarm limit configuration Make sure that alarm limits are properly set. You may
use detailed view in the Roof Monitoring window to use
historical data as input to find the appropriate alarm
limits.
Primary variable (PV) configured as
Level for the Rosemount 3308
Configure Primary Variable to Distance (PV=Distance).
transmitter
Incorrect inventory setup
Communication failure
Invalid level
Configuration error
Incorrect configuration or invalid data
from one or several transmitters.
Check gauge status for tilt gauge, drain gauge, and
hydrocarbon gauge
Check floating roof status in Tank Inventory window
Check Tank Capacity Table (TCT)
Check Average Temperature
Check inventory configuration in Tank Inventory
window
Incorrect tank geometry configuration
for reference level gauge
Measurement updates from tilt gauges
out of sync
A reflector is moved out of correct
position
Make sure that tank geometry is configured with
correct values.
Add alarm delay time
Change alarm limit
Increase update time for tilt gauges
Make sure that each reflector is properly placed under
the tilt gauge.
Normal function. TankMaster does not automatically
Tank roof has landed on its support legs
disable floating roof high alarm when tank roof has
landed.
Hardware error. Wrong transmitter
head is mounted on probe after
maintenance.
Low battery in one or several wireless
devices
One or several wireless devices off line
Wireless field network does not
comply with IEC 62591 (WirelessHART)
best practice
Make sure that the transmitter head is mounted on the
correct probe and roof position.
Verify battery status by e.g. using the gateway web
interface
Verify that all wireless devices (including repeaters) are
online
Verify wireless network communication according to
IEC 62591 (WirelessHART) standards best practice.
58
Service and Troubleshooting
Page 65

Reference Manual
00809-0500-5100, Rev AC
Commissioning Checklist
May 2020
Appendix A Commissioning Checklist
This check list may be used as a tool to ensure that you have walked through all steps of the Floating Roof Monitoring setup.
Table A-1. Checklist
Item
1 Verify all mechanical requirements.
2
3
4
5
Description See section
Make sure that all transmitters are configured:
Communication
Tank geometry
Device specific data
Verify tilt gauge and reference level gauge measurements. Hand dipping is
recommended to ensure that level readings are correct.
Configure alarm limits for floating roof monitoring.
Verify that alarm limits are properly setup relating to maximum roof tilt and
roof floating high/low.
Make sure that maintenance schedule includes verifying wireless network
regularly.
Ch. 3.3.1 (Shell mounted)
Ch. 3.3.2 (Roof mounted)
See reference manual for respective
transmitter.
N/A
Ch. 4.3.8
Ch. 5.3.1
IEC 62591 (WirelessHART)
Rosemount Tank Gauging Wireless
System Reference Manual
Commissioning Checklist
59
Page 66

Commissioning Checklist
May 2020
Reference Manual
00809-0500-5100, Rev AC
60
Commissioning Checklist
Page 67

Reference Manual
00809-0500-5100, Rev AC
Index
Index
May 2020
A
Actual distance . . . . . . . . . . . . . . . . . . . . . . . . . . . . . . . . . . . . . . 32
Alarm Disconnect. . . . . . . . . . . . . . . . . . . . . . . . . . . . . . . . . . . . 44
Alarm limits. . . . . . . . . . . . . . . . . . . . . . . . . . . . . . . . . . . . . .18, 42
Alarm priority . . . . . . . . . . . . . . . . . . . . . . . . . . . . . . . . . . . . . . . 56
Alarm settings . . . . . . . . . . . . . . . . . . . . . . . . . . . . . . . . . . . . . . 37
Alarm Settings button . . . . . . . . . . . . . . . . . . . . . . . . . . . . . . . . 37
Alarm setup . . . . . . . . . . . . . . . . . . . . . . . . . . . . . . . . . . . . . . . . 37
Antenna inclination . . . . . . . . . . . . . . . . . . . . . . . . . . . . . . . . . . 15
Antenna Orientation. . . . . . . . . . . . . . . . . . . . . . . . . . . . . . . . . . 14
B
Battery power . . . . . . . . . . . . . . . . . . . . . . . . . . . . . . . . . . . . . . . 16
Blind Zone. . . . . . . . . . . . . . . . . . . . . . . . . . . . . . . . . . . . . . . . . . 18
Bracket . . . . . . . . . . . . . . . . . . . . . . . . . . . . . . . . . . . . . . . . . . . . 12
C
Calibration . . . . . . . . . . . . . . . . . . . . . . . . . . . . . . . . . . . . . . 28, 32
Configuration . . . . . . . . . . . . . . . . . . . . . . . . . . . . . . . . . . . . . . . 22
Configuration/Operation . . . . . . . . . . . . . . . . . . . . . . . . . . . . . . 21
Creating a group view. . . . . . . . . . . . . . . . . . . . . . . . . . . . . . . . . 46
D
Drain gauge . . . . . . . . . . . . . . . . . . . . . . . . . . . . . . . . . . . . . . . . 35
Drain sump . . . . . . . . . . . . . . . . . . . . . . . . . . . . . . . . . . . . . . . . . 20
F
Floating Roof Monitoring setup . . . . . . . . . . . . . . . . . . . . . .23, 24
Floating roof status. . . . . . . . . . . . . . . . . . . . . . . . . . . . . . . . . . . 22
Flushing ring connection . . . . . . . . . . . . . . . . . . . . . . . . . . . . . . 17
Free space. . . . . . . . . . . . . . . . . . . . . . . . . . . . . . . . . . . . . . .12, 17
G
Group view . . . . . . . . . . . . . . . . . . . . . . . . . . . . . . . . . . . . . .45, 46
M
Measuring range. . . . . . . . . . . . . . . . . . . . . . . . . . . . . . . . . . . . . 18
Minimum nozzle height . . . . . . . . . . . . . . . . . . . . . . . . . . . . . . . 18
More Details button . . . . . . . . . . . . . . . . . . . . . . . . . . . . . . . . . . 40
N
Normal Distance. . . . . . . . . . . . . . . . . . . . . . . . . . . . . . . . . .18, 34
Nozzle height . . . . . . . . . . . . . . . . . . . . . . . . . . . . . . . . . . . . . . . 18
P
Priority . . . . . . . . . . . . . . . . . . . . . . . . . . . . . . . . . . . . . . . . . . . . 56
R
Reference level gauge . . . . . . . . . . . . . . . . . . . . . . . . . . . . . . . . 11
Reflector . . . . . . . . . . . . . . . . . . . . . . . . . . . . . . . . . . . . . . . . . . . 13
Roof Monitoring Alarm Limits button . . . . . . . . . . . . . . . . . . . . 42
Roof Monitoring view . . . . . . . . . . . . . . . . . . . . . . . . . . . . . . . . . 40
Roof Monitoring window . . . . . . . . . . . . . . . . . . . . . . . . . . . . . . 51
Roof Mounted. . . . . . . . . . . . . . . . . . . . . . . . . . . . . . . . . . . . . . . 33
Roof status . . . . . . . . . . . . . . . . . . . . . . . . . . . . . . . . . . . . . . . . . 51
S
Setup. . . . . . . . . . . . . . . . . . . . . . . . . . . . . . . . . . . . . . . . . . . . . . 23
Shell mounted with level reference . . . . . . . . . . . . . . . . . . . . . . 26
Shell mounted without level reference . . . . . . . . . . . . . . . . . . . 31
Status . . . . . . . . . . . . . . . . . . . . . . . . . . . . . . . . . . . . . . . . . . . . . 51
T
Tank geometry . . . . . . . . . . . . . . . . . . . . . . . . . . . . . . . . . . . . . . 26
Tank Reference Height . . . . . . . . . . . . . . . . . . . . . . . . . . . . . . . . 26
Tank shell . . . . . . . . . . . . . . . . . . . . . . . . . . . . . . . . . . . . . . . . . . 11
TankMaster WinOpi . . . . . . . . . . . . . . . . . . . . . . . . . . . . . . . . . . 39
Tilt gauge . . . . . . . . . . . . . . . . . . . . . . . . . . . . . . . . . . . . . . . . . . 11
Tilt gauge position . . . . . . . . . . . . . . . . . . . . . . . . . . . . . . . . . . . 19
H
Hand dip . . . . . . . . . . . . . . . . . . . . . . . . . . . . . . . . . . . . . . . . . . . 18
Historical data. . . . . . . . . . . . . . . . . . . . . . . . . . . . . . . . . . . . . . . 48
Hydrocarbon detecting transmitter. . . . . . . . . . . . . . . . . . . . . . 36
Hydrocarbon detection . . . . . . . . . . . . . . . . . . . . . . . . . . . . . . . 20
I
Inclination. . . . . . . . . . . . . . . . . . . . . . . . . . . . . . . . . . . . . . . . . . 15
Installation Recommendations . . . . . . . . . . . . . . . . . . . . . . . . . 12
Inventory calculations . . . . . . . . . . . . . . . . . . . . . . . . . . . . . . . . 22
Index
V
Ventilated nozzle . . . . . . . . . . . . . . . . . . . . . . . . . . . . . . . . . . . . 17
W
WinOpi . . . . . . . . . . . . . . . . . . . . . . . . . . . . . . . . . . . . . . . . . . . . 39
WinSetup workspace . . . . . . . . . . . . . . . . . . . . . . . . . . . . . . . . . 23
61
Page 68

Index
May 2020
Reference Manual
00809-0500-5100, Rev AC
62
Index
Page 69

Page 70

Global Headquarters and Europe Regional Office
Tank Gauging
Emerson Automation Solutions
Box 150
(Visiting address: Layoutvägen 1)
SE-435 23 Mölnlycke
+46 31 337 00 00
+46 31 25 30 22
sales.rtg@emerson.com
North America Regional Office
Tank Gauging
Emerson Automation Solutions
6005 Rogerdale Road
Mail Stop NC 136
Houston TX 77072
United States
+1 281 988 4000 or +1 800 722 2865
sales.rtg.hou@emerson.com
Reference Manual
00809-0500-5100, Rev AC
May 2020
Latin America Regional Office
Emerson Automation Solutions
1300 Concord Terrace, Suite 400
Sunrise, FL 33323, USA
+1 954 846 5030
+1 954 846 5121
RFQ.RMD-RCC@Emerson.com
Asia Pacific Regional Office
Emerson Automation Solutions
1 Pandan Crescent
Singapore 128461
+65 6777 8211
+65 6777 0947
Enquiries@AP.Emerson.com
Middle East and Africa Regional Office
Emerson Automation Solutions
Emerson FZE P.O. Box 17033
Jebel Ali Free Zone - South 2
Dubai, United Arab Emirates
+971 4 8118100
+971 4 8865465
RFQ.RMTMEA@Emerson.com
Linkedin.com/company/Emerson-Automation-Solutions
Twitter.com/Rosemount_News
Facebook.com/Rosemount
Youtube.com/user/RosemountMeasurement
Google.com/+RosemountMeasurement
Standard Terms and Conditions of Sale can be found on the Terms and Conditions of
Sale page.
The Emerson logo is a trademark and service mark of Emerson Electric Co. Rosemount
is a mark of one of the Emerson family of companies. All other marks are the property
of their respective owners.
© 2020 Emerson. All rights reserved.
 Loading...