

Reference Manual
303042EN, Edition 1
November 2007
Rosemount TankMaster
Network Configuration
r
a
d
a
R
k
n
a
T
t
n
u
o
m
e
s
o
R
f
f
O
M
R
E
T
n
O
i
Rx
H
N
I
Tx
A
G
o
L
USB
RS-232
Ext. pwr
0
8
1
2
M
B
F
www.rosemount-tg.com


Reference Manual
303042EN, Edition 1
November 2007
Rosemount TankMaster Network Configuration
Rosemount TankMaster
Network Configuration
NOTICE
Read this manual before working with the product. For personal and system safety, and for
optimum product performance, make sure you thoroughly understand the contents before
installing, using, or maintaining this product.
For equipment service or support needs, contact your local Emerson Process
Management/Rosemount Tank Gauging representative.
The contents, descriptions and specifications within this manual is subject to change
without notice. Rosemount TankRadar AB accepts no responsibility for any errors that may
appear in this manual.
Cover Photo: cover-network-overview.eps
www.rosemount-tg.com


Reference Manual
303042EN, Edition 1
November 2007
Rosemount Tank Master Network Configuration
Table of Contents
SECTION 1
Getting started
SECTION 2
Installation
SECTION 3
Troubleshooting
1.1 General information . . . . . . . . . . . . . . . . . . . . . . . . . . . . . . . . . . 1-1
1.2 Minimum requirements . . . . . . . . . . . . . . . . . . . . . . . . . . . . . . . 1-1
1.2.1 Software . . . . . . . . . . . . . . . . . . . . . . . . . . . . . . . . . . . 1-1
1.2.2 Hardware:. . . . . . . . . . . . . . . . . . . . . . . . . . . . . . . . . . 1-1
1.2.3 Network requirement . . . . . . . . . . . . . . . . . . . . . . . . . 1-2
1.3 Definitions and abbreviations . . . . . . . . . . . . . . . . . . . . . . . . . . 1-2
2.1 Windows Configuration . . . . . . . . . . . . . . . . . . . . . . . . . . . . . . . 2-3
2.1.1 Windows network configuration . . . . . . . . . . . . . . . . . 2-3
2.1.2 Configure regional and language settings . . . . . . . . . 2-5
2.1.3 TankMaster installation . . . . . . . . . . . . . . . . . . . . . . . 2-5
2.1.4 Configuring the Windows firewall . . . . . . . . . . . . . . . . 2-6
2.1.5 Configuring DCOM settings . . . . . . . . . . . . . . . . . . . . 2-8
2.1.6 Enable shared folder TM . . . . . . . . . . . . . . . . . . . . . 2-13
2.1.7 Access permission on shared folder TM . . . . . . . . . 2-15
2.2 Time Server Configuration. . . . . . . . . . . . . . . . . . . . . . . . . . . . 2-17
2.3 Time Client and WinOpi Configuration . . . . . . . . . . . . . . . . . . 2-19
2.4 Connect WinOpi to the Tank Server . . . . . . . . . . . . . . . . . . . . 2-20
3.1 DCOM error messages . . . . . . . . . . . . . . . . . . . . . . . . . . . . . . . 3-1
3.1.1 Server not available . . . . . . . . . . . . . . . . . . . . . . . . . . 3-1
3.1.2 Access is denied . . . . . . . . . . . . . . . . . . . . . . . . . . . . 3-1
3.1.3 Server execution failed. . . . . . . . . . . . . . . . . . . . . . . . 3-1
3.1.4 System message about protocol servers .... . . . . . . . 3-1
3.1.5 The object exporter specified was not found . . . . . . . 3-1
3.1.6 The object has disconnected from it´s clients . . . . . . 3-1
3.2 Other . . . . . . . . . . . . . . . . . . . . . . . . . . . . . . . . . . . . . . . . . . . . . 3-1
3.2.1 Unable to connect to shared folder TM . . . . . . . . . . . 3-1
www.rosemount-tg.com

Rosemount TankMaster Network Configuration
Reference Manual
303042EN, Edition 1
November 2007
TOC-2
Table of Contents

Reference Manual
303042EN, Edition 1
November 2007
Section 1 Getting started
1.1 General information . . . . . . . . . . . . . . . . . . . . . . . . . page 1-1
1.2 Minimum requirements . . . . . . . . . . . . . . . . . . . . . . page 1-1
1.3 Definitions and abbreviations . . . . . . . . . . . . . . . . . page 1-2
TankMaster Network Configuration
1.1 GENERAL INFORMATION
1.2 MINIMUM REQUIREMENTS
This document describes how to install and configure TankMaster in a
network environment.
The following requirements should be met in order to run the Rosemount
TankMaster System (version 4.G0):
1.2.1 Software • Windows XP english version with Service Pack 2 (SP2)
• Installation of Windows XP fix (enclosed on the TankMaster CD)
• Virtual memory size: 300 Mb or more is recommended.
1.2.2 Hardware: • Processor: Intel Pentium or compatible processor 2 GHz.
• Free Hard Disk Space: 40GB
(TankMaster needs approximately 500 Mb).
• CD-ROM player.
• Internal Memory (RAM): 1024MB.
• Two RS-232 ports. (USB port can be used if no RS-232 serial port
exists)
• A 17 inch or larger monitor.
• Graphical card: 1152*864, 65536 colors.
• Field Bus Modem (FBM 2180).
• One network card.
• Hardware key. One key for each PC where a TM server or client is
installed.
• One Parallel Port for the hardware key (USB port can be used if no
Parallel port exists).
www.rosemount-tg.com
If the TankMaster server has more than two clients it is recommended to use:
• Twice the above specified requirements of RAM.
• 2 GHz double processor or corresponding single processor.

TankMaster Network Configuration
Reference Manual
303042EN, Edition 1
November 2007
1.2.3 Network requirement
1.3 DEFINITIONS AND
ABBREVIATIONS
• TankMaster requires a minimum bandwidth of 2Mbit/s.
• TankMaster network functionality is only supported on Windows
networks. (No support for Novell networks)
• All TankMaster nodes must have the same regional settings. Especially
the decimal point must be the same.
• All TankMaster nodes must have the same version of TankMaster
installed.
• All network related hardware must support DCOM.
Abbreviation Explanation
ACL Access Control List
COM Component Object Model
DCOM Distributed COM
FCU Field Communication Unit
FBM Field Bus Modem
LAN Local Area Network
OPC OLE For Process Control
RTG Radar Tank Gauge
1-2
Section 1. Getting started

Reference Manual
303042EN, Edition 1
November 2007
Section 2 Installation
2.1 Windows Configuration . . . . . . . . . . . . . . . . . . . . . . page 2-3
2.2 Time Server Configuration . . . . . . . . . . . . . . . . . . . page 2-17
2.3 Time Client Configuration . . . . . . . . . . . . . . . . . . . . page 2-19
2.4 Connect WinOpi to the Tank Server . . . . . . . . . . . . page 2-20
The installation is divided into three parts:
• The first part includes general Windows settings such as network
installation and configuration, firewall and DCOM settings, verification
of the shared folder and the Tankmaster installation.
• The second part is server specific and includes the Windows Time
Server.
• The third and final part is client specific and includes the Windows time
client and WinOpi configuration.
TankMaster Network Configuration
www.rosemount-tg.com

TankMaster Network Configuration
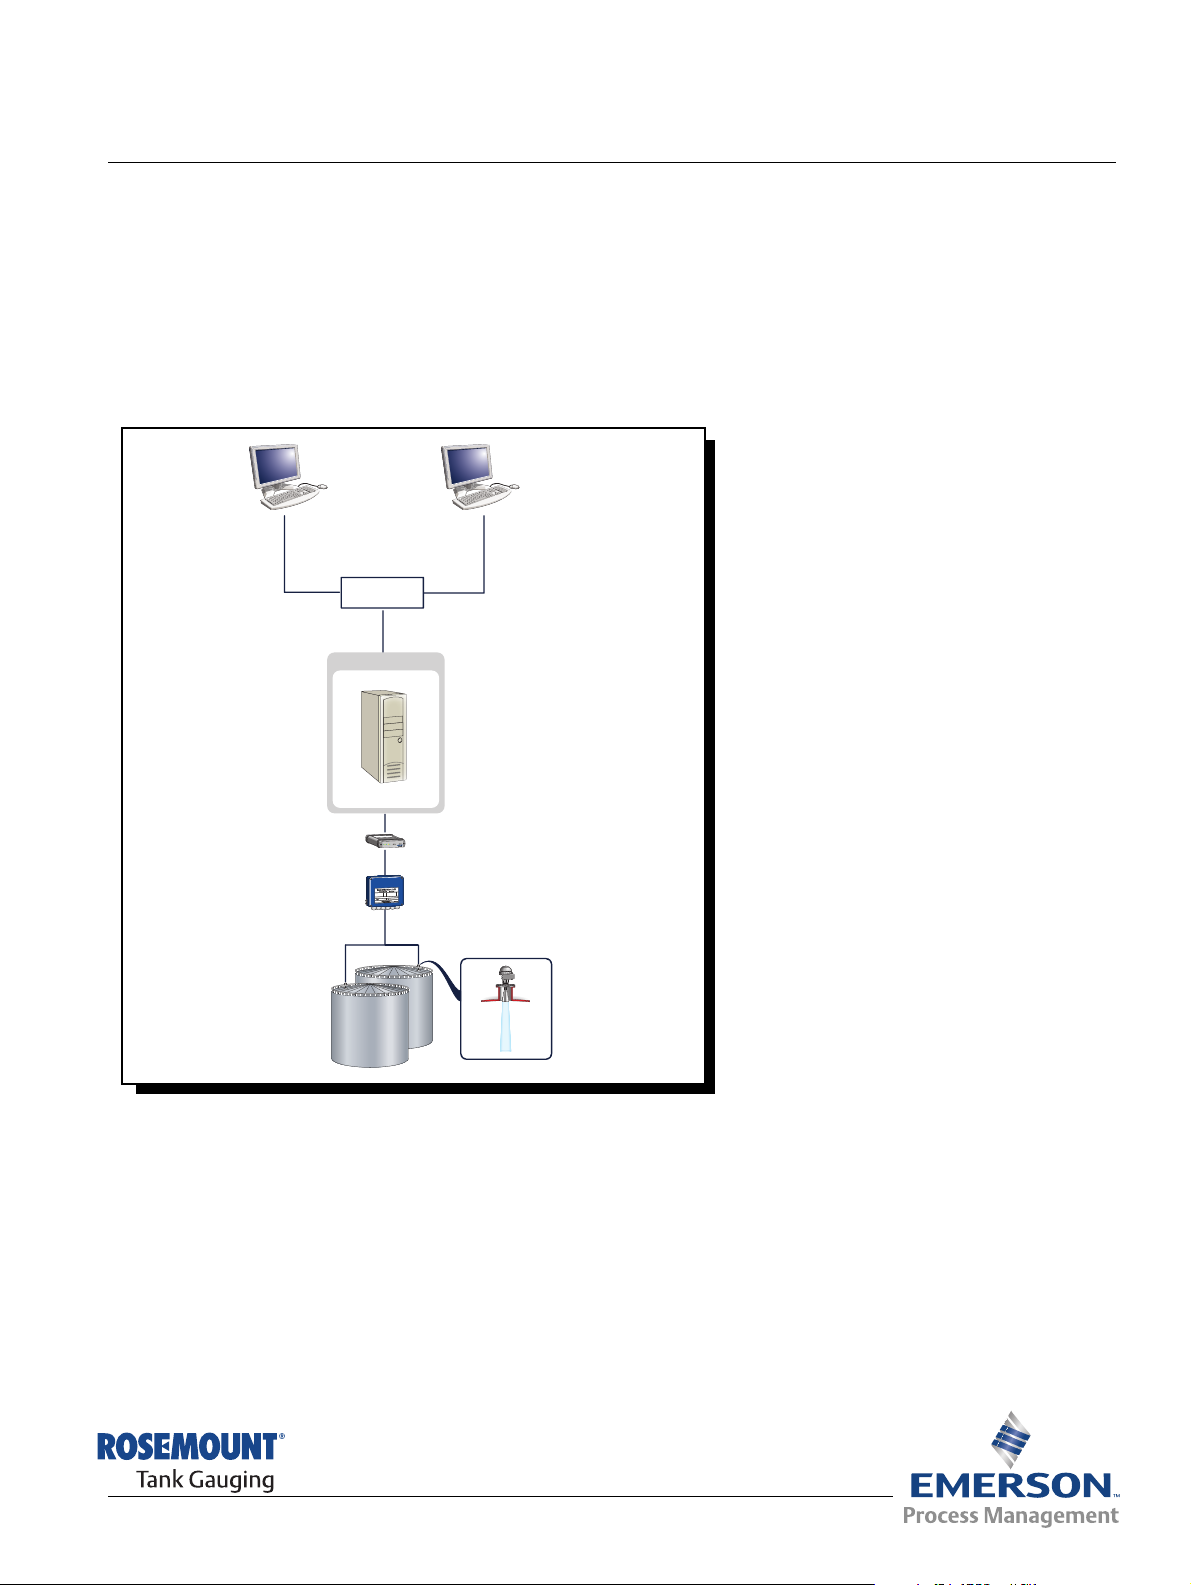
In this manual, the following network topology is used for the installation of
TankMaster in a network environment:
Figure 2-1. A typical network
topology
WinOpi
TankMaster Server
WinOpi
Reference Manual
303042EN, Edition 1
November 2007
WinOpi
Switch
Firewall
Existing LAN
at Customer
WinOpi
WinOpi
NOTE
Basic knowledge about Local Area Network (LAN) is required for a network
installation of TankMaster.
2-2
Section 2. Installation

Reference Manual
303042EN, Edition 1
November 2007
TankMaster Network Configuration
2.1 WINDOWS CONFIGURATION
2.1.1 Windows
network
configuration
This chapter applies to both servers and clients. The Windows configuration
includes the following steps:
1. Windows network configuration, see “Windows network configuration” on
page 2-3.
2. Configuration of regional and language settings, see “Configure regional
and language settings” on page 2-5.
3. TankMaster installation, see “TankMaster installation” on page 2-5.
4. Windows firewall configuration, see “Configuring the Windows firewall”
on page 2-6.
5. DCOM configuration, see “Configuring DCOM settings” on page 2-8.
6. Enabling the shared folder TM, see “Enable shared folder TM” on
page 2-13.
7. Verifying the access permission on the shared folder TM, see “Access
permission on shared folder TM” on page 2-15.
A detailed description of these steps is given in the following sections.
Before installing TankMaster, it must be decided how the computers shall be
connected to the network, i.e. if a domain or a workgroup shall be used.
A workgroup is the simplest alternative and does not require a separate logon
server, but the same Windows user name and password must be used on all
connected computers. This because the matching of the user is done locally
in the server. If different user names are used, WinOpi produces an Access
denied error message at connection time.
On a domain, different Windows user names can be used as long as they are
members of the same domain. A domain requires a separate domain server.
Workgroup
When installing TankMaster in a workgroup, perform the following steps:
• Create a Windows user name with administrator rights on the server
and all clients.
User name: TMSystem
Password: TankMaster
• Configure both server and clients to auto logon on Windows with the
newly created user name TMSystem, see “Configure auto logon in a
Workgroup” on page 2-4.
• Restart and verify that the automatic logon works.
Section 2. Installation
2-3
 Loading...