


00809-0200-3412, Rev AA
Rosemount™ FCL
Free Chlorine System with Rosemount 56 Transmitter
Reference Manual
May 2019

Essential instructions
Read this page before proceeding!
Your instrument purchase from Emerson is one of the finest available for your particular application. Emerson designs,
manufactures, and tests its products to meet many national and international standards. Experience indicates that its
performance is directly related to the quailty of the installation and knowledge of the user in operating and maintaining the
instrument. To ensure continued operation to the design specifications, read this Manual thoroughly before proceeding with
installation, commissioning, operation, and maintenance of this instrument. If this equipment is used in a manner not specified by
the manufacturer, the protection provided by it against hazards may be impaired. Failure to follow the proper instructions may
cause any one of the following situations to occur: loss of life, personal injury, property damage, damage to this instrument, and
warranty invalidation.
• Ensure that you have received the correct model and options from your purchase order. Verify that this Manual covers your
model and options. If not, call 1-800-999-9307 to request the corrrect Manual.
• For clarification of instructions, contact your Rosemount™ representative.
• Follow all warnings, cautions, and instructions marked on and supplied with the product.
• Use only qualified personnel to install, operate, program, and maintain the product.
• Install equipment as specified in the installation instructions of the appropriate Reference Manual and per applicable local and
national codes. Connect all products to the proper electrical and pressure sources.
• Use only factory documented components for repair. Tampering or unauthorized substitution of parts and procedures can
affect the performance and cause unsafe operation of your process.
WARNING
Electrical shock
Making cable connections to and servicing this instrument require access to shock hazard level voltages, which can cause death
or serious injury.
Equipment protected throughout by double insulation.
Disconnect main power and relay contacts wired to separate power sources before servicing.
Do not operate or energize instrument with case open.
Non-metallic cable strain reliefs do not provide grounding between conduit connections. Use grounding type bushings and
jumper wires.
Electrical installation must be in accordance with the National Electrical Code (ANSI/NFPA-70) and/or any other national or
local codes.
Unused cable conduit entries must be securely sealed by non-flammable closures to provide exposure integrity in
compliance with personal safety and environmental protection requirements. Unused conduit openings must be sealed
with NEMA 4X or IP65 conduit plugs to maintain the ingress protection rating (IP65).
Operate only with front and rear panels fastened and in place over terminal area.
Safety and performance require that this instrument be connected and properly grounded through a three-wire power
source.
WARNING
This product is not intended for use in the light industrial, residential, or commercial environments per the instrument's
certification to EN50081-2.
CAUTION
Radio interference
This product generates, uses, and can radiate radio frequency energy and thus can cause radio communication interference.
Improper installation or operation may increase such interference. As temporarily permitted by regulation, this unit has not
been tested for compliance within the limits of Class A computing devices, pursuant to Subpart J of Part 15 of FCC rules, which
are designed to provide reasonable protection against such interference.
Operation of this equipment in a residential area may cause interference, in which case the operator, at his own expense,
will be required to take whatever measures may be required to correct the interference.
2

WARNING
Physical access
Unauthorized personnel may potentially cause significant damage to and/or misconfiguration of end users’ equipment. This
could be intentional or unintentional and needs to be protected against.
Physical security is an important part of any security program and fundamental to protecting your system. Restrict physical
access by unauthorized personnel to protect end users’ assets. This is true for all systems used within the facility.
3

4

Reference Manual Contents
00809-0200-3412 May 2019
Contents
Chapter 1 Description and specifications........................................................................................7
1.1 Specifications................................................................................................................................... 7
1.2 Ordering information....................................................................................................................... 9
Chapter 2 Display and operation.................................................................................................. 11
2.1 Main display................................................................................................................................... 11
2.2 Keypad........................................................................................................................................... 12
2.3 Operation.......................................................................................................................................13
2.4 Hold............................................................................................................................................... 16
2.5 Main display................................................................................................................................... 17
2.6 Security.......................................................................................................................................... 18
Chapter 3 Programming the transmitter......................................................................................21
3.1 Entering the Program menus..........................................................................................................21
3.2 Outputs..........................................................................................................................................22
3.3 Relays.............................................................................................................................................22
3.4 Measurement.................................................................................................................................24
3.5 Temperature.................................................................................................................................. 25
3.6 pH diagnostic setup........................................................................................................................26
3.7 Security.......................................................................................................................................... 27
Chapter 4 Calibrate...................................................................................................................... 29
4.1 Introduction................................................................................................................................... 29
4.2 Entering the Calibration menus...................................................................................................... 29
4.3 Calibrating temperature.................................................................................................................30
4.4 Calibrate the free chlorine sensor................................................................................................... 30
4.5 Calibrate the pH sensor.................................................................................................................. 31
4.6 Calibrate the analog outputs.......................................................................................................... 31
4.7 Reset.............................................................................................................................................. 32
Chapter 5 Digital communications............................................................................................... 33
Chapter 6 Data and event logging and retrieval............................................................................35
6.1 Data and event logging overview................................................................................................... 35
6.2 Configure data and event logging and retrieval.............................................................................. 35
6.3 Downloading data and events........................................................................................................ 36
6.4 Viewing events............................................................................................................................... 36
6.5 Date and time.................................................................................................................................37
Chapter 7 Graphical display..........................................................................................................39
7.1 Graphical display overview............................................................................................................. 39
7.2 Configuration................................................................................................................................. 39
Rosemount FCL 56 v

Contents Reference Manual
May 2019 00809-0200-3412
Chapter 8 Maintenance................................................................................................................41
8.1 Replace sensor circuit board........................................................................................................... 41
8.2 Chlorine sensor...............................................................................................................................42
8.3 pH sensor....................................................................................................................................... 44
8.4 Constant head flow controller........................................................................................................ 44
Chapter 9 Troubleshoot............................................................................................................... 49
9.1 Overview........................................................................................................................................ 49
9.2 Reading and troubleshooting Fault and Warning messages............................................................49
9.3 Sensor diagnostics..........................................................................................................................50
9.4 Troubleshooting calibration problems............................................................................................50
9.5 Other troubleshooting - chlorine.................................................................................................... 51
9.6 Other troubleshooting - pH............................................................................................................ 53
9.7 Other troubleshooting - general..................................................................................................... 55
9.8 Simulate inputs - chlorine............................................................................................................... 56
9.9 Simulating inputs - pH.................................................................................................................... 57
9.10 Simulating inputs - temperature...................................................................................................58
vi Emerson.com/Rosemount

Reference Manual Description and specifications
00809-0200-3412 May 2019
1 Description and specifications
1.1 Specifications
Table 1-1: General Specifications
Characteristic Specifications
Sample requirements
Pressure 3 to 65 psig (122 to 549 kPa abs)
A check valve in the inlet prevents the sensor flow cells
from going dry if sample flow is lost. The check valve opens
at 3 psig (122 kPa abs). If the check valve is removed,
minimum pressure is 1 psig (108 kPa abs).
Temperature 32 to 122 °F (0 to 50 °C)
Minimum flow 3 gal/hr (11 L/hr)
Maximum flow 80 gal/hr (303 L/hr); high flow causes the overflow tube to
back up.
Sample conductivity > 50 µS/cm at 77 °F (25 °C)
Process connection ¼-in. OD tubing compression fitting (can be removed and
replaced with barbed fitting for soft tubing)
Drain connection ¾-in. barbed fitting. Sample must drain to open
atmosphere.
Wetted parts Overflow sampler and flow cell: acrylic, polycarbonate,
Kynar™, nylon, silicone
Chlorine sensor: Noryl™, Viton™, wood, silicone,
polyethersulfone, polyester, and platinum
pH sensor (3900 VP): stainless steel, glass, Teflon™,
polyphenylene sulfide, EPDM, and silicone
Response time < 80 sec to 95% of final reading for inlet sample flow of 3
gph (11 L/hr)
Weight/shipping weight
(1) Rounded to the nearest 1 lb. (0.5 kg)
(1)
Rosemount FCL-01: 10 lb./13 lb. (4.5 kg/6.0 kg)
Rosemount FCL-02: 11 lb./14 lb. (5.0 kg/6.5 kg)
Table 1-2: Sensor Specifications
Characteristics Specifications
Free chlorine range 0 to 10 ppm as Cl2. For higher ranges, consult the factory.
pH correction range 6.0 to 9.5. For samples having pH between 9.5 and 10.0,
consult the factory. If pH < 6.0, correction is not necessary.
For manual pH correction, choose option -01. For
continuous pH correction, choose option -02.
Accuracy Accuracy depends on the accuracy of the chemical test
used to calibrate the sensor.
Rosemount FCL 56 7

Description and specifications Reference Manual
May 2019 00809-0200-3412
Table 1-2: Sensor Specifications (continued)
Characteristics Specifications
Interferences Monochloramine, permanganate, peroxides
Electrolyte volume 25 mL (approx.)
Electrolyte life 3 months (approx.); for best results, replace electrolyte
monthly.
Table 1-3: Rosemount™ 56 Transmitter
Characteristic Specifications
Case Polycarbonate
Display Full color LCD, 3.7x x 2 in. (95 x 56 mm); you can customize
the display.
Languages English, French, German, Italian, Spanish, Portuguese,
Chinese, Russian, and Polish
Ambient temperature and humidity 14 to 140 °F (-20 to 60 °C)
Power 85 to 265 Vac, 47.5 to 65.0 Hz, 20 W
RFI/EMI EN 61326
LVD
Outputs Four 4-20 or 0-20 mA isolated current outputs; assignable
Alarms and timers Four relays, fully configurable as a setpoint alarm. Interval
Relays Form C, SPDT, expoxy sealed
Relay contact ratings
Data logger Data automatically stored every 30 seconds for 30 days;
Event logger Stores up to 300 events with date and time stamps: faults,
EN-6101-01
to measurement or temperature; fully scalable; maximum
load 550 Ω. HART® digital signal is superimposed on
output 1.
timer, TPC, bleed and feed timer, delay timer, date and
time timer, and fault alarm.
5 A at 28 Vdc or 300 Vac (resistive) ⅛ HP at 120/240
Vac
older date removed to make room for new data. the
following data are automatically stored:
Chlorine: date and time, ppm, temperature, and raw
sensor current
pH: date and time, pH, temperature, mV, glass impedance,
and reference impedance (if available)
warnings, calibration data, calibration results (pass or fail),
power on/off cycles, and hold on/off. Can also store alarm
relay activation and deactivation. Older events are
automatically removed to make room for new events.
Data event downloading Through USB port on front panel.
8 Emerson.com/Rosemount

Reference Manual Description and specifications
00809-0200-3412 May 2019
Table 1-3: Rosemount™ 56 Transmitter (continued)
Characteristic Specifications
Digital communications HART digital communication is standard. Profibus® DP is
optional.
1.2 Ordering information
The Rosemount™ FCL is a system used for measuring free chlorine in aqueous samples.
This complete system consists of a free chlorine sensor (pH sensor optional), a transmitter,
and a constant head overflow device to control sample flow. All components are mounted
on a backplate. The factory ships three replacement membranes and a 4 oz. (118 mL)
bottle of electrolyte solution with the system.
Free Chlorine System
Table 1-4: Free Chlorine System
Code Measurement option
01 Without pH sensor
02 With pH sensor
Code Transmitter option
240 56-03-24-38-HT, 85 - 265 Vac, 47.5/65.0 Hz, chlorine only (option -01 only)
241 56-03-24-32-HT, 85 - 265 Vac, 47.5/65.0 Hz, chlorine and pH (option -02 only)
Typical model number: FCL-02-241
Component parts
Table 1-5: Transmitter
Transmitter model Description
56-03-24-38-HT Rosemount 56-03-24-38-HT, 85 - 265 Vac, 47.5/65.0 Hz, chlorine only
56-03-24-32-HT Rosemount 56-03-25-32-HT, 85 - 265 Vac, 47.5/65.0 Hz, chlorine and pH
Table 1-6: Sensor
Sensor model Description
499ACL-01-54-VP Free chlorine sensor with Variopol connector
3900VP-02-10 pH sensor with Variopol connector
Table 1-7: Cable
Sensor cable Description
23747-04 Interconnecting cable, Variopol for Rosemount 499ACL sensor, 4 ft. (1.2
m)
24281-05 Interconnecting cable, Variopol for Rosemount 3900VP sensor, 4 ft. (1.2
m)
Rosemount FCL 56 9

Description and specifications Reference Manual
May 2019 00809-0200-3412
Accessories
Table 1-8: Tag
Part number Description
9240048-00 Tag, stainless steel (specify marking)
10 Emerson.com/Rosemount

Reference Manual Display and operation
00809-0200-3412 May 2019
2 Display and operation
2.1 Main display
The transmitter has a four line display.
See Figure 2-1. The display can be customized to meet your requirements. Fault or
warning messages, if appropriate, appear at the bottom of the screen. See Overview.
Figure 2-1: Main display
The following abbreviations are used in the lower two lines of the display. The number
following the display refers to the sensor, alarm relay, or output.
O
T Temperature (live)
Tm Temperature (manual)
M Measurement
AL Alarm relay
I Sensor current (chlorine)
mV mV input (pH)
Slp slope (pH)
R.Z. reference impedance (pH)
Gl.Z. glass impedance (pH)
Output
Rosemount FCL 56 11

Display and operation Reference Manual
May 2019 00809-0200-3412
2.2 Keypad
Local communication with the transmitter is through the membrane keypad.
See Figure 2-2.
Figure 2-2: Transmitter Keypad
A. Press INFO to get more information about the control setting or calibration step the
cursor is on. To close the INFO box, press any key.
B. Use the alphanumeric keypad to enter numbers or letters.
C. When the main display is showing, press ENTER/MENU to view the main menu. In other
cases, press ENTER/MENU to select an item for editing or to store a change.
D. Four navigation keys move the cursor up, down, left, and right.
E. Press EXIT to return the display to the first screen in a series of related screens. Changes
that have not been stored will not be saved.
12 Emerson.com/Rosemount

Reference Manual Display and operation
00809-0200-3412 May 2019
2.3 Operation
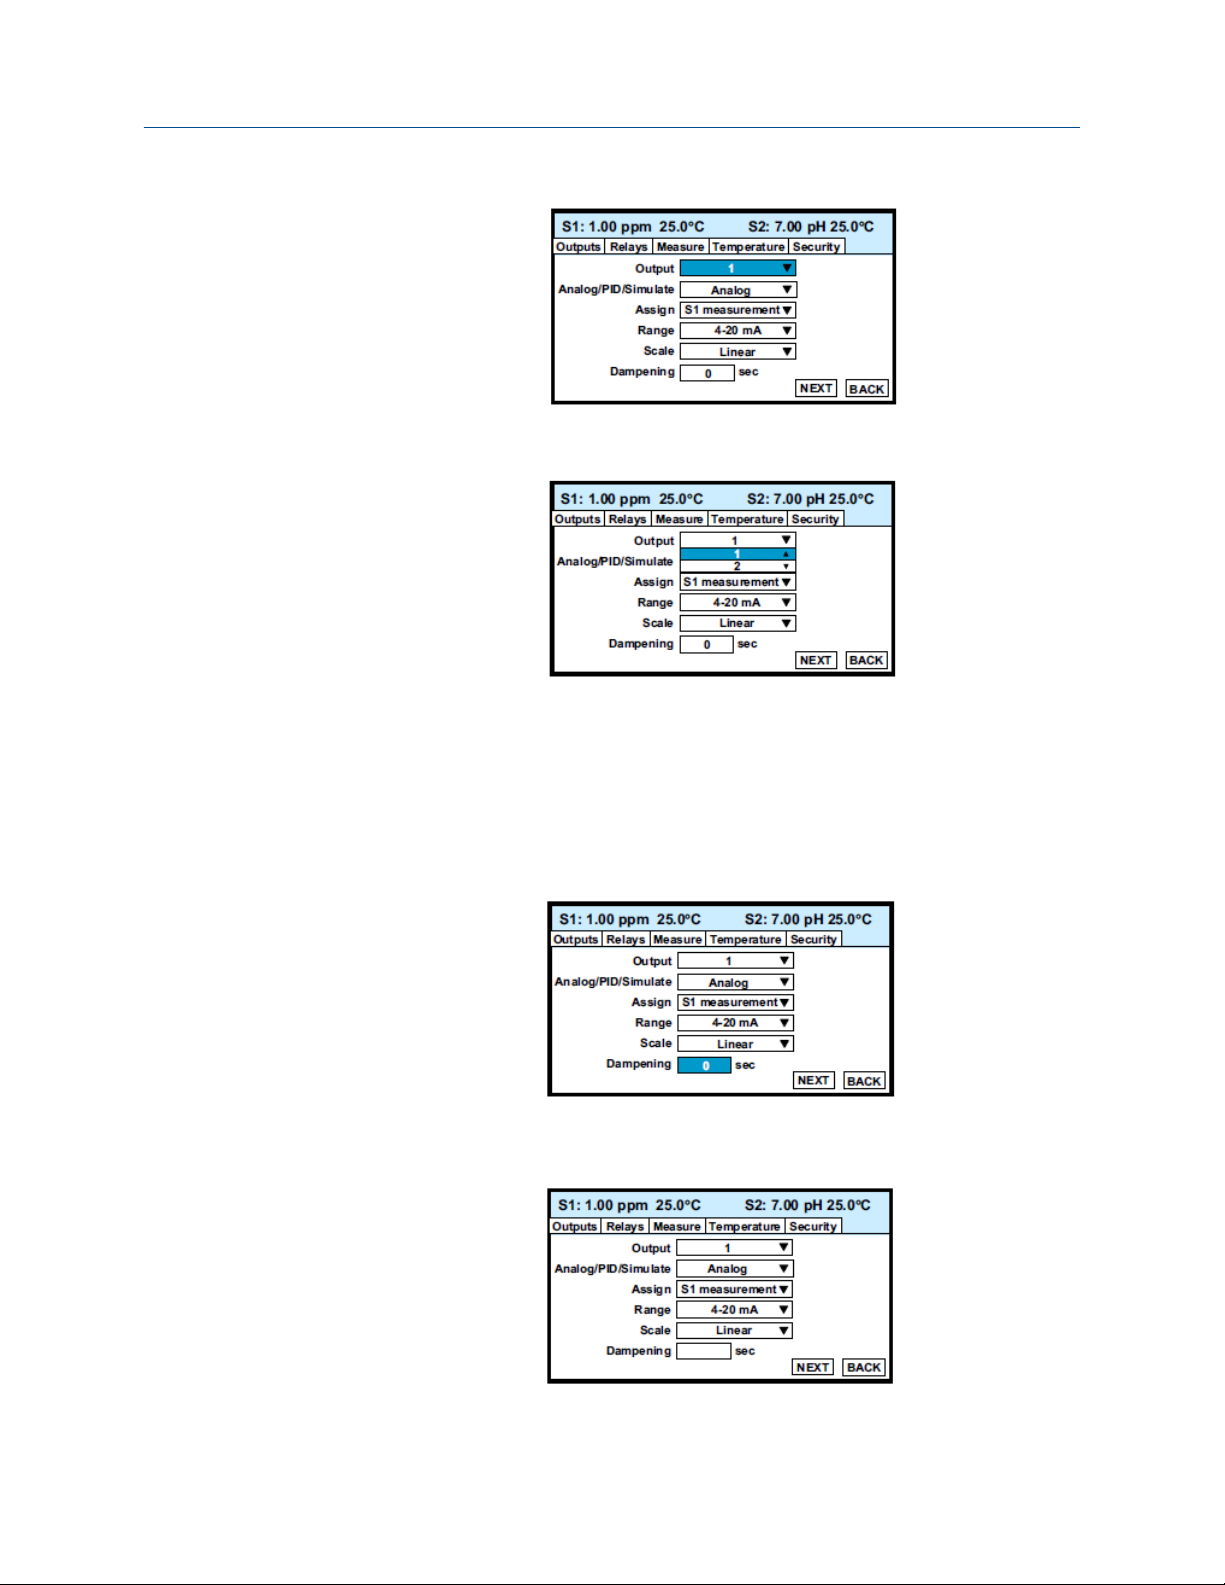
The operation of the Rosemount 56 Transmitter can best be understood from the
following example.
Procedure
1. With the main display showing (Figure 2-1), press ENTER/MENU.
The main Menu, shown below, appears.
Important
Pressing the ENTER/MENU key will bring up the main Menu only if the main display
is showing.
Note that the current reading and temperature for sensor 1 (S1) and sensor 2 (S2),
if applicable, always appear at the top of the screen.
The cursor (dark blue backlit field) is on Calibrate.
2. Press Down to move the cursor to Program.
3. Press ENTER/MENU.
The cursor is on Outputs, and the first screen in the Outputs submenu is showing.
4. To select a different program submenu, use Right to move the cursor to the desired
tab and press ENTER/MENU.
5. To enter the Outputs submenu, press Down.
The cursor moves to the first control box, Output. The Rosemount 56 has four
analog outputs, and this control lets you select which output to configure. The
default is output 1.
Rosemount FCL 56 13
Display and operation Reference Manual
May 2019 00809-0200-3412
6. To select a different output, press ENTER/MENU.
A list of the available outputs, shown two at a time, appears.
7. To view the list, press or press and hold Up or Down. To select and store the
highlighted selection, press ENTER/MENU. To move from one control box to
another, press Up or Down.
Some controls require you to select an item from a list. Others, like Dampening,
require you to enter a number.
8. Move the cursor to Dampening at the bottom of the screen.
The default Dampening value is 0 seconds.
9. To change the value, press ENTER/MENU.
The dark blue back-lighting disappears, indicating that a number can be entered.
14 Emerson.com/Rosemount

Reference Manual Display and operation
00809-0200-3412 May 2019
10. Use the numeric keypad to enter the desired number. If you make an error, press
Left to erase the digit last entered. To store the number, press ENTER/MENU.
Every control box has an information or help screen associated with it.
11. To view the information screen for the control box the cursor is on, press INFO.
The information screen for Dampening is shown below.
12. To close the information screen, press any key.
A NEXT and BACK button are at the bottom of the screen. NEXT means that
additional control boxes are available on at least one or more screen.
13. To view the next screen, use the navigation keys (either Down or Right) to move
the cursor to NEXT and press ENTER/MENU.
The next screen in the Outputs submenu appears. The cursor is on the Outputs tab.
14. To enter the screen, press Down.
15. To return to the previous screen, move the cursor to BACK and press ENTER/MENU.
16. To return to the main menu, press EXIT.
Rosemount FCL 56 15

Display and operation Reference Manual
May 2019 00809-0200-3412
2.4 Hold
2.4.1 Putting sensor in hold
To prevent unwanted alarms and improper operation of control systems or dosing pumps,
place the alarm relays and outputs assigned to the sensor in hold before removing the
sensor for maintenance.
Hold is also useful if calibration, for example, buffering a pH sensor, will cause an out of
limits condition. During hold, outputs assigned to the sensor remain at the last value, and
alarms assigned to the sensor remain in their present state.
2.4.2 Use the Hold function
The Hold function uses certain programming features not discussed in Operation.
Procedure
1. With the main display showing, press ENTER/MENU.
The main menu appears.
2. Choose Hold.
The screen below appears. The cursor is on the first checkbox.
3. To hold outputs and relays associated with sensor 1, press ENTER/MENU. A check
appears in the checkbox. To put sensor 2 on hold also, move the cursor to the
sensor 2 line and press ENTER/MENU to select the sensor 2 checkbox.
4. To activate Hold, move the cursor to the APPLY at the bottom left of the screen and
press ENTER/MENU.
The selected sensor outputs and alarm relays remain on hold until taken out of hold.
However, if power is lost and then restored, hold will automatically be turned off.
The screen describes how to take the transmitter out of hold.
16 Emerson.com/Rosemount

Reference Manual Display and operation
00809-0200-3412 May 2019
Important
Be sure to press APPLY once the box has been unchecked.
A message stating which sensors are in hold appears in the fault/warning banner at
the bottom of the display.
2.5 Main display
2.5.1 Configuring the main display
The main display can be configured to meet your specific requirements.
Procedure
1. With the main display showing, press ENTER/MENU.
The main menu appears.
2. Choose Display Setup.
The screen below appears.
3. Move the cursor to Display setup and press ENTER/MENU.
The screen below appears.
4. Choose Configure main display.
Rosemount FCL 56 17

Display and operation Reference Manual
May 2019 00809-0200-3412
The screen below appears. The position of each control box corresponds to the
position of the variable in the main display.
5. Move the cursor to the control box and press ENTER/MENU. Use Up and Down to
scroll through the list of variables and press ENTER/MENU to select the desired
variable for display.
2.5.2
Set brightness
Complete the following steps to the set the brightness on the 56 Transmitter screen.
Procedure
1. Move the cursor to the Set brightness button shown in step 3 in Section and press
ENTER/MENU.
2. Then move the cursor to Display brightness and select the desired brightness.
The information screen gives recommendations about setting the brightness level
especially in areas where the ambient temperature exceeds 50 °C (121 °F).
2.6 Security
2.6.1 Enter security code
Security codes prevent accidental or unwanted changes to program settings or
calibrations.
There are three levels of security:
1. A user can view the main display and diagnostic screens only.
2. A user has access to the Calibration and Hold menus only.
3. A user has access to all menus.
Procedure
1. If a security code has been programmed, pressing a submenu button (see
Operation) causes the security screen shown below to appear.
18 Emerson.com/Rosemount
 Loading...