


User’s Guide
Ref. no: 303040E
Third Edition, February 2007
Rosemount TankMaster.net
Website
www.rosemount-tg.com


Rosemount TankMaster.net Website
User’s Guide
Third Edition
Copyright © 2001-2007 Rosemount Tank Radar AB
Rosemount TankMaster.net 3
Third Edition, February 2007

Copyright © 2001 - 2007 Rosemount Tank Radar AB, Sweden,
Copyright law and international treaties protect this program. Unauthorized
reproduction, distribution of this program or any portion of it may result in severe civil
and criminal penalties, and will be prosecuted to the maximum extent possible under
the law.
4 Rosemount TankMaster.net
Third Edition, February 2007

Overview of Manuals
Overview of Manuals
TMn2Installation.pdf
This manual describes the procedure for installing TankMaster.net on Windows
2000 Server, Windows XP Pro and Windows 2003 Server with Internet
Information Services (IIS). Before installing TankMaster.net Server, minimum
system requirements have to be met that are mentioned in this manual. The
manual also presents the minimum system requirements for installing
TankMaster.net.
TMn2Config.pdf
This manual describes the procedure for configuring the TankMaster.net
Server. The information that is viewed on the TankMaster.net Website/WAP
website is set by the Administrator using the TankMaster.net Configuration
application. The manual describes how the Administrator can create, edit,
delete and assign rights to the Users and Groups for viewing tanks.
TMn2DataCollector.pdf
This manual describes the DataCollector application, which displays the Live
and Static data of the tanks polled with the current date and time. The manual
also explains how to start and end the application manually or automatically.
The data collected by this application is displayed on the TankMaster.net
Website/WAP websites.
TMn2Website.pdf
This manual provides a detailed description of various menus, products,
information etc which are viewed by the user on the website. The user can
change limited details of his profile, view details of all products, individual tanks,
view graphs and download tank information in Excel format.
TMn2UserStatus.pdf
This manual gives a detailed description of the information that is available on
users who are logged on to the TMn2Web website. It also displays the current
page being viewed by the user, the session Id assigned, session start time and
session expiry time. Only the Administrator can access this website.
Rosemount TankMaster.net 5
Third Edition, February 2007

Overview of Manuals
TMn2Wapsite.pdf
This manual describes how the TankMaster.net WAP website works using an
Internet browser. It also describes how to view details of individual tanks and
product groups.
6 Rosemount TankMaster.net
Third Edition, February 2007

Contents
Contents
1.0 Folder names and conventions used throughout this document.......8
2.0 Introduction........................................................................................9
2.1 Overview of TankMaster.net website.............................................9
2.1.1 TankMaster.net Login page.....................................................9
2.1.2 TankMaster.net Post Login Page..........................................10
3.0 Login................................................................................................13
4.0 Change Profile.................................................................................15
5.0 Help.................................................................................................17
5.1 Help..............................................................................................17
5.2 Glossary.......................................................................................17
6.0 Tank Inventory.................................................................................18
7.0 Overview .........................................................................................19
7.1 All Products..................................................................................19
7.2 All Tanks ......................................................................................21
7.3 Schematic ....................................................................................22
7.4 Error Indications...........................................................................23
8.0 History Graphs ................................................................................25
9.0 Download ........................................................................................30
10.0 Auto Refresh .................................................................................32
11.0 Logout ...........................................................................................35
12.0 Add/Modify a Language to theTankMaster.net website................36
12.1 To change the default language of the TankMaster.net website
...........................................................................................................36
12.2 To add a language to the TankMaster.net website....................37
12.3 To modify a Language for the TankMaster.net website.............39
13.0 Description of .ini files for TankMaster.net website......................47
13.1 Colors.ini....................................................................................49
13.2 Current.ini...................................................................................51
13.3 DownloadUnicode.ini.................................................................57
13.4 Format_Html.ini and Format_Win.ini.........................................60
13.5 History.ini and HistoryUnicode.ini..............................................67
13.6 Language.ini ..............................................................................69
13.7 Login.ini......................................................................................75
13.8 PieChartUnicode.ini...................................................................75
13.9 Schematic.ini..............................................................................76
14.0 Troubleshooting.............................................................................78
Rosemount TankMaster.net
Second Edition, February 2007
7

Folder names and conventions used throughout this document
1.0 Folder names and conventions used
throughout this document
In this document we will need to refer to some folders regularly. With a view to
make such references easier and shorter we will use the following
conventions:
TMnData will refer to the folder that by default resides in:
C:\Program Files\Saab\TankMasternet\TMnData
TMn2Web will refer to the folder that by default resides in:
C:\Program Files\Saab\TankMasternet\TMn2Web
TMn2WebHelp will refer to the folder that by default resides in:
C:\Program Files\Saab\TankMasternet\TMn2Web\WebHelp
Language Folder will refer to a subfolder of TMnData with the
LanguageName, Example: The English folder will refer to the folder that
resides in:
C:\Program Files\Saab\TankMasternet\TMnData\English.
There is also a Language subfolder that resides in:
C:\Program Files\Saab\TankMasternet\TMn2Web\WebHelp.
8 Rosemount TankMaster.net
Third Edition, February 2007

Introduction
2.0 Introduction
2.1 Overview of TankMaster.net website
The main aim of TankMaster.net is to make data of the tanks and
products available to users all over the world from offices, residences or
WAP phones. This data is available to users who are assigned a
Username and Password by the administrator. Users can only read the
data available on the website and view/download data in the form of Excel
spreadsheets for editing. The configuration of TankMaster.net is achieved
with the help of the TankMaster.net Configuration and TankMaster.net
DataCollector applications.
To access the Tankmaster.net website open the Internet browser, in the
address field enter
should be replaced by the internet name of the TankMaster Server or its
IP address. (E.g.
http://59.181.101.23/tankmasternet). The TCP port 80 (HTTP) is needed
to be enabled in the firewall/router settings for TankMaster.net to be
accessible on Internet.
If the TankMaster Server does not have a hardware lock, the
DataCollector and the website will run in DEMO MODE. A user by the
name of DEMO is created by default during the TankMaster.net
installation. If the application is working in DEMO MODE, only the user by
the name DEMO will be allowed to login to the website. To overcome this
mode, connect the hardware lock to the parallel/USB port of the
TankMaster Server.
2.1.1 TankMaster.net Login page
The Login page is the default page of the TankMaster.net website.
This page allows a valid user to Login, Change Profile and
change Language. It also provides Help for items on the Login
page.
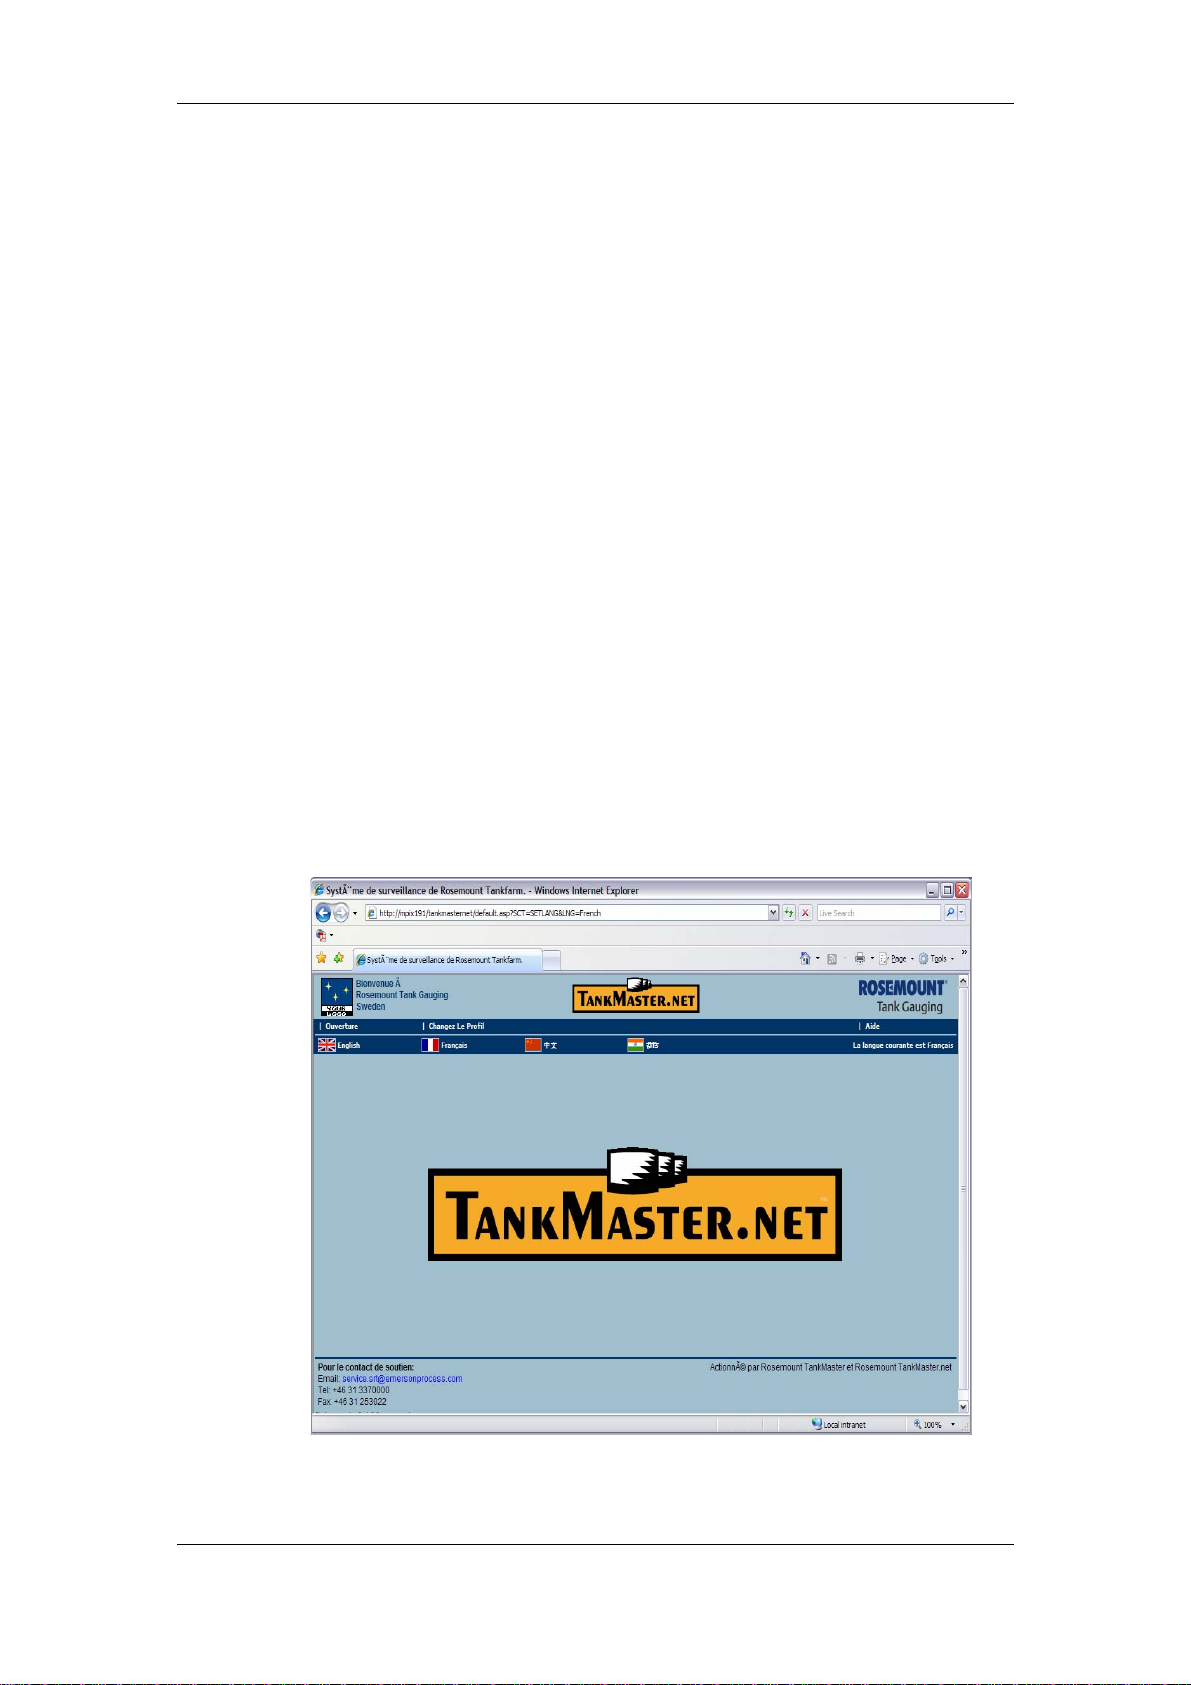
Language Selection
The website can be configured to be viewed in different languages.
The default language is English. The administrators can add/modify
a language. The language configuration files are located in
TMnData and TMn2Web\WebHelp folders.
Note! For adding/modifying a language the Operating System should support
the desired language.
http://servername/tankmasternet. The servername
http://mpix191/tankmasternet or
Rosemount TankMaster.net 9
Third Edition, February 2007

Introduction
Login
The Login option allows a valid user to login into the website.
Change Profile
The Change Profile option allows the user to change their profile
according to the rights assigned by the administrator.
To change the user profile, click the Change Profile option on the
Login page. The administrator can add/remove the fields of the
Change Profile window, by editing the Login.ini file located in the
TMnData\Language directory.
Help option
The Help option has two submenus, Help and Glossary.
Help
The Help submenu provides help on items of the Login page.
Glossary
The Glossary submenu displays the details of the terms used
on the TankMaster.net website.
After the user logs in, the default page as set by the administrator is
displayed.
2.1.2 TankMaster.net Post Login Page
The navigation bar of this website contains: Tank List, Overview,
History, Download, Help and Logout.
Tank List
This option displays the list of available tanks mapped to the local
computer. Individual tank inventory can be viewed by clicking on a
tank in the Tank List.
Overview option
The Overview option has sub menus: All Products, All Tanks and
Schematic.
10 Rosemount TankMaster.net
Third Edition, February 2007

Introduction
All Products
The All Products submenu will display the details of all products
in a pie chart. It also displays the aggregate of the tank values in
the product group. The administrator can control the fields
displayed by editing the Current.ini file, located in the TMnData
directory.
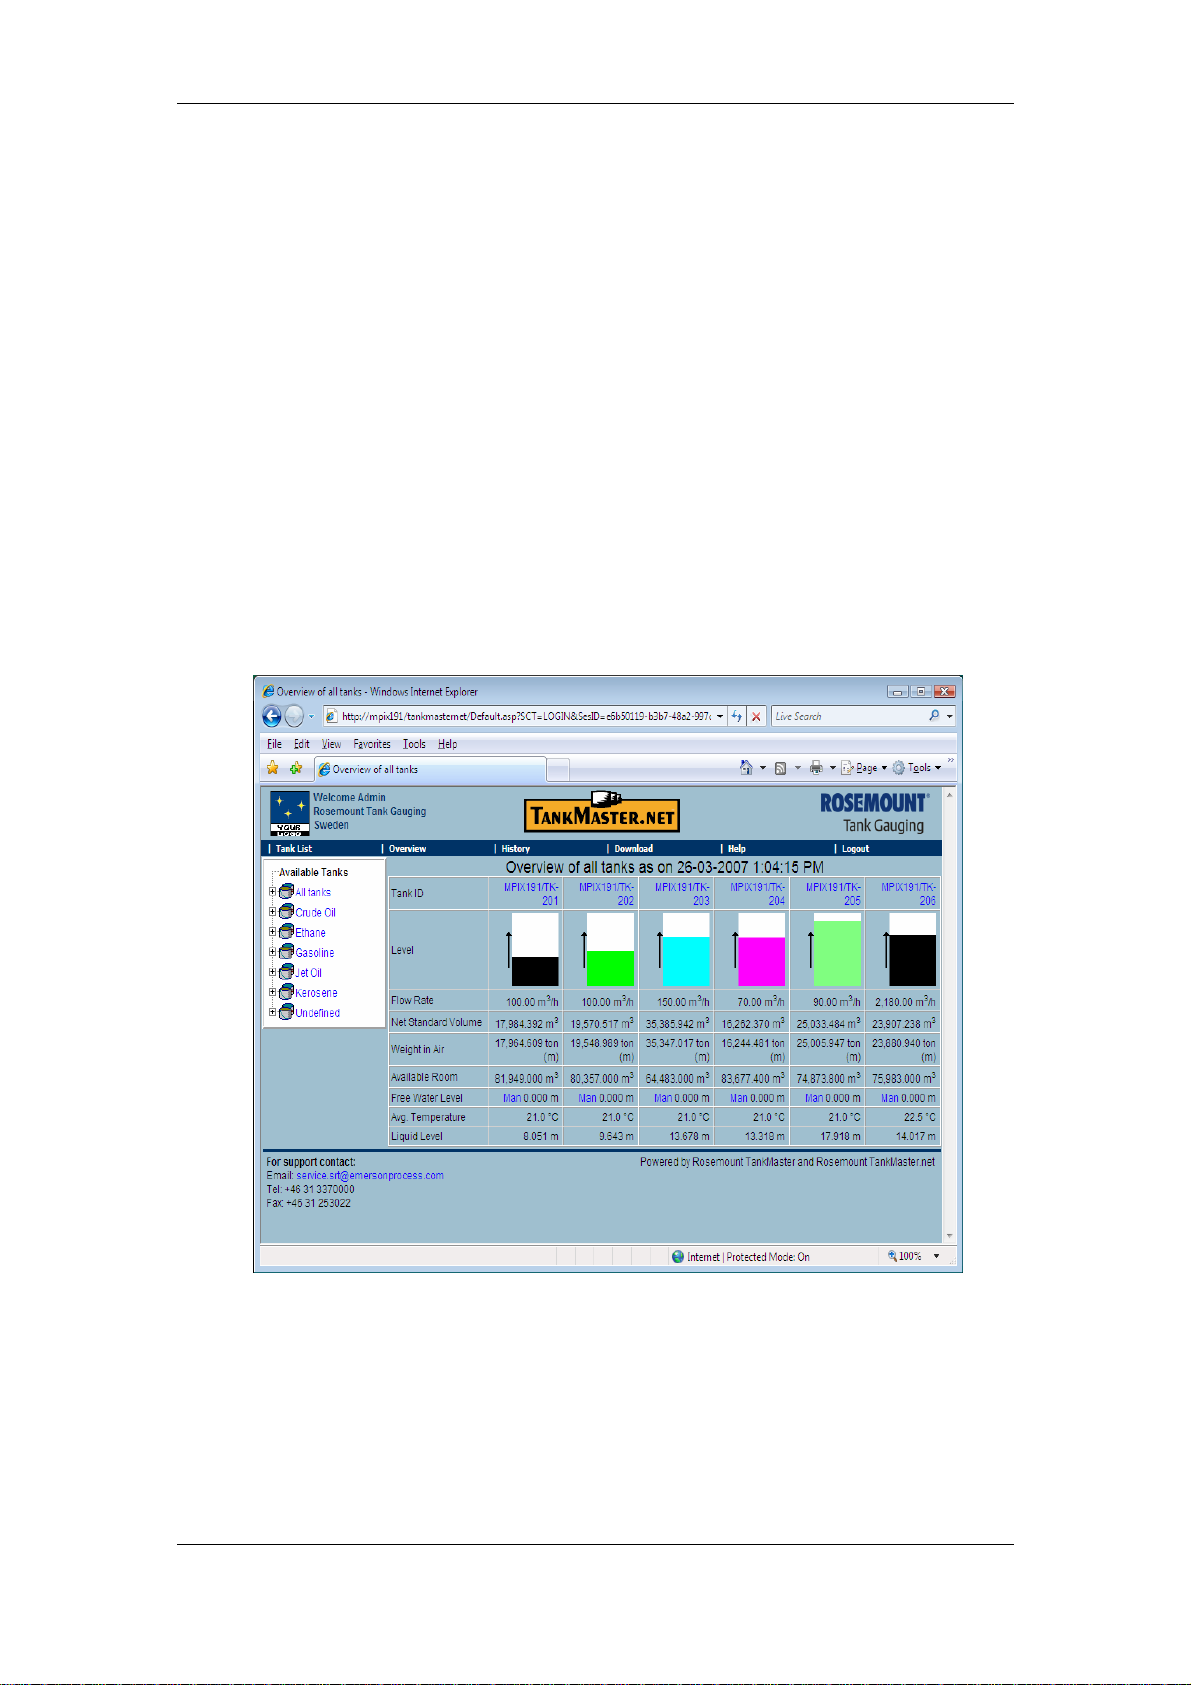
All Tanks
The All Tanks submenu will display the details of all tanks as a
bar graph. It also displays available values of each tank. The
administrator can control the fields displayed by editing the
Current.ini file, located in the TMnData directory.
Schematic
The Schematic submenu will display the layout of the Tank
Farm. The Schematic web page has links (hotspot) to the Tank
Inventory page. The web user can click on the hotspot of the
tank that is visible on the schematic image to view the details of
the selected tank. The administrator can control the hotspots
displayed on the schematic diagram by editing the
Schematic.ini file, located in the TMnData\Language folders.
This file contains the tank name and the co-ordinates that are
used to control the size and the location of the tank in the
schematic diagram.
History option
The History option will display the past data of the OPC items in a
graphical format. The History page allows the user to view the
graphs of the tanks, by selecting the OPC items and setting the
date/time period. Tanks are identified by using different colors set
by the administrator. Changes can be made by editing the
History.ini and HistoryUnicode.ini files located in
TMnData\Language folders. This file allows the administrator to
set/change the default Refresh Rate for the history page, items to
be viewed under OPC items and the history period (in time) for the
graph to be displayed.
Download option
The Download option allows the user to download Live and Static
data in the form of an Excel workbook. The data contains Inventory
data of All Tanks and All Products.
Rosemount TankMaster.net 11
Third Edition, February 2007

Introduction
When the Download option is clicked during browsing the History
page, the data downloaded, will be the History data. If any other
page is being browsed, and the user clicks on the Download
option, the data downloaded is the Current data.
The administrator can control the fields that can be downloaded by
the user through a file DownloadUnicode.ini”. This file is in the
TMnData\Language directory. The Excel workbook will display the
Current and History data.
Help option
The Help option has two submenus: Help and Glossary.
Help
The Help submenu displays the help file of the current web
page.
Glossary
The Glossary submenu displays the details of the terms used
on the TankMaster.net website.
Logout
The Logout option exits the users from the TankMaster.net website
and displays the Login page.
12 Rosemount TankMaster.net
Third Edition, February 2007

Login
3.0 Login
To access the Tankmaster.net website open the Internet browser, and in the
address field enter
be replaced by the internet name of the TankMaster Server or its IP address.
(E.g.
http://mpix191/tankmasternet or http://59.181.101.23/tankmasternet
Select the Login button. This allows TankMaster.net web users to login to the
website. Only those web users who have a valid
assigned by the administrator will be able to login to this website.
http://servername/tankmasternet. The servername should
LoginID and Password
Login to the TankMaster.net website the user will have to do the following:
To
The default language of the Login page is English. The user can change
the language, by selecting a language on the language bar.
Select the Login option from the navigation bar, to allow the user to login
to the website
A Login window will be displayed with fields for LoginID and Password.
The valid LoginID and Password should be entered in these fields.
If an incorrect LoginID or Password is entered, an error message
Authentication error. Please try again will appear.
Note! A hardware lock should be connected on the TankMaster Server. If the
hardware lock is not found, the user will have to login to the website with
Rosemount TankMaster.net 13
Third Edition, February 2007

a LoginID and Password as “demo”. In DEMO MODE a maximum of five
Demo users are allowed. The number of concurrent users will depend
upon the hardware lock connected to the machine.
Login
14 Rosemount TankMaster.net
Third Edition, February 2007

Change Profile
4.0 Change Profile
The user can change his profile by selecting the
navigation bar of the Login page, according to the rights assigned by the
administrator.
To Change Profile
The Change Profile window is displayed below.
Change Profile option on the
The user will have to click on the Change Profile option on the navigation
bar of the Login page.
Note! The user is allowed to change his profile if the administrator has
assigned rights to the user in the TankMaster.net Configuration
application.
The user should enter the LoginID, Old Password, New Password and
Confirm Password in the fields provided. All fields are mandatory.
To change the password, the user should enter the LoginID in the field
provided for the LoginID. The old password (which at present is the
current password) is to be provided in Old Password field. The New
Password is to be entered in the field for New Password. This password
will be retyped in the field provided for Confirm Password.
Rosemount TankMaster.net 15
Third Edition, February 2007

Change Profile
The user should click on the button to submit the information. After
clicking the
If the user does not want to change his profile, he should select any other
option available on the Login page of the navigation bar or click on the
Change Profile option to exit from the Change Profile menu.
Note! If for any reason the user is not able to change his profile, he will have to
ask for the administrator’s assistance. After the password is changed, the user
will login to the website with the new password. The administrator can add
fields in the Change Profile menu by making changes in the “Login.ini” file
located in the TMnData\Language directories. A user cannot change his profile
in DEMO MODE.
button, the user data will be saved.
16 Rosemount TankMaster.net
Third Edition, October2004

Help
5.0 Help
The
Help option is available on the navigation bar of the Login Page.
The Help menu contains two submenus,
submenu contains the help on various pages on the website and the
Glossary submenu contains the definitions of terms used in the
TankMaster.net website.
5.1 Help
If the user clicks on the Help option before logging into the
TankMaster.net website, he will be able to view help on Login and
Change Profile.
If the user clicks on the Help option after logging into the TankMaster.net
website, he will be able to view help on the section that he is currently
viewing.
5.2 Glossary
To access the Glossary section the user will have to click on the Help
option on the navigation bar and click on Glossary.
The Glossary page will contain definitions of the terms used in the
TankMaster.net website.
Help and Glossary. The Help
Rosemount TankMaster.net 17
Third Edition, February 2007
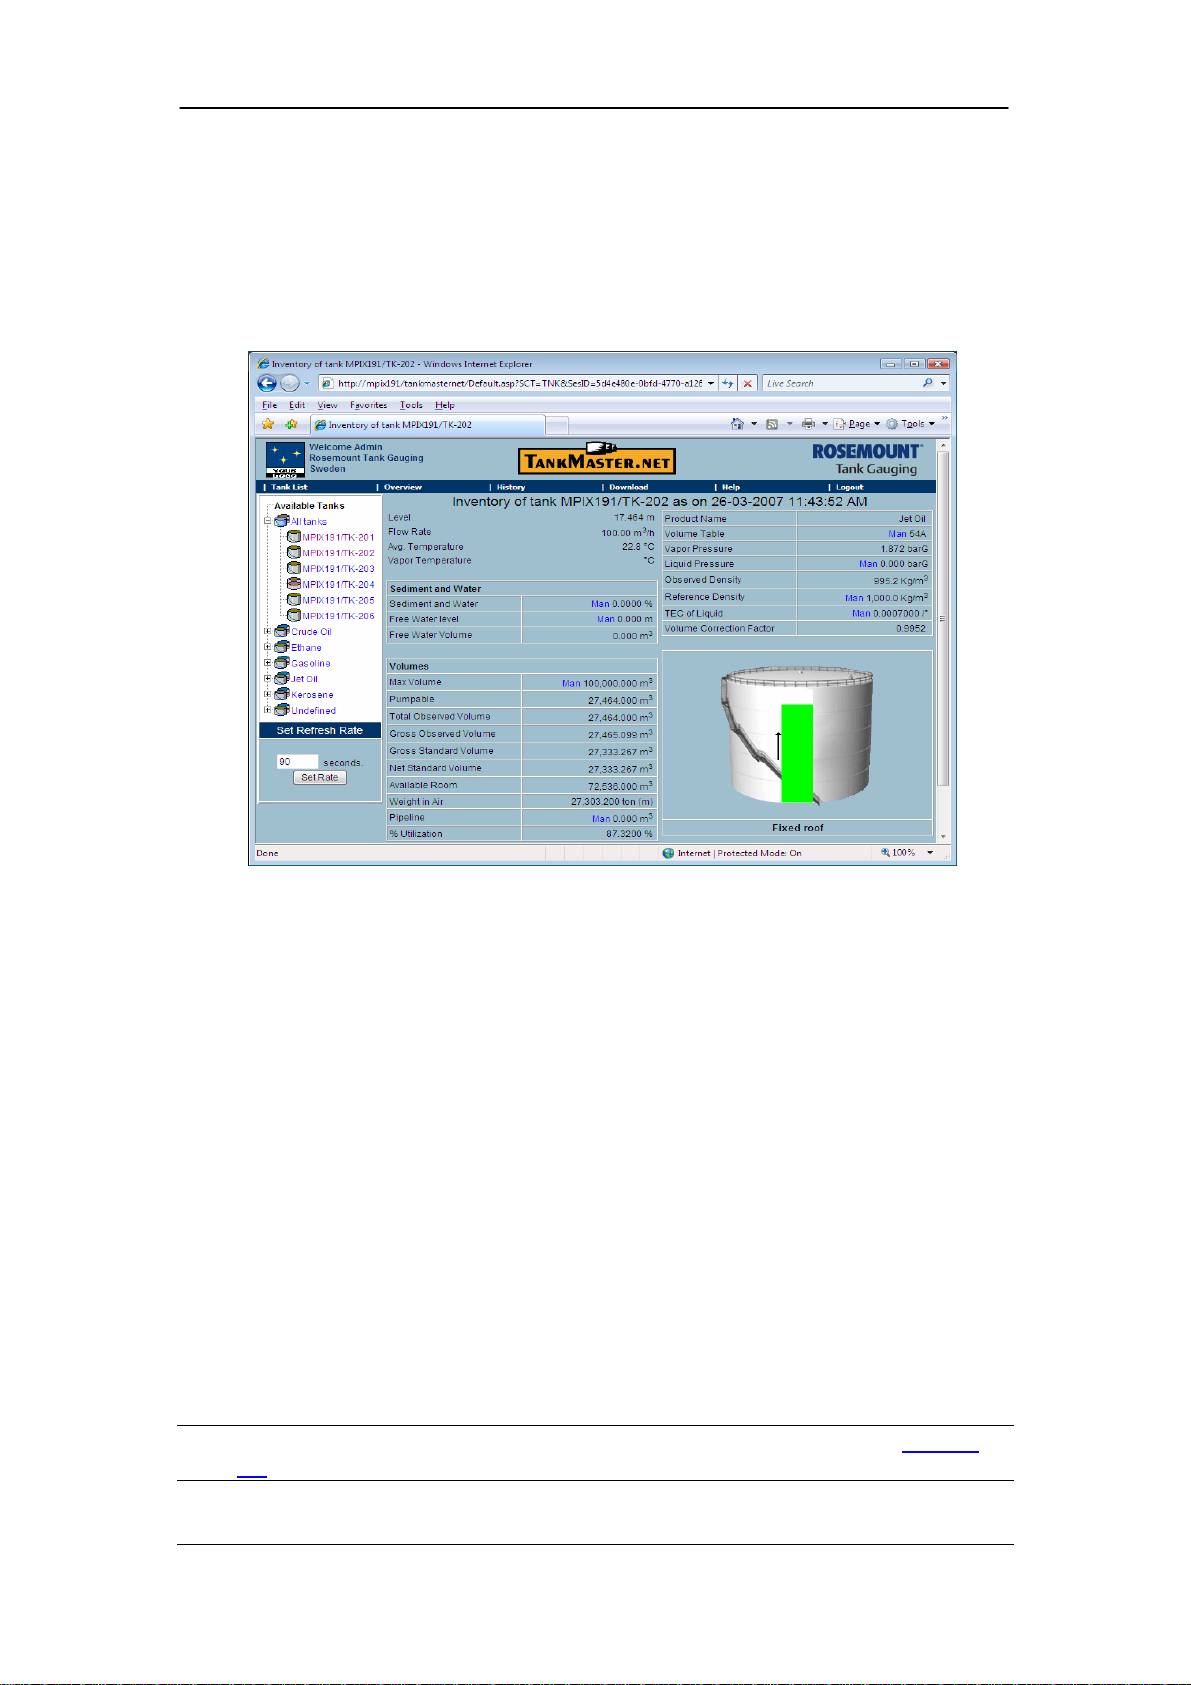
6.0 Tank Inventory
To view a single tank’s inventory, either select a tank from the
option in the navigation bar, or select the tank from the
The single tank inventory window is as displayed below.
Tank Inventory
Tank List
Tree view.
The Tree view will display Available Tanks. These tanks can be viewed
under
belong.
All Tanks will display a list of all available tanks of all products. Click on the ‘+’
button to view all tanks.
To view tanks of a particular product, click on the ‘+’ button under the product
group.
To view a single tank’s inventory, click on an individual tank name from
Tanks
The rate of change in the levels of the product in the tank is shown by the up
and down arrows on the image of the tank. The up arrow signifies that the rate
of change is increasing and the down arrow signifies that the rate of change is
decreasing. If a red cross is visible in place of the arrow it signifies that it is an
Invalid Tank.
Note! For details on Error Indications in OPC value of a tank, refer to
7.4
All Tanks and under the respective product category to which they
or the product group.
All
section
18 Rosemount TankMaster.net
Third Edition, February 2007

Overview
7.0 Overview
The Overview option on the navigation bar has three submenus, All
Products, All Tanks and Schematic.
7.1 All Products
Overview of All Products
The All Products submenu allows the user to view details of all the
products that are available. The pie chart displays the aggregate of Total
Level Available, Total Level Utilized and the Free Water Level, by the
product available in the tanks in percentage value.
The net aggregate values as set up by the administrator are displayed
below the pie charts.
The image shown below, displays the Overview of all products.
Rosemount TankMaster.net 19
Third Edition, February 2007

Overview
If the user clicks on the pie chart of a product it will link to a page where
he will be able to view all the tanks that are listed under the particular
product.
The Overview of All Products will show the products with their levels
and other details. The rates of change in levels of the product in the tank
are shown by the up and down arrows. The Up arrow signifies that the
rate of change is increasing and the Down arrow signifies that the rate of
change is decreasing.
The Refresh Rate window appears below the Product tree view. The
default Refresh Rate is set as 90 seconds. This setting can be changed
by entering the Refresh Rate in seconds and clicking on the Set Rate
button.
If the Refresh Rate is set to zero, it means that the data will not be
refreshed. Do not set the Refresh Rate below 30 seconds.
Note! For details on Error Indications in OPC value of a tank, refer to
7.4
section
20 Rosemount TankMaster.net
Third Edition, February 2007

Overview
7.2 All Tanks
Overview of All Tanks
The All Tanks submenu allows the user to view details of all the tanks
that are available.
The tanks are displayed as a bar graph showing the Free Water Level at
the bottom of the tank and the product contained in it in a different color.
All Products are depicted in different colors.
If the user clicks on the arrow near a particular tank or the tank name, it
will display the tank’s inventory.
The Overview of all tanks will show all the tanks with their levels and
other details. The rate of change of the levels of the product in the tank is
shown by the up and down arrows. The Up arrow signifies that the rate of
change is increasing and the Down arrow signifies that the rate of change
is decreasing.
The Refresh Rate window appears below the Product tree view. The
default Refresh Rate is set as 90 seconds. This setting can be changed
by entering the Refresh Rate in seconds and clicking on the Set Rate
button.
If the Refresh Rate is set to zero, it means that the data will not be
refreshed. Do not set the Refresh Rate below 30 seconds.
Note! For details on Error Indications in OPC value of a tank, refer to
7.4
section
Rosemount TankMaster.net 21
Third Edition, February 2007

7.3 Schematic
This option displays the Schematic diagram of the Tank Farm.
The image shown below is a sample of the schematic diagram.
Overview
Setting up the Schematic diagram
To set up the Schematic diagram of the Tank farm:
Take an image of your tank farm. Re-scale that image to 838 pixels x 527
pixels and save as “Schematic.gif” in the TMn2Web\Images directory.
The outline of a tank can be defined as a circle, rectangle or a polygon.
If a circle is a suitable definition for the tank, determine the center
point in pixels and the radius in pixels.
If a rectangle is a suitable definition for the tank, determine the leftx, top-y, right-x, bottom-y co-ordinates of the rectangle.
If a polygon is a suitable definition for the tank, determine the x1,
y1, x2, y2, ..., xN, yN co-ordinates.
Determine a suitable place to place the legend (short name) of the tank
and note down the co-ordinates.
With the above information the Schematic.ini file can be edited.
22 Rosemount TankMaster.net
Third Edition, February 2007

Overview
To view the Schematic diagram:
Select the Schematic submenu under the Overview option on the
navigation bar.
The Schematic web page has links (hotspot) to the Tank Inventory page.
The web user can click on the hotspot of the tank that is visible on the
schematic image to view the details of the selected tank.
7.4 Error Indications
Significance of the red cross “x” and black cross “X”
If a red cross “x” is visible in place of the arrow it signifies that the data
pertaining to the status is invalid.
If a black cross “X” is visible in the center of the tank it signifies that the
data pertaining to the tank is invalid.
The image shown below is a sample of a tank having an invalid Level.
Significance of “?”
“?” displayed in a table indicates that the OPC_Quality is bad.
The image shown below is a sample of a tank having a bad OPC Quality.
Significance of “!”
“!” displayed against a value of an OPC item it signifies that the value is
an Invalid Value.
The image shown below is a sample of OPC item having an invalid value
Rosemount TankMaster.net 23
Third Edition, February 2007

Overview
Significance of “Man”
“Man” displayed as a prefix to a value signifies that the value of the OPC
item is manually set by the administrator.
The image shown below is a sample of a tank entry entered manually
Significance of date and time displayed in red
If the date and time is displayed in red with a warning message (warning:
last known data is used!)” then the data displayed is past data. This
error can be due to data collector service not started or data collection has
stalled
The image shown below is a sample of past data displayed.
24 Rosemount TankMaster.net
Third Edition, February 2007

History Graphs
8.0 History Graphs
The History option shows a graphical representation of the past data of the
OPC items of a product. The user will be able to view the graphs of only those
OPC items that are setup by the administrator on the TankMaster Server. The
administrator will have to set the OPC items on the TankMaster Server so that
the user can view the history graphs on the TankMaster.net website.
The following steps should be taken to setup the OPC Items history on
TankMaster Servers:
Open the WinOPI application by double clicking the icon on the desktop.
Login using the Username and Password. The Username is Supervisor
and the Password is Super by default. For security reasons, you are
advised to change the password at the earliest.
Select the View>Historical Graph option on the Menu bar. A window titled
Historical View will be displayed.
Rosemount TankMaster.net 25
Third Edition, February 2007

History Graphs
Click on the “Sample Setup” button. The Sample Setup window will be
displayed.
Click on the Select Blocks for all Tanks button. The Multiple block
selection window will be displayed as shown below.
From the list, select the OPC items to be viewed in the history graph. Click
on the OK button to add them.
The selected items will be displayed in the list under Used blocks.
Click on the Apply button to save changes.
Click on the OK button to exit from the current window.
26 Rosemount TankMaster.net
Third Edition, February 2007

History Graphs
The light in the Sample Settings section will turn from red to green. This
will indicate that the data sampling for the History items has started.
The items selected in Sample Setup will be the only items whose history
data can be viewed on the TankMaster.net website.
The graph that you will be able to view will be as shown below.
Rosemount TankMaster.net 27
Third Edition, February 2007

History Graphs
To view the graphical history records of a product or a tank, the user will
have to do the following:
Select the History option from the navigation bar. By default this will
display the graph for the first product group in the Tree view list.
For selecting a product or a tank, the user will click on the Tree view of the
products on the left side of the page under Available Tanks. The name of
the product will appear on top of the graph with a caption Graph of
Group/Tank (name of the product group or tank) as on (Current date and
Time).
The user can select the number of days or months option to view the data
from the drop down menu, with a caption For. The user can select the
time period to view the history data for a minimum of 4 hours to a
maximum of 1 year. By default, the time period is set to 4 hours.
The user can also set the end date along with the time in the box provided
with the caption set the End Date/Time. The user can view the data up to
the current time and date. For selecting this option, check the box
Autoset to Now. This option will set the date and time to the system’s
current date and time.
The user can select the required OPC item to be graphed by selecting an
item from the drop down list under Graph this item. The items displayed
in the drop down list are the items which were selected during the WinOPI
setup.
After making the proper selections, the user can click on the Graph It
button to see the graphical representation of the item for the period that
was selected.
Example:
If the user selects the date as 17-09-2004 03:45 PM in the date box and
the period as 3 days then the data that will be displayed will be from 14-
09-2004 03:45 PM.
On the graph, different tanks are depicted by different colors. The color
that stands for a particular tank is stated below the graph. Along with the
names of the tanks, the numbers displayed in the bracket states the
minimum and the maximum levels. These levels will be displayed on the
Y-axis. The minimum level will be at the bottom and the maximum level
will be at the top of the graph. The first number displayed in the bracket is
the minimum level and the second number is the maximum level. The
date and time are displayed on the X-axis. Level (m) indicates the level in
meters. “?” indicates unavailable data.
28 Rosemount TankMaster.net
Third Edition, February 2007

History Graphs
The Refresh Rate window appears below the Product tree view. The
default Refresh Rate is set as 300 seconds. This setting can be changed
by entering the Refresh Rate in seconds and clicking on the Set Rate
button.
If the Refresh Rate is set to zero, it means that the data will not be
refreshed. Do not set the Refresh Rate below 90 seconds.
Note! The “set the end Date/Time” will show the current Date and Time by
default. The period, for which the graph can be viewed, will be a minimum
of 4 hours and maximum of 1 Year. The administrator can change these
settings by making changes in History.ini and HistoryUnicode.ini files.
These files contain settings for the History page
Rosemount TankMaster.net 29
Third Edition, February 2007

9.0 Download
To download data as an Excel spreadsheet, the user should click on the
Download option on the navigation bar.
If the user is viewing All Products, All Tanks or Tank Inventory pages and
clicks on the Download option, the data downloaded will be Current data. If
user is viewing the History graphs and clicks on the Download option, the
data downloaded will be the past data.
After clicking Download, the user will be able to see a window, which will give
options, Open this file from its current location or Save this file to disk. If
the user does not want to save the data and view the data in the Excel
workbook, he should click on the Open this file from its current location
option. If the user wants to save data to a certain folder he will have to click on
the Save this file to disk option. This will save the Excel workbook on the
user’s hard disk for viewing/editing.
The screen that appears after clicking on the Download option is shown
below.
Download
Select the desired option and click on Ok. It will open/save an Excel workbook
as per option selected.
The Excel workbook will contain separate sheets for each product and it will
show all tanks with their details.
The user can view the details of various product groups, by selecting the
desired worksheet displayed at the bottom of the page. Each worksheet is
named with the product description.
30 Rosemount TankMaster.net
Third Edition, February 2007

Download
The image shown above is the sample image of an Excel workbook when
saved/opened, when the Download option is selected.
Rosemount TankMaster.net 31
Third Edition, February 2007

10.0 Auto Refresh
The auto refresh rates are found in Current and History data sections.
In the Current data section the Refresh Rate window appears below the
Product tree view. The default Refresh Rate is set as 90 seconds. This
setting can be changed by the user by entering the Refresh Rate in seconds
and clicking on the Set Rate button. If the Refresh Rate is set to zero, it
means that the data will not be refreshed. Do not set the Refresh Rate below
30 seconds.
In the History data section the Refresh Rate window appears below the
Product tree view. The default Refresh Rate is set as 300 seconds. This
setting can be changed by the user by entering the Refresh Rate in seconds
and clicking on the Set Rate button. If the Refresh Rate is set to zero, it
means that the data will not be refreshed. Do not set the Refresh Rate below
90 seconds.
The default Refresh Rate and Auto Refresh values can be changed by editing
the Current.ini and the History.ini files under TMnData\Language directory
General section of the Current.ini file is shown below
[General]
; s=second, n=minute, h=hour, d=day
; 60n = 60 minutes
WarnOldValuesTime=60n
;RefreshRate is in seconds
RefreshRate=90
;Consider Auto-Refresh as Usage
; Not Usage = 0
; Usage = Not Zero
AutoRefreshIsUsage=1
; Set the first page after login
; AGOVW = All Products overview - Default
; GOVW = All Tanks overview
; TNK = Single Tank inventory
StartPage=GOVW
General section of the History.ini file is shown below
[General]
; Number of data points for graphs.
NoOfDataPoints=200
Auto Refresh
32 Rosemount TankMaster.net
Third Edition, February 2007

Auto Refresh
;RefreshRate is in seconds
RefreshRate=300
;Consider Auto-Refresh as Usage
; Not Usage = 0
; Usage = Not Zero
AutoRefreshIsUsage=1
The value of AutoRefreshIsUsage in Current.ini and History.ini is defined by
the values 0 and 1.
The value 0 indicates that the auto refreshed pages will not be counted as
usage, and the user will be logged out in 20 minutes.
The value 1 indicates that the user will not be logged off at all if the pages are
being refreshed periodically.
The administrator can disable the Refresh Rate table displayed on the
TankMaster.net website by modifying the TMnWebTanks.htm file in the
TMnData\Language directory.
The TMnWebTanks.htm file is shown below
<table width="100%" border="0" cellspacing="0">
<tr>
<td width="160" valign="top">
<table width="100%" cellpadding="3" cellspacing="0" border="2">
<!-- Treeview starts -->
<tr><td align="left" valign="top" bgcolor="white" class="Treeview">
<TMN_TREE />
</td></tr>
<!-- Treeview Ends -->
<tr><td class="RefreshTitle">Set Refresh Rate</td></tr>
<!-- Refresh Form Starts -->
<tr><td class="RefreshBody" valign="top">
<form method="post" name="Refresh" Action="<TMN_REFRESHACTION
/>">
<br />
<p>
<input class="RefreshBody" name="RefreshPeriod" id="RefreshPeriod"
size="4" maxlength="4" value="<TMN_REFRESHRATE />">
seconds.
<input class="RefreshBody" type="submit" value="Set Rate">
</p>
</form>
</td><tr>
<!-- Refresh Form Ends -->
</table>
Rosemount TankMaster.net 33
Third Edition, February 2007
Auto Refresh
</td>
<!-- Page Data starts -->
<td valign="top">
<table width="100%" cellpadding="0" cellspacing="0" border="0">
<center>
<TMN_ERRORMSG />
<TMN_PAGEDATA />
</center>
</table>
</td>
<!-- Page Data Ends -->
</tr>
</table>
Delete the highlighted section displayed above and save the file.
The screen without the refresh rate is as shown below.
The Refresh Rate section table will not be viewed on the TankMaster.net
website and the user will not be allowed to change the refresh rate which has
been set as default by the administrator.
If the RefreshRate (as mentioned above) is set to zero, then there would be
no Auto Refresh on the site
34 Rosemount TankMaster.net
Third Edition, February 2007

Logout
11.0 Logout
To logout of the TankMaster.net website, the user should click on the Logout
button on the navigation bar.
To Logout of the website:
The Logout option will allow the user to sign out of the website. Once the
user logs out, the login page of the TankMaster.net website will be
displayed. If the user, after logout, wants to view the TankMater.net data,
he will need to re-login to the website using his valid LoginID and
Password.
If the user closes the Internet Explorer browser window without clicking on
the Logout option, he will not be considered as logged out of the
TankMaster.net website (i.e. The UserStaus website will display that this
user is still logged in to the TankMaster.net website). After 20 minutes of
inactivity or once the session timeout period is reached, the web user will
be automatically logged out (i.e. The UserStatus web page will delete this
user from the user/login list).
Rosemount TankMaster.net 35
Second Edition, February 2007
Add/Modify a Language to the TankMaster.net website
12.0 Add/Modify a Language to theTankMaster.net
website
12.1 To change the default language of the TankMaster.net
website
The default language of the website is English. The administrator can
add/modify the language as per the requirements. Note: To add any
language the Operating System should support the desired language.
For example, assume two languages are loaded on the TankMaster.net
website (English and French). To change the default language from
English to French, edit the TankMasternet.ini file, which exists in the
default Windows directory [for Windows 2000, the default windows
directory is C:\WinNT; for Windows XP and Windows 2003 the default
windows directory is C:\Windows]. The Tankmasternet.ini file can be
edited in any plain text editor like Notepad.
To change the default website language from English to French, edit
the Tankmasternet.ini file and locate the header section [Data].
Locate the line ‘LanguageFolder= English’ and change the word
‘English’ to ‘French’. Save the file and exit.
When the TankMaster.net website is opened it will observed, that the
default language set for viewing the Login page is changed to French.
36 Rosemount TankMaster.net
Third Edition, February 2007

Add/Modify a Language to the TankMaster.net website
12.2 To add a language to the TankMaster.net website
To add a language, the following steps should be observed (Example,
To add Italian language)
If the Italian language is to be added to the website, it is necessary that
the Windows Operating System should support the Italian language.
Create an image file in Gif format with a height of 16 pixels, which can
be used as an icon flag for the new language (Italian). Save the image
file as “FlagItaly.gif” and save it in the TMn2Web\Images and
TMn2Web\WebHelp\Images folders.
A sample flag is shown below.
Copy the entire ‘English’ subdirectory of the TMnData folder and paste
it in the same directory. It will be named as ‘Copy of English’. Rename
this folder to ‘Italian’.
To switch/change languages, the user will make changes in the
TMn2WebLogin.htm file that is located in TMnData\Language
directories. (This file is to be edited in all Language folders)
The file TMn2WebLogin.htm can be edited in a plain text editor like
Notepad. Changes to be made are as follows:
Go to the ‘LanguageBar’ section and copy the first line as shown
below.
<td class=“LanguageBar” width=“16%”><a
href=“default.asp?SCT=SETLANG&LNG=English”
class=“Language”><img src=“images/FlagUK.gif”
class=“Language” alt=“English” /> English</a></td>
Paste this line as the last line of the ‘LanguageBar’. Edit the last
‘LanguageBar’ line by replacing the word ‘English’ to ‘Italian’ and
rename ‘FlagUK.gif’ to ‘FlagItaly.gif’. The line after editing will
appear as follows.
<td class=“LanguageBar” width=“16%”><a
href=“default.asp?SCT=SETLANG&LNG=Italian”
class=“Language”><img src=“images/FlagItaly.gif”
class=“Language” alt=“Italian” /> Italian</a></td>
Note! FlagItaly.gif is an independent file that is created to be viewed as an
Italian flag on the website.
Rosemount TankMaster.net 37
Second Edition, February 2007
Add/Modify a Language to the TankMaster.net website
The above edited line is to be copied to all Language folders in
TMn2WebLogin.htm file.
The changes mentioned below have to be made in the
TMnData\Italian\TMn2WebLogin.htm file.
Locate the line with the ‘LanguageMessage’ that is the next line after
‘LanguageBar’. Edit the line by replacing the word ‘English’ with ‘Italian’.
The edited line will read as follows.
<td class=“LanguageMessage”>Current Language is Italian</td>
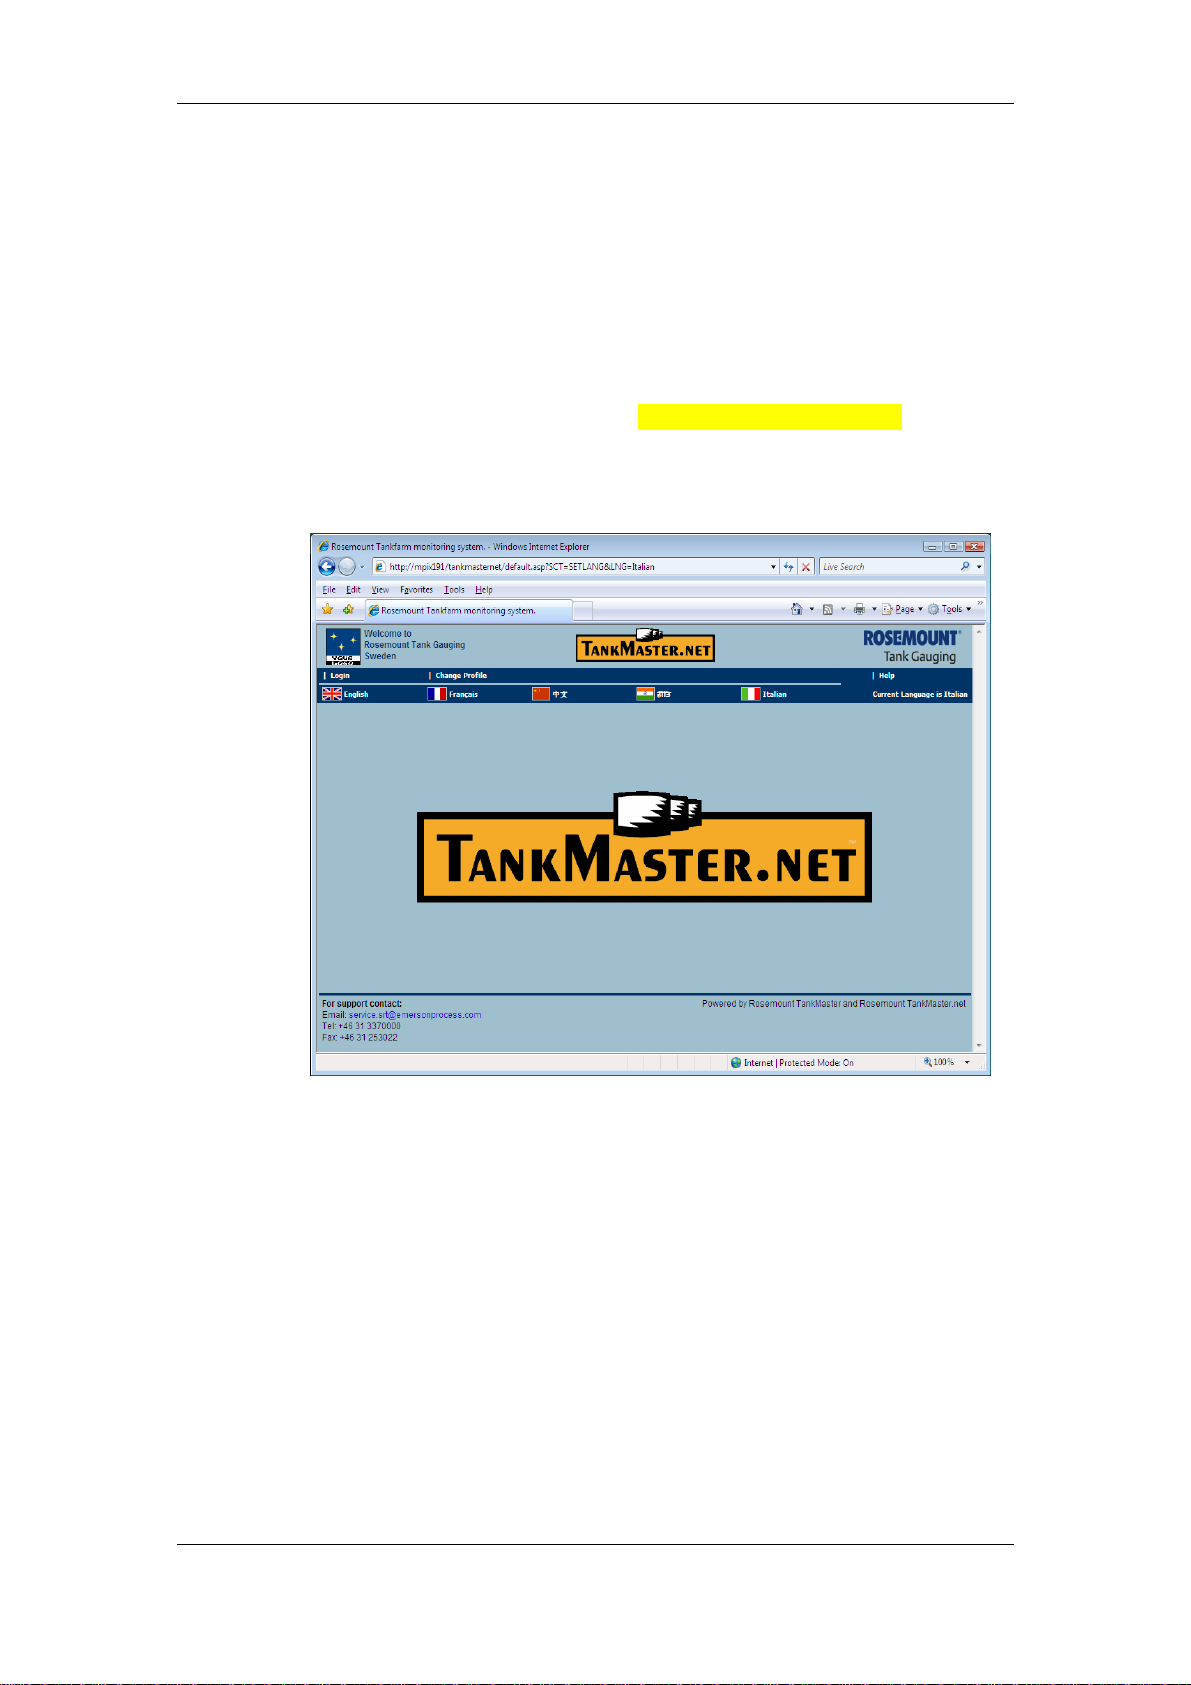
After adding the Italian language, the Login page will appear as shown
below.
This completes adding a language to the TankMaster.net website.
38 Rosemount TankMaster.net
Third Edition, February 2007

Add/Modify a Language to the TankMaster.net website
12.3 To modify a Language for the TankMaster.net website
To modify a Language on the TankMaster.net website, .ini and .htm files
need to be edited. These files should be edited using a plain text editor
like Notepad. The files are located in the TMnData\Language
directories. In this section we shall explain the changes required to be
incorporated to modify the language, Italian, (assuming that the Italian
Language has been added using the procedure described in the Adding
a Language section).
Note! Before making any modifications it is advised to take a backup of all
TMnData/Language folders.
The files to be modified are:
Current.ini
•
•
DownloadUnicode.ini
Format_Html.ini and Format_Win.ini
•
History.ini and HistoryUnicode.ini
•
Language.ini
•
Login.ini
•
PieChartUnicode.ini
•
•
TMn2WebLogin.htm
TMn2WebTanks.htm
•
These files are located in the TMnData\Italian directory.
Note! In all .ini files, the lines beginning with a semicolon ‘;’ are remark
statements and should not be translated in languages.
Do not change or alter any information available within the HTML tags.
HTML tags are displayed with symbols ‘< >’. Text between ‘< >’ tags
should not be translated in languages.
Rosemount TankMaster.net 39
Second Edition, February 2007

Add/Modify a Language to the TankMaster.net website
Current.ini
Note! This file is to be saved in UTF-8 format.
In each of the sections, [All Products], [Products],
[Level&Temp], [S&W], [Volumes], [Vapour], [Product] and
[Roof], each line beginning with LineN where ‘N’ is a number needs
to have the characters between the ‘=’ and the first ‘|’ character
translated in the required language.
Example of a small section of the Current.ini file under section [All
Products].
[AllProducts]
MaxTanksPerRow=6
Line1=$||1
Line2=Level||4
Line3=Net Standard Volume|NSV.CV|2
Line4=Weight in Air|WIA.CV|2
Line5=Available Room|AVRM.CV|2
Line6=Free Water Level|FWL.CV|2
Line7=Avg. Temperature|AT.CV|8
To modify the language as in the above example, everything
highlighted in yellow needs to be translated and then saved.
This file has sections for modification which will be viewed on the
TankMaster.net WAP website. The sections are [WapProduct],
[WapUnkProduct], [WapTank], [WapTank2] and [WapUnkTank].
Note! For detailed description on Current.ini file for TankMaster.net website
refer to section 13.2
DownloadUnicode.ini
Note! This file is to be saved in UNICODE format
In the [Download] section, each line beginning with LangN, where
‘N’ is a number, needs to have the characters after ‘=’ till the end of
the line translated in the required language.
40 Rosemount TankMaster.net
Third Edition, February 2007

Add/Modify a Language to the TankMaster.net website
Example of a small section of the DownloadUnicode.ini file under
section [Download].
[Download]
; Excel sheet titles
Lang1=All Products Overview as on <LANG_DATETIME>
Lang2=Product Overview of <LANG_DATA> as on
<LANG_DATETIME>
Lang3=Inventory details of all tanks as on <LANG_DATETIME>
Lang4=Product History of <LANG_DATA> for <LANG_ITEM> in
(<LANG_UOM>)
Lang5=History details of All Tanks for <LANG_ITEM> in
(<LANG_UOM>)
In the [All Groups], [Groups] and [TankInventory] sections, each
line beginning with LineN where ‘N’ is a number, needs to have the
characters between the ‘=’ and the first ‘|’ character translated in
the required language.
Example of a small section of the DownloadUnicode.ini file under
section [All Groups].
[AllGroups]
Line1=Max level|LL.MX|1
Line2=Level|LL.CV|2
Line3=Net Standard Volume|NSV.CV|2
Line4=Weight in Air|WIA.CV|2
Line5=Available Room|AVRM.CV|2
Line6=Free Water Level|FWL.CV|2
Line7=Avg. Temperature|AT.CV|10
To modify the language as in the above examples, everything
highlighted in yellow needs to be translated and then saved.
Note! For detailed description on DownloadUnicode.ini file for TankMaster.net
website refer to section 13.3
Format_Html.ini and Format_Win.ini
Note! The file, Format_HTML.ini is to be saved in UTF-8 format and the file
Format_Win.ini is to be saved in UNICODE format
In the [RoofState], [RoofSplState], [RoofPosition], [TankType],
[UnitOfMeasurement] and [Quality] sections, each line beginning
with LangN, where ‘N’ is a number, needs to have the characters
after ‘=’ till the end of the line translated in the required language.
Rosemount TankMaster.net 41
Second Edition, February 2007

Add/Modify a Language to the TankMaster.net website
Example of a small section of the Format_Html.ini file under
section [RoofState].
[RoofState]
; ROOF_RESTING_ON_LEG
Lang1=Roof resting on leg
; ROOF_PARTLY_FLOATING
Lang2=Roof partly floating
; ROOF_FREELY_FLOATING
Lang3=Roof freely floating
; Else
Lang4=Not valid
To modify the language as in the above example, everything
highlighted in yellow needs to be translated and then saved.
Note! For detailed description on Format_Html.ini and Format_Win.ini files for
TankMaster.net website refer to section 13.4
History.ini and HistoryUnicode.ini
Note! The file, History.ini is to be saved in UTF-8 format and the file
HistoryUnicode.ini is to be saved in UNICODE format
In the section, [HistoryItems] each line beginning with LineN,
where ‘N’ is a number, needs to have the characters after ‘|’ till the
end of the line translated in the required language.
Example of a small section of the History.ini file under section
[HistoryItems].
[HistoryItems]
Line1=LL.CV|Level
Line2=TOV.CV|Total Observed Volume.
Line3=GSV.CV|Gross Standard Volume.
Line4=NSV.CV|Net Standard Volume.
Line5=AT.CV|Average Temperature.
In the [HistoryPeriods] section, each line beginning with LineN,
where ‘N’ is a number, needs to have the characters after ‘=’ and
before the ‘|’ to be translated in the required language.
[HistoryPeriods]
Line1=4 hours|4h
Line2=6 hours|6h
Line3=8 hours|8h
Line4=1 day|1d
42 Rosemount TankMaster.net
Third Edition, February 2007

Add/Modify a Language to the TankMaster.net website
Line5=3 days|3d
Line6=7 days|7d
Line7=1 month|1m
Line8=3 months|3m
Line9=1 year|1y
To modify the language as in the above example, everything
highlighted in yellow needs to be translated and then saved.
Note! For detailed description on History.ini and HistoryUnicode.ini files for
TankMaster.net website refer to section 13.5
Language.ini
Note! This file is to be saved in UTF-8 format
In the [Common], [Login], [Current] and [History] sections, each
line beginning with LangN, where ‘N’ is a number, needs to have
the characters after ‘=’ till the end of the line translated in the
required language.
Example of a small section of the Language.ini file under section
[Common]
[Common]
; Login Menu
Lang1=Login
; Login Menu tip
Lang2=You need to Login to use this site.
; Change password Menu
Lang3=Change Profile
; Change password Menu tip
Lang4=Change Name, Password etc.
; Help (Top Level) Menu and tip
To modify the language as in the above example, everything
highlighted in yellow needs to be translated and then saved.
This file has a section [UserStatus] for modification which will be
viewed on the TankMaster.net UserStatus website.
Note! For detailed description on Language.ini file for TankMaster.net website
refer to section 13.6
Rosemount TankMaster.net 43
Second Edition, February 2007

Add/Modify a Language to the TankMaster.net website
Login.ini
Note! This file is to be saved in UTF-8 format
In the [ChangePassword] section, lines beginning with ItemN,
where ‘N’ is a number, need to have the characters after ‘=’ till the
end of the line translated in the required language.
Example of the Login.ini file
[ChangePassword]
Item1=EmailID
Item2=FullName
To modify the language as in the above example, everything
highlighted in yellow needs to be translated and then saved.
Note! For detailed description on Login.ini file for TankMaster.net website
to section 13.7
PieChartUnicode.ini
Note! This file is to be saved in UTF-8 format
In the [PieChart] section, each line beginning with LangN, where
‘N’ is a number, needs to have the characters after ‘=’ and before
‘<LANG_DATA>%’ translated in the required language.
Example of PieChartUnicode.ini file.
[PieChart]
; Free Water Level
Lang1=FWater <LANG_DATA> %
; Product level
Lang2=Utilized <LANG_DATA> %
; Available room
Lang3=Available <LANG_DATA> %
; Invalid quality
Lang4=Quality Bad
To modify the language as in the above example, everything
highlighted in yellow needs to be translated and then saved. The
spaces between the highlighted text and the HTML tags should be
maintained as is.
Note! For detailed description on PiechartUnicode.ini file for TankMaster.net
website refer to section 13.8
refer
44 Rosemount TankMaster.net
Third Edition, February 2007

Add/Modify a Language to the TankMaster.net website
TMn2WebLogin.htm
Edit this file in a plain text editor like Notepad.
Locate the line shown below.
<td class=“LanguageMessage”>Current Language is English</td>
To modify the language in the above example, everything
highlighted in yellow needs to be translated and then saved.
Locate the lines shown below.
<tr><td colspan=“2” align=“middle”><font face=“arial” font
size=“2”>This is a restricted area.</font><br></td></tr>
<tr><td align=“right”><font face=“arial” font
size=“2”>LoginID</font></td>
<td align=“left”><input type=“text” name=“LoginID”
id=“inpLoginID” size=“16” value=““></td></tr>
<tr><td align=“right”><font face=“arial” font
size=“2”>Password</font></td>
To modify the language in the above example, everything
highlighted in yellow needs to be translated and then saved.
Locate the lines shown below.
<tr><td colspan=“2” align=“middle”><font face=“arial” font
size=“2”>This is a restricted area.</font><br></td></tr>
<tr><td align=“right”><font face=“arial” font
size=“2”>LoginID</font></td>
<td align=“left”><input name=“LoginId” id=“inpLoginIdPW”
size=“16” value=““></td></tr>
<tr><td align=“right”><font face=“arial” font size=“2”>Old
Password</font></td>
<td align=“left”><input type=“password” name=“OldPassword”
size=“16” value=““></td></tr>
<tr><td align=“right”><font face=“arial” font size=“2”>New
Password</font></td>
<td align=“left”><input type=“password”
name=“NewPassword” size=“16” value=““></td></tr>
<tr><td align=“right”><font face=“arial” font size=“2”>Confirm
Password</font></td>
To modify the language in the above example, everything
highlighted in yellow needs to be translated and then saved.
Rosemount TankMaster.net 45
Second Edition, February 2007

Add/Modify a Language to the TankMaster.net website
TMn2WebTanks.htm
Edit this file in a plain text editor like Notepad.
Locate the lines shown below.
<!-- Treeview Ends -->
<tr><td class=“RefreshTitle”>Set Refresh Rate</td></tr>
<!-- Refresh Form Starts -->
<tr><td class=“RefreshBody” valign=“top”>
<form method=“post” name=“Refresh”
Action=“<TMN_REFRESHACTION />“>
<br />
<p>
<input class=“RefreshBody” name=“RefreshPeriod”
id=“RefreshPeriod” size=“4” maxlength=“4”
value=“<TMN_REFRESHRATE />“>
seconds.
<input class=“RefreshBody” type=“submit” value=“Set Rate”>
To modify the language in the above example, everything
highlighted in yellow needs to be translated and then saved.
This completes modifying the language for TankMaster.net website.
46 Rosemount TankMaster.net
Third Edition, February 2007

Description of .ini files for TankMaster.net website
13.0 Description of .ini files for TankMaster.net website
The administrator can make changes to the TankMaster.net website by
editing the .ini and .htm files. These files are located in the
TMnData\Language folders. The .ini files must be saved in the encoding
standard specified. A brief description of encoding standards is given below.
Encoding Standards
Saving a file in Unicode, UTF-8 or ANSI format
To save a file in any of the above formats, open the file in NotePad and click
on File>Save As. Under the Encoding field, select the type of encoding
required as shown below.
About Unicode
The Unicode Standard is the universal character-encoding standard used for
representation of text for computer processing. Unicode provides a consistent
way of encoding multilingual plain text and brings order to a chaotic state of
affairs that has made it difficult to exchange text files internationally. The
character sets of many existing international, national and corporate
standards are incorporated within the Unicode Standard. For example, its first
256 characters are taken from the widely used Latin-1 character set.
Duplicate encoding of characters is avoided by unifying characters within
scripts across languages; characters that are equivalent in form are given a
Rosemount TankMaster.net 47
Second Edition, February 2007

Description of .ini files for TankMaster.net website
single code. Chinese/Japanese/Korean (CJK) consolidation is achieved by
assigning a single code for each ideograph that is common to more than one
of these languages. This is instead of providing a separate code for the
ideograph each time it appears in a different language. (These three
languages share many thousands of identical characters because their
ideograph sets evolved from the same source.)
The Unicode Standard specifies an algorithm for the presentation of text with
bi-directional behavior, for example, Arabic and English. Characters are
stored in logical order. The Unicode Standard includes characters to specify
changes in direction when scripts of different directionality are mixed. For all
scripts Unicode text is in logical order within the memory representation,
corresponding to the order in which text is typed on the keyboard.
About UTF-8
Character encoding standards define not only the identity of each character
and its numeric value, or code point, but also how this value is represented in
bits.
The Unicode Standard defines three encoding forms that allow the same data
to be transmitted in a byte, word or double word oriented format (i.e. in 8, 16
or 32-bits per code unit). All three encoding forms encode the same common
character repertoire and can be efficiently transformed into one another
without loss of data. The Unicode Consortium fully endorses the use of any of
these encoding forms as a conformant way of implementing the Unicode
Standard.
UTF-8 is popular for HTML and similar protocols. UTF-8 is a way of
transforming all Unicode characters into a variable length encoding of bytes.
It has the advantages that the Unicode characters corresponding to the
familiar ASCII set have the same byte values as ASCII, and that Unicode
characters transformed into UTF-8 can be used with much existing software
without extensive software rewrites.
About ANSI
Stands for "American National Standards Institute." ANSI does not itself
develop standards or conduct tests; rather it facilitates this work by
"accrediting" (i.e., recognizing) qualified groups with appropriate expertise.
The Institute is the official U.S. representative to the International
Organization for Standardization (ISO) and the International Electrotechnical
Commission (IEC). ANSI works within the industries to coordinate and set
standards in the US. ASCII is one of the ANSI standards.
Note! In all .ini files, the lines beginning with a semicolon ‘;’ are remark
statements.
Do not change or alter any information available within the HTML tags.
HTML tags are displayed with symbols ‘< >’.
48 Rosemount TankMaster.net
Third Edition, February 2007

Description of .ini files for TankMaster.net website
The detailed description of the .ini files, which exist in the TMnData\Language
directories, is as follows:
13.1 Colors.ini
Note! This file is to be saved in ANSI format
This file will display the different colors in the History section in the
graph and the Product table.
Colors.ini
; Product Color Table
[ProductColors]
Product1=RGB(0,0,0)
Product2=RGB(128,0,0)
Product3=RGB(0,128,0)
Product4=RGB(0,0,128)
Product5=RGB(0,128,128)
Product6=RGB(128,0,128)
Product7=RGB(128,128,0)
Product8=RGB(128,128,128)
Product9=RGB(255,0,0)
Product10=RGB(0,255,0)
Product11=RGB(0,0,255)
Product12=RGB(0,255,255)
Product13=RGB(255,0,255)
Product14=RGB(255,255,0)
Product15=RGB(255,128,128)
Product16=RGB(128,255,128)
Product17=RGB(128,128,255)
Product18=RGB(128,255,255)
Product19=RGB(255,128,255)
Product20=RGB(255,255,128)
; History Graph / Chart Line Colors
[SeriesColors]
Series1=RGB(0,0,255)
Series2=RGB(0,255,0)
Series3=RGB(255,0,0)
Series4=RGB(0,255,255)
Series5=RGB(255,0,255)
Series6=RGB(128,128,0)
Series7=RGB(0,0,128)
Series8=RGB(0,128,0)
Series9=RGB(128,0,0)
Series10=RGB(0,128,128)
Series11=RGB(128,0,128)
Series12=RGB(128,128,0)
Rosemount TankMaster.net 49
Second Edition, February 2007

Description of .ini files for TankMaster.net website
The data in the colors.ini can be understood as follows.
The data under [ProductColors] section sets the color for different
products. The color value should be put in the RGB format (Red value,
Green value, Blue value).
The data under [SeriesColors] section will set the colors of the line
representing a tank in the graph. Series1 will hold the color for the first
tank that is displayed in the History graph and so on. By default colors
for 12 tanks have been set.
50 Rosemount TankMaster.net
Third Edition, February 2007

Description of .ini files for TankMaster.net website
13.2 Current.ini
Note! This file is to be saved in UTF-8 format
Sections highlighted in gray are relevant to the TankMaster.net WAP
section, which are explained in the TMn2Wap.pdf file.
[General]
; s=second, n=minute, h=hour, d=day
; 60n = 60 minutes
WarnOldValuesTime=60n
;RefreshRate is in seconds
RefreshRate=90
;Consider Auto-Refresh as Usage
; Not Usage = 0
; Usage = Not Zero
AutoRefreshIsUsage=1
; Set the first page after login
; AGOVW = All Products overview - Default
; GOVW = All Tanks overview
; TNK = Single Tank inventory
StartPage=GOVW
[AllProducts]
MaxTanksPerRow=6
Line1=$||1
Line2=Level||4
Line3=Net Standard Volume|NSV.CV|2
Line4=Weight in Air|WIA.CV|2
Line5=Available Room|AVRM.CV|2
Line6=Free Water Level|FWL.CV|2
Line7=Avg. Temperature|AT.CV|8
[Products]
MaxTanksPerRow=6
Line1=$||1
Line2=Level||4
Line3=Flow Rate|FR.CV|2
Line4=Net Standard Volume|NSV.CV|2
Line5=Weight in Air|WIA.CV|2
Line6=Available Room|AVRM.CV|2
Line7=Free Water Level|FWL.CV|2
Line8=Avg. Temperature|AT.CV|2
Line9=Liquid Level|LL.CV|2
[Horizontal LPG]
TankTables=Level&Temp, S&W, Volumes, Vapour, Product,
TankImage
TablesInLHS=4
WapTankTables=WapTank2
Rosemount TankMaster.net 51
Second Edition, February 2007

Description of .ini files for TankMaster.net website
WapUnkTankTables=WapUnkTank
[Spherical LPG]
TankTables=Level&Temp, S&W, Volumes, Vapour, Product,
TankImage
TablesInLHS=4
WapTankTables=WapTank
WapUnkTankTables=WapUnkTank
[Floating roof]
TankTables=Level&Temp, S&W, Volumes, Roof, Product, TankImage
TablesInLHS=4
WapTankTables=WapTank2
WapUnkTankTables=WapUnkTank
[Fixed roof]
TankTables=Level&Temp, S&W, Volumes, Product, TankImage
TablesInLHS=3
WapTankTables=WapTank
WapUnkTankTables=WapUnkTank
[Spherical]
TankTables=Level&Temp, S&W, Volumes, Vapour, Product,
TankImage
TablesInLHS=4
WapTankTables=WapTank
WapUnkTankTables=WapUnkTank
[Horizontal]
TankTables=Level&Temp, S&W,Volumes, Vapour, Product, TankImage
TablesInLHS=3
WapTankTables=WapTank2
WapUnkTankTables=WapUnkTank
[Level&Temp]
Line1=$||0
Line2=Level|LL.CV|2
Line3=Flow Rate|FR.CV|2
Line4=Avg. Temperature|AT.CV|2
Line5=Vapor Temperature|VT.CV|2
[S&W]
Line1=$|Sediment and Water|1
Line2=Sediment and Water|SW.CV|2
Line3=Free Water level|FWL.CV|2
Line4=Free Water Volume|FWV.CV|2
[Volumes]
Line1=$|Volumes|1
Line2=Max Volume|MXV.CV|1
Line3=Pumpable|PV.CV|2
Line4=Total Observed Volume|TOV.CV|2
Line5=Gross Observed Volume|GOV.CV|2
52 Rosemount TankMaster.net
Third Edition, February 2007

Description of .ini files for TankMaster.net website
Line6=Gross Standard Volume|GSV.CV|2
Line7=Net Standard Volume|NSV.CV|2
Line8=Available Room|AVRM.CV|2
Line9=Weight in Air|WIA.CV|2
Line10=Pipeline|PC.CV|1
Line11=% Utilization|TOV.CV|10
[Vapour]
Line1=$|Vapor|1
Line2=Liquid Equivalent of Vapor|LEV.CV|2
Line3=Vapor Mass|VM.CV|2
[Product]
Line1=$||1
Line2=Product Name|PROD.DC|1
Line3=Volume Table|VCT.CV|1
Line4=Vapor Pressure|VP.CV|2
Line5=Liquid Pressure|LP.CV|2
Line6=Observed Density|DOBS.CV|2
Line7=Reference Density|DREF.CV|1
Line8=TEC of Liquid|TECL.CV|1
Line9=Volume Correction Factor|VCF.CV|1
[TankImage]
Line1=$||1
Line2=||4
[Roof]
Line1=$|Roof|1
Line2=Roof Position|ROOF.CP|2
Line3=Roof State|ROOF.RS|2
[WapProduct]
Line1=$||1
Line2=TOV|TOV.CV|2
Line3=NSV|NSV.CV|2
Line4=WIA|WIA.CV|2
Line5=Avl.Room|AVRM.CV|2
Line6=% Utilization|TOV.CV|10
Line7=Level||4
[WapUnkProduct]
Line1=$||1
Line2=TOV|TOV.CV|2
Line3=NSV|NSV.CV|2
Line4=WIA|WIA.CV|2
Line5=Avl.Room|AVRM.CV|2
Line6=% Util|TOV.CV|10
Line7=Level||4
[WapTank]
Line1=$||1
Line2=Product|PROD.DC|1
Rosemount TankMaster.net 53
Second Edition, February 2007

Description of .ini files for TankMaster.net website
Line3=L Level|LL.CV|2
Line4=Avg.Temp.|AT.CV|2
Line5=Flow Rate|FR.CV|2
Line6=TOV|TOV.CV|2
Line7=Volume Table|VCT.CV|1
Line8=Level||4
[WapTank2]
Line1=$||1
Line2=Product|PROD.DC|1
Line3=L Level|LL.CV|2
Line4=Avg.Temp.|AT.CV|2
Line5=Flow Rate|FR.CV|2
Line6=TOV|TOV.CV|2
Line7=Volume Table|VCT.CV|1
Line8=Level||16
[WapUnkTank]
Line1=$||1
Line2=Product|PROD.DC|1
Line3=L Level|LL.CV|2
Line4=Avg.Temp.|AT.CV|2
Line5=Flow Rate|FR.CV|2
Line6=TOV|TOV.CV|2
Line7=Volume Table|VCT.CV|1
Line8=% Util|TOV.CV|10
Line9=Level||16
The data under the [General] section is understood as below.
When “WarnOldValuesTime=60n” is set, a warning message “(warning:
last known data is used)” will be displayed 60 minutes after the
TankMaster Data Collector stops polling data
will be displayed at the top of the web page, next to the time displayed.
The administrator can set this time period to display this message in
seconds, minutes, hours and days. To change the unit of time, replace
n with s for seconds, h for hours and d for days.
For example, for 60 seconds, replace 60n to 60s, for 60 minutes set the
value to 60n, for 60 hours set the value to 60h and for 60 days to 60d.
The Refresh Rate in seconds for the current data can be set by editing
the line, “RefreshRate=90”. By default, the Refresh Rate is set to 90
seconds.
The value of AutoRefreshIsUsage is defined by the values 0 and 1. The
value 0 indicates that the auto refreshed pages will not be counted as
usage, and the user will be logged out in 20 minutes. The value 1
indicates that the user will not be logged off at all if the pages are being
refreshed periodically.
The data under “; Set the first page after login” is to set the first page
that will be displayed when a user logs in to the website. The
explanation is as follows:
. This warning message
54 Rosemount TankMaster.net
Third Edition, February 2007

Description of .ini files for TankMaster.net website
AGOVW is the ID used for the overview of All Products page.
GOVW is the ID used for All Tanks Overview.
TNK is the ID used for Single Tank Inventory page.
The ID against the StartPage will be the default start up page when the
user logs in to the website.
The data under the [AllProducts] section allows the administrator to
customize the OPC items to be displayed in the All Products section in
the TankMaster.net website.
The data under the [Products] section is for the All Tanks and
Products tank options on the site.
The information contained in the [Products] and [All Products] section
is as follows.
.The “MaxTanksPerRow=6” indicates the maximum number of tanks a
row can accommodate. The administrator can change this value.
The lines indicate each row. The first line “Line1=$| |1” can be
understood as follows.
The $ indicates that this is the first row in the table.
The space between “|” and “|” shows that there is no heading for the
table. If required, the heading can be inserted by putting it in between
the two “|”. The number 1 at the end indicates that the table should
have a border of “size=1”.
The data after the key name (“Line2=“) is the name of the OPC items
used as the description of each row and the data after “|” indicates the
OPC ID.
All numbers that are displayed at the end of each statement have
different meanings.
0 = Displays as the Title.
1 = Display from fixed data.
2 = Display from live data.
4 = Display as image (different sections show different types of
images).
8 = Display as average (Total Value / No. of tanks).
10 = Display as percentage (TOV /MXV).
16 = Create Bargraph as an image (used in the Wap site).
The data under [Horizontal LPG], [Spherical LPG], [Fixed roof],
[Floating roof], [Spherical], [Horizontal] allows customization of the
Tank Inventory depending on the type of tank.
If a user clicks on a type of tank that is a Horizontal LPG, then the data
that will be displayed to the user will be from the tables mentioned for
the Horizontal LPG under “[Horizontal LPG]” section against
“TankTables”.
Rosemount TankMaster.net 55
Second Edition, February 2007

Description of .ini files for TankMaster.net website
The “TankTables=Level&Temp, S&W, Volumes, Vapour, Product,
TankImage” indicates that the details of the items given under
[Level&Temp], [S&W] etc. will be displayed when the single tank’s
information is displayed. The administrator can alter details of the tanks
from the “TankTable”. The details for a particular table are given in the
respective sections.
In the [Level&Temp], [S&W], [Volumes], [Vapour], [Product] and
[TankImage] sections.
The first line “Line1=$| |0” can be understood as follows:
The $ indicates that this is the first row in the table.
The space after “|” shows that there is no heading for the table. If the
administrator wants to put a heading then he can do so by putting the
heading in between the two “|”. The number 0 after the pipes indicates
that the table has no border.
The subsequent rows can be understood as follows:
The data after the key name (“Line2=“) is the name of the OPC items
used as the description of each row and the data after “|” indicates the
OPC ID.
All numbers that are displayed at the end of each statement have a
different meaning:
0 = Displays as the Title.
1 = Display from fixed data.
2 = Display from live data.
4 = Display as image (different sections show different types of
images).
8 = Display as average (Total Value / No. of tanks).
10 = Display as percentage (TOV /MXV).
16 = Create Bargraph as an image (used in the Wap site).
Note! For description of the sections relevant to the TankMaster.net WAP
website of the Current.ini file refer to section 5.1 in file TMn2WapSite.pdf
56 Rosemount TankMaster.net
Third Edition, February 2007

Description of .ini files for TankMaster.net website
13.3 DownloadUnicode.ini
Note! This file is to be saved in UNICODE format
This file will display the values that will be viewed in the Excel
workbook.
[Download]
; Excel sheet titles
Lang1=All Products Overview as on <LANG_DATETIME>
Lang2=Product Overview of <LANG_DATA> as on
<LANG_DATETIME>
Lang3=Inventory details of all tanks as on <LANG_DATETIME>
Lang4=Product History of <LANG_DATA> for <LANG_ITEM> in
(<LANG_UOM>)
Lang5=History details of All Tanks for <LANG_ITEM> in
(<LANG_UOM>)
; Excel Sheet names - Current - AllProducts-Overview, AllTanksInventory
; These must match with sheet names in the Current Template file.
Lang6=AllGroups
Lang7=TankInv
; Excel Sheet names - History - AllTanks
; This must match with sheet name in the History Template file.
Lang8=All Tanks
; Other items Tank ID, Product
Lang9=Tank ID
Lang10=Product
; Date-time, Value
Lang11=Date-Time
Lang12=Value
[CurrentGeneral]
xlTemplateFile=TMNCurrent.xlt
; = RowNo, ColNo
SheetTitleCoordinates=1|2
SheetTableCoordinates=2|2
xlFileFormat=Excel9
[HistoryGeneral]
xlTemplateFile=TMNHistory.xlt
; = RowNo, ColNo
SheetTitleCoordinates=1|2
SheetTableCoordinates=2|2
xlFileFormat=Excel9
NoOfDataPoints=20
[AllGroups]
Line1=Max level|LL.MX|1
Line2=Level|LL.CV|2
Line3=Net Standard Volume|NSV.CV|2
Line4=Weight in Air|WIA.CV|2
Line5=Available Room|AVRM.CV|2
Rosemount TankMaster.net 57
Second Edition, February 2007

Description of .ini files for TankMaster.net website
Line6=Free Water Level|FWL.CV|2
Line7=Avg. Temperature|AT.CV|10
[Groups]
Line1=Product|PROD.DC|1
Line2=Max level|LL.MX|1
Line3=Level|LL.CV|2
Line4=Net Standard Volume|NSV.CV|2
Line5=Weight in Air|WIA.CV|2
Line6=Available Room|AVRM.CV|2
Line7=Free Water Level|FWL.CV|2
Line8=Avg. Temperature|AT.CV|10
[TankInventory]
Line1=Product Type|PROD.DC|1
Line2=Level|LL.CV|2
Line3=Avg Temperature|AT.CV|2
Line4=Vapor Temperature|VT.CV|2
Line5=$|Sediment and Water|1
Line6=Sediment and Water|SW.CV|2
Line7=Free Water level|FWL.CV|2
Line8=Free Water Volume|FWV.CV|2
Line9=$|Volumes|1
Line10=Pumpable|PV.CV|2
Line11=Total Observed Volume|TOV.CV|2
Line12=Gross Observed Volume|GOV.CV|2
Line13=Gross Standard Volume|GSV.CV|2
Line14=Net Standard Volume|NSV.CV|2
Line15=Available Room|AVRM.CV|2
Line16=Weight in Air|WIA.CV|2
Line17=Pipeline|PC.CV|1
Line18=$|Vapor|1
Line19=Liquid Equivalent of Vapor|LEV.CV|2
Line20=Vapor Mass|VM.CV|2
Line21=$||1
Line22=Product Type|PROD.DC|1
Line23=Volume Table|VCT.CV|1
Line24=Vapor Pressure|VP.CV|2
Line25=Liquid Pressure|LP.CV|2
Line26=Observed Density|DOBS.CV|2
Line27=Reference Density|DREF.CV|1
Line28=TEC Liquid|TECL.CV|1
Line29=Volume Correction Factor|VCF.CV|1
The data under the [CurrentGeneral] section is for the Excel
spreadsheet that is downloaded for current data and the data under
[HistoryGeneral] is for the Excel spreadsheet that is downloaded for
past data. The line “XLFileFormat=Excel9” is used to specify the
version of Excel spread sheet to be used. The versions that can be
used are Excel 2000 and above. The number against “NoOfDataPoints”
will be the number of rows used in the History Excel spread sheet.
58 Rosemount TankMaster.net
Third Edition, February 2007

Description of .ini files for TankMaster.net website
“SheetTitleCordinates= 1|2” will insert the title of the page in the first cell
of the first row. “SheetTableCordinates= 2|2” will set the start points of
the data in the Excel spreadsheet. For this file the data will start from
the second cell of the second column.
The data under [AllGroups] section allows the administrator to
customize the “All Products” option in the Excel spreadsheet.
The data under [Groups] section is for the “All Tanks” option in the
Excel spreadsheet. The data under [TankInventory] section is to
customize the single tank's information.
In the [AllGroups], [Groups] and [TankInventory] sections:
In each group the number of lines indicates the keys. The $ indicates
that this is the first row in the table. The space after “|” shows that there
is no heading for the table. If the administrator wants to put a heading,
he can do so by putting the heading in between the two “|”. The number
1 after the pipes indicates that the table has a border of size 1.
The data after “Line1=“ is the name of the OPC items used as the
description of each row and the data after “|” indicates the OPC ID.
The number “1” indicates that it is “Static Data”, number “2” indicates
that it is “Current Data”. The number “10” indicates that the data in the
field is an average of all the data present for that parameter.
Rosemount TankMaster.net 59
Second Edition, February 2007

Description of .ini files for TankMaster.net website
13.4 Format_Html.ini and Format_Win.ini
Note! The file Format_Html.ini is to be saved in UTF-8 format, while the file
Format_Win.ini is to be saved in UNICODE format.
Both these files have the same function; the Format_Html.ini file is
used to view data on the website and the file Format_Win.ini is used to
view data in Windows format.
[RoofState]
; ROOF_RESTING_ON_LEG
Lang1=Roof resting on leg
; ROOF_PARTLY_FLOATING
Lang2=Roof partly floating
; ROOF_FREELY_FLOATING
Lang3=Roof freely floating
; Else
Lang4=Not valid
[RoofSplState]
; “*”
Lang1=State for volume value
; “@”
Lang2=Roof resting on leg
; “ “
Lang3=Roof partly floating
; “=“
Lang4=Roof freely floating or pressure sensor in liquid
; “?”
Lang5=Pressure sensor above liquid
; Else
Lang6=Not valid
[RoofPosition]
; ROOF_POS_OPERATIONAL
Lang1=Operational
; ROOF_POS_MAINTENANCE
Lang2=Maintenance
; ROOF_POS_NOT_VALID
Lang3=Not valid
[TankType]
; TT_CYLINDER
Lang1=Fixed Roof
; TT_FLOATINGROOF
Lang2=Floating roof
; TT_SPHERE
Lang3=Spherical
; TT_HORIZONTAL
Lang4=Horizontal
; TT_SPHERELPG
Lang5=Spherical LPG
; TT_HORIZONTALLPG
60 Rosemount TankMaster.net
Third Edition, February 2007

Description of .ini files for TankMaster.net website
Lang6=Horizontal LPG
; TT_HTG_FIXED_ROOF
Lang7=HTG Fixed Roof
; TT_HTG_FLOATING_ROOF
Lang8=HTG Floating Roof
; TT_HTG_FLOATING_BLANKET
Lang9=HTG Floating Blanket
; TT_CARGO
Lang10=Cargo
; TT_BALLAST
Lnag11=Ballast
; TT_MISC
Lang12=Misc
; TT_CARGO_SPHERE_LNG
Lang13=LNG Sphere
; TT_CARGO_MEMBRANE_LNG
Lang14=LNG Membrane
; TT_CARGO_SPHERE_LPG
Lang15=LPG Sphere
[UnitOfMeasurement]
; 100 = meters
Lang1=m
; 101 = feet
Lang2=f
; 102 = inches
Lang3=in.
; 110 = meters per hour
Lang4=m/h
; 111 = feet per hour
Lang5=f/h
; 120 degrees Centigrade
Lang6=°C
; 121 degrees Farenhite
Lang7=°F
; 130 barG
Lang8=barG
; 131 barA
Lang9=barA
; 132 psiG
Lang10=psiG
; 133 psiA
Lang11=psiA
; 134 Pa
Lang12=Pa
; 135 kPa
Lang13=kPa
; 136 Kg per square cm.
Lang14=Kg/cm<sup>2</sup>
; 140 cubic meter
Lang15=m<sup>3</sup>
; 141 bbl
Lang16=bbl
Rosemount TankMaster.net 61
Second Edition, February 2007

Description of .ini files for TankMaster.net website
; 142 gallons US
Lang17=gal (US)
;143 cubic Dm
Lang18=Dm<sup>3</sup>
; 150 Kilogram per cubic meter
Lang19=Kg/m<sup>3</sup>
; 151 degree API
Lang20=°API
; 152 60/60 <sup>o</sup>F
Lang21=60/60 <sup>o</sup>F
; 153 pounds per gallon US
Lang22=lb/gal (US)
; 160 cubic meter /h
Lang23=m<sup>3</sup>/h
; 161 bbl/h
Lang24=bbl/h
; 162 gal/h
Lang25=gal (US)/h
; 163 cubic Dm per hour
Lang26=Dm<sup>3</sup>/h
; 170 metric tonne
Lang27=ton (m)
; 171 ton s
Lang28=ton (s)
; 172 ton l
Lang29=ton (l)
; 173 Kilogram
Lang30=Kg
; 174 Pound
Lang31=lb
; 1000 digital OnOff
Lang32=Digital
; 1001 RTG Status
Lang33=Status
; 1002 Percent
Lang34=%
; 1003 per degree
Lang35=/°
; 1004 ppm per degree
Lang36=E<sup>-6</sup>/<sup>o</sup>
; 1005 NoUnit
Lang37=
; 1006 tenth of a second
Lang38=1/10 s
; 1007 milli Volt
Lang39=mV
; 1008 milli Ampere
Lang40=mA
; 1009 Custom
Lang41=Custom
; 1010 Unit
Lang42=Unit
; 1011 Hertz
62 Rosemount TankMaster.net
Third Edition, February 2007

Description of .ini files for TankMaster.net website
Lang43=Hz
; 1012 Seconds
Lang44=s
; 1013 pH value
Lang45=pH
; 1014 Feet, Inches and 1/16 inch
Lang46=Ft
; 1015 LED
Lang47=LED
; 1016 Degrees
Lang48=°
; 1017 Volt
Lang49=V
; 1018 Alarm Status
Lang50=
; 0 null
Lang51=
; Else
Lang52=Unknown #<LANG_DATA>
[Quality]
; x0 Bad
Lang1=Bad
; x4 Config Error
Lang2=?
; x8 Not Connected
Lang3=
; xC Device Failure
Lang4=?
; x10 Sensor Failure
Lang5=?
; x14 Last Known
Lang6=?
; x18 Comm Failure
Lang7=CommFailure
; x1C Out Of Service
Lang8=?
; x20 Invalid value
Lang9=<font color='red'>?</font>
; x24 Last Known Before Failure
Lang10=?
; x40 Uncertain
Lang11=Uncertain
; x44 Last Useable
Lang12=Last Useable
; x50 Sensor Cal
Lang13=Sensor Cal
; x54 EGU Exceeded
Lang14=EGUExceeded
; x58 Sub Normal
Lang15=SubNormal
; xC0 GoodQuality
Lang16=Good Quality
Rosemount TankMaster.net 63
Second Edition, February 2007

Description of .ini files for TankMaster.net website
; xD8 Manual
Lang17=<font color=“blue”>Man </font>
; Else
Lang18=<font color=“red”>Quality #<LANG_DATA></font>
[VolumeCorrectionTable]
; VCT_54
Lang1=54
; VCT_54_A
Lang2=54A
; VCT_54_B
Lang3=54B
; VCT_54_C
Lang4=54C
; VCT_54_D
Lang5=54D
; VCT_RT_54_A
Lang6=RT 54A
; VCT_RT_54_B
Lang7=RT 54B
; VCT_RT_54_C
Lang8=RT 54C
; VCT_RT_54_D
Lang9=RT 54D
; VCT_6_A
Lang10=6A
; VCT_6_B
Lang11=6B
; VCT_6_C
Lang12=6C
; VCT_6_D
Lang13=6D
; VCT_RT_6_A
Lang14=RT 6A
; VCT_RT_6_B
Lang15=RT 6B
; VCT_RT_6_C
Lang16=RT 6C
; VCT_RT_6_D
Lang17=RT 6D
; VCT_60_A
Lang18=60A
; VCT_60_B
Lang19=60B
; VCT_60_C
Lang20=60C
; VCT_60_D
Lang21=60D
; VCT_24_A
Lang22=24A
; VCT_24_B
Lang23=24B
; VCT_24_C
64 Rosemount TankMaster.net
Third Edition, February 2007

Description of .ini files for TankMaster.net website
Lang24=24C
; VCT_24_D
Lang25=24D
; VCT_D4311
Lang26=D4311
; VCT_CHEM
Lang27=CHEM
; VCT_LINEAR
Lang28=LINEAR
; VCT_CUSTOM
Lang29=Custom
; VCT_SPARE_1
Lang30=Not Used
; VCT_USER1
Lang31=USER1
; VCT_USER2
Lang32=USER2
; VCT_USER3
Lang33=USER3
; VCT_USER4
Lang34=USER4
; VCT_USER5
Lang35=USER5
; VCT_USER6
Lang36=USER6
; VCT_USER7
Lang37=USER7
; VCT_USER8
Lang38=USER8
; VCT_USER9
Lang39=USER9
; VCT_USER10
Lang40=USER10
The items under the [RoofState], [RoofSplState] and [RoofPosition]
sections are displayed while viewing a single tank in the Roof header
table.
The [TankType] section is used to describe the type of tank being
used. There are different types of tanks in which materials are stored.
They are Fixed Roof, Floating Roof, Spherical, Horizontal, Spherical
LPG, Horizontal LPG etc.
The [UnitOfMeasurement] section describes the units of
measurements for different type of items stored in the tanks. Examples
of Units of measurements are:
meters = m (Used for measuring Levels).
cubic meter = m<sup>3</sup> (Unit for measuring volumes).
The [Quality] section comes into effect when the OPC quality of the
data is not acceptable (i.e. Bad, Config error, device failure, Sensor
failure etc.).
Rosemount TankMaster.net 65
Second Edition, February 2007

Description of .ini files for TankMaster.net website
The [VolumeCorrectionTable] section displays measurement units
that are universal. All tank containers are not the same. Each container
may have dents, bumps, curvatures etc. (The containers are not
uniform). To get an accurate value from these tanks is difficult. Hence a
mean/average reading has to be taken. For this reason, the Volume
Correction Table comes into effect. This standard is a universal
measurement and is accepted worldwide.
The different types of units used in the Volume Correction Table are 54,
54A, 54B, 54C etc. On the TankMaster.net website these values are
seen against the values for Volume Table, Vapor Pressure and Liquid
Pressure.
66 Rosemount TankMaster.net
Third Edition, February 2007

Description of .ini files for TankMaster.net website
13.5 History.ini and HistoryUnicode.ini
Note! The file History.ini is to be saved in UTF-8 format, while the file
HistoryUnicode.ini is to be saved in UNICODE format.
Both these files have the same function. The file History.ini is used to
view data in windows format while the HistoryUnicode.ini file is used
to view data on the website.
These files contain the minimum and maximum number of days a
history graph should be displayed, the name of the OPC items whose
data can be displayed and the color of the lines that will represent a
tank.
These files are located in the TMnData\Language directories
[General
; Number of data points for graphs.
NoOfDataPoints=200
;RefreshRate is in seconds
RefreshRate=300
;Consider Auto-Refresh as Usage
; Not Usage = 0
; Usage = Not Zero
AutoRefreshIsUsage=1
[HistoryItems]
Line1=LL.CV|Level
Line2=TOV.CV|Total Observed Volume.
Line3=GSV.CV|Gross Standard Volume.
Line4=NSV.CV|Net Standard Volume.
Line5=AT.CV|Average Temperature.
[HistoryPeriods]
Line1=4 hours|4h
Line2=6 hours|6h
Line3=8 hours|8h
Line4=1 day|1d
Line5=3 days|3d
Line6=7 days|7d
Line7=1 month|1m
Line8=3 months|3m
Line9=1 year|1y
The data under the [General] section is used to set the default refresh
rate (in seconds) and AutoRefreshIsUsage for the History page.
The data under the [HistoryItems] section indicates the OPC items
whose graphical data will be displayed on the site when the History
option is selected. The “Line” arranges the OPC items in the given
Rosemount TankMaster.net 67
Second Edition, February 2007

Description of .ini files for TankMaster.net website
order. The item between the “=“ and the “|” is the OPC ID and the item
after “|” is the description of the OPC item.
The data under the [History Periods] section stores the options for the
hours/days/months/year to be displayed on the history graphs available
for selection and the data seen after “|” is the unit ID.
The administrator can also change the color of the lines that will be
displayed on the graph representing different tanks. This can be
displayed by setting the color changes in the “Colors.ini” file. For details
on changing the color settings
refer to section 13.1
68 Rosemount TankMaster.net
Third Edition, February 2007

Description of .ini files for TankMaster.net website
13.6 Language.ini
Note! This file is to be saved in UTF-8 format
This is the main file for making language changes. The translations
made in this file will be reflected on the TankMaster.net and UserStatus
websites.
The details for the language.ini file are as follows.
Sections highlighted in gray are relevant to the TankMaster.net
UserStaus section, which are explained in the TMn2UserStatus.pdf file.
[Common]
; Login Menu
Lang1=Login
; Login Menu tip
Lang2=You need to Login to use this site.
; Change password Menu
Lang3=Change Profile
; Change password Menu tip
Lang4=Change Name, Password etc.
; Help (Top Level) Menu and tip
Lang5=Help
Lang6=Click for help.
; Help Menu Second Level - 1 and tip
Lang7=Help
Lang8=Context Help.
; Help Menu Second Level -2 and tip
Lang9=Glossary
Lang10=Glossary of terms.
; Logout Menu and tip
Lang11=Logout
Lang12=Click to Logout.
; Tank List Menu and tip
Lang13=Tank List
Lang14=List of available tanks.
; Overview Menu and tip
Lang15=Overview
Lang16=Overview.
; Overview Menu Second Level - 1 and tip
Lang17=All Products
Lang18=All Products Overview.
; Overview Menu Second Level - 2 and tip
Lang19=All Tanks
Lang20=All Tanks Overview.
; Overview Menu Second Level - 3 and tip
Lang21=Schematic
Lang22=Schematic diagram of the tank farm.
; History Menu and tip
Lang23=History
Lang24=Graphs of Historical data
; Download Menu and tip
Rosemount TankMaster.net 69
Second Edition, February 2007

Description of .ini files for TankMaster.net website
Lang25=Download
Lang26=Download Microsoft Excel workbook of current data.
; Welcome message before Login / after Login
Lang27=Welcome to
Lang28=Welcome <LANG_DATA>
; Postscript on left hand side
Lang29=<b>For support contact:</b><br>
Lang30=Email: <a
href='mailto:<LANG_DATA>'><LANG_DATA></a><br>
Lang31=Tel: <LANG_DATA><br>
Lang32=Fax: <LANG_DATA><br>
; Postscript on right hand side
Lang33=Powered by Rosemount TankMaster and Rosemount
TankMaster.net
Lang34=Too many users.
Lang35=In DEMO mode. Password not changed.
; the Word Tank in TankList
Lang36=Tank
; “All Tanks” and “Available tanks” in LHS pane (folding list of tanks)
Lang37=All tanks
Lang38=Available Tanks
[Login]
; Page title
Lang1=Rosemount Tankfarm monitoring system.
; Messages Authentication, TooManyUsers, DemoMode,
ProfileChanged.
Lang2=Authentication error. Please try again.
Lang3=User profile has been changed. Please login.
[Current]
; PageTitles, PageHeader, ErrorPageHeader for TankInventory
Lang1=Inventory of tank <LANG_DATA>
Lang2=Inventory of tank <LANG_DATA> as on <LANG_DATETIME>
Lang3=Inventory of tank <LANG_DATA> as on <font
color='red'><LANG_DATETIME></font> (warning: last known data is
used!)
; PageTitles, PageHeader, ErrorPageHeader for ProductGroup
Lang4=Overview of <LANG_DATA>
Lang5=Overview of <LANG_DATA> as on <LANG_DATETIME>
Lang6=Overview of <LANG_DATA> as on <font
color='red'><LANG_DATETIME></font> (warning: last known data is
used!)
; PageTitles, PageHeader, ErrorPageHeader for AllProducts
Lang7=Overview of all products
Lang8=Overview of all products as on <LANG_DATETIME>
Lang9=Overview of all products as on <font
color='red'><LANG_DATETIME></font> (warning: last known data is
used!)
; PageTitles, PageHeader, ErrorPageHeader for AllTanks.
Lang10=Overview of all tanks
Lang11=Overview of all tanks as on <LANG_DATETIME>
70 Rosemount TankMaster.net
Third Edition, February 2007

Description of .ini files for TankMaster.net website
Lang12=Overview of all tanks as on <font
color='red'><LANG_DATETIME></font> (warning: last known data is
used!)
; PageTitle for Schematic
Lang13=Schematic of the Tank Farm
; PageTitles, PageHeader, ErrorPageHeader for A Tank for Mobile
Lang14=Tank <LANG_DATA>
Lang15=Tank <LANG_DATA><br /><LANG_DATETIME>
Lang16=Tank <LANG_DATA><br /><font
color='red'><LANG_DATETIME></font>
; PageTitles, PageHeader, ErrorPageHeader for A Product for Mobile
Lang17=Overview of <LANG_DATA>
Lang18=Overview of <LANG_DATA><br /><LANG_DATETIME>
Lang19=Overview of <LANG_DATA><br /><font
color='red'><LANG_DATETIME></font>
; TankID and ProductID
Lang20=Tank ID
Lang21=Product ID
; ErrorMsg - Invalid tank for the user
Lang22=Tank authentication error. Please contact administrator.
[History]
; PageTitles, PageHeader, for Graphs of Tank.
Lang1=Graph of Tank <LANG_DATA>
Lang2=Graph of Tank <LANG_DATA> as on <LANG_DATETIME>
; PageTitles, PageHeader, for Graphs of All Tanks.
Lang3=Graph of all tanks
Lang4=Graph of all tanks as on <LANG_DATETIME>
; PageTitles, PageHeader, for Graphs of Groups.
Lang5=Graph of Group <LANG_DATA>
Lang6=Graph of Group <LANG_DATA> as on <LANG_DATETIME>
; Items in the Graph Menu form
Lang7=Graph It
Lang8=For<br>
Lang9=Autoset to Now<br><b>or</b> set the End Date/Time<br>
Lang10=Graph this item<br>
;[Download]
;; Excel sheet titles
;Lang1=All Products Overview as on <LANG_DATETIME>
;Lang2=Product Overview of <LANG_DATA> as on
<LANG_DATETIME>
;Lang3=Inventory details of all tanks as on <LANG_DATETIME>
;Lang4=Product History of <LANG_DATA> for <LANG_ITEM> in
(<LANG_UOM>)
;Lang5=History details of All Tanks for <LANG_ITEM> in
(<LANG_UOM>)
;; Excel Sheet names - Current - AllProducts-Overview, AllTanksInventory
;Lang6=AllGroups
;Lang7=TankInv
;; Excel Sheet names - History - AllTanks
;Lang8=All Tanks
Rosemount TankMaster.net 71
Second Edition, February 2007

Description of .ini files for TankMaster.net website
[GraphGif]
;Lang=
[GraphMenu]
;Lang=
[UserStatus]
; PageTitle for Login
Lang1=Rosemount TankMaster.net Users monitoring system.
; PageTitle for Status Display
Lang2=Rosemount TankMaster.net Users monitoring system.
; PageCaption for Status Display - DEMO MODE
Lang3=*** DEMO MODE ***<br>
; PageCaption for Status Display Lang4=There are <LANG_DATA> active users from <LANG_DATA2>
allowed on <LANG_DATETIME>
; Column headers of the Status Display - SessionID, LoginID, Page
Description, Start Time, Expiry Time
Lang5=Session ID
Lang6=Login ID
Lang7=Page Description
Lang8=Start Time
Lang9=Expiry Time
In the data under the [Common] section, the lines “Lang1=“ to
“Lang26=“are used in conjunction to display the menu wording and tool
tips displayed on the TankMaster.net website.
Line “Lang27=“ is used to display the “Welcome to” message on the
website’s Login page on the top left corner besides the company logo.
Line “Lang28=“ is used to display the “Welcome” message on the
website after login. “<LANG_DATA>“ will be replaced by the name of
the user logged in to the website.
Lines “Lang29=“ to “Lang32=“ will display the support information on
the bottom left corner on all pages of the website. “<LANG_DATA>“ on
each line will be replaced by the information entered in the
TankMaster.net Configuration under the Setup HTML info tab.
Line “Lang33=“ displays the description “Powered by Rosemount
TankMaster and Rosemount TankMaster.net” at the bottom right corner
of all pages of the website.
Line “Lang34=“ describes the error message that will be displayed
when more than the licensed users try to access the website.
This error message will be displayed below the navigation bar after
login.
Line “Lang35=“ describes the error message that will be displayed
when a demo user tries to change the password. This error message
will be displayed below the navigation bar after login.
72 Rosemount TankMaster.net
Third Edition, February 2007

Description of .ini files for TankMaster.net website
Line “Lang36=“ describes the word in the drop down list of the Tank
List option on the navigation bar.
Lines “Lang37=“ and “Lang38=“ describe the words that are displayed
in the Tree view on each page of the website.
The data under the [Login] section is described as follows:
Line “Lang1=“ the text is displayed as the page title of the
TankMaster.net website login page.
Line “Lang2=“ the text is displayed as an error message on the login
page of the website below the navigation bar. This error message is
displayed when a user types a wrong/invalid username or password.
Line “Lang3=“ the text is displayed after the profile of the user is
changed. This is an information message (not an error message). This
is displayed when a user changes his profile from the Login page.
The data under the [Current] section is described as follows:
Line “Lang1=“ to “Lang3=“ display the page titles, page headers, error
page headers for single Tank Inventory. The <LANG_DATA> is
replaced by the tank selected and the <LANG_DATETIME> is replaced
by the date time stamp on the Server. The <font color=> tag will display
the color in which the error message for past data will be displayed.
Line “Lang4=“ to “Lang6=“ display the page titles, page headers, error
page headers for Overview of a Product Group. The <LANG_DATA> is
replaced by the product group selected and the <LANG_DATETIME> is
replaced by the date time stamp on the Server. The <font color=> tag
will display the color in which the error message for past data will be
displayed.
Line “Lang7=“ to “Lang9=“ display the page titles, page headers, error
page headers for Overview of All Products. The <LANG_DATETIME> is
replaced by the date time stamp on the Server. The <font color=> tag
will display the color in which the error message for past data will be
displayed.
Line “Lang10=“ to “Lang12=“ display the page titles, page headers,
error page headers for the page Overview of All Tanks. The
<LANG_DATETIME> is replaced by the date time stamp on the Server.
The <font color=> tag will display the color in which the error message
for past data will be displayed.
Line “Lang13=“ displays the page title for the Schematic page.
Line “Lang14=“ to “Lang16=“ display the page titles, page headers,
error page headers on the TankMaster.net WAP website on selecting
an individual tank. The <LANG_DATA> is replaced by the tank selected
Rosemount TankMaster.net 73
Second Edition, February 2007

Description of .ini files for TankMaster.net website
and the <LANG_DATETIME> is replaced by the date time stamp on the
Server. The <font color=> tag will display the color in which the error
message for past data will be displayed.
Line “Lang17=“ to “Lang19=“ display the page titles, page headers,
error page headers on the TankMaster.net WAP website on selecting a
product group. The <LANG_DATA> is replaced by the product group
selected and the <LANG_DATETIME> is replaced by the date time
stamp on the Server. The <font color=> tag will display the color in
which the error message for past data will be displayed.
Line “Lang20=“ is displayed in the first row and first column of each
table on the TankMaster.net website while viewing the Overview of All
Tanks.
Line “Lang21=“ is displayed in the first row and first column of each
table on the TankMaster.net website while viewing the Overview of All
Products.
Line “Lang22=“ is displayed as an error message on the
TankMaster.net website, when a user not authorized to access the tank
tries to access it. This error message is displayed below the navigation
bar as a page header.
The data under the [History] section is described as follows:
The contents of this section will be displayed on the History pages of
the TankMaster.net website, below the navigation bar.
Lines “Lang1=“ and “Lang2=“ display the page title and page headers
while viewing the History of a tank. The <LANG_DATA> is replaced by
the tank selected and the <LANG_DATETIME> is replaced by the date
time stamp on the Server.
Lines “Lang3=“ and “Lang4=“ display the page title and page headers
while viewing the History of All Tanks. The <LANG_DATETIME> is
replaced by the date time stamp on the Server.
Lines “Lang5=“ and “Lang6=“ display the page title and page headers
while viewing the History of a Product Group. The <LANG_DATA> is
replaced by the product group and the <LANG_DATETIME> is replaced
by the date time stamp on the Server.
Lines “Lang7=“ to “Lang10=“ display the text items on the History page
of the website.
Note! For description of the [UserStaus] section of the Language.ini file refer to
section 7.1 in file TMn2UserStatus.pdf
74 Rosemount TankMaster.net
Third Edition, February 2007

Description of .ini files for TankMaster.net website
13.7 Login.ini
Note! This file is to be saved in UTF-8 format.
This file displays the information in the Change Profile menu option.
The details of the Login.ini are as follows:
Login.ini
[ChangePassword]
Item1=EmailID
Item2=FullName
More fields can be added to the Change Profile form by adding them as
“Item(no)=“ and the name of the field against it.
13.8 PieChartUnicode.ini
Note! This file is to be saved in UNICODE format
This file displays wordings that appear below the piechart when
Overview of All Products is selected.
The details of the PieChartUnicode.ini file are as follows.
[PieChart]
; Free Water Level
Lang1=FWater <LANG_DATA> %
; Product level
Lang2=Utilized <LANG_DATA> %
; Available room
Lang3=Available <LANG_DATA> %
; Invalid quality
Lang4=Quality Bad
The <LANG_DATA> is replaced by the percentage value against the
particular item.
Rosemount TankMaster.net 75
Second Edition, February 2007

Description of .ini files for TankMaster.net website
13.9 Schematic.ini
Note! This file is to be saved in UTF-8 format.
The administrator can customize the Schematic.ini file located in
“TMnData\Language” directories.
The details of the Schematic.ini file are as follows.
Schematic.ini
[ImageMap]
MPIX191/TK-201=TK-201|circle|741,113,38|728,120
MPIX191/TK-202=TK-202|circle|635,111,31|621,114
MPIX191/TK-203=TK-203|circle|747,216,31|737,224
MPIX191/TK-204=TK-204|circle|641,215,38|632,222
MPIX191/TK-205=TK-205|circle|754,297,23|745,304
MPIX191/TK-206=TK-206|circle|686,295,22|674,304
MPIX191/TK-207=TK-207|circle|509,92,16|499,95
;
;
; Syntax:
; TankName=DisplayText|Shape|Co-ords|DisplayTextPosition
;
; Where:
; TankName as seen in TankList on the TMn2 website
; DisplayText the short text to display.
; Shape = rect or circle or poly
; Co-ords are the x, y co-ordinate points as used in HTML
; For rect = left, top, right, bottom
; For circle = center-x, center-y, radius
; For poly = x1, y1, x2, y2, ..., xN, yN
; DisplayTextPosition are the x,y co-ordinates for placing the
; DisplayName. Left, Top. If DisplayTextPostion is left blank then
; the DisplayText will not be shown. ToolTips will yet be seen.
;
; Note: All co-ordinate values are in pixels.
The “Schematic.ini” stores the details of the tank that will be displayed
on the Schematic image on the TankMaster.net website.
The first item is the TankName as seen in the TankList on the
TankMaster.net website.
The second item (“TK-201”) indicates the text for the tank to be
displayed on the image.
The third item indicates the shape of the tank.
The fourth item displays the co-ordinates of the shape in the third item
as used in HTML.
• For rectangle = left, top, right, bottom
76 Rosemount TankMaster.net
Third Edition, February 2007

Description of .ini files for TankMaster.net website
• For circle = center-x, center-y, radius
• For polygon = x1, y1, x2, y2, ..., xN, yN
The last item is the x,y co-ordinates for placing the DisplayName. If
DisplayTextPostion is left blank then the DisplayText will not be shown.
The tool tips will be seen.
Note: All co-ordinate values are in pixels.
Note! Changing the settings of the “Schematic.ini” should be made before
starting the TankMaster.net website.
Rosemount TankMaster.net 77
Second Edition, February 2007

14.0 Troubleshooting
What if I cannot Login to the TankMaster.net website?
If you cannot Login to the TankMaster.net website, it may be because:
You have not been granted rights by the Administrator to login to the site.
Your Login Name or your Password may be incorrect.
What if I cannot login as user “demo”?
In DEMO MODE a maximum of five consecutive Demo users are allowed. If
five users are already logged in, you will not be able to login.
What if I get an error “Tank authentication error. Please contact the
administrator”?
This error message indicates that the tanks are not assigned to a group. This
setting is possible in the TankMaster.net Configuration application and can be
configured by the administrator.
What if I cannot change my profile on the TankMaster.net website?
If you cannot change your profile, it may be because the administrator has not
assigned rights in the TankMaster.net Configuration application.
A user cannot change his profile in DEMO mode.
What if I cannot change my password in the Change Profile window?
If you cannot change your password in the Change Profile window:
Contact the administrator for assigning you the change password rights.
What if I cannot Login with the correct username and password?
The password is case sensitive and may have been typed wrongly.
What if I get a “MAN” displayed against the value of an OPC item?
If I get a “MAN” displayed against the value of an OPC item, it indicates that
the value has been manually fed in.
Troubleshooting
78 Rosemount TankMaster.net
Third Edition, February 2007

Troubleshooting
What if I get a “?” displayed against the value of an OPC item?
If I get a “?” displayed against the value of an OPC item, it indicates that the
OPC_QUALITY is bad.
What if I get a blank or no value against an OPC Item?
If I get a blank or no value against an OPC item then the OPC_QUALITY is
NOT_CONNECTED.
What if I get a red cross in the center of the tank?
If you get a red cross in the center of the tank, it signifies that it is an Invalid
tank.
What if the date and time is displayed in red with a warning message?
If the date and time is displayed in red with a warning message, it indicates
that the last known data is used.
What if I cannot view the details of a tank from the Schematic page?
If you cannot view the details of a tank from the Schematic page, edit the
Schematic.ini file for hot spots on the tank. This file is to be edited before login
to the TankMaster.net website.
What if I cannot download data with Microsoft Office 2003?
If you cannot download data with Microsoft Office 2003, it would indicate that
MS Office 2003 has not been activated and is working in trial mode.
What if I cannot view History Graphs?
If I cannot view the history graphs then it indicates that the OPC items on the
TankMaster Server has not been set by the administrator.
What if the web page does not refresh automatically?
If the web page does not refresh automatically it indicates that the Refresh
Rate is set to 0 seconds.
Rosemount TankMaster.net 79
Second Edition, February 2007

Troubleshooting
What if the History Graph page refreshes without the graphs being
displayed?
If the history graph page refreshes without the graphs being displayed, it
indicates that the Refresh Rate is set to a very low value. The lowest
recommended value is 90 seconds.
What if I cannot download tank inventory data?
To download tank inventory data, Office Web Components (OWC) is required,
which is installed during installation of Microsoft Office 2000/XP/2003.
What if I close the TankMaster.net website without logging out?
If TankMaster.net website is closed without using the logout option, the user
session is considered as logged in, which will expire 20 minutes prior to
closing the browser.
How do I change the default language to another language?
To change the default language, edit the TankMasternet.ini file, which exists
in the default Windows directory. Edit the Tankmasternet.ini file and locate the
header section [Data]. Locate the line ‘LanguageFolder= English’ and change
the word “English” to the desired language. Save the file and exit.
80 Rosemount TankMaster.net
Third Edition, February 2007


User’s Guide
Ref. no: 303040E
Third Edition, February 2007
Emerson Process Management
Rosemount Tank Gauging
Box 130 45
SE-402 51 Göteborg
SWEDEN
Tel (International): +46 31 337 00 00
Fax (International): +46 31 25 30 22
E-mail: sales.srt@emersonprocess.com
www.rosemount-tg.com
Copyright © Rosemount Tank Radar AB. Third Edition. February 2007. Ref. no: 303040E.
 Loading...