

Reference Manual
303041EN, Edition 1/Rev. B
September 2007
TankMaster
Batch Handling
www.rosemount-tg.com


Reference Manual
303041EN, Edition 1/Rev. B
September 2007
Rosemount Tank Radar REX
Rosemount Tank Radar REX
Tank Gauging System
NOTICE
Read this manual before working with the product. For personal and system safety, and for
optimum product performance, make sure you thoroughly understand the contents before
installing, using, or maintaining this product.
For equipment service or support needs, contact your local Emerson Process
Management/Rosemount Tank Gauging representative.
The contents, descriptions and specifications within this manual is subject to change
without notice. Rosemount TankRadar AB accepts no responsibility for any errors that may
appear in this manual.
Cover Photo: TM_BatchHandling_Ed1_303041.jpg
www.rosemount-tg.com


Reference Manual
303041EN, Edition 1/Rev. B
September 2007
TankMaster Batch Handling
Table of Contents
SECTION 1
Getting Started
SECTION 2
General
SECTION 3
System Configuration
1.1 Introduction . . . . . . . . . . . . . . . . . . . . . . . . . . . . . . . . . . . . . . . . 1-1
1.2 Help . . . . . . . . . . . . . . . . . . . . . . . . . . . . . . . . . . . . . . . . . . . . . . 1-1
1.3 Definitions and abbreviations . . . . . . . . . . . . . . . . . . . . . . . . . . 1-1
1.4 Overview of the batch process . . . . . . . . . . . . . . . . . . . . . . . . . 1-2
2.1 Start and logon . . . . . . . . . . . . . . . . . . . . . . . . . . . . . . . . . . . . . 2-1
2.2 The WinOpi workspace . . . . . . . . . . . . . . . . . . . . . . . . . . . . . . . 2-2
2.2.1 Main window . . . . . . . . . . . . . . . . . . . . . . . . . . . . . . . 2-2
2.2.2 Folders . . . . . . . . . . . . . . . . . . . . . . . . . . . . . . . . . . . . 2-3
2.2.3 Batches menu . . . . . . . . . . . . . . . . . . . . . . . . . . . . . . 2-4
2.2.4 Tools menu . . . . . . . . . . . . . . . . . . . . . . . . . . . . . . . . 2-7
2.3 Icons used in TankMaster . . . . . . . . . . . . . . . . . . . . . . . . . . . . . 2-8
3.1 Batch Server Configuration . . . . . . . . . . . . . . . . . . . . . . . . . . . . 3-1
3.1.1 Batch Units and Ranges . . . . . . . . . . . . . . . . . . . . . . 3-1
3.1.2 Defaults . . . . . . . . . . . . . . . . . . . . . . . . . . . . . . . . . . . 3-2
3.1.3 Alert and Alarm Settings . . . . . . . . . . . . . . . . . . . . . . 3-2
3.1.4 Miscellaneous . . . . . . . . . . . . . . . . . . . . . . . . . . . . . . 3-2
3.1.5 Configure Tank Servers . . . . . . . . . . . . . . . . . . . . . . . 3-2
3.1.6 Assign Tank Colors . . . . . . . . . . . . . . . . . . . . . . . . . . 3-2
3.1.7 Customize Parameters. . . . . . . . . . . . . . . . . . . . . . . . 3-3
3.1.8 Parcel settings . . . . . . . . . . . . . . . . . . . . . . . . . . . . . . 3-3
3.1.9 Batch Data . . . . . . . . . . . . . . . . . . . . . . . . . . . . . . . . . 3-3
3.1.10 User Access Levels . . . . . . . . . . . . . . . . . . . . . . . . . . 3-3
3.2 Product Table . . . . . . . . . . . . . . . . . . . . . . . . . . . . . . . . . . . . . . 3-4
3.3 User accounts . . . . . . . . . . . . . . . . . . . . . . . . . . . . . . . . . . . . . . 3-4
SECTION 4
Batch Setup Phase
SECTION 5
Delivery Phase
SECTION 6
General tasks
4.1 Create new batch . . . . . . . . . . . . . . . . . . . . . . . . . . . . . . . . . . . 4-1
4.2 Assign Tanks . . . . . . . . . . . . . . . . . . . . . . . . . . . . . . . . . . . . . . . 4-4
4.3 Open/start parcel . . . . . . . . . . . . . . . . . . . . . . . . . . . . . . . . . . . . 4-8
5.1 Monitor and log batch running data . . . . . . . . . . . . . . . . . . . . . . 5-1
5.1.1 Alarms . . . . . . . . . . . . . . . . . . . . . . . . . . . . . . . . . . . . 5-1
5.1.2 Batches overview . . . . . . . . . . . . . . . . . . . . . . . . . . . . 5-1
5.1.3 Batch status . . . . . . . . . . . . . . . . . . . . . . . . . . . . . . . . 5-2
5.2 Parcel manual closing data . . . . . . . . . . . . . . . . . . . . . . . . . . . . 5-2
5.3 Close and complete. . . . . . . . . . . . . . . . . . . . . . . . . . . . . . . . . . 5-4
6.1 Recalculation . . . . . . . . . . . . . . . . . . . . . . . . . . . . . . . . . . . . . . . 6-1
6.2 System Messages . . . . . . . . . . . . . . . . . . . . . . . . . . . . . . . . . . . 6-3
6.3 Print Unofficial Batch Summary Report . . . . . . . . . . . . . . . . . . . 6-3
6.4 Print Unofficial Delivery Ticket. . . . . . . . . . . . . . . . . . . . . . . . . . 6-3
6.5 View Batch Messages . . . . . . . . . . . . . . . . . . . . . . . . . . . . . . . . 6-4
www.rosemount-tg.com

TankMaster Batch Handling
Reference Manual
303041EN, Edition 1/Rev. B
September 2007
6.6 View Batch Status . . . . . . . . . . . . . . . . . . . . . . . . . . . . . . . . . . . 6-5
6.7 Batch Overview . . . . . . . . . . . . . . . . . . . . . . . . . . . . . . . . . . . . . 6-6
6.8 Release Tank . . . . . . . . . . . . . . . . . . . . . . . . . . . . . . . . . . . . . . 6-6
6.9 Print Ticket and Batch Summary Report . . . . . . . . . . . . . . . . . . 6-7
6.10 Connect Batch Server . . . . . . . . . . . . . . . . . . . . . . . . . . . . . . . . 6-7
6.11 Redundancy . . . . . . . . . . . . . . . . . . . . . . . . . . . . . . . . . . . . . . . 6-8
6.12 Disconnect Batch Server . . . . . . . . . . . . . . . . . . . . . . . . . . . . . . 6-8
6.13 Status . . . . . . . . . . . . . . . . . . . . . . . . . . . . . . . . . . . . . . . . . . . . 6-8
APPENDIX A
Configure Batch Server
A.1 Batch Units and Ranges . . . . . . . . . . . . . . . . . . . . . . . . . . . . . .A-1
A.2 Alert and Alarm Settings . . . . . . . . . . . . . . . . . . . . . . . . . . . . . .A-3
A.3 Defaults . . . . . . . . . . . . . . . . . . . . . . . . . . . . . . . . . . . . . . . . . . . A-4
A.4 Miscellaneous . . . . . . . . . . . . . . . . . . . . . . . . . . . . . . . . . . . . . . A-6
A.5 Configure Tank Servers. . . . . . . . . . . . . . . . . . . . . . . . . . . . . . . A-8
A.6 Assign Tank Colors . . . . . . . . . . . . . . . . . . . . . . . . . . . . . . . . . .A-9
A.7 Customize Parameters . . . . . . . . . . . . . . . . . . . . . . . . . . . . . .A-10
A.8 Parcel settings . . . . . . . . . . . . . . . . . . . . . . . . . . . . . . . . . . . . .A-11
A.9 Batch Data. . . . . . . . . . . . . . . . . . . . . . . . . . . . . . . . . . . . . . . . A-13
A.10 User Access Levels . . . . . . . . . . . . . . . . . . . . . . . . . . . . . . . . .A-14
TOC-2
Table of Contents

Reference Manual
303041EN, Edition 1/Rev. B
September 2007
Rosemount Tank Radar REX
Section 1 Getting Started
1.1 INTRODUCTION This document describes how to operate the TankMaster WinOpi batch
handling system developed by Emerson Process Management/Rosemount
Tank Gauging.
The batch handling system is an extension to the existing TankMaster system.
It provides you with powerful functions for setup, monitoring, alarm handling,
backup, reports, recalculation of delivery tickets and redundancy. There are
also optional functions available (require a hardware key) allowing you to
save batches in a MS Access database up to 365 days, and a transfer
calculator for planning new batches.
For instructions how to install, configure and use the TankMaster system, see
TankMaster WinSetup User’s Guide [Ref. no. 303027 E] and TankMaster
WinOpi User’s Guide [Ref. no. 303028 E].
Additional installation must be made for the batch handling system.
The TankMaster Administrator program is automatically started by the
operating system. The Administrator program has an Autostart function which
automatically starts up various TankMaster programs.
1.2 HELP A help function is available under Help in the main menu and when pressing
the F1 button or the button in different windows.
1.3 DEFINITIONS AND ABBREVIATIONS
Abbreviation Explanation
bbl Blue Barrel
FWL Free Water Level
FWV Free Water Volume
GOV Gross Observed Volume
GSV Gross Standard Volume
LAN Local Area Network
NSV Net Standard Volume
RTG Radar Tank Gauge
TOV Total Observed Volume
VCF Volume Correction Factor
WIA Weight in air
WIV Weight in Vacuum
For more information about the abbreviations, see TankMaster WinOpi User’s
Guide [Ref. no. 303028 EN].
www.rosemount-tg.com

TankMaster Batch Handling
Reference Manual
303041EN, Edition 1/Rev. B
September 2007
1.4 OVERVIEW OF THE BATCH PROCESS
TankMaster lets you create and supervise Batch transfers between source
and target tanks. A Batch can be transferred between a plant and a ship or
truck, or between tanks within a plant.
A Batch can be divided into smaller units, so called Parcels. It may consist of
several Parcels allowing you to, for example, use several source tanks to fill
up a single target tank.
In order to create, start and close a Batch you have to make certain
configurations of the system, see chapter Section 3 System Configuration for
more information about the configuration steps.
During the batch process, alarms and messages about important events in
the system are shown to the operator, see chapter 5.1 Monitor and log batch
running data and chapter 6.5 View Batch Messages for more information.
All reports in the system are pre-configured according to customized
templates. These templates can be edited with MS Notepad or a standard
HTML editor. The system will automatically generate the following reports:
• Opening ticket
• Closing ticket
• Batch summary report
The report layout is depending on the chosen Movement Type. The Opening
Ticket and Closing Ticket must be signed before opening and closing the
parcel/batch.
NOTE!
It is possible to disable signatures, see section Appendix A: Defaults for more
information.
1-2
Section 1. Getting Started
Reference Manual
303041EN, Edition 1/Rev. B
September 2007
TankMaster Batch Handling
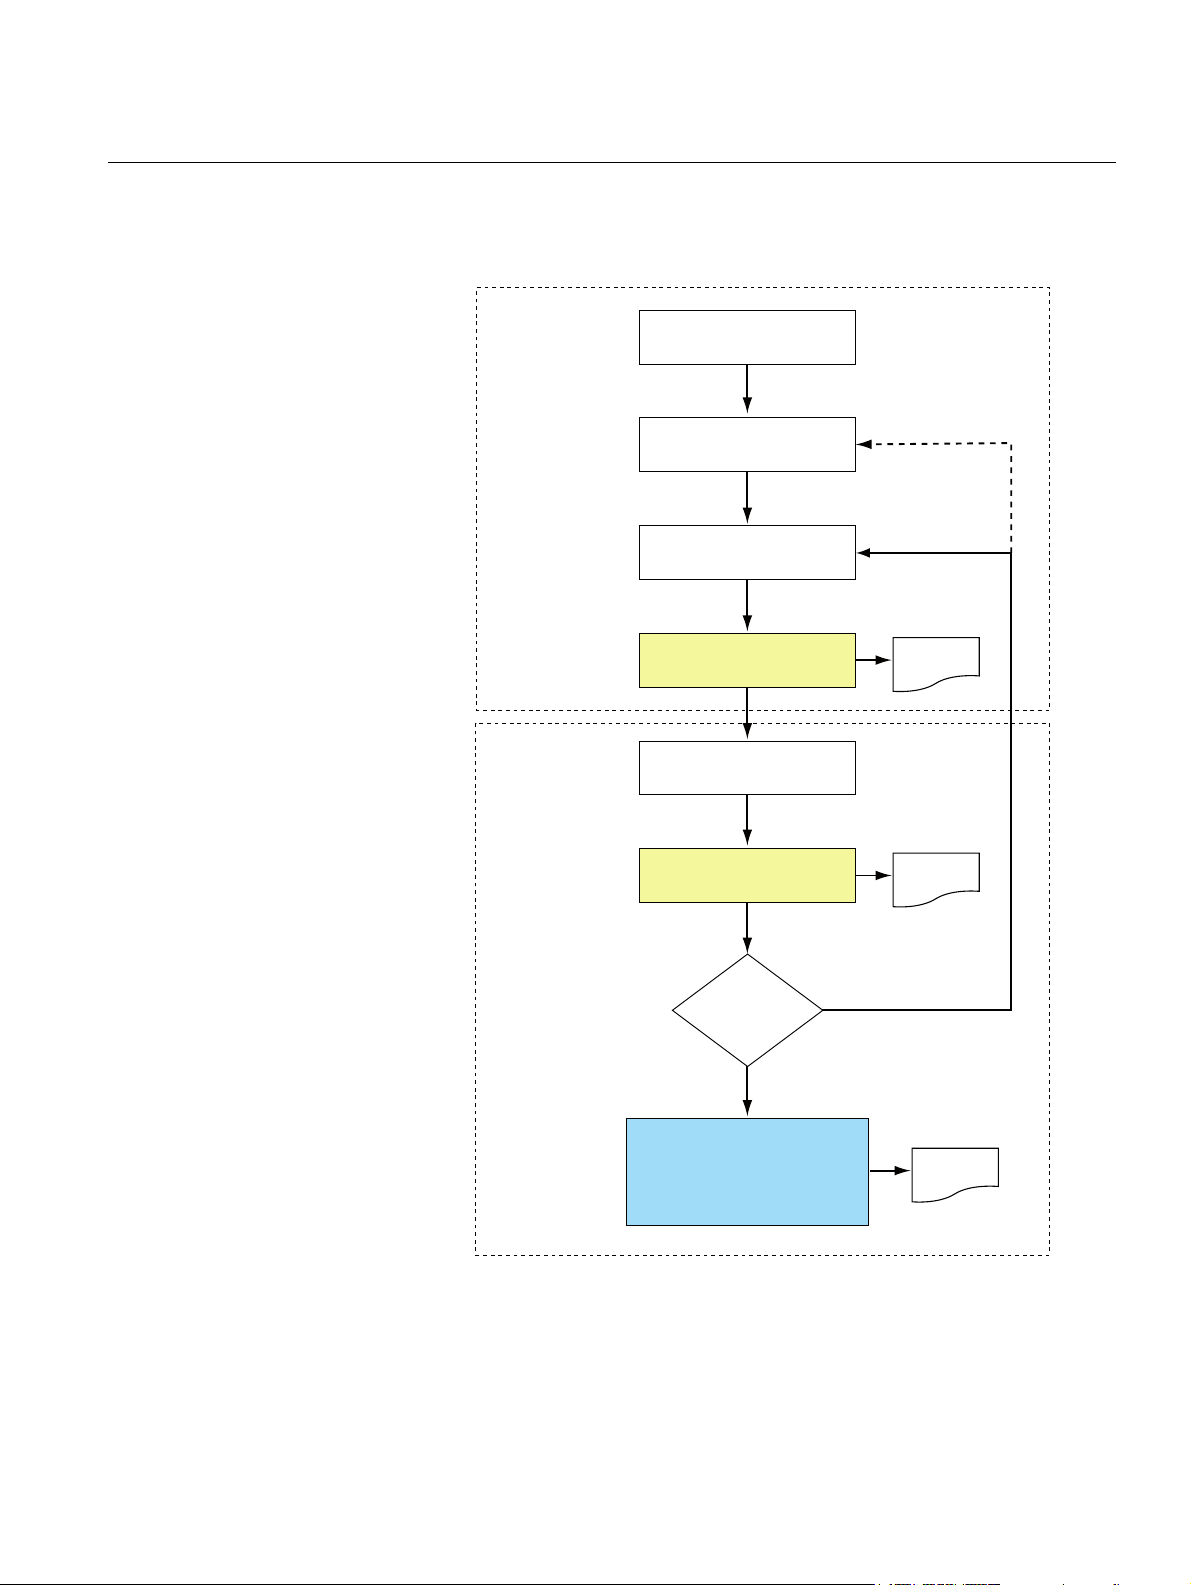
Figure 1-1. Batch handling
flowchart
Figure 1-1 below shows the different steps
Open/start phase
Create Batch
Assign Tanks
Enter parcel manual
opening data
Open and Start Parcel
Delivery phase
Enter parcel
manual closing data
(1)
in the batch transfer process:
(1)
Opening
ticket
Close and Complete
(1)
Parcel
Open parcels?
No
Enter Batch Closing Data,
Close and Complete Batch
(1) “Open and Start Parcel”, “Close and Complete Parcel”, and “Enter Batch Closing Data,
Close and Complete Batch” can be divided into separate steps. See section Appendix A:
Defaults for more information.
Yes
(1)
Delivery
ticket
Batch
Summary
Section 1. Getting Started
1-3

TankMaster Batch Handling
Reference Manual
303041EN, Edition 1/Rev. B
September 2007
1-4
Section 1. Getting Started

Reference Manual
303041EN, Edition 1/Rev. B
September 2007
Rosemount Tank Radar REX
Section 2 General
2.1 START AND LOGON 1. To open the WinOpi client, double click on the WinOpi icon on the
desktop. The application will start and the Logon to TankMaster window
will be displayed.
Figure 2-1. The Logon window
2. Log on with your user name and password. The password is case
sensitive but the user name is not.
In the User name drop down menu you can see the user names of
previous users.
NOTE!
If logging on fails five times the user account is disabled. In this case the user
account has to be enabled by an administrator.
To administer user accounts, set required access levels, change protection
level of separate windows, change password or to change inactivity time-out,
see chapter User Management in the TankMaster WinOpi User´s Guide.
www.rosemount-tg.com
TankMaster Batch Handling
Reference Manual
303041EN, Edition 1/Rev. B
September 2007
2.2 THE WINOPI WORKSPACE
For more information about the folders and menus in the Main window, see
TankMaster WinOpi User´s Guide [Ref. no. 303028 EN].
2.2.1 Main Window Configuration and operation of tanks, batches and parcels is handled in the
WinOpi main window in the TankMaster system. In order to use the Batch
Handling system, select the Batches tab in the WinOpi workspace.
Figure 2-2. WinOpi main window
2-2
Section 2. General

Reference Manual
303041EN, Edition 1/Rev. B
September 2007
TankMaster Batch Handling
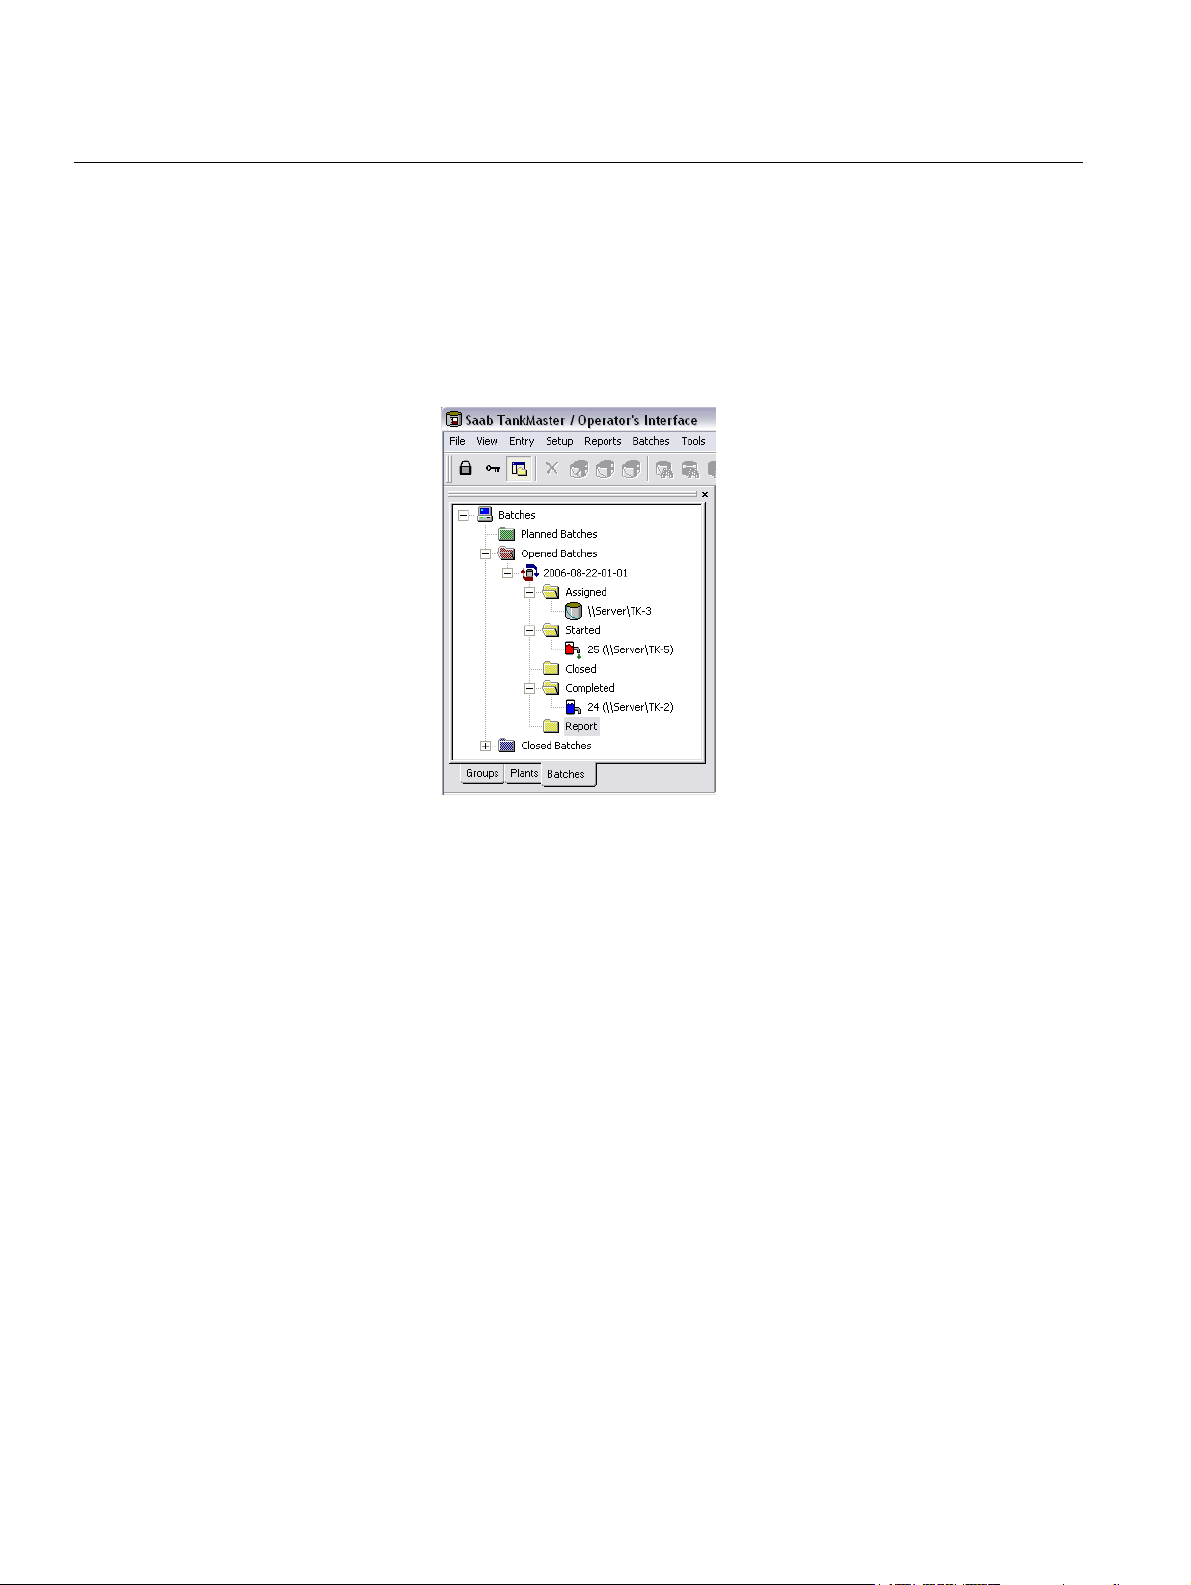
2.2.2 Folders Batches are organized in different folders corresponding the current state. For
each batch there are folders with all included parcels.
Figure 2-3. Batches and Parcels
are organized in a folder
structure
Batches Folders
Planned Batches This folder keeps all planned batches. These Batches are not yet
assigned to one or several tanks.
Opened Batches This folder keeps all opened batches.
Closed Batches This folder keeps all completed batches for 24 hours (if you haven’t
changed the default value for closed batches, see section Appendix A:
Miscellaneous for more information).
Batch Subfolders
Assigned This folder keeps all assigned tanks in a batch.
Started This folder keeps all started parcels.
Closed This folder keeps all closed parcels. This option is only used when
Close Parcel and Complete Parcel are handled as separate
operations.
Completed This folder keeps all completed parcels.
Report Each batch has a Report folder which stores Opening Ticket and
Delivery Ticket for each parcel as well as the Batch Summary. A report
is stored 100 days by default. The report lifetime can be changed to
any number of days, see section Appendix A: Miscellaneous for more
information.
NOTE!
Open/Start Parcel and Close/Complete Parcel can be handled as separate
operations. For more information see section Appendix A: Defaults.
Section 2. General
2-3

Reference Manual
TankMaster Batch Handling
303041EN, Edition 1/Rev. B
September 2007
2.2.3 Batches Menu All functions are available under Batches in the main menu and also by
clicking the right mouse button on the appropriate icon.
The following commands are not related to a specific batch. They are
available when the Batches icon is selected:
Table 2-1. Batch menu items
related to the Batches icon
Menu item Description
Configure Batch Server Settings for the Batch server. For more information see
chapter 3.1 Batch Server Configuration and Appendix A
Configure Batch Server.
Connect Batch Server Enabled if there is no connection to the Batch Server.
Otherwise disabled. See chapter 6.10 Connect Batch
Server for more information.
Redundancy Select the Backup Batch Server, see chapter 6.11
Redundancy for more information.
Disconnect Batch Server Disconnects the Batch server, see chapter 6.12 Disconnect
Batch Server for more information.
Status Opens the OPC Server Information window. In this window
information about the OPC server and also all events are
presented, see chapter 6.13 Status for more information.
New Batch Opens the Batch Manual Data window.
Batches overview Opens the Batches Overview window. In this window
information about all opened and closed batches are
shown. See chapter 6.7 Batch Overview for more
information.
Batch Messages Opens the Active Messages window. In this window you
can see all active messages in the system. See chapter 6.5
View Batch Messages for more information.
2-4
Section 2. General

Reference Manual
303041EN, Edition 1/Rev. B
September 2007
Table 2-2. Batch menu items
related to a specific batch
TankMaster Batch Handling
The following commands are related to a specific batch and are available
when a batch icon is selected:
Menu item Description
Batch Status Opens the Batch Status window. In this window you can find
data and messages regarding the selected batch. See
chapter 6.6 View Batch Status for more information.
Batch Manual Data Opens the Batch Manual Data window allowing you to enter
the desired descriptions and specifications for the batch.
See chapter 4.1 Create new batch for more information.
Assign Tanks Opens the Assign Tanks window. This window is used to
choose tanks to be included in a batch transfer, and to
specify the amount to be transferred.
See chapter 4.2 Assign Tanks for more information.
Enter Closing Data Opens the Batch Manual Closing Data window. In this
window you can choose Operator and Supervisor
signatures. Available when Close Batch and Complete
Batch are handled as separate operations. See section
Appendix A: Defaults.
Close Batch Opens the Batch Closing Data window. In this window
signature data must be entered to close the batch, see
chapter 5.3 Close and complete for more information.
Complete Batch Change status from closed batch to completed. This menu
item is only available when Close Batch and Complete
Batch are handled as separate operations, see section
Appendix A: Defaults for more information.
Delete Batch This menu item is only available when the batch does not
have associated tanks or parcels. It removes the batch from
the workspace and the database.
Remove Batch from Workspace Removes a completed batch from the workspace. It is
possible to put the batch back by using the Add Batch to
Workspace menu item.
Unofficial Summary Report Before a parcel is completed it is possible to print an
Unofficial Summary Report to check and identify missing
data. The report is marked with “Unofficial”. This menu item
is only available when Close Batch and Complete Batch are
configured as separate commands, see section
Appendix A: Defaults for more information.
Summary Report If you mark a closed batch and choose this menu item, you
can select Print Official or Save Official. If Close Batch and
Complete Batch are configured as separate commands,
you can select the Print Unofficial option for a closed batch.
Section 2. General
2-5

TankMaster Batch Handling
Table 2-3. Batch menu items
related to a parcel
Reference Manual
303041EN, Edition 1/Rev. B
September 2007
The following commands are available when a parcel icon is selected:
Menu item Description
Parcel Manual Opening Data Opens the Parcel Manual Opening Data window which lets
you specify Operator and Supervisor signatures as well as
edit some inventory parameters, see chapter 4.3 Open/start
parcel for more information.
Open Parcel Changes status from assigned to opened parcel.
Start Parcel Changes status from opened to started parcel. This menu
item is only available when Open Parcel and Start Parcel
are configured as separate commands, see Appendix A:
Defaults for more information about the configuration.
Change Nominated This menu item is enabled when the parcel is started. It
opens the Parcel Nominated Value Data window which
allows you to change the nominated value. Note that it can
only be changed to a value higher than the transferred
amount.
Pause/Resume Parcel Pauses a parcel or resumes a paused parcel.
Enter Closing Data Opens the Parcel Manual Closing Data window. In this
window you can change parameters and choose
signatures, see chapter 5.2 Parcel manual closing data for
more information.
Close Parcel Opens the Parcel Gauge Closing Data window. In this
window you can check if the values are correct and press
the Close and Print button to close the parcel.
Complete Parcel Change status from closed to completed parcel. This menu
item is only available when Close Parcel and Complete
Parcel are configured as separate commands, see
Appendix A: Defaults for more information about the
configuration.
Release Tank You can release a tank when the parcel is closed. This
makes it possible to assign a tank to another parcel before
it is completed. This menu item is only available when
Close Parcel and Complete Parcel are configured as
separate commands, see Appendix A: Defaults for more
information.
Print & Save Tickets This menu item lets you print Official Opening Ticket, save
Official Opening Ticket, print Official Delivery Ticket and
save Official Delivery Ticket.
View Tickets This menu item makes it possible to view the Official
Delivery Ticket or a Recalculated Ticket.
Recalculate This menu item makes it possible to recalculate a parcel in
a completed batch. You can enter new opening and/or
closing data for the parcel and confirm the new values, see
chapter 6.1 Recalculation for more information.
Print Report Prints a selected report.
Add Batch to Workspace This menu option makes it possible to put batches which
have been removed from workspace back (see Remove
Batch from Workspace). Choose the desired batch by
clicking the Select check box in the Add Batch to the
Workspace window.
Expand all Expands all items under a folder. This menu item is only
available when clicking the right mouse button.
Collapse all Collapses all items under a folder. This menu item is only
available when clicking the right mouse button.
2-6
Section 2. General

Reference Manual
303041EN, Edition 1/Rev. B
September 2007
TankMaster Batch Handling
2.2.4 Tools Menu The Tools menu includes the Tank Transfer Calculation option which may be
used as a tool for planning new batches.
For information about the other Tools menu items, see TankMaster WinOpi
User’s Guide [Ref. no. 303028 EN].
Figure 2-4. The Tank Transfer
Calculator window offers the
option to calculate transferred
volumes based on specifiec
Opening and Closing values
Section 2. General
2-7
TankMaster Batch Handling
Reference Manual
303041EN, Edition 1/Rev. B
September 2007
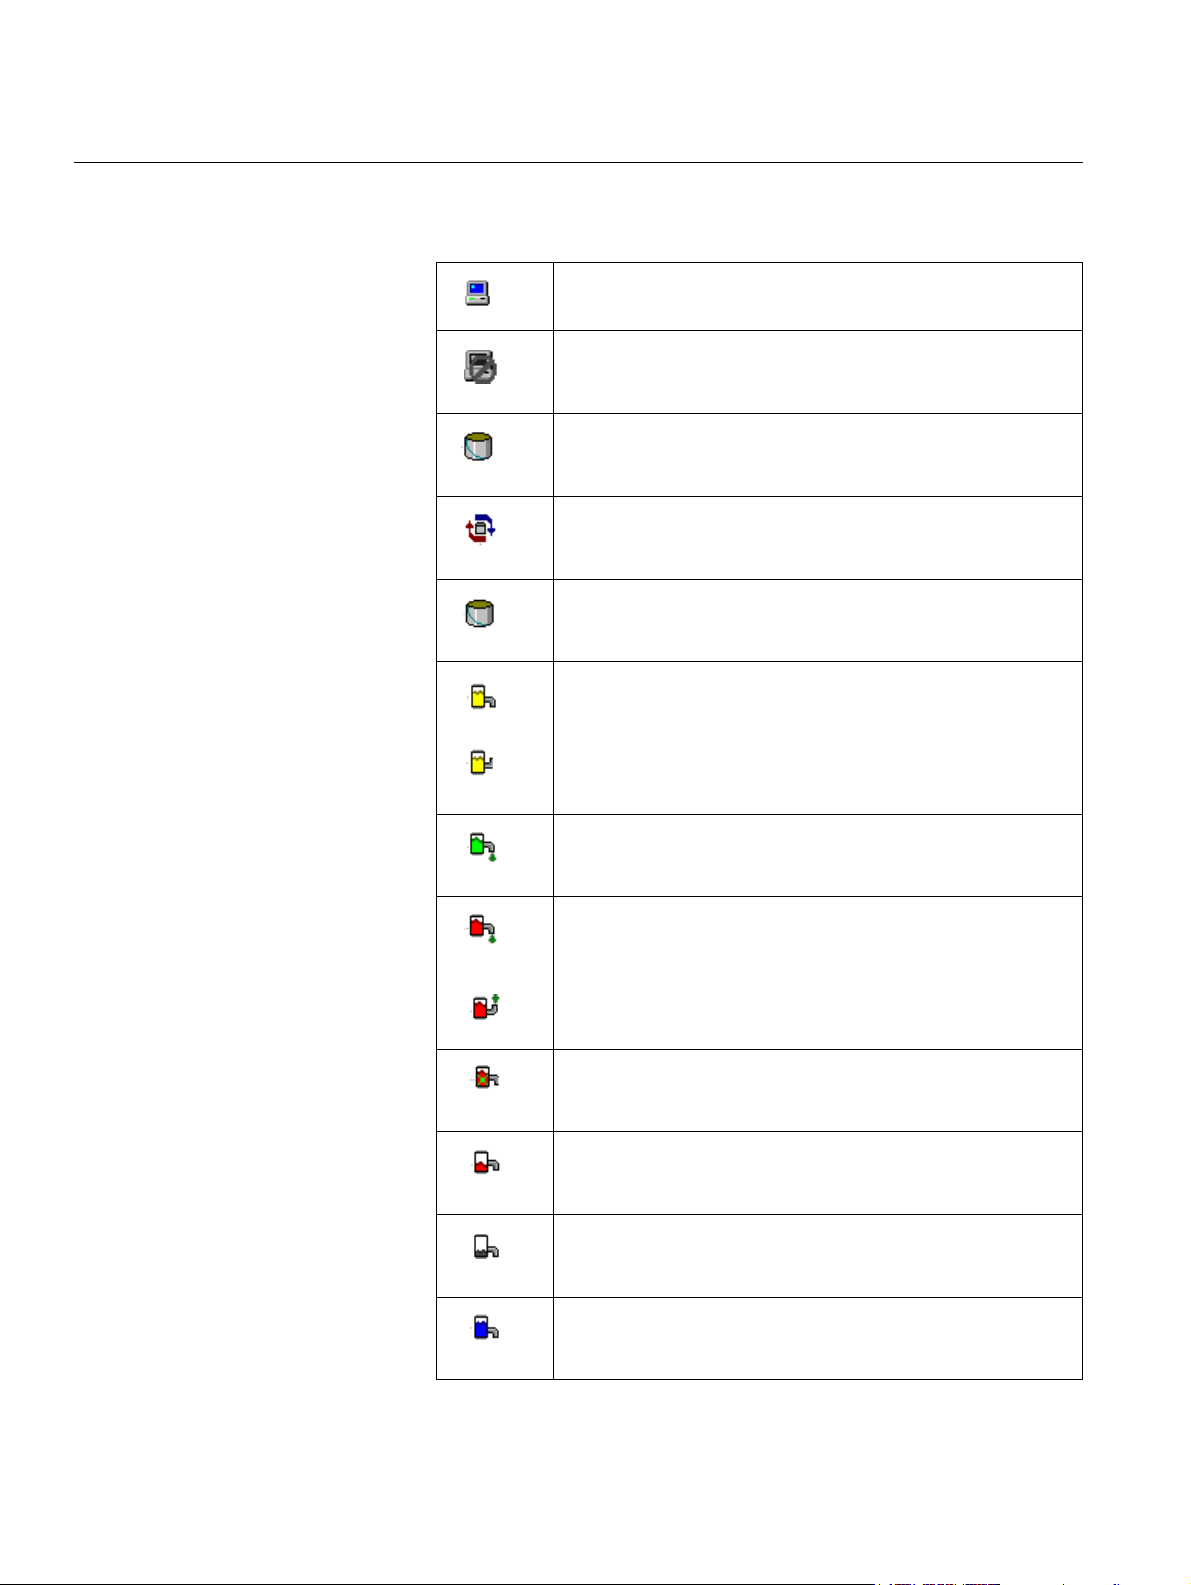
2.3 ICONS USED IN TANKMASTER
In the Batches tab the server, batches and parcels are represented by the
following icons:
One server is running (on non-redundant system).
No connection with the server.
Tank ic o n
Batch icon
Tank - assigned.
Yellow - assigned and opened.
Yellow - planned parcel, i.e. manually open data entered.
The pipe direction shows whether shipping or receiving.
Green- opened parcel, i.e. opened data saved and
opening ticket printed
Red - started parcel. The pipe of the icon shows if it is
shipping or receiving.
Red /Green - paused parcel.
Red - pre-closed parcel, i.e. manually closed data saved.
Green/Brown - closed parcel, i.e. closed data saved.
Completed parcel.
2-8
Section 2. General

Reference Manual
303041EN, Edition 1/Rev. B
September 2007
TankMaster Batch Handling
Section 3 System Configuration
Before using the Batch Handling function you should make the following
preparations:
• Configure the Batch Server
• Set up the Product Table
• Specify User accounts
3.1 BATCH SERVER CONFIGURATION
Figure 3-1. Configure Batch
Server window
The Configure Batch Server window allows you to make customized settings
of the batch handling process. These settings will affect the Batch server. A
few settings in the Customize Parameters and Defaults tabs will affect the
local client.
3.1.1 Batch Units and
Ranges
Section 3. System Configuration
Select the measurement units for the batch. Only tanks using the same units
can be assigned to a batch. Density and Temperature differences can be
specified for verification of entered values and for checking measured open
and close values.
For more information, see Appendix A: Batch Units and Ranges.
3-1
 Loading...