

Page 1

Rosemount™ CT5800
Continuous Gas Analyzer
Quick Start Guide
00825-0100-5800, Rev AA
October 2019
Page 2

Quick Start Guide October 2019
2 Rosemount CT5800
Page 3

October 2019 Quick Start Guide
Important information
NOTICE
This section is in accordance with IEC 60079-0: 2011 Clause 30. This section must not be changed,
amended, or removed.
Important
Users must read, understand, and comply with the following information before proceeding.
All users, installers, operators, and maintainers must be familiar with operating the analyzer. To install,
start up, operate, maintain, and service the analyzer in a safe manner, it is MANDATORY to read all
additional instruction manuals shipped with the analyzer. The following instruction manual(s) are
available and/or referenced within this manual:
Rosemount CT5800 Continuous Gas Analyzer Reference Manual, 00809-0100-5800, Rev AA
User information
NOTICE
This section is in accordance with IEC 60079-0: 2011 Clause 30. This section must not be changed,
amended, or removed.
Important
All users must read this page before proceeding!
Emerson (Rosemount) designs, manufactures, and tests its products to meet many national and
international standards. The Rosemount CT5800 is a sophisticated technical product, and to ensure it
continues to operate as designed and within normal specifications, it MUST be installed, used, and
maintained correctly. The following instructions MUST be adhered to and integrated into your safety
program when installing, using, and maintaining Emerson (Rosemount) products.
• Failure to follow the proper instructions may cause:
— Loss of life
— Personal injury
— Damage to property
— Damage to this instrument
— Warranty invalidation
• Read all instructions prior to installing, operating, and servicing the product.
• If you do not understand any of the instructions, contact your Emerson (Rosemount)
representative for clarification.
• Follow all warnings, cautions, and instructions marked on and supplied with the product.
• Inform and educate your personnel in the proper installation, operation, and maintenance of the
product.
• Install your equipment as specified in the installation instructions of the appropriate manual and
in accordance with applicable local and national codes.
• Connect all products to the proper electrical and pressure sources.
• To ensure proper performance, use qualified personnel to install, operate, update, program, and
maintain the product.
Quick Start Guide 3
Page 4

Quick Start Guide October 2019
• When replacement parts are required, ensure that qualified people use replacement parts
specified by Emerson (Rosemount).
• Unauthorized parts and procedures can affect the product’s performance, place the safe
operation of your process at risk, and VOID YOUR WARRANTY. Look-alike substitutions may result
in fire, electrical hazards, or improper operation.
• To prevent electrical shock and personal injury, all equipment doors must be closed and
protective covers in place, except when maintenance is being performed by qualified personnel.
• The information contained in this document is subject to change without notice.
4 Rosemount CT5800
Page 5

October 2019 Quick Start Guide
General safety notice/residual risk
Installation, operation, and maintenance of the analyzer must be in accordance with these
instructions.
When operated as intended and all applicable safety instructions are observed, an element of risk will
remain, including, but not limited to, the following:
• Explosion protection measures may become ineffective on the occurrence of one failure (for
Category 3 instruments).
• The emission of gases hazardous to health may be possible when all gas connections have been
correctly made.
To avoid exposure to the dangers of residual risks, take particular care when installing, operating,
maintaining, and servicing the analyzer.
Authorized personnel
NOTICE
This section is in accordance with IEC 60079-0: 2011 Clause 30. This section must not be changed,
amended, or removed.
In-depth specialist knowledge is an absolute requirement for working with and on the analyzer.
Personnel installing, operating, servicing, and maintaining the analyzer must be instructed, trained,
qualified, and authorized for hazardous areas with the operating company and the manufacturer. It is
the operating company's responsibility to:
• Train staff
• Observe safety regulations
• Follow the safety instructions and procedures in the product manual
Operators must:
• Be trained
• Read and understand all relevant sections of the product manual before commencing work
• Know the safety mechanisms and regulations
WARNING
To avoid explosions, loss of life, personal injury, and damage to this equipment and on-site property,
do not install, operate, maintain, or service this instrument before reading and understanding this
instruction manual and receiving appropriate training.
Quick Start Guide 5
Page 6

Quick Start Guide October 2019
Regulations and standards
Regulations / Standards Description
2014/35/EU The Low Voltage Directive
94/9/EC (until April 19, 2016)
2014/34/EU (from April 20, 2016)
2014/30/EU The Electromagnetic Compatibility Directive
2012/19/EU Waste Electrical and Electronic Equipment (WEEE) Directive
USA 21 CFR 1040.1 Laser products
NEC 505 National Electrical Code (issued by ANSI: American National
EN 6223: 2008 EMC Safety Standard
IEC 60529:1992 + A2 2013 Ingress protection
BS EN 60825-1:2007 Safety of laser products. Equipment classification and
BS EN 61010-1 2010 IEC 61010-1 2010 Safety requirements for electrical equipment for
IEC 61241-10: 2004-06 Electrical apparatus for use in the presence of combustible
BS EN 61326-1: 2013 Electrical equipment for measurement, control, and laboratory
BS EN60079-0: 2012 Explosive atmospheres - Part 0: Equipment - General
BES EN 60079-1: 2014 Explosive atmospheres. Equipment protection by flameproof
IEC 60079-0:2011 Ed 6 Explosive atmospheres - Part 0: Equipment - General
IEC 60079-1:2014 Ed 7 Explosive atmospheres, Part 1: Equipment protection by
(1)
(2)
The ATEX Directive
Standards Institute and NFPA 70: National Fire Protection
Association)
requirements (identical to IEC 608250-1 2007).
measurements, control, and laboratory use. General
requirements.
dust. Part 10: Classification of areas where combustible dusts
are or may be present.
use. EMC requirements. General requirements.
requirements
enclosures d
requirements
flameproof enclosures d
(1) May affect equipment tested prior to April 20, 2016, but shipped at a later date.
(2) All equipment tested from April 20, 2016 will be subject to the directive.
Associated publications
Reference Manual: 00809-0100-5800
Compliance approvals
This product complies with USA 21 CFR 1040.10.
This product is designed and manufactured under an approved quality
management system to ISO 9001: 2015.
Emerson and the Rosemount CT5800 have satisfied the requirements for applying
the CE marking to the Rosemount CT5800 Gas Analyzer.
6 Rosemount CT5800
Page 7

October 2019 Quick Start Guide
This equipment meets all requirements of the EMC and Low Voltage directives.
Explosive protection This article is in accordance with IEC 60079-0: 2011 Clause 30.
Waste disposal
This article must not be changed, amended, or removed.
Emerson has satisfied the requirements of and complies with ATEX for operation of
electrical/electronic equipment in hazardous locations .
Do not dispose of measuring tools into household waste.
Only for EC countries:
In accordance with European Directive 2012/19/EU for Waste Electrical and
Electronic Equipment and its implementation into national right, measuring tools
that are no longer usable must be collected separately and disposed of in an
environmentally correct manner.
Quick Start Guide 7
Page 8

Quick Start Guide October 2019
Safety and information notices
This article is in accordance with IEC 60079-0: 2011 Clause 30. This article must not be changed
amended or removed.
DANGER
WILL CAUSE DEATH
Failure to follow this warning will result in death or serious injury to personnel.
WARNING
DANGER TO PERSONNEL
Failure to follow this warning may result in serious injury to personnel.
CAUTION
MAY CAUSE DAMAGE TO EQUIPMENT
Failure to follow this warning may result in damage to the equipment.
NOTICE
Important or tip messages will appear in this format.
8 Rosemount CT5800
Page 9

October 2019 Quick Start Guide
Safety information
All authorized users, including installation, operation, and maintenance personnel, must observe the
following safety precautions and warnings.
This article is in accordance with IEC 60079-0: 2011 Clause 30.
This article must not be changed, amended, or removed.
DANGER
FLAMMABLE SUBSTANCES
This article is in accordance with IEC 60079-0: 2011 Clause 30.
Internal parts of the analyzer may reach temperatures of 150 °F (65 °C) and may present an ignition
source. Failure to observe this warning will cause death, personal injury, and/or damage to persons
and/or property.
Exercise care when using oil, paint, cleaning rags, and other flammable substances near the analyzer. A
fire may result if this precaution is not observed. Always assume that the interior of an analyzer is hot
unless it has been switched off and allowed to cool down.
DANGER
ELECTRIC SHOCK
This article is in accordance with IEC 60079-0: 2011 Clause 30.
Failure to observe this precaution will cause death, personal injury, and/or damage to persons and/or
property.
This analyzer operates using mains voltage that is dangerous to life.
Make sure the circuit breakers are set to OFF and tagged off before opening the front cover.
DANGER
FAILURE TO LOCK-OUT GAS HANDLING SYSTEM MAY CAUSE DEATH.
This article is in accordance with IEC 60079-0: 2011 Clause 30.
Unauthorized operation of the gas handling system when maintenance is being performed on the
analyzer or its associated pipes/hoses may result in highly flammable gas being released, causing fire
or explosion.
Always lock out the gas handling system when shutting down the analyzer.
DANGER
FAILURE TO VENT SAMPLE GAS MAY CAUSE DEATH.
This article is in accordance with IEC 60079-0: 2011 Clause 30.
The sample gas in the system must be vented to prevent fire or explosion during maintenance and
to prevent damage to the analyzer during startup.
The sample gas in the pipes leading to the analyzer must be purged to prevent hazards to
personnel during maintenance. Purging the sample gas must be done in accordance with the safe
working procedures for the site.
Allow the analyzer and system for returning the sample gas to run for five minutes to allow any
sample gas in the system to be returned to the exhaust.
Quick Start Guide 9
Page 10

Quick Start Guide October 2019
WARNING
EXPLOSION HAZARD
The unit described in this manual may not be used in explosive atmospheres without additional safety
measures.
WARNING
ELECTRICAL SHOCK
This article is in accordance with IEC 60079-0: 2011 Clause 30.
Installation requires access to live parts which can cause death or serious injury.
Do not operate without covers secure.
Do not open while energized.
For safety and proper performance, this instrument must be connected to a properly grounded
three-wire source of power.
WARNING
TOXIC GASES
The analyzer's exhaust may contain toxic gases, such as (but not limited to) sulfur dioxide. These gases
can cause serious injuries.
Avoid inhaling exhaust gases.
Connect the exhaust pipe to a suitable flue and inspect the pipes regularly for leaks.
Make sure all connections are airtight to avoid leaks.
WARNING
GASES HAZARDOUS TO HEALTH
Follow the safety precautions for all gases (sample and span gases) and gas cylinders.
Before opening the gas lines, purge them with air or neutral gas (N2) to avoid danger from
escaping toxic, flammable, explosive, or hazardous gases.
WARNING
FLAMMABLE OR EXPLOSIVE GASES
When supplying explosive gases or flammable gases with concentrations of more than 25% of the
lower explosion limit, Emerson recommends implementing one or more additional safety measures:
Purging the unit with inert gas
Stainless steel internal pipes
Flame arrestors on gas inlets and outlets
Infallible measuring cells
10 Rosemount CT5800
Page 11

October 2019 Quick Start Guide
WARNING
CONNECTING UNITS FOR PERMANENT INSTALLATION
Failure to complay may cause the risk of injury or death and invalidate the analyzer's warranty. Working
on units equipped with screw-type terminals for electrical components may result in the exposure of
energized components.
Only qualified personnel familiar with possible risks should install the analyzer.
Wall-mounted units have no power switch and are operational when connected to a power
supply. The operating company is therefore required to have a power switch or circuit breaker (as
per IEC 60947-1/-3) available on the premises. This switch must be installed near the unit, easily
accessible to operators, and labeled as a power cut-off for the analyzer.
WARNING
EXPLOSION HAZARD
Exhaust gases may contain hydrocarbons and other toxic gases, such as carbon monoxide. Carbon
monoxide is toxic. Faulty gas connections may lead to explosion and death.
Ensure that all gas connections are connected as labeled and airtight.
WARNING
EXPLOSION HAZARD
This article is in accordance with IEC 60079-0: 2011, Clause 30.
Failure to observe this warning and/or follow safety instructions could cause an explosion or potentially
hazardous situation, which if not avoided, could result in death or serious injury.
Read all instruction manuals (including versions for auxiliary equipment) before installing this
instrument.
WARNING
EXPLOSION HAZARD
This article is in accordance with IEC 60079-0: 2011 Clause 30.
Failure to observe this warning and/or follow safety instructions could cause an explosion or potentially
hazardous situation which, if not avoided, could result in death or serious injury.
When installing and wiring this equipment, comply with all relevant national legislative
requirements and regulations.
Consider all safety instructions within this manual and all associated analyzer manuals.
WARNING
EXPLOSION HAZARD
This article is in accordance with IEC 60079-0: 2011 Clause 30.
Failure to observe this warning and/or follow safety instructions could cause an explosion or potentially
hazardous situation which, if not avoided, could result in death or serious injury.
When the analyzer is out of order, shut off all inputs and outputs connected to external equipment.
Quick Start Guide 11
Page 12

Quick Start Guide October 2019
WARNING
EXPLOSION HAZARD
This article is in accordance with IEC 60079-0: 2011 Clause 30.
Failure to observe this warning and/or follow safety instructions could cause an explosion or potentially
hazardous situation which, if not avoided, could result in death or serious injury.
Only properly trained personnel who understand the content of all applicable manuals and related
instructions must conduct the startup procedure.
WARNING
EXPLOSION HAZARD
This article is in accordance with IEC 60079-0: 2011 Clause 30.
Failure to observe this warning and/or follow safety instructions could cause an explosion or potentially
hazardous situation which, if not avoided, could result in death or serious injury.
Do not open in an explosive atmosphere.
WARNING
Do not open when energized
WARNING
EXPLOSION HAZARD
This article is in accordance with IEC 60079-0: 2011 Clause 30.
Failure to comply will void certification and may cause explosions. Failure to observe this warning
and/or follow safety instructions could cause an explosion or potentially hazardous situation which, if
not avoided, could result in death or serious injury.
Use only replacement parts and components authorized by Emerson. All replacement parts and
components must be suitable Ex-certified components for use in hazardous areas.
WARNING
EXPLOSION HAZARD BY BATTERY
This article is in accordance with IEC 60079-0: 2011 Clause 30.
Failure to observe this warning and/or follow safety instructions could cause an explosion or potentially
hazardous situation which, if not avoided, could result in death or serious injury.
The Rosemount CT5800 contains a low voltage battery for data backup purposes on the CPU.
Under normal operating conditions, there is no need to replace the battery during the analyzer
lifetime. However, if you do replace it, make sure to only use the same type and model.
12 Rosemount CT5800
Page 13

October 2019 Quick Start Guide
WARNING
OPTICAL RADIATION EXPOSURE HAZARD
The analyzer contains lasers. Opening the analyzer and attempting to perform adjustments or
procedures other than those specified in this manual may result in hazardous optical radiation
exposure.
Failure to follow the correct procedures may cause damage to the eye.
The Rosemount CT5800 is Class 1. The beams are fully enclosed, and there is no access to the laser
beams while the product is in operation or during maintenance. Do not look at the lasers with any kind
of magnifier or optical measuring device.
The use of control or adjustments or performance of procedures other than those specified herein may
result in hazardous radiation exposure.
In accordance with USA 21 CFR 1040, the Rosemount CT5800 has warning labels at appropriate
positions.
Classification
There are three types of lasers that may be included in the Rosemount CT5800: Quantum Cascade
Lasers (QCLs), Interband Cascade Lasers (ICLs), and Tunable Diode Lasers (TDLs). The characteristics of
the lasers contained within are given in the table below.
Parameter
Operation mode Pulsed Pulsed Pulsed
Lasers per system 1 - 6 1 - 6 1 - 6 Maximum of 6 lasers
Wavelength 4 -10 µm 2 - 5 µm 760 nm
Power < 5 mW < 5 mW < 5 mW
Pulse duration < 1 µs 1 µs < 5 µs
Pulse repetition
frequency
Duty cycle < 5% < 5% < 5%
QCL ICL TDL Comments
per system
< 100 kHz < 100 kHz < 100 kHz
Quick Start Guide 13
Page 14

Quick Start Guide October 2019
WARNING
HAZARDOUS SUBSTANCES
Gas handling components within the analyzer will contain particulate matter residue from the sample
gases. Over the life of the analyzer, the concentration of the particulate matter will become enriched
within the gas handling components.
When performing repairs or maintenance on the analyzer:
Handle used gas handling components with extreme caution.
Avoid direct skin contact with used gas handling components.
Do not smoke, drink, or eat in the work area.
Wear goggles or eye shields.
Wear a suitable face mask to protect against inhalation of particulate matter.
Do not wet fingers, eyes, or any exposed skin.
Pack used gas handling components for disposal in sealed packaging and label them
Contaminated.
Dispose of contaminated items as hazardous material according to the applicable local, national,
or international health and safety regulations and pollution regulations.
WARNING
EXPLOSION HAZARD
This article is in accordance with IEC 60079-0: 2011 Clause 30.
Unauthorized operation of the gas handling system when maintenance is being performed on the
analyzer or its associated pipes/hoses may release highly flammable gas, causing fire or explosion.
Always lock-out tag-out the gas handling system when shutting down the analyzer.
WARNING
HEAVY ITEM
Handle the analyzer with caution during unpacking, installing, maintaining, and transporting to
prevent crushing of hands, feet, or other body parts.
The analyzer weighs 176.4 lb. (80 kg). Always use suitable lifting/moving equipment when
moving the analyzer.
Wear suitable protective gloves and protective footwear.
When preparing the analyzer for transport by air, road, or rail, safeguard the analyzer against
movement or break-away during transport by securely strapping it in place.
WARNING
HEAVY INSTRUMENT
Failure to observe this warning and/or follow safety instructions could result in death or serious injury.
The analyzer weighs 176.4 lb. (80 kg) and must be wall or frame mounted.
Emerson recommends that a minimum of two people move and lift the analyzer using suitable
lifting and transportation equipment.
Use suitable fasteners for weight of the analyzer.
Make sure the wall or stand the analyzer is mounted on is solid, stable, and of suitable material to
hold the analyzer.
Do not mount the analyzer on stud or partition walls.
14 Rosemount CT5800
Page 15

October 2019 Quick Start Guide
WARNING
HAZARDOUS GAS
This article is in accordance with IEC 60079-0: 2011 Clause 30.
The product stream that the analyzer is examining may be hazardous even at low concentrations.
Therefore, take special care to ensure that the sample gas return port either returns the sample gas to
the product stream or discharges the sample gas to a location that will not cause a hazard.
WARNING
ELECTROSTATIC CHARGING HAZARD
This article is in accordance with IEC 60079-0: 2011 Clause 30.
The keypad is non-conducting and may generate an ignition capable level of electrostatic charges
under certain extreme conditions.
Ensure that the equipment is not installed in a location where it may be subjected to external
conditions (such as high pressure steam) which might cause a build-up of electrostatic charges on nonconducting surfaces. Only clean equipment with a damp cloth.
WARNING
HIGH PRESSURE GAS AND AIR
This article is in accordance with IEC 60079-0: 2011 Clause 30.
The calibration gas supply and compressed air supply operate at a pressure that can cause injury, e.g.,
damage to eyes and skin punctures from debris blown by the high pressure gas or compressed air.
Always lock off or tag off the calibration gas supply and compressed air supply when shutting down the
analyzer.
WARNING
BURNS
Some parts of the analyzer may be heated to 150 °F (65 °C). Failure to allow sufficient cooling may
cause serious burn injury to personnel.
Do not touch any part of the analyzer.
Assume all parts of the analyzer are hot unless it has been switched off and allowed to cool down.
Always wear proper protective equipment when handling the analyzer.
Switch off the analyzer and allow it to cool for at least two hours before fitting, removing, or
performing any maintenance.
The analysis cell is insulated against heat loss. Allow the analyzer to cool for at least 12 hours
before performing any maintenance on, or in the vicinity of, the analysis cell.
Quick Start Guide 15
Page 16

Quick Start Guide October 2019
WARNING
CRUSHING HAZARD
Take care not to crush hands when closing the frront door of analyzer field housings.
Keep out of the closing area between the enclosure cover and base.
WARNING
EXPLOSION
Danger of explosion if battery is incorrectly replaced.
Replace with only the same or equivalent type of battery.
WARNING
Physical access
Unauthorized personnel may potentially cause significant damage to and/or misconfiguration of end
users’ equipment. This could be intentional or unintentional and needs to be protected against.
Physical security is an important part of any security program and fundamental to protecting your
system. Restrict physical access by unauthorized personnel to protect end users’ assets. This is true for
all systems used within the facility.
CAUTION
EQUIPMENT DAMAGE
Failure to follow the startup procedure may result in damage to the analyzer.
Always follow the startup procedure.
CAUTION
EQUIPMENT DAMAGE
Failure to follow the shutdown procedure may result in damage to the analyzer.
Always follow the shutdown procedure.
CAUTION
EMC
This is a Class A product. In a domestic environment, this product may cause radio interference, in
which case you may be required to take adequate measures.
16 Rosemount CT5800
Page 17

October 2019 Quick Start Guide
CAUTION
EQUIPMENT DAMAGE
If the equipment is used in a manner not specified by the manufacturer, the protection provided by the
equipment may be impaired.
CAUTION
EQUIPMENT DAMAGE
Ensure that the local power voltage where the unit is to be installed corresponds to the unit’s nominal
voltage as given on the name plate label.
CAUTION
EQUIPMENT DAMAGE
Do not power up or try to operate the analyzer unless it is physically secure and all electrical and
pneumatic connections to the analyzer are in place.
Before commencing the start-up process, it is important to ensure that electrical power, sample
gas handling facilities, and any calibration gases that are required are available to the analyzer.
CAUTION
EQUIPMENT DAMAGE
Additional notes for units with screw-type terminals:
Cables for external data processing must be double-insulated against mains power.
If this is not possible, cables must be laid in such a way as to guarantee a clearance of at least 0.2
in. (5 mm) from power cables. This clearance must be permanently secured (e.g., with cable ties).
Contents
Plan............................................................................................................................................19
Install......................................................................................................................................... 29
Start-up procedure.....................................................................................................................53
Operating the analyzer...............................................................................................................55
Spare parts list............................................................................................................................62
Engineering drawings.................................................................................................................64
Quick Start Guide 17
Page 18

Quick Start Guide October 2019
18 Rosemount CT5800
Page 19

October 2019 Quick Start Guide
1 Plan
1.1 Unpacking the analyzer
WARNING
HEAVY ITEM
In accordance with IEC 60079-0: 2011 Clause 30.
Failure to propery handle the analyzer may cause injury to personnel.
Make sure the wall the analyzer is mounted on is solid, stable, and of
suitable material to hold the weight of the analyzer.
Handle the analyzer with caution during unpacking, installing,
maintaining, and transporting to prevent crushing of hands, feet, or
other body parts.
The analyzer weighs 176.4 lb. (80 kg).
Emerson recommends that a minimum of two people move and lift the
analyzer.
Wear suitable protective gloves and protective footwear.
WARNING
EXPLOSION HAZARD
This article is in accordance with IEC 60079-0: 2011 Clause 30.
Failure to observe this warning and/or follow safety instructions could result
in an explosion or potentially hazardous situaiton which, if not avoided,
could result in death or serious injury.
Comply with all relevant national legislative requirements and
regulations when installing and wiring this analyzer.
Consider all safety instructions within this manual and all associated
instruction manuals.
WARNING
EXPLOSION HAZARD
Installing the instrument requires opening the enclosure and working at
the open instrument. This is permitted only when both no hazardous
atmosphere is present and the instrument and connected external
circuitry are de-energized.
Depending on the local regulations, this may require a competent hot
work supervisor to issue a hot work permit.
Quick Start Guide 19
Page 20

Quick Start Guide October 2019
CAUTION
SHOCK AND VIBRATION
Failure to follow this caution may result in damage to the analyzer.
The Rosemount CT5800 contains sensitive electronic equipment.
Do not subject it to any shock or vibration.
Procedure
1. On receipt of goods, look for any visible damage to the analyzer and
verify that all items noted to be shipped were received. Record on
the goods receipt note any damage or missing items, noting both
the item(s) and the quantity missing.
2. Visually inspect the exterior of the analyzer for signs of damage,
corrosion, gas leaks, or signs of previously overheating.
3. Use safety approved and tested lifting equipment to remove the
analyzer from the shipping container.
4. Place the analyzer on a solid, level surface and prepare to wall mount
the analyzer.
5. Make sure that the analyzer is stored in its protective plastic cover
until installation.
1.2 Installing and connecting the unit
The following notices should be followed to ensure compliance with the low
voltage directive (Europe) and other applicable regulations.
• Suitably ground all connectors provided for this purpose.
• Properly reinstate all safety covers and grounding connections after
maintenance work or troubleshooting.
• Provide a fuse at the installation site which will completely disconnect
the analyzer in case of failure. Installing an isolating switch may also be
beneficial. In either case, these components must be constructed to
conform to recognized norms.
1.3
20 Rosemount CT5800
System overview
A complete Rosemount CT5800 system consists of a gas handling system,
the analyzer, and the associated interconnecting wiring and gas piping.
The Rosemount CT5800 is supplied by Emerson. The gas handling system
may be provided by either you or Emerson, depending upon the specific
installation. The circuit breakers used to control the application of electrical
power to the analyzer, the interconnecting wires, and gas piping are
Page 21

October 2019 Quick Start Guide
provided by you. In Figure 1-1, the items supplied by Emerson are colored
blue, customer-supplied items are colored purple, and items that can be
supplied by either Emerson or you are green. Table 1-1 lists the main items
of the system.
Figure 1-1: Complete Rosemount CT5800 Gas Analysis System
A. Gas handling system
B. Sample supply line
C. Sample ENTER (exhaust) line
D. Rosemount CT5800 gas analyzer
E. Electrical power
F. Measurement data
G. Control center
Emerson has designed the analyzer for industrial process applications
requiring ATEX Zone 1 hazardous area certification; the analyzer has an Ex d
flameproof enclosure. It contains an optical system with multiple lasers and
a series of optical components that provide an optical path, a heated multipass analysis cell, and sample and outlet ports that can be connected to a
gas handling system and control and analysis electronics. The number of
lasers installed depends upon customer requirements. The complete system
operates Vac from a 110/240 Vac 50/60 Hz supply.
The analyzer uses mid-infrared optical absorption spectroscopy to measure
gas concentrations. The light sources are lasers, which are operated to
produce wavelength sweeps that cover the absorption lines of the gases.
The light from each laser is routed through an optical path to the analysis
cell, which provides measurement of low concentrations of the subject
gases. An external sample handling system conditions the sample gas and
draws it through the analysis cell. The light exits the multi-pass analysis cell
and is directed to a receiver in the analyzer. The variation in the intensity of
light in the vicinity of the absorption lines is measured, and the
concentration is determined using a comprehensive spectral fitting routine.
Quick Start Guide 21
Page 22

Quick Start Guide October 2019
Table 1-1: Main Items of the Rosemount CT5800 System
Item Name or
description
1 Rosemount
CT5800
2 Rosemount
CT5800
software
package,
version 5.x.x
3 Gas handling
system
4 Heated gas
sample line
hose
5 Exhaust line
hose (for
sample gas)
6 Reference gas
cylinders
(instrument
gas) for
calibration
purposes
7 Pressure
regulator
8 Pneumatic T-
piece
9 Excess flow line Customer Customer
10 240 Vac power
cable
11 Cable from
analyzer to
control center
12 Main circuit
breaker
Supplied by Part number Quantity Notes
Emerson 1 N/A
Emerson N/A 1 Software is
Customer
(optionally by
Emerson)
Customer/
Emerson
Customer Customer
Customer Customer
Customer Customer
Customer Customer
Customer Customer 1 Connect
Customer Customer
Customer Customer
Customer
choice
choice
choice
choice
choice
choice
choice
choice
embedded in
PC board.
Version
described in
manual
1 Optional
1 Optional
1 Optional
Dependent
upon number
of gases being
measured
1 per gas
cylinder
1 N/A
1 Required for
1 N/A
1 N/A
supply by
Emerson
supply by
Emerson
supply by
Emerson
N/A
N/A
calibration
Rosemount
CT5800 to
mains power
supply
22 Rosemount CT5800
Page 23

October 2019 Quick Start Guide
1.4 Equipment purpose and role
The analyzer is a gas sensor system that can be configured to measure the
concentrations of multiple small molecules in a gas sample that is provided
to the analyzer via a sample line.
The types of molecules that are measured depend on the system
configuration.
Figure 1-2: Rosemount CT5800
The analyzer can be configured to detect and measure up to twelve different
gases, depending on the combination of laser modules fitted.
1.5
Detailed system specifications
Table 1-2: General Characteristics
Rosemount CT5800 Value Comment
Voltage 220/240 ± 10% Vac
110/120 ± 10% Vac
Peak power consumption 1100 W Max consumption per gas analyzer
Continuous steady-state
power consumption
Quick Start Guide 23
800 W N/A
50 Hz ± 5% (factory set)
60 Hz ± 5% (factory set)
Page 24

Quick Start Guide October 2019
Table 1-2: General Characteristics (continued)
Rosemount CT5800 Value Comment
Electrical compartment
enclosure
Optical compartment
enclosure
Measurement technique N/A Mid IR absorption spectroscopy
Mid IR source N/A Quantum Cascade™ Laser
Near IR source N/A Interband Cascade Laser Tunable diode laser
Laser classification Class 1 BS EN 60825-1: 2007 safety of laser products.
Inlet gas port connector ¼ in.
Outlet (exhaust) gas port
connector
Measurement result
signals
Warm-up time 90 minutes N/A
N/A Aluminum
N/A Aluminum
Equipment classification and requirements
(identical to IEC 60825-1 2007)
6 mm
¼ in.
6 mm
4 to 20 mA 4 or 8 channel outputs, specify on order
Swagelok® type, factory-configured, specify
on order
Swagelok type, factory-configured, specify on
order
24 Rosemount CT5800
Page 25

October 2019 Quick Start Guide
Figure 1-3: Rosemount CT5800 Dimensions: Front View
A. User interface
B. 2 off lifting eyelets
Quick Start Guide 25
Page 26

Quick Start Guide October 2019
Figure 1-4: Rosemount CT5800 Dimensions: Side View
A. Rating plate
B. External earth point
26 Rosemount CT5800
Page 27

October 2019 Quick Start Guide
Figure 1-5: Rosemount CT5800 Radius for Opening
A. Opening arc
Table 1-3: Environmental Characteristics
Environmental
characteristic
Operating temperature range -4 to 131 °F (-20 to 55 °C) Ambient temperature
Sample gas temperature
range (condition for safe use
Europe)
Sample gas temperature
range (condition for safe use
North America)
Sample gas moisture content 8% Maximum
Sample gas particulate
density
Quick Start Guide 27
Value Comment
39 to 140 °F (4 to 60 °C) Factory set, specify on order
122 to 176 °F (50 to 80 °C) Factory set, specify on order
3
5 mg/m
Maximum
Page 28

Quick Start Guide October 2019
Table 1-3: Environmental Characteristics (continued)
Environmental
characteristic
Sample gas particulate size 10 µm Maximum
IP code 66 IP to IEC 60529
Sensor humidity range 10 to 95% Relative humidity (non-
Value Comment
condensing) at 113 °F (45 °C)
1.5.1 Optical description
The laser modules are located in the core of the analyzer. Each laser module
produces a separate light beam, and these beams are combined linearly as
the modules are aligned in the system. The combined beams are closely
coupled, parallel, and coaxial about a virtual line. The laser light beams pass
through an optical steering assembly, which directs the laser beam through
the sample cell.
The sample cell contains a set of mirrors to create a path through the sample
gas that is between 0.7 ft. (0.2 m) and 49.2 ft. (15 m) through multiple
reflections along the length of the cell. The laser beams exit the cell at the
opposite end from where they entered and are directed using a second
optical block to a receiver.
By measuring and analyzing the light detected by the receiver unit, it is
possible to accurately determine the concentrations of the target molecules
within the gas sample cell.
28 Rosemount CT5800
Page 29

October 2019 Quick Start Guide
2 Install
This section describes the correct installation procedure for the analyzer.
NOTICE
This section is in accordance with IEC 60079-0: 2011 Clause 30. This section
must not be changed, amended, or removed.
2.1 Site requirements
Select an appropriate site for installing the analyzer.
NOTICE
This section is in accordance with IEC 60079-0: 2011 Clause 30. This section
must not be changed, amended, or removed.
WARNING
INSTALLATION REQUIREMENTS
The place of installation must be clean, dry, and protected against strong
vibrations and frost.
Observe the advisable operating temperatures given in Detailed system
specifications.
Do not subject analyzer to direct sunlight or heat sources.
For outdoor installation, Emerson recommends installing the analyzer in
a cabinet. At a minimum, protect it against rainfall.
WARNING
FIRE AND EXPLOSION
In accordance with IEC 60079-0: 2011 Clause 30.
Failure to ensure the area is safe or leaving the device powered on can cause
an explosion or fire and seriously injure personnel.
Do not open the Ex d enclosure unless the area is known to be free of
flammable materials or unless all devices are switched off.
Quick Start Guide 29
Page 30

Quick Start Guide October 2019
DANGER
ELECTRIC SHOCK
This article is in accordance with IEC 60079-0: 2011 Clause 30.
Failure to observe this precaution may cause death, injury, and/or damage
to persons and/or property.
The analyzer operates using mains voltage that is dangerous to life.
Make sure that the circuit breakers are set to OFF and tagged off before
opening the front cover.
In accordance with IEC 60079-0:2011 Clause 30, install the analyzer in a
suitable position with shading to protect it from the elements. The displays
and control panel on the front of the housing must not be exposed to direct
UV light sources or direct sunlight.
WARNING
POTENTIAL ELECTROSTATIC CHARGING HAZARD
This article is in accordance with IEC 60079-0: 2011 Clause 30.
The keypad is non-conducting and may generate an ignition capable of
electrostatic charges under certain extreme conditions.
Ensure that the equipment is not installed in a location where it may be
subjected to external conditions (such as high pressure steam), which
might cause a build-up of electrostatic charges on non-conducting
surfaces.
Only clean the analyzer with a damp cloth.
The analyzer has a T4 temperature classification which specifies the
maximum surface temperature of the instrument, under a fault condition, is
275 °F (135 °C). You must ensure that no combustible gas concentrations
are present, whether on a continual or occasional basis, which have an
ignition temperature below the T classification of the unit.
WARNING
FIRE AND EXPLOSION
Failure to observe this precaution may cause death, personal injury, and/or
damage to equipment.
Do not open the Ex d enclosure of the analyzer unless the atmosphere of the
area is known to be below the ignitable concentration of combustible gases
or materials.
30 Rosemount CT5800
Page 31

October 2019 Quick Start Guide
In accordance with IEC 60079-0: 2011 Clause 30, install the analyzer in a
suitable position with shading to protect it from the elements. Do not
expose the displays and control panel on the front of the housing to direct
UV light sources or direct sunlight.
Provide a fuse at the installation site which will completely disconnect the
analyzer in case of failure. Installing an isolating switch may also be
beneficial. In either case, these components must be constructed to
conform to recognized norms.
In accordance with IEC 60664-1, install the analyzer in an area of not more
than Pollution Degree 2.
Provide sufficient space around the analyzer to allow maintenance and
servicing of this unit.
2.2 Mounting
This procedure requires a minimum of two people to safely move and mount
the analyzer.
Detailed system specifications shows outline dimensional drawings of the
analyzer.
NOTICE
In accordance with IEC 60079-0: 2011 Clause 30. Figure 2-4 shows the
positions of the glands for the three electrical conduits. Do not redesign or
reposition these glands without consulting Emerson.
WARNING
HEAVY ITEM
In accordance with IEC 60079-0: 2011 Clause 30.
Failure to properly handle the analyzer may cause injury to personnel.
Make sure the wall the analyzer is mounted on is solid, stable, and of a
suitable material to hold the weight of the analyzer.
Handle the analyzer with caution during unpacking, installing,
maintaining, and transporting to prevent crushing of hands, feet, or
other body parts.
The analyzer weighs 176.4 lb. (80 kg).
Emerson recommends that a minimum of two people move and lift the
analyzer.
Wear suitable protective gloves and protective footwear.
Make sure that the wall fixing points are capable of supporting a load of
176.4 lb. (80 kg) each; this includes a x2 safety factor. All mounting points
are 0.6 in. (15 mm) diameter holes.
Quick Start Guide 31
Page 32

Quick Start Guide October 2019
Procedure
1. Use safety approved equipment to lift the analyzer from the stable
platform. One person guides the unit into position as the other
person carefully operates the lifting equipment.
2. Mount the analyzer using the factory fitted and pre-drilled wall
mounting brackets (Figure 2-1) using four M8 x 1.25 (5/16 - 18 UNC)
A2/A4 grade 70 bolts.
Figure 2-1: Mounting Details
A. Wall mounting bracket
Mounting brackets are 1/16-in. (4 mm) thick stainless steel. Position
the bolts in such a way to allow maximum use of all thread length.
Make sure that the fasteners used are suitable for the load and
surface the analyzer is mounted on.
32 Rosemount CT5800
Page 33

October 2019 Quick Start Guide
Emerson recommends installing the analyzer in an upright (vertical)
position; other orientations may affect the measuring results.
3. If you want to increase security on the installation of the analyzer by
thread-locking the fittings, only do this with compounds compatible
with the hazardous area zone classification of the installation
location.
4. Make sure the bolts are secure. Apply maximum torque permissible
for the material combination of the supporting structure.
5. Remove the lifting eyes and retain them for future use. Protect the
threads with plastic grommets and a suitable grease.
Postrequisites
Do not place any additional load on the analyzer.
2.3 Connecting the system
2.3.1 Opening the enclosure
Use these procedures to make the electrical, power, and gas line
connections.
Procedure
1. Make sure that the hinges are securely connected to the enclosure.
WARNING
HEAVY FRONT HOUSING
Failure to properly support the lid may cause injury to personnel.
The analyzer's front housing is heavy, 68.1 lb. (30 kg).
After removing the captive bolts, provide support when opening
the lid.
CAUTION
EQUIPMENT HAZARD
Inspect the hinges for damage before removing the M16 x 45
captive bolts to open the housing.
Make sure no obstructions are in the opening radius when the
front housing is opened.
Make sure no obstructions are in the opening radius when the
front housing is opened.
2. Unscrew the 20 off M16 x 1.5 inch captive bolts holding the front and
rear housings of the enclosure together.
Quick Start Guide 33
Page 34

Quick Start Guide October 2019
Figure 2-2: Rosemount CT5800 Housing
A. 20 off M16 captive bolts
3. Carefully lower the front enclosure to the fully open position.
34 Rosemount CT5800
Page 35

October 2019 Quick Start Guide
Figure 2-3: Enclosure Open
A. Flamepath (green highlight)
B. Seal
C. Flanges
4. Apply masking tape to the flanges, seal, and flamepath to protect
them from scratches, chipping, and other forms of damage of
deformation.
CAUTION
PROTECT FLAMEPATH
Any damage to the flamepath will invalidate certification.
Protect the flamepath with masking tape.
5. Continue the installation with the power and signal cables.
Quick Start Guide 35
Page 36

Quick Start Guide October 2019
See AC power safety information.
2.3.2 AC power safety information
NOTICE
This section is in accordance with IEC 60079-0:2011 Clause 30.
This section must not be changed, amended, or removed.
WARNING
ELECTRIC SHOCK
Failure to follow instructions may cause personal injury or death.
Only qualified personnel, taking into account all applicable standards
and legislative requirements, should install the analyzer and connect the
power and signal cables.
Instruments providing screw terminals for electrical connections may
require working near live parts.
The analyzer does not have power switches and is operable when
connected to power.
A customer-supplied power switch or circuit breaker (complying with IEC
60947-1/ -3) must be in the building installation. The switch has to be
installed near the analyzer, must be easily accessible, and has to be
assigned as a disconnector for the analyzer.
Disconnect instruments with screw terminals from power when working
at power terminals (pull power plug or operate power switch / circuit
breaker in building installation).
The analyzer provides a protective earth terminal. To prevent electrical
shock hazards, connect the instruments to a protective earth. The
instruments must be connected to power with a three wire power cable
with earth conductor. Any interruption of the earth connector inside or
outside the instrument or disconnecting the earth terminal may cause
potential electrical shock hazard.
36 Rosemount CT5800
Page 37

October 2019 Quick Start Guide
WARNING
EXPLOSION HAZARD
In accordance with IEC 60079-0: 2011 Clause 30.
Failure to observe this warning could cause an explosion or potentially
hazardous situation which, if not avoided, may cause death or personal
injury.
Only enable the purge controller bypass function during setup or
maintenance and only when the area is known to be non-hazardous.
The customer supplied circuit breaker must be in accordance with ATEX /
IECEx / North American protection concepts. The main power isolator
controls the application of electrical power to the analyzer.
Electrical protection for the instrumentation circuitry of the analyzer is
provided by fuses F1 and F2 located inside the analyzer.
Table 2-1: Electrical power requirements
Electrical supply Power consumption Voltage Fuse
Instrumentation
supply voltage
Purge supply voltage 10 W 110 to 240 Vac, 50/60
500 W (peak)
300 W (usual)
110 to 240 Vac, 50/60
Hz ± 10%
Hz ± 10%
3.15 A internal fuses
F1 and F2. See
Connecting the signal
cables.
1 A (located in
secondary circuit
breaker)
For the electrical power wiring, use 16 AWG stranded, 3 conductor copper or
tin plated copper power wire, rated for at least 250 Vac, of the required
length.
Cables must be rated for operation in ambient temperatures greater than
176 °F (80 °C).
Cables must be terminated in accordance with local electrical codes.
A switching system is not supplied with this equipment. You must supply a
suitably rated switch or circuit breaker to be included with this installation.
Check the installation of the switch for conformity in accordance with
national/local regulations and standards by inspection.
The switch or circuit breaker must be suitably located, easily reached, and
identified as the disconnection device for the analyzer.
Quick Start Guide 37
Page 38

Quick Start Guide October 2019
Figure 2-4: Rosemount CT5800 Bottom View: Gas Connectors and Cable
Glands
A. Gas connections (flame arrestor) (M18 x 1.5)
B. Conduit / cable entry apertures (M20 x 1.5)
C. Wall fixing line
D. Earth (ground) bond
The customer supplied circuit breaker must be in accordance with suitably
certified hazardous area Ex protection concepts. The main power isolator
controls the application of electrical power to the analyzer.
WARNING
EXPLOSION
Do not open the instrument when it is energized.
Ensure that external circuitry is disconnected or de-energized before
opening the instrument.
All cables (power and signal) must end (be connected) in either a safe
(nonhazardous) area or in a protecting enclosure (e.g., explosion-proof
junction box).
38 Rosemount CT5800
Page 39

October 2019 Quick Start Guide
WARNING
INSTALLATION USING CONDUITS
The analyzer has metric threads for installing cable entries.
Installing conduits requires metric to national pipe thread (NPT)
adapters.
To be compliant with North American ordinarly location (Ordloc) and
hazardous area (Hazloc) certification, use stainless steel with captive Oring seals.
Select a type of conduit and seals in accordance with local codes and
suitable for the site of installation.
For North American sites, do not fit seals more that 2 in. (50 mm) from
the Ex d entry point.
Unused entries are provided with plugs, secured in place with thread
locking compound.
WARNING
INSTALLATION USING CABLE GLANDS
All cable glands must be suitable certified for use in area of application
(Zone/Class/Division).
When installing the analyzer in a hydrogen environment and/or applying
hydrogen to the analyzer, do not use the standard compression type
cable glands. Use suitable compound barrier cable glands to stay
compliant to EN 60079-14.
When selecting cable glands, make sure the correct diameter is selected
to ensure correct cable fit.
CAUTION
SELECT THE CORRECT TYPE OF CABLE ENTRY.
Before starting to install the analyzer, verify what type of cable entry is
required at your site of installation.
Rosemount CT5800 gas analyzers may be equipped with cable glands
(e.g., regulated for installations covered by ATEX/IEX/Ex) or may be
installed with conduits (e.g., in North America).
Electrical protection for the instrumentation circuitry of the analyzer is
provided by fuses F1 and F2 located inside the analyzer.
Quick Start Guide 39
Page 40

Quick Start Guide October 2019
Figure 2-5: Fuses
Connect power to the system through the power gland on the base of the
analyzer (Figure 2-4).
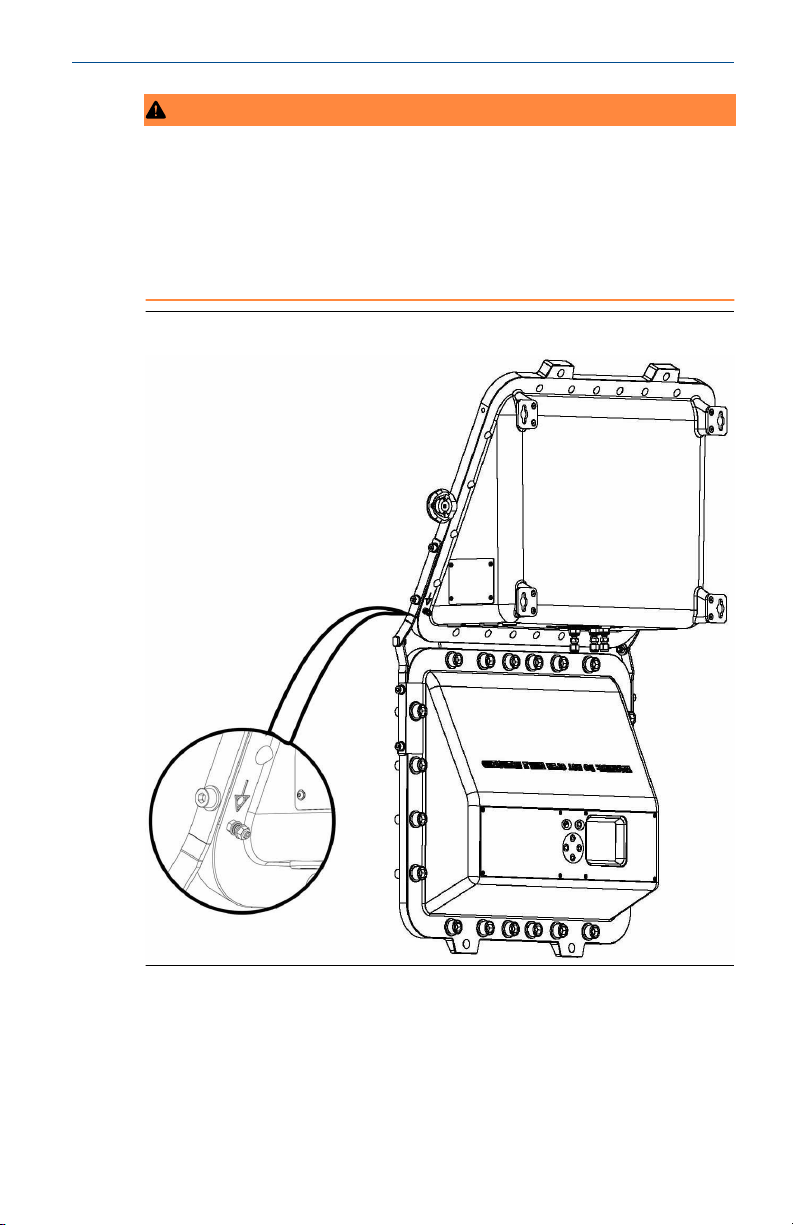
2.3.3 Earthing/grounding the analyzer
The system must be suitably earthed / grounded using the M5 stud bonded
to the rear of the system and the connector inside with cable between 1.5
and 4 mm square.
NOTICE
This section is in accordance with IEC 60079: 2011 Clause 30. This article
must not be changed, amended, or removed.
40 Rosemount CT5800
Page 41
October 2019 Quick Start Guide
WARNING
ELECTRIC SHOCK
In accordance with IEC 60079-0: 2011 Clause 30.
Failure to observe this warning may cause death or personal injury.
The analyzer must be earthed/grounded in accordance with national/local
regulations.
Figure 2-6: Earth Bond
Quick Start Guide 41
Page 42

Quick Start Guide October 2019
2.3.4 Connecting the signal cables
Connect the signal cables through conduit outlets 2 and 3 as shown in the
figures below.
NOTICE
This section is in accordance with IEC 60079-0: 2011 Clause 30. This section
must not be changed, amended, or removed.
The signal cables are connected to the system through conduit outlets 2 and
3 as shown in Figure 2-7 and Figure 2-9. All signal cables are to be minimum
20 AWG tri-rated switchgear cables. Customer supplied conduit and cables
must be terminated in the conduit outlets in accordance with local electrical
codes.
Figure 2-7: Cable Glands, Conduits, and Gas Line Connections
A. Breather
B. Gas connection out (flame arrestor) (M18 x 1.5)
C. Gas connection in (flame arrestor) (M18 x 1.5)
D. Conduit / cable entry apertures (M20 x 1.5)
42 Rosemount CT5800
Page 43

October 2019 Quick Start Guide
Figure 2-8: Signal Connections
Figure 2-9: Signal Cable Connections
Table 2-2: Power, Digital, and Analog Connections
Terminal Function
1 System supply (L)
2 System supply (N)
3 Digital output 1
4 Digital output 2
Quick Start Guide 43
Page 44

Quick Start Guide October 2019
Table 2-2: Power, Digital, and Analog Connections (continued)
Terminal Function
5 Digital output 3
6 Digital output 4
7 Digital output 5
8 Digital output 6
9 Digital output 7
10 Digital output 8
11 Digital output 9
12 Digital output 10
13 Digital output 11
14 Digital output 12
15 Analog output 1
16 Analog output 2
17 Analog output 3
18 Analog output 4
19 Analog output 5
20 Analog output 6
21 Analog output 7
22 Analog output 8
23 Status output 1 (check function)
24 Status output 2 (maintenance required)
25 Status output 3 (out of specification)
26 Status output 4 (failed)
Table 2-3: Ethernet Interface Module wiring to MOXA Ethernet Socket
Terminal Designation Color coding
1 Tx+ Orange / White
2 Tx Orange
3 Rx+ Green / White
4 Not used Blue
5 Not used Blue / White
44 Rosemount CT5800
Page 45

October 2019 Quick Start Guide
Table 2-3: Ethernet Interface Module wiring to MOXA Ethernet Socket
(continued)
Terminal Designation Color coding
6 Rx- Green
7 Not used Brown / White
8 Not used Brown
2.3.5 Connecting the sample supply and return lines
Sample gas supply and sample return connections are from ¼-in. (6 mm)
Swagelok® type fittings.
The analyzer has one gas input and one gas output, which are located on the
base of the analyzer (Figure 2-7).
The gas sample that is to be measured for impurities enters the instrument
through the sample gas input port.
Once the sample gas has been examined for impurities, it is expelled from
the instrument through the sample gas return port.
NOTICE
Remove the breather blanking cap and never connect anything to this port.
To avoid the risk of gas leaks, make sure that these connections are made
correctly and tightly. Both the sample gas supply pipe and the sample return
pipe should be thermal insulated.
NOTICE
The Swagelok recommendation for pipe fittings of this size is to tighten the
nut finger tight and then tighten an additional one and a quarter (1 and ¼)
turns with a spanner.
The maximum gas supply pressure is 1 BarG.
The sample supply line must be heated all the way to the sample gas input
port on the analyzer to prevent condensation forming at any point in the
sample supply line.
Quick Start Guide 45
Page 46

Quick Start Guide October 2019
WARNING
HAZARDOUS GAS
This article is in accordance with IEC 60079-0: 2011 Clause 30.
The product stream that the analyzer is examining may be hazardous even
at low concentrations.
Take special care to ensure that the sample gas return port either returns the
sample gas to the product stream or discharges the sample gas to a location
that will not cause a hazard.
WARNING
MAINS SUPPLY CABLE
Failure to follow this warning may result in personal injury.
Make sure that the mains supply cable used is of a suitable rating for the
analyzer's power requirements.
The Ethernet connector provides an Ethernet output from the analyzer that
may be used for downloading data for failure diagnostic purposes.
The analyzer outputs the results of the gas analysis through the 4-20 mA
analog outputs and sends them to your process control center.
The status outputs provide fault indications to your process control center.
Each digital output is connected to a normally closed relay, located inside
the analyzer, which will open in response to the detection of a specific fault.
The possible causes of a fault indication are:
• The sample gas concentration is outside of specification (i.e., the sample
gas concentration has exceeded the measurement range of the
instrument).
• The analyzer is out of specification or has developed a fault.
WARNING
HIGH VOLTAGE
Failure to obey the wiring regulations may result in serious injury to
personnel.
Voltages up to 250 Vac, 50 Hz may be present on the digital output
terminals.
Install external circuits in accordance with national wiring regulations.
46 Rosemount CT5800
Page 47

October 2019 Quick Start Guide
WARNING
ELECTRIC SHOCK
Attaching cables and wiring harnesses longer than 9.8 ft. (3 m) may cause
injury to personnel.
The analyzer passed electromagnetic compatibility (EMC) tests based on all
electrical cables and harnesses attached to it being 9.8 ft. (3 m) long.
2.3.6 Closing the housing
After all internal connections have been made and proved/tested, close the
enclosure and secure the 20 off M16 x 45 captive screws and form A washers
in accordance with the torque sequence.
See Figure 2-11.
Procedure
1. Remove all protective covering from the flamepath and enclosure
sealing gasket.
2. Inspect the seal.
If any damage is detected, stop the process immediately and report
to maintenance.
3. Clean the seal to remove any adhesive from the protective cover.
4. Inspect the flanges/flamepath for damage (i.e., scratches, chipping,
and/or other form of damage/deformation).
If any damage is detected, stop the process immediately and report
to maintenance.
5. Carefully lift the housing up and align with the rear housing.
6. Make sure that all holes are aligned. If necessary, use the two holes
(Figure 2-10) to assist alignment.
Quick Start Guide 47
Page 48

Quick Start Guide October 2019
Figure 2-10: Alignment holes
A. Alignment holes
7. Insert the captive M16 bolt and engage the threads on the rear
housing.
8. Refer to the torque sequence (Figure 2-11) and tighten all bolts.
WARNING
HAZARDOUS AREA PROTECTION
Failure to follow the warning will invalidate hazardous area Ex d
protection.
Always use captive M16 x 45 screws and form A washers to secure
the enclosure shut.
48 Rosemount CT5800
Page 49

October 2019 Quick Start Guide
Figure 2-11: Torque sequence
Tighten all bolts in sequence to a torque value of 18.44 ft.-lb. (25
Nm).
2.4 Test connections
Before sealing the cable glands, it is vital to test the new connections in
order that any faults can be remedied before the cables are permanently
sealed.
WARNING
EXPLOSION HAZARD
In accordance with IEC 60079-0: 2011 Clause 30.
Failure to observe this warning could cause an explosion or potentially
hazardous situation which, if not avoided, may cause death or personal
injury.
The cable glands used in this analyzer are only suitable for use in areas with a
low risk of mechanical damage. Protect the cable glands suitably.
Temporarily seal the cable glands with a suitable sealant to allow testing.
The tests described below are a basic check to prove function, rather than a
test of sensor capability.
Quick Start Guide 49
Page 50

Quick Start Guide October 2019
To start the analyzer, follow the steps in Start-up procedure.
WARNING
INSTALLER RESPONSIBILITY
In accordance with IEC 60079-0: 2011 Clause 30
Failure to observe this warning could cause a potentially hazardous situation
which, if not avoided, may cause death or personal injury.
It is the installer's responsibility to connect the analyzer to a suitable alarm or
shutdown facility.
2.4.1 Testing power input cables and circuit breakers
The power input cables and circuit breakers can be tested as follows.
NOTICE
This section is in accordance with IEC 60079-0: 2011 Clause 30. This section
must not be changed, amended, or removed.
Procedure
1. Set the main circuit breaker to ON.
2. Check that the display controller lights up.
The instrument begins to power up.
2.4.2 Testing temperature sensor and cell heater
The sample cell is controlled to operate at a pre-set temperature. This
involves a heater and a temperature sensor.
NOTICE
This section is in accordance with IEC 60079-0: 2011 Clause 30. This section
must not be changed, amended, or removed.
Procedure
1. Check that a temperature reading is displayed against
Temperature on the display controller as described in Operating
the analyzer.
2. Leave the analyzer operating and confirm that the temperature rises
until the analysis cell reaches the pre-set operating temperature
around 122 °F (50 °C).
This takes approximately 90 minutes.
50 Rosemount CT5800
Page 51

October 2019 Quick Start Guide
2.4.3 Pressure sensor
The pressure sensor monitors the pressure in the analysis cell.
NOTICE
This section is in accordance with IEC 60079-0: 2011 Clause 30. This section
must not be changed, amended, or removed.
Procedure
1. Check that a pressure reading is displayed under Pressure on the
display controller.
The reading is approximately 760 Torr at atmospheric pressure.
NOTICE
A Torr is a non SI unit of pressure, defined as 1/760 of standard
atmospheric pressure, and is equal to the fluid pressure of 1 mm of
mercury.
2. If desired, cap off the gas inlet and use an external pump to evacuate
the cell.
Make sure the pressure drops as expected.
Quick Start Guide 51
Page 52

Quick Start Guide October 2019
2.4.4 Testing analog output cables
Prerequisites
In order to generate a 4-20 mA output, let the analyzer warm up for 90
minutes and make sure the analysis cell is at the correct pressure.
The 4-20 mA outputs operate when the analysis cell is between 104 and 140
°F (40 and 60 °C) and the pressure is between 180 and 220 Torr. It is not
essential to flow sample gas through the system; nitrogen or atmospheric air
is adequate for this test.
Procedure
With the analyzer at operating temperature and pressure, ensure that a
current between 4 mA and 20 mA is generated on each 4-20 mA output, as
listed in Connecting the signal cables.
Use a multimeter to measure the current.
2.4.5 Testing the measurement valid flag
The measurement flag is normally open contact. It is simplest to test this
with a multimeter.
With the analyzer closed and compressed air applied as described in the
startup procedure (Startup procedure) when the system is operating
correctly, an open contact is created between the two contact wires (white).
Procedure
To test the Error state, shut off the sample gas and allow the pump to reduce
the cell pressure below 180 Torr.
At this point, the contact should close and there should be no resistance
between the two white wires.
WARNING
FIRE AND EXPLOSION
In accordance with IEC 60079-0: 2011 Clause 30.
Failure to ensure the area is safe or leaving the device powered on can cause
an explosion or fire and serious injury to personnel.
Do not open the Ex d enclosure unless the area is known to be free of
flammable materials or unless all devices are switched off.
2.5 Commissioning
Once the sensor is fully installed as described above, commission it
according to the commissioning plan agreed on between you and Emerson.
52 Rosemount CT5800
Page 53

October 2019 Quick Start Guide
3 Start-up procedure
3.1 Introduction
CAUTION
EQUIPMENT DAMAGE
Damage to the analyzer may result from a failure to follow this procedure.
Always follow the start-up procedure.
The analyzer normally operates continuously. It should only be necessary to
start up the analyzer under the following circumstances:
• When the analyzer is first switched on following installation.
• Following repair or maintenance.
• When the analyzer has been switched off as part of a plant shutdown or
maintenance.
3.2 Preparation for use
The analyzer must be installed and fully commissioned prior to startup.
WARNING
BURNS
Failure to allow sufficient cooling may cause serious burn injury to personnel.
Do not touch any part of the analyzer.
Assume all parts of the analyzer are hot unless it has been switched off
and allowed to cool down.
Some parts of the analyzer may be heated to 150 °F (65 °C).
Always wear proper protective equipment when handling the analyzer.
Switch off the analyzer and allow it to cool for at least two hours before
fitting, removing, or performing any maintenance.
The analysis cell is insulated against heat loss. Allow the analyzer to cool
for at least twelve hours before performing any maintenance on, or in
the vicinity of, the analysis cell.
Quick Start Guide 53
Page 54

Quick Start Guide October 2019
3.3 Startup procedure
NOTICE
The gases shown in the screenshots and the measurements thereof may be
different from those shown in your particular analyzer. They indicate the
functionality of the software, which is the same regardless of the gases being
measured.
NOTICE
To stop the startup procedure at any time, set the main circuit breaker to
OFF.
To start up the analyzer, perform the following steps:
Procedure
1. Visually inspect the exterior of the analyzer for signs of damage,
corrosion, gas leaks, or overheating. Report anything found to the
hazardous area Ex maintenance organization.
2. Make sure that the analyzer has been correctly installed.
See Install.
3. Make sure that the enclosure is closed and all bolts are correctly
torqued.
If the enclosure cannot be closed and locked, report it to the
maintenance organization and do not proceed further until the door
has been repaired.
4. Make sure that the gas handling system is turned OFF.
5. Make sure that the external circuit breaker is set to OFF.
6. Visually examine the gas ports to make sure that the sample supply
line and the sample return line are correctly attached to the analyzer.
7. Visually check that the electrical connections have been made to the
instrument.
8. Set the main circuit breaker to ON, which applies main power to the
instrument.
The analyzer begins its automatic startup. The control PC that forms
part of the instrument is configured to automatically load the
necessary gas sensor software and configuration files. The startup
sequence commences automatically under software control.
At the end of the startup procedure, the gas measurements initially appear
as 0.00 ppm until the first readings are taken. After a few seconds, the
initial gas concentrations will be displayed.
54 Rosemount CT5800
Page 55

October 2019 Quick Start Guide
4 Operating the analyzer
4.1 Introduction
This chapter describes the controls, displays, and indicators on the
Rosemount CT5800 and how to use the display controller located on the
front panel of the instrument.
NOTICE
The gases shown in the screenshots and the measurements may be different
from those shown in your particular analyzer. They indicate the functionality
of the software, which is the same regardless of the gases or gas
concentrations being measured.
4.2 Normal operation
The analyzer is designed for long term continuous operation, and therefore
its normal state is to be switched on and performing gas measurements. The
analyzer is usually only switched off for maintenance.
Figure 4-1: Gas Sensor Main Screen
Quick Start Guide 55
Page 56

Quick Start Guide October 2019
Figure 4-2: Pressure and Temperature Screen
4.3 Front panel controls and indicators
The analyzer is configured from the display controller located on the front
panel.
56 Rosemount CT5800
Page 57

October 2019 Quick Start Guide
Figure 4-3: Front Panel Display Controller
Quick Start Guide 57
Page 58

Quick Start Guide October 2019
4.4 Display controller
Figure 4-4: Front Panel Display Controller
A. LCD display
B. Navigation buttons
You can control the analyzer through six navigation buttons (Figure 4-4, B)
on the display controller.
The LCD display (A) can be used to display:
• Gas concentration measurements obtained
• Operating temperature and pressure
• Help screens
• Step-by-step calibration
• Diagnostics
The navigation buttons (B) are configured to perform different functions
according to which software screen is shown on the LCD display.
4.5
Gas Sensor Main screen
When the analyzer is switched on, at the end of the start-up procedure, the
Gas Sensor Main screen (Figure 4-5) appears.
The Gas Sensor Main screen is the screen that is normally displayed.
NOTICE
The gas concentrations shown in the following screenshots may be different
from those shown in your particular analyzer. The screenshots indicate the
functionality of the software, which is the same regardless of the gases or
gas concentrations being measured.
58 Rosemount CT5800
Page 59

October 2019 Quick Start Guide
Figure 4-5: Gas Sensor Main Screen
At the end of the start-up procedure, the gas measurements initially appear
as 0.00 ppm until the first readings are taken. After a few seconds, the
initial gas concentrations are displayed.
The Gas Sensor Main screen also shows the status of the analyzer. In the
example shown in the analyzer is Running and OK (i.e., no faults have been
identified).
If a fault is identified, ? is displayed; if maintenance is required, is
displayed.
To access other screens through the Main menu, press . (Refer to ).
is a link between the Gas Sensor Main screen () and the Pressure and
Temperature screen (Figure 4-6). Press to toggle between the two
screens.
is a link to the Help system. Press to go to a Help screen (described
in Help system).
On the Gas Sensor Main screen, has no function when the analyzer is
operating correctly. If, however, the software detects a fault, an error
message is displayed. Press to get further information on the error.
4.6
Quick Start Guide 59
Pressure and Temperature screen
The Pressure and Temperature screen (Figure 4-6) shows pressure and
temperature measurements taken inside the analyzer.
Page 60

Quick Start Guide October 2019
Figure 4-6: Pressure and Temperature Screen
NOTICE
A Torr is a non-SI unit of pressure defined as 1/760 of standard atmospheric
pressure and is equal to the fluid pressure of 1 mm of mercury.
4.7 Help system
The analyzer software includes a context-sensitive help system. Press ,
which is available on most of the software screens, to open the help system.
The help system contains a number of different Help screens, each
conveying a different message. As the help system is context-sensitive, the
Help screen that appears is the one that is most appropriate to the software
function engaged when was pressed. Figure 4-7 shows an example of a
Help screen.
60 Rosemount CT5800
Page 61

October 2019 Quick Start Guide
Figure 4-7: Example of a Help Screen
4.8 Main menu
To access the Main menu , press on either the Gas Sensor Main screen
(Figure 4-5) or the Pressure and Temperature screen (Figure 4-6). The Main
menu ( ) options are:
• DIAGNOSTICS: Displays various parameters used in the internal
calculations and compares desired and actual parameters, for example,
the analysis cell pressure and temperature. The diagnostics routines and
screens are used to perform fault diagnosis.
• FAULTS: Takes you to a screen that lists any faults affecting the analyzer.
This option is used as part of the failure diagnosis procedures.
• GAS SERVICE: Allows you to check the sensor readings against a known
gas source (verification) or, if necessary, to calibrate the analyzer against
that known gas source (calibration).
• DATA SERVICE: Takes you to a screen that allows data to be downloaded
from the instrument. The downloaded data is used to diagnose faults.
• SYSTEM: Takes you to a screen that allows the analyzer to be shut down
or displays the software versions.
4.9
Quick Start Guide 61
BACK button
On most of the software screens, the top left-hand button is configured
as a BACK button. Press BACK
to return to the previous screen.
Page 62

Quick Start Guide October 2019
A Spare parts list
Rosemount part number Description
P-6001-00012 Remote Ethernet I/O 2-port Etnet switch, 6 DIs and 6
P-6001-00013 ioLogik remote Ethernet I/O 4AO, 2-port Switch
E-4004-6303 Tested TEC 3 board
E-4004-8001 Tested TC5000 motherboard
E-4004-6201 Tested peripheral board with XStream display interface
P-6001-00027 Cartridge fuse, F, 5A
P-6001-00032 CTE8000 series 0-2 bar A, 0-5 V output, G⅛ in. BSP
P-6001-00036 Crydom SPST-NO solid state relay DIN rail mount, zero
P-6001-00030 1 output switch mode DIN rail panel mount power
P-6001-00037 PT100 lead assembly, 6 mm dia x 50 long
P-6001-00040 O2 detector
P-6001-00052 Detector
P-6001-00038 110 V Watlow cartridge ¼-in. (6.4 mm) OD x 7.5-in.
P-6001-00031 Hasselroth XSTREAM display screen
P-6000-00034 Enclosure sealing gasket (cut to length)
P-6000-00112 Hasselroth enclosure flame arrestor
relay
male
cross, 5 A rms, 15 V
supply, 12 Vdc, 10 A
(190.5 mm) x 200 W
62 Rosemount CT5800
Page 63

October 2019 Quick Start Guide
Quick Start Guide 63
Page 64

Quick Start Guide October 2019
B Engineering drawings
B.1 List of engineering drawings
Drawing number Description
W-2000-0038 (Sheets 1-5) Rosemount CT5800 Gas Analyzer
64 Rosemount CT5800
Page 65

2
1
3
4
5
6
7
8
DRG No:TEMPLATE: 7.3.3.00001-06REVISION:SAVED BY:
jchalmers
DATE LAST SAVED:
19-Oct-17 13:56
E
CASCADE TECHNOLOGIES LTD
GLENDEVON HOUSE-CASTLE BUSINESS PARK
STIRLING FK9 4TZ-UK
TERMINALS
THIS DRAWING AND DATA CONTAINED WITHIN IT ARE THE SOLE
PROPERTY OF CASCADE TECHNOLOGIES LTD, PART OF EMERSON
PROCESS MANAGEMENT AND CANNOT BE COPIED, COMMUNICATED
OR REPLICATED PARTIALLY OR IN ITS ENTIRETY WITHOUT
EXPRESSED WRITTEN CONSENT BY CASCADE TECHNOLOGIES LTD.
DO NOT ALTER
DO NOT SCALE
MANUALLY
GENERAL DRAWING PRACTICE TO ISO14617, PNEUMATIC SYMBOLS DRAWN
TO ISO1219-1, PIPING AND INSTRUMENTATION DIAGRAMS (P&ID) DRAWN TO
ISO 10628, WIRING DRAWN TO IEC61346 & ICS 19-2002, WHERE APPLICABLE,
CUSTOM SYMBOLS LISTED ON KEY PROVIDED, BLOCK DIAGRAMS CAN BE
INSERTED TO CLARIFY FUNCTIONALITY.
TERMINALS
TERMINALS
A3
D
TO DIGITAL
MODULES
2,5E
1
11
NO NO
3 4 5 6 7 8 9 10 11 12 13 14 15 16 17 18 19 20 21 22 23 24 25 26
C
12
13
C
14
15
NO
C
16
17
NO
C
18
DIGITAL OUTPUT
1 3 5 7 S
(OPTIONAL)
ANALOGUE OUTPUT
STATUS OUTPUT
19
NO
C
20
21
NO
NO
NO
NO
NO
NO
NO
2 4 6 8
INTERFACE
MODULE
+ + + + + + + +
NO
NO
NO
NO
SOCKET
C
22
23
C
24
25
C
26
27
C
28
29
C
30
31
C
32
33
C C
34
ETHERNET
35
- - - - - - - -
36
37
38
39
40
41
42
43
44
45
46
47
48
49
50
51
52
53
C
54
55
C
56
57
C
58
C
*
ETHERNET
TO MOXA
2,5C
2
TO ANALOGUE
MODULES
2,3C
3
TO STATUS
RELAYS
2,5C
4
B
RJ45 netwrok to the Moxa port
to the Moxa moudle at the Moxa module end and plug in the extrenal
W-2000-0038
1. To Connect to ethernet signal using muticore cable tails connect the
cable as per the above table
2. To connect to ethernet network using an RJ45 connector unplug the
ethernet cable, marked
*,
that goes from the ethernet interafce module
NON PERMISSIBLE
NOTES ;−
4 Not Used Blue
5 Not Used Blue/White
6 Rx− Green
7 Not Used Brown/White
8 Not Used Brown
B
A
DOCUMENT, UNAUTHORISED
CERTIFICATION RELATED
ALTERATION, STRICTLY
TERMINAL DESIGNATION COLOUR CODING
2 Tx− Orange
3 Rx+ Green/White
Tx+1
Orange/White
DESCRIPTION:
W-2000-0038
CT5800 GAS ANALYZER
SHEET OF
1,2A
1
BALLOON I.D. NO.
DRAWING SHEET LOC.
DRAWING SHEET NO.
5
DRAWING No:
1 2
F1
F2
CONNECTION
MAIN EARTH
REV.
B
DRAWN BY
CHECKED BY
ISSUE DATE
TERMINALS
1
2
E
E
MAINS INPUT
1
28/11/2016
JMC
??
E
D
TERMINALS
TO DIN
RAIL
2,5E
5
FILTER
MAINS
UNIT
3
4
EE
1516171819
20212223242526
ANALOGUE OUTPUT 2
ANALOGUE OUTPUT 3
ANALOGUE OUTPUT 4
ANALOGUE OUTPUT 5
ANALOGUE OUTPUT 6
ANALOGUE OUTPUT 7
ANALOGUE OUTPUT 8
STATUS OUTPUT 1 (Check Function)
STATUS OUTPUT 2 (Maintenance reqd.)
STATUS OUTPUT 3 (Out of Sepecification)
STATUS OUTPUT 4 (Failed)
C
1011121314
678
9
DGITAL OUTPUT 4
DGITAL OUTPUT 5
DGITAL OUTPUT 6
DGITAL OUTPUT 7
DGITAL OUTPUT 8
DGITAL OUTPUT 9
DGITAL OUTPUT 10
DGITAL OUTPUT 11
DGITAL OUTPUT 12
ANALOGUE OUTPUT 1
B
TERMINAL
342
5
2
1 SYSTEM SUPPLY (L)
DGITAL OUTPUT 1
DGITAL OUTPUT 2
DGITAL OUTPUT 3
SYSTEM SUPPLY (N)
USER CONNECTIONS
FUNCTION
A
Page 66

2
1
3
4
5
6
7
8
T
EMPLATE: 7.3.3.00001-06 REVISION:SAVED BY:
jchalmers
CASCADE TECHNOLOGIES LTD
GLENDEVON HOUSE-CASTLE BUSINESS PARK
STIRLING FK9 4TZ-UK
THIS DRAWING AND DATA CONTAINED WITHIN IT ARE THE SOLE
PROPERTY OF CASCADE TECHNOLOGIES LTD, PART OF EMERSON
PROCESS MANAGEMENT AND CANNOT BE COPIED, COMMUNICATED
OR REPLICATED PARTIALLY OR IN ITS ENTIRETY WITHOUT
EXPRESSED WRITTEN CONSENT BY CASCADE TECHNOLOGIES LTD.
GENERAL DRAWING PRACTICE TO ISO14617, PNEUMATIC SYMBOLS DRAWN
TO ISO1219-1, PIPING AND INSTRUMENTATION DIAGRAMS (P&ID) DRAWN TO
ISO 10628, WIRING DRAWN TO IEC61346 & ICS 19-2002, WHERE APPLICABLE,
CUSTOM SYMBOLS LISTED ON KEY PROVIDED, BLOCK DIAGRAMS CAN BE
INSERTED TO CLARIFY FUNCTIONALITY.
DATE LAST SAVED:
E
E
4
3
ioLogik E1214
20
21
22
R4_C
R5_NO
R5_C
ioLogik E1214
32
33
34
R4_C
R5_NO
R5_C
19-Oct-17 13:54
D
12V DC
V ADJ.
111213141516171819
DI0
DI1
DI2
DI3
DI4
DI5
GND
R0_NO
R0_C
R1_NO
R1_C
R2_NO
R2_C
R3_NO
R3_C
R4_NO
232425262728293031
DI0
DI1
DI2
DI3
DI4
DI5
GND
R0_NO
R0_C
R1_NO
R1_C
R2_NO
R2_C
R3_NO
R3_C
R4_NO
E
E
E
E
65(blk)
64(red)
MOXA
Port 2
Port 1
Ready
Power
COM
MOXA
Port 2
Port 1
Ready
Power
COM
E
C
−+−+
65
64
65
64
DRG No:
B
W-2000-0038
NON PERMISSIBLE
TO ANALOGUE
TERMINALS
OUTPUT
1,3C
3
ioLogik E1241
41424039383736
IO3+
IO3−
EX_V
EX−C
ioLogik E1241
49504847464544
IO3+
IO3−
EX_V
EX−C
65
64
12
11
51
52
53
54
55
56
57
58
14
12
11
14
12
11
14
12
11
14
3
6
3
3
5
3
3
4
4
IO0−
VO1+
VO1−
IO1+
IO1−
VO2+
VO2−
I02+
IO2−
VO3+
VO3−
IO0−
VO1+
VO1−
IO1+
IO1−
VO2+
VO2−
I02+
IO2−
VO3+
VO3−
0V
12V
DIG O/P RELAY
DIG O/P RELAY
DIG O/P RELAY
DIG O/P RELAY
13
1
14
2
13
1
14
2
L
N
MOTHER
BOARD
3,2B
TO
8
MOXA
35
Port 2
Port 1
Ready
VO0+
VO0−
IO0+
43
Port 2
Port 1
Ready
VO0+
VO0−
IO0+
65
64
A2
A1
A2
A1
A2
A1
A2
A1
A1
3
A2
4
A1
3
A2
4
E
3
4
65
−+−+
Power
64
MOXA
65
Power
64
68
69
70
71
72
73
74
75
59
60
61
62
B
A
DOCUMENT, UNAUTHORISED
CERTIFICATION RELATED
ALTERATION, STRICTLY
DO NOT ALTER
DO NOT SCALE
MANUALLY
CT5800 GAS ANALYZER
1,2A
DRAWING SHEET NO.
A3
DESCRIPTION:
W-2000-0038
B
SHEET OF
CHECKED BY
ISSUE DATE
1
BALLOON I.D. NO.
DRAWING SHEET LOC.
2
28/11/2016
JMC
??
5
1,6C
1,1D
5
TO MAINS
FILTER
UNIT
1,6D
1
6
TERMINAL
TERMINALS
TO MAINS
TO DIGITAL
EARTH
OUTPUT
DRAWING No:
3,6C
1,2D
14
TERMINAL
TO CELL
EARTH
BASE
1,4C
2
4
OUTPUT TERMINALS
INTERFACE
TO RJ45
TO STATUS
4,3B
3,7C
10
11
HEATERS
HEATERS
TO CELL
TO BOX
3,7A
3,2D
9
7
PERIPHERAL
MOTHER
BOARD
BOARD
TO
TO
REV.
DRAWN BY
E
D
C
B
A
Page 67

2
1
3
4
5
6
7
8
T
EMPLATE: 7.3.3.00001-06 REVISION:SAVED BY:
jchalmers
DATE LAST SAVED:
E
19-Oct-17 13:54
D
J5
C
+12/0/−12V
J6
CASCADE TECHNOLOGIES LTD
GLENDEVON HOUSE-CASTLE BUSINESS PARK
STIRLING FK9 4TZ-UK
TERMINALS
TO 12V DC
2,5A
20 Way Ribbon cable (6 off)
10 Way Ribbon cable
7
64(red)
65(blk)
B
DRG No:
W-2000-0038
NON PERMISSIBLE
B
A
DOCUMENT, UNAUTHORISED
CERTIFICATION RELATED
ALTERATION, STRICTLY
J1
TO MOXA
MODULE
TEC BOARD
MOTHERBOARD
J5 J6 J3 J4 J8 J9
2,3B
8
ETHERNET
J22 J23
123
GND
Tx
Rx
123
14Way Ribbon cable
64(red)
J17
J16
1 2
65(blk)
J10
THIS DRAWING AND DATA CONTAINED WITHIN IT ARE THE SOLE
PROPERTY OF CASCADE TECHNOLOGIES LTD, PART OF EMERSON
PROCESS MANAGEMENT AND CANNOT BE COPIED, COMMUNICATED
OR REPLICATED PARTIALLY OR IN ITS ENTIRETY WITHOUT
EXPRESSED WRITTEN CONSENT BY CASCADE TECHNOLOGIES LTD.
GENERAL DRAWING PRACTICE TO ISO14617, PNEUMATIC SYMBOLS DRAWN
TO ISO1219-1, PIPING AND INSTRUMENTATION DIAGRAMS (P&ID) DRAWN TO
ISO 10628, WIRING DRAWN TO IEC61346 & ICS 19-2002, WHERE APPLICABLE,
CUSTOM SYMBOLS LISTED ON KEY PROVIDED, BLOCK DIAGRAMS CAN BE
INSERTED TO CLARIFY FUNCTIONALITY.
J7
J2
J26
J32
J27
J33J34
READER
CARD
J20
20Way Ribbon cable
J701
J32
DO NOT ALTER
DO NOT SCALE
MANUALLY
CT5800 GAS ANALYZER
1,2A
DRAWING SHEET NO.
A3
DESCRIPTION:
W-2000-0038
DRAWING No:
9
10
DETECTOR
DETECTOR
MODULE
(Optional)
MODULE
1
2
HEATER RODS WIRED IN SERIES
FOR 240 V OPERATION
78
79
REV.
B
SHEET OF
1
BALLOON I.D. NO.
DRAWING SHEET LOC.
5
DRAWN BY
CHECKED BY
ISSUE DATE
3
28/11/2016
JMC
??
HEATER RODS WIRED IN PARALLEL
FOR 110 V OPERATION
GAS PRESSURE
SENSOR
81
80
83
GAS TEMP
SENSOR
DETECTOR
DETECTOR
MODULE
(Optional)
MODULE
1
2
GAS PRESSURE
SENSOR
GAS TEMP
SENSOR
MODULE
MODULE
LASER
MODULE
MODULE
LASER
TEMP
LASER
TEMP
LASER
CELL
CELL
PT 100
MODULE
MODULE
PLATE CTRL
76
77
PT
100
HEATER ROD 1
HEATER ROD 1
MODULE
LASER
PT
100
HEATER ROD 1
HEATER ROD 1
MODULE
LASER
BOX HEATER
THERMOSTAT
LASER
THERMOSTAT
LASER
RAIL EARTH
TERMINAL
TO DIN
2,5D
6
8
MODULE
MODULE
LASER
LASER
GAS CELL
6
8
MODULE
MODULE
LASER
LASER
GAS CELL
J31
BNC Cable
BNC Cable
14
8
8
1 2 3 4
8A
8
8A
8A
8A
4
8
4A
7A
4
4
4
61
62
CONTROL RELAY
59
TO HEATER
60
2,6C
11
8
8
8
1 2 3 4
1 2 3 4
4A
8A
4
4
2,6C
11
Insulated soldered joints
4 way mini fit to 4 way mini fit
110V operation link cable,
CONTROL RELAY
PERIPHERAL BOARD
J2
J51 J25
6
5
4
3
2
1
J50
J37
34
76
77
10
TO HEATER
USB
J24
1231234 12
83(Brn)
9
J703
J21
J12
65(blk)
64(red)
J11 J6 J5 J18
75
1 2
74
73
72
71
J23
70
69
68
2345678910
1
CLOCK
(5)
CHIP SEL
(1)
MOSI
(6)
MISO
(4)
GND
(9)
2,5A
9
4K7
(7)
J8
12345678910
J9
J1
56
J7
80(Blk)
81(Whi)
78
83
84
79
OUTPUT RELAYS
+5V
(8)
TO DIGITAL
RIBBON
CABLE
NOs.
4,6C
13
DISPLAY
TO HMI
E
D
C
B
A
Page 68

2
1
3
4
5
6
7
8
T
EMPLATE: 7.3.3.00001-06 REVISION:SAVED BY:
jchalmers
CASCADE TECHNOLOGIES LTD
GLENDEVON HOUSE-CASTLE BUSINESS PARK
STIRLING FK9 4TZ-UK
THIS DRAWING AND DATA CONTAINED WITHIN IT ARE THE SOLE
PROPERTY OF CASCADE TECHNOLOGIES LTD, PART OF EMERSON
PROCESS MANAGEMENT AND CANNOT BE COPIED, COMMUNICATED
OR REPLICATED PARTIALLY OR IN ITS ENTIRETY WITHOUT
EXPRESSED WRITTEN CONSENT BY CASCADE TECHNOLOGIES LTD.
DO NOT ALTER
DO NOT SCALE
MANUALLY
GENERAL DRAWING PRACTICE TO ISO14617, PNEUMATIC SYMBOLS DRAWN
TO ISO1219-1, PIPING AND INSTRUMENTATION DIAGRAMS (P&ID) DRAWN TO
ISO 10628, WIRING DRAWN TO IEC61346 & ICS 19-2002, WHERE APPLICABLE,
CUSTOM SYMBOLS LISTED ON KEY PROVIDED, BLOCK DIAGRAMS CAN BE
INSERTED TO CLARIFY FUNCTIONALITY.
A3
DATE LAST SAVED:
E
BOX HEATER PLATE (optional)
HEATER RODS WIRED IN SERIES
FOR 240 V OPERATION
HEATER RODS WIRED IN PARALLEL 110 V
BOX HEATER PLATE (optional)
OPERATION
VIEW FROM INSIDE FRONT COVER
19-Oct-17 13:53
HEATER ROD 1
HEATER ROD 1
HEATER ROD 1
HEATER ROD 1
D
THERMOSTAT
THERMOSTAT
C
7
5
7
7A
7A
4
7
5
7
1 2 3 4
4A
7
4A
4A
4
4A
4
DRG No:
B
7
7
1 2 3 4
7A
7A
4
4
2,6C
10
CONTROL RELAY
TO HEATER
7
7
1 2 3 4
4
4
2,6C
10
Insulated soldered joints
4 way mini fit to 4 way mini fit
110V operation link cable,
CONTROL RELAY
TO HEATER
+5V
GND
10
W-2000-0038
NON PERMISSIBLE
DISPLAY
H.M.I.
CHIP SET
DSP3V3
CLOCK
MOSI
MISO
123456789
B
A
DOCUMENT, UNAUTHORISED
CERTIFICATION RELATED
ALTERATION, STRICTLY
DESCRIPTION:
W-2000-0038
CT5800 GAS ANALYZER
1,2A
1
BALLOON I.D. NO.
DRAWING SHEET LOC.
DRAWING SHEET NO.
DRAWING No:
TO PERIPHERAL
BOARD
3,7A
13
REV.
B
SHEET OF
DRAWN BY
CHECKED BY
ISSUE DATE
4
28/11/2016
JMC
??
5
E
D
C
10 Way Ribbon cable
B
A
Page 69

2
1
3
4
5
6
7
8
T
EMPLATE: 7.3.3.00001-06 REVISION:SAVED BY:
jchalmers
CASCADE TECHNOLOGIES LTD
GLENDEVON HOUSE-CASTLE BUSINESS PARK
STIRLING FK9 4TZ-UK
THIS DRAWING AND DATA CONTAINED WITHIN IT ARE THE SOLE
PROPERTY OF CASCADE TECHNOLOGIES LTD, PART OF EMERSON
PROCESS MANAGEMENT AND CANNOT BE COPIED, COMMUNICATED
OR REPLICATED PARTIALLY OR IN ITS ENTIRETY WITHOUT
EXPRESSED WRITTEN CONSENT BY CASCADE TECHNOLOGIES LTD.
GENERAL DRAWING PRACTICE TO ISO14617, PNEUMATIC SYMBOLS DRAWN
TO ISO1219-1, PIPING AND INSTRUMENTATION DIAGRAMS (P&ID) DRAWN TO
ISO 10628, WIRING DRAWN TO IEC61346 & ICS 19-2002, WHERE APPLICABLE,
CUSTOM SYMBOLS LISTED ON KEY PROVIDED, BLOCK DIAGRAMS CAN BE
INSERTED TO CLARIFY FUNCTIONALITY.
DATE LAST SAVED:
E
19-Oct-17 13:50
D
C
B
DRG No:
W-2000-0038
B
A
ALTERATION, STRICTLY
RELATED DOCUMENT,
NON PERMISSIBLE
UNAUTHORISED
CERTIFICATION
DO NOT ALTER
DO NOT SCALE
MANUALLY
CT5800 GAS ANALYSER
1,2A
DRAWING SHEET NO.
A3
DESCRIPTION:
W-2000-0038
DRAWING No:
REV.
B
SHEET OF
1
BALLOON I.D. NO.
DRAWING SHEET LOC.
5
DRAWN BY
CHECKED BY
ISSUE DATE
5
23/MAR/2016
JMC
??
E
D
C
B
A
Page 70

October 2019 Quick Start Guide
Quick Start Guide 65
Page 71

Quick Start Guide October 2019
66 Rosemount CT5800
Page 72

CASCADE TECHNOLOGIES
Glendevon House
Castle Business Park
Stirling FK9 4TZ
Scotland
+44 1786 447 721
+44 1786 475 822
cascade.support@emerson.com
*00825-0100-5800*
Quick Start Guide
00825-0100-5800, Rev. AA
October 2019
AMERICAS
Emerson Automation Solutions
10241 West Little York, Suite 200
Houston, TX 77040 USA
Toll Free 866 422 3683
+1 713 396 8880 (North America)
+1 713 396 8759 (Latin America)
+1 713 466 8175
cascade.support@emerson.com
MIDDLE EAST AND AFRICA REGIONAL
OFFICE
Emerson Automation Solutions
Emerson FZE
Jebel Ali Free Zone
Dubai, United Arab Emirates, P.O. Box
17033
+971 4 811 8100
+971 4 886 5465
cascade.support@emerson.com
Linkedin.com/company/Emerson-
Automation-Solutions
twitter.com/rosemount_news
Facebook.com/Rosemount
youtube.com/RosemountMeasurement
EUROPE REGIONAL OFFICE
Emerson Automation Solutions
Neuhofstrasse 19a PO Box 1046
CH-6340 Baar
Switzerland
+41 (0) 41 768 6111
+41 (0) 41 768 6300
cascade.support@emerson.com
ASIA-PACIFIC REGIONAL OFFICE
Emerson Automation Solutions
1 Pandan Crescent
Singapore 128461
Republic of Singapore
+65 6 777 8211
+65 6 777 0947
cascade.support@emerson.com
©
2019 Emerson. All rights reserved.
The Emerson logo is a trademark and service
mark of Emerson Electric Co. Rosemount is a
mark of one of the Emerson family of companies.
All other marks are the property of their
respective owners.
 Loading...