

Page 1

Rosemount 751 Field Signal Indicator
Reference Manual
00809-0100-4378, Rev CE
February 2014
Page 2

Page 3
Reference Manual
NOTICE
00809-0100-4378, Rev CE
Rosemount 751 Field Signal Indicator
Title Page
February 2014
Read this manual before working with the product. For personal and system safety, and for
optimum product performance, make sure you thoroughly understand the contents before
installing, using, or maintaining this product.
Within the United States, Rosemount Inc. has two toll-free assistance numbers:
Customer Central
Technical support, quoting, and order-related questions.
1-800-999-9307 (7:00 am to 7:00 pm CST)
North American Response Center
Equipment service needs.
1-800-654-7768 (24 hours—includes Canada)
Outside of the United States, contact your local Emerson Process Management
representative.
The products described in this document are NOT designed for nuclear-qualified
applications. Using non-nuclear qualified products in applications that require
nuclear-qualified hardware or products may cause inaccurate readings.
For information on Rosemount nuclear-qualified products, contact your local Emerson
Process Management Sales Representative.
1
Page 4

Page 5

Reference Manual
00809-0100-4378, Rev CE
1Section 1: Introduction
2Section 2: Installation
Table of Contents
February 2014
1.1 LCD display . . . . . . . . . . . . . . . . . . . . . . . . . . . . . . . . . . . . . . . . . . . . . . . . . . . . . . . . . . . .3
1.2 Analog meter . . . . . . . . . . . . . . . . . . . . . . . . . . . . . . . . . . . . . . . . . . . . . . . . . . . . . . . . . .4
1.3 Service support. . . . . . . . . . . . . . . . . . . . . . . . . . . . . . . . . . . . . . . . . . . . . . . . . . . . . . . . .5
1.4 Product recycling/disposal . . . . . . . . . . . . . . . . . . . . . . . . . . . . . . . . . . . . . . . . . . . . . . .5
2.1 Assembly . . . . . . . . . . . . . . . . . . . . . . . . . . . . . . . . . . . . . . . . . . . . . . . . . . . . . . . . . . . . . . 7
2.2 Wiring diagrams . . . . . . . . . . . . . . . . . . . . . . . . . . . . . . . . . . . . . . . . . . . . . . . . . . . . . . . .9
2.3 LCD display configuration. . . . . . . . . . . . . . . . . . . . . . . . . . . . . . . . . . . . . . . . . . . . . . .11
2.3.1 Remove the cover. . . . . . . . . . . . . . . . . . . . . . . . . . . . . . . . . . . . . . . . . . . . . . . .11
2.3.2 Position the decimal point and select the meter function . . . . . . . . . . . . .11
2.3.3 Store the information . . . . . . . . . . . . . . . . . . . . . . . . . . . . . . . . . . . . . . . . . . . .12
2.3.4 Set the display equivalent to a 4 mA signal . . . . . . . . . . . . . . . . . . . . . . . . . .12
2.3.5 Set the display equivalent to a 20 mA signal . . . . . . . . . . . . . . . . . . . . . . . . .12
2.3.6 Replace the cover . . . . . . . . . . . . . . . . . . . . . . . . . . . . . . . . . . . . . . . . . . . . . . . .12
AAppendix A: Reference data
A.1 Housing specifications . . . . . . . . . . . . . . . . . . . . . . . . . . . . . . . . . . . . . . . . . . . . . . . . .13
A.1.1 Physical specifications . . . . . . . . . . . . . . . . . . . . . . . . . . . . . . . . . . . . . . . . . . . .13
A.2 LCD display specifications. . . . . . . . . . . . . . . . . . . . . . . . . . . . . . . . . . . . . . . . . . . . . . .14
A.2.1 Functional specifications. . . . . . . . . . . . . . . . . . . . . . . . . . . . . . . . . . . . . . . . . .14
A.2.2 Performance specifications. . . . . . . . . . . . . . . . . . . . . . . . . . . . . . . . . . . . . . . .15
A.2.3 Physical specification . . . . . . . . . . . . . . . . . . . . . . . . . . . . . . . . . . . . . . . . . . . . .15
A.3 Analog meter specifications. . . . . . . . . . . . . . . . . . . . . . . . . . . . . . . . . . . . . . . . . . . . .16
A.3.1 Functional specifications. . . . . . . . . . . . . . . . . . . . . . . . . . . . . . . . . . . . . . . . . .16
A.3.2 Performance specifications. . . . . . . . . . . . . . . . . . . . . . . . . . . . . . . . . . . . . . . .16
A.3.3 Physical specification . . . . . . . . . . . . . . . . . . . . . . . . . . . . . . . . . . . . . . . . . . . . .16
A.4 Dimensional drawings. . . . . . . . . . . . . . . . . . . . . . . . . . . . . . . . . . . . . . . . . . . . . . . . . .17
A.5 Ordering information . . . . . . . . . . . . . . . . . . . . . . . . . . . . . . . . . . . . . . . . . . . . . . . . . .18
BAppendix B: Product Certifications
B.1 European directive information. . . . . . . . . . . . . . . . . . . . . . . . . . . . . . . . . . . . . . . . . .21
B.2 Ordinary location certification for FM approvals . . . . . . . . . . . . . . . . . . . . . . . . . . .21
B.2.1 North America . . . . . . . . . . . . . . . . . . . . . . . . . . . . . . . . . . . . . . . . . . . . . . . . . . .21
B.2.2 . . . . . . . . . . . . . . . . . . . . . . . . . . . . . . . . . . . . . . . . . . . . . . . . . . . . . . . . . Europe22
Table of Contents
B.2.3 International . . . . . . . . . . . . . . . . . . . . . . . . . . . . . . . . . . . . . . . . . . . . . . . . . . . .22
CAppendix C: Approval drawings
C.1 Declaration of conformity . . . . . . . . . . . . . . . . . . . . . . . . . . . . . . . . . . . . . . . . . . . . . .34
1
Page 6

Page 7

Reference Manual
00809-0100-4378, Rev CE
Section 1 Introduction
LCD display . . . . . . . . . . . . . . . . . . . . . . . . . . . . . . . . . . . . . . . . . . . . . . . . . . . . . . . . . . . . . . . . . page 3
Analog meter . . . . . . . . . . . . . . . . . . . . . . . . . . . . . . . . . . . . . . . . . . . . . . . . . . . . . . . . . . . . . . . page 4
Service support . . . . . . . . . . . . . . . . . . . . . . . . . . . . . . . . . . . . . . . . . . . . . . . . . . . . . . . . . . . . . page 5
Product recycling/disposal . . . . . . . . . . . . . . . . . . . . . . . . . . . . . . . . . . . . . . . . . . . . . . . . . . . page 5
The Rosemount 751 Field Signal Indicators provide a means of displaying important process
variables. These devices operate with any two-wire transmitter that measures input variables
such as pressure, flow, liquid level, or temperature. Rosemount indicators are ideal for
installations where an integral meter would be difficult to view.
Rosemount 751 Indicators are designed for use in industrial environments where all-weather
performance is necessary. These units are vibration- and corrosion-resistant, and explosion-proof or intrinsically safe. An LCD display or analog meter may be ordered to meet specific
application requirements.
Section 1: Introduction
February 2014
1.1 LCD display
The LCD display requires an analog 4–20 mA dc output from a two-wire transmitter. It may be
configured from a 4 mA point of –999 to 1000 and a 20 mA point of -999 to 9999. The sum of
the 4 mA point and the span must not exceed 9999. The decimal point can be placed in any of
three positions (X.X.X.X) or not used. Calibration adjustments are made using noninteractive
zero and span buttons. The scaled meter may be labelled with the appropriate engineering
units. A twenty-segment bar graph, on the bottom of the meter faceplate, represents the 4–20
mA signal directly.
The large 2
Figure 1-1. The 4 and 20 mA points may be changed by pressing the buttons on the meter
faceplate. The meter can be rotated in 90-degree increments within the enclosure for
convenient viewing.
Figure 1-1. LCD display
1
/4-inch meter face has 1/2-inch-high characters for easy readability as shown in
LCD display
Introduction
3
Page 8

Section 1: Introduction
PERCENT
0
20
40
60
80
100
February 2014
1.2 Analog meter
The analog meter requires an analog 4–20 mA dc, 10–50 mA dc, or 40–200 mV dc transmitter
output from a two-wire transmitter. Several meter calibration options are available to suit the
requirements of a particular application. Linear 0 to 100 percent meter scaling is adequate for
the majority of applications. A logarithmic 0 to 100 percent scale is available for use with flow
transmitters. As an option, the user can specify special meter scaling for direct readout in psi,
gph, °F, °C, or other convenient engineering units.
Reference Manual
00809-0100-4378, Rev CE
The large 2
1
/4-inch diameter meter face has a two-inch long scale for easy readability as shown in
Figure 1-2. A meter-zero adjustment is located on the meter faceplate. The meter can be
rotated in 90° increments within the enclosure for convenient viewing.
Figure 1-2. Analog Meter
Analog Meter Face
4
Introduction
Page 9
Reference Manual
00809-0100-4378, Rev CE
1.3 Service support
To expedite the return process outside of the United States, contact the nearest Emerson
Process Management representative.
Within the United States, call the Emerson Process Management Instrument and Valves
Response Center using the 1-800-654-RSMT (7768) toll-free number. This center, available 24
hours a day, will assist you with any needed information or materials.
The center will ask for product model and serial numbers, and will provide a Return Material
Authorization (RMA) number. The center will also ask for the process material to which the
product was last exposed.
Individuals who handle products exposed to a hazardous substance can avoid injury if they
are informed of and understand the hazard. If the product being returned was exposed to a
hazardous substance as defined by OSHA, a copy of the required Material Safety Data Sheet
(MSDS) for each hazardous substance identified must be included with the returned goods.
Section 1: Introduction
February 2014
Emerson Process Management Instrument and Valves Response Center representatives will
explain the additional information and procedures necessary to return goods exposed to
hazardous substances.
1.4 Product recycling/disposal
Recycling of equipment and packaging should be taken into consideration and disposed of in
accordance with local and national legislation/regulations.
Introduction
5
Page 10

Page 11
Reference Manual
A
B
C
D
E
F
G
H
I
J
K
L
M
N
00809-0100-4378, Rev CE
Section 2 Installation
Assembly . . . . . . . . . . . . . . . . . . . . . . . . . . . . . . . . . . . . . . . . . . . . . . . . . . . . . . . . . . . . . . . . . . page 7
Wiring diagrams . . . . . . . . . . . . . . . . . . . . . . . . . . . . . . . . . . . . . . . . . . . . . . . . . . . . . . . . . . . . page 9
LCD display configuration . . . . . . . . . . . . . . . . . . . . . . . . . . . . . . . . . . . . . . . . . . . . . . . . . . . . page 11
2.1 Assembly
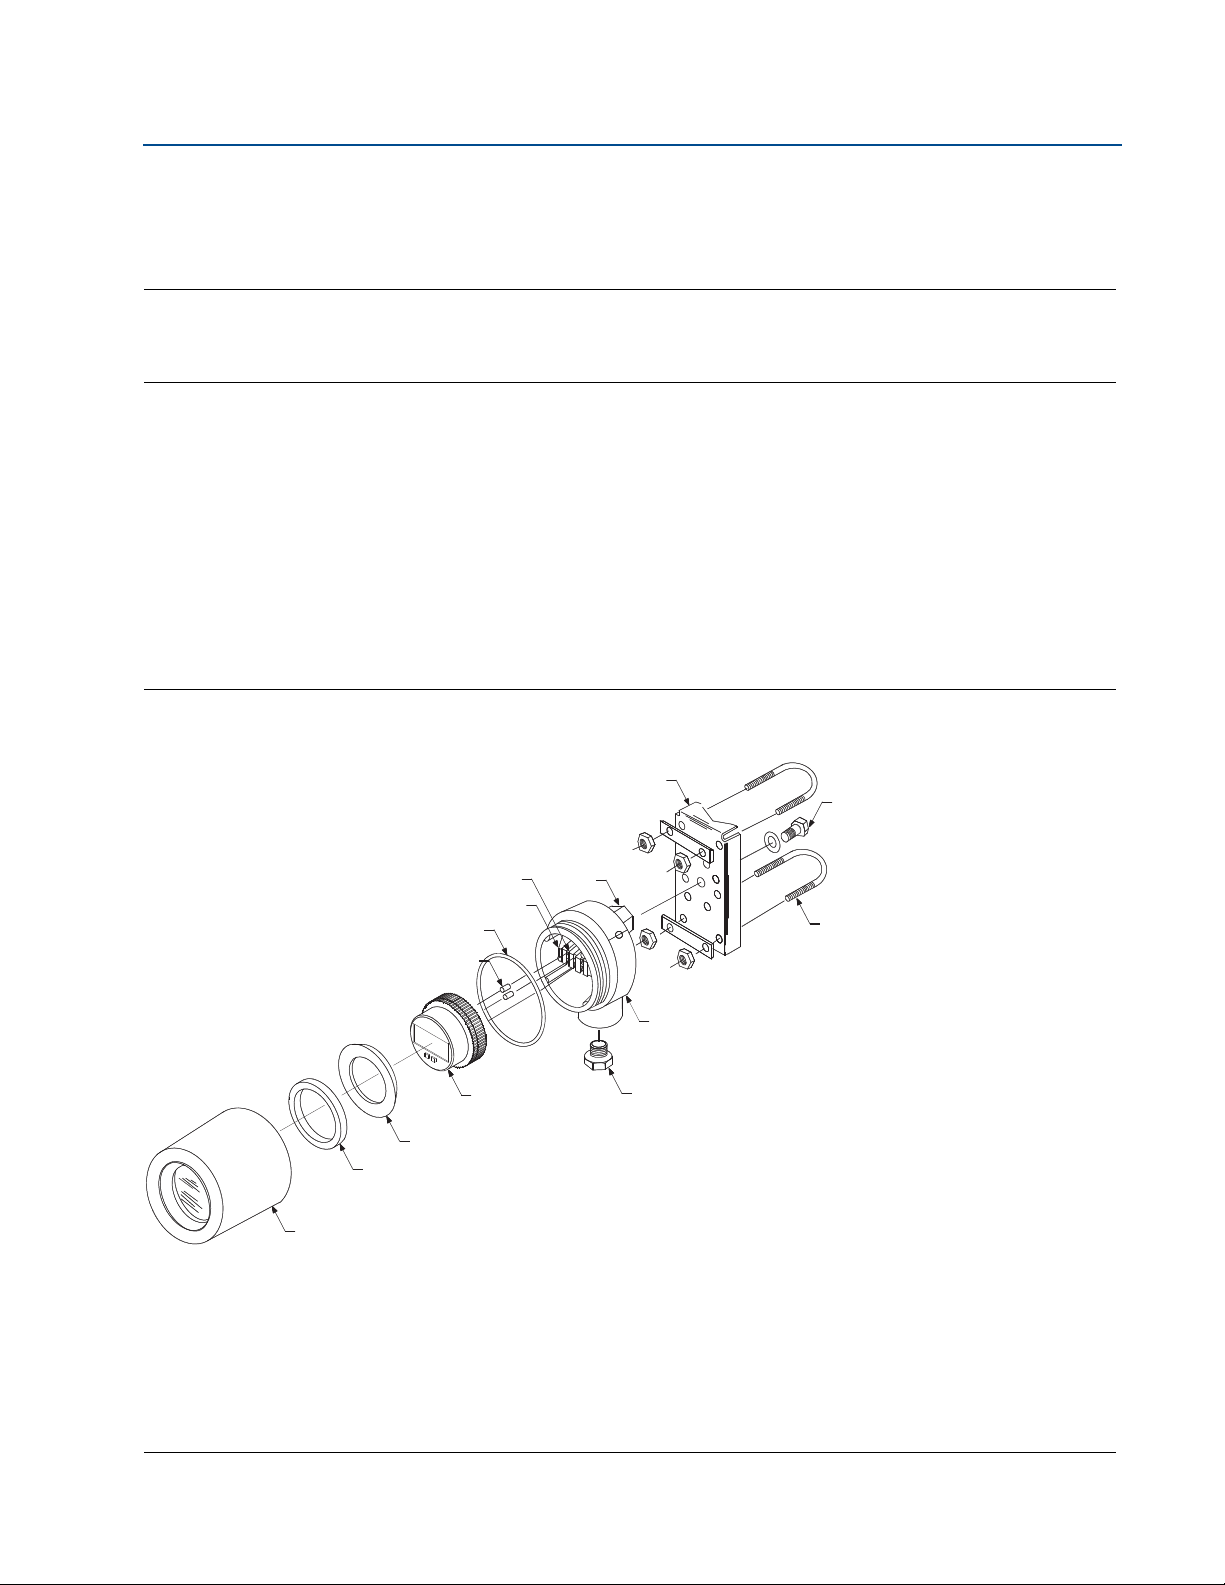
The Rosemount 751 Field Signal Indicator is comprised of the components shown in Figure 2-1.
The housing may contain an analog or LCD display. Both meters are independent of component
parts and are completely interchangeable. Both meters plug into the terminal screws on the
housing, as shown in Figure 2-1.
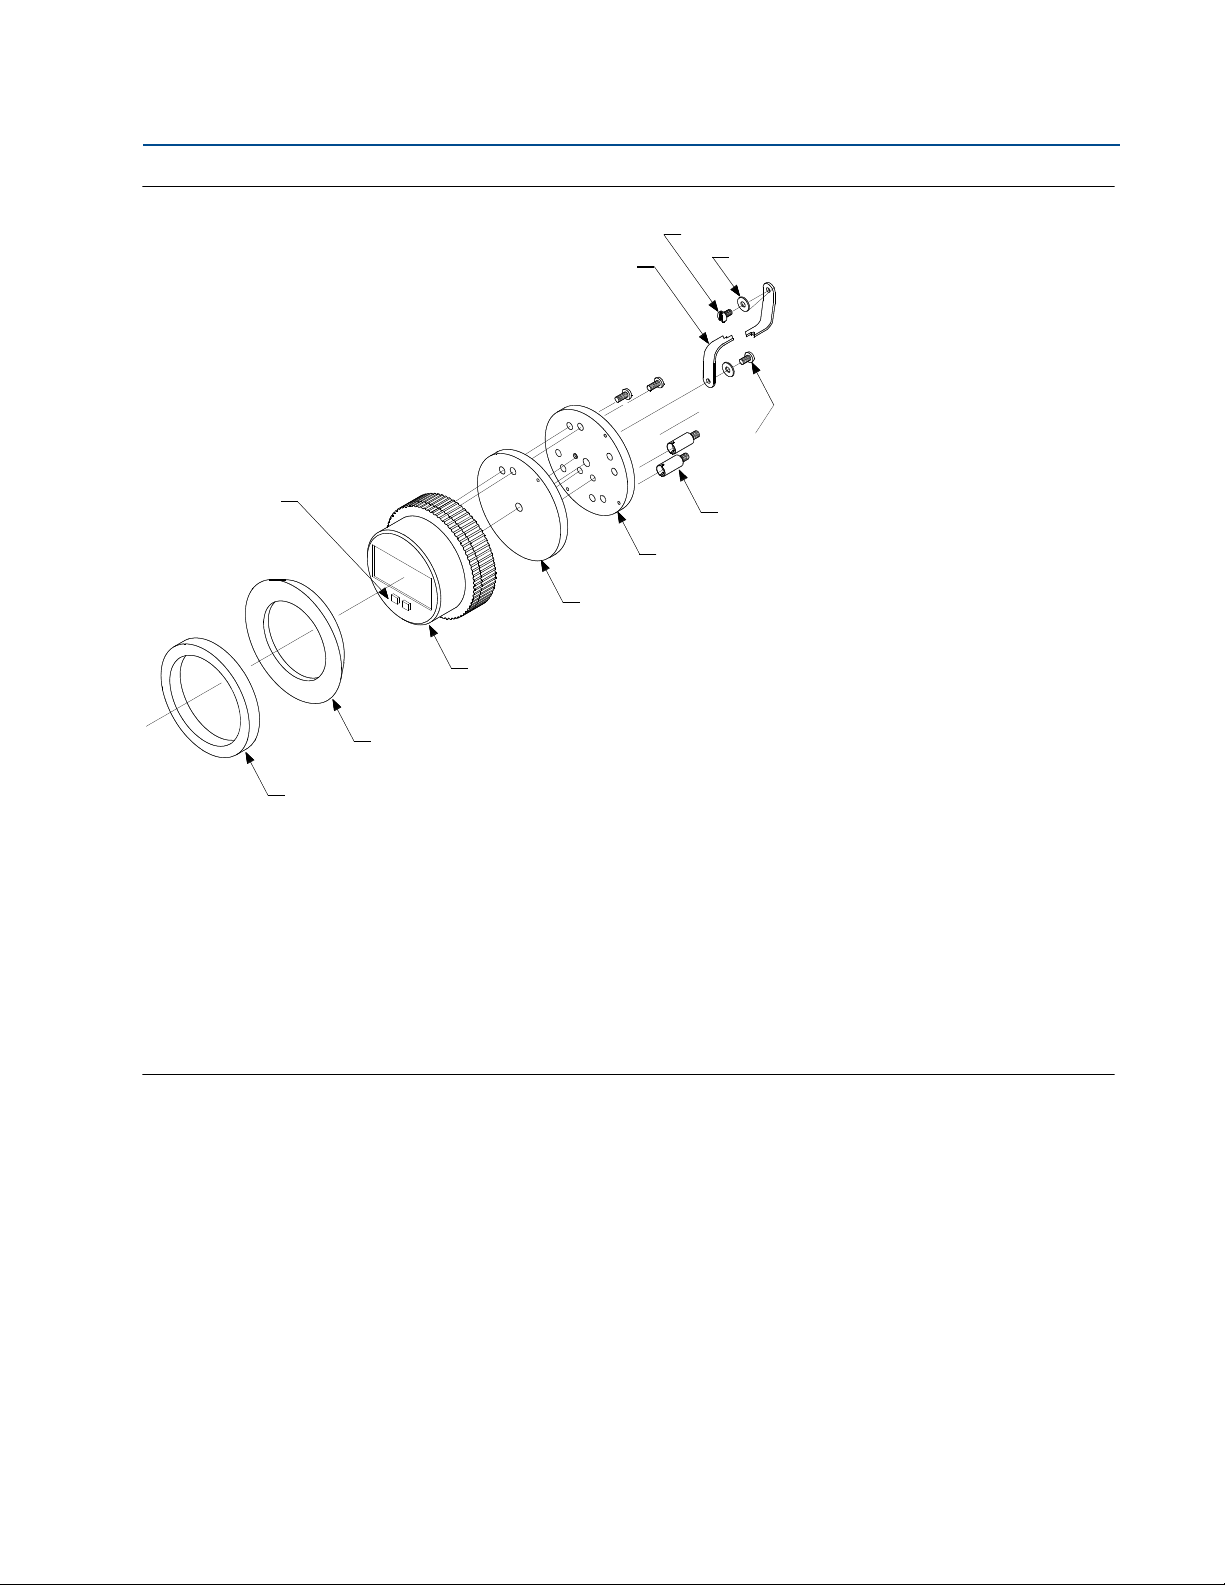
The meter subassembly contains the components shown in Figure 2-2.
Section 2: Installation
February 2014
Figure 2-1. Rosemount 751 Exploded View
A. Terminal Screws
B. Housing O-Ring
C. Field Wiring Terminals
D. Loop Protection Diode
E. Tapped Mounting Boss
F. Optional Mounting Bracket
G. Mounting Bolt with Washer
H. U-Bolt for 2-inch Pipe
I. Housing
J. Optional ¾ to ½-inch Conduit Reducing Bushing (if required)
K. Meter
L. Bushing
M. Foam Spacer
N. Housing Cover
7Installation
Page 12
Section 2: Installation
A
B
C
D
K
J
I
H
G
F
E
February 2014
Figure 2-2. LCD display exploded view
Reference Manual
00809-0100-4378, Rev CE
A. Retaining Straps
B. Mounting Screw into Housing
C. Washer for Retaining Strap
D. Mounting Screws into Mounting Plate
E. Terminal Screws (2)
F. Mounting Plate
G. Spacer Plate
H. LCD Display
I. Bushing
J. Foam Spacer
K. Configuration Buttons
8
Installation
Page 13
Reference Manual
Power Supply
Power Supply
751
4–20 dc Input Signal for
Rosemount 2051
4–20 mA dc Input Signal for
Rosemount 3144P
+
+
–
–
Optional Ground
Load Resistor
T
2051
+
–
+
–
3144P
Optional Ground
Load Resistor
–
+
T
751
+
–
Power Supply
Power Supply
4–20 dc Input Signal for
Rosemount 3051S
4–20 mA dc Input Signal for
Rosemount 3051C
+
+
–
–
Optional Ground
Load Resistor
T
3051C
751
+
–
+
+
–
–
Optional Ground
Load Resistor
T
3051S
751
+
–
00809-0100-4378, Rev CE
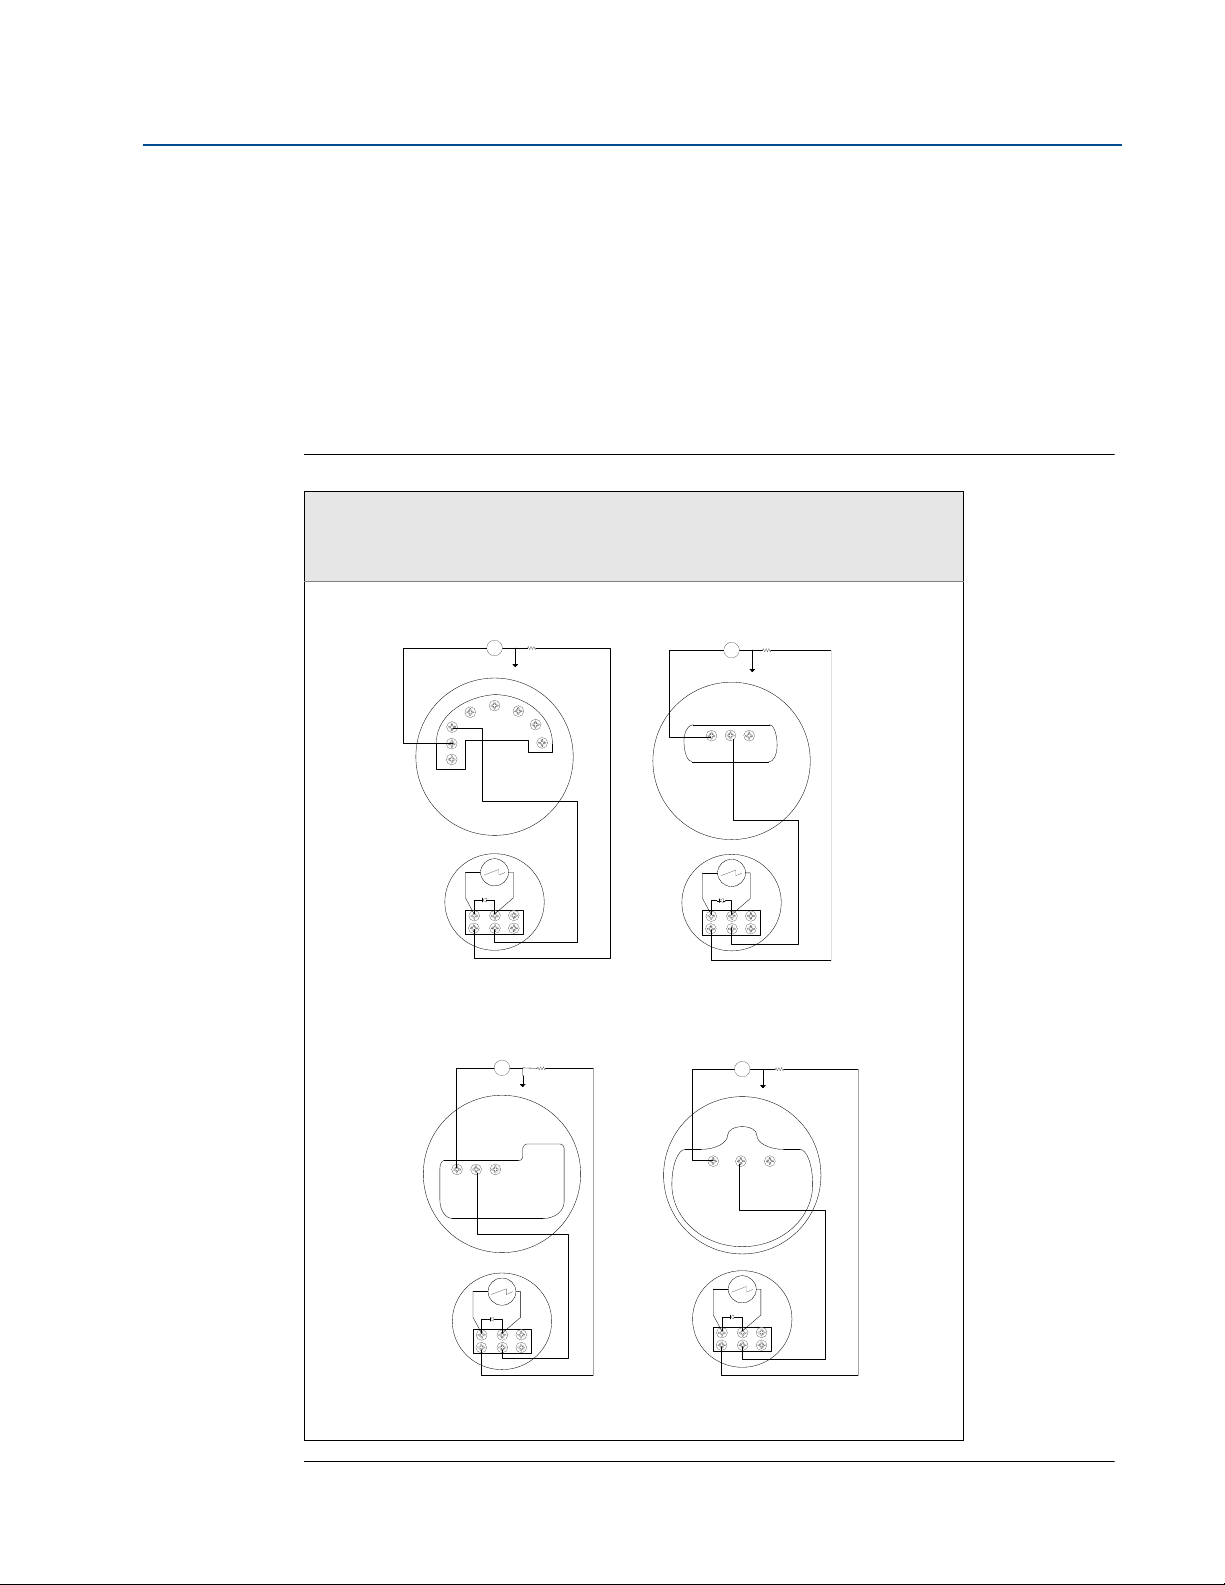
2.2 Wiring diagrams
Use the following wiring diagrams to wire the Rosemount 751 Field Signal Indicator, in series or
in parallel, with Rosemount transmitters. Use shielded cable for best results in electrically noisy
environments.
It is recommended that the 751 indicator be wired in a series configuration when the 4-20 mA
transmitter does not contain a test terminal. The 751 is designed so the analog or LCD display
can be removed from the housing without impacting the integrity of the 4-20 mA loop.
Removal of the entire 751 device from the series configuration will disrupt the loop.
Figure 2-3. Rosemount 751 Series Wiring Diagrams
Series Wiring Diagrams for Rosemount 3144P Temperature
transmitters and Rosemount 2051, 3051C, or 3051S Pressure
Section 2: Installation
February 2014
Tra ns mitt er s
Installation
9
Page 14

Section 2: Installation
Power Supply
Power Supply
751
4–20 dc Input Signal for
Rosemount 2051
4–20 mA dc Input Signal for
Rosemount 3144P
+
+
–
–
Optional Ground
Load
Resistor
T
2051
+
–
+
–
3144P
Optional Ground
Load
Resistor
–
+
T
751
+
–
Power Supply
Power Supply
4–20 dc Input Signal for
Rosemount 3051S
4–20 mA dc Input Signal for
Rosemount 3051C
+
+
–
–
Optional Ground
Load
Resistor
T
3051C
751
+
–
+
+
–
–
Optional Ground
Load
Resistor
T
3051S
751
+
–
3051C
4–20 mA dc Input Signal for
Rosemount 3051C
February 2014
It is recommended that the 751 indicator be wired in a parallel configuration when the 4-20 mA
transmitter includes a test terminal. Utilization of the test terminal is required in a parallel
configuration. Connecting the 751 indicator across the positive and negative terminals of the
4-20 mA transmitter could impact the loop.
A parallel configuration will allow the removal of the 751 indicator without affecting the
integrity of the 4-20 mA loop. Additionally, spare 751 indicators can be added without
disrupting the loop.
Figure 2-4. Rosemount 751 Parallel Wiring Diagrams
Reference Manual
00809-0100-4378, Rev CE
Parallel Wiring Diagrams for Rosemount 3144P Temperature
Tra ns mitt er
and Rosemount 2051, 3051C or 3051S Pressure Transmitters
10
Installation
Page 15

Reference Manual
00809-0100-4378, Rev CE
2.3 LCD display configuration
The 20-segment bar graph is factory calibrated and represents 4–20 mA directly, but the end
points of the LCD display are user-definable. The meter requires a current between 4 and 20 mA
in order to be scaled, but the actual value of the current is not significant.
2.3.1 Remove the cover
Explosions can result in death or serious injury. Do not remove the instrument cover in
explosive environments when the circuit is alive.
1. Unscrew and remove the transparent housing cover from the
LCD display body.
Note
The LCD display time-out is approximately 16 seconds. If you do not press the configuration
buttons within 16 seconds, the indicator will revert to reading the current signal.
Section 2: Installation
February 2014
2.3.2 Position the decimal point and select the meter function
1. Press the left and right configuration buttons simultaneously and release them
immediately.
2. To move the decimal point to the desired location, press the left configuration button.
Note that the decimal point wraps around.
3. To scroll through the mode options, press the right configuration button repeatedly
until the meter displays the desired mode (See Ta bl e 2 -1 ).
Table 2-1. LCD display mode options
Options Relationship between input signal and digital display
L in Linear
LinF Linear with five-second filter
Srt Square root
SrtF Square root with five-second filter
Square root function only relates to the digital display. The bar graph output remains linear
with the current signal.
Square root response
The digital display will be proportional to the square root of the input current where 4 mA = 0
and 20 mA = 1.0, scaled per the calibration procedure. The transition point from linear to
square root is at 25 percent of full scale flow.
Installation
Filter response operates upon “present input” and “input received in the previous five second
interval” in the following manner:
Display = (0.75 ⫻ previous input) + (0.25 ⫻ present input)
This relationship is maintained provided that the previous reading minus the present reading
is less than 25 percent of full scale.
11
Page 16

Section 2: Installation
February 2014
2.3.3 Store the information
1. Press both configuration buttons simultaneously for two seconds.
Note
The meter displays “- -” for approximately 7.5 seconds while the information is being stored.
2.3.4 Set the display equivalent to a 4 mA signal
1. Press the left configuration button for two seconds.
2. To decrease the display numbers, press the left configuration button. To increase the
numbers, press the right configuration button. Set the numbers between –999 and
1000.
3. To store the information, simultaneously press both configuration buttons for two
seconds.
2.3.5 Set the display equivalent to a 20 mA signal
Reference Manual
00809-0100-4378, Rev CE
1. Press the right configuration button for two seconds.
2. To decrease the display numbers, press the left configuration button. To increase the
numbers, press the right configuration button. Set the numbers between –999 and
9999.
Note
The sum of the 4 mA point and the span must not exceed 9999.
3. To store the information, simultaneously press both configuration buttons for two
seconds. The LCD display is now configured.
2.3.6 Replace the cover
1. Make sure the rubber gasket is seated properly, and thread the transparent housing
cover onto the LCD display body.
12
Installation
Page 17

Reference Manual
00809-0100-4378, Rev CE
Appendix A Reference data
Housing specifications . . . . . . . . . . . . . . . . . . . . . . . . . . . . . . . . . . . . . . . . . . . . . . . . . . . . . . . page 13
LCD display specifications . . . . . . . . . . . . . . . . . . . . . . . . . . . . . . . . . . . . . . . . . . . . . . . . . . . . page 14
Analog meter specifications . . . . . . . . . . . . . . . . . . . . . . . . . . . . . . . . . . . . . . . . . . . . . . . . . . page 16
Dimensional drawings . . . . . . . . . . . . . . . . . . . . . . . . . . . . . . . . . . . . . . . . . . . . . . . . . . . . . . . page 17
Ordering information . . . . . . . . . . . . . . . . . . . . . . . . . . . . . . . . . . . . . . . . . . . . . . . . . . . . . . . . page 18
A.1 Housing specifications
A.1.1 Physical specifications
Appendix A: Reference Data
February 2014
Materials of construction
Enclosure
Low-copper aluminum
Paint
Polyurethane
O-rings
Buna N
Meter mounting materials
Noryl® plastic
Electrical connections
3-pole terminal block with 8–32 nickel-plated brass screw terminals, with 3/4–14 NPT conduit.
(Stainless steel
3
1
/4- to
/2-inch reducer available as an option.)
Enclosure rating
NEM A Type 4x . CSA Type 4x . IP66.
Weight
Indicator only: 1.8 kg (4 lb)
Indicator with optional mounting bracket: 2.27 kg (5 lb)
13Reference Data
Page 18

Appendix A: Reference Data
February 2014
A.2 LCD display specifications
A.2.1 Functional specifications
Input signal
4–20 mA dc
Display
4 mA point limits
–999 to 1000
20 mA point limits
-999 to 9999
The sum of the 4 mA point and span must not exceed 9999. Adjustments are made using
non-interactive zero and span buttons.
Reference Manual
00809-0100-4378, Rev CE
Display options
Standard display response is linear with mA input. Optional square root or filtered response may
be selected.
Overload limitations
666 mA, maximum
Temperature limits
Storage
–40 to 85 °C (–40 to 185 °F)
Operating
–40 to 70 °C (–40 to 158 °F)
(1)
Humidity limitation
0 to 95% non-condensing relative humidity
Update period
750 ms
(1) For temperatures below -20 °C or above 60 °C the LCD may not be readable, but the loop will remain intact and the LCD will not
be damaged.
14
Reference Data
Page 19

Reference Manual
00809-0100-4378, Rev CE
Response time
Responds to changes in input within a maximum of two update periods. If the filter is activated,
then the display responds to the change within nine update periods.
Voltage drop
0.7 Vdc typical, 1.0 Vdc maximum
A.2.2 Performance specifications
Digital display resolution
0.05% of calibrated range ± 1 digit
Analog bar graph resolution
0.5% of calibrated range
Appendix A: Reference Data
February 2014
Indication accuracy
0.25% of calibrated range ± 1 digit
Stability
0.1% calibrated range ± 1 digit per six months
Temperature effect
0.01% of calibrated range per °C on zero
0.02% of calibrated range per °C on span over the operating temperature range
Power interrupt
All calibration constants are stored in EEPROM memory and are not affected by power loss.
Failure mode
LCD display failure will not affect transmitter operation.
Under/over range indication
Input current < 3.5 mA: Display blank
Input current > 22.0 mA: Display flashes 112.5% of full scale value or 9999, whichever is less
A.2.3 Physical specification
Meter size
21/4-inch diameter face with four
Reference Data
1
/2-inch high characters
15
Page 20

Appendix A: Reference Data
February 2014
A.3 Analog meter specifications
A.3.1 Functional specifications
Input signal
4–20 mA dc
10–50 mA dc
40–200 mV
Note
Maximum series resistance is ten ohms for ammeters.
Meter indication
0 to 100% linear scale
0 to 100% flow scale
Special optional ranges
Reference Manual
00809-0100-4378, Rev CE
Overload limitation
150% of rated end scale value for two minutes
Temperature limits
-40 to 65 °C (–40 to 150 °F)
Humidity limits
0 to 100% relative humidity
Zero adjustment
Adjustment screw on face of meter
A.3.2 Performance specifications
Indication accuracy
±2% of calibrated span
Temperature effect
Less than 2% of full scale at any point within the temperature limits
A.3.3 Physical specification
Meter size
21/4-inch diameter face with 2-inch long scale
16
Reference Data
Page 21

(95)
2.8
(71)
5.0
(127)
6.0
(152)
4.1
(104)
.37 (9.4) Diameter Holes
(typically four places)
Optional
Mounting
Bracket
7.0
(178)
4.2
(107)
1.0
(25)
3.0
(76)
4.0
(102)
1.1
(28)
Optional
Mounting
Bracket
Permanent
Tag
FM or CSA Tag
(if required)
3/4-14 NPT
Conduit
Connection
Reference Manual
00809-0100-4378, Rev CE
A.4 Dimensional drawings
Figure A-1. Dimensional Drawing
3.75
Appendix A: Reference Data
February 2014
Dimensions are in inches (millimeters).
Reference Data
2-in. Pipe
17
Page 22

Appendix A: Reference Data
February 2014
A.5 Ordering information
Model Product description
751 Remote Signal Indicator
Input signal
A 4–20 mA dc
B 10–50 mA dc (Not Available with LCD display)
C 40–200 mV dc (Not Available with LCD display)
Meter scale
M1 Linear Analog Meter, 0–100% Scale
M2 Square Root Analog Meter, 0–100% Flow
M6 Square Root Analog Meter, 0–10
(1)
M4
(1)
M7
(1)
M8
(1)
M9
Product certificates
NA No Approval Required
E2 INMETRO Flameproof
I2 INMETRO Intrinsic Safety
K2 INMETRO Flameproof, Intrinsic Safety
E3 NEPSI Flameproof
E5 FM Explosion-Proof
E6 CSA Explosion-Proof
E7 IECEx Flameproof
E8 ATE X Fl ameproof
I5 FM Intrinsic Safety and Non-incendive
I6 CSA Intrinsic Safety
I7 IECEx Intrinsic Safety
I8 ATEX Intrinsic Safety
N1 ATEX Type N Non-incendive
C6 CSA Intrinsic Safety, Non-incendive, and Explosion-proof approval combination
K5 FM Intrinsic Safety, Non-incendive, and Explosion-proof approval combination
Options
Mounting bracket
B Mounting Bracket for Flat Surface or 2-inch Pipe
Reducer
C Stainless Steel Reducer ¾- to ½-in. for Conduit Connection (See Figure 1 for reference.)
Bar code tag
BT Customer Specified Barcode Tag
Typical model number: 751 A M1 NA BC
(1) May be reconfigured in the field.
Linear LCD display, 0–100% Scale
Special Scale LCD display (specify range, mode, and engineering units)
Square Root LCD display, 0–100% Flow
Square Root LCD display, 0–10
Reference Manual
00809-0100-4378, Rev CE
18
Reference Data
Page 23

Reference Manual
00809-0100-4378, Rev CE
Tagg in g
Appendix A: Reference Data
February 2014
The indicator will be tagged, at no charge, in accordance with customer requirements. All tags are
stainless steel. The standard tag is permanently attached to the indicator. Tag character height is
1
in. (1.6 mm). A wired-on tag is available upon request.
/16
Reference Data
19
Page 24

Appendix A: Reference Data
February 2014
Reference Manual
00809-0100-4378, Rev CE
20
Reference Data
Page 25

Reference Manual
00809-0100-4378, Rev CE
Appendix B: Product Certifications
February 2014
Appendix B Product Certifications
European directive information . . . . . . . . . . . . . . . . . . . . . . . . . . . . . . . . . . . . . . . . . . . . . . . page 21
Ordinary location certification for FM approvals . . . . . . . . . . . . . . . . . . . . . . . . . . . . . . . . . page 21
B.1 European directive information
A copy of the EC Declaration of Conformity can be found at the end of the Quick Start Guide.
The most recent revision of the EC Declaration of Conformity can be found at
www.rosemount.com.
B.2 Ordinary location certification for FM approvals
As standard, the transmitter has been examined and tested to determine that the design meets
the basic electrical, mechanical, and fire protection requirements by FM Approvals, a nationally
recognized test laboratory (NRTL) as accredited by the Federal Occupational Safety and Health
Administration (OSHA).
B.2.1 North America
E5 FM Explosionproof
Certificate: 0T2H8.AE
Standards Used: FM Class 3600: 1989, FM Class 3615: 1989
Markings: XP CL I, DIV 1, GP B, C, D; DIP CL II/III, DIV 1, GP E, F, G; Type 4X
I5 FM Intrinsic Safety and Nonincendive
Certificate: 0T9H2AX
Standards Used: FM Class 3600: 2011, FM Class 3610: 2010, FM Class 3611: 2004, FM Class
3810: 1989, NEMA-250: 1991, ANSI/ISA 60079-0: 2009, ANSI/ISA 60079-11: 2009
Markings: IS CL I / II / III, DIV 1, GP A, B, C, D, E, F, G; T5(-60 °C T
AEx ia IIC T5(-60 °C T
installed per Rosemount drawing 00751-0074; Type 4X
E6 CSA Explosionproof
Certificate: 1718395
Standards Used: CSA Std C22.2 No. 25-1966; CSA Std C22.2 No. 30-M1986;
CAN/CSA-C22.2 No. 94-M91; CSA Std C22.2 No. 142-M1987
Markings: Explosionproof for CL I, GP C, D; CL I, GP E, F, G; CL III; Suitable for CL I DIV 2, GP
A, B, C, D; Type 4X
I6 CSA Intrinsic Safety
Certificate: 1718395
Standards Used: CSA Std C22.2 No. 25-1966; CSA Std C22.2 No. 30-M1986;
CAN/CSA-C22.2 No. 94-M91; CSA Std C22.2 No. 142-M1987; CAN/CSA-C22.2 No. 157-92;
CSA Std C22.2 No. 213-M1987
Markings: Intrinsically Safe for CL I Groups A, B, C, D; when installed per Rosemount
drawing 00751-0068; Type 4X
+60 °C); IS CL I, Zone 0,
+60 °C); NI CL I, DIV 2, GP A, B, C, D; T5(-60 °C Ta+60 °C); when
a
a
Product Certifications
21
Page 26

Appendix B: Product Certifications
February 2014
B.2.2 Europe
E8 ATEX Flameproof
Certificate: DEKRA11ATEX0240X
Standards Used: EN 60079-0:2009, EN 60079-1:2007
Markings: II 2 G Ex d IIC T5/T6 Gb, T6(-20 °C T
Special Condition for Safe Use (X):
The original manufacturer shall be contacted for information on the dimensions of the
flameproof joints.
I8 ATEX Intrins ic Safety
Certificate: Baseefa03ATEX0448X
Standards Used: EN 60079-0:2009, EN 60079-11:2007
Markings: II 1 G Ex ia IIC T5/T6 Ga; T6(-60 °C T
Special Condition for Safe Use (X):
The apparatus enclosure may contain light metals. The apparatus must be installed in such
a manner as to minimize the risk of impact or friction with other metal surfaces.
Reference Manual
00809-0100-4378, Rev CE
+40 °C), T5(-20 °C Ta +70 °C)
a
+40 °C), T5(-60 °C Ta +80 °C)
a
N1 ATEX Type n
Certificate: Baseefa03ATEX0454
Standards Used: EN 60079-0:2009; EN 60079-15:2010
Markings: II 3 G Ex nA IIC T6 Gc; (-40 °C T
B.2.3 International
E7 IECEx Flameproof
Certificate: IECEx DEK 11.0082X
Standards Used: IEC 60079-0:2007-10; IEC 60079-1:2007-04
Markings: Ex d IIC T5/T6 Gb, T6(-20 °C T
Special Condition for Safe Use (X):
The original manufacturer shall be contacted for information on the dimensions of the
flameproof joints.
I7 IECEx Intrinsic Safety
Certificate: IECEx BAS 11.0064X
Standards Used: IEC 60079-0: 2011; IEC 60079-11: 2011
Markings: Ex ia IIC T5/T6 Ga; T6(-60 °C T
Special Condition for Safe Use (X):
The enclosure may be made of aluminum alloy and given a protective polyurethane or
epoxy polyester paint finish; however, care should be taken to protect it from impact or
abrasion if located in a Zone 0 environment.
+70 °C)
a
+40 °C), T5(-20 °C Ta +70 °C)
a
+40 °C), T5(-60 °C Ta +80 °C)
a
22
Product Certifications
Page 27

Reference Manual
00809-0100-4378, Rev CE
E2 INMETRO Flameproof
I2 INMETRO Intrinsic Safety
E3 China Flameproof
Appendix B: Product Certifications
February 2014
Brazil
Certificate: NCC 12.1204X
Standards Used: ABNT NBR IEC 60079-0:2011, ABNT NBR IEC 60079-2011
Markings: Ex d IIC T5/T6 Gb; T6(-20 °C T
+40 °C), T5(-20 °C Ta +70 °C)
a
Special Condition for Safe Use (X):
The manufacturer should be contacted for information on the dimensions of the
flameproof joints.
Certificate: NCC 12.1163X
Standards Used: ABNT NBR IEC 60079-0:2011, ABNT NBR IEC 60079-11:2009, ABNT NBR
IEC 60079-26:2009
Markings: Ex ia IIC T5/T6 Ga; T6(-60 °CT
+40 °C), T5(-60 °C Ta+80 °C)
a
Special Condition for Safe Use (X):
The enclosure may be made of aluminum alloy; however, care should be taken to protect it
from impact or abrasion if located in a Zone 0 environment.
China
Certificate: GYJ12.1034X
Standards Used: GB 3836.1-2010, GB 3836.2-2010
Markings: Ex d IIC T6 Gb
Special Conditions for Safe Use (X):
1. Symbol “X” is used to denote specific conditions of use: Contact the original
manufacturer when repair work relates to the flamepath.
2. Ambient temperature range is: -20 °C T
+60 °C.
a
3. The earth connection facility in the enclosure should be connected reliably.
4. During installation, there should be no mixture harmful to flameproof housing.
5. During installation in hazardous location. Cable glands, conduits and blanking plugs,
certified by state-appointed inspection bodies with Ex d IIC Gb degree, should be used.
6. During installation, use and maintenance in explosive gas atmospheres, observe the
warning “Do not open when energized.”
7. End users is not permitted to change any components insides, but to settle the problem
in conjunction with manufacturer to avoid damage to the product.
8. When installation, use and maintenance of this product, observe following standards:
GB3836.13-1997 “Electrical apparatus for explosive gas atmospheres Part 13: Repair
and overhaul for apparatus used in explosive gas atmospheres.”
GB3836.15-2000 “Electrical apparatus for explosive gas atmospheres Part 15: Electrical
installations in hazardous area (other than mines).”
GB3836.16-2006 “Electrical apparatus for explosive gas atmospheres Part 16:
Inspection and maintenance of electrical installation (other than mines).”
GB50257-1996 “Code for construction and acceptance of electric device for explosion
atmospheres and fire hazard electrical equipment installation engineering.”
K2 Combination of E2 and I2
K5 Combination of E5 and I5
C6 Combination of E6 and I6
Product Certifications
Combinations
23
Page 28

Page 29

Reference Manual
00809-0100-4378, Rev CE
Appendix C: Approval Drawings
Appendix C Approval drawings
This section contains the following drawings:
Rosemount Drawing 00751-0068, Rev. A, 2 sheets: Rosemount 751 CSA Intrinsic Safety
Approval Configuration Installation.
Rosemount Drawing 01151-0214, Rev. V, 6 sheets: Index of Intrinsically Safe Barrier
Systems and Entity Parameters for 444, 1135, 1144, 1151, and 3051 Transmitters and
751 Field Signal Indicators.
You must follow the installation guidelines presented by these drawings in order to maintain
certified ratings for installed instruments.
February 2014
Approval Drawings
25
Page 30

Appendix C: Approval Drawings
February 2014
Reference Manual
00809-0100-4378, Rev CE
26
Approval Drawings
Page 31

Reference Manual
00809-0100-4378, Rev CE
Appendix C: Approval Drawings
February 2014
Approval Drawings
27
Page 32

Appendix C: Approval Drawings
February 2014
Reference Manual
00809-0100-4378, Rev CE
28
Approval Drawings
Page 33

Reference Manual
00809-0100-4378, Rev CE
Appendix C: Approval Drawings
February 2014
Approval Drawings
29
Page 34

Appendix C: Approval Drawings
February 2014
Reference Manual
00809-0100-4378, Rev CE
30
Approval Drawings
Page 35

Reference Manual
00809-0100-4378, Rev CE
Appendix C: Approval Drawings
February 2014
Approval Drawings
31
Page 36

Appendix C: Approval Drawings
February 2014
Reference Manual
00809-0100-4378, Rev CE
32
Approval Drawings
Page 37

Reference Manual
00809-0100-4378, Rev CE
Appendix C: Approval Drawings
February 2014
Approval Drawings
33
Page 38

Appendix C: Approval Drawings
EC Declaration of Conformity
No: RMD 1012 Rev. E
Vice President, Quality
(signature) (function- printed)
Timothy J. Layer
March 1, 2012
(name-printed) (date of issue)
We,
Rosemount Inc.
8200 Market Boulevard
Chanhassen, MN 55317-9685
USA
declare under our sole responsibility that the product,
Model 751 Field Signal Indicator
manufactured by,
Rosemount Inc.
12001 Technology Drive and 8200 Market Boulevard
Eden Prairie, MN 55344-3695 Chanhassen, MN 55317-9687
USA USA
to which this declaration relates, is in conformity with the provisions of the European
Community Directives, including the latest amendments, as shown in the attached schedule.
Assumption of conformity is based on the application of the harmonized standards and, when
applicable or required, a European Community notified body certification, as shown in the
attached schedule.
February 2014
C.1 Declaration of conformity
Reference Manual
00809-0100-4378, Rev CE
34
Approval Drawings
Page 39

Reference Manual
Schedule
EC Declaration of Conformity RMD 1012 Rev. E
File ID: Page 2 of 3 C:\Documents and Settings\sharrem\Local Settings\Temporary Internet
Files\Content.Outlook\RJ7U20GO\751_RMD1012_E (2).doc
EMC Directive (2004/108/EC)
Harmonized Standards: EN 61326-1:2006
ATEX Directive (94/9/EC)
Baseefa03ATEX0448X Intrinsic Safety
Equipment Group II Category 1 G; Ex ia IIC T5 or T6 Ga,
T5(-60°C Ta +80°C), T6 (-60°C Ta +40°C);
Harmonized Standards Used:
EN60079-0:2009; EN60079-11:2007
Baseefa03ATEX0454X Type n
Equipment Group II Category 3 G; Ex nA IIC Gc T6 (-40°C Ta +70°C);
Harmonized Standards Used:
EN60079-0:2009; EN60079-15:2010
DEKRA11ATEX0240X Flameproof
Equipment Group II Category 2 G; Ex d IIC T5 or T6 Gb,
T5(-20°C Ta +70°C), T6(-20°C Ta +40°C)
Harmonized Standards Used:
EN60079-0:2009; EN60079-1:2007
00809-0100-4378, Rev CE
Appendix C: Approval Drawings
February 2014
Approval Drawings
35
Page 40

Appendix C: Approval Drawings
Schedule
EC Declaration of Conformity RMD 1012 Rev. E
File ID: Page 3 of 3 C:\Documents and Settings\sharrem\Local Settings\Temporary Internet
Files\Content.Outlook\RJ7U20GO\751_RMD1012_E (2).doc
ATEX Notified Bodies for EC Type Examination Certificate
DEKRA Certification B.V.
[Notified Body Number: 0344]
Utrechtseweg 310, 6812 AR
Arnhem, The Netherlands
Baseefa. [Notified Body Number: 1180]
Rockhead Business Park
Staden Lane
Buxton, Derbyshire
SK17 9RZ United Kingdom
ATEX Notified Body for Quality Assurance
Baseefa. [Notified Body Number: 1180]
Rockhead Business Park
Staden Lane
Buxton, Derbyshire
SK17 9RZ United Kingdom
February 2014
Reference Manual
00809-0100-4378, Rev CE
36
Approval Drawings
Page 41

Page 42

Reference Manual
00809-0100-4378, Rev CE
February 2014
Standard Terms and Conditions of Sale can be found at www.rosemount.com/terms_of_sale
The Emerson logo is a trademark and service mark of Emerson Electric Co.
Rosemount. the Rosemount logotype, and SMART FAMILY are registered trademarks of Rosemount Inc.
Coplanar is a trademark of Rosemount Inc.
Halocarbon is a trademark of the Halocarbon Products Corporation.o.
Fluorinert is a registered trademark of Minnesota Mining and Manufacturing Company Corporation
Syltherm 800 and D.C. 200 are registered trademarks of Dow Corning Corporation.
Neobee M-20 is a registered trademark of PVO International, Inc.
HART is a registered trademark of the HART Communication Foundation.
Foundation fieldbus is a registered trademark of the Fieldbus Foundation.
All other marks are the property of their respective owners.
© February 2014 Rosemount, Inc. All rights reserved.
Emerson Process Management
Rosemount Measurement
8200 Market Boulevard
Chanhassen MN 55317 USA
Tel (USA) 1 800 999 9307
Tel (International) +1 952 906 8888
Fax +1 952 906 8889
Emerson Process Management
Latin America
1300 Concord Terrace, Suite 400
Sunrise Florida 33323 USA
Tel + 1 954 846 5030
Emerson Process Management
GmbH & Co.
Argelsrieder Feld 3
82234 Wessling
Germany
Tel 49 (8153) 9390
Fax 49 (8153) 939172
Emerson Process Management Asia
Pacific Private Limited
1 Pandan Crescent
Singapore 128461
T (65) 6777 8211
F (65) 6777 0947
Enquiries@AP.EmersonProcess.com
Beijing Rosemount Far East
Instrument Co., Limited
No. 6 North Street,
Hepingli, Dong Cheng District
Beijing 100013, China
T (86) (10) 6428 2233
F (86) (10) 6422 8586
 Loading...