


Enhanced 3051 Upgrade Kit
00825-0300-4007, Rev AB
June 2016
Enhanced Rosemount™ 3051 Upgrade
Kit
Spare Parts Installation Guide
Contents
Identify device . . . . . . . . . . . . . . . . . . . . . . . . . . . 2
Gather necessary external configuration button
assembly components . . . . . . . . . . . . . . . . . . . . 3
Remove existing retainer button assemblies . 4
Insert new retainer button assemblies . . . . . . . 4
Replace electronics board. . . . . . . . . . . . . . . . . . 7
Upload new device driver (DD/DTM) . . . . . . . . 8
External Buttons Installation Guide
A
B
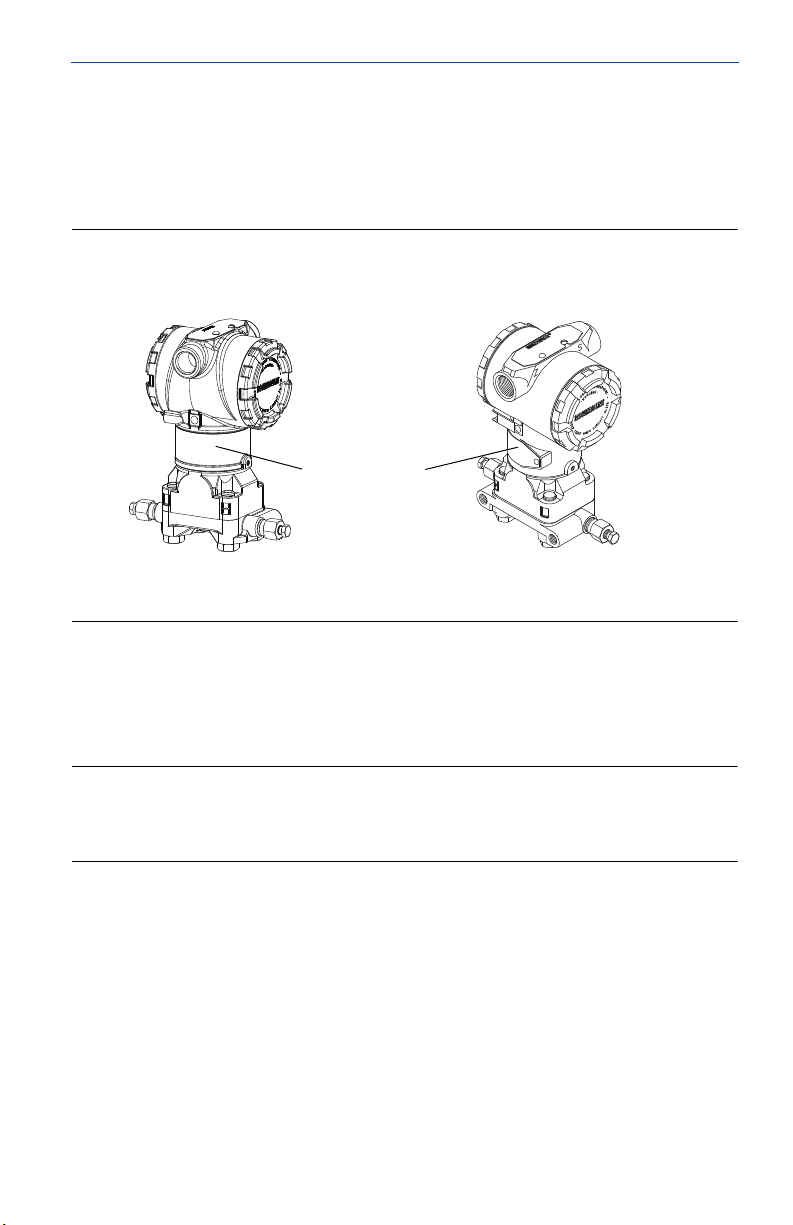
Step 1: Identify device
External button installation is dependant on what device is being upgraded in
addition to the housing material (Aluminum or Stainless Steel). The two types of
devices are the Enhanced Rosemount 3051 and Standard Rosemount 3051
pictured in Figure1.
Figure 1. Enhanced and Standard Rosemount 3051
Enhanced 3051 Standard 3051
A. Wrap around tag
B. Riveted tag
June 2016
By referencing Figure 1, there is a distinct difference between the Enhanced and
Standard 3051 in the neck label. The Enhanced Rosemount 3051 utilizes a
wraparound (rivet less) neck label, standard Rosemount 3051 uses a riveted label
that does not fully wrap around.
Note
For wrap around neck labels verify that option code “TR” is not specified on the transmitter model
string (engraved on the neck label). Option code “TR” indicates a 3051 Rev5 Transmitter that is not
compatible with the Enhanced 3051 Upgrade Kits.
2
June 2016
LABEL
-3001 / AB
COMMUNICATION PROTOCOL
P/N 03031-0020-3100
4-20mA
EXTERNAL BUTTONS: DZ
LABEL
-3101 / AB
P/N 03031-0020-3110
COMMUNICATION PROTOCOL
EXTERNAL BUTTONS: D4
P/N 03031-0020-3120
LABEL
-3201 / AB
COMMUNICATION PROTOCOL
4-20mA
EXTERNAL BUTTONS: M4
LABEL
-3301 / AB
P/N 03031-0020-3130
COMMUNICATION PROTOCOL
External Buttons Installation Guide
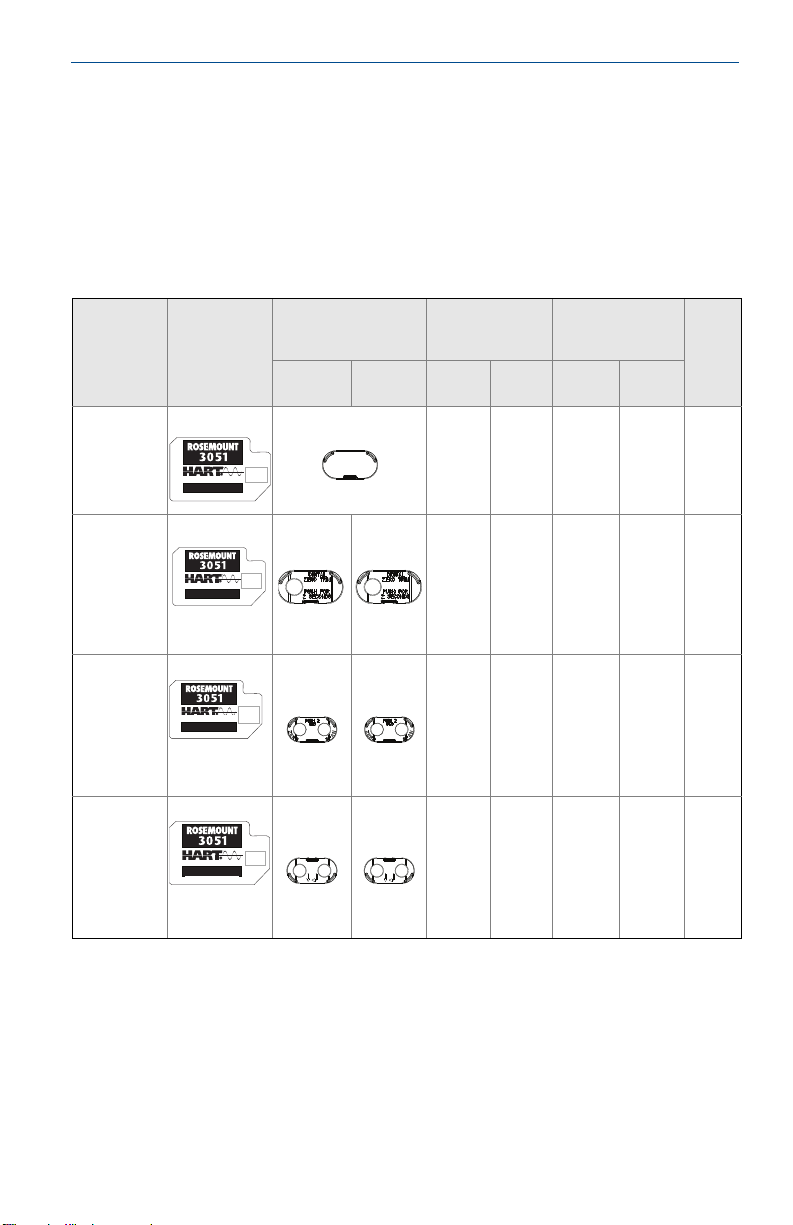
Step 2: Gather necessary external configuration button assembly components
After the device has successfully been identified, the correct retainer button
assembly components should be gathered. The retainer and buttons used in this
installation are dependant on the current housing they are being installed on
(Enhanced or Standard Rosemount 3051). Follow Table 1 below to gather the
correct configuration button assembly parts.
Table 1. Spare Parts Kits
Kit Number
03031-00203100
(no
configuration
Buttons)
03031-00203110
(Digital Zero
Tri m)
03031-00203120
(Analog Zero
and Span)
03031-00203139
(Local
Operator
Interface)
Electronics
Board
4-20mA
DZ
4-20mA
D4
M4
Retain er
(includes Rubber
Gasket)
Enhanced
3051
Standard
Blue
1
Blue
Grey Blue
Green Purple
3051
Blue
Standard 3051
(Buttons)
AL
Housing
Housing
SST
Enhanced 3051
(Buttons)
AL
Housing
Housing
N/A N/A N/A N/ A 0
1 – Blue 1 - Black 1 - Grey 1 - Black 1
2
2 - Blue 2 - Black 2 - Grey 2 - Green 2
2 - Blue 2 - Black 2 - Grey 2 - Green 2
Springs
SST
1. Retainer has thickness of 0.18 inches.
2. Retainer has a thickness of 0.12 inches.
3

External Buttons Installation Guide
June 2016
Step 3: Remove existing retainer button assemblies
1. Loosen top tag of transmitter to expose retainer slot.
2. Using a small screwdriver remove any existing button assemblies (retainer,
gasket, buttons, and springs) and discard.
A. Pry out retainer using the identified “pry-out” grooves seen in Figure 2.
3. When the retainer slot is empty proceed to Step 4.
Figure 2. Existing Retainer “Pry-Out” Grooves
Step 4: Insert new retainer button assemblies
1. Install external button assembly in accordance to the following Figures (listed
below). Retainers will snap into place.
A. 03031-0020-3100: Enhanced Rosemount 3051 upgrade Figure 3 on page 5
B. 03031-0020-3110: Digital Zero Trim Figure 4 on page 5
Magnetic button must be in the left hole, relative to the transmitter
Terminal Block.
C. 03031-0020-3120: Analog Zero and Span Figure 5 on page 6
D.03031-0020-3139: Local Operator Interface Figure 6 on page 6
Note
If not already done, refer to Tab le 1 to gather correct components of retainer button assembly
based on transmitter style (Enhanced or Standard Rosemount 3051) and housing material
(Aluminum or Stainless Steel).
4

June 2016
A
B
A
B
C
D
Figure 3. 03031-0020-3100 Button Retainer Assembly
A. Blue retainer
B. Rubber gasket
Figure 4. 03031-0020-3110 DZ Retainer Button Assembly
External Buttons Installation Guide
A. Blue DZ retainer
B. Rubber gasket
C. Magnetic buttons
D. Springs
5

External Buttons Installation Guide
A
B
C
D
A
B
C
D
Figure 5. 03031-0020-3120 D4 Retainer Button Assembly
A. D4 retainer
B. Rubber gasket
C. Magnetic buttons
D. Springs
Figure 6. 03031-0020-3139 M4 Retainer Button Assembly
June 2016
A. M4 retainer
B. Rubber gasket
C. Magnetic buttons
D. Springs
6

June 2016
B
C
D
A
D
C
B
A
External Buttons Installation Guide
Step 5: Replace electronics board
1. Remove transmitter electronics housing cover (A in Figure 7)
A. If LCD is present, it must be removed in conjunction with the electronics
board.
B. The LCD and electronics board are held together by two screws (B from
Figure 7) and an interconnecting pin (D from Figure 7)
2. Loosen the screws and gently remove the LCD and electronics board to avoid
damage to the ribbon cable
3. Detach the ribbon cable that connects the sensor module to the electronics
board.
4. If LCD or LOI Spare kit was ordered, ensure the interconnecting pin is properly
positioned to connect the electronics board and the LCD or LOI Display.
5. Install the Enhanced electronics by first connecting the ribbon cable to the
electronics board with the two screws (included)
6. Reattach transmitter housing cover; cover must be fully engaged to comply
with explosion proof requirements.
Note
Installation procedures are consistent for Analog Zero and Span, Digital Zero,
and Local Operator Interface electronics boards.
The button function is programmed into the electronics board, the board
label indicates what function the buttons will have
Figure 7. Enhanced and Standard Rosemount 3051 Electronics Assemblies
Enhanced Rosemount 3051 Standard Rosemount 3051
A. Housing cover
B. Screws
C. LCD/LOI board
D. Electronics board
7

External Buttons Installation Guide
Step 6: Upload new device driver (DD/DTM)
June 2016
To take full advantage of the new features and capabilities of the Enhanced 3051
Electronics board, an updated DD must be installed on your HART
®
Configuration
Tool.
1. Download latest DD at EmersonProcess\Rosemount.com
(download device
drivers) or www.hartcomm.org
2. In the HART Communication’s Website (hartcomm.org) locate the Browse by
Member dropdown menu and select Rosemount Business Unit of Emerson
Process Management.
3. Select device revision based on HART Revision Configuration listed in Tab l e 2
on page 8
Table 2. Enhanced Rosemount 3051 Device Revision
Find Device Driver Files Review Inst ructions
HART Universal Revision Device Revision Manual Document Number
7 10
5 9
AA
8

June 2016
ᴹ
㇑᧗⢙䍘䎵䗷ᴰབྷ⎃ᓖ䲀٬Ⲵ䜘Ԧරࡇ㺘
䜘Ԧ〠
ᴹᇣ⢙䍘䍘
䫵
⊎
䭹
ޝԧ䬜䬜
ཊⓤ㚄㚄㤟
ཊⓤ㚄㚄㤟䟊
External Buttons Installation Guide
China RoHS
List of Rosemount 3051 Parts with China RoHS Concentration above MCVs
/ Hazardous Substances
Rosemount 3051
Part Name
⭥ᆀ㓴Ԧ
Electronics
Assembly
༣փ㓴Ԧ
Housing
Assembly
Րᝏಘ㓴Ԧ
Sensor
Assembly
ᵜ㺘Ṭ㌫ᦞ
This table is proposed in accordance with the provision of SJ/T11364.
Ѫ䈕䜘ԦⲴᡰᴹ൷䍘ᶀᯉѝ䈕ᴹᇣ⢙䍘Ⲵ䟿൷վҾ
O:
O: Indicate that said hazardous substance in all of the homogeneous materials for this part is below the limit requirement of
GB/T 26572.
Ѫ൘䈕䜘Ԧᡰ֯⭘Ⲵᡰᴹ൷䍘ᶀᯉ䟼ˈ㠣ቁᴹа㊫൷䍘ᶀᯉѝ䈕ᴹᇣ⢙䍘Ⲵ䟿儈Ҿ
X:
X: Indicate that said hazardous substance contained in at least one of the homogeneous materials used for this part is above
the limit requirement of GB/T 26572.
Lead
(Pb)
Mercury
(Hg)
Cadmium
(Cd)
XO O O O O
XO O X O O
XO O X O O
Ⲵ㿴ᇊ㘼ࡦ
SJ/T11364
Hexavalent
Chromium
(Cr +6)
GB/T 26572
Polybrominated
biphenyls
(PBB)
ᡰ㿴ᇊⲴ䲀䟿㾱≲
GB/T 26572
Polybrominated
diphenyl ethers
(PBDE)
ᡰ㿴ᇊⲴ䲀䟿㾱≲
9

*00825-0300-4007*
Quick Start Guide
00825-0300-4007, Rev AB
Global Headquarters
Emerson Process Management
6021 Innovation Blvd.
Shakopee, MN 55379, USA
+1 800 999 9307 or +1 952 906 8888
+1 952 949 7001
RFQ.RMD-RCC@EmersonProcess.com
North America Regional Office
Emerson Process Management
8200 Market Blvd.
Chanhassen, MN 55317, USA
+1 800 999 9307 or +1 952 906 8888
+1 952 949 7001
RMT-NA.RCCRFQ@Emerson.com
Latin America Regional Office
Emerson Process Management
1300 Concord Terrace, Suite 400
Sunrise, FL 33323, USA
+1 954 846 5030
+1 954 846 5121
RFQ.RMD-RCC@EmersonProcess.com Linkedin.com/company/Emerson-Process-Management
Europe Regional Office
Emerson Process Management Europe GmbH
Neuhofstrasse 19a P.O. Box 1046
CH 6340 Baar
Switzerland
+41 (0) 41 768 6111
+41 (0) 41 768 6300
RFQ.RMD-RCC@EmersonProcess.com
Asia Pacific Regional Office
Emerson Process Management Asia Pacific Pte Ltd
1 Pandan Crescent
Singapore 128461
+65 6777 8211
+65 6777 0947
Enquiries@AP.EmersonProcess.com
Middle East and Africa Regional Office
Emerson Process Management
Emerson FZE P.O. Box 17033,
Jebel Ali Free Zone - South 2
Dubai, United Arab Emi rates
+971 4 8118100
+971 4 8865465
RFQ.RMTMEA@Emerson.com
Twitter.com/Rosemount_News
Facebook.com/Rosemount
Youtube.com/user/RosemountMeasurement
Google.com/+RosemountMeasurement
Standard Terms and Conditions of Sale can be found at
www.Emerson.com/en-us/pages/Terms-of-Use.aspx
The Emerson logo is a trademark and service mark of Emerson
Electric Co.
HART is a registered trademark of the FieldComm Group.
All other marks are the property of their respective owners.
© 2016 Emerson Process Management. All rights reserved.
June 2016
 Loading...