

Page 1
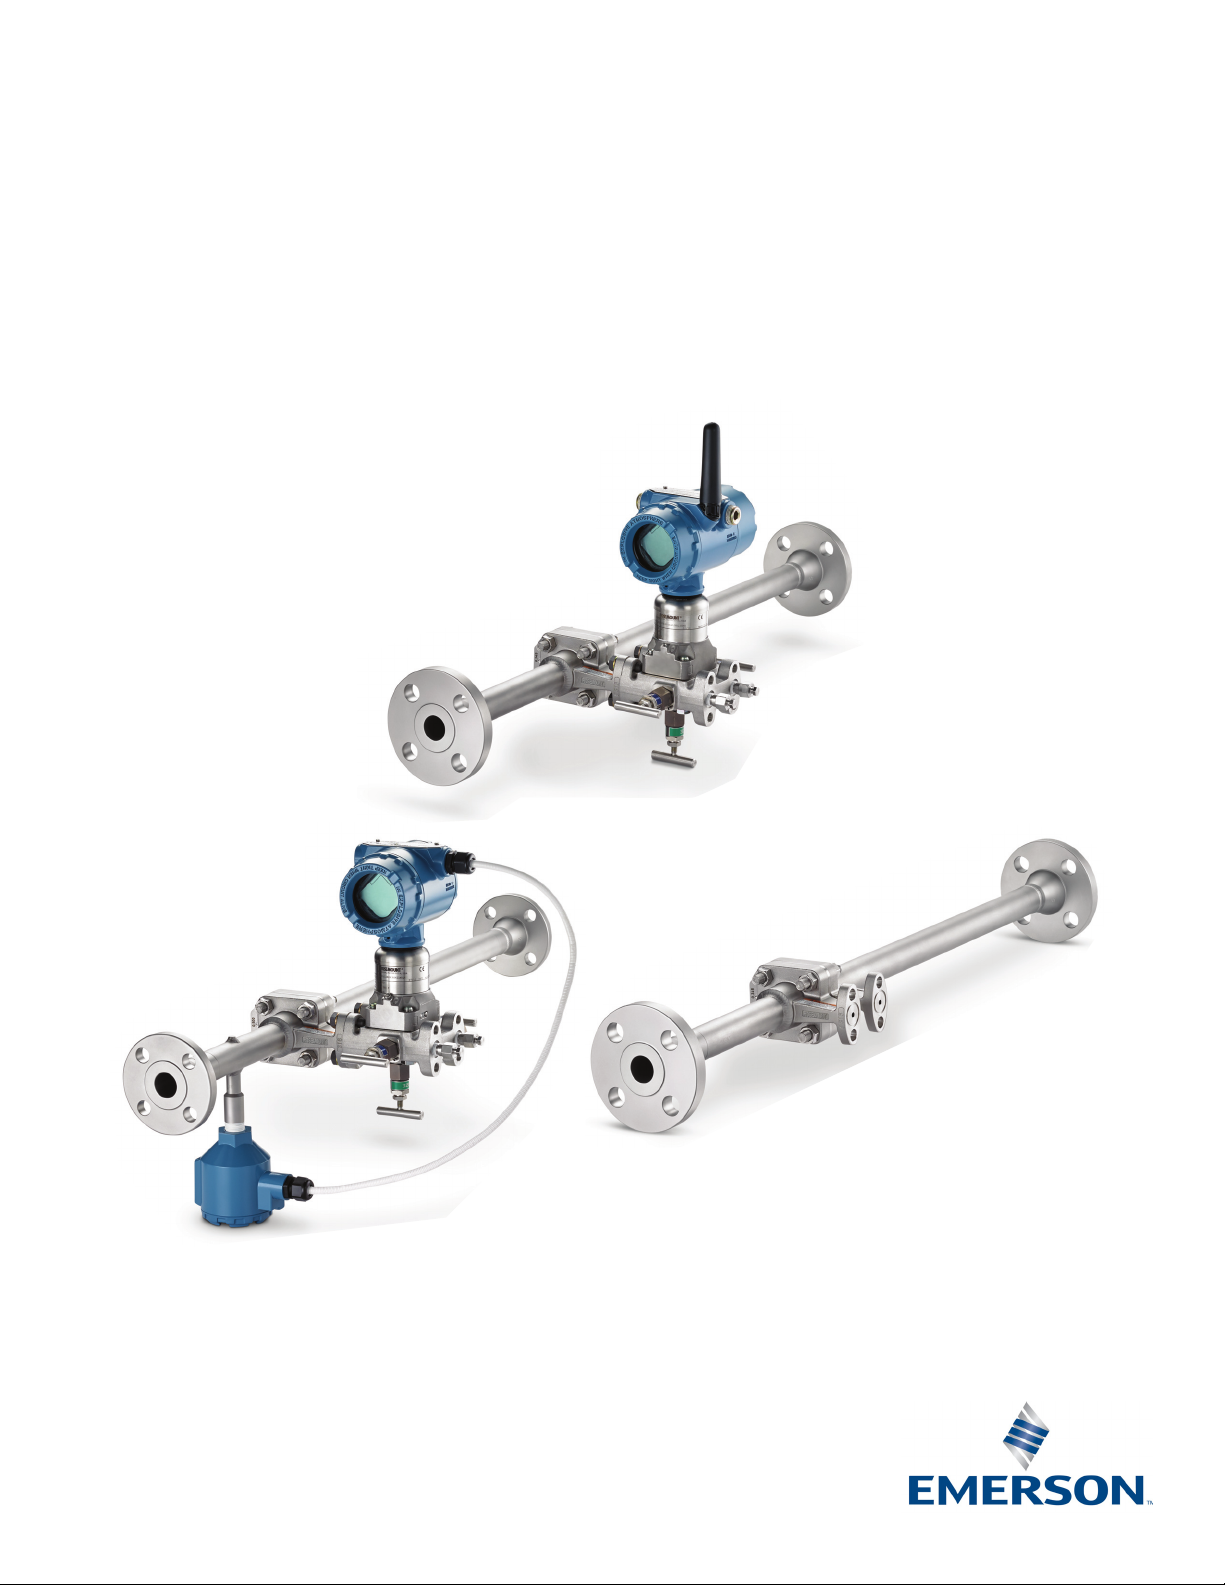
Rosemount™ Integral Orifice
Flow Meter Series
Reference Manual
00809-0100-4686, Rev KA
December 2017
Page 2

Page 3

Reference Manual
00809-0100-4686, Rev KA
Contents
1Section 1: Introduction
2Section 2: Installation
Contents
December 2017
1.1 Using this manual. . . . . . . . . . . . . . . . . . . . . . . . . . . . . . . . . . . . . . . . . . . . . . . . . . . . . . 1
1.2 Returning the product. . . . . . . . . . . . . . . . . . . . . . . . . . . . . . . . . . . . . . . . . . . . . . . . . . 1
1.3 Considerations . . . . . . . . . . . . . . . . . . . . . . . . . . . . . . . . . . . . . . . . . . . . . . . . . . . . . . . . 2
1.3.1 Functional. . . . . . . . . . . . . . . . . . . . . . . . . . . . . . . . . . . . . . . . . . . . . . . . . . . . . . . 2
2.1 Safety messages . . . . . . . . . . . . . . . . . . . . . . . . . . . . . . . . . . . . . . . . . . . . . . . . . . . . . . . 3
2.2 Receiving and inspection . . . . . . . . . . . . . . . . . . . . . . . . . . . . . . . . . . . . . . . . . . . . . . . 3
2.3 Installation. . . . . . . . . . . . . . . . . . . . . . . . . . . . . . . . . . . . . . . . . . . . . . . . . . . . . . . . . . . . 4
2.3.1 Handling . . . . . . . . . . . . . . . . . . . . . . . . . . . . . . . . . . . . . . . . . . . . . . . . . . . . . . . . 4
2.3.2 Straight run requirements. . . . . . . . . . . . . . . . . . . . . . . . . . . . . . . . . . . . . . . . . 4
2.3.3 Bolting a transmitter to the Rosemount 1195 . . . . . . . . . . . . . . . . . . . . . . . 5
2.3.4 Direct mount orientation . . . . . . . . . . . . . . . . . . . . . . . . . . . . . . . . . . . . . . . . . 7
2.3.5 Remote mount orientation . . . . . . . . . . . . . . . . . . . . . . . . . . . . . . . . . . . . . . . . 9
2.3.6 Temperature sensors . . . . . . . . . . . . . . . . . . . . . . . . . . . . . . . . . . . . . . . . . . . . 11
3Section 3: Commissioning
3.1 Safety messages . . . . . . . . . . . . . . . . . . . . . . . . . . . . . . . . . . . . . . . . . . . . . . . . . . . . . . 13
3.2 Direct mount applications . . . . . . . . . . . . . . . . . . . . . . . . . . . . . . . . . . . . . . . . . . . . . 14
3.2.1 Liquid service . . . . . . . . . . . . . . . . . . . . . . . . . . . . . . . . . . . . . . . . . . . . . . . . . . . 14
3.2.2 Gas service . . . . . . . . . . . . . . . . . . . . . . . . . . . . . . . . . . . . . . . . . . . . . . . . . . . . . 15
3.2.3 Steam service . . . . . . . . . . . . . . . . . . . . . . . . . . . . . . . . . . . . . . . . . . . . . . . . . . 16
3.3 Remote mount applications. . . . . . . . . . . . . . . . . . . . . . . . . . . . . . . . . . . . . . . . . . . . 17
3.3.1 Liquid service . . . . . . . . . . . . . . . . . . . . . . . . . . . . . . . . . . . . . . . . . . . . . . . . . . . 17
3.3.2 Gas service . . . . . . . . . . . . . . . . . . . . . . . . . . . . . . . . . . . . . . . . . . . . . . . . . . . . . 18
3.3.3 Steam service . . . . . . . . . . . . . . . . . . . . . . . . . . . . . . . . . . . . . . . . . . . . . . . . . . 19
4Section 4: Operation and Maintenance
4.1 Safety Messages . . . . . . . . . . . . . . . . . . . . . . . . . . . . . . . . . . . . . . . . . . . . . . . . . . . . . . 21
4.2 Troubleshooting. . . . . . . . . . . . . . . . . . . . . . . . . . . . . . . . . . . . . . . . . . . . . . . . . . . . . . 22
4.3 RTD Maintenance. . . . . . . . . . . . . . . . . . . . . . . . . . . . . . . . . . . . . . . . . . . . . . . . . . . . . 23
4.3.1 Replacing an RTD . . . . . . . . . . . . . . . . . . . . . . . . . . . . . . . . . . . . . . . . . . . . . . . 24
Contents
AAppendix A: Specifications and Reference Data
iii
Page 4

Contents
December 2017
Reference Manual
00809-0100-4686, Rev KA
A.1 Product Certifications . . . . . . . . . . . . . . . . . . . . . . . . . . . . . . . . . . . . . . . . . . . . . . . . . 27
A.2 Ordering Information, Specifications, and Drawings . . . . . . . . . . . . . . . . . . . . . . 27
iv
Contents
Page 5

Reference Manual
00809-0100-4686, Rev KA
Rosemount Integral Orifice Flow Meter
Series
NOTICE
Read this manual before working with the product. For personal and system safety, and for
optimum product performance, make sure you thoroughly understand the contents before
installing, using, or maintaining this product.
For technical assistance, contacts are listed below:
Customer Central
Technical support, quoting, and order-related questions.
United States - 1-800-999-9307 (7:00 am to 7:00 pm CST)
Asia Pacific- 65 777 8211
Europe/Middle East/Africa - 49 (8153) 9390
North American Response Center
Title Page
December 2017
Equipment service needs.1-800-654-7768 (24 hours—includes Canada)
Outside of these areas, contact your local Emerson
The products described in this document are NOT designed for nuclear-qualified applications.
Using non-nuclear qualified products in applications that require nuclear-qualified hardware or
products may cause inaccurate readings.
For information on Rosemount nuclear-qualified products, contact your local Emerson Sales
Representative.
This device is intended for use in temperature monitoring applications and should not be used
in control and safety applications.
™
representative.
Title Page
v
Page 6

Title Page
December 2017
Reference Manual
00809-0100-4686, Rev KA
vi
Title Page
Page 7

Reference Manual
00809-0100-4686, Rev KA
Section 1 Introduction
1.1 Using this manual
The sections in this manual provide information on installing, operating, and maintaining the
Rosemount Integral Orifice Flow Meter Series.
The sections in this manual are organized as follows:
Section 2: Installation contains mechanical and electrical installation instructions.
Section 3: Commissioning contains techniques for properly commissioning the device.
Section 4: Operation and Maintenance contains operation and maintenance techniques.
Appendix A: Specifications and Reference Data supplies procedure on how to get the
specifications, ordering information, and product certification.
Section 1: Introduction
December 2017
1.2 Returning the product
To expedite the return process, call the Rosemount National Response Center toll-free at
800-654-7768. This center, available 24 hours a day, will assist you with any needed information
or materials.
The center will ask for the following information:
Product model
Serial numbers
The last process material to which the product was exposed
The center will provide
A Return Material Authorization (RMA) number
Instructions and procedures that are necessary to return goods that were exposed to
hazardous substances
Note
If a hazardous substance is identified, a Material Safety Data Sheet (MSDS), required by law to be
available to people exposed to specific hazardous substances, must be included with the
returned materials.
Introduction
1
Page 8

Section 1: Introduction
December 2017
1.3 Considerations
1.3.1 Functional
The Rosemount 1195 produces the most accurate and repeatable measurement when it is used
in single-phase flow or steam flow above the saturation temperature. Location of the
Rosemount 1195 in pulsating flow will cause a noisy signal. Vibration can also distort the output
signal and compromise the structural limits of the flow meter.
Mount the Rosemount 1195 in a secure run of pipe as far as possible from pulsation sources
such as check valves, reciprocating compressors or pumps, and control valves.
Install the Rosemount 1195 in the correct location within the piping branch to prevent
measurement inaccuracies caused by flow disturbances.
Process temperature limits for direct mount applications is from –40 to 450 °F (–40 to 232°C).
Process temperature limits for remote mount applications is –112 to 554°F (–80 to 290°C).
Contact DP Flow specialists on availability of special all welded designs for applications with
process temperatures as low as –320 °F (–195 °C) or as high as 850 °F (454 °C).
Reference Manual
00809-0100-4686, Rev KA
Vibration effect for Rosemount 1195, 3051SFP, 3051CFP,
2051CFP
Less than ±0.1percent of URL when tested per the requirements of IEC60068-2-6 (10 to 1000 Hz
test frequency range, 0.075 mm displacement peak amplitude, 10 m/s2 acceleration
amplitude).
2
Introduction
Page 9

Reference Manual
00809-0100-4686, Rev KA
Section 2 Installation
Safety messages . . . . . . . . . . . . . . . . . . . . . . . . . . . . . . . . . . . . . . . . . . . . . . . . . . . . . . . . . . . . . . . . . . . . . . page 3
Receiving and inspection . . . . . . . . . . . . . . . . . . . . . . . . . . . . . . . . . . . . . . . . . . . . . . . . . . . . . . . . . . . . . .page 3
Installation . . . . . . . . . . . . . . . . . . . . . . . . . . . . . . . . . . . . . . . . . . . . . . . . . . . . . . . . . . . . . . . . . . . . . . . . . . . page 4
2.1 Safety messages
Instructions and procedures in this section may require special precautions to ensure the safety of the
personnel performing the operations. Refer to the following safety messages before performing any
operation in this section.
Failure to follow these installation guidelines could result in death or serious injury.
Make sure only qualified personnel perform the installation.
Explosions could result in death or serious injury:
Do not remove the transmitter cover in explosive atmospheres when the circuit is live.
Before connecting a Field Communicator in an explosive atmosphere, make sure the instruments in
the loop are installed in accordance with intrinsically safe or non-incendive field wiring practices.
Verify that the operating atmosphere of the transmitter is consistent with the appropriate hazardous
locations certifications.
Both transmitter covers must be fully engaged to meet explosion-proof requirements.
Electrical shock can result in death or serious injury.
Avoid contact with the leads and the terminals.
The product may be hot while in service, potentially causing burns. Handle with care.
Installation
December 2017
2.2 Receiving and inspection
Flow meters are available in different models and with different options, so it is important to inspect and
verify that the appropriate model was delivered before installation.
Upon receipt of the shipment, check the packing list against the material received and the purchase
order. All items are tagged with a model number, serial number, and customer tag number. Report any
damage to the carrier.
Installation
3
Page 10

Installation
December 2017
2.3 Installation
2.3.1 Handling
The product tag is not designed to withstand the weight of the flow meter- do not lift the product by the
tag. Do not use any part of the Rosemount 1195 Flow Meter as a step or hand support. Product is not
designed to withstand the weight of individuals.
Reference Manual
00809-0100-4686, Rev KA
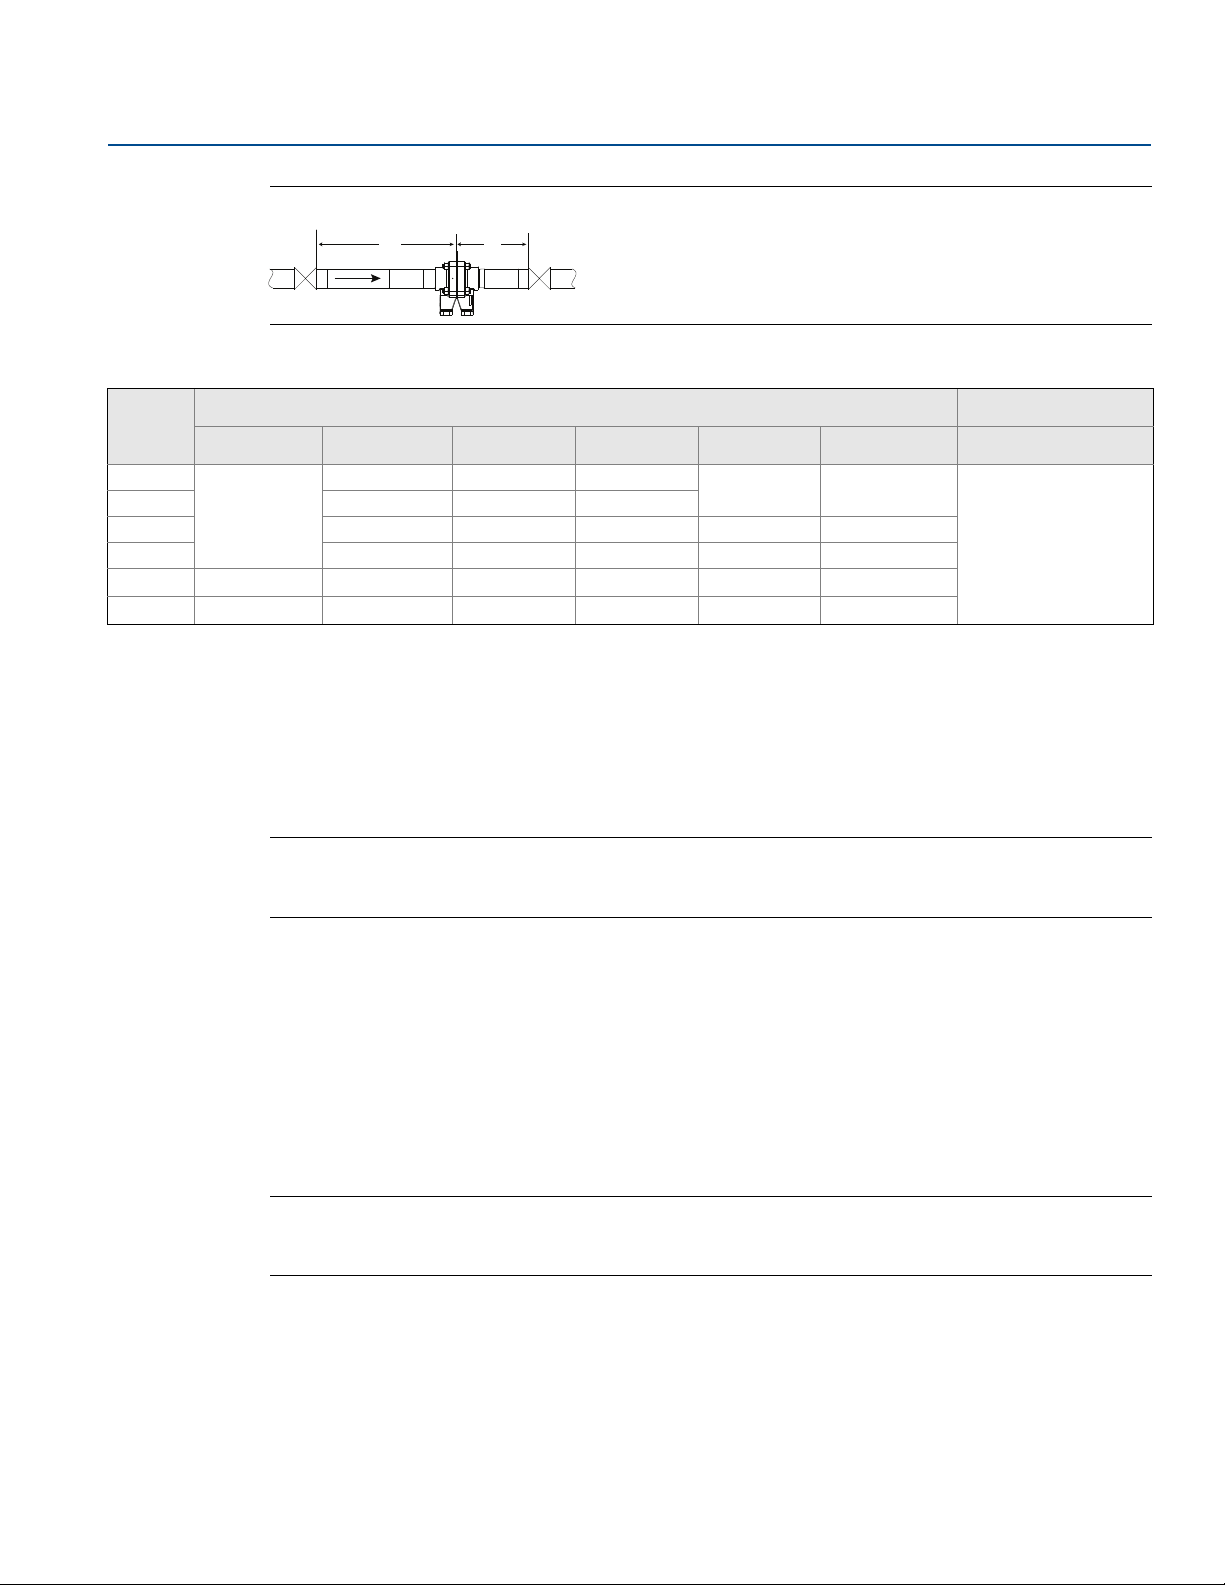
2.3.2 Straight run requirements
Figure 2-1. Reducer
U D
(2d to d over a length of 1.5d to 3d)
Figure 2-2. Single 90° Bend Flow from One Branch
U D
Figure 2-3. Two or More 90° Bends in Same Planes
U
D
(1)
Figure 2-4. Two or More 90° Bends in Different Planes
U D
Figure 2-5. Expander
(0.5d to d over a length of d to 2d)
1, For dimensions, see Table 1 on page 5.
4
U D
Installation
Page 11
Reference Manual
00809-0100-4686, Rev KA
Figure 2-6. Ball/Gate Valve Fully Open
U D
Table 1. Straight Run Requirements (in Pipe Diameters)
Installation
December 2017
(1)
β
Upstream (U) Downstream (D)
Figure 2-1 Figure 2-2 Figure 2-3 Figure 2-4 Figure 2-5 Figure 2-6 Figures 3–8
0.20
0.40 25 27 31
0.50 25 28 33 23 23
0.60 27 31 37 25 25
0.70 23 32 35 42 28 28
0.75 25 35 38 45 30 30
Interpolation of intermediate β values can be used.
1.
2.
All straight lengths are expressed as multiples of the pipe inside diameter (d) and shall be measured from the upstream face of orifice plate.
20
24 25 30
22 22
2.3.3 Bolting a transmitter to the Rosemount 1195
If the Rosemount 1195 is ordered separately from the Rosemount transmitter and will be used in a direct
mount configuration, it will need to be assembled to the transmitter.
Follow the directions below to assemble the Rosemount 1195 to a transmitter with manifold:
Note
Units shipped from the factory direct mounted are pressure tested and characterized with the primary
attached. Factory assembly is recommended for best performance.
Bolt to a 3- or 5-valve manifold
(2)
10
Installation
1. Use studs and nuts supplied with the Rosemount1195 to connect to the transmitter sensor and
manifold.
2. Always use a 3- or 5-valve manifold when direct mounting a transmitter to the Rosemount 1195.
3. Observe the side of the orifice plate marked “Inlet.” This side should align to the High Pressure side of
the DP transmitter.
4. Torque the bolts to 32 lb-ft using a cross pattern.
Note
Protect the transmitter sensing diaphragms and do not remove the O-rings in transmitter sensor
module.
5. Carefully assemble the Rosemount 1195 body to the manifold and pressure transmitter sensor
making sure the “H” and “L” on transmitter and primary match.
6. Preload to 16 lb-ft then final torque at 32 lb-ft using a cross pattern.
5
Page 12

Installation
December 2017
Reference Manual
00809-0100-4686, Rev KA
Figure 2-7. Rosemount 1195 Body
A
B
F
E
A. Manifold
B. Gaskets
C. Studs
D. Nuts
E. Transmitter
F. Rosemount 1195 body
G. Rosemount 1195 orifice plate
(1)
C
D
G
1, Transmitter and housing are shown for clarity purposes - only supplied if ordered.
6
Installation
Page 13

Reference Manual
A
B
C
A
C
B
00809-0100-4686, Rev KA
2.3.4 Direct mount orientation
A direct mounted Rosemount 1195 may be shipped with the transmitter already bolted directly to the
sensor.
Note
Process temperature limits for direct mount applications is from –40 to 450°F (–40 to 232 °C). Refer to
“Remote mount orientation” on page 9 if the process could potentially exceed this temperature range.
Gas in horizontal pipes
Rosemount 1195 should be mounted above the pipe to ensure that condensate does not collect on the
transmitter sensing diaphragms. Orient the unit within the recommended zone as shown in Figure 2-8.
Figure 2-8. Direct Mount Gas in Horizontal Pipes
A
Installation
December 2017
B
C
A. 90° recommended zone
B. Vertical plane
C. Horizontal plane
Liquid or steam in horizontal pipes
Rosemount 1195 should be mounted below the pipe to ensure that gases do not collect on the
transmitter sensing diaphragms. Orient the unit within the recommended zone as shown in Figure 2-9.
Figure 2-9. Direct Mount Liquid or Steam in Horizontal Pipes
C
B
A
A. 90° recommended zone
Installation
B. Vertical plane
C. Horizontal plane
7
Page 14

Installation
A
FLOW
A
A
December 2017
Reference Manual
00809-0100-4686, Rev KA
Liquid in vertical pipes
Note
Rosemount 1195 should not be used in vertical liquid or steam applications if the fluid is flowing down.
Vertical steam should be remote mounted.
Figure 2-10. Direct Mount Liquid in Vertical Pipe
A. 360° recommended zone
Gas in vertical pipes
Note
Due to drain vent orientation, a direct mount Rosemount1195 should not be used in vertical gas
applications if the fluid is flowing up. Consider remote mounting the pressure transmitter to facilitate
condensate draining.
Figure 2-11. Direct Mount Gas in Vertical Pipes
FLOW
A. 360° recommended zone
A
8
Installation
Page 15

Reference Manual
FLOW
A
B
C
D
E
F
00809-0100-4686, Rev KA
2.3.5 Remote mount orientation
Gas in vertical or horizontal pipes
Figure 2-12. Remote Mount Gas in Vertical or Horizontal Pipes
A
B
C
D
Installation
December 2017
E
A. Low valve
B. Vent
C. High valve
D. Equalizer valve
E. Block valves
FLOW
Liquid or steam in vertical or horizontal pipes
Note
Rosemount1195 should not be used in vertical liquid or steam applications if the fluid is flowing down.
Figure 2-13. Remote Mount Liquid or steam in Vertical or Horizontal Pipes
A. Vent
B. High valve
C. Equalizer valve
D. Vent valves
E. Low valve
F. Block val ves
Installation
9
Page 16

Installation
December 2017
Reference Manual
00809-0100-4686, Rev KA
Remote mount adapter installation
Rosemount 1195 is available with 1/2–14-in. NPT connections (option code G2). The 1/2-in. connections
can be rotated to attain connection centers of 2-, 2
1
/8-, or 2 1/4-in. (51, 54, or 57 mm). See Figure 2-14 for
detail. Use a lubricant or sealant when making the process connections.
Ensure all four flange studs are installed and tightened prior to applying pressure to prevent process
leakage.
Figure 2-14. Adapter for Remote Mounting
2.00 (51)
2.13 (54)
2.25 (57)
Note
Do not attempt to loosen or remove the nuts or studs while the Rosemount 1195 is in service.
Perform the following to install flange adapters to the instrument connection of the Rosemount 1195
(see Figure 2-15 on page 11).
1. Place O-ring in the groove on the instrument connection face.
2. Position flange adapters on top of the instrument connection with the machined surface in contact
with the O-ring.
3. Insert studs through the Rosemount 1195 instrument connection and flange adapters.
4. Thread nuts onto studs. Tighten nuts to 32 ft-lbs.
O-rings must be replaced each time the Rosemount 1195 is disassembled for installation or
maintenance.
10
Installation
Page 17

Reference Manual
A
B
C
D
E
F
00809-0100-4686, Rev KA
Figure 2-15. Rosemount 1195 Remote Mount Flange Adapter Installation
A. O-ring groove
B. Nut
C. Flange adapter
D. O-ring
E. Stud
F. Rosemount 1195 instrument connection
Installation
December 2017
2.3.6 Temperature sensors
No cabling is provided on Rosemount 1195 and 3051SFP models ordered with temperature sensors.
Installation
11
Page 18

Installation
December 2017
Reference Manual
00809-0100-4686, Rev KA
12
Installation
Page 19

Reference Manual
00809-0100-4686, Rev KA
Section 3 Commissioning
Safety messages . . . . . . . . . . . . . . . . . . . . . . . . . . . . . . . . . . . . . . . . . . . . . . . . . . . . . . . . . . . . . . . . . . . . . . page 13
Direct mount applications . . . . . . . . . . . . . . . . . . . . . . . . . . . . . . . . . . . . . . . . . . . . . . . . . . . . . . . . . . . . . page 14
Remote mount applications . . . . . . . . . . . . . . . . . . . . . . . . . . . . . . . . . . . . . . . . . . . . . . . . . . . . . . . . . . . . page 17
3.1 Safety messages
Instructions and procedures in this section may require special precautions to ensure the safety of the
personnel performing the operations. Please refer to the following safety messages before performing
any operation in this section.
Explosions could result in death or serious injury:
Do not remove the transmitter cover in explosive atmospheres when the circuit is live.
Before connecting a Field Communicator in an explosive atmosphere, make sure the instruments in
the loop are installed in accordance with intrinsically safe or non-incendive field wiring practices.
Verify that the operating atmosphere of the transmitter is consistent with the appropriate hazardous
locations certifications.
Both transmitter covers must be fully engaged to meet explosion-proof requirements.
Failure to follow these installation guidelines could result in death or serious injury:
Make sure only qualified personnel perform the installation.
If the line is pressurized, serious injury or death could occur by opening valves.
Commissioning
December 2017
Commissioning
13
Page 20

Commissioning
December 2017
3.2 Direct mount applications
3.2.1 Liquid service
1. Pressurize line.
2. Open the equalizer valve.
3. Open the high and low side valves.
4. Bleed drain/vent valves until no gas is apparent in the liquid.
5. Close the vent/drain valves.
6. Close the low side valve.
7. Check the transmitter zero according to the transmitter product manual so that the output on the
test meter reads zero percent of span.
8. Close the equalizer valve.
9. Open the low side valve. The system is now operational.
Reference Manual
00809-0100-4686, Rev KA
Figure 3-1. Direct Mount Liquid Service
C
D
A
B
A. Vent
B. Low valve
C. Equalizer valve
D. High valve
14
Commissioning
Page 21

Reference Manual
A
B
C
D
00809-0100-4686, Rev KA
3.2.2 Gas service
1. Pressurize line.
2. Open the equalizer valve.
3. Open the high and low side valves.
4. Open drain/vent valves to ensure no liquid is present.
5. Close the vent/drain valves.
6. Close the low side valve.
7. Check the transmitter zero according to the transmitter product manual so that the output on the
test meter reads zero percent of span.
8. Close the equalizer valve.
9. Open the low side valve. The system is now operational.
Figure 3-2. Direct Mount Gas Service
Commissioning
December 2017
A. Vent
B. High valve
C. Equalizer
D. Equalizer valve
Commissioning
15
Page 22

Commissioning
A
B
C
D
December 2017
3.2.3 Steam service
1. Remove pressure from line.
2. Open equalizer, high, and low side valves.
3. Fill manifold and transmitter with water via drain vents.
4. Close low side valve.
5. Pressurize line.
6. Gently tap electronics body, manifold head, and Rosemount 1195 body with a small wrench to
dislodge any entrapped air.
7. Zero electronics.
8. Close equalizer valve.
9. Open the low side valve. The system is now operational.
Figure 3-3. Direct Mount Steam Service
Reference Manual
00809-0100-4686, Rev KA
A. Vent
B. Low valve
C. Equalizer valve
D. High valve
16
Commissioning
Page 23

Reference Manual
FLOW
A
B
C
D
E
F
00809-0100-4686, Rev KA
3.3 Remote mount applications
3.3.1 Liquid service
1. Pressurize line.
2. Open equalizer valve on transmitter manifold. Close equalizer valve at Rosemount 1195, if one is
used.
3. Open high and low side transmitter manifold valves and high and low block valves at Rosemount
1195.
4. Bleed drain/vent valves on transmitter manifold until no air is present.
5. Close drain vent valves, then bleed vent valves at the Rosemount 1195 block valves until no air is
present.
6. Close vent valves at Rosemount 1195 block valves.
7. Close equalizer valve at transmitter manifold.
8. Close low and high side block valves at Rosemount 1195.
9. Open vent valves at Rosemount 1195 block valves.
Commissioning
December 2017
10.Check transmitter zero according to transmitter manual.
11.Close vent valves at Rosemount 1195 block valves.
12.Open high and low side block valves at Rosemount 1195.
Figure 3-4. Remote Liquid Service
A. Vent
B. High valve
C. Equalizer valve
D. Vent valves
E. Low valve
F. Block val ves
Commissioning
17
Page 24

Commissioning
December 2017
3.3.2 Gas service
1. Pressurize line.
2. Open equalizer valve on transmitter manifold.
3. Open high and low side transmitter manifold valves.
4. Open drain/vent valves on transmitter manifold to ensure no liquids are present.
5. Close drain/vent valves.
6. Close low side transmitter manifold valve.
7. Check transmitter zero according to transmitter manual.
8. Close equalizer on transmitter manifold.
9. Open low side valve on transmitter manifold. The system is now operational.
Figure 3-5. Remote Gas Service
Reference Manual
00809-0100-4686, Rev KA
B
C
A. Low valve
B. Vent
C. High valve
D. Equalizer valve
E. Block valves
A
D
E
FLOW
18
Commissioning
Page 25

Reference Manual
FLOW
A
B
C
D
E
F
00809-0100-4686, Rev KA
3.3.3 Steam service
1. Remove pressure from line or close block valves at Rosemount 1195.
2. Open equalizer valves, high and low side valves on the transmitter manifold. Close equalize valve at
Rosemount 1195, if one is used.
3. Open vent valves at Rosemount 1195 block valves.
4. Fill transmitter manifold and instrument lines with water via low side vent at Rosemount 1195 block
valves.
5. Open and close vent valves at transmitter to bleed out trapped air.
6. Close the equalizer valve at transmitter manifold.
7. Complete filling the low side sensing line.
8. Gently tap electronics body, transmitter manifold, instrument lines, and Rosemount 1195 with a
small wrench to dislodge any trapped air.
9. Check transmitter zero according to transmitter manual.
10.Close vent valves at Rosemount 1195 block valves.If block valves at Rosemount 1195 had been closed
they should now be opened. System is now operational for steam flow measurement.
Commissioning
December 2017
Figure 3-6. Remote Steam Service
A. Vent
B. High valve
C. Equalizer valve
D. Vent valves
E. Low valve
F. Block val ves
Commissioning
19
Page 26

Commissioning
December 2017
Reference Manual
00809-0100-4686, Rev KA
20
Commissioning
Page 27

Reference Manual
00809-0100-4686, Rev KA
Operation and Maintenance
Section 4 Operation and Maintenance
Safety Messages . . . . . . . . . . . . . . . . . . . . . . . . . . . . . . . . . . . . . . . . . . . . . . . . . . . . . . . . . . . . . . . . . . . . . . page 21
Troubleshooting . . . . . . . . . . . . . . . . . . . . . . . . . . . . . . . . . . . . . . . . . . . . . . . . . . . . . . . . . . . . . . . . . . . . . . page 22
RTD Maintenance . . . . . . . . . . . . . . . . . . . . . . . . . . . . . . . . . . . . . . . . . . . . . . . . . . . . . . . . . . . . . . . . . . . . . page 23
4.1 Safety Messages
Procedures and instructions in this section may require special precautions to ensure the safety of the
personnel performing the operations. Information that raises potential safety issues is indicated by a
warning symbol ( ). Refer to the following safety messages before performing an operation preceded
by this symbol.
December 2017
Explosions can result in death or serious injury:
Do not remove the instrument cover in explosive environments when the circuit is live.
Both transmitter covers must be fully engaged to meet
explosion-proof requirements.
Before connecting a communicator in an explosive atmosphere, make sure the instruments in the
loop are installed in accordance with intrinsically safe or nonincendive field wiring practices.
Electrical shock can result in death or serious injury.
Avoid contact with the leads and the terminals.
Operation and Maintenance
21
Page 28

Operation and Maintenance
December 2017
4.2 Troubleshooting
If a malfunction is suspected despite the absence of diagnostic messages on the communicator display,
follow the procedures described below to verify that the flow meter hardware and process connections
are in good working order. Always approach the most likely and easiest-to-check conditions first.
Table 4-1. Troubleshooting
Symptom Possible cause Corrective action
• Is the flow arrow pointed in the direction of the flow?
Improper installation
System leaks Check for leaks in instrument piping. Repair and seal all leaks.
Contamination/plugging Remove the flow meter and check for contamination.
Questionable accuracy
or erroneous flow signal
Spiking flow signal Two -ph ase flow
Spiking flow signal
(stream service)
Milliamp reading is zero
Electronics not in
communication
Milliamp reading is low
or high
No response to changes
in applied flow
Low reading/high
reading
Closed valve
Connections (remote mount only)
Entrapped air
(liquid and steam applications)
Operating conditions
Improper insulation
(vertical pipes only)
Excessive vibration
• Verify that the cross reservoirs are perfectly level with one another.
• Is there sufficient straight run upstream and downstream of the flow
meter?
Verify that both HI and LO manifold valves are open.
Verify that vent, equalizer, and line valves are properly
positioned per the “start up procedure.”
Verify that the high side of the electronics is connected to the
high side of the flow meter. Check the same for the low side.
Are there uneven water legs caused by air entrapment in the
instrument connections? If so, bleed air.
Are the operating conditions in compliance with those given at
the time the flow meter was purchased?
Check the flow calculation and the fluid parameters for
accuracy.
Double-check pipe inside diameter for proper sizing.
The flow meter is a head measurement device and will not
accurately measure a two-phase flow.
Added insulation may be required to ensure that a phase change
occurs at the cross reservoirs.
Check the impulse piping for vibration.
• Check if power polarity is reversed
• Verify voltage across terminals (should be 10–55 Vdc)
• Check for bad diode in terminal block
• Replace electronics terminal block
• Check power supply voltage at electronics (10.5 Vdc minimum)
• Check load resistance (250 ohms minimum)
• Check if unit is addressed properly
• Replace electronics board
• Check pressure variable reading for saturation
• Check if output is in alarm condition
• Perform 4–20 mA output trim
• Replace electronics board
• Check test equipment
• Check impulse piping for blockage
• Check for disabled span adjustment
• Check electronics security switch
• Verify calibration settings (4 and 20 mA points)
• Contact factory for replacement
• Check impulse piping for blockage
• Check test equipment
• Perform full sensor trim (if software revision is 35 or higher)
• Contact factory for replacement
Reference Manual
00809-0100-4686, Rev KA
22
Operation and Maintenance
Page 29

Reference Manual
00809-0100-4686, Rev KA
Table 4-1. Troubleshooting
Symptom Possible cause Corrective action
• Check impulse piping for blockage
Erratic reading for
pressure variable
• Check damping
• Check for EMF inter ference
• Contact factory for replacement
Check flow direction
Check that the side of the orifice plate marked “Inlet” is facing upstream. If the DP transmitter is remote
mounted from the Rosemount 1195, be sure that the impulse tubing is connected correctly from the
Rosemount 1195 to the DP transmitter (high to high and low to low).
Check orientation
Improper orientation can result in inaccurate measurements.
Check zero
The transmitter may read off in the high or low direction if not zeroed properly at start-up/commissioning. Refer to the appropriate transmitter reference manual for additional information.
Operation and Maintenance
December 2017
Check valves
The correct valve setting for flow measurement are: equalizer valve fully closed, high and low side valves
fully open.
Check configuration/scaling
Is the 20 mA DP URL of the Rosemount 1195 set properly? This may involve sizing the Rosemount 1195
in the Toolkit Software program to confirm.
Confirm the DCS or PLC and transmitter on Rosemount 1195 are scaled consistently.
Is the square root being taken in the DCS or transmitter attached to the Rosemount 1195? The square
root should not be taken in both places.
Check Rosemount 3051SMV configuration
If a Rosemount 3051SMV Transmitter is being used, its enhanced functionality should be taken into
account during configuration and troubleshooting. The square root should not be taken in the DCS if a
Rosemount 3051SMV Transmitter is being used.
See the Rosemount 3051SMV Reference Manual
4.3 RTD Maintenance
To test the 4-wire RTD (refer to Figure 4-1 on page 24):
for additional information.
1. Disconnect power from the electronics.
2. Remove the temperature terminal housing cover.
3. Disconnect the RTD lead wires from the terminal block.
4. Separate the wires so that the un-insulated ends are not touching anything.
Operation and Maintenance
23
Page 30

Operation and Maintenance
W
R
WW
W
R
R
R
4-wire RTD
Terminal housingRosemount 3051SMV
December 2017
5. Check that the resistance measured between the two red wires is the same as the resistance
measured between the two white wires within +/- 0.1 ohms. Take note of the resistance value
measured between the two white wires for use in step 6.
6. Measure the resistance between one red wire and one white wire. Subtract the resistance measured
in step 5 from the resistance measured in this step. Refer to Table 4-2 on page 25 to determine if this
resistance matches the temperature that the RTD is in contact with.
7. Check the resistance between any wire and the RTD head or sheath. An acceptable resistance is 200
K ohms or greater.
8. If any of the above measurements are not within the acceptable range as stated above, contact an
Emerson representative for a replacement RTD.
9. To return the RTD to service, connect the lead wires as shown in Figure 4-1.
10. Replace the Temperature Terminal Housing cover.
11. Re-connect power to the electronics.
Figure 4-1. Temperature Terminal Housing
Reference Manual
00809-0100-4686, Rev KA
4.3.1 Replacing an RTD
If an RTD needs to be replaced, proceed as follows:
1. Disconnect power from the electronics.
2. Remove the temperature terminal housing cover.
3. Disconnect the RTD lead wires from the terminal block.
Note
Take care not to damage the RTD lead wires or insulation.
7
4. Use a
24
/16-in.deep socket and a pair of vise grip pliers to remove the RTD from the thermowell. It is
necessary to feed the wires through the socket to avoid damaging the lead wires. Grip the socket with
the vise grip pliers and turn the socket to remove the RTD.
Operation and Maintenance
Page 31

Reference Manual
00809-0100-4686, Rev KA
Operation and Maintenance
December 2017
Note
A special tool (part number 28-509004-01) may be purchased to perform this task.
5. Install the new RTD using the socket and pliers as in step 4 above.
6. Connect the RTD lead wires to the terminal block (see Figure 4-1).
7. Replace the temperature terminal housing cover.
8. Re-connect power to the electronics.
Table 4-2. Resistance vs. Temperature
IEC 751
Platinum 100, Alpha = 0.00385 RTD
°F Ohms °F Ohms °F Ohms °F Ohms °C Ohms °C Ohms °C Ohms °C Ohms
–330 18.04 60 106.07 450 187.65 840 263.80 –200 18.52 20 107.79 240 190.47 460 267.56
–320 20.44 70 108.23 460 189.67 850 265.68 –190 22.83 30 111.67 250 194.10 470 270.93
–310 22.83 80 110.38 470 191.68 860 267.56 –180 27.10 40 115.54 260 197.71 480 274.29
–300 25.20 90 112.53 480 193.70 870 269.44 –170 31.34 50 119.40 270 201.31 490 277.64
–290 27.57 100 114.68 490 195 .71 880 271.31 –160 35.54 60 123.24 280 204.90 500 280.98
–280 29.93 110 116.83 500 197 .71 890 273.17 –150 39.72 70 127.08 290 208.48 510 284.30
–270 32.27 120 118.97 510 199 .71 900 275.04 –140 43.88 80 130.90 300 212.05 520 287.62
–260 34.61 130 121.11 520 201 .71 910 276.90 –130 48.00 90 134.71 310 215.61 530 290.92
–250 36.94 140 123.24 530 203 .71 920 278.75 –120 52.11 100 138.51 320 219.15 540 294.21
–240 39.26 150 125.37 540 205 .70 930 280.61 –110 56.19 110 142.29 330 222.68 550 297.49
–230 41.57 160 127.50 550 207 .69 940 282.46 –100 60.26 120 146.07 340 226.21 560 300.74
–220 43.88 170 129.62 560 209 .67 950 284.30 –90 64.30 130 149.83 350 229.72 570 304. 01
–210 46.17 180 131.74 570 211 .66 960 286.14 –80 68.33 140 153.58 360 233.21 580 307. 25
–200 48.46 190 133.86 580 213 .63 970 287.98 –70 72.33 150 157.33 370 236.70 590 310. 49
–190 50.74 200 135.97 590 215 .61 980 289.82 –60 76.33 160 161.05 380 240.18 600 313. 71
–180 53.02 210 138.08 600 217 .58 990 291.65 –50 80.31 170 164.77 390 243.64 610 316. 92
–170 55.29 220 140.19 610 219 .55 1000 293.48 –40 84.27 180 168.48 400 247.09 620 320.12
–160 57.55 230 142.29 620 221 .51 1010 295.30 –30 88.22 190 172.17 410 250.53 630 323.30
–150 59.81 240 144.39 630 223 .47 1020 297.12 –20 92.16 200 175.86 420 253.96 640 326.48
–140 62.06 250 146.49 640 225 .42 1030 298.94 –10 96.09 210 179.53 430 257.38 650 329.64
–130 64.30 260 148.58 650 227 .38 1040 300.75 0 100.00 220 183.17 440 260.78 660 332.79
–120 66.54 270 150.67 660 229 .33 1050 302.56 10 103.90 230 186.84 450 26 4.18
–110 68.77 280 152.75 670 231.27 1060 304.37
–100 71.00 290 154.83 680 233.21 1070 306.17
–90 73.22 300 156.91 690 235.15 1080 307.97
–80 75.44 310 158.98 700 237.09 1090 309.77
–70 77.66 320 161.05 710 239.02 1100 311.56
–60 79.86 330 163.12 720 240.95 1110 313.35
–50 82.07 340 165.18 730 242.87 1120 315.14
–40 84.27 350 167.24 740 244.79 1130 316.92
–30 86.47 360 169.30 750 246.71 1140 318.70
–20 88.66 370 171.35 760 248.62 1150 320.47
–10 90.85 380 173.40 770 250.53 1160 322.24
0 93.03 390 175.45 780 252.44 1170 324.01
10 95.21 400 177.49 790 254.34 1180 325.77
20 97.39 410 179.53 800 256.24 1190 327.53
30 99.57 420 181.56 810 258.14 1200 329.29
40 101.74 430 183.59 820 260.0 3 1210 331.04
50 103.90 440 185.62 830 261.9 2 1220 332.79
Note
To convert from °C to °F: (1.8 x [°C]) + 32 = °F
Example: (1.8 x 100) + 32 = 212 °F
To convert from °F to °C: 0.556 ([°F] – 32) = °C
Example: 0.556 (212 – 32) = 100 °C
Operation and Maintenance
25
Page 32

Operation and Maintenance
December 2017
Reference Manual
00809-0100-4686, Rev KA
26
Operation and Maintenance
Page 33

Specifications and Reference Data
December 2017
Reference Manual
00809-0100-4686, Rev KA
Appendix A Specifications and Reference Data
Product Certifications . . . . . . . . . . . . . . . . . . . . . . . . . . . . . . . . . . . . . . . . . . . . . . . . . . . . . . . . . . . . . . . . . page 27
Ordering Information, Specifications, and Drawings . . . . . . . . . . . . . . . . . . . . . . . . . . . . . . . . . . . . . . .page 27
A.1 Product Certifications
To view current Rosemount 1195, 2051CFP, 3051CFP, and
3051SFP Product Certifications, follow these steps:
1. Go to Emerson.com/Rosemount/Rosemount-1195-
Integral-Orifice-Primary-Element.
2. Scroll as needed to the green menu bar and click
Documents & Drawings.
3. Click Manuals & Guides.
4. Select the appropriate Quick Start Guide.
A.2 Ordering Information,
Specifications, and
Drawings
To view current Rosemount 1195, 2051CFP, 3051CFP, and
3051SFP Ordering Information, Specifications, and
Drawings, follow these steps:
1. Go to Emerson.com/Rosemount/Rosemount-1195-
Integral-Orifice-Primary-Element.
2. Scroll as needed to the green menu bar and click
Documents & Drawings.
3. For installation drawings, click Drawings &
Schematics and select the appropriate document.
4. For ordering information, specifications, and
dimensional drawings, click Data Sheets & Bulletins
and select the appropriate Product Data Sheet.
27
Specifications and Reference Data
Page 34

Reference Manual
00809-0100-4686, Rev KA
Specifications and Reference Data
December 2017
Specifications and Reference Data
28
Page 35

Page 36

Global Headquarters
Emerson Automation Solutions
6021 Innovation Blvd.
Shakopee, MN 55379, USA
+1 800 999 9307 or +1 952 906 8888
+1 952 949 7001
RFQ.RMD-RCC@Emerson.com
North America Regional Office
Emerson Automation Solutions
8200 Market Blvd.
Chanhassen, MN 55317, USA
+1 800 999 9307 or +1 952 906 8888
+1 952 949 7001
RMT-NA.RCCRFQ@Emerson.com
Latin America Regional Office
Emerson Automation Solutions
1300 Concord Terrace, Suite 400
Sunrise, FL 33323, USA
+1 954 846 5030
+1 954 846 5121
RFQ.RMD-RCC@Emerson.com
Reference Manual
00809-0100-4686, Rev KA
December 2017
Europe Regional Office
Emerson Automation Solutions Europe GmbH
Neuhofstrasse 19a P.O. Box 1046
CH 6340 Baar
Switzerland
+41 (0) 41 768 6111
+41 (0) 41 768 6300
RFQ.RMD-RCC@Emerson.com
Asia Pacific Regional Office
Emerson Automation Solutions
1 Pandan Crescent
Singapore 128461
+65 6777 8211
+65 6777 0947
Enquiries@AP.Emerson.com
Middle East and Africa Regional Office
Emerson Automation Solutions
Emerson FZE P.O. Box 17033
Jebel Ali Free Zone - South 2
Dubai, United Arab Emirates
+971 4 8118100
+971 4 8865465
RFQ.RMTMEA@Emerson.com
Linkedin.com/company/Emerson-Automation-Solutions
Twitter.com/Rosemount_News
Facebook.com/Rosemount
Youtube.com/user/RosemountMeasurement
Google.com/+RosemountMeasurement
Standard Terms and Conditions of Sale can be found on the Terms and Conditions of
Sale page.
The Emerson logo is a trademark and service mark of Emerson Electric Co.
Paine and Paine logotype are trademarks of Emerson.
All other marks are the propert y of their respective owners.
© 2017 Emerson. All rights reserved.
 Loading...