


FASHION FORWARD WATCHES
inspired by

ENGLISH
NEDERLANDS
FRANÇAIS
DEUTSCH
ESPAÑOL
ITALIANO
4
8
12
16
20
24
Instructions
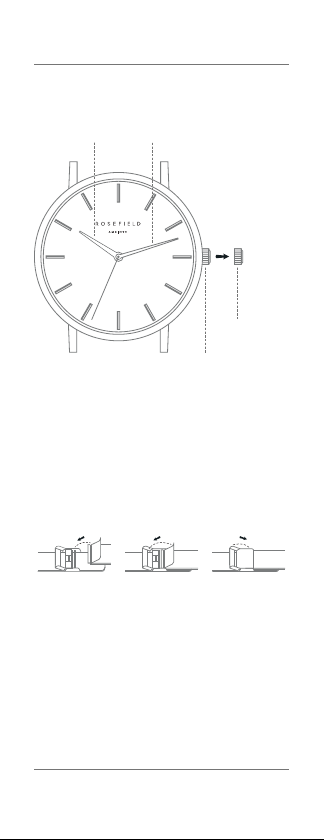
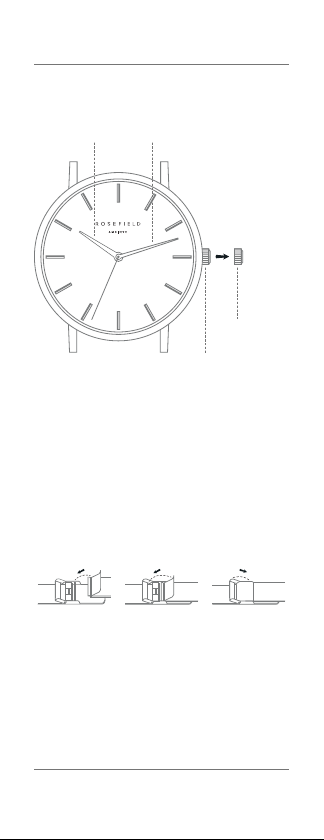
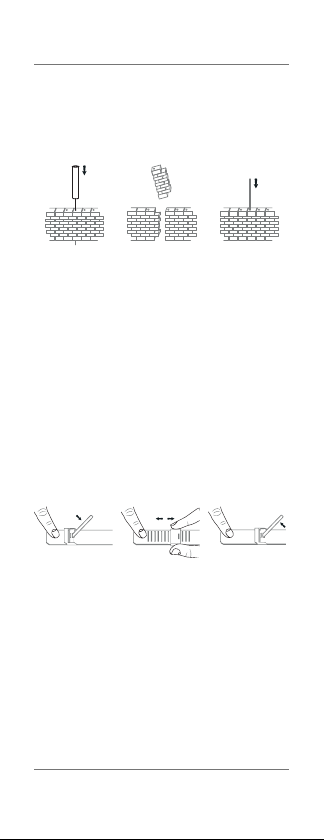
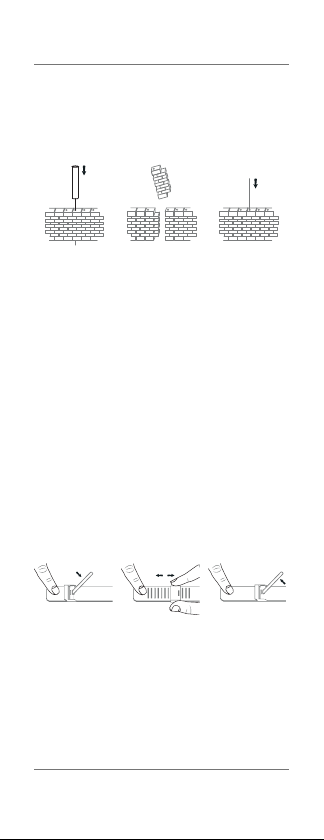
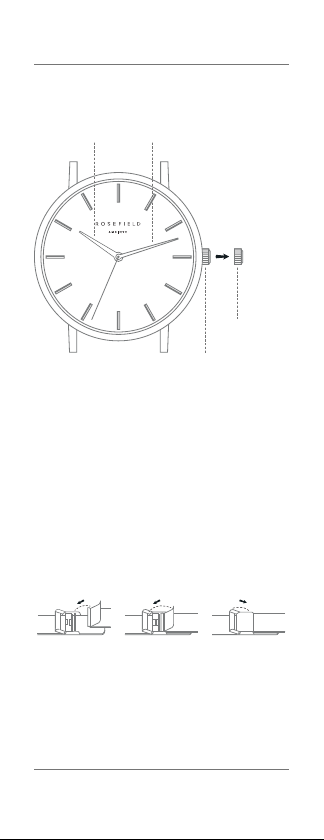
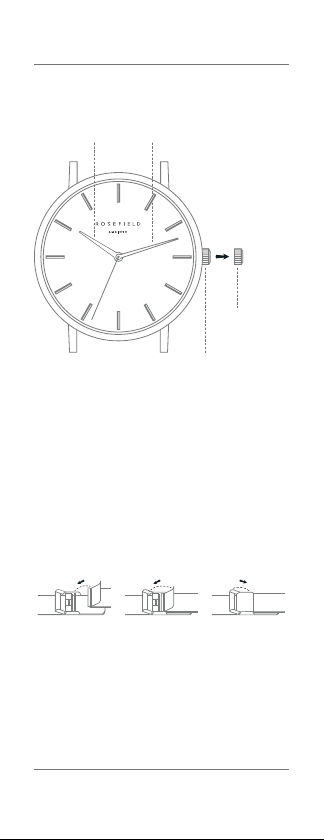
SETTING THE TIME
Hour hand Minute hand
1st Position
Normal crown position
1.
Remove the plastic stopper to start the watch.
2.
Pull the crown out to the first position.
3.
Turn the crown to set the time.
4.
Push the crown back to the normal position.
CLOSING THE CLASP OF YOUR MERCER WATCH
1. Hook the top
part of the clasp
onto the thin
metal bar.
2. Snap the
closure on.
ENG
3. Clasp the cover
over to securely
close your mesh
watch.
Instructions
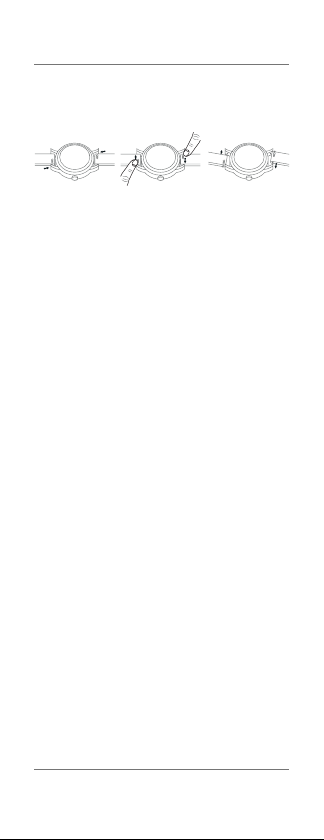
ADJUSTING YOUR STRAP
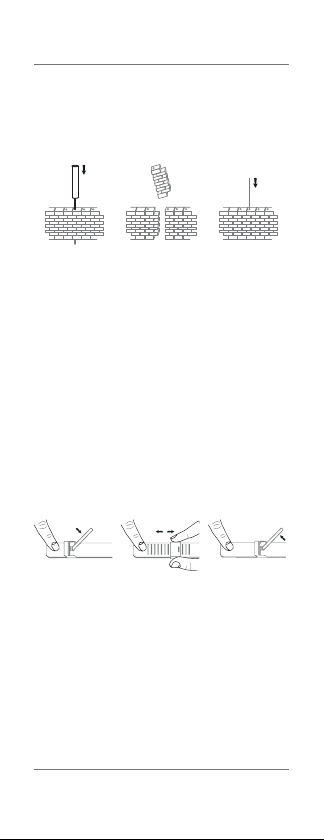
ADJUSTING THE SIZE OF YOUR STEEL BAND
1. Insert
adjustment tool
(supplied with
every steel band)
into the hole on
the side of the
band and push
the pin out in the
direction of the
arrow. Using a
small household
hammer, tap
lightly until the
pin comes out
the other side.
Grasp the pin and
pull out.
ADJUSTING THE SIZE OF YOUR MESH BAND
1. Insert the
adjustment tool
(supplied with
every mesh band)
into the slot and
lift up the plate
clamp.
For instruction videos, we invite you to consult the Customer Support
2. Remove or add
required strap
links. If removing
more than one
strap link, remove
an equal number
of links from both
sides to keep the
strap even and
symmetrical.
2. On the back
side, slide the
locking clasp
to the desired
position to adjust
the length of the
band.
section on our website: www.roseeldwatches.com/faq/
3. After removing
or adding the
necessary
number of strap
links, place the
pins back in the
opposite direction
of the arrows.
Tap the pins back
through using the
hammer to finish.
3. Press the plate
clamp back down
(firmly) to lock the
clasp to the mesh
band.
Instructions
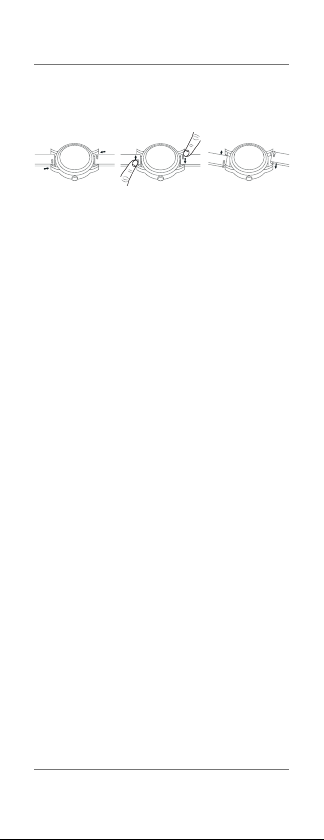
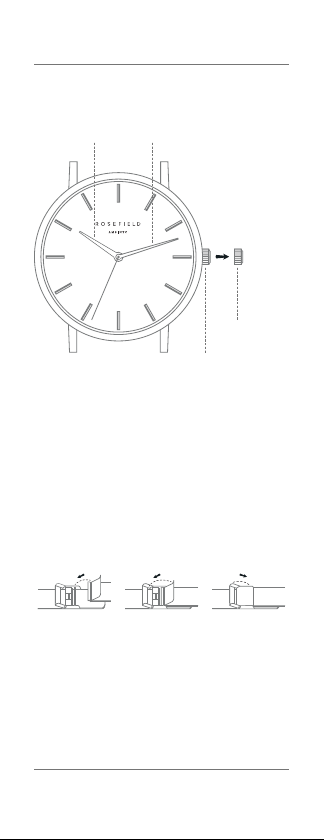
CHANGING YOUR STRAP
1. Securely hold
the watch and
locate the pin
mechanism on the
bottom side of the
strap.
2. Slide the pin to
the other side to
release the strap
from the lug.
3. To attach a new
strap, start with
the pin located
on the opposite
side of the slide
mechanism. Place
the pin in the
lug, while slightly
tilting the strap
forward. Slide the
pin mechanism
and place the
other pin in
the lug.
RETURNS AND EXCHANGES
Any purchase made through the website
www.rosefieldwatches.com may be returned within 14
days from receipt, without stating a reason. This right
applies only in the case that the product and its original
packaging can be returned in the same state as when
received.
Please note that removal of the protective stickers voids
any exchange or refund during this period unless the
product adheres to the warranty guidelines set out in the
Terms & Conditions section on our website:
www.rosefieldwatches.com/terms-n-conditions/
You can find the return form in the Shipping & Returns
section on our website:
www.rosefieldwatches.com/shipping-returns/
ENG

Instructions
INTERNATIONAL WARRANTY
ROSEFIELD oers a warranty term of two years from the
date of purchase. The two year warranty on a ROSEFIELD
watch guarantees the buyer that the product meets the
standards of usabilty, reliability and
durability.
The warranty does not apply to:
- damages as a result of inattention or improper usage
such as scratching, bouncing or falling.
- failure or damage caused by unjustifiable repair or
modification performed by a third party, without prior
written permission by ROSEFIELD.
- failure or damage caused by fire or water (the watches
are 3 ATM water-resistant).
- Wear traces visible on the watch (e.g. minor scratches
on the case and/or crystal, alteration of the color on the
watchband and scratches or softening of the leather
strap).
- battery replacement, also not during the warranty term.
For further instructions, we invite you to consult the Customer Support
section on our website: www.roseeldwatches.com/faq/
Instructies
DE TIJD INSTELLEN
Uurwijzer Minutenaanwijzer
1.
Verwijder de plastic stopper om het horloge
te starten.
2.
Trek de kroon uit tot de eerste positie.
3.
Draai aan de kroon voor het instellen van de
juiste tijd.
4.
Druk de kroon terug naar de normale positie.
HET SLUITEN VAN JE MESH HORLOGE
Eerste positie
Normale kroon postitie
1. Haak het
bovenste deel van
de sluiting om het
staafje.
2. Klik de sluiting
vast.
NED
3. Klik daarna
het andere klepje
vast om je mesh
horloge goed te
sluiten.
Instructies
AANPASSEN VAN DE HORLOGEBAND
DE GROOTTE VAN DE STALEN BAND AANPASSEN
1. Plaats het
afstel instrument
(toegevoegd bij
iedere stalen
band) in het
gaatje aan de
zijkant van de
band en druk de
pin eruit in de
richting van de
pijl. Gebruik hierbij
een kleine hamer,
tik zachtjes tot
de pin eruit komt.
Pak de pin en trek
deze eruit.
DE GROOTTE VAN DE MESH BAND AANPASSEN
1. Plaats het
afstel instrument
(toegevoegd
bij iedere mesh
band) in de
opening en open
het slotje.
Voor instructievideo’s verwijzen we je graag naar onze Klantenonders-
teuning sectie op onze website: www.roseeldwatches.com/faq/
2. Verwijder
of voeg de
benodigde
schakels toe. Als
je meer dan één
schakel verwijdert,
verwijder dan
evenveel schakels
van beide kanten
om de band
symmetrisch te
houden.
2. Schuif aan
de achterzijde
het slotje tot de
gewenste positie
om de lengte van
de band aan te
passen.
3. Na het
verwijderen of
toevoegen van
de benodigde
schakels, plaats
je de pinnen terug
in tegengestelde
richting van de
pijlen. Tik zachtjes
met een kleine
hamer tot de
pinnen weer op
hun plaats zitten.
3. Druk het slotje
(hard) dicht om
het slotje vast
te zetten op de
mesh band. Om
het horloge om
te doen, plaats
de haak over het
staafje en druk de
sluiting vast.
Instructies
HORLOGEBAND VERWISSELEN
1. Houd het
horloge goed
vast en vind het
pinsysteem aan
de onderzijde van
de bandjes.
2. Schuif de pin
naar de zijkant
om de band los
te klikken van
de kast.
3. Om een nieuwe
band vast te
maken, begin je
met de pin aan
de andere kant
van het schuif-
mechanisme.
Druk die pin in het
gaatje terwijl je de
band naar voren
brengt. Gebruik
dan het schuifmechanisme om
de andere pin vast
te klikken.
RETOURNEREN & OMRUILEN
Iedere aankoop via onze website
www.rosefieldwatches.com mag binnen 14 dagen
geretourneerd worden, zonder het opgeven van een reden.
Dit geldt alleen wanneer het product en de originele
verpakking geretourneerd kunnen worden in dezelfde staat
als waarin deze ontvangen zijn.
Let op: omruiling of restitutie is niet mogelijk na verwijdering
van de protectie stickers. Met uitzondering van producten
die onder de garantie vallen zoals vermeld op onze
website: www.rosefieldwatches.com/terms-n-conditions/
Het retourformulier vind je in de FAQ op onze website:
www.rosefieldwatches.com/shipping-returns/
NED

Instructies
INTERNATIONALE GARANTIE
ROSEFIELD biedt een garantie van twee jaar vanaf de
aankoopdatum. De twee jaar garantie garandeert de
koper dat het product voldoet aan de standaarden van
bruikbaarheid, betrouwbaarheid en duurzaamheid.
De garantie geldt niet op:
- Schade als gevolg van onoplettendheid of onjuist gebruik
zoals bekrassen, stoten of laten vallen.
- Schade als gevolg van wijzigingen of reparaties door
derden, zonder daar schriftelijke toestemming voor te
hebben van ROSEFIELD.
- Schade veroorzaakt door vuur of water (de horloges zijn 3
ATM waterbestendig).
- Esthetische veranderingen die ontstaan bij het dragen,
zoals normale slijtage en veroudering (zoals verandering
van de kleur van de band, krassen op de behuizing of glas,
het zachter worden van of krassen op lederen bandjes).
- Batterij vervanging, ook niet tijdens de garantieperiode.
Voor aanvullende instructies, verwijzen we je graag naar de Klantenon-
dersteuning te vinden op onze website: www.roseeldwatches.com/faq/
Instructions
RÉGLER L’HEURE
Aiguille des
Aiguille des
heures
minutes
1.
Retirez l’embout de protection plastique.
2.
Tirez la couronne jusqu’au premier déclic.
3.
Tournez la couronne pour ajuster l’heure.
4.
Repoussez la couronne jusqu’en position
normale.
FERMER LE FERMOIR DE VOTRE
BRACELET EN MAILLES
Premier déclic
Position normale de la
couronne
1. Accrochez
le crochet du
fermoir sur la fine
barre en métal.
2. Refermez la
plaque en métal
par dessus.
FRA
3. Refermez la
petite plaque
du fermoir afin
de verrouiller la
fermeture de votre
montre.
Instructions
AJUSTER VOTRE BRACELET
AJUSTER VOTRE BRACELET EN ACIER
1. Insérez l’outil de
réglage (fourni
avec chaque
bracelet en
acier) dans le
trou situé sur le
côté du bracelet
et poussez la
broche dans le
sens de la flèche.
À l’aide d’un
petit marteau,
taper légèrement
jusqu’à ce que
la broche sorte
de l’autre côté
du bracelet.
Saisissez la
broche et tirez-la
pour la sortir
complètement.
AJUSTER VOTRE BRACELET EN MAILLES
1. Insérez l’outil de
réglage (fourni
avec chaque
bracelet en
mailles) dans la
fente et soulevez
la plaque.
Pour les vidéos d’instructions, nous vous invitons à consulter la section
Service Client sur notre site: www.roseeldwatches.com/faq/
2. Retirez
ou ajoutez
les maillons
nécessaires. Si
vous désirez retirer
plus d’un maillon,
retirez un nombre
égal de maillons
de chaque côté
du bracelet afin
de préserver le
bracelet égal et
symétrique.
2. Sur la face
arrière, faites
glisser le fermoir le
long du bracelet
en mailles afin
d’atteindre
la position
souhaitée.
3. Après avoir
enlevé ou ajouté
le nombre
nécessaire de
maillons à votre
bracelet, placez
les broches
dans la direction
opposée des
flèches. Tapez
doucement sur les
broches à l’aide
du marteau pour
terminer.
3. Pressez
fermement sur
la plaque afin
de verrouiller le
fermoir en place
sur le bracelet en
mailles.

Instructions
CHANGER VOTRE BRACELET
1. Retournez votre
montre afin de
repérer la goupille
située sous le
bracelet.
2. Faites glisser la
goupille en sens
inverse afin de
libérer le bracelet
du cadran.
3. Pour attacher
un nouveau
bracelet,
commencez par
insérer le côté
opposé à celui
de la goupille.
Placez la broche
dans le trou
tout en gardant
le bracelet
légèrement incliné.
Faites glisser la
goupille et insérez
l’autre côté de la
broche dans le
trou opposé.
RETOURS ET ÉCHANGES
Tout achat eectué sur notre site internet
www.rosefieldwatches.com peut être retourné dans les 14
jours suivant la réception du colis, sans raison préalable.
Le produit ainsi que son emballage doivent être retournés
dans leur condition d’origine.
Veuillez noter que le retrait des autocollants de
protection prévient toute possiblité d’échange et/ou de
remboursement à moins que votre produit n’adhère aux
conditions de garanties énoncées dans les Termes &
Conditions accessibles sur notre site internet:
www.rosefieldwatches.com/terms-n-conditions/
Vous pouvez accéder au formulaire de retour dans la
section Échanges & Retours sur notre site internet:
www.rosefieldwatches.com/shipping-returns/
FRA

Instructions
GARANTIE INTERNATIONALE
ROSEFIELD ore une garantie de deux ans à compter de
la date d’achat.
La garantie de deux ans sur les montres Rosefield garantit
à l’acheteur que le produit répond aux normes d’usage
normal et de fiabilité.
La garantie ne couvre pas:
• Les dommages liés à la mauvaise attention ou mauvais
usage tels que rayures, chocs ou chutes.
• Panne ou dommages causés par une réparation
injustifiable ou modification eectuée par un tiers, sans
permission écrite préalable de la part de Rosefield.
• Panne ou dommages causés par le feu ou l’eau (les
montres sont 3 ATM résistantes à l’eau)
• Changements esthétiques dûs à un usage normal
régulier et à travers le temps (ex: changement de couleur
du bracelet, rayures fines sur le boitîer, assouplissement ou
rayures sur le cuir).
• Changement de la pile, et ce également pendant la
période de garantie.
Pour plus d’informations, nous vous invitons à consulter la section
Service Client sur notre site: www.roseeldwatches.com/faq/
Anleitung
EINSTELLEN DER UHRZEIT
Stundenzeiger Minutenzeiger
1.
Entfernen Sie den Stopper um die Uhr zu
aktivieren.
2.
Ziehen Sie die Krone auf die Position 1 heraus.
3.
Stellen Sie die Zeiger durch Drehen der Krone
ein.
4.
Drücken Sie die Krone zurück in die
Normalstellung.
DEN VERSCHLUSS DER MERCER
UHR SCHLIESSEN
Position 1
Krone (Normalstellung)
1. Haken Sie den
oberen Teil des
Verschlusses
in den dünnen
Metallstab.
2. Schließen Sie
den Verschluss
und drücken Ihn
an bis Sie ein
klicken hören.
DEU
3. Schließen
Sie jetzt die
Klemme um Ihre
Mercer sicher zu
befestigen.

Anleitung
UHRENARMBAND ANPASSEN
ANPASSEN DER GRÖSSE DES STAHLBAND
1. Einstellwerkzeug
(geliefert mit
jedem Stahlband)
in das Loch auf
der Seite des
Bandes einsetzen
und den Stift
in Pfeilrichtung
drücken. Mit
einem kleinen
Haushalt Hammer,
tippen Sie leicht,
bis der Pin aus
der anderen
Seite rauskommt.
Ziehen sie dann
den Stift raus.
ANPASSEN DER GRÖSSE DES MESHBANDES
1. Platzieren
Sie das
Einstellwerkzeug
(geliefert mit
jedem Meshband)
in die Önung
und heben Sie die
Plattenklemme an.
Eine genaue Anleitung nden Sie auch in unserem Anleitungs Video auf
2. Entfernen
oder fügen Sie
erforderliche
Riemenverbindungen
hinzu. Wenn Sie
mehr als eine
Verbindung
entfernen,
entfernen Sie die
gleiche Anzahl
von Gliedern von
beiden Seiten, um
das Gurtband
gleichmäßig und
symmetrisch zu
halten
2. Schieben Sie
den Verschluss
auf der Rückseite
in die gewünschte
Position, um die
Größe des Bandes
anzupassen.
unserer Webseite: www.roseeldwatches.com/faq/
3. Nach dem
Entfernen oder
Hinzufügen der
notwendigen
Anzahl von
Verbindungen
legen Sie die
Stifte wieder in die
entgegengesetzte
Richtung der
Pfeile. Tippen Sie
mit dem Hammer
die Stifte zurück in
das Band.
3. Drücken Sie die
Plattenklemme
nach unten
(fest), um den
Verschluss zu
schließen. Um die
Uhr anzuziehen,
platzieren Sie
den Haken über
den Stab und
schließen Sie die
Klemme.

Anleitung
LEDERARMBAND WECHSELN
1. Halten Sie die
Uhr fest, um den
Stiftmechanismus
an der Unterseite
des Bandes zu
lokalisieren.
2. Schieben Sie
den Stift zu der
anderen Seite um
das Lederband
von dem Gehäuse
zu lösen.
3. Um ein neues
Lederarmband
anzubringen,
beginnen Sie mit
dem Stift an der
anderen Seite des
Mechanismus.
Bringen Sie
den Stift am
Gehäuse an und
heben Sie das
Lederarmband
leicht an.
Schließen Sie den
Stiftmechanismus.
RETOUREN UND UMTAUSCH
Jede Bestellung via unsere Webseite
www.rosefieldwatches.com kann bis zu 14 Tagen nach
Erhalt, ohne Angaben von Gründen, zurückgeschickt
werden.
Dies gilt nur für den Fall, dass das Produkt sich in
Original Zustand und Verpackung befindet. Bitte
beachten Sie, dass das Entfernen der Versiegelung
dieses Recht widerruft und das Produkt und hiernach nur
gilt, falls das Produkt defekt ist und unter die Garantie
Regelung fällt. Lesen Sie hierzu bitte unsere Allgemeinen
Geschäftsbedingungen unter
www.rosefieldwatches.com/de/terms-n-conditions/.
Das Rücksendeformular finden Sie auf unserer Webseite
unter www.rosefieldwatches.com
DEU

Anleitung
INTERNATIONALE GARANTIE
Rosefield bietet eine zweijährige Garantie ab des
Kaufdatums. Die zweijährige Garantie auf Rosefield
Uhren garantiert dem Kunden, dass das Produkt die
Standarde der Zuverlässigkeit, Benutzerfreundlichkeit und
Langlebigkeit erfüllt.
Die Garantie gilt nicht bei:
• Schäden die durch Unachtsamkeit oder unsachgemäße
Verwendung entstehen, z.B. Kratzer oder fallen lassen.
• Schäden als Folge von Änderungen oder Reparaturen
von Dritten die ohne schriftliche Erlaubnis von Rosefield
vorgenommen wurden.
• Schäden durch Feuer oder Wasser (die Uhren sind 3 AT
wasserdicht).
• Ästhetische Veränderungen die durch das tragen der Uhr
verursacht werden, wie Verschleiß oder Abnutzung (z.B.
der Farbe des Armbandes, Kratzer auf dem Gehäuse oder
Glas, Aufweichung oder Kratzer des Lederarmbandes).
• Austausch der Batterie, auch nicht während der
Garantiezeit.
Weitere Informationen nden Sie auch bei unserem Kundendienst unter
www.roseewatches.com/faq

Soporte
PONER LA HORA
Aguja horaria Aguja minutera
1.ª posición
Posición normal de
corona
1.
Retira el separador de plástico para poner en
marcha el reloj.
2.
Saca la corona a la primera posición.
3.
Gira la corona para poner la hora.
4.
Vuelve a poner la corona en la posición
normal.
ABROCHAR EL CIERRE DE TU RELOJ DE MALLA
1. Engancha la
parte superior del
cierre a la varilla
metálica.
2. Presiona el
cierre con fuerza.
ESP
3. Cierra la
cubierta para
abrochar
firmemente tu
reloj de malla.

Soporte
AJUSTAR LA CORREA
AJUSTAR EL TAMAÑO DE LA CORREA DE ACERO
1. Inserte la
herramienta
de ajuste
(suministrada
con cada correa
de acero) en el
orificio del lado
de la banda
y empuje la
herramienta
hacia fuera en la
dirección de la
flecha. Utilizando
un pequeño
martillo, golpee
levemente hasta
que el pivote
salga al otro
lado. Sujete la
herramienta y
sáquela.
AJUSTAR EL TAMAÑO DE LA CORREA DE MALLA
1. Inserta la
herramienta
de ajuste
(suministrada
con cada correa
de malla) en la
ranura y levanta
la hebilla de
placa.
En la sección de Atención al Cliente de nuestra web encontrarás vídeos
2. Quite o agregue
los enlaces de
correa necesarios.
Si retira más de
un eslabón de
correa, quite un
número igual
de eslabones
de ambos lados
para mantener la
correa uniforme y
simétrica.
2. En la parte
trasera, desliza el
cierre de bloqueo
hasta la posición
deseada para
ajustar la longitud
de la correa.
explicativos: www.roseeldwatches.com/faq/
3. Una vez
haya quitado
o agregado el
número necesario
de eslabones de
la correa, coloque
los pivotes en
la dirección
opuesta de las
flechas. Golpee
nuevamente los
pivotes usando
el martillo para
terminar.
3. Presiona la
hebilla de placa
(con fuerza) para
fijar el cierre a la
correa de malla.
Para ponerte el
reloj, coloca el
gancho sobre la
varilla y cierra la
placa de bloqueo.

Soporte
CAMBIAR LA CORREA
1. Sujeta el reloj
firmemente
y localiza el
mecanismo del
pasador en la
parte inferior de
la correa.
2. Desliza el
pasador hasta
el otro lado para
soltar la correa de
las asas.
3. Para montar
una correa nueva,
empieza por el
pasador situado
en el lado opuesto
al mecanismo de
deslizamiento.
Coloca el pasador
en las asas
mientras inclinas
ligeramente la
correa hacia
delante. Desliza
el mecanismo del
pasador y coloca
el otro pasador en
las asas.
DEVOLUCIONES Y CAMBIOS
Todas las compras realizadas en el sitio web
www.rosefieldwatches.com se pueden devolver en el plazo
de 14 días a partir de su recepción sin indicar el motivo.
Este derecho solo tiene efecto en el caso de devolver el
producto y su embalaje original en el mismo estado de su
recepción.
Ten en cuenta que el hecho de retirar los adhesivos
protectores anula el derecho a cambio o devolución
durante este plazo, excepto si el producto cumple los
supuestos de garantía indicados en la sección Términos y
Condiciones de nuestro sitio web:
www.rosefieldwatches.com/terms-n-conditions/
Puedes encontrar el formulario de devolución en la
sección Envíos & Devoluciones de nuestro sitio web:
www.rosefieldwatches.com/shipping-returns/
ESP

Soporte
GARANTÍA INTERNACIONAL
ROSEFIELD ofrece una garantía de dos años a partir
de la fecha de compra. La garantía de dos años de un
reloj ROSEFIELD asegura al comprador que el producto
cumple el nivel de calidad en términos de uso, fiabilidad
y resistencia.
La garantía no se aplica a:
• Daños causados por descuidos o usos inadecuados,
como arañazos, golpes o caídas.
• Averías o daños causados por una reparación o
modificación no justificable efectuada por terceros sin el
permiso previo por escrito de ROSEFIELD.
• Averías o daños causados por fuego o agua (nuestros
relojes ofrecen 3 ATM de resistencia al agua).
• Señales de desgaste visibles en el reloj (p. ej., pequeños
arañazos en la caja y/o cristal, alteración del color en la
correa y arañazos o reblande- cimiento de la correa de
piel).
• Sustitución de pilas, incluso dentro del plazo de la
garantía.
En la sección de Atención al Cliente de nuestra web encontrarás
instrucciones más detalladas: www.roseeldwatches.com/faq/
Supporto
IMPOSTARE L’ORA
Lancetta dell’
Lancetta dei
ora
minuti
Normale posizione
della corona
1.
Rimuovere la protezione di plastica.
2.
Posizionare la corona in prima posizione.
3.
Ruotare la corona per impostare l’ora.
4.
Riposizionare la corona nella sua normale
posizione.
CHIUDERE IL FERMAGLIO DEL VOSTRO
OROLOGIO IN RETE D’ACCIAIO
Prima
posizione
della corona
1. Agganciare la
parte superiore
del fermaglio alla
sottile barra di
metallo.
2. Fare scattare la
chiusura.
ITA
3. Agganciare la
copertura per
chiudere il vostro
orologio in rete
d’acciaio in modo
sicuro.

Supporto
REGOLARE IL CINTURINO
REGOLARE LA LUNGHEZZA DEL VOSTRO CINTURINO
IN ACCIAIO
1. Inserire l’utensile
di regolazione (in
dotazione con
ogni cinturino in
acciaio) all’interno
della fessura sul
lato del cinturino,
e spingere il perno
nella direzione
della freccia.
Utilizzando
un piccolo
martello, colpire
leggermente il
perno fino a farlo
uscire dalla parte
opposta. Aerrare
il perno e tirarlo
verso l’esterno.
REGOLARE LA LUNGHEZZA DEL VOSTRO CINTURINO
IN RETE D’ACCIAIO
1. Inserire
l’utensile di
regolazione (in
dotazione con
ogni cinturino in
rete d’acciaio)
per la regolazione
nella fessura
e sollevare
la piastra di
fissaggio.
Per le video istruzioni, vi invitiamo a consultare la sezione Servizio
2. Rimuovere
o aggiungere
maglie del
cinturino. Nel caso
in cui si volesse
rimuovere più
di una maglia,
si consiglia di
rimuovere un
numero pari
di maglie da
entrambi i lati
per mantenere
la lunghezza
del cinturino
simmetrica.
2. Sul lato
inferiore, fare
scorrere la fibbia
fino alla posizione
desiderata per
regolare la
lunghezza del
cinturino.
Clienti sul nostro sito: www.roseeldwatches.com/faq/
3. Dopo aver
aggiunto o
rimosso il numero
necessario di
maglie, inserire
il perno nella
direzione opposta
rispetto alle
frecce. Colpire
leggermente
il perno nella
direzione opposta
per completare la
procedura.
3. Spingere
saldamente
la piastra di
fissaggio verso il
basso per fissarla
al cinturino
d’acciaio.

Supporto
CAMBIARE IL CINTURINO
1. Impugnare
saldamente
l’orologio e
individuare il
gancetto del
meccanismo di
apertura situato
sul lato inferiore
del cinturino.
2. Fare scorrere
il gancetto verso
il lato opposto
per rimuovere il
cinturino.
3. Per applicare
un nuovo
cinturino, iniziare
con il gancetto
situato sul lato
opposto rispetto
al meccanismo
di apertura.
Inserire il gancetto
all’interno della
cassa, piegando
leggermente il
cinturino in avanti.
Fare scorrere il
meccanismo di
apertura e inserire
l’altro gancetto
all’interno della
cassa
RESTITUZIONI & CAMBI
Ogni acquisto eettuato sul nostro sito web
www.rosefieldwatches.com può essere restituito entro
14 giorni dalla ricezione dell’ordine, senza obbligo di
motivazione. Questo diritto si applica solo nel caso in cui
il prodotto e il suo imballaggio originale possano essere
restituiti nelle stesse condizioni in cui sono stati ricevuti.
Si prega di notare che la rimozione della pellicola
protettiva rende nulla la garanzia di cambio o rimborso
a meno che il prodotto non aderisca alle indicazioni di
garanzia definite nella sezione Termini & Condizioni del
nostro sito: www.rosefieldwatches.com/terms-n-conditions/
È possibile trovare il Modulo di restituzione nella sezione
Spedizioni & Restituzioni del nostro sito:
www.rosefieldwatches.com/shipping-returns/
ITA

Supporto
GARANZIA INTERNAZIONALE
ROSEFIELD ore una garanzia di due anni dalla data
dell’acquisto. I due anni di garanzia applicati ad un
orologio ROSEFIELD assicurano al cliente che il prodotto
raggiunga gli standards di usabilità, adabilità e
resistenza.
La garanzia non si applica a:
- Danni causati da disattenzione o uso improprio del
prodotto, come gra o cadute.
- Inosservanza o danni causati da un’ingiustificata
riparazione o modifica eettuata da terze parti senza
previo permesso scritto da parte di ROSEFIELD.
- Inosservanza o danni causati da fuoco o acqua (gli
orologi sono resistenti all’acqua 3ATM).
- Tracce di usura visibili sulla superficie dell’orologio (es.
alterazione del colore dei cinturini; gra sulla cassa e/o
sul cristallo; usura o graature dei cinturini in pelle).
- Sostituzione della batteria, anche nel periodo escluso
dalla garanzia.
Per maggiori informazioni, vi invitiamo a consultare la sezione Servizio
Clienti del nostro sito: //www.roseeldwatches.com/faq/


Thank you for your purchase from
Dank u voor uw aankoop bij
Merci de votre achat chez
Vielen Dank ür Ihren Einkauf bei
Gracias por tu compra en
Grazie per il vostro acquisto da


www.roseeldwatches.com
 Loading...