

Page 1
Page 2
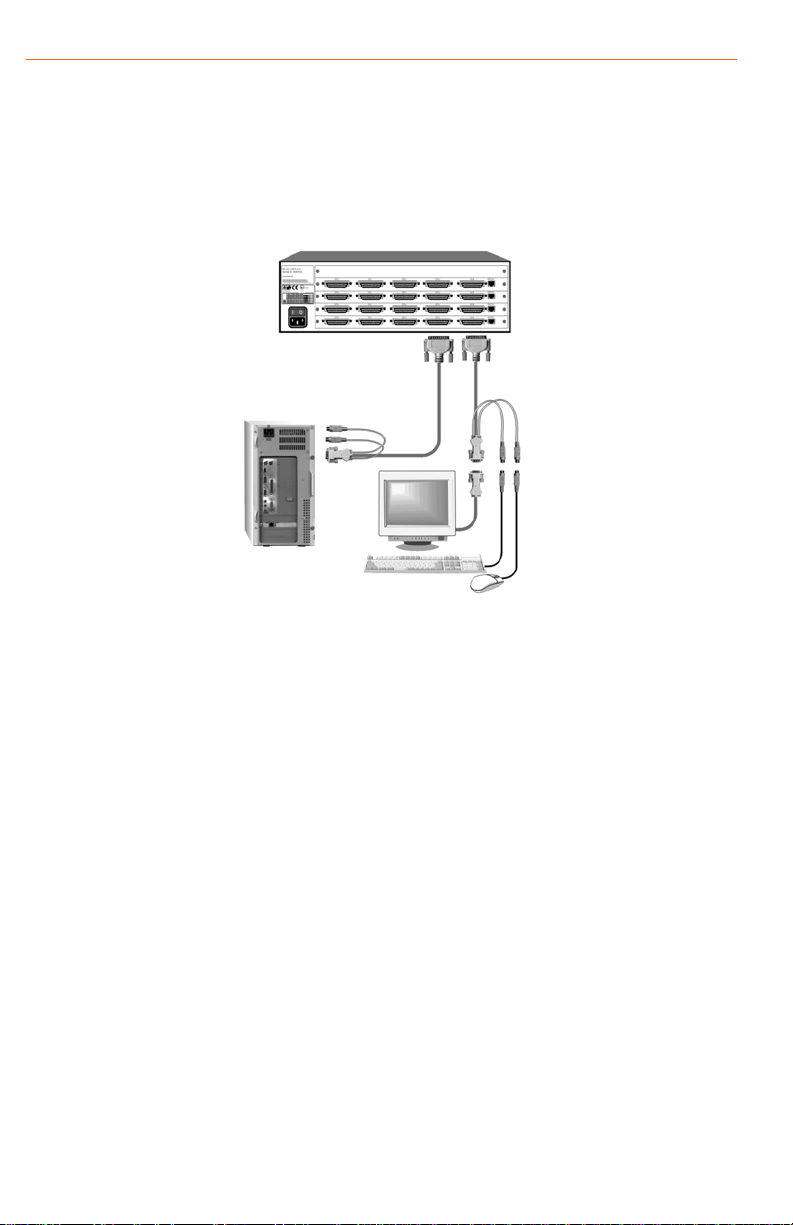
UltraMatrix Single unit Installation
KVM Station
KVM adapter
cable
CPU adapter
cable
The following installation procedure features the 4XE model. Installation for
other models (2, 4, or 8 computers) follow the same basic procedure.
It is recommended that power to all monitors, computers, and UltraMatrix be off
until all connections have been made.
The below illustration shows the basic cable connections for UltraMatrix and the
installation steps to properly connect the cables, computers, and KVM stations
to UltraMatrix.
1. Connect a KVM station to the KVM 1 DB25F connector using the
appropriate KVM adapter cable. Depending on the model, connect other
KVM stations to the KVM x DB25F connector.
2. Connect the computers to UltraMatrix using the appropriate CPU adapter
cable. Connect the keyboard, monitor, and mouse computer ports to the
corresponding connectors on the CPU adapter cable. Connect the DB25M
connector to the CPU DB25F connector on UltraMatrix.
3. Connect other computers (4, 8, 12, or 16 depending on model)
4. With all cabling in place, power on all monitors, the UltraMatrix switch, and
boot the computers last.
Please refer to the Installation and Operations manual for the installation
procedure for an expanded system.
Page 3
Operating Instructions
With all cabling in place and power applied to all equipment, the video monitor
connected to KVM port #1 should display the video from computer #1 (default).
Switching to other computers is accomplished by:
1. Keyboard commands (press and release left Ctrl key + CPU #)
(LCtrl + 3 switches to port #3)
2. On-Screen-Display list of computers (Left Ctrl + Esc key)
3. Remotely using the RS232 port and sending switching commands from a
remotely connected computer using a communication program like
HyperTerminal. (Sending K2C8S, enter, switches KVM #2 to CPU port #8)
Additional keyboard commands are available for other switching methods,
invoking the scan mode, and others. See Table 1 for a list of keyboard
commands and their functions.
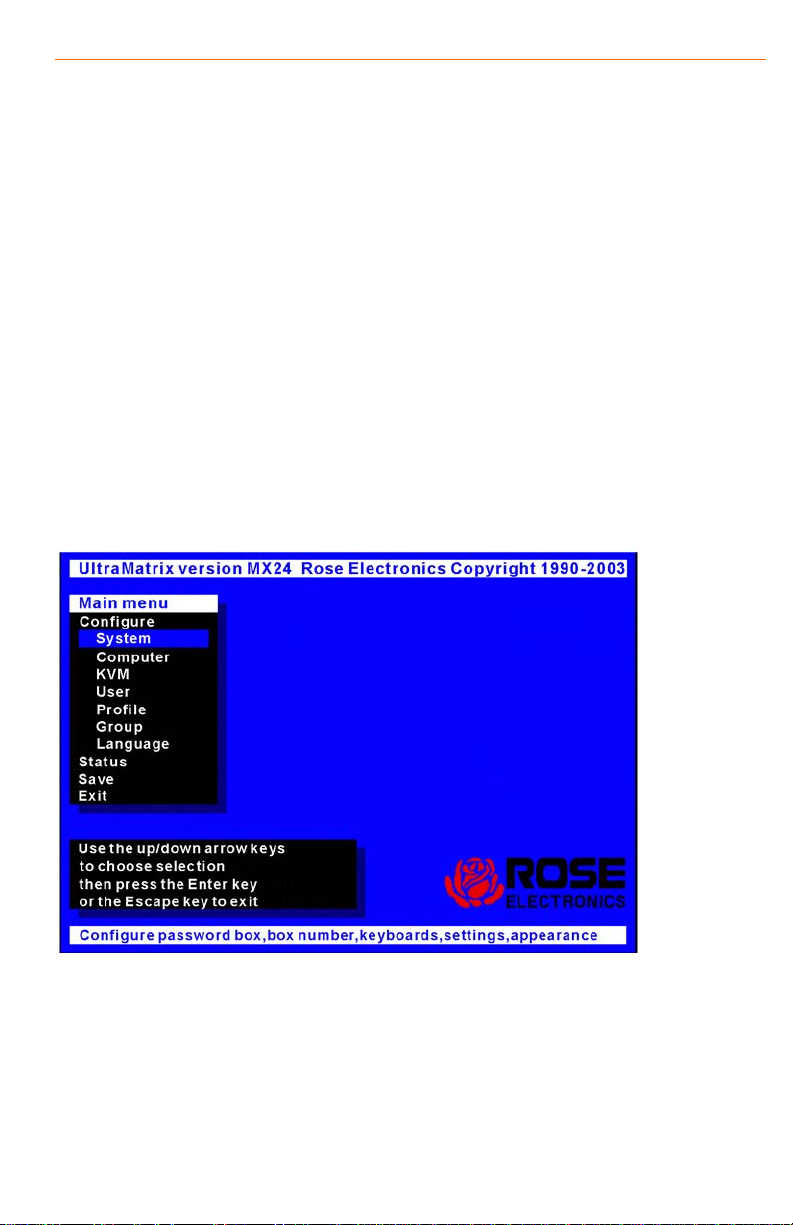
The OSD provides a visual interface to the features, set-up and additional
functions. The OSD is invoked by pressing and releasing the left Ctrl key, then
the F12 key. The below menu will display for configuring the System,
Computers, KVM. User, Profile, Group, and Language. Refer to the Installation
and Operations manual for a detailed description of each menus features and
options.
To navigate through the menu system, use the arrow keys to select the
configuration menu needed and press [Enter]. When you press [Enter] that
menu will display, an input box will display for a new value, or a list of
supported choices will display. Enter or select the information needed and
press [Enter]. To return to the previous page or abort an input, press the [Esc]
key.
Page 4

Command
Key sequence
Description
Main Menu
[Ctrl] [F12]
Displays main menu
CPU List
[Ctrl] [Esc]
Displays CPU selec ti on lis t
Direct CPU
connect
[Ctrl] n [Enter]
Connects directly to the specific
CPU number “n”.
Connect
Back
[Ctrl] [Backspace]
Connects to the previous CPU
Connect
Down
[Ctrl] [Minus sign]
Connects to the previous CPU
in a Group.
Connect Up
[Ctrl] [Plus sign]
Connects to the next sequential
CPU in a group
KVM Status
[Ctrl] D
Displays / Removes status box.
Logout
[Ctrl] L
Logs user out if the KVM station
is configured for user logins.
Disconnect
[Ctrl] Q
Disconnects the current CPU
Reset
mouse
[Ctrl] R
Resets / enables keyboard and
connected CPU
Send Null
[Ctrl] N
Sends a null byte to the CPU’s
gets “out of sync”.
Reset Mouse
[Ctrl] O (not zero)
Resets the currently selected
mouse driver to “wheel” mode.
Start Scan
[Ctrl] S
Sequentially steps through all
connected CPUs in a group.
Stop Scan
[Ctrl] X
Turns scan “Off”
Keyboard commands
The following table describes the available keyboard commands. The [Ctrl] key
sequence is a press and release of the left control key. Commands following
[Ctrl] must be entered within 2 seconds.
Keyboard/
Byte
mouse; enables PS/2 mouse on
PS/2 mouse port. Use this
command if the PS/2 mouse
(NT or Unix
systems only)
NT or Unix computers PS/2
mouse. Also switches the NT
Table 1 - Keyboard Commands
Copyright Rose Electronics 2007. All rights reserved.
No part of this publication may be reproduced, stored in a retrieval system, or transcribed in any form or any
means, electronic or mechanical, including photocopying and recording, without the prior written permis sion of
Rose Electronics.
Rose Electronics Part # QS-UME
Printed In the United States of America
 Loading...