

Rackview Switch -
with integrated 8-port KVM Switch
INSTALLATION AND
OPERATIONS MANUAL
Rackview Switch
With 17” or 19” LCD
1280 x 1024
10707 Stancliff Road Phone: (281) 933-7673
Houston, Texas 77099 WWW.ROSE.COM


LIMITED WARRANTY
Rose Electronics warrants t he Rackview Switch to be in good working order for one year from the
date of purchase from Rose Electronics or an authorized dealer. Should this product fail to be in
good working order at any time during this one-year warranty period, Rose Electronics will, at its
option, repair or replace the Unit as set forth below. Repair parts and replacement units will be
either reconditioned or new. All replaced parts b ecome the pr operty of Rose Electr onics. This
limited warranty does not include service to repair damage to the Unit resulting from accident,
disaster, abuse, or unauthorized modification of the Unit, includin g s tatic dis charge and power
surges.
Limited Warranty service may be obtained by delivering this unit during the one-year warranty
period to Rose Electronics or an authorized repair center providing a proof of purchase date. If this
Unit is delivered by mail, you agree to insure the Unit or assume the risk of loss or damage in
transit, to prepay shipping charges to the warranty service location, and t o use the origi nal
shipping container or its equivalent. You must call for a return authorization number first. Under no
circumstances will a unit be accepted without a return authorization number. Contact an
authorized repair center or Rose Electronics for further informati on.
ALL EXPRESS AND IMPLIED WARRANTIES FOR THIS PRODUCT INCLUDING THE
WARRANTIES OF MERCHANTABILITY AND FITNESS FOR A PARTICULAR P URPOS E, ARE
LIMITED IN DURATION TO A PERIOD OF ONE YEAR FROM THE DATE OF PURCHASE, AND
NO WARRANTIES, WHETHER EXPRESS OR IMPLIED, WILL APPLY AFTER THIS PERIOD.
SOME STATES DO NOT ALLOW LIMITATIONS ON HOW LONG AN IMPLIED WARRANTY
LASTS, SO THE ABOVE LIMITATION MAY NOT APPLY TO YOU.
IF THIS PRODUCT IS NOT IN GOOD WORKING ORDER AS WARRANTED ABOVE, YOUR
SOLE REMEDY SHALL BE REPLACEMENT OR REPAIR AS PROVIDED ABOVE. IN NO
EVENT WILL ROSE ELECTRONICS BE LIABLE TO YOU FOR ANY DAMAGES INCLUDING
ANY LOST PROFITS, LOST SAVINGS OR OTHER INCIDENTAL OR C ON SEQU EN TIAL
DAMAGES ARISING OUT OF THE USE OF OR THE INABILITY TO USE SUCH PRODUCT,
EVEN IF ROSE ELECTRONICS OR AN AUTHORIZED DEALER HAS BEEN ADVISED OF THE
POSSIBILITY OF SUCH DAMAGES, OR FOR ANY CLAIM BY ANY OTHER PARTY.
SOME STATES DO NOT ALLOW THE EXCLUSION OR LIMITATION OF INCIDENTAL OR
CONSEQUENTIAL DAMAGES FOR CONSUMER PRODUCTS, SO THE ABOVE MAY NOT
APPLY TO YOU. THIS WARRANTY GIVES YOU SPECIFIC LEGAL RIGHTS AND YOU MAY
ALSO HAVE OTHER RIGHTS WHICH MAY VARY FROM STATE TO STATE.
NOTE: This equipmen t has been tested and fou nd to comply with the limits for a Class A digital
device, pursuant to Part 15 of the FCC Rules. These limits are designed to provide reasonable
protection against harmful interference when the equipment is operated in a commercial
environment. This equipment generates, uses, and can radiate radio frequency energy and, if not
installed and used in accordance with the instruction manual, may cause harmful interference to
radio com m unicati o ns. Operation of this equipment in a residential area is likely to cause harmful
interference in which case the user will be required to correct the interference at his own expense.
IBM, AT, and PS/2 are trademarks of I nternat io nal Business Machine s Co rp. Microsoft and
Microsoft Windows are registered trademarks of Microsof t Corp. Any other trad emarks mentioned
in this manual are acknowledged to be the property of the trademark ow ner.
Copyright Rose Electronics 2013. All rights reserved.
No part of this manual may be reproduced, stored in a retrieval system, or transcribed in any form or any
means, electronic or mechanical, including photocopying and recording, without the prior written permission
of Rose Electronics.
Rose Electronics Part # MAN-Rackview Switch
Printed In the United States of America – Revision 1.1

TABLE of CONTENTS
Contents Page #
Disclaimer ...................................................................................................... 1
System Introduction ....................................................................................... 1
Features ..................................................................................................... 2
Package contents ....................................................................................... 2
Product Registration ................................................................................... 3
Model Description .......................................................................................... 4
System Operation .......................................................................................... 7
CPU push buttons ...................................................................................... 7
HotKey switching ........................................................................................ 7
HotKey and Push-Button command description ........................................ 8
HotKey Command Examples ..................................................................... 9
Service Information ...................................................................................... 10
Maintenance and Repair .......................................................................... 10
Technical Support .................................................................................... 10
Rose Electronics web site ........................................................................ 10
Safety ........................................................................................................... 11
Figures Page #
Figure 1. Basic Installation............................................................................. 5
Table Page #
Table 1. HotKey descriptions ......................................................................... 8
Appendices Page #
Appendix A – General Specification ............................................................ 12
Appendix B – Part Numbers ........................................................................ 15
Appendix C – Rack Mount Procedure ......................................................... 15

INTRODUCTION
Disclaimer
While every precaution has been taken in the preparation of this manual, the
manufacturer assumes no responsibility for errors or omissions. Neither
does the manufacturer assume any liability for damages resulting from the
use of the information contained herein. The manufacturer reserves the
right to change the specifications, functions, or circuitry of the product
without notice.
The manufacturer cannot accept liability for damages due to misuse of the
product or other circumstances outside the manufacturer’s control. The
manufacturer will not be responsible for any loss, damage, or injury arising
directly or indirectly from the use of this product.
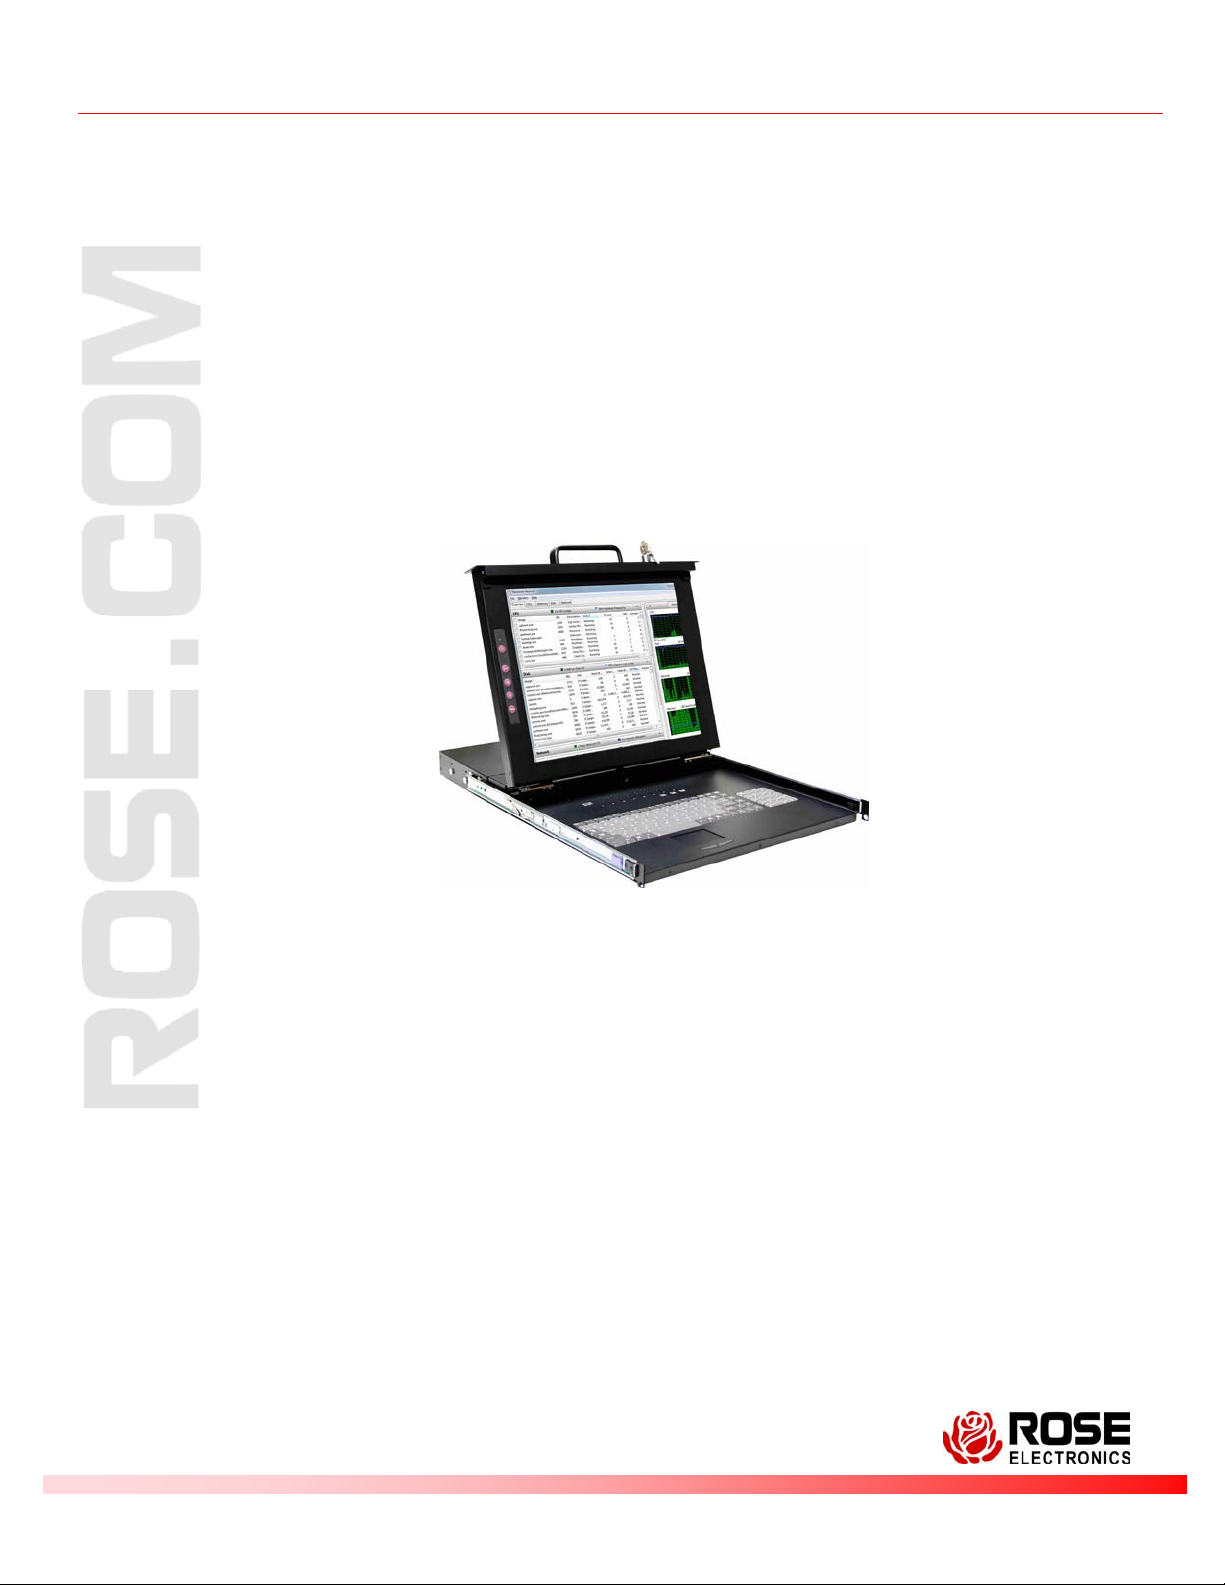
System Introduction
Thank you for choosing the Rose Electronics Rackview Switch, a 1x8 DVI
USB KVM switch integrated with a 17” or 19” RackView. This combination
of a KVM rack drawer and our 1x8 DVI USB KVM switch makes it ideal for
controlling up to 8 DVI computers from a single KVM station all mounted in a
19” rack. Switching to a specific CPU port can be easily done by keyboard
commands or the push of a button conveniently located above the
keyboard. Either method instantly switches the video, keyboard and mouse
control of the connected computer.
In addition to switching and controlling a computer, the computer’s audio
can also be switched. A unique feature of the 1x8 DVI USB KVM switch is
that the audio can be either switched with the video or not switched. The
advantage is that, for example, you can have the audio from CPU #1 playing
while viewing and controlling CPU #5.
This binding and unbinding feature also applies to the 2 port USB hub. You
can be printing a document from PC #1 while vie win g and co ntrol li ng
PC #4. The keyboard commands to bind and unbind the audio and USB
hub are explained in Table 1.
Installing the unit is a plug-and-play function. The default settings are
appropriate for most systems. Simply power on the unit, optionally connect
the user station’s monitor, USB keyboard, USB mouse, speakers,
microphone, and shared USB devices to the 1x8 switch. Connect 1-8
computers to the PC ports on the unit and power up the computers one by
one. When everything is powered up, you can begin operating the
Rackview Switch.
Installation and Opera tio ns Manu al 1

Features
(1 x 8 DVI-I USB Switch)
Available with 8 DVI-I video ports
Supports local USB keyboard and mouse
Push-buttons or hotkey switching
User definable keyboard hotkey sequence
Switch USB hub, speaker and microphone jointly with the PC
selection or independently
USB 2.0 compliant
2 port USB hub for connecting shared USB devices.
Scanning feature, scans through each PC connection at a fixed or
programmable rate
(Fixed = 5 sec. / Programmable = 10–100 sec.)
Multi-platform support for:
PC’s / Macintosh G3/G4/G5 / iMAC / Mac Mini / Power Book
Mounted in a Single Rail 17” RackView
(Single Rail RackView)
Full size tactile QWERTY keyboard with separate numeric keypad
Integrated 2-button touchpad mouse
Supports video resolution up to 1280 x 1024
Easy access KVM port selector buttons (1-8)
Easy monitor adjustments with on screen display (Menu, auto adjust,
brightness, contrast, color)
Easy-glide KVM drawer mounts at any height in a standard 19 inch
rack
Lockable front panel conceals and secures the unit when not in use
Firmware upgradeable through the USB port
Package contents
1x Rackview Switch product
8x DVI-MM and 8xUSB-AB cables (5-6ft, 1.8-2.0m)
Power adapter and power cable
Product manual
One set of sliding rails with front and rear brackets
Two keys
One set of screws and washers
If the package contents are not correct, contact Rose Electronics or your
reseller so the problem can be quickly resolved.
2 Installation and Operations Manual

Product Registration
Take advantage of the following when you register your Rose Electronics
products online at http://www.rose.com/htm/online-registrationform.htm.
Rose standard warranty Plus…
Free lifetime firmware updates
Free lifetime technical support
30 day money back guarantee
Priority “First-In-Line” status for technical support
Installation and Opera tio ns Manu al 3
MODEL
17” or 19” RackView
1 x 8 DVI USB KVM Switch
2x USB2.0 8 - Computer
Model Description
Full Size Keyboard
Separate numeric keypad
Touchpad mouse
8x PC selector buttons
On-screen menu
Fold forward – lockable
drawer
19” rack mountable
Integrated 1 x 8 DVI USB
KVM Switch
Computer connections
8 DVI-I PC ports
8 USB ports (Kbd / Mouse)
8 Speaker connectors
8 Microphone connectors
The local user station operates in parallel with the RackView’s keyboard,
monitor, and mouse but has limited functionality.
4 Installation and Operations Manual
Ports Connections
Local User connections
1 DVI-I monitor output
2 USB (Kbd / Mouse)
1 speaker connector
1 microphone connector
2 USB hub ports

INSTALLATION
1 – 8 Computers
with DVI
USB keyboard,
USB mouse, Audio
& Microphone
The first installation procedure is to strategically install the unit in a 19” rack
so all CPU connection cables do not exceed the recommended cable
lengths. The recommended max DVI-I cable length is 16 feet (5 meters);
USB max cable length is 13 feet (4 meters). If longer cable lengths are
needed, Rose Electronics has a range of DVI and USB extenders that can
extend the DVI/USB cable lengths up to 400ft (140m) over CATx cable.
Fiber versions are also available which w ill ex ten d to a m uch greater
distance.
To properly mount the unit in a 19” rack, please refer to APP ENDIX C for a
detailed procedure. For safety reasons, it is recommended that the rack
installation be performed by at least two people, although one person can
install the Rackview Switch.
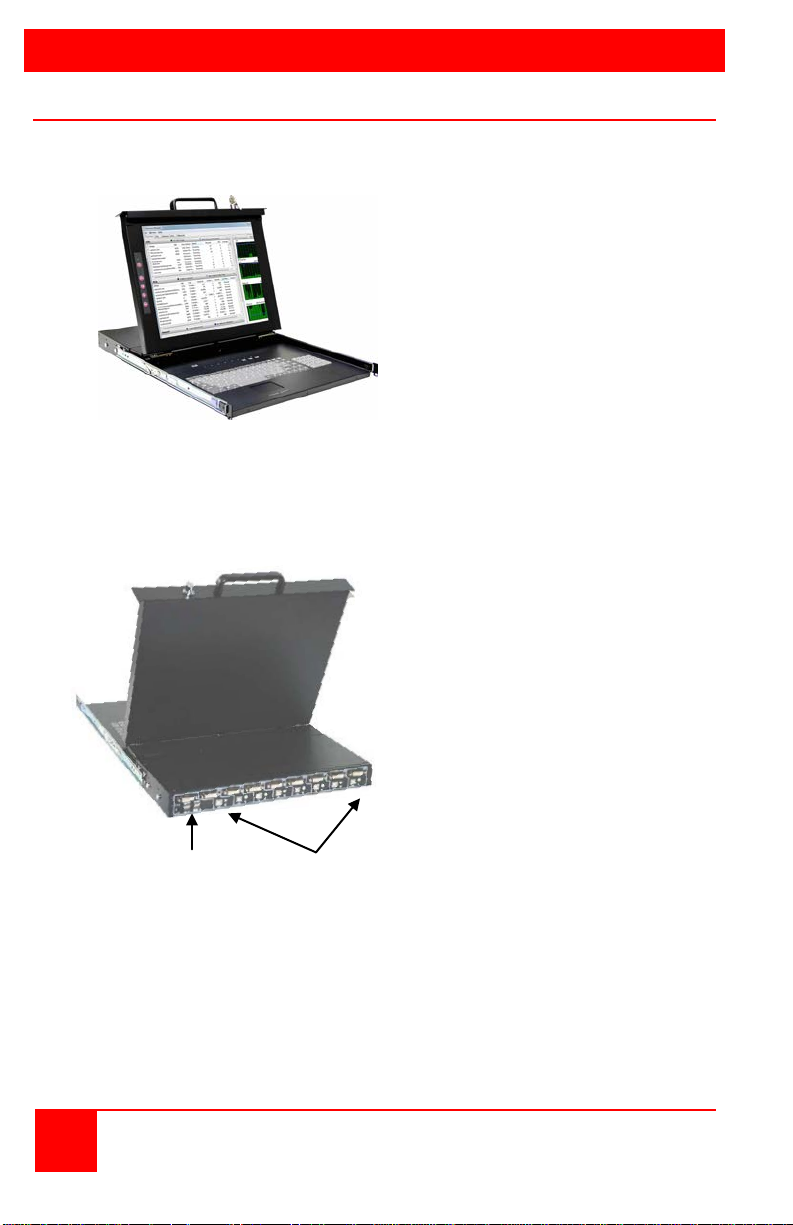
Figure 1 shows the basic installation of the 1x8 DVI switch. It is
recommended that power on all equipment be powered off.
-I video,
Figure 1. Basic Installation
Installation and Opera tio ns Manu al 5

The default settings for the unit are appropriate for most systems and no
initial configuration is needed. When the unit is securely installed in a
19” rack you can start connecting the computers, USB devices,
speakers, and microphone. Please observe proper strain relief
techniques to reduce the stress on the connectors.
It is recommended that the following installation process be followed to
assure the switch properly recognizes the connected computers,
keyboard, and mouse types.
Step 1 - Connect the power adapter to the power connector on the rear
panel of the switch (110 – 240 VAC to +12VDC adapter) and
apply power to the switch.
Step 2 - Optionally connect a USB keyboard, USB mouse, DVI monitor,
a speaker set, microphone and the shared USB devices to the
corresponding connectors on the rear panel.
(Optional local keyboard and mouse have limited functionality)
Step 3 - Connect each computer’s video to the switch using a DVI-I
(Male-Male) video cable.
Connect a USB cable (Type A - Type B) from each computer’s
USB Type A connector to the switches Type B connector for
each of the computers being connected.
Using standard stereo audio cables (3.5mm MM cables),
connect the audio and microphone outputs from the computers
to the corresponding connectors on the rear panel.
Step 4 - Turn on the locally connected monitor (if connected) and the
RackView Switch monitor.
Step 5 - Press PC button #1 located between the RackView’s keyboard
and monitor to connect to PC port #1 and power up computer
#1. You should see the boot-up sequence on the RackView’s
monitor and on the locally connected monitor. Verify that there
is keyboard and mouse control for computer #1 before
proceeding.
Final - Press PC button #2 to connect to PC port #2 and power up
computer #2. Verify that the keyboard and mouse now control
computer #2. Repeat this process for each of the connected
computers.
After all computers are powered up and operating, the keyboard and
mouse well be recognized and you can now fully operate the KVM
switch.
NOTE: If you need to connect a computer with an analog vid eo port,
(HD15) to the KVM switch, a VGA to DVI converter must be used.
6 Installation and Operations Manual

OPERATION
PC port selection using the
are also switched.
System Operation
Operating the system can be done by using the PC push buttons or by
hotkey commands from the RackView Switch keyboard.
The USB and audio features of the switch can be jointly switched when you
switch computer ports or can be switched independently. Using hotkey
commands, you can bind the audio and/or USB to the video or un-bind them
and switch the audio and USB functions separately.
(See Table 2 for Hotkey and push-button functions)
CPU push buttons
HotKey switching
Hotkey switching and control should only be performed using the RackView
Switch keyboard. The local console keyboard should not be used for
entering Hotkey commands.
A hotkey keyboard command consists of three specific keystrokes:
1 2 3
HOTKEY = [ScrLk]* + [ScrLk]* + Command (Default)
(*Press and release the ScrLk key twice)
* The hotkey can be modified to use the following user-defined keys:
Scroll Lock
Caps Lock
Esc
F12
Num Lock
To modify the hotkey enter [ScrLk] + [ScrLk] + H + K
where K = the Scroll Lock, Caps Lock, ESC, F12 or Num Lock key.
convenient push buttons is the
easiest method of selecting a
computer. Buttons 1-8 switch
the RackView’s keyboard,
monitor, and mouse to that
selected PC port. If binding is
enabled, the audio and USB hub
Installation and Opera tio ns Manu al 7

Command
HotKey Sequence
Push-Button
Description
[ScrLk] + [ScrLk] + (x)
x = 1 - 8
Press buttons
1 - 8
Selects the active
CPU port
[ScrLk] + [ScrLk] +
Selects the next
lower CPU port
[ScrLk] + [ScrLk] +
Selects the next
higher CPU port
[ScrLk] + [ScrLk] +
Toggles between
current CPU port
Switches CPU,
together
Unbind PC / Audio / Mic
[ScrLk] + [ScrLk] + (W)
N/A
Disables binding
Switches CPU,
together
Unbind PC / USB port
hub
Select audio / Mic
channel
[ScrLk] + [ScrLk] + (A) + (Y)
y=audio/Mic port
Selects the active
Audio / Mic channel
Selects the PC that
hub ports
Scans each CPU
port for 5 sec.
programmed
Autoscans each
10 – 100 seconds
Stops autoscan
function
[ScrLk] + [ScrLk] + (H) + (y)
F12, or Num Lock key
HotKey and Push-Button command descri p tion
The following table describes each of the available HotKey commands
and the corresponding push button action.
Use the numeric keys above the keyboard for entering values
CPU port select
Next lower CPU port
Next higher CPU port
Previous CPU port
Bind PC / Audio / Mic [ScrLk] + [ScrLk] + (Q) N/A
Bind PC / USB port hub
Select USB Hub control
Autoscan [ScrLk] + [ScrLk] + (S) N/A
Autoscan +
delay
Stop Autoscan Press any key Press any button
[ScrLk] + [ScrLk] + (Z) N/A
[ScrLk] + [ScrLk] + (X) N/A Disables binding
[ScrLk] + [ScrLk] + (Fx)
Fx=Function key F1 – F8
[ScrLk] + [ScrLk] + (S) + (z)
Z= 1 – 0 (1=10 Sec, 2=20,
… 0 = 100 Sec)
N/A
N/A
N/A
N/A
N/A
N/A
the previous and
Audio & Mic
USB hub ports
controls all USB
CPU port for the
programmed delay
Define Hotkey Sequence
y=scroll Lock, Caps, Esc,
N/A
User defined
hotkey sequence
Table 1. HotKey descriptions Factory default setting
NOTE: Above switching commands assume that audio and USB binding is enabled.
8 Installation and Operations Manual

Function
HotKey Command Sequence
1
Switch to CPU port #1
[ScrLk] + [ScrLk] + 1
2
Switch to CPU port #3
[ScrLk] + [ScrLk] + 3
3
Unbind PC and Audio / Mic
[ScrLk] + [ScrLk] + W
[ScrLk] + [ScrLk] + 5
connected to CPU port #3
5
Unbind PC and USB Hub
[ScrLk] + [ScrLk] + X
[ScrLk] + [ScrLk] + 8
CPU port #3 / USB hub on CPU port #5)
[ScrLk] + [ScrLk] + Q
is issued)
[ScrLk] + [ScrLk] + 2
CPU port #5)
[ScrLk] + [ScrLk]+ Z
is issued)
[ScrLk] + [ScrLk] + 6
and USB hub all to port #6
HotKey Command Examples
Initial conditions – HotKey sequence = [ScrLk] + [ScrLk]
Binding is enabled for the Audio/Mic & USB port
4 Switch to CPU port #5
6 Switch to CPU port #8
7 Bind PC and Audio / Mic
8 Switch to CPU port #2
9 Bind PC and USB Hub
10 Switch to CPU port #6
The switching to a PC port can be done with the HotKey commands or by
using the PC push-buttons. Binding, unbinding, audio and USB switching
can only be performed by Hotkey commands.
(keyboard / monitor / mouse and USB to
computer on port #5 - Audio / Mic are
(keyboard / monitor / mouse to
computer on port #8 – Audio / Mic on
(Same as #6 until a switching command
(keyboard, monitor, mouse, audio & Mic
switched to CPU port #2, USB is still on
(Same as #8 until a switching command
(Keyboard, monitor, mouse, audio, Mic,
Installation and Opera tio ns Manu al 9

SERVICE and SUPPORT
Service Information
Maintenance and Repair
This Unit does not contain any internal user-serviceable parts. In the
event a Unit needs repair or maintenance, you must first obtain a Return
Authorization (RA) number from Rose Electronics or an authorized repair
center. This Return Authorization number must appear on the outside of
the shipping container.
See Rose Limited Warranty for more information.
When returning a Unit, it should be double-packed in the original container
or equivalent, insured and shipped to:
Rose Electronics
Attn: RA__________
10707 Stancliff Road
Houston, Texas 77099 USA
Technical Support
If you are experiencing problems, or need assistance in setting up,
configuring or operating your Rackview Switch drawer, consult the
appropriate sections of this manual. If, however, you require additional
information or assistance, please contact the Rose Electronics Technical
Support Department at:
Phone: (281) 933-7673
E-Mail: TechSupport@rose.com
Web: www.rose.com
Technical Support hours are from: 8:00 am to 6:00 pm CST (USA),
Monday through Friday. Please report any malfunctions in the operation of
this Unit or any discrepancies in this manual to the Rose Electronics
Technical Support Department.
Rose Electronics web site
Visit our web site at www.rose.com for additional information on the this
and other products offered by Rose Electronics that are designed for data
center applications, classroom environments, and many other access and
switching applications.
10 Installation and Operations Manual

SAFETY
Safety
The Rackview Switch has been tested for conformance to safety regulations
and requirements. Like all electronic equipment, this Unit should be used
with care. To protect yourself from possible injury and to minimize the risk
of damage to the Unit, read and follow these safety instructions.
Follow all instructions and warnings marked on this Unit.
Except where explained in this manual, do not attempt to service this
Unit yourself.
Do not use this Unit near water.
Assure that the installation of this Unit in a 19” rack is secure and level
on all planes.
Provide proper ventilation and air circulation.
Keep power cord and connection cables clear of obstructions that might
cause damage to them.
Use only power cords, power adapter and connection cables designed
for this Unit.
Use only a grounded (three-wire) electrical outlet.
Use only the power adapter provide d with the Uni t .
Keep objects that might damage this Unit and liquids that may spill, clear
from this Unit. Liquids and foreign objects might come in contact with
voltage points that could create a risk of fire or electrical shock.
Do not use liquid or aerosol cleaners to clean this Unit. Always unplug
this Unit from its electrical outlet before cleaning.
Unplug this Unit from the electrical outlet and refer servicing to a
qualified service center if any of the following conditions occur:
The power cord or connection cables are damaged or frayed.
The Unit has been exposed to any liquids.
The Unit does not operate normally when all operating instructions
have been followed.
The Unit has been dropped or the case has been damaged.
The Unit exhibits a distinct change in performance, indicating a need
for service.
Installation and Opera tio ns Manu al 11

APPENDICES
LCD
Depth
Height
Weight
17”
23.3” / 592mm
1.7” / 44mm
28.7lbs/ 13kg
19”
22.4” / 642mm
1.7” / 44mm
30.9lbs / 14kg
Rail Depth
Standard (Max Depth)
Option (Max Depth)
17”
31.5” / 800mm
39.37” / 1000mm
19” 31.5” / 800mm
39.37” / 1000mm
Rackview LCD Monitor
1280x1024, SXGA
Viewing Angle H/V
170°/ 160°
Contrast Ratio
1000:1
Supported Colors
16.7M/ 8-Bit
Pixel Pitch (mm)
17”: 0.264x.0264 19”: 0.098x0.294
Panel Type
Active Matrix TFT LCD
Brightness
White 250 (cd/m2)
Backlight
Dual Lamps
OSD Controls
Capacitive panel, push-button
Keyboard
Full size tactile 106-key keyboard with separate
numeric keypad
Mouse
2-button Touchpad
Power Source
100-240 VAC 50/60 Hz auto-sensing
Operating Temp
32°F - 122°F (0°- 50° C)
Storage Temp
-4°F - 140°F (-20°- 60° C)
Reltv Humidity
10- 90%, non-condensing
Approvals
UL, FCC, CE, CUL, C-Tick
Chassis
Heavy Duty Steel
Keyboard Options
/UK, /FR, /IT, /DN, /BE, /NO, /DE,
Appendix A – General Specification
Max Resolution
Response Time (ms)
Elec Consumption
17”: 1.2/3.8 19”: 1.3/3.7
17”: 13.35W 19”: 13.6W
(powered internally)
Add /nn to part number
/ES, /PO, /SI, /SD, /DA/ /JP, /TW
12 Installation and Operations Manual

SAFETY
DVI - KVM Switch
Video
Single Link DVI-I
Input Resolution
Up to 1920x1200, 1080p
Dimensions
16.0x3.94x1.74 (“) 406x100x42(mm)
Bandwidth
165Mhz
8x DVI-I In.
1x DC power
The local port of the switch (DVI-I
Power Source
12 VDC/4.16A power jack
Operating Temp
32°F - 122°F / 0°C - 50°C
Storage Temp
-4°F - 140°F / -20°C - 60°C
Reltv Humidity
0 – 90% non-condensing
Connectors
8x USB-B In.
8x Audio In.
2x USB 2.0
and USB-HID) works in parallel with
the Rackview
Installation and Opera tio ns Manu al 13


Part Number
Description
RV1-CSKVT17/KVM-8TDVI/A1
17” RackView/1x8 DVI-I USB KVM Switch
RV1-CSKVT19/KVM-8TDVI/A1
19” RackView/1x8 DVI-I USB KVM Switch
CAB-DVIDMM006
DVI to DVI male cable
CAB-USBAB006
USB Type A to USB Type B cable
CAB-SPMM006
3.5mm stereo audio cable
Appendix B – Part Numbers
Appendix C – Rack Mount Procedure
Installation and Opera tio ns Manu al 15

Extension Brackets
Step 1
Step 2
The enclosed rackmount rail brackets can be used to mount the
Rackview Switch product in a standard 19” wide x 19.8” – 32.5” deep
computer rack. Extension brackets are included that can be added to fit
in computer racks 32.5” – 39.4” deep.
Rack cabinet installation (Note: left and right brackets are different)
1. Loosen the four screws on the rear of each bracket.
This allows the rear portion of the bracket to slide in and out.
(Do Not fully remove the four screws)
2. Position the brackets in the computer rack at the desired
height. Slide the rear of the bracket to fit the depth of
the rack and secure the front and rear bracket ears to the rack.
3. Tighten the four screws that were loosened in #1
Repeat this procedure for the other side. Make sure the brackets
are positioned at the same height on the right and left side of the
computer rack
.
16 Installation and Operations Manual

Step 3
Step 5
Step 6
4. With both left and right brackets installed in the computer rack, align
the unit side rails with the rack installed brackets and carefully slide
the unit into the mounted brackets. It is recommended that two
people install the unit into the mounted brackets. The unit will not
slide to the end of the rack due to the locking mechanism. Unlock
the drawer
5. On each side of the unit there is a rail-lock switch. Pull th e left and
right rail-lock switches towards the front of the rack and push the
unit until it reaches the rear of the computer rack.
6. Position the brackets in the computer rack at the desired
height. Slide the rear of the bracket to fit the depth of
the rack and secure the front and rear bracket ears to the rack.
7. With the unit fully installed in the computer rack, secure the rear of
the unit to the rack using the 3 flat head Phillips screws
(Left and Right side)
Step 4
Installation and Opera tio ns Manu al 17

Step 7
Step 8
Step 9
Mounting
Screws (6)
Extension Rail Installation
To mount the Unit in a computer rack that is 32.6” – 39.4” deep, the
extension rails must be installed. To install the extension rails:
1. First remove the six mounting screws that secure the short rail
bracket.
2. Remove the short rail brackets from the rack rail (each side)
3. Install the longer extension rails and adjust the length to fit the
computer rack
4. Secure the extension rail to the rack rail with 2 or 3 screws. Using 1
screw will not support the rail extension properly. Use at least 2
screws to secure the extension rail.
5. Install the rack rail with the extensions brackets installed to the rack.
18 Installation and Operations Manual

Step 10
Step 11
Install a min
of 2 screws
Installation and Opera tio ns Manu al 19


NOTES
Installation and Opera tio ns Manu al 21

WWW.ROSE.COM sales@rose.com (800) 333 9343
Rose Electronics 10707 Stancliff Road Houston, Texas 77099
Rose USA (281) 933 7673 Rose Europe +49 (0) 2454 969442 Rose Asia +65 6324 2322 Rose Australia +61 (0) 421 247083
 Loading...