

Page 1

RevoPro
Programmable Gobo Rotator
™
Operations Manual
ver 1.1
Copyright 2011
Page 2

p. 2
TABLE OF CONTENTS
Quick Set Up GuideA.
Getting to Know your RevoPRO1.
What’s in the box2.
Requirements3.
Installing Gobos4.
Installation and Power Supply5.
Choosing the Mode of Operation6.
Setting DMX Address and Operation Mode 7.
Precautions8.
Troubleshooting9.
Technical Specications10.
Accessories and replacement parts11.
Compliance and Certications12.
Warranty13.
Page 3

RevoPRO Operations Manual
p. 3
QUICK SET UP GUIDE
The RevoPRO™ Dual Programmable Rotator is quick and easy to congure
using the LCD display.
1. Load a standard B size gobo into each gobo wheel. The threaded collar
should be tightened until just in contact with the gobo. Do not over
tighten. If using two metal gobos with ne elements in the design, place
a Gobo Spacer Ring (Part no. 205 83007 0000) between the gobos to
prevent warping and entanglement.
Tip: When screwing on the threaded collar, place one nger from each
hand on the machined at spots and slowly rotate the collar, keeping
even pressure on both ngers. This helps the threads to engage evenly
and prevents binding and cross threading.
2. Insert RevoPRO™ into a the iris slot of a compatible luminaire. Make sure
unit is completely seated.
3. Engage Friction Lock by depressing plunger. Secure RevoPRO™ to the
luminaire using a safety cable.
4. Connect an IEC 18AWG power cable to the appropriate power supply
(100-240VAC 50/60hz).
5. Use LCD Display and buttons B1 – B4 to congure RevoPRO.
6. Press B1 to enter Setup mode. When display begins blinking, press B1
again to select desired Mode (1-7). Note: RevoPRO™ uses 2, 4, or 6 channels of DMX depending on the Operation Mode selected.
7. Set DMX Address using B2 – B4. Press B2 to set 100s place of desired DMX
Address. Press B3 to set 10s place. Press B4 to set 1s place.
8. Display will now show, for example 1.001 to indicate Mode 1, DMX Address 001.
9. Press and hold B2 to save your conguration. RevoPRO™ will remember
and restore your saved conguration on power up.
10. Adjust channels 1-6 (depending on Op Mode) on your lighting control
desk to set speed, direction and index position of each gobo.
11. RevoPRO™ can be congured for stand alone operation, requiring no
DMX control. See Section 7 inside for more instructions.
Page 4

p. 4
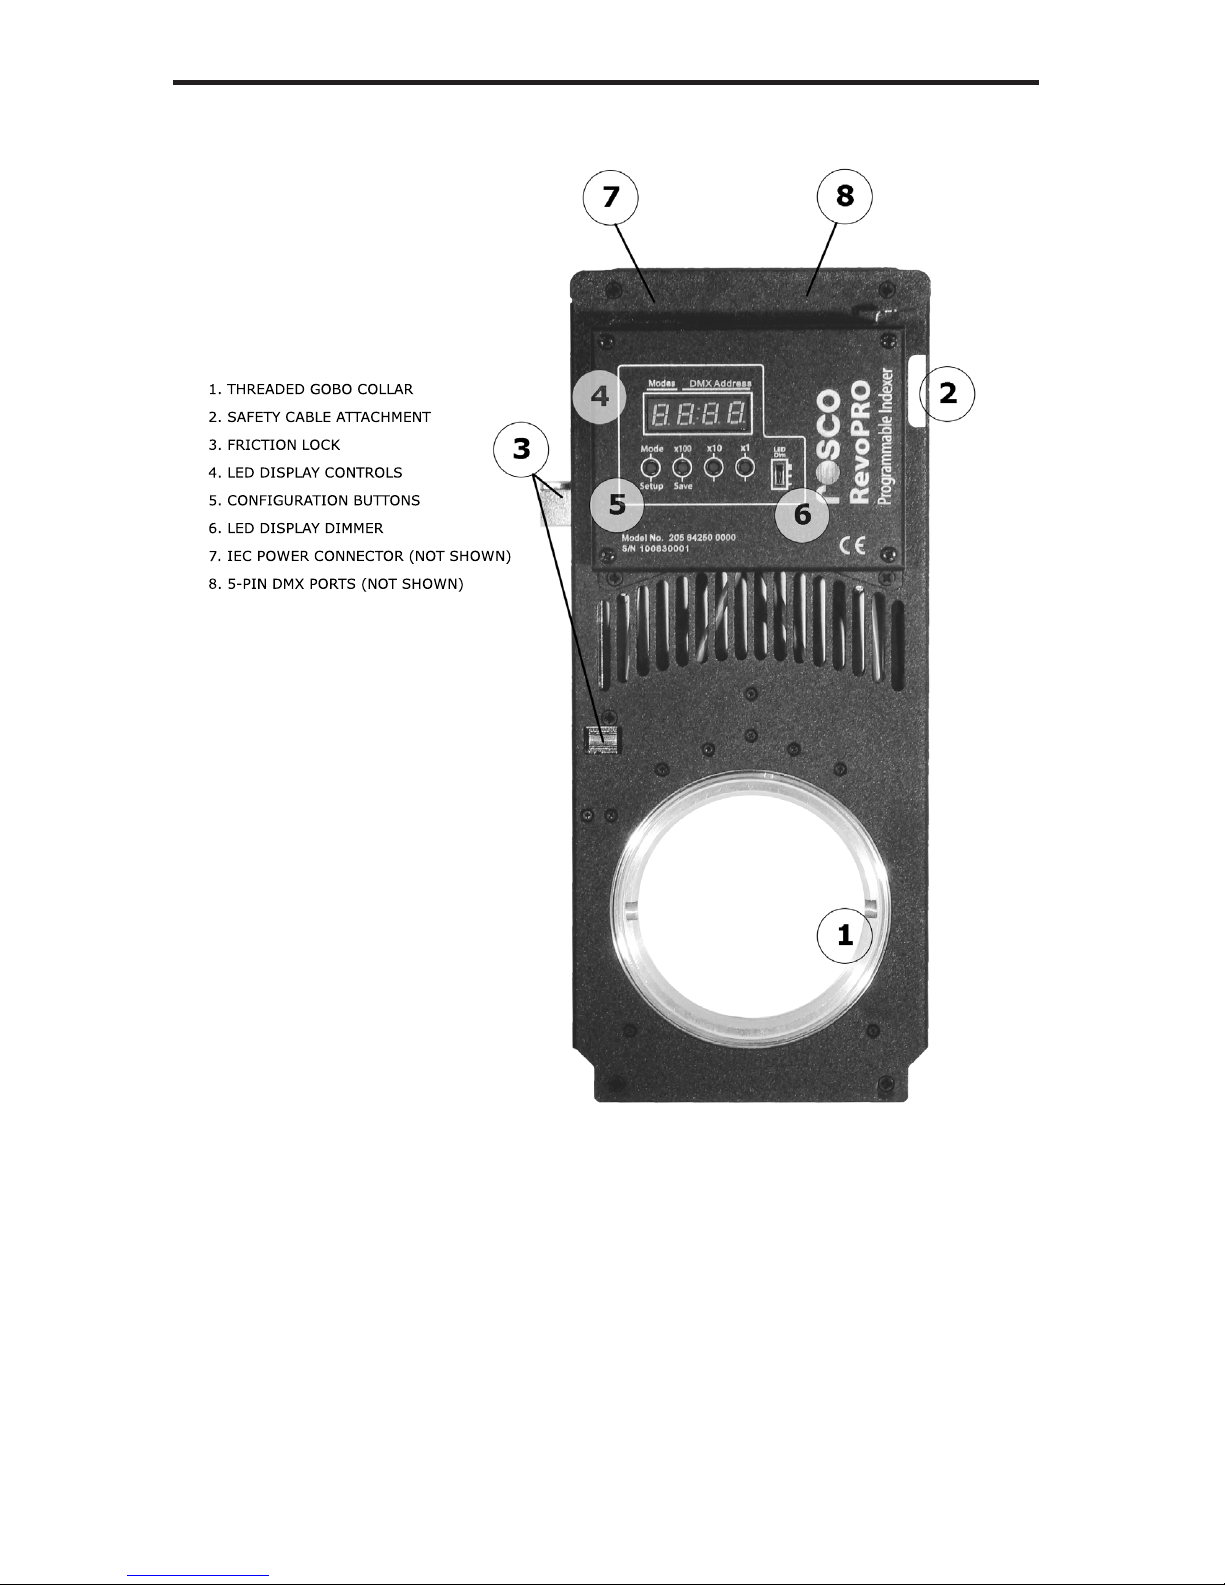
1. GETTING TO KNOW YOUR REVOPRO
RevoPRO™ Programmable Gobo Rotator
Advanced features and control options for any environment. DMX control
with 7 modes of operation or console-free on board programming. Complete control even in spaces without lighting desks and universes of DMX like
museums, retail, and commercial buildings. With its internal power supply,
RevoPRO is perfectly suited in lighting rigs where an external PSU is not desirable, like theme parks and cruise ships. RevoPRO™ is a powerful and versatile
tool for creating subtle or dynamic, realistic or extravagant, beautiful or arresting lighting eects
Engineered with fresh eyes and a focus on building a versatile, advanced feature set, the RevoPRO™ was designed with the lighting designer in mind.
The RevoPRO™ features
Dual stepper motors for independent control of speed and direction for •
each gobo
Indexing control of BOTH gobos in 8- or 16-bit resolution •
Universal 100-240VAC auto-sensing, auto-switching power supply with •
standard IEC connector.
On-board 5-pin DMX input and pass-thru ports•
Flexible programming congurations accommodates simple 2 channel •
control or advanced moving light console controls
99 pre-programmed eects sequences selected using the LED display •
panel
Custom programming option to set and store speed and direction •
without DMX or external controllers
High temperature silicon belt for smooth, reliable, silent (squeak free) •
operation;
Modern stepper motor drives with advanced electronic controls allow •
the designer to dial speed from 0.5rpm to 24rpm with no risk of stalling;
Simple, intuitive and user friendly operator modes provide maximum •
exibility for programmers of all abilities;
Threaded gobo collar insures secure t for any type of gobo – thin •
metal to thick eects glass.
Friction Lock™ secure t mechanism holds the rotator tightly in the iris •
slot even when the lens barrel is rotated around.
Unleash your imagination and browse through more than 2000 steel and
glass gobos at www.rosco.com or design your own pattern, made by Rosco
to your precise specications. The lighting eects you will create with the
RevoPRO™ are limitless.
Page 5
RevoPRO Operations Manual
p. 5
Page 6

p. 6
2. WHAT’S IN THE BOX
RevoPRO™ programmable gobo rotator•
Operator manual•
Quick start card•
3. REQUIREMENTS
• 100-240VAC 50/60 hz mains power
• DMX512controlsignaloroperateinstand-alonemode
• Modernellipsoidalspotlightwithappropriatesizedirisslotincluding
ETC S4, ETC S4 Zoom, Selecon Pacic, Strand SL and Altman Shakespeare, among others.
• Bsizesteelorglassgobos
4. SPECIFYING AND INSTALLING GOBOS
Your Rosco RevoPRO Dual Programmable Rotator will accept standard B-size
gobos of virtually any style, whether steel or glass, b/w or color, textured or
at. A B-size gobo has a diameter of 86mm (3.38in) and an image area of
64.5mm (2.54in).
Many modern luminaires have optical systems capable or projecting a larger
image area. The RevoPRO™ has an open aperture of 75mm (2.95in) giving you
the exibility to maximize your projection size by using gobos with a larger
image area.
RevoPRO™ will accept a wide range of gobo styles from many manufacturers
including Stainless Steel gobos, Colorizers™, Image Glass™, Prismatics™, Colorwaves™, Silk Screen Gobos , B/W Glass gobos, 1C Glass Gobos, 2C Glass Gobos,
3C Glass Gobos, Multi-Color Gobos and many others.
Loading Gobos into your RevoPRO™ rotator
RevoPRO™ has two gobo wheels into which you can load gobo eects. While
it is most common to load just one gobo into each wheel, you can stack
gobos together into the same wheel position providing your stack does not
exceed the total maximum thickness of 3.5mm (0.138in).
All Rosco BeltDriveFx rotators utilize an innovative Threaded Collar to securely
hold gobos of varying thicknesses. Unlike the spring clips common in similar
equipment, the Threaded Collar screws down to positively lock the gobo in
place. This prevents the gobo from slipping during rotation and losing index
or centering.
Page 7

RevoPRO Operations Manual
p. 7
To load a gobo into the gobo wheels
1. Place the rotator on a stable at surface. Unscrew the Threaded Collar
from each gobo wheel (counter-clockwise to unscrew, clockwise to
tighten).
There are two at sections on the collar to give your ngers a place to
grip. If the collar has been over tightened and is stuck, another small
machined spot on the outer ring allows you to gain purchase when
spinning the collar opposite to the entire gobo wheel.
2. Once the Threaded Collars are removed, insert a B size gobo so that it
lays at against the gobo wheel.
TIP: When installing a metal gobo, an optional Gobo Spacer Ring
(Part no. 205 83007 0000) is available to increase the separation between the gobos to achieve a wider range of focus eects. This spacer
can also be useful if two metal gobos with ne thin details are being
used. In the event that the heat from the luminaire causes the gobos
to warp towards one another, use of the spacer ring will prevent the
gobos from getting tangled together.
3. Screw on the Threaded Collar until just in contact with the gobo. Do
not over tighten.
The Threaded Collar has Teon™ threads to ease rotation and avoid
binding however there is still a small risk of cross threading. Do not
forcibly screw on the Threaded Collar . If you encounter undue resistance, back o and start again. Lay the Threaded Collar at onto the
ring and slowly and evenly rotate until the threads align and engage
properly.
Page 8

p. 8
TIP: When screwing on the Collar, place one nger from each hand on
the machined ats and slowly rotate the collar, keeping even pressure
on both ngers. This helps the threads to engage evenly and prevents
binding and cross threading. If you are having diculties getting the
thread to “catch,” slowly spin the Collar CCW while continuing to apply
gentle even pressure, then reverse back to CW until the threading
begins.
4. Repeat this process for both gobo wheels.
NOTE: When using Apollo gobos
Apollo Design manufactures a non-standard “B” sized gobo which has
an 80mm diameter. Rosco BeltDriveFx rotators can accept these smaller
gobos provided you keep a few considerations in mind. The underside of
the Threaded Collar which hold gobos in place has been machined with an
80mm recessed lip. To install an Apollo 80mm gobo, you must insure that
the gobo sits in the center of the gobo mounting ring as the Threaded Collar slowly tightens down. Slight wiggling of the gobo during this process
helps to nd the center recessed ridge.
5. INSTALLATION, POWER AND DATA CONNECTIONS
The RevoPRO™ has been engineered to t into the bodies of most modern ellipsoidal luminaires including ETC Source Four, ETC S4 Zoom, Selecon Pacic,
Selecon Pacic Zoom, Altman Shakespeare and Strand SL among others.
1. Insert RevoPRO™ into the iris slot of the luminaire with the motor box
facing forward, towards the lens.
Inserting the rotator in the opposite orientation will cause the motor
box to interfere with the shutter handles.
It may be necessary to angle the yoke of the luminaire back to allow
access into the accessory iris slot.
On certain luminaires, the sliding cover over the iris slot may have to be
removed to allow the RevoPRO™ to t properly.
Note: When installing into a Selecon Pacic luminaire, align the groove
in the edge of the RevoPRO™ body with the rear-most tab of the Iris
Slot.
2. When seated fully and completely, the gobo wheel should be centered
in the lens tube. If necessary, remove the lens tube and visually conrm
that the rotator is seated and aligned properly. It is important that
the aperture of the gobo rotator be centered in the optical path of the
Page 9
RevoPRO Operations Manual
p. 9
luminaire in order to project without obstructions to the gobo design.
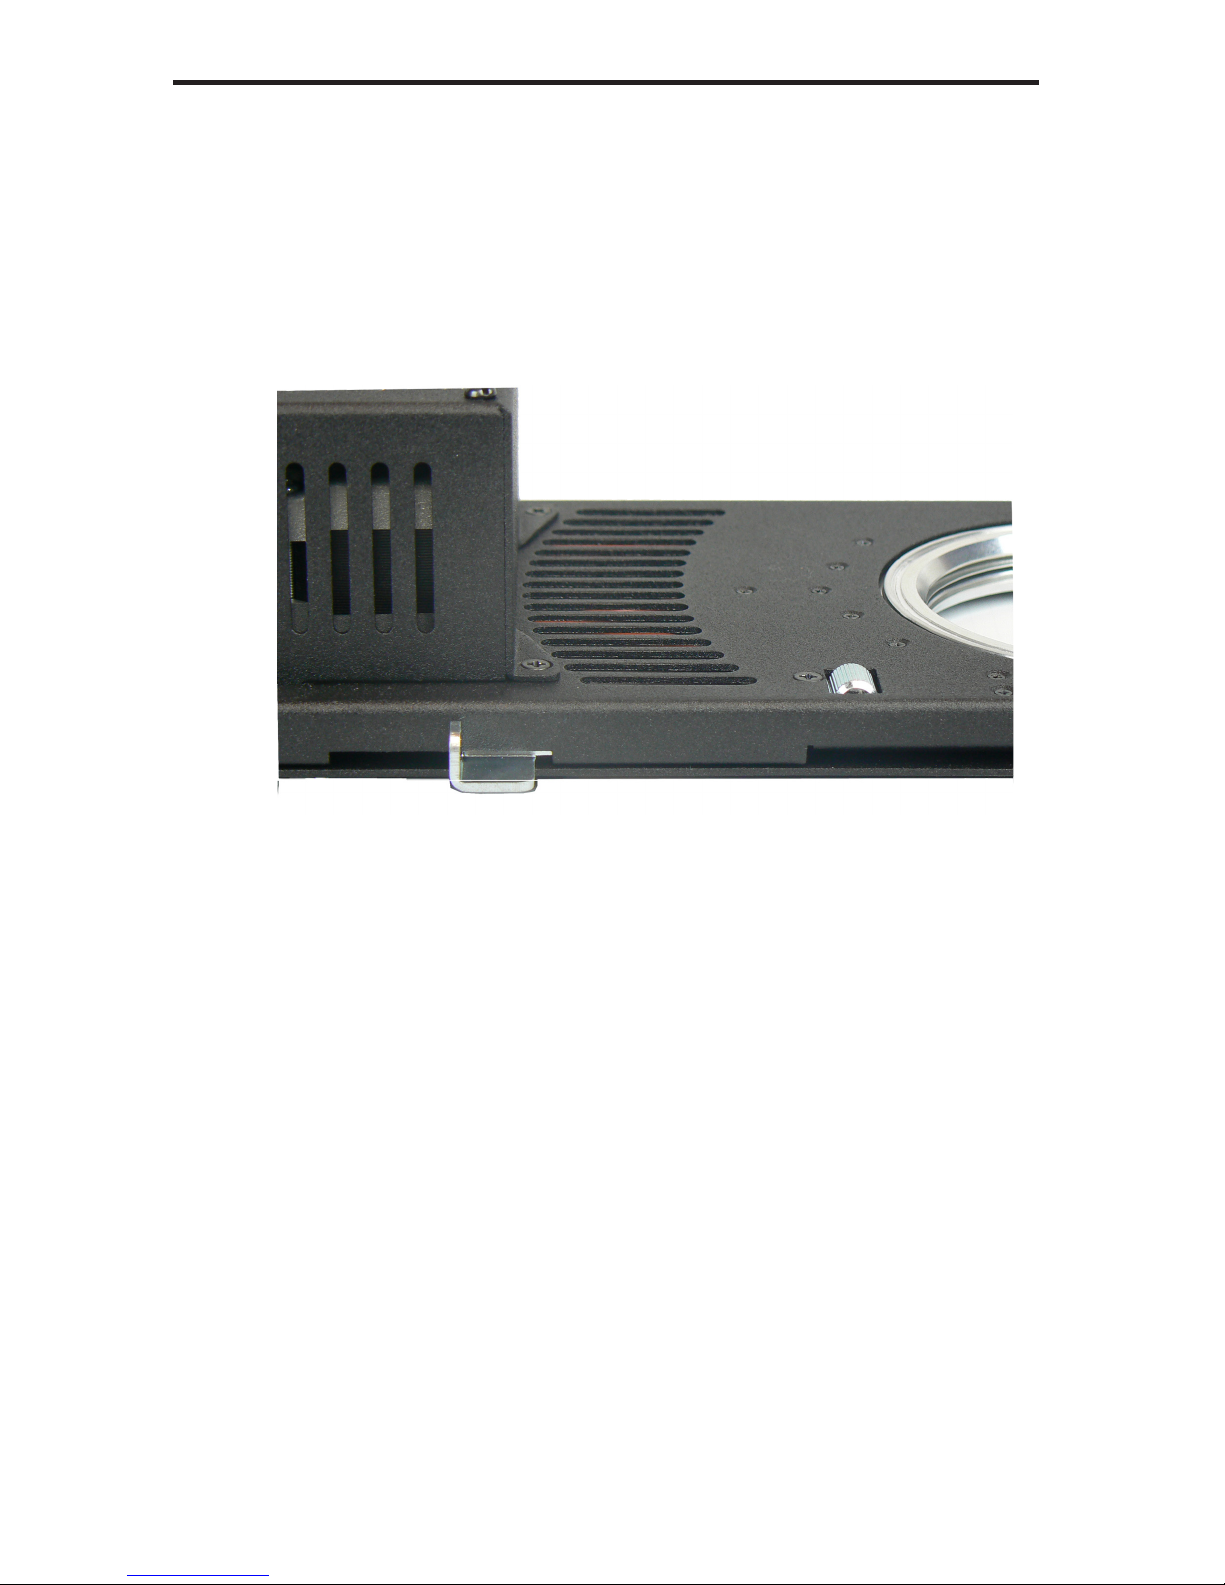
3. The RevoPRO™ is equipped with a unique safety feature, the Friction
Lock. Depress the metal slider located on the left side of the RevoPRO™
to extend a knurled brake cylinder.
This brake presses against the inside wall of the iris slot, securely holding the RevoPRO™ in place.
Note: To install the RevoPRO™ into your luminaire it is necessary that
the Friction Lock Slider be in the UP position, with the lock disengaged.
4. Attach a safety cable to the RevoPRO™ and then to the yoke of your
luminaire or other secure point.
The D-cut out in the metal housing to the right of the motor box will
accept the spring clip of a standard safety cable or the loop end of a
small safety cable.
Power and Data
The RevoPRO™ uses an internal, auto-sensing, auto-switching power supply
suitable for almost any location.
1. Connect it to any suitable 100-240VAC 50/60hz power source using an
ANSI standard IEC cable.
2. If using a DMX controller, connect a 5-pin DMX cable from your lighting desk/console or from the pass–thru of another DMX device into the
DMX input port on your PSU.
6. CHOOSING OPERATION MODE AND SETTING DMX ADDRESS
When powered on, the RevoPRO™ will restore to its previous conguration. If
this conguration was an indexing mode (3-7) then the unit will go through a
Page 10

p. 10
15 second BOOT process rst.
Use the LCD display and buttons B1 – B4 to set Mode and DMX Address.
ModesDMX Address
Modes x100 x10 x1
SetupSave Test
B1 B2 B3 B4
1. 001
Note: Press = Quick Press ~ 0.25 seconds, Press and Hold = 1 second
To Set Operation Mode
Press B1 once to enter SETUP . Display will momentarily change to SET- •
and then return to the previous display, blinking.
To Change Modes, Press B1 to select the desired mode 1-7 (see below •
for detailed explanation of the dierent modes).
For example 2.001 = Mode 2, DMX Address 001.
For Stand Alone Mode or Library Eects, press B1 until E.6XX appears in
the display.
Press and hold B2 to SAVE or continue to set DMX Address.•
To Set DMX Address
If still in SETUP (display blinking) use buttons B2 – B4 to set the three •
digits of the DMX address desired.
Press B2 to set 100’s place. Keep pressing until desired digit appears. •
Press B3 to set the 10s place. •
Press B4 to set the 1s place. •
For example 3.101 = Mode 3, DMX Address 101. •
Press and hold B2 to SAVE•
Page 11

RevoPRO Operations Manual
p. 11
7. OPERATION MODES
The RevoPRO™ has seven modes of operation to oer the programmer and
lighting designer maximum exibility.
MODE ONE – 2 Channel - Std Forward Control•
MODE TWO – 2 CH - ML Center Inverse Control•
MODE THREE – 4 CH 8 Bit (Coarse) Indexing – Std Forward Control •
MODE FOUR – 4 CH 8 Bit Indexing ML Center Inverse Control•
MODE FIVE – 6 CH 16 Bit (Fine) Indexing - Std Forward Control•
MODE SIX – 6 CH 16 Bit (Fine) Indexing ML Center Inverse Control•
MODE SEVEN – 4 CH Indexing Shortest Path – 8 bit•
STAND ALONE – No DMX required•
Page 12

p. 12
MODE ONE: 2 CH Forward Control
Mode One provides simple control of Gobo A and Gobo B using only two
channels of DMX. Channel 1 controls Gobo A, Channel 2 controls Gobo
B. Speed and direction of each gobo is adjusted by varying the level of the
appropriate channel. Adjust Channel 1 from 0 to 50% (0 – 127 DMX value)
to rotate Gobo A clockwise. Adjust Channel 1 from 51 – 99% (128 – 254) to
rotate Gobo A Counter-Clockwise. 0% (DMX 0), 50% (DMX 128) and 100%
(DMX 255) are full stop.
Adjust Channel 2 to control Gobo B similarly.
Note: Clockwise is determined when looking down the light path from the
point of view of the lamp, with the motor box facing away from you.
Mode 1 Channel assignments
CH Level DMX Function / Result
1 0 0 Gobo A - Stop
2 0 0 Gobo B - Stop
1 1-49 1-127 Gobo A - CW (slow to fast)
1 50 128 Gobo A - Stop
1 51-99 129-254 Gobo A - CCW (slow to fast)
1 FL 255 Gobo A - Stop
2 1-49 1-127 Gobo B - CW (slow to fast)
2 50 128 Gobo B - Stop
2 51-99 129-254 Gobo B - CCW (slow to fast)
2 FL 255 Gobo B - Stop
MODE TWO: 2 CH - ML Center Inverse Control
Similar to Mode one, Mode Two provides simple two channel control of the
RevoPRO™. For programmers who prefer it, the speed and direction control is
more similar to that used by automated lighting programmers. Speed control
conguration is “center inverse.” In this mode, slowest speed in both directions is set at the 50% (DMX 128) point on the channel. To increase speed in
the clockwise directions, adjust the level down from 50% (DMX 128) to 1% for
full speed. 0% is full stop. To increase speed in the Counter Clockwise direction, adjust the level up from 50% to 99%.
Adjust Channel 2 to control Gobo B similarly
Page 13

RevoPRO Operations Manual
p. 13
Mode 2 Channel assignments
CH Level DMX Function / Result
1 0 0 Gobo A - Stop
2 0 0 Gobo B - Stop
1 1-49 1-127 Gobo A - CW (fast to slow)
1 50 128 Gobo A - Stop
1 51-99 129-254 Gobo A - CCW (slow to fast)
1 FL 255 Gobo A - Stop
2 1-49 1-127 Gobo B - CW (Fast to slow)
2 50 128 Gobo B - Stop
2 51-99 129-254 Gobo B - CCW (slow to fast)
2 FL 255 Gobo B - Stop
MODE THREE: 4 CH Indexing – 8 bit resolution - Forward Control
Indexing is a feature where the designer can specically stop the rotation at a
certain location. This is useful for some eects like Clock or See-Saw movements, but it is also useful with an I-Cue Mirror when you need to keep the
orientation of a gobo very specic, as with a logo. Mode Three allows for simple, low resolution indexing using only 2 channels per gobo. As in Mode One,
speed and direction for Gobo A is controlled by Channel 1, speed and direction for Gobo B controlled by Channel 2. Channel 3 is used to set the position
of between 1-degree and 370-degrees of Gobo A. Channel 4 is used to set the
position of Gobo B between 1-degree and 370-degrees. For precise programming, program the index using DMX values, not channel percentages.
Example: To set Gobo A rotating at full speed, set CH1 = 99% and set CH3 = 0.
To now stop Gobo A at a precise orientation, set CH 3 = DMX 127 (or any other
value > 0). Rotation will continue until the exact orientation is acheived and
then stop. To continue rotating, set CH3 = 0.
Mode 3 Channel assignments
CH Level DMX Function / Result
1 0 0 Gobo A - Stop
2 0 0 Gobo B - Stop
1 1-49 1-127 Gobo A - CW (slow to fast)
1 50 128 Gobo A - Stop
1 51-99 129-254 Gobo A - CCW (slow to fast)
1 FL 255 Gobo A - Stop
Page 14

p. 14
CH Level DMX Function / Result
3 0 0 Gobo A - Continuous rotation
3 1-100 1-255 Gobo A - Index position 0-370°
1.45° per DMX value
2 1-49 1-127 Gobo B - CW (slow to fast)
2 50 128 Gobo B - Stop
2 51-99 129-254 Gobo B - CCW (slow to fast)
2 FL 255 Gobo B - Stop
4 0 0 Gobo B - Continuous rotation
4 1-100 1-255 Gobo B - Index position 0-370°
1.45° per DMX value
MODE FOUR: 4 CH Indexing – 8 bit resolution - ML Center Inverse
Similar to Mode Two, Mode Four uses the center 50% mark on the channel
level to control speed and direction of the gobos. And similar to Mode Three,
this conguration allows for low resolution indexing of the gobos using Channels 3 & 4.
Mode 4 Channel assignments
CH Level DMX Function / Result
1 0 0 Gobo A - Stop
2 0 0 Gobo B - Stop
1 1-49 1-127 Gobo A - CW (Fast to slow)
1 50 128 Gobo A - Stop
1 51-99 129-254 Gobo A - CCW (Slow to Fast)
1 FL 255 Gobo A - Stop
3 0 0 Gobo A - Continuous rotation
3 1-100 1-255 Gobo A - Index position 0-370°
1.45° per DMX value
2 1-49 1-127 Gobo B - CW (Fast to slow)
2 50 128 Gobo B - Stop
2 51-99 129-254 Gobo B - CCW (Slow to Fast)
2 FL 255 Gobo B - Stop
4 0 0 Gobo B - Continuous rotation
4 1-100 1-255 Gobo B - Index position 0-370°
1.45° per DMX value
Page 15

RevoPRO Operations Manual
p. 15
MODE FIVE: 6 CH Indexing – 16 bit resolution - Forward Control
16-Bit or high resolution indexing provides very ne position control over
the orientation of the gobo but requires 1 extra control channel per gobo
to accomplish this. In 8-bit resolution, each point of DMX value changes the
position of the gobo by 1.45-degrees. (370-degrees / 255 values of DMX).
When projected over long distances, this 1.45-degree step can make for very
coarse gobo position control. In 16-Bit, high resolution, each 1.45-degree step
is further divided by 255 points of DMX. With this additional channel of precision, the gobo position can be adjusted within 0.005-degrees!
8-Bit
Indexing
16-Bit
Indexing
To program in 16-bit resolution, Channels 1 control speed and direction of
Gobo A. Channel 3 sets the coarse position of Gobo A. Channel 4 sets the ne
position of Gobo A (precisely adjusting the coarse point set by Channel 3).
Channels 2, 5, & 6 similarly control Gobo B.
Mode 5 Channel assignments
CH Level DMX Function / Result
1 0 0 Gobo A - Stop
2 0 0 Gobo B - Stop
1 1-49 1-127 Gobo A - CW (Slow to Fast)
1 50 128 Gobo A - Stop
1 51-99 129-254 Gobo A - CCW (Slow to Fast)
1 FL 255 Gobo A - Stop
3 + 4 0 0 Gobo A - Continuous rotation
3 1-100 1-255 Gobo A - Coarse Index 0-370°
1.45° per DMX value
4 1-100 1-255 Gobo A - Fine Index
.005° per DMX value
2 1-49 1-127 Gobo B - CW (Slow to Fast)
2 50 128 Gobo B - Stop
2 51-99 129-254 Gobo B - CCW (Slow to Fast)
2 FL 255 Gobo B - Stop
Page 16

p. 16
CH Level DMX Function / Result
5 + 6 0 0 Gobo B - Continuous rotation
5 1-100 1-255 Gobo B - Coarse Index 0-370°
1.45° per DMX value
6 1-100 1-255 Gobo B - Fine Index
.005° per DMX value
MODE SIX: 6 CH Indexing – 16 bit resolution - ML Center Inverse
Mode Six is similar to Mode 5 except Speed and Direction controls are congured to Center Inverse like in Modes Two and Four.
Mode 6 Channel assignments
CH Level DMX Function / Result
1 0 0 Gobo A - Stop
2 0 0 Gobo B - Stop
1 1-49 1-127 Gobo A - CW (Fast to Slow)
1 50 128 Gobo A - Stop
1 51-99 129-254 Gobo A - CCW (Slow to Fast)
1 FL 255 Gobo A - Stop
3 + 4 0 0 Gobo A - Continuous rotation
3 1-100 1-255 Gobo A - Coarse Index 0-370°
1.45° per DMX value
4 1-100 1-255 Gobo A - Fine Index
.005° per DMX value
2 1-49 1-127 Gobo B - CW (Fast to slow)
2 50 128 Gobo B - Stop
2 51-99 129-254 Gobo B - CCW (Slow to Fast)
2 FL 255 Gobo B - Stop
5 + 6 0 0 Gobo B - Continuous rotation
5 1-100 1-255 Gobo B - Coarse Index 0-370°
1.45° per DMX value
6 1-100 1-255 Gobo B - Fine Index
.005° per DMX value
MODE SEVEN: 4 CH Indexing Shortest Path – 8 bit
In Mode Seven, control of speed, direction, and 8-bit index position is separated into 2 channels for each gobo. Channel 1 sets Gobo A to rotating CW,
Page 17

RevoPRO Operations Manual
p. 17
increasing speed from 0-100% (0-255 DMX). Channel 2 will set Gobo A spinning CCW, speed varying from 0-100% based on level. If BOTH Channel 1 and
2 are at levels other than 0, then Channel 2 sets the 8 bit index position. The
gobo will rotate, at the speed set by Channel 1 until it reaches the index point
set by Channel 2 and then stop. If either channel is then taken to 0, rotation
will resume with speed and direction according to the level set on the active
channel.
Control of Gobo B uses Channels 3 & 4 similarly.
Mode 7 Channel assignments
CH Level DMX Function / Result
1
2
0
0
0
0
Gobo A - Stop
1
2
1-100
0
1-2550Gobo A - CW (Slow to Fast)
1
2
0
1-100
0
1-255
Gobo A - CCW (Slow to Fast)
1
2
1-100 1-255
1-255
Gobo A - CW speed to index position
Gobo A - Index 0-370° (1.45°/DMX)
3
4
0
0
0
0
Gobo B - Stop
3
4
1-100
0
1-2550Gobo B - CW (Slow to Fast)
3
4
0
1-100
0
1-255
Gobo B - CCW (Slow to Fast)
3
4
1-100 1-255
1-255
Gobo B - CW speed to index position
Gobo B - Index 0-370° (1.45°/DMX)
EFFECTS LIBRARY – NO DMX
The RevoPRO can be congured to operate with no DMX signal present by
using the LED Display Panel to recall and apply one of 10 pre programmed
eects sequences to either Gobo A or Gobo B. By combining any of these
10 sequences, a total of 100 variations can be achieved. The list of pre-programmed eects is:
0 = Continuous rotation
1 = Swing 181°
2 = Swing 80°
3 = Swing 21°
4 = Swing 360°
Page 18

p. 18
5 = Slide 116° with speed (slow to fast)
6 = Clock ticking
7 = Shaking and rotate
8 = Slide 360° with speed (slow to fast)
9 = March 5°, 5°, 5°, 5°, stop and continuous
Once applied to a specic gobo wheel, you can further set speed and direction of each of these sequences.
Press B1 once to enter SETUP . Display will momentarily change to 1.
SET- and then return to the previous display, blinking.
Press B1 until E.6XX appears in the display. 2.
Each X corresponds to the eect applied to gobo wheel A and B
respectively. For example E.600 indicates that Eect 0 (continuous
rotation) has been applied to Gobo A and Gobo B. E.637 indicates
that Eect 3 (swing 21°) has been applied to Gobo A and Eect 7
(Shaking and Rotate) has been applied to Gobo B.
Press B3 to increment the Eect Number for Gobo A3.
Press B4 to increment the Eect Number for Gobo B4.
Press B2 once. Display will show A._XX for speed and direction of 5.
GOBO A
Press B4 to increase speed. Positive numbers indicate CW rotation.6.
Press B3 to decrease speed. Negative numbers indicate CCW rota-7.
tion.
Press B2 again to switch to Gobo B. Display will show B._XX8.
Press B4 to increase speed. Positive numbers indicate CW rotation.9.
Press B3 to decrease speed. Negative numbers indicate CCW rota-10.
tion.
Press and hold B2 to SAVE.11.
Depending on the eects sequence selected, RevoPRO may run through a
homing sequence before activating the specied eects. To adjust the speed
and direction of this program, repeat steps 1-12 without changing the Eects
numbers in steps 1-4. RevoPRO will recall and restore the last programmed
eects sequence in the event of a power loss or Operation Mode change.
Note: Some eects sequences (notably, #3, #6, #9) that create quick alternating
movements may and which are run at high speeds may cause minor clicking
noises due to the fast direction changes. Reduce the speed settings to minimize
this.
Page 19

RevoPRO Operations Manual
p. 19
STAND ALONE MODE - USER DEFINED ROTATION
To set and store your own rotation eect, use Eect 0 Continuous Rotation applied to both gobos. This allows you to dene the exact speed and direction
of each gobo and recall this customized specication without using a DMX
console.
Press B1 once to enter SETUP . Display will momentarily change to 1.
SET- and then return to the previous display, blinking.
Press B1 until E.600 appears in the display. 2.
Press B2 once. Display will show A._XX for speed and direction of 3.
GOBO A
Press B4 to increase speed. Positive numbers indicate CW rotation.4.
Press B3 to decrease speed. Negative numbers indicate CCW rota-5.
tion.
Press B2 again to switch to Gobo B. Display will show B._XX6.
Press B4 to increase speed. Positive numbers indicate CW rotation.7.
Press B3 to decrease speed. Negative numbers indicate CCW rota-8.
tion.
Page 20

p. 20
Press and hold B2 to SAVE.9.
8. PRECAUTIONS
Use only properly rated IEC power cord (18AWG 3C SJT) and connect •
only to compatible voltage supplies (100-240v 50-60hz)
Always use a safety cable to insure the RevoPRO™ cannot fall out of the •
xture.
Do not allow power cord to come in contact with the hot body of the •
luminaire or the rear lamp cap.
Keep ngers clear of moving parts.•
The metal case of the RevoPRO™ may get very hot after continuous •
use in a luminaire. Use caution to avoid burns when handling units that
have been in running luminaires.
9. TROUBLESHOOTING
The RevoPRO™ will not t into the Iris Slot.1.
Make sure the Friction Lock is in the up (disengaged) position a.
and that the lock itself is not extending outside the metal case.
The iris slot cover of the luminaire may need to be removed to b.
allow complete access to the slot. Fully remove the two screws
holding the cover and lift o. Set aside so that the cover can be
reinstalled at a later date.
Installing the RevoPRO™ into the Selecon Pacic Coolight c.
requires that the guide channel in the side cut of the RevoPRO™
align with the rear guide track in the Pacic’s iris slot.
Note: RevoPRO™ is not compatible with Philips/Selecon SPX or d.
Leviton LEO.
Threaded Collar will not tighten down on gobo2.
Check that Threaded Collar is not cross-threaded. Gently un-a.
screw the Threaded Collar. Reset gobo and re-thread Threaded
Collar following the instructions in Section 4, Installing Gobos.
The projected gobo appears out of round or cut o.3.
The RevoPRO™ is not properly seated in the luminaire. Remove a.
RevoPRO™ unit and reinsert making sure that the unit is seated
all the way down in the light.
Note: The Selecon SPX and Leviton Leo luminaires are not cur-b.
rently compatible with the RevoPRO™ rotator.
RevoPRO™ is powered on but no LED lights appear to indicate that 4.
Page 21

RevoPRO Operations Manual
p. 21
the unit is receiving power.
Check LED DIM switch is set to the UP position.a.
Conrm power to IEC cable.b.
Display is alternating LOST 512-.5.
RevoPRO™ is not receiving DMX signal. Check connections and a.
console. Troubleshoot to isolate valid DMX.
Display is ashing 1.001 or similar sequence of numbers6.
RevoPRO™ is in Setup mode. Use buttons to assign proper a.
MODE and DMX Address and then Press and Hold button B2 to
SAVE assignment.
Gobo rotation is erratic and irregular.7.
Make sure Threaded Collar is tight enough on the gobo to pre-a.
vent slipping. Do Not Over Tighten.
If using two steel gobos, check to make sure gobos have not b.
warped towards one another and become entangled. If this has
happened, use a Gobo Spacer Ring (205 83007 0000) underneath
one or both metal gobos.
Channel is at full but gobo is not rotating.8.
Channel levels 0, 50% and 100% (DMX 0, 128, 255) all represent a.
STOP values for rotation. 1-49 and 51-99 are channel levels that
increase or decrease speed.
RevoPRO™ is operating but will not respond to DMX.9.
Check MODE. If Display reads E.6XX, RevoPRO is in Stand Alone a.
mode. Press B1 to enter Setup mode. Use B2 – B4 to assign
Mode and DMX Address as intended. Press and hold B2 to Save.
RevoPRO™ is behaving oddly and other DMX devices in the same 10.
chain are also behaving oddly.
Conrm DMX addressing for all units. Remember that in some a.
modes, RevoPRO™ will use 2, 4, or 6 channels of DMX. Make sure
no two device share DMX address assignments.
Check cable connections for faults.b.
Check console. Troubleshoot to validate good DMX signal.c.
Motor is turning, but one or both gobos are not turning.11.
Check belts. Replace if broken. Reset if out of alignment.a.
Check to see if gobos have warped and are entangled. If neces-b.
sary, use a Gobo Spacer Ring (205 83007 0000) underneath one
or both metal gobos.
Page 22

p. 22
Check DMX Mode and programming. Channel assignments and c.
motor control operation vary by mode. Conrm correct programming parameters for selected MODE.
Gobo rotation appears normal but stops when channel is brought to 12.
FULL or 100%.
Check MODE selection. In Mode 2, 4, or 6 this is NORMAL opera-a.
tion. 99% (DMX 254) is FULL speed. 100% (DMX 255) is STOP.
10. Technical Specications
Dimensions (w x h x d)
4.68in x 10.9in x 0.53/2.5in
119mm x 277mm x 13.4/63.6mm
Weight
31 oz (0.88Kg)
Electrical
Input: 100-240VAC 50/60hz
Max Power Draw: 1A
Connector Type: IEC C13
DMX: 5-pin XLR
Operation
Speed 0.5 - 24 rpm
Operation 2, 4,or 6 channel DMX control
400-degree indexing on both gobos
8-bit or 16 bit resolution
On-board custom programming
99 stand-alone eect sequences
Gobos Type and Sizes
86mm Std B Size (metal or glass)
Apollo B (80mm) metal or glass
86mm OD x 75mmIA x 3.5mm thick
(maximum dimensions)
Page 23

RevoPRO Operations Manual
p. 23
11. ACCESSORIES AND PARTS
Metal and Glass Gobos www.rosco.com/us/gobos
Gobos Spacer Ring Part No. 205 83007 0000
Threaded Collar – Gobo mounting wheel Part No. 205 65002 0001
Silicon Belts – Set of 2 – Simple Spin Part No. 205 65310 0000
Silicon Belts – Set of 2 – Revo & RevoPRO Part No. 205 65420 0000
Safety Cable Part No. 205 65008 0001
Power Cord 16/3 IEC - 6ft (1.8m) Part No. 226 19903 0119
4-Pin Power / Data Cable – 25 ft Part No. 205 70002 0025
5-Pin DMX Cable – 25 ft Part No. 201 50425 0025
PSU 50 Part No. 205 71402 0050
PSU 51 (includes DMX pass-thru) Part No. 205 71402 0051
PSU 200 Part No. 205 71402 0200
Page 24

p. 24
12. Compliance and Certications
DECLARATION OF CONFORMITY
ROSCO LABORATORIES INC.,
52 Harbor View Ave
Stamford, CT 06902
United States
Hereby declares that the product(s):
Rosco DMX Iris, Rosco Simple Spin, Rosco REVO, Rosco RevoPRO
Model Number(s)
74500, 63100, 64200, 64250
Conform(s) to the following Product Specifications:
European Council Directive 2004 / 108 / EC
EN 61326-1:2006, EN 61000-3-2:2006, EN 61000-3-3, 1995+A1:2001+A2:2005
European Council Directive 2006 / 95 / EC
EN 61010-1:2001
Joshua Alemany
Director of Products
Date: June 11, 2009
Page 25

RevoPRO Operations Manual
p. 25
13. Warranty
The warranty protection described below covers the following list of Rosco lighting
eects equipment (the “Product”): Vortex 360 Gobo Rotator (all styles), DHA Gobo
Rotators (all styles), DHA Animation Motor (all styles), Innity Animation System (all
styles), I-Cue Moving Mirror, X24 Eects Projector (all styles), PSU 50, PSU 51, PSU 200,
PSU 400, Simple Spin Rotator, REVO Rotator, and RevoPRO Rotator.
1 YEAR LIMITED WARRANTY
Rosco Laboratories warrants to the rst retail purchaser that this Product will be free
from defects in workmanship and material for a period of twelve (12) months from the
date of original purchase. For warranty service you must be able to provide proof of
purchase.
Should this Product prove defective during the warranty period, please contact your
local Rosco oce for return authorization. No warranty service will be performed
without Return Authorization. At Rosco’s sole discretion, covered Products will be
repaired or replaced with new or refurbished equipment or a model of like kind and
quality. Exchanged or replaced parts and Products assume the remaining warranty
period of the original Product covered by this limited warranty.
You are responsible for securely packaging the defective Product and returning it
to Rosco as per the instructions on the Return Authorization. Within North America,
Rosco will ship the repaired or replaced Product to you freight prepaid. Shipments to
other locations will be made freight collect.
This warranty is not transferable and does not extend beyond the rst retail purchase
of the Product. This warranty does not cover damage to the Rosco product caused by
parts not manufactured, distributed or certied by Rosco. Rosco is not obligated to
provide warranty service should the product fail to be properly maintained or fail to
function properly as a result of misuse, abuse, improper installation, neglect, improper
shipping, damage caused by disasters such as ood, re and lightning, improper electrical current or connection or service other than by a Rosco Authorized Servicer. If a
claimed defect cannot be identied or reproduced, you will be held responsible for the
costs incurred.
Unless otherwise stipulated by state law, all warranties expressed or implied are limited to the twelve (12) month period of this warranty.
THE WARRANTY AND REMEDY PROVIDED ABOVE ARE EXCLUSIVE AND IN LIEU OF ALL OTHER EXPRESS OR IMPLIED WARRANTIES INCLUDING BUT NOT LIMITED TO THE IMPLIED WARRANTIES OF
MERCHANTABILITY, NON-INFRINGEMENT OR FITNESS FOR A PARTICULAR PURPOSE. EXCEPT AS
PROVIDED IN THIS WRITTEN WARRANTY AND UNLESS EXCLUSIONS ARE SPECIFICALLY FORBIDDEN
BY STATE LAW, NEITHER ROSCO NOR ITS AFFILIATES WILL BE LIABLE FOR ANY LOSS, INCONVENIENCE,
OR DAMAGE, INCLUDING DIRECT, SPECIAL, INCIDENTAL OR CONSEQUENTIAL DAMAGES, INCLUDING INJURY TO PERSONS OR PROPERTY, RESULTING FROM THE USE OR INABILITY TO USE THE ROSCO PRODUCT, WHETHER RESULTING FROM BREACH OF WARRANTY OR ANY OTHER LEGAL THEORY.
Page 26

p. 26
Gobo Library
Rosco’s extensive gobo library contains more than
2500 steel and glass designs and contains the
inspiration and creative tools to invent almost any
lighting eect a designer needs.
www.rosco.com/us/gobos/
Simple Spin™ Dual Gobo Rotator
One of Rosco’s BeltDriveFX rotators, the SimpleSpin
is a “set and forget” style belt drive gobo rotator.
Internal auto-sensing power supply makes for easy
installation anywhere in the world.
REVO™ Dual Indexing Rotator
Many of the same features as the RevoPro but powered by an external 24v power supply for convenient installation with common theatrical accessories like color scrollers and I-Cue mirror.
DHA Double Gobo Rotator
Proven reliable for more than 25 years, the Double
Gobo Rotator uses a precision engineered gear
drive to rotate two gobos independent of one
another. Manual and DMX Controllers are available
for this 12v device.
Vortex 360 Gobo Rotator
The durability and reliability of a gear drive at a value-engineered price. The Vortex uses an external
12v transformer and is controlled by an on-board
speed potentiometer.
Innity Animation Eects System
A large rotating disk of your selection animates any
gobo with realistic and kinetic movement. Shimmering re, falling rain, blowing clouds and leaves
are among a few of the linear eects created with
the Innity.
ALSO AVAILABLE
Page 27

RevoPRO Operations Manual
p. 27
iPro Image Projector
This innovative accessory holds and cools
a plastic gobo printed from an ordinary ink
jet printer. Project any full color or black
and white image you imagine from your
Source Four or similar leko within minutes.
I-Cue Moving Mirror
A perfect accessory to expand your lightplot. This silent, accurate motorized mirror
attachment turns your simple leko into an
innite number of lighting specials.
X24 Eects Projector
Bright, dynamic, unique rippling light
eects. Weighing barely 12 lbs but with a
5000 lumen output, the X24 projector creates dazzling, water and re eects, aurora
borealis, and
Page 28

Corporate Oce
52 Harbor View Ave
Stamford CT 06902
M +1 203 708-8900
F +1 203 708-8919
Toll Free (800) ROSCO NY
info@rosco.com
www.rosco.com
Western US Sales Oce
1265 Los Angeles Street
Glendale CA 91204
M +1 818 543-6700
F +1 818 662-9470
Rosco Canada
1241 Denison St #44
Markham, Ontario L3R 4B4
M +1 905 475-1400
F +1 905 475-3351
info@roscocanada.com
Roscolab Ltd - England
Kangley Bridge Road
Sydenham, London SE26 5AQ
United Kingdom
M +44 20 8659 2300
F +44 20 8659 3153
sales@rosco-europe.com
Rosco Iberica SA - Spain
C/Oro, 76 Poligono Industrial Sur
28770 Colmenar Viejo, Madrid
Espana
M +34 918 473 900
F +34 918 463 634
info-spain@rosco-iberica.com
Rosco do Brasil
R. Visconde de Itaborai, 141
Tatuape, Sao Paulo - SP
Cep: 03308-050
M +55 2098 2865
F +55 2098 0193
info-brazil@rosco.com
Rosco Australia PTY Ltd
42 Sawyer Lane, Artarmon
New South Wales 2064
M +(02) 9906 6262
F +(02) 9906 3430
roscoaus@rosco.com.au
www.rosco.com
 Loading...