

Page 1
I-CUE
INTELLIGENT
MIRROR
Operations
Manual
Page 2

Table of Contents
Introduction 1
Control and Power Requirements 2
Unpacking of the Unit 2
Addressing and Modes of Operation 3
Non DMX Mode 3
Mounting on the Fixture 3
Achieving Both Color and Motion 4
Mirror Specifications Table 5
Illustration 6
Troubleshooting 7
Parts List 8
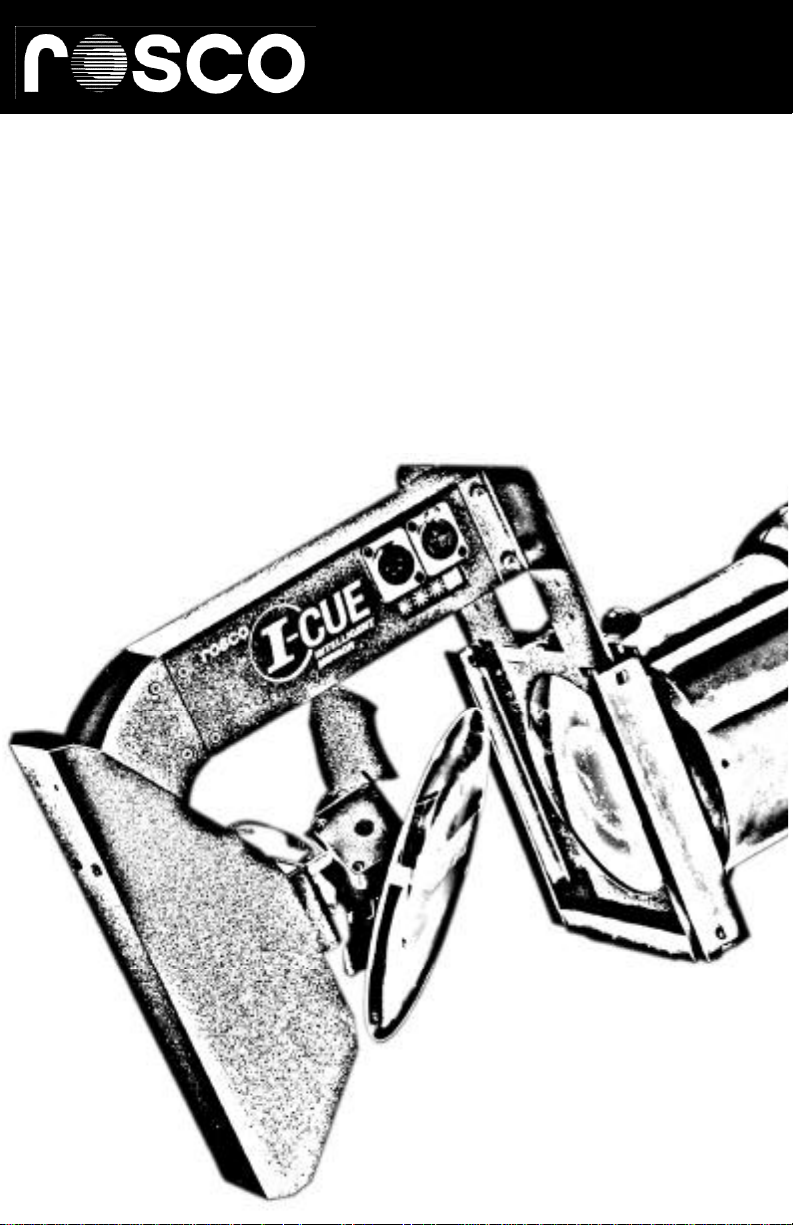
Introduction
Rosco’s I-Cue Mirror is a motorized mirror attachment that provides precise,
DMX controlled direction to the light beam from an ellipsoidal reflector spotlight.
It can be used to turn stationary light into a "moving light" by moving the beam around
up and down, left and right. The I-Cue can also be used to direct the light beam to a
specific spot. Since the I-Cue’s DMX control can re-direct the beam to meet the
needs of dozens of light cues, the number of instruments needed is minimized.
The I-Cue Mirror is lightweight, compact and quiet enough to use in any production setting. With the ability to integrate with color scrollers, it is possible to produce
both motion and color changing from one ellipsoidal fixture. The I-Cue Mirror offers
lighting designers a precision of movement usually found in high-end, high priced
Moving Lights.
The unit is designed to work with the ETC Source Four, Altman Shakespeare,
Strand SL, and Selecon Pacific series fixtures.
pg 1
Page 3

The I-Cue does not interfere with the positioning or focusing of the light fixture.
O p t i mum operational chara c t e ristics are achieved when the device is used on fixtures
with a beam angle of 36 degrees or less.
The Pan range is up to 230 degrees with the Tilt range up to 57.3 degr e e s. T h e
light is reflected to the desired direction by a large 6”x 7 ”ellipsoidal glass mirror and
the unit is suitable for operation in any position.
The unit comes in a basic configuration with universal mounting brackets for
ellipsoidal spotlight fixtures. Modular power supplies and accessory cable are also
available for the units.
Control And Power Requirements
The device requires 24-volt DC external power supply and operates on two or
four channels of DMX 512 to control the movement of the mirror. Power and DMX
signals are transmitted to the unit via a four conductor XLR scroller cable.
In the two-channel mode, one channel controls the pan and the other tilt with
8 -bit resolution. In this mode the pan range is 230 degrees with 0.9 degrees of resolution and the tilt range is 57.3 degrees with 0.225-degree resolution.
In the four-channel mode the channels are respective l y, Pan coarse, Pan fine, T i l t
c o a r s e, and Tilt fine with 16-bit resolution. In this mode the pan range resolution is 0.228
d e grees and the tilt range resolution is 0.028. The user can choose 8 or 16-bit opera t i n g
mode by means of Dipswitch #1.(See Addressing and Modes of Operation section.)
The scroller cable power pair is 14AWG and the data pair is 22AW G . T h e
c o nnectors are four pins XLR with the fo l l owing Pin-out. Pin 1 is 0 volts DC and pin
4 is +24 volts DC and pin 2 is DMX (-) with pin 3 being DMX (+). Care should be
t a ken to confirm that the output of the power supply used confo rm s
to the above as some scroller power supply manu facturers use
r everse polarity in their units. The device draws 0.7 amps at 24 volts.
Unpacking Of The Unit
The unit is shipped in a specially constructed shipping carton to provide protection
to the unit. Carefully open the carton and remove the device by grasping the support
a rm in the middle and lifting the unit ve rtically out of the cart o n . N ext, carefully remove
the ru bber restraint band used to stabilize the mirror unit during shipment.
The front light shield had been designed so that it can act as a shipping support and
must be repositioned before using the device as a moving mirror. Loosen the two M4
wing screws on the front of the unit and reposition the light shield by moving the shield
d ow n ward to the position necessary to prevent light leaks depending on the beam angle
and focusing.
pg 2
Page 4

Addressing And Modes Of Operation
pg 3
The unit has user-friendly rotary address switches and can be addressed to any
location between 1 and 512 by dialling the number on the three decimal rotary sw i t c hes.
The device is also equipped with additional binary switches for setting the fo llowing operating characteristics:
•Switch #1 selects between 8-bit resolution ("off" position) and 16-bit resolution
operation ("on" position)
• Switch #2 allows the user to reverse the direction of pan motion when the
c o nfiguration of the light fixture and device dictate. Normal operation mode is
"off"; reverse mode is achieved in the "on" position.
• Switch #3 reverses the tilt mode of operation with normal operation being the
"off" position and the reverse mode is achieved in the "on" position.
Non DMX Mode
The device is designed with the option of playing back a factory pre-recorded
chase when no DMX signal is available. This mode of operation becomes activated
when the rotary address switches are set at 600. The x1 address switch allows for
four different Pan speeds corresponding to the numbers 0, 1, 2, and 3 where 0 is the
fastest. The x10 address switch allows for four different Tilt speeds corresponding to
the numbers 0, 1, 2 and 3 where 0 is the fastest.
Mounting On The Fixture
For proper operation, the device must be firmly attached to the light fixture it is
mounted on. To achieve this, the mounting plate of the unit has two flat springs at the
outer edge. This basic unit is designed to mount in the rear color frame slot of the ETC
Source Fo u r, Strand SL, Altman Shake s p e a r e, and Selecon Pacific ellipsoidal fixtures.
The units back plate should be inserted in the rear color slot and gently pushed
down until the unit is firmly seated in the bottom slot and latched in place. Next, input
power and DMX should be brought to the unit by way of 4-pin XLR connector scroller
c a bl e. If daisy chaining is desired, scroller cable should be run from the output
c o nnector on the device to the next device.
When DMX is first applied to the unit, it will go through a homing sequence,
which will cause the mirror to momentarily move rapidly in opposite directions, around
the home position before following the chase sequence.
If the rear slot is not available for mounting of the device because of the use of
a gel holder in this slot and it is not convenient to place the gel holder in the front color
slot, the front slot can be used for mounting.
Page 5

Achieving Both Color And Motion
The device has been designed to operate with theatrical scrollers. To achieve
this mode of operation, an extension bracket is required.
The scroller is mounted first in the front color frame for the light fixture after being
properly addressed. The preferred orientation of the scroller is an orientation rotated
90 degrees from the normal vertical position.
The I-Cue Mirror with the extension bra cket is then inserted in the rear color slot
as before and connected to the input XLR cabl e. A short cable (length of scroller) is
then run from the output XLR connector of the I-Cue Mirror to the input of the scroller
to provide power and DMX control to the unit. The output of the scroller can be
daisy-chained to other mirrors, scrollers or compatible accessory dev i c e s.
pg 4
Page 6

I-CUE Mirror Specifications
Dimensions Length 9.5", Width 6.5", Height 9.5"
Weight 3.5 lbs.
Speed 2 seconds: 0 to100% Pan, 1 second: 0 to 100% Tilt
Resolution 0.9 degrees for Pan and 0.225 for Tilt in 8-bit mode
0.028 degrees for Pan & Tilt in 16-bit mode
Addressing 1 to 512 by setting three decimal rotary switches
Power Requirements 24V DC
Power Consumption 0.7 amps @ 24V DC
Body Material Black powdered aluminum
Mounting plate 6.25”Width, 5.0” Aperture
pg 5
Page 7

SPECS
pg 6
Page 8

Troubleshooting
Symptoms Possible Cause Solution
At power-up the mirror doesn’t
go through the homing
sequence
Doesn’t respond to DMX at all
The mirror vibrates in one place
when supposed to move
Mirror panning/tilting in opposite
direction
The tilt doesn’t respond to DMX
Missing or improper power
Damaged electronic card
No DMX to the Power Supply
Faulty scroller cable
Improper address setting
Broken motor cable
Popped out motor connector
Pan/tilt reverse switch
improper setting
16-bit mode setting when 8-bit
control is intended or vice versa
Ch e ck power control line
Check power supply
Consult the distributor for
service center
Ch e ck power supply/splitter
for presence of DMX
Confirm scroller cable is
used and not mic
cable/replace cable
Check setting
Contact distributor for
service centre
Reconnect and check
Check and reset
Check and reset
pg 7
Page 9

I-Cue Intelligent Mirror Parts List
Part Number
IC-01 Mounting Plate Assembly 205 81001 0000
IC-02 Broadway Mounting Bracket 205 81002 0000
IC-03 XLR Connector Assembly 205 81003 0000
IC-04 Stepper Motor Lead (each) 205 81004 0000
IC-05 Safety Chain Assembly 205 81005 0000
IC-06 Mirror/Mounting Bracket Assembly 205 81006 0000
IC-07 Digital Control Card 205 81007 0000
IC-08 Stepper Motor (each) 205 81008 0000
IC-09 Mirror Back Plate 205 81009 0000
IC-10 Front Light Shield Assembly 205 8101 00000
Please call Rosco or your local Rosco dealer for pricing and availability.
pg 8
Page 10

Rosco Laboratories, I n c .
52 Harbor V i ew Ave., Stamford, CT 06902
(203) 708-8900 1 (800) RO S C ONY FA X (203) 708-8919
1120 N.C i t rus Ave., Hollywood, CA 90038
(323) 462-2233 1 (800)RO S C O LA FA X : (323) 462-3338
Rosco Laboratories, L t d .
1241 Denison St. #44, Markham, Ontari o, Canada L3R 4B4
(905) 475-1400 (888)RO S C O TO FA X :(905) 475-3351
R o s c o l a b ,L t d .
Blanchard Wo rk s, Kangley Bridge Rd., Sydenham, London SE26 5AQ England
(208) 659-2300 FA X :(208) 659-3153
Rosco Iberica,S . A .
C/Del Oro 76A, Po l .I n d u s t rial Sur, 28770 Colmenar V i e j o, Madrid, Spain
(34)918-473-900 Fa x :(34) 918-463-634
Rosco do Brasil Ltda.
Rua Antonio De Barros, 827, São Paulo SP Brasil CEP 03401-000
(011) 218-2865 FA X :(011) 218-0193
Rosco Australia Pty Ltd.
42 Saw yer Lane, Art a rmon 2064, New South Wa l e s, Au s t ra l i a
(02) 9906-6262 FA X :(02) 9906-3430
 Loading...