

Page 1
DMX IRIS
Operations
Manual
Page 2
DMX IRIS OPERATIONS MANUAL
Introduction to your DMX Iris
Features
10mm – 75mm aperture range•
24 leaf mechanism for smooth-edged, truly round aperture projections •
No external PSU required•
100-240 v compatible for use around the •
world
Unique friction lock holds unit securely in iris •
slot of luminaire
Manual control knob allows use without •
power or DMX
In the Box
(1) Rosco DMX Iris unit
(1) NEMA/IEC power cord with u-ground type connector
(1) Operations manual
Set-Up and Installation
Power Requirements
The Rosco DMX Iris is equipped with an internal, auto-sensing power supply.
It will automatically adjust and accept power input from 100 volts to 240
volts at a frequency range of 50 – 60 hz.
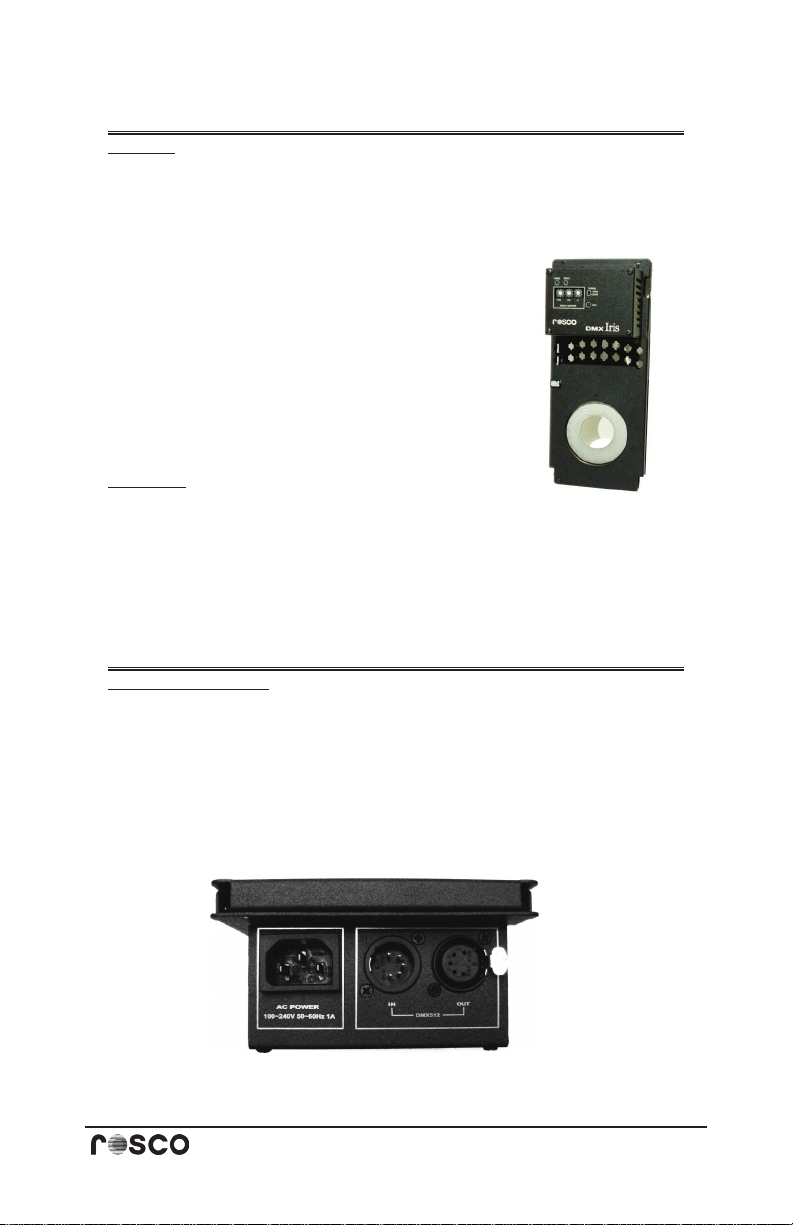
Connect the included IEC power cord by rmly pushing it into the recessed
socket on the DMX Iris. (Figure 1) When using the DMX Iris in regions using
Figure 1
Power & DMX Connections
p. 2
Page 3
connectors other than a u-ground type, simply replace the connector or
substitute the included IEC cable for one with the appropriate connector
type. Make sure to use an IEC cable with at least 18 gauge conductors.
Plug the connected power cord into a suitable non-dim or mains power
supply. Do not connect the DMX Iris to a dimmer circuit unless the dimmer
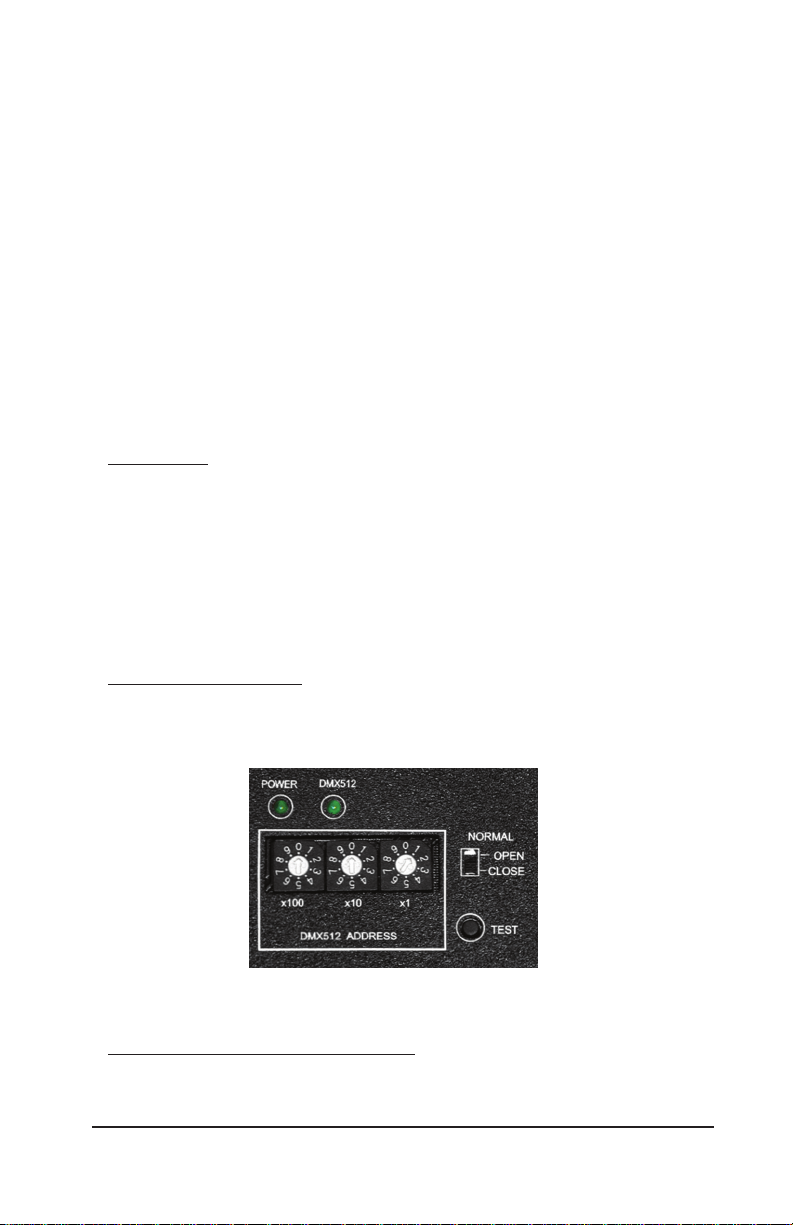
has been preset into a non-dim mode. The green LED indicator light will
illuminate when power is present. (Figure 2)
Immediately after receiving power, the DMX Iris Unit will go through a
homing cycle. For approximately 10 seconds. It will revert to its open or
closed position, determined by the Normal Switch.
Pressing the Test Button will cycle the DMX Iris closed and back to open -- or
open and back to closed if the Normal Switch is in the CLOSE position.
DMX Control
If you are using the DMX Iris with DMX control, you will need to connect a
5-pin DMX cable to the unit. It is equipped with (2) DMX ports, input and
out (pass-through). (Figure 1) The DMX Iris may require an external DMX
terminator if used at the end of your DMX chain.
The green LED indicator light will illuminate when a DMX Signal is present.
(Figure 2)
Setting the DMX Address
The DMX Iris uses one channel of DMX. Use the three rotary pots to set the
desired DMX address, for example 2-0-1 = DMX Address 201. The small arrow
on each rotary switch indicates the setting. (Figure 2)
Figure 2
DMX Addressing
Installing the DMX Iris in your luminaire
The DMX Iris has been designed to t into most modern ellipsoidal
luminaires. With its thin body design and customized toolings, the list
www.rosco.comp. 3
Page 4

DMX IRIS OPERATIONS MANUAL
of compatible xtures includes ETC Source Four, ETC Source Four Zoom,
Selecon Pacic, Altman Shakespeare, Strand SL, Leviton Leo and many
others.
The Rosco DMX Iris is equipped with a unique safety feature, the Friction
Lock. Located on the left side of the DMX Iris is the Lock Slider. (Figure 3)
Depressing this plunger will extend a knurled cylinder which presses against
the insides of the accessory iris slot, securely
holding the DMX Iris in place. To install the
DMX Iris into your luminaire it is necessary
that the Lock Slider be in the UP position,
with the lock disengaged.
Insert the DMX Iris into the iris slot of your
luminaire with the motor box extending
towards the front, the lens end, of the
light. It may be necessary to angle the
yoke of the luminaire back to allow access
into the accessory iris slot. Note that on
certain luminaires, the sliding cover of
the iris slot may have to be removed to
allow the DMX Iris to t properly. Make
sure that the DMX Iris is seated all the
way down into the luminaire. This is is
important to insure that the light path is not
blocked. If you project an oblong or cut o
beam pattern, wiggle and reseat the Iris all
the way down.
To engage the Friction Lock, press down
on the Lock Slider until it stops. (Figure
3) The unit will be held securely into the
accessory iris slot. The Friction Lock is only
intended to prevent accidental movement
of the DMX Iris within the accessory slot. It
is highly recommended that you install a safety
cable to prevent the DMX Iris from falling out of
the xture and possibly causing harm.
Caution: Make sure to route the power cord and DMX cables to avoid the
extremely hot back end of the luminaire. Failing to do so could result in
melting cords, signal failure or re!r
Figure 3
Friction Lock
p. 4
Page 5

Operation and Control
DMX Operation
Changing the level of the assigned DMX channel will cause the iris
mechanism to open or close. With your Rosco DMX Iris you can dene how
the unit responds to DMX control signals. A slider switch is positioned to
the right of the rotary DMX address pots. This “Normal Switch” allows you to
toggle the default behavior of the DMX Iris. (Figure 2) With the switch in the
OPEN position, the DMX Iris will default to a full open aperture. As the level
of the DMX channel increases, the aperture will iris down and when the level
reaches 100% the aperture will be at its smallest 10mm opening. With the
switch in the CLOSE position, the DMX Iris will default to it smallest opening.
Then as the level of the DMX
channel increases, the aperture
will iris up and when the level
reaches 100% the aperture will
be at its largest 75mm opening
Manual Operation
The Rosco DMX Iris can also be
used as a manually adjustable
iris in situations where live
control of the aperture size is
not required. With no power
applied to the DMX Iris, turn the manual knob on the back of the DMX Iris
until the desire aperture size is achieved. (Figure 4) If power is present, the
manual knob cannot be used.
Manual Control & Safety Cable Connection
Figure 4
Precautions
Use only properly rated IEC power cord (18AWG 3C SJT) and connect only •
to compatible voltage supplies (100-240v 50-60hz)
Always use a safety cable to insure the DMX Iris cannot fall out of the xture.•
Do not allow power cords or DMX cables to come in contact with the body •
of the luminaire or the rear lamp cap.
Do not connect DMX Iris to a dimming circuit.•
Keep ngers clear of moving iris mechanism.•
The metal case of the DMX Iris may get very hot after continuous use in a •
luminaire. Use caution to avoid burns when handling units that have been
in running luminaires.
www.rosco.comp. 5
Page 6

DMX IRIS OPERATIONS MANUAL
Troubleshooting
The DMX Iris will not t into the Iris Slot.1.
Make sure the Friction Lock is in the up (disengaged) position and •
that the lock itself is not extending outside the metal case.
The iris slot cover of the luminaire may need to be removed to allow •
complete access to the slot. Fully remove the two screws holding
the cover and lift o. Set aside so that the cover can be reinstalled
at a later date.
Installing the DMX Iris into the Selecon Pacic Coolight requires that •
the guide channel in the side cut of the DMX Iris align with the rear
guide track in the Pacic’s iris slot.
The projected aperture appears out of round or cut o.2.
The DMX Iris is not properly seated in the luminaire. Remove Iris unit •
and reinsert making sure that the unit is seated all the way down in
the light.
The manual control knob won’t turn.3.
Make sure the DMX Iris is unplugged and no power is getting to the •
unit. The manual knob will not operate when power is present.
Irregular or failed DMX Control4.
Check that the DMX Address is set properly.•
Check that proper DMX signal is present (is the DMX indicator light •
illuminated?)
If the DMX Iris is at the end of the DMX chain, connect a proper DMX •
terminator to the OUT port of the DMX Iris.
Specications
Power Input 100 -240 v 50-60 hz, < 500 mA power draw
Cord 18AWG 3C SJT, IEC/NEMA Connector
Motor 24v 1.8° Stepper Type
Aperature 10mm - 75mm
Mechanism 24 leaf iris, bonded stainless steel
Temp 450° C at iris leaves
p. 6
Page 7

Made in Taiwan
Copyright 2008 Rosco Laboratories Inc.
www.rosco.comp. 7
Page 8

www.rosco.com
Rosco Laboratories, Inc.
52 Harbor View Ave., Stamford, CT 06902
(203) 708-8900 FAX(203) 708-8919
1265 Los Angeles St., Glendale, CA 91204
(818) 543-6700 FAX (818) 662-9470
Rosco Laboratories, Ltd.
1241 Denison St. #44, Markham, Ontario, Canada L3R 4B4
(905) 475-1400 FAX (905) 475-3351
Roscolab, Ltd.
Blanchard Works, Kangley Bridge Rd.,
Sydenham, London SE26 5AQ England
(20) 8659-2300 FAX (20) 8659-3153
Rosco Iberica SA
C/Oro,76 Polígono Industrial Sur
28770 Colmenar Viejo, Madrid. Espana
(34) 918 473 900 FAX (34) 918 463 634
Rosco do Brasil Ltda.
Rua Antonio De Barros, 827, São Paulo
SP Brasil CEP 03401-000
(11) 218-2865 FAX (11) 218-0193
Rosco Australia Pty Ltd.
PO Box 873, Artarmon,
NSW, 1570
42 Sawyer Lane, Artarmon,
NSW, 2064, Australia
(02) 9906-6262 FAX (02) 9906-3430
 Loading...