

Roper ELECTRIC DROP-IN D975 Owner's Manual
ROPER”
Home Appliances
OWNER’S MANUAL
ELECTRIC DROP-IN
model D975
INSTALLATION
CARE & USE
RECIPES
PART NO. 4343041 MNUOOS (343743)-3

I
THIS PAGE
CONTENTS
INSTALLATION
USE AND CARE
Important Instructions for Your Safety
Your Oven and lts Features
The Electronic Oven Control
Oven Cooking
Broiling
Favorite American Recipes
The Self-Clean Cycle
Cleaning Tips
Removable Range Parts
SERVICE
Replacing Oven Light Bulbs
What to Do before Calling for Service
Adjusting Oven Temperature
WARRANTY
EC0015
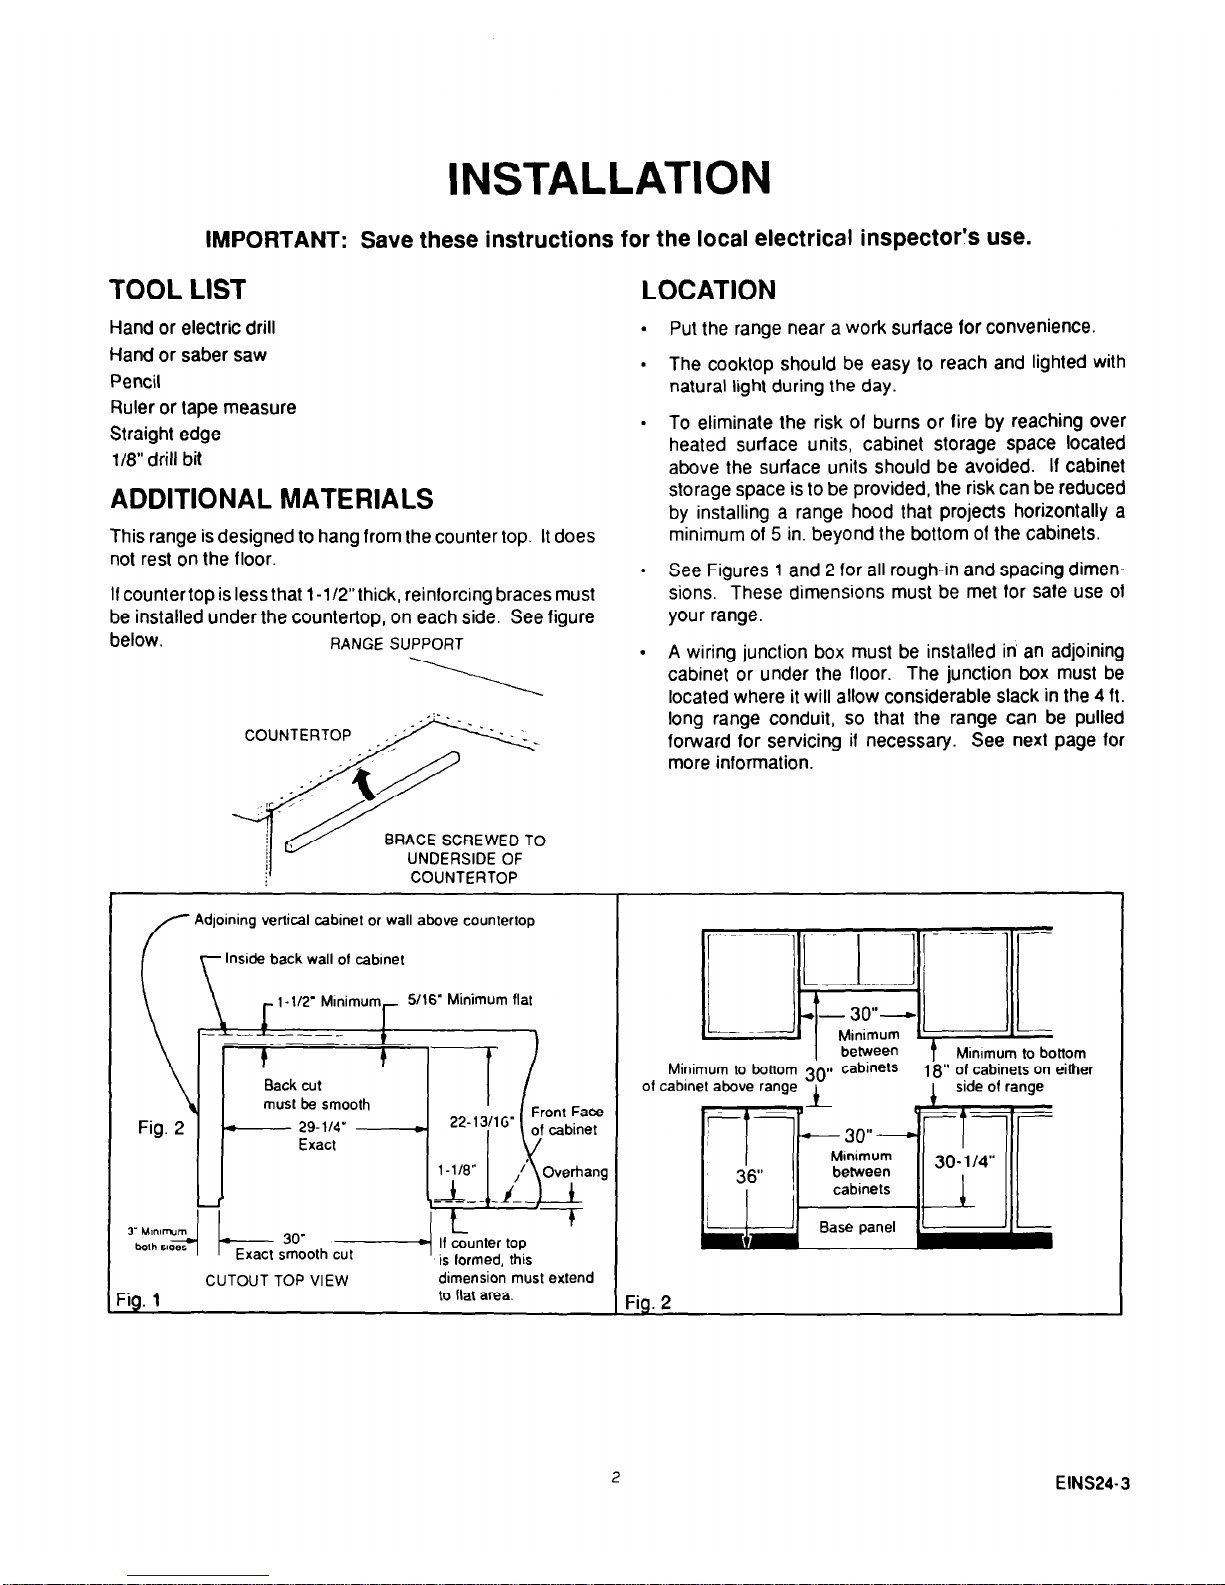
INSTALLATION
IMPORTANT: Save these instructions for the local electrical inspector’s use.
TOOL LIST
LOCATION
Hand or electric drill
Hand or saber saw
Pencil
Ruler or tape measure
Straight edge
l/8” drill bit
l
Put the range near a work surface for convenience.
l
The cooktop should be easy to reach and lighted with
natural light during the day.
ADDITIONAL MATERIALS
This range is designed to hang from the counter top. It does
not rest on the floor.
l
To eliminate the risk of burns or fire by reaching over
heated surface units, cabinet storage space located
above the surface units should be avoided. If cabinet
storage space is to be provided, the risk can be reduced
by installing a range hood that projects horizontally a
minimum of 5 in. beyond the bottom of the cabinets.
If countertop is less that 1-1/2”thick, reinforcing braces must
be installed under the countertop, on each side. See figure
below.
RANGE SUPPORT
l
See Figures 1 and 2 for all rough-in and spacing dimensions These dimensions must be met for safe use of
your range.
l
A wiring junction box must be installed in’ an adjoining
cabinet or under the floor. The junction box must be
located where it will allow considerable slack in the 4 ft.
long range conduit, so that the range can be pulled
forward for servicing if necessary. See next page for
more information.
BRACE SCREWED TO
UNDERSIDE OF
COUNTERTOP
Adloining vertical cabinet or wall above countertop
Ins& back wall 01 cabinet
1 -l/2’ Mmimum
546” Minimum flat
-_~-_-
must be smooth
Exact
:ig. 1
CUTOUT TOP VIEW
dimension must extend
to flat area.
flo”om
18” of cabinets on either
of cablnet above range
Fio. 2
2
EINS24-3
ELECTRICAL REQUIREMENTS
We recommend you have the electrical wiring and hookupof
your range done by a qualified electrician. After installation,
have the electrician show you where your main range
disconnect is located.
Check with your local utilities for electrical codes which apply
in your area. Failure to wire you range according to governing codes could result in a hazardous condition. If there are
no local codes, you range must be wired and fused to meet
the requirements of the National Electrical Code, ANSI/
NFPA No. 70-1987. You can get a copy by writing:
National Fire Protection Association
Batterymarch Park
Quincy, MA 02269
You must use a three-wire, single-phase A.C. 208Y/120Volt
or 120/240 Volt, 60 Hertz electrical system. If you connect
to aluminum wiring, properly installed connections approved
for use with aluminum wiring must be used.
In the absence of local codes, we recommend that a minimum wire size of No. 8 copper wire and a 40 amp fuse or
circuit breaker be used, on both 208Y/120 Volt and 1201240
Volt systems.
PREPARE THE COUNTER
Install base cabinets 30” apart, and be sure they are
plumb and level before attaching the countertop.
Lay out the cutout opening on the countertop per Fig. 1.
(Countertopcutout shown in Fig. 1. assumes a standard
installation in a 25” deep counter with a standard 1 -l/4”
overhang.) If theoverhang is less than 1 -l/4”, the range
front side trims and control panel end caps will extend
into the 30” cutout. If the overhang is greater than
l-1/4”, a gap between the cabinet face and the range
front side trims will exist. A moulding may be fitted to
provide a more custom appearance. Before cutting,
check for dimension marked min. (Fig. 1). If these
dimensions are not met, the product can be moved
forward on the countertop until minimum dimensions are
met. (Decreasethecutoutdimensions22-13/16”&1-l/
8” by the amount of the forward movement.) This will
make the end caps extend forward in front of the
countertop and may create a gap between the range
front trims and the cabinet face. If this occurs, fit
mouldingas above. If it is not flat at the backof the notch,
the raised area must be filed or cut away to fit.
Make cutout. If the countertop is not 1 -l/2” thick, install
reinforcing braces under the countertop as shown on
page 1.
Install the wiring junction box in an adjoining cabinet or
underthefloor. Cut 1-1/2”dia. hole to bringthe electrical
cable from the range to the junction box.
The junction
box must be located so that there will be enough slack
in the connected cable to allow the range to be pulled
forward several inches for service if necessary.
MAKE ELECTRICAL CONNECTION
1. De-energize range branch circuit.
2. With range in front of opening, push flexible electrical
cable through hole in floor or adjacent base cabinet and
attach it to the junction box. Do not shorten this cable.
The flexible cable connector must be securely attached
to the junction box and the flexible cable must be
securely attached to the connector. If the flexible cable
will not fit within the connector, do not install the range
until a connector of the proper size is obtained.
When connecting to a 3-conductor branch circuit, if
local codes permit, connect the white and bare
ground connector leads of the range to the branch
circuit neutral (white or gray in color), the range red
lead to the branch circuit red lead and the range black
lead to the branch circuit black lead in accordance
with local codes.
Special Grounding Instructions
.
.
.
1.
2.
3.
When connecting to a 4-conductor branch circuit.
When installing range in a mobile home.
When local codes do not permit grounding through
neutral.
Attach the appliance grounding lead (green or bare
copper) to the residence grounding conductor (green or
bare) in accordance with local codes. If the residence
grounding conductor is aluminum, see “WARNING”
note below.
Connect the range neutral (white) lead to the branch
circuit neutral (white or gray) in accordance with local
codes.
Connect the range red lead to the branch circuit red lead
and the range black lead to the branch circuit black lead
in accordance with local codes. If the residence red and
black leads are aluminum conductors, see “WARNING”
note below.
NOTE TO ELECTRICIAN: The three power leads supplied
with this appliance are U-L. recognized for connection to
larger gauge household wiring. The insulation of these three
leads is rated at temperatures much higher than the temperature rating of household wiring. The current carrying
capacity of a conductor is governed by the temperature
rating of the insulation around the wire rather than the wire
gauge alone.
WARNING: IMPROPER CONNECTION OF ALUMINUM
HOUSE WIRING TO THESE COPPER LEADS CAN RESULT IN A SERIOUS PROBLEM. USE ONLY CONNECTORS DESIGNED FOR JOINING COPPER TO ALUMINUM AND FOLLOW THE MANUFACTURER’S RECOMMENDED PROCEDURE CLOSELY.
3
EINS29-1
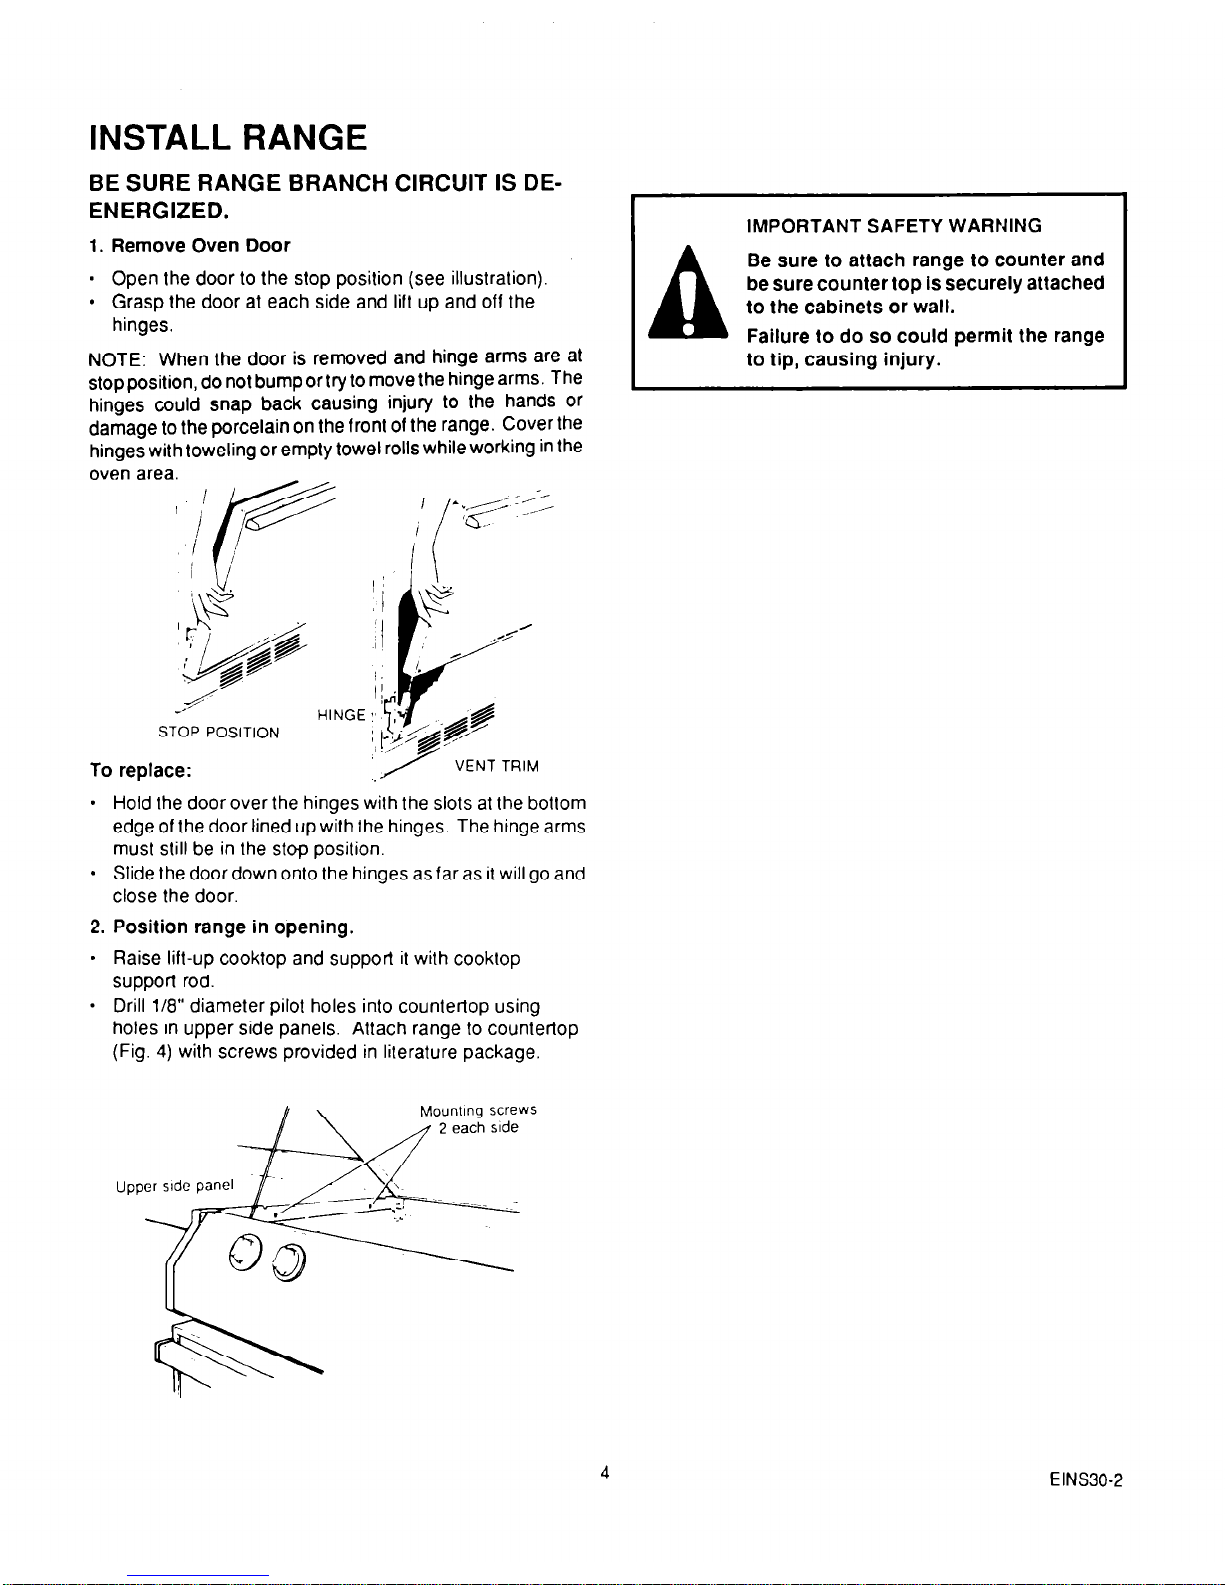
INSTALL RANGE
BE SURE RANGE BRANCH CIRCUIT IS DEENERGIZED.
I
IMPORTANT SAFETY WARNING
1. Remove Oven Door
n
Open the door to the stop
position (see illustration).
l
Grasp the door at each side and
lift
up and off the
hinges.
NOTE: When the door is removed and hinge arms are at
stop position, do not bumportry to move the hinge arms. The
hinges could snap back causing injury to the hands Or
damage to the porcelain on the front of the range. Cover the
hinges with toweling or empty towel rolls while working in the
oven area.
Be sure to attach range to counter and
be sure counter top is securely attached
to the cabinets or wall.
A
Failure to do so could permit the range
to tip, causing injury.
STOP POSITION
To replace:
VENT TRIM
l
Hold the door over the hinges with the slots at the bottom
edge of the door lined up with the hinges. The hinge arms
must still be in the stop position.
l
Slide the door down onto the hinges as far as it will go and
close the door.
2. Position range in opening.
l
Raise lift-up cooktop and support it with cooktop
support rod.
l
Drill 118” diameter pilot holes into countertop using
holes in upper side panels. Attach range to countertop
(Fig.
4)
with screws provided in literature package.
EINS30-2
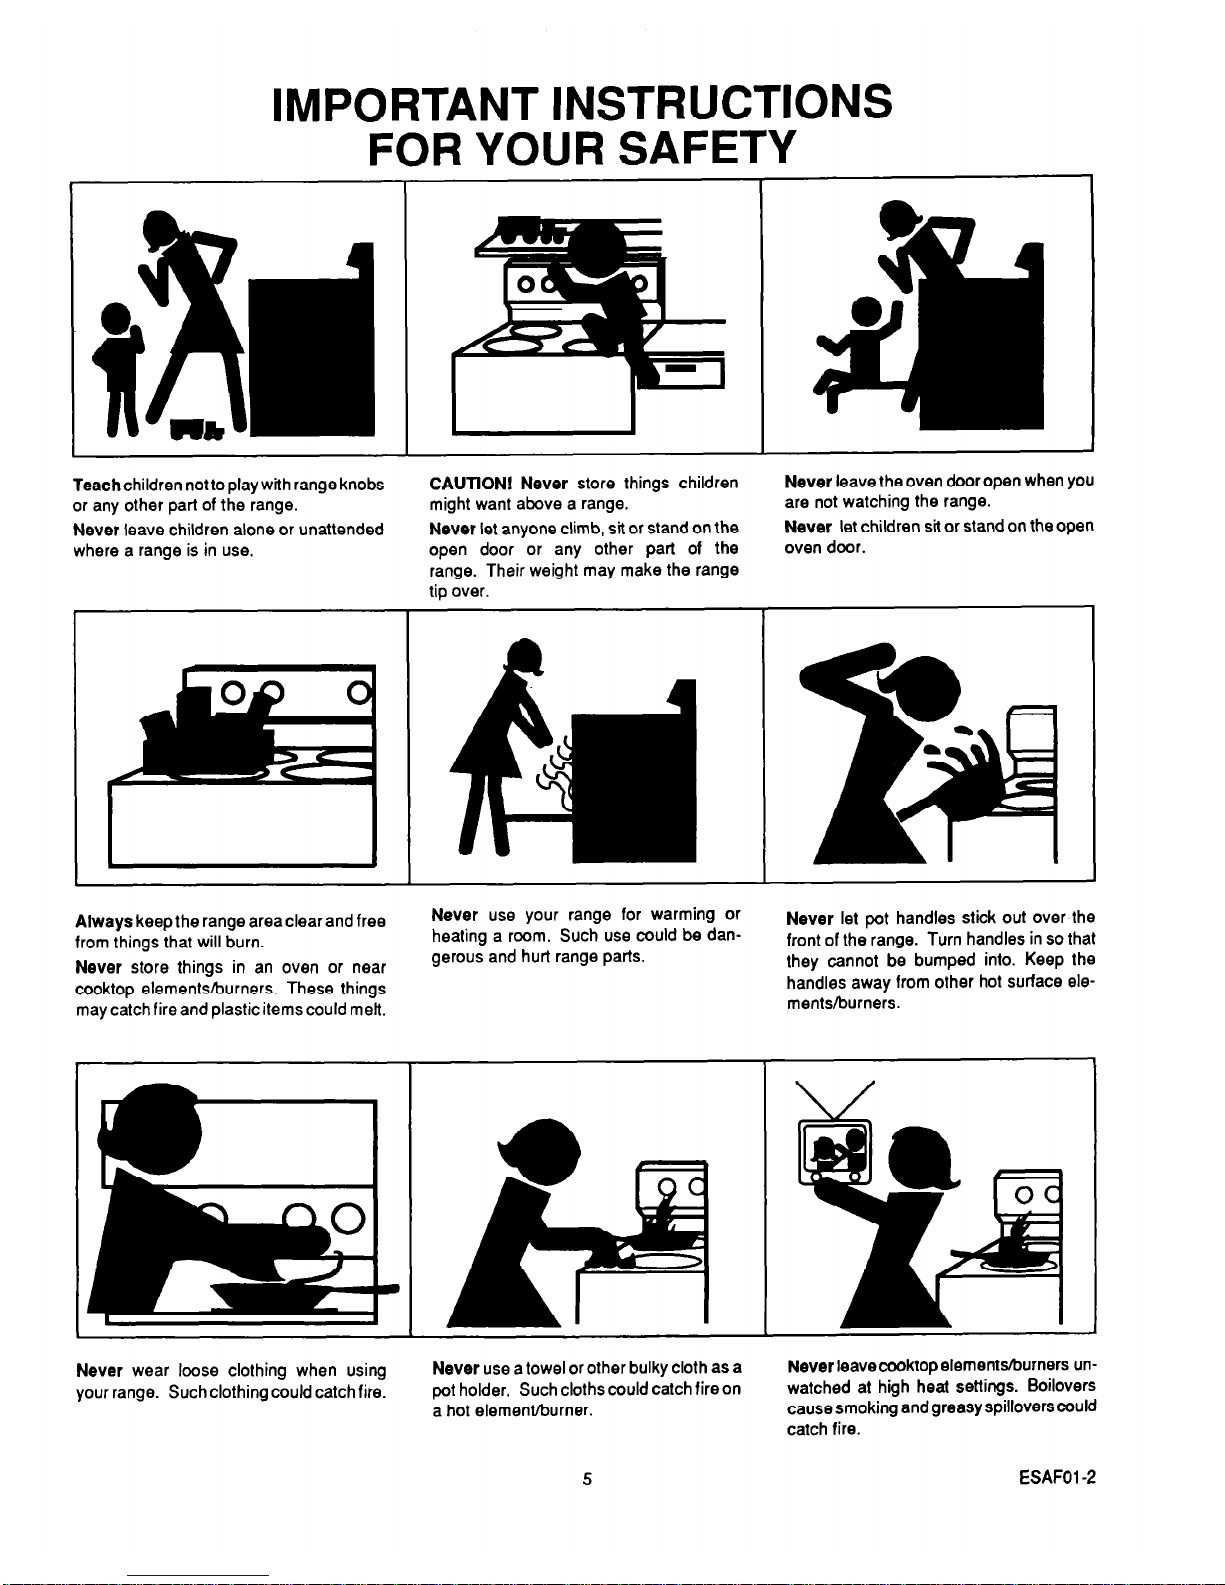
IMPORTANT INSTRUCTIONS
FOR YOUR SAFETY
Teach children not to play with range knobs
CAUTION! Never store things children
Never leave the oven door open when you
or any other part of the range.
might want above a range.
are not watching the range.
Never leave children alone or unattended
Never let anyone climb, sit or stand on the
Never let children sit or stand on the open
where a range is in use.
open door or any other part of the
oven door.
range. Their weight may make the range
tip over.
I
I
I
Always keepthe range areaclearand free
from things that will burn.
Never store things in an oven or near
cooktop elements/burners. These things
may catch fire and plastic items could melt.
Never use your range for warming or
healing a room. Such use could be dangerous and hurt range parts.
Never let pot handles stick out over the
front of the range. Turn handles in so that
they cannot be bumped into. Keep the
handles away from other hot surface elements/burners.
Never wear loose clothing when using
your range.
Such clothing could catch fire.
Never use a towel or other bulky cloth as a
pot holder.
Such cloths could catch fireon
a hot element/burner.
Never leavecooktop elemenWburners unwatched at high heat settings. Boilovers
cause smoking and greasy spillovers could
catch fire.
5
ESAFOl -2
IMPORTANT SAFETY INSTRUCTIONS
Keep this book for later use.
Be sure your range is installed and grounded
properly.
Choose pots and pans with flat bottoms, large
enough to cover the entire cooktop element. This
will cut down the risk of setting pot holders or
clothing on fire with an uncovered element and
waste less energy.
Always use care when touching cooktop elements, areas near cooktop elements, oven heating elements or inside the oven. Heating elements could be hot enough to burn you even if they
are dark in color. The oven vent duct and oven
door may also become hot during range use.
Only some kinds of glass or ceramic pans can be
used for cooktop cooking. Be sure that the pan
you use will not break when heated on the cooktop
elements.
Always change oven rack positions while oven is
cool.
After broiling, alwaystake the broiler pan out of the
range and clean it. Leftover grease in the broiler
pan can catch on fire next time you use the pan.
Always use dry pot holders when removing pans
from the oven or cooktop. Moist or damp pot
holders can cause steam burns.
Always use care when opening oven door. Let
hot air and steam out before moving food.
Always follow cleaning instructions in this book.
Always remove the broiler pan and other utensils
from the oven before a self-clean cycle.
Never try to repair or replace any part of the range
unless instructions are given in this book.
All other
work should be done by a skilled technician.
Never heat unopened food containers. Pressure
build up may make container burst and cause
injury.
Never leave jars or cans of fat or drippings on or
near the range.
Never let grease build up on your
range. You can keep grease fires from starting if
you clean up grease and spills after each range
use.
Never use aluminum foil to line drip bowls or oven
bottoms. Improper use of foil could start a fire.
Never block free airflow through the oven vent.
Never try to move a pan of hot fat, especially a
deep fat fryer. Wait until the fat has cooled.
Never put removable heating elements in water.
Never use the cooktop without reflector pans or
drip bowls being in place. If these pans or bowls
are not there during cooking, wiring or other range
parts may be damaged.
Never rub, move or damage the door gasket on
self-cleaning ranges.
The gasket is essential for a
good seal. Only clean the gasket by soaking it
with hydrogen peroxide, as described in the selfclean section of the manual.
Never touch surface units, heating elements, or
interior surfaces of the oven. They may be hot
even though they appear dark in color.
COOKTOP GREASE FIRE
Never pick up a flaming pan...lnstead:
1. Turn off the element.
Read and understand this information NOW!
2. Smother the fire with a tightly fitting pan
Should you ever need it, you will not have time
lid, baking soda or an extinguisher.
for reading.
OVEN FIRE
1. Close oven door and turn controls off.
Never use water on a grease fire - it will only
spread the flames.
2. If fire continues, throw baking soda on the
ESAFOZ-4
 Loading...