

Roper B500 Use And Care Manual
ROPER
USE and CARE MANUAL
ELECTRIC BUILT-IN
model
B500
Part No. MNU013 (343758)
THIS PAGE
INTENTIONAUY LEFT BLANK

CONTENTS
INSTALLATION
USE AND CARE
Important Instructions for Your Safety
Your Range and Its Features
The Electronic Range Control
Cooktop Cooking
Oven Cooking
Broiling
Favorite American Recipes
Cleaning Tips
Removable Range Parts
SERVICE
Replacing Range Light Bulbs
What to Do before Calling for Service
Adjusting Oven Temperature
REPAIR PARTS LIST
WARRANTY
EC0005
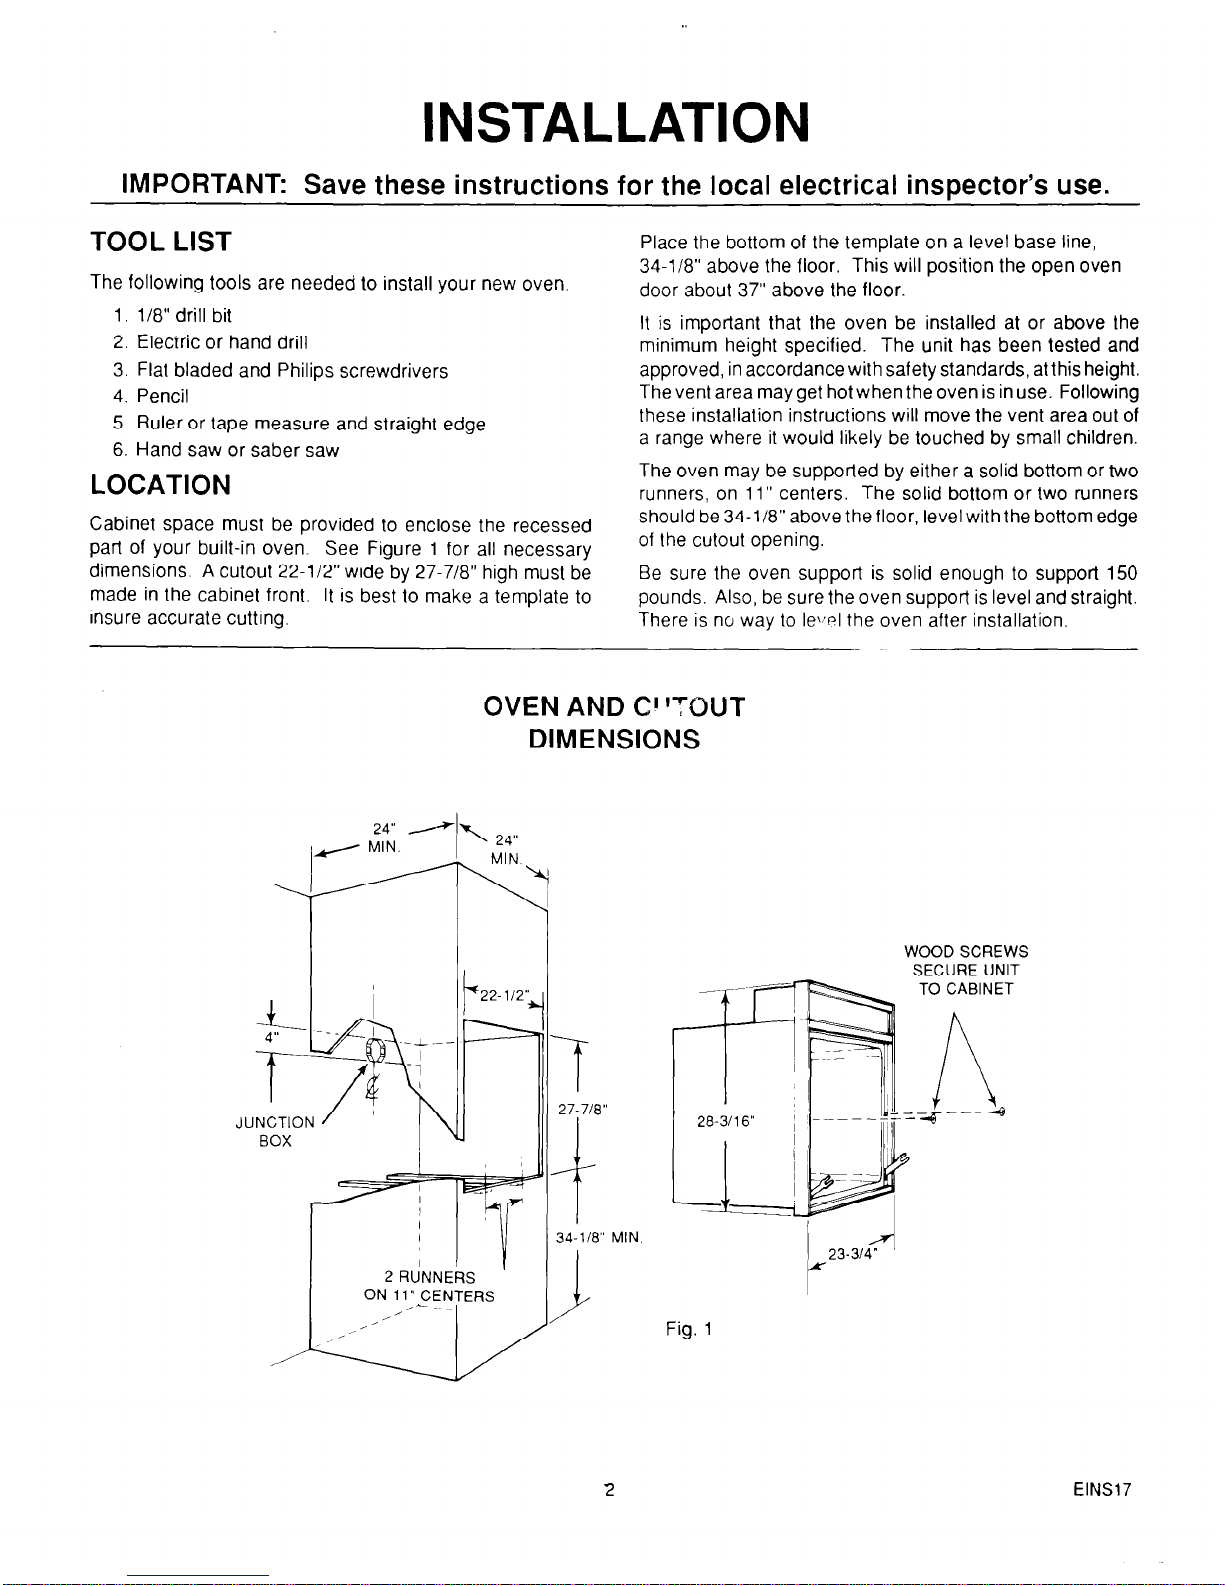
INSTALLATION
IMPORTANT: Save these instructions for the local electrical inspector’s use.
TOOL LIST
The following tools are needed to install your new oven
1. l/8” drill bit
2. Electric or hand drill
3. Flat bladed and Philips screwdrivers
4. Pencil
5. Ruler or tape measure and straight edge
6. Hand saw or saber saw
LOCATION
Cabinet space must be provided to enclose the recessed
pat-t of your built-in oven. See Figure 1 for all necessary
dimensions. A cutout 22-l/2” wide by 27.7/8” high must be
made in the cabinet front. It is best to make a template to
insure accurate cutting.
Place the bottom of the template on a level base line,
34-l/8” above the floor. This will position the open oven
door about 37” above the floor.
It is important that the oven be installed at or above the
minimum height specified. The unit has been tested and
approved, in accordance with safety standards, at this height.
The vent area may get hot when the oven is in use. Following
these installation instructions will move the vent area out of
a range where it would likely be touched by small children.
The oven may be supported by either a solid bottom or two
runners, on 11” centers. The solid bottom or two runners
should be34-118”above thefloor, levelwiththe bottom edge
of the cutout opening.
Be sure the oven support is solid enough to support 150
pounds. Also, be sure the oven support is level and straight.
There is no way to le\?l the oven after installation.
OVEN AND CY’TOUT
DIMENSIONS
BOX
ON 11’ CENTERS
-f
27-710"
i
34-118"
MIN.
WOOD SCREWS
SECURE UNIT
TO CABINET
1
23-314"
Fig. 1
2
EINS17
ELECTRICAL CONNECTION
We recommend that you have the electrical hookup of your
oven done by a qualified electrician. Have the electrician
show you where your main oven disconnect is located.
Call your Electric Company and ask which codes apply in
your area. If there are no codes, you must follow the
NATlONALELECTRlCALCODE,ANSI/NFPANO.70-1987.
You can get a copy by writing:
National Fire Protection Association
Batterymarch Park
Quincy, MA 02269
If you fail to wire your oven in accordance with governing
codes, you may create a hazardous condition.
You must use a three-wire, single-phase AC 120/240 Volt or
208Y/120 Volt, 60 Hertz electrical system to operate your
oven.
If you connect to aluminum wiring, properly
installed connections listed for use with aluminum and
copper wiring must be used.
Use #12 copper wire and 20 Amp fuse or circuit breaker for
120/240 Volt and 208Y/120 Volt systems.
Before installing the oven or moving it to another location,
have the electrician verify:
l
That your home is provided with adequate electrical
service.
l
That the additionof the oven will not overload the household
circuit on which it is used.
The electrical power to the oven supply line must be
shut off while line connections are being made. Failure
to do so could result in serious injury or death.
Install an approved junction box in the upper 4” of the cutout
(see Fig. 1).
When making the wire connections, use the entire length of
conduit provided (4 feet).
The conduit must not be cut.
The neutral of the unit is grounded to the frame through the
bare ground wire
A
UNITS WITH NEUTRAL WIRE: Frame
grounded by connection of grounding
lead to neutral lead. If used in a mobile
home or if local codes do not permit
grounding through neutral, open connection and use grounding lead to ground
unit in accordance with local codes. Connect neutral lead to branch circuit neutral
conductor in usual manner.
ALL UNITS: When applying set screw
type connectors care should be taken not
to damage conduit.
INSTALLATION
Your built-in oven is packed with a shipping base pad on the
bottom of the unit. This
pad
protects the lowerfroi\t trim and
should nc be removed until you are ready to install the oven.
Before in talling the oven, you may remove the oven doors
to lessen the weight of the unit if you wish. See the care and
cleaning section of the use and care manual for instructions.
Put the oven into the cabinet and use a l/8” drill bit to drill
holes in the cabinet front through the holes in the oven trim.
Secure the oven in the cabinet with the screws provided.
See the care and cleaning section of the use and care
manual for instructions on how to install oven racks and
guides.
3
EINS18

IMPORTANT SAFETY INSTRUCTIONS
Keep this book for later use.
Be sure your oven is installed and grounded prop-
erly by a qualified technician.
Always use care when touching oven heating
elements or inside the oven. Heating elements
could be hot enough to burn you even if they are
dark in color. The oven vent duct and oven door
may also become hot during oven use.
Always keep the appliance area clear and free
from things that will burn, gasoline and other
flammable vapors and liquids.
Always change oven rack positions while oven is
cool.
After broiling, always take the broiler pan out of the
oven and clean it. Leftover grease in the broiler
pan can catch on fire next time you use the pan.
Always use dry pot holders when removing pans
from the oven. Moist or damp potholders can
cause steam burns.
Always use care when opening oven door. Let
hot air and steam out before moving food.
Always follow cleaning instructions in this book.
Teach children not to play with oven controls or
any other part of the oven.
Always remove the broiler pan and other utensils
from the oven before a self-clean cycle.
IMPORTANT SAFETY INFORMATION
Be sure the oven is securely installed in a cabinet that is firmly attached to the house structure.
Weight on the oven door could potentially cause
the oven to tip and result in injury. Never allow
anyone to climb, sit, stand, or hang on the oven
door.
Never try to repair or replace any part of the oven
unless instructions are given in this book.
All other
work should be done by a skilled technician.
Never heat unopened food containers. Pressure
build up may make container burst and cause
injury.
Never leave jars or cans of fat or drippings on or
near the oven. Never let grease build up on your
oven. You can keep grease fires from starting if
you clean up grease and spills after each oven
use.
Never use aluminum foil to line oven
bottoms. Improper use of foil could start a fire.
Never block free airflow through the oven vent.
Never try to move a pan of hot fat, especially a
deep fat fryer. Wait until the fat has cooled.
Never leave children alone or unattended where
an oven is in use.
Never use your oven for warming or heating a
room. Such use can be dangerous and can
damage oven parts.
Never wear loose fitting or hanging clothes while
using your oven. Such clothes could catch fire
and cause serious injury.
Never use a towel or other bulky cloth as a pot
holder. Such clothes could catch fire on a hot
element.
Never store things in an oven.
Never rub, move or damage the door gasket on
self-cleaning ovens. The gasket is essential for a
good seal. Only clean the gasket by soaking it
with hydrogen peroxide, as described in the self-
clean section of this manual.
FIRE!
Read and understand this information NOW!
Should you ever need it, you will not have
time for reading.
Never use water on a grease fire - it will only
spread the flames.
OVEN FIRE
Do not try to move the pan.
1. Close oven door and turn controls off.
2. If fire continues, throw baking soda on the
fire.
4
ESAFll-1
 Loading...