

Page 1
1
Read this manual completely and understand the
instructions before operating the machine.
“English Version”
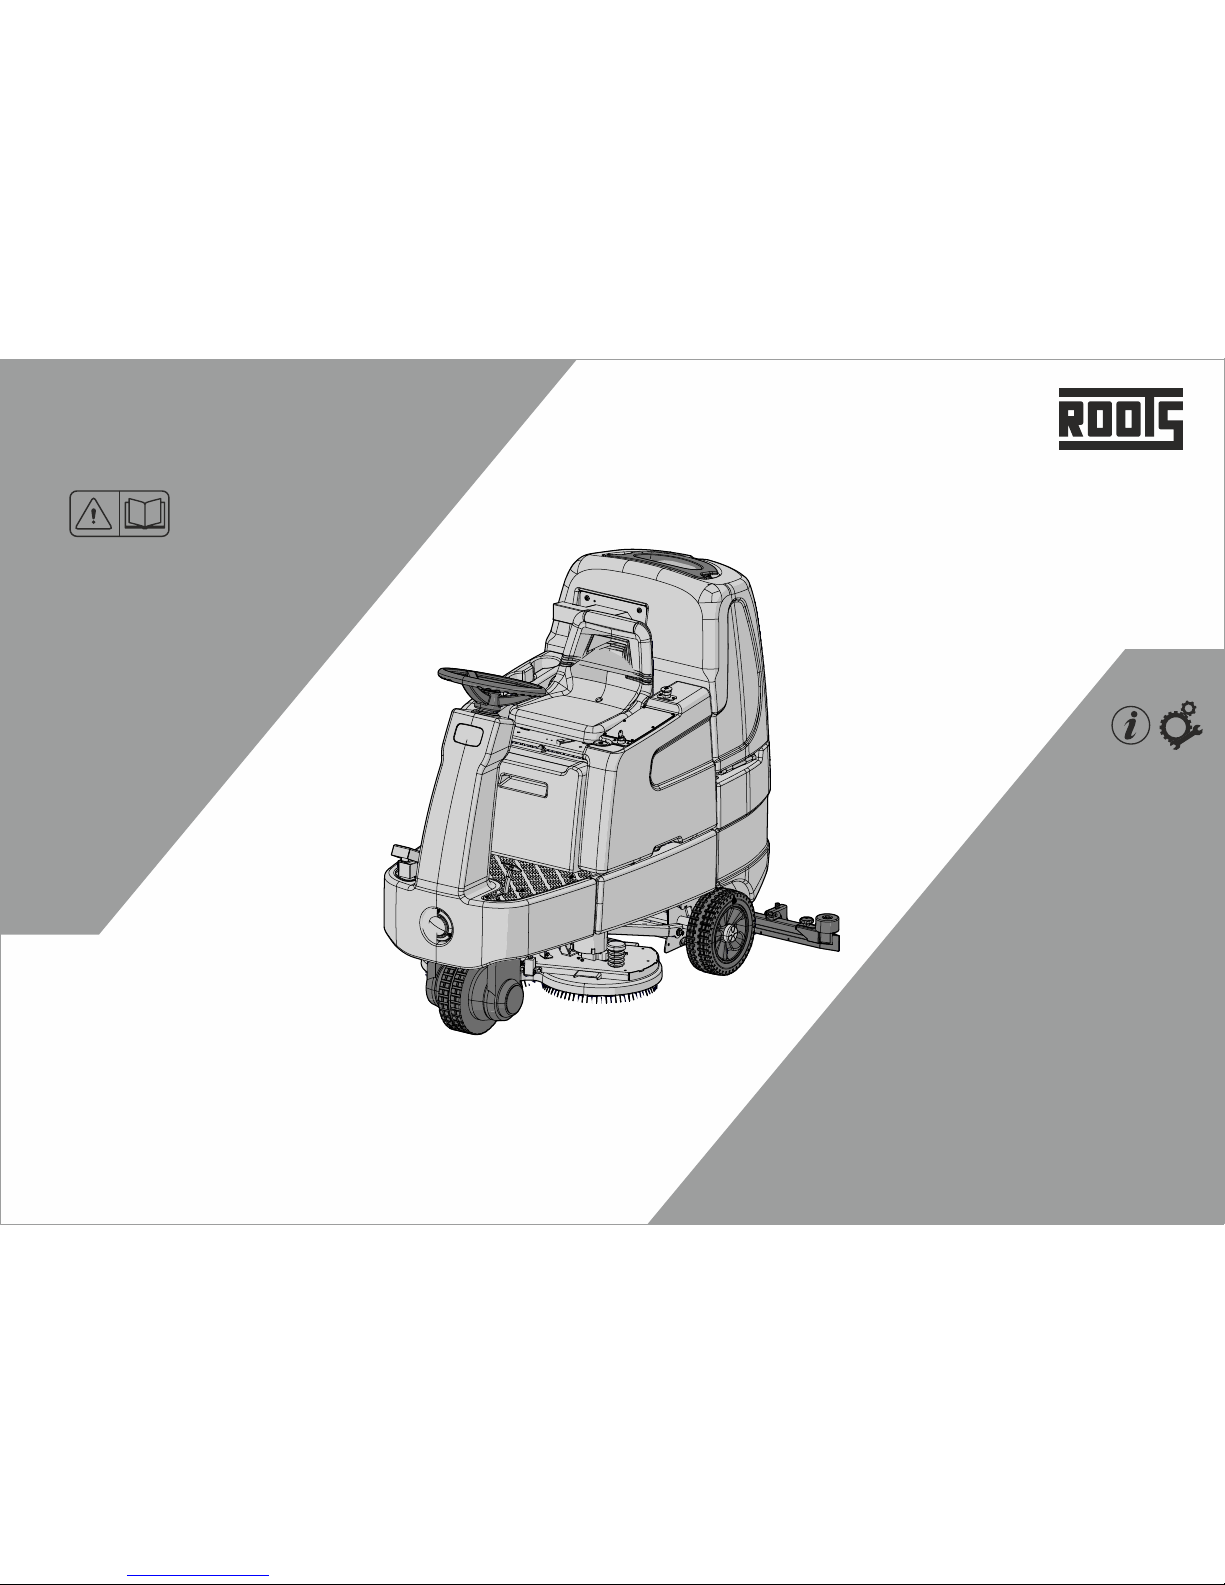
RootsScrub RB 800/950
Ride On Scrubber Drier
Battery
Operator’s Manual
24V
200Ah
240Ah
320Ah
Page 2

2
Page 3
3
P/N: 557100014-00, Rev-J, 07/2018
Prepared by SN, NPM TD Dept.
TABLE OF CONTENTS
IMPORTANT NOTE:
Roots Multiclean Ltd. (RMCL) is not liable for any legal claims that may arise as
a direct or indirect result of the contents of this manual.
Roots Multiclean Ltd.
R.K.G. Industrial Estate, Ganapathy,
Coimbatore - 641 006, India.
MACHINE DATA
Please fill at the time of installation for future reference:
Model No. - _______________________________
Serial No. - ________________________________
Battery No. - _______________________________
Installation Date - ___________________________
RootsScrub RB 800/950
Introducon
Aer Sales Support
Know Your Machine
Troubleshoong
Machine Operaon
Table Of Contents & Important Note
Technical Specificaons
Safety Instrucons
Decals On The Machine
Maintenance
Do & Don’ts
4
8
14
27
16
3
6
9
15
25
28
Baery Instrucons
29
Page 4
4
INTRODUCTION
PREFACE
We are pleased with you having chosen the for RootsScrub RB 800/950
your floor cleaning requirements. Backed by our industry expertise that spans
across two decades, we assure you that the machine comes with ROOTS
promise of quality, efficiency and performance.
We advise you to carefully read through the instructions prior to the
operation of the machine. This manual contains detailed instructions for the
proper operation of the machine, along with important information regarding
its handling, care maintenance and service needs.
We are sure that you will find the machine and its performance to your utmost
satisfaction. Once again, we thank you for choosing as a trusted partner for us
your cleaning requirements.
Usage, Handling & Modification
Use of the product beyond the specified scope of functioning is deemed
improper and the manufacturer cannot be held liable for any damages which
may arise due to this.
This machine may be used only by persons who are trained or are familiar with
the machine and are aware of the possible hazards involved. The appropriate
Accident Prevention Regulations as well as applicable general regulations
pertaining to Safety and Health at the work place must be adhered to by the
user.
Modifications made to machine without the manufacturer's consent will
relieve the manufacturer of responsibility and any possible liability for
consequential damage.
Dear Customer,
Acceptance of the Machine
On arrival of the machine at the shipping address, please check for any
damage that may have occurred as a result of transit. In the event of any such
damage, the purchaser is bound by responsibility to send a claim letter to the
concerned dealer with a copy of the invoice. The letter should be authorized
sent within 24 hours of receipt of the machine.
Notes on Warranty
Refer the Warranty Manual supplied along with the machine.
Our Address:
NOTE:
ILLUSTRATIONS SHOWN IN THIS MANUAL ARE FOR REPRESENTATIVE
PURPOSE ONLY. ACTUAL PRODUCT MAY VARY.
ROOTS reserves the right to change the product or contents of this manual
without prior information.
For Engine, Battery, Motors or other OEM components related kindly refer
to their manufacturers manual supplied along with the machine for
instructions regarding usage, maintenance and service.
RootsScrub RB 800/950
Page 5
5
INTRODUCTION
All information contained is without obligation. RMCL particularly reserves
the right to modify any equipment, technical specifications, colours, shapes,
materials and the like so as to adapt them to local conditions all without
previous announcement and without giving reasons. RMCL may stop
manufacturing certain models without prior notice.
The Operator’s Manual corresponds to the latest information available for
this machine at the time it was printed. Minor deviations resulting from
enhancements of the design cannot be entirely represented.
The Manual
Prior to first operation, read the manual carefully and strictly comply with
the instructions contained.
The Operator’s Manual is an integral part of the machine and must not be
misplaced.
Please note the following details:
Serial number of machine:
Date of commissioning:
Machine model:
RootsScrub RB 800/950
Page 6
6
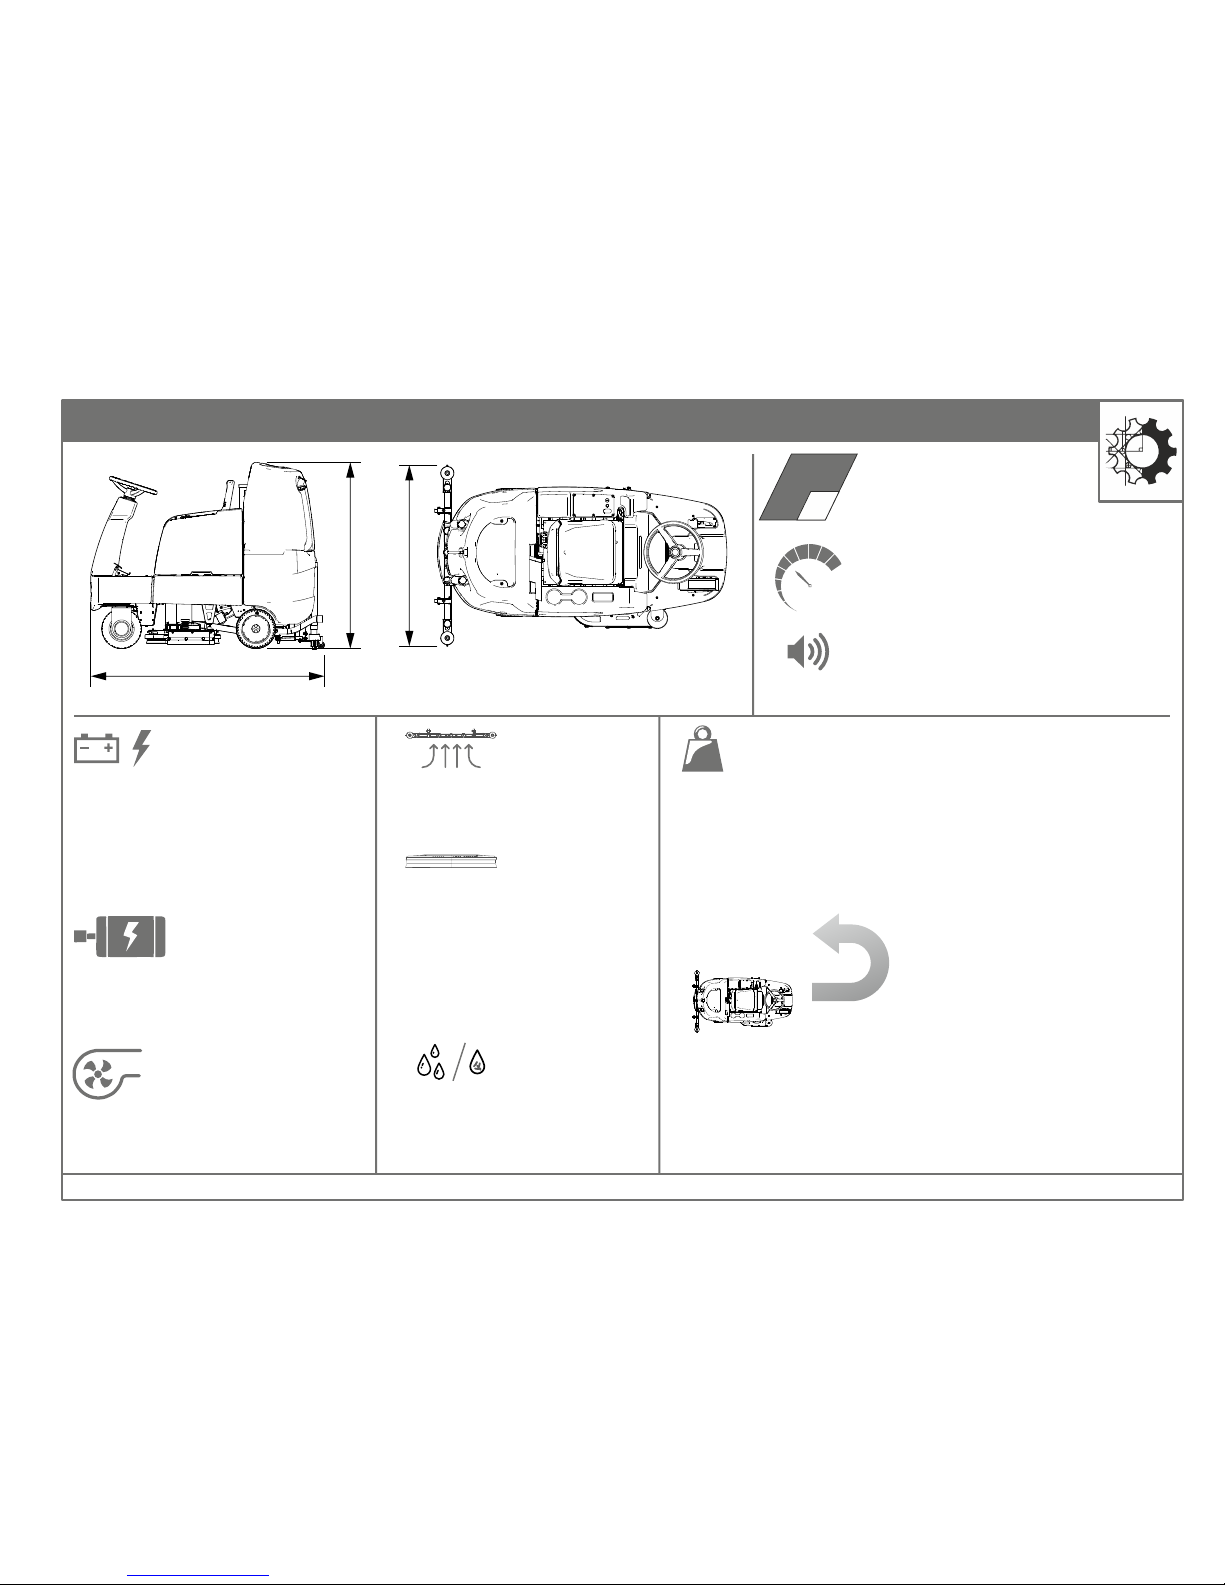
TECHNICAL SPECIFICATION - RB800
Length - 1750 mm
Height - 1410 mm
Width - 1100 mm
Theoretical area coverage
- 4800 m²/h
m²
Working speed upto - 6 km/h
Travel speed - 6 km/h
Noise level - 69 dB
Power supply - 24 V
Battery rating - 24 V/200, 240,320 Ah
Total power - 2400 W
Brush motor power - 2 X 550 W
Vacuum motor power - 550 W
Drive motor power - 750 W
Vacuum pressure - 1650 mm of H₂O
Airflow rate - 33 L/sec
Suction width - 1100 mm
No. of brushes per machine - 2
Brush diameter - 405 mm
Brush speed - 180 rpm
Scrubbing width - 800 mm
Brush load - 43 Kg
Fresh water tank - 120 L
Dirty water tank - 120 L
Total weight empty/w battery - 272/490 kg for 240 Ah battery
Total weight empty/w battery - 272/540 kg for 320 Ah battery
Total weight, ready to operate - 600 kg for 240 Ah battery
Total weight, ready to operate - 660 kg for 320 Ah battery
1.8m
Turning radius -
RootsScrub RB 800/950
Page 7
7
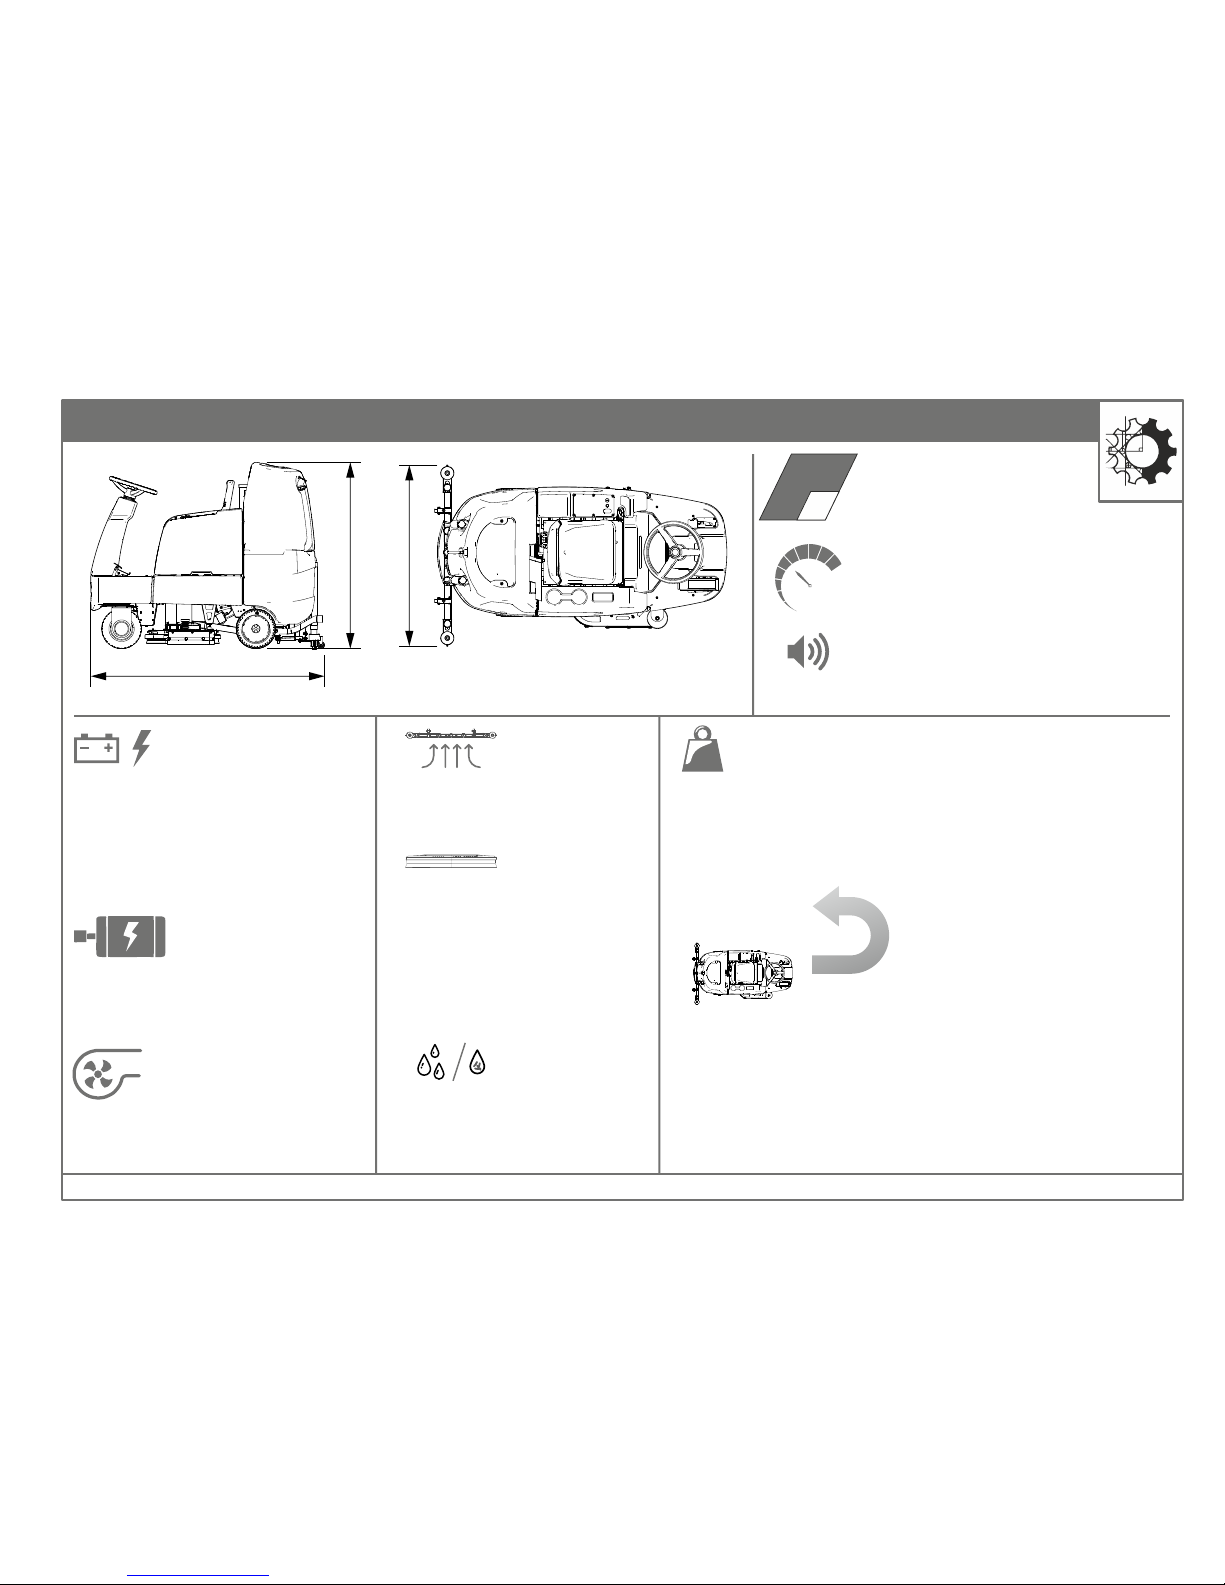
TECHNICAL SPECIFICATION - RB950
Length - 1750 mm
Height - 1410 mm
Width - 1200 mm
Theoretical area coverage
- 6175 m²/h
m²
Working speed upto - 6 km/h
Travel speed - 6 km/h
Noise level - 69 dB
Power supply - 24 V
Battery rating - 24 V/320 Ah
Total power - 2400 W
Brush motor power - 2 X 550 W
Vacuum motor power - 550 W
Drive motor power - 750 W
Vacuum pressure - 1650 mm of H₂O
Airflow rate - 33 L/sec
Suction width - 1200 mm
No. of brushes per machine - 2
Brush diameter - 485 mm
Brush speed - 180 rpm
Scrubbing width - 950 mm
Brush load - 48 Kg
Fresh water tank - 120 L
Dirty water tank - 120 L
Total weight empty/w battery - 272/540 kg for 320 Ah battery
Total weight, ready to operate - 665 kg for 320 Ah battery
1.8m
Turning radius -
RootsScrub RB 800/950
Page 8
8
AFTER SALES SUPPORT
CUSTOMER SUPPORT SYSTEM (CSS) ANNUAL MAINTENANCE CONTRACT (AMC)
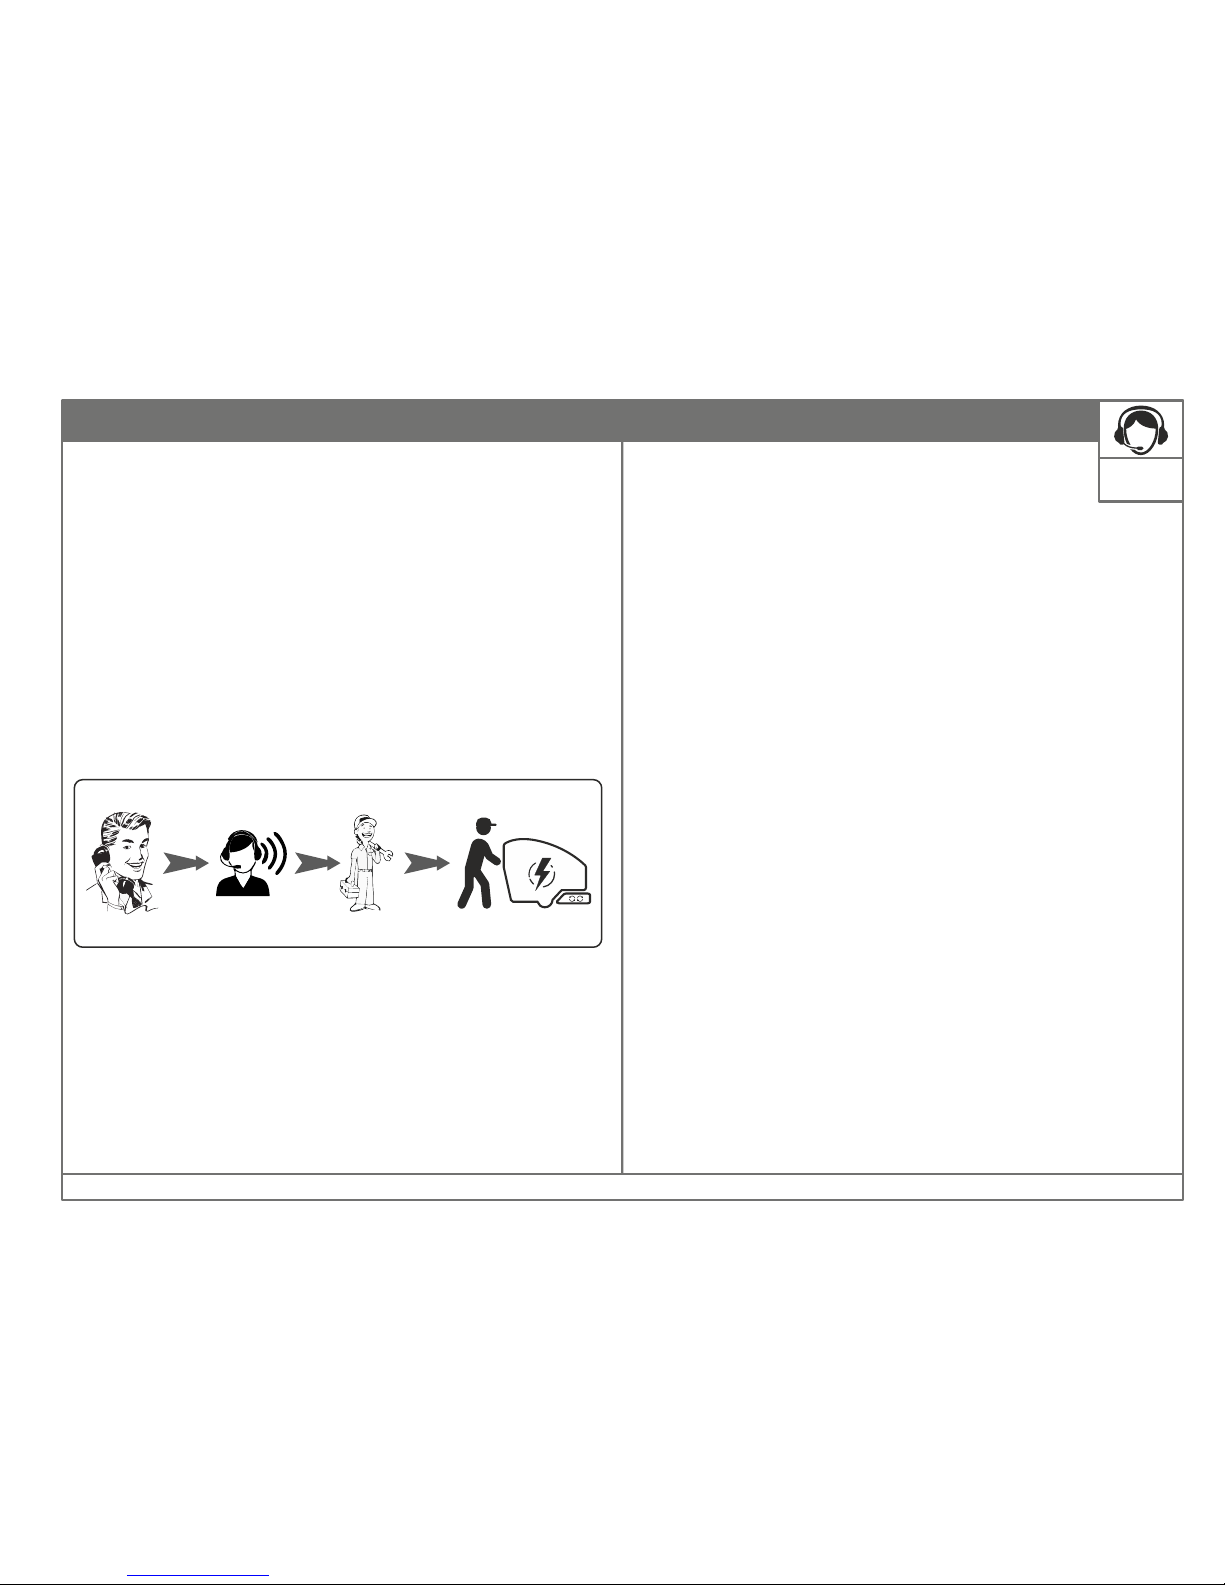
RMCL has a dedicated CSS Team to ensure prompt after sales service
support. One call solution for all your complaints/concerns. Register your
complaint or concern through the below toll free number for hassle free
support. The customer support executive registers your complaint/concern
and will keep you updated on the progress ensuring prompt closure.
Toll Free Number:
1800 41 99 77 9
Our timings (Monday to Saturday):
8:00 am to 7:00 pm
Customer Support System Process
Customer
CSS Executive
Engineer
Site Location
AMC or Annual Maintenance Contract is a professional and
timely maintenance cover offered by RMCL to its customers.
AMC takes care of scheduled and preventive maintenance services.
Equipment under AMC qualifies for four scheduled visits and to a maximum
of twelve unscheduled visits during the contract.
Advantages of AMC:
þ
Pan India network presence.
þ
Maximum equipment uptime.
þ
Focus on your business while we take care of your equipment.
þ
Well trained engineers to take care of the equipment.
þ
System driven scheduled periodic maintenance.
þ
Genuine spare parts.
þ
Toll free number assistance for breakdown.
AMC
RootsScrub RB 800/950
Page 9
9
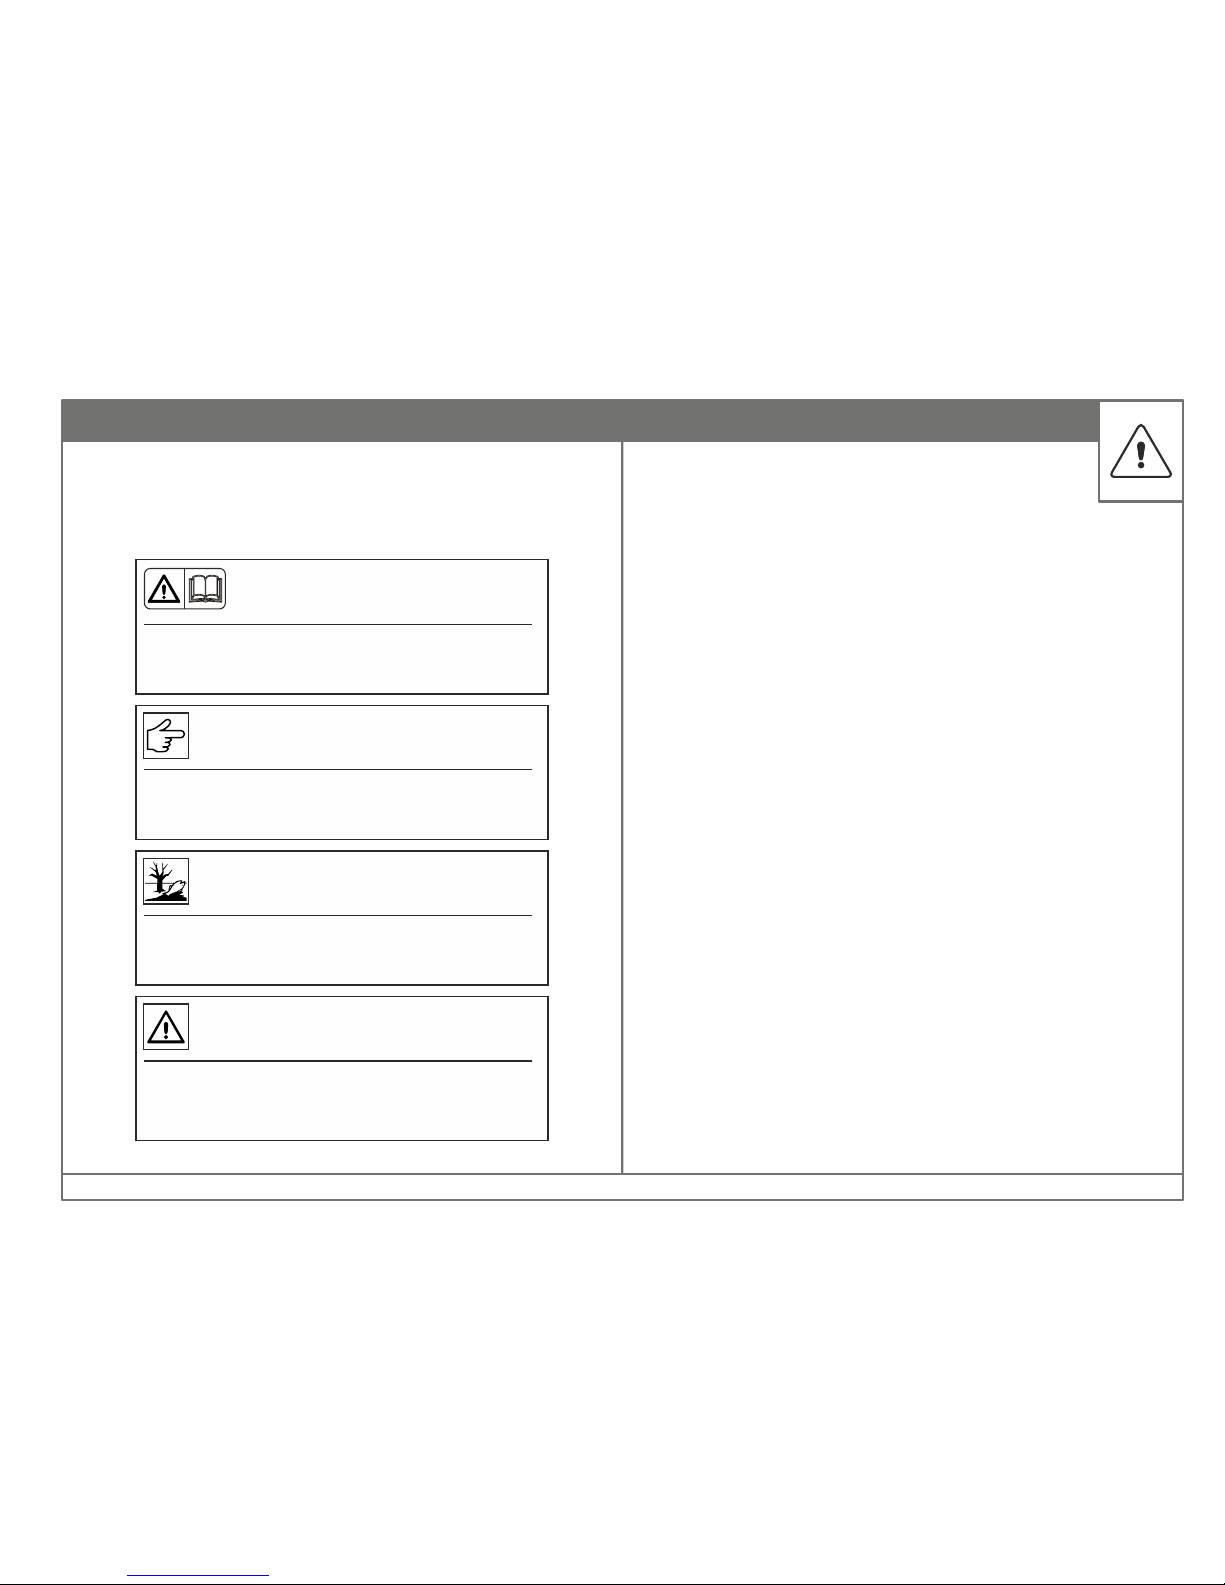
3.1. GENERAL SAFETY SYMBOLS
Prior to first operation, read the manual carefully and
strictly comply with the instructions contained.
Read
manual
Important information on handling the machine in
order to maintain operability.
Caution
(the machine)
Due to use of substances representing an inherent
danger to health of environment.
Ecological hazard
(the environment)
Safety provisions in dangerous situation caused by
mi sus e in acc urate adher ence of i nstru cti on o r
prescribed work routine.
Safety Provisions
(persons & goods)
SAFETY INSTRUCTIONS
All paragraphs in this manual that refer to personal safety, safety of the
machine and environmental protection are attributed respective warning
symbols as indicated.
General Guidelines
Ÿ In addition to the information contained in this manual,
generally applicable legal provisions for Safety and Prevention of accidents
must be adhered to.
Ÿ Please go through the manual and the instructions contained herein
carefully, even if you possess prior experience in operating similar ground
cleaning equipment.
Ÿ Schedule some time for the careful and thorough perusal of the manual
contents.
Ÿ The responsibility of all persons in the working area fall upon the operator
of the machine.
Ÿ No persons, children included, should be allowed within the zone of
danger.
Ÿ The warning and instruction plates attached to the machine carry
important advice on safe operation of the machine.
Ÿ Lost or illegible stickers must be replaced at the earliest.
Ÿ Prior to operation of the machine, the operator must ensure that the
machine and its working implements are in proper and safe operating
condition.
Ÿ Machines with identified and known defects must not be used.
Ÿ It is important that operators and all persons likely to use the machine
familiarize themselves with all accessories and controls, as well as their
functions, before commencing operation.
Ÿ Adherence to the above general instructions will help avoid the operator
from having to read the manual while operating the machine.
Safety During Machine Operation
Ÿ The machine is applicable for WET scrubbing only.
Ÿ Ground cleaning machines may be run by qualified personnel only.
Ÿ The machine may be used for cleaning such surfaces approved by the
owner or this authorized representatives.
RootsScrub RB 800/950
Page 10

10
SAFETY INSTRUCTIONS
Ÿ The machine is only suitable for use on the types of surfaces specified in
the owner’s manual.
Ÿ Protect the machine from frost or extremely low temperatures.
Ÿ Never scrub or vacuum explosive liquids, combustible / explosive dusts as
well as acids and solvents! This includes diesel, petrol, kerosene, paints,
paint thinners, heating oil, etc which can generate explosive fumes on
contact with the suction air. Acetone, undiluted acids and aggressive
solvents must not vacuumed as it may cause damage to the machine
components and brooms.
Ÿ Do not scrub/vacuum burning or glowing debris.
Ÿ Do not scrub/vacuum in flooded and slushy areas.
Ÿ This machine must not be operated by persons (including children) with
limited physical ability, sensoric/mental capabilities or lack of experience,
unless such persons are supervised by the person in charge.
Ÿ Children should be prevented from playing with the machine.
Ÿ The operator must use the machine properly. The operator must consider
the local conditions and must pay attention to third parties especially
children when operating the machine.
Ÿ Never leave the machine unattended when the motor is running.
Ÿ The operator must leave the machine only after the motor has come to a
complete standstill, parking brake applied and the key has been removed.
Ÿ Prior to starting work, the operator has to check the machine’s safety
devices are working properly.
Ÿ The operator must wear tight fitting clothes only. The operator should
wear safety shoes only when operating or while carrying out maintenance
work.
Ÿ Loose fitting clothes or shoes must not be worn by the operator or any
maintenance personnel who are intended to work on/with the machine.
Ÿ Check the immediate surrounding prior to starting. Ensure sufficient
visibility!
Ÿ The operator must always use safety gloves, safety helmet, shoes while
operating/maintaining the machine.
Ÿ On inclined/tilted surfaces, the tilt angle and the driving
direction should not exceed the values given in this manual.
Ÿ Do not place any tools or metallic objects on top the battery.
Risk of short circuit and deflagration!
Ÿ Smoking or naked flames are strictly prohibited.
Ÿ Always allow the machine sufficient time to cool before carrying out any
repair or maintenance work.
Ÿ Ensure that there is adequate ventilation for diverting the exhaust
gases/dust when operating the machine in a closed area.
Ÿ Do not place hand or any object while the brushes are running.
Ÿ Suitable tools must be used for cleaning and maintenance work.
Ÿ Do not carry out any welding, drilling, sawing or grinding work on the
frame sections. Damaged parts may only be changed at an authorized
service center.
Ÿ It is not permitted to use aggressive and corrosive cleaning agents.
Ÿ Used batteries with the recycling symbol must not be disposed of in
household waste.
Ÿ Maintenance work may be carried out by authorised dealer only.
Ÿ Always use appropriate tool and equipments while working on the
machine.
Ÿ Disconnect the battery when working on electrical system.
Ÿ Battery may only be handled and changed by properly skilled maintenance
personnel.
Ÿ Pay attention that the insulation of the charger cable is not damaged and
cannot be damaged during the charging process.
Ÿ The cable must not chafe against anything. In the case of defective
insulation, do not use the on-board charger.
Ÿ When charging the batteries, there must be sufficient ventilation in the
charging area. Otherwise, there is a risk of explosion!
Ÿ Batteries must not be connected or disconnected when conducting
electricity.
Ÿ Do not use harsh chemicals to clean the machine.
RootsScrub RB 800/950
Page 11
11
SAFETY INSTRUCTIONS
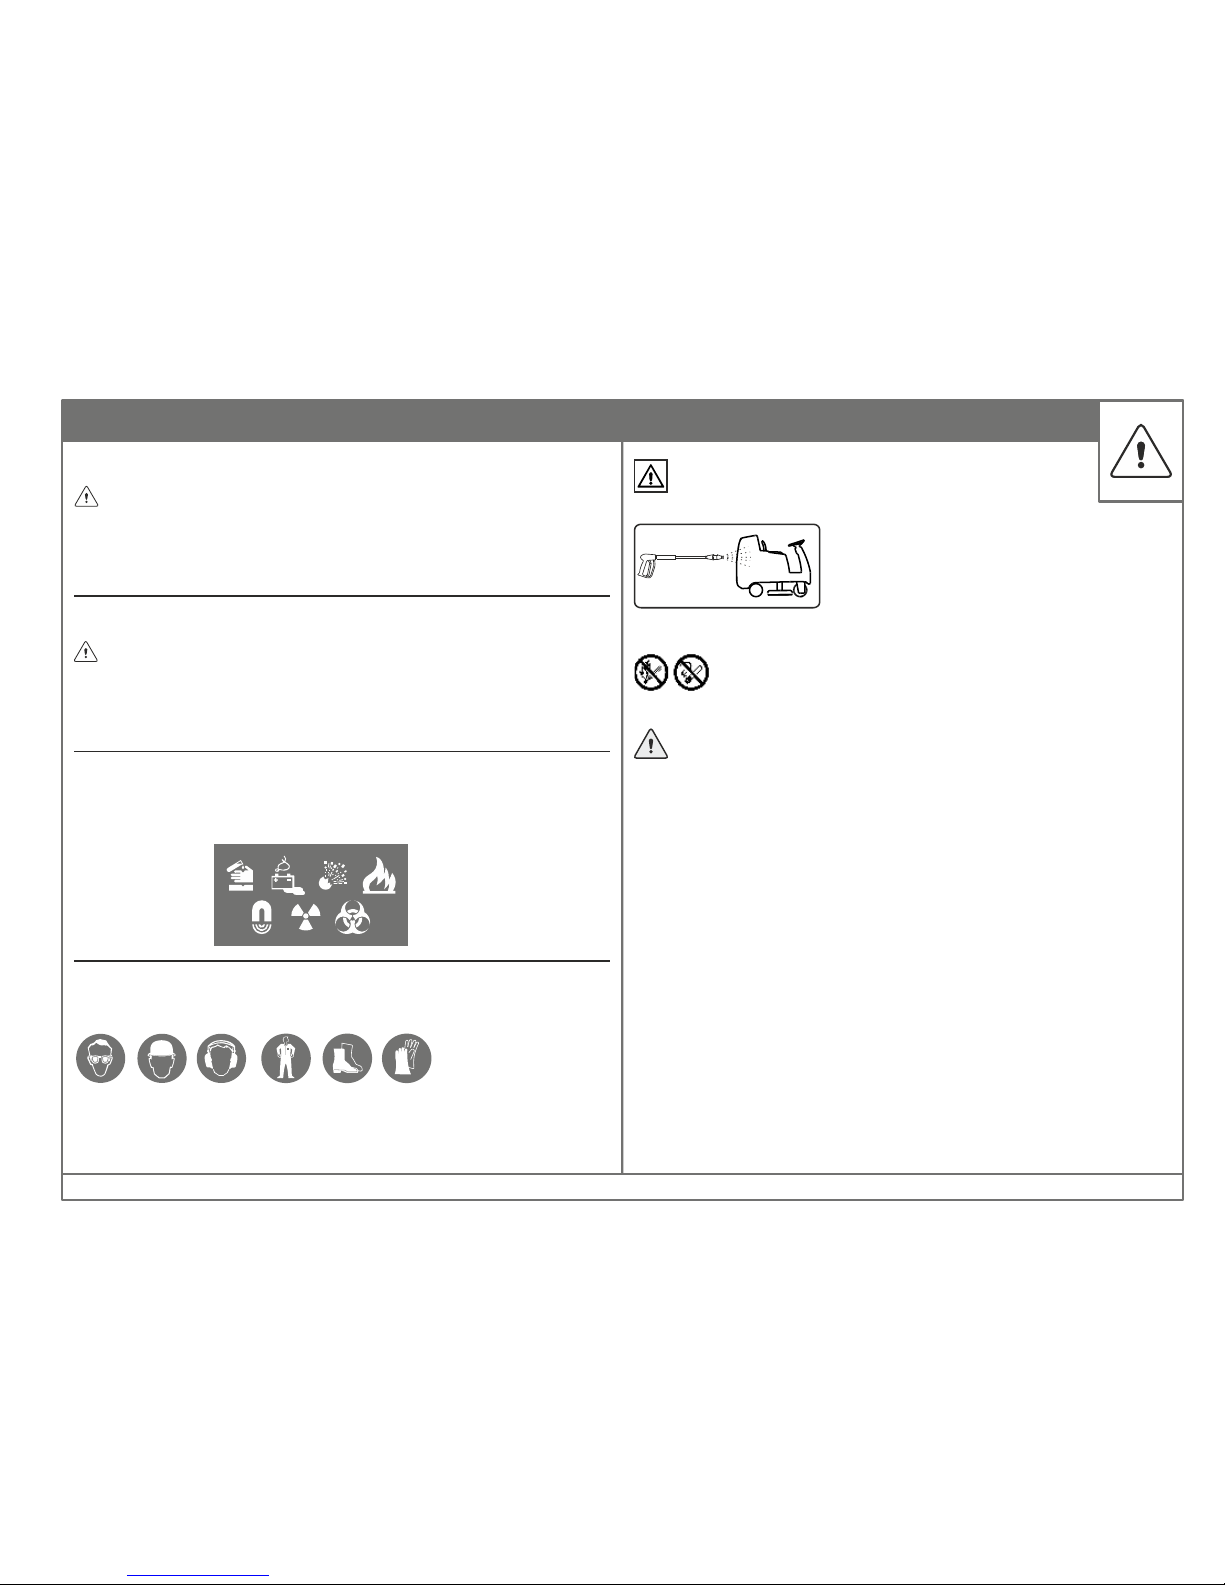
This machine is not suitable for evacuation of
dusts, which are explosive or dangerous to health.
DO NOT CLEAN THE MACHINE BY MEANS
OF VAPOUR JET OR HIGH PRESSURE
CLEANING EQUIPMENT.
- Do not smoke near machine.
- Do not expose machine to open flames or burning debris.
The machine may be used only on indoor hard floorings and for
operation on level grounds with a maximum inclination of up to 10° .
- The machine is splash-water proof (IPX3).
- This machine is not intended for use on public roads and places. Only
qualified personnel must perform maintenance and repair work .
- Turn the machine off and disconnect the mains plug before cleaning and
maintaining the machine, when replacing parts or when changing over to
another function.
X
Only use accessories and spare parts which have been approved by the
manufacturer. The exclusive use of original accessories and original spare
parts ensures that the appliance can be operated safely and trouble free.
= Use only brushes that are provided with the machine or specified in the
Operations Manual. The use of other brushes can affect the safety of the
machine.
Spare Parts & Accessories:
Equipments With Rotating Brushes:
Safety Gear:
WARNING
DANGER
As necessary
DANGER - Do Not Scrub Or Vacuum:
Corrosive/Battery Fluids/Explosive/Flammable/
Magnetic/Radio-active/Biohazard Materials.
RootsScrub RB 800/950
Page 12
12
SAFETY INSTRUCTIONS
Re ad the O per ato r ’s
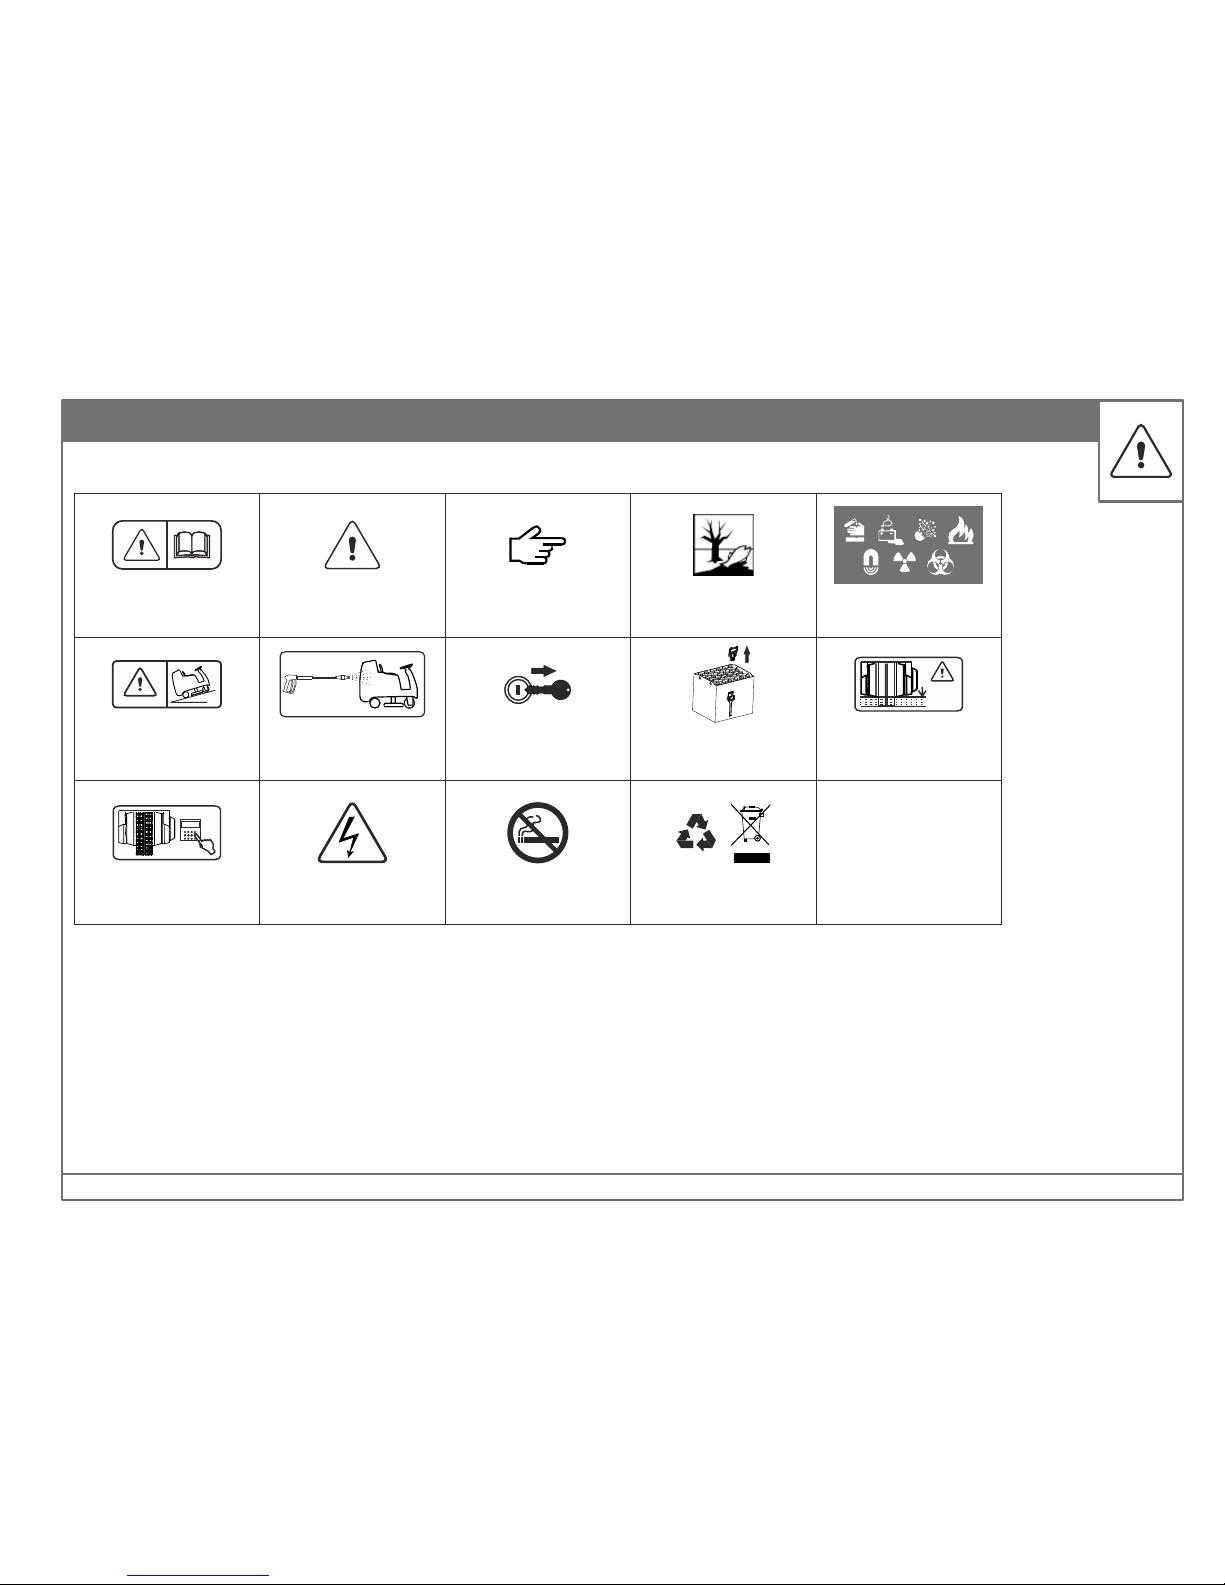
Manual
Toxic Hazard
Do Not Tamper No Smoking
Remove Key Unplug BatteryMax. Inclination
Electrical Hazard Recycle
Do Not Use High
Pressure Jets
Max. Water
Wading
General Warning Caution Ecological Hazard
SYMBOL & HAZARD PICTORIAL DEFINITIONS
Max. 10°
X
MAX
5.0 mm
Water Level
X
RootsScrub RB 800/950
Page 13
13
ENVIRONMENTAL RESPONSIBILITY
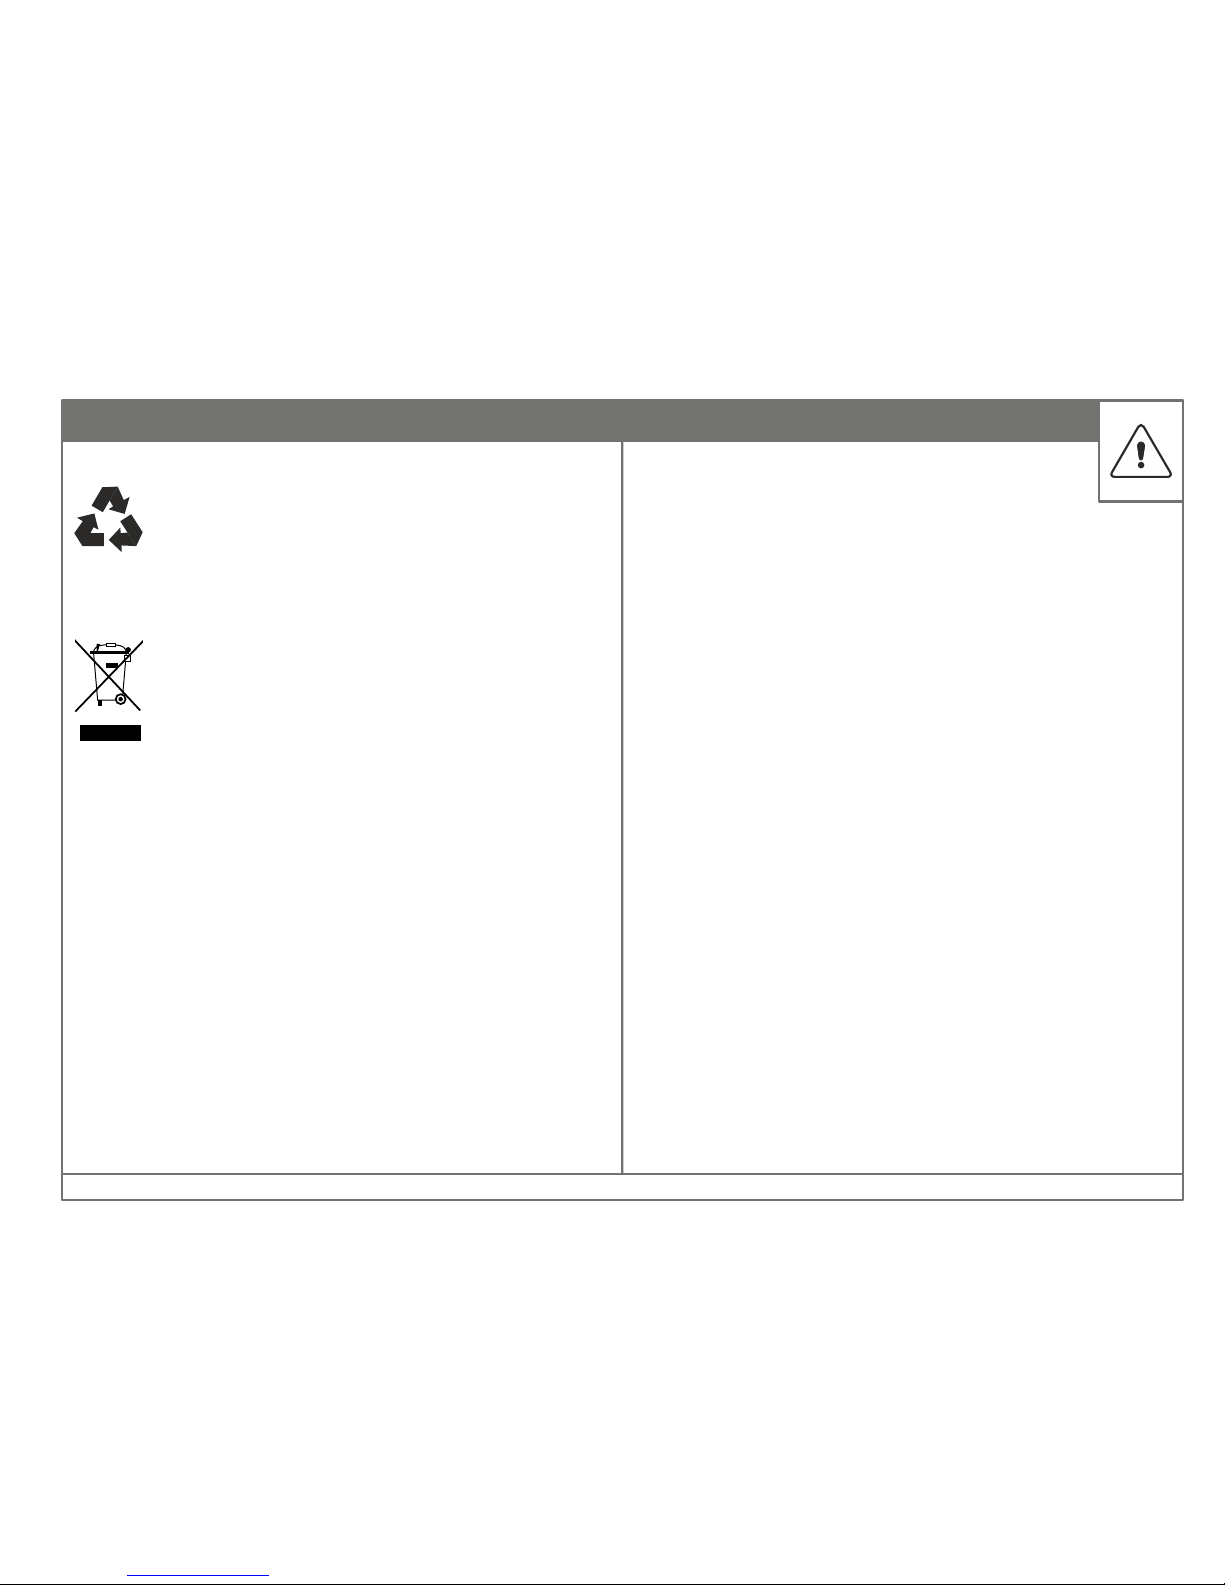
The packaging material can be recycled. Please do not place the packaging
into the ordinary refuse for disposal, but arrange for the proper recycling.
Old machines contain materials that can be recycled. Please arrange for the
proper recycling of old machines. Batteries and actuators contain substances
that must not enter the environment. Please dispose of your old machines,
batteries and actuators using appropriate collection systems.
SAFETY INSTRUCTIONS
RootsScrub RB 800/950
Page 14
14
KNOW YOUR MACHINE
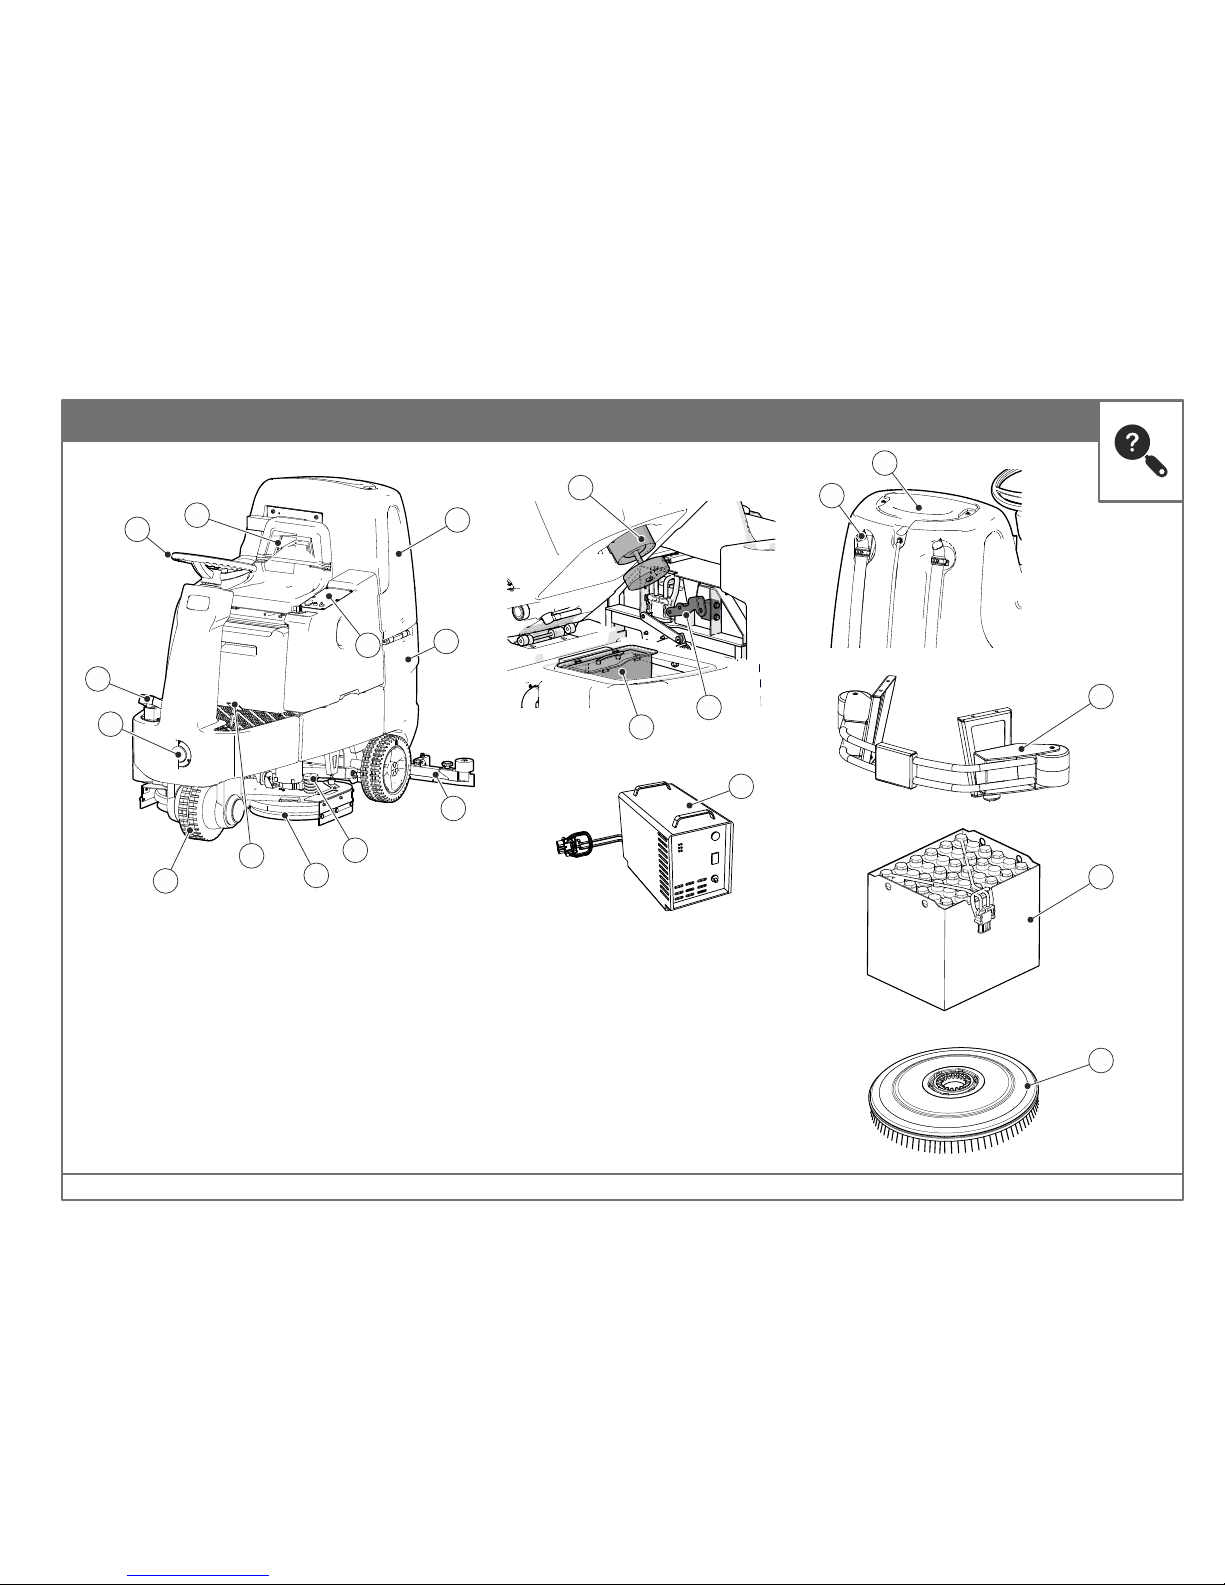
1. Steering Wheel
2. Operator Seat
3. Accelerator Pedal
4. Control Panel
5. Fresh Water Tank
6. Dirty Water Tank
7. Brush Head
8. Float
9. Debris Tray
10. Tank Lock
11. Headlamp
12. Brush Release Pedal
13. Traction Drive Motor
14. Traction Battery Pack
15. Safety Bumper
16. Squeegee
17. Drain Hoses
18. Fresh Water Fill Port
19. Brake Pedal
20. Brush
21. Off-Board Battery Charger
1
2
3
4
5
6
7
8
9
10
11
12
13
16
19
18
17
15
14
20
21
RootsScrub RB 800/950
Page 15
15
X
X
X
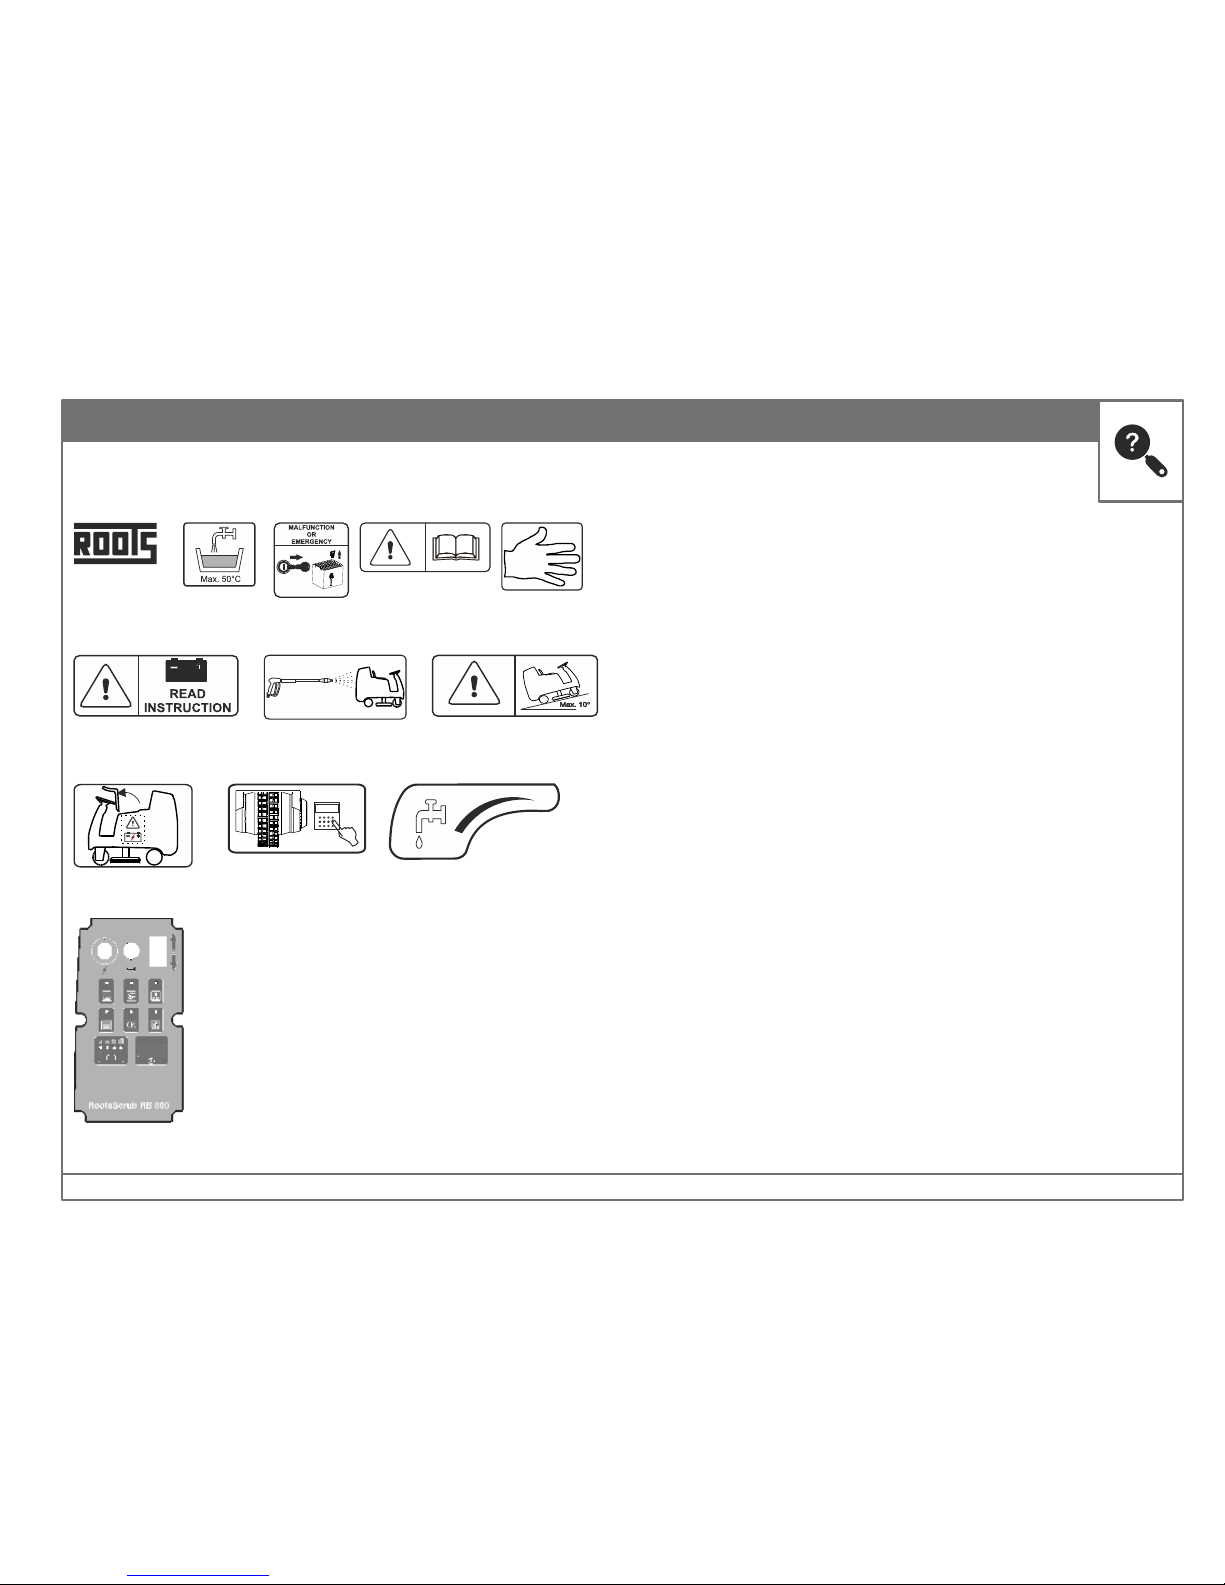
DECALS ON THE MACHINE
These labels appear on the machine in the locations indicated. If any label
becomes damaged or illegible, install a new label in its place.
MAX
0
1. Roots - silvergrey
2. Fresh water filling
3. Remove key
4. Read instruction manual
5. Hand crush warning
6. Read battery instruction
7. Do not wash with high pressure
8. Max inclination
9. Battery charging instruction
10. Do not tamper drive motor controller
11. Fresh water flow control
12. Control panel sticker
(1)
(6) (7) (8)
(9) (10) (11)
(12)
(2) (3) (4) (5)
RootsScrub RB 800/950
Page 16
16
12.1 Machine Operaon:
It is the operator’s responsibility to be knowledgeable of all potenal
operang hazards and to take every reasonable precauon to ensure oneself,
others, animals, and property are not injured or damaged by the machine
This secon of the Operator’s Manual is designed to familiarize, instruct, and
educate safe and proper machine use to the operator. The operator must be
familiar with the machine operaon and all associated safety pracces before
operang.
Proper operaon of the machine, as detailed in this manual, will help ensure
years of safe and sasfactory use of the machine. READ, UNDERSTAND, and
FOLLOW the safety messages. Serious injury or death may occur unless care is
taken to follow the warnings and instrucons stated in the safety messages.
Always use good common sense to avoid hazards.
Do not operate a damaged or
malfunconing machine. Risk of
equipment failure or cause of injury or
death or damage to property.
WARNING
Only qualified people are allowed to operate the machine. A qualified
operator has read and understood the owner’s manual and should comply
with its procedures. If any part of the operaon and safe use of this equipment
is not completely understood, consult an authorized dealer for a complete
explanaon.
12.1.1 Operator Requirements:
a. Train the employee to operate the machine in a safe way.
B. Permit only qualified personnel to operate and service the machine.
c. Instruct all operators to maintain the shields and guards in its proper
working condion at all mes.
d. Ensure that the operators use approved Personal Protecve Equipment at
all mes or whenever required.
e. Forbid the operators to carry addional people on the truck or the machine.
f. Ensure that nobody including the operator modifies or alters the machine or
any of its funcon, doing so may cause fatal injury or death or it may damage
the machine itself.
g. Ensure that children do not operate the machine.
12.1.2 Employer Responsibilies:
12.1.3 Before Starng The Machine:
Before operang the machine, ensure that the equipment is working properly
and that you are prepared for vacuuming operaons by checking the Preoperave checklist and tesng the machine operaons.
If the operator cannot read the manuals for themselves or does
not completely understand the operaon of the equipment, it is
the responsibility of the supervisor to read and explain the
manuals, safety pracces, and operang instrucons to the operator.
MACHINE OPERATION
RootsScrub RB 800/950
Page 17
17
Owner’s personnel are not allowed to unpack the machine.
After unloading
Verify the machine and accessories with the invoice copy. Check
the machine for any transit damage, if found contact the
branch/dealer immediately.
The machine and battery are shipped in a packed condition to the customer’s
place.
To unpack the machine follow the below steps:
è Remove the packing crates from the sides and the top.
è Remove the squeegee from its packing position.
è Remove the brush box.
è Install the ramps on the rear of the pallet.
è Remove the J Hooks from the front and rear wheels.
è Remove the retaining straps from the front, rear and brush head areas.
è Remove the wheel blocks.
è Disengage the parking brake.
è Push the machine backwards slowly down the ramp.
è Park the machine on a flat solid ground.
è The Operator’s manual is packed along with the machine.
è Remove the packing from the top side by removing the packing straps.
è Hoist the battery using appropriate lifting equipment.
è Tilt the seat of the machine.
è Remove the door assembly.
è Place the battery on the machine.
è Plug the battery terminals to the machine.
è Install the door assembly back in position and lower the seat.
è Now the machine is ready to use.
UNLOADING
MACHINE OPERATION
NOTE:
Machine and Battery are packed separately.
RootsScrub RB 800/950
Machine unloading
Battery unpacking and installation
Page 18
18
1
2
3
4
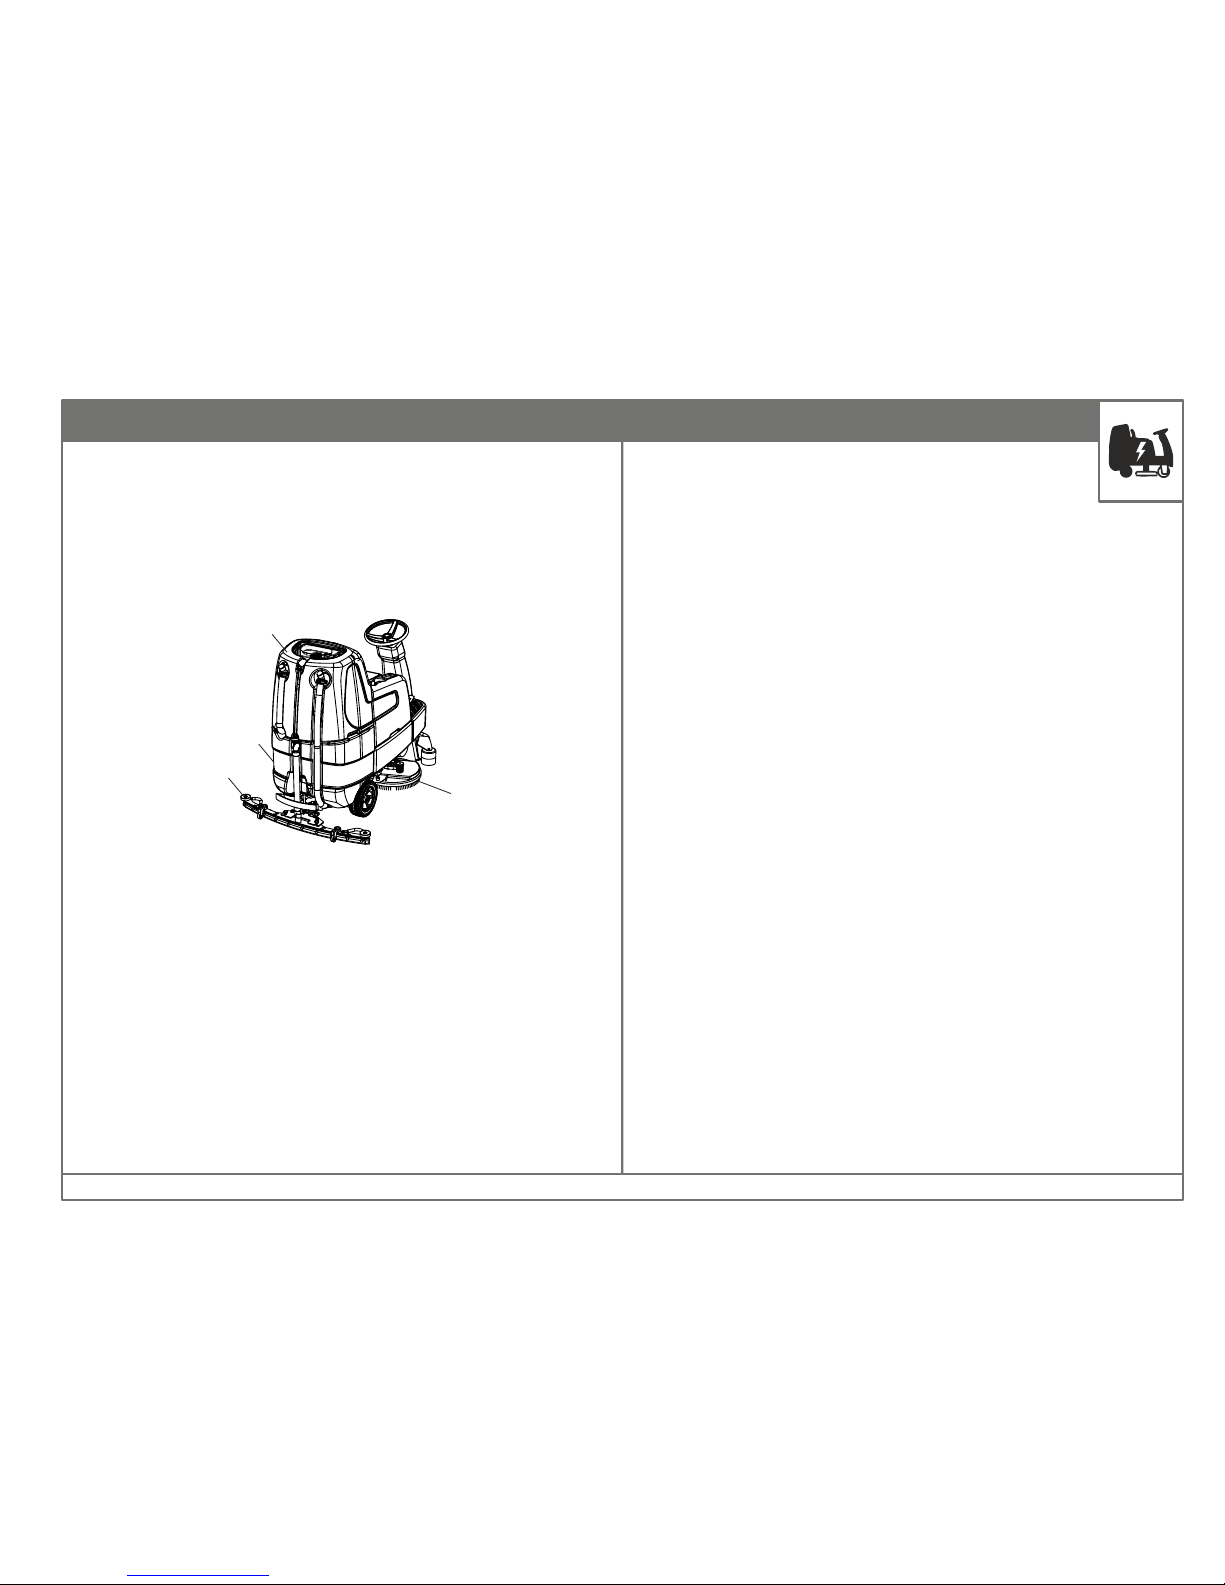
A squeegee and suitable brushes or pads are required for wet cleaning of hard
floorings. The rotating brushes (1) scrubs the floor thoroughly, removing dirt,
by cleaning agent supplied from the fresh water tank (2) thereby cleaning the
floor. The soiled water is drawn during the same cycle through the squeegee
(3) and fed into the dirty water tank (4). Thus, the floor can be walked on
immediately after it is dry and clean.
MACHINE OPERATION
WORKING PRINCIPLE
Useful Tips
· Prior to wet cleaning, it is necessary to clean the floor. This way, not only is
the cleaning efficiency improved, but wear of the brush is also
substantially reduced.
· If floors are particularly dirty or if wax has to be removed (basic cleaning);
the floor must be treated twice.
· During the first cycle, the floor is scrubbed with the cleaning agent
selected according to the degree of dirt encountered, the squeegee
remaining lifted.
· Allow the cleaning agent to act on the floor for approx. 5 or 10 minutes,
complying with the manufacturer's instructions.
· Scrub the floor once again while the squeegee is lowered.
· Too much foam indicates excessive dosage or improper suitability of
detergent for the existing kind of dirt.
· Detergent particles contained in the soiled water that are not
used will cause formation of foam.
· Instructions for dosage are given on the detergent tank and
must ideally adhere to manufacturer's recommendations.
· The ideal type of detergent and the perfect dosage applicable to it will
come through sustained use of the machine.
NOTE:
Comply with instructions for correct dosage of detergent. Correct dosage will
help optimize costs and also minimize impact on the environment. Too much
foam can affect the performance of the machine.
RootsScrub RB 800/950
Page 19
19
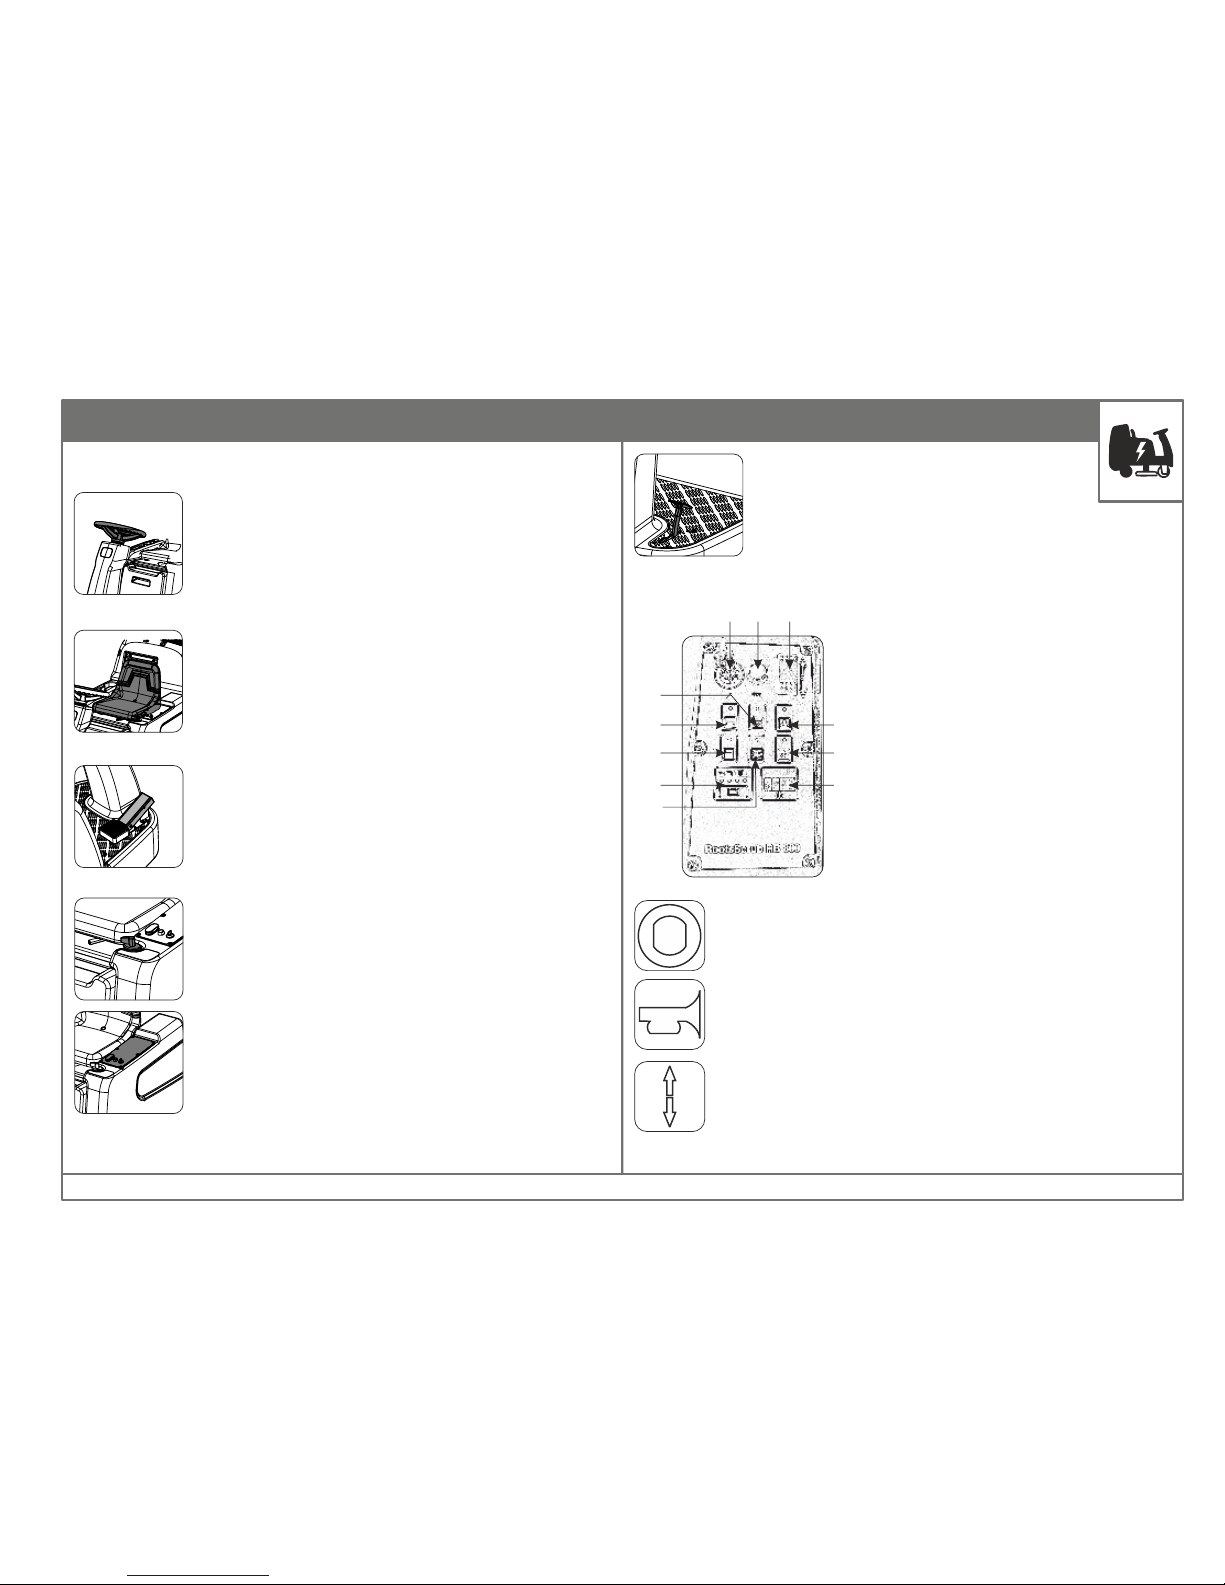
1. Steering Wheel-
5. Control Panel-
2. Operator’s seat
3. Accelerator Pedal
Used to propel the machine forward or backwards.
Used to steer the machine.
Houses all the controls of the machine.
Control panel switches in detail -
4. Water Flow Control
Used to change the water flow from minimum to maximum.
Adjus t th e dr iver' s seat lo ngitu dinal ly as follo ws:
- Push lever to the side and displace the seat as required,
then let the lever catch into place again.
F
I
K
A
D
E
G
J
H
B
C
A. Key Switch (On/Off)
B. Horn Button
C. Direction Selector (Forward/Backward)
D. Brush Motor (On/Off)
E. Suction Turbine (On/Off)
F. Extra Pressure
G. Soiled Water Tank Full Indicator Lamp
H. Working Lamp (On/Off)
I. Drive Motor Malfunction Warning Lamp
J. Battery Charge Status Indicator Lamp
K. Hour meter & Error Code Display
A. Key Switch-
Turns the electrical system On/Off.
C. Direction Selector-
Selects the direction of travel.
0
I
B. Horn Button-
Actuates the electric horn.
OPERATING AND INDICATOR ELEMENTS
6. Brake Pedal
Used to slow/stop the machine.
MACHINE OPERATION
RootsScrub RB 800/950
Page 20
20
MACHINE OPERATION
OPERATING AND INDICATOR ELEMENTS
M
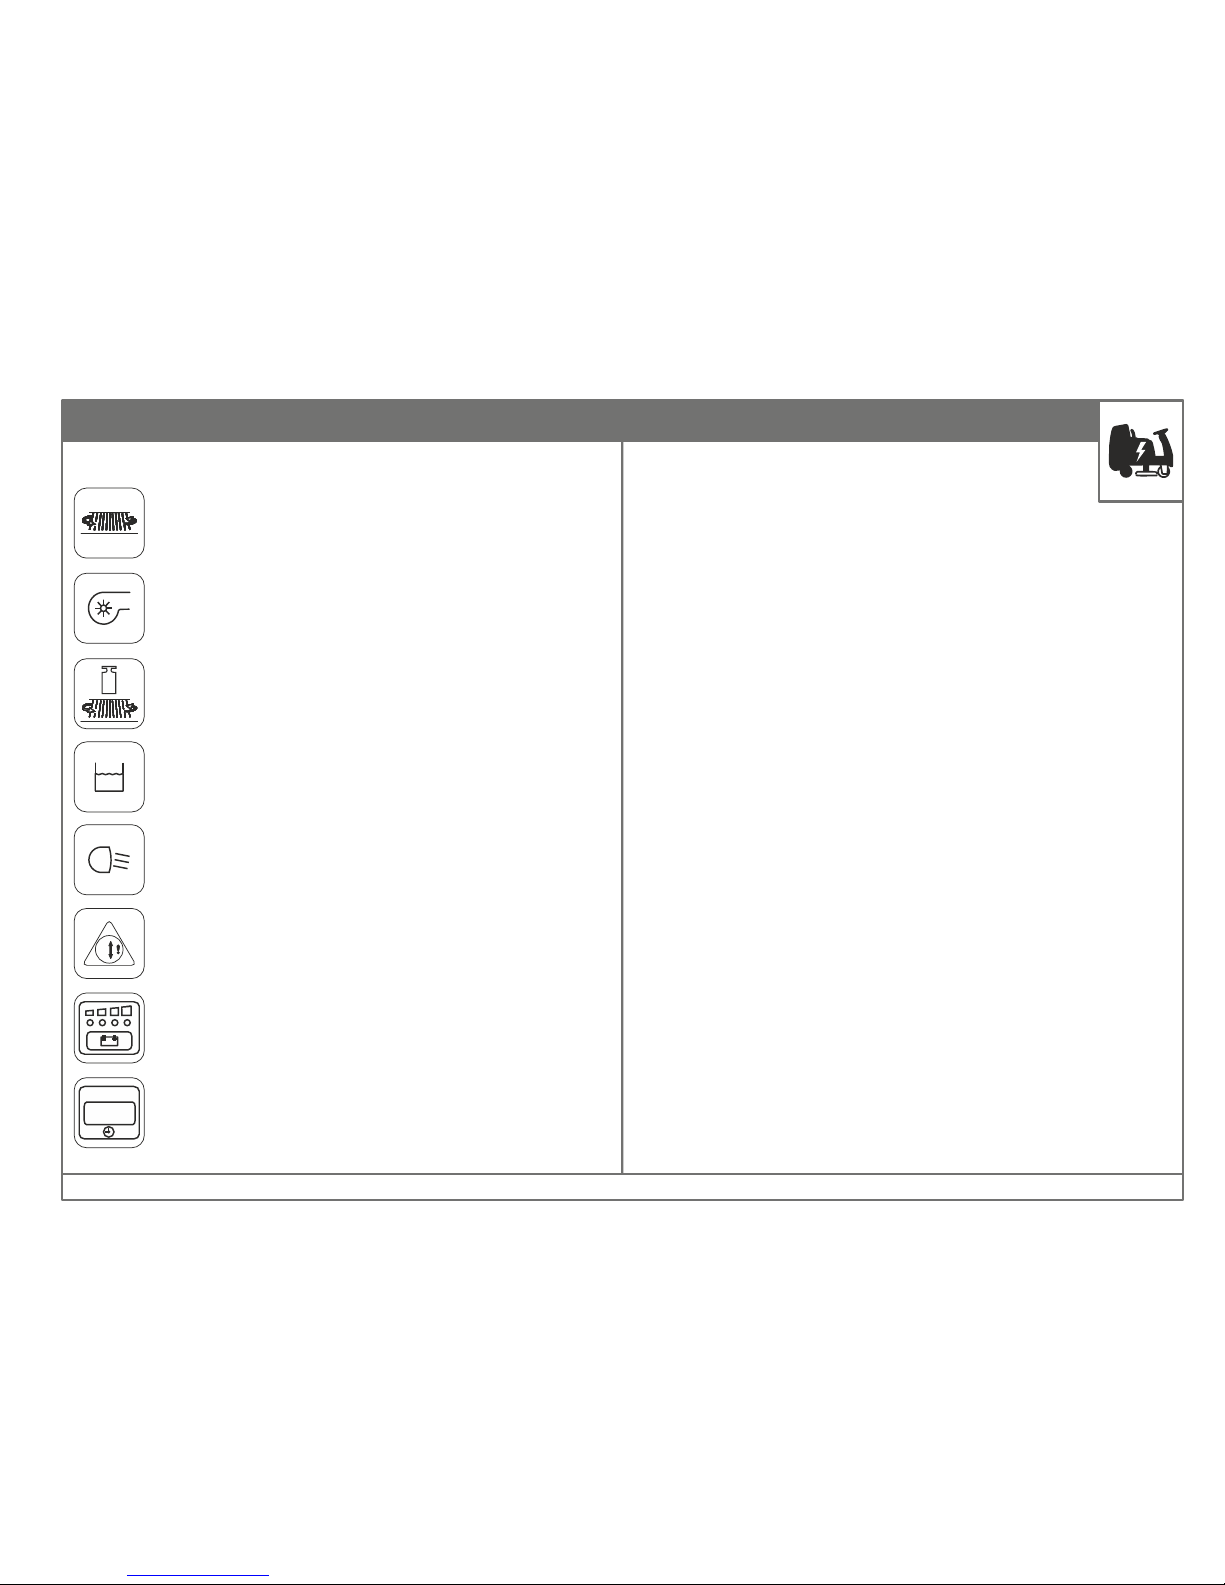
D. Brush Motor (On/Off)-
Turns the Brush motor On/off Lowers & Raises the brush head
according to the operation.
E. Suction Turbine (On/Off)-
Turns the Suction Turbine On/Off. Lowers & Raises the
squeegee according to the operation.
F. Extra Pressure-
Increases the brush pressure to 50 kg max for heavy soiling.
G. Soiled water tank full indicator lamp-
Glows when the soiled water tank is full.
H. Working Lamp (On/Off)-
Toggles the working lamp On or Off.
I. Drive Motor Malfunction Warning Lamp-
Glows when there is an error in the drive motor or controller.
J. Battery Charge Status Indicator Lamp-
Shows the status of the battery.
K. Hour meter & Error Code Display-
Displays the total hours of machine use and any error in the
electronic module.
RootsScrub RB 800/950
Page 21
21
MACHINE OPERATION
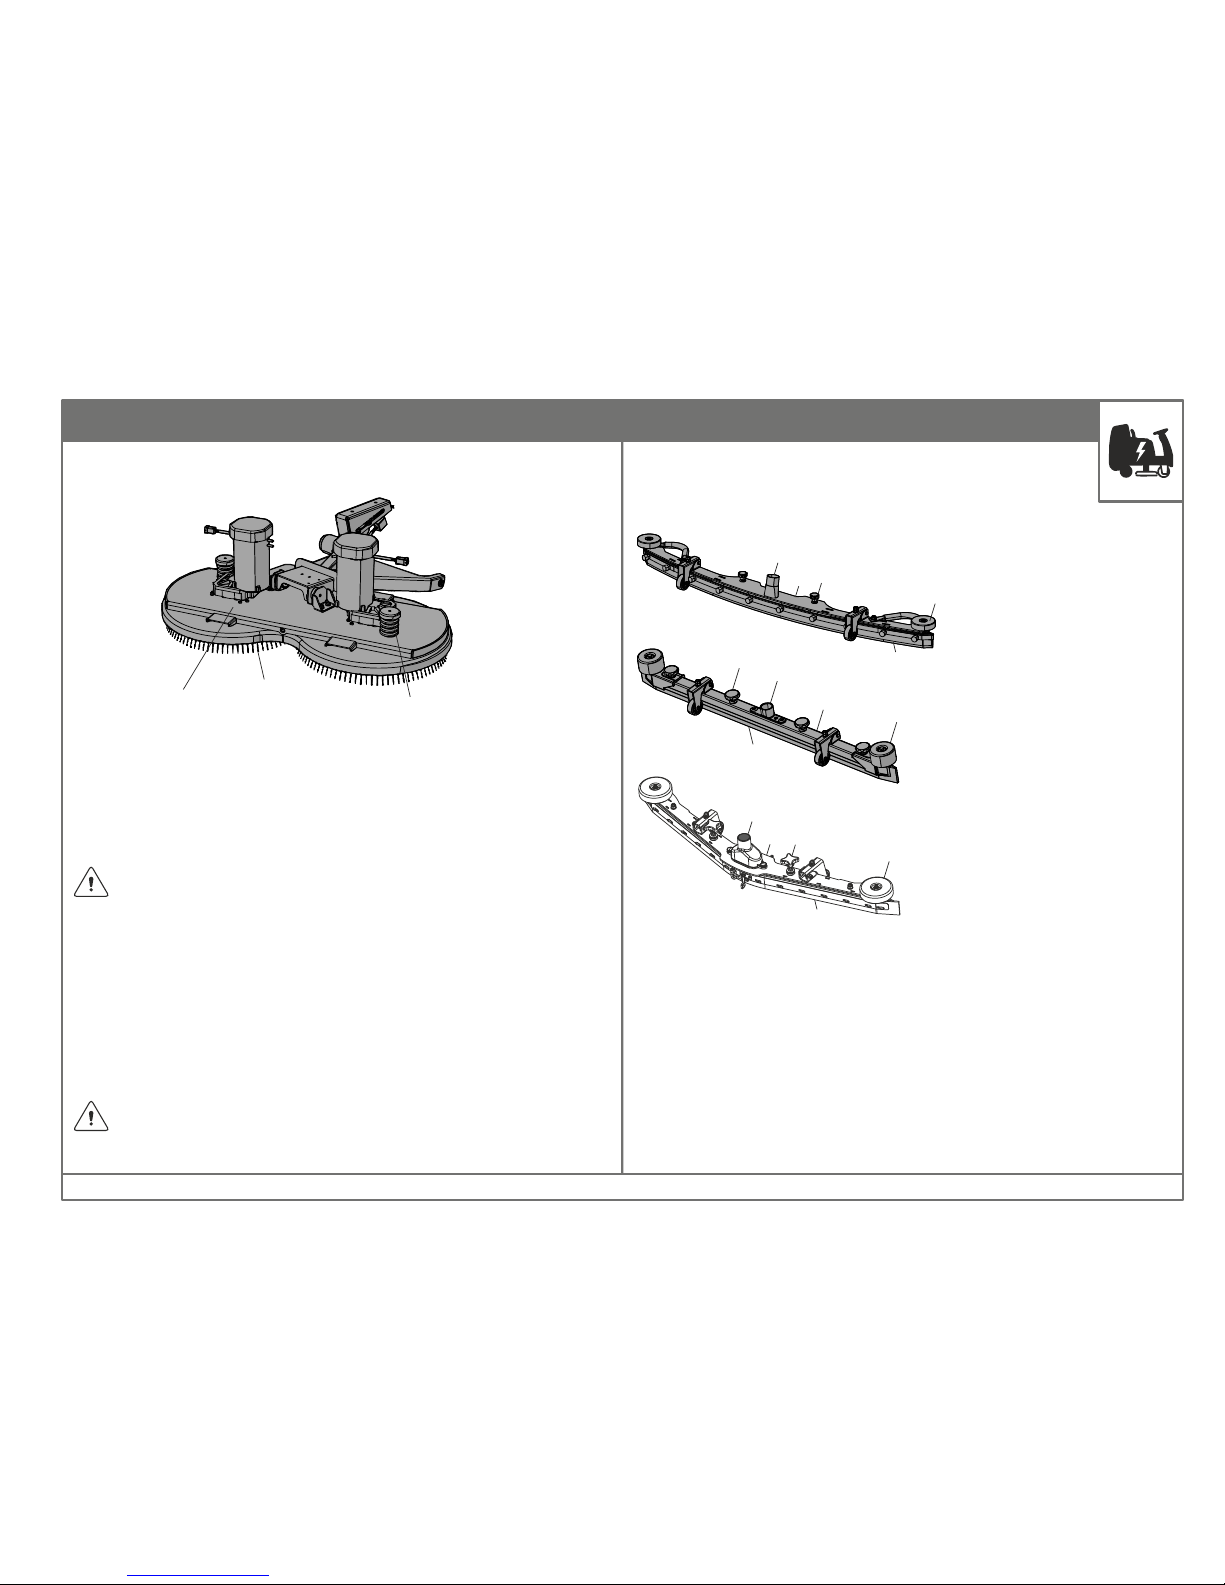
Disc Brush Head
Brush head
Brushes
Brush release pedal
Clean the disc brushes on the brush head daily or as necessary.
1. Raise the brush head.
2. Press the brush release pedal downwards and remove the disc brushes to
clean them.
Cleaning the disc brushes
Do not use harsh acids or chemicals to clean the disc brushes.
Check the disc brushes on the brush head weekly for signs of wear. In case of
wear the disc brushes must be changed.
1. Raise the brush head.
2. Press the brush release pedal downward and remove the disc brushes.
3. Slide a new disc brush under the brush head and press it into the catch using
both hands.
Installation of disc brushes
Switch off machine before changing brushes.
Care should be taken while mounting brushes.
Do not stand on the brush head.
Squeegee
The squeegee is used to extract the dirty water from the floor.
Straight
V-type
1
5
4
3
2
Parabolic
1
4
5
3
2
1
4
5
3
2
1. Squeegee base
2. Squeegee lip
3. Knob
4. Deflector roller
5. Suction port
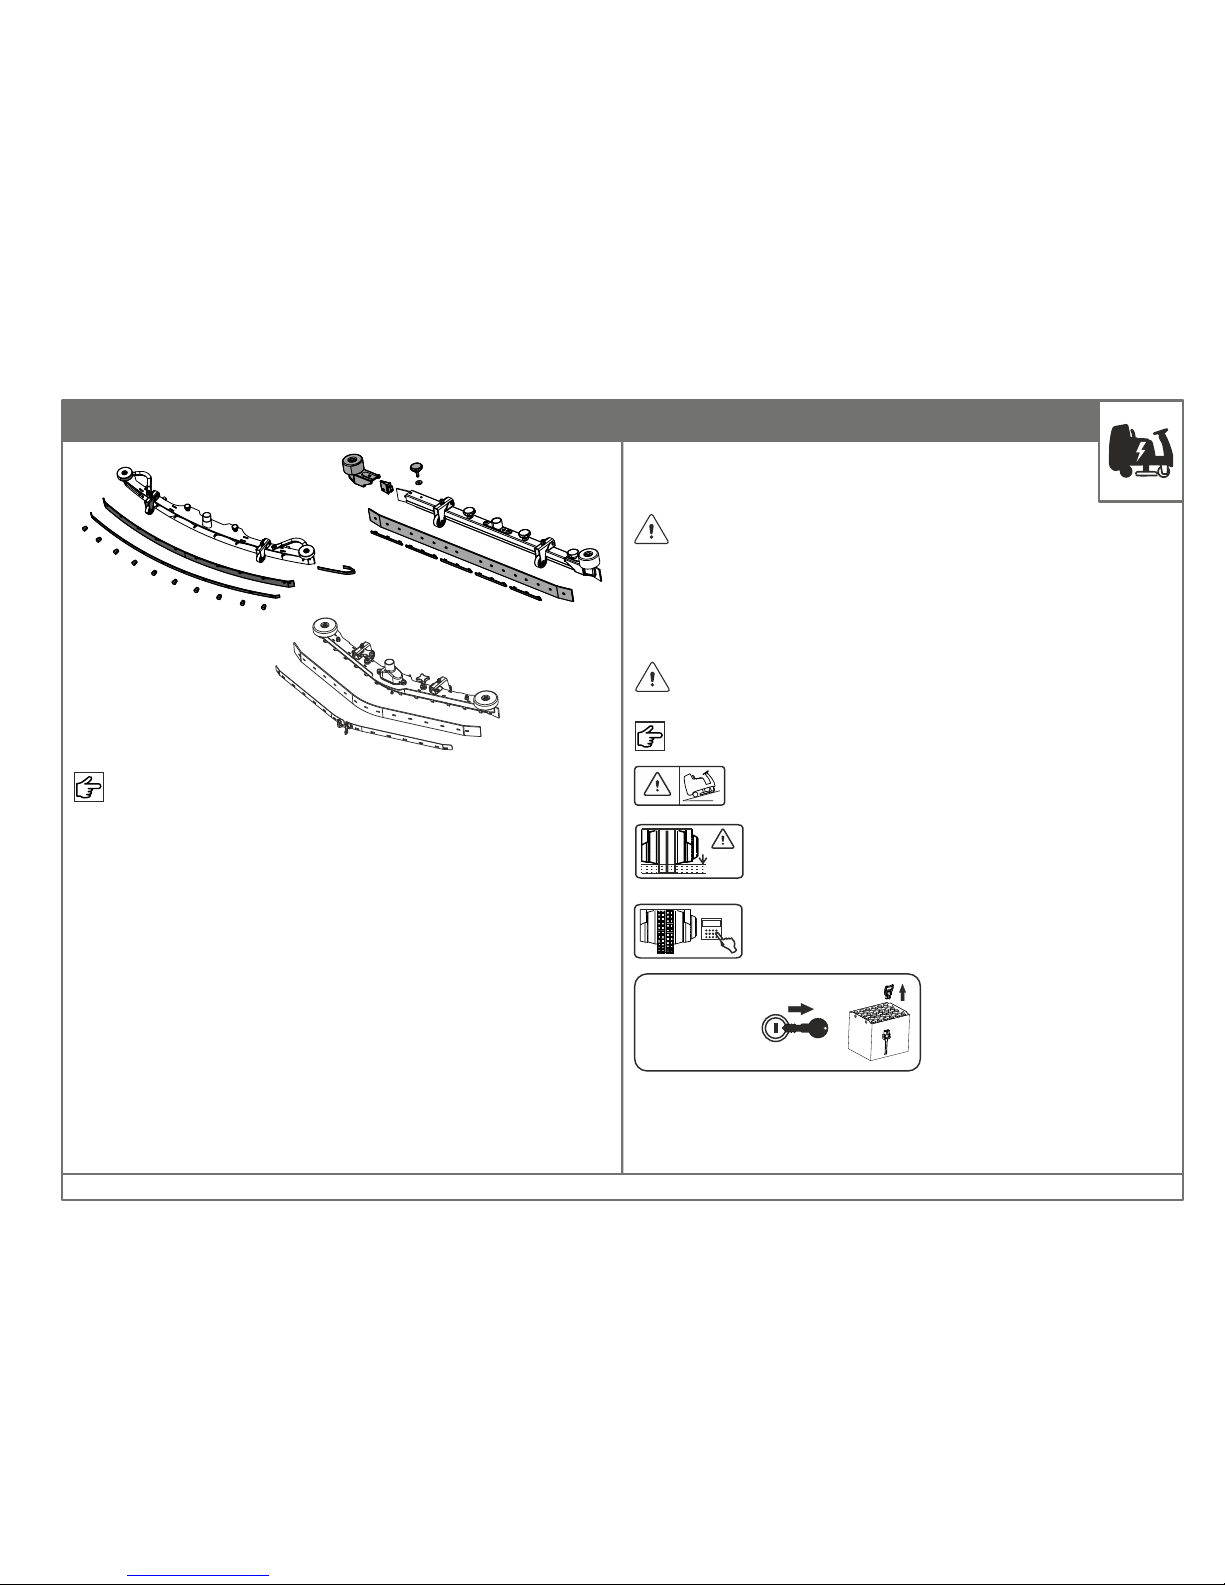
Replacement of squeegee lips
Check the inner and outer lips on the squeegee daily for signs of wear. The lips
can be used four times by flipping it 90º and reused.
1. Raise the squeegee.
2. Pull the suction hose from the squeegee, unscrew the knobs and remove
the squeegee.
3. Loosen the fastening knobs/strips and remove the lip. Turn or replace the
lip if necessary. Follow the same for the inner lip also.
RootsScrub RB 800/950
Page 22
22
MACHINE OPERATION
Clean the squeegee before starting the work cycle every time.
Do not stand on the squeegee.
Cleaning the squeegee
Check the squeegee daily and clean as necessary.
To clean the squeegee, raise it, disconnect it from the suction hose, loosen the
knobs and remove the squeegee.
Wash the squeegee under clean running water.
MAX
5.0 mm
Water Level
Max. 10°
Driving the machine
Do not park the machine on slopes or ramps.
Maximum inclination of 10° is only allowed.
Maximum water wading of 5.0 mm is allowed.
The machine is powered by a powerful traction motor.
Starting-
To propel the machine press the accelerator pedal in downward direction.
Stopping-
To stop or slow the machine release the accelerator pedal (Pedal returns to its
initial position). Press the brake pedal to slow or stop the machine.
Proceed to the first driving trials on a clear training ground until the driver is
acquainted with the elements and their functions.
- Before leaving the machine make sure to remove the key.
- Because of skidding hazard drive at reduced speed on wet
grounds and when turning.
- Drive slowly on downhill, turning, wet grounds, ramps
and on uneven surfaces.
- Do not drive the machine in flooded areas. Risk of damaging the
traction motor.
- Never make sharp maneuvers while driving.
- Do not adjust the seat while driving the machine.
Do not modify the machine to transport people or goods.
Do not drive fast with the tanks full of water.
MALFUNCTION
OR
EMERGENCY
X
Do not tamper the traction motor controller.
Risk of damaging the motor.
In case of an emergency or malfunction - switch of key and disconnect
battery plug.
RootsScrub RB 800/950
Page 23
23
MACHINE OPERATION
Start of Cleaning
Ÿ To fill clean water in the fresh water tank insert the water hose into the fill
port.
Ÿ Add required amount of recommended cleaning agents to the water.
Ÿ Move the machine to the area to be cleaned.
Ÿ Switch on key “A”.
Ÿ Operate water lever to select the desired amount of flow.
Ÿ Press “D” to lower the brush head - brush head lowers and brushes rotate.
Ÿ Press “E” to start suction turbine - suction turbine starts and squeegee
lowers.
Ÿ Operate “C” to forward position.
Ÿ Drive immediately or the brushes will leave traces on the floor.
Ÿ Commence cleaning operation of the area.
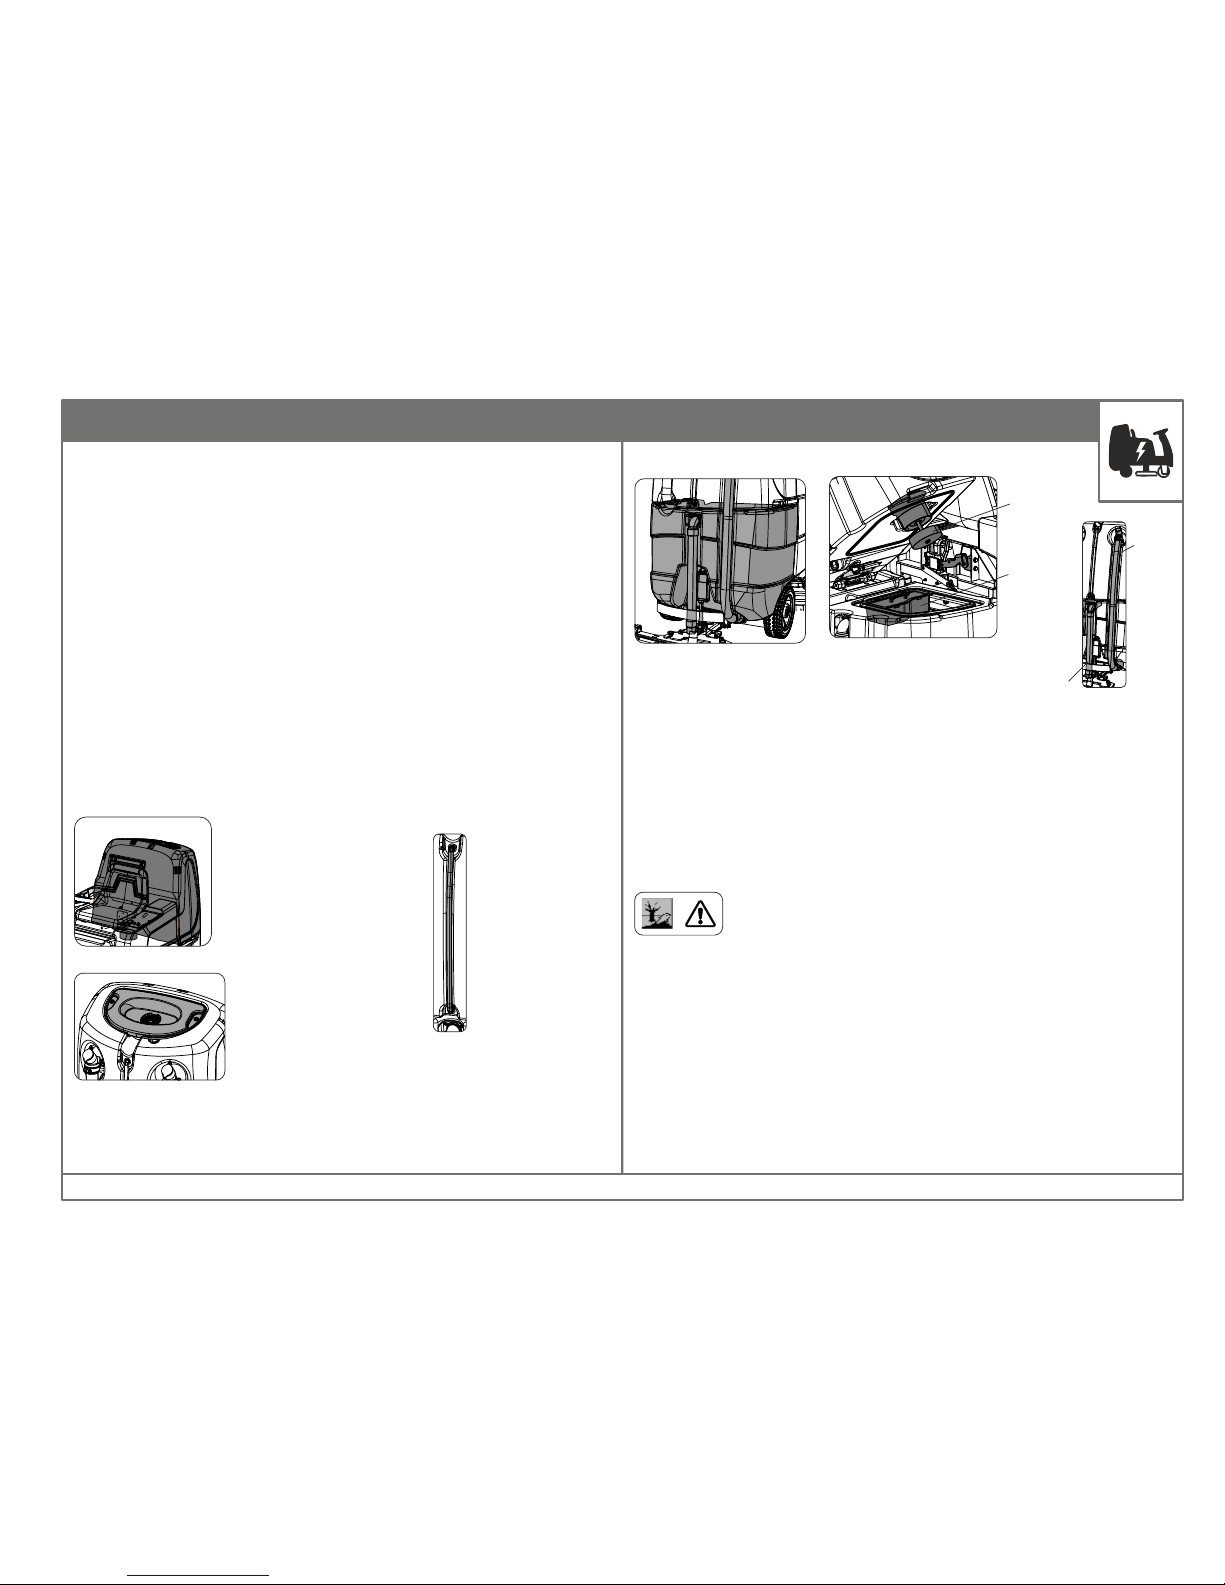
DIRTY AND FRESH WATER TANKS
Fresh Water Tank
The fresh water tank
has a capacity of 120
liters of water.
Place the water hose
into the fill port to filter
and fill the tank.
Do not fill water beyond
a temperature of 50°C.
Fresh water tank
indicator hose.
Dirty Water Tank
The dirty water tank has a
capacity of 120 liters.
Float
Collection
Tray
Suction
Hose
Drain
Hose
End of Cleaning
Ÿ Press “D” to switch off brush head.
Ÿ Close the water flow.
Ÿ Run the machine to collect the remaining water.
Ÿ Press “E” to switch off suction turbine and raise squeegee.
Ÿ Drive the machine to the waste disposal area.
Ÿ Unhook the drain hose and dump the dirty water to the drain.
Do not drain the soiled
water into the environment.
- Remove the collection tray and clean with fresh water.
- Clean the dirty water tank with clean water.
RootsScrub RB 800/950
Page 24
24
MACHINE OPERATION
Remove the squeegee from the machine and clean the lips before the next
operation.
- Do not direct the water jet into any opening, slots, on electronic
modules, control panels or sealing.
- Do not use harsh chemicals to clean the machine.
- Wipe the machine with a damp cloth after usage.
- Do not clean the machine by means of a vapor jet or a high pressure
cleaning equipment. Clean the brush head with a water hose
(pressure: 5 to 6 bar max.) and from the bottom only.
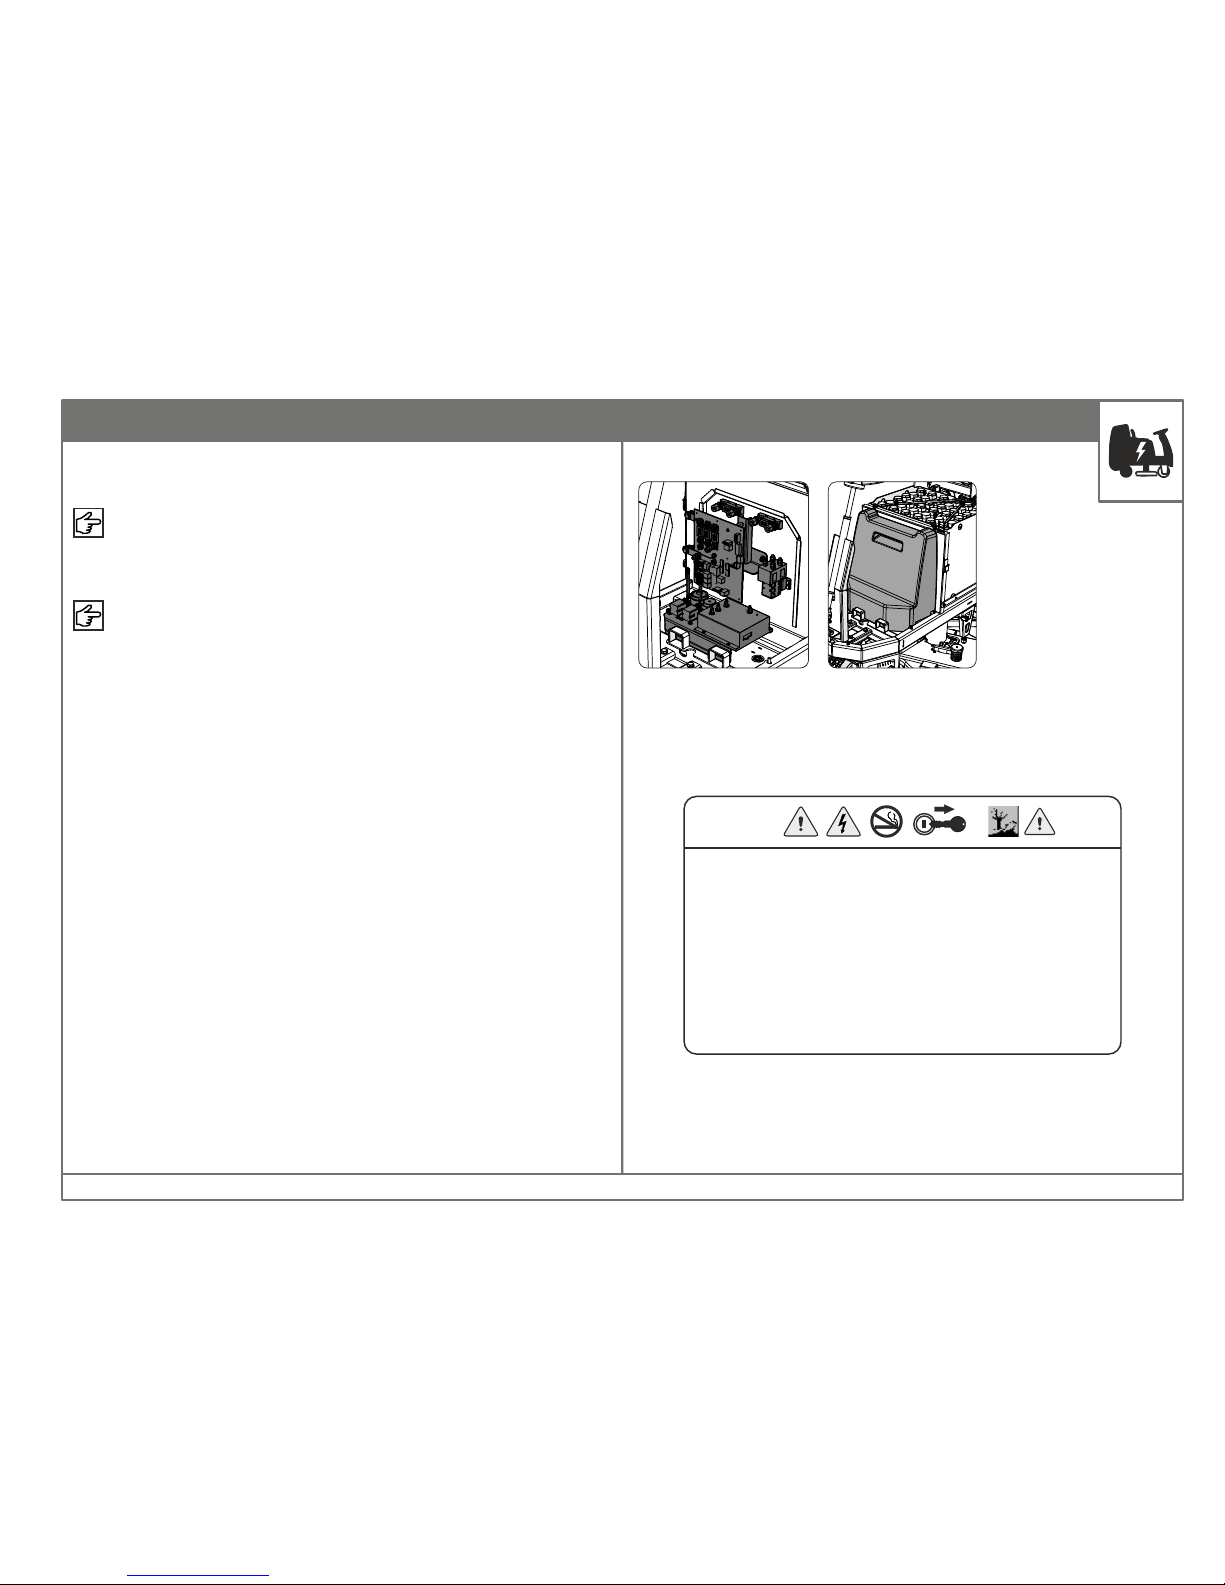
Electrical System
Main control module
& Traction motor controller
Cover electrical module
- Do not open the cover of the electrical module.
- Remove key before carrying out any electrical work.
- During battery top up ensure that the cover electrical
module is closed securely.
- Never open the cover electrical module in dusty areas.
- DO NOT TAMPER WITH THE ELECTRICAL MODULE OR THE
CONTROLLER.
- Do not dispose the replaced electrical/electron ic
components in to the environment.
The electrical system houses the main control module and the traction motor
controller.
End of Cleaning
RootsScrub RB 800/950
Page 25
25
MAINTENANCE
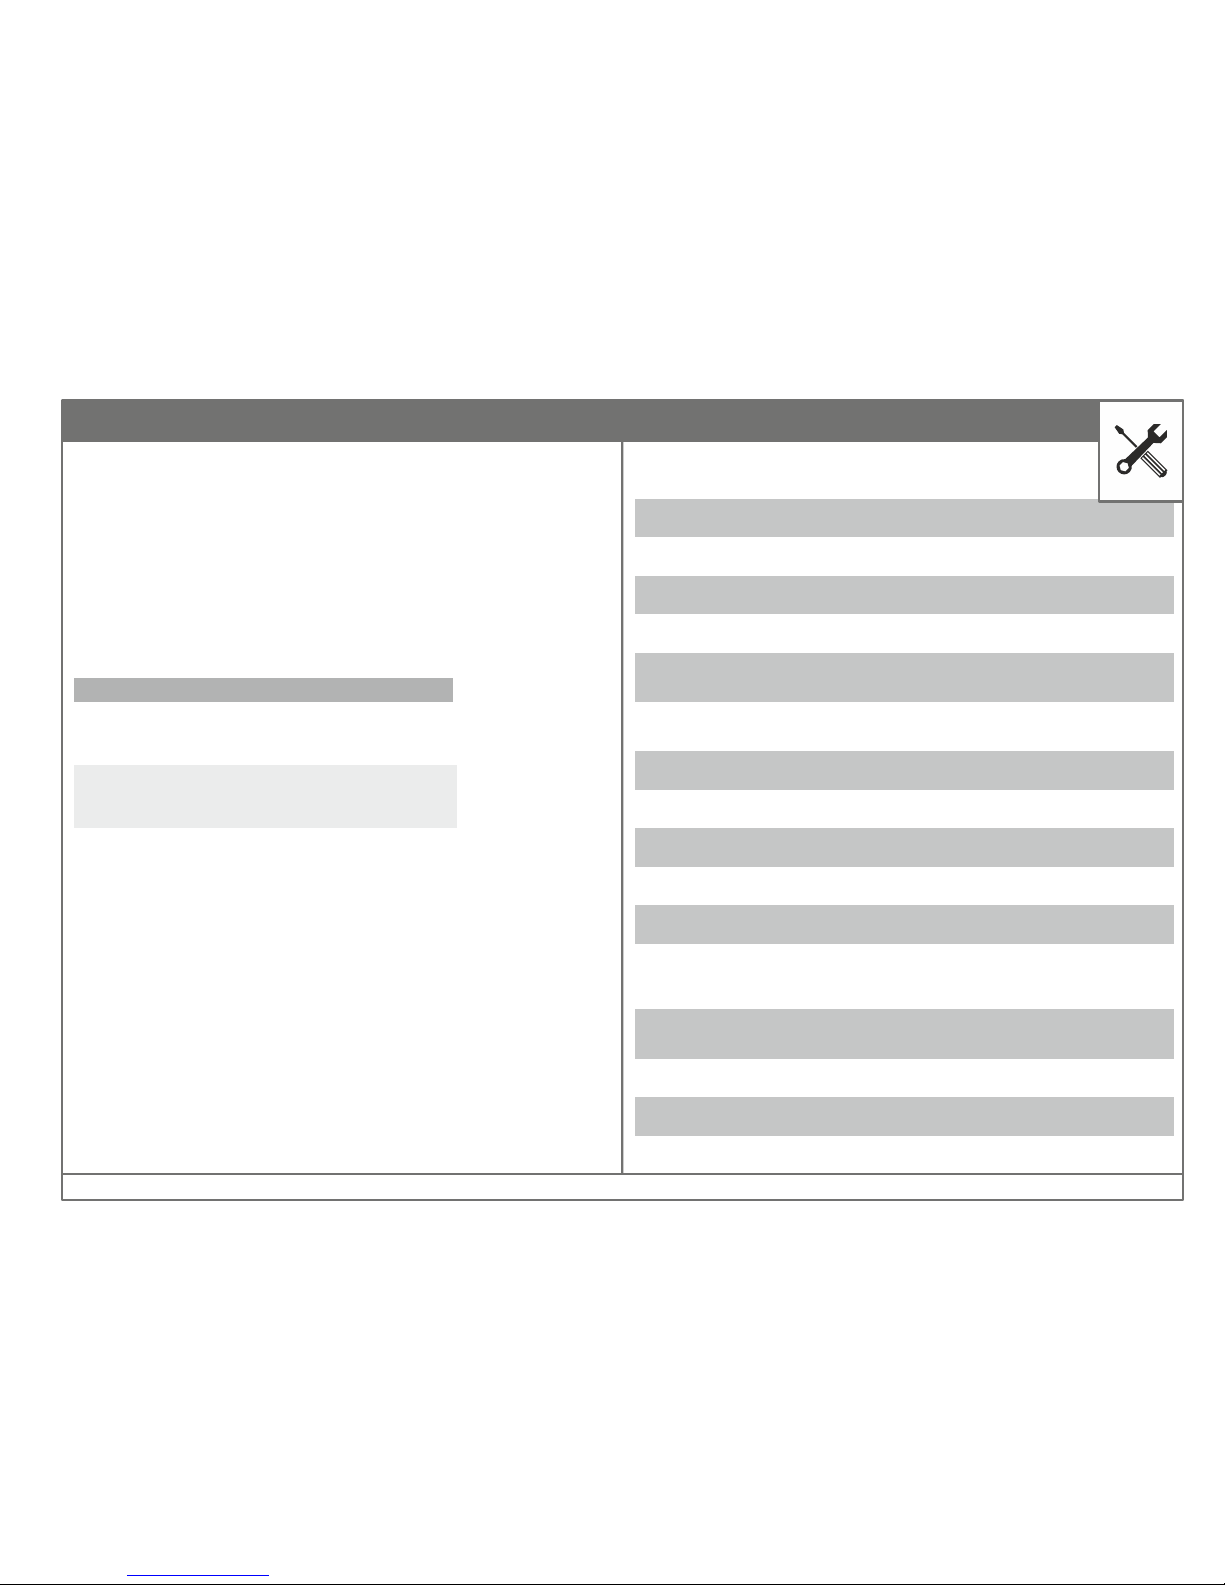
Service Display
Fuse Error Codes
- software version
is displayed
- battery type
is displayed
- total operated hours
is displayed
V 02 LA 0000
The hour meter holds the service display. Upon turning on the following are
successively displayed:-
Error Code Description What to do ?
EF 01 F1 Fuse blown
Brush motor 1 is overloaded.
Rectify the cause and replace
the fuse.
EF 02 F2 Fuse blown
Brush motor 2 is overloaded.
Rectify the cause and replace
the fuse.
EF 03 F3 Fuse blown
Suction turbine is
overloaded. Rectify the cause
and replace the fuse.
If a malfunction occurs during operation, e.g. a defective fuse, a 4-digit
number appears in the hour meter display with 4 dots flashing and a buzzer
sounding. This 4- digit number advises the technician in detail on the last error
found.
Other Error Codes
(For RMCL service engineers reference only)
Error
Code
No.of Alarm
LED Blinks
Description What to do ?
A 1 1
FNR switch(-S3) at forward
position when power-on
Put the accelerator pedal to zero and set
the FNR switch in neutral at power-on.
A2 2
FNR switch(-S3) at reverse
position when power-on
Put the accelerator pedal to zero and set
the FNR switch in neutral at power-on.
A3 3
Potentiometer(-S6) in the
accelerator pedal fault.
Check the potentiometer (-S6) wires
A4 4
Potentiometer(-S6) out of
neutral position at power on
Move the potentiometer to neutral
position or,if it is in neutral position
already, calibrate the speed reference.
A5 5 Thermal protection
Wait few minutes and check the motor
current. If it is high rectify the cause and
then use.
A6 6
Controller power stage
damaged
Change the drive controller.
A7 7 Over current 1: short circuit
Check the motor wires: if OK, and the
controller repeats this alarm, change it
A8 8 Over current 2: short circuit
Check the motor wires: if OK, and the
controller repeats this alarm, change it
A9 9 Under voltage Check the battery's charge
A10 10 Over voltage
Battery voltage upper than 45V : Check the
battery
A11 11 Overload protection
Check whether the traction motor brake
functions properly. If not replace brake
immediately and use. Check the motor
working current.
A12 12 Disable switch on
Check the parking brake limit switch ( if
used). This alarm will reset by resetting the
keyswitch (-S1).
A13 13 Key-off sequence detected Check the key switch(-S1) connections
A14 14
E2 prom fail
Check your settings: if the controller
repeats this alarm, change it
RootsScrub RB 800/950
Page 26
26
Compliance with our recommendations concerning maintenance work will give you
the certitude always having a machine at your disposal, which is ready to work and in
good operating condition. Please contact your local distributor; the people there will
be glad to perform that work for you.
- Well trained personnel and genuine spare parts are at your disposal.
- In case of any inquiries or orders for spare parts, please always quote the machine's
serial number mentioned on the nameplate.
- The name plate is fixed in the rear side of the machine.
- When cleaning or servicing the machine, and when replacing any parts, shut off the
machine and on principle disconnect the power plug from the power supply.
- For reasons of safety during cleaning and/or maintenance work in or on the tank,
the tank lid - when lifted - must be secured so as to prevent accidental closing or
tilting down.
- The machine may be taken into operation only if all guarding devices are fitted and
in protective position. As far as possible, cleaning should not be done by hand, but
using appropriate tools or equipment.
- Maintenance and repair work may be carried out only by means of suitable tools
and by the people trained in the factory - for reasons of safety, only genuine spare
parts may be used.
Maintenance Work
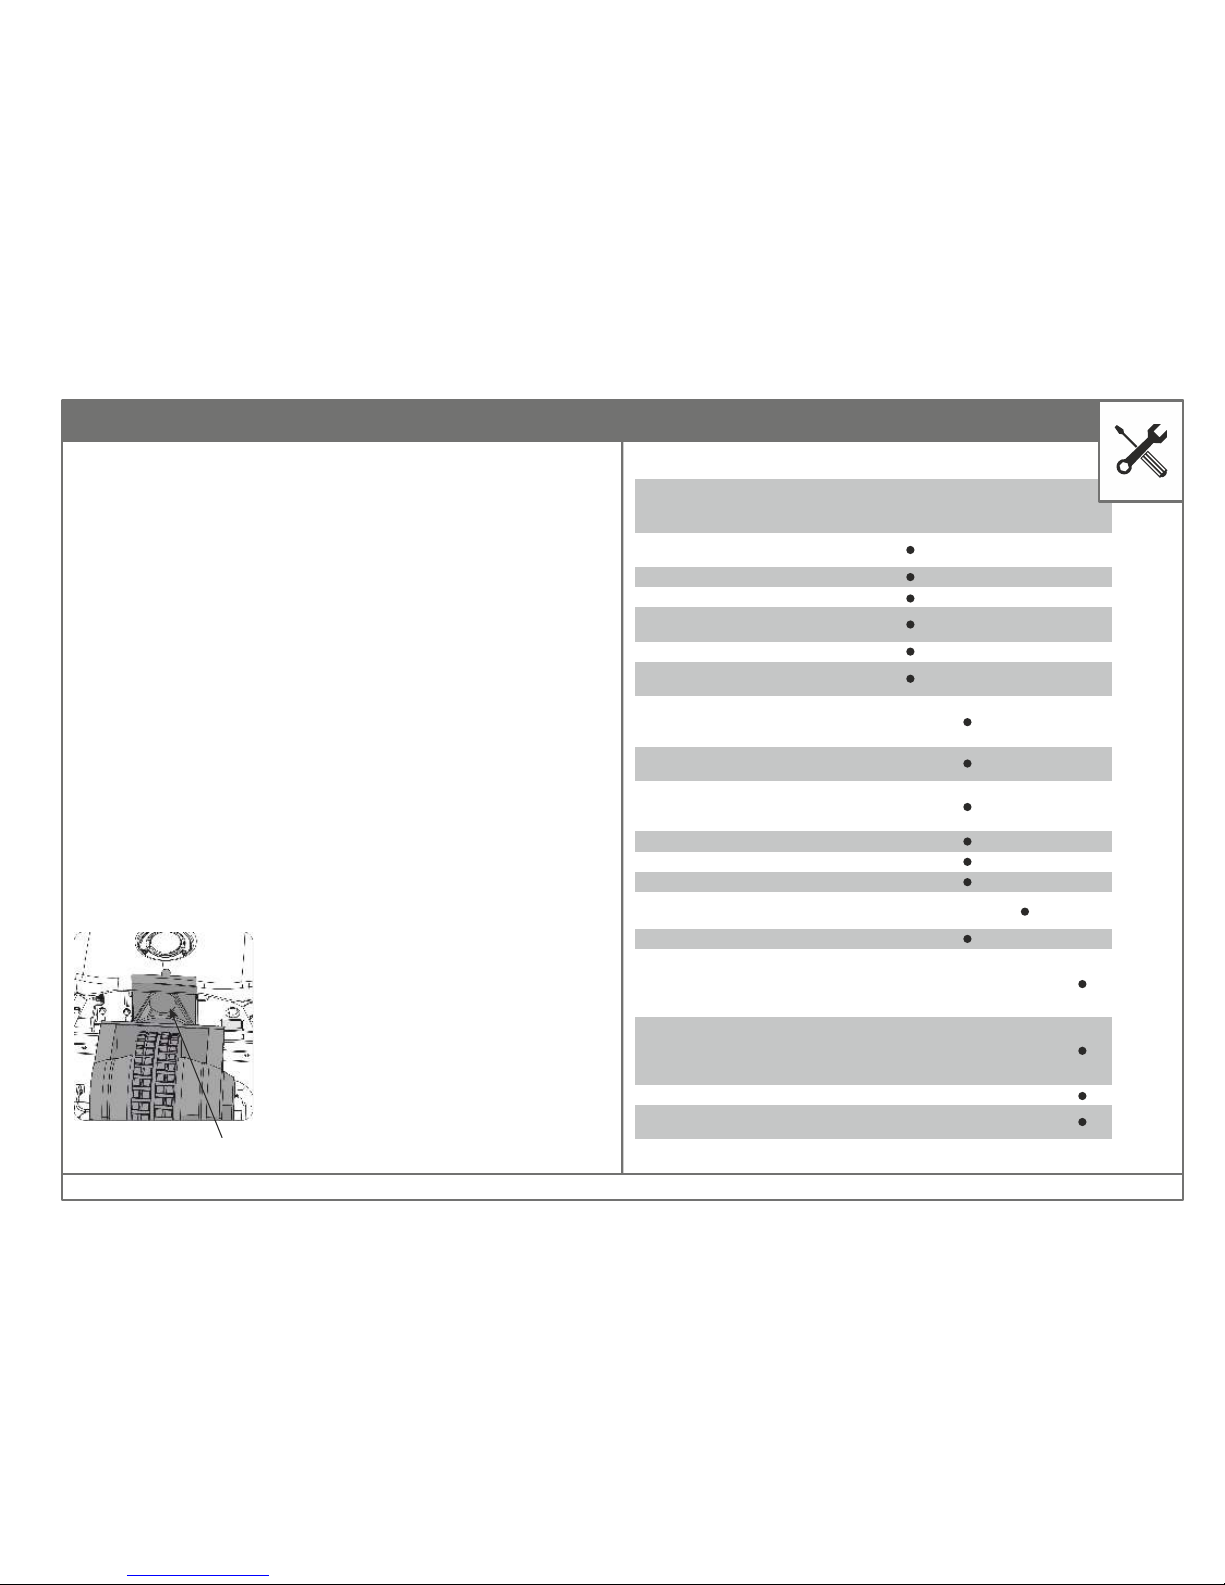
Maintenance Schedule
daily every 50 every 200 every 500
Recharge batteries according to charger unit
instructions
Empty and clean dirty water tank
Check condition of squeegee lips
Check squeegee for foreign particles taken
and clean if required
Clean filter in fresh water tank
Check battery poles and apply grease if
required
Check tight fitting and condition of suction
hose between squeegee and dirty water tank
Check squeegee lips for wear and turn or
replace if required
Check brushes and water retaining ring for
tight fitting and condition and replace if
required
Check function of float
Check rotational direction of the brushes
Check function of brake
Check squeegee holder and castor roller, readjust if required
Check fresh water supply to the brushes
Clean traction motor from carbon dust and
check the accessible carbon brushes for
smooth running and condition, replace if
required
Clean electro-motor from carbon dust and
check the accessible carbon brushes for
smooth running and condition, replace if
required
Grease steering pinion and gear ring
Check joints at squeegee holder and grease if
required
Service Hours
Maintenance Table
Greasing Points
Greasing point
MAINTENANCE
RootsScrub RB 800/950
Page 27
27
Problem Cause Remedy
Poor water recovery Tank gasket faulty Contact service
Drain hose leak Hook up drain hose and close
Suction turbine faulty Contact service
Battery charge low Recharge battery
Tires noisy Bearing dry Grease bearings
Faulty hubs Contact service
Poor traction Excessive brush pressure Reduce pressure
Worn traction tire Replace tire
Heavy soap concentration Contact service
Short run time Battery run down Charge battery twice
Battery still down Contact service
Battery low on water Refill with distilled water
Battery over cycled Contact service
Problem Cause Remedy
No power - nothing works Faulty power switch Contact service
Battery need to be recharged Recharge battery
Faulty battery Replace battery
Loose battery cable Tighten loose cable
Main fuse blown
Rectify the cause & Replace the
fuse
Brush motor does not work Accelerator pedal is not depressed Depress accelerator pedal
Main fuse blown
Rectify the cause & Replace the
fuse
Faulty brush motor or loose cable Contact Roots service
Suction turbine does not
work
Faulty suction turbine switch Replace switch
Suction turbine fuse blown Replace the fuse
Faulty suction turbine Contact Roots service
Carbon brushes worn Contact Roots service
Insufficient water flow Water tank low Refill fresh water
Flow lever turned to stop Turn lever more to open
Water line clogged
Remove and blow with
compressed air
Water valve clogged Remove and clean
Poor water recovery Dirty water tank is full Empty dirty water tank
Suction hose is clogged Remove debris
Squeegee is clogged Remove debris
Squeegee lip is worn Rotate or replace lips
Faulty vacuum hose Contact service
TROUBLESHOOTING
RootsScrub RB 800/950
Page 28

28
Do’s Don’ts
ü Charge the batteries after it has been completely discharged.
ü Charge the batteries only in a well ventilated area.
ü Use only clean water to fill the fresh tank.
ü Fill fresh water till the marked level only.
ü Clean the fresh water filter after each cleaning cycle.
ü Empty the dirty water at a specified draining area.
ü Clean the dirty water tank and collection tray after each cleaning cycle.
ü Clean the suction float assembly if any dirt is noticed.
ü Clean the squeegee after every cleaning cycle.
ü Use only recommend cleaning solutions.
ü Wipe the machine at the end of the day.
ü Drive at a slow speed on ramps and uneven surfaces.
ü Use only recommended brushes for the specified floors.
ü Park the machine in a covered dry place.
û Do not charge the batteries between cleaning cycle.
û Do not use the machine for transporting goods or persons.
û Do not modify the machine.
û Do not fill water beyond 50°C.
û Do not use harsh or acidic solutions.
û Do not empty the dirty water in a habitable area.
û Do not drive with the fresh water tank open.
û Do not stand on the brush head and squeegee.
û Do not park the machine on ramps or slopes.
û Do not place any objects on the battery while charging.
û DO NOT TAMPER WITH THE ELECTRICAL CIRCUITS.
û Do not open the electrical module cover.
û Do not adjust the drive motor controller.
û Do not clean the machine with a high pressure cleaning system.
û Do not abuse the machine beyond its operable limit.
û Do not mix brushes and use.
û Do not park the machine by exposing it to the natural elements.
û Do not use the machine to tow or push other equipments.
û Do not over fill the distilled water in the battery.
DO’S & DON’TS
RootsScrub RB 800/950
Page 29
29
Before using the machine
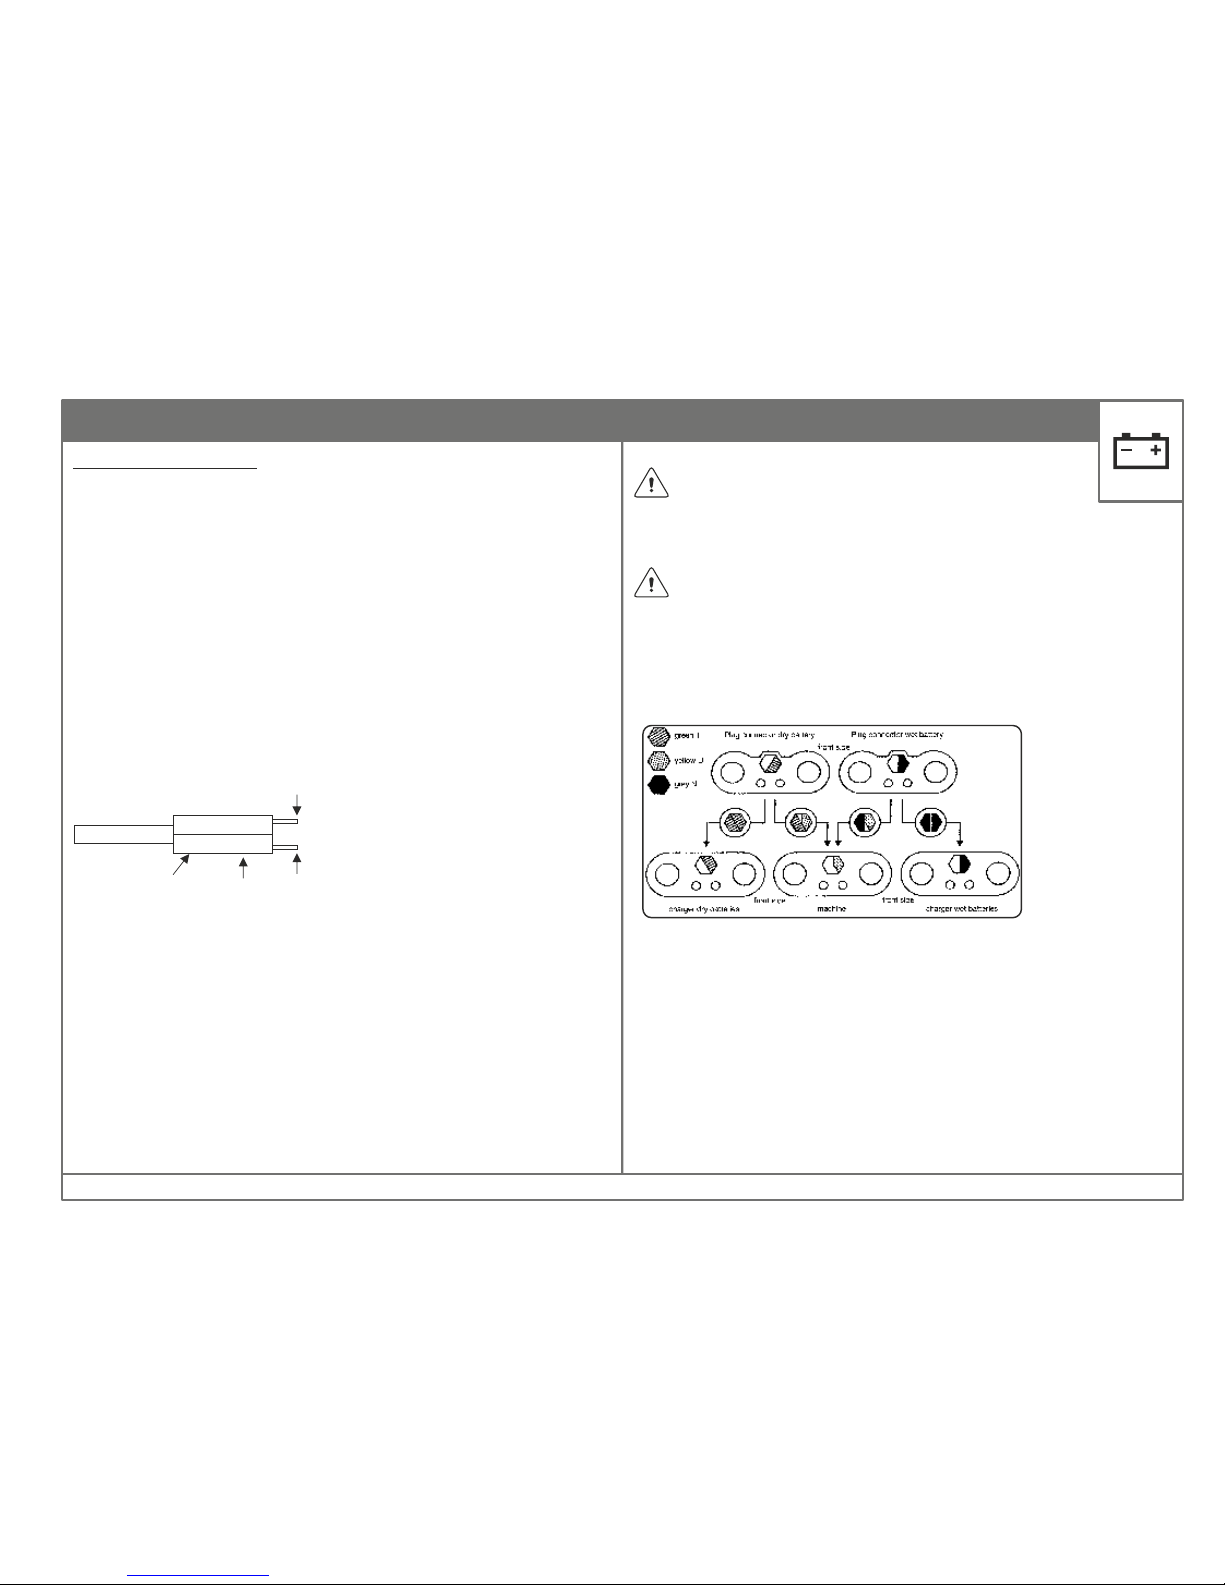
Battery plug coding
Plug case of charger units :
Grey for fluid-filled batteries, Green for maintenance-free Gel batteries
Plug case of machine :
Yellow for both battery types
Socket case of battery: Grey for fluid-filled batteries :
Green for maintenance-free
36 V
24 V
80 V
24 V
No mi na l p lu g v ol tag e i s
indicated on each side of the
hexagon (letters upside down)
I nd i c a ti o n f o r
no mi n al so ck et
voltage accordingly
Replace the coding plugs by pressing the ends together
with pliers.
All battery plugs at machines, batteries and battery charger units have to be
coded with the colored coding pins according to the battery type and the
charger unit plugs are/will be seteristic curve such that a modification of the
curve (in relation to the battery type) requires changing of the plug coding
nominal voltage.
Press together for removal
Insert coding plug such that the nominal voltage inscription is visible through
the case window. Socket and plug only with the same nominal voltage.
The following three conditions have to be met:
1) Voltage coding must be the same for all sockets and plugs.
2) Coding pin colour in the machine = yellow
3) Coding pin colour in the charger unit = the same as for the battery plug
according to battery type.
Open the seat console of the machine
before performing charging operations.
Before first operation of the machine, fully charge the battery with an
initial charging procedure and comply with the operating instructions
of the charger as well as with those of the battery manufacturer.
Roots cannot be held liable for damages resulting from the fact that
the initial charging has not or insufficiently been done.
Coding system in the charger unit for fluid-filled batteries
Example 24V Battery System
BATTERY SYSTEM
RootsScrub RB 800/950
Page 30
30
Charging Procedure For Traction Block Batteries
- Make sure to connect the charger to the specified voltage and
frequency.
- Ensure that the seat cover is completely open.
- Do not place any objects on the battery.
Charge the batteries in a well ventilated area.
Do not tamper with the charger settings.
- Drain both the tanks
- Move machine near charger location
- Switch Off Key
- Remove key
- Tilt operator seat forward completely
- Disconnect the battery plugs and connect them to the
charger supplied with the machine.
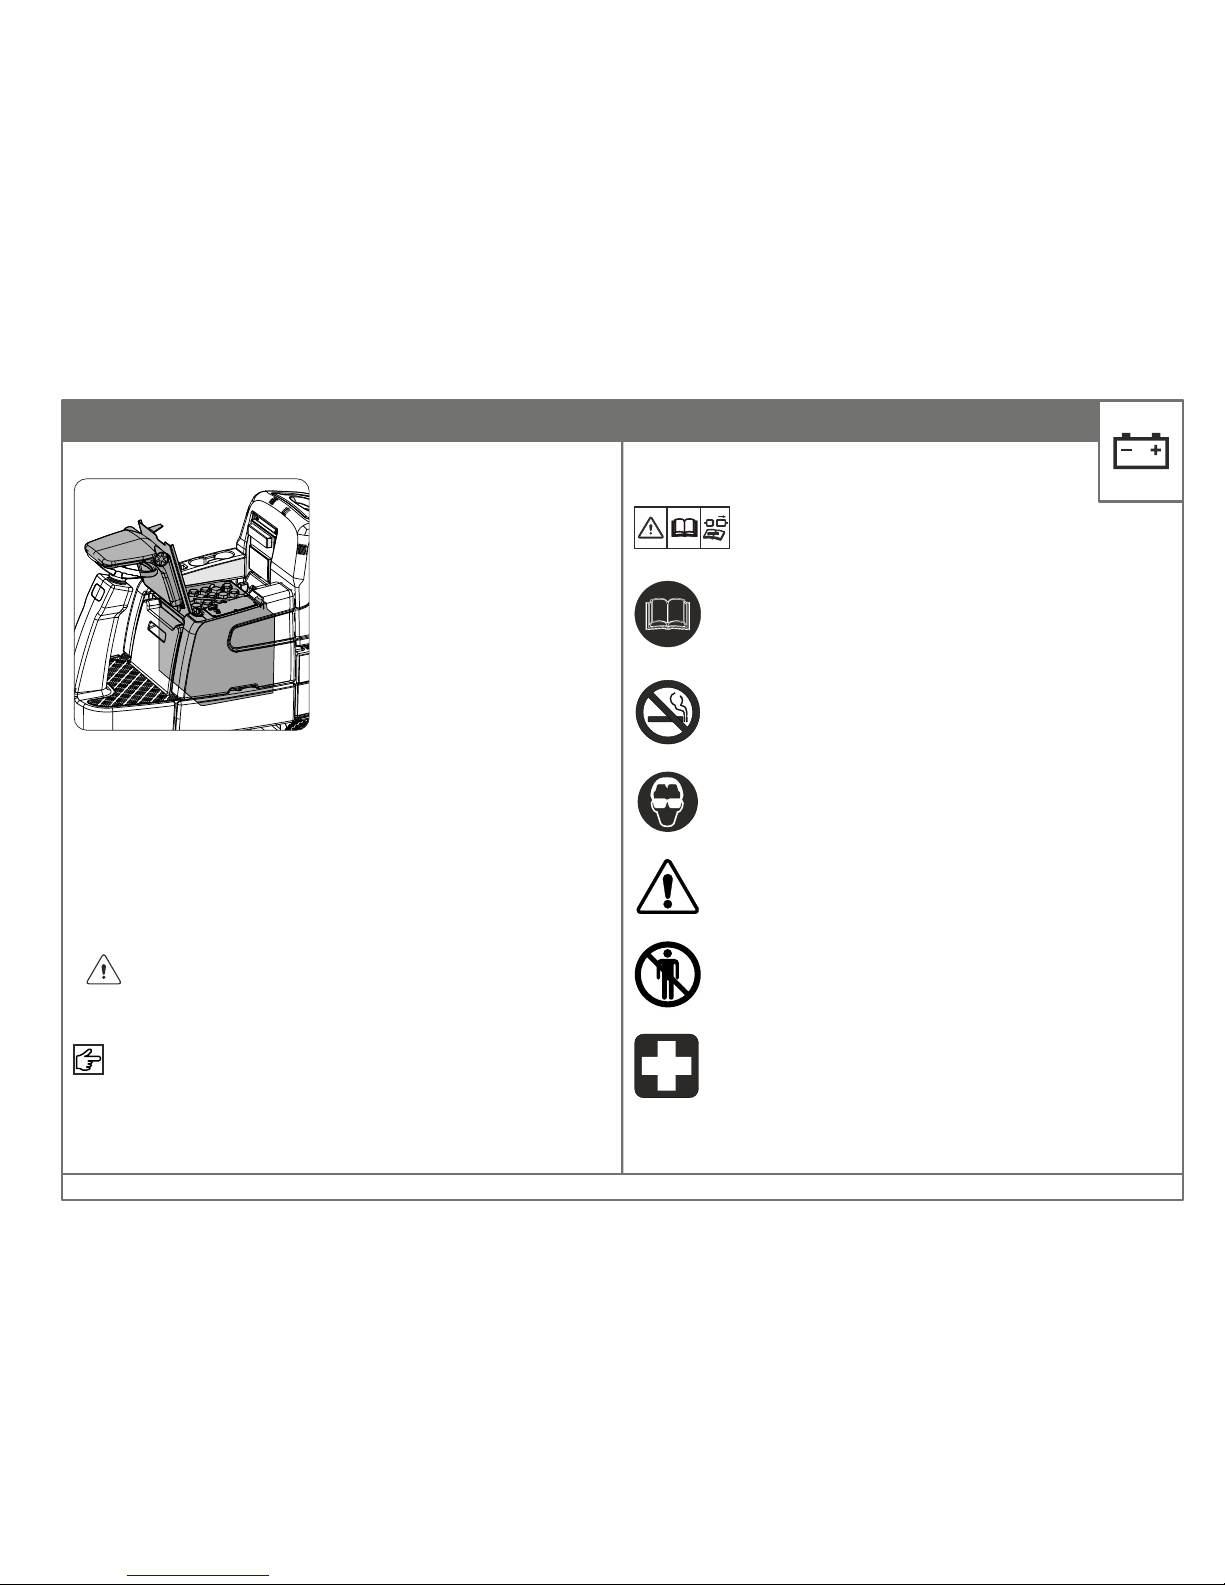
Safety Symbols For Traction Battery System
The above instructions have been established for
your safety and have to be strictly observed.
-Observe the instruction which
must be mounted clearly at the
charging point!
-No Smoking!
-No naked lights, embers or sparks
in the vicinity, risk of fire and explosion!
-Wear protective goggles and protective
clothing when working on the batteries!
-Do not tilt the battery!
-Only use certified hoisting and
transport equipment.
-Keep children away from batteries
-Any splashes of acid in the eyes or
on the skin must be rinsed throughly
with plenty of clear pure water.
-Then consult a doctor immediately!
BATTERY SYSTEM
RootsScrub RB 800/950
Page 31
31
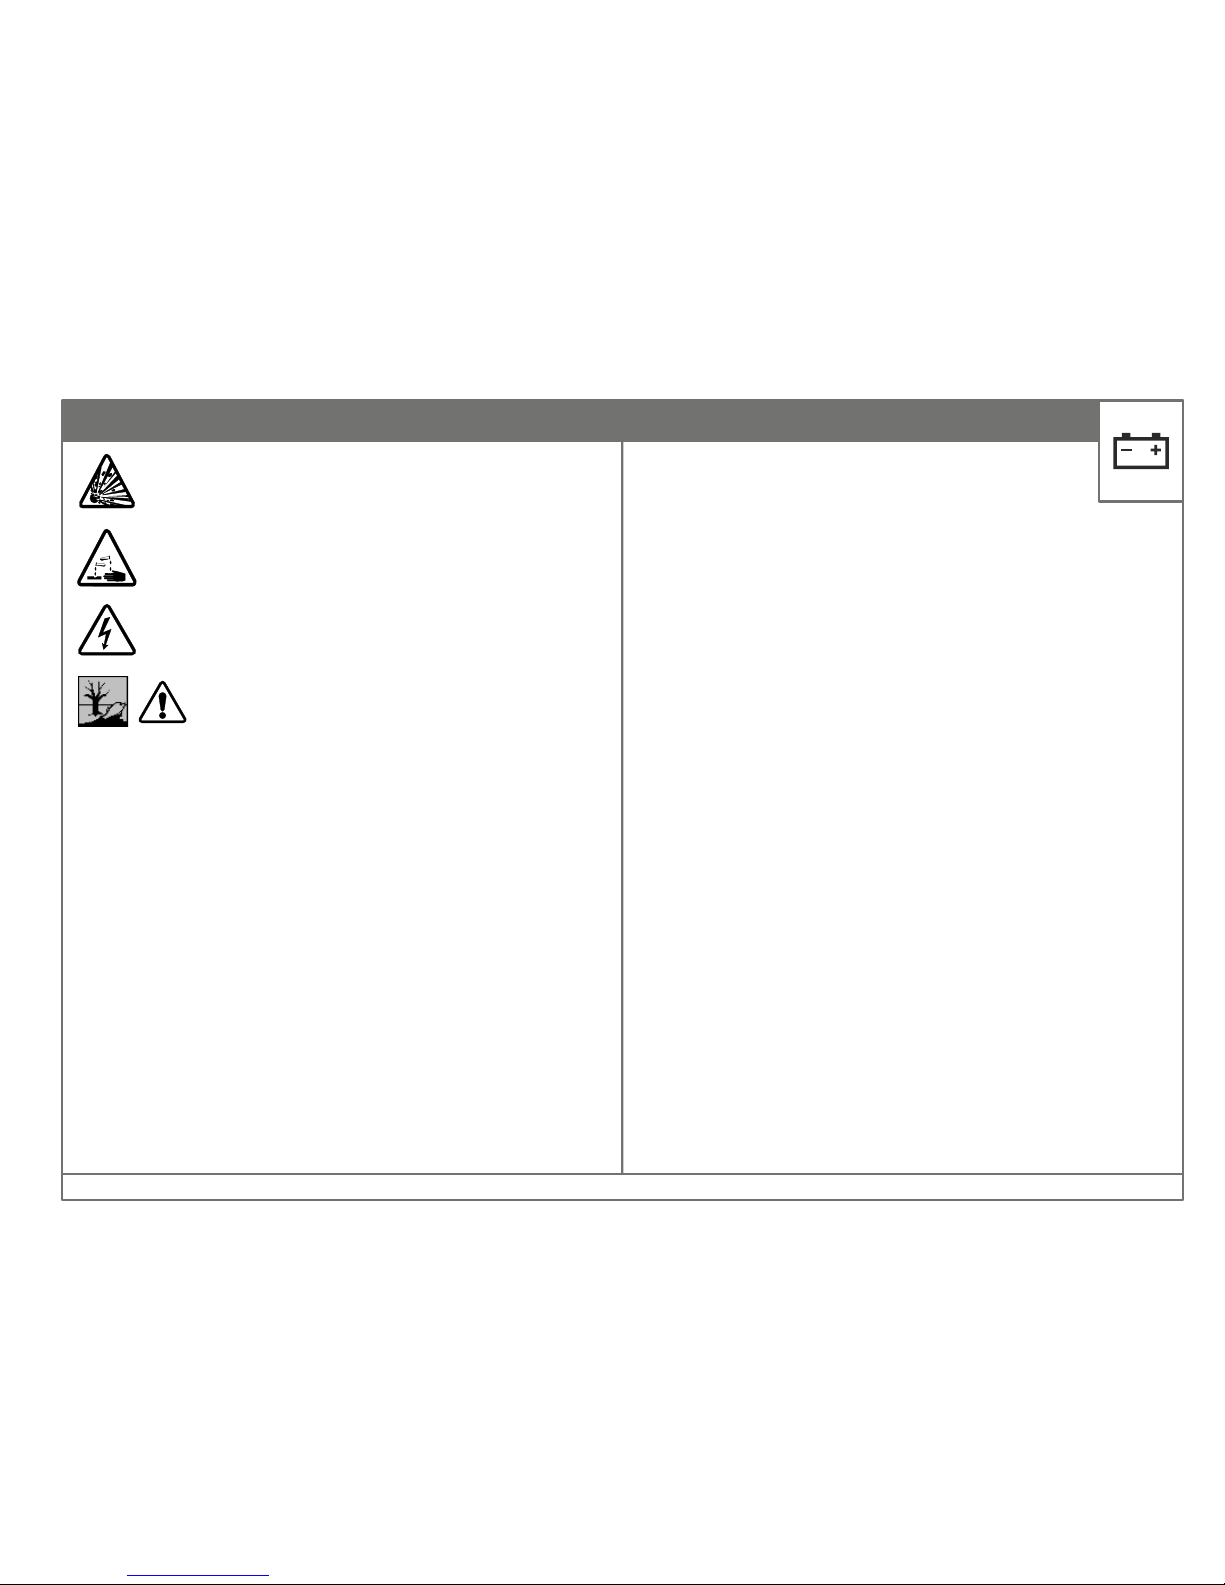
-Do not throw in garbage!
-Charge in a well-ventilated area
-Electrolyte is highly corrosive!
Traction Batteries (LA)
1. Initial Checking-
Check the battery to ensure that it is in perfect mechanical condition. All
screwed unions within the circuit must be tightened to ensure reliable
contacts. Machine cables and charging cable are to be connected to the
correct poles of the battery otherwise battery and charger can be damaged.
2. Discharging-
Ventilation openings may not be covered or closed. Electric connections (e.gplugs) may be connected or disconnected only when the machine is in off
condition. Discharge batteries must be recharged immediately and may not
remain in discharged condition. This also applies to only partially discharged
batteries.
The battery may only be connected up to the allocated battery charger
certified for the particular battery size, to avoid overload on the electric
current Maintenance Free Batteries have low gassing properties but are not
completely free of gassing. The battery is to be connected with the correct
poles (plus to plus and minus to minus) to the disconnected battery charger.
The battery charger should then be switched on.
During the recharging procedure, the temperature in the battery
increases by approx. 10 °C. For this reason, the recharging
procedure may not be started unless the temperature is below 35
°C.
Before recharging the battery, the temperature should be at least 15 °C,
otherwise the battery will not be correctly.
If the temperatures are constantly greater than 40 °C or lower than 15 °C,
temperature-dependent constant voltage regulation of the battery charger
will be necessary.
3. Temperature-
The battery temperature of 30 °C is rated temperature. Higher temperatures
shorten the service life and lower temperatures reduce available capacity. 45
°C (51 °C for AGM) is the limit temperature and is not tolerable as operating
temperature.
4. Electrolyte-
The electrolyte is sulphuric acid. The density of the electrolyte cannot be
measured. Use the recommended electrolyte to top up.
5. Maintenance-
Daily maintenance- Recharge the battery every time it has been discharged.
Weekly maintenance- Visual inspection after recharging for signs of dirt and
mechanical damage.
Maintenance to be carried out every three months
After fully recharging and following a standing period of at least 5 hours, the
following must be measured and Recorded: – total voltage / – individual
voltage
If noticeable changes are detected compared to previous measurements, or
differences between the cells or block batteries, the customer service should
be called for testing or repair.
- Risk of fire explosion, avoid short circuits!
- Caution! Metal components in the battery cells are always under
voltage, never place any foreign items or tools on the battery!
6. Care-
The battery must be kept clean and dry to prevent creeping current. Any liquid
in the battery container must be extracted and disposed of according to
regulations.
BATTERY SYSTEM
RootsScrub RB 800/950
Page 32
32
7. Storage-
If batteries are out of operation for longer periods, they should be stored in
fully charged state in a dry, frost free room.
In order to ensure that the battery is ready for operation at any time, it can be
recharged according to one of the following methods:
1. Full recharge every three months. When a consumer is connected up (e.g.
measuring or controlling devices), it may be necessary to recharge the battery
every two weeks.
2. Maintenance recharging at a recharging voltage of 2.25 V x number of cells.
The storage period is to be taken into account for the service life.
8. Faults-
The customer service should be called immediately when any faults are
discovered in battery or battery charger.
Lead Acid (LA) Battery Instructions
Ÿ Kindly ensure that the Warranty certificate of the battery is available at
your end.
Ÿ Kindly read the Do’s & Don't’s of the battery, understand and follow.
Ÿ Check the electrolyte level before charging and top it up with battery
grade distilled water if required.
Ÿ Match the battery to the correct charger.
Ÿ Keep the battery well ventilated while charging.
Ÿ Charge the battery immediately after it is discharged completely.
Ÿ Keep all inter cell connections and bolted terminals tight and covered
with petroleum jelly.
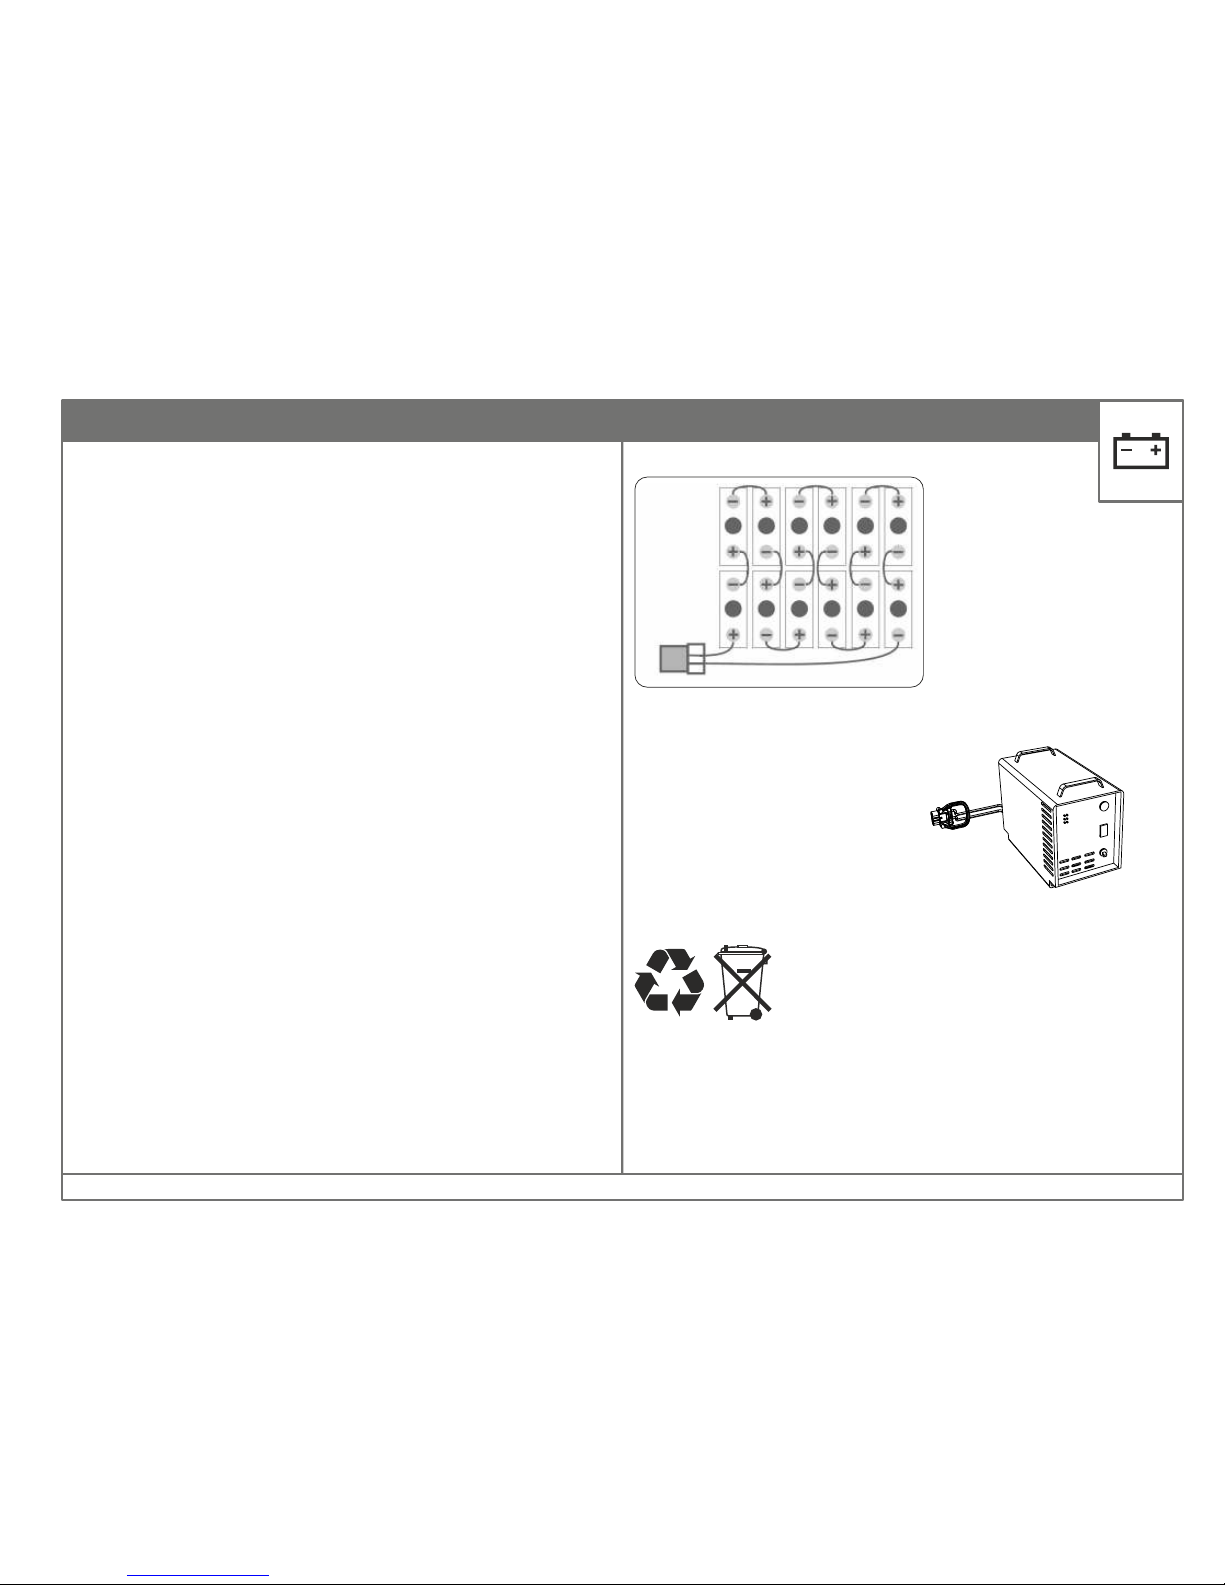
Battery Connection Diagram
Battery And Charger Specification
Battery:
Type: Traction block battery
Rating: 24V, DC, 200Ah, 240Ah, 320Ah
Charger:
Type: Off-board
Rating: 230V, AC, 50-60Hz, 30Amps
Disposal Of Batteries
Old batteries with this sign are recyclable economic goods and should be
brought back into the recycling process.
Old batteries which are not brought back into the recycling process, have to be
dealt with as dangerous materials under the observance of all regulations.
BATTERY SYSTEM
RootsScrub RB 800/950
Page 33

33
Page 34

34
Roots Multiclean Ltd.
R.K.G. Industrial Estate, Ganapathy, Coimbatore - 641 006, India.
Phone: +91 (422) 4330 330, E-mail: [email protected]
Web: rootsmulticlean.in,
Toll Free: 1800 41 99 77 9
 Loading...