

Page 1
1
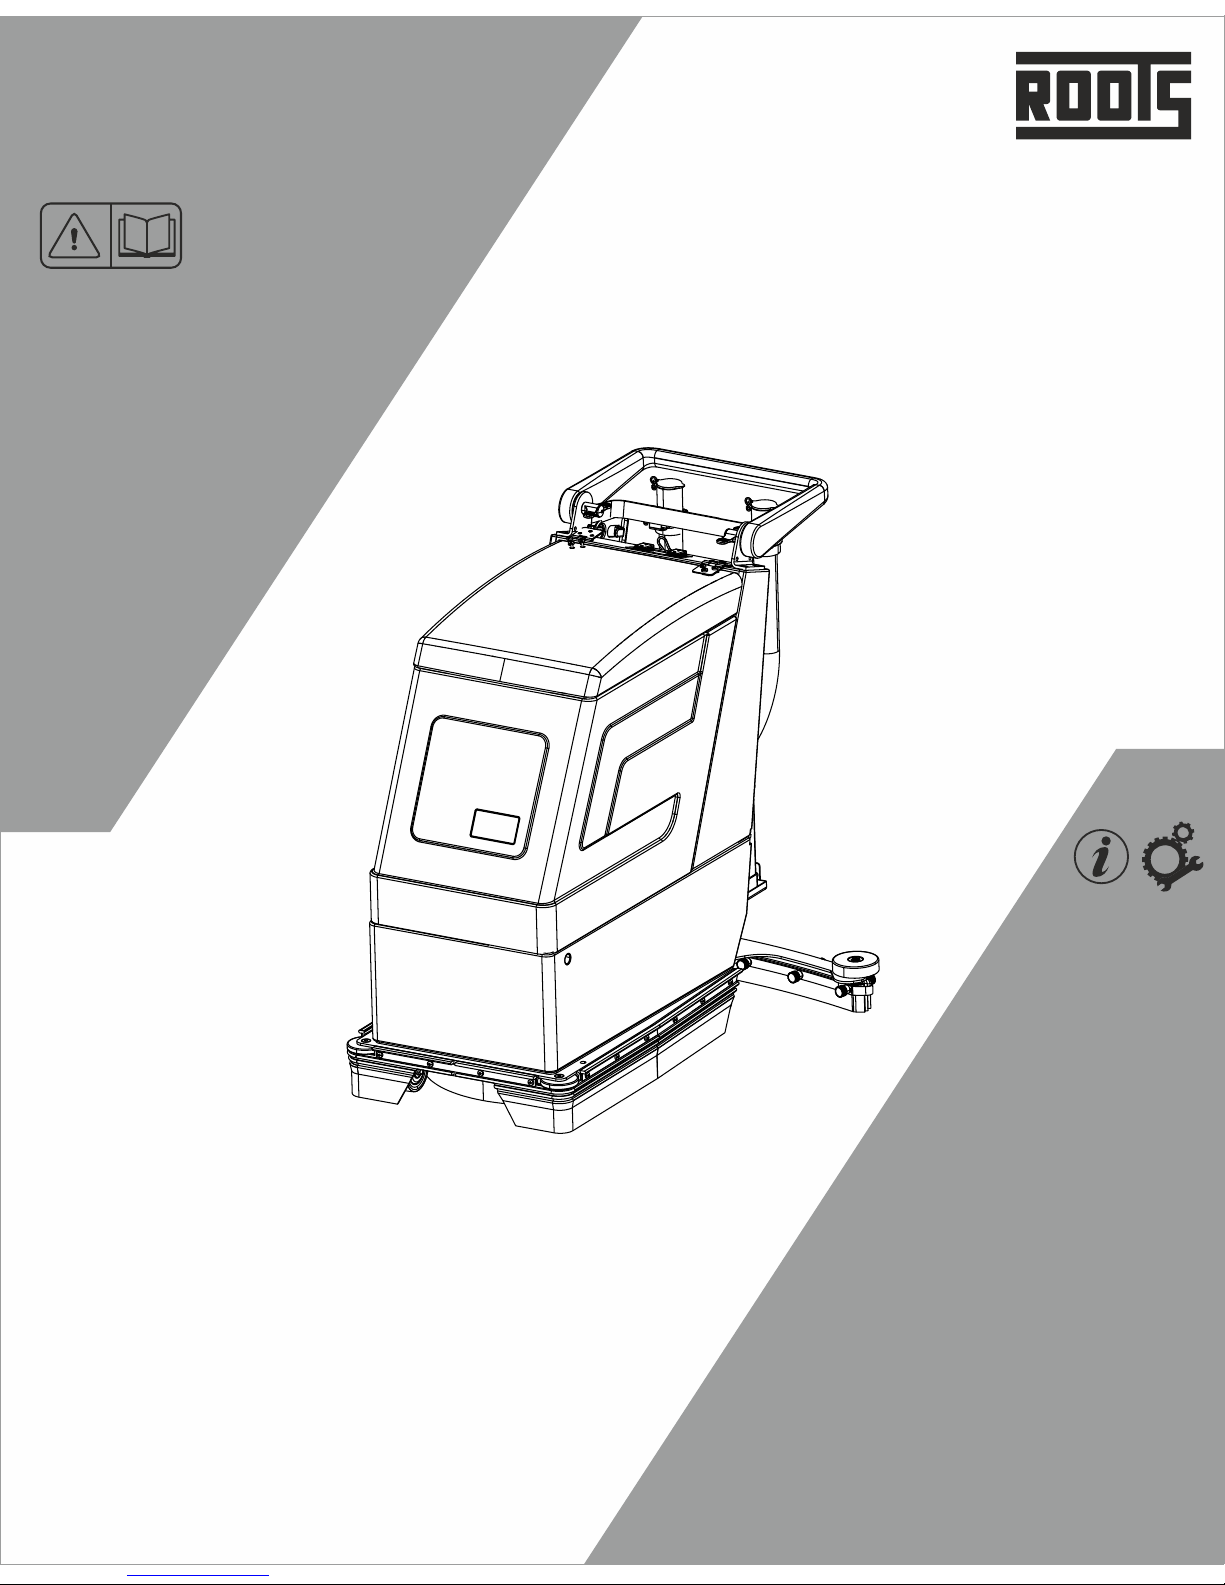
RootsScrub E430
Operator’s Manual
RootsScrub E430
Walk Behind Scrubber Drier
Electric
Read this manual completely and understand the
instructions before operating the machine.
“English Version”
230V/50Hz
Page 2

2
RootsScrub E430
Page 3
3
RootsScrub E430
Technical Specification
Introduction
Customer Support System
Safety Instructions
Initial Setup
Operating Brush
Operation Squeegee
Procedure For Scrubbing
Maintenance
4
5
6
7
11
13
14
15
17
P/N: 557320047-00, Rev: H, Date: 02/2018
Prepared by: KM-NPM TD Dept.
Roots Multiclean Ltd. (RMCL) is not liable for any legal claims that
may arise as a direct or indirect result of the contents of this
manual.
Roots Multiclean Ltd.
R.K.G. Industrial Estate, Ganapathy,
Coimbatore - 641 006, India.
IMPORTANT NOTE:
MACHINE DATA
Please fill at the time of installation for future reference:
Model No. - _______________________________
Serial No. - ________________________________
Accessories - ______________________________
Installation Date - ___________________________
TABLE OF CONTENTS
Page 4
4
RootsScrub E430
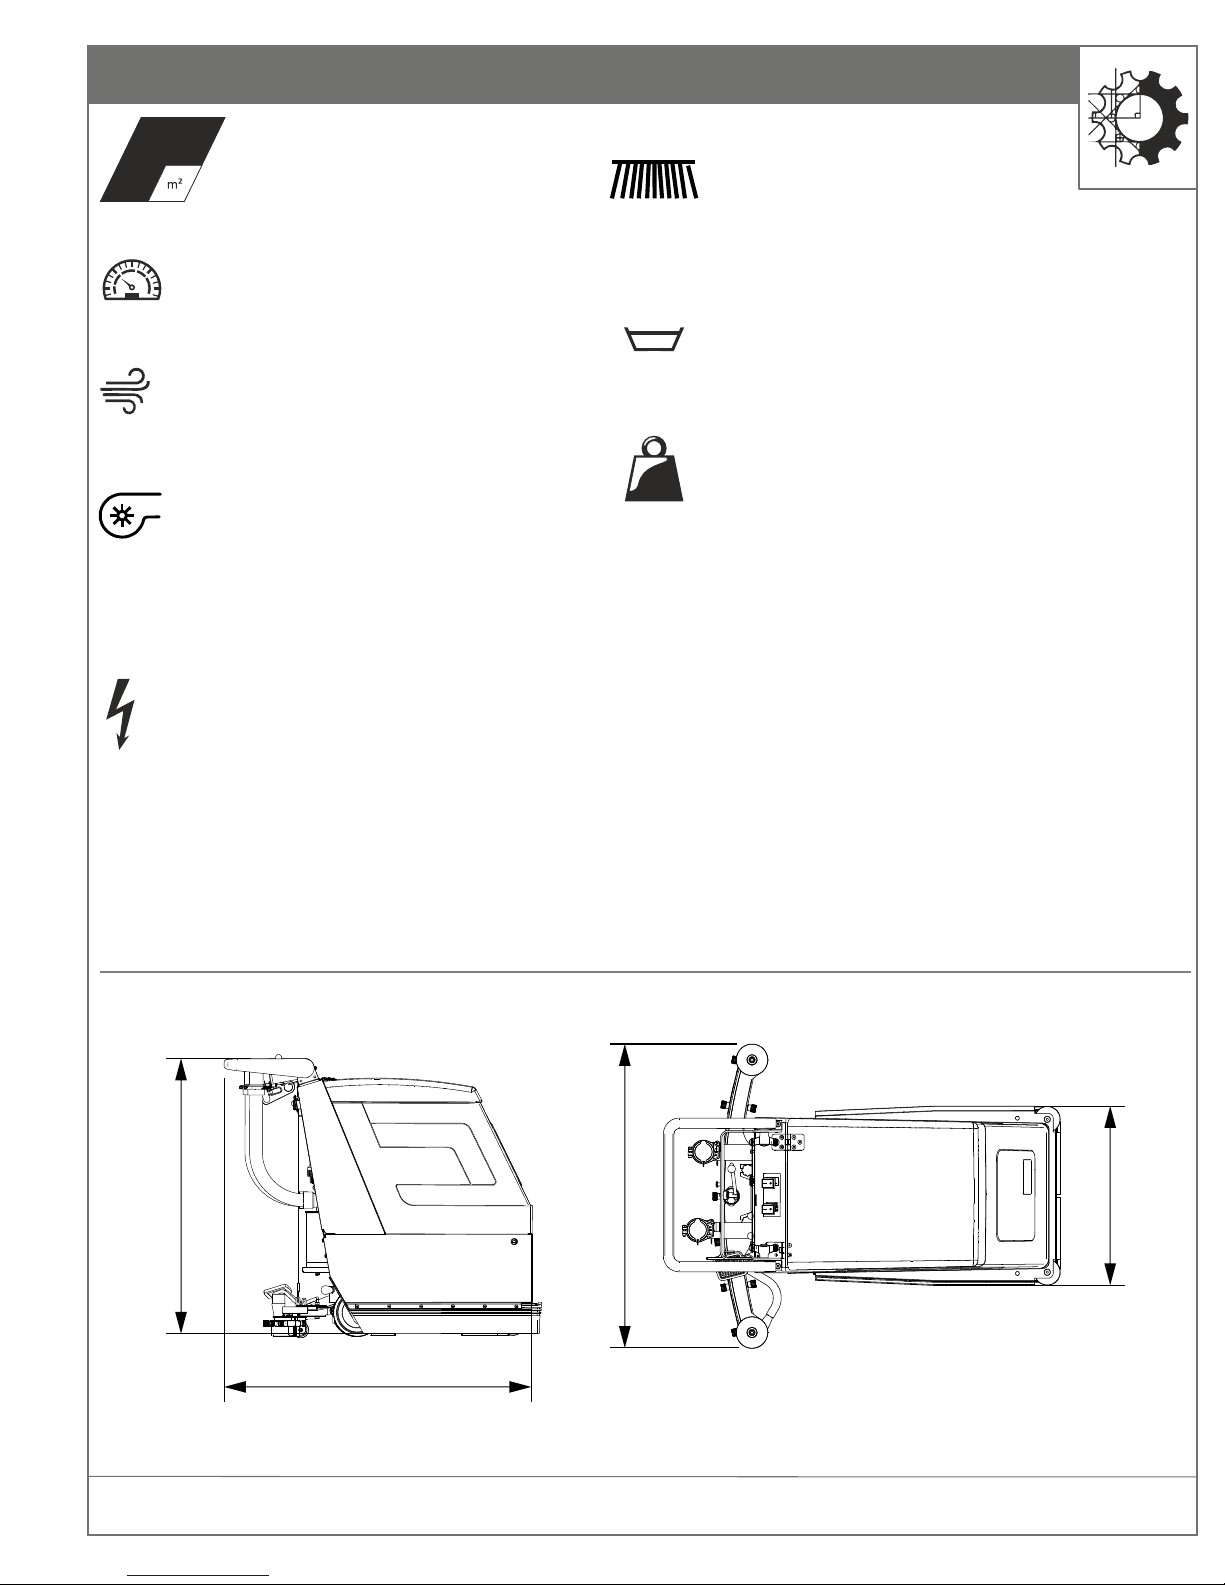
TECHNICAL SPECIFICATION
Rated voltage - 230 V
Frequency - 50 Hz
Brush motor power - 800 W
Vacuum motor power - 400 W
Total power (max) - 1200 W
Total weight, empty - 79 kg
Total weight, ready to operate - 100 kg
No. of brushes per machine - 1
Brush diameter - 430 mm
Brush speed - 280 rpm
Scrubbing width - 430 mm
Brush load - 22 kg
Fresh water tank - 22 L
Dirty water tank - 22 L
Vacuum pressure, max. - 1206 mm of H₂O
Effective suction width - 750 mm
1700 m²/h
Working speed, upto - 4 km/h
Airflow rate - 28 L/sec
750 mm
870 mm
1000 mm
450 mm
Page 5

5
RootsScrub E430
PREFACE
Dear Customer,
We are pleased with your having chosen the RootsScrub E430
machine for your floor cleaning requirements. Backed by our
industry expertise that spans across decades, we assure you that
the machine comes with our Roots promise of quality, efficiency
and performance.
We advise you to carefully read through the instructions prior to
the operation of the machine. This manual contains detailed
instructions for the proper operation of the machine, along with
important i n f o r m a t i o n regarding i t s handl i n g , care,
maintenance and service needs.
We are sure that you will find the machine and its performance
to your utmost satisfaction. Once again, we thank you for
choosing Roots Multiclean Ltd. (RMCL) as a trusted partner for
your cleaning requirements and solutions.
USAGE, HANDLING AND MODIFICATIONS
Use of the product beyond the specified scope of functioning is
deemed improper and the manufacturer cannot be held liable
for any damages which may arise due to this.
This machine may be used only by persons who are trained or
are familiar with the machine and are aware of the possible
hazards involved. The appropriate Accident Prevention
Regulations as well as applicable general regulations pertaining
to Safety and Health at the work place must be adhered to by the
user.
Modifications made to machine without the manufacturer's
consent will relieve the manufacturer of responsibility and any
possible liability for consequential damage.
NOTES ON DOMESTIC WARRANTY
Please refer to the Limited Warranty card supplied along with
the machine for additional information. This Warranty Policy is
applicable only for the product sold within India.
If the product requires repair or maintenance work to be
performed, please ensure that you get the machine serviced
from an authorised service center or dealer of RMCL to ensure
that the warranty is not void.
ACCEPTANCE OF THE MACHINE
On arrival of the machine at the shipping address,
please check for any damage that may have
occurred as a result of transit. In the event of any such damage,
the purchaser is bound by responsibility to send a claim letter to
the concerned authorized branch/dealer with a copy of the
invoice. The letter should be sent within 24 hours of receipt of the
machine.
THE MANUAL
Al l informatio n contained is wi thou t obligation. R MCL
particularly reserves the right to modify any equipment,
technical specifications, colours, shapes, materials and the like so
as to adapt them to local conditions all without previous
announcement and without giving reasons. RMCL may stop
manufacturing certain models without previous notice.
The Operator’s Manual corresponds to the latest information
available for this machine at the time it was printed. Minor
deviations resulting from enhancements of the design cannot be
entirely represented.
The Operator’s Manual is an integral part of the machine and
must not be misplaced.
RMCL reserves the right to change the product or contents of this
manual without prior information.
For Battery, Motors, Engines and other OEM components related
kindly refer to their manufacturers manual supplied along with
the machine for instructions regarding usage, maintenance and
service.
NOTE: Illustrations shown in this manual are for representative
purpose only. Actual product may vary.
INTRODUCTION
Page 6
6
RootsScrub E430
CUSTOMER SUPPORT SYSTEM (CSS)
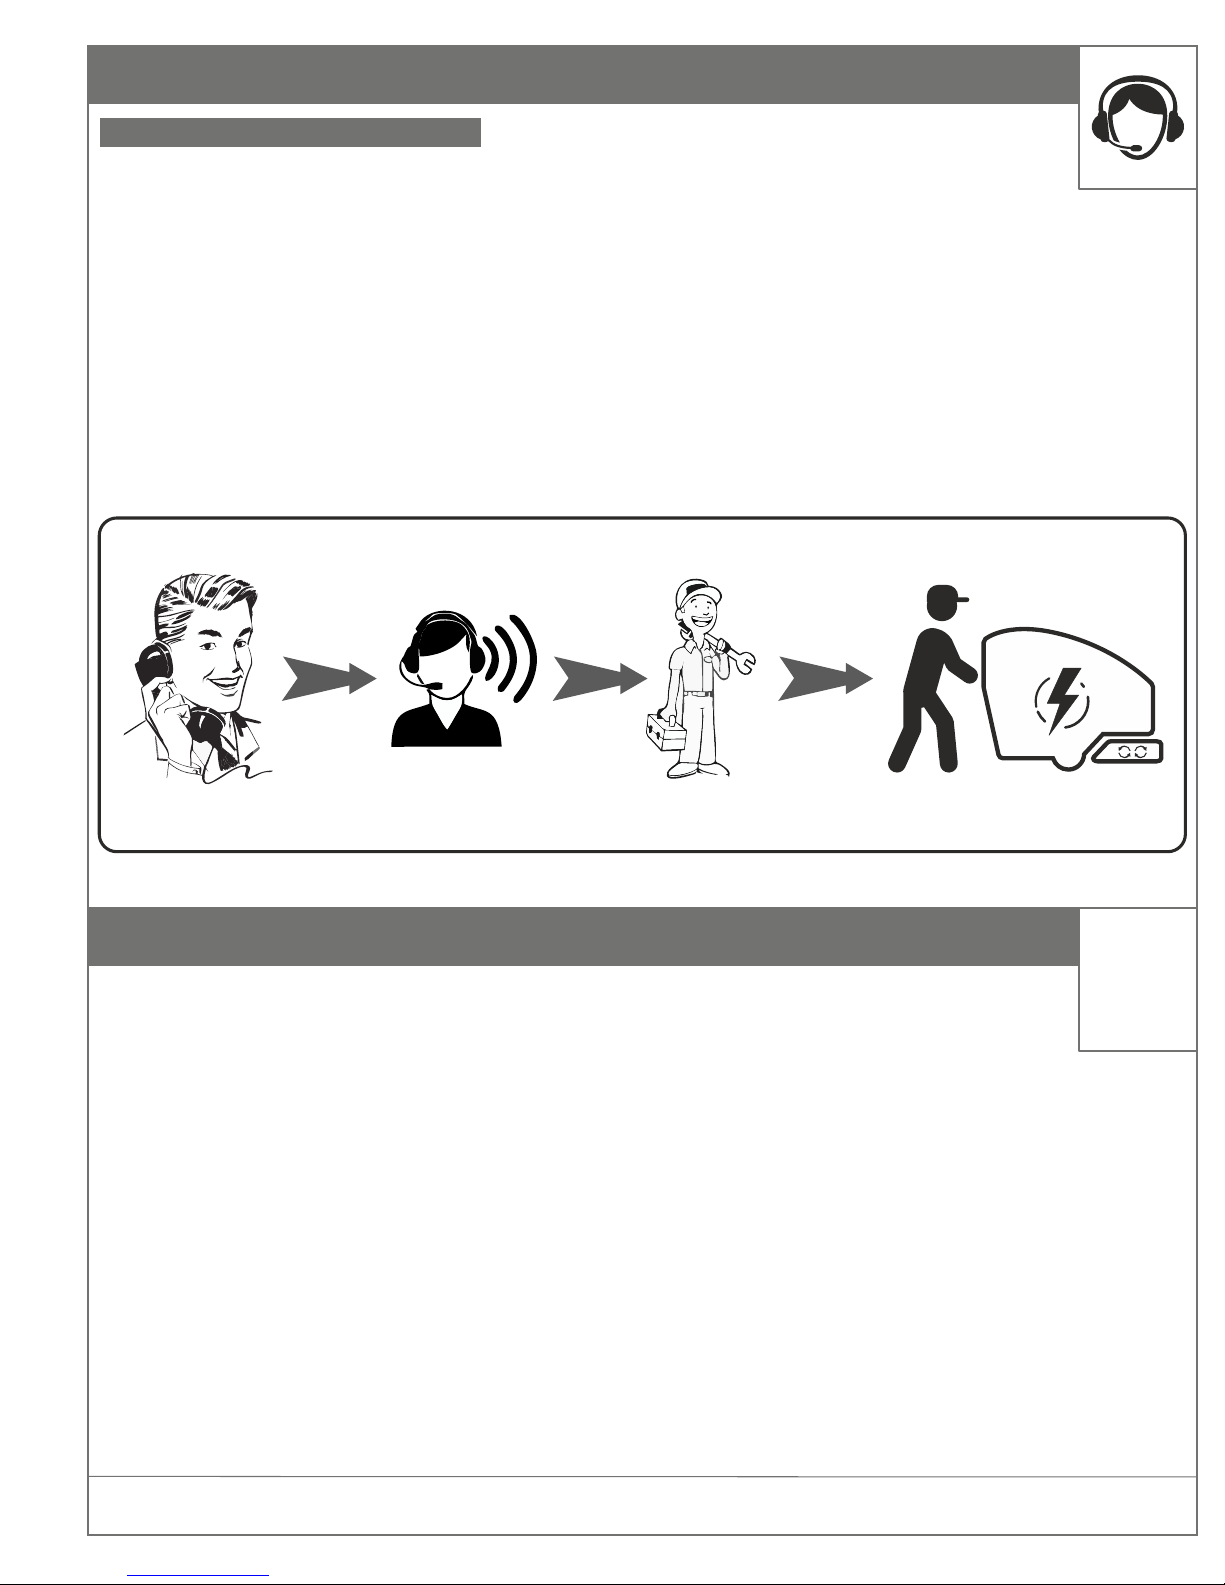
RMCL has a dedicated CSS Team to ensure prompt after sales service support. One call solution
for all your complaints/concerns. Register your complaint or concern through the below toll
free number for hassle free support. The customer support executive registers your
complaint/concern and will keep you updated on the progress ensuring prompt closure.
Toll Free Number:
1800 41 99 77 9
Our timings (Monday to Saturday):
8:00 am to 7:00 pm
CUSTOMER SUPPORT SYSTEM
ANNUAL MAINTENANCE CONTRACT
Customer Support System Process
Customer
CSS Executive
Engineer
Site Location
AMC or Annual Maintenance Contract is a professional and timely maintenance cover offered by
RMCL to its customers. AMC takes care of scheduled and preventive maintenance services.
Equipment under AMC qualifies for agreed scheduled visits during the contract.
Advantages of AMC:
þ
Pan India network presence.
þ
Maximum equipment uptime.
þ
Focus on your business while we take care of your equipment.
þ
Well trained engineers to take care of the equipment.
þ
System driven scheduled periodic maintenance.
þ
Genuine spare parts.
þ
Toll free number assistance for breakdown.
AMC
Page 7
7
RootsScrub E430
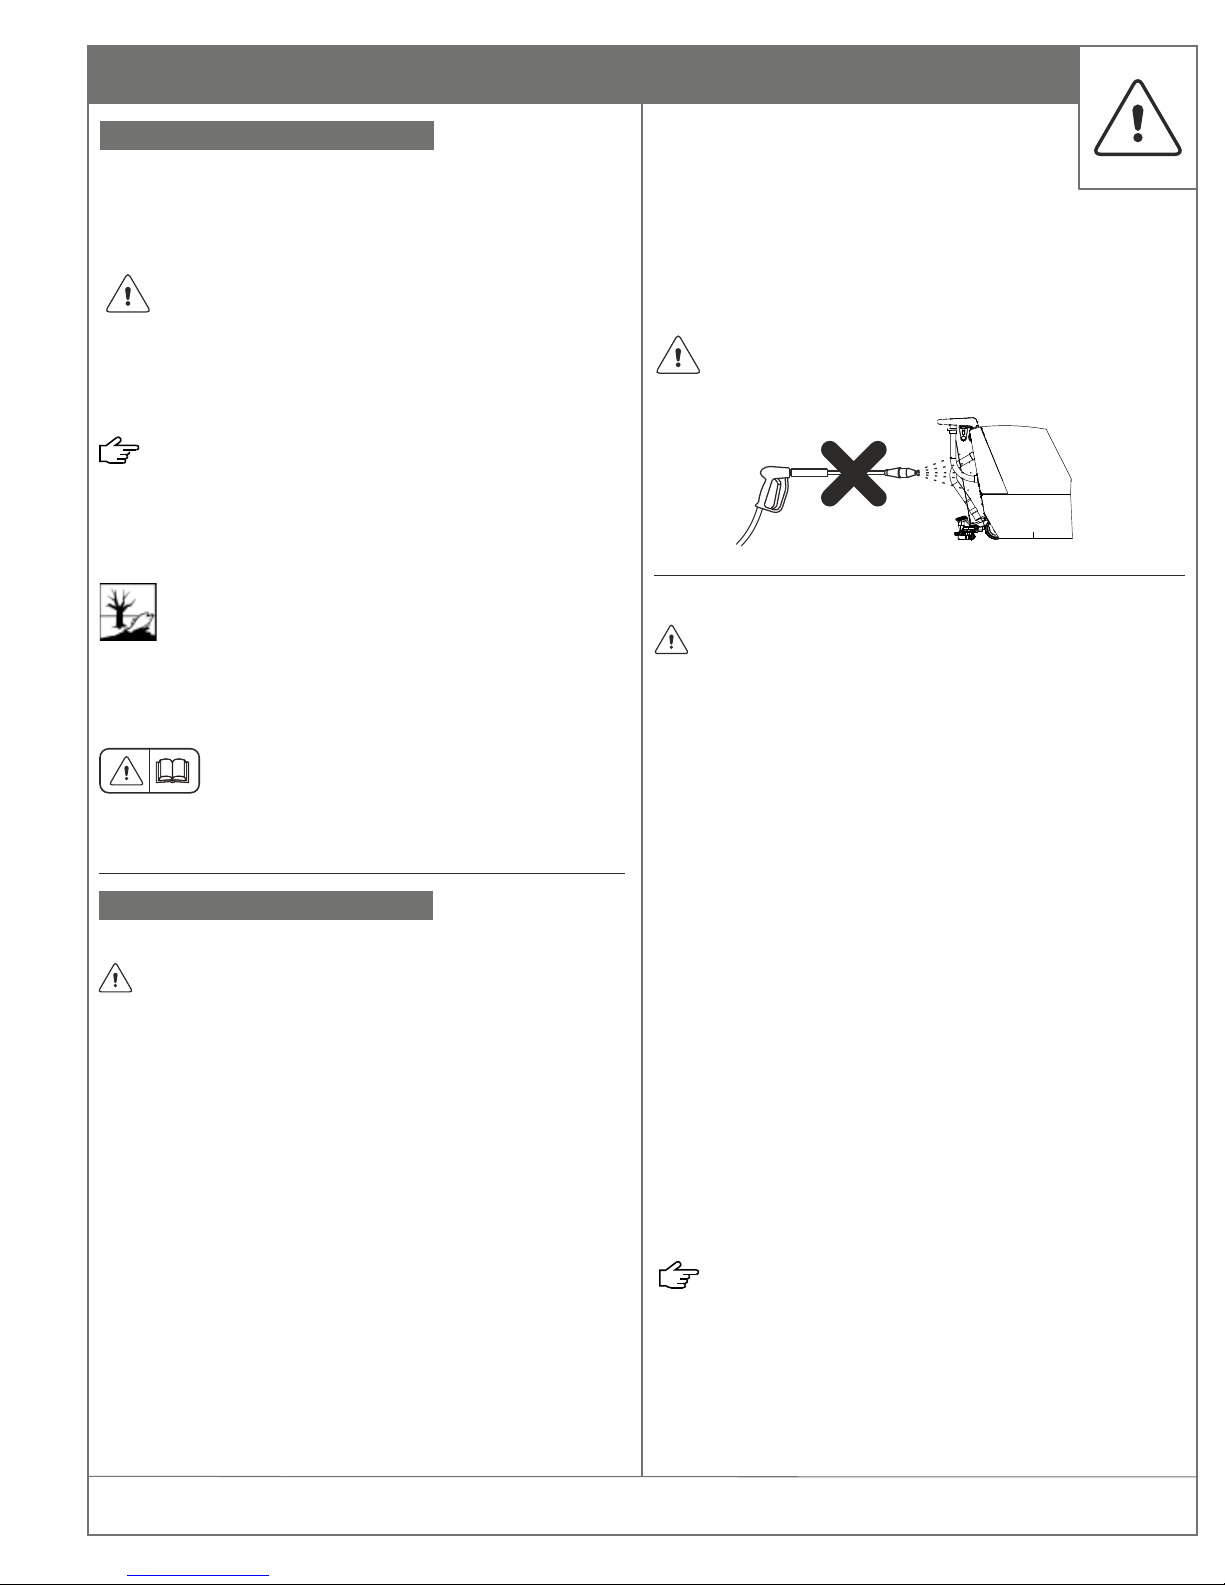
All paragraphs in this manual referring to you personal safety,
the safety of your machine and the environmental protection
are attributed one of the following warning symbols:
Safety provisions in dangerous situation caused by misuse
inaccurate adherence of instruction or prescribed work routine.
Safety Provisions (persons and goods)
Due to use of substances representing an inherent danger to
health of environment.
Ecological Hazard (the environment)
Prior to first operation, read the manual carefully and strictly
comply with the instructions contained.
Read Manual
Important information on handling the machine in order to
maintain operability.
Caution (the machine)
SAFETY & WARNING SYMBOLS
SAFETY INSTRUCTIONS
Electrical Power Connection Safety Instructions:
DANGER
= The voltage indicated on the name plate must correspond to
the voltage of the electrical source.
= Wh ile working wi th fluids (such as deterge nts) , we
recommend the use of a safe socket with over current
protection.
= Please use the mains cable authorized by the manufacturer;
the same is also applicable when you replace the internal
cables.
= Check the power cord with mains plug for damage before
every use. If the power cord is damaged, please arrange
immediately for the exchange by an authorized customer
service or a skilled electrician.
= Never touch the mains plug with WET hands.
= Make sure that the power cord or extension cables are not
damaged by running over, pinching, dragging or similar.
Protect the cable from heat, oil, and sharp edges.
= If couplings of the power cord or extension cable are damaged
replace the splash protection and the mechanical tightness
must be ensured.
= The power cord must be checked regularly for
damages, such as cracks or aging. If damage is
found, the cable must be replaced before
further use.
Application Safety Instructions:
DANGER
DO NOT CLEAN THE MACHINE WITH A WATER HOSE OR
HIGH-PRESSURE WATER JET (DANGER OF SHORT
CIRCUITS OR DAMAGE TO MACHINE).
= The water level indication hose must be cleaned regularly and
checked for signs of damage.
= Never scrub or vacuum up explosive liquids, combustible
gases, explosive dusts as well as undiluted acids and solvents!
This includes petrol, paint thinner or heating oil which can
generate explosive fumes or mixtures upon contact with the
suction air. Acetone, undiluted acids and solvents must also be
avoided as they can harm the materials on the machine.
= Do not scrub or vacuum up any burning or glowing objects.
= Do not use this machine as a vacuum cleaner.
= Humans and animals must not be scrubbed/vacuumed with
this machine.
= Only use chemicals recommended by the manufacturer and
comply with their application, disposal a nd warning
guidelines.
= Do not use the recommended detergents in an undiluted state.
The products are safe for operations as they do not contain
any acids, alkalis or environment hazardous substances. We
recommend to keep the detergents out of reach of children. If
the detergent comes in contact with the eyes, please rinse the
eyes thoroughly with water, consult a doctor immediately if
the detergent has been swallowed.
= This machine is not suitable for vacuuming dust. This
endangers health.
= Please follow the regulations for disposing off dirty water.
= This machine is not a vacuum cleaner! Never suck in more fluid
than what has been sprayed. Do not use to suck in dry dust!
= This machine must be used only on indoors only.
CAUTION
SAFETY INSTRUCTIONS
Page 8
8
RootsScrub E430
= machine operatorThe operator must use the properly. The
must consider the local conditions and must pay attention to
third parties, in particular with children, when working with
the .machine
= Always use appropriate gloves while working on the
machine.
= machineThe may only be used by persons who have been
instructed in handlin g the or ha ve proven machine
qualification and expertise in operating the or have machine
been explicitly assigned the task of handling the .machine
= machineThe must not be operated by children or persons
who have not been instructed accordingly.
= This machine is not intended for use by persons (including
ch ildr en) wit h reduced physical, sen sory or mental
capabilities, or lack of experience and knowledge.
= Children should be supervised to prevent them from playing
with the .machine
= machineTurn off the immediately in case of leaks.
= machineCaution! Switch the off immediately in case foam or
liquid escape!
= Do not open the hood/guards when the motor is running.
= The brush motor should be shut off and the brush head must
be raised.
= All water systems must be shut off to prevent water
spill/wastage
= Accessories if attached must be disconnected.
= Switch off the power prior to performing any cleaning or
maintenance tasks on the machine, replacing parts or
switching over to another function. In the case of mains
operated machines, remove the mains plug.
= Maintenance work may be carried out only by approved
customer service outlets or experts in this field who are
familiar with the respective safety regulations.
= Please observe the local safety regulations regarding
portable commercially used machines.
Only use accessories and spare parts which have been approved
by the manufacturer. The exclusive use of original accessories and
original spare parts ensures that the appliance can be operated
safely and trouble free.
= Use only brushes that are provided with the machine or
specified in the Operations Manual. The use of other brushes
can affect the safety of the machine.
= Please keep in mind that the power cord or extension cable can
be damaged when run over while operating the cleaning head
with rotating brushes.
Operation Safety Instructions:
Transport Safety Instructions:
Maintenance Safety Instructions:
Spare Parts & Accessories:
Equipments With Rotating Brushes:
Safety Gear:
DANGER
WARNING
WARNING
WARNING
DANGER
As necessary
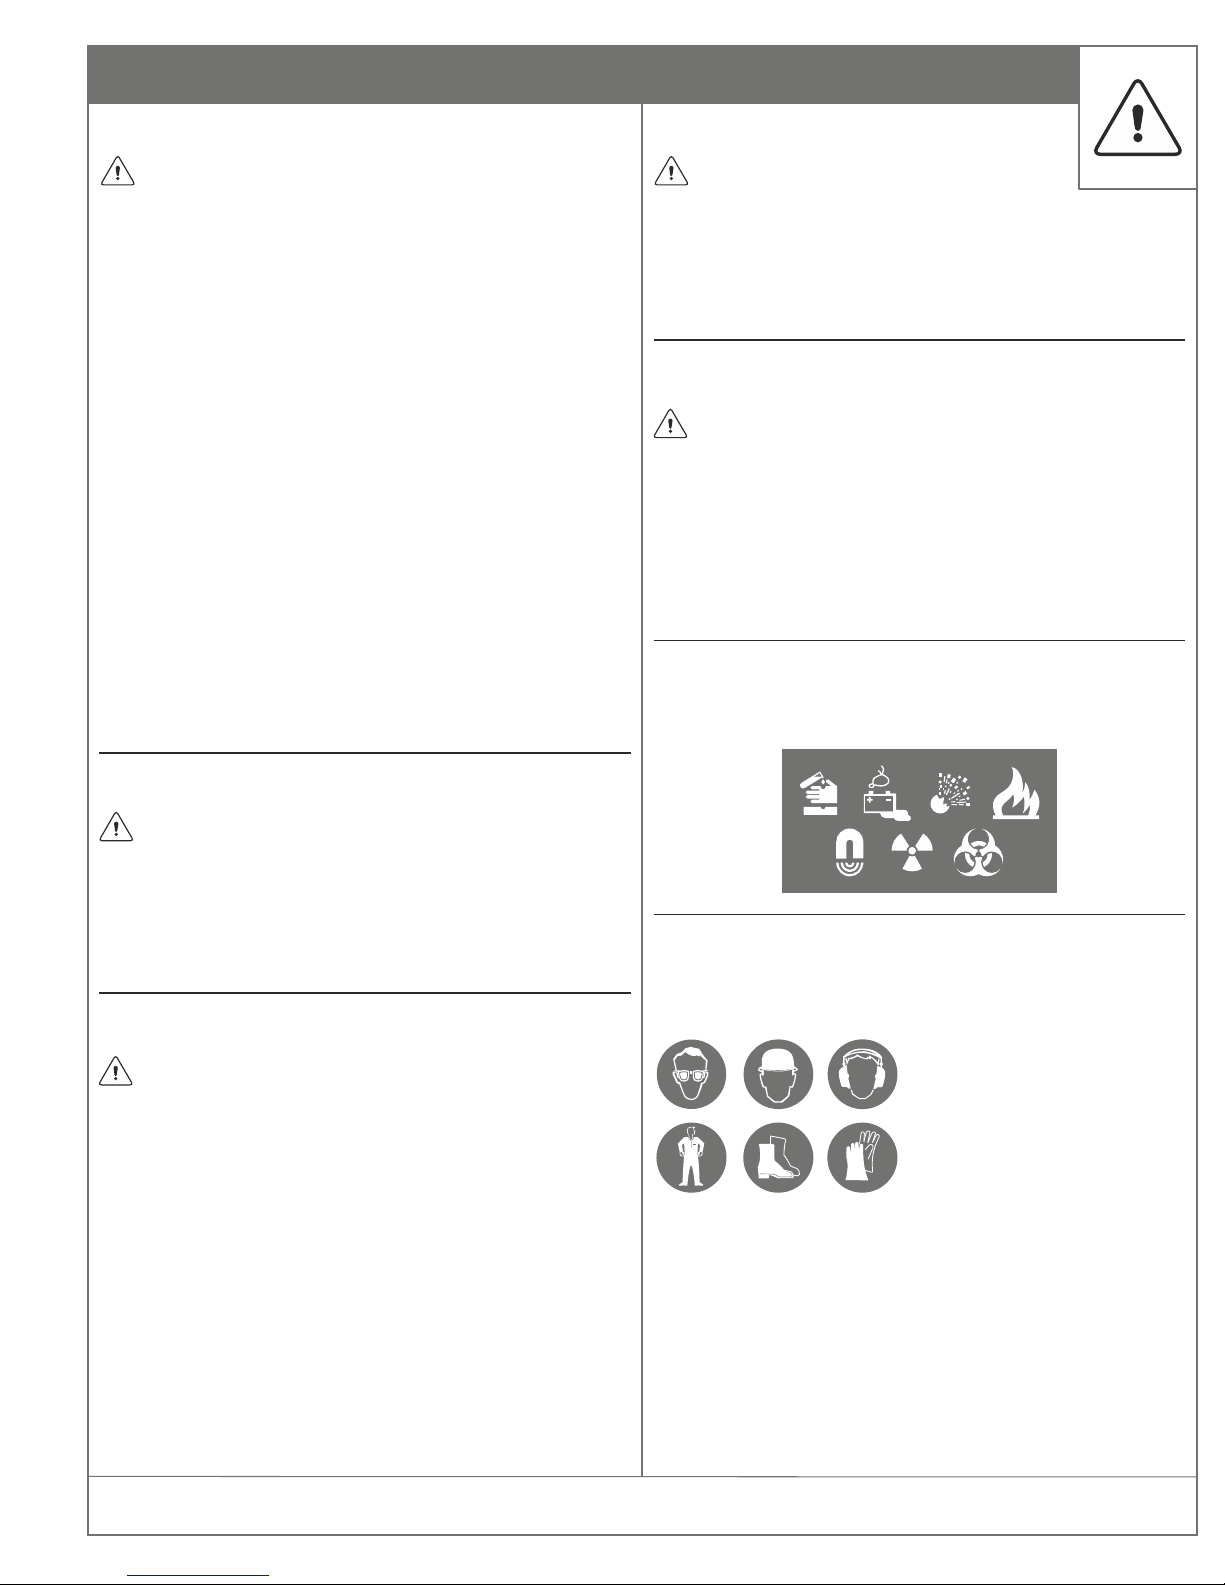
DANGER - Do Not Scrub Or Vacuum:
Corrosive/Battery Fluids/Explosive/Flammable/
Magnetic/Radio-active/Biohazard Materials.
SAFETY INSTRUCTIONS
Page 9
9
RootsScrub E430
Handling of line cords
Ÿ Make sure that the line cords are not damaged by running
over, squeezing, dragging , etc.
Ÿ The line cords must be checked regularly with regard to
damage and aging.
Ÿ The machine must not be used unless the line cords are in
proper condition.
Ÿ Use only o riginal extensio n cables, wi th max imum
admissible length of 25 m.
Ÿ When using or replacing line cords, it is necessary to adhere
to as specified by the manufacturer.
Ÿ When replacing coupler plugs of line cords or connecting
leads, splash-proof protection and mechanical strength
must be guaranteed.
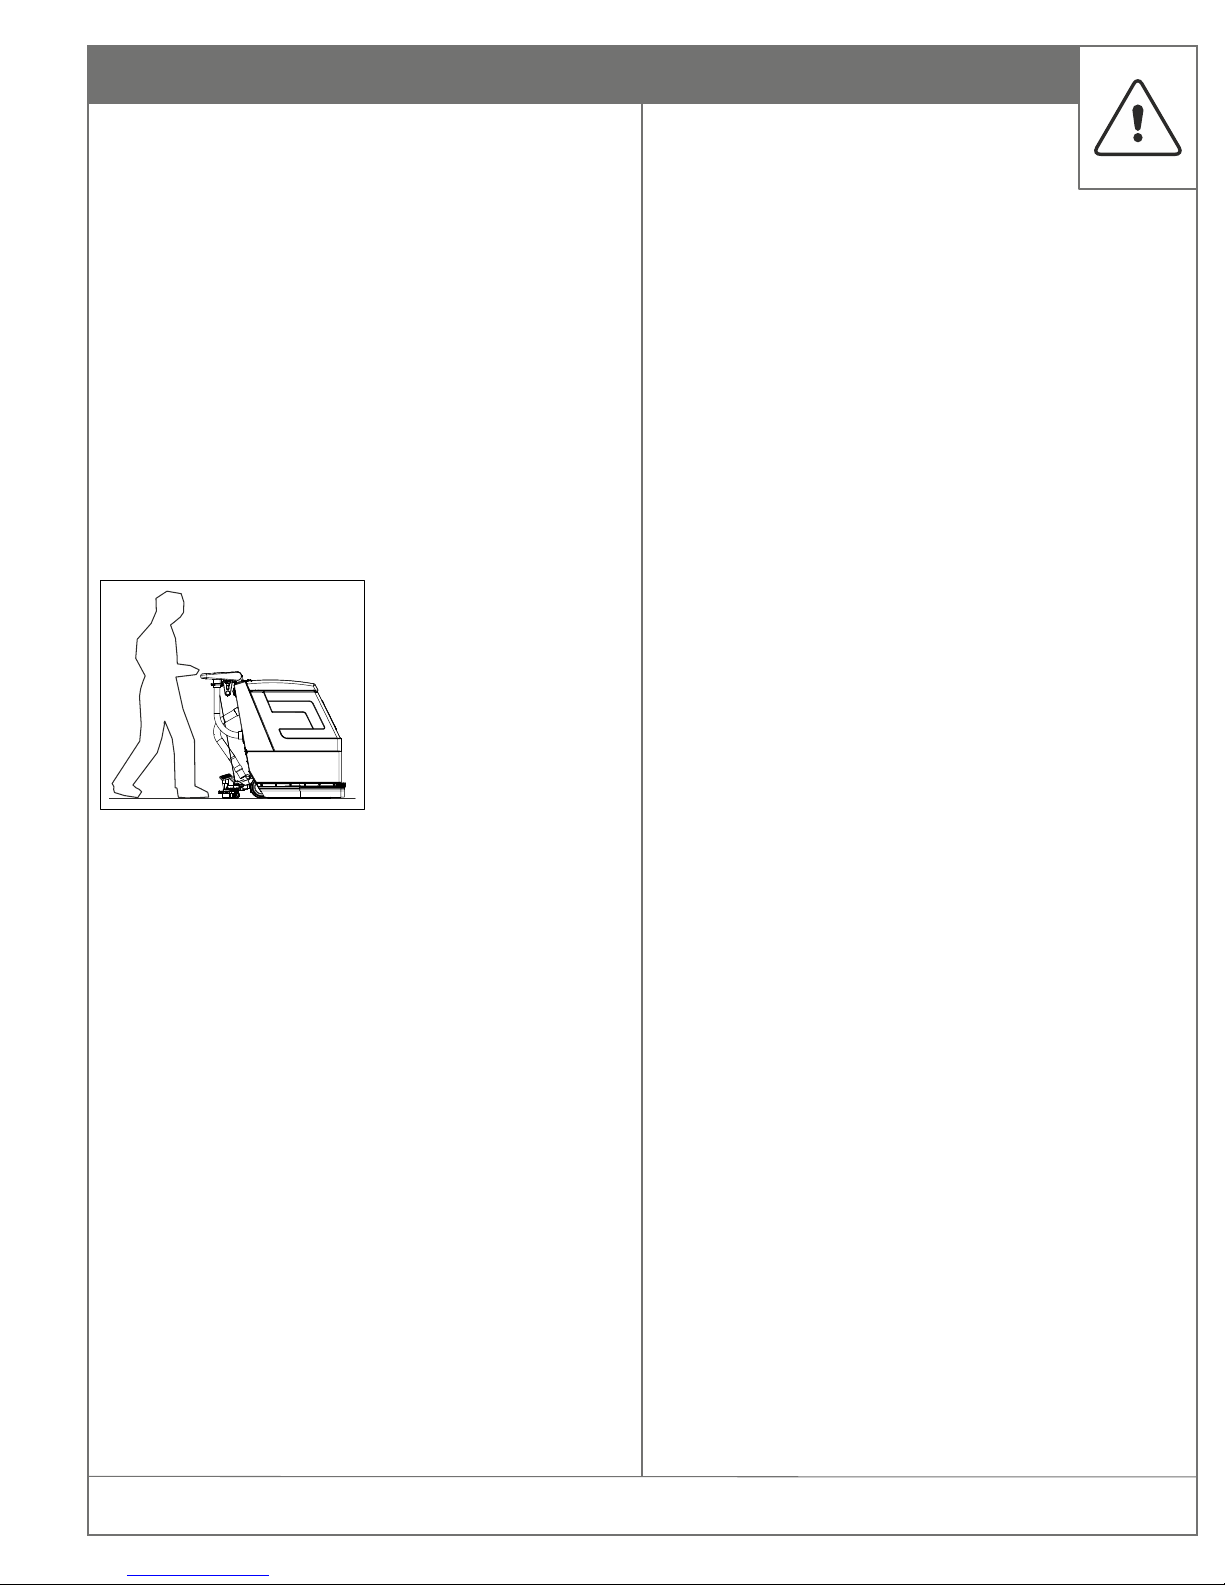
For easy transportation of the machine, it is recommended to lift
up the brush head and squeegee as represented, prior to
transportation of the machine .
Transport
SAFETY INSTRUCTIONS
Page 10
10
RootsScrub E430
SAFETY INSTRUCTIONS
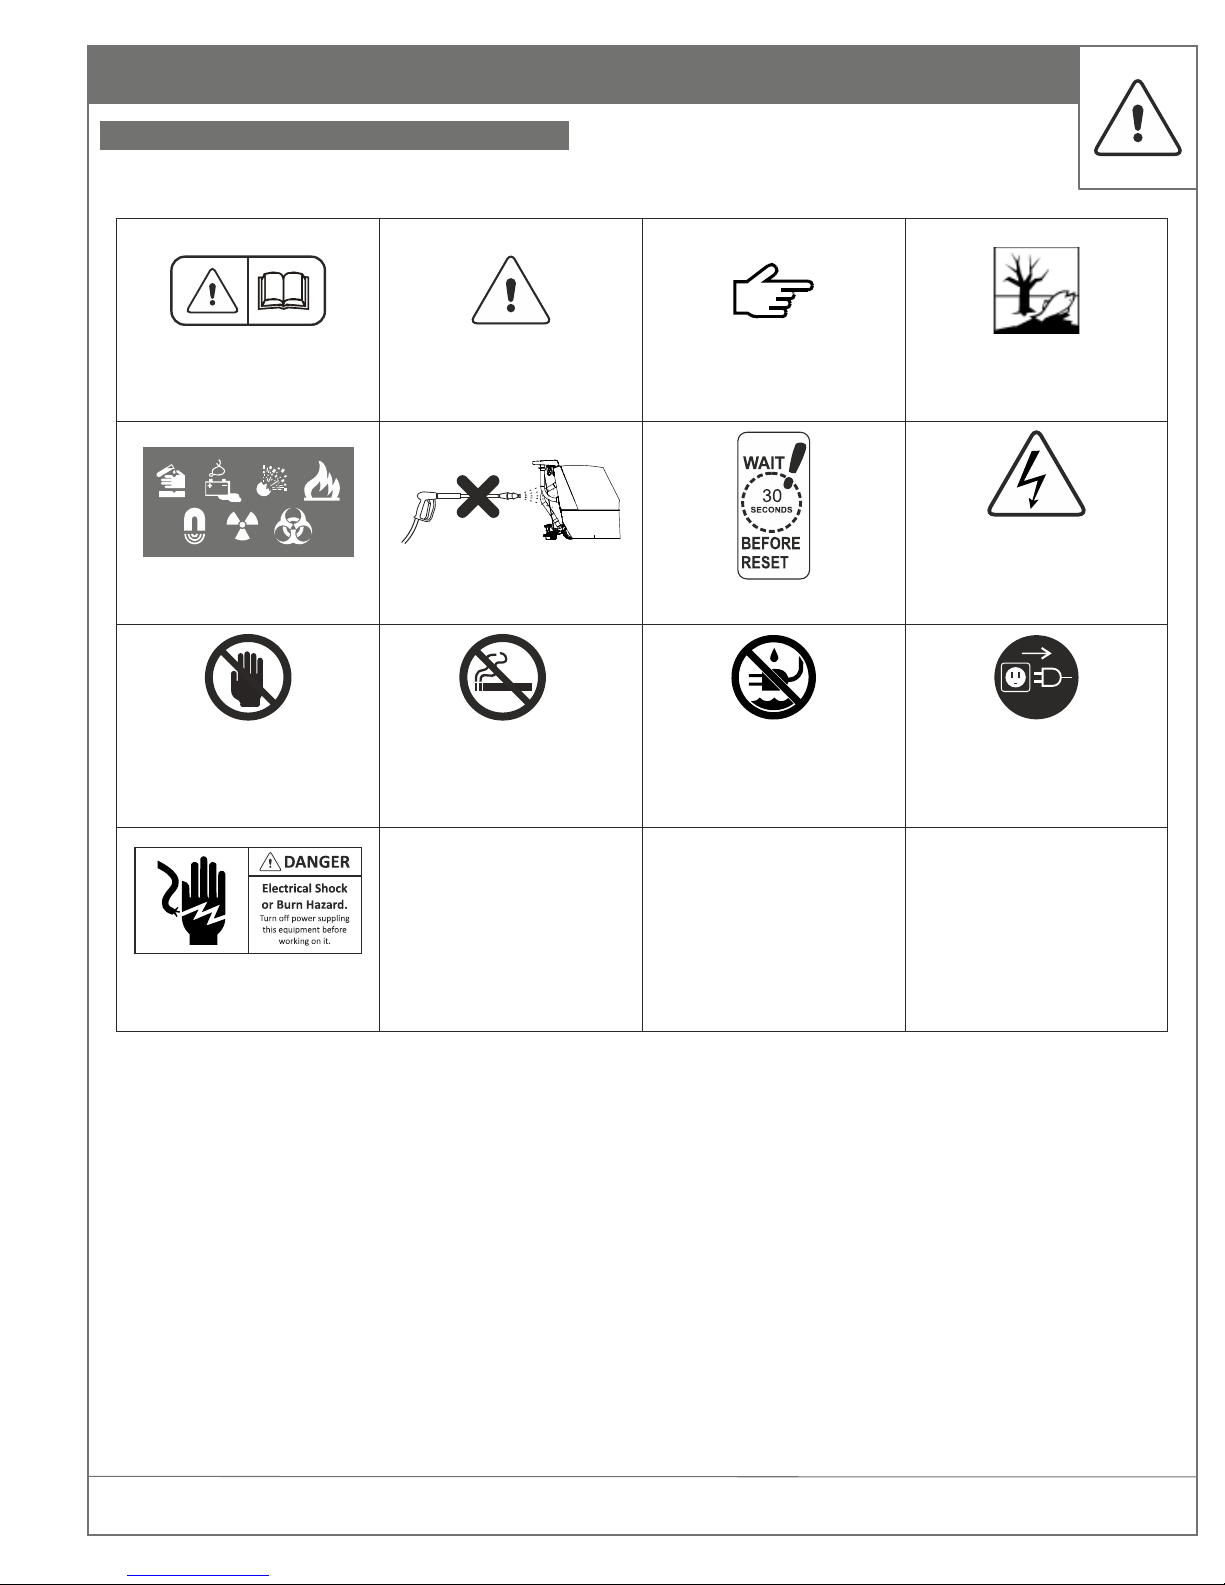
Read t he Op era to r ’s
Manual
Toxic Hazard
No Smoking
Reset Warning Electrical Hazard
Disconnect Powercord
Do not let powercord
come in contact with
water or other fluids.
Electric Shock Hazard
STOP No Access
Do Not Use High
Pressure Jets
General Warning Caution Ecological Hazard
SYMBOL & HAZARD PICTORIAL DEFINITIONS
Page 11
11
RootsScrub E430
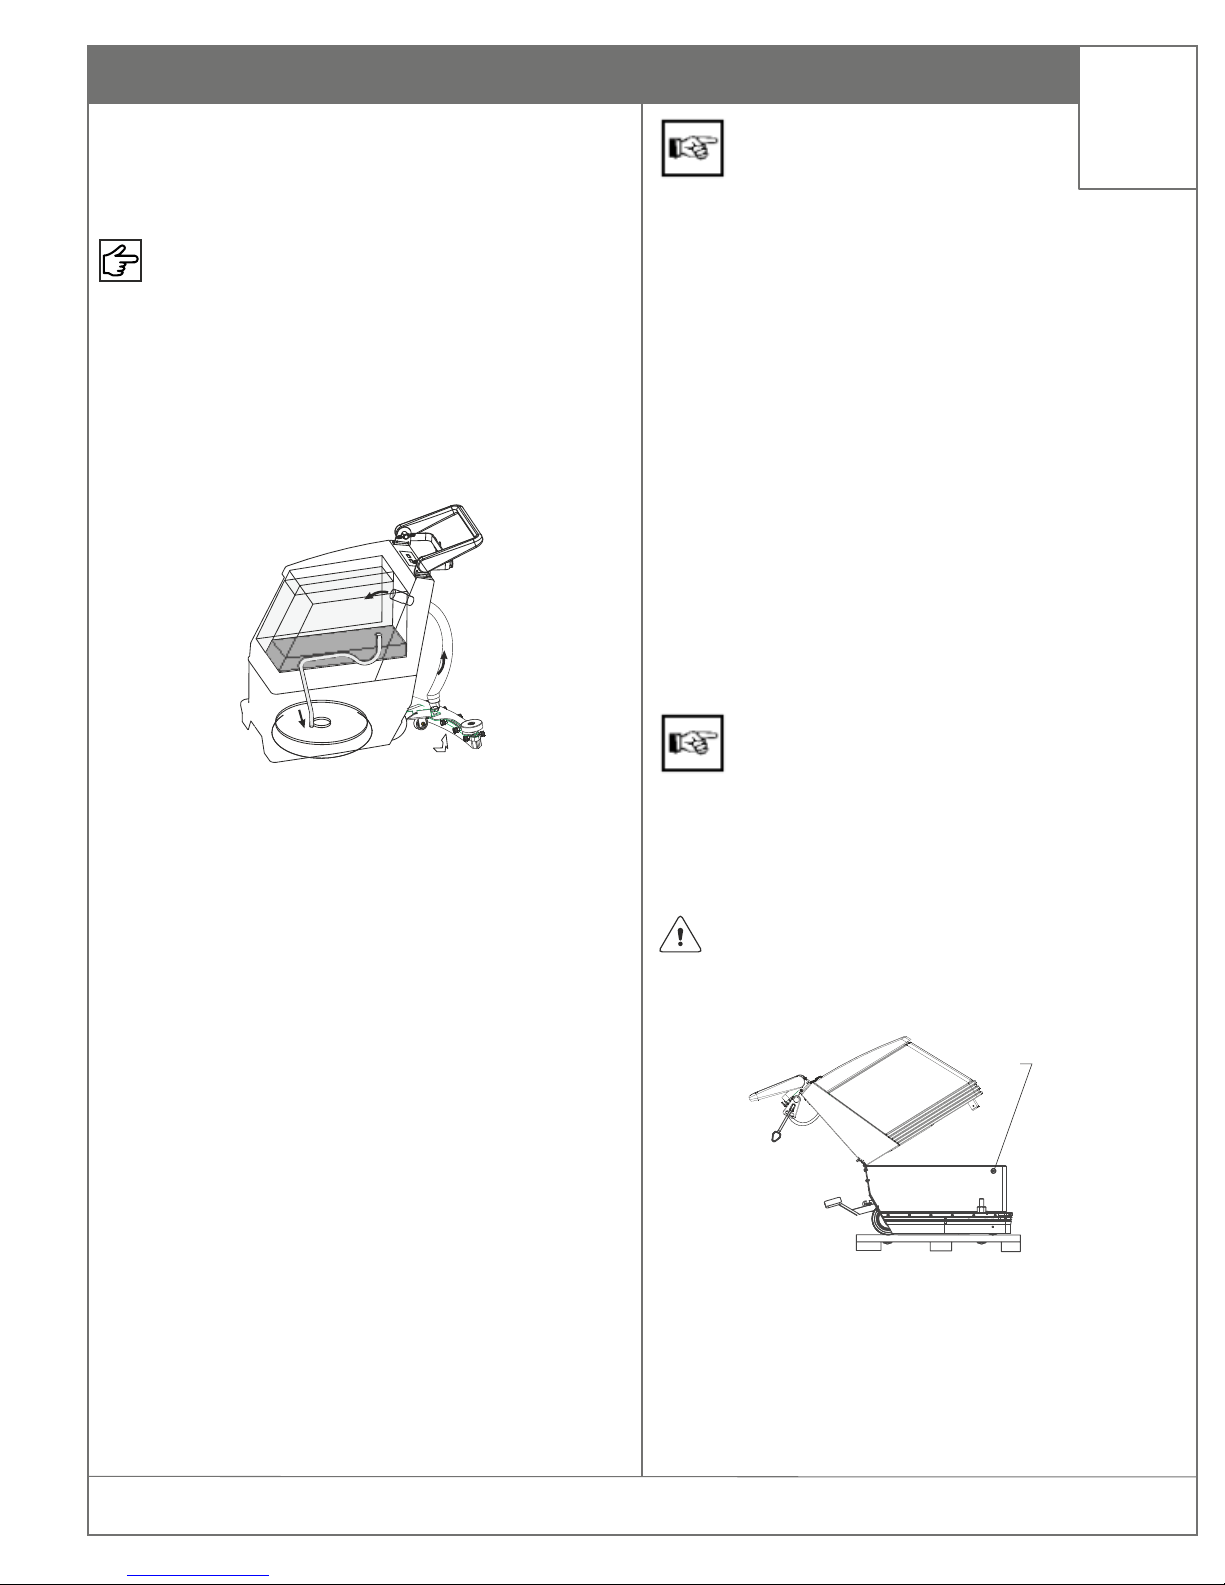
Comply with instructions for correct dosage of
detergent. Correct dosage will help optimize
costs and also minimize impact on the environment. Too much
foam can affect the performance of the machine.
A squeegee and suitable brushes or pads are required for wet
cleaning of hard floorings. The rotating brush scrubs the floor
thoroughly, removing dirt through suds, thereby cleaning the
floor. The dirty water is drawn during the same cycle through the
squeegee. Thus, the floor can be walked on immediately after it
is dry and clean.
Useful tips:
Ÿ Prior to wet cleaning, it is necessary to sweep the floor.
Ÿ This way, not only is the cleaning efficiency improved, but
wear of the brush is also substantially reduced.
Ÿ If floors are particularly dirty or if wax has to be removed
(basic cleaning); the floor must be treated twice.
Ÿ During the first cycle, the floor is scrubbed with the cleaning
agent selected according to the degree of dirt encountered,
the squeegee remaining lifted.
Ÿ Allow the cleaning agent to act on the floor for approx. 5 or
10 m inute s , co m p lyin g wi t h th e ma n u factu r e r 's
instructions.
Ÿ Scrub the floor once again while the squeegee is lowered.
Ÿ Too much foam indicates excessive dosage or improper
suitability of detergent for the existing kind of dirt.
Ÿ Detergent particles contained in the soiled water that are
not used will cause formation of foam.
Ÿ Instructions for dosage are given on the detergent tank and
must ideally adhere to manufacturer's recommendations.
Ÿ The ideal type of detergent and the perfect dosage
applicable to it will come through sustained use of the
machine.
After unpacking:
Principle of Operation
Before operation:
1. Upon delivery, the machine has been secured by insulations
blocks and hooks at the bottom to preclude unwanted
movement of the machine. After taking the machine from the
pallet:
Ÿ Open the cardboard box at the top side and pull upwards to
remove it.
Ÿ Remove the hook by loosening the screws.
Ÿ Lift the brush head to up position by using pedal.
Ÿ Take the machine off the box and avoid any damage to the
machine.
Ÿ Remove the nut from the plank in order to remove the brush
from the pallet.
Qualified personnel only are admitted to open the
machine; Any work such as e.g. maintenance or repair
actions at the electric components have tobe executed
with adequate tools only and by qualified personnel
only.
2. Tilt the body of the machine to gain access to the inside of the
tank, the tank will stay in its position with a help of a rope assy.
- Care should be taken while closing the tank.
-Do not drop hardly, which might cause possible damage
to equipment and cause personal injury.
3. The brush motor is fastened to the connecting arm for upward
and downward movement of brush head and this can be
controlled by the pedal. In order to prevent unwanted
swinging movement during transport, stopper pin in the
connecting arm hits the bolt of the brush head to retain its
stability. Also remove the tie bolt indicated in the picture.
Verify the machine and accessories with the invoice copy. Check
the machine for any transit damage, if found contact the
branch/dealer immediately.
Owner’s personnel are not allowed to
unpack the machine.
Rubber cap
& screw
INITIAL SETUP
SETUP
Page 12
12
RootsScrub E430
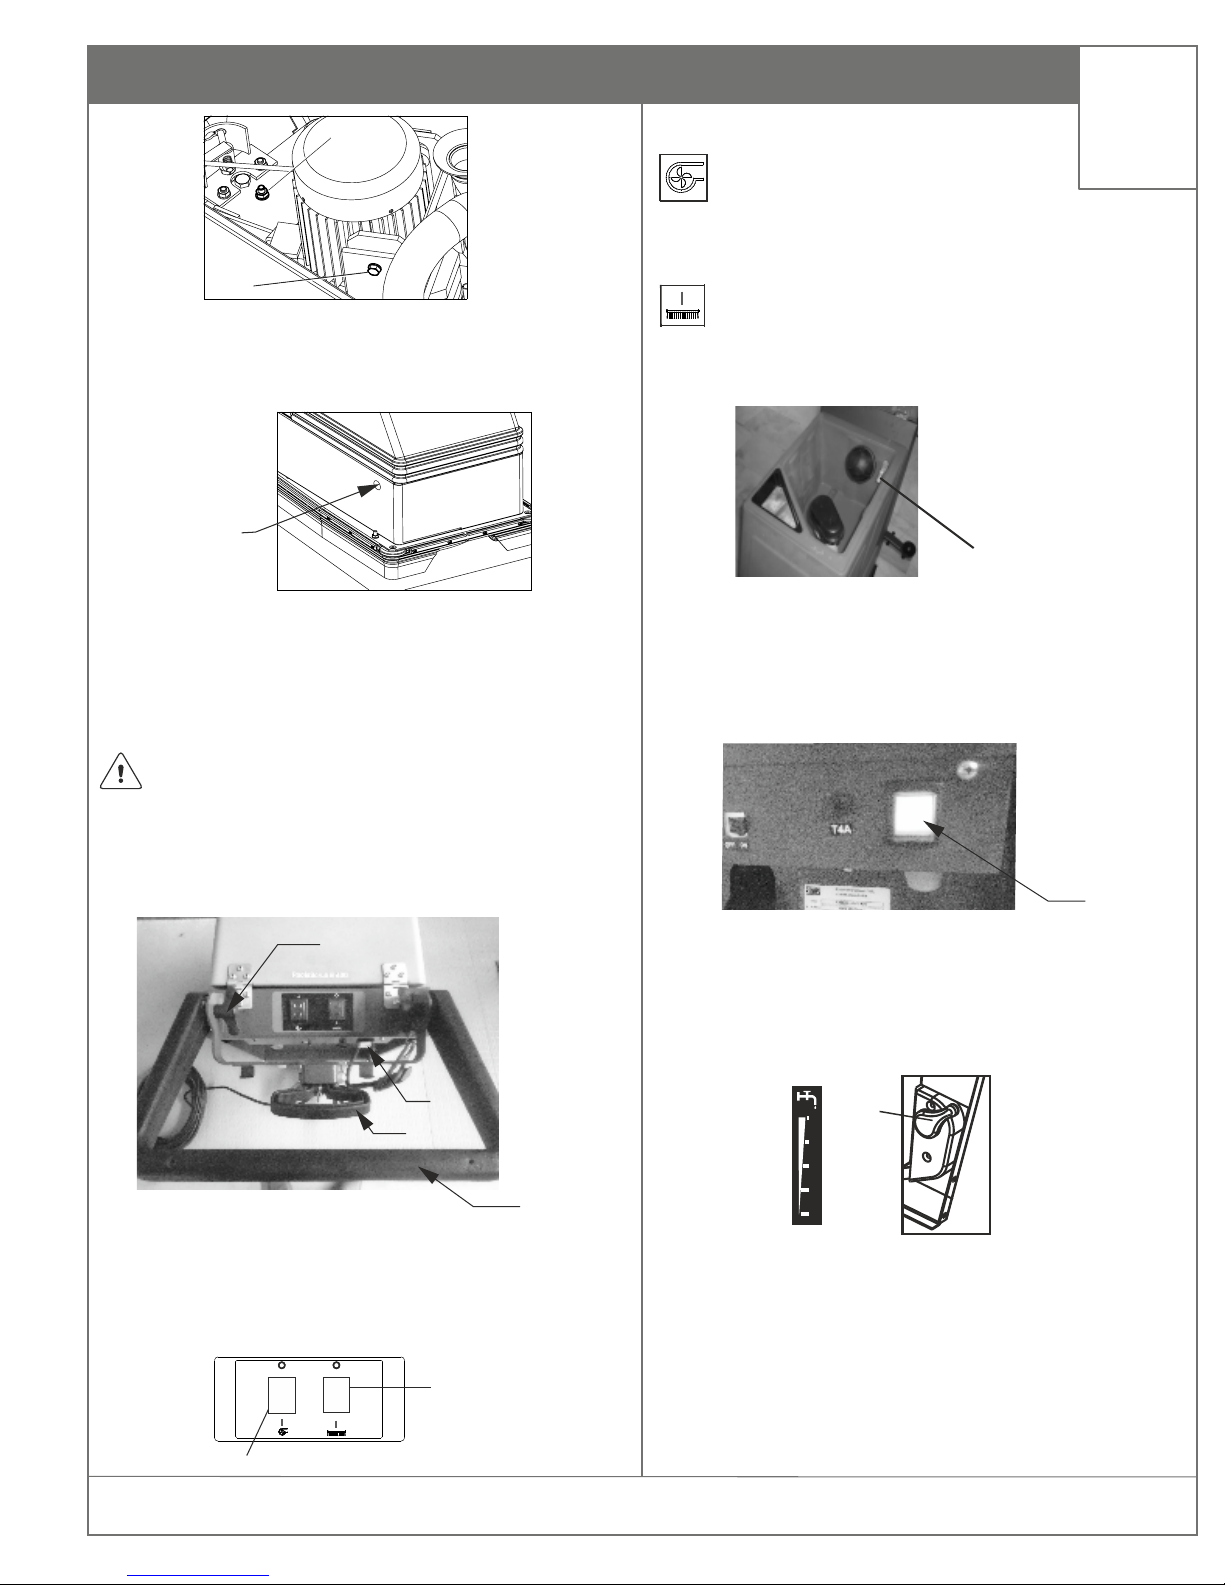
4. Close the body back and secure it with screws and rubber
caps. Remove the two tie-bolts outside the body of the
machine .
Screw
Tie bolt
5. Take the machine out of the pallette carefully. Fit the drain
hoses (2 Nos.) ensuring the position of hooked end of the
hoses. Take the power cord through the cable retainer. Now
you can take machine from the platform.
If the supply cord is damaged, it must be replaced by a
special cord available from the manufacturer or an
authorised service agent.
Operating & Indicator Elements:
Controls
1. Adjustable handle
2. Knob - handle
3. Lever for lifting the squeegee
4. Switch to unlock the brush
Control Panel
B
A
1. Switches For Vacuum Motor And Brush
A. ON/OFF switch for Suction Turbine
Ÿ Is on when “A” is at position “ I “
Ÿ Is off when “A” is at position “ 0“
B. ON/OFF Switch for Brush Motor
Ÿ Is on when “B” is at position “ I “
Ÿ Is off when “B” is at position “ 0“
When, the dirty water tank is full, the float switch will switch Off
the vacuum motor automatically. One, the motor is switched off,
the operator has to switch off the switch ‘A’ and empty the tank.
Ÿ Brush will be released when switch C is pressed But, ensure
the switch B is at position “ 0 “
C. Switch For Brush Release
2. Cleaning Solution Discharge Control
Ÿ Turn the lever up, to discharge the detergent and position the
lever suitably to achieve the desired flow of Detergent.
Ÿ Turn down to close the detergent flow.
Ÿ Important! Do not over-exert the lever; A gentle force is
enough to close/open.
Lever
0
1
2
3
4
Float switch
1
2
3
4
C
Tie Bolt
INITIAL SETUP
SETUP
Page 13
13
RootsScrub E430
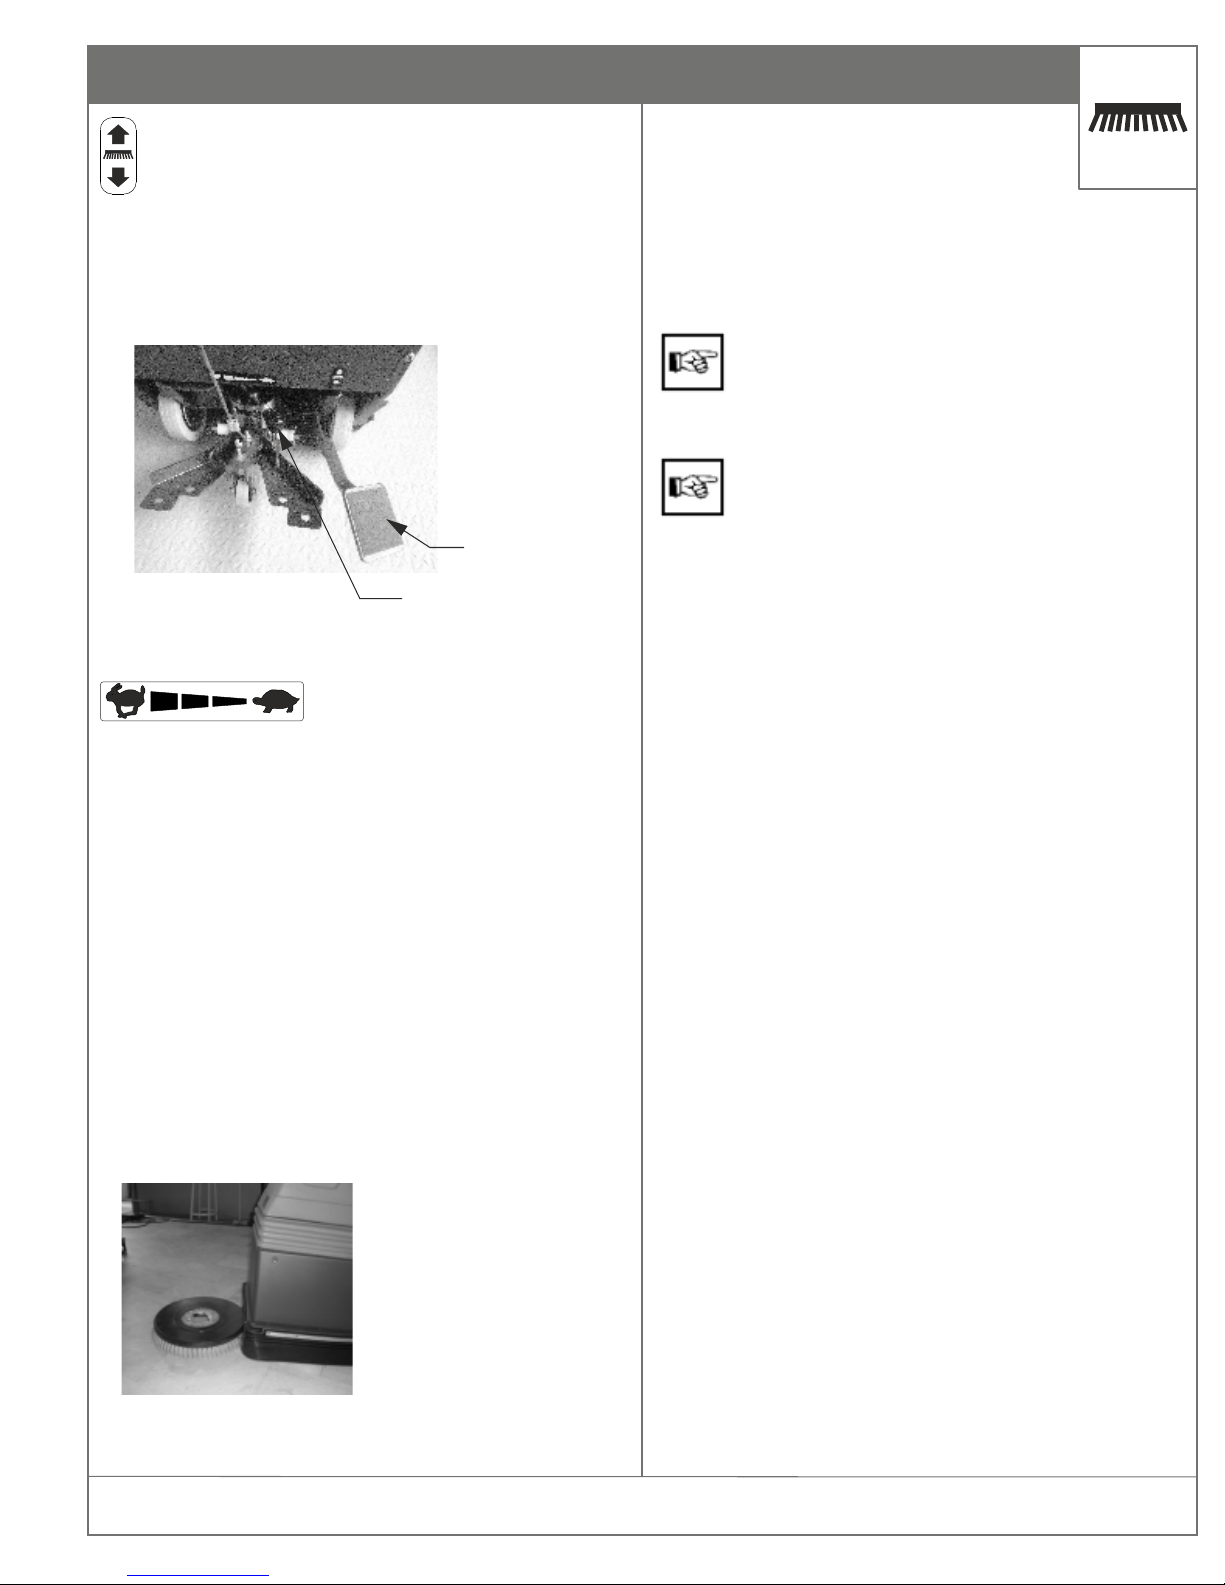
Brush lifting
Ÿ Pedal is used to lift and lower the brush.
Ÿ For lowering, first press the pedal a little to outside (unlock)
and then allow it to move slowly upwards.
Ÿ For lifting, press the pedal slowly downwards and make it
lock.
Control for the speed of machine
Ÿ Pull the black knob a little
Ÿ Take the knob to the left to increase the speed.
Ÿ Take it to the right to decrease speed.
Ÿ Leave the knob so that it locks in its place. The speed is
adjustable in four steps.
Brushes/pads
The machine must be equipped with brushes from the
accessories kit, as required by the degree of dirtiness and kind of
ground.
Installation of brush
Ÿ Press the machine downwards at the rear end
and move to above the brush so that the
catch is positioned, as close as possible, over
the center of the brush.
Ÿ Lower the front end of the machine so that the catch is
centered in the brush.
Ÿ Turn on switch “D” for a short time in order to allow locking.
Ÿ The tank should be empty.
Ÿ Lift the squeegee.
Ÿ Place the brush in front of the machine.
Ÿ Lower the brush head.
When lowering the machine pay attention to prevent
the pedal for lifting of the brush head from being
pressed down.
The brush must snap in immediately. A rattling noise
indicates that the brush head is not correctly centered.
Turn off switch ”D”, correct position of brush head and
turn on switch “C” for locking. Now the brush is locked.
Repeat locking operation.
Removal of brush
Ÿ Empty the tanks.
Ÿ Lift the squeegee and the brush head.
Ÿ Turn on switch “D” for unlocking of brush.
Ÿ Turn off the machine.
Ÿ Press the rear end of the machine downwards.
Ÿ Pull the machine towards the rear side.
Ÿ Brush is now lying in front of the machine.
2. Speed control lever
1. Pedal for lifting brush
1
2
OPERATION BRUSH
Page 14
14
RootsScrub E430
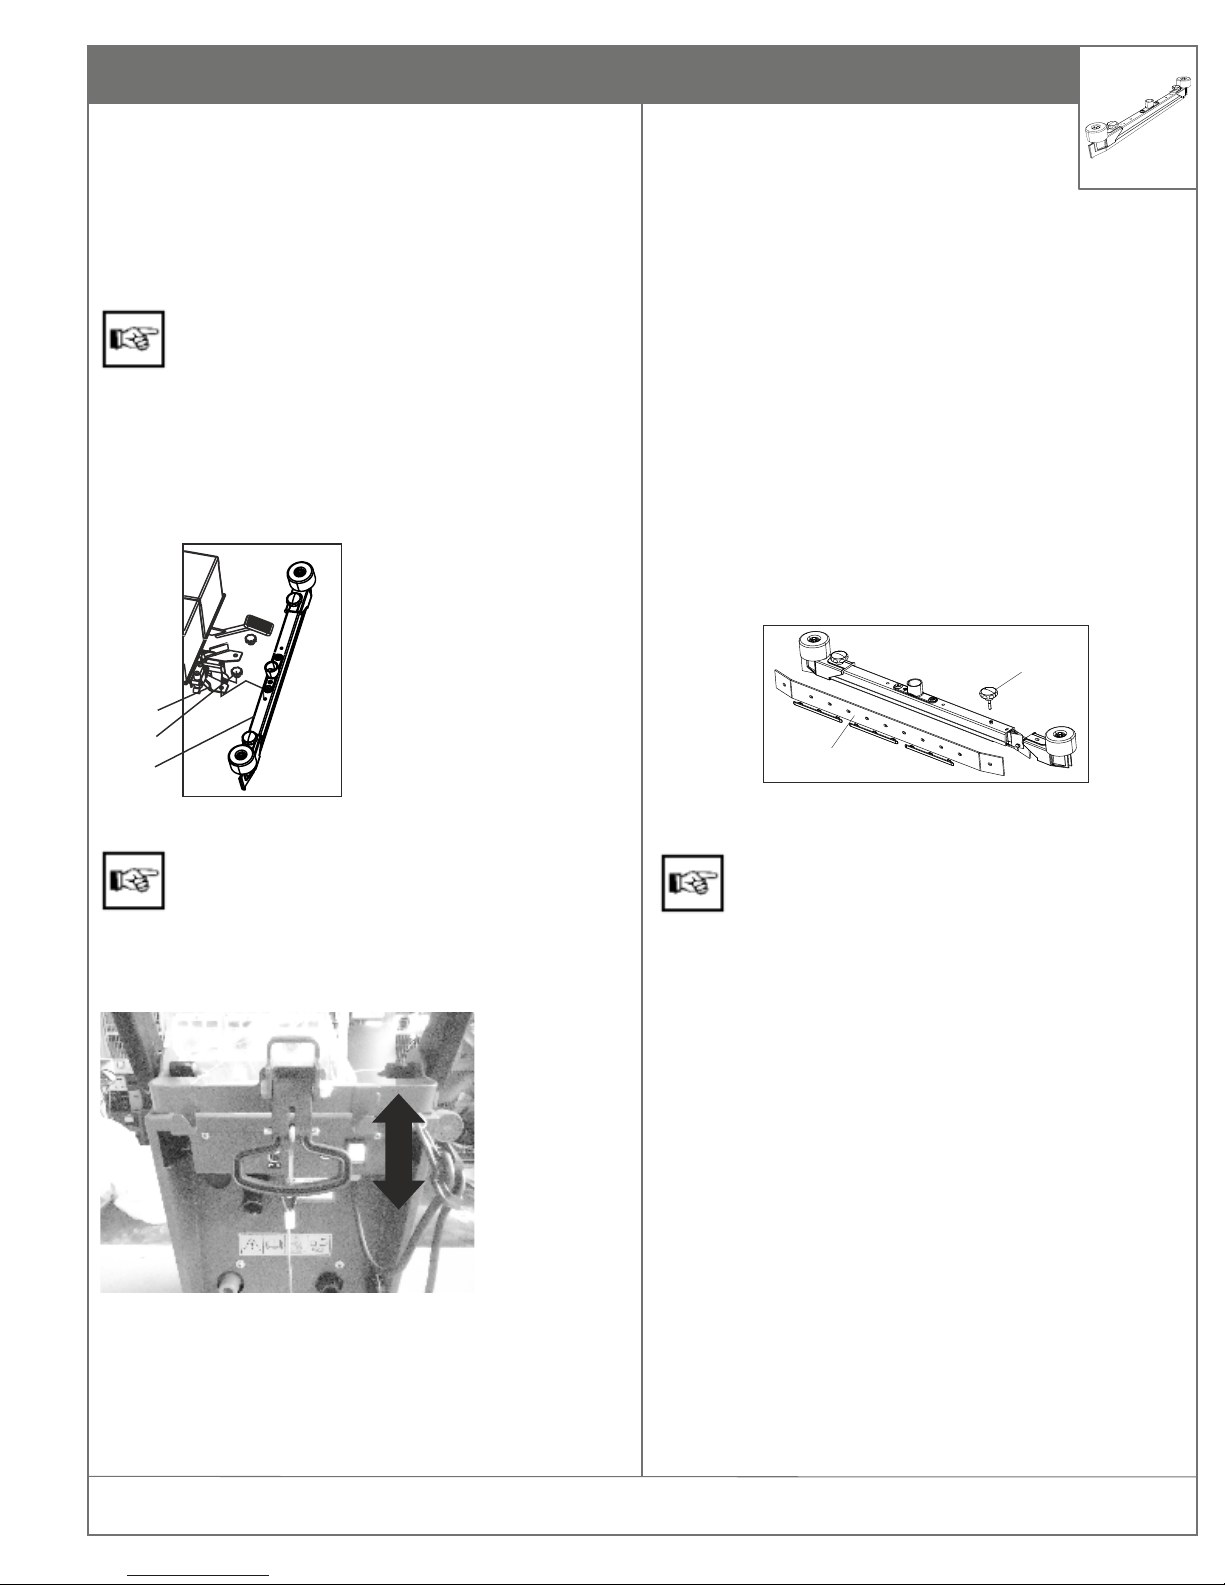
Mounting of squeegee (first time)
Ÿ Lift squeegee bracket group (3)
Ÿ Mount squeegee (1) to squeegee bracket group (3) as shown
in figure.
Ÿ Attach suction hose to the tubular socket of the squeegee.
The supporting wheel under the squeegee bracket
group has been adjusted by the factory.
Ÿ Lift squeegee.
Ÿ Unscrew the squeegee nut (2 Nos.).
Ÿ Remove the squeegee towards the bottom
side.
Removal of squeegee
1. Squeegee
2. Squeegee Knob
3. Squeegee bracket
group
Replacement of sealing strips
The sealing strips can be remove without any need of tools, as
follows:
Ÿ Remove the squeegee (refer to section "Removal of
squeegee")
Ÿ Remove the knob at the deflector area.(1)
Ÿ Pull the sealing strips (2).
Ÿ Mount the new sealing strips by inverse sequence of
operation.
Ÿ Tightening of the knurled nuts (just slightly, by hand) has to
be done starting from the center towards outside (sealing
strips with slots to frontside, and plain one to the rear).
1
3
2
2
1
Ÿ If worn, the rear sealing strip can be turned at the
front side edge.
Ÿ The supporting strip may modify the sealing strip
effect, hard-soft, and thus be adapted to different
floor conditions.
The machine equipped with a squeegee with a working width of
750 mm. The squeegee bracket group fixed to the machine,
allowing swiveling and the oscillating movements. The
squeegee, protruding at the side, evades obstacles in the
machines path and is made swivel backwards.
Before staring to work, check the squeegee for possible
collection of foreign matter and for proper condition.
Raising / lowering the squeegee
Ÿ To lower the squeegee release the handle from its locking
position by pulling it upwards and releasing it.
Ÿ To raise the squeegee lift the handle upwards and lock it in
position.
Squeegee
OPERATION SQUEEGEE
Page 15
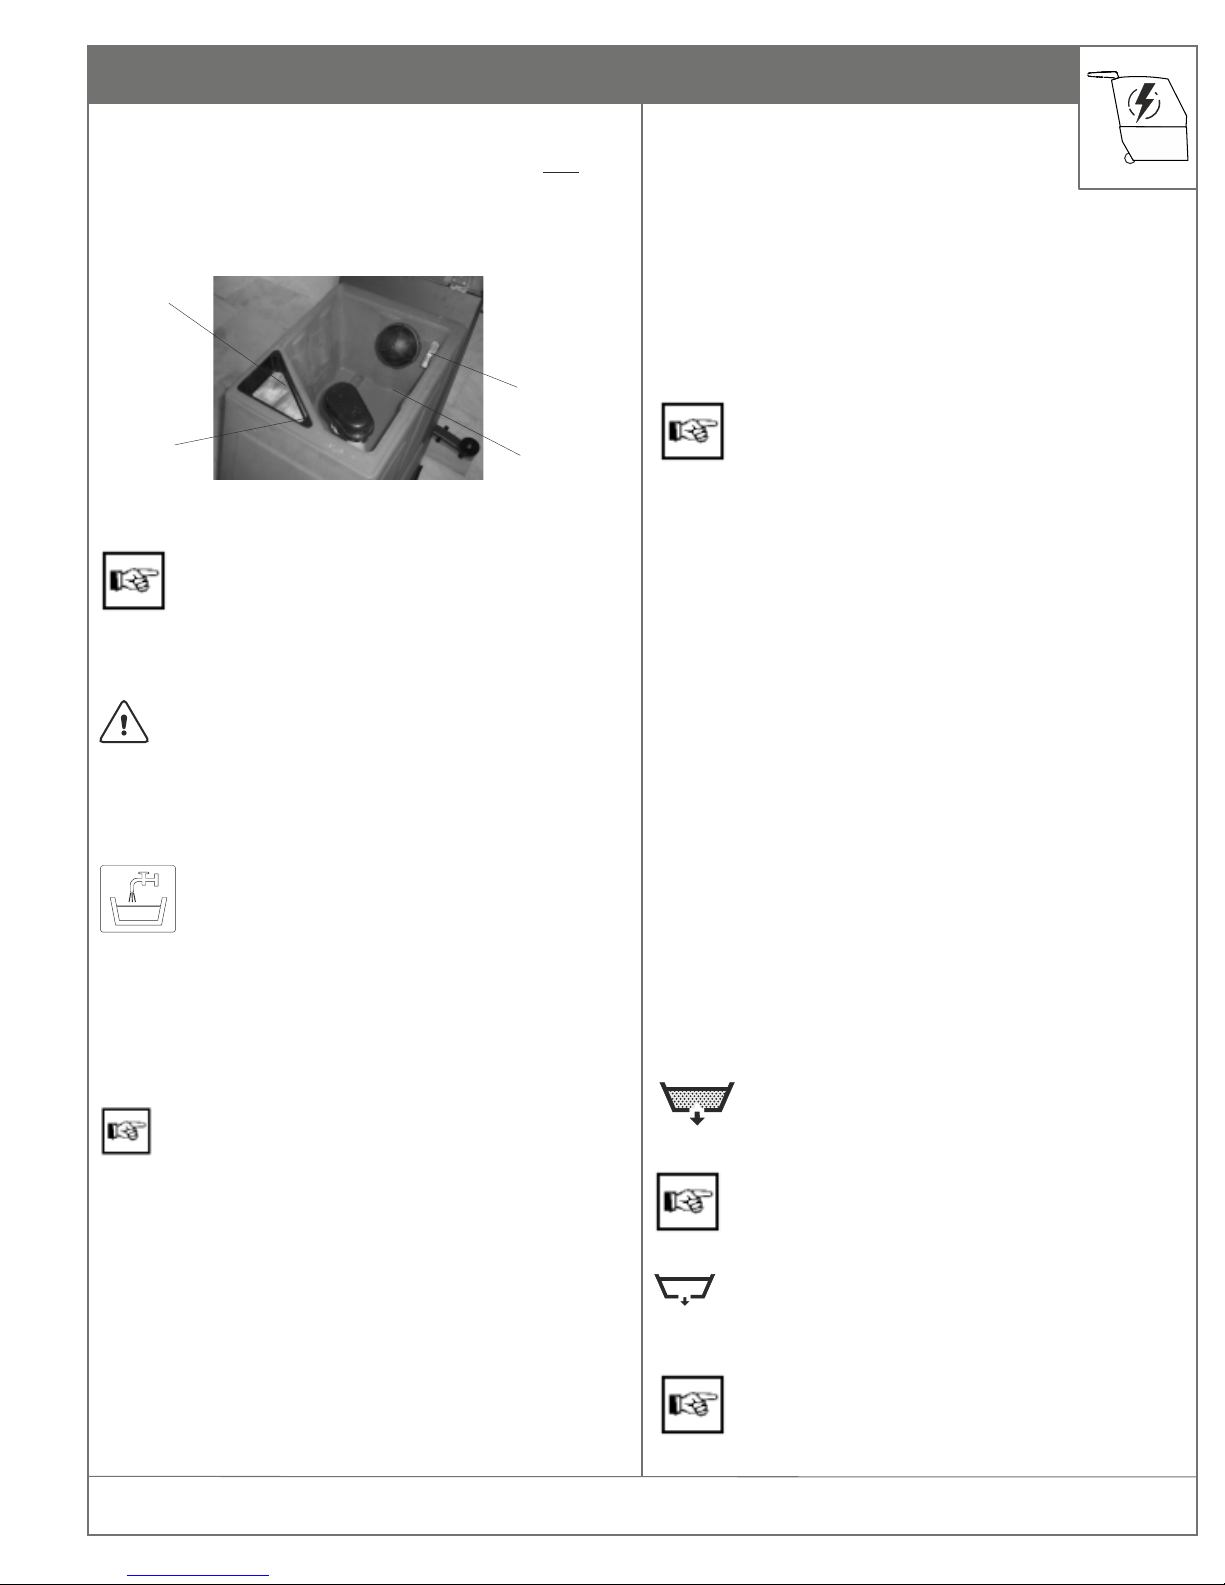
15
RootsScrub E430
Ÿ Fill fresh water and detergent as described below before
start of operation.
Ÿ Fill the fresh water tank with water (50° max) as required by
the work to be done, and add detergent as specified by the
manufacturer.
Use detergents suitable for automatic machines (low foaming) in
order to preclude damages at the suction turbine. We
recommend our agents for cleaning and care, which are
perfectly adopted to the machine. These products fulfil the
requirements of the Detergents Act.
How to operate the machine:
Filling of water
Dirty And Fresh Water Tanks
Ÿ Turn on Switch “B” the brush is rotating.
Ÿ To discharge the detergent, position the lever
suitably to achieve the desired flow of
detergent.
Ÿ Lower the brush head.
Ÿ Lower the squeegee.
Ÿ Turn on switch “A” the suction turbine is running.
After l owerin g the b rush m ove t h e mac h i ne
immediately; otherwise the brush might leave traces on
the floor. Lift the squeegee during reverse travel. When
passing over dormers with a height of more than 0.7° in
=10 mm, the brush drive must be turned off and the
brush must be lifted up.
Ÿ It is dangerous to pass over the power supply cable while the
brush is rotating.
Ÿ Cleaning of floor areas starts from the outlet socket and is
effected stripe by stripe.
Ÿ In case of unoccupied areas it will be useful to clean at first
the border areas, passing with the machine along those areas
in counterclockwise sense.
Ÿ Cleaning of the remaining areas then should be effected
stripe by stripe, starting from the outlet socket.
Ÿ Partially occupied areas should be subdivided into single
working areas, within reach of the power supply cable.
Ÿ Within a short time, the operator will learn how to avoid
unnecessary inconveniences caused by the cable.
When work is completed, the dirty water tank has to be
drained and rinsed.
Draining of fresh water tank
Ÿ The water level hose is used to drain the fresh water.
The tank requires rinsing at regular intervals.
Fresh water
tank
Strainer
Soiled water
tank
Float switch
The machine has a Dirty water tank and a Fresh water tank. (lye)
Please do not fill water temperature above 50°C. Do not fill the
tank beyond its maximum capacity. Dirty water is fed via the
suction hose into the dirty water tank.
- Do not collect any external water.
- When work is finished both the dirty and the fresh
water tanks on principle must be drained and rinsed
in order to preclude formation of residues.
For disposal of dirty water and lye, the legal provisions
have to be compiled with.
Check the in-feed filter in the tank regularly and clean it
if required.
Procedure for draining tanks
Ÿ Slowly open the cap and drain the water.
Ÿ Re-close the cap.
Ÿ Re-attach the drain hose.
Ÿ Follow the above sequence to drain the fresh water tank.
Draining of dirty water tank
Ÿ Is used to drain the dirty water.
PROCEDURE FOR SCRUBBING
Page 16
16
RootsScrub E430
At the end of cleaning
Ÿ Stop the machine and lift the brush head.
Ÿ Lift the squeegee.
Ÿ Drain and rinse the dirty water tank (refer to section "Dirty
and Fresh Water Tanks" )
Ÿ Clean the sealing strips at the squeegee.
Ÿ Check the strainer upstream of the intake opening in the
fresh water tank; clean if required, as otherwise the suction
efficiency will be affected.
The machine must not be cleaned by water jet or
high pressure cleaning equipment, as this will
endanger its proper working function.
PROCEDURE FOR SCRUBBING
Page 17
17
RootsScrub E430
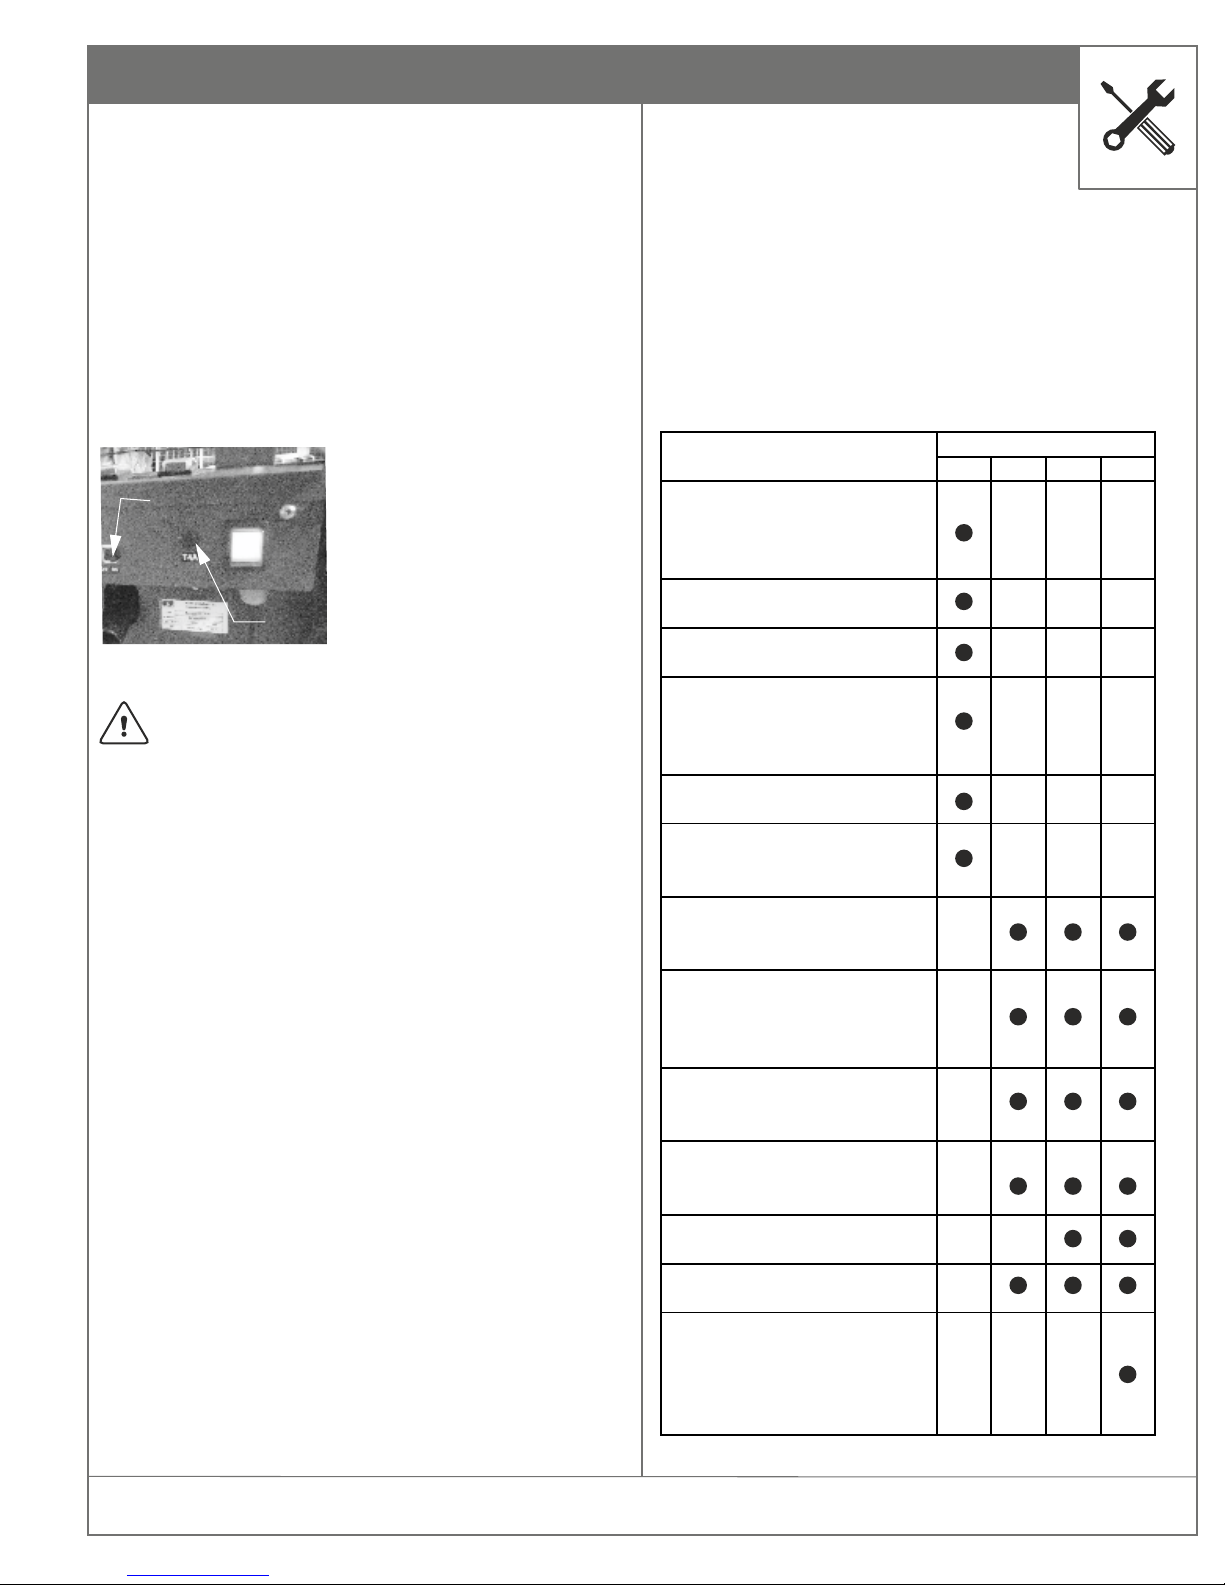
The electrical equipment of the machine uses a mains voltage of
230 V/50 Hz AC. Easy access to brush motor and suction turbine
is possible after the upper part of the unit has been titled to
upside. The suction turbine has been provided with a fuse (E)
having a rating of T4A. It must be replaced by a fuse of same
rating (T stands for Time -lag). The brush motor is protected by a
circuit breaker (F) which requires to be manually reset incase of
tripping. When brush motor trips identify the cause and correct
it before trying to run the machine. The protector can be reset by
pressing transparent dome on the electrical box cover. Please
allow approximately 30 seconds before resetting.
Ÿ If there should be repeated cases of failure, look for
the reason.
Ÿ Any work at the electrical system has to be carried
out by specialized electricians only.
Com p l ianc e wi t h ou r rec o m mend a t i ons c once r n ing
maintenance work will give you the certitude always having a
machine at your disposal, which is ready to work and in good
operating condition.
Please contact your local Roots Multiclean distributor; the
people there will be glad to perform that work for you. There
well trained personnel and genuine Roots spare parts are at your
disposal.
Ÿ Well trained personnel and genuine Roots spare parts are at
your disposal.
Ÿ In case of any inquiries or orders for spare parts, please
always quote the machine's serial number mentioned on the
nameplate.
Ÿ The name plate is fixed in the rear side of the machine.
Ÿ When cleaning or servicing the machine, and when
replacing any parts, shut off the machine and on principle
disconnect the power plug from the power supply.
Ÿ For reasons of safety during cleaning and/or maintenance
work in or on the tank, the tank lid - when lifted - must be
secured so as to prevent accidental closing or tilting down.
Ÿ The machine may be taken into operation
only if all guarding devices are fitted and in
protective position. As far as possible,
cleaning should not be done by hand, but
using appropriate tools or equipment.
Ÿ Maintenance and repair work may be carried out only by
means of suitable tools and by the people trained in the
factory. For reasons of safety, only genuine spare parts may
be used.
Electrical system
Maintenance Schedule
Maintenance work
E. Fuse for vacuum motor.
F. Overload protector for
brush motor.
E
F
Daily 50 100 200
Check connection - extension
cables and plugs for good
condition; discard defective
cables immedietely
Empty and clean the soiled
water tank
Check the sealing strips of
squeegee for good condition
Check the squeegee for
possibly collected foreign
matter and clean it, if required
Check the float for proper
operation
Check the stainer in the fresh
water tank, clean it as
required.
Check the suction hose
between squeegee and soiled
water tank
Check the caps both of fresh
and soiled water drain hose;
chek them for smooth
operation
Check the squeegee sealing
strips for wear; renew them if
required
Check the brush for tight fit
and wear; renew them if
required
Check the tank lid seal; renew
if it is required
Check the fresh water infeed
to the brush
Remove carbon dust from the
suction motor, check the
carbon brush for smooth
operation and wear; renew as
required
Service Hours Every
Maintenance Work
MAINTENANCE
Page 18

18
RootsScrub E430
Page 19

19
RootsScrub E430
Roots Multiclean Ltd.
R.K.G. Industrial Estate, Ganapathy, Coimbatore - 641 006, India.
Phone: +91 (422) 4330 330, E-mail: [email protected]
Web: rootsmulticlean.in,
Toll Free: 1800 41 99 77 9
 Loading...