

Page 1
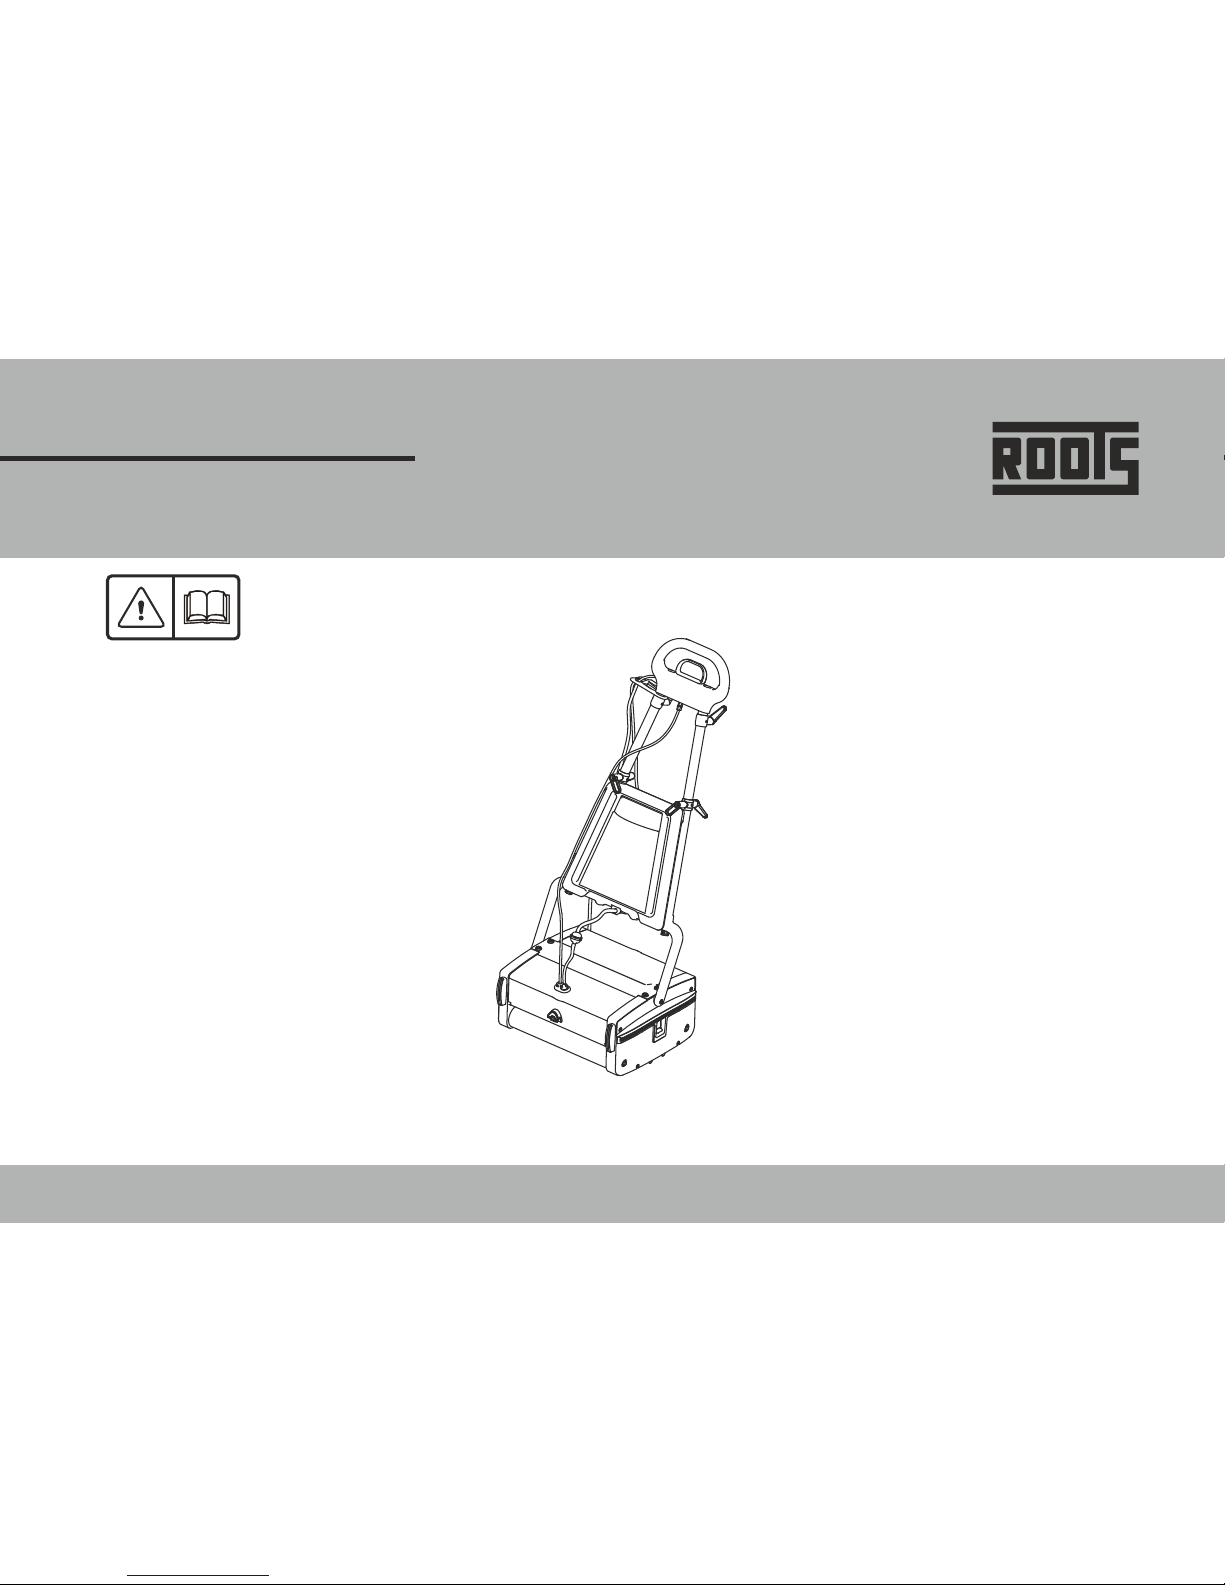
Wizzard Series
Mini Floor Scrubber
Instruction Manual
Page 2

Page 3
3
Wizzard
Please be advised explicitly that we cannot accept any legal claims out of the contents of this manual. If repair work has to be
performed, make sure that only genuine spare parts are used since genuine spare parts only may guarantee continuous and
dependable operation of your machine.
Roots Multiclean Ltd.
RKG Industrial Estate,
Coimbatore - 641 006, India.
557250017-00, Rev - E, 11/16
TABLE OF CONTENTS
Know your machine
Technical specification
Introduction
General safety instruction
4
5
7
8
Description
Page No.
First operation
Machine operation
Maintenance
Notes
11
16
18
24
Description
Page No.
Page 4
4
Wizzard
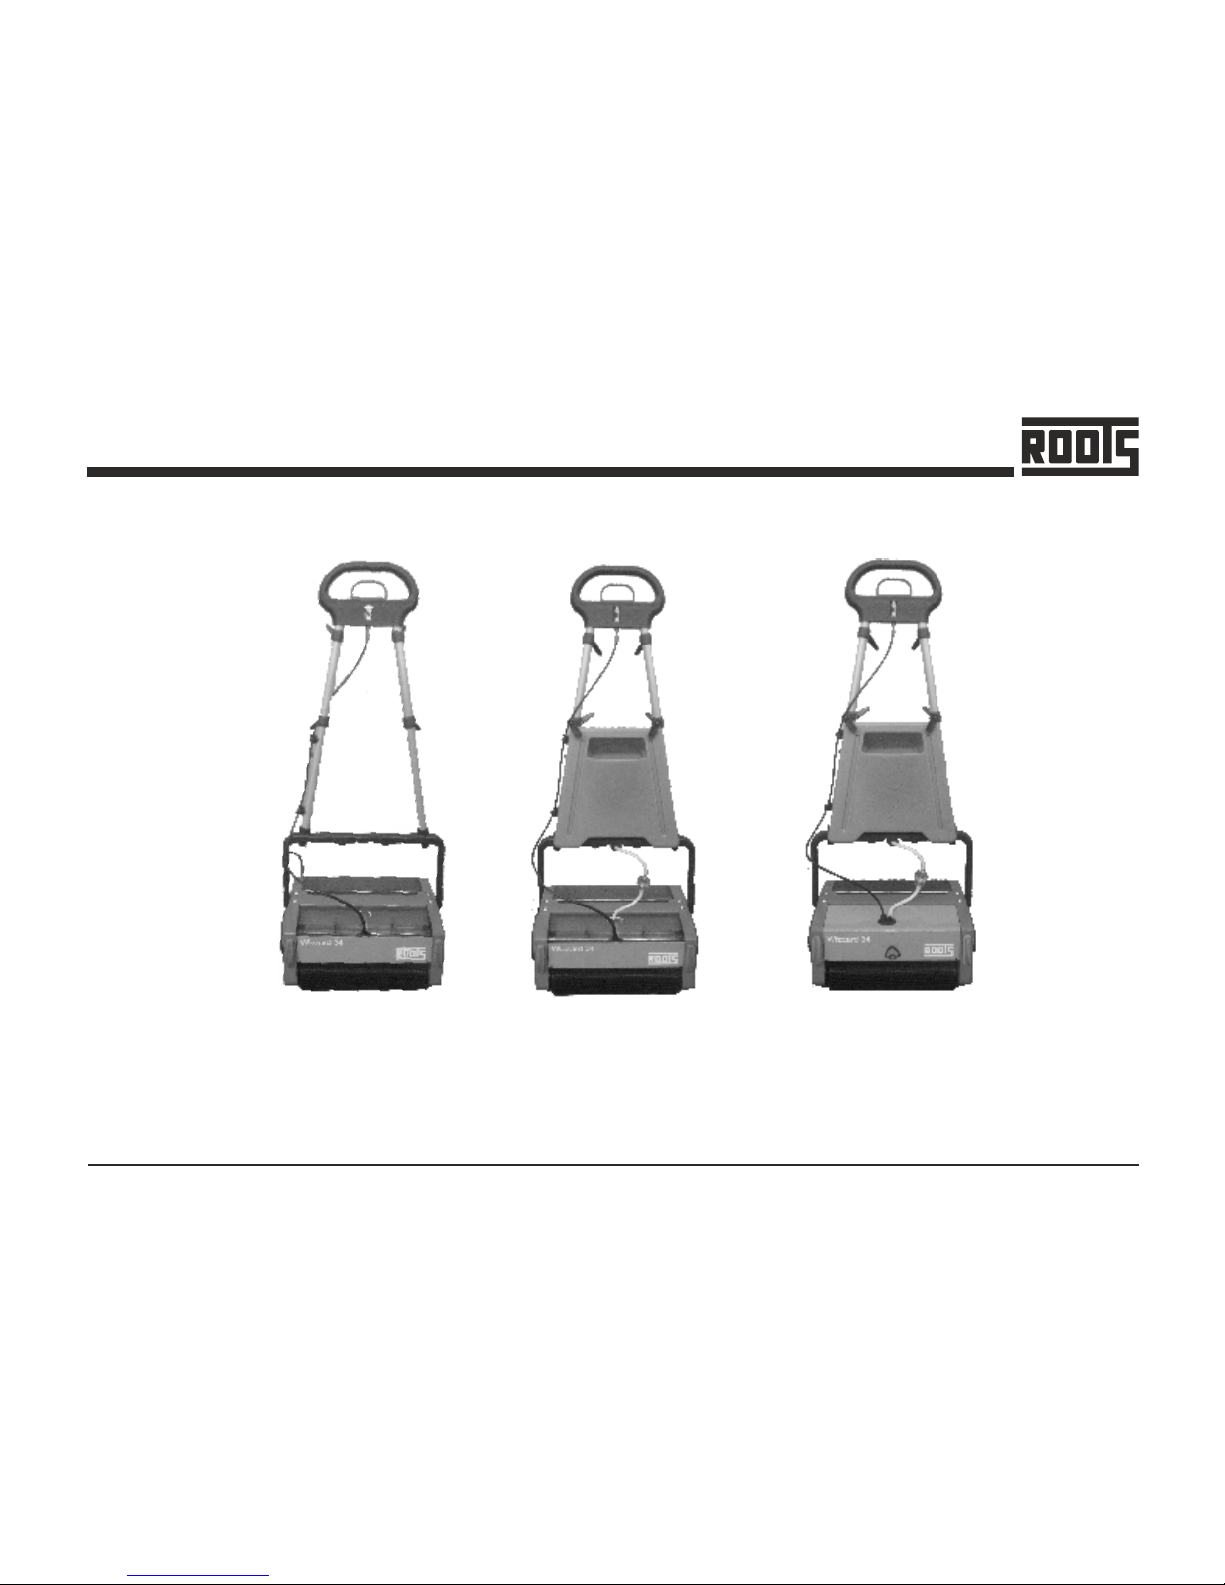
KNOW YOUR MACHINE
Pump
Natural Tank
For 24,34 & 44 machines.
Page 5
5
Wizzard
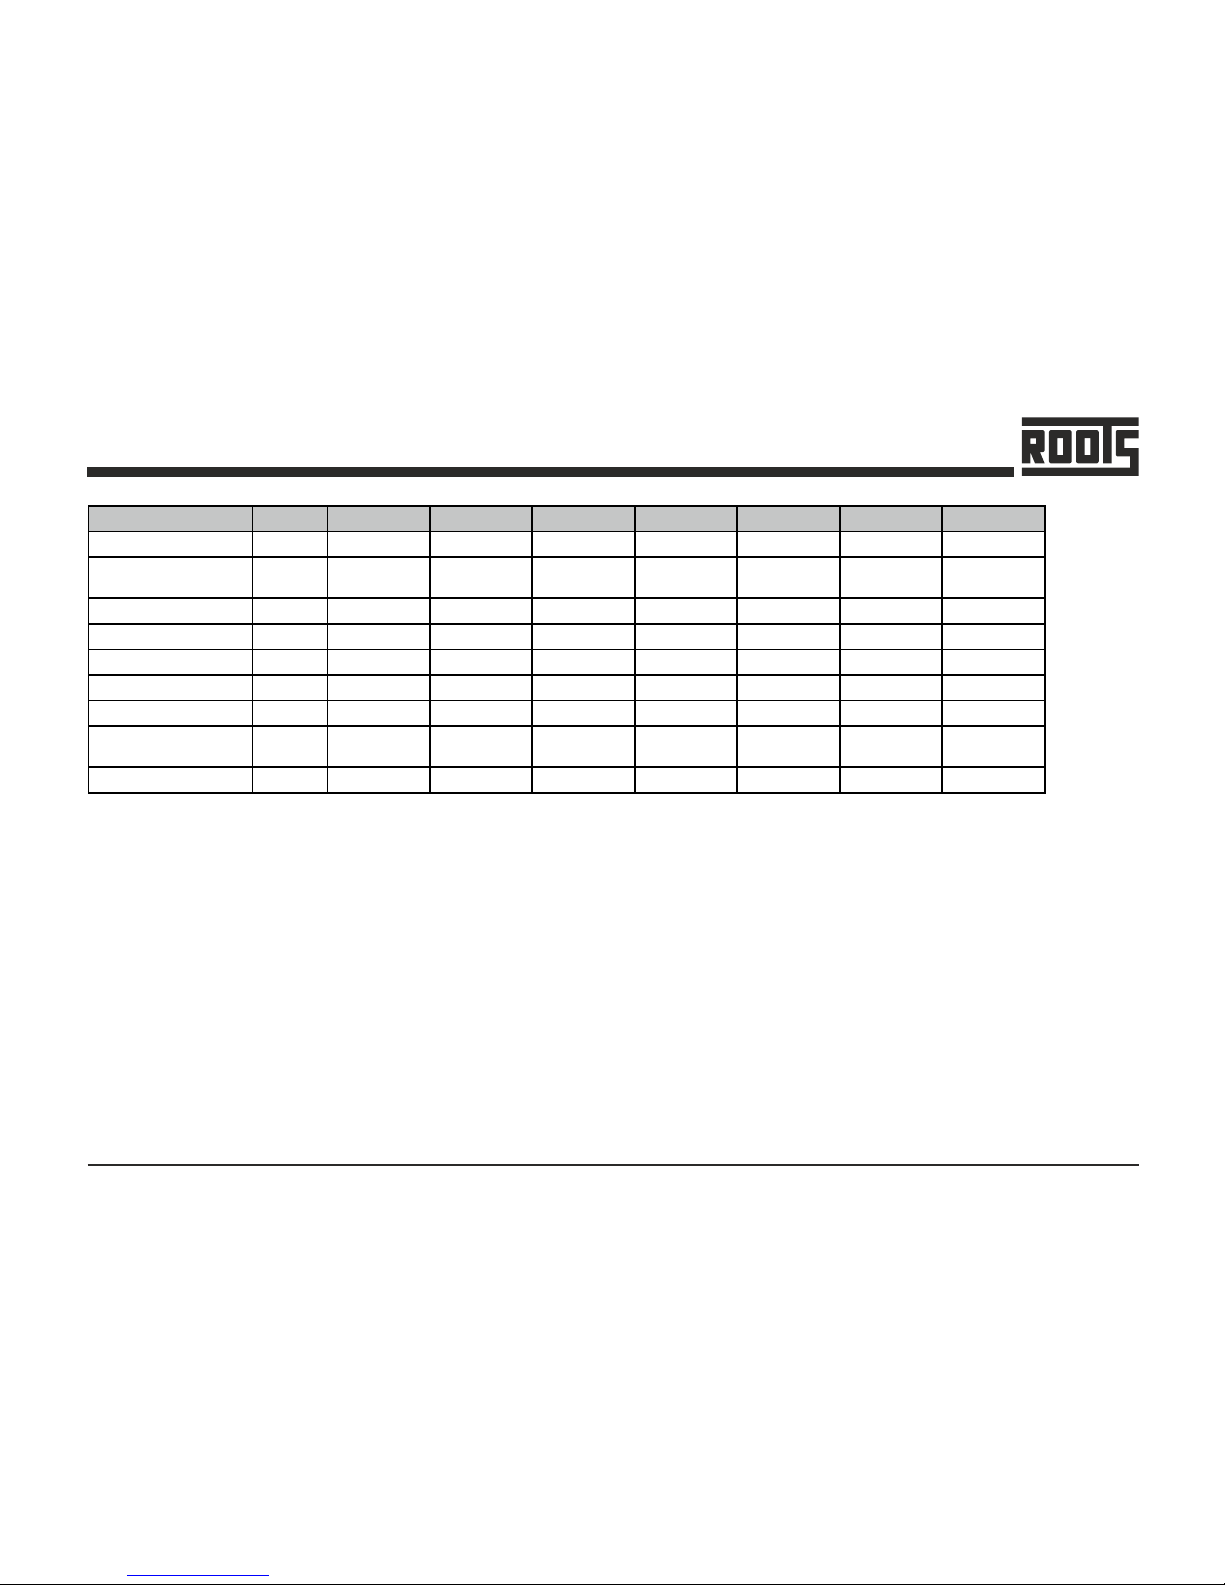
TECHNICAL SPECIFICATION
Technical data Units 24N 24T 24P 34N 34T 34P 44P
Scrubbing width mm 215 215 215 315 315 315 420
Theoretical area
coverage
m2/h
250 250 250 350 350 350 450
Power Supply V / Hz 230/50 230/50 230/50 230/50 230/50 230/50 230/50
Total Power W 400 400 400 600 600 600 1000
Brush Speed rpm 650 650 650 650 650 650 650
Fresh water tank L 1.2 1.2+3 3 1.7 1.7+4 4 4
Dirty water tank L 1.2 1.2 1.2 1.7 1.7 1.7 2.2
Dimensions (L x B x H) mm
378 X 340 X
1118
378 X 340 X
1118
378 X 340 X
1118
378 X 440 X
1114
378 X 440 X
1114
378 X 440 X
1114
378 X 540 X
1118
Weight kg 20 20.5 20.5 23.5 24 25 29.5
Page 6
6
Wizzard
Model Power Supply Total Power Brush Speed
24N/24T 220/60 1050 780
34N/34T 220/60 1050 780
220/60 1050 780
110/50 750 650
110/60 750 780
220/60 1200 780
110/50 850 650
110/60 850 780
34P
44P
The machine also available in different power supply.
Such as 220 & 110 Volts.
TECHNICAL SPECIFICATION
Page 7
7
Wizzard
Dear Customer,
Thank you for choosing to become the proud owner of
WIZZARD. Having been in the market for close to three
decades now, we are sure that you will be happy about your
decision. We also assure you that our services and attention
will always be available, should you need them!
Before the first operation of your machine, please read these
instructions carefully. This manual will provide you with
detailed instructions on the operation of the product and also
give you valuable information on operation, service and
maintenance.
Preface
Proper Use / Product Information
This machine may be used, serviced and repaired only by
persons who are familiar with the machine and are aware of
possible hazards involved. The appropriate Accide nt
Prevention Regulations as well as applicable general
regulations about safety and health at work must be complied
with.
Modifications made to machine in the absence of the
manufacturer's consent will relieve the manufacturer from
possible liability for consequential damage.
Use of the product beyond the specified range is deemed
improper and the manufacturer cannot be held liable for
consequential damages.
The terms of proper use also includes compliance with the
manufacturer's instructions on the operation, maintenance
and repair of the product.
Notes on Warranty
Refer Limited Warranty card supplied along with the
machine.
Acceptance of the machine
As soon as the machine arrives, Please check for any
transport damage. In the event of any damage, it is the
purchaser’s responsibility to send a claim letter to the
particular RMCL Branch / Dealer with a copy of invoice. The
letter should be sent within 24 hours after the goods were
delivered.
INTRODUCTION
Page 8
8
Wizzard
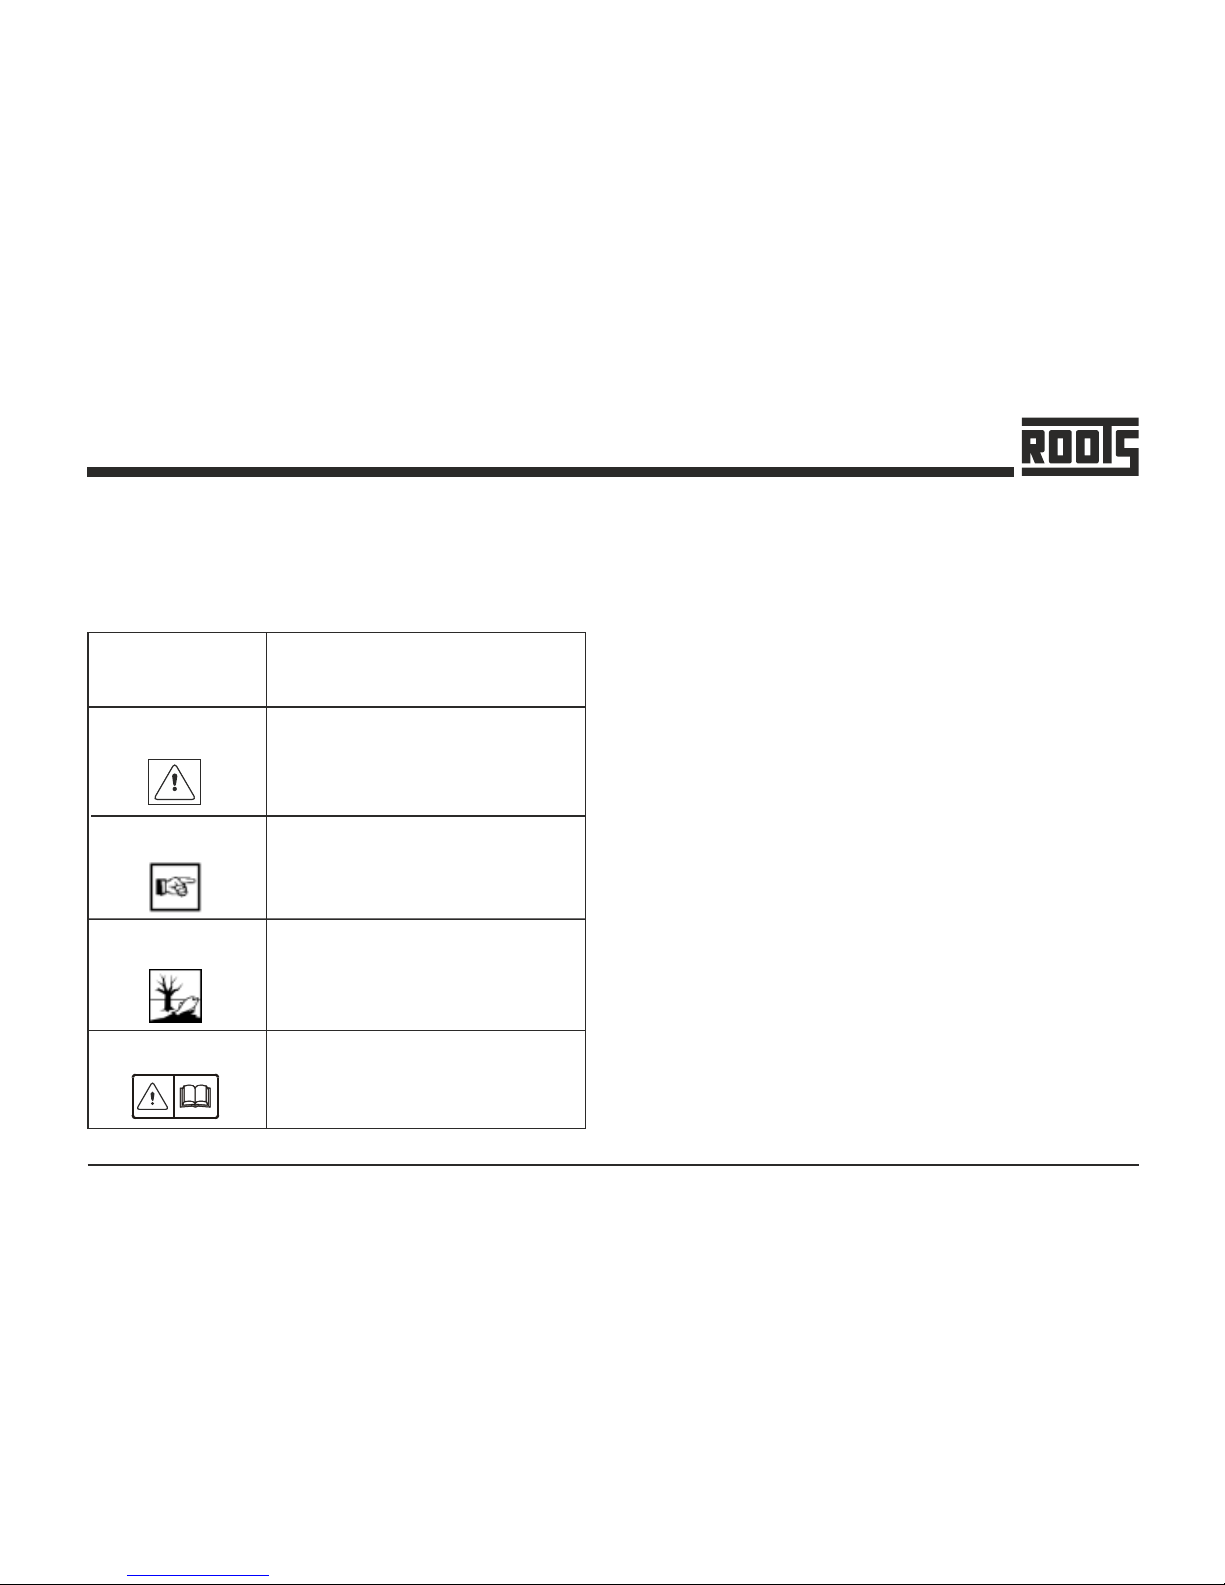
All paragraphs in this manual referring to you personal safety,
the safety of your machine and the environment protection are
attributed one of the following warning symbols.
General Guidelines
Ÿ This machine is for WET scrubbing only.
Ÿ Apart from information contained in this manual,
generally applicable legal provisions for safety and
prevention of accidents must be adhered to.
Ÿ Do not put this manual aside without having read it, even if
you have already operated similar floor cleaning
equipment before.
Ÿ Allow yourself the time to do so in order to save time at a
later time.
Ÿ The operator is responsible for all persons in the working
area.
Ÿ Children must be kept away from the machine during
operation.
Ÿ No person must be allowed to stay in the zone of
danger.
Ÿ The warning and instruction plates attached to machine
give important advice on safe operation.
Ÿ Replace lost or illegible stickers.
Ÿ Before starting to work, the operator has to check that the
machine and its working implements are in proper and
safe operating condition.
Ÿ Machines with known defects must not be used.
Ÿ It is important for operators and all persons likely to use the
product, to familiarize themselves with all accessories and
controls, as well as their functions, before starting
operations.
GENERAL SAFETY INSTRUCTION
Safety & Warning Symbols
Symbol
(Hazardous for)
Description
Safety Provisions
Caution
Ecological hazard
Read Manual
(persons and goods)
(the machine)
(the environment)
Prior to first operation, read the manual
carefully and strictly comply with the
instructions contained.
Due to use of substances representing
an inhere nt dan ger to he alth of
environment.
Important information on handling the
m a ch i ne i n o r de r t o m a in t ai n
operability.
Safety provisions i n dangerous
situation caused by misuse inaccurate
adherence of instruction or prescribed
work routine.
Page 9
9
Wizzard
Ÿ you Abiding by the above general instructions can help
avoid having to read this book while trying to run the
machine.
Ÿ This machine must only be used for the manufacturer’s
approved application as described in this manual.
Ÿ The machine must be kept clean and in good condition, if
any parts are damaged they shall only be replaced by an
approved part by the manufacturer, its service agent or a
similar qualified person in order to avoid a hazard.
Ÿ Only genuine accessories and spare parts provided with
the machine or those approved by the manufacturer
should be used. All repairs must be performed by a
qualified service agent.
Safety during machine operation
Ÿ Floor cleaning machines may be run by qualified
personnel only.
Ÿ The machine may be used for cleaning such surfaces
approved by the owner or this authorized representative.
Ÿ The operator must use the machine in accordance to its
intended fields of application.
Ÿ The machine must be unpacked and assembled in
accordance with these instructions before connecting to
the electrical supply.
Ÿ During operation, the operator must take account of local
conditions (stairs, obstacles) and of other persons,
particularly children.
Ÿ This machine is for dry indoor use only and should not
be used or stored outdoors in wet conditions.
Ÿ Take care when using a machine near the top of stairs to
avoid over balancing.
Ÿ Keep hair, loose clothing, hands, feet and all other parts of
the body away from openings and moving parts.
GENERAL SAFETY INSTRUCTION
Use only genuine spare brushes as specified by the
manufacturer. Use of other than the indicated brush
types may affect safety.
Never collect explosive fluids, undiluted acids and
solvents. This includes e.g. gasoline paint thinners or
fuel oil, which-when combined with air, may form
explosive vapors or mixtures. Acetone, undiluted
acids and solvents can be aggressive to the material
used for the machine components.
- Do not clean the machine by means of vapour jet or
high pressure cleaning equipment.
- Do not USE the machine on steps.
Page 10
10
Wizzard
The machine may be used only on indoor hard
floorings and for operation on level grounds with a
maximum inclination of up to 2 %.
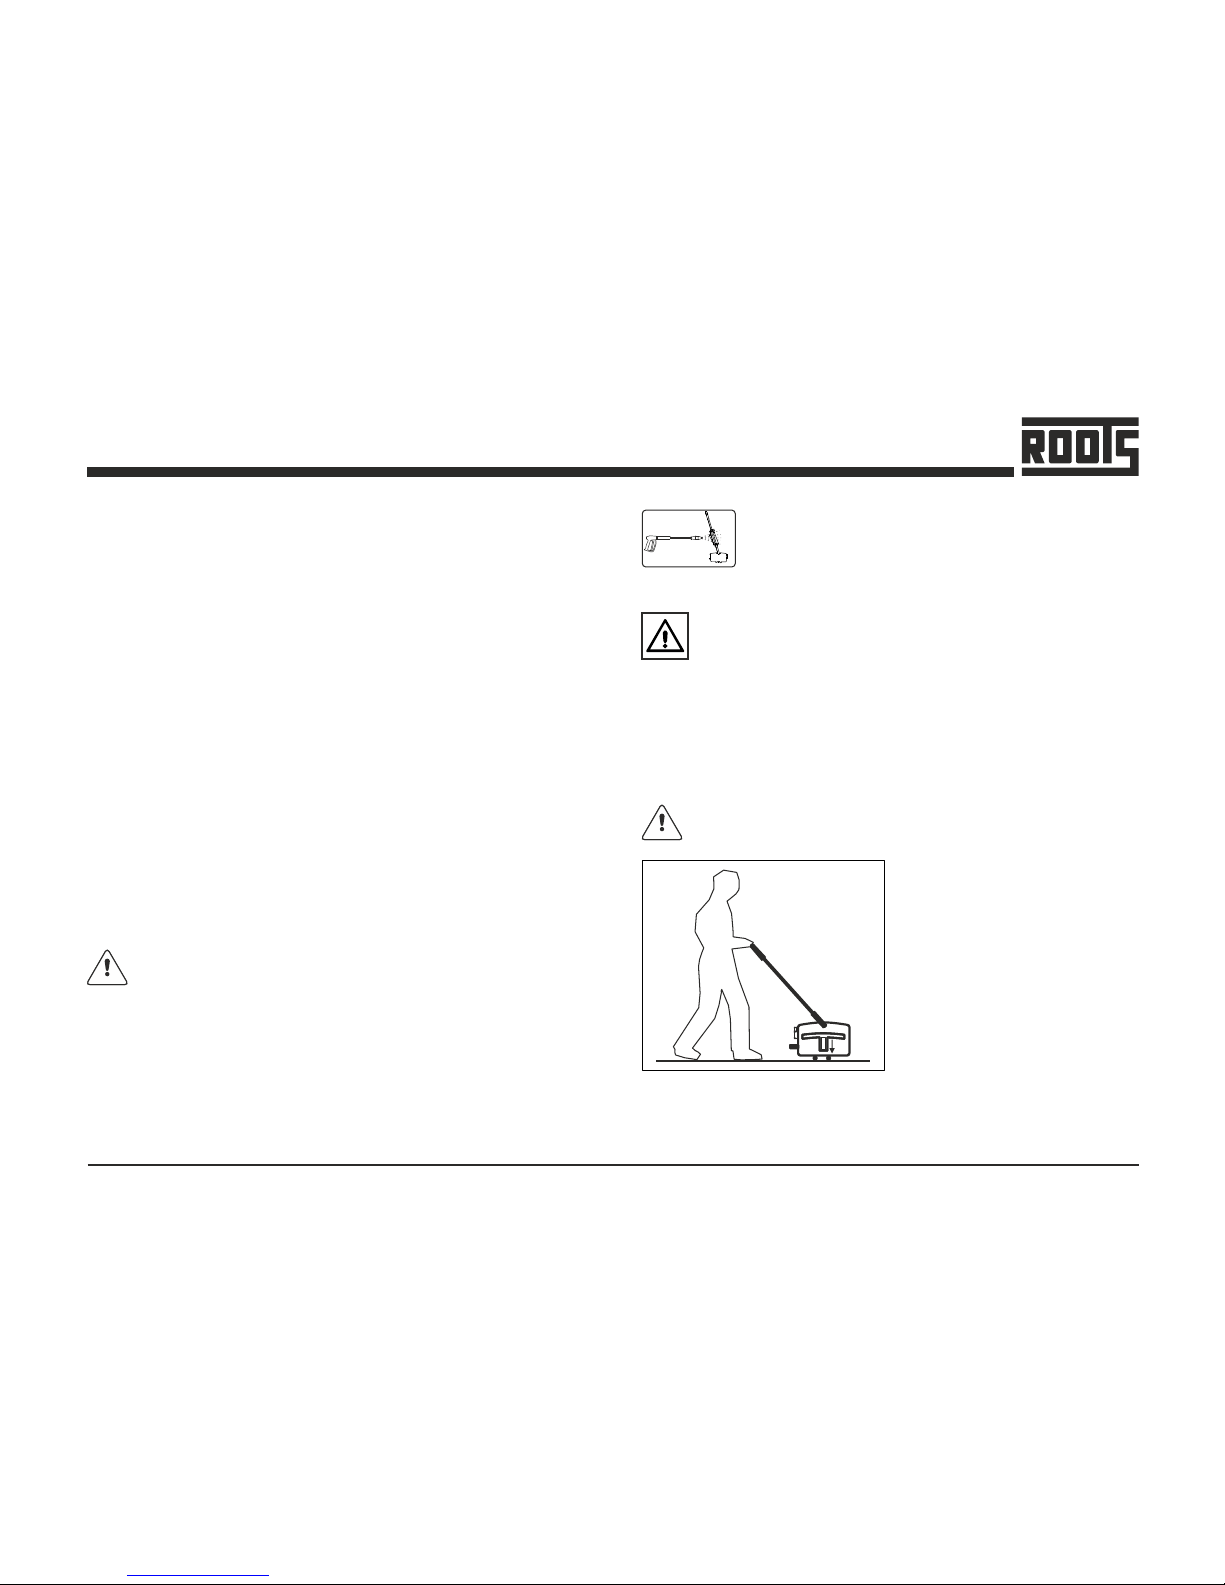
Before moving the machine select the Transport mode.
- Use of the machine in areas prone to explosion hazards is
strictly forbidden.
Transport
Incorrect lifting techniques may result in personal injury. We
advise that the manual handling regulations are followed.
Carefully wrap the charger supply cord and store in dry indoor
location. Do not expose the machine to rain or moisture.
GENERAL SAFETY INSTRUCTION
Slide the knob to BOTTOM position to move the machine from
one place to other place and to park the machine.
Ÿ This machine should always be connected to a fully earth
power supply of the right voltage and frequency.
Ÿ When working on the electrical system, always disconnect
the cable.
Ÿ Keep the power supply cord away from moving parts.
During operation, hazard may occur when running
machine over the power cord.
Ÿ It is not permitted to use aggressive and corrosive cleaning
agents.
Ÿ DO NOT run the machine dry, as this could damage the
floor surface or the machine itself.
Ÿ Take adequate care to hold the machine firmly while
installing and removing the brush.
Ÿ Never use excessive foaming or highly corrosive cleaning
solutions.
Ÿ While operating on a flooded floor, always ensure that the
water level does not exceed 1 mm.
Ÿ DO NOT operate this machine on rough uneven surface
like industrial concrete floor.
Ÿ Ensure all parts are fitted properly before operation.
Do not direct water or other liquids into the
electrical control unit of your machine, risk of
damaging the equipment or short circuit.
Do not clean the machine by means of
va pour j et or hi gh pressur e c leaning
equipment.
X
Page 11
11
Wizzard
FIRST OPERATION
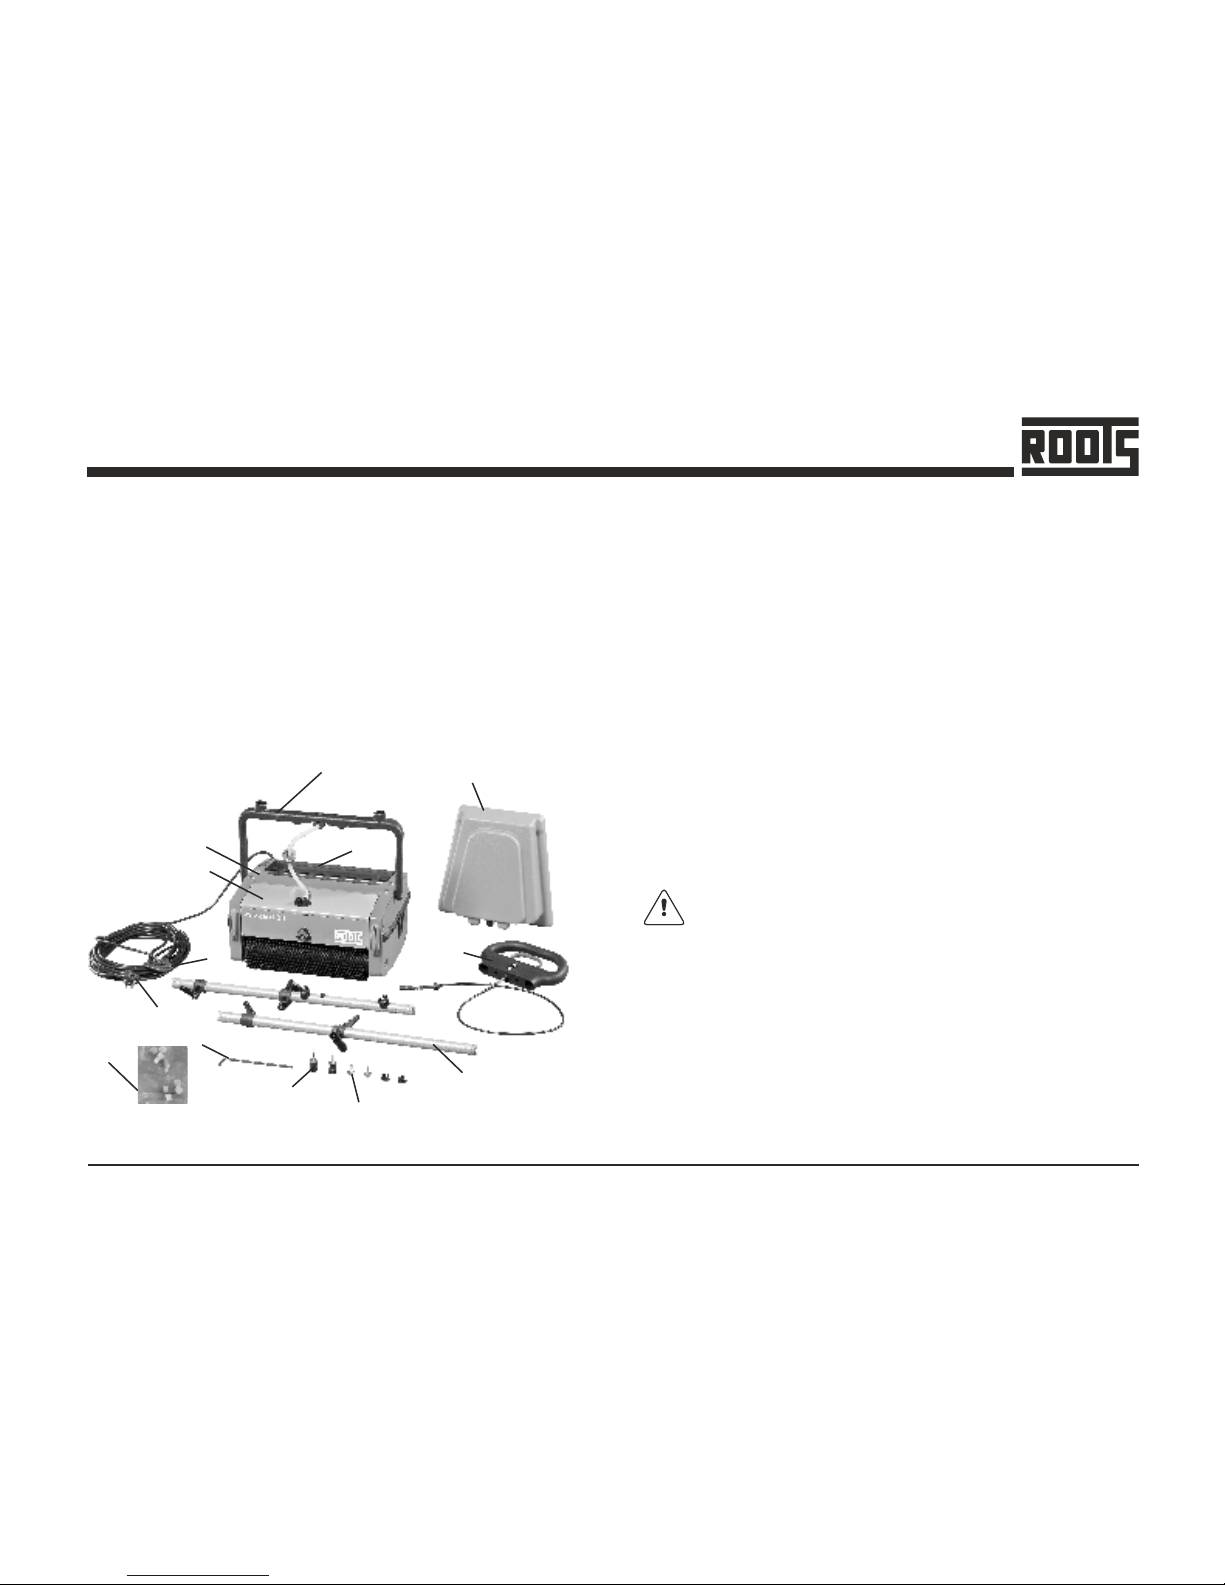
Unpacking & Handling
1. Bottom handle
2. Machine body
3. Pump Housing (P) /
Fresh water tank(N/T)
4. Auxillary Tank (T/P)
5. Top handle & pull cable
6. Handle LH & RH
7. Allen key
8. Screws & washers
9. Cable retainer
10. Power cord
11. Dirty water tank
12. Knob
13. Brush buttons
Ÿ To save packing space and to ensure the safety of the
machine during transporting, the WIZZARD comes to you
with its handle dismantled. Ensure that the listed parts are
present as shown and identify them in order to understand
the assembly instructions.
Ÿ Remove the rubber band which holds the bottom handle
with the machine body while holding the bottom handle.
Since the bottom handle is spring loaded, the casual
removal of the rubber band may result in sudden spring
back leading to possible injury to personnel.
It is an ideal machine to clean hard floors in small and medium
areas like offices, hospitals, restaurants, shopping complexes
and in many commercial applications. It dispenses / sprays
plain water / detergent solution, scrubs and picks up the dirt
water - all in a single pass. It has different optional brushes to
suit a variety of applications. This machine can be used (only)
on smooth even floors like Mosaic, natural stone floors, PVC,
smooth concrete, cut-pile carpet, wood and profiled rubber.
1
2
3
4
5
6
13
12
8
7
9
11
10
Page 12
12
Wizzard
(10)
(12)
Fig. e
Fig. g
(14)
Fig. d
(2)
(2)
(1)
(4)
(4)
(3)
(6)
(13)
(11)
(11)
(7)
(5)
(5)
(9)
(8)
(1)
Fig. a
Fig. b
Fig. c
Fig. f
Fig. f
FIRST OPERATION
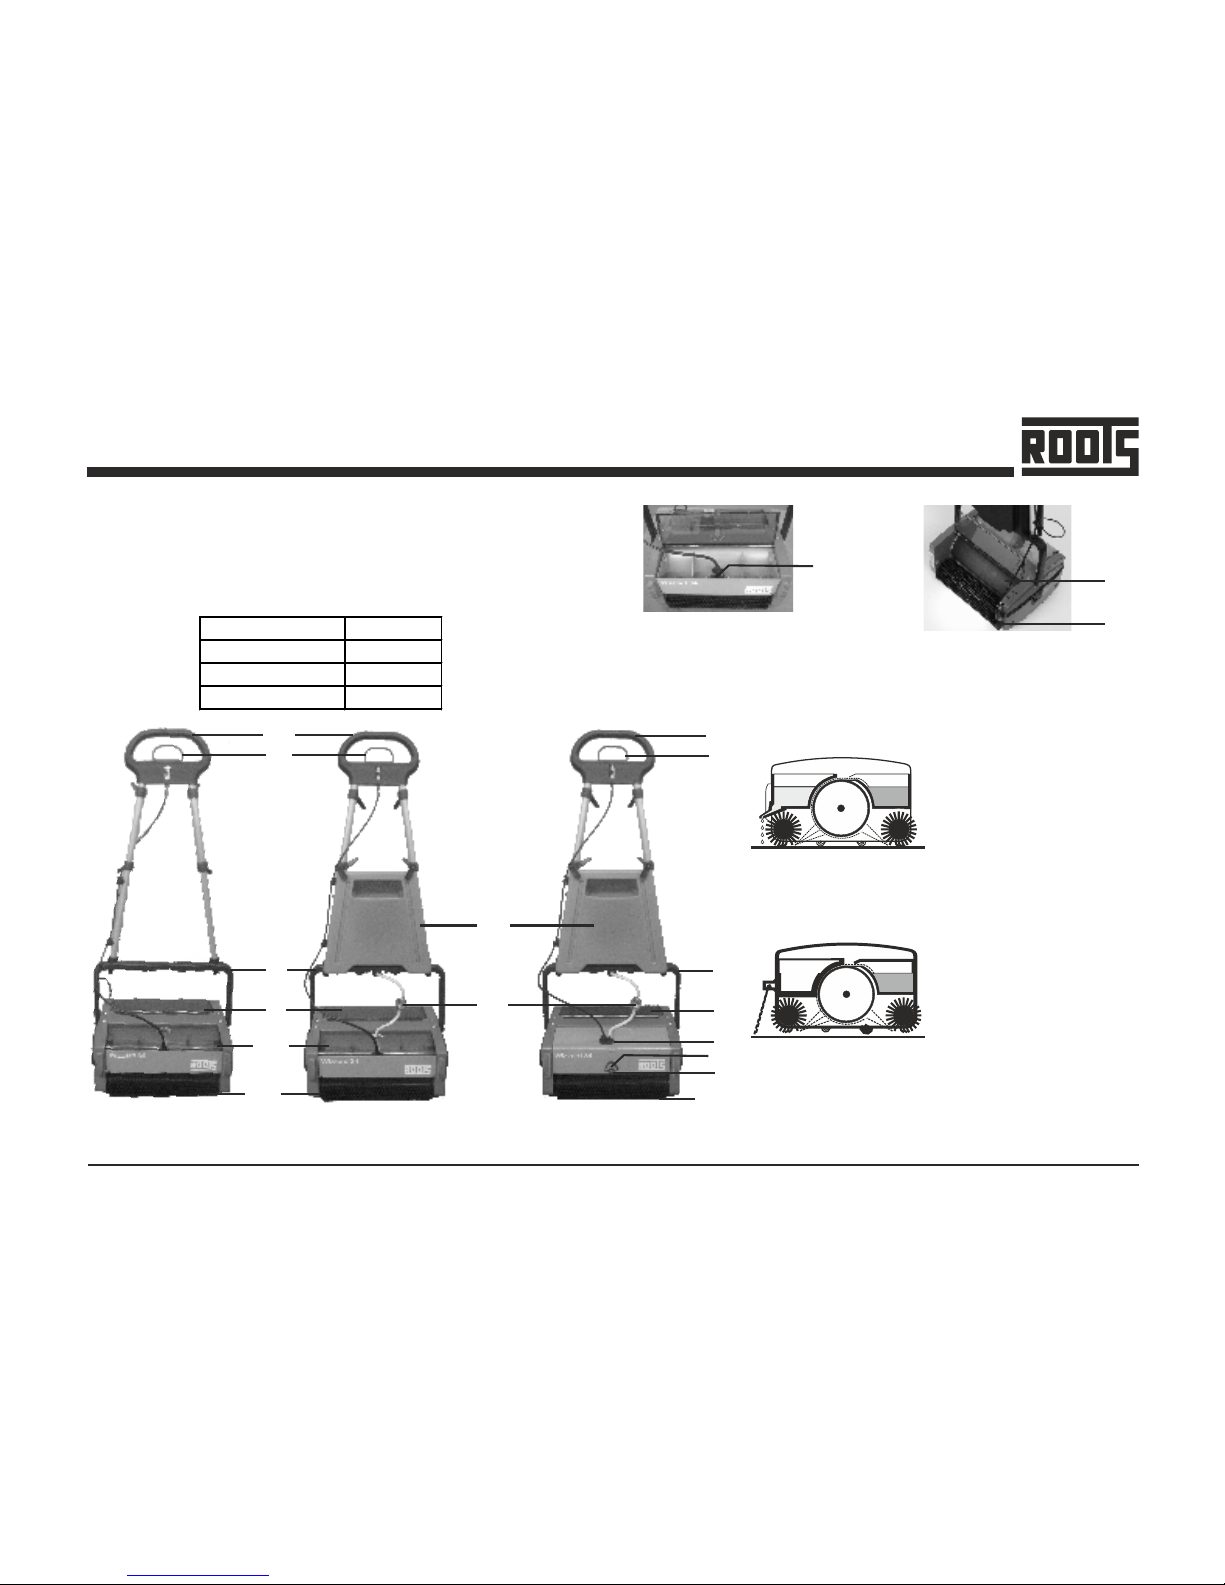
Identification of Main Parts
Note: 24 / 34 / 44 refers to the machine width in cm. Refer the
given table for your model.
Model Figure
N - Natural model a,d,e,f
T - Tank model b,d,f
P - Pump model c,e,g
(1)
(2)
(3)
(4)
(5)
(6)
(7)?
(8)
(9)
(10)
(11)
(12)
(13)
(14)
Top handle
Liquid discharge
control handle
Tank
Bottom handle
Dirty water tank
Filter
Lid cap
Boot
Nozzle
Conveyor drum
Brush
Pedal
Fresh water tank
Strainer
Page 13
13
Wizzard
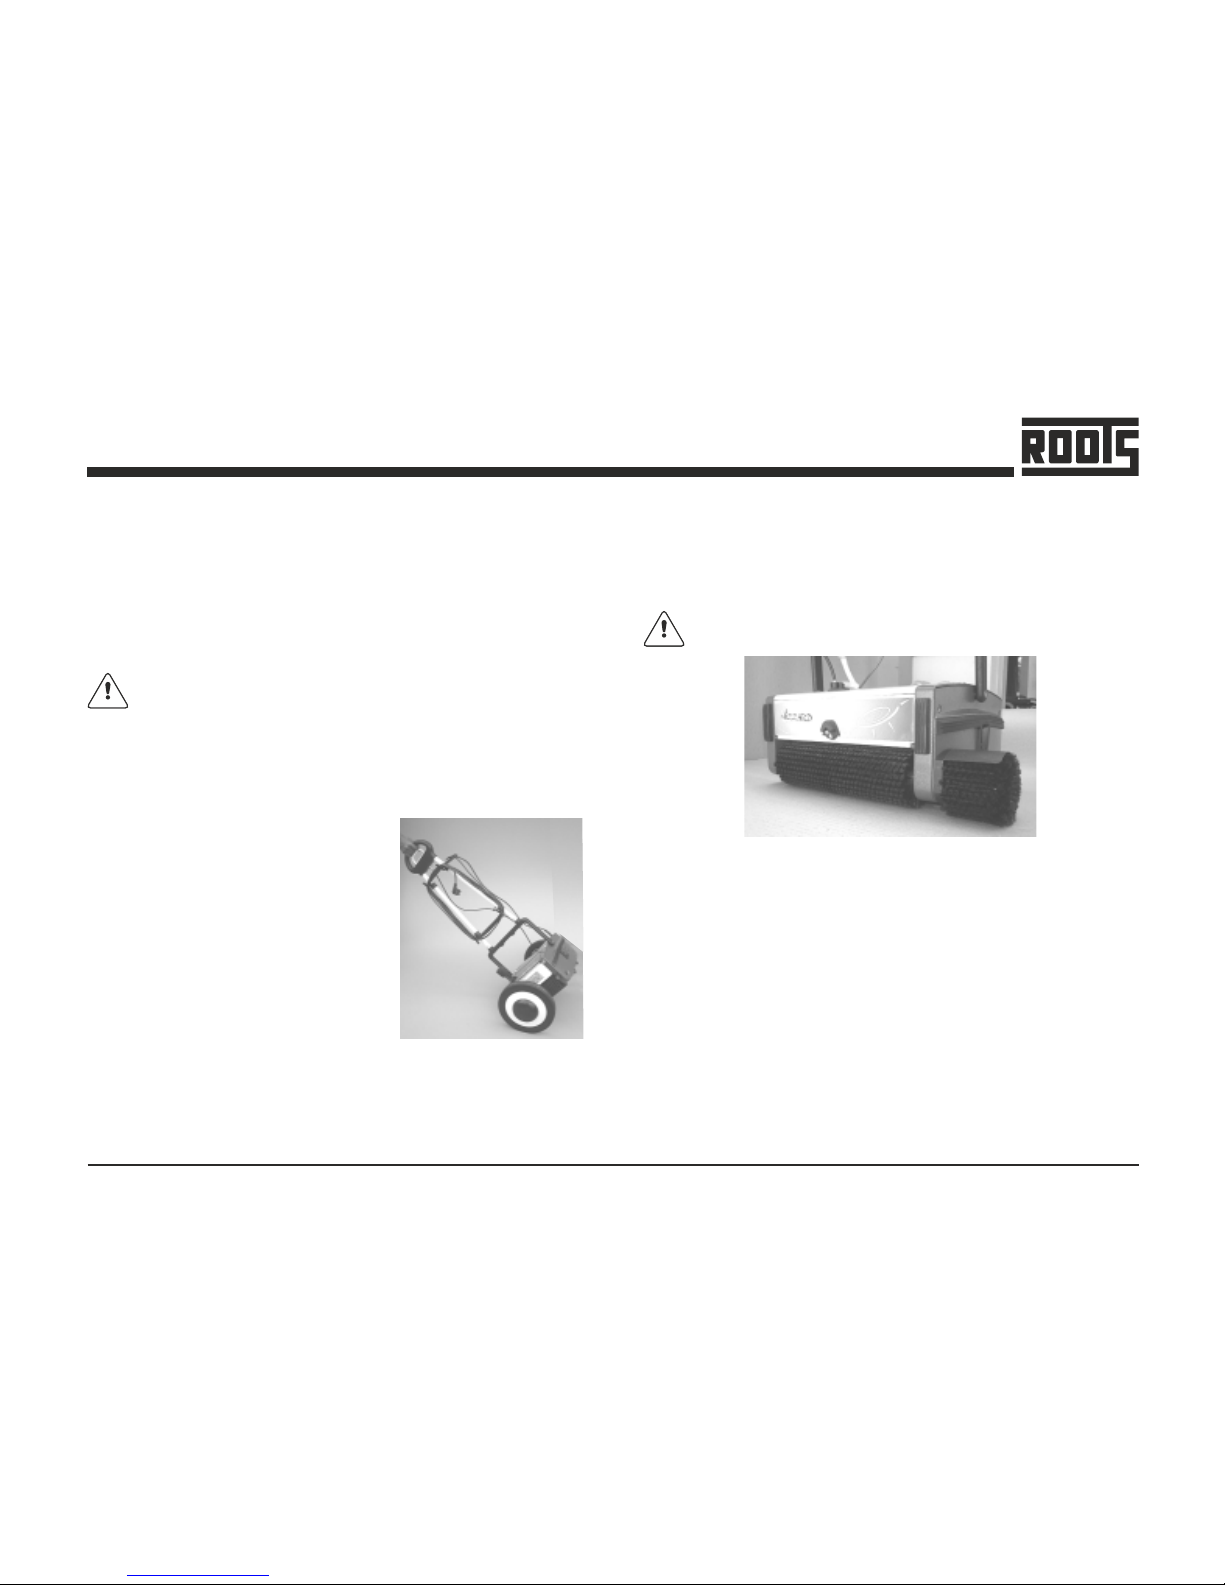
2. Side Brush
To wash the edges, the side brush shall be used. Switch off
and unplug the machine before fitting the side brush.
Warning! Do not use side brush in a room with no wall
skirting, otherwise, the wall will get dirty.
Fitting the side brush
Ÿ Remove the front brush and brush shaft.
Ÿ Fix the shield assembly on the side plate.
Ÿ Insert the side brush through the shield and main brush.
Using the side brush
Ÿ Tilt the machine at an angle move forward. This way, the
dirty water thrown by the side brush will be collected by the
rear brush.
Ÿ Use side brush only for washing the edges.
Installing the Transporter
Ÿ With the machine handle in the
u p ri g h t p o si t i o n p la c e t h e
transporter centrally alongside the
machine.
Ÿ By holding the machine firmly,
strap the velcro with the machine
to fix the transporter.
Ÿ En s ure tha t t he velcr o s trap
properl y wrapped aroun d the
bottom handle.
Ÿ Now the transporter is ready to
use. The machine can then be
maneuvered easily whilst holding
the top handle.
FIRST OPERATION
Optional accessories
1. Transporter
The simply fitted trolley provides for ease of movement when
transporting the machine.
Empty all liquid from the machine before using the
transporter.
Page 14
14
Wizzard
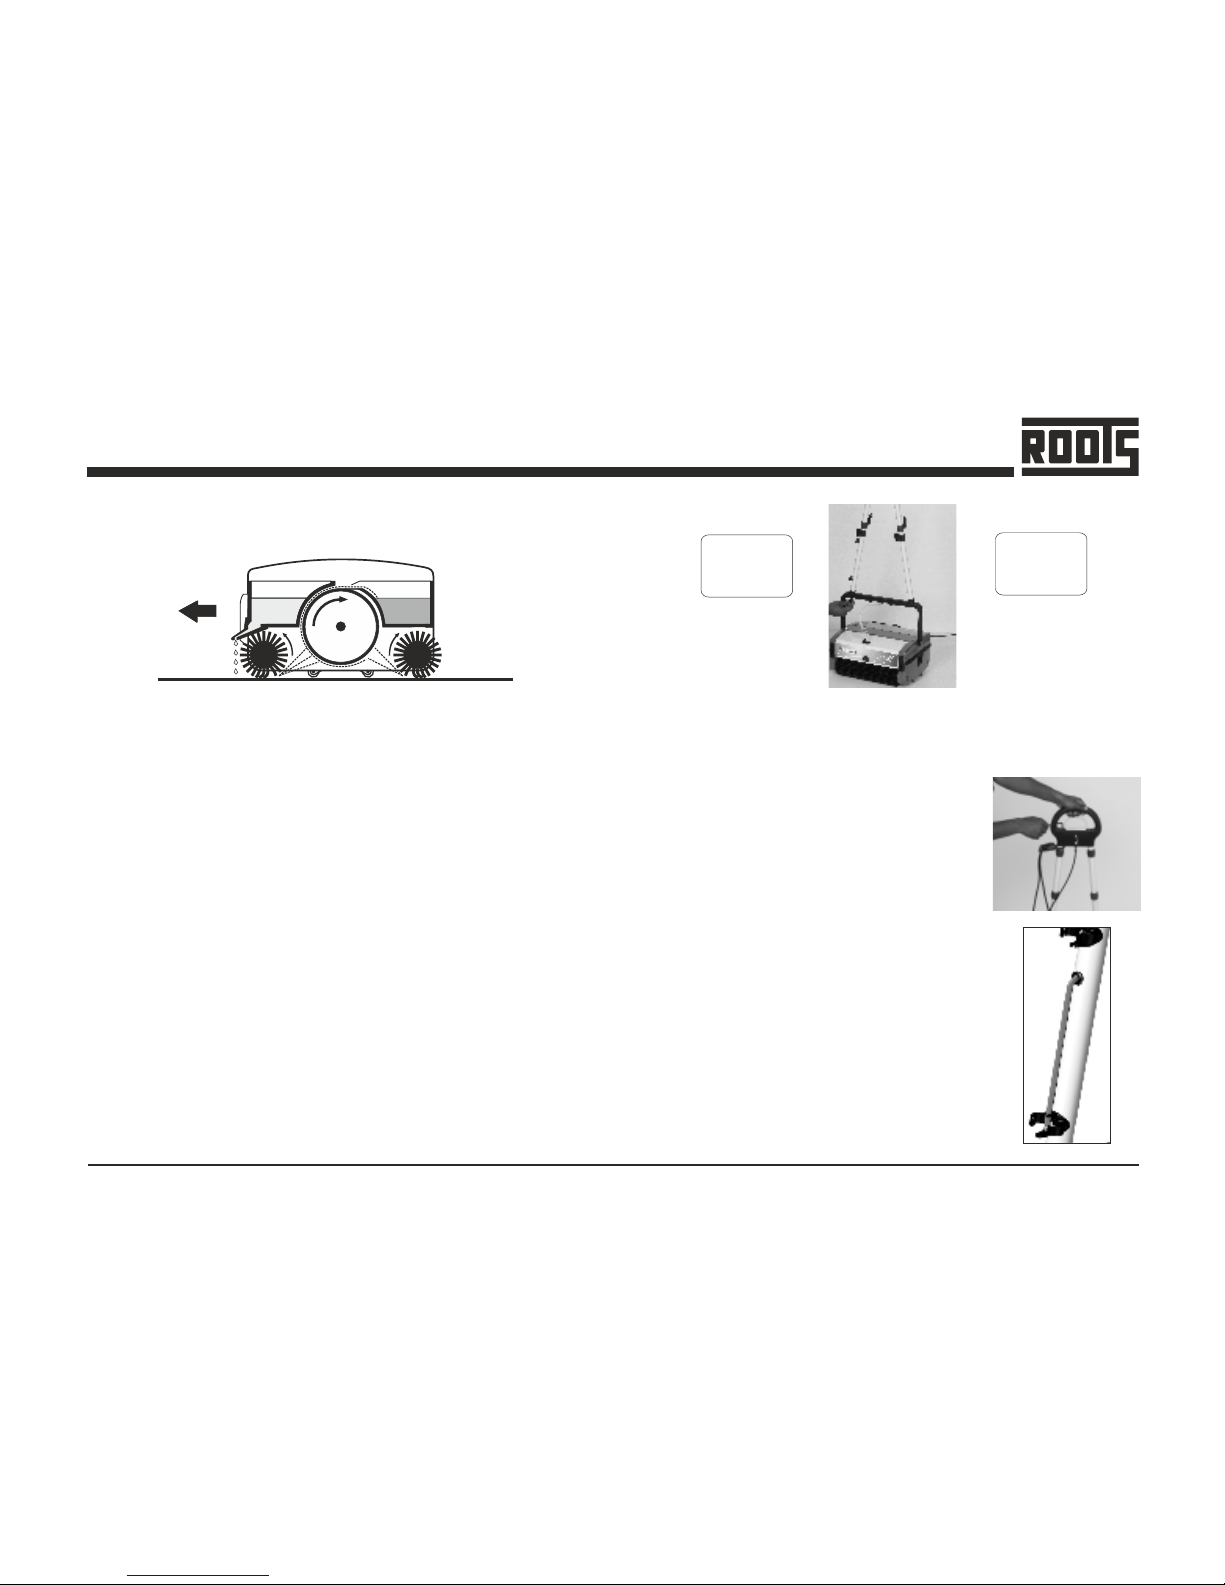
Principle of Operation
Front
Ÿ Cleaning liquid in the solution tank is applied to the floor by
either dripping (N/T) or spraying (P).
Ÿ The counter rotating brushes scrubs the floor and also
throws the dirty water on the Conveyor drum. The front
brush does most of the scrubbing and drying. The rear
brush completes the scrubbing and collects the remaining
water off the floor.
Ÿ A blade fitted to the dirty water tank wipes the drum and
collects the dirty water.
Before Operation
Ÿ Insert the two tubular handles into the bottom handle and
secure them using knob (2 Nos) by tightening lightly.
Ensure that the handles are assembled according to their
marked position and the cable holding hooks are pointing
towards the rear.
Ÿ Slide the electric cable retainer into the top portion of RH
handle.
Ÿ Fit the top handle over the tubular
handles and secure them with washer
and screw (2 sets). Ensure that the
label on the top handle is facing the
front of the machine. Now tighten firmly
both the knobs and screws alternately.
Insert the dummy caps provided to
cover the screws (2 nos) in the top
handle.
Ÿ Pass the free end of the pull cable
through the plastic guide in RH Handle.
Press and twist clockwise to firmly
secure the cable end to the fresh water
tank (N / T).
Ÿ Fix the auxillary tank firmly into the
bottom handle by holding the top
handle.
L E F T
B O T T O M
R E A R
R I G H T
B O T T O M
R E A R
FIRST OPERATION
Page 15
15
Wizzard
Ÿ Rotate the knob to hold the auxillary tank.
Ÿ The brushes are only loosely packed in the machine for
transit, therefore the brush shafts must be fitted before
operating the machine. Push the shafts through the
brushes from the side of the machine. To remove brushes,
push the brush shaft out from the side of the machine using
the fingers and withdraw the shaft. Normally standard
brush type will be supplied with the machine. Brushes shall
be selected according to the type of floor surface to be
cleaned, and the degree of dirt to be removed, please refer
Brush Selection Guide.
Ÿ Now machine is ready for use.
Ÿ Secure the allen key in the slot provided in the handle tube
for further usage.
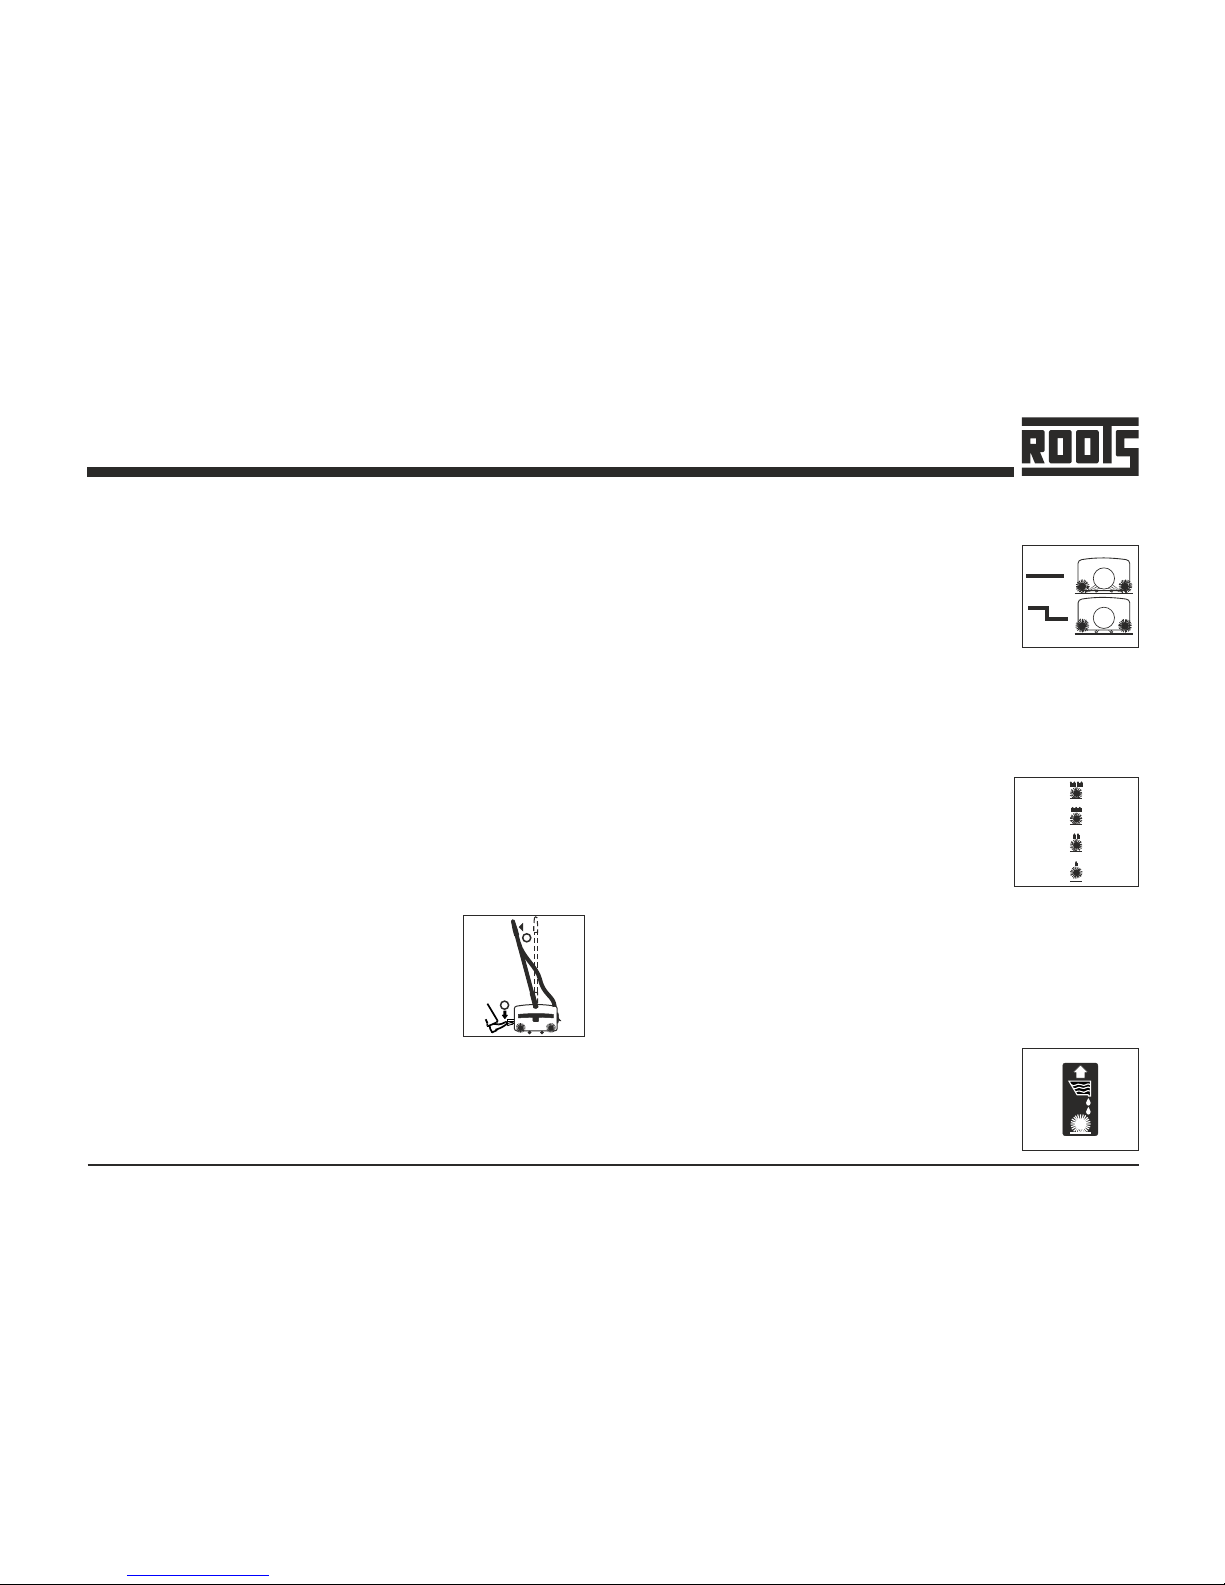
Operating & Indicator Elements
On/Off Control
Ÿ By pressing the pedal lightly with your
foot, pull back the handle a little to start
the motor. The brushes and the drum
starts rotating. Pulling the handle further
without pressing the pedal, lowers the
machine and engages the rotating
brushes onto the floor. To stop working,
take the handle to the vertical position.
1
2
OFFON
Ÿ Brush contact with the floor is adjustable
in 4 steps, contact is MINIMUM when the
knob is fully down and MAXIMUM when it
is f u l l y raised . T h i s helps y o u t o
compensate for the wear of brushes and
also to control the scrubbing effect. If there
is no machine moveme n t wh i l e i n
operation (working mode), change the
knob position to one step up.
Ÿ Slide this knob to TOP position (Working
Mode) to operate the machine. Slide this
knob to BOTTOM position to move the
machine from one place to other place and
to park the machine. By keeping the knob
to top position (working mode) and moving
the machine will damage the brushes.
Transport/Working Mode Control
Brush Contact Control
Ÿ By pulling, the liquid discharge control
handle up, the cleaning liquid is made to
spray on the floor. The spraying stops once
the liquid discharge control handle is
released.
Cleaning Liquid Discharge Control
FIRST OPERATION
Page 16
16
Wizzard
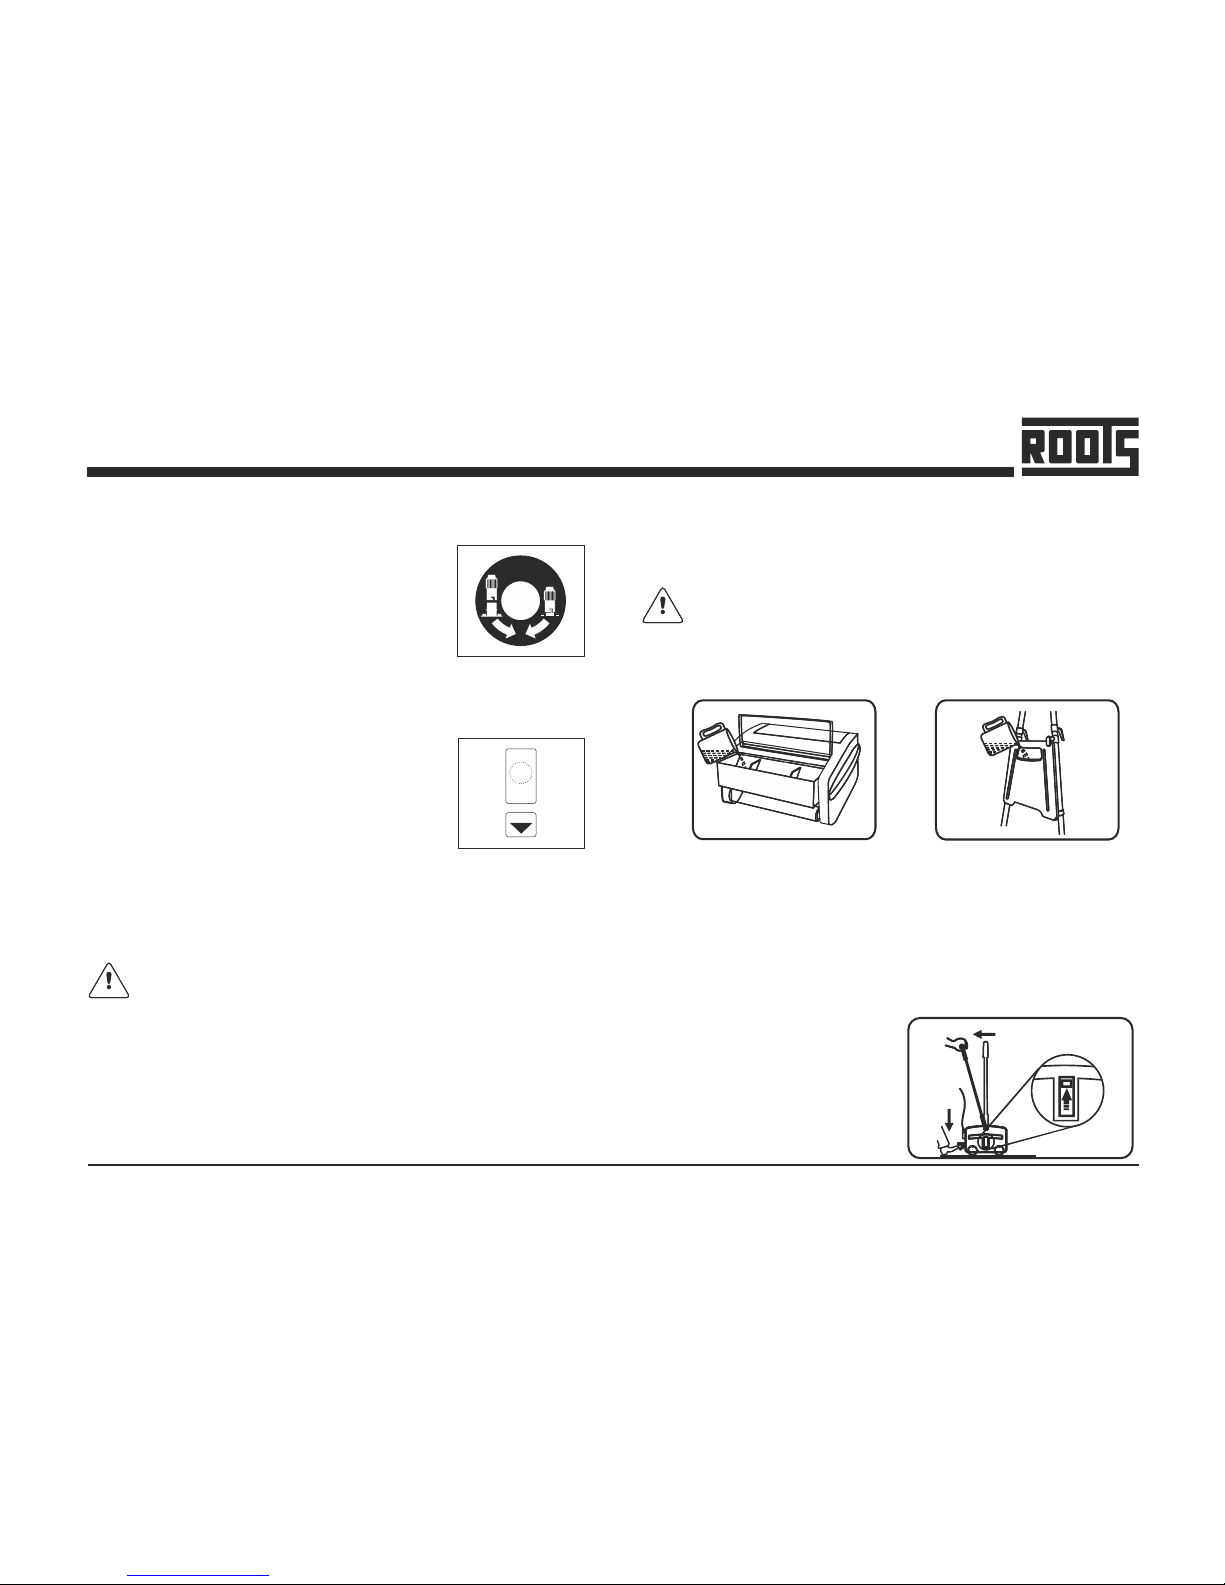
Ÿ Insert the free end of pull cable into the
valve body fitted in the fresh water tank.
Press and twist clockwise to secure the
cable end. Similarly, press and twist anticlockwise to disconnect the cable end.
In the event of motor getting overloaded due
to improper power supply or unexpected
obstruction to the brush/drum rotation, the
over load protector trips and protects the
motor from damage. If this happens, identify
the cause, correct it and, reset the protector
button after minimum 30 seconds from
tripping by pressing the over load protector
manually and continue working.
Motor Overload Protector
Pull cable connect / disconnect control
BEFORE
R ES E T
WAI T
SEC OND S
30
!
PR ES S
Should the machine fail to operate, contact the supplier
from whom you purchased the machine.
MACHINE OPERATION
MACHINE OPERATION
Before the washing operation starts
Ÿ Fill cleaning liquid in fresh water tank (Fig-i)
Precleaning of floor is must before using the machine.
Model (T/P)
(i)
(i)
Model (N)
Ÿ Insert the plug into mains 3-pin socket.
Ÿ Ensure that the brushes are fitted properly.
Ÿ Slide the transport/working mode control knob to TOP
(working) position (Fig-ii).
Recommended washing sequence
Ÿ Start the machine by pressing the pedal and pulling the
handle back (Fig-ii).
ON
3
2
1
OFF
(ii)
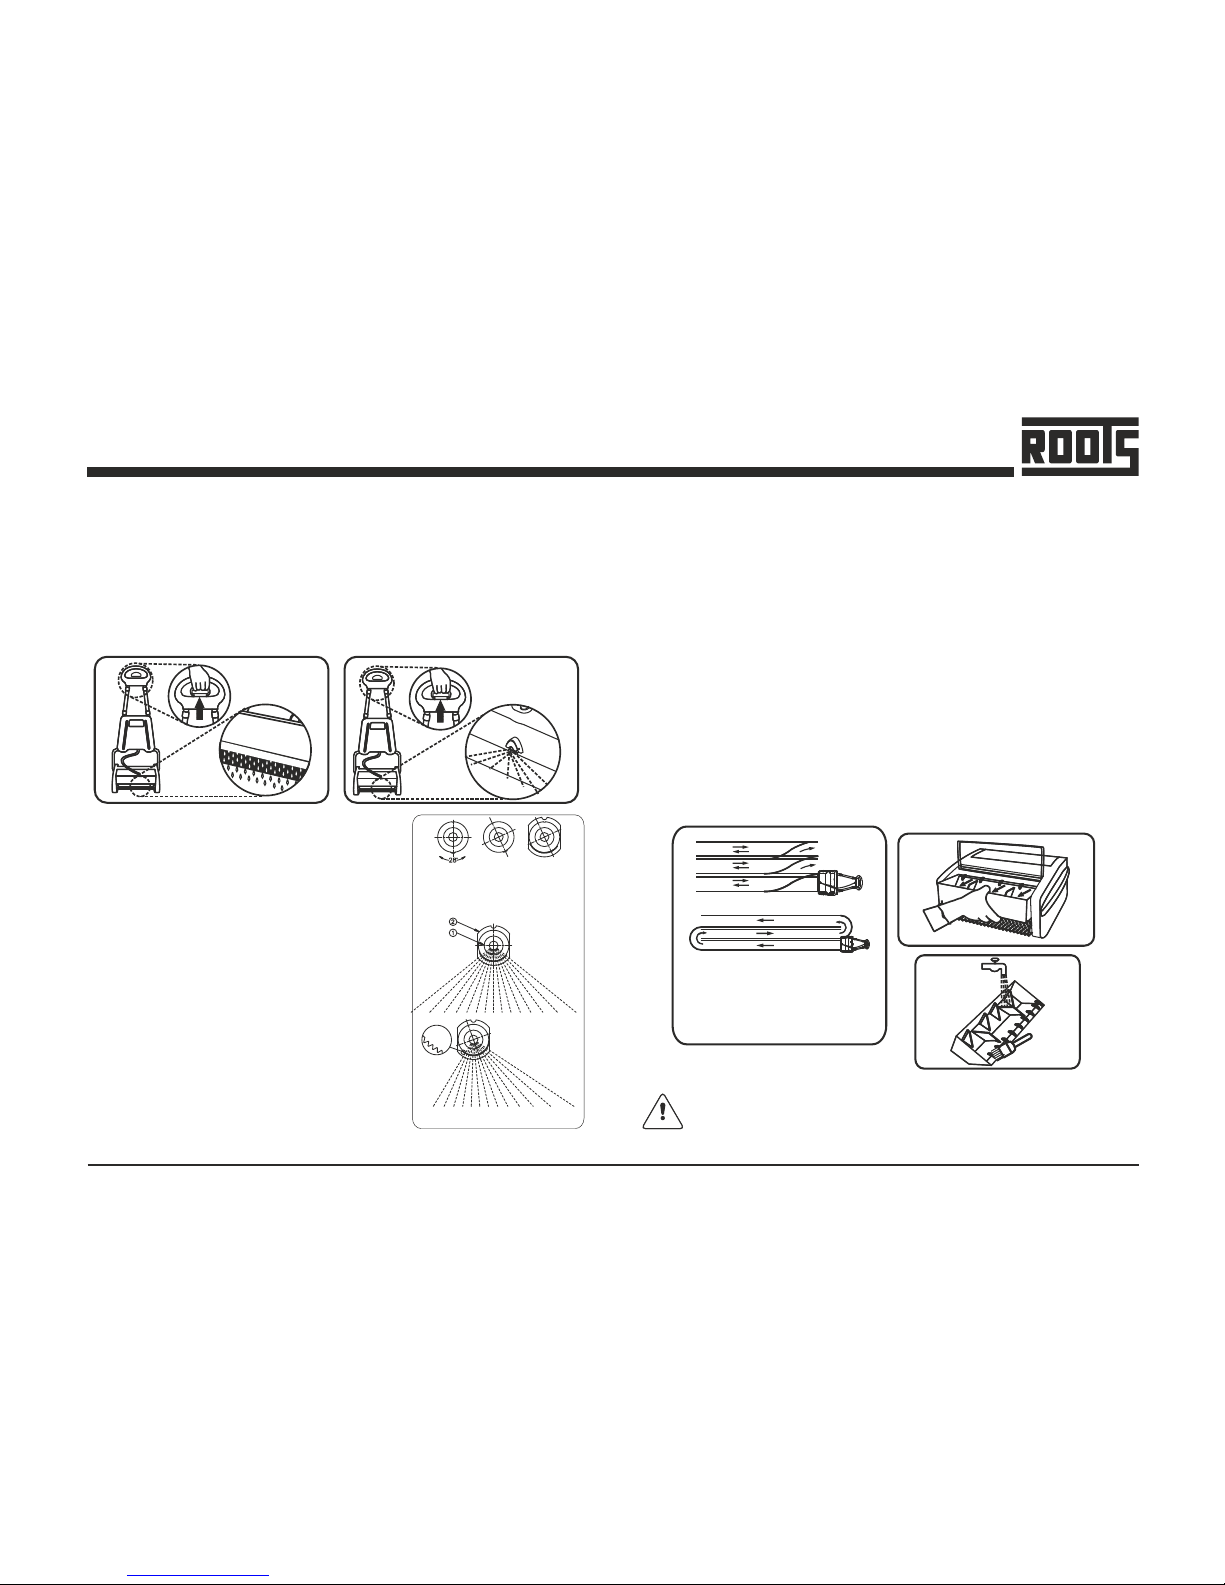
Ÿ M o ve f o rw a rd , w hi le
s p ar i n g ly p u ll i n g t h e
liquid discharge control
handle (Fig-iii). This
Page 17
Ÿ Stop the liquid discharge approximately one foot before
the end of forward motion. continue to move forward up to
the wall without pulling the pull handle.
(iv)
1. Nozzle
2. Nozzle holder
Serrations
(a)
(a) Nozzle at normal position
(b) Nozzle at rotated position
(c) Nozzle inserted inside the holder
at rotated position
(b) (c)
Ÿ Spray angle / area can be controlled
by the user according to their
requirements. It also prevents water
/ solutions sprayed in the cleaned
area. Spray angle of the solution is
made to adjust using the serrations
provided in the nozzle and the
no z zle ho l der. Nozz le can be
rotated about 28 degrees either
clockwise or counter clockwise @
the increment of 4 degree (Fig-i v).
(a)
(b)
(v)
(a) Recommended pattern for
small rooms
(b) Recommended pattern for
large halls
17
Wizzard
Model (P)Model (N/T)
(iii) (iii)
handle should not be kept pulled all the time. The duration
and frequency of pulling and releasing has to be adjusted
suitable to match with the type of floor, extent of dirt. etc.
For ceramic & granite floors, apply very little water.
Ÿ Pull the machine backwards in the same track, but without
discharging any liquid. When you are reaching the starting
point, change the track and repeat steps 2 through 4.
When you are changing the track allow some overlap with
the cleaned area. In case of large halls take a U-turn and
move forward. If quick drying is desired, move on the
same track, without discharging the liquid (Fig-v)
Ÿ When the dirty water tank is full, lift and pull the tank out of
the machine (Fig vi). Empty the tank and wash it in running
water or dip it in a bucket of water (Fig-vii). Clean the
blades and push the tank into its place.
(vi)
(vii)
Avoid touching the sharp edge of dirty water tank, it may
cause injury to hands.
MACHINE OPERATION
Page 18
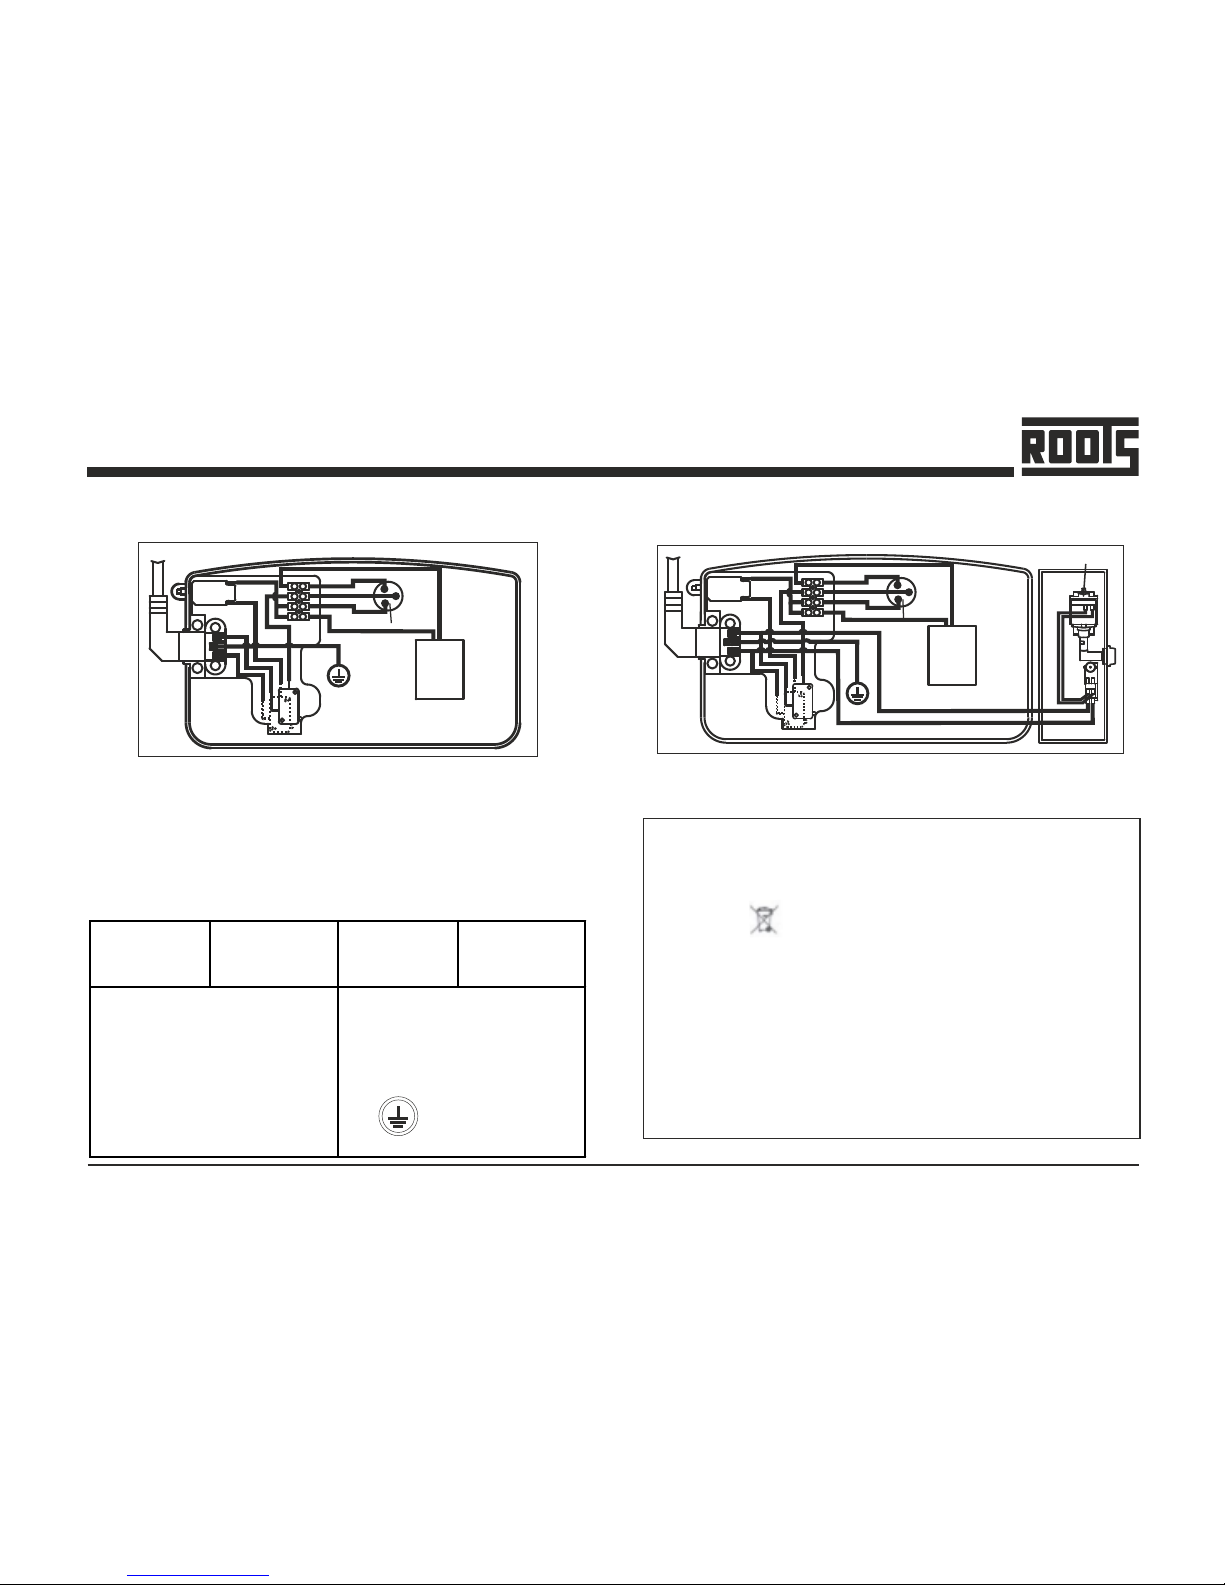
CAPACITOR
928746
SC
BK
R
W
BR
BR
MOTOR
BR
BL
BL
BR/W
BL/BK
G/Y
N
RC
CBE
Electrical Diagram
CAPACITOR
928748
SC
BK
R
W
BR
BR
MOTOR
BR
BL
BL
BR/W
BL/BK
G/Y
N
RC
CBE
BR/W
BL/BK
PUMP
BR/W
BL/BK
Diagram 1(N/T) and diagram 2 (P) are made available in the
cover (Power cord side) of the respective machine for service
purpose.
1. Electrical layout of N/T model 2. Electrical layout of P model
ADDITIONAL INFORMATION-WEEE
( WASTE OF ELECTRIC AND ELECTRONIC
EQUIPMENT )
The symbol on the product or its packages indicates that
the product may not be treated as house hold waste. Instead
it shall be handed over to applicable collection point for
recycling of electrical and electronic equipment. By ensuring
this product is disposed of correctly, you will help prevent
potential negative consequence of the environment and
human health, which could otherwise be caused by
inappropriate waste handling of this product, please contact
your local city office, your household waste disposal service
or shop where you purchased the product.
18
Wizzard
Abbreviation
/ Symbol
Description
Abbreviation
/ Symbol
Description
CBE Circuit Breaker G/Y Green / Yellow
BR Brown SC Strating coil
BL Blue RC Running coil
W White N Normal
BK Black Ground
R Red
Abbreviations given in the diagram as listed:
MAINTENANCE
Page 19
(x)
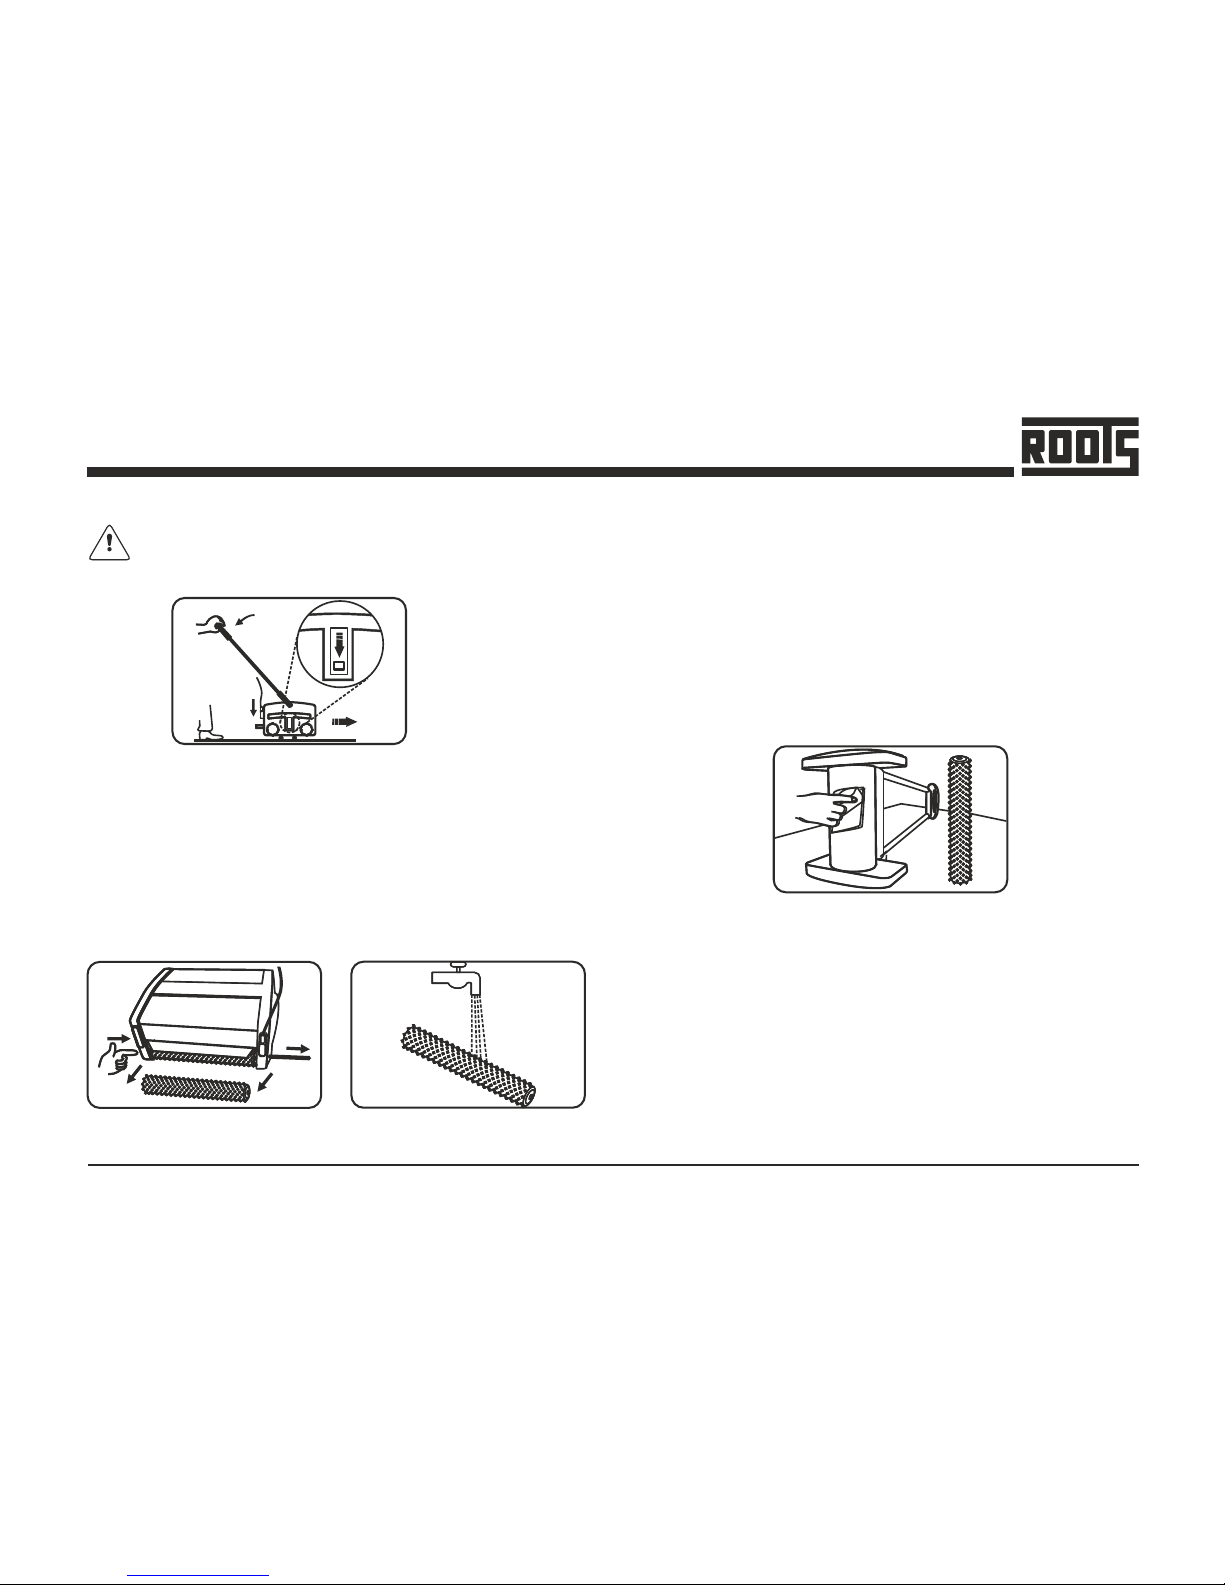
Ÿ Remove the brushes by pushing the brush shaft out (Fig-
ix).
Ÿ Wash the brushes either by dipping in a bucket/sink or in
running water (Fig-x).
Ÿ Turn the machine sideways and wipe clean the conveyor
and machine body with a damp cloth (Fig-xi).
Ÿ Re-install the brushes after washing. It is easier to push
the brush shaft form the right hand side (identified by the
electrical cable).
Ÿ Keep the machine in the safer place.
19
Wizzard
(xi)
Before undertaking the cleaning of machine, switch off
the machine and unplug from the electrical supply.
(viii)
Ÿ Move the Transport / Working mode control knob to
BOTTOM (Transport) position (Fig-viii).
Ÿ Disconnect the power supply by unplugging the electrical
plug and wind the cable over cable holders in the handle.
Ÿ Pull out the dirty water tank and wash it completely.
Ÿ To prevent possible clogging of filter, drain cleaning liquid
and keep the fresh water tank clean.
3
2
1
(ix)
MAINTENANCE
Page 20
20
Wizzard
Brush selection guide
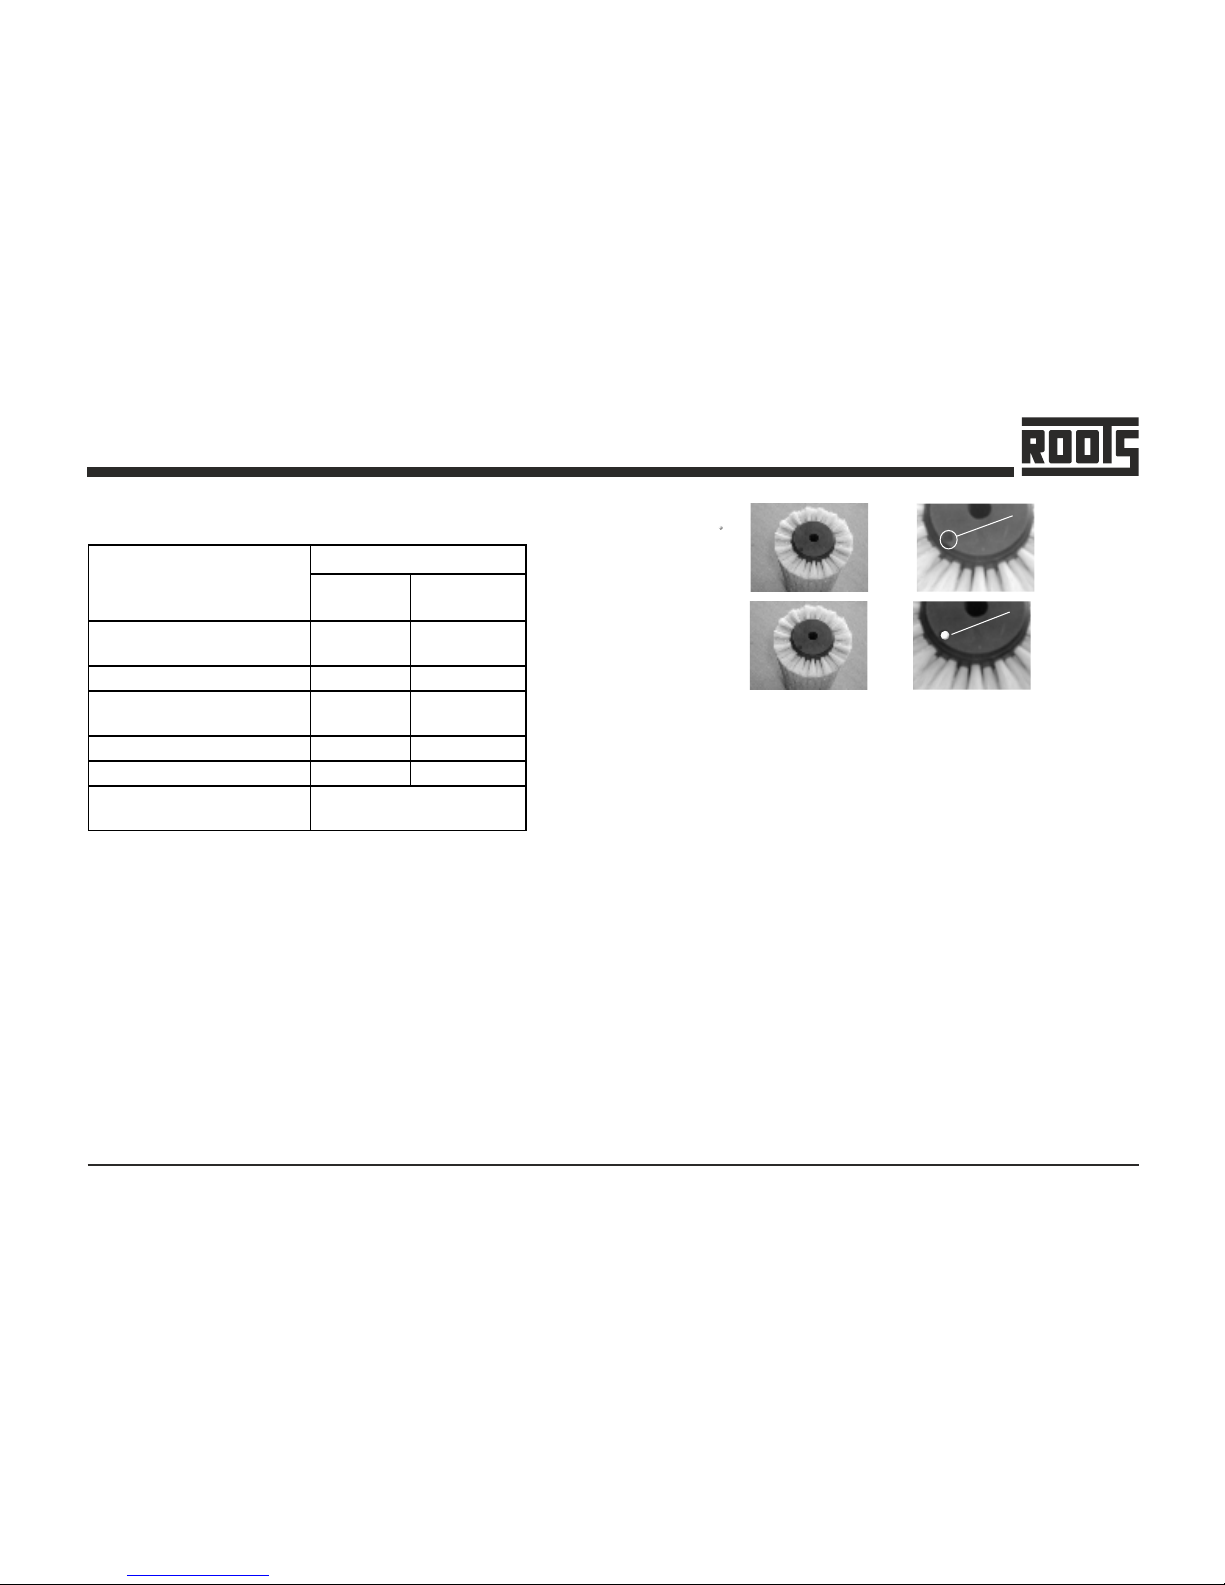
Brush Identification
(b)
(a)
This is applicable when the customer has more than one set of
brushes of same type
.
Example : 2 or more sets of Standard Brush
(a) Hole provided for plugging button.
(b) Brush with button plugged.
Customers may not interested to use same brushes in
Bedroom / Kitchen / germ free area which is already been used
in other areas like Corridor / Bathroom / Oil or chemical
deposited areas. It is difficult for the customers to identify the
particular brush which is used in certain area. To make this
easy, Brush buttons of colors RED, BLUE, WHITE and
YELLOW are packed with the machine. Customers shall plug
the buttons on the hole provided in the brush as shown.
This helps the customer to identify the particular brush by
keeping the button (color) as reference.
First time
cleaning
Maintenance
cleaning
Ceramic, Mosaic, Wood,
Profiled rubber, Vinyl, PVC.
Standard Soft
Short pile carpet Soft Soft
All nature stone floors
(Marble, Granite etc.)
Soft Soft
Smooth concrete Hard Standard
Escalator Escalator Escalator
Other
Brush Type
Type of floor
To suit individual floor
conditions
MAINTENANCE
Page 21
21
Wizzard
Upkeep of your machine
To get the maximum life of the machine ensure the following.
Solution tank filter (N/T)
Ÿ The filter prevents clogging of the drip holes in the tank.
Periodically clean the filter to ensure uniform discharge of
liquid.
Ÿ In case of non uniform discharge from the drip holes, back
flush the tank in running water. Clean the drip holes using
wire or a blunt pin.
Solution feed filter (P)
Ÿ The filter prevents clogging of the spray nozzle and should
be periodically cleaned.
Ÿ Use pressurized air/ water for cleaning.
Nozzle maintenance (P)
Ÿ If the spray of the nozzle become blocked, slide the nozzle
cover off and remove nozzle wash in clean water and
clean using a pin and refit.
Supply cord
Ÿ Regularly inspect sheath, plug and cord anchorage for
damage or loose connection.
Brushes
Ÿ For maximum life wash the brushes regularly. Ensure
machine is in Transport mode when not in use.
Ÿ Store additional brushes in a vertical position to avoid
bending of bristles.
Ÿ Check for permanent bending of bristles in a particular
direction. This may occur if the machine is operated for
several days without removing the brushes, which is not
recommended.
Ÿ If this occurs, reverse the brush so that the bent bristles are
automatically straightened.
Wiper Blade
Ÿ This may wear out after years of use. If this occurs the
water collection performance will decrease. It should be
replaced by an authorized Service Agent.
MAINTENANCE
Page 22
22
Wizzard
Do’s & Don’t’s
Do’s
Ÿ The machine must be disconnected from the mains
supply (by pulling the plug out) before changing the
brushes, cleaning the machine and for maintenance.
Ÿ Use only the brushes/accessories recommended as per
t h e i n st r uc t io n m a nu a l. U s ag e of a n y o t he r
brushes/accessories can cause safety problems.
Ÿ Periodically inspect the power cord for possible damage.
A damaged power cord must be replaced.
Ÿ Regularly clean the Fresh water tank filter.
Ÿ Clea n the water spra y nozz l e re g u l a r l y f o r a n
uninterrupted flow.
Ÿ Increase the brush pressure gradually.
Ÿ Clean the brushes, brush shafts, tanks & drum assembly
after each operation.
Ÿ Before moving the machine select the transport mode.
Don’t’s
Ÿ Do not leave the machine connected to the power supply
when not in use, always remove the plug from the mains
socket.
Ÿ Do not use the machine where hazardous dust is present.
Ÿ Do not use the machine near flammable liquids.
Ÿ Do not use in an explosive atmosphere.
Ÿ Do not use in gradient surface.
Ÿ Do not use the machine without water.
Ÿ Do not use in rough uneven surfaces.
Ÿ Do not allow the mains cable near the brushes during
machine operation.
Ÿ When the handle is in lower position do not leave machine.
Ÿ Do not pull the liquid discharge control handle when the
machine in reverse direction.
MAINTENANCE
Page 23
23
Wizzard
Trouble shooting
Problem Remedy
Drum assembly
not rotating /
Abnormal sound
in the drum
Check the condion of teeth's in the
drum.
Check water level in tank.
Check the pump & voltage supplied
to pump.
Check water level in tank.
Check & clean the inlet filter and
hose.
Clean the water spray nozzle.
Check the position of dirty water tank
with housing.
Check the blade condition in dirty
water tank.
Check the blade for any dirt
blockage.
Check the condition of Drum sleeve.
Cleaning
efficiency is poor
Check the brush pressure & condion
of brushes.
Machine not
collecting the
dirty water
properly
Absence of water
in the floor.
Insufficient water
flow
Problem Remedy
Check the machine mode in Idle
side housing.
Check the power supply.
Check whether the circuit breaker
is tripped.
Check the micro switch, wirings,
capacitor & power supply to brush
motor.
Check the wires for any short
circuit.
Check the current consumption of
the motor.
Check the conditon of bearings in
the drive side.
Check the condition of circuit
breaker.
Water not spraying
Check the function of micro switch
& power supply to the pump.
Brush stops
rotating when
brush loaded
Check the condition of the
capacitor & motor.
Brushes are not
rotating when the
motor is working
Check the belt tension & readjust.
Machine not
getting switched
ON
Circuit breaker
gets tripped
MAINTENANCE
Page 24
24
Wizzard
NOTES
Page 25

Page 26
Roots Multiclean Ltd.
R.K.G. Industrial Estate, Ganapathy,
Coimbatore - 641 006, India.
Phone: +91 (422) 4330 330
E-mail: [email protected]
Web: rootsmulticlean.in
Toll Free: 1800 41 99 77 9
 Loading...