

Page 1
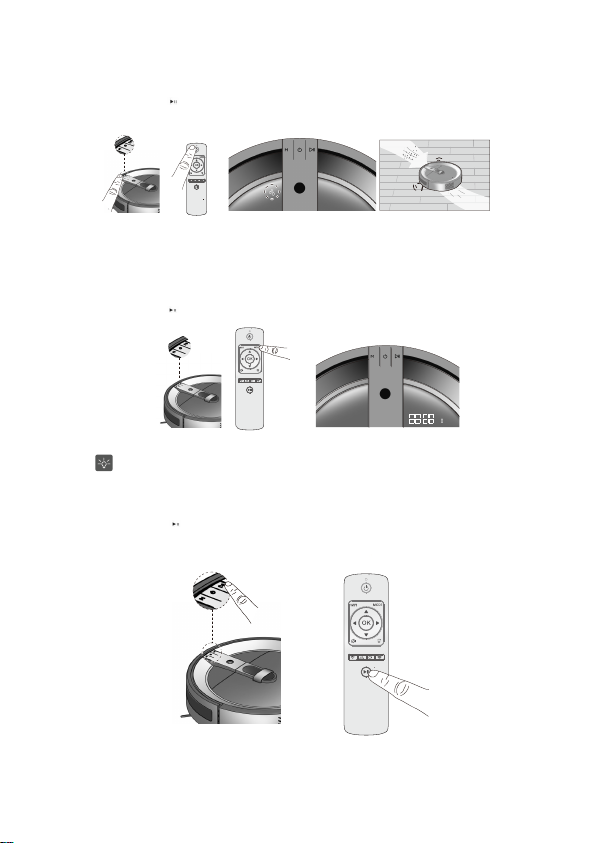
4.Switc h o n t he ho st an d p lace it ba ck to s tar t fro m the ch ar ging st an d.
5. Press the start/stop (
The indicator of the mode will be shown on the screen.
Intensive Cleaning
The ro bo tic va cuu m c lea ner will ta ke t he cu rren t p os itio n a s t he c en ter to cle an in te nsive ly t he s pa ce
aro un d in 1 s qu are m ete r.
1. Turn on thepower switch
2. Press the mode button “M”on t hevacuum cleaner or on the remote control to shift to the mode for intensive cleaning.
3.Press the start/stop (
the mode will be showed on thescreen.
) button on the top of the vacuum cleaneror on the remote control to
) button on the top of the vacuumcleaner or on the remote control to start cleaning. The indicator of
start cleaning.
After the cleaning is finished underintensive cleaning mode, the vacuum cleaner will stop
At a place with too many obstacles,the cleaner may not do the cleaning normally.
Manual Cleaning
The robotic vacuum cleaner canbe operated manually by using the remote control.
1. Press the start/stop (
) button when the cleaning is working,the cleaner will be
15
right there.
stopped.
Page 2
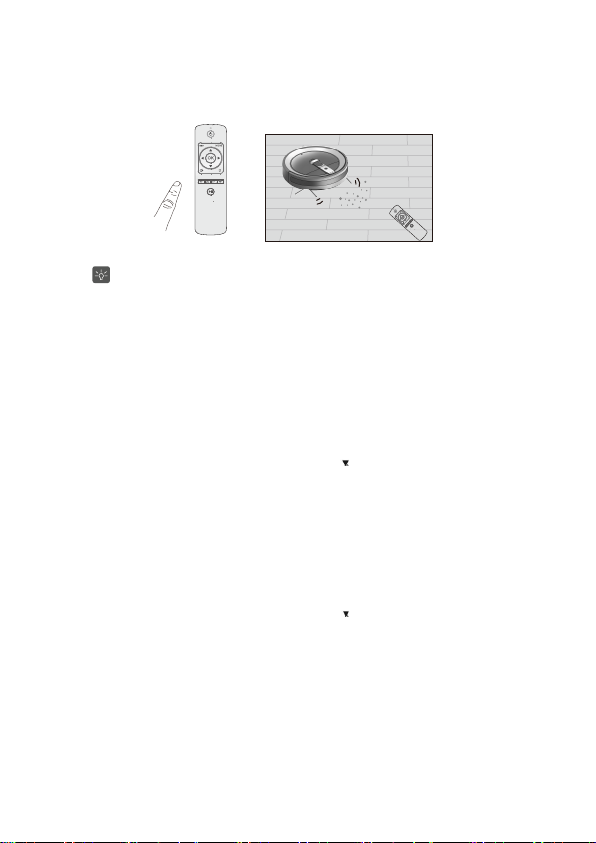
2.Using the direction button of the remote control enables you to operate the robotic vacuum cleaner freely.
Manual operation is not possible duringcharging. It can only be operated without the
Time/Schedule Settings
The robotic vacuum cleaner has the scheduled cleaning function.You can use the remote control to schedule it to clean up at any
time within 24hour a day and 7 days a week.
Before make the schedule, pleaseset the system clock first.
Only when the robotic vacuum cleaneris charging on the charger stand, it can be set.
If the cleaneris charging at the scheduletime settled, it cannot followthe instruction until
Set currenttime
a. Set current weekday
Press ‘Time’button on the remote con
▲
Press ‘
▲
’b uttonto shift from 1 to 7, and the figure 1 to 7 represents Monday to Sunday.
Press ‘OK’to save the current weekday setting and enter the current hour and minute setting.
b. Set current hour and minute.Time is set according to 24-hour system.
1) Toset the hour first. Press ‘▲button, the number is increasing, while press’
Press ‘OK’to save the current hour setting and move on to the minute setting.
to shift between hour and minutesetting.
Press ‘
▲▲▲
2) Aftert heminute setting, press ‘OK’ to save the whole-time setting.The figures stop flashing.
Schedule Cleaning Settings
a. Schedule weekday settings:
Press ‘Schedule’button on the remote control. The time figure will change to” H1:OF”,keeps flashing.
▲
Press button to shift from H1 to H7, and thefigure H
▲
Press ‘OK’to save the current weekday setting.
▲
Press button to shift from “OF” to “ON”,and “OF” represents OFF, while “ ON” represents ON.
▲
Press ‘OK’to make sure the setting status is ON/OFF.
b. Schedule cleaning hour andminute settings. Time is set according to 24-hour system.
1) Toset the hour first. Press ‘▲button, the number is increasing, while press’
Press ‘OK’to save the current hour setting and move on to the minute setting.
Press to shift between hour and minute setting.
▲
2) Aftert heminute setting, press ‘OK’ to save the whole-time setting.The figures on the sc reenwill change to be back to the
weekday setting menu.
c. Finish settings
Press ‘Schedule’button on the remote control again to exit the setting menu. The indicatorof the mode will be shown on the screen.
d. Press ‘Time’and ‘Sc
e. Cancel the appointment
Under the mode of schedule,h avea long press on ‘Schedule’ for about 3 seconds to cancelthe schedule.
trol. The time figure willchange to “A: 1”, keeps flashing.
1 to H7 represents Monday to
hedule’at the same time to check the schedule and use to check different scheduled time;
16
connection of the chargingsta nd.
fully charged.
button, the number is decreasing.
Sunday.
button, the
number is decreasing.
Page 3
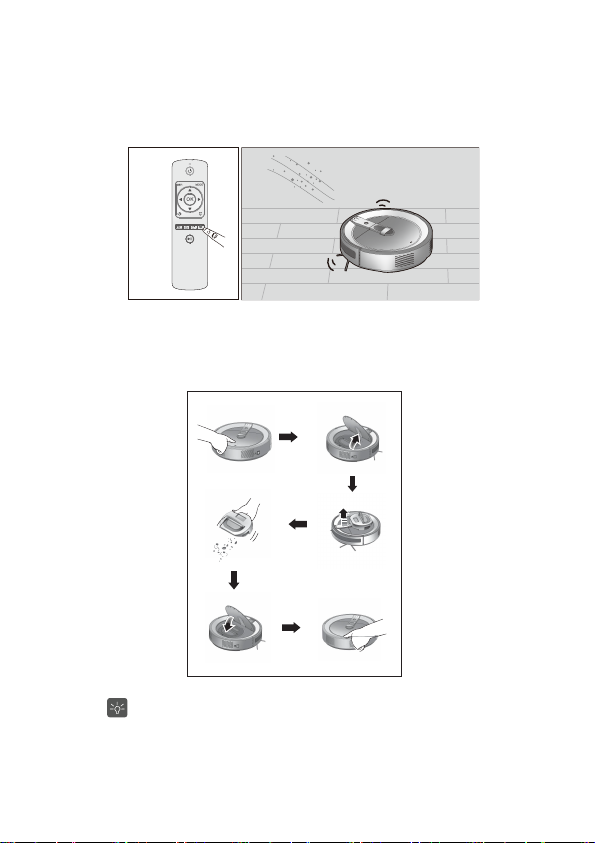
Suction Power Adjustment
The su ctio n p ow er c an b e a dju st ed by r em ot e co nt rol a cco rdin g t o d iffer en tc lea ning re qu irem en ts .
Pre ss “t urb o” bu tt on o n th e re mo te co nt rol t o a dju st t he su ctio n p ow er.
The ba tte ry w ill red uce t he use o f tim e, t he wo rking n oise will in cre ase un de r t he tu rb o p ow erfu l su ctio n m o de .
Maintenance
Cleaning Dust Bin
Press the “PUSH” position
Empty the dust bin
Reinstall the dust bin
You can empty the dust bin after each cleaning,ORoperate according to the dust-full indicator.The cleaning effect
will be influenced,if the dust bin is not cleaned in time.
Takethe dust bin out
Click the “PUSH” position
to ensure the cover closed
17
Open the cover
Page 4
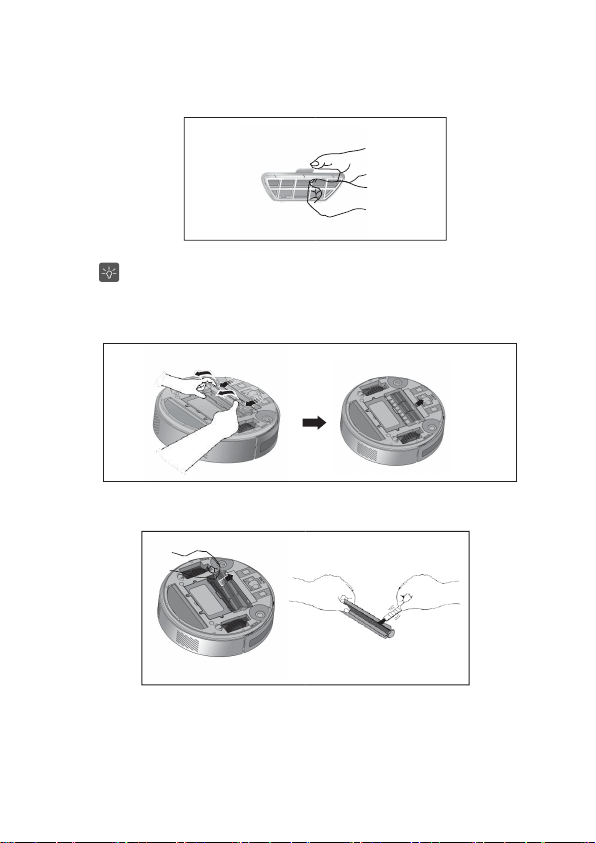
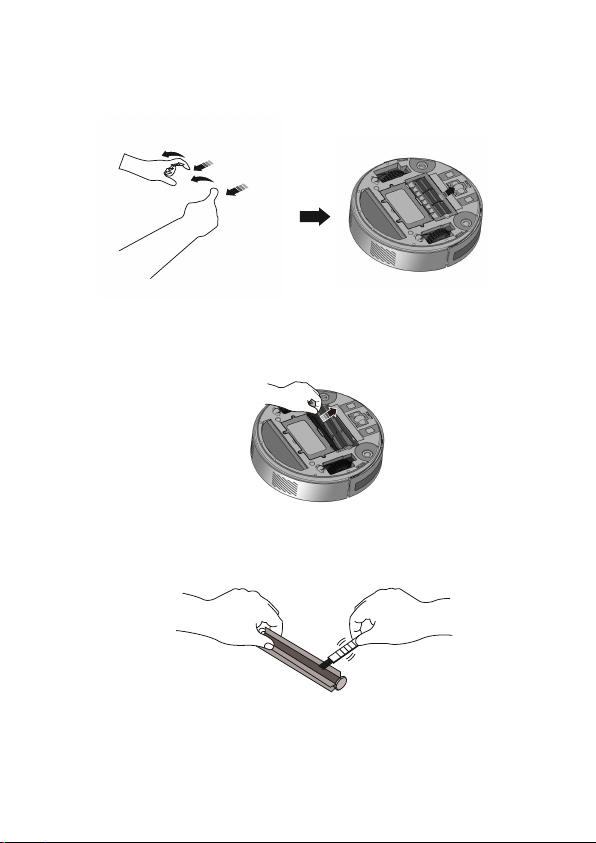
Change the filter in the dust bin
When you see the filter cracks or there are some holes on the filter,please change it immediately.
In normal enviroment,the use life for the filter is two months.The actual use life depends on the enviroment.
If the filter is not changed in time,the suction power will be weakened.The filter is not washable.
Clean the Suction Inlet
Open the cover
Remove the main brush.
18
Page 5

Clean the Sensors and wheels
Clean the sensors
1Use the attached cleaningbrush or cotton stick to removeor clean the three anti-fallingsensors shown in thepicture.
2If they are very dirty, pleaseu seclean and wet cotton stickto clean them.
3Please do not use waterto clean the floor directlyor use benzene or alcoholto clean.
Clean the frontand side wheels
1.
Use hands toturn the side wheels aroundwhile cleaning them with thecleaning brush or cotton cloth.
2.
Use cleaningb rushto clean the front wheel.
3.
Please removet hedirt which will wind thewheels such as hair.
19
Page 6
Clean the Suction Inlet
Open the cover of the suction inlet
Disassemble the main brush
Use cleaning brush to clean themain brush
20
Page 7

Use the cleaningbrush or cotton stick toclean the two dust sensors.
1.
If the dustsensors are very dirty,please use wet cotton stick toclean them but do notuse water and benzeneor alcohol to clean.
2.
21
Page 8

Re-install the mainbrush and suction inlet cover,and confirm that theyare in the correct place.
Battery Management
After long timeusing, the life time ofthe battery will shorten.
Battery life
The battery lifein normal environment is 12months.
To havethe best status of thebatteries, please make it fullycharged before using it each time.
The battery lifemay vary according to differentenvironments.
If the vacuumcleaner is not used fora long time, please turn offthe po
Please often cleanthe suction inlet, dust bin,main brush, side brushes andwheels.
When the dustbin is full, the internalmotor of the vacuum cleanerwill run over load, which will cause the batterylife shortened.
When chargingand keeping the cleaner, pleaseavoid direct sun ray exposure,fire and smoke.
Using time forthe battery
When it isthe first time to use thecleaner, please get itfully charged before using.
The chargingneeds 4 hours.
d, the vacuumcleaner can be used for90 minutes normally.
After fully charge
Under the turbopowerful suction mode, the usingtime may be shortened toless than 1 hour.
When the surroundingis too complicated or itis too dusty, theusing time may be shortened.
When keeping thevacuum cleaner without charging,the operation time will beshortened or t hebattery will be consumed.
Changebatteries
When the operationtime is shortened greatly,please change the batteries.
Please use thebatteries
Please makesu re that the power is switchedoff before changing the battery.
The changedor the removed batteries changedsh allbe disposed safely accordingto the local disposal regulations.
Please contact theservice center for buying additionalbatteries.
If the batterycannot be changed by yourself, please contact the servicecenter.
with the samespeciation as requirements.
wer switch.
22
Page 9
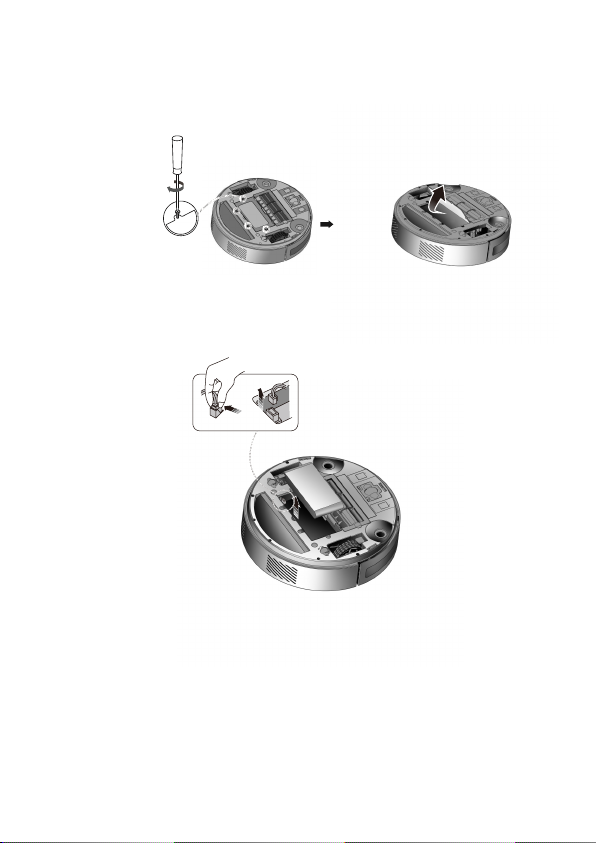
Turn offthe power switch on theside of the vacuum cleaner.
Remove the screws(4) from the battery coverand remove the battery cover.
Disassemble the powerline connection of the batteryand remove the battery.
23
Page 10

Voice Prompt Instruction
The Voice Prompt Instruction is a list of basicaudio instructions and they may vary according to the usage convenience and cleaner types.
Function of Voice Instruction
Content of the instructions Working status
Now navigation cleaning starts
Now intensive cleaning starts Start intensive cleaning mode
Now wet mopping starts
Start navigation cleaning mode(the default mode is
with high climbing)
Start wet cleaning mode(the fault mode is with low
climbing)
Now schedule cleaning starts Start schedule cleaning mode
Now manual cleaning starts
Now cleaning is paused
Cleaning is completed
Start manual cleaning mode
During cleaning, when the button Start/ Stop is
pressed
Cleaning operation is finished
Now start charging Start charging
Start the Turbo mode The suction is adjusted to the maximum
Now enter the schedule mode
The schedule is saved successfully
The schedule is cancelled
Now return to the chargingstand
ErrorCodes
Commom Faults and Treatment Methods
Notes: The robot will stop working or c annot be started under the following circumstances and th
Follow the process below to remove the faults with the error codes, reasons, identification an
Error
Code
Anti-dropping sensor
does not work
E001
Leftor r ightwheel fa ults
E002
Leftor r ights idebr ush
faults
E003
Leftor r ightwheels do
not touch
E004
Middle brush faults
E005
Theba tteryis low
E006
Thehost ca nnot be
c
harged.
E007
Anti-collision sensors do
not work.
E008
Error reason
thefloor
The sensor is blocked or the
h
ost is
Thereis line winding from the
leftor
There is line winding from the
left or right
Theleft or the right wheel do
not touch
There maybe line winding
fromt he
Thehost does not work
normally
The power switch of the host
is not on or the battery is not
connected well
Anti-collision sensors are
blocked.
Start schedule settings
Complete schedule settings
Complete cancellation of the schedule settings
Start the function of recharging
Erroridentification
Check and clean the
antifalling sensors or take
blockeda t thest airs
out the host
Remove the things from the
left and right wheels and
right wheels
restart the cleaning mode
Remove the things from the
left and right side brush and
side brush.
restart the cleaning mode
Put the host on the smooth
floor and restar the cleaning
thefloor.
mode
Remove the things from
middle brush
middle brush and restart the
cleaning mode
Please put the host manually
on the charging stand to get
it charged
Turn on the power or
connect the battery properly
Clean the shell of the
anticollision sensors in
front of the vacuum cleaner
Handling ways
e device gives warning sounds;
d treatmentmethods.
Notes: If the faults are not cleared after handling according to the above ways, please contact the after-sales departments of thecompany.
24
Page 11

Specification
Type
Size
Battery
Capacity of the dust bin
Capacity of the water tank
Charging Stand
Size
Input
Output
Signal transmission
distance (IR)
Remote Control
Size
Battery
Signal transmission
distance (IR)
RMRV10
Diameter 348mm x Height 96mm
Lithium battery 14.4V 2600mAh
700ml
120ML
Length 270mm x Height 146mm x Width99 mm
24 V DC
24 V DC
3m
Length139mm x Height 22mm x Width 40mm
AAAx2
3m
25
Page 12

FCC Caution.
§ 15.19 Labelling requirements.
This device complies with part 15 of the FCC Rules. Operation is subject to the
following two conditions: (1) This device may not cause harmful interference, and (2)
this device must accept any interference received, including interference that may
cause undesired operation.
§ 15.21 Information to user.
Any Changes or modifications not expressly approved by the party responsible for
compliance could void th e user's authority to operate the equipment.
§ 15.105 Information to the user.
Note: This equipment has been tested and found to comply with the limits for a
Class B digital device, pursuant to part 15 of the FCC Rules. These limits are designed
to provide reasonable protection against harmful interference in a residential
installation. This equipment gen erates uses and can radiate radio fre quency energy
and, if not installed and used in accordance with the instructions, may cause harmful
interference to radio communications. However, there is no guarantee t hat
interference will not occur in a particular installation. If this equipment doe s cause
harmful interference to radio or television reception, which can be determined by
turning the equipment off and on, the user is encouraged to try to correct the
interference by one or more of the following measures:
-Reorient or relocate th e receiving antenna.
-Increase the separation between the equipment and re ceiver.
-Connect the equipment into an outlet on a circuit different from th at to which the
receiver is connected.
-Consult the dealer or an experienced radio/TV technician for help.
*RF warning for Mobile device:
This equipment complies with FCC radiation exposure limits set forth for an uncontrolled
environment. This equipment should be installed and operated with minimum distance
20cm between the radiator & your body.
 Loading...