

Page 1
CRIB ASSEMBLY INSTRUCTIONS
for Nest Crib
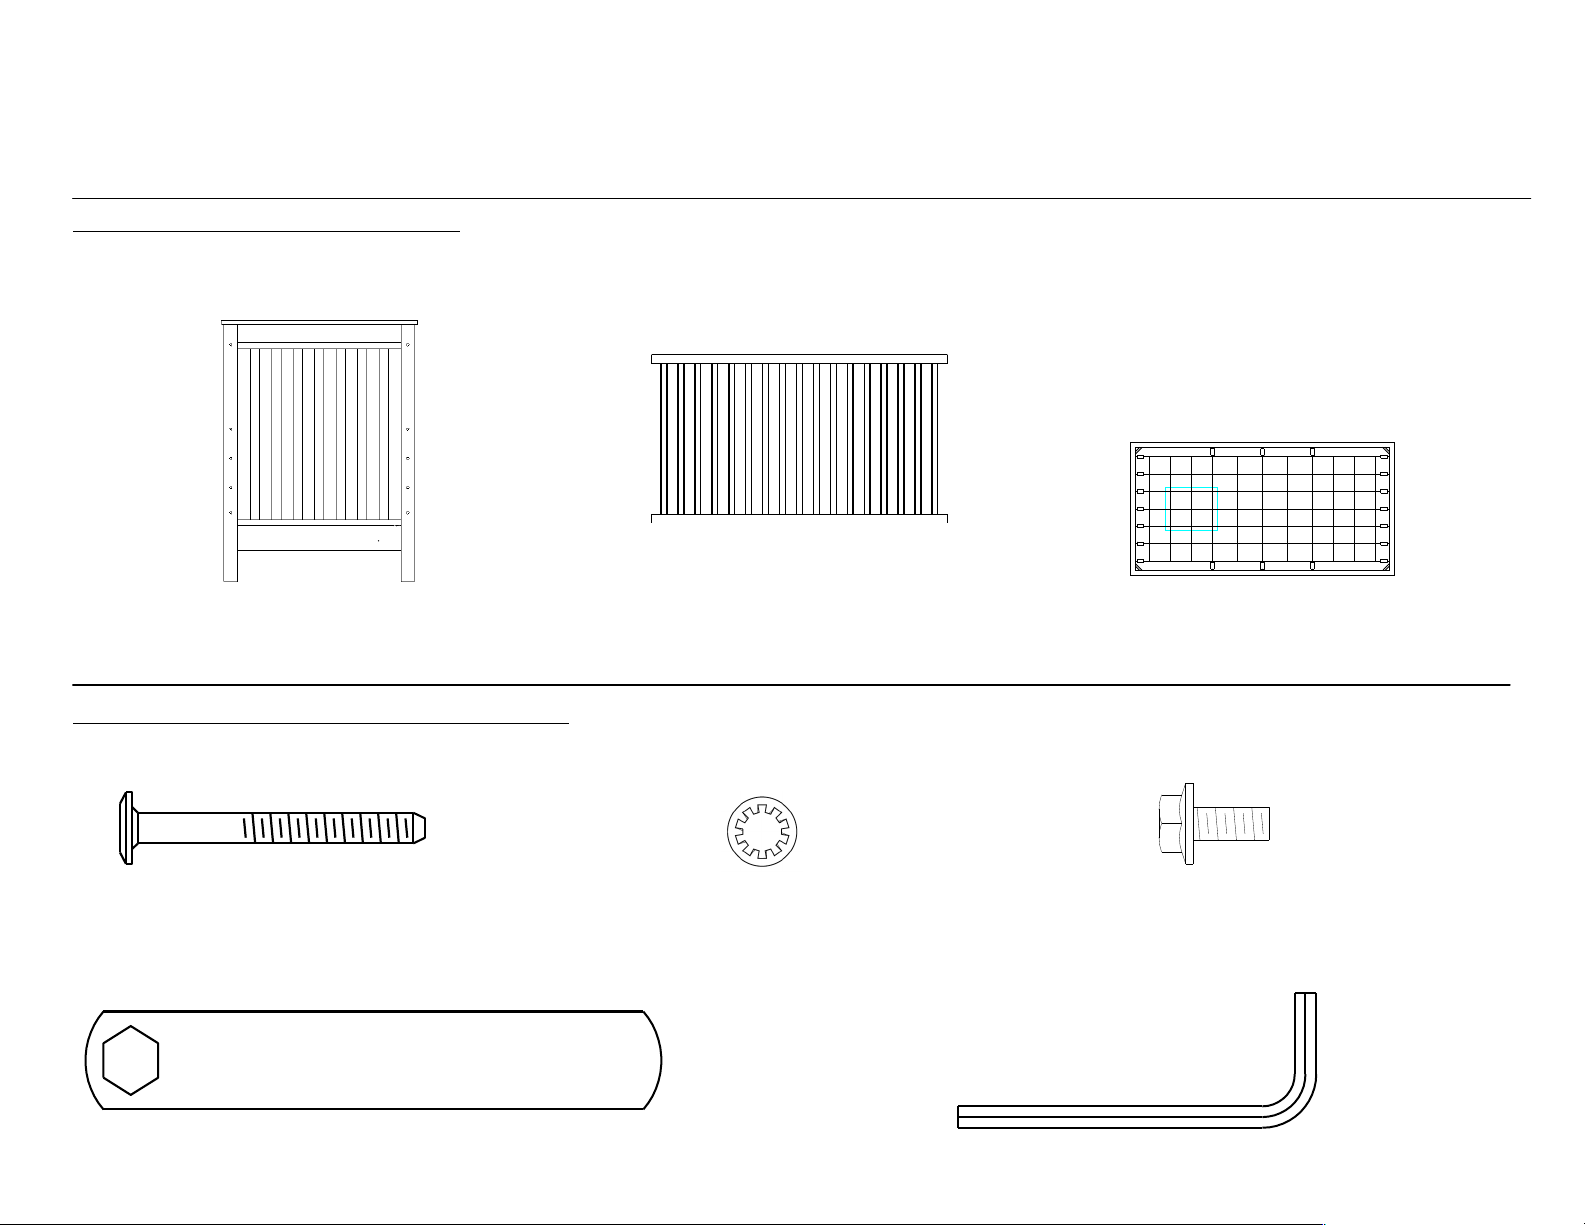
PA RTS IN CLUDED IN CARTON
2 – HEADBOADS 2 – SIDES 1 – MATTRESS SUPPORT SPRING
PA RTS IN CLUDED IN HARDWARE B AG
8 – DECORATIVE BOLTS 8 – LOCK WASHERS 4 – HEX BOLTS
1 – HEX WRENCH 1 – ALLEN WRENCH
Page 2

CRIB ASSEMBLY INST RUCTIONS
For Nest Crib
• READ ALL INSTRUCTIONS BEFORE ASSEMBLING
CRIB. KEEP INSTRUCTIONS FOR FUTURE USE.
WARNING: IN FAN TS CAN
SUF FOC ATE ON SO FT BED DIN G. NE VER AD D A
PILLO W, COM FOR TER OR PADDI NG.
• TO REDUCE THE RISK OF SIDS, PEDIATRICIANS
RECOMMEND HEALTHY INFANTS BE PLACED ON
THEIR BACKS TO SLEEP, UNLESS OTHERWISE
ADVISED BY YOUR PHYSICIAN.
Strangulation Hazard:
• STRINGS CAN CAUSE STRANGULATION! DO NOT
PLACE ITEMS WITH A STRING, CORD OR RIBBON
AROUND A CHILD’S NECK SUCH AS HOOD STRINGS
OR PACIFIER CORDS. DO NOT SUSPEND STRINGS
OVER CRIB OR TODDLER BED OR ATTACH STRINGS
TO TOYS FOR ANY REASON.
• TO HELP PREVENT STRANGULATION TIGHTEN ALL
FASTENERS. A CHILD CAN TRAP PARTS OF THE
BODY OR CLOTHING ON LOOSE FASTENERS.
• DO NOT PLACE CRIB OR TODDLER BED NEAR
WINDOW WHERE CORDS FROM BLINDS OR DRAPES
MAY STRANGLE A CHILD.
Fall Hazard:
• WHEN CHILD IS ABLE TO PULL TO STANDING
POSITION, SET MATRESS TO LOWEST POSITION
AND REMOVE BUMPER PADS, LARGE TOYS AND
OTHER OBJECTS THAT COULD SERVE AS STEPS
FOR CLIMBING OUT.
• WHEN CHILD IS ABLE TO CLIMB OUT OR REACHES
THE HEIGHT OF 35 IN. (90 CM), THE CRIB SHALL NO
LONGER BE USED AND THE CHILD SHOULD BE
PLACED IN A YOUTH OR REGULAR BED.
CAUTION: AN Y MATT RE SS US ED IN T HIS C RIB
MU ST BE AT LE AS T 27 ¼ INC HE S ( 69 C M ) BY 5 1 5 /8
IN CH E S (1 3 1 CM ) W IT H A T HI CKNE SS N O LE SS TH AN 4
IN CH E S (1 1 C M) AN D NO T E XC EE DI NG 6 INC HE S (15
CM ).
• CHECK THIS PRODUCT FOR DAMAGED HARDWARE,
LOOSE JOINTS, MISSING PARTS OR SHARP EDGES
BEFORE AND AFTER ASSEMBLY AND FREQUENTLY
DURING USE. SECURELY TIGHTEN LOOSE BOLTS AND
OTHER FASTENERS. DO NOT USE CRIB IF ANY PARTS
ARE MISSING, DAMAGED OR BROKEN. ASK YOUR
ROO M & BOAR D® STO RE OR WRITE TO E L G REC O
WOO DWO RKI NG FOR REPLACEMENT PARTS AND
INSTRUCTIONAL LITERATURE IF NEEDED. DO NOT
SUBSTITUTE PARTS.
• IF REFINISHING, USE A NON-TOXIC FINISH SPECIFIED
FOR CHILDREN’S PRODUCTS.
• NEVER USE PLASTIC SHIPPING BAGS OR OTHER
PLASTIC FILM AS MATTRESS COVERS BECAUSE THEY
CAN CAUSE SUFFOCATION.
• INFANTS CAN SUFFOCATE IN GAPS BETWEEN CRIB
SIDES AND A MATTRESS THAT IS TOO SMALL.
• PERIODICALLY CHECK TO SEE THAT ALL BOLTS ARE
SECURELY TIGHTENED.
• TO CLEAN CRIB: WIPE WITH CLEAN SOFT CLOTH
DAMPENED WITH MILD CLEANSER AND WATER. RINSE
WITH CLEAN WATER USING SOFT CLOTH, AND DRY
THOROUGHLY.
• FOLLOW WARNINGS ON ALL PRODUCTS IN A CRIB.
• WHEN A VAPORIZER IS IN USE, ALWAYS AIM VAPOR
STREAM AWAY FROM CRIB AS WELL AS AWAY FROM
ANY OTHER WOOD FURNITURE.
WARNING: FAILUR E T O F OLLO W
TH E SE W AR N IN GS AN D ASS EM BLY
IN S TR UC T IO N S COU LD RE SU LT IN SE RIO US
Page 3

CRIB ASSEMBLY INSTRUCTIONS
for Nest Crib
DO NOT U SE POWER TOOLS !
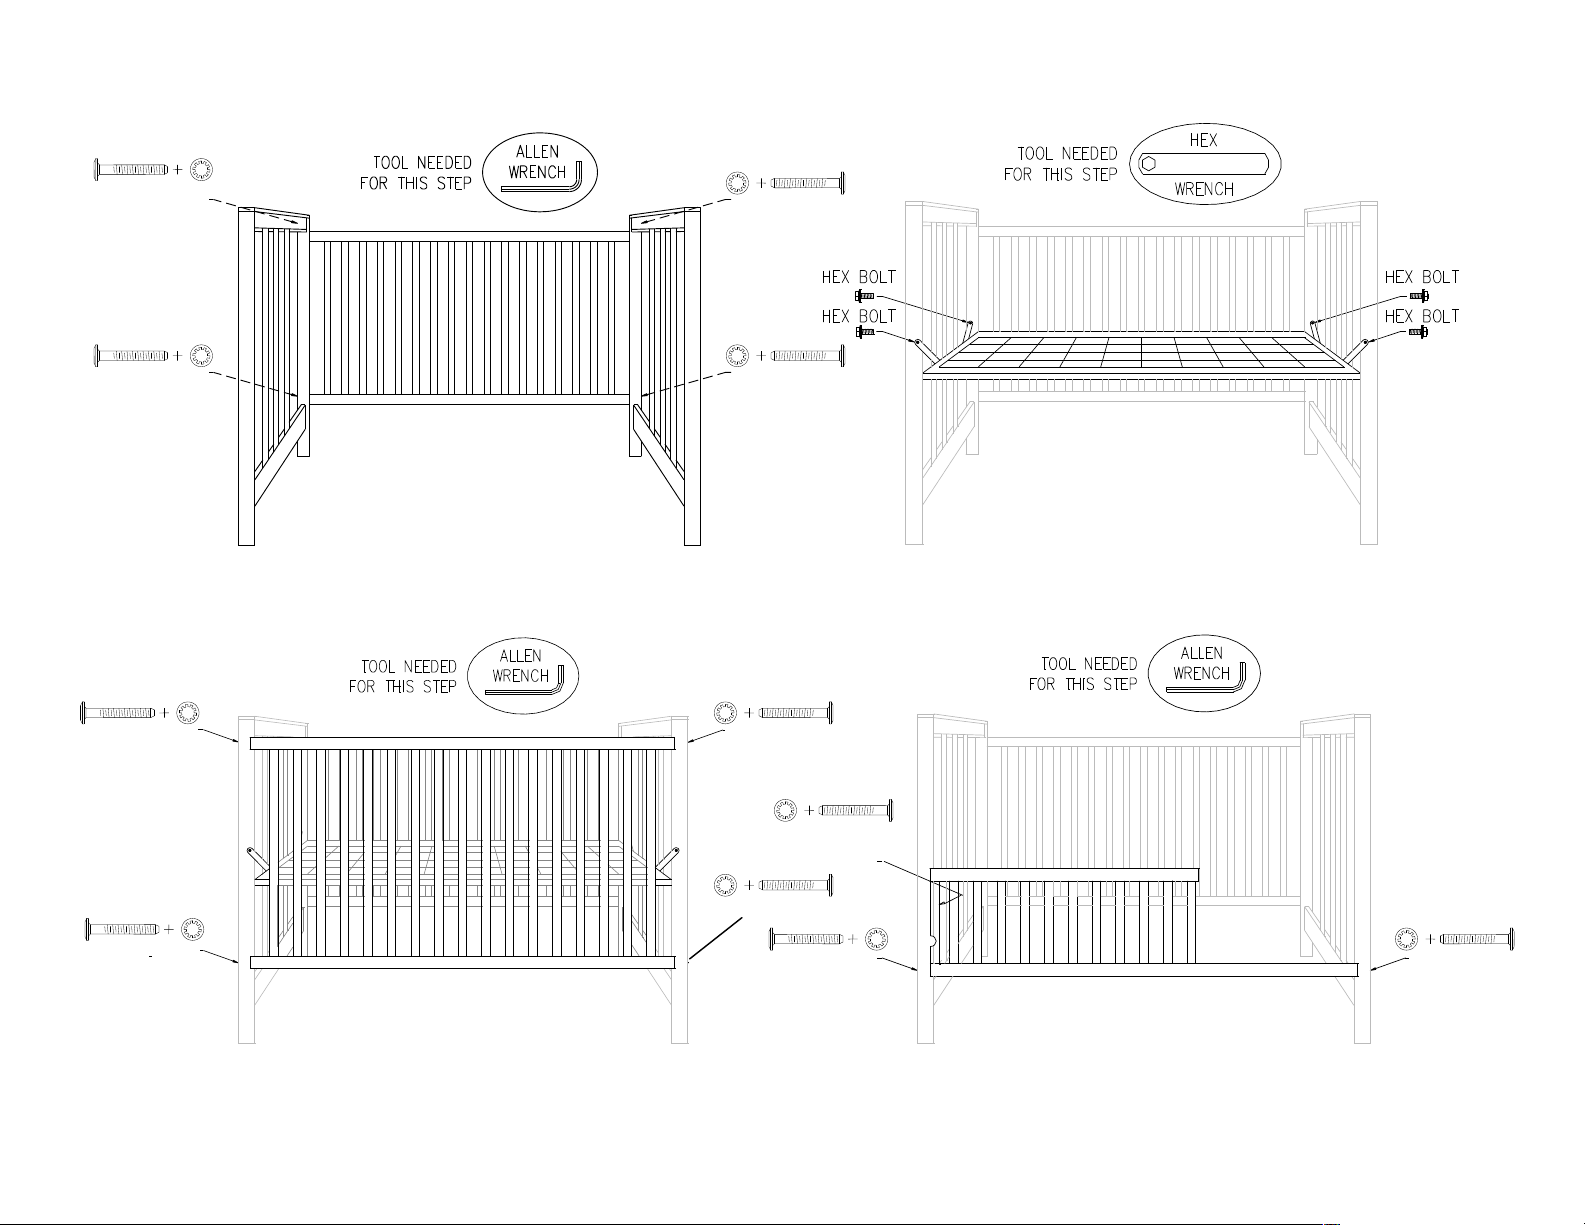
STEP 1: Mount one Side to the rear posts of the Headbo ards . Use four D eco rati v e B olts and Loc k Was hers to fasten the side to the
posts. DO NOT tighten the bolts completely yet.
STEP 2: Install the Mattres s S upport Spring in the crib with the flat side up. Extend the mounting flange on each corner and attach the
spring to headboard and footboard at the desired level using four Hex Bol ts and Hex Wrench provided. The top position is
recommended for newborns. The bottom position must be used when the baby is able to kneel or stand in the crib.
STEP 3: Mount the other Side to the posts of the Headbo ards . Use four De c orati ve Bol ts and Loc k Was hers to fasten the side to the
posts. Tighten all bolts, including the ones from the first side, with the All en wrenc h provided.
STEP 4: Once the crib is in use, periodically check to make sure all bolts are tight, and tighten as necessary. For future use, keep these
instructions in the plastic bag attached to the mattress support spring.
Conve rsi on to To ddl er Be d: Mattress should be in lowest position. Remove one Side by unscrewing the 4 D e co rativ e B olts holding it in
place. Be sure to loosen all the other Dec orati ve B olts before attempting to remove the S ide . Once removed, attach Toddl e r Rail (sold
separately) using three of the Decorative Bolts and Lock Washers you just removed, and retighten all remaining Decorative Bolts.
THIS CRIB MAY NOT BE USED AS A TODD LER B ED WITHOUT A TODDLER RAIL.
Fo r Toddl er Bed use , the minimum age shall be no less than 15 months and the maximum weight shall not be greater than 50 lb (22.7kg). The
mattress intended for use on the bed shall be a full-size crib mattress having minimum dimensions of 51.625 in. (1310mm) in length and 27 ¼ in.
(690mm) in width and thickness of no less than 4 in. (100mm) and not exceeding 6 inches (150mm).
Maintenance: Upon completion of assembly be sure all screws, bolts and fastening devices have been tightened securely. Periodically repeat this
check to make sure all screws, bolts and fastening devices are tight. Before each usage or assembly, inspect crib for damaged hardware, loose joints,
missing parts or sharp edges. DO NOT use crib if parts are missing or broken. DO NOT substitute parts. DO NOT make any alteration to this crib.
Cle aning : Mix together a mild solution of gentle dishwashing liquid and water, apply to crib surface using a soft clean cloth lightly dampened in
the solution. Rinse with clean water again using a soft clean cloth, then dry all surfaces thoroughly with a soft dry cloth. NO ABRASIVE
CLEANERS, SCOURING PADS, STEEL WOOL OR COARSE RAGS SHOULD BE USED TO CLEAN THIS FINE FURNITURE.
Sto rage: A plastic pouch is attached to the crib for the storage of the assembly directions for future referral. After completing the assembly process
you are advised to read and beware of all WARNINGS, CAUTIONS, CLEANING, STORAGE, USE AND MAINTENANCE notices contained in
these instructions. We caution you not to place excess hardware in the plastic pouch as it could present danger to a child if retrieved and it could also
puncture the crib mattress.
Page 4
NES T CRIB ASS EMB LY IN S TRUCTIONS
CRIB - STEP 1 CRIB - S TEP 2
CRIB - S TEP 3 Toddl er Rail (s old se paratel y)
(Mattress support s pring should be in low est pos i ti on;
it has bee n remove d f rom thi s drawi ng for c larity.)
BOLT + WASHER
BOLT + WASHER
BOLT + WASHER
BOLT + WASHER
BOLT + WASHER
BOLT + WASHER
BOLT + WASHER
BOLT + WASHER
BOLT + WASHER
BOLT + WASHER
BOLT + WASHER
 Loading...