

Page 1
Car Top Carriers
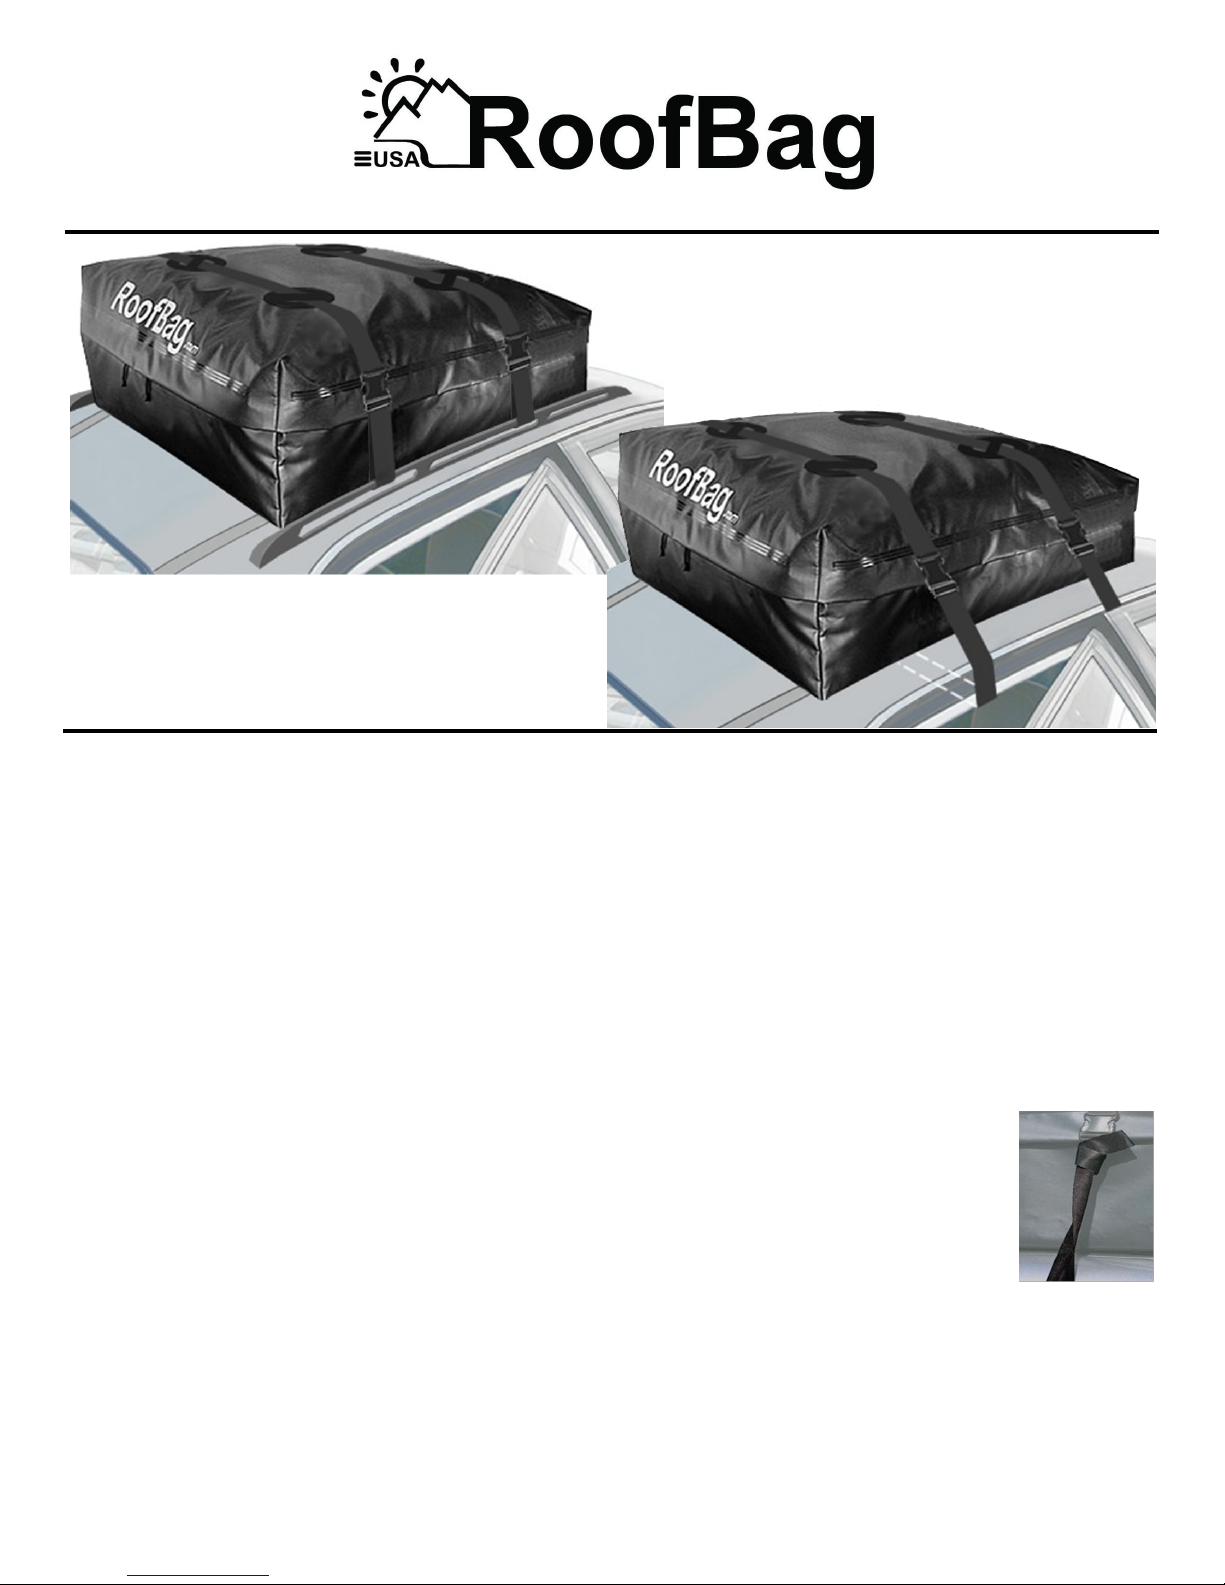
RoofBag’s versatile
design fits cars
WITH rack ...
Installation
Booklet
RB2017
… or WITHOUT rack
Tips for Trouble-free Enjoyment of Your Carrier
AVOIDING WATER ENTRY
Zipper must be fully closed and
protected by the flap:
1- Logo should be at the back.
2- Close zipper sliders all the way,
until they touch at the back of the
carrier.
3- Use carrier full if possible, to
keep zipper flap pointing down.
4- If carrier is not full, make sure
the zipper flap points down along
all 3 sides.
AVOIDING WATER ENTRY INTO
THE CAR
No-rack installation: over-tight
straps may deform the door seal
and allow rainwater into the car.
Loosen straps slightly when driving
through rain and loosen them
completely when leaving car
parked in the rain.
FILLING THE CARRIER
1- Use carrier full if possible to
avoid fabric damage caused by
wind flapping and to avoid water
entry through the zipper.
2- Cushion hard or sharp objects
inside bag with towels or blankets.
3- Distribute the weight evenly inside carrier to avoid denting the
roof.
LOOSE CREASES
Loose fabric creases cause noise,
lower gas mileage and damage the
fabric. Hold down loose creases
with straps. Use extra straps if necessary.
STRAP ATTACHMENT
Rack installation: straps should be
attached only to strong side rails or
cross bars. Don’t attach straps to
rain gutter, roof edge, open hooks
or anything not intended to support heavy loads. Also, don’t attach
straps to RoofBag’s strap guides.
STRAP TENSION
Straps should be snug but not overtight. Over-tight straps can dent a
thin roof or damage the paint at
roof's edge. Check strap tension during travel.
STRAP ANGLES
Follow the “Correct Strap Angles"
diagrams for optimum stability.
STRAP NOISE
If a strap whistles or
rumbles: unbuckle,
twist and re-buckle.
To avoid strap flapping
noise: wrap the free
end and tuck the tip
under the last turn.
COLD WEATHER
Fabric can get stiff at cold temperatures. To facilitate zipper operation:
Lubricate zipper ahead of time with
silicone spray or gel and flip up the
flap corners when opening or closing the zipper.
Page 2
OVERVIEW
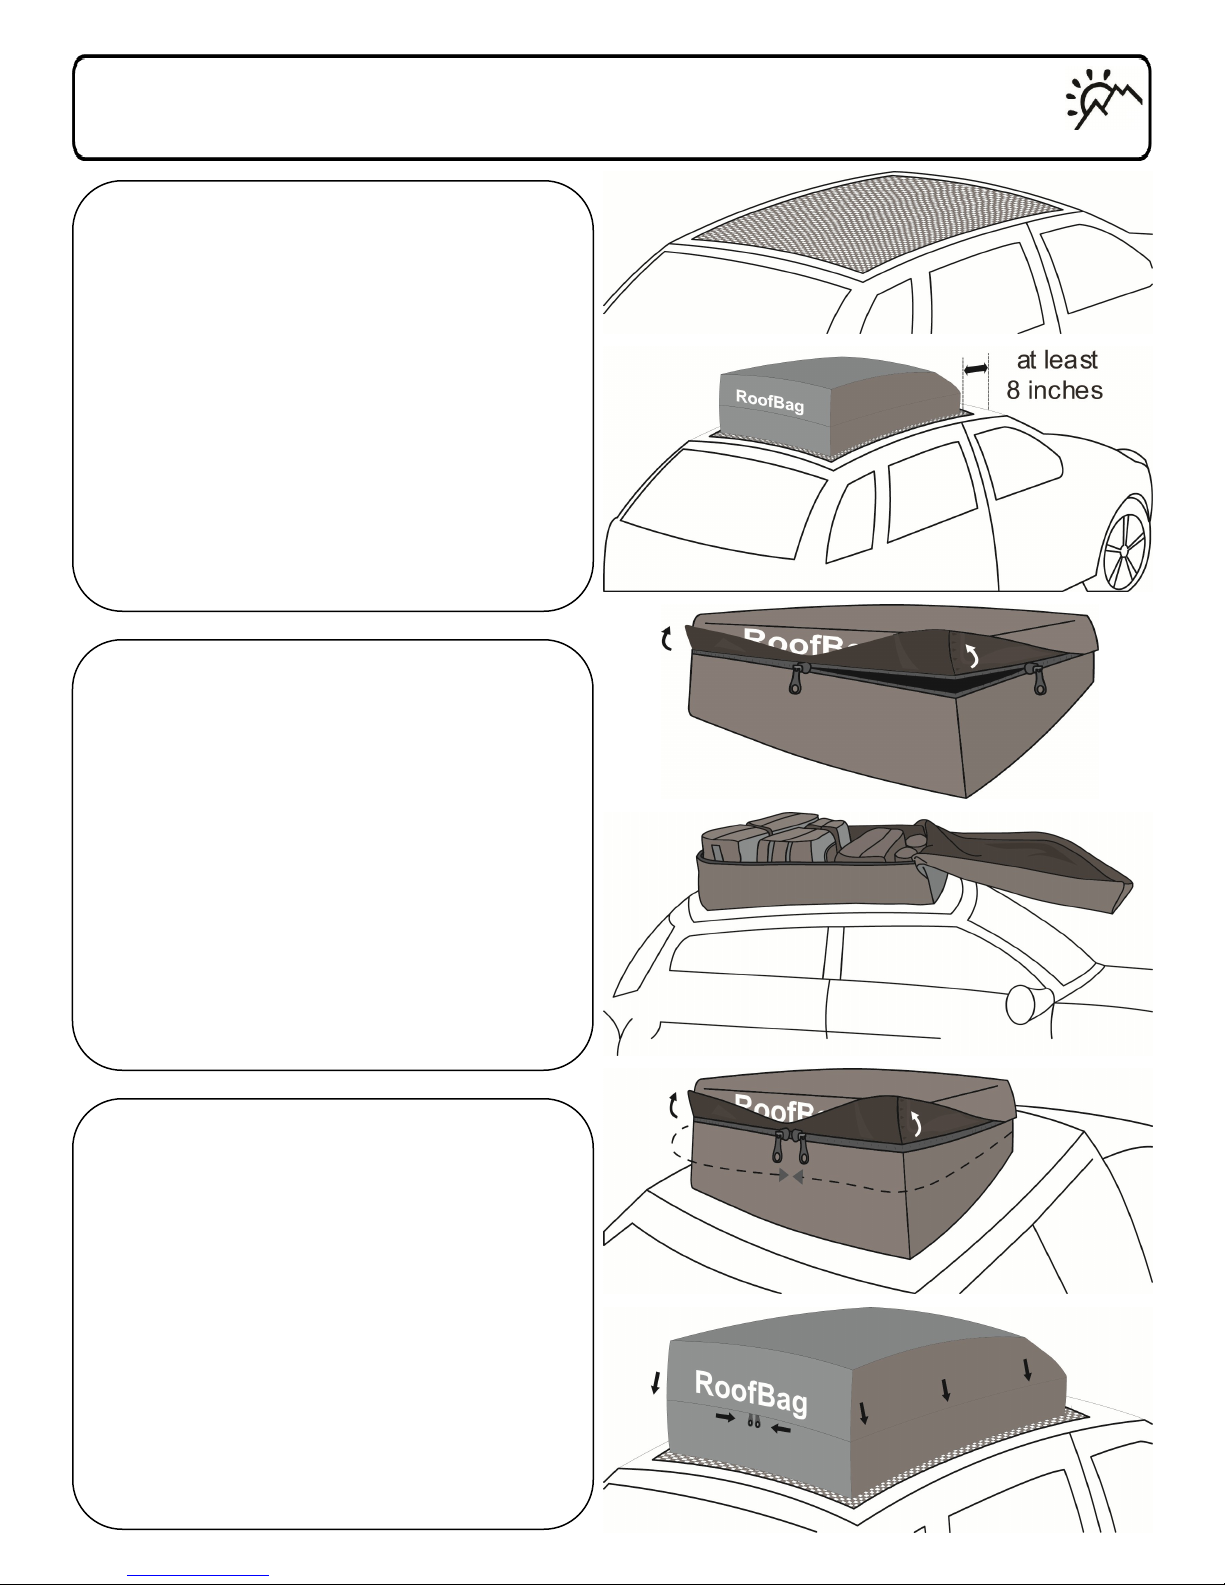
Prepare carrier
1. Place carrier on a clean roof and
(preferably) on a Protective Mat (sold
separately).
2. Logo should face the back of the car.
3. Front of carrier should be at least 8
inches behind front edge of roof.
4. Flip up the corners of the zipper flap and
open zipper on all three sides.
5. Open carrier completely like a clamshell
and fill carrier while on top of the car.
Page 2
Fill carrier
1. Fill carrier as full as possible.
2. Place more bulky items at the rear to
preserve the bag’s aerodynamic shape.
3. Cushion hard or sharp objects with towels or blankets to avoid abrasion damage
to the carrier fabric.
4. Distribute heavy items evenly inside carrier to avoid denting the roof.
Close carrier
1. Flip up corners of flap to facilitate closing
the zipper.
2. Close zipper on all three sides. Zipper
pullers should meet at the back. Leave no
gap between pullers to avoid water entry.
3. Flip down flap corners.
4. Zipper flap should point downward along
its entire length (sides and rear of the carrier), to avoid water entry.
Page 3
Side Rails
Place carrier between
the side rails.
Side Rails or Cross Bars
Page 3
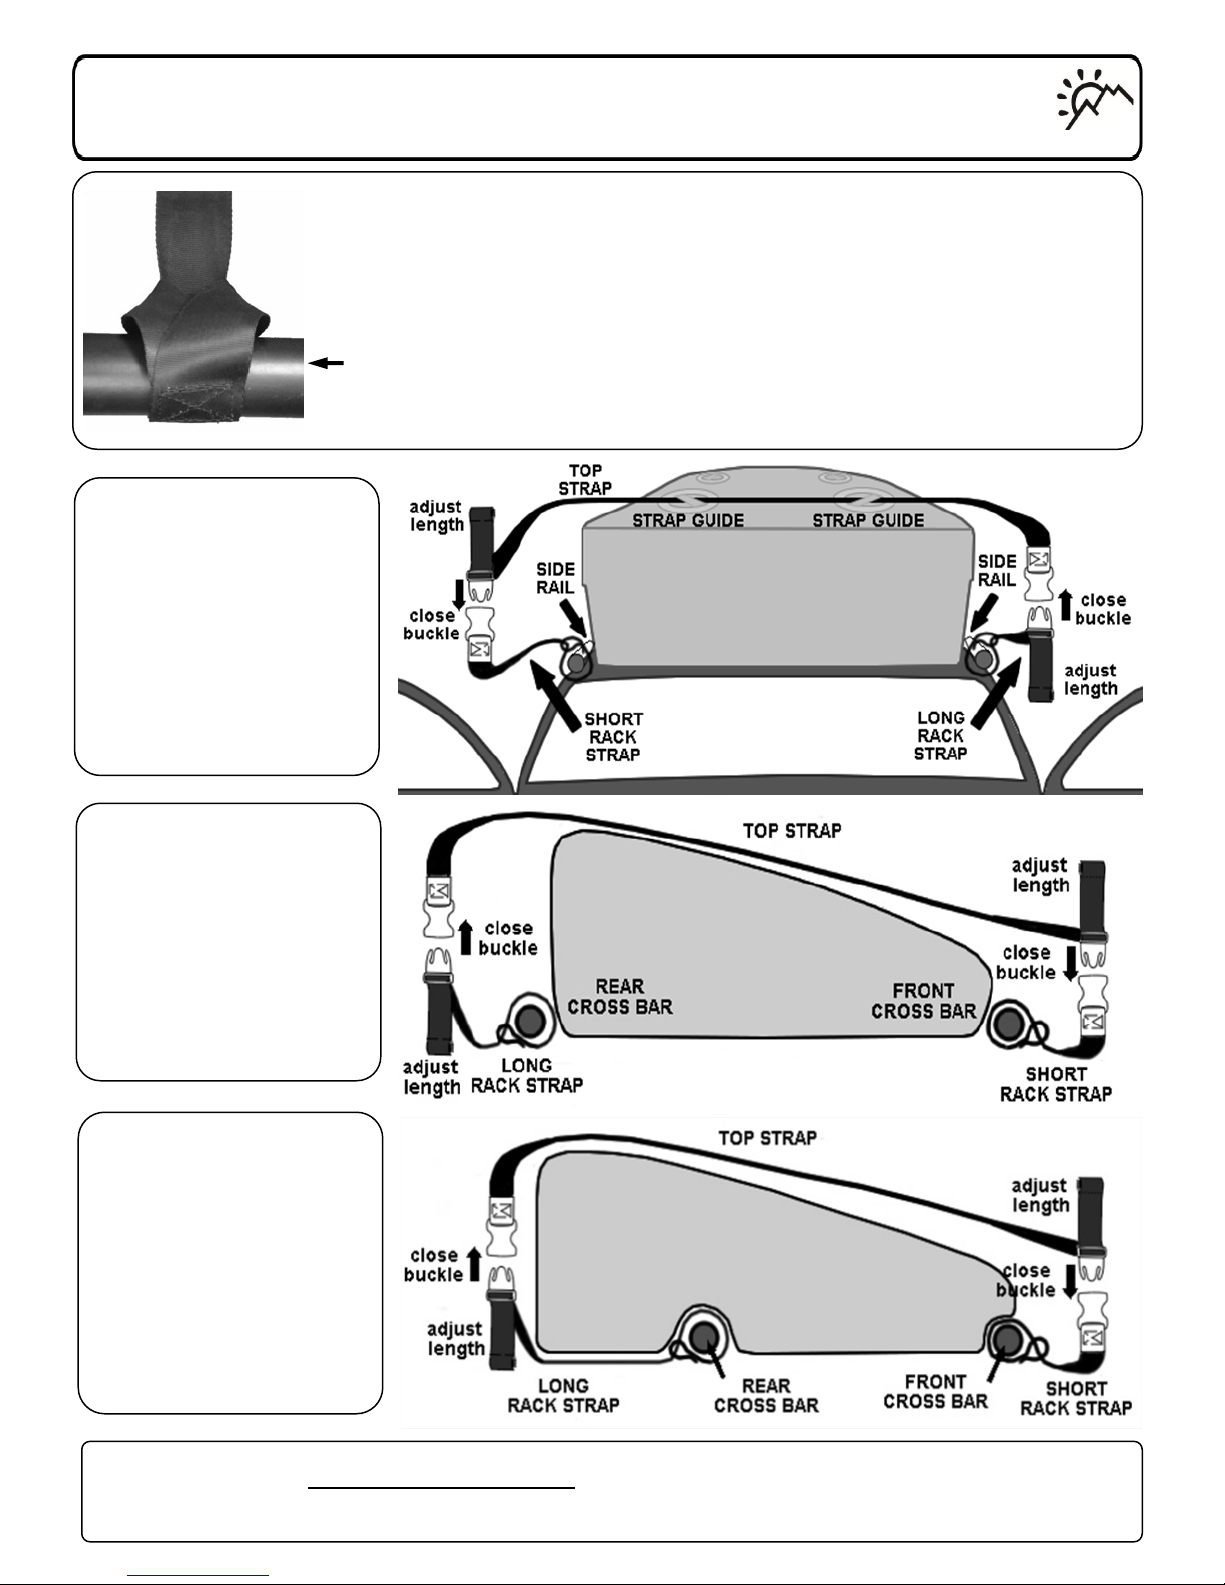
Each strap has 3 sections: Top Strap, Rack Short Strap, Rack Long
Strap.
1. Slide a Top Strap under 2 strap guides, left-right for side rails or
front-back for cross bars.
2. Repeat for the other Top Strap.
3. Attach other 2 sections to side rails or cross bars as shown and
connect buckles to the Top Strap until they click.
4. Repeat for the other strap
Carrier is flexible and
can be squeezed into
available space between side rails.
Cross Bars Far
Apart
Place carrier between
cross bars if enough
space is available.
Cross Bars Close
Together
Place front of carrier
right behind front cross
bar.
Carrier can ride over
rear cross bar.
If the car has both side rails and cross bars, a second pair of Rack Straps (purchased separately) can be installed at right angles to the first pair, using the same 4 strap guides.
Page 4
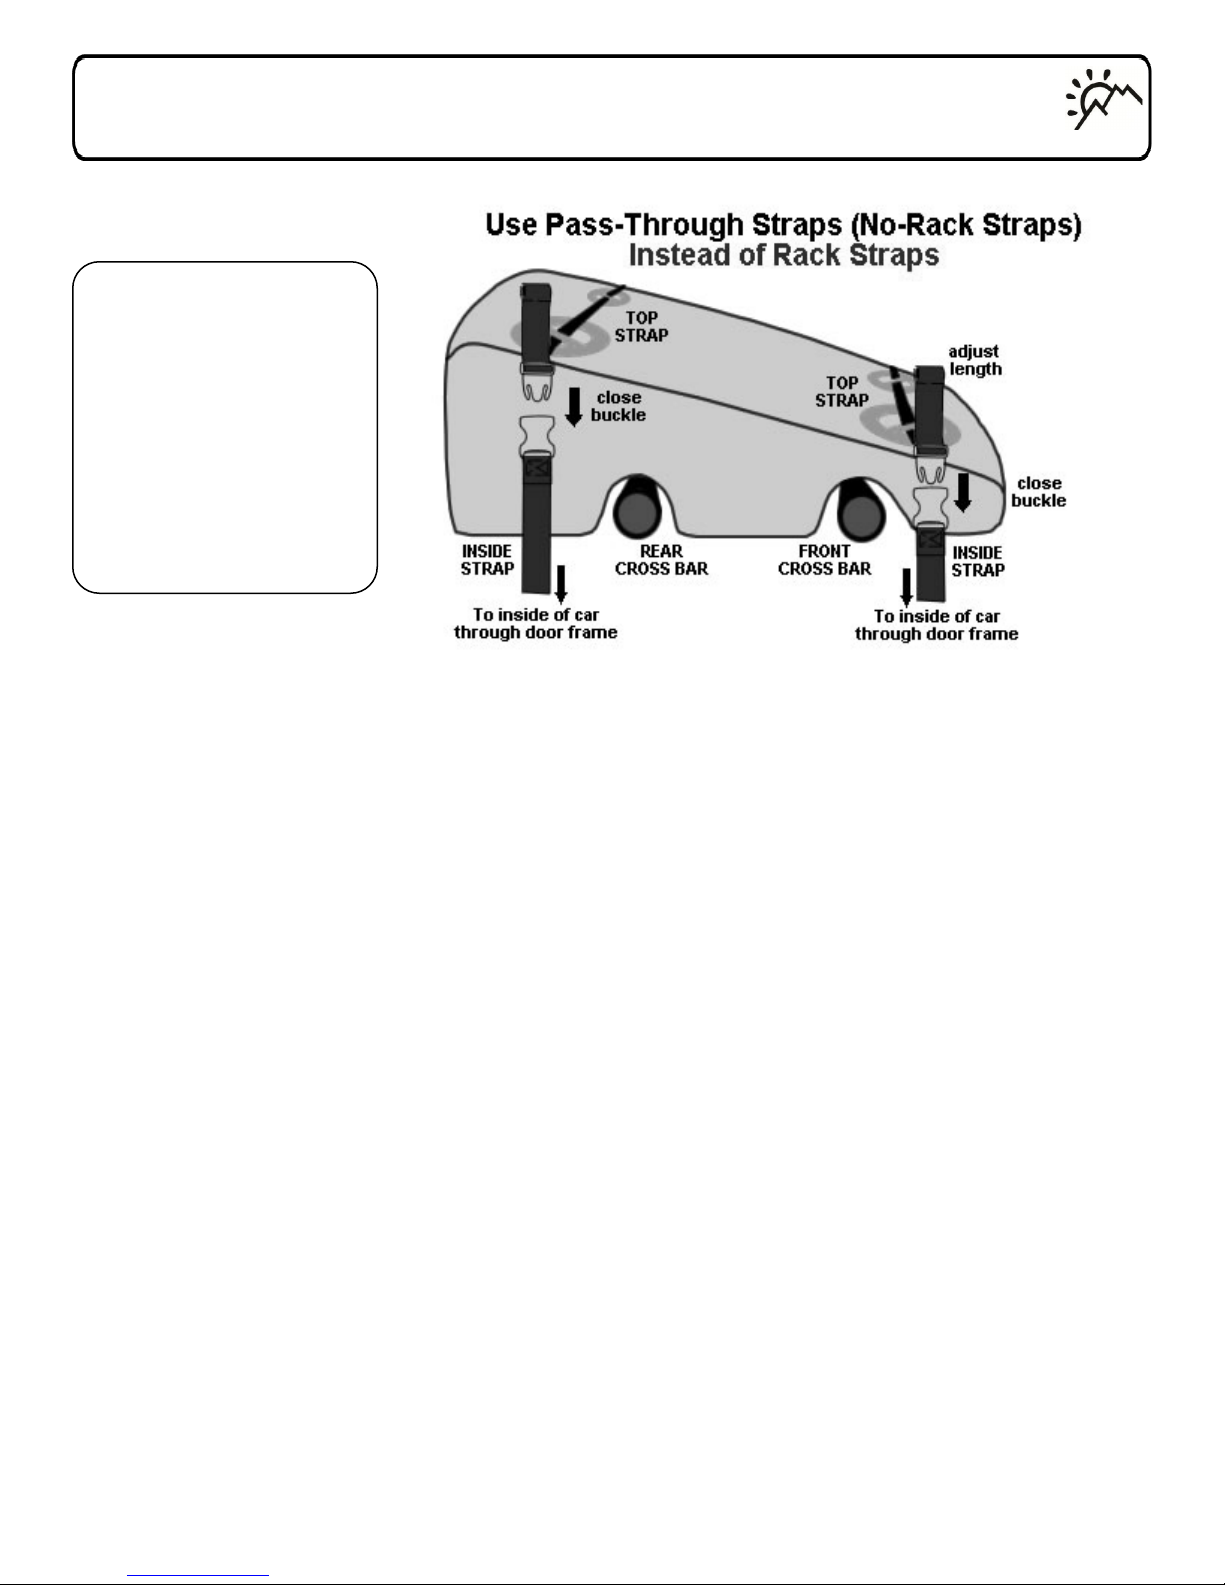
Cross Bars Very
Close Together
Use Pass-Through
Straps (No-Rack
Straps) as shown, instead of Rack Straps.
Side Rails or Cross Bars (cont.)
Page 4
Page 5
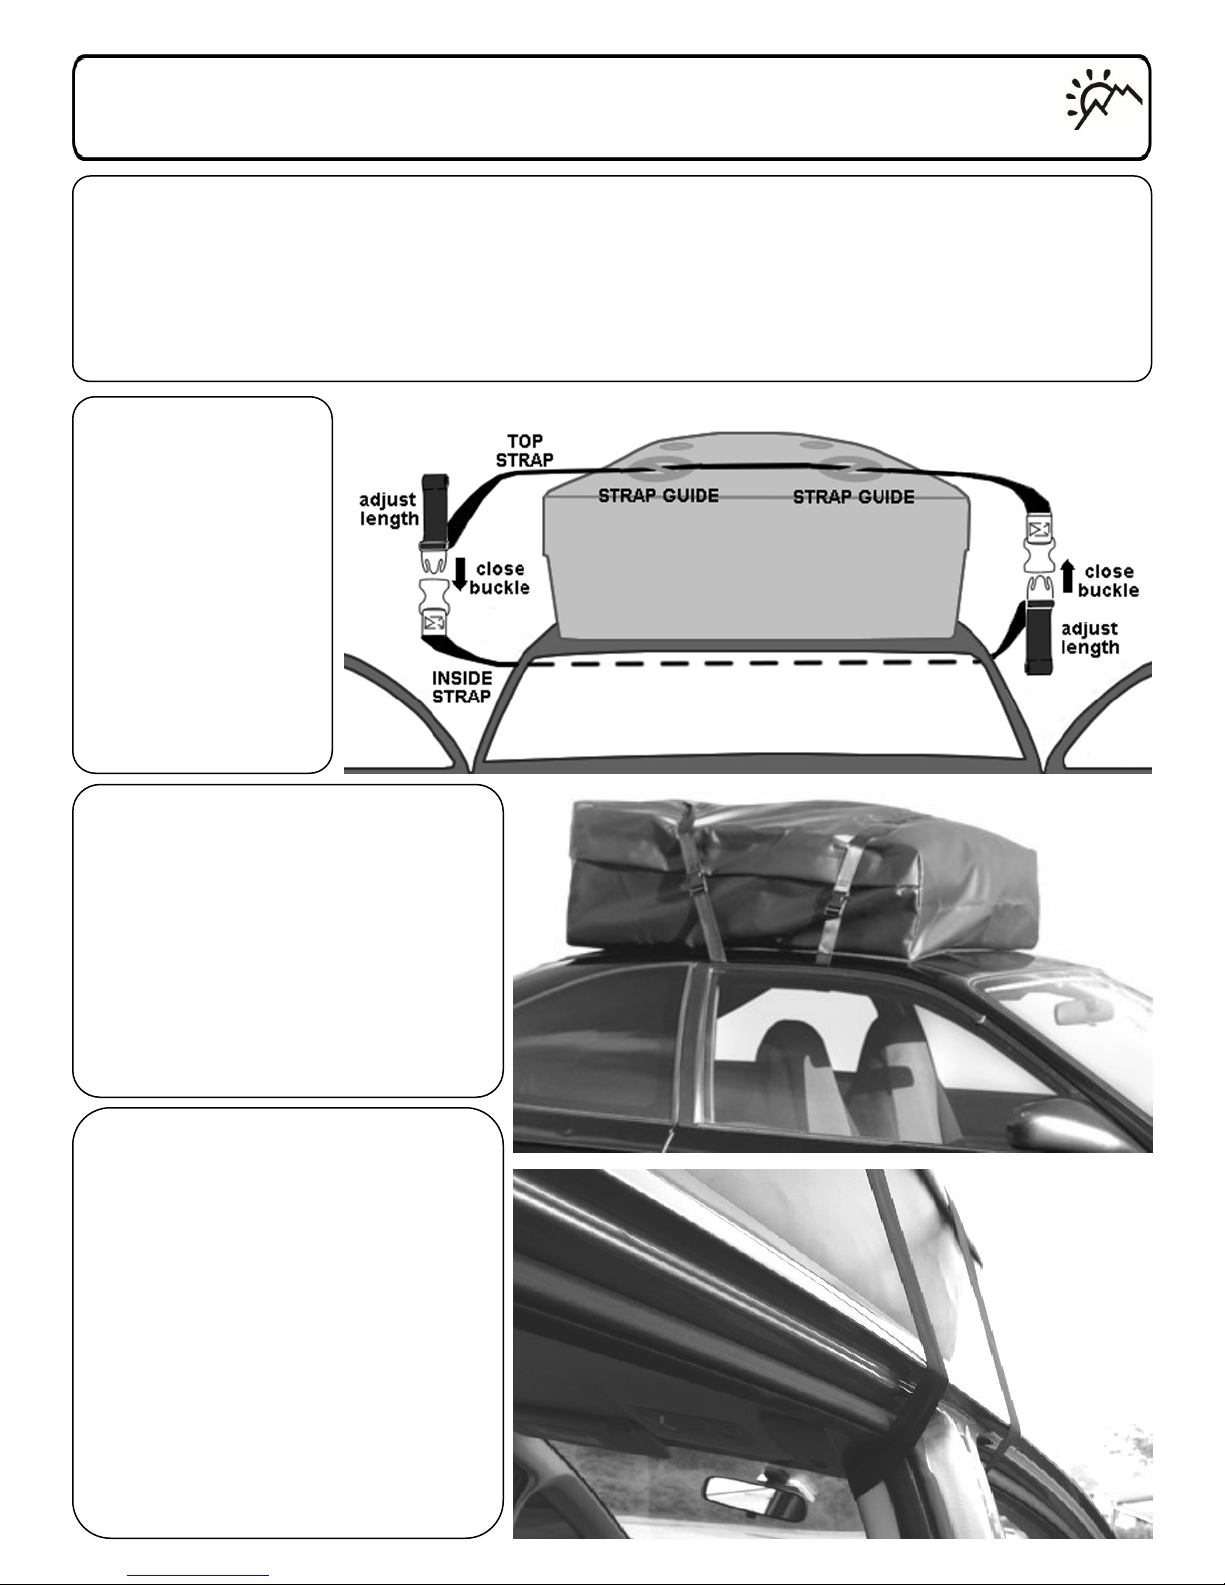
Car or Van WITHOUT Rack
Page 5
Each strap has 2 sections: Top Strap (shorter) and Inside Strap (longer).
1. Slide a Top Strap under 2 strap guides, left-to-right.
2. Open the front doors of the car, run the Inside Strap across the interior, and connect buckles to the Top Strap until they click.
3. Repeat for other strap.
Pull the free ends
of the straps to
tighten straps
snug, but not overtight.
Over-tight straps
may deform door
seal and allow rainwater into the car.
2-door cars
Rear strap: should enter the car at
the top-rear corner of door frame,
and should slant down-forward.
Front strap: enter the car at least
8” in front of rear strap, and should
be vertical or slant slightly downrearward.
Optional Pillar Installation
(only for 11 c.f. carrier)
Install Top Straps first.
Connect one end of an Inside Strap
to a Top Strap, wrap it around the
pillar, as shown, go back up and
connect to the other Top Strap.
Install the other Inside strap
around the pillar on the other side
of the car, and adjust length as required.
Page 6
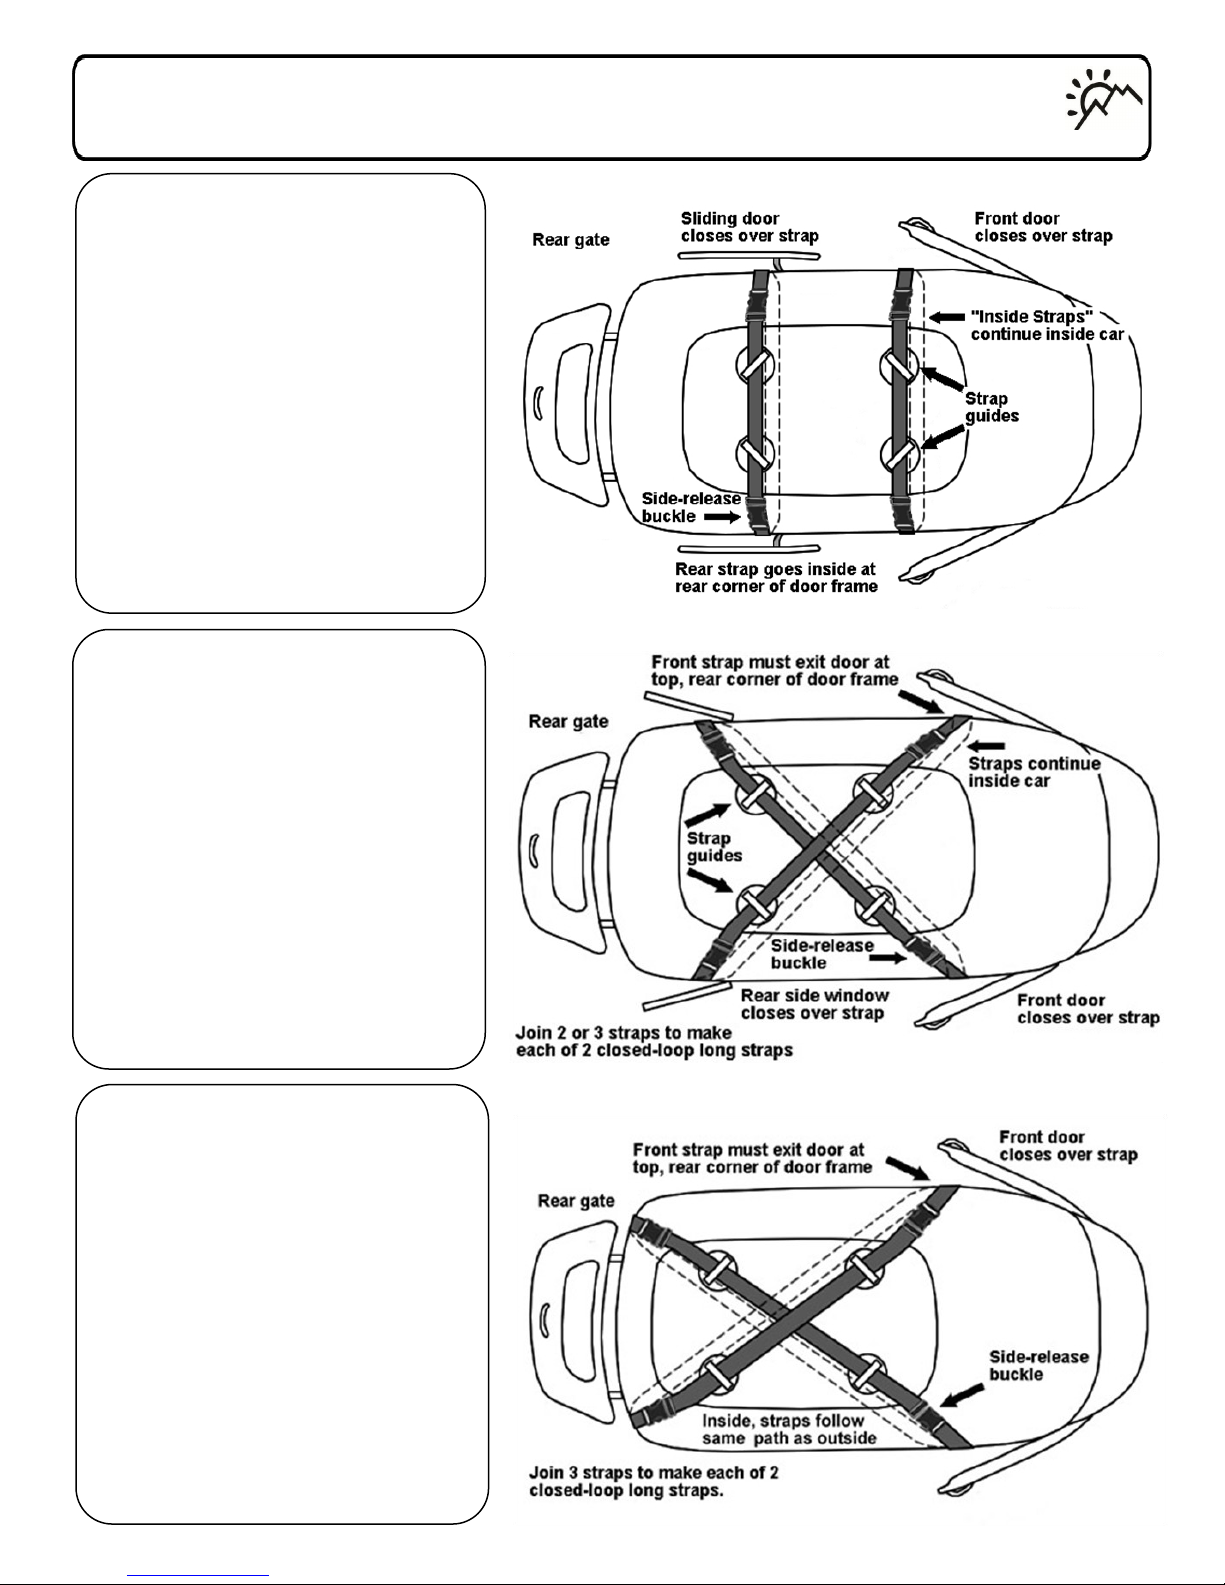
Van WITHOUT Rack
Standard Installation:
Vans with side doors
Install straps through front doors
and side doors. Check for interference with the side door closing
mechanism.
Each strap is 142” long (Top Strap + In-
side Strap).
Page 6
Alternative #1:
Vans with rear
windows that open
Install straps in x-pattern through
front doors and rear side windows.
Note: You may need to purchase additional straps and join them end-to-end
to make longer straps.
Each strap is 142” long (Top Strap +
Inside Strap).
Alternative #2:
Vans with rear gate
Install straps in x-pattern through
front doors and rear gate or
trunk.
Note: You may need to purchase additional straps and join them end-to-end
to make longer straps.
Each strap is 142” long (Top Strap +
Inside Strap).
Page 7
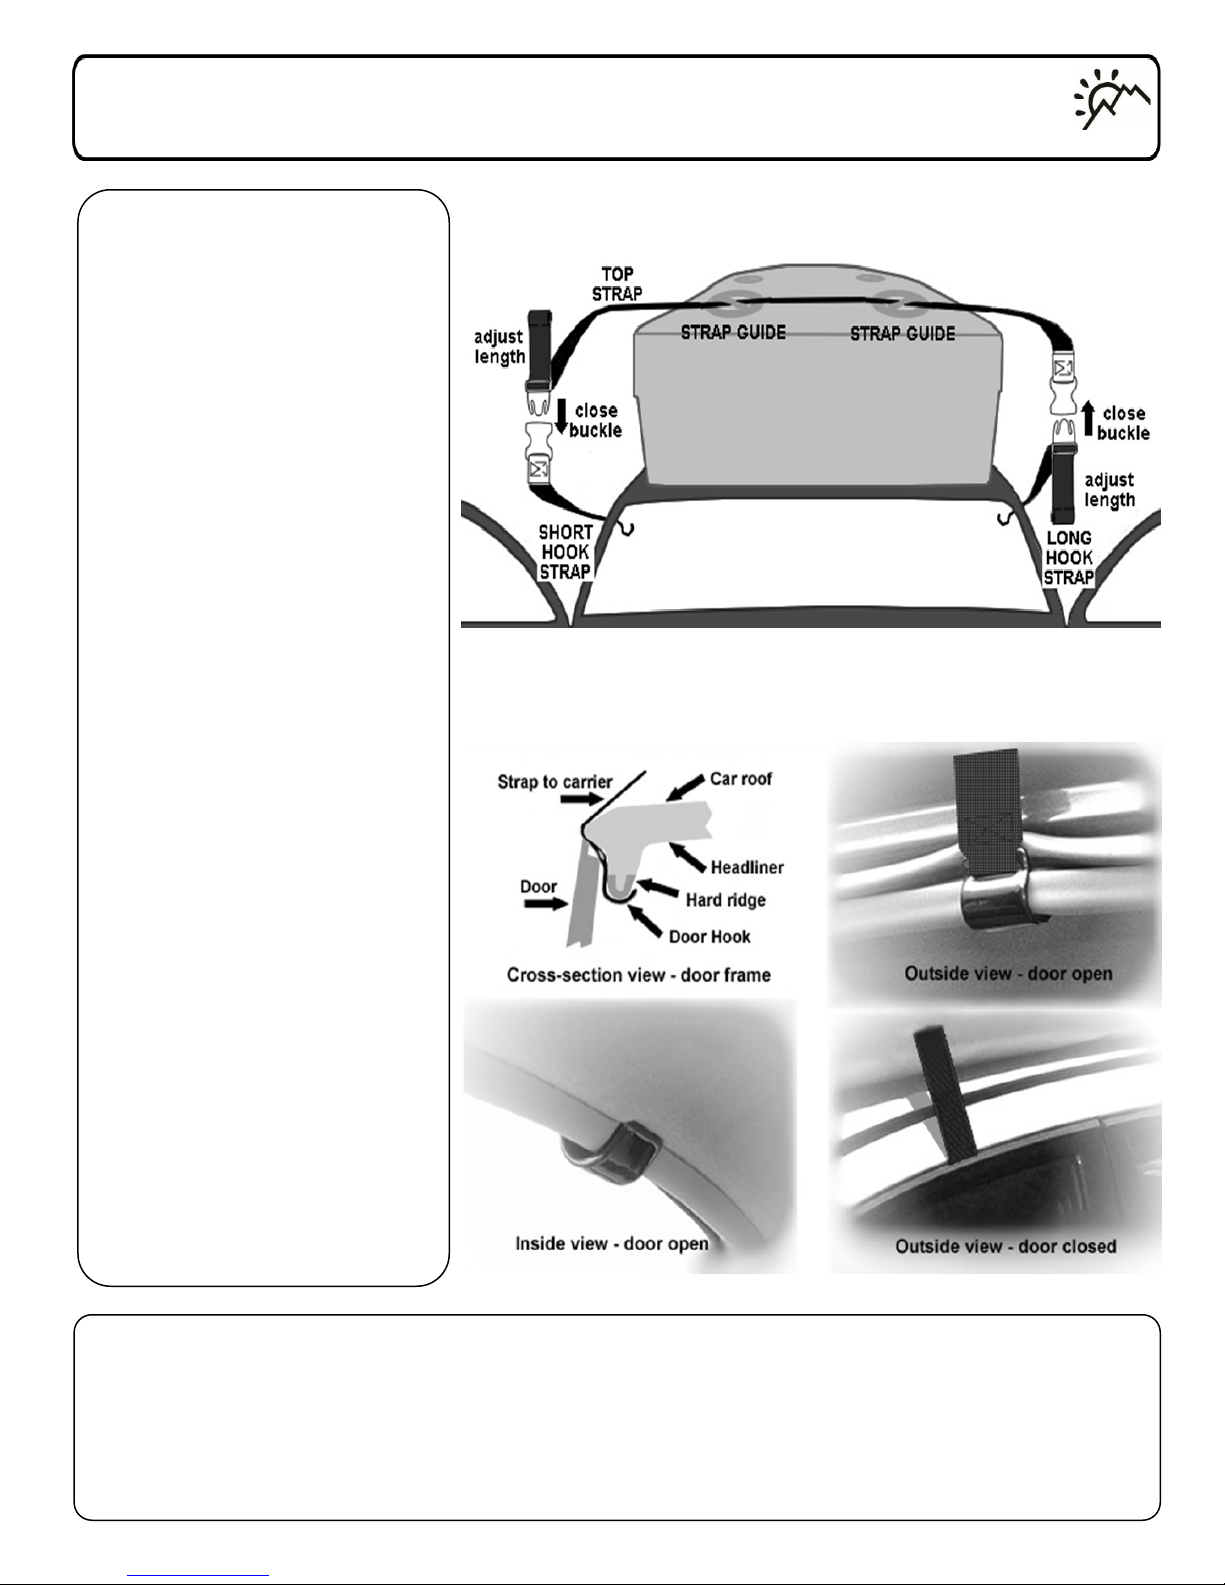
Hook Straps (Sold Separately)
Each strap has 3 sections: Top
Strap, Hook Short Strap, Hook
Long Strap.
1. Slide a Top Strap under 2
strap guides, left-to-right.
2. Open the car’s doors and at-
tach one of the hooks onto a
hard ridge or lip about ½” wide
by ½” high, that should stick
down from the top of the door
Page 7
frame inside the car. This ridge
may be covered with a plastic
molding or rubber seal. If ridge
is not there, or if it is too wide
or shallow, you can’t use hook
straps.
TEST: The hook should stay
firmly in place when pulling
the strap upward.
3. Close door over the strap.
Connect the buckles to the Top
Strap.
TEST: The strap should exit be-
tween the door and the frame,
and the hook should not be
visible from the outside.
4. Tighten the straps by pulling
from the free ends.
Check that the carrier is firmly held by the straps, that the straps are taut and that the
Hooks are tightly seated over the ridge and they stay in place even with the doors open.
NOTE: If your car does not have the required ½” ridge, or if the installation does not feel
tight and stable, use instead the Pass-Through Straps that come with the carrier.
Page 8
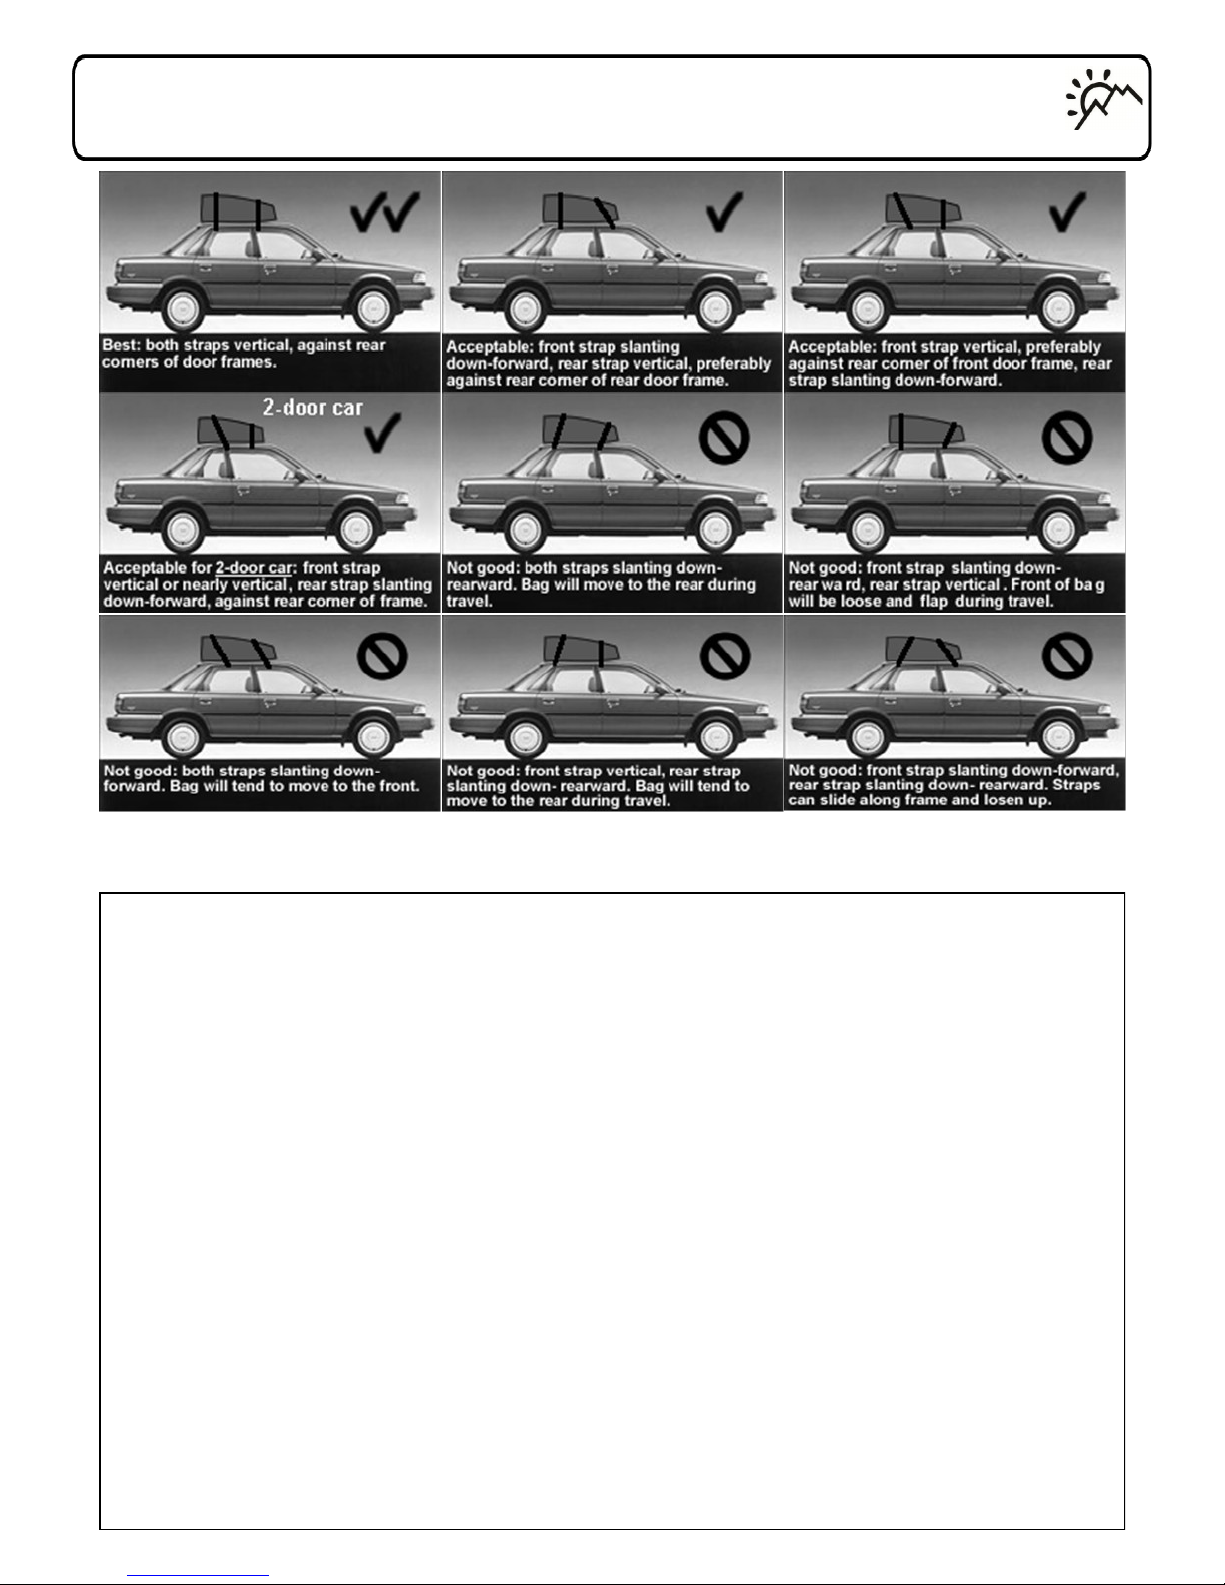
Correct Strap Angles
Page 8
Questions? - 800-276-6322 - 619-662-0495 - [email protected]
or visit: www.RoofBag.com/FAQ.asp
CAUTION and DISCLAIMER
By using RoofBag’s car top carrier you agree to the following:
An improperly secured carrier can damage the car or fall off the car, potentially injuring others or damaging the
carrier, your belongings or other vehicles. The buyer is fully responsible for installing the RoofBag carrier securely.
The manufacturer has no control over the way the buyer installs the carrier, and therefore the manufacturer cannot assume any responsibility for any damage or loss resulting from its installation. The instructions we provide
are intended to be guidelines for safe installation, and are based on our experience, our best judgment, and the
experience of many customers. However, the user has the ultimate responsibility for the security and safety of the
attachment. The manufacturer is not liable for any loss or damage caused by the carrier or its use, or for any indirect, incidental or consequential damages resulting from the use or the fall of a RoofBag carrier, whether the carrier was defective or not. The manufacturer's liability is limited to the repair or replacement of a defective carrier
according to the warranty terms described at www.RoofBag.com.
If you don't agree with this policy, please return the carrier to RoofBag.com for a full refund.
If you need installation assistance, please call RoofBag: 800-276-6322 or 619-662-0495.
WARRANTY and RETURNS
Unused carriers can be returned within 30 days after purchase. A 2-year repair/replacement warranty covers:
fabric puncture or tear, fabric and seam water-proofness, failure of straps or buckles and zipper operation. Not
covered by the warranty: water entry into the carrier through the zipper, damage to the carrier caused by falls, ac-
cidents, improper installation, normal wear and tear, or failure of the car’s components used to attach the carrier.
Used carriers cannot be returned for a refund, but if defective, will be repaired or replaced. If you need to return
your RoofBag carrier, send email to [email protected] requesting a Return Authorization Number and including your name, order number and reason for the return. For more details see Warranty/Returns page at
www.RoofBag.com.
 Loading...