

Page 1

Page 1 of 31
Instruction Manual
For
Ronin Lift
Your Personal Ascender
“Original Instructions”
Page 2

Page 2 of 31
WARNING:
To avoid electrical shock, do not open the Ronin Lift’s front cover. Refer servicing to
qualified personnel only.
Caution:
Modification of controls or adjustment or performance other than specified by procedures
herein may results in injury or death.
You are cautioned that any changes or modifications not expressly approved by the party
responsible for compliance could void the user’s authority to operate the equipment.
If you have questions about this product, visit
www.changeyourelevation.com/contact/ or contact Ronin
Customer Service at 657-444-2557. You can also write to,
Ronin
Customer Service/Technical Support
600 S. Jefferson St Suite D
Placentia CA 92870 USA
Declaration of Conformity
Trade Name: Ronin Lift
Model No.: 2805-11
Responsible Party: Ronin
Address: 600 S. Jefferson St Suite D
Placentia CA 92870 USA
Telephone: 657-444-2557
This device complies with Part 15 of FCC Rules and
Industry. Canada license-exempt RSS standard(s).
Operation is subject to the following two conditions: (1)
this device may not cause harmful interference, and (2)
this device must accept any interference received,
including interference that may cause undesired
operation.
Page 3

Page 3 of 31
About lithium ion battery
The lithium ion battery used to power this product contains Perchlorate. The following
statement is required by the state of California, USA:
Perchlorate Material – special handling may apply. See
http://www.dtsc.ca.gov/hazardouswaste/percholate
Page 4

Page 4 of 31
Contents
Warning …………………………………….…….....2
About Lithium Ion Battery …………………..…......3
Precautions ……………………………………....…5
Product Overview ……………………….………….8
Specifications………………………………….…...10
Box Contents……………………………...….……12
Ronin Lift Device Labels …………………………13
Charging Instructions …………………………….16
Rope Requirements ……………………………...16
Operating Instructions …................................…18
Battery Installation and Motor Initiation ………..18
Loading Rope ………………………………..…...20
Operating Ronin Lift ………………………...……23
Inspection and Maintenance .……………...……28
Inspection and Log Sheet ……………………….29
End of Life Recycling ………………………….....30
Warranty …………………………………...….......30
Returns …………………………………………….31
Page 5

Page 5 of 31
Precautions
Before using this product, carefully read this manual and retain it for future reference.
Parents and guardians of children should read this manual and make sure that the child
follows all safety precautions.
Safety
This product has been designed with the highest concern for safety. However, any
electro-mechanical device, if used improperly, has the potential for causing fire, electrical
shock or personal injury. To help ensure accident-free operation, follow these guidelines:
• Observe all warnings, precautions and instructions
• Regularly inspect AC power cord for damage
• Do not leave any charging battery unattended
• Unplug charging battery immediately upon charge is complete
• Stop use, unplug AC power cord from electrical outlet immediately if the device
functions in an abnormal manner, produces unusual sounds or smells, become too
hot to touch, or battery becomes swollen/bloated
• Do not handle damaged or leaking lithium-ion batteries
• Do not allow the battery to come into contact with fire or subject to extreme
temperatures such as direct sunlight, in a vehicle exposed to sun or near a heat
source
Prior to using Ronin Lift Personal Ascender please ensure you properly inspect all gear
and accessories. To learn more about proper safety precautions please visit the following
websites:
https://adrenalineromance.com/2013/04/11/rock-climbing-101-safety-checkscommunication-and-proper-belaying-technique/
http://climbing.about.com/od/staysafeclimbing/tp/10ClimbingSafetyTips.htm
http://www.climbingtechniques.org/safety-checks-and-commands.html
Knott Tying Reference:
http://www.animatedknots.com/indexclimbing.php#ScrollPoint
Page 6

Page 6 of 31
Use and Handling
• Do not use Ronin Lift without the proper safety equipment. Not doing so may
cause serious injury or death
• Only use approved static rope with Ronin Lift personal ascender
• Do not overheat the DC motor. If motor becomes extremely hot discontinue use
until motor has cooled down
• Inspect all equipment prior to each use, including Ronin Lift, safety harness,
carabineer clips, static rope, and helmet.
• Only use safety rated carabineer clips with Ronin Lift
• Do not wet or submerge Ronin Lift. Ronin Lift is not water proof.
• Be careful when caring Ronin Lift, if you do not have a good grip, the device may
drop causing potential damage or injury
• Do not stand on or put objects on the device, and do not stack the device with
other devices
• Keep the device, accessories, and any small components out of reach of small
children
• Stop using the device immediately if you begin to feel tired or if you experience
discomfort or pain in your hands, arms or legs while operating the device
• If you experience any of the following health problems, discontinue use of the
device immediately. If symptoms persist, consult your doctor.
⎯ Dizziness, nausea, fatigue or symptoms similar to motion sickness
⎯ Discomfort or pain in a part of the body, such as hands, arms or legs
• Do not place device on the floor or in a place where it may cause someone to trip,
stumble or fall
• Do not expose the device to high temperatures or high humidity
• Do not use device in an electrical storm
• Do not touch connectors on device
• Do no wet device on surface that are unstable, tilted or subject to vibration
• Do not allow liquid, small particles or other foreign debris to enter the device
Vents
Do not block any vents. To maintain good ventilation, follow the guidelines below:
• Do not cover ventilation holes
• Do not allow dust to build up on the vents
• Do not allow foreign debris to cover vents
Page 7

Page 7 of 31
AC Power Cord Use
• Do not plug in AC power cord without verifying electrical outlet compatibility. Check
AC power supply connected to AC power cord for power outlet compatibilities
• To help ensure safe operation, regularly inspect the AC power cord. If damaged,
stop use immediately and contact customer support.
• Do not modify the cord
• Do not use a power cord other than the supplied AC power cord
• Do not touch the AC power cord with wet hands
• Protect the AC power cord from being walked on or pinched particularly at plugs,
expansion receptacles and the point where the cords exits the power supply
• Do not place heavy items on the AC power cord
• Do not place the AC power cord near heating equipment and do not expose the
cord to heat
• Unplug the AC power cord from the electrical outlet when you do not intend to use
the charger. When disconnecting, grasp the AC power cord by the plug and pull
straight out of the electrical outlet. Never pull by the cord and do not pull out at an
angle.
• Do not connect AC power cord to a voltage transformer or inverter.
Moisture condensation
If the device is brought directly from a cold location to a warm one, moisture may
condense either on the electronics or motor. Should this occur, the device may not
operate properly. In this case, remove the battery until moisture evaporates from the
device (this may take several hours). If the device still does not operate properly contact
customer service.
Page 8
Page 8 of 31
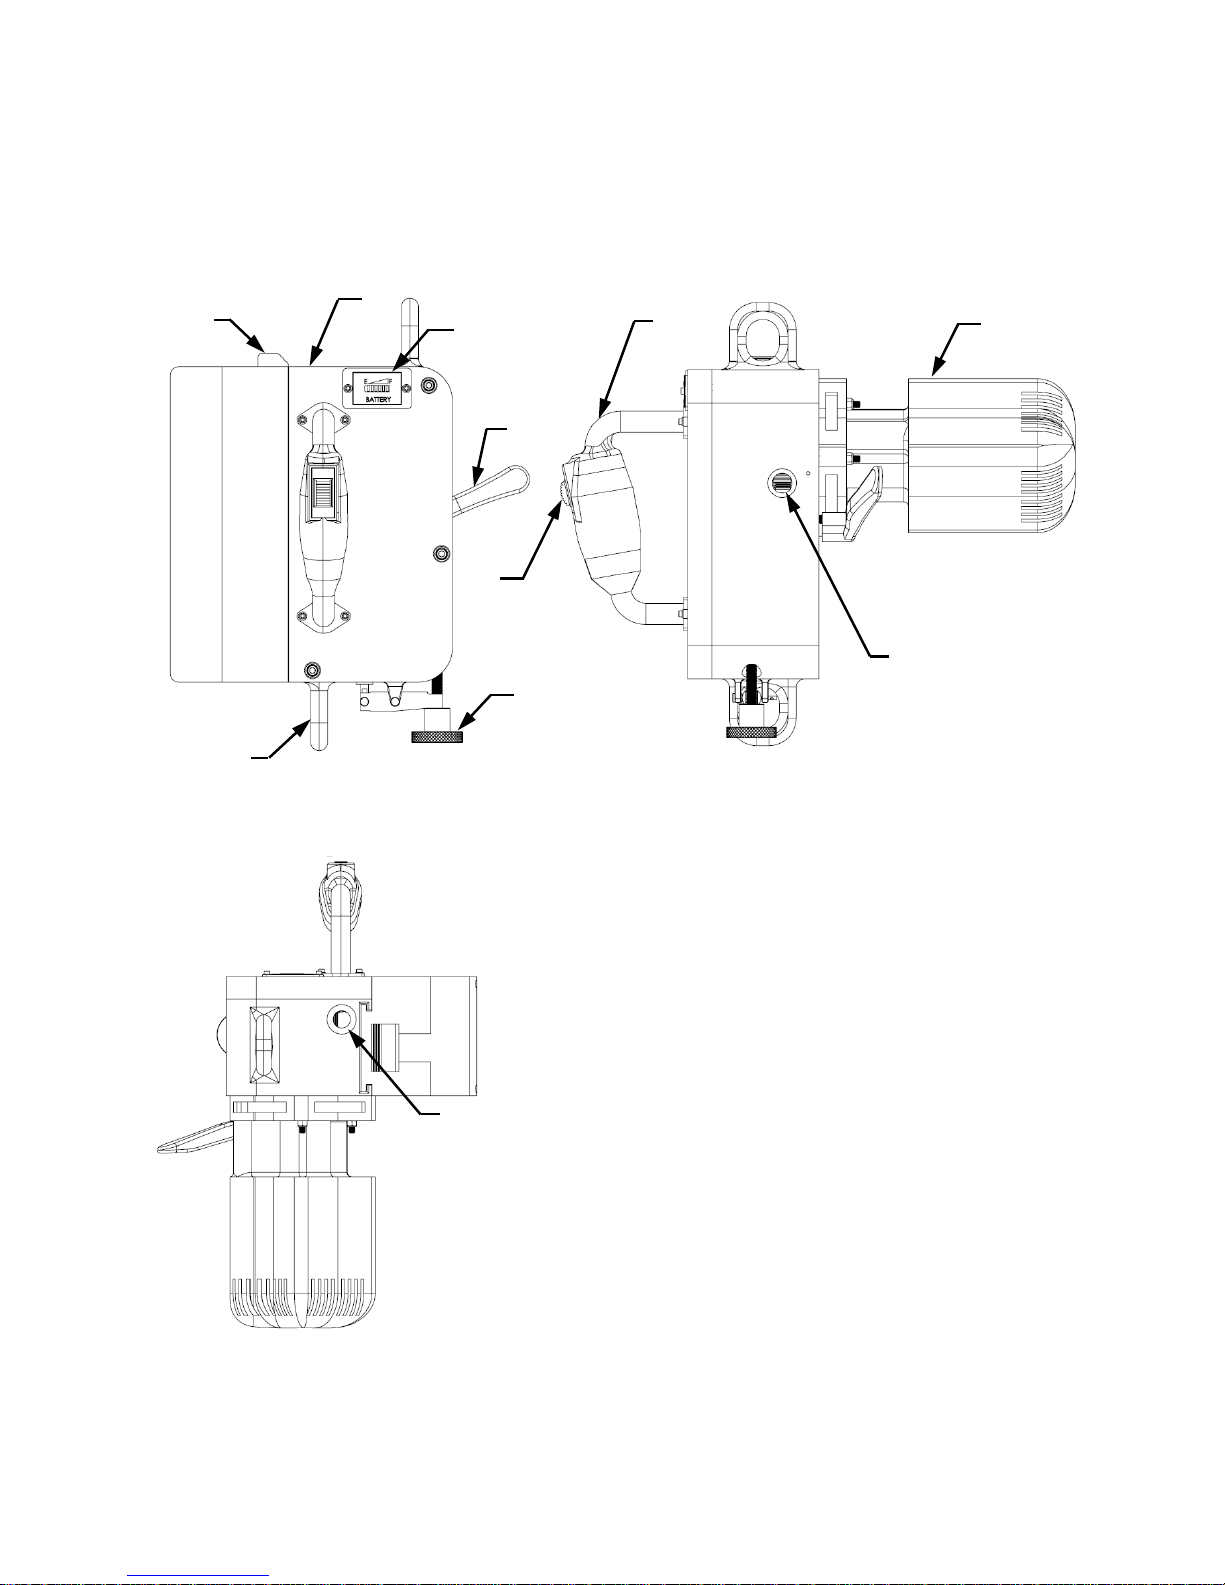
Product Overview
2
4
3
5
6
7
8
9
10
11
Page 9

Page 9 of 31
Ronin Lift Personal Ascender
1 – Ronin Lift Personal Ascender
2 – Lithium Ion Rechargeable Battery
3 – Battery Indicator
4 – Brake/Repel Handle
5 – Tensioner Knob
6 – Carabineer Clip Attachment Point
7 – Handle
8 – Thumbwheel
9 – Motor/Gearbox
10 – Rope Exit Hole
11 – Rope Inlet Hole
Page 10

Page 10 of 31
Specification
Ronin Lift
Motor
28 VDC nominal
100 amps (1 min burst)
275º F (135º C) max operating Temp
4500 rpm
5 N-m continuous torque
Gearbox
32:1 reduction
Speed Controller
Pulse Width Modulation (PWM)
120 amps max
32 VDC Max
Thumbwheel
.381k ohm
60º rotation
Brake
Manual Operations Via Brake Handle
Rope Diameters
Static Line Rope 10 mm to 12 mm
Max Rated Power
3,300 watts max
Mass
25 lbs.
Speed
Variable Approx. 1.00 – 1.75 ft/sec
Operating Temp
-4º F - 140º F (-20º C - 60º C)
Sound Level
83.1 dBa
Vibration Level
6.9 m/s2
Capacity
400 lbs. (1.78 kN) Max or 1 Person Max
Operational Humidity
0 – 85 percent
Operating Barometric
Pressure
29.9 in. Hg – 7.04 in. Hg (101 kPa – 23.8 kPa)
Storage Temperature
-4º F - 113º F (-20º C - 45º C) Less than 1 month
-4º F - 95º F (-20º C - 35º C) Less than 6 months
Storage Humidity
≤ 80% Less than 1 month
≤ 70% Less than 6 months
Page 11

Page 11 of 31
Battery
Type
Lithium-Ion
Voltage
28.8 VDC Nominal
Amperage
100 amps (1 min burst)
Battery Capacity
6 Ah
Operating Temperature
-4º F - 140º F (-20º C - 60º C)
Mass
Approx. 6.5 lbs.
Battery Life
300 Charges
Charge Time
Approximately 2.5 hrs.
Charging Temp
109 º F (43 º C) Maximum
Storage Temperature
-4º F - 113º F (-20º C - 45º C) Less than 1 month
-4º F - 95º F (-20º C - 35º C) Less than 6 months
Storage Humidity
≤ 80% Less than 1 month
≤ 70% Less than 6 months
Power Supply
Type
Lithium-Ion Battery Charger
Input Charging Voltage
110 VAC – 240 VAC
Input Charging Amperage
5 amps max
Operating Temperature
32º F - 104º F (0º C - 40º C)
Operating Humidity
5% - 90%
Charge Time
Approximately 2.5 hrs.
Charging Temp
104 º F (40 º C) Maximum
Storage Temperature
-4º F - 185º F (-20º C - 85º C)
Storage Humidity
5% - 90%
Rope
Specification
EN 1891 and EN 564 approved rope
Rope Size
10.0 mm – 11.5 mm with less than 2.0% elongation
Rope Size
11.6 mm – 12.0 mm with less than 3.3% elongation
Rope Type
Aramid or Kernmantle Sheath
Page 12
Page 12 of 31
Box Contents
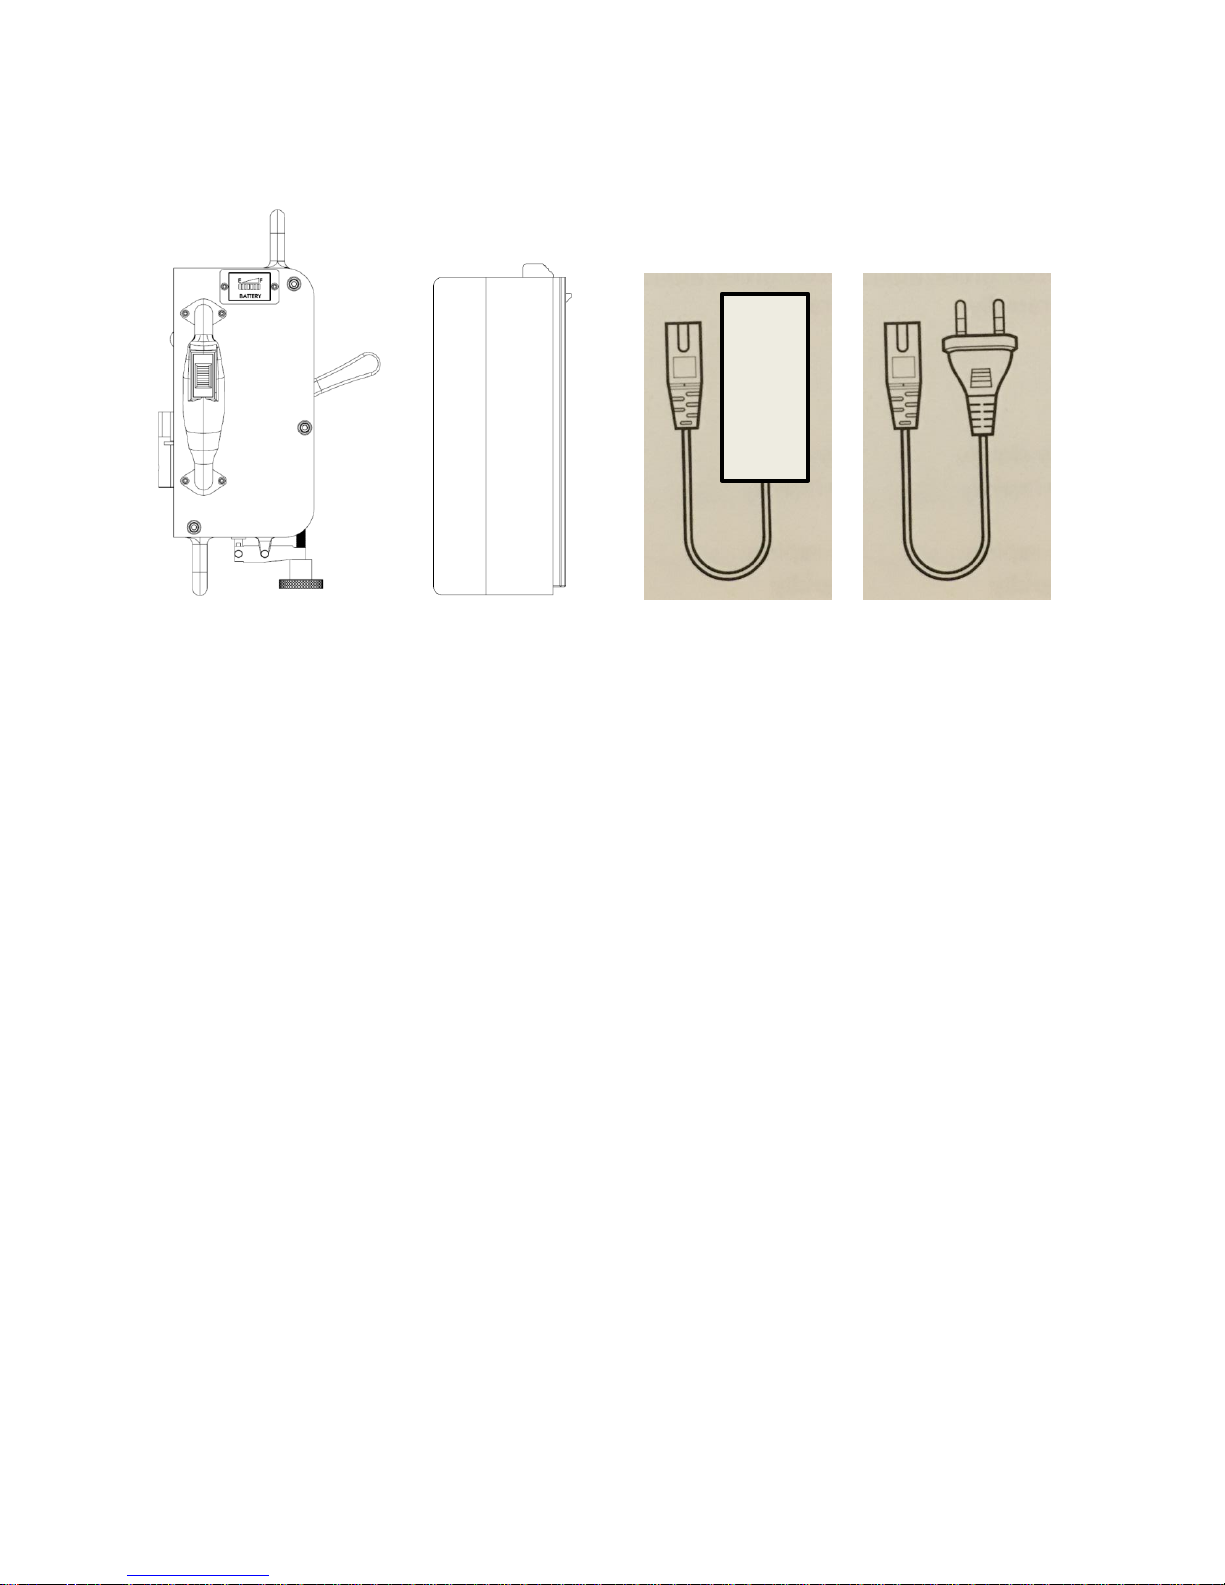
1 2 3 4
1: Ronin Lift Personal Ascender
2: Lithium-Ion Rechargable Battery
3: AC Power Supply
4:AC Power Cord
Page 13
Page 13 of 31
Ronin Lift Device Labels
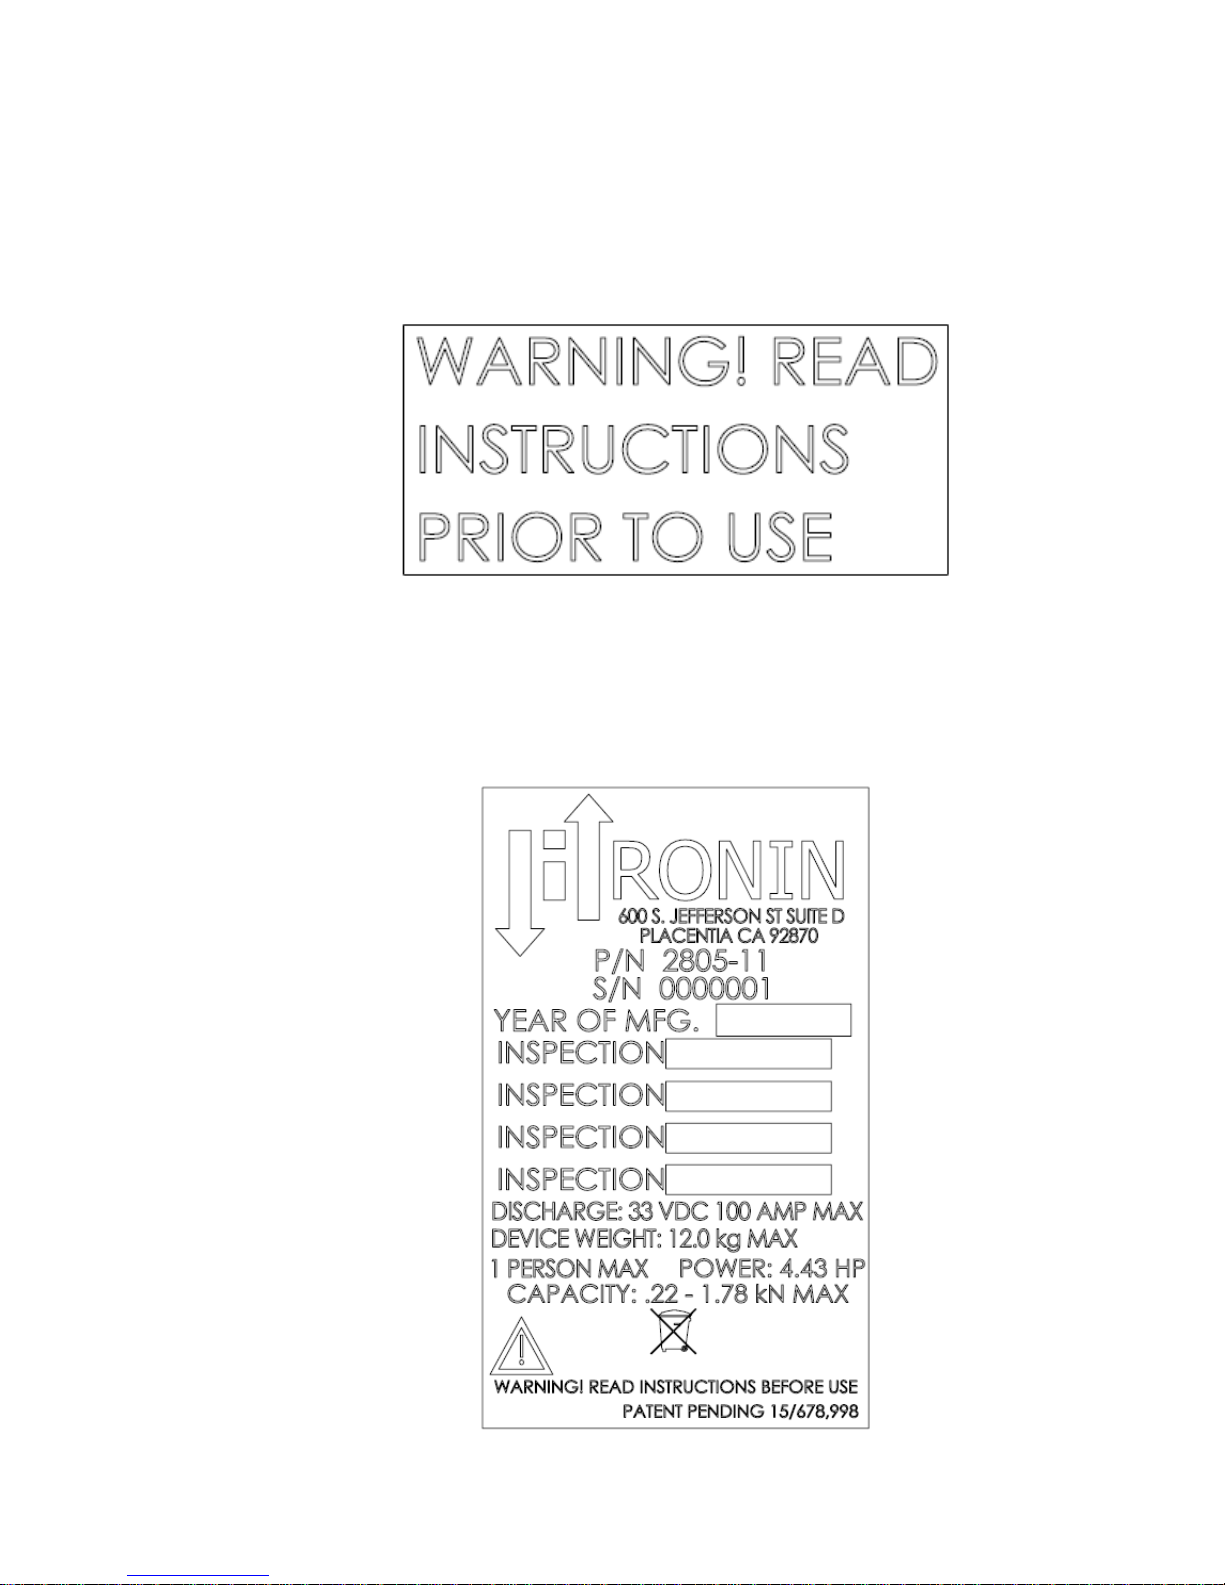
1) Warning Label instructions user to read the entire instruction manual and have
a thorough understanding of the device prior to use. Please contact customer
service if you are unsure of anything prior to use.
2) The Ronin Lift label provides device information, Part number, Serial number,
year of manufacture, device limits and capabilities, certifications acquired and
yearly maintenance intervals performed for the 5-year life of the Ronin Lift
Personal Ascender.
Page 14
Page 14 of 31
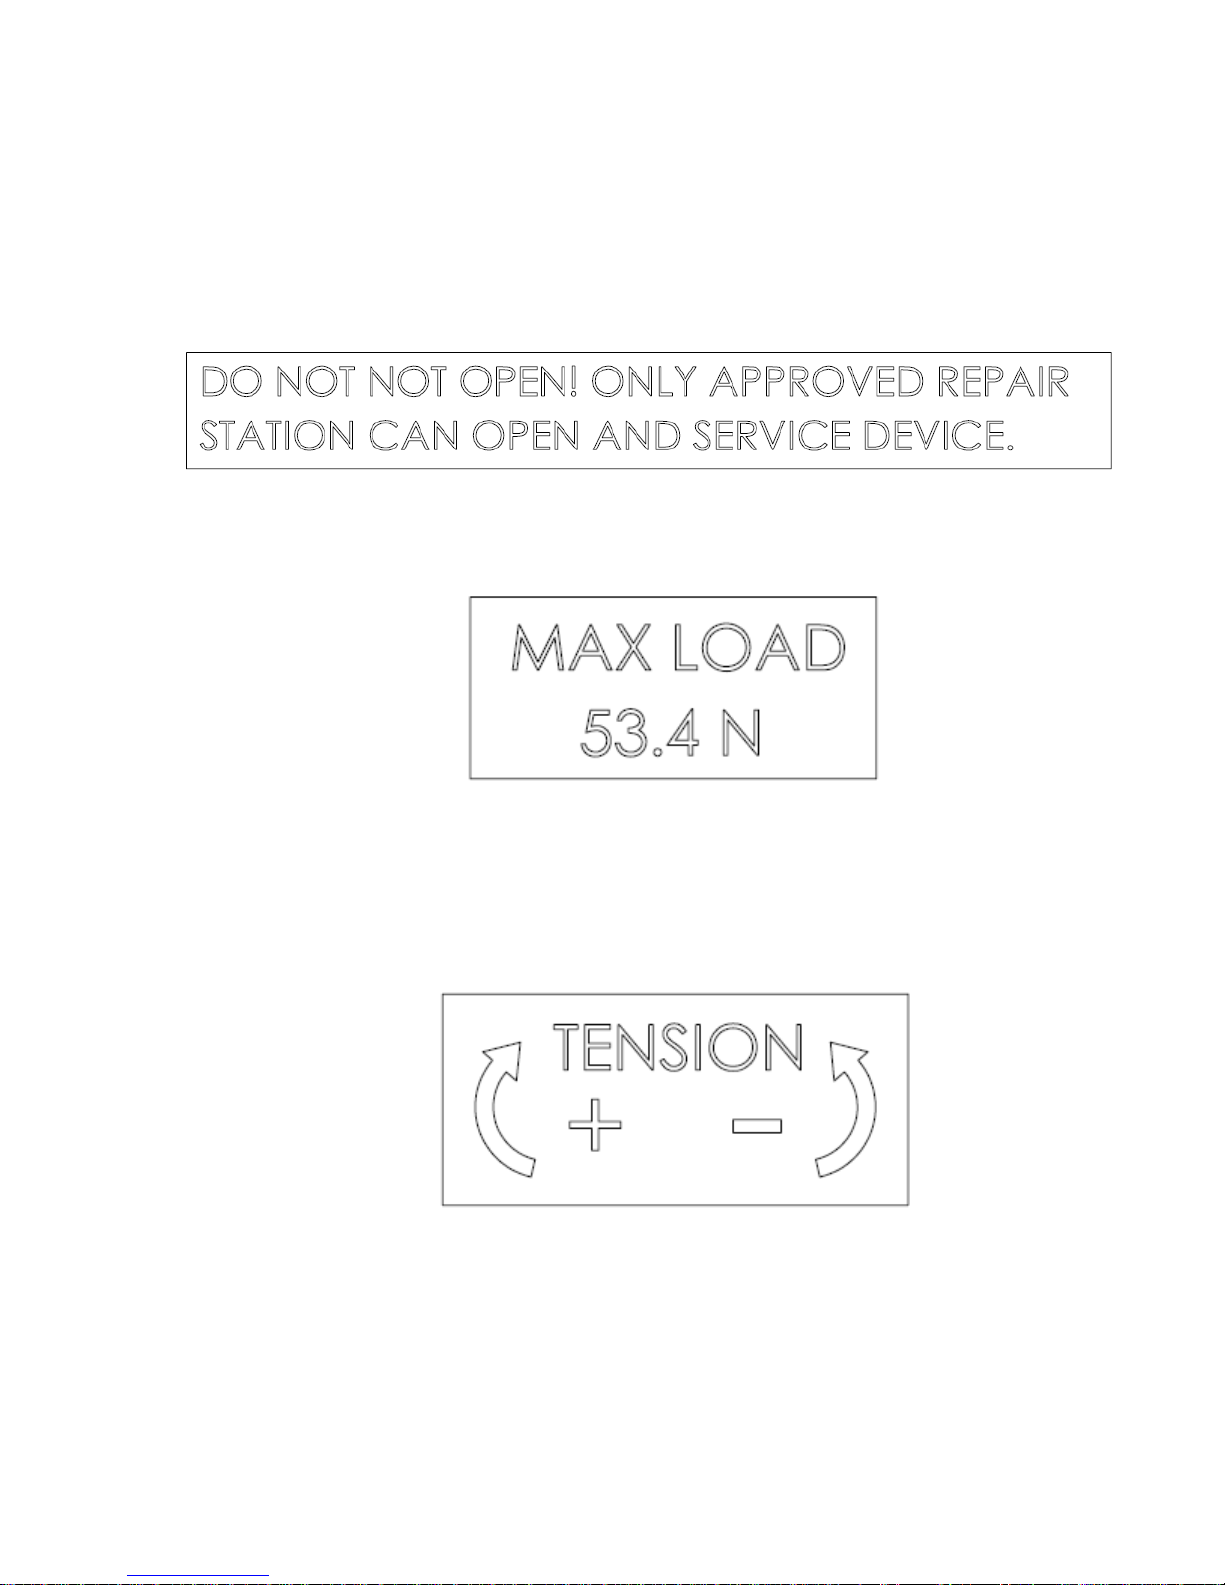
3) Ronin Lift can only be serviced or repaired by an approved repair center or by
sending the device back to the manufacturer. The maintenance or repair can be
scheduled by calling and obtaining a Manufacturer Repair Order (MRO)
number. Do not open the Ronin Lift or warranty will be voided, the do not open
label is a tear away one-use label for anti-tampering.
4) Max load label is the maximum permitted load on the battery carabineer
attachment point. The carabineer Attachment point on the battery is not load
bearing, maximum permitted load is 53.4 N (12 lbs.).
5) The tension label describes which direction to turn the tensioner to apply more
or less tension to the rope. More tensions increase the grip on the rope to
reduce rope slippage with larger loads on the Ronin Lift. It is also used to apply
a larger holding capability during lifting max 400 lbs. loads using the Ronin Lift.
Turning it in the Counterclockwise direction increases grip and holding capacity.
Turning it in the Clockwise direction allows rope to be loaded in the device.
Page 15

Page 15 of 31
6) The brake label provides instructions on which direction to operate the brake
handle for applying the brake or removing the brake.
Page 16

Page 16 of 31
Charging the battery
The battery takes approx. 2.5 hrs. to charge.
The charger LED codes are the following:
Standby (Solid Green with no battery plugged in)
Charging (Solid Red when battery is charging)
Fully Charged (Solid Green with battery plugged in)
Battery Warnings
• To charge the battery, you must only use the included charger.
• Only use included AC power cord.
• Do not over-discharge the Lithium-Ion battery.
• If at any time the Lithium-Ion battery begins to balloon or swell, discontinue
charging or discharging immediately.
• Always terminate all processes if the battery/charger malfunctions.
• Do not over charge the battery.
• Store the Lithium-Ion battery at room temperature in a dry area for best results.
• Allow the Lithium-Ion Battery to cool to ambient/room temperature before recharging.
• Never charge the Lithium-Ion battery unattended at any time.
• Never charge the Lithium-Ion battery connected to the Ronin Lift.
• Never Charge the battery above 109 º F (43 º C).
Rope Requirements
• Only use static line rope with aramid or kernmantle sheath in your Ronin Lift
personal ascender.
• The only approved rope sizes for use with the Ronin Lift is Static Rope in the range
of 10 mm diameter to 12 mm diameter sizes.
• Static rope sizes between 10 mm and 11.5 mm need to have an aramid or
kernmantle sheath with low reduction in rope diameter (recommended under 2%
elongation).
• Rope diameter up 11.5 mm to 12 mm can be used with larger elongation factors
(recommended under 3.3% elongation).
• The diameter of the rope should not shrink below 10 mm when weight is applied to
the device.
• Both ends of the rope should have good clean burns and all tape or shrink wrap
should be removed from the rope.
Page 17

Page 17 of 31
Rope Warnings
• Only use static line ropes with aramid or kernmantle sheath with Ronin Lift
• Inspect rope prior to use, during use and after use for rope integrity
• Never use damaged or worn rope
• Only use EN 1891 and EN 564 approved rope
Page 18
Page 18 of 31
Operating Instructions
Battery Installation and Motor Initiation
Warning: If battery is to be switched out mid-line a lanyard shall be
attached to the battery carabineer attachment point and another point either
on person or device. This ensures if the battery was to fall it will be retained
by the lanyard. This is a safety precaution to ensure a battery does not
accidentally fall and injure person(s) below.
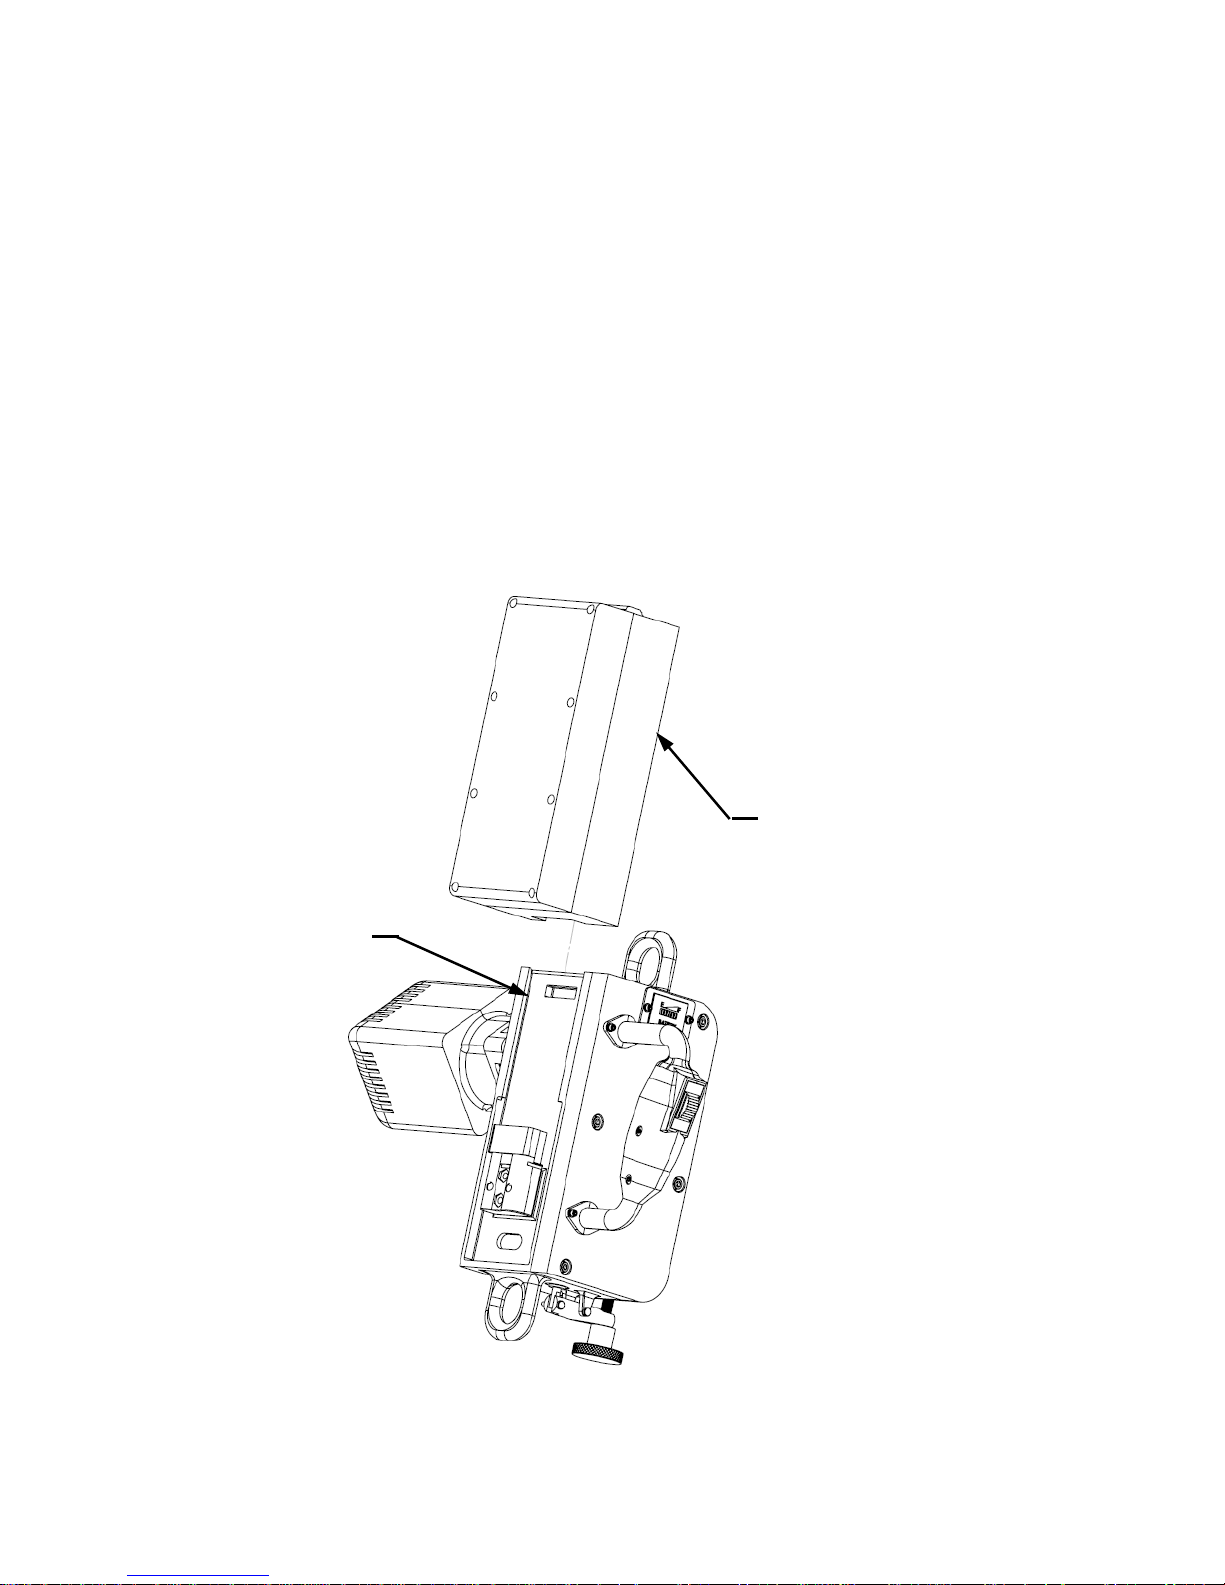
1. Slide the battery down the side of the Ronin Lift, matching the slots in the Ronin
Lift with the tangs on the battery.
Ronin Lift Battery
Slot
Battery
Page 19

Page 19 of 31
2. Drive the battery down with enough force to mate the connectors.
Note: The connectors are impact resistant, due to tolerance stack
some batteries may take more force to connect then others.
3. The battery connection will start up the motor arming sequence. You will hear the
motor beep 5 times. After the initial 3 beeps will follow an additional 2 beeps.
These two beeps indicate the motor is armed and the Ronin Lift is ready for use.
4. The battery indicator will also go through a lighting sequence. It will circulate from
empty (red color tick mark left most side) to full (green color tick mark right most
side), then display the batteries current charge state.
Page 20
Page 20 of 31
Loading Rope
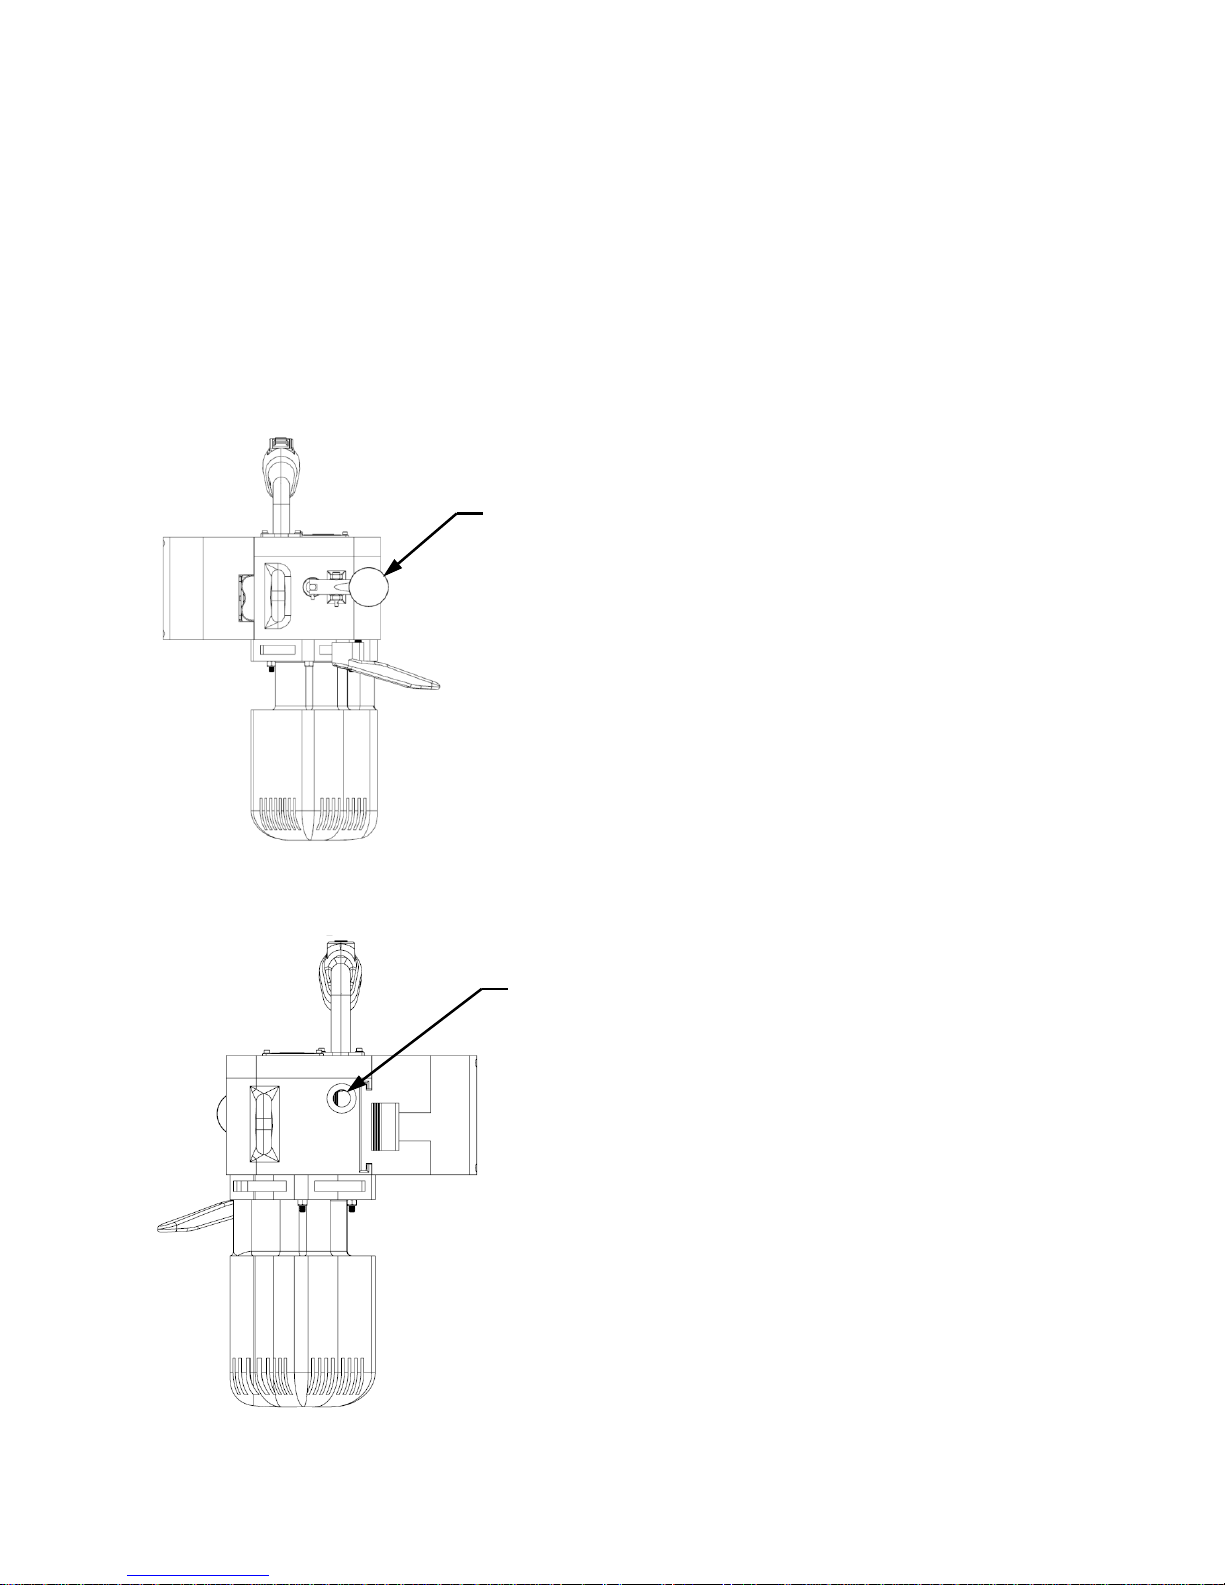
1. Rotate the tensioner dial knob in the clockwise direction until it bottoms out on the
Ronin Lift ascender housing. This will relieve the tension allowing the first wrap to
be started. Only rotate the knob until it stops.
Note: Screw the tensioner knob clockwise until it cannot turn anymore. The
knob will start getting tight and this is due to the spring, continue to screw
the knob down until it bottoms out or will not turn anymore.
2. Insert Static Line Rope with 10 mm to 12 mm diameter through the rope inlet feed
hole.
Tensioner knob
Insert Rope Here
Page 21
Page 21 of 31
3. Push Static Line Rope 10 mm to 12 mm diameter manually into the Ronin Lift
personal ascender as far as it will go.
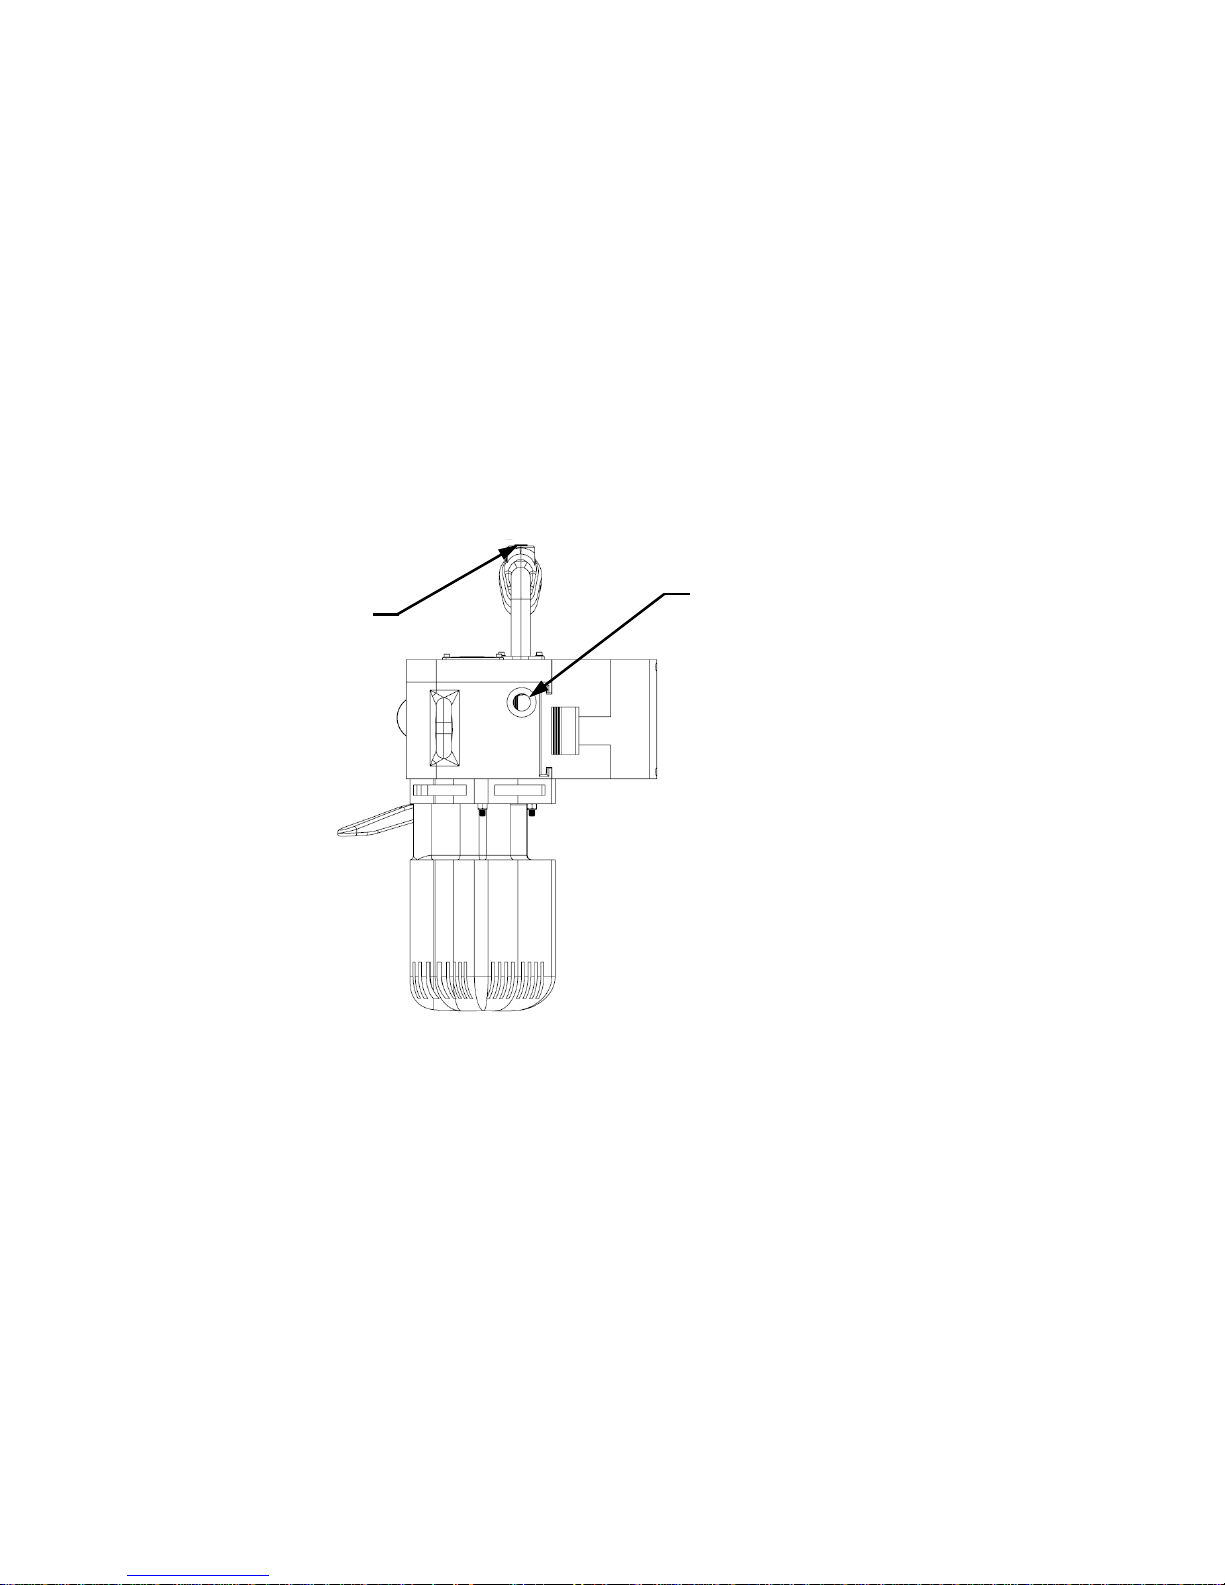
4. Grab the rope 3 to 4 inches above the inlet hole and push rope into the device. At
the same time as you push rope into the device tap the thumbwheel, rope will start
to feed through the device.
Warning: Do not hold the thumbwheel trigger down. When rope is not fully
feed through the system with proper tension applied, rope can become burnt
and/or tear the sheath. Heat buildup from the shaft spinning around the rope
can cause the sheath to melt or tear. Only tap the trigger as you push the
rope into the inlet.
5. Continue to grab 3 to 4 inches of rope behind the inlet hole and push the rope into
the device tapping the thumbwheel until the rope can no longer feed into the
device.
Note: During this process the tensioner may need to be adjusted in either
the tension + (Counterclockwise) or tension – (Clockwise) direction as the
thumbwheel is tapped to feed rope through the device. This is rope
dependent.
Rope Inlet
Thumbwheel
Page 22
Page 22 of 31
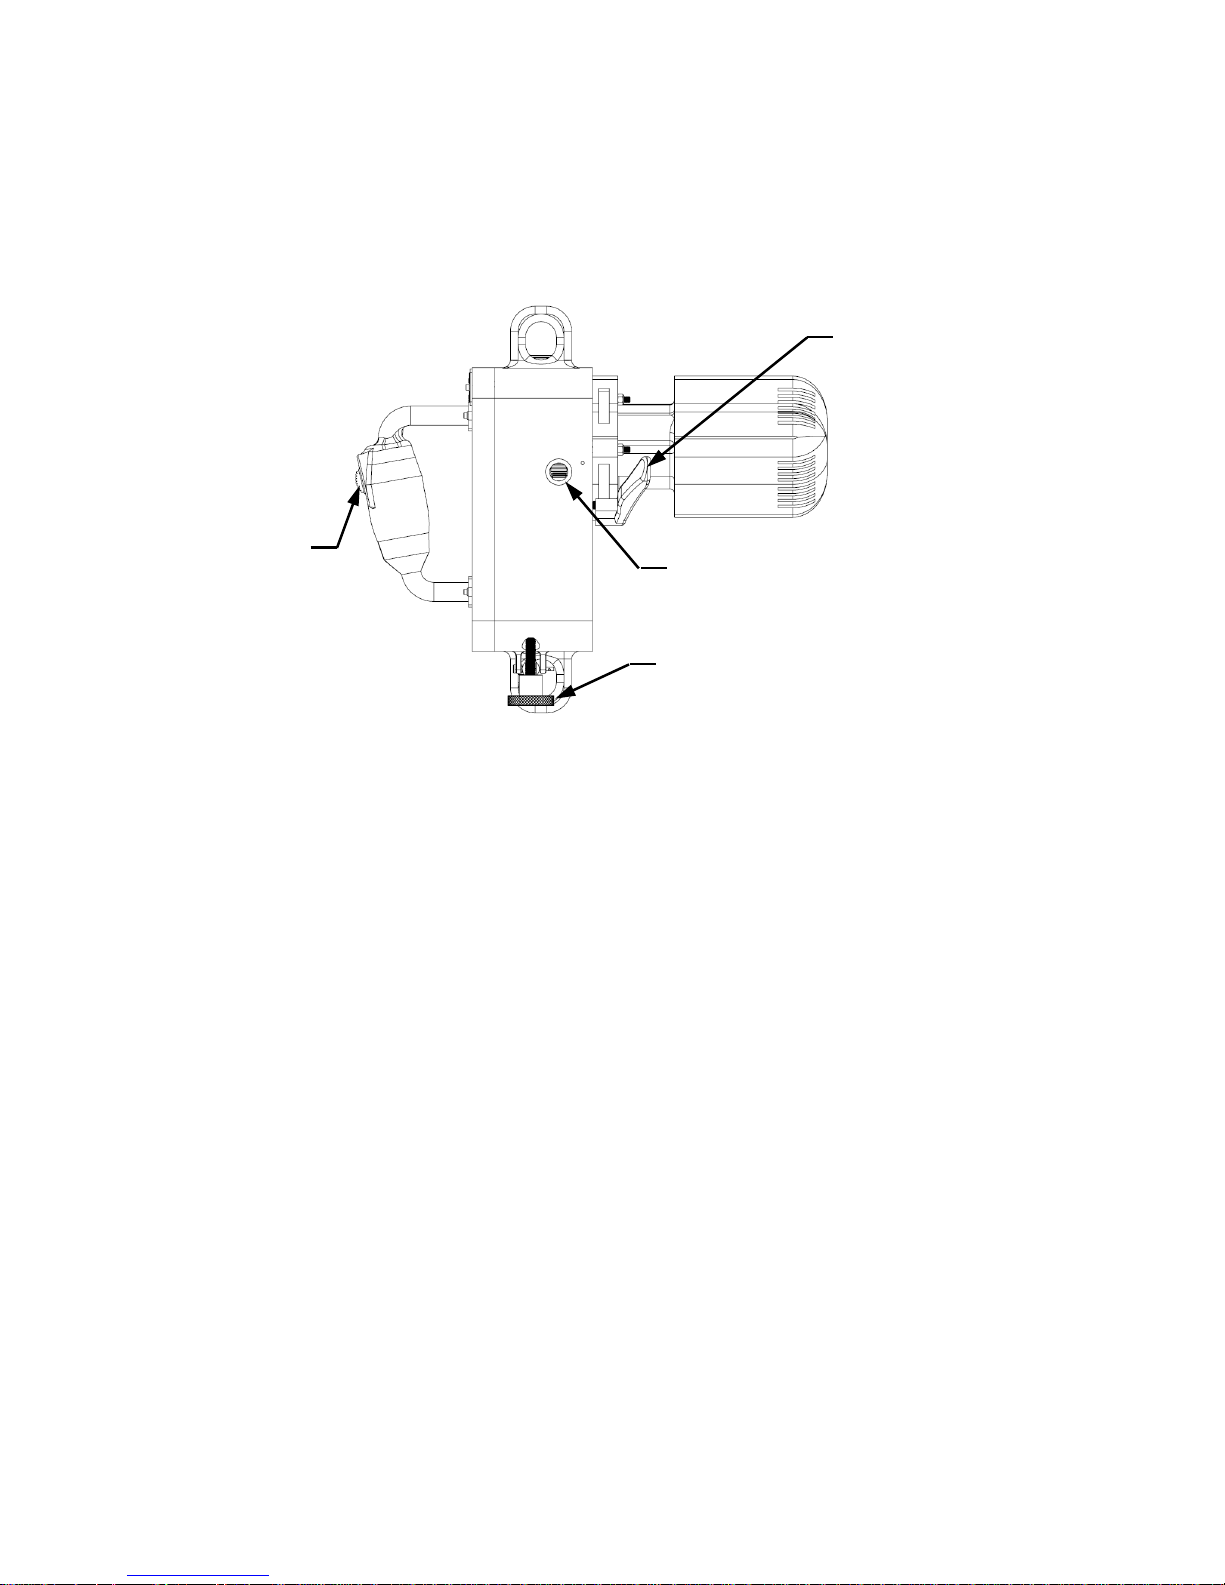
6. Once rope is no longer feeding into the device apply tension via the tensioner by
rotating the tensioner knob in the counterclockwise direction.
Note: Rotate the tension knob counterclockwise until the knob is tight
and will not physically rotate anymore.
7. Slowly pull the thumbwheel switch actuating the motor. This will drive the rope out
of the system.
8. Once the Rope has reached the exit, allow 40-50 inches of rope to be fed out of
the device.
9. The system is now ready to be used.
Note: The tension can be used to limit descent speed. If too much tension is
applied, you may not be able to descend. If this happens reduce the amount
of tension. Full speed descent of 4 ft./sec. with 400 lbs. can be achieved by
screwing the knob in fully clockwise.
Tensione knob
Thumbwheel
Exit Outlet
Brake Handle
Page 23
Page 23 of 31
Operating Ronin Lift
Caution: Ensure you have all safety equipment on and properly
secured prior to using Ronin Lift. Misuse or improperly secured
equipment could result in serious injury or death. Never use Ronin Lift
Personal Ascender without a Safety lock line.
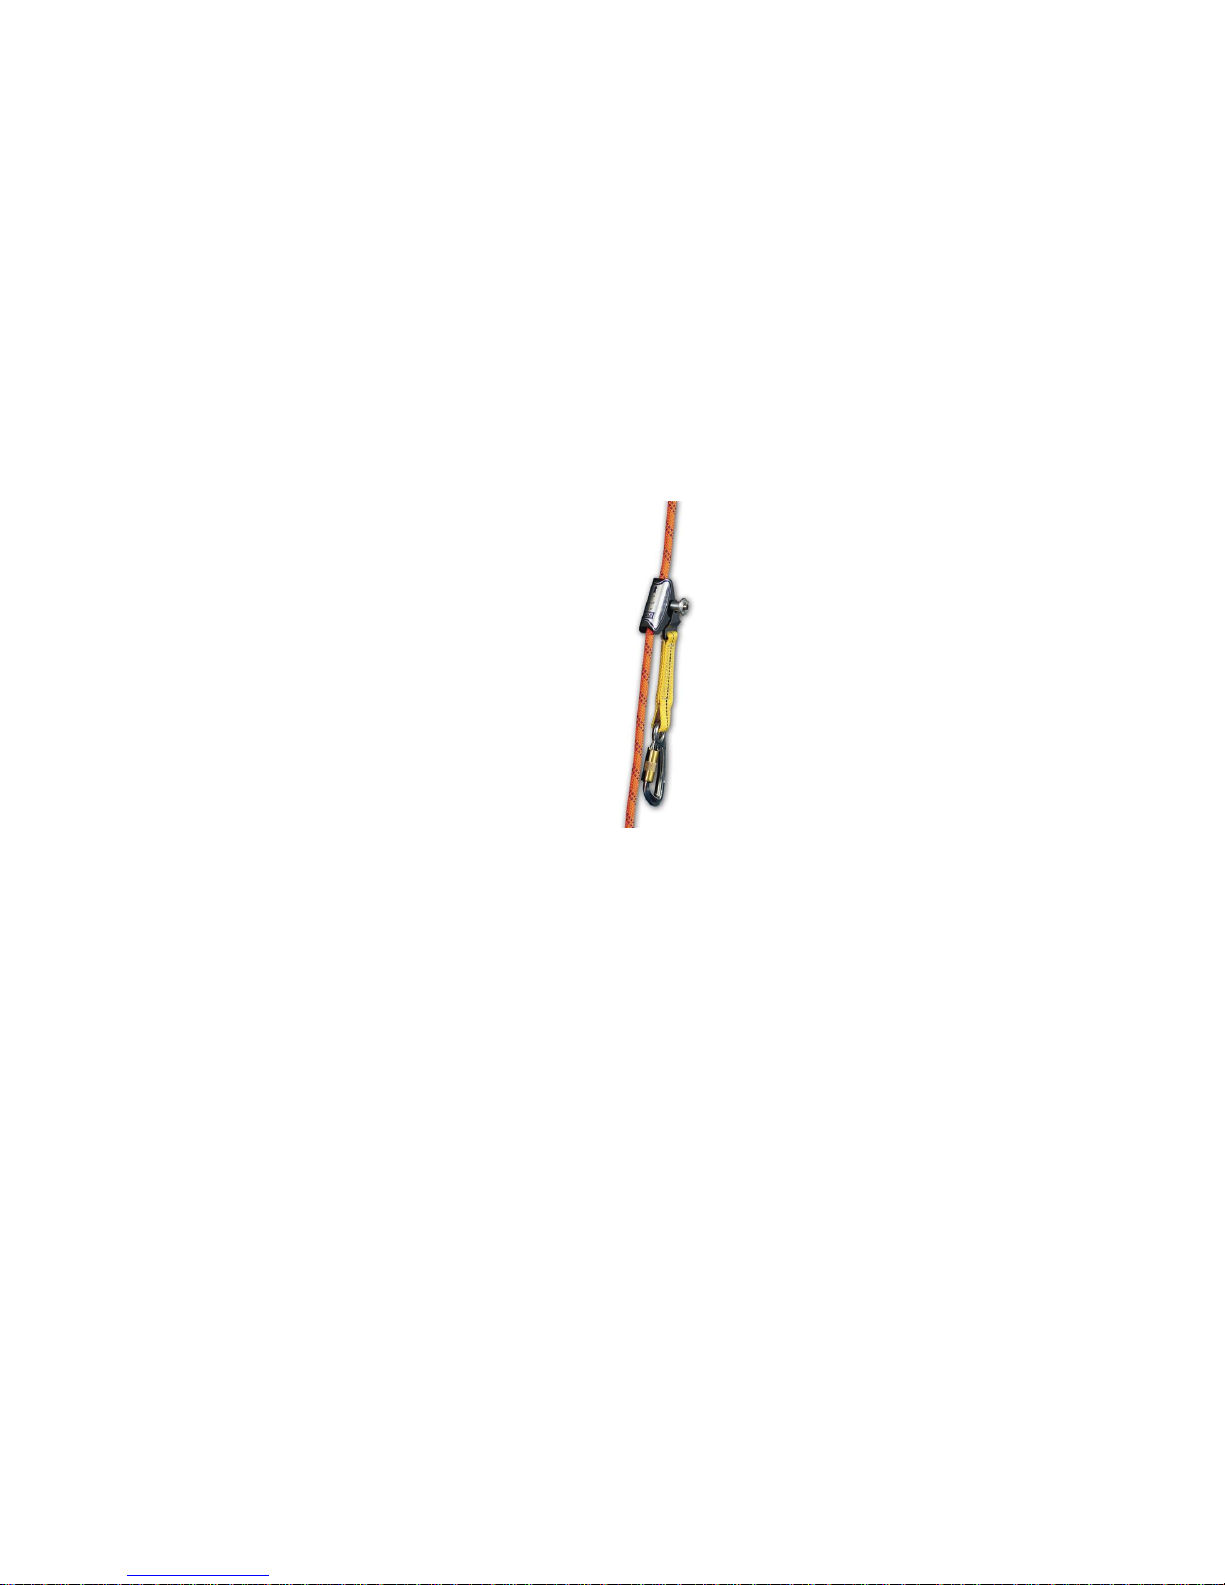
1. Using a rope grab on a secondary safety line, system or an approved secondary
catch system, connect it to your harness. Below is an example of a rope grab
system, this is one example. There are many different secondary safety line
systems that can be used.
2. Using a load baring carabineer clip that complies with ANSI standards, connect the
Ronin Lift Personal Ascender to your harness via carabineer clip.
Caution: Do not use a key chain clip or any clip not rated for
holding persons. This could result in serious injury or death.
Page 24
Page 24 of 31
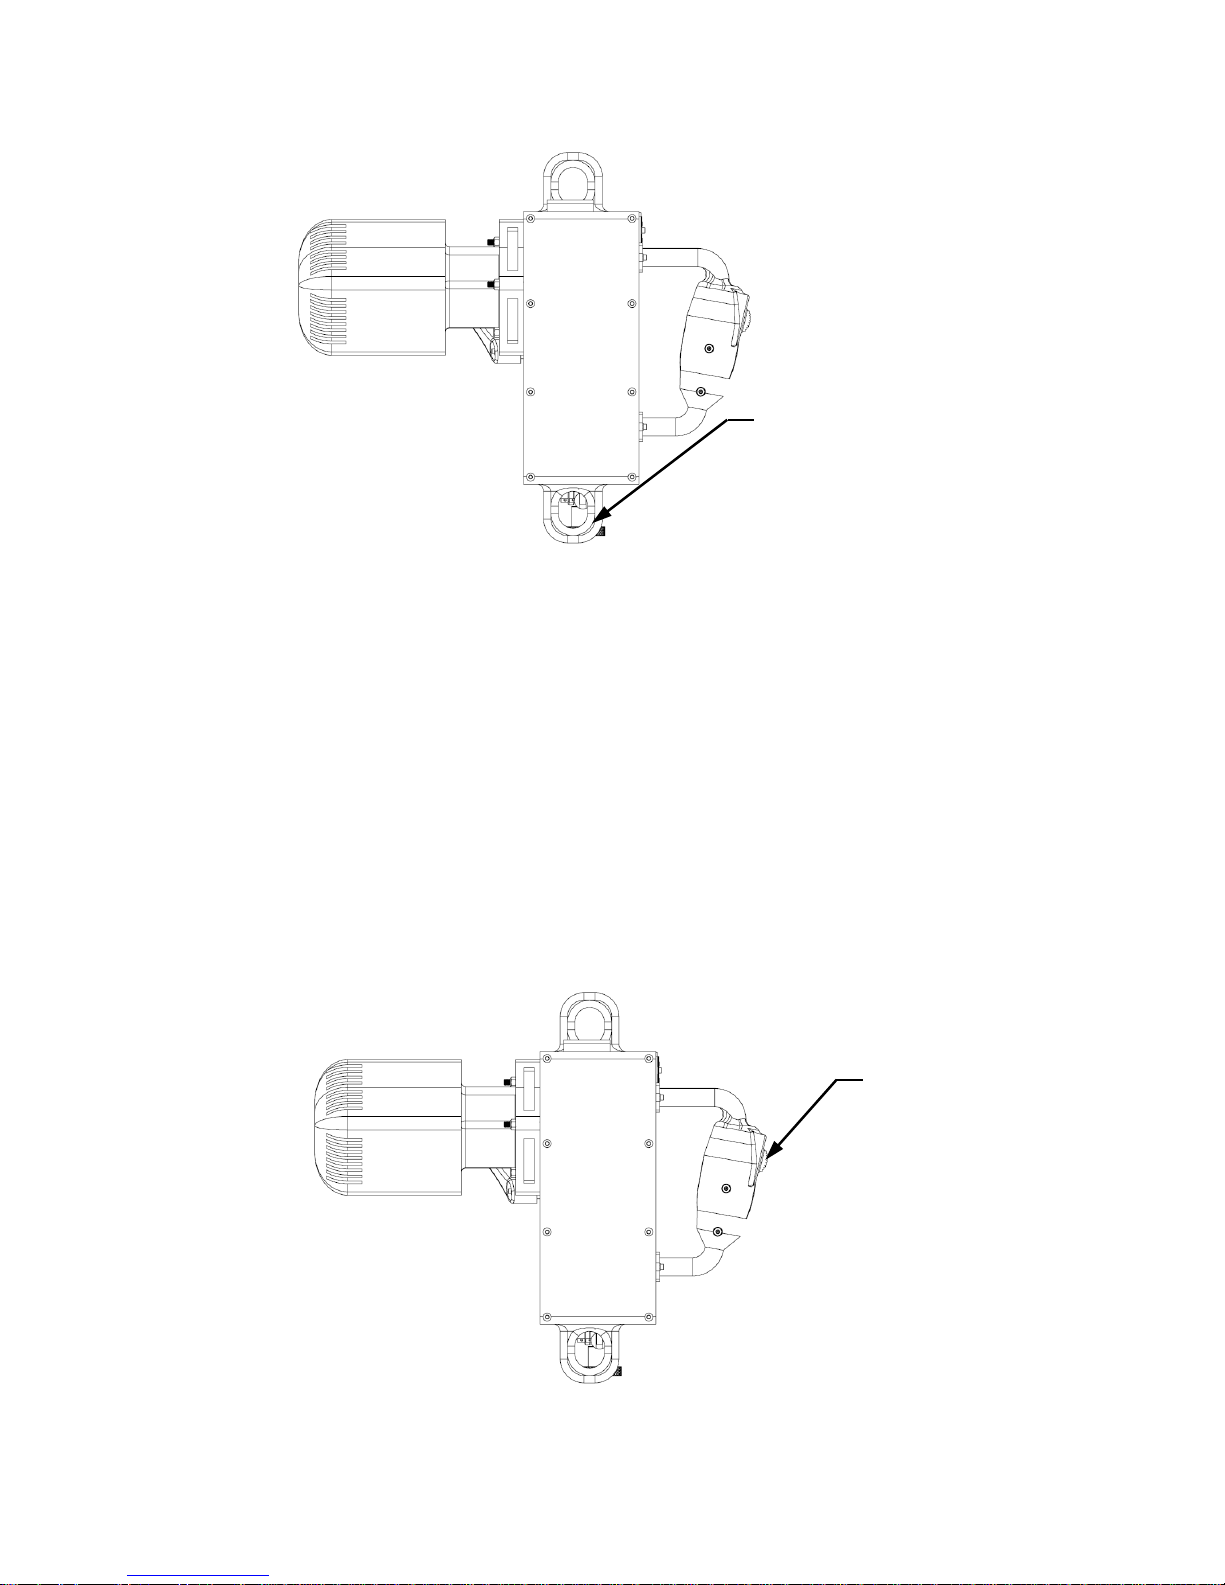
3. Prior to using the Ronin Lift in an ascent apply back tension to the system to allow
the drive shaft to grip and drive rope. This is accomplished by rotating the tension
knob counterclockwise.
Note: The tensioner is how the Ronin Lift accommodates multiple rope
sizes and drives rope with heavier loads. If the drive shaft is slipping there is
not enough back tension. Increase the back tension by rotating the tensioner
knob counterclockwise until the tensioner knob will not physically rotate.
4. Once clipped into Ronin Lift, grip the handle in your left hand and pull down the
brake/repel handle with your right hand. Gently pull the thumbwheel about ¼ of the
stroke to actuate the motor taking out any slack in the line.
Carabineer Clip
Attachment Point
Thumbwheel
Page 25
Page 25 of 31
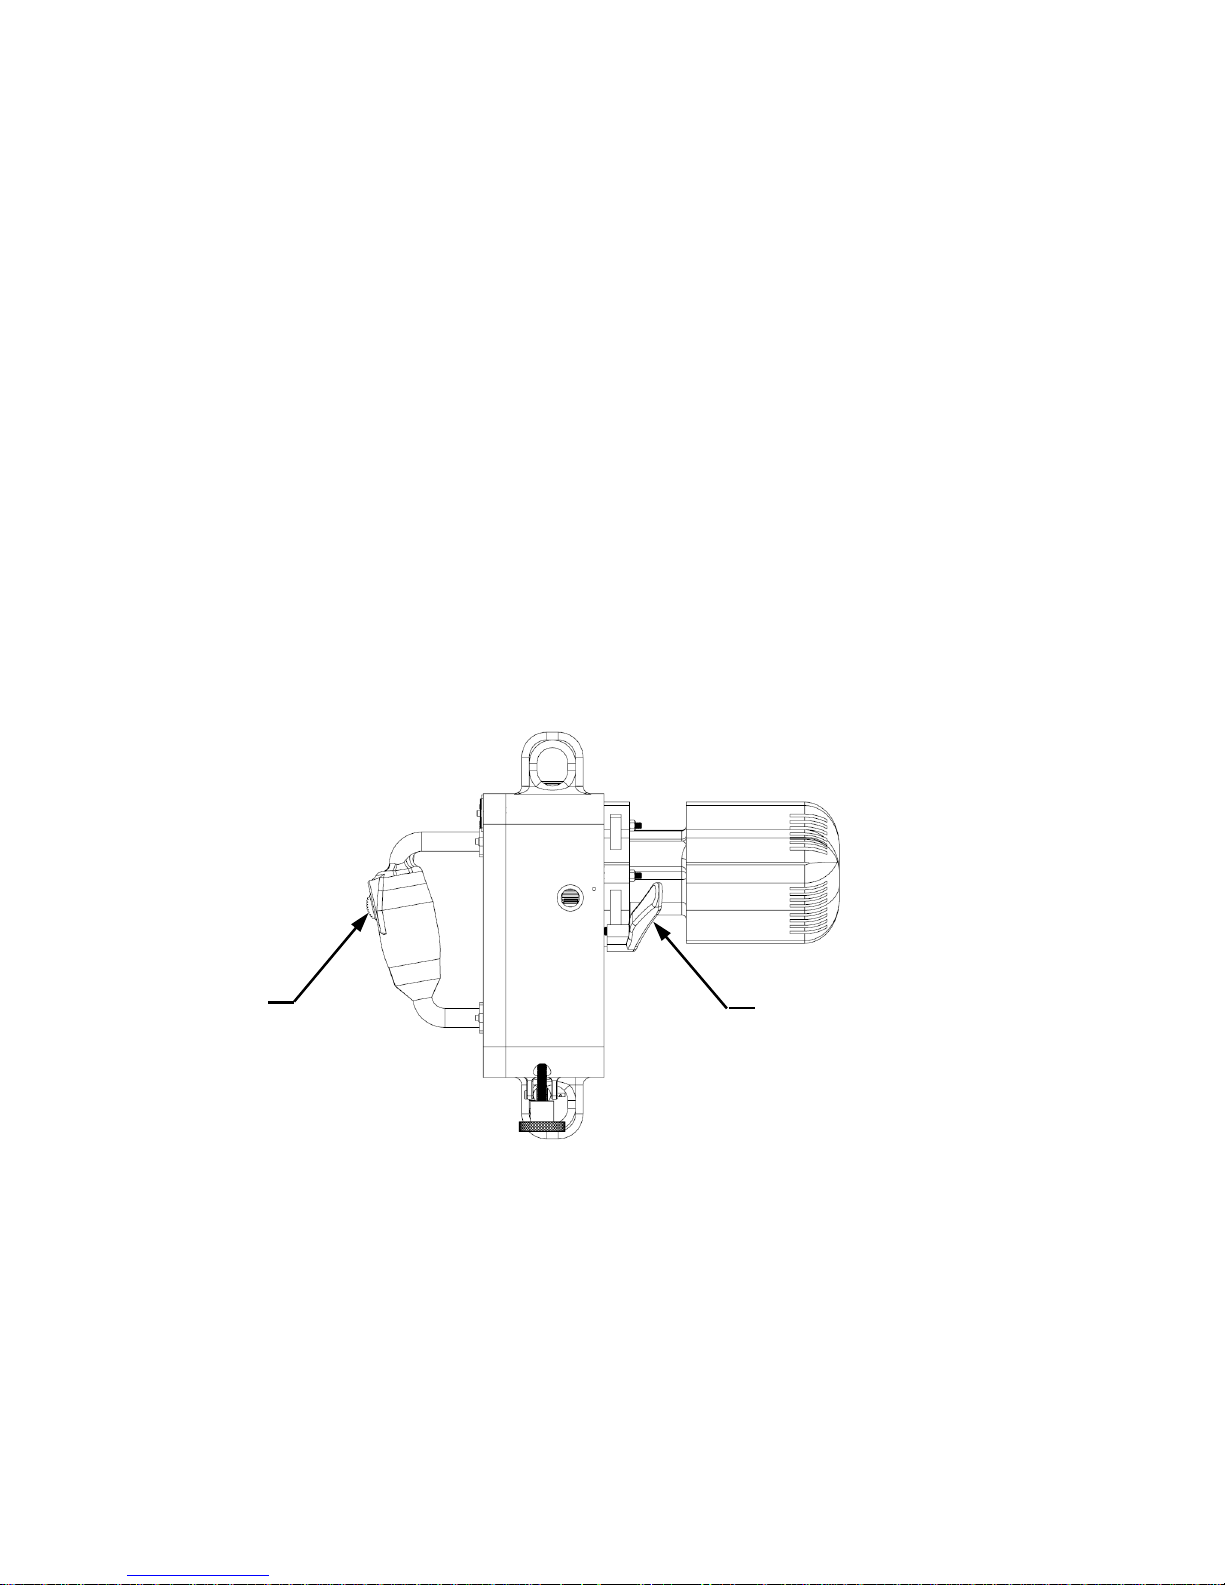
5. Once all slack has been removed, grip handle with your left hand and manual
brake/repel handle with your right hand. (Only place thumb on thumbwheel when
ready to ascend)
Warning: Do not hold manual brake/repel hand in the up/locked
position and operate/pull thumbwheel switch on Ronin Lift. This will
cause the ropes outer sheath to melt or tear. This can cause
detrimental damage to the rope and jeopardize rope integrity.
Serious injury or death can occur with a rope break due to misuse.
Warning: Prior to ascent double check all equipment for integrity,
rope, Ronin Lift Personal Ascender, Harness, Safety line connected
and functioning, Helmet secured, etc.
Warning: Before operation, the user shall ensure there is no risk
of objects falling on the lift, operator or surrounding person(s)
below.
Manual Brake/Repel Handle
Thumbwheel
Page 26
Page 26 of 31
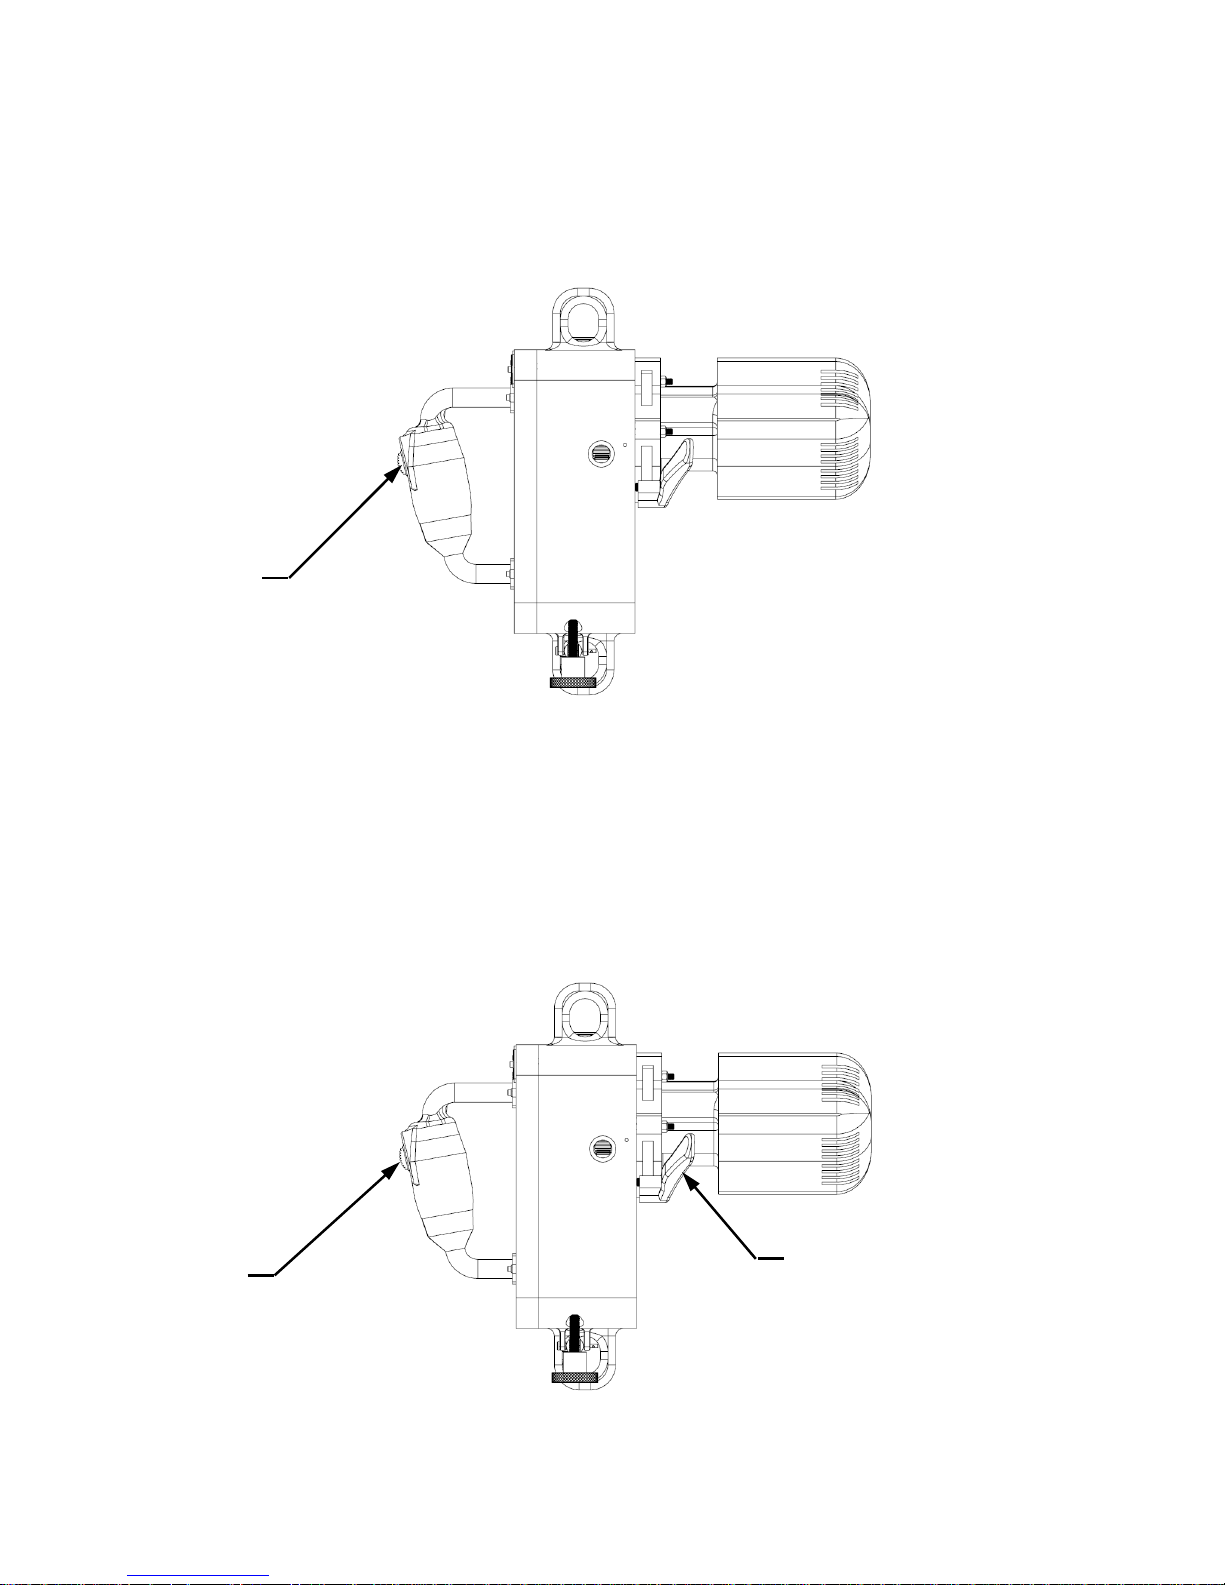
6. Once ready for ascent pull thumbwheel down with your left hand to achieve
desired ascent rate. The thumbwheel switch is a variable speed thumbwheel
capable of providing ascent speeds of .50 ft./sec to 1.75 ft./sec. The further you
pull down the thumbwheel the faster the ascent will be.
7. When ready to stop ascending release the thumbwheel switch with your left hand.
Note: The brake is an always “on” system and will self-engage once the
thumbwheel is released.
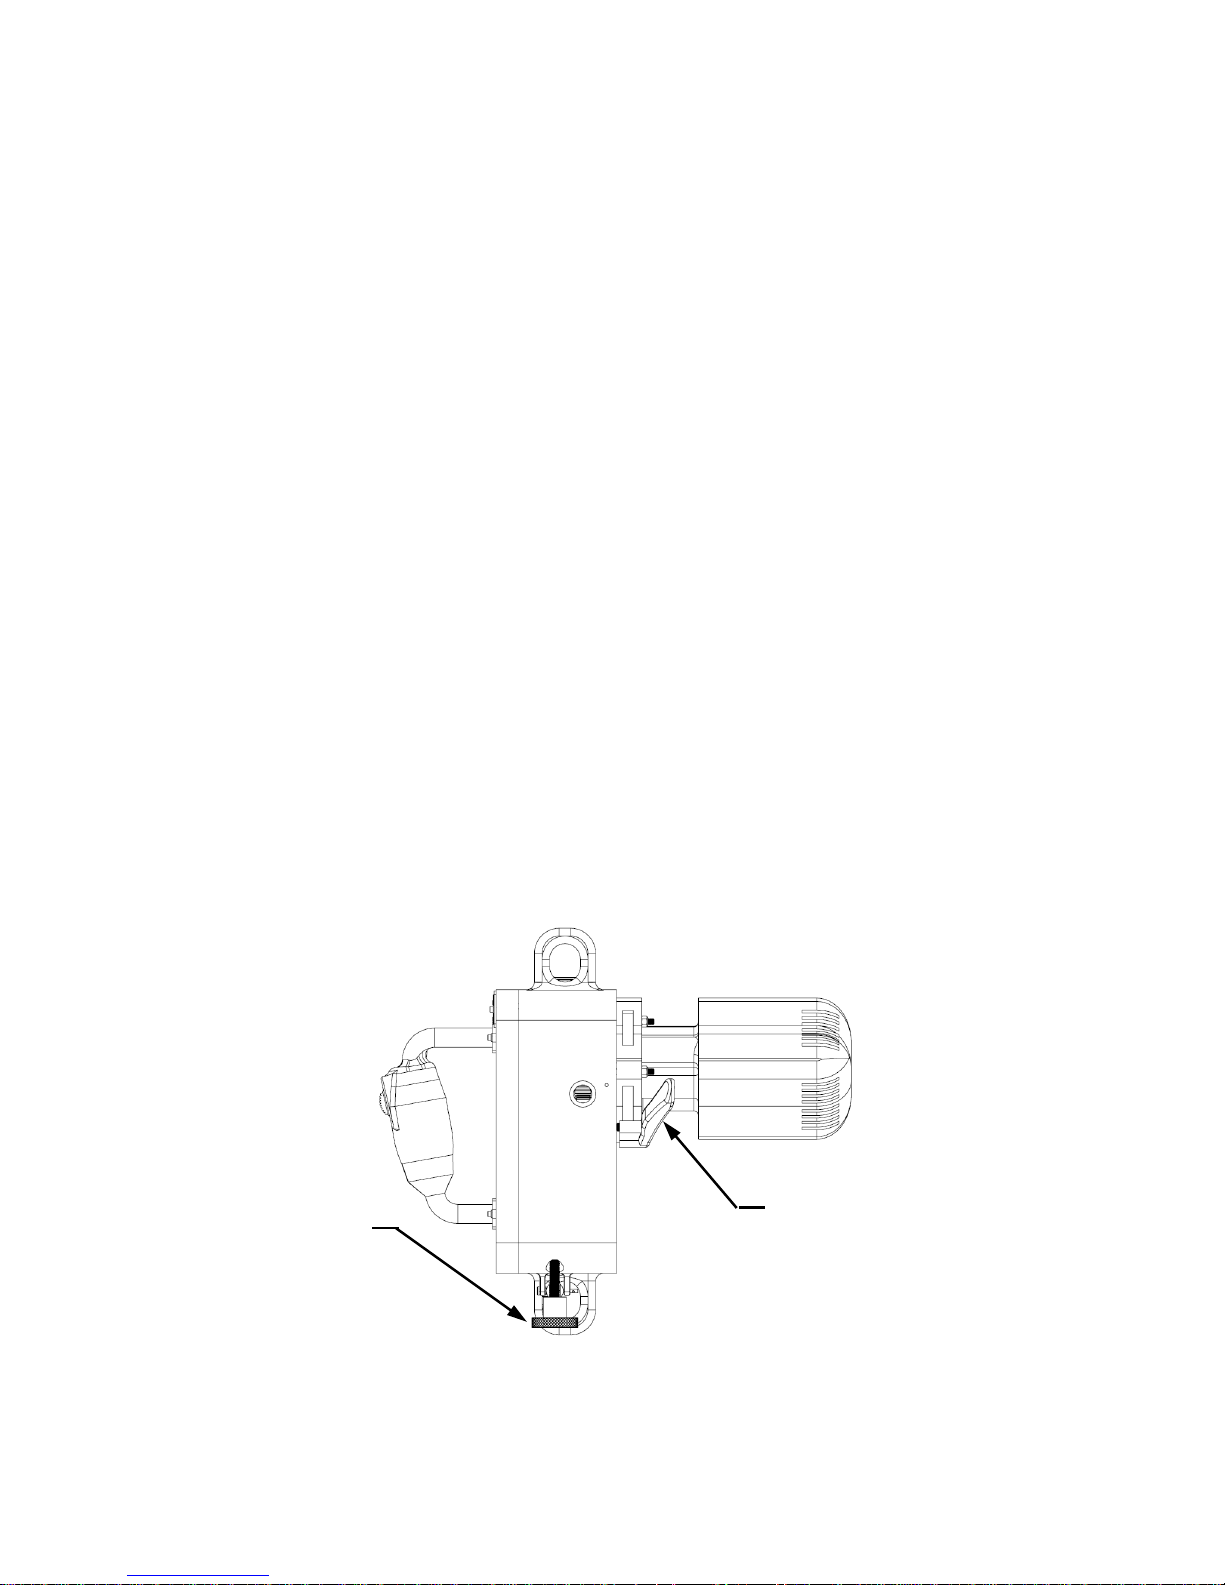
Manual Brake/Repel Handle
Thumbwheel
Thumbwheel
Page 27
Page 27 of 31
8. Once the device has stopped, hands free operation can be achieved.
9. Once decent is ready to be performed, grip handle with left hand for and use your
right hand pulling downward the manual brake/repel handle. Tap the thumbwheel
to release the brake or if there is no charge on the battery forcefully pull the
brake/repel handle down.
10. You can control your decent speed by turn the tensioner knob counterclockwise to
slow down or clockwise to speed up. Pull the manual brake/repel handle down to
speed up decent and push manual brake/repel handle up to slow decent/stop/lock.
Note: The tensioner system also increases the amount of force it takes to
back drive the reduction gearbox. If you have the brake/repel handle wide
open and you are not descending or descending very slow and would like to
speed your descent turn the tensioner knob clockwise back to the neutral
position or until it bottoms out and all tension is removed. The tensioner
system can be used as a means of maximum speed achieved in descent. For
example, a double up system can be used by using a pulling and connecting
one end of the rope to the top of the Ronin Lift and feeding the other end
through the Ronin Lift. This reduces the speed of the device in half. But
during the descent if the back tension is set too high on the device it will not
descend. The back tension must be fully removed for the unit to descend;
therefore, the tensioner knob must be screwed completely in clockwise.
11. Once you are safely on the ground and sufficient slack has been taken out of the
rope, you may unclip from Ronin Lift.
Manual Brake/Repel Handle
Tensioner Dial knob
Page 28

Page 28 of 31
Inspection and Maintenance
During the Ronin Lifts life cycle periodic inspection and maintenance is required. Some
parts will experience wear and will need to be replaced. See table below for periodic
inspection, maintenance check and part replacement interval.
Part
Number
Description
Inspection
Interval
Inspection
Maintenance
Interval
Maintenance
Replacement
Interval
101504
Thumbwheel
Daily Prior
to Use
With battery connected and power to
unit rotate thumbwheel downward
slowly and verify motor increases in
speed. Then rotate thumbwheel
slowly back to neutral position and
verify thumbwheel decreases motor
speed to off.
None
None
As required
151023
Motor
Daily Prior
to Use
With battery connected and power to
unit rotate thumbwheel downward
slowly and verify motor increases in
speed. Then rotate thumbwheel
slowly back to the off position and
verify thumbwheel decrease motor
speed to off in the neutral position.
Ensure there is no debris blocking the
air slots in the motor cover and the
motor is free from debris inside. If
debris is found blow out using air.
None
None
3 years
770518
Tensioner
Knob
Daily Prior
to Use
Visually inspect tensioner knob
threads are in good working
condition and lubricated with grease
Monthly
Apply Teflon
based grease
1 year
520435
Tensioner
Assembly
N/A
Verify tensioner assembly moves up
and down smoothly with operation of
the tension knob
None
None
1 years
112483
Battery
Indicator
Daily Prior
to Use
Verify when battery is connected
indicator flashes through the
indicator lights and then illuminates
battery charge
None
None
As required
110230
Cam Cinch
Assembly
Daily Prior
to Use
Look into the Ronin Lift Exit hole and
visually inspect Cam Cinch teeth and
not clogged with any debris and is
not worn
None
None
1 year
82610
Drive Shaft
Assembly
N/A
Will be performed at authorized
repair facility
None
None
1 years
508822
Battery
Daily Prior
to Use
Verify battery is not damaged,
leaking, or swollen
None
None
300 Charges
Page 29
Page 29 of 31
Inspection and Log Sheet
Return your Ronin Lift to Ronin Revolution Corp or your local authorized Ronin Lift dealer to have the yearly
required inspection and part replacement performed. If you bought your product directly from
www.changeyourelevation.com, please follow the directions below.
1. Request an MRO (Manufacturing Repair Order) number from Ronin Customer Support by clicking
on the Contact Us link at the bottom left of the main www.changeyourelevation.com/contact/.
2. Package products along with a copy of the MRO form.
3. Write the MRO number on the outside of the box and send to the appropriate address based on
your specific location: (items must be received by Ronin within 30 days of issuing the MRO):
Note: Please do not hand deliver your product to the Ronin facility, even if you are local. This facility is not
set up to receive visitors. Thanks!
Inspection Interval 1 Date:
Work Performed:
Inspection Interval 2 Date:
Work Performed:
Inspection Interval 3 Date:
Work Performed:
Inspection Interval 4 Date:
Work Performed:
Page 30

Page 30 of 31
End of life product recycling
Ronin Lift is made of many materials that may be recycled. The battery is lithium ion,
materials are aluminum, and speed controller contains solder and electrical components.
Ronin products can be recycled for free in the United States and Canada by dropping the
product off at any number nationwide recycling locations.
Warranty Information
We're disappointed if you're not completely satisfied with your Ronin purchase. We take a
lot of pride in our products and service! If you are experiencing a problem with a Ronin
purchase, please take a minute to read the information below to determine if your issue is
covered under the Ronin warranty.
30 DAY MONEY BACK GUARANTEE: (Ronin Webstore Purchases)
We want you to be totally psyched about the products you purchase from the
www.changeyourelevation.com. If at any time within 30 days of receiving your order, you are
not 100% satisfied, you may return it to us for a refund. No questions asked. Any items
damaged due to reasons not covered under warranty cannot be accepted back for refund
under our 30 Day Money Back Guarantee. Also, associated shipping fees are not
refundable. NOTE: this guarantee only applies to orders placed on Ronin webstore at
www.changeyourelevation.com
Ronin Warranty
Ronin products and accessories are guaranteed against manufacturing defects 90 days
from the original date of purchase. Ronin's sole obligation in the event of such defects
during this period is to repair or replace the defective part or product with a comparable
part or product at Ronin's sole discretion. Except for such repair or replacement, the sale,
processing or other handling of this product is without warranty, condition or other liability
even though the defect or loss is caused by negligence or other fault. Damage resulting
from use, accident, or normal wear and tear is not covered by this or any warranty. Ronin
assumes no liability for any accident, injury, death, loss, or other claim related to or
resulting from the use of this product. In no event shall Ronin be liable for incidental or
consequential damages relating to or resulting from the use of this product or any of its
parts. This product is not warrantied against user repairs and user repairs will result in
voided warranty. Because of possible user resealing error water housing leakage or any
resulting water damage resulting because of user resealing error will void warranty.
Returns or replacements of parts and/or products may be subject to shipping, handling,
replacement and/or restocking fees.
Page 31

Page 31 of 31
Ronin Web Store Returns
If you bought your product directly from www.changeyourelevation.com, and you are not
satisfied with your purchase within 30 days of receipt, you can return it following the
below procedure. Your card will be credited upon receipt of the returned merchandise.
4. Request an RMA (Return Merchandise Authorization) number from Ronin
Customer Support by clicking on the Contact Us link at the bottom left of the main
www.changeyourelevation.com/contact/.
5. Package products along with a copy of the RMA form.
6. Write the RMA number on the outside of the box and send to the appropriate
address based on your specific location: (items must be received by Ronin within
14 days of issuing the RMA):
Note: Please do not hand deliver your product to the Ronin facility, even if you are
local. This facility is not set up to receive visitors. Thanks!
 Loading...