

Ronco CHEF N GO Instructional Manual
Instructional Guide with Recipes

Welcome to Your New CHEF N GO
Components
How to Clean and Maintain Your CHEF N GO
Getting to Know Your CHEF N GO: The Control Panel
Using the CHEF N GO and Cooking Functions:
What makes this a Set it and Forget it Kitchen Wonder
(Your Guide to Mastering the Multiple Uses of this Machine)
¥ Regular and Quick modes: How to use and Recipes for these modes
¥ Cake mode: Baking a Cake, Muffins, Brownies, Desserts and More
¥ Hot Cereal mode: Cooking many types of Hot Cereals
¥ Soup mode: Making Soups, Stews and Slow Cook Recipes
¥ Steam mode: Using the Steam mode for vegetables, shellfish,
dumplings, breads etc.
¥ Steam and Brown modes: How to use and Recipes for these modes
¥ Brown and Quick modes: How to use and Recipes for these modes
¥ Cooking Timer How to use and Recipes for this function
¥ Reheat Reheating Leftovers or Second Helpings
Problems and Solutions
Safety Precautions
Service Guarantee
1
2
3
5
7
8
11
15
16
20
21
23
24
25
26
27
28
Contents
WELCOME TO YOUR NEW CHEF N GO
1
The CHEF N GO is the newest
Ronco “Set it and Forget It”
Kitchen Wonder. The CHEF N GO
is a sturdy yet lightweight kitchen
appliance that is designed to
make cooking, entertaining, and
everyday living easier and more
convenient. The CHEF N GO is
automatic and worry free because
it is designed with a special
microchip technology that not only
cooks with steam to lock in flavor,
but also cooks with a sensor so
that each meal cooks perfectly
every time.
The machine is designed so that you can set your recipe by each cooking mode
and go about your daily living whether it is running errands, working, carpooling
or after-school activities. Just “Set It and Forget it” and know that you’ll have your
meal ready when you return.
The CHEF N GO is also portable unlike any other cooking machine out there
today. The portability of this machine allows you to bring your cooked meal,
appetizer, dessert, or any special recipe to a football game, tailgating party, soccer
practice, potluck, church function or even just to work because you just want to
have a delicious cooked meal. Some people even cook at work since it is so easy
to carry, they simply put the ingredients inside the CHEF N GO and cook during
lunch hour so they can bring the meal to family or friends after they leave work.
And, when you have a special occasion or holiday function, you can use the
CHEF N GO as an extra cooking device when preparing for the family, and just
bring the appetizer or gourmet dish to the party.
The CHEF N GO will change your life because it is easy to cook with and even
easier to clean up when you’re done! Imagine not having to take out a pot or
pan and having a completely cooked meal or special birthday cake done with
no mess!
At Ronco our goal is to improve the quality of your life, and the CHEF N GO was
carefully designed to make everyday more enjoyable for you.
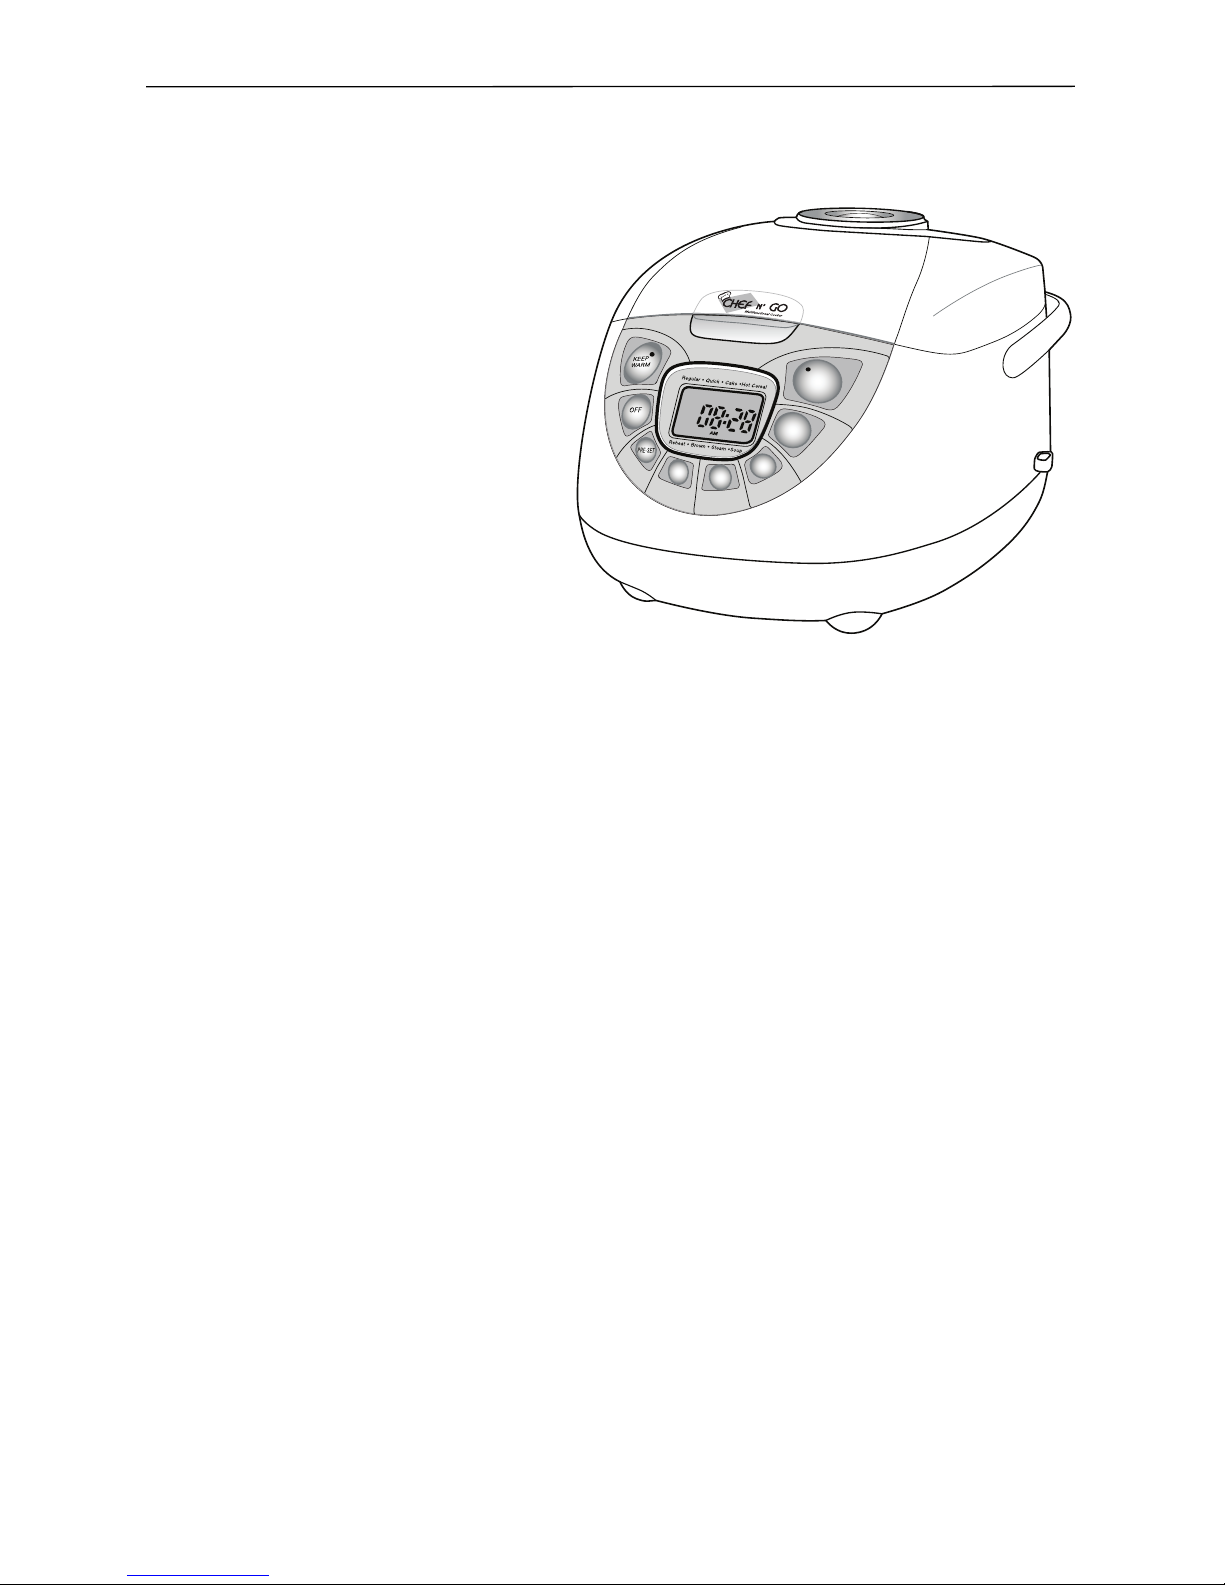
CHEF N GO Features
S
T
A
R
T
M
E
N
U
M
I
N
H
R
S
C
O
O
KIN
G
T
IMER
C
L
O
C
K
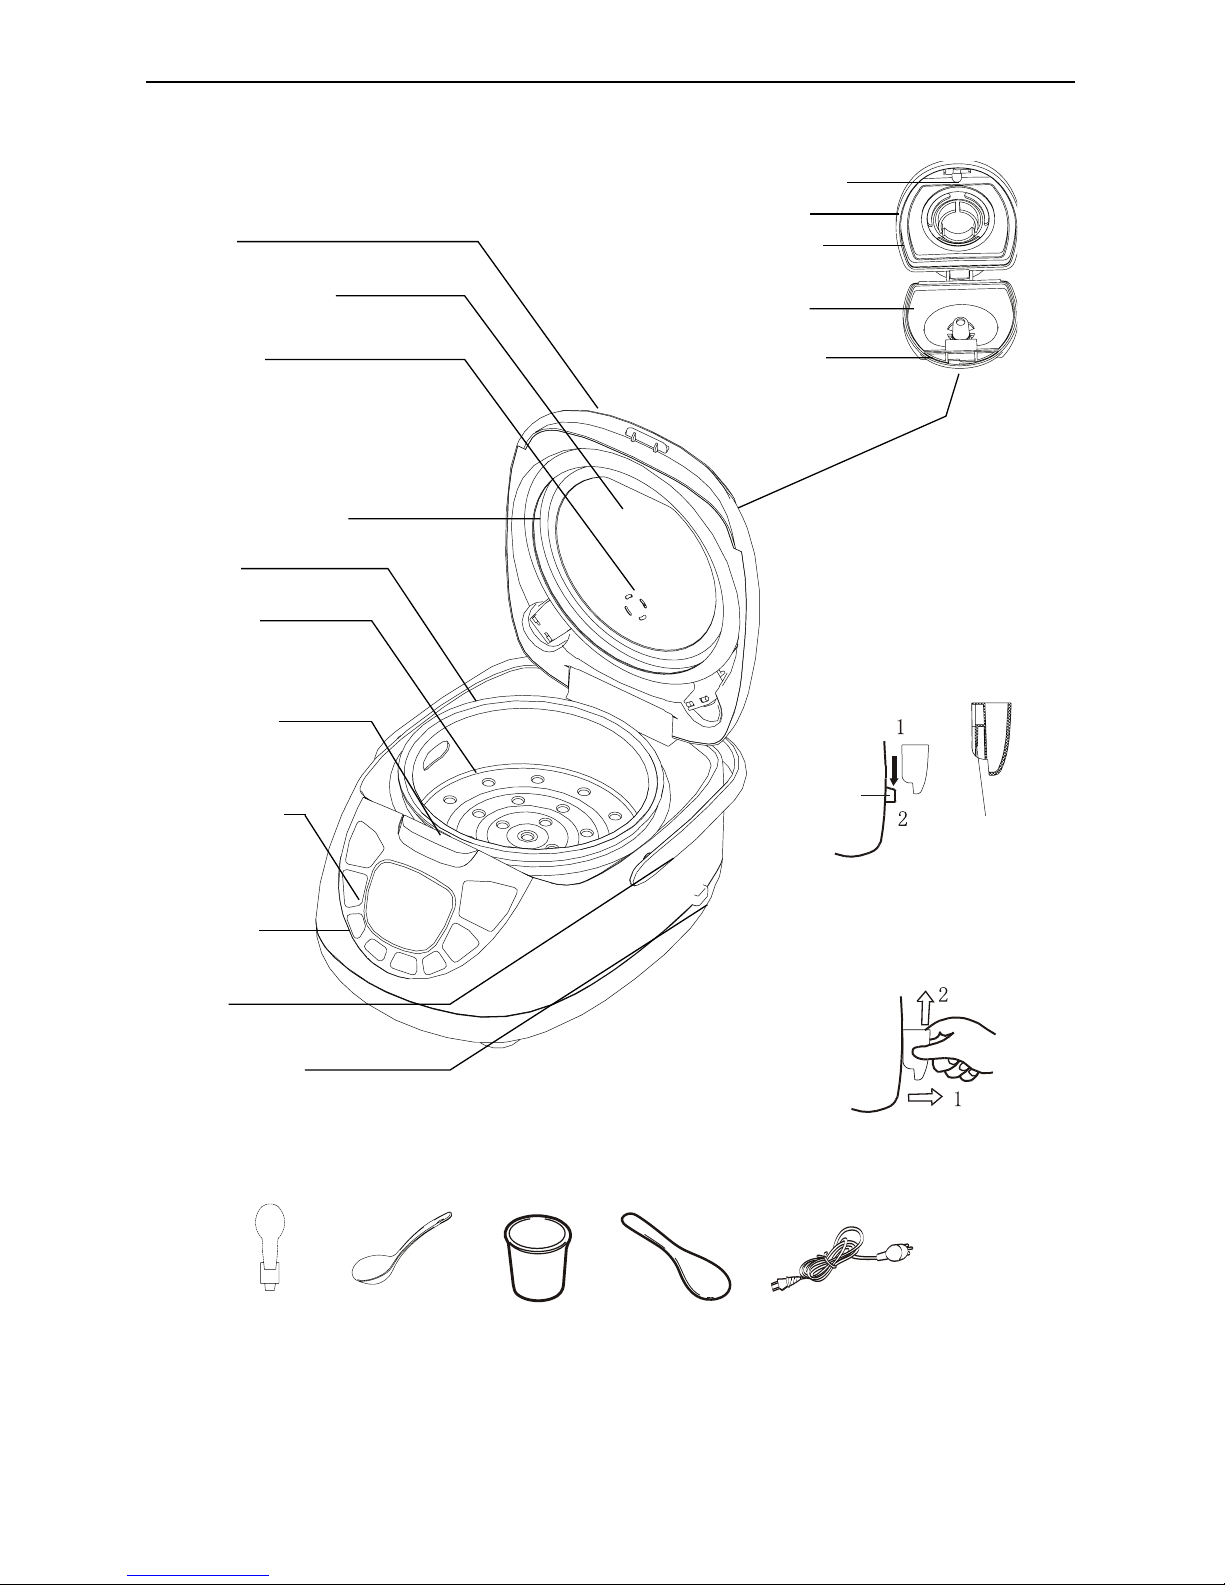
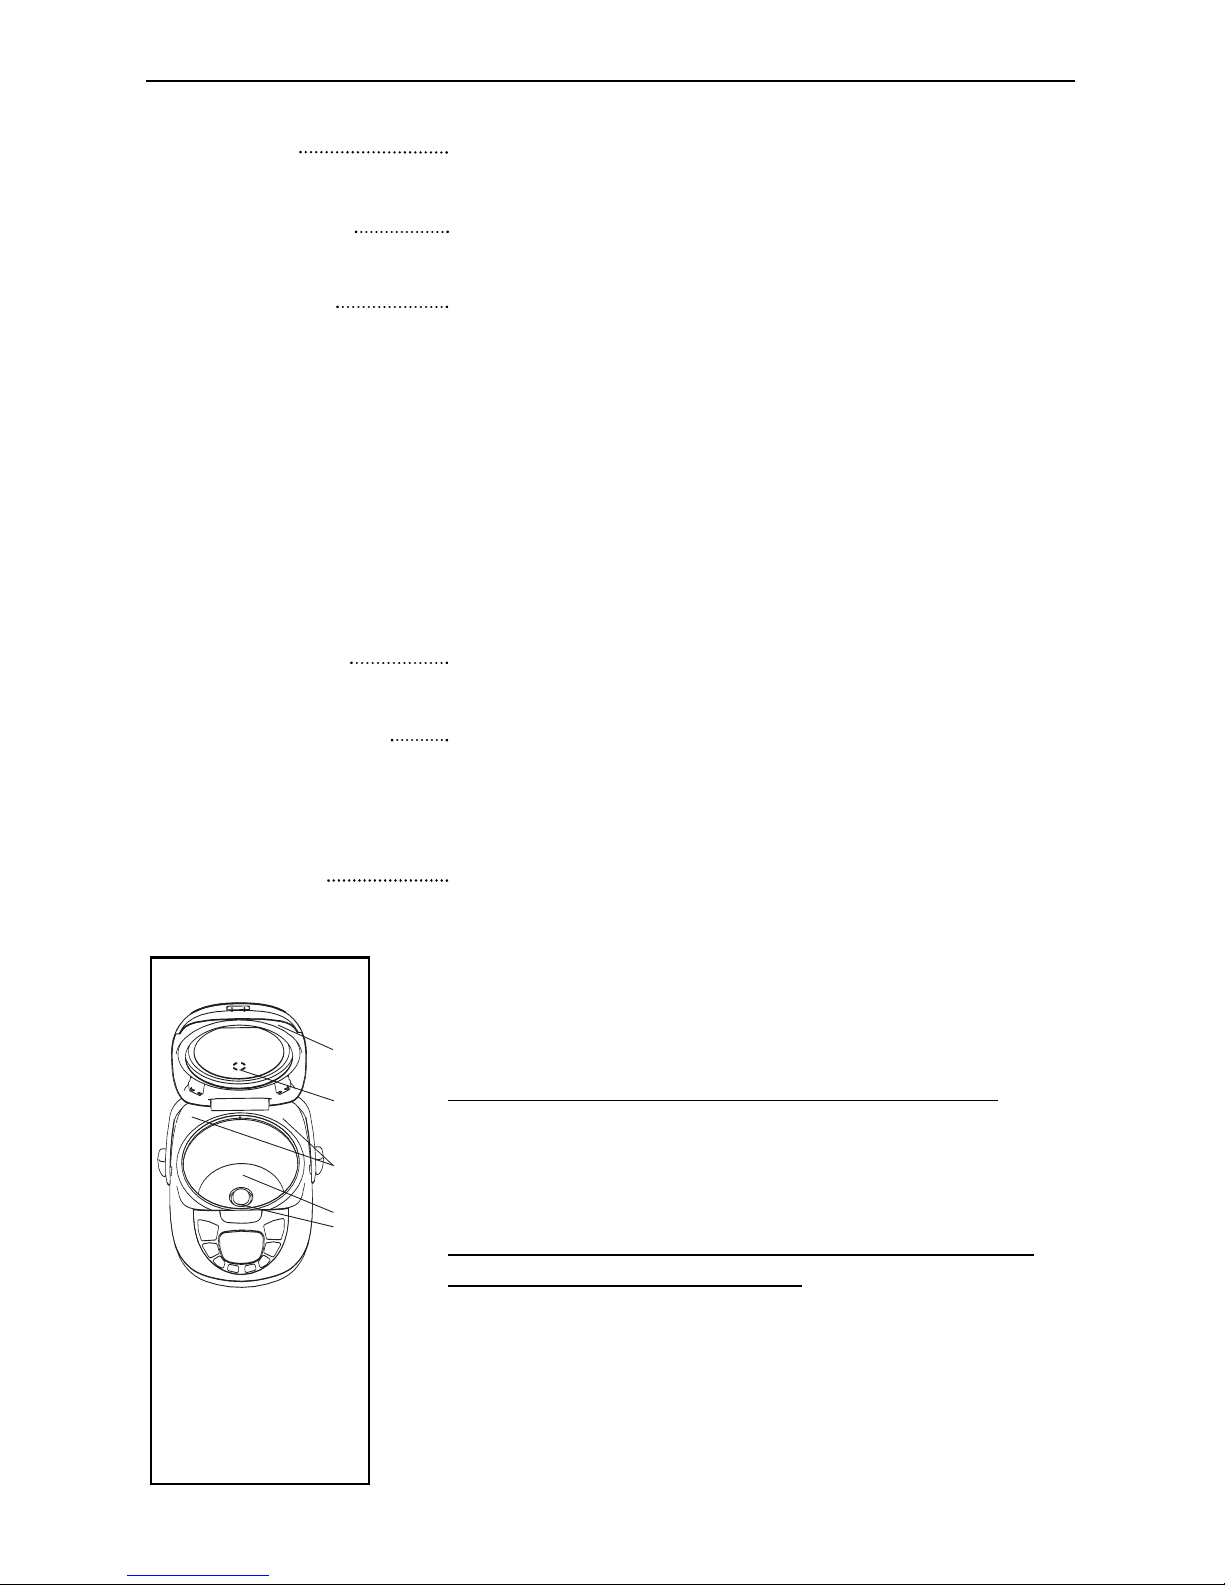
COMPONENTS
Included items
Outer lid
Handle
Spatula holder
Aluminum inner lid
Steam vent
Rubber sealing ring
Inner pot
Steam tray
Open button
Control panel
Main body
Spatula holder: To attach
and detach this part, follow
the diagrams below.
Spatula
holder
Spoon Measuring
cup
Spatula Power cord
Spatula
holder
Detach
Groove
Buckle
Base
Steam seal
Steam lid
Slide fastener
Steam valve
Attach
2
HOW TO CLEAN AND MAINTAIN YOUR CHEF N GO
After cooking, it is advisable to clean the CHEF N GO as well as the spatula
and spoon to remove leftover food and odors. Always remember to unplug the
CHEF N GO before cleaning. Use a damp sponge (non-abrasive) and a mild
dish washing soap.
Remove the steam valve from the unit by lifting, using the lip on the valve and
twisting up. On the back of the valve is a switch, move the switch to the open
position which will allow you to open the valve for cleaning. Insert the steam valve
back into the upper lid with the hinge of the steam valve toward the rear of the
CHEF N GO and push down.
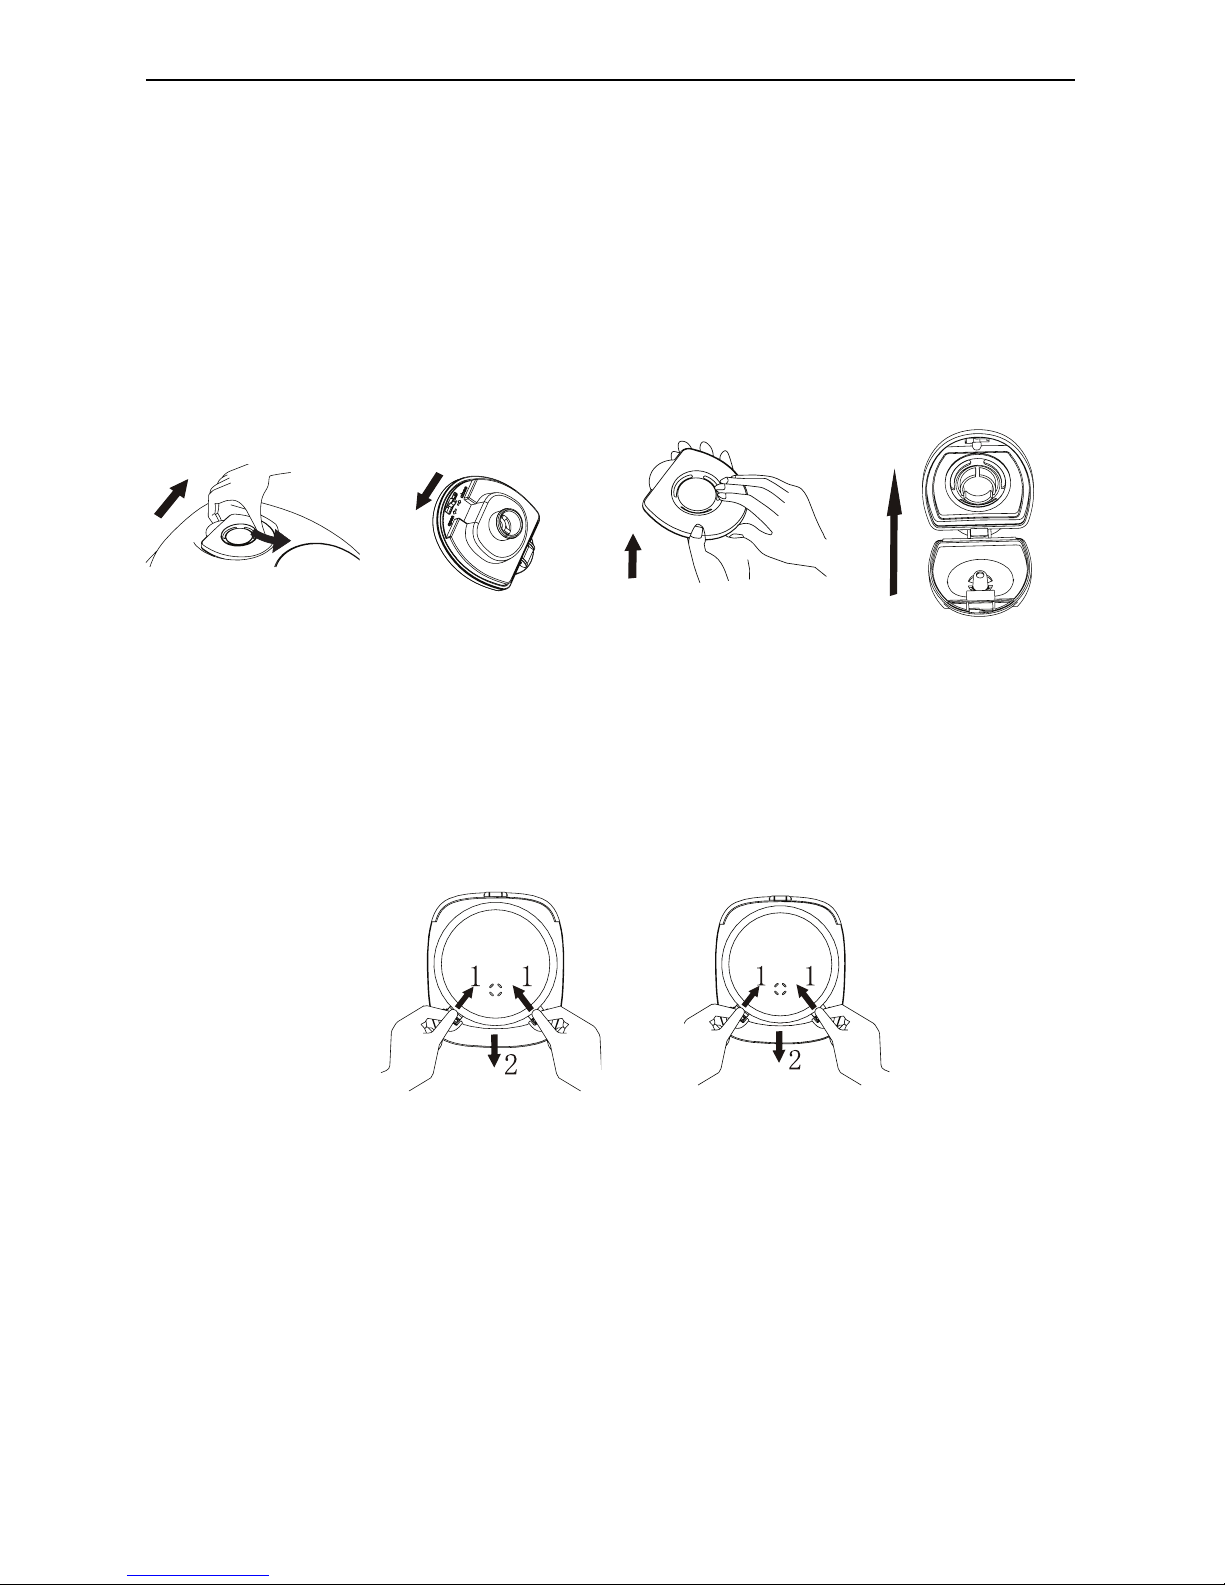
The Steam Valve
3
Mount
Remove
Gently remove the inner lid’s circular steam seal (do not twist or pull). Once it
has been removed, clean it in warm soapy water. You can also place this in the
dishwasher as it is dishwasher safe. Once dry, put the steam seal back into the
groove, adjusting it until correctly positioned. To reassemble, align the base with
the lid making sure that the two hinges are correctly positioned. The two pieces
should snap right into place. Move the hinges back toward the lid into the closed
position until you hear it click. This will connect the two pieces.
The Inner Lid Steam Seal
All of your accessories are dishwasher safe. To hand wash the Bowl Gripper, Egg
Poacher, Silicone Muffin molds, and Ronco’s famous Chef Knife; simply place in your
dishwasher or clean with a mild dish soap, sponge and water and dry thoroughly
before using again in the CHEF N GO. All of the additional accessories such
as the Extendable Colander, Slotted Spoon, Silicone Wisk, Silicone Ladle, Silicone
Ladle Holder, Silicone Spatula and the Silicone Measuring Cups, can also be cleaned
in the dishwasher or with a mild soap and non-abrasive sponge. Dry thoroughly before
each next use.
The Accessories
Wipe with a clean damp cloth or towel and very mild dishwashing soap.
After cooking, baking, steaming or reheating, be sure
to wipe the CHEF N GO clean with a damp cloth.
Open lid. With two hands press the 2 tabs at the bottom of metal disc, and lift up to remove aluminum lid.
Wash in warm soapy water and let dry. To replace, insert
top of the aluminum lid into slot and snap into place.
To clean the circular inner rim on top of the lid that is
encased with rubber sealing, press the two buttons
toward the bottom of the lid and wash with soap and
water. (This will not fit into place if the circular steam seal
does not have the seal fold facing inside the inner lid.
Take note of which side the hinges are on so you can be
sure not to try and snap it back together backwards.)
Because water may collect here, wipe off with a
clean cloth.
Food may cling to these areas and, if not cleaned, may
affect future cooking. Wipe clean with a soft, dry cloth.
If very difficult to clean –you may use a sponge that is
non-abrasive.
To avoid damaging the inner coating on the cooking pot,
use the attached scoop or the spatula. You can also
use the additional silicone spatula, ladle holder or slatted
spoons (sold as additional accessories) as they won’t
damage the inner pot. Do not use any metal utensils.
It may scratch the non stick coating.
Never clean the inner pot or steamer with vinegar
,
which can be corrosive. Also, never wash with a
metal brush or abrasive scouring pad, both of which
may damage the interior coating of the cooking pot.
Always wash with a mild soap and war
m water, then
wipe dry with a soft clean cloth. It is very important that
you dry the inner bowl completely on the bottom before
inserting into the unit. If you do not, the water will create
an additional sizzling sound when you begin using your
CHEF N GO. Also, the inner pot and steamer basket
are dishwasher safe for quick and easy cleaning.
HOW TO CLEAN AND MAINTAIN YOUR CHEF N GO
4
Main body
Inner upper lid
Water storage
Heating plate and
Temperature sensor
Aluminum lid
Main body
Inner upper lid
Aluminum lid
Water storage
Heating plate and
temperature sensor
Inner pot
and steamer
1
2
3
4
1
2
3
4
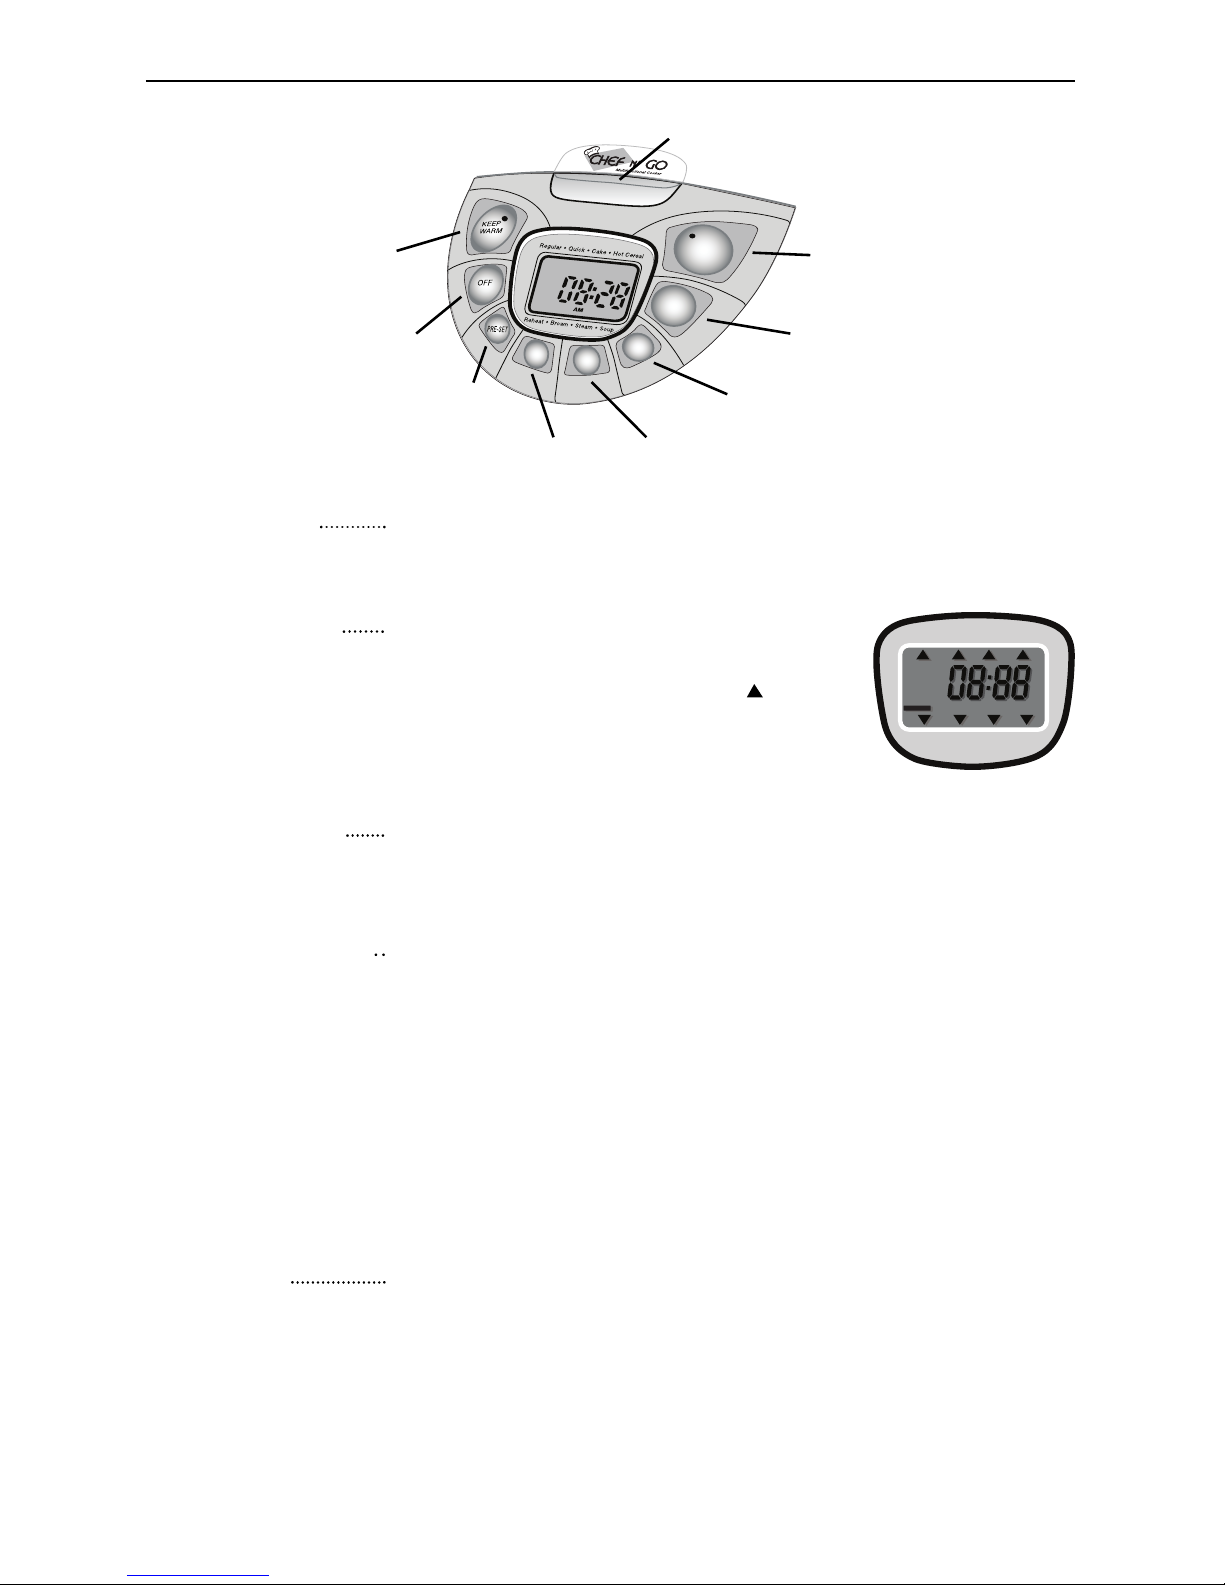
GETTING TO KNOW YOUR CHEF N GO: THE CONTROL PANEL
START
M
E
N
U
MIN
HRS
COOKING
TIMER
CL
OCK
“Keep Warm”
button
OFF
button
COOKING TIMER
button
HOUR and MINUTE
buttons
MENU
button
PRE-SET
button
START
button
Release latch for cooker lid
(push down to open)
LCD Screen
MENU button
PRE-SET button
START button
When unplugged, the screen will display the current time only.
When plugged in, the screen will display the current time as well
as its menu.
After plugging in the CHEF N” GO, press
the “Menu” button to select the various
“modes”. A triangular indicator “ ” will
point to the cooking modes which include
Regular, Quick, Cake, Hot Cereal, Soup,
Steam, Brown, and Reheat.
After pressing the “Menu” button to select one of the cooking
modes, press the “Start” button. At this point the START
indicator will light up and the cooking mode will begin.
The “Pre-Set” button is used to set the time of day when the
recipe will be finished. The Pre-Set time that is set must
consider the default cooking time of a specific cooking
mode. If the cooking mode is for example, Regular (60 Minutes)
the amount of HRS and MIN you set, must also include the
default hour the mode (Regular) will be cooking automatically.
To set The Pre-Set time, press the “Hour” and “Minute” buttons to the desired completion time. When finished, press
desired Cooking Mode with the “Menu” button and then
press the “Start” button. You’re set to go.
COOKING
TIMER button
The cooking timer can be set from 30 minutes to 4 hours.
You use the “Cooking Timer” button to set total cooking time
with regard to your recipe or preference. Note: cooking time
cannot be adjusted in “Regular” and “Quick” cooking
modes.(Refer to Quick Start Guide for Cooking Times and
Temperatures).
5
Regular • Quick • Cake • Hot Cereal
Reheat • Brown • Steam • Soup
H
M
KEEP WARM
CLOCKCOOK
TIME
END
KEEP WARM
CLOCK
COOK
TIME
END
H
M
AM
AM
EP
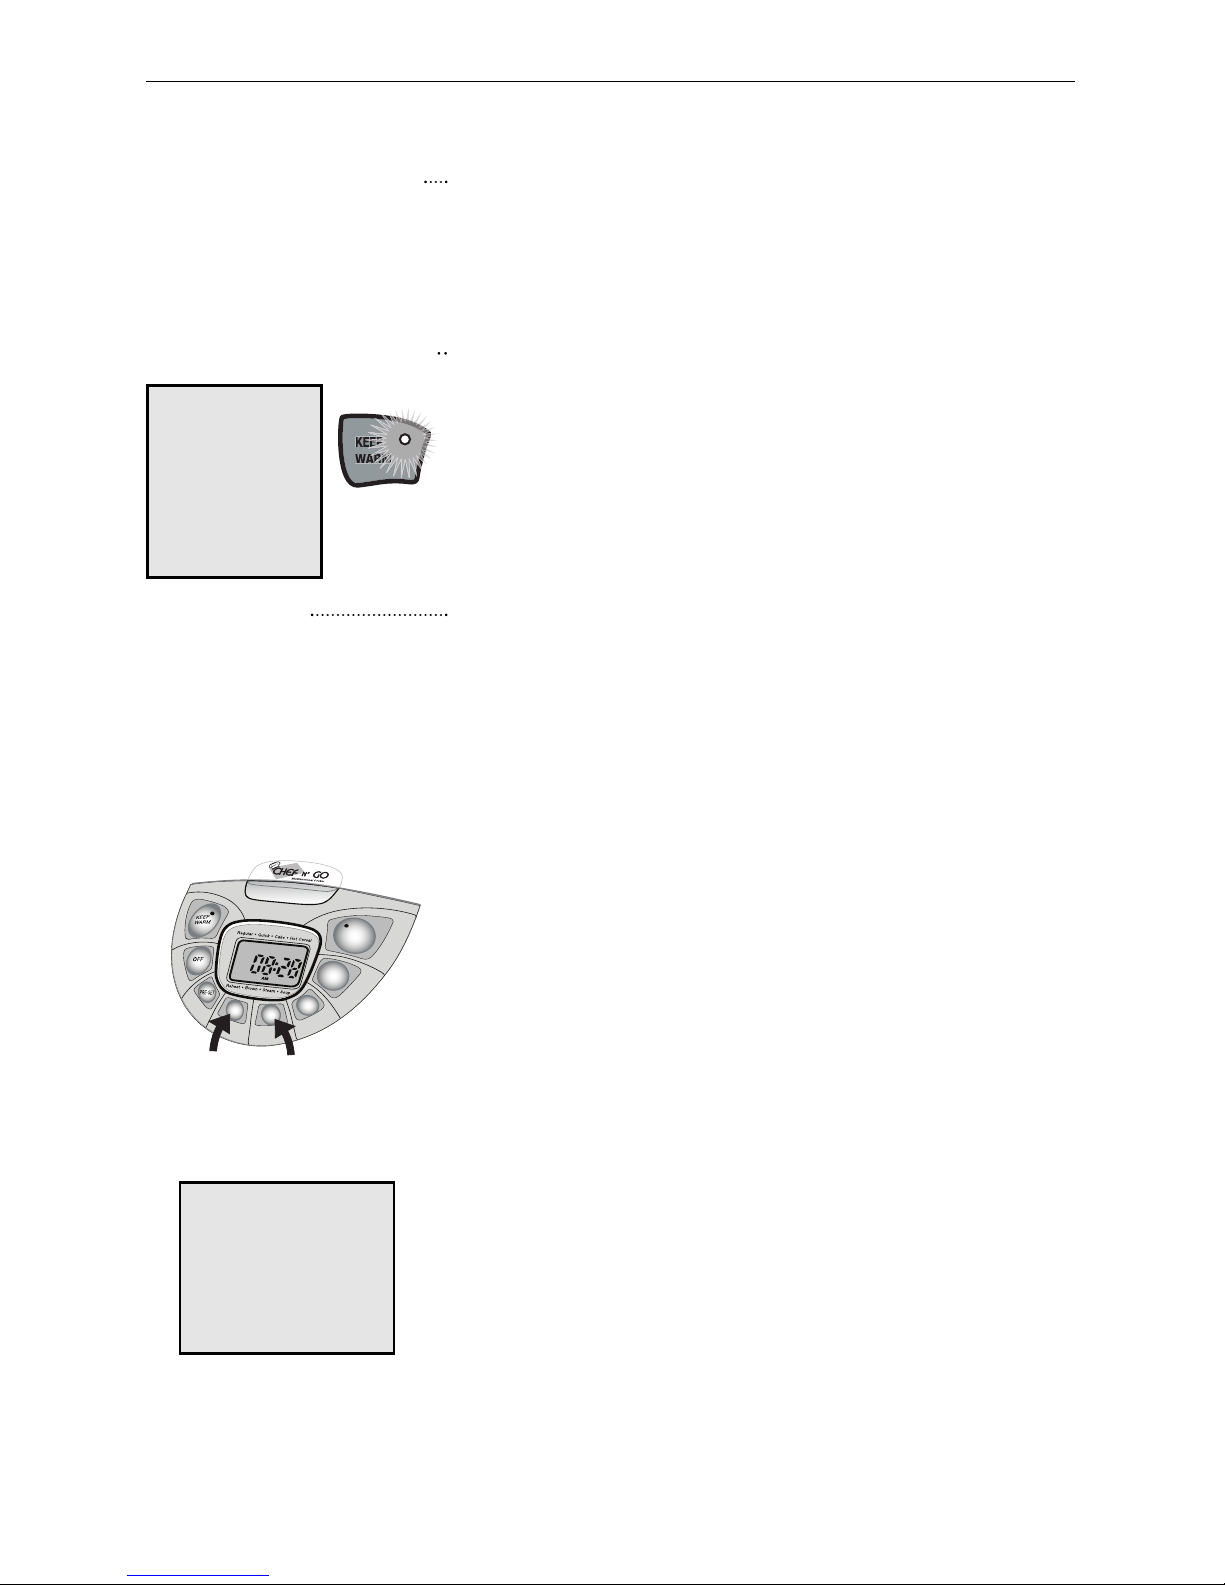
The light on the
“Keep Warm”
button glows
when in
“Keep Warm”
function.
The HOUR (HRS) and MINUTE (MIN) buttons are used
to adjust the CHEF N GO’s clock as well as the PRE-SET
and COOKING TIMER settings.
(To set or adjust the clock see instructions below).
The “Keep Warm” button will automatically activate the “Keep
Warm” function. When cooking in all modes (except the
Brown mode) the CHEF N GO will automatically go into the
“Keep Warm” function when the cooking cycle is finished.
The light will glow on the button indicating the Keep
Warm function is operating. (“Keep Warm” will operate
for up to 24 Hours). When you wish to turn off the “Keep
Warm” function simply press the “Off” button.
HOUR and MINUTE
buttons
KEEP WARM button
OFF button
Press this button to turn off the CHEF N GO. Also use
this button if you want to change a function once
cooking has started. The “Off” button will not turn
the machine off completely. To do so you must unplug
the cord from the unit and the wall socket.
Note:
The cooker’s clock
can be set any time
after plugging it
into a power supply.
S
T
A
R
T
M
E
N
U
M
IN
H
R
S
CO
O
K
ING
TIME
R
C
L
O
C
K
Press the HOUR and
MINUTE buttons to
adjust the time.
Setting the CHEF N GO internal clock is very easy.
When you first plug it into a wall socket the numbers on
the screen will flash indicating that you must set the
time, this is simply done by pressing the “Hours” button
to adjust the hours, and the “Minute” button to adjust the
minutes, nothing else is required.
After 10 seconds, The CHEF N GO will sense that you
are not pressing the buttons, and the numbers will stop
flashing. Your clock is set and the CHEF N GO is ready
to cook you a wonderful meal. (If the screen continues
to flash, the time was not set, simply repeat the above
procedure).
To re-set the clock, simply press the “Hours” button
or the “Minute” button, you will hear a beep, and then
you may adjust the time by pressing the HRS and the
MIN buttons as needed.
The CHEF N GO has a built in battery and is provided
so that the Clock will operate when the unit is not
plugged into a wall socket.
Setting the Clock
6
GETTING TO KNOW YOUR CHEF N GO: THE CONTROL PANEL

USING THE CHEF N GO: THE COOKING FUNCTIONS
7
Press this button to activate a selected function or mode.
Press this button to select a cooking mode.
Press this button to add additional cooking time.
Press these buttons to: Set the Clock, adjust the COOKING
TIMER and PRE-SET cooking times.
Press this button to adjust the time your recipe should be finished.
Press this button to Reset or Stop a cooking function or mode.
Press this button to activate the KEEP WARM function.
• START
• COOKING TIMER
• MIN. & HRS.
• PRE-SET
• OFF
• KEEP WARM
The chart below will give you some suggestions of what to cook in each cooking
mode. Following this chart, we provide you with step-by-step instructions and
recipes to illustrate how delicious your cooking and baking experience can be.
Cooking suggestions for each Cooking mode
Regular
Brown
Cake
Steam
Soup
Hot Cereal
Quick
Meat and
Poultry
Main dishes
Casseroles-
Meat, Potato,
Vegetables,
Ethnic
Egg dishes-
Souffle, Quiche,
Frittatas
Pilafs &
Vermicelli-
Packaged &
Recipes
• MENU
Pasta meals-
Spaghetti,
Macaroni &
Cheese, Tortellini
Frozen
Entrees
Cakes Oatmeal
Potato dishesSweet potato's,
Yams, Mashed
& Scalloped
potato's
Rice dishesPackaged &
Recipes
Noodle dishes-
Package &
Recipes
Stuffing-
Cornbread,
Turkey or
Chicken
Scrambled
Eggs
Side Dishes
Drink recipesHot Chocolate,
Cider
Spreads
Dips
Custards
Biscuits
Puddings
Parfaits
Dessert recipes
Cornmeal,
Hash
Grits
Polentas
Baby Cereals
Cereal Pastinas
Bisques
Chili
Sauces
Beans
Slow Cook
recipes
Wontons
Breads
Steamed Buns
Tortillas
Hot Dogs
Stir Fry / Wok
Style foods /
Tofu
Poultry /
Lamb /
Game
Light Fried foods-
Frozen Chicken
Patties, Hash
Browns etc.
Pork
Burgers /
Steaks
Appetizers &
snacks
(Swedish
Meatballs/Wing
s etc.)
Brownies
Cream
of Wheat
Chowders
Packaged
Pasta Noodles
Onions / Garlic /
Spices
for recipes
Muffins
Cream
of Rice
Stews
Seafood (Shrimp,
Mussels, Clams,
Lobster, etc.)
Meatballs/
Sausages
Soups/Stocks
Vegetables
Roasts
 Loading...