


INSTALLATION AND CARE GUIDE
STACK LED MIRROR CABINET
E015612
E015615
STACK LED Mirror Cabinet
Model :
E015612
Designed By: PHOENIX DESIGN | GERMANY
E015615
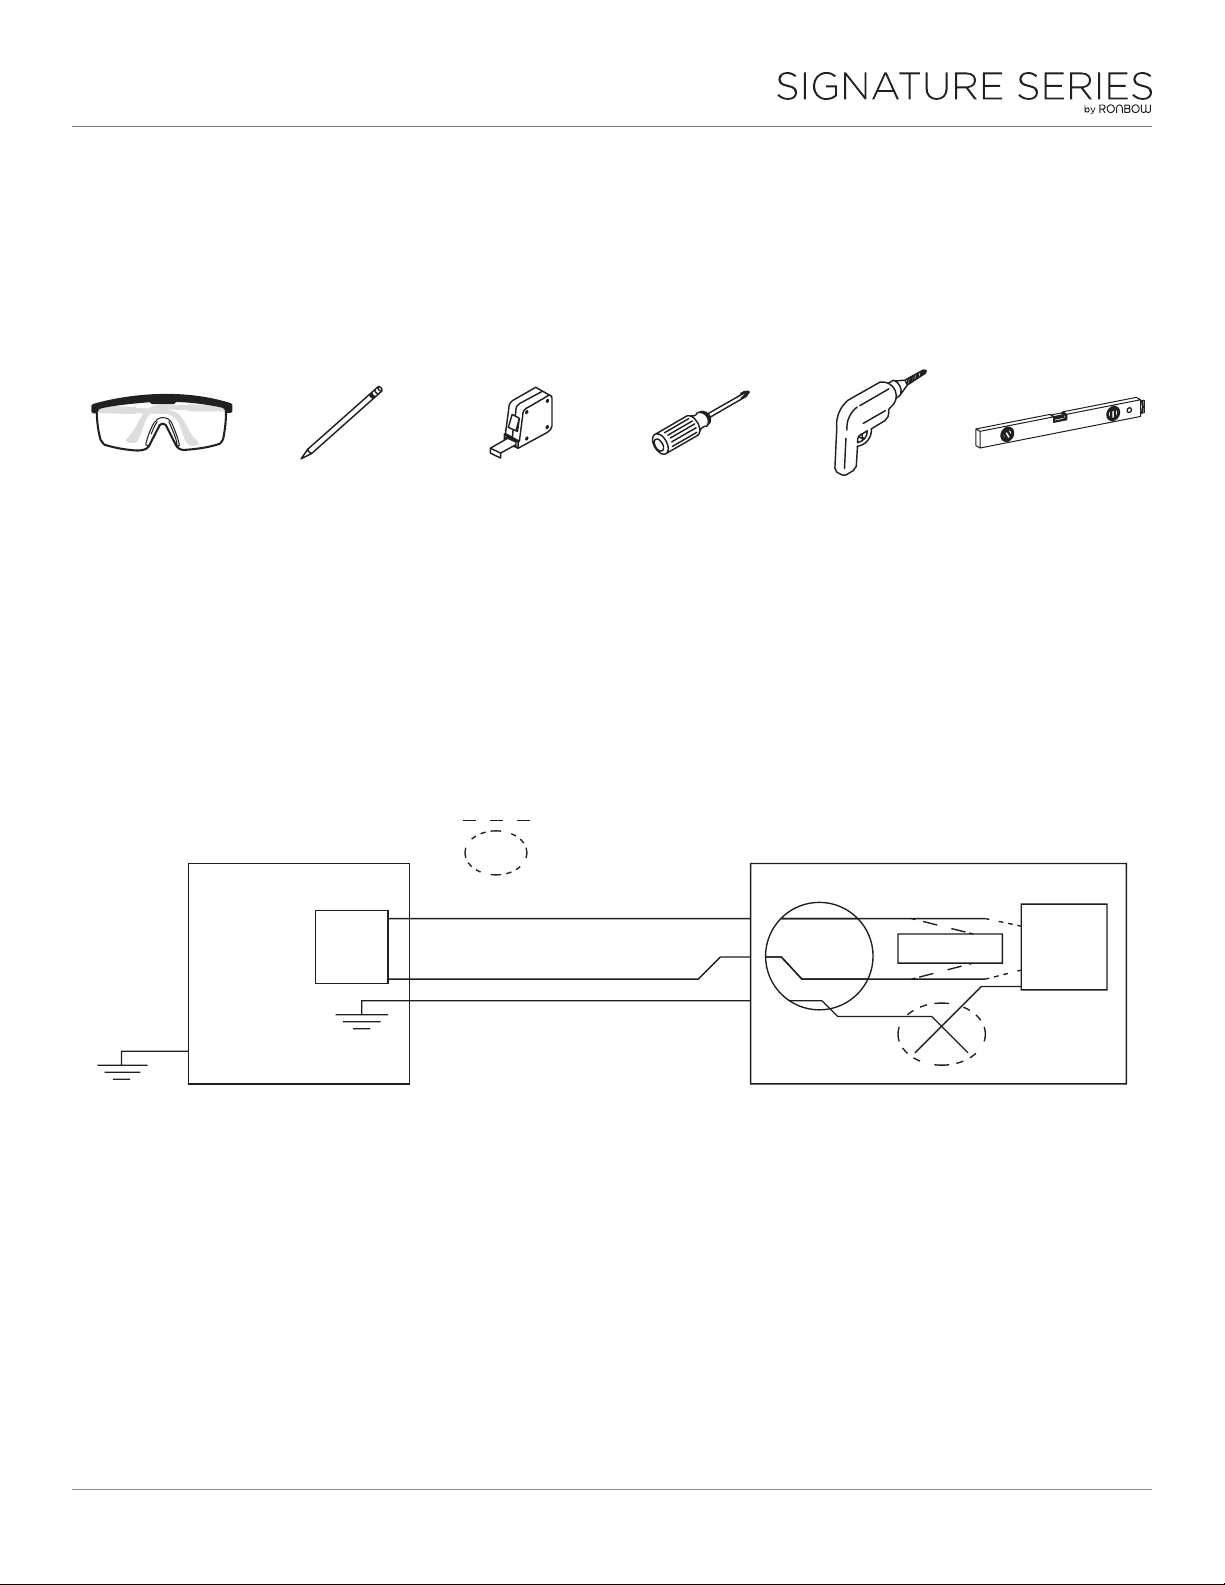
PRE-INSTALLATION
Tools Required
ALL WIRING SHOULD BE DONE BY A QUALIFIED LICENSED ELECTRICIAN.
WARNING: To reduce the risk of electrical shock, shut o power before wiring the cabinet.
CAUTION: Requires 120V 20AMP circuit.
CAUTION: The LED mirror must be wired to a GFI (ground fault interrupter) circuit breaker when used in
bathrooms and all other locations required by the national electric code.
CIRCUIT BREAKER
Materials Included
E015612
4 long screws
1 set of wall cleats
Materials Required
1 2x4 beam
1 electrical box
3 wire nuts
120VAC
20A GFI
FIELD CONNECTION
Black= Positive
White = Negative
Green= Ground
E015615
6 long screws
1 set of wall cleats
LED MIRROR CABINET
Black= Positive
DEFOGGER
White = Negative
Green= Ground
LED
1
160823ronbow.eu | ronbow.comINSTALLATION SHEET

STACK LED Mirror Cabinet
Model :
E015612
E015615
INSTALLATION
Step 1:
Step 2:
Determine the ideal location of your
new LED mirror.
Mark the locations for the long screws
to hang the wall cleat.
NOTE: It is highly recommended
the location has at least two studs.
Front notch the studs to install a 2x4
horizontal beam for added stability.
Cut an opening in the wall and connect
the electrical wires to the housing.
NOTE: Run electrical wires to the
opening. An electrical box is recommended inside the opening.
Designed By: PHOENIX DESIGN | GERMANY
Figure 1.
Figure 2.
Step 3:
Step 4:
Step 5:
See Figure 1.
Secure the wall cleat to with the long
screws provided.
Verify the wall cleat is level.
Connect the wires.
See Figure 2.
Secure the cleat in the back of the
mirror to the wall cleat. Hide all
wires in the opening.
See Figure 2 & 3.
Figure 3.
Green(Ground)
Black(Positive)
White(Negative)
2
160823ronbow.eu | ronbow.comINSTALLATION SHEET

STACK LED Mirror Cabinet
Model :
E015612
Designed By: PHOENIX DESIGN | GERMANY
E015615
PRODUCT CARE AND MAINTENANCE
The fine furniture finish of your new vanity, mirror or other bathroom accessories are designed to
protect against normal home use. With proper care, your product will provide years of use and beauty
in your home.
General Care Tips
• Test cleaning product on small, discrete area prior to applying to entire surface.
• Wipe surfaces frequently with dry, soft, non-abrasive and lint-free towel.
• Do not allow liquids and moisture to accumulate on the surface of products.
• For warranty information, please visit our website at www.ronbow.com or contact the Customer Service
Department at (510) 713-1188.
Wood Surfaces
• If a spill occurs, clean and dry the surface immediately as liquid can soak through the surface and cause
greater damage.
• Do not place in direct sunlight. Exposure to sunlight may affect the appearance of your vanity, and the
finish will eventually crack.
• Keep away from direct sources of extreme temperatures as heat, cold or moisture from humidity.
Color changes, or blemishes in the wood can occur if recommended care of is not met. Try to avoid
these extremes.
• Most wood surfaces can be cleaned, or dusted, with any commercial wood cleaning product. For general
cleaning, use a non-abrasive, or lint-free cloth while dusting along the wood grain to preserve the
wood’s chacteristics.
Recommended Products
• Pledge Orange Oil, or similar
• Orange-Glo Wood Cleaner
DISCLAIMERS: Wood naturally ages, darkens and changes color over time due to several environmental conditions that may cause materials to vary from their
original color and/or to warp, split or crack. These variations are considered to be the nature of the material in relation to their environmental exposure and may
be significant over a long period of time. The eectiveness of cleaning Ronbow product is dependant on various factors that include sunlight, smoke, moisture,
household cleaners and/or amount of cleaning product used over time. Ronbow cannot guarantee that the above Product Care & Maintenance methods will
eectively clean your product.
3
160823ronbow.eu | ronbow.comINSTALLATION SHEET

STACK LED Mirror Cabinet
Model :
E015612
Designed By: PHOENIX DESIGN | GERMANY
E015615
Glass Surfaces
• Clean up any spills or liquids immediately. Never allow liquids of any kind to remain on surface as it
may form buildup and deposits.
• DO NOT use abrasive brushes, sponges or cleaners as they may scratch and damage the surface.
• Do not use oil or any oil-based cleaners on the glass as this may remove the frosted finish.
Recommended Products
• Windex
• Proprietary Glass Cleaning Products
DISCLAIMERS: Clear glass will tend to have a greenish tint. This is a natural feature and not a defect. Eectiveness of cleaning your Ronbow products is dependent
on various factors that include: water temperature, concentration and/or amounts of cleansers. Because of these many dierent conditions, Ronbow cannot
guarantee that the above Product Care & Maintenance methods will eectively clean your product.
4
160823ronbow.eu | ronbow.comINSTALLATION SHEET

160823
40650 Encyclopedia Circle
Fremont, CA 94538
T 510.713.1188
F 510.657.9388
ronbow.eu | ronbow.com
 Loading...