

Page 1
ASSEMBLY INSTRUCTIONS
FOR
ANTONIO & CLEOPATRA
YOUR
BEDS
6515
6530
7515
7530
20 Corporation Row, Edison, NJ 088 7
Phone1(718) 478 5100, Fax (718) 478 5117
www.rominafurniture.com
NOTE: THE STYLE OF YOUR
BED MAY VARY FROM WHAT IS
PICTURED IN THE
INSTRUCTION SHEET
DO NOT THROW OUT THIS
INSTRUCTION BOOKLET
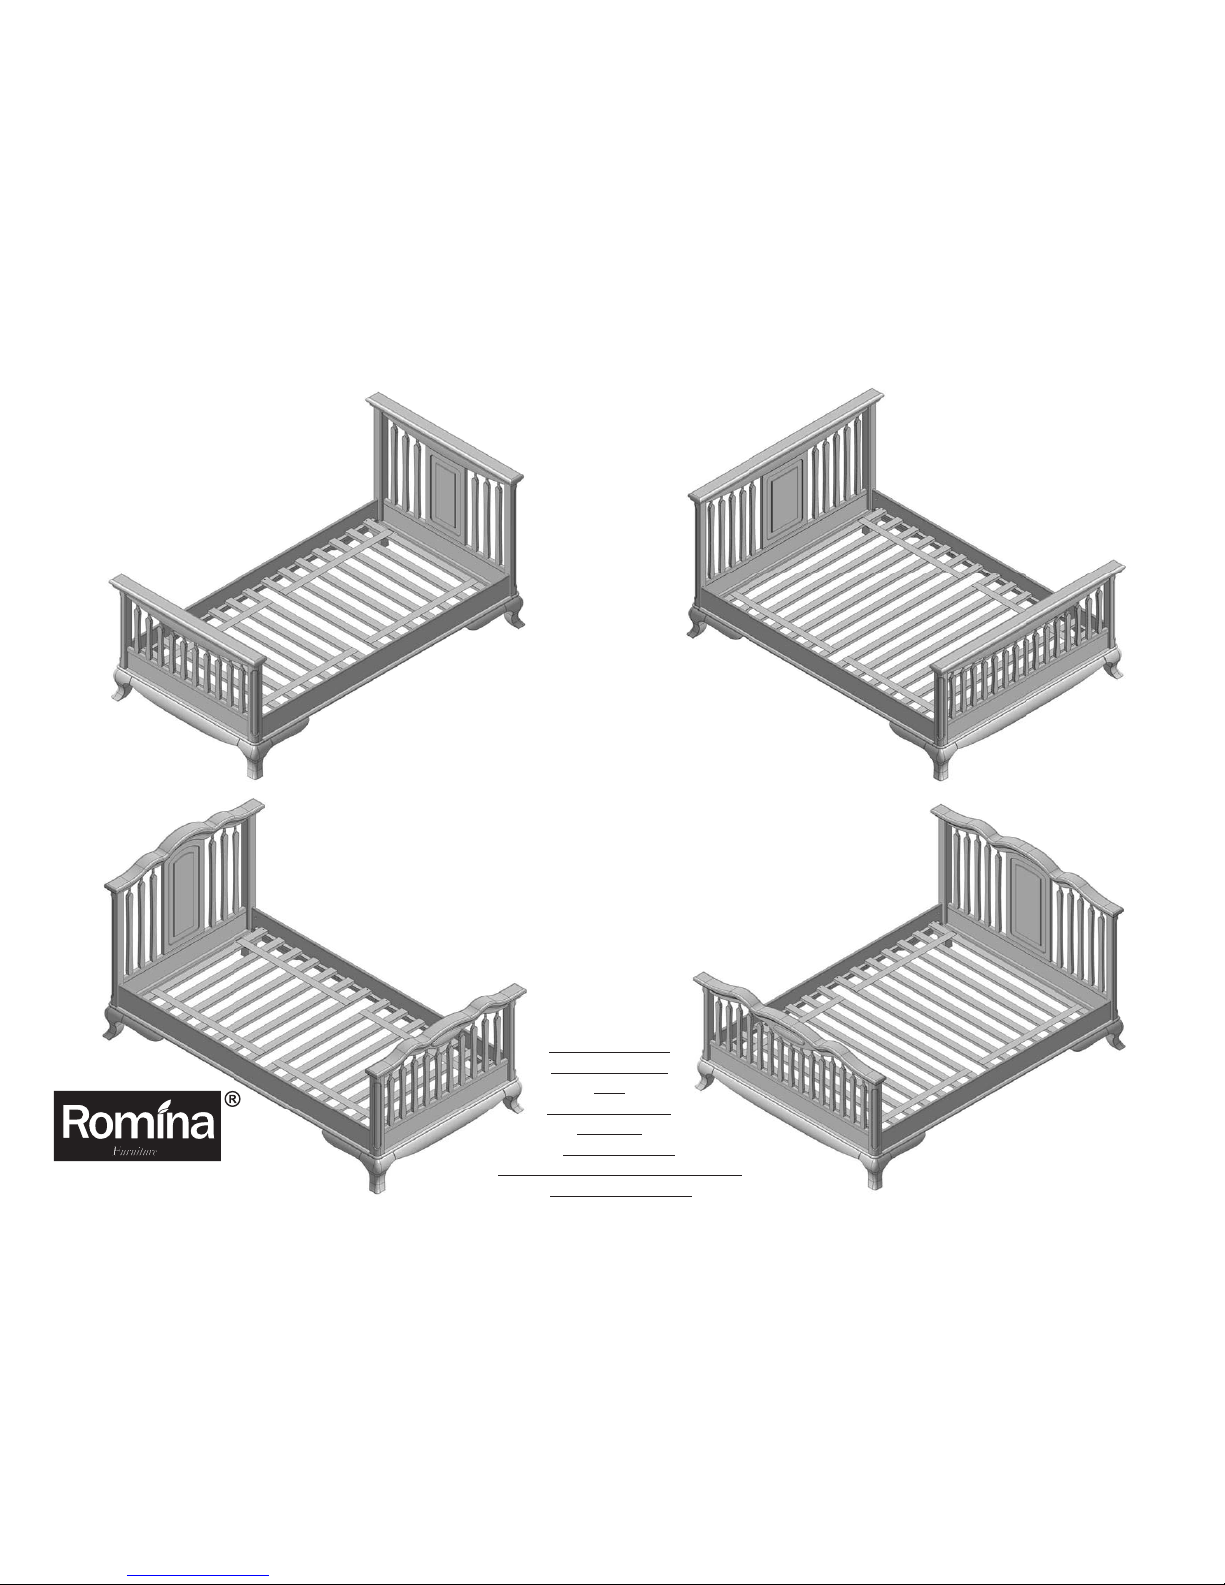
these pictures shows how your beds
should look like after completing assembly
IMPORTANT:
PLEASE, READ
ALL
INSTRUCTIONS
BEFORE
ASSEMBLING!
PLEASE, SAVE INSTRUCTIONS
FOR FUTURE USE
Page 2
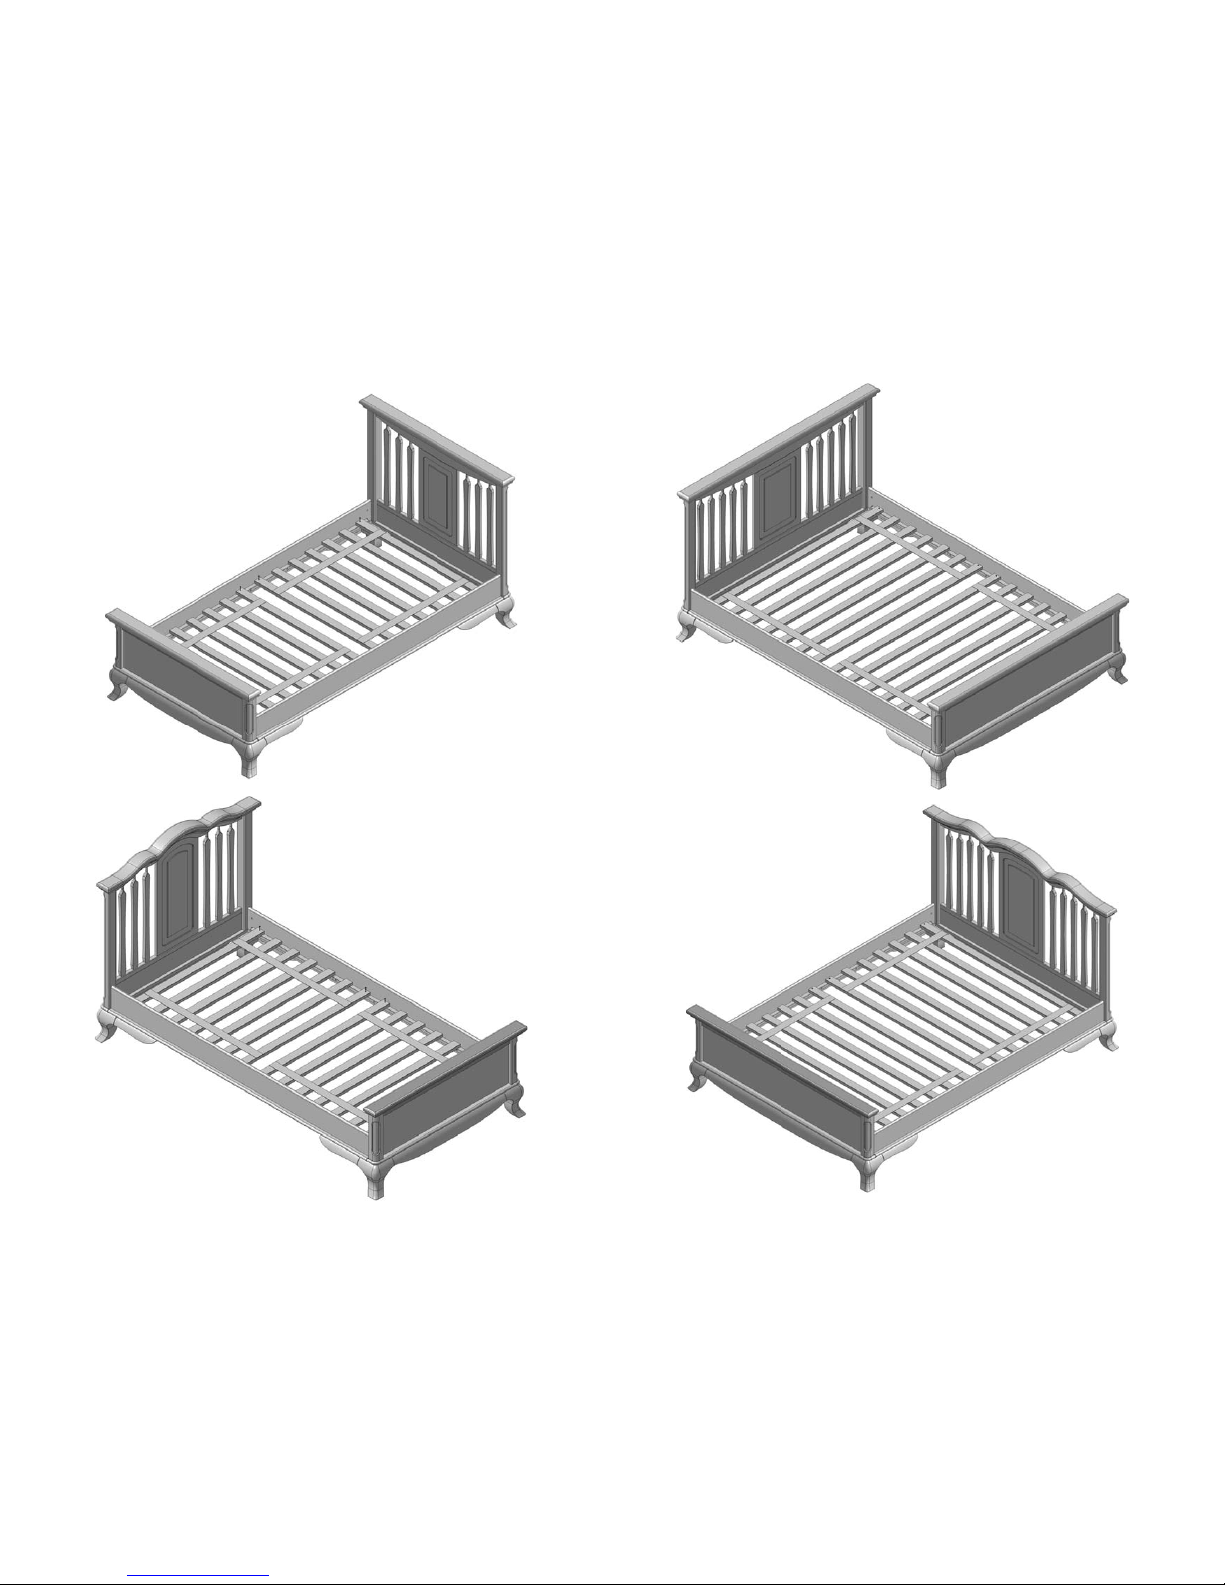
6515 LP FB
6530 LP FB
7515 LP FB
7530 LP FB
Page 3
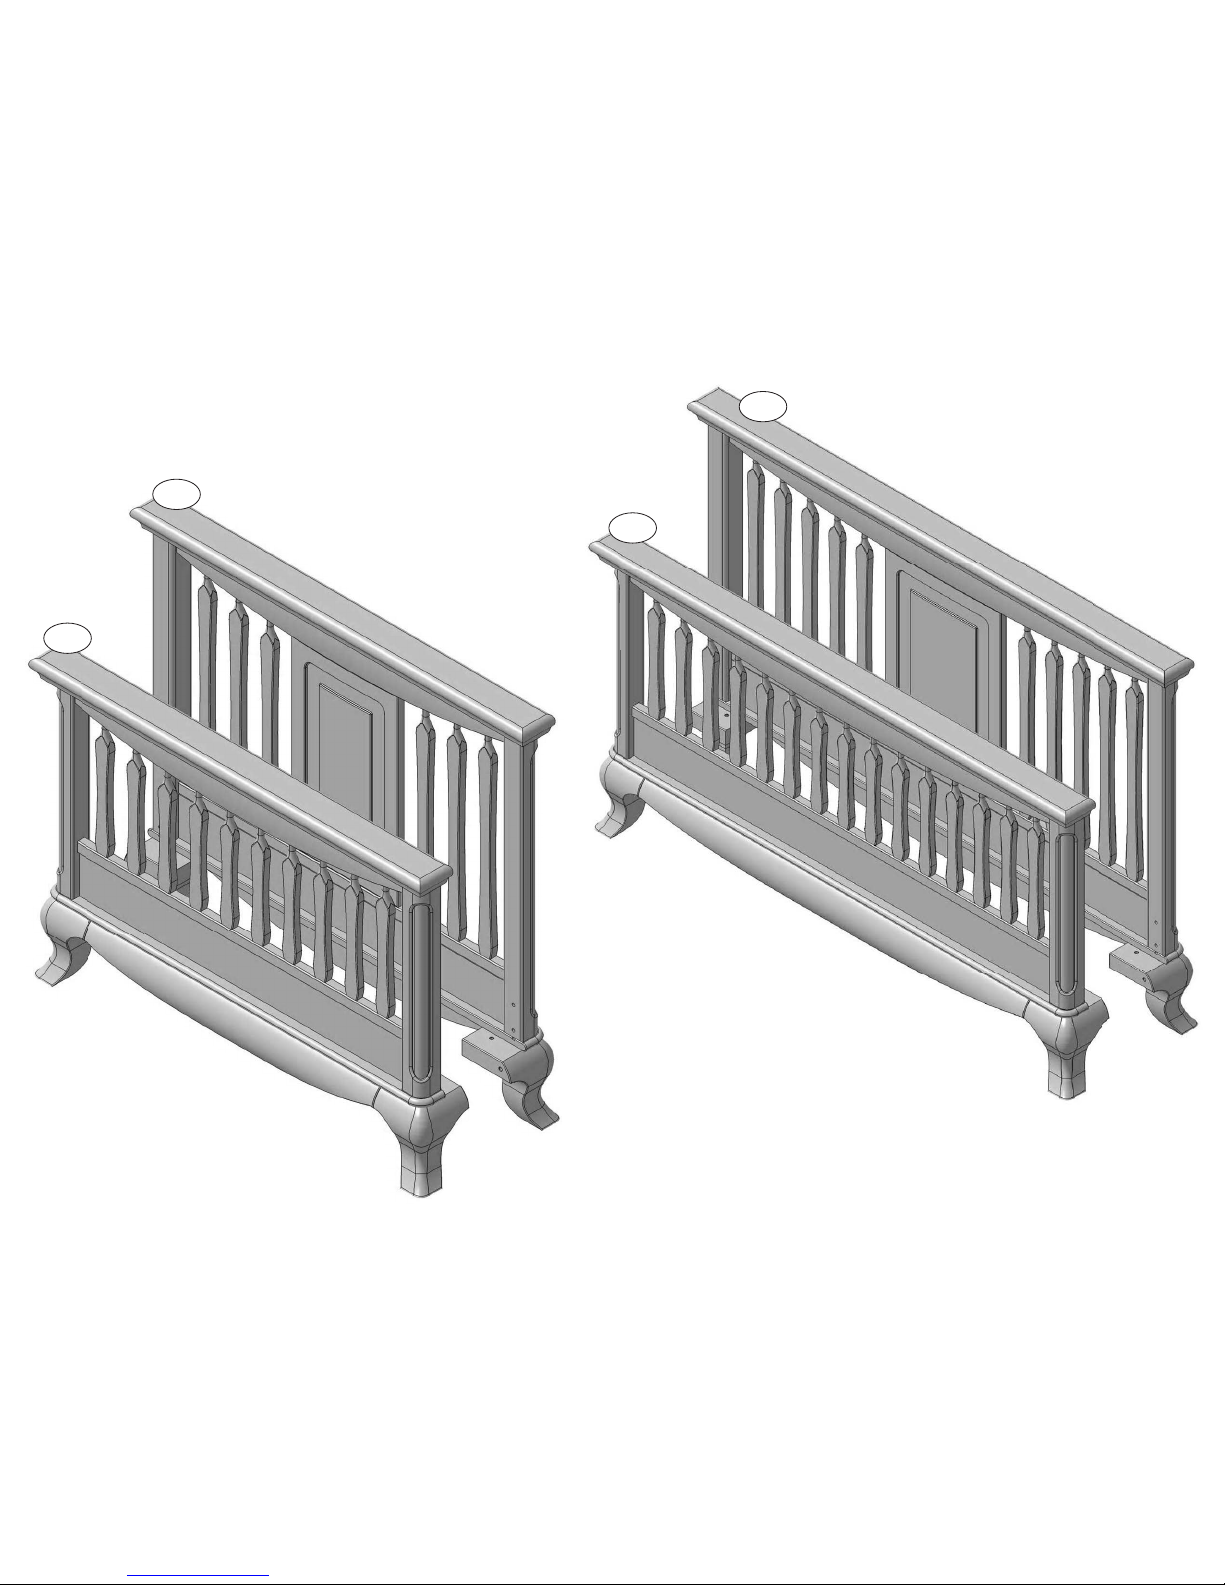
6530 HEADBOARD & FOOTBOARD
6515 HEADBOARD & FOOTBOARD
HB
FB
HB
FB
Page 4
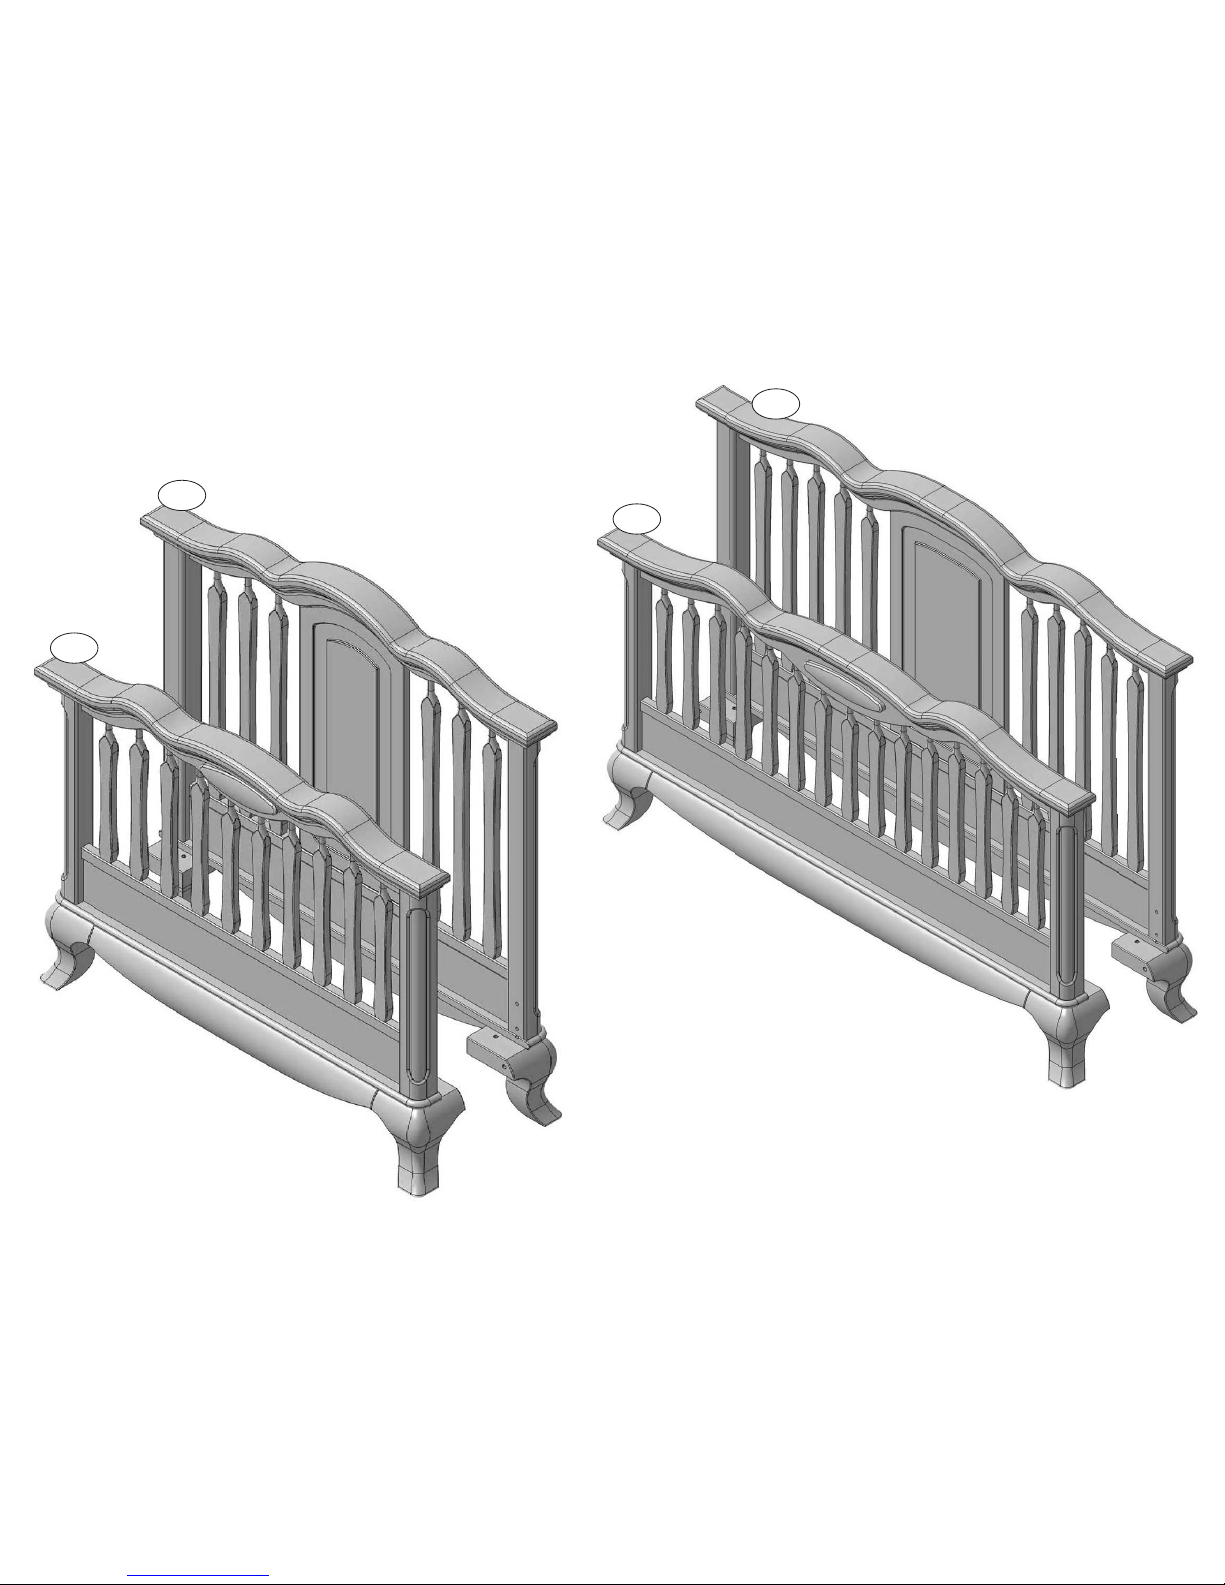
7530 HEADBOARD & FOOTBOARD
7515 HEADBOARD & FOOTBOARD
HB
FB
FB
HB
Page 5
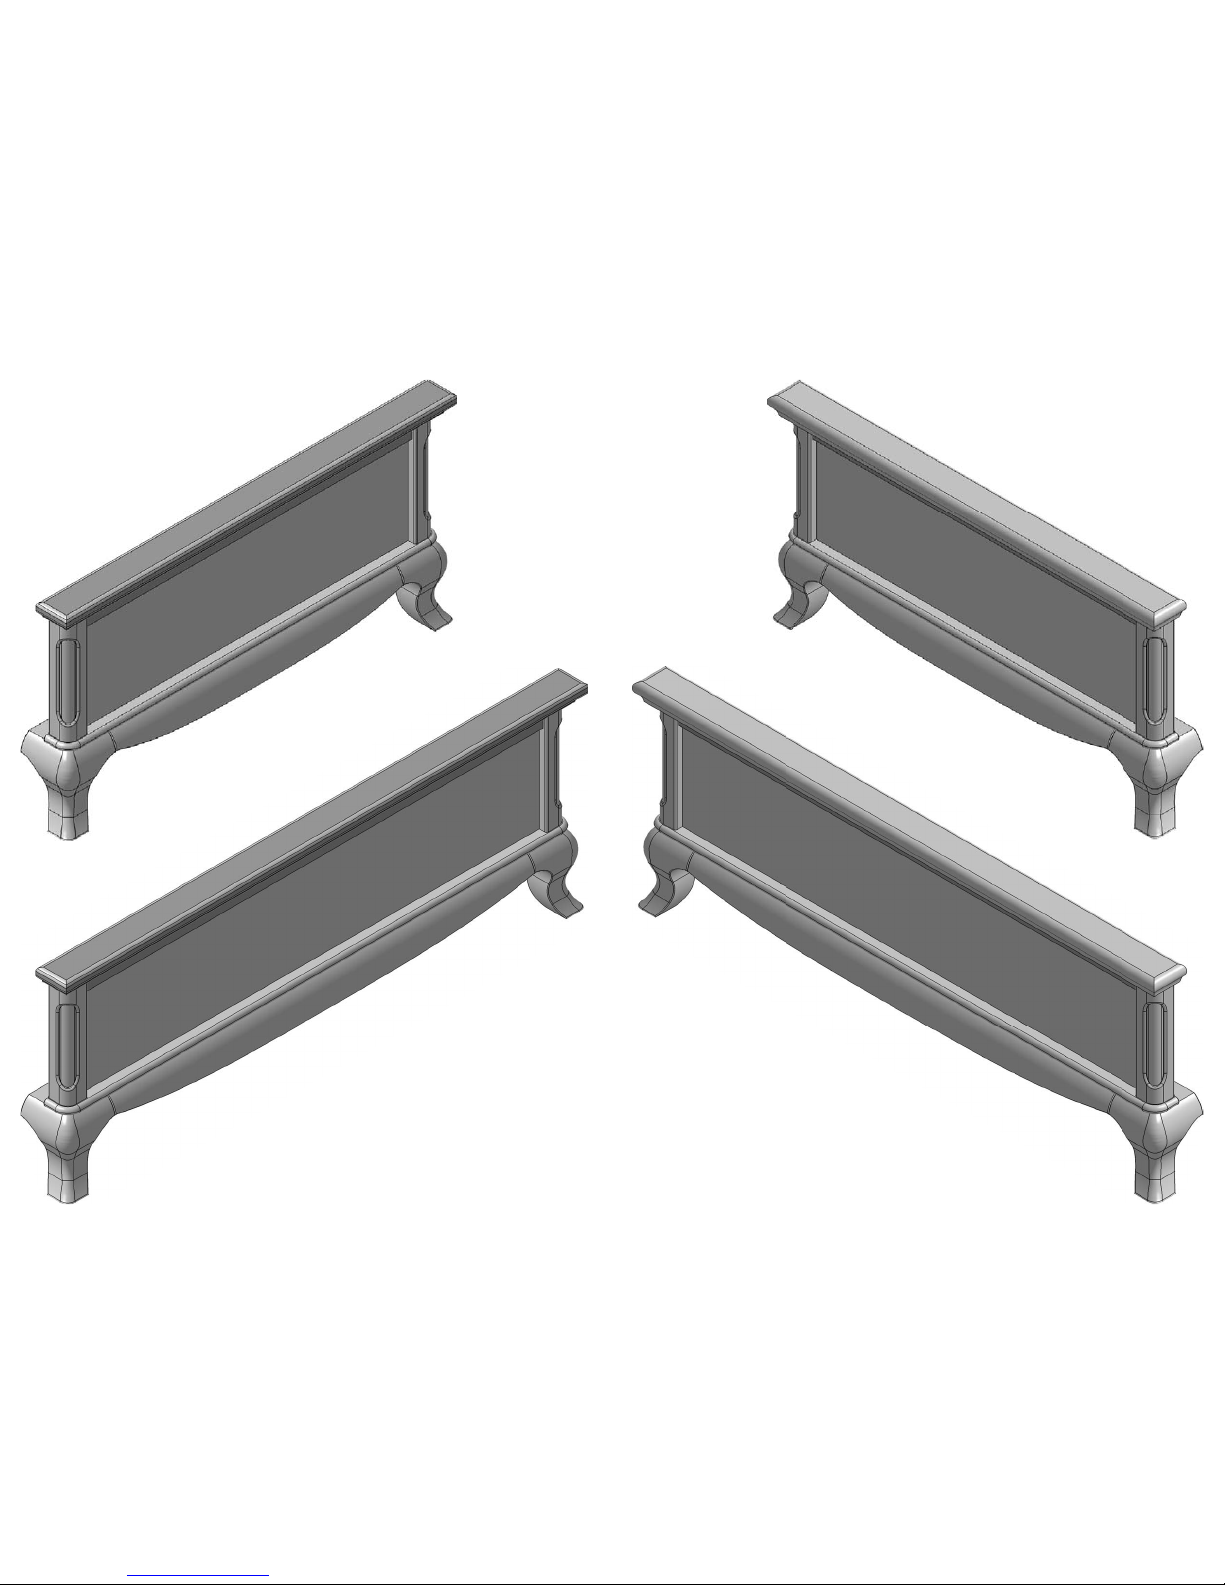
LOW PROFILE FOOTBOARD FOR 6515
LOW PROFILE FOOTBOARD FOR 6530
LOW PROFILE FOOTBOARD FOR 7515
LOW PROFILE FOOTBOARD FOR 7530
Page 6
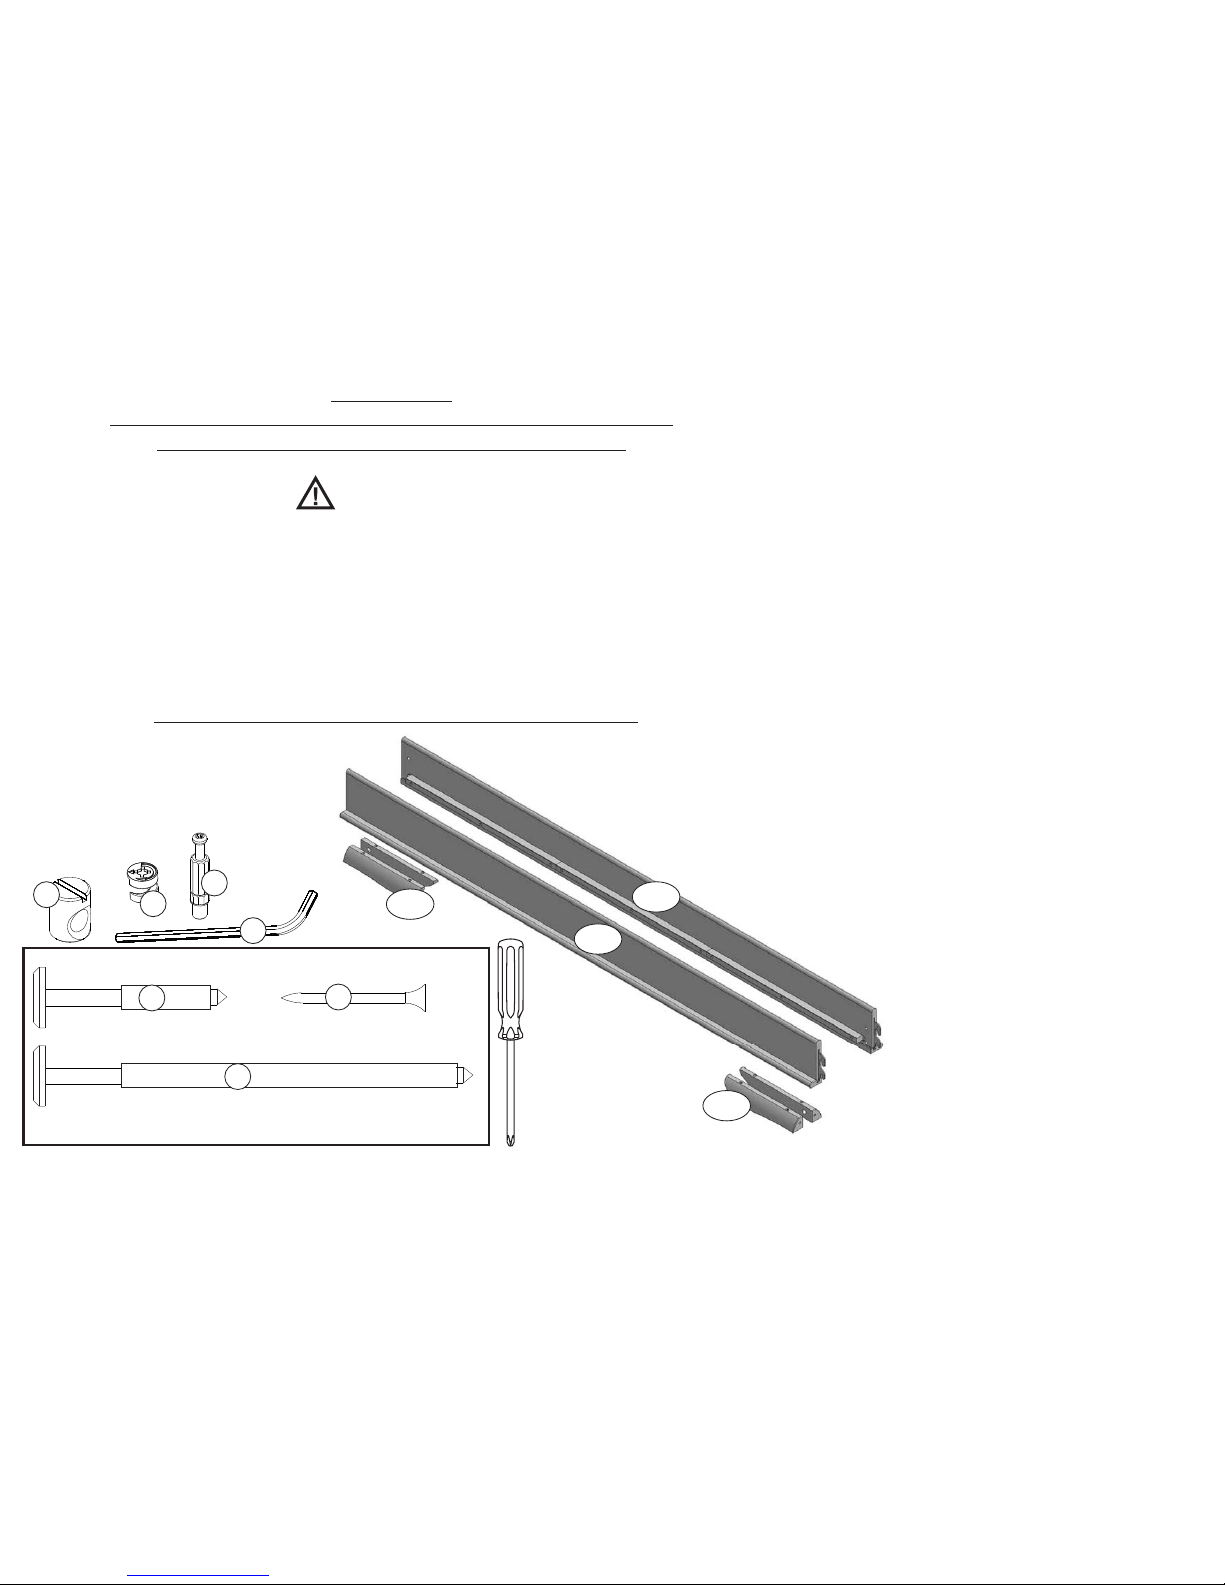
Please locate and confirm you have the following parts:
FB LP FB
HB
BR
SL
WO
or - footboard or low profile footboard = 1 (please see
pages 3-5 for footboard style, )
- headboard = 1
- bed rails = 1+1
- group of 7 support slats assembled with 2 textile ribbons = 2
- wooden ornament = 2+2
depending of your bed type
(please see pages 3-4 for headboard style,
depending of your bed type)
1. Allen bolts (100mm - 4") = 4
2. Allen bolts (40 mm - 1 9/16") = 8
3. barrel nuts = 4
4. wood screw (flat head 35mm - 1 3/8") = 8
5. Allen wrench = 1
6. metallic dowel = 4
7. cam fitting = 4
Allen wrench (supplied), Phillips screwdriver (not
included), flat screwdriver (not included).
Do not use a power screwdriver which can cause
screws to break or strip
The letters which identifies a part are the initials of the
respective part name (such method is employed to facilitate parts
recognition between the drawings and the parts list).
One bag of hardware with the following:
Required tools:
CAUTION:
Note:
ANTONIO & CLEOPATRA BEDS
BOX CONTENT
Phillips screwdriver
(not included)
6
5
1
2
3
7
BR
WO
Fasteners shown in full size
4
WARNING!
TO HELP PREVENT SERIOUS OR FATAL INJURIES FROM ENTRAPMENT OR FALLS:
§
§
§
§
§
PROHIBIT HORSEPLAY AND JUMPING ON OR UNDER BED(S).
PERIODICALLY CHECK AND ENSURE THAT ALL THE COMPONENTS ARE IN THEIR PROPER POSITION,
FREE FROM DAMAGE, AND THAT ALL CONNECTIONS ARE TIGHT.
DO NOT SUBSTITUTE PARTS. PLEASE, CONTACT ROMINA FURNITURE FOR REPLACEMENT PARTS.
THE USE OF WATER OR SLEEP FLOTATION MATTRESSES IS PROHIBITED.
PACKAGING MATERIAL, SMALL PARTS & PLASTIC BAGS ARE HAZARDOUS TO SMALL CHILDREN.
PLEASE DISPOSE OF THEM IMMEDIATELY!
KEEP THESE INSTRUCTIONS FOR FUTURE REFERENCE!
IMPORTANT:
PLEASE, READ ALL INSTRUCTIONS BEFORE ASSEMBLING!
PLEASE, SAVE INSTRUCTIONS FOR FUTURE USE
Note:
TIGHTEN
During the assembly process whenever using screws or bolts, check each by placing the screw / bolt on the upper
diagram which is drawn in actual size. Be sure to use the proper size and shape specified in the instructions. Be sure to
the screws / bolts when you are asked to do this.COMPLETELY
WO
BR
Note:
Thank you.
The item number of your product is located
on the inner side of the headboard or footboard,
on a black and white label. Please, refer to this
number in the event that you need to call ROMINA
FURNITURE or your local distributor.
Page 7
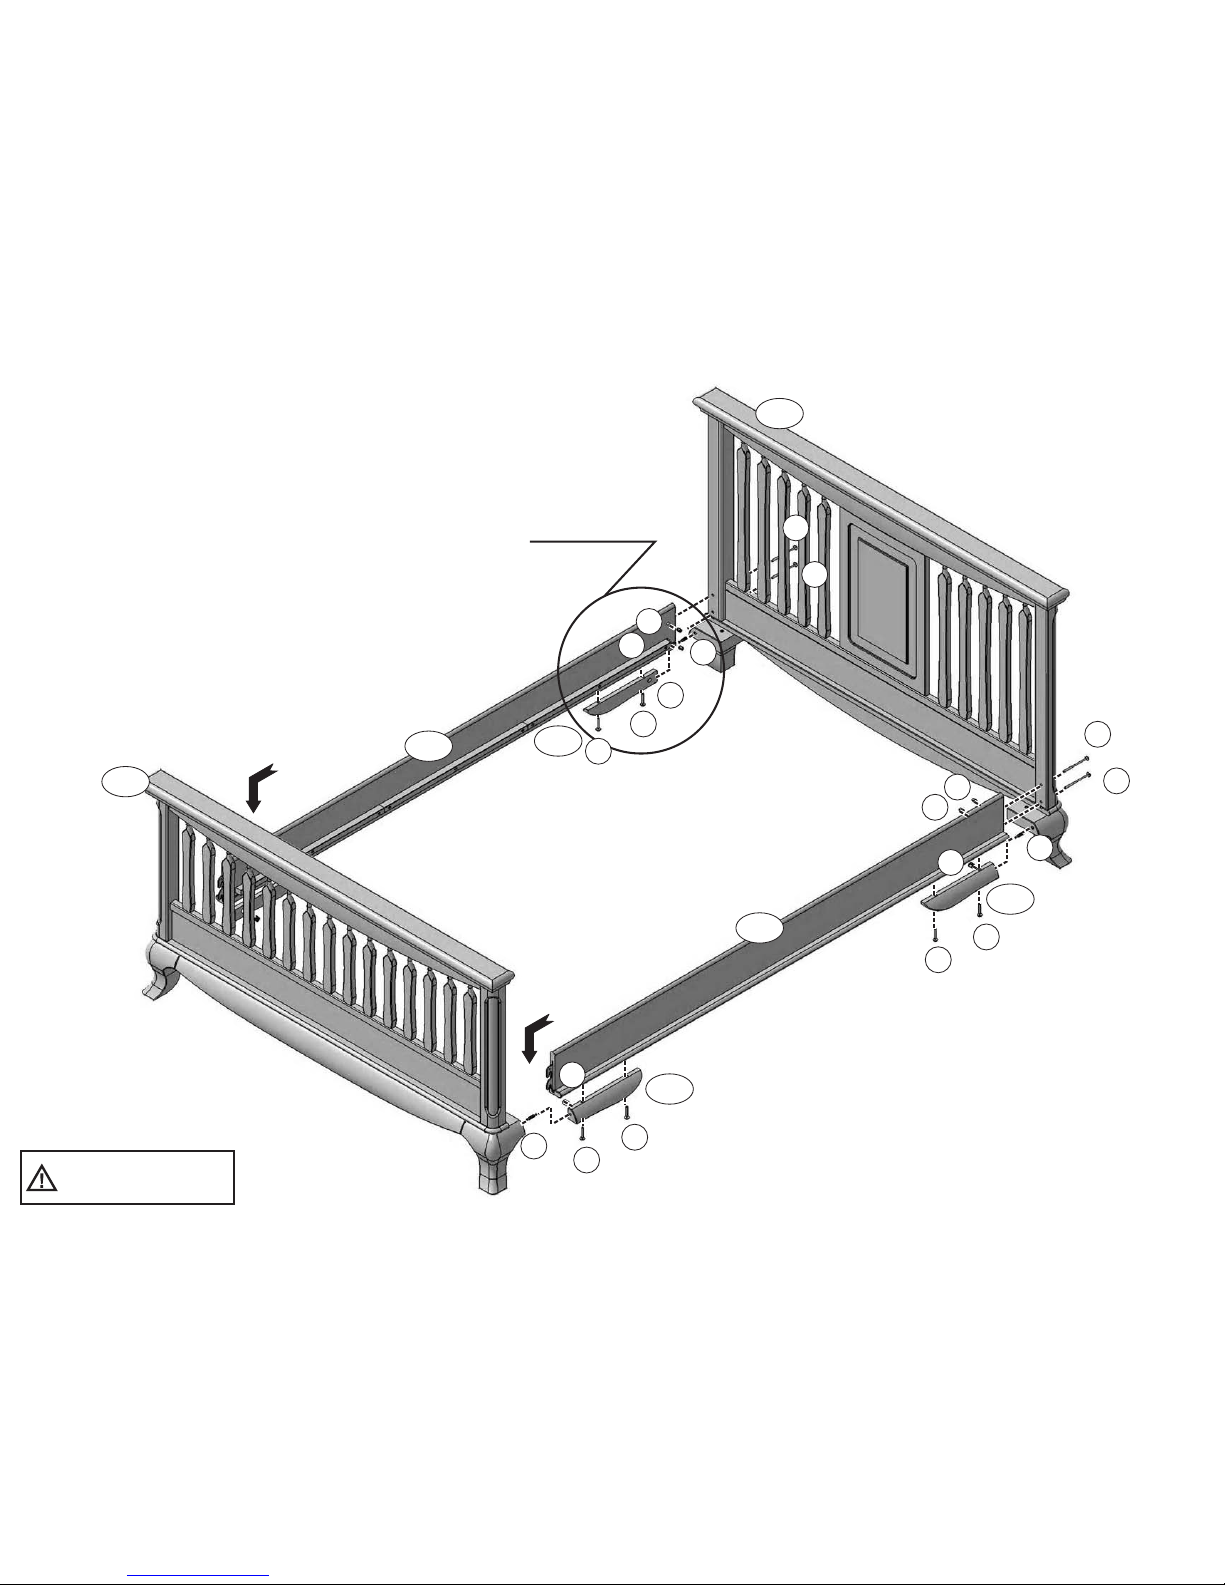
STEP 2 (for all ANTONIO & CLEOPATRA beds)
Completely tighten
Insert the metallic hooks attached at the ends of the bed rails into the
slots provided in the footboard's (low profile footboard’s) legs, so the
hooks will catch the inner pins. Make sure that both bed rails are firmly
attached to the footboard ( ) or low profile footboard ( ).
all four bigger Allen bolts.
FB LP FB
STEP 1 (for all ANTONIO & CLEOPATRA beds)
Attach one of the bed rails ( ) to the headboard ( ) using 2 bigger
Allen bolts ( ) and 2 barrel nuts ( ). Make sure that the wood brackets
attached to the bed rail faces towards the inside of the bed.
Align the straight slot in the head of the barrel nut horizontally, so the
threads in the bolt will insert in the barrel nut. You can adjust the position
of the barrel nut with a flat head screwdriver (not supplied) or a coin.
Push the Allen bolts through the headboard and into the bed rail. Start the
threads by hand to assure you don't strip the threads, then, use the
supplied Allen wrench.
Do not completely tighten the bolts at this step, you will be asked to do so
later.
Repeat the above operations for the other bed rail.
BR HB
13
s
6
1
1
1
1
2
2
2
2
2
6
6
7
7
7
3
3
3
3
FIGURE 1
2
please see the
detailed view on
the next page
HB
FB
BR
BR
WO
WO
WO
WARNING!
COMPLETELY TIGHTEN!
Page 8
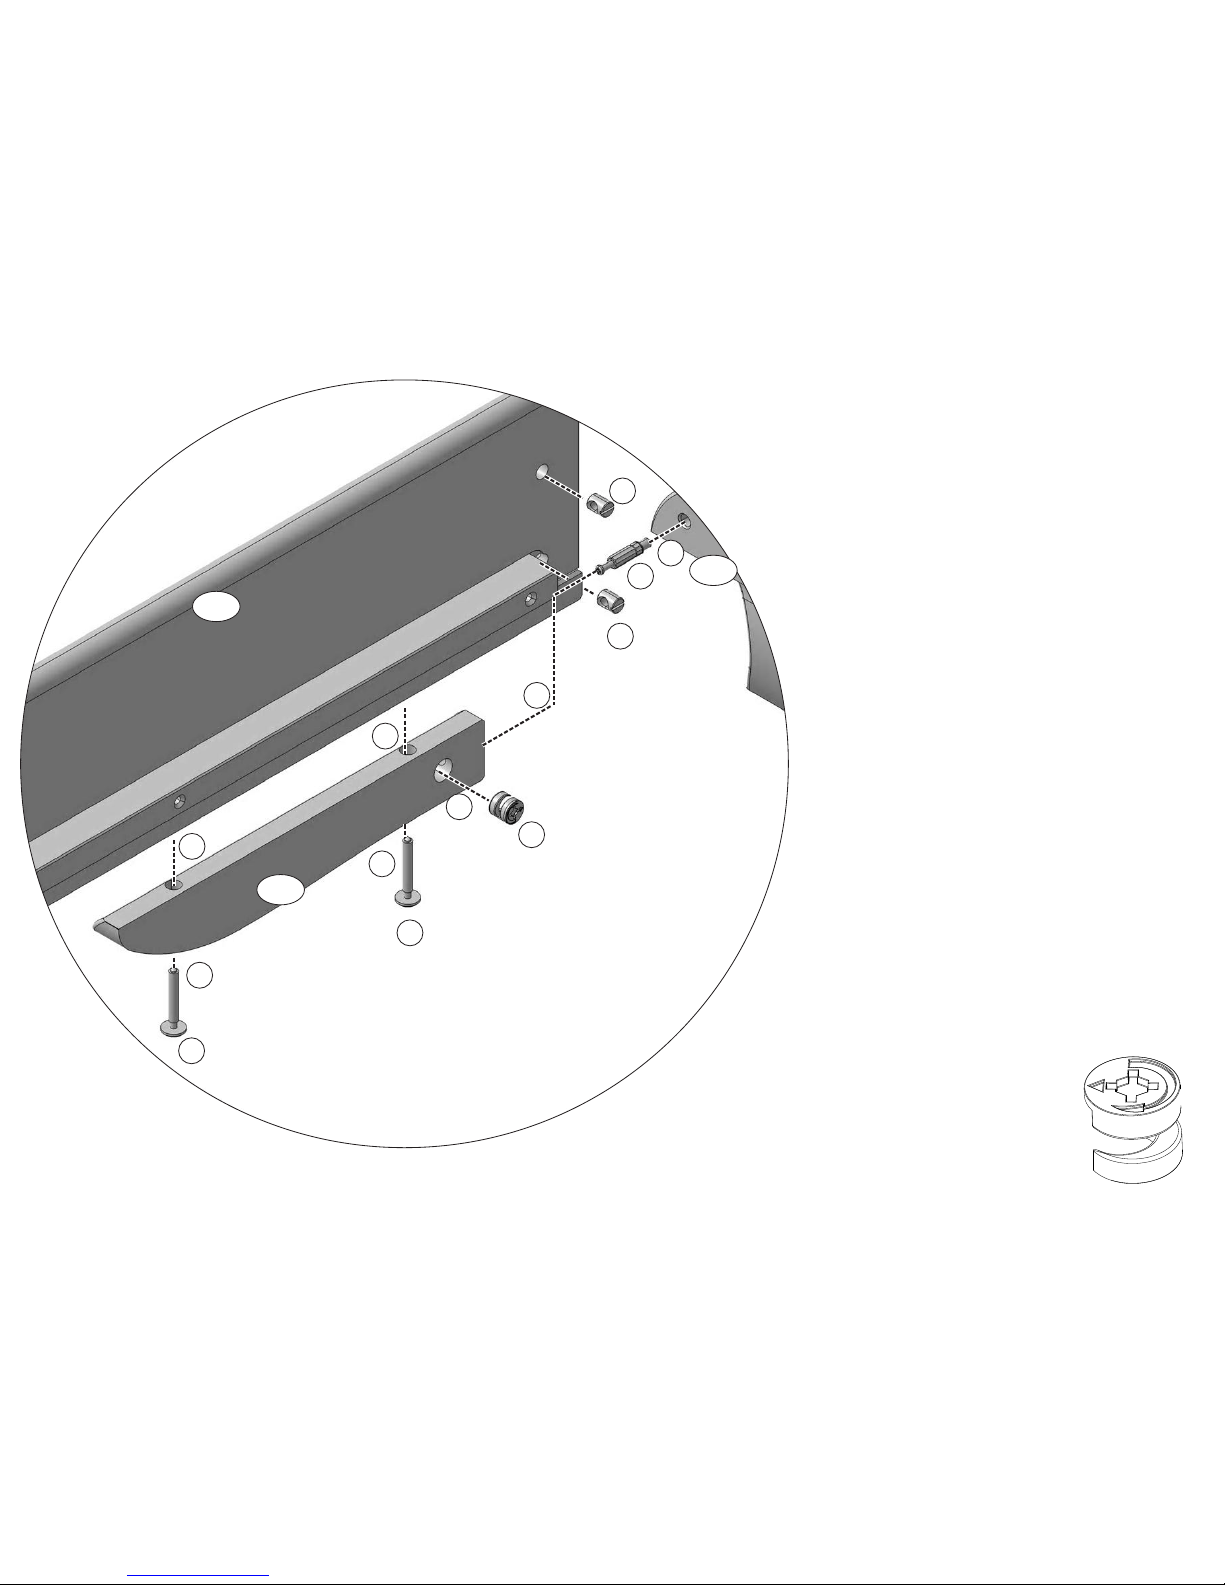
STEP 3 (for all ANTONIO & CLEOPATRA beds)
Using all eight smaller Allen bolts ( ), all four metallic dowels
( ) and all four cam fittings ( ), attach the wooden ornaments
( ) to the bed rails ( ) and to the end panels ( & ),
following the next steps:
using a Phillips screwdriver (not supplied) or just the hand,
insert a metallic dowel ( ) into one crib’s foot;
attach the wooden ornament ( ) to the end panel ( or
), inserting the dowel into the hole found on the smaller
side of the wooden ornament;
slightly pressing the wooden ornament against the crib’s
foot, insert the cam fitting ( ) into the inner face hole of the
wooden ornament, taking care that the little arrow of the cam is
pointing to the crib’s foot (parallel to the dowel’s direction)
insert the smaller Allen bolts ( ), starting the threads by
hand. Do not completely tighten the bolts at this moment, you
will be asked to do this later.
Adjust the position of the wooden ornament to follow the lines
of the crib’s foot by slightly moving the ornament then using the
supplied Allen wrench and moderate force, slightly rotate the
cam fitting clockwise (see the cam’s rounded arrow) by about
90 deg to 120 deg until become tight. You don’t need to
overtight the cam!
Using the supplied Allen wrench and moderate force,
completely tighten the two smaller Allen bolts ( ).
Repeat the above steps for the rest of the three wooden
ornaments.
2
67
WO BR HB FB
A)
6
B) WO HB
FB
C)
7
D) 2
2
FIGURE 2 (detailed view of FIGURE 1)
6
2
3
7
WO
BR
HB
A
B
C
D
D
D
D
2
3
little
arrow
r
o
u
n
d
e
d
a
r
r
o
w
Page 9
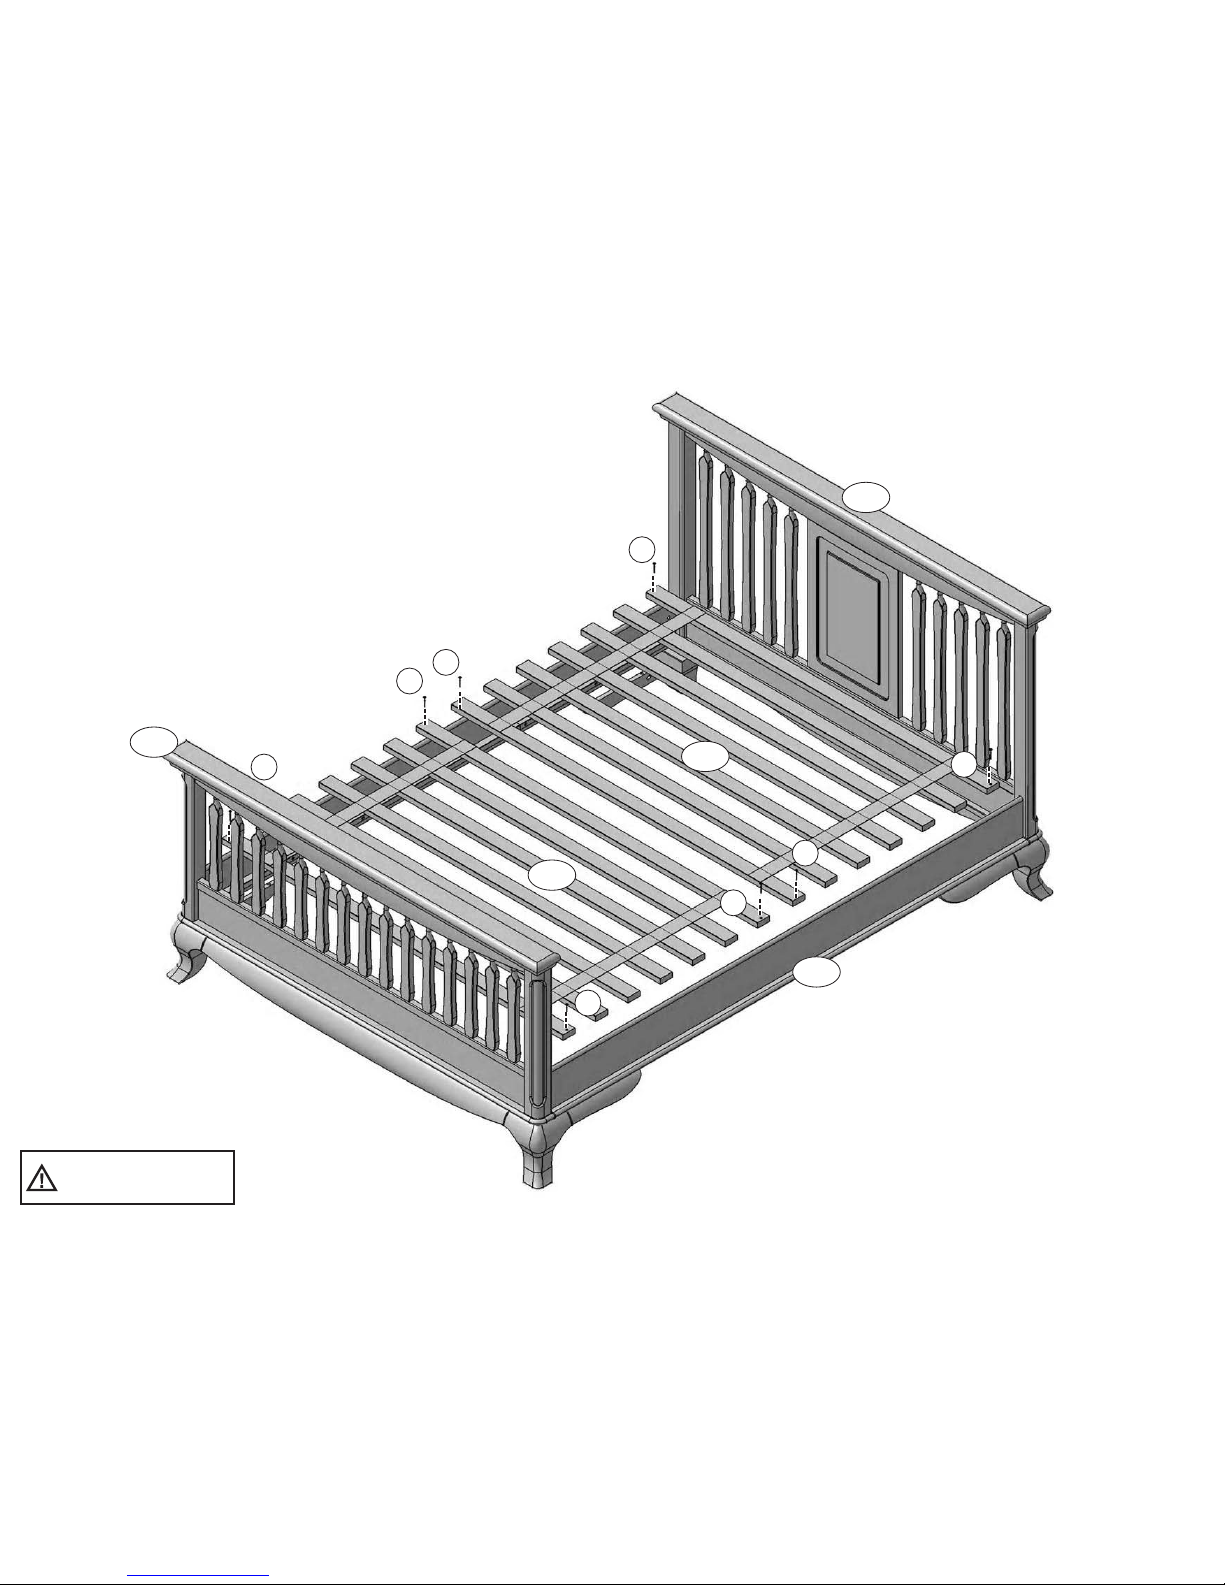
STEP 4 (for all ANTONIO & CLEOPATRA beds)
Place the onto the wood brackets attached to the bed rails ( ). Position
the support slats evenly between the bed ends. Make sure you firmly attach the support slats
to the wood brackets using all eight wood screws ( ) provided.
BR
4
support slats ( )
Use a Phillips screwdriver
(not supplied) to completely tighten the screws.
SL
4
HB
FB
BR
SL
SL
4
4
4
4
4
4
4
After completing assembly, your bed should look like one of the four beds
depicted on the first pages of this booklet, depending of your bed type
.
FIGURE 3
WARNING!
COMPLETELY TIGHTEN!
Page 10

GENERAL FURNITURE CARE TIPS
· Wood, like any natural material is likely to present variations of grain and texture which will result in
slight color variations or richness in the finish. These differences make each Romina furniture item as
beautiful and unique as you and your baby are.
· To preserve the initial appearance and functionality of your furniture, it is recommended that all furniture
items be usedin accordance with their intended design.
· Special water-based finishes are used to make this furniture safe for your baby. These finishes may be
more delicate than those used on adultfurniture thus requiring careful maintenance.
· Constant rubbing or mechanical interaction with sharp/hard objects such as belt buckles, jeans' zippers
or buttons will likely damage the finishon your furniture. When placing or retrieving itemsonto the furniture,
always set them down and pick them up, do not “slide” them. Items placed onto the horizontal surfaces
must be moved/rotated to prevent discoloration inthe finish.
· Exposure to extreme variations of environmental conditions such as humidity and temperature can
affect the finish quality due to wood sudden expansion or shrinkage. It is recommended that the room
temperature be maintained in between 65 and 75 degrees Fahrenheit and a relative humidity of 35 – 40 %.
Do not place items which are toohot or too cold directly onto thefinished surfaces!
· Use caution when using a humidifier or vaporizer. Excessive moisture is harmful to the furniture causing
the finish to peel and the woodto warp.
· Wipe up spillspromptly. If water or other liquids stay in contactwith the furniture for a long period of time,
they can cause the finish to turnwhite or discolor. Alcohol orsolvent containing substances or materials will
permanently damage the finish.
· In general, furniture should not be placed in front or too close to air-conditioning outlets, fireplaces,
heaters or humidifiers. Direct sunlight and ultraviolet rays will cause colors to fade, affect the luster and
smoothness of the finish and in most cases may cause hairline cracks in the finish. White finishes will
yellow naturally over time; exposure to direct sunlight will accelerate this natural process. Please note that
all wood essences will darken over time along with the natural aging process which is not considered to be
a quality defect.
· To clean the furniture, use a damp cloth immediately followed by wiping with a dry cloth. Do not allow
water to stay in contact with thefinish as it will damage the finish.
· If you need to putyour furniture into storage for any period of time, avoidplacing it in damp basements or
hot attics. Air flow around and under the furniture should be allowed. Do not place furniture too close to
walls, do not stack anything on itand do not cover it entirely.
· When using a vinyl changing pad or similar plastic accessories, make sure to use a fabric felt
underneath. Certain plastics have ingredients that can react with and damage the finish. It is
recommended to rotate the changing pad's positionfrequently to avoid finish discoloration.
Page 11

Page 12

Regular cleaning withmild soap ona soft cloth,followed by aclean damp
cloth, then adry cloth, will preserve the original luster and beauty of the
fine finish ofyour RominaFurniture product.
Visit
for updates, special offers and more new designs.
www.rominafurniture.com
Team
Thank you for being one of our distinguished clients.
 Loading...