


32K ORGANIZER
RF- 2034
User’s Guide
20
License Agreement
READ THIS LICENSE AGREEMENT BEFORE USING THE
ELECTRONIC REFERENCE. YOUR USE OF THE
ELECTRONIC REFERENCE DEEMS THAT YOU ACCEPT
THE TERMS OF THIS LICENSE. IF YOU DO NOT AGREE
WITH THESE TERMS, YOU MAY RETURN THIS
PACKAGE WITH PURCHASE RECEIPT TO THE DEALER
FROM WHICH YOU PURCHASED THE ELECTRONIC
REFERENCE AND YOUR PURCHASE PRICE WILL BE
REFUNDED. ELECTRONIC REFERENCE means the
software product and documentation found in this package
and FRANKLIN means Franklin Electronic Publishers, Inc.
Limited Use License
All rights in the ELECTRONIC REFERENCE remain the
property of FRANKLIN. Through your purchase, FRANKLIN
grants you a personal and nonexclusive licensed to use this
ELECTRONIC REFERENCE. Y ou may not make any copies
of the ELECTRONIC REFERENCE or of the data stored
therein, whether in electronic or print format. Such copying
would be in violation of applicable copyright laws. Further,
you may not modify, adapt, disassemble, decompile,
translate, create derivative works of, or in any way reverse
engineer the ELECTRONIC REFERENCE. You may not
export or reexport, directly or indirectly, the ELECTRONIC
REFERENCE without compliance with appropriate
governmental regulations. The ELECTRONIC REFERENCE
contains Franklin’s confidential and proprietary information
which you agree to take adequate steps to protect from
unauthorized disclosure or use. This license is effective until
terminated. This license terminates immediately without
notice from FRANKLIN if you fail to comply with any provision
of this license.
1
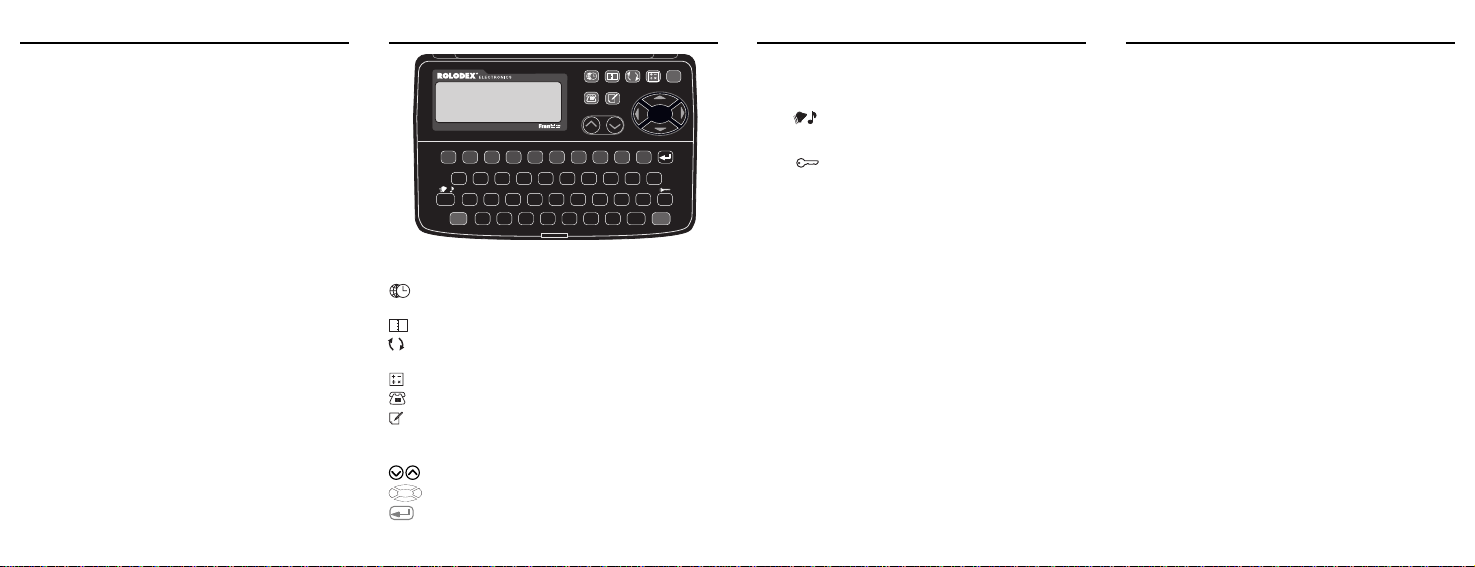
Key Guide
TIME SCHEDULE CONV CALC
32K
TEL
1234567890
M–
MC
MR
QWE R T Y U I OP
DEL
ASDFGHJ K L
CE
AC
OFF
ZXCVBN
Main Function Keys
(
TIME
) Toggles between the clock and the daily
(
(
(
(
(
CONV
CALC
TEL
MEMO
alarm screen.
SCHEDULE
)
Selects the scheduler.
) Toggles between the metric and currency
converter.
) Selects the calculator.
) Selects the phone directory.
) Selects the memo pad.
Direction Keys
(
SEARCH
)
Displays the next or previous record.
Moves the cursor or changes the input field.
In schedule records, phone records, and
memos, lets you type text on the next line.
÷
M+
12/24
x
%
AM/PM
2
Key Guide
Other Function Keys
hour display.
toggles the keytone on or off. At the daily
alarm, toggles the alarm mode on or off.
) Lets you edit a schedule record, phone record,
memo, or exchange rate. At the clock, lets you
set, change, or delete the password.
SPACE
ON
.
+
EDIT
=
ENTER
MEMO
SEARCH
–
M
C (12/24) Toggles the clock between 12- and 24-
DEL ( ) Deletes a character or record. At the clock,
EDIT (
ENTER Enters or saves information in records.
ON & OFF Turn the organizer on or off.
SPACE Types a space.
V (
AM/PM
) When setting a time, toggles the a.m. or
p.m. setting.
Calculator Keys
The first time you use this organizer, do the following.
Warning! Resetting the organizer (Step 2 below)
erases any user-entered information in the organizer
and clears its settings.
1. Carefully pull and remove the battery insulation tag.
The insulation tag prevents battery wear prior to using the organizer.
3. Press the recessed RESET button on the back of
the organizer using a thin, pointed object such as
a pencil.
4. Press Y to reset and start using the organizer.
Note: After you have initialized the organizer as described above, you can turn it off by pressing OFF
and turn it on by pressing ON, TIME, SCHEDULE,
CONV, CALC, TEL, or MEMO.
Getting Started
E (M-) Adds a negative number to the memory.
ENTER(=) Makes a calculation.
I (-) Performs a subtraction.
O (+) Performs an addition.
P (.) Types a decimal point (also in the converter).
Q (
MC
) Clears the calculator memory.
R (
M
+) Adds a positive number to the memory.
T (%) Calculates a percentage.
U (x) Performs a multiplication.
W (
MR
) Retrieves the calculator memory.
X (
CE
) Clears the most recent entry.
Y (
÷
) Preforms a division.
Z (
AC
) Clears the calculation.
3
✔
Keep Written Copies of Your Information
Warning! Your information can be permanently lost
or corrupted if this organizer is operated improperly,
if it loses all battery power, or if certain other circumstances occur. Therefore, always keep written copies of your important information as a backup.
✔ About the Screen Illustrations
Some screen illustrations in this manual may differ
from what you see on the screen. This does not
mean that your organizer is malfunctioning.
4

Using the Clock
This organizer keeps two times: T1 and T2. T1 is the time of
the scheduler and should be set before using the scheduler.
To Set the Clock
1. Toggle TIME until the clock appears.
WED JAN/ 1/ 97
T1 00 - 00 00
T2 00 - 00 00
2. Toggle C (12/24) to switch the times to or from
12- or 24-hour display.
3. Hold ENTER for at least two seconds to enter the time
setting mode.
or to select a flashing field.
4. Use
5. Use ▲ or ▼ to increase or decrease its value.
6. When a time is flashing, toggle V (
or p.m. setting.
7. Press ENTER to save your settings.
✔ Disabling or Enabling the Keytone
The keytone is the beep that sounds whenever a
key is pressed. To disable or enable the keytone,
first toggle TIME until the clock appears and then
toggle DEL. The icon on the screen indicates if
the keytone is on or off.
✔ Checking the Memory
When SCHEDULE, TEL, or MEMO is pressed (except when the lock mode is enabled), the remaining
storage capacity in bytes appears on the screen.
AM/PM
) to change the a.m.
5
Using the Daily Alarms
To Turn the Alarm Mode On or Off
The daily alarms and schedule alarms will sound only
if the alarm mode is turned on. To learn about
schedule alarms, read “Using the Scheduler.”
1. Toggle TIME until
Or press SCHEDULE.
2. Toggle DEL (
indicated by the bell icon on left of the screen.
To Set a Daily Alarm
You can set multiple daily alarms. Each will sound for 30
seconds. You can stop its sound by pressing any key.
1. Toggle TIME until
2. Type an alarm name (for example,
To move the cursor, use and . To delete a flashing character, press DEL.
3. Press ENTER to change the time.
and to select a field, and use ▲ or ▼ to
4. Use
increase or decrease its value.
5. Press ENTER to save the alarm.
To Change or Delete a Daily Alarm
1. Toggle TIME until
2. Use
or to find an alarm. Or type the first few
letters in its name and then use or .
3. To change the alarm, press EDIT and then follow
Steps 2-5 of “To Set a Daily Alarm.” Or, to delete
the alarm, press DEL and then press Y.
RECORD NAME?
) to turn the alarm mode on or off
RECORD NAME?
RECORD NAME?
appears.
appears.
WAKE UP CALL
appears.
).
6
Using the Scheduler
To Enter a Schedule Record
1. Press SCHEDULE.
The schedule alarm icon, , at the top of the screen indicates that a 20-second alarm will sound whenever a scheduled event occurs, if the alarm mode is turned on. To learn
how to turn on the alarm mode, see page 6. To stop the
sound of an alarm, press any key.
2. Type an record name (for example, an appointment or
thing to do).
S TAFF MTG
3. To type a second line of a record name, press .
4. Press ENTER to set the date and time.
S TAFF MTG
MAY 30 1997
5. Use and to select a field, and use ▲ or ▼ to
increase or decrease its value.
6. When the time is flashing, toggle V (am/pm) to change
the a.m. or p.m. setting.
7. Press ENTER to save the record.
8. To add another record without exiting the scheduler, go
to Step 2 above.
To Search for a Schedule Record
1. Press SCHEDULE.
3 - 30 P
7
Using the Scheduler
2. Use or to find a record. Or type the first few
letters of its record name and then use or .
Notice that
3. To see the full record name, use .
Small triangles on the screen indicate if the record
has information that is not currently visible.
4. To find more records, repeat Step 2. Or enter a
new record.
search
appears on the screen.
To Edit a Schedule Record
1. Find a schedule record.
To learn how, read “To Search for a Schedule Record.”
2. Press EDIT.
Notice that
3. To change its record name, use and to move
the cursor and then type your changes. To delete
a character, press DEL.
4. Press ENTER to change the date or time.
5. Use
6. Use ▲ or ▼ to increase or decrease its value.
7. Press ENTER to save your changes.
edit
appears on the screen.
and to select a field.
To Delete a Schedule Record
1. Find a schedule record.
To learn how, read “To Find a Schedule Record.”
2. Press DEL.
3. Press Y to delete the record or N to cancel.
8

Using the Phone Directory
Each phone record can contain individual and
company names, titles, telephone numbers, fax
numbers, pager numbers, mobile phone numbers, and
a multiple-line address. You can store up to 575 phone
records.
To Enter a Phone Record
1. Press TEL.
2. Type a name.
To move the cursor, use . To delete a flashing
character, press DEL.
3. To type more information on the next line,
first press .
MA RY SMITH
XYZ COMPANY
ANYTOWN USA
4. Press ENTER and then type a telephone number.
To type a space between numbers, press SPACE.
5. To type a second telephone number, press .
TELEPHONE?
123 456 7890
098 765 4321
6. Press ENTER and type one or two fax numbers.
Remember, to type a second number, first press .
To enter no number, simply press ENTER.
9
Using the Phone Directory
7. Press ENTER and type one or two pager numbers.
8. Press ENTER and type one or two mobile phone
numbers.
9. Press ENTER and type an address.
To type additional lines, first press .
10. When done, press ENTER to save your record.
To Search for, Edit, or Delete a Phone
Record
1. Press TEL.
2. Use
or to find a record. Or type the first few
letters in its name and then use or .
3. To scroll through the name, use .
4. To view its other numbers and the address,
use ▲ and ▼ .
5. To edit a phone record, first press EDIT and then
follow Steps 2-10 of “To Enter a Phone Record.”
Or, to delete a phone record, first press DEL and
then press Y to delete it or N to cancel.
✔ About the Automatic Shutoff
If you forget to turn off this organizer, it will shutoff
automatically about four minutes after you have
stopped using it.
10
Using the Memo Pad
To Enter a Memo
Y ou can type many lines in a memo and up to 255
characters on a line.
1. Press MEMO.
2. Start typing your memo.
3. To move the cursor, use
character, press DEL.
4. To type on the next line, first press
BRING CHART
AND OVERHEAD
TO STAFF MTG.
5. Press ENTER to save your memo.
To Search for, Edit, or Delete a Memo
1. Press MEMO.
2. Use
or to find a memo. Or type its first few
letters and then use or .
3. To scroll through the memo, use .
Small triangles on the screen indicate if the memo
has information that is not currently visible.
4. To edit a memo, press EDIT and then follow
Steps 2-5 of “To Enter a Memo.” Or, to delete a
memo, first press DEL and then press Y to delete
it or N to cancel.
. To delete a flashing
.
11
Metric and Currency Conversions
To Make Metric Conversions
1. Press CONV until a metric conversion pair appears.
F –> M
2. Use ▼ or ▲ to select a conversion.
3. Type a number.
4. Press
5. To clear the conversion, use ▼ or ▲.
for a forward conversion or for a
reverse conversion.
To Set an Exchange Rate
1. Press CONV until a currency conversion pair appears.
USD –> YEN
2. Use ▼ or ▲ to select a pair of currencies.
3. Press EDIT.
4. If you want, type a new currency abbreviation.
Currency abbreviations can have up to four characters. Use and to move the cursor.
5. Press ENTER.
0
1
12

Metric and Currency Conversions
USD –> YEN
RAT E
6. Type an exchange rate and then press ENTER.
The rate should be the units of the target currency
(the currency the arrow points to) equal to one unit
of the source currency.
To type a decimal, press P.
7. If you want, repeat Steps 2-6 to set another exchange rate.
1
To Convert Currencies
1. Press CONV until a currency conversion pair
appears.
2. Use ▼ or ▲ to select a pair.
3. Type a number.
4. Press
5. To clear the conversion, use ▼ or ▲.
for a forward conversion or for a
reverse conversion.
This organizer may change operating modes due to electrostatic discharge. Normal operation of this organizer can be re-established by
pressing the RESET button, or ON and then OFF, or by removing
or replacing the battery.
13
Using Password Protection
To Enable the Lock Mode
The lock mode prevents access to the scheduler, phone
directory, and memo pad without a password. Access to
the calculator and converter is unaffected.
Warning! Your password is not retrievable from the
organizer, so always write and save it in a separate
location. If you lose or forget your password, you must
reset the organizer to use the scheduler, phone
directory, or memo pad, thereby losing all their
information. To learn more, read “To Reset the
Organizer” under “Battery Replacement.”
1. Press TIME until the clock appears.
2. Press EDIT (
PASSWORD?
NEW–_
3. Type a password of up to six characters and
press ENTER.
PASSWORD?
CONFIRM–_
4. Type the password again and press ENTER
to confirm it.
The key icon appearing on the left of the screen indicates the lock mode is enabled.
).
14
Using Password Protection
To Use the Password
With lock mode enabled, the password is requested
when the scheduler, phone directory, or memo pad
is accessed for the first time in a session.
1. If not done already, enable the lock mode.
2. Press SCHEDULE, TEL, or MEMO.
PASSWORD?
_
3. Type the password and then press ENTER.
To Change the Password
1. Press TIME until the clock appears.
2. Press EDIT (
3. Type the password and press ENTER.
4. Type a new password and press ENTER.
5. Enter the new password again to confirm it.
).
To Disable the Lock Mode
Disabling the lock mode means that a password is not
required for access.
1. Press TIME until the clock appears.
2. Press EDIT (
3. Type the password and press ENTER.
The absent key icon shows the lock mode is disabled.
4. Press any main function key to continue.
).
15
Using the Calculator
To Make a Calculation
1. Press CALC.
The
123
2. Type a number of up to 12 digits.
3. Press O (+), I (-), U (X), or Y (÷).
4. Type another number.
5. Press ENTER to complete your calculation.
6. Press Z (AC) to clear the calculation.
To Use the Calculator Memory
1. Make a calculation as shown above or simply type
2. Press R (
3. To clear the calculation, press Z (AC).
4. To retrieve the memory, press W (
5. To clear the calculator memory, press Q (
icon indicates the calculator.
To type a decimal, press P.
To clear the most recent input, press X (CE). Then
type another number.
Or press T (%) to calculate a percentage addition,
subtraction, multiplication, or division.
a number in the calculator.
M
a positive number. Or press E (M-) to add it to the
memory as a negative number.
The M on screen indicates a number is in the
memory.
+) to add the number to the memory as
MR
).
MC
).
16

Battery Replacement
This organizer requires only one CR2025, 3-volt battery
for operation but can accommodate a second CR2025
for extended battery life. Before following the steps below you should have a small Phillips screwdriver at hand.
Warning! When no batteries are installed, this
organizer will save your information for no more than
15 seconds. Never leave the battery contacts
completely empty for more than 15 seconds.
Caution: If you install two batteries, never use an old
battery with a new battery. Doing so will not extend the
battery life.
1. Turn off the organizer.
2. With a Phillips screwdriver, remove the battery
cover on the back of the organizer.
Do not remove the other screws on the organizer.
3. If you are using one battery, place the new battery
in the empty slot and then remove the old one. If
you are using two batteries, replace the batteries
one by one.
The battery plus (+) sign(s) should face you.
4. Replace the battery cover.
To Reset the Organizer
Warning! Resetting the organizer permanently and
irretrievably erases all the information entered in it.
1. Using a pencil, press the recessed RESET button
on the back of the organizer.
2. Press Y to reset or N to cancel.
17
Specifications
Pocket Organizer, 32K
Model RF-2034
Storage Capacity: 32k • Battery: one CR2025 • LCD: 3 lines • Size: 8.1 x
12.1 x 1.4 cm • Weight: 3.2 oz
Cleaning This Product
T o clean this product, spray a mild glass cleaner onto a cloth and wipe its
surface. Don’t spray liquids directly onto the unit. Don’t use or store your
organizer in extreme or prolonged heat, cold, humidity, or other adverse
conditions.
FCC Notice
Complies with the limits for a Class B computing device pursuant to
Subpart B of Part 15 of FCC Rules. Operation is subject to the following
two conditions (1) This device may not cause harmful interference; and
(2) This device must accept any interference received, including
interference that may cause undesirable operation.
Copyrights, Trademarks, Patents, ISBN
© 1997 Franklin Electronic Publishers, Inc.
Burlington, N.J. 08016-4907 USA. All rights reserved.
Rolodex is a registered trademark of Sterling Plastics Co., a subsidiary of
Newell Co.
Patents Pending.
Limited Warranty (Outside U.S. only)
This product, excluding batteries is guaranteed by Franklin for a period of
one year from the date of purchase. It will be repaired or replaced (at
Franklin’s option) free of charge for any defect due to faulty workmanship
or materials.
Products purchased outside the United States that are returned under
warranty should be returned to the original vendor with proof of purchase
and description of fault. Charges will be made for all repairs unless valid
proof of purchase is provided.
This warranty explicitly excludes defects due to misuse, accidental damage,
or wear and tear. This guarantee does not affect the consumer’s statutory
rights.
Customer Service
For sales and customer service, please call 1-800-266-5626.
18
Limited Warranty (U.S. only)
Franklin Electronic Publishers, Inc. (“Franklin”) warrants to the end user that this product will
be free from defects in material and workmanship for a period of ONE YEAR from the date of
original retail purchase, as evidenced by sales receipt. On discovery of a defect, the end user
must return this product (transportation charges prepaid) either to the dealer from whom it was
purchased or directly to Franklin at the address given below. Each product returned must
include the user’s name, address, and telephone number, as well as a brief description of the
nature of the defect and a copy of the sales receipt as proof of the date of the original retail
purchase. Franklin will, at its option, repair or replace any product at no further charge to the
end user on determination by Franklin, in its sole discretion, that the product was defective and
that such defect arose within the duration of this limited warranty.
This warranty does not apply if, in the sole discretion of Franklin, the product has been tampered
with, damaged by accident, abuse, misuse, or misapplication, or as a result of service or
modification by any party, including any dealer, other than Franklin. FRANKLIN SHALL NOT
BE RESPONSIBLE IN ANY WAY FOR ANY SERVICE OR MODIFICATION TO THIS
PRODUCT BY ANY PARTY, INCLUDING ANY DEALER, OTHER THAN FRANKLIN.
This warranty applies only to products manufactured by or for Franklin. Batteries, corrosion of
battery contacts and any damage caused by batteries are not covered by this warranty.
ALL IMPLIED WARRANTIES, INCLUDING ANY IMPLIED WARRANTIES OF
MERCHANTABILITY OR FITNESS FOR A P ARTICULAR PURPOSE, SHALL BE STRICTLY
LIMITED IN DURATION TO THAT OF THE EXPRESS WARRANTY SET FORTH ABOVE,
THAT IS, ONE YEAR FROM THE DATE OF ORIGINAL RET AIL PURCHASE.
THE WARRANTY AND REMEDY SET FORTH ABOVE ARE THE EXCLUSIVE REMEDY
OF THE RETAIL BUYER AND END USER IN CONNECTION WITH THE MANUFACTURE,
SALE, OR USE OF THIS PRODUCT AND ARE IN LIEU OF ANY AND ALL OTHER
WARRANTIES OR REMEDIES, WRITTEN OR ORAL, EXPRESS OR IMPLIED. NO
FRANKLIN DEALER, AGENT, OR EMPLOYEE IS AUTHORIZED TO MAKE ANY
ADDITIONAL WARRANTY IN THIS REGARD OR TO MAKE ANY MODIFICATION OR
EXTENSION OF THIS EXPRESS WARRANTY.
FRANKLIN SHALL NOT BE RESPONSIBLE FOR SPECIAL, INCIDENTAL, OR
CONSEQUENTIAL DAMAGES RESULTING FROM THE BREACH OF ANY EXPRESS OR
IMPLIED WARRANTY OR IN CONNECTION WITH THE MANUFACTURE, SALE, OR USE
OF THIS PRODUCT UNDER ANY LEGAL THEORY , WHICH DAMAGES SHALL INCLUDE,
BUT NOT BE LIMITED TO, LOST PROFITS, DAMAGES TO PROPERTY OR DAMAGES
FOR PERSONAL INJURY (BUT ONLY TO THE EXTENT PERMITTED BY LAW). UNLESS
OTHERWISE CONTRARY TO APPLICABLE LAW, FRANKLIN’S LIABILITY SHALL IN NO
CASE EXCEED THE PRICE PAID FOR THE PRODUCT CLAIMED TO BE DEFECTIVE.
This warranty shall not be applicable to the extent that the enforcement of any provision may
be prohibited by applicable law. This warranty gives you specific rights, and you may also
have other rights which vary from state to state. Some states do not allow the exclusion or
limitation of incidental or consequential damages or limitation on how long an implied warranty
may last so the above limitation or exclusion may not apply to you. Enclose $3.00 check or
money order for shipping and handling to:
REP-28009-00
P/N 7201857 Rev . A
FRANKLIN ELECTRONIC PUBLISHERS, INC.
ATTENTION: SERVICE DEPARTMENT
ONE FRANKLIN PLAZA
BURLINGTON, NEW JERSEY 08016
609-386-2500
19
 Loading...