

Page 1

User’s Guide • Mode d’emploi • Manual del usuario
Multi-lingual Databank
Agenda électronique multilingue
Banco de datos multilingüe
RFNA-2
Page 2

1
License Agreement
READ THIS LICENSE AGREEMENT BEFORE USING THE
ELECTRONIC REFERENCE. YOUR USE OF THE
ELECTRONIC REFERENCE DEEMS THAT YOU ACCEPT
THE TERMS OF THIS LICENSE. IF YOU DO NOT AGREE
WITH THESE TERMS , YOU MAY RETURN THIS PACKAGE
WITH PURCHASE RECEIPT TO THE DEALER FROM
WHICH Y OU PURCHASED THE ELECTRONIC REFERENCE
AND YOUR PURCHASE PRICE WILL BE REFUNDED.
ELECTRONIC REFERENCE means the software product and
documentation found in this package and FRANKLIN means
Fr anklin Electronic Publishers , Inc.
Limited Use License
All rights in the ELECTRONIC REFERENCE remain the
proper ty of FRANKLIN. Through your purchase, FRANKLIN
grants you a personal and nonexclusive licensed to use this
ELECTRONIC REFERENCE. You may not make any copies
of the ELECTRONIC REFERENCE or of the data stored therein,
whether in electronic or print format. Such copying would be in
violation of applicable copyright laws. Further, you may not
modify, adapt, disassemble, decompile, translate, create
derivative works of, or in any way reverse engineer the
ELECTRONIC REFERENCE. You may not e xport or reexport,
directly or indirectly, the ELECTRONIC REFERENCE without
compliance with appropriate governmental regulations. The
ELECTRONIC REFERENCE contains Franklin’s confidential
and proprietary information which you ag ree to take adequate
steps to protect from unauthorized disclosure or use. This license
is effective until terminated. This license terminates immediately
without notice from FRANKLIN if you fail to comply with any
provision of this license.
Page 3

2
Getting Started
Before you start using this organizer for the first time
do the following steps.
1. Turn your organizer over and carefully pull the
battery insulation tape to remove it.
Now, you may want to perform a system reset. Here’s how.
Warning: A system reset erases all information
and clears all settings.
2. Press OFF to turn the organizer off, if needed.
3. Use a paper clip to simultaneously press the
Reset button on the back of the organizer while
pressing MODE at the same time.
The organizer will beep loudly and enter the self-test
mode where the LCD and RAM test will be performed.
4. Press OFF three times to turn the organizer off.
5. Press MODE again to turn the organizer back on.
You can press OFF at any time to turn the organizer off.
To Chang e the Display Language
This organizer can display messages in English,
French, Ger man, Italian, and Spanish. When you first
turn the product on, the display language will be in
English.
1. Press DUAL TIME or MODE repeatedly to view the
Local time screen, if needed.
Read “Using the Clocks” for more information.
2. Press L.
3. Press UP or DOWN to move to the desired display language.
4. Press STORE to select the display language.
Page 4

3
✓ Turning Off the Keytone
The “keytone” is the tone that sounds whenever you
press a key. To turn off the keytone, press DUAL
TIME or MODE repeatedly until the Local Time
screen is shown. Hold INS for 2 seconds until the
key tone sounds again.
To turn the keytone on again, hold INS for two seconds
at the Local Time screen until the keytone sounds.
✓ Keep Written Copies of Important Data
Data is safely kept in memory as long as the battery
supplies power. If the battery loses power or is removed all of your data will be lost. Data can also be
lost or corrupted if you make a mistake while operating the organizer. Because of this, you should always keep written copies of your important data just
in case it is corrupted or lost.
✓ Viewing the Modes
While using this organizer you can use MODE to
switch between the clocks, the memo/telephone directory, and the scheduler. You can press UP or
DOWN to view your records in the directory or the
scheduler. Also you can press OFF to turn the organizer off. All of these keys can be pressed while the
lid to the organizer is closed.
✓ About Screen Illustrations
Some screen illustrations in this User’s Guide may differ from what you see on the actual screen. This does
not mean that your organizer is malfunctioning.
Getting Started
Page 5

4
Ke y Guide
Function Keys
CALC Selects the calculator.
CODE Lets you type accents, diacritical marks,
and non-English characters.
DEL Deletes characters and changes clock
features.
DUAL TIME
Cycles through the Home Time cloc k,
World Time cloc k, and the Daily alarm.
EDIT Lets you edit records, and lets you
change the pass word lock.
INS Turns keytone on or off , and inserts a space.
MEMO/TEL
Selects the memo/telephone directory.
MODE Turns the organizer on and cycles
through the clocks, the memo/telephone
directory, and the scheduler.
OFF Turns the organizer off.
SCHE Selects the scheduler.
SHIFT Shifts keys to type numbers.
SPAC E Types a space.
STORE Creates a new record, switches between
fields, and enters records.
The Direction ke y allows y ou to mov e in the
indicated direction: up, down, left, or right.
Calculator Function Keys
G (%) Lets you calculate percentages .
H (÷) Divides numbers.
J (x) Multiplies numbers.
K (–) Subtracts numbers.
•
•
•
•
Page 6

5
Calculator Function Keys (cont.)
L (+) Adds numbers.
Q-P Type numbers (1-0).
CODE (CE/C)
Clears current number or calculation.
DEL (
TAX) Lets you calculate sales tax.
EDIT (.) Types a decimal point.
INS (
TIPS) Lets you calculate tips.
SPACE (
MU)Lets you calculate a mark up .
STORE (=) Calculates math functions.
Calculator Memory Keys
A (MC) Clears calculator memory.
D (
M-) Subtracts n umber from calculator
memory.
F (
M+) Adds number to calculator memory.
S (
MR) Retrie ves calculator memory.
Calculator Conversion Keys
B (GA↔L)
Lets you convert between gallons and liters.
C (MI↔KM) Lets you convert between miles and kilometers.
M (
o
F
↔
o
C
)
Lets you convert between Fahrenheit and
Centigrade.
N (OZ↔
GM
)
Lets you convert between ounces and grams.
V (LB↔KG)
Lets you convert between pounds and
kilograms.
X (
IN↔CM) Lets you convert between inches and
centimeters.
Z (FT↔M)
Lets you convert between feet and meters.
SHIFT (£↔$)
Lets you calculate exchange rates.
Key Guide
Page 7
6
Using the Clocks
This organizer has two clocks: a Local Time cloc k and
a W orld Time clock.
To Set the Local Time Clock
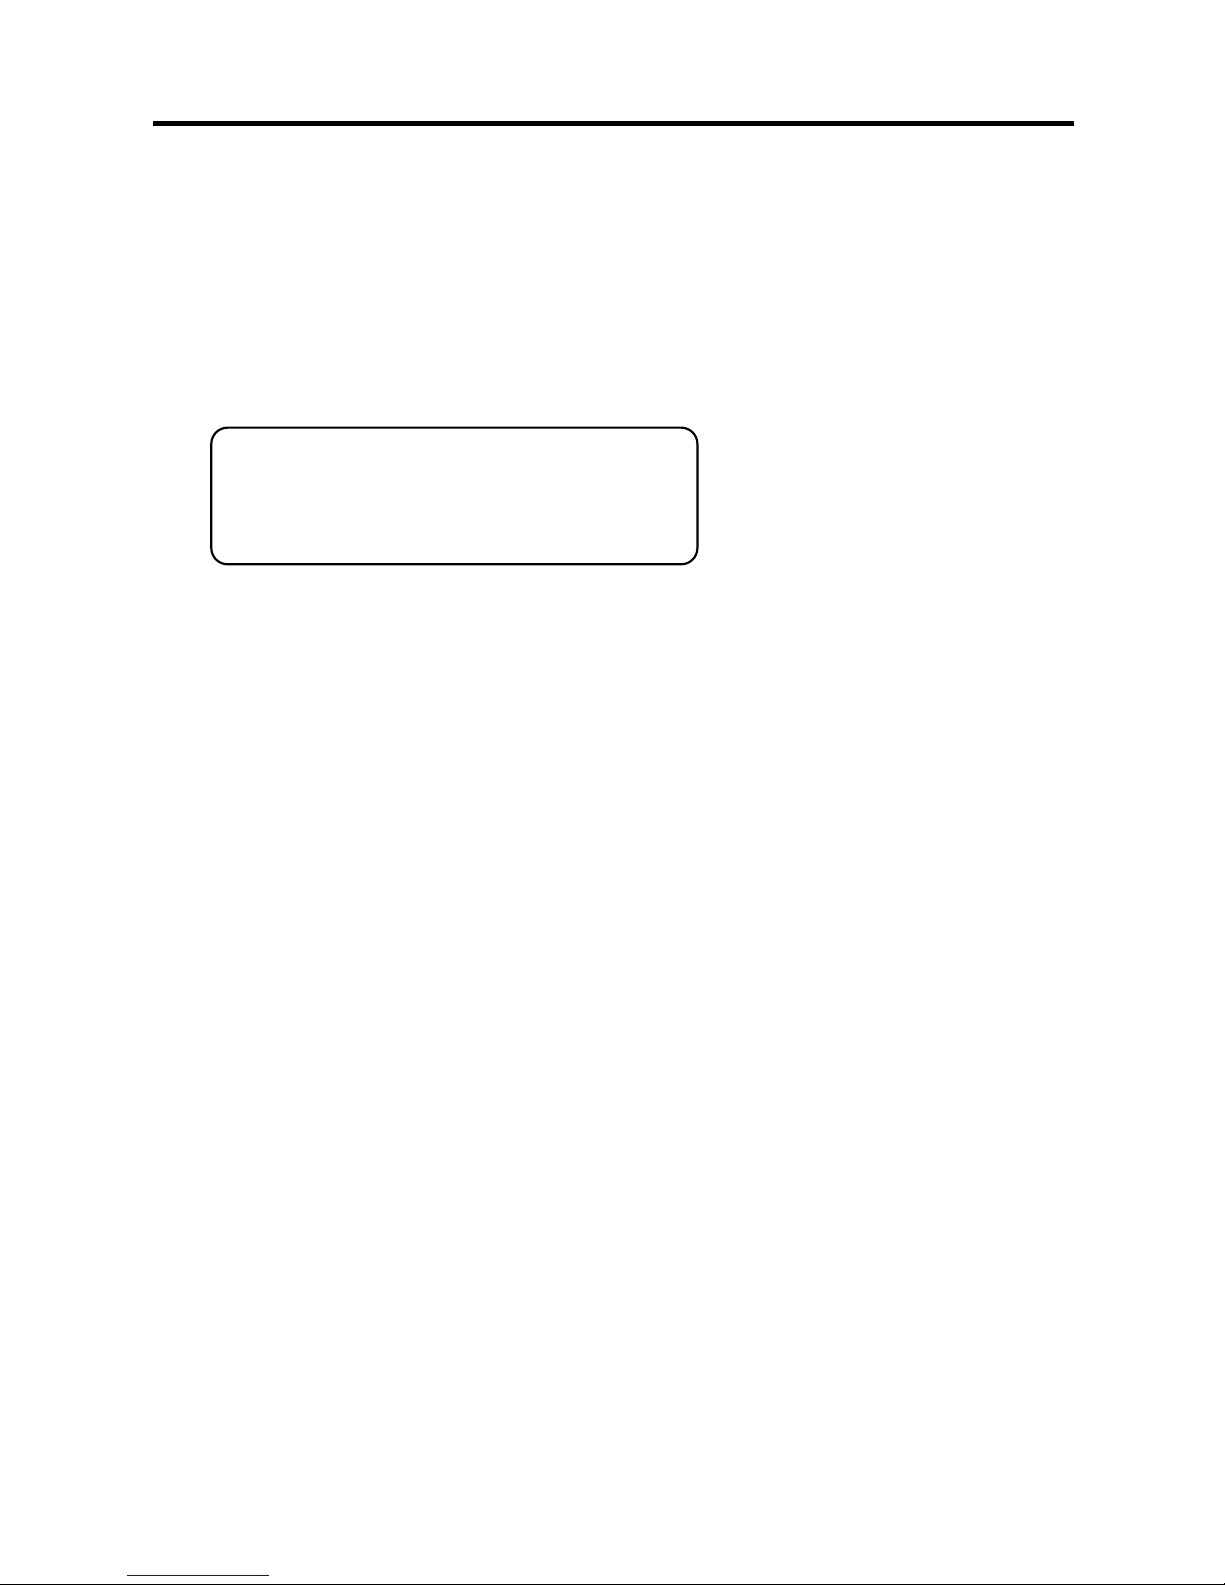
1. Press MODE or DUAL TIME until the Local Time
screen appears.
WED 01/01/97
12-
00
00
A
This is the Local Time screen.
If needed, press DEL (12/24) to switch the clock
between 12 and 24 hour mode.
2. Hold STORE for 2 seconds to change the local time.
You can press DUAL TIME at any time to cancel.
3. Use the numbered keys to type the month, the
date, and the last two digits of the year.
You do not need to hold down SHIFT, because the
numbered keys are automatically shifted.
To erase a character, use the direction key to select it, and then press DEL.
4. Type the current time, and then press DEL (
A/P)
to change the time to a.m. or p.m., if needed.
5. Press STORE to set the Local time.
To Set the World Time Clock
1. Press MODE or DUAL TIME until the World
Time screen appears.
Page 8
7
Using the Clocks
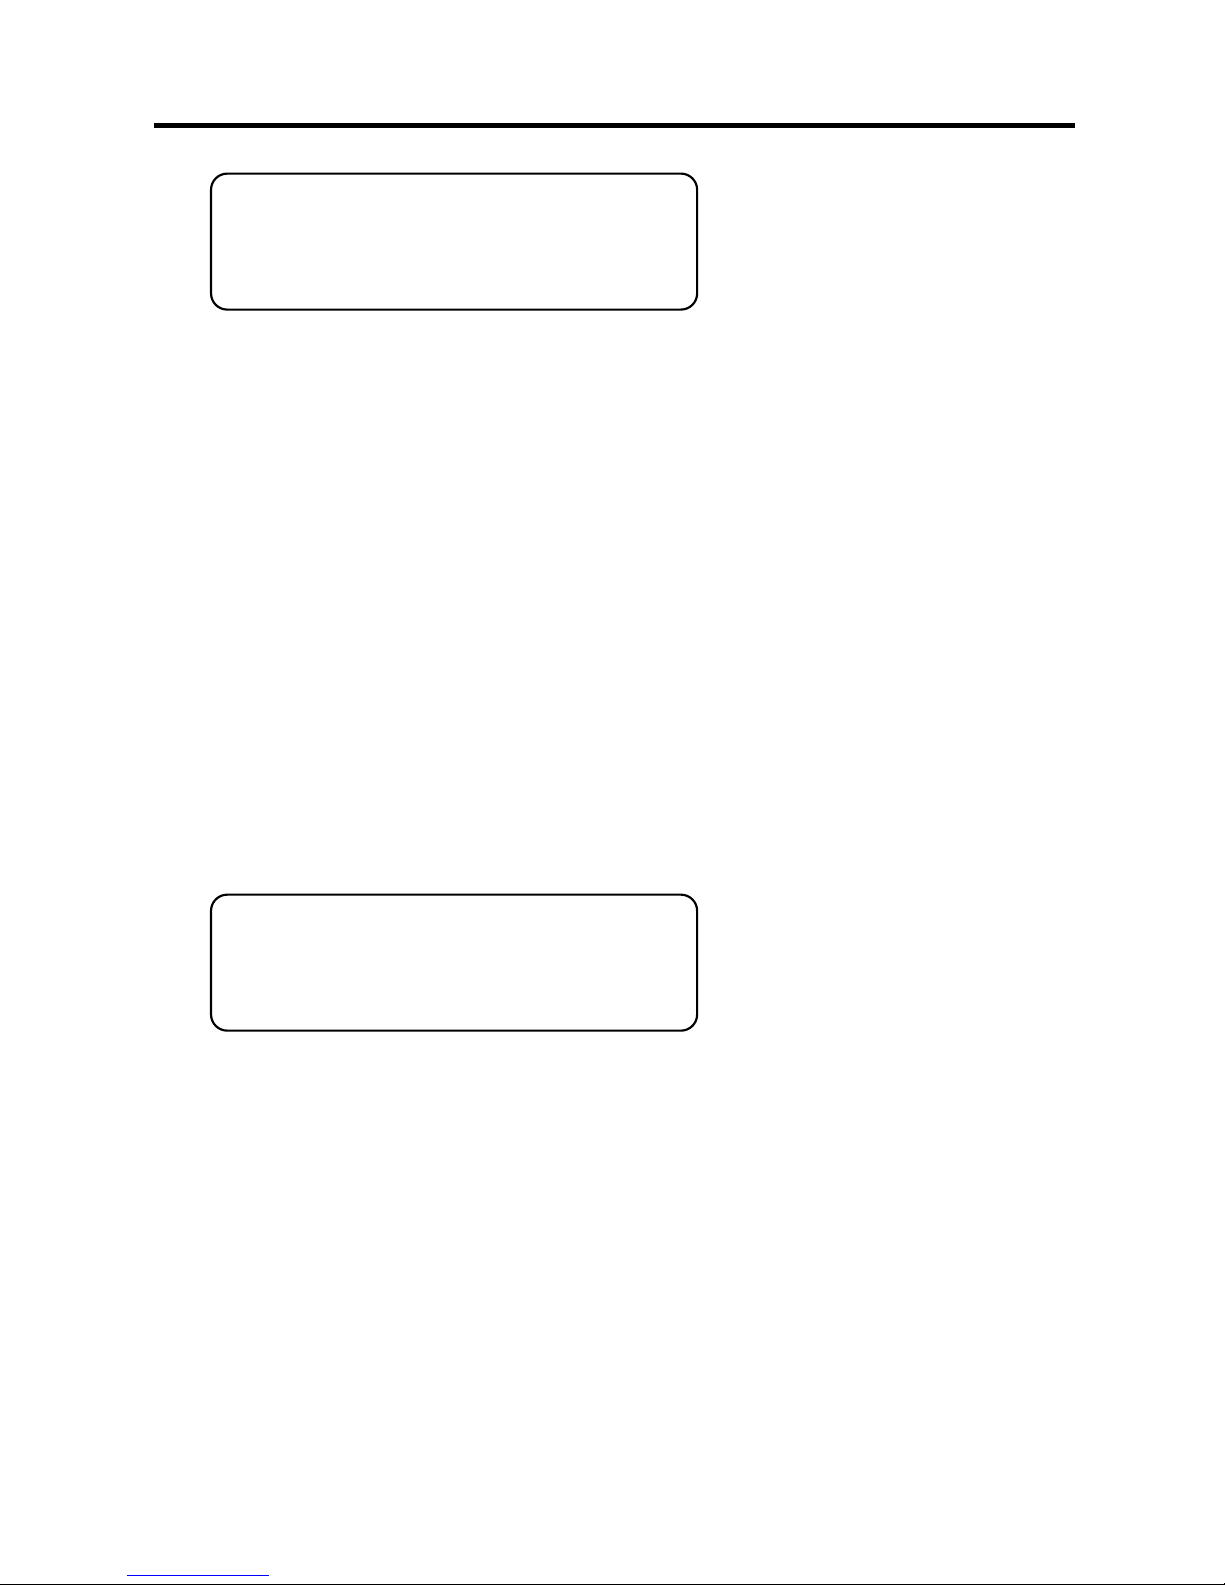
T-2
12-
00 00
A
This is the World Time screen.
2. Press STORE.
3. Type a city or a place name.
You can type up to 12 characters.
4. Press STORE to enter the name.
5. Use the numbered keys to type the appropriate
time and then press DEL to change to a.m. or p.m.
6. Then press STORE to set the World time.
To Set the Daily Alarm
1. Press MODE or DUAL TIME until the Daily
Alarm screen appears.
ALARM
12 -
00
A
This is the Daily Alarm screen.
2. Press STORE.
You can press DUAL TIME at any time to cancel.
3. Use the numbered keys to type the alarm time and
then press DEL (
A/P) to change to a.m. or p.m.
To erase a character, use the direction key to select it, and then press DEL.
4. Then press STORE to set the alarm time.
5. Press INS (((•))) repeatedly to enable or disable
the alarm sound.
Page 9
8
Using the Clocks
When the alarm sound is enabled, the (((•))) symbol is displayed.
The alarm will sound for 30 seconds or until you
press any key.
To Use the Calendar Search Feature
You can find the day of the week for any date from
1/1/1990 to 12/31/2089.
1. Press DUAL TIME or MODE until the Local Time
screen is displayed.
2. Press UP or DOWN to go to the Calendar
Search screen.
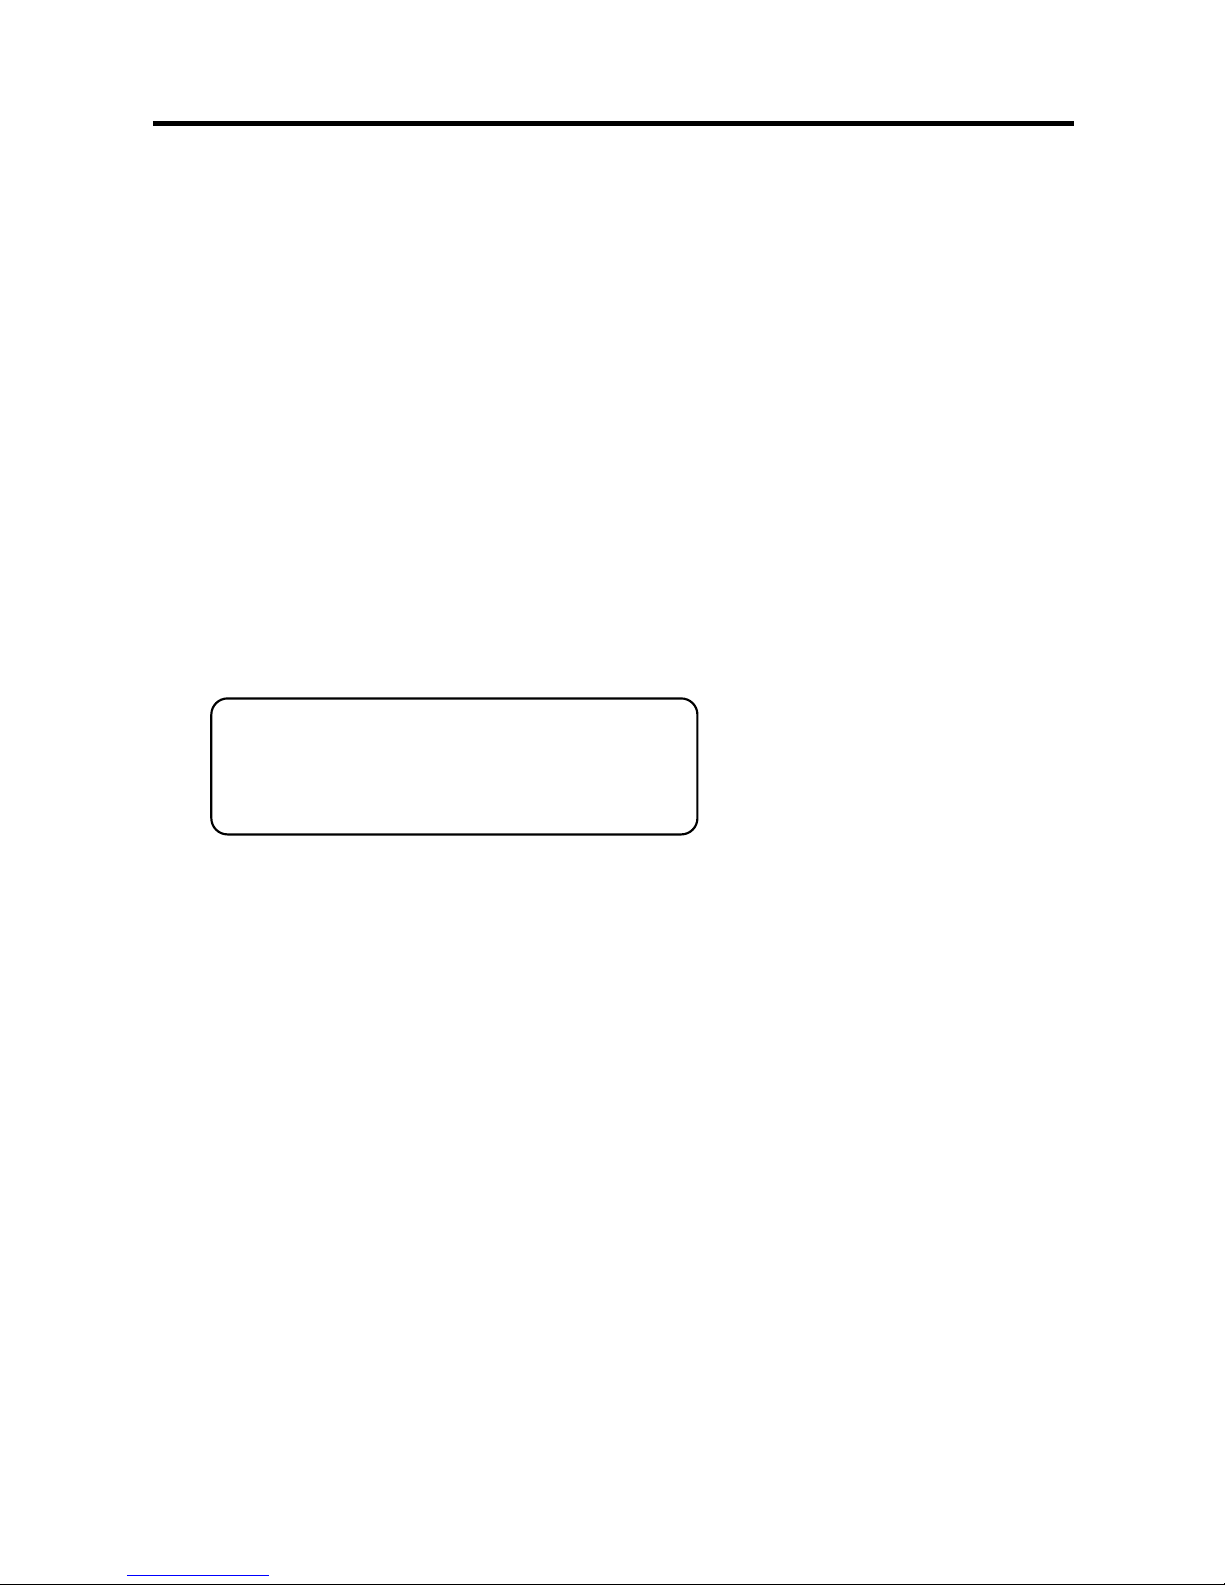
ENT 01/01/97
3. Enter a date. For example, type
1/1/98
.
4. Press UP or DOWN to view the day of the week.
5. Press CODE to type another date.
Or press MODE to return to the Local Time screen.
Page 10
9
Using the Memo/T elephone Directory
To Create a Record
1. Press MEMO/TEL or press MODE until the
Memo/Telephone screen appears.
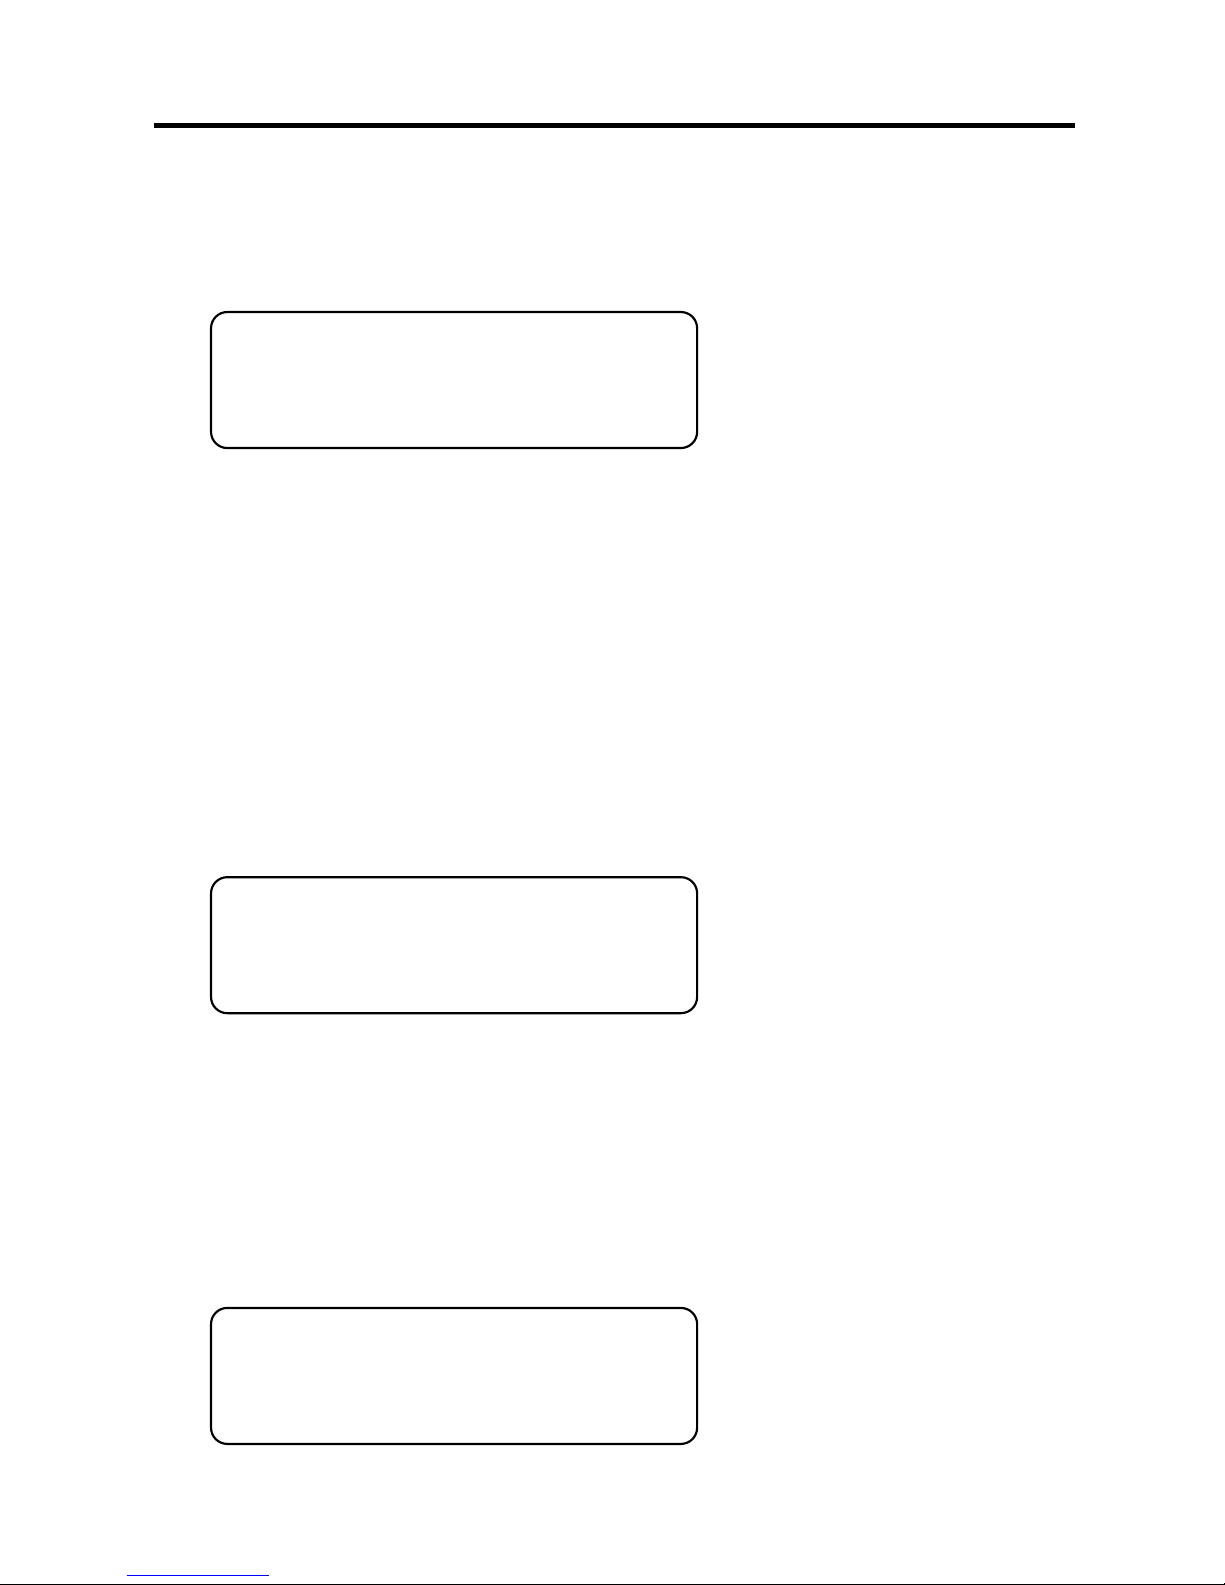
NAME?
1
35
2
This is the Memo/Telephone screen.
The number in the lower right corner displays the
amount of memory remaining in this organizer. For
more information read “Gauging the Memory.”
2. Press STORE.
To cancel the entry at any time, press MEMO/TEL to
return to the Memo/Telephone screen.
3. Type the first line (for example, type a name)
and press STORE.
S
MITH
JO
E
To learn how to type accent marks, diacritical marks or
non-English characters, read “Typing Special Characters.”
To erase a character, use the direction key to select it, and then press DEL.
4. Type a telephone number or other numerical in-
formation on the second line.
SMITH JOE
555
-4321
You can type up to 12 characters.
Page 11
10
Using the Memo/Telephone Directory
You can only type numbers, a space, or a hyphen
(-) on the second line.
To type a hyphen, press K.
5. Press STORE key to save the record.
To View or Edit Records
Records will be listed alphabetically.
1. Press MEMO/TEL or repeatedly press MODE until
the Memo/Telephone screen appears, if needed.
2.
Use UP or DOWN to cycle through the records.
Or
type the first letter of the record and, if needed,
then press DOWN to view all of the following
records alphabetically.
SMITH JOE
555
-4321
This is a sample record.
You can also repeatedly press the first letter of a
record to cycle through all of the records that begin
with that letter.
If the first line of a record is longer than 12 characters, press RIGHT or LEFT to view the whole line.
3. To edit a record, press EDIT.
4. Enter your changes to the first line and press
STORE to go to the second line.
NOTE: Any changes you make will automatically
overwrite the record that is currently there.
To insert a space, press INS.
To delete the flashing character, press DEL.
Page 12

11
Using the Memo/Telephone Directory
5. Enter your changes to the second line and
press STORE to save the record.
To Delete Records
1. Press MEMO/TEL or repeatedly press MODE until
the Memo/Telephone screen appears.
2. Use UP or DOWN to find the record you want to
delete.
3.
Press DEL, and then press Y to delete the record.
Or press N to cancel.
✓ Typing Numbers
In records that require numerical information, you can
simply use the numbered keys (i.e., the top row of letter
keys) to type numbers. To type a number in a record
which does not require numerical information you need
to first press SHIFT and then press a numbered key.
SHIFT does not automatically lock the number keys, so
to type another number, press SHIFT again.
Page 13

12
Using the Memo/Telephone Directory
✓ Typing Special Characters
In many fields, you can type a variety of accents,
diacritical marks, and non-English letters. You can
type these characters by using the CODE key to
type the accent or diacritical mark and then the desired letter. See the chart below to learn how to type
the character you want.
To T ype... First Then Then
Press... Press... Press...
Á, É, Í, Ó, or Ú CODE Q (/) A, E , I , O , or U
À, È, Ì,.Ò, or Ù CODE W (\) A, E , I, O , or U
Â, Ê, Î, Ô, or Û CODE E (^) A, E , I, O , or U
Ä, Ë, Ï, Ö, or Ü CODE R (..) A, E, I, O, or U
Ñ CODE T (˜)N
ΠCODE Y (
Œ)
Ç CODE U (
Ç)
ß CODE I (
ß)
For example, to type
Î
, press CODE, then press 3
(^), and lastly, press I.
✓ Gauging the Memory
When you press MEMO/TEL or SCHE, the number
displayed on the lower right side of the screen is
how much memory your organizer has left to store
new information.
If there is not enough memory to store a new record
or if there is not enough memory to create a new
record, the word FULL will appear on the screen
and the information will not be saved.
Page 14
13
Using the Scheduler
To Create a Record
In each record you can enter the name and type of
the event and the date and time when the event is
going to occur.
1. Press SCHE or repeatedly press MODE until the
Scheduler screen appears.
SCHEDULE?
1
35
2
This is the Scheduler screen.
2. Press STORE.
The number in the lower right corner displays the
amount of memory remaining in this organizer. For
more information read “Gauging the Memory.”
To cancel the entry at any time, press SCHE to return
to the Scheduler screen.
3.
Type your information and press STORE to enter
it. For example, enter
MEET JOHN
.
MEET JOHN
0
1-01 12-
00
A
To erase characters, use the direction key to move the
cursor before the character(s) and press DEL.
4. Type the date for the event.
MEET JOHN
03
-15 5-14P
NOTE: You can type only numbers on this line.
Page 15

14
Using the Scheduler
5. Press DEL to change the time from a.m. to p.m., if
needed.
6. Press STORE to save the record.
To View or Edit Records
Records are listed alphabetically.
1. Press SCHE or repeatedly press MODE until the
Scheduler screen appears, if needed.
2.
Use UP or DOWN to cycle through the records.
If the first line of a record is longer than 12 characters, press RIGHT or LEFT to view the whole line.
3. To edit an entry, press EDIT.
4. Type your changes to the first line and then
press STORE to go to the second line.
NOTE: Any changes you make will automatically
overwrite the existing record.
To insert a space, press INS.
To delete the flashing character, press DEL.
5. Enter your changes to the second line and then
press STORE to save the new record.
To Delete Records
1. Press SCHE or repeatedly press MODE if needed,
until the Scheduler screen appears.
2. Use UP or DOWN to find the record you want to
delete.
3. Press DEL, and then press Y to delete the record.
Or press N to cancel.
Page 16

15
Using the Calculator
To Make a Calculation
1. Press CALC or repeatedly press MODE until the
Calculator screen appears.
CALC
0
2. Type a number.
To clear a number, press CODE (
C/CE).
You can type up to 12 digits with this calculator.
3. Press L (+), K (–), J (x), or H (
÷) to add, subtract,
multiply, or divide, respectively.
4. Type another number.
5. Press STORE (=) to calculate.
Or press G (%) to calculate the percentage.
To clear the calculation, press CODE (
C/CE).
To Calculate Sales Tax and Tips
To calculate sales tax or tip , you m ust first set a
percentage.
1. Press CODE (
CE/C) to clear the calculator.
2. Press DEL (
TAX) or INS (TIPS).
3. Type a percentage. For example, type
150
for 15%.
4. Press DEL (
TAX) or INS (TIPS).
5. Type a number. For example, type 50.
6. Press DEL (
TAX) or INS (TIPS) to calculate the per-
centage. For example
7.5
.
7. Press DEL (
TAX) or INS (TIPS) again to add the
percentage to the original number. For example,
57.5
.
Page 17

16
To Calculate Markup
You can calculate mar kup. In the following example,
you can find the total markup of an item with a $100
cost and a 20% markup.
1. Press CODE (
CE/C) to clear the calculator.
2. Type a number to represent cost. For example,
type 100.
3. Press SPACE (
MU).
4. Type the percentage of markup. For example,
type 20.
5. Press G (%) to find the markup.
You can also calculate the markup percentage. In the
following example, you can find the markup percentage
of an item with a $100 cost and a $125 retail price.
1. Press CODE (
CE/C) to clear the calculator.
2. Type a number to represent retail price. For example, type 125.
3. Press K (–).
4. Type a number to represent cost. For example,
type 100.
5. Press SPACE (
MU
) to find the markup percentage.
Using the Calculator
Page 18

17
Converting Measurements and Currency
To Convert to and from Metric Measurements.
1. Press CALC or repeatedly press MODE until the
Calculator screen appears.
2. Press CODE (
CE/C).
3. Type the amount you want converted. For example, type
15
.
4. Press RIGHT and then press one of the conversion keys. For example press X (
IN↔CM) to con-
vert inches to centimeters.
Or press LEFT and then press X to convert from
centimeters to inches.
To Convert Currency
1. Press CALC or repeatedly press MODE until the
Calculator screen appears.
2. Press CODE (
CE/C).
3. Type an exchange rate (for example, type
1.5
).
This exchange rate states that 1 British pound
equals 1.5 American dollars.
Note: You can convert currencies other than
pounds and dollars by substituting other currencies
for the $ and £ symbols.
4. Press SHIFT (£↔$) to set the exchange rate.
5. Press CODE (
CE/C).
6. Type the amount you want exchanged. For example, type
200
.
7. Press RIGHT to convert British pounds to
American dollars, or press LEFT to convert dollars to pounds.
8. Press SHIFT (£↔$) to view the converted amount.
Page 19
18
Using a Password
You can lock your organiz er so that only the Clock
and the Calculator can be used without supplying the
password. Note: You do not need to set a password to
use this organizer.
Warning: If you forget your password, you will not be
able to reco ver any of the data stored in your
organizer. To bypass the password, you will have to
perform a system reset, which will clear the password
and erase all of the data stored in memory. To learn
how to perf orm a system reset, read “Getting Started”
on page 2.
To Set the Password
1. Press MODE or DUAL TIME until the Local Time
screen appears.
2. Press EDIT (LOCK).
LOCK
3. Type a password.
Your password can consist of any combination of
up to four numbers, except 0000.
4. Press STORE to save your password.
The key icon indicates that your password is in effect.
Note: Whenever you first turn your organizer of
and select either the Memo/Telephone Directory or
the Scheduler, you will be asked to supply the
password. Simply type the four-digit password, and
press STORE.
Page 20

19
Using the Password
To Change or Disable the Password
1. Press MODE or DUAL TIME until the Local Time
screen appears.
2. Press EDIT (LOCK).
3. Type your old password, and then press ENTER.
4. To change your password, type a new password and then press ENTER.
To disable the password, type
0000
and then
press ENTER.
Page 21
20
To Replace the Battery
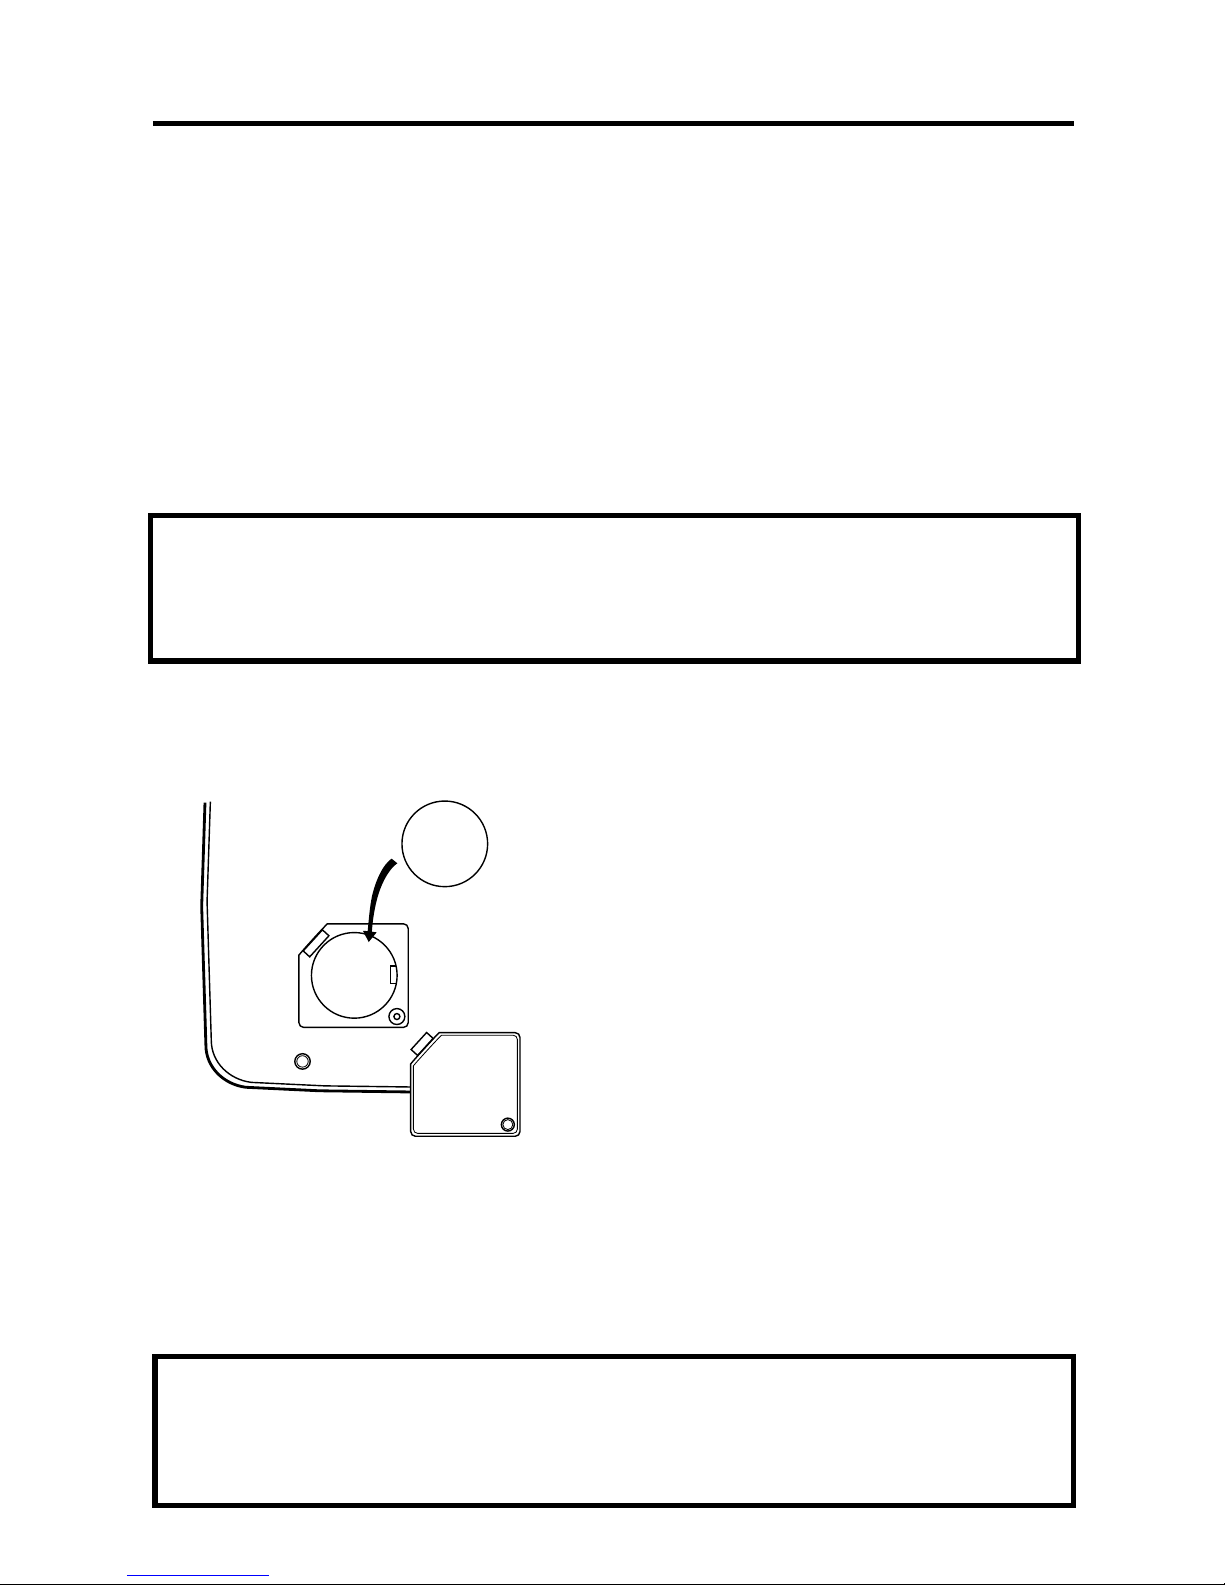
This organizer uses one CR2025, 3-volt lithium
battery. Before you follow these steps you should
have a Phillips screwdriver and a new battery in hand.
1. Press MODE or DUAL TIME until the Alarm
screen appears.
2. Hold SPACE for about 6 seconds until the
change battery screen appears.
3. Press Y to turn the organizer off.
Warning! This saves the information in your orga-
nizer for only 30 seconds without the battery, so
you should perform the remaining steps quickly.
4. Using a thin Phillips screwdriver, remove the
screw that holds the battery cover in place.
+
+
5. Remove the old battery and install a new battery with its plus sign facing you.
6. Replace the battery cover.
This organizer ma y change operating modes due to
Electro-static Discharge. Normal operation of this
organizer can be re-estab lished b y pressing MODE.
Page 22

21
Limited Warranty (U.S. Only)
Fr anklin Electronic Publishers, Inc. (“Franklin”) warrants to the end user that this product will
be free from defects in material and workmanship for a period of ONE YEAR from the date of
original retail purchase, as evidenced by sales receipt. On discov ery of a defect, the end user
must return this product (transportation charges prepaid) either to the dealer from whom it
was purchased or directly to Franklin at the address given below . Each product returned must
include the user’s name, address, and telephone number , as well as a brief description of the
nature of the defect and a copy of the sales receipt as proof of the date of the original retail
purchase. F ranklin will, at its option, repair or replace any product at no further charge to the
end user on deter mination by Franklin, in its sole discretion, that the product was defective
and that such defect arose within the duration of this limited warranty.
Enclose $3.00 check or money order for shipping and handling to Franklin Electronic Publishers,
Inc.
This warranty does not apply if, in the sole discretion of Franklin, the product has been tampered
with, damaged by accident, abuse, misuse, or misapplication, or as a result of ser vice or
modification by any party, including any dealer , other than F ranklin. FRANKLIN SHALL NOT
BE RESPONSIBLE IN ANY WAY FOR ANY SERVICE OR MODIFICATION TO THIS
PRODUCT BY ANY PARTY, INCLUDING ANY DEALER, OTHER THAN FRANKLIN.
This warranty applies only to products manufactured by or for F ranklin. Batteries , corrosion of
battery contacts and any damage caused by batteries are not covered by this warranty.
ALL IMPLIED WARRANTIES, INCLUDING ANY IMPLIED WARRANTIES OF
MERCHANT ABILITY OR FITNESS FOR A P ARTICULAR PURPOSE, SHALL BE STRICTL Y
LIMITED IN DURATION TO THAT OF THE EXPRESS W ARRANTY SET FOR TH ABOVE,
THAT IS, ONE YEAR FROM THE DATE OF ORIGINAL RET AIL PURCHASE.
THE WARRANTY AND REMEDY SET FORTH ABOVE ARE THE EXCLUSIVE REMEDY
OF THE RETAIL BUYER AND END USER IN CONNECTION WITH THE MANUF ACTURE,
SALE, OR USE OF THIS PRODUCT AND ARE IN LIEU OF ANY AND ALL OTHER
WARRANTIES OR REMEDIES, WRITTEN OR ORAL, EXPRESS OR IMPLIED. NO
FRANKLIN DEALER, AGENT, OR EMPLOYEE IS AUTHORIZED TO MAKE ANY
ADDITIONAL WARRANTY IN THIS REGARD OR TO MAKE ANY MODIFICATION OR
EXTENSION OF THIS EXPRESS WARRANTY.
FRANKLIN SHALL NOT BE RESPONSIBLE FOR SPECIAL, INCIDENTAL, OR
CONSEQUENTIAL DAMAGES RESUL TING FROM THE BREACH OF ANY EXPRESS OR
IMPLIED W ARRANTY OR IN CONNECTION WITH THE MANUF ACTURE, SALE, OR USE
OF THIS PRODUCT UNDER ANY LEGAL THEOR Y , WHICH DAMAGES SHALL INCLUDE,
BUT NOT BE LIMITED TO, LOST PROFITS, DAMAGES TO PROPERTY OR DAMAGES
FOR PERSONAL INJURY (BUT ONLY TO THE EXTENT PERMITTED BY LAW). UNLESS
OTHERWISE CONTRAR Y TO APPLICABLE LAW, FRANKLIN’S LIABILITY SHALL IN NO
CASE EXCEED THE PRICE PAID FOR THE PRODUCT CLAIMED TO BE DEFECTIVE.
This warranty shall not be applicable to the extent that the enforcement of any provision may
be prohibited by applicable law. This warranty gives you specific rights, and you may also
have other rights which vary from state to state. Some states do not allow the exclusion or
limitation of incidental or consequential damages or limitation on how long an implied warranty
may last so the above limitation or exclusion may not apply to you. Enclose $3.00 check or
money order for shipping and handling to:
FRANKLIN ELECTRONIC PUBLISHERS, INC.
ATTENTION: SERVICE DEPARTMENT
ONE FRANKLIN PLAZA
BURLINGTON, NEW JERSEY 08016
609-386-2500
Page 23

22
Specifications
Model RFNA-2
Size: 11.2 x 7.5 x 1.1 cm • Weight: 65 g • Batteries: 1 CR-2025 Lithium
Storage Capacity: Over 100 Items
Cleaning This Product
To clean this product, spray a mild glass cleaner onto a cloth and wipe its
surface . Don’t spra y liquids directly onto the unit. Don’t use or store y our
organizer in e xtreme or prolonged heat, cold, humidity, or other adverse
conditions.
FCC Notice
Complies with the limits for a Class B computing device pursuant to Subpart
B of P art 15 of FCC Rules . Operation is subject to the following tw o
conditions (1) This device may not cause harmful interference; and (2) This
device m ust accept any interference received, including interference that may
cause undesirable operation.
Copyrights, Trademarks, Patents
© 1997 Franklin Electronic Publishers, Inc.
Burlington, N.J. 08016-4907 USA. All rights reserved.
ROLODEX
®
is a registered trademark of Sterling Plastics Co., a subsidiary of
Newell Co.
Patents Pending.
Customer Service
For sales and customer service in the U.S., please call 1-800-266-5626.
Limited W arranty (outside U.S.)
This product, excluding batteries is guaranteed by Franklin f or a period of one
year from the date of purchase. It will be repaired or replaced (at Franklin’s
option) free of charge for any def ect due to f aulty w orkmanship or mater ials .
Products purchased outside the United States that are returned under
warranty should be retur ned to the original v endor with proof of purchase and
description of f ault. Charges will be made for all repairs unless valid proof of
purchase is provided.
This warranty e xplicitly e xcludes def ects due to misuse , accidental damage , or
wear and tear. This guarantee does not affect the consumer’s statutory rights.
Page 24

23
Registration Information
Register now to receive an extended warranty!
When you register your new product, we’ll extend your
warranty period from one-year to two!
There are four easy ways to register (in the U.S.):
1. CALL 1-800-266-5626
2. INTERNET http://www.franklin.com
3. FAX 609-387-7420
4. MAIL Franklin Electronic Publishers
One Franklin Plaza
Burlington, NJ 08016-4907
ATTN: Product Registration
If you register by FAX or MAIL, please include the
following information:
Name
Street Address
Apt. or Suite Number
City, State, Zip
Home Telephone Number
Model Number
If you have any questions, please contact Customer
Support at 1-800-266-5626.
 Loading...