

RP·HOPPER
USER
MANUAL
HOPPER
E·SCOOTER

IMPORTANT
NON-COMPLIANCE WITH SAFETY INSTRUCTIONS COULD CAUSE SERIOUS BODY DAMAGE
AND IN EXTREME CASES, DEATH.
WELCOME
Thank you for your purchase of the Roller-Pro Hopper E-Scooter!
The Roller-Pro Hopper E-Scooter takes the power of electricity, the style of a traditional scooter,
adds them together, and tops it off with a bit of swag.
To ensure your safety and the safety of others, please read and follow the guidelines in this user
manual carefully and thoroughly before and during riding.
If you have any questions regarding the Roller-Pro Hopper E-Scooter, contact us on atencionalcliente@rollerpro.es
TABLE OF CONTENTS
IMPORTANT ------------------------------------------------------------------ 1
WELCOME -------------------------------------------------------------------- 1
TABLE OF CONTENTS ---------------------------------------------------- 1
GENERAL INFORMATION ------------------------------------------------ 2
MAIN SPECIFICATIONS --------------------------------------------------- 4
PARTS & FEATURES ------------------------------------------------------- 5
FOLDING & ASSEMBLY --------------------------------------------------- 5
CHARGING -------------------------------------------------------------------- 6
USAGE ------------------------------------------------------------------------- 7
FOLDING & TRANSPORTING ------------------------------------------- 8
MAINTENANCE -------------------------------------------------------------- 9
HARMFUL SUBSTANCE ------------------------------------------------- 10
DECLARATION OF CONFORMITY ------------------------------------ 11
1

GENERAL INFORMATION
Before operating this vehicle, please read all instructions. This manual will guide you through the
functions, usage, and proper care of your Roller-Pro Hopper E-Scooter. If you have any questions
or cannot find the information you need in the manual, please contact your place of purchase or our
customer service center. Before contacting customer service, please have your purchase information ready as this may be needed during the call. This information may be recorded below.
It is important that you follow all safety warnings that appear throughout this manual and
exercise good judgment when using your Roller-Pro Hopper E- scooter. Consult this manual
before attempting to ride.
1.1 Important Information
Within this manual, “the Roller-Pro Hopper E-Scooter”, “your Roller-Pro Hopper E-Scooter”, “your
scooter” and “the Hopper” refer to the Roller-Pro Hopper E-Scooter. The Roller-Pro Hopper
E-Scooter is a personal scooter that uses electrical power. By riding the Roller-Pro Hopper
E-Scooter, the user acknowledges and accepts responsibility for all risks associated with the use of
the scooter which may include, but are not limited to, muscle injuries, broken bones, lacerations,
serious injury, and possible death, which may be sustained while using the Roller-Pro Hopper
E-Scooter.
To better ensure your safety, ALWAYS USE APPROPRIATE PROTECTIVE GEAR, read and follow
all instructions and warnings in the user manual.
Appropriate protective gear should always be worn at all times
Use the Roller-Pro Hopper E-Scooter at your own risk. ROLLER-PRO shall not be held
responsible for accidents due to poor judgment.
1.2 Safety Warnings
When reading this manual, note these icons:
Notes with this icon MUST be read, understood, and obeyed to Prevent injury or damage, etc.
Notes with this icon include relevant information.
Properly dispose of all packaging material. Some items may be packed in plastic bags or other
material and may cause suffocation or injury to pets or children.
Keep the packaging in a safe place in case it needs to be used later for transportation.
Verify that all parts of the product are available. If any part is missing, contact Roller-Pro
customer service center. If any ports or cables or surrounding parts are damaged, do not use
the product.
Always use the original accessories supplied. Charge your Hopper E-Scooter using the
included charger. The use of a different one could cause failures in the product and invalidate
its warranty.
Always use appropriate clothing when riding the Hopper E-Scooter. In order to avoid any injury,
it is always recommendable to use knee pads, elbow pads, gloves.
Do not use the product if your weight less than 20Kg or exceed 120 Kg.
Do not attempt to open or modify your Hopper E-scooter as doing so will void the manufacturer´s warranty and could lead to serious injuries or death.
Do not use your Hopper E-scooter in situations or places where you can cause danger or an
accident to people around you.
Never ride your Hopper E-scooter under the influence of drugs or alcohol. Do not ride in case
you are tired.
2

Do not ride your Hopper E-scooter in ramps, curbs, slopes, slippery surfaces or try to perform
acrobatics or tricks. This can cause serious injuries.
Always use your Hopper E-scooter in a smooth way. Do not be aggressive as this can cause
failure or an accident.
Do not use your Hopper E-scooter in wet areas where water is present, muddy places, sandy
places or stony roads.
Do not ride your Hopper E-scooter during bad or stormy weather. Example: Rain, snow, hail,
frost, fog, extreme heat.
Never insert objects into the product other than the cables etc. as described in this manual.
Be very careful when allowing children or elderly people use the product. These people may not
have the physical abilities necessary to drive safely.
Respect always all the traffic signals and make sure you observe the direction in which you are
riding your Hopper E-scooter. Always be careful of pedestrians or nearby people and objects.
Do not ride your Hopper E-scooter while talking on the phone, writing a message or conversing
with someone. This could cause an accident.
Do not ride your Hopper E-scooter on highways, bicycle lane, bus lane, near cars. It is
important you check the local laws before starting to use your E-scooter.
If the product is to be used by children, the caregiver should explain the contents of the user
manual to the children. The caregiver should provide adequate supervision to ensure that the
device is being used as explained in the user manual.
Risk of shock! Do not allow water and/or liquids to come in contact with any part of the product.
Use dry, non-abrasive cloth to remove debris or dust. Do not spray liquids onto the product.
Never submerge the product or any of the product’s components and/or accessories into water.
Do not ride over stairs
Do not allow more than one person on the scooter at a time. Do not jump on the E-scooter.
People with a lack of balance or pregnant should not use this product.
Be very careful when allowing children or elderly people use the product. These people may not
have the necessary Physical abilities to drive safely.
Always calculate the distance required for braking. The Hopper E-scooter employs an electronic
brake which reacts gradually. Therefore, it is extremely important to apply the brakes on time in
order to avoid any collision.
Do not ride your Hopper E-scooter in dark areas where there is no light.
Do not place your feet in any other area besides the inferior base where you are supposed to
have them.
Always avoid riding through potholes or stony roads as this will deteriorate the E-scooter parts
and will cause failures.
The product shall only be used as described in this manual.
When not in use, cover the E-scooter to protect it from dust. Do not store it in a dusty environment, humid, as this may cause damage over time.
WARNING- RISK OF FIRE - No user serviceable parts
IMPORTANT:
YOU MUST COMPLY WITH ALL LOCAL LAWS AND / OR STATES OF YOUR REGION / COUNTRY ON THE USE OF THIS TYPE OF DEVICE
3

1.3 Disposal at End-of-Life
This product must not be disposed of by incineration, landfilling, or mixing with household trash.
Improper disposal of the battery contained within this product may result in the battery heating up,
rupturing, or igniting which may cause serious injuries. The substances contained inside the battery
present chemical risks to the environment. The recommended disposal for ROLLER-PRO®
Roller-Pro Hopper E-scooter at its end-of-life is to dispose of the entire unit at or through an
e-waste recycling center, program, or facility. Local regulations and laws pertaining to the recycling
and disposal of lithium-ion batteries and/or products containing them will vary according to country,
state, and local governments. You must check laws and regulations corresponding to where you live
in order to dispose of the battery and/or unit properly. It is the user’s responsibility to dispose of their
waste equipment properly in accordance with local regulations and laws.
For additional information about where you should drop off your batteries and electrical or electronic
waste, please contact your local or regional waste management office, your household waste
disposal service, or your point-of-sale.
MAIN SPECIFICATIONS
Dimensions 1050 x 440 x 1140 mm (L/W/H)
Folded dimensions
Weight
Max. load
Recommended driver’s age
Recommended driver’s height
Maximum speed
Range
Maximum incline
Operating temperature
Storage temperature
Protection class
Rated voltage (DC)
Maximum Output voltage
Rated capacity
Smart battery management
Temperature anomaly, short circuit, under voltage auto
dormancy, over-current, double overcharge, double protection
Motor power
Maximum power
Rated power
Rated input voltage (AC)
Rated Output Voltage
Rated current
Charging time
These figures may vary depending on the speed, the person's weight and the unit's load (typical
range: maximum load, 75 kg load, 25ºC and 60% maximum average speed on a flat surface)
1050 x 440 x 480 mm (L/W/H)
12 kg
120 kg
16 - 50 years
120 - 200 cm
25 km/h
12 / 15 Km (4.0 Ah), 18 / 25 Km (6.0 Ah)
15°
-10 °C to +40 °C
-20 °C to 45 °C
IP54
36 V (4/6 Ah)
DC 42V
280 w/h
250 W Brushless
350 W
71 W
110-220 V
DC 42 V
2 Ah
3.5 - 4 h
4
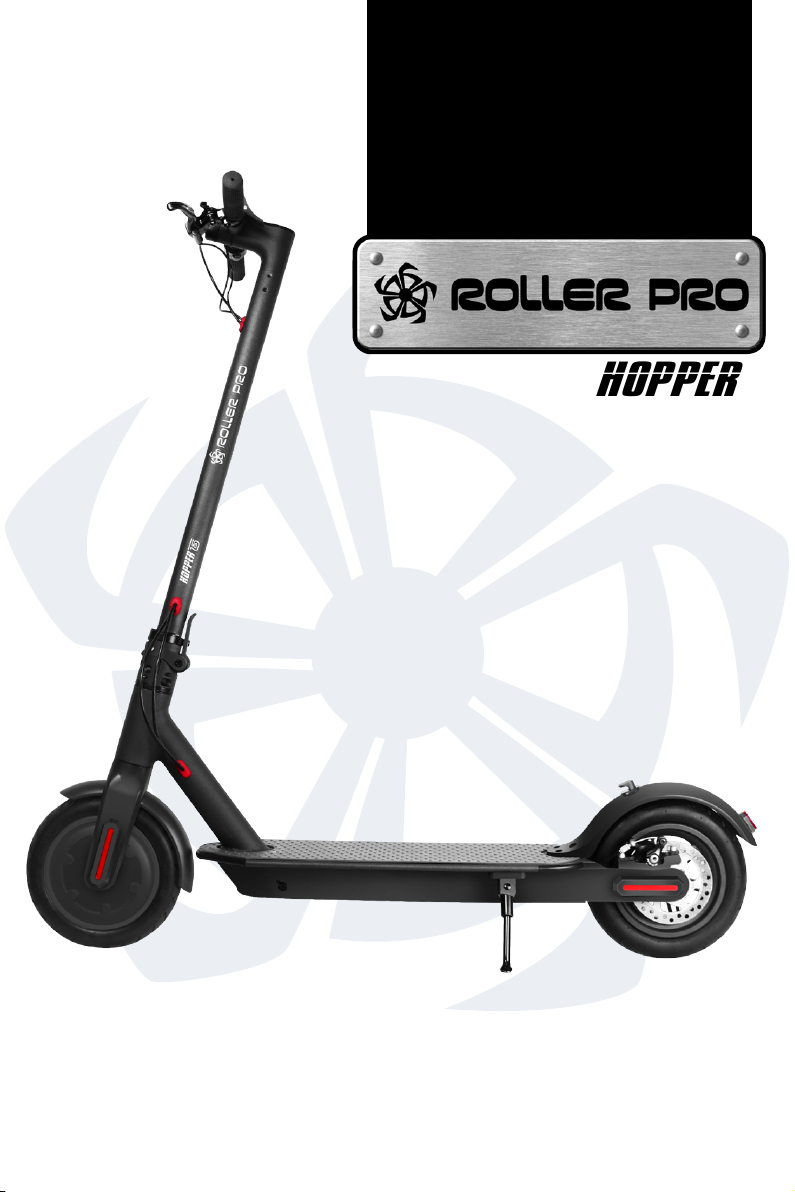
PARTS & FEATURES
What’s in the Box?
■
1 x Roller-Pro Hopper E-Scooter
■
1 x Charger
■
2 x Handles
■
1 x User Manual
■
4 x screws
■
Socket wrench
■
Valve connector
■
Warranty card
Parts:
Control panel:
Picture may vary from
actual product
1.Speed indicator: These numbers indicate the current speed.
2.Mode display: The green light indicates the power is on. When in low speed mode, the maximum
speed is set to 15 km/h. To Increase to the second gear speed, simply press the on/off switch twice
to select high speed mode. The LED will turn into red indicating the maximum speed of 25 km/h.
3.Battery indicator: There are four LED lights to indicate the battery capacity. The power consump
tion of the battery level indication will change from right to left. At first the light will be still, then will
flash and finally will go off. The 4 LED lights indicate a capacity of 100% - 86%; 3 lights indicate a
capacity of 85% - 71%. When no capacity is left, the 4 lights will go off and the scooter will stop
working. When this occurs, it is time to recharge the battery.
4.Power switch: Short press the on/off button to switch on the scooter. Press and hold for
approximately 3 seconds to switch off the scooter. When switched on, short press the on/off
button to activate the headlight.
FOLDING & ASSEMBLY
Make sure the Roller-Pro Hopper E-scooter is turned off before working with any of its parts. The
scooter comes mostly assembled within the package.
Some minor assembly is required before riding. All parts and tools are included.
Assembling:
5

1 Insert the head tube and fold out the kick
stand.
2 Install the handlebar on the head tube.
3 Use the supplied hex wrench to fasten the
4 After installation you can switch the scooter on.
screws on both sides.
CHARGING
Remove the rubber
from the connector
1. Ensure the scooter is turned off before proceeding to charge the battery.
2. Locate the charging port on the bottom part of the scooter.
3. Use the supplied charger to connect it to the charging port and to the wall outlet.
4. While the scooter is charging, the adaptor indicator light will turn red.
If charging for the first time, charge the scooter for at least 4 hours before using it. Make
sure the E-scooter is turned off.
Do not use any other charger than the one which is supplied with your Hopper E-scooter.
If you use any other charger, it will cause failure and the warranty will be void.
5. Once the scooter is fully charged, the adaptor indicator light will turn green. Disconnect the AC
charger from the port and the wall outlet.
Insert the
charging plug
After charging, replace
the rubber cap
6

Do not, under any circumstances, use the E-scooter while it is connected to the charger.
Do not charge longer than necessary. Standard charging time is approx. 3 hours.
Charging longer than this may affect the battery life and/or performance.
To maximize the battery life, charge it once every other month or once a week after
riding. This process is very important for the battery to keep running.
Charge preferably in places away from flammable products.
Monitor and control the charging process (Do not exceed the recommended Charging
time)
Do not charge your E-scooter at night while you are sleeping.
If your E-scooter has been exposed to High or low temperatures, wait until it has been
cooled down before charging.
USAGE
Read the following information before attempting to ride your Roller-Pro Hopper E-scooter.
The Roller-Pro Hopper E-Scooter supports up to 120 kg. Do not carry passengers.
Only operate the Roller-Pro Hopper E-Scooter where permitted. Local laws may restrict where
you may ride.
The Roller-Pro Hopper E-Scooter contains a motor and may be classified as a motor vehicle
under local laws in your area. It is your responsibility to abide by any local laws restricting how
or where you may ride.
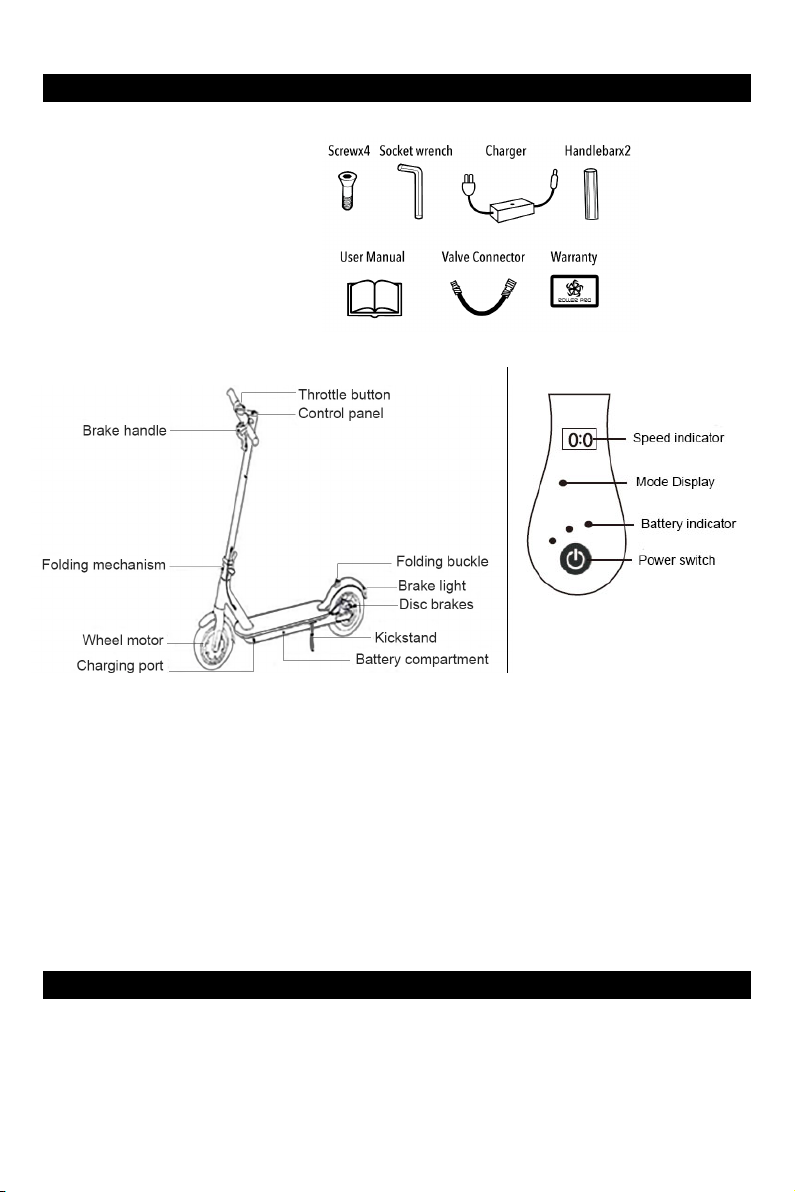
How to Ride:
Before starting to ride, make sure you are well equipped and protected. The Roller-Pro Hopper
E-Scooter is placed on a flat level surface and is fully charged. Follow the below steps. For your
safety, please read this entire section before attempting to ride.
Step 1. Carefully step on with one foot and stand upright but relaxed. Grab both handles.
Step 2. Keep one foot on the ground and press the throttle very slowly to begin accelerating. Use
the handles to steer.
Step 3. Start your Roller-Pro Hopper E-Scooter by pressing the power button, and continue
accelerating by pushing the throttle.
Step 4. To stop, release the throttle and use the handbrake, footbrake, or both to gradually come to
a stop. Step out of the scooter by putting one leg at a time.
Step 5. To turn the scooter off, remain at a complete stop for a few seconds and press and hold the
power button for approximately 3 to 5 seconds.
Cruise Control:
The cruise control function operates automatically, once the Hopper reaches a certain speed.
While riding the Hopper E-scooter at around 12-14 km/h, at one point, a beep sound will be
heard.
This beep sound indicates that the Auto cruise control is activated and therefore you can release
the throttle button as the E-scooter will continue riding at a constant speed.
To disactivate the auto cruise control, simply press the brake or the throttle.
Practicing Guidelines:
Practice until you are comfortable with using all of the scooter’s functions. Check the following
tips below.
■
Avoid wearing anything that can drape over or get caught into/under the wheels. Wear
closed-toe, flat shoes to maintain flexibility and stability.
■
Practice until you can easily get on, move forward, turn, stop, and dismount with ease.
■
The scooter is designed to handle inclines up to 15°. The inclination will depend on the battery
status, weight, the terrain type on which you are riding. Riding over steep inclines is not
recommended.
7
■
The Roller-Pro Hopper E-Scooter is designed for relatively smooth, flat terrain.
■
Until you are comfortable using the scooter, avoid operating in places with slopes, pedestrians,
or obstacles.
A helmet as well as other
protective. Gear must be worn
at all times.
Release the throttle button to slow down. The energy recovery
system automatically slows you down as well. Use the brake
handle on the handlebar to stop the scooter.
Turn on the power and check
the power indicator.
Press the throttle button to
engage the electric motor and to
begin accelerating.
Lean slightly to one side and
slowly turn the handlebar to
drive around corners
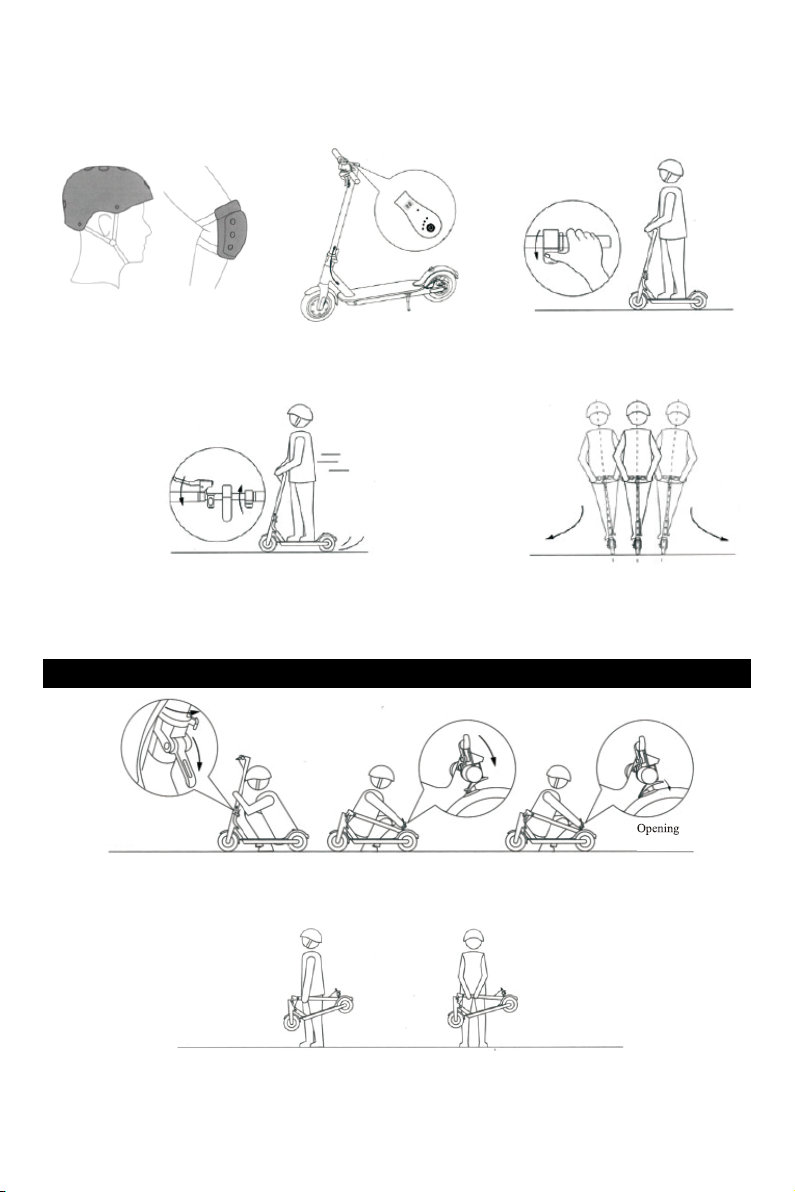
FOLDING & TRANSPORTING
Folding
Make sure that the electric scooter is turned off. Open the folding mechanism and hook the handlebar
on to the rear mudguard. To open, press the hook until the handle bar unhook. Unfold the head tub
until vertical and lock the folding mechanism.
Transporting
Transporting:
Before moving, lifting or transporting the scooter, turn it off. Fold the scooter as shown in the picture
above and pull the scooter along. You can also carry it as shown on the diagram picture.
8

MAINTENANCE
Do not perform any maintenance when the power is on, or the battery is charging.
After each ride, especially if you have travelled a long distance, inspect your scooter.
■
Inspect the brakes to make sure that is working properly.
■
Make sure all screws and bolts are taut and properly fastened to prevent injury and
Unnecessary wear and tear.
Cleaning:
Remove dirt with a soft, damp cloth. Remove stubborn dirt with a bit of toothpaste and a toothbrush,
then use a damp cloth to clean. Remove scratches with sandpaper or other polishing materials.
Warning: Do not use alcohol, gasoline, kerosene or other corrosive, volatile chemical solvents for
cleaning. This will seriously damage the appearance and the structure of the scooter. Do not use a
high-pressure cleaner and ensure that the charging cable has been unplugged and the rubber cap
is tightened when cleaning with water. Risk of electric shock or serious product failure.
When not in use, store the electric scooter in a dry and cool place; avoid long-term storage
outdoors. Direct sunlight, extreme heat or cold will accelerate the aging of the electric scooter and
its tyres and generally reduce the life span of the battery pack.
Battery Maintenance:
1. Do not use third party batteries; this can cause technical defects.
2. Do not touch the battery contacts, and do not open or expose the battery casing. Avoid metal
objects touching die battery contacts; this will cause a short circuit, damage the battery or cause
personal injury or death.
3. To avoid the risk of damage and fire, only use die original charger.
4. Improper disposal of used batteries may cause serious contamination of the environment.
Observe local regulations when discarding of the battery pack. Do not dispose of the battery pack
with the household waste.
5. After each use, recharge the battery.
Do not expose the battery to temperatures above 50°C or below -20°C (e.g. in the boot of a car).
This can lead to battery failure, overheating, and fire. Charge the battery if you will not be using
your scooter for more than 30 days. Store it in a cool and dry place and fully charge it every 60
days. Damages due to non-observance are not covered by the warranty.
Avoid completely discharging the unit to preserve the utility of the battery life, make sure to charge
the battery before the battery can be 100% drained out. If the battery runs out, put it to charge
immediately. Charge the battery at room temperature as the life span and performance of the
battery will drop in temperatures below 0°C.
Warning: A fully charged electric scooter battery is depleted after approx. 120-180 days in standby
mode. The battery is equipped with a smart chip to record the battery charge and discharge
situation. Prolonged non-charging can cause irreversible damage to the battery, which is not
covered by your warranty. Only a qualified service technician is allowed to remove the battery pack
as this holds the risk of serious injuries through electric shock or short circuit!
Adjusting the disc brake
Brake cable
If your brakes are too tight, use the supplied M5 hex wrench and turn counter-clockwise to release
the brake cable. Shorten the exposed tail length slightly and lock the pressure plate screws again. If
your brake is not tight enough, release the pressure plate screws and lengthen the exposed tail
length slightly. Then lock the pressure plate screws again.
9

Adjust the vibration on the handlebar
Adjust the vibration on handlebar:
If your head tube of the electric scooter is vibrating, use the supplied M5 hex wrench to tighten the
two screws at the folding mechanism.
Tyre valve extension
Tyre valve extension:
If your electric scooter front and rear tyres are deflated, use an extension tube for the tyre valves to
inflate the tyres. First remove the valve cap, then screw the extension tube on the tyre valve and
connect the pump to inflate. Replace the valve caps after finished pumping.
Note:
Tire wear and tear is normal. The rate at which the tires deteriorate depends on riding style i.e.
casual riding may yield minimal wear while performance and/or heavy drifting may yield excessive
wear. To purchase tire replacements and/or for questions about your Rider’s E-Bike parts, please
visit our website: www.rollerpro.es
HARMFUL SUBSTANCE
Name of
component
Charger
Battery
Tyre valve
Charging port
Master control board
Instrumentation
circuit board
Wheel motor
Scooter frame
Tyres
This table corresponds to SJ/11364.
O:Indicates that the content of this harmful substance in all homogeneous materials of this component is below the
limit prescribed in GB/T 26572.
X:Indicates that the content of this harmful substance in at least one homogeneous material of this component is
beyond the limit prescribed in GB/T 26572.
Lead
(Pb)
Mercury
(Hg)
Cadmium
Harmful substance
Hexavalent
(Cd)
chromium
(Cr(VI))
Polybrominated
biphenyls
(PBB)
Polybrominated
diphenyl ethers
(PBDE)
10

DECLARATION OF CONFORMITY
Manufacturer Name: Satyatrade S. L.
Address: Pol.Ind.La Raya. C/ Guadalquivir, 2.
Camarma de Esteruelas, 28816 Madrid
Tel: 902 430 967
Fax: 91 8864285
NIF: B83254763
Manufacturing country: China
Description: Roller-Pro Electric Bike
Roller Pro® RP-HOPPER 4/6 complies with the following directives:
EMC Standards: Directive 2014/30/UE
EN55014-1: 2017
EN55014-2: 2015
EN6100-3-2: 2014
EN6100-3-3: 2013
LVD Standards: Directive 2014/35/UE
EN60335-1: 2012+A11: 2014
MD Standards: Directive 2006/42/CE
EN60204-1: 2006+A1: 2009+AC2010
ROHS Standards: Directive 2011/65/UE sobre restricción de sustancias peligrosas
AC CHARGER:
EMC Standards: Directive: 2004/108/CE
EN55022: 2010+AC: 2011
EN55024: 2010+A1: 2015
EN61000-3-2: 2014
EN61000-3-3: 2013
LVD Standards: Directive: 2014/35/UE
EN60950-1: 2006+A11: 2009+A1: 2010+A12: 2011+A2: 2013
EN60335-2-29: 2004+A2: 2010
BATTERY :
Directive : UN38.3
Directive : 2013/56/EU
Signed: Ajeet Nebhwani Utamchandani
Sole Administrator
11
 Loading...