

Rollei Sportsline 60 plus User Guide [ml]


Rollei Sportsline 60 PLUS
English...........................................................................................................
German........................................................................................................
French...............................................
Spanish........................................................................................................
Italian............................................
Portuguese..................................................................................................
Greek.......................................................................................................... .
Dutch..
.........................................................................................................
Czech..............................................................................
Slovak.........................................................................................................
Hungarian
Swedish..............
Finnish...............................................................................
Norwegian..............................................................
Danish.........................................................................................................
....................................................................................................
.........................................................................................
..........................................................
...............................................................
.............................
..........................
....................................
112
136
159
182
.
204
224
247
269
291
312
.
21
43
66
88
1

Rollei Sportsline 60 Plus
User Manual
1

Thank you for purchasing this product. Please read these
operating instructions carefully in order to use the digital video
camera correctly. Keep the instructions in a safe place after
reading so that you can refer to them later.
Precautions
Before using the digital camera, please ensure that you read and
understand the safety precautions described below.
• Do not try to open the case of the digital camera or attempt to modify
this digital camera in any way. Maintenance and repairs should be
carried out only by authorized service providers.
• Use only the recommended power accessories. Use of power
sources not expressly recommended for this equipment may lead to
overheating,
distortion of the equipment, fire, electrical shock or other hazards.
2

1. Parts of the digital camera
1: Shutter Button
2: Power Button
3: Flash Strobe
4: Lens
5: Speaker
6: Self-timer Indicator Light
7: LCD Display Screen
8: Menu Button
9: Mode Button
10: Charging Indicator Light
11: Up/Zoom in button
12: Right/Flash Button
13: OK Button
14: Down/Zoom out Button
15: Left/Self-timer Button
16: Playback Button
17: Delete Button
18: Battery/TF card/USB Jack Cover
19: Cover Lock
3

2. Preparing for using
Installing the Battery
1: Push the lock button (1) to open the battery cover.
2: Insert the battery with the positive (+) and negative (-) poles
matching the directions indicated inside the battery compartment.
3: After the battery is properly installed, close the battery cover.
4

Charge the battery
Please charge the battery when the indicator sh ows the icon.
1: Turn off the digital camera.
2: Connect the camera to your computer via provided USB cable.
3: Charging starts when charge indicator LED turns green. The charge
indicator light turns OFF when charging is completed.
4: Unplug the USB cable.
Inserting the Memory Card
1: Turn off the digital camera.
2: Push the lock button (1) to open the battery cover. And then you will
see the SD card slot.
3: Insert the memory card to the ca r d slot with the label against the
LCD screen. Check the right direction before insert the memory card.
5

• To release the memory card open the battery cover firstly and then
press the edge of the card gently.
Format the memory card
It is important to format the memory card when it is the first time you
use this digital camera. All data will be deleted including protected files.
Be sure to download important files to your computer before
formatting.
1: Turn the power on, and set the digital camera to the Setup Menu.
2: Press the Up or Down button to select [Format], then press the OK
button to launch the submenu.
3: Press the Up or Down button to select the item [OK] and then press
the OK button to launch the format submenu.
4: Press the Up or Down button to select the item [Yes] and then press
the OK button to erase all data.
Setting the Language
When using the digital camera for the first time after purchasing it, be
sure to choose a language and set the date & time before using the
6

digital camera.
1: Turn the power on, and set the digital camera to the Setup Menu..
2: Press the Up or Down button to select [Languag e] then press the
OK button to launch the submenu.
3: Press the Up or Down button to select the desired language and
then press the OK button to confirm the setting.
Setting the date and time
1: Turn the power on, press the MENU button to display the menu.
2: Press the Left or Right button to select [Capture Setting] Menu.
3: Press the Up or Down button to select [Date] then press the OK
button to launch the submenu.
4: Press the Up or Down button to select [Set Date] then press the OK
button to launch the dialog box.
5: Press the Up or Down button to change the highlighted value. Press
the Left or Right button to move the cursor between settings.
6: Press the OK button to confirm the settings.
Note: The date and time can be only added to still images by setting
the function [Date] in Capture Setting menu.
7
3. Using this digital camera
Turning the Digital camera On and Off
1.Press the POWER button to turn on the camera and press it again to
turn the digital camera off.
To save battery power, you can change the power-off time by setting
the function [Auto Power Off] in the Setup menu.
Change the record mode
1: Press the POWER button to turn on the digital cameraDŽ
2: Press the Mode button to change the mode. Each time the
Mode button is pressed the mode icon is changed.
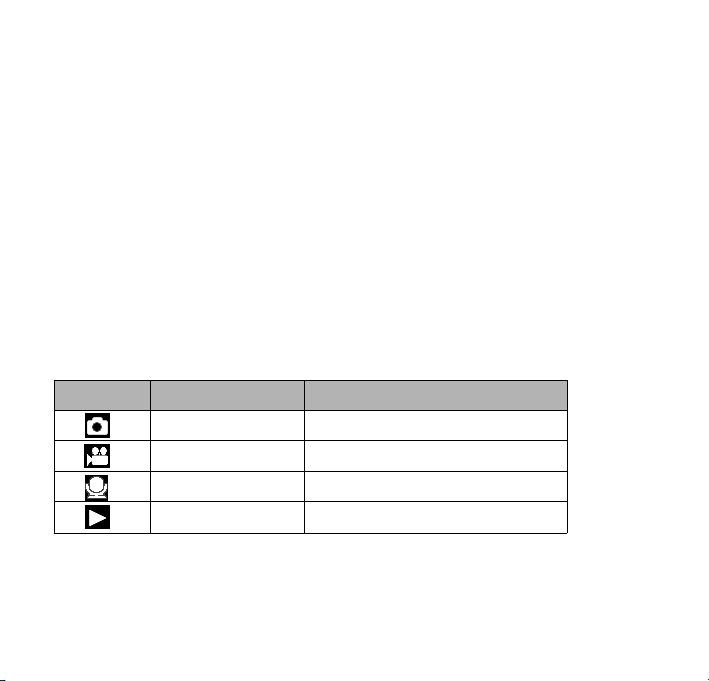
Display Title Description
Capture mode For taking still photos.
Video mode For recording movie clips.
Audio mode For recording audio files.
Playback mode For previewing record files.
Note:
You can only switch the digital camera to playback mode by using the
8
PLAYBACK button. Press the PLAYBACK button to set the camera to
playback mode and press it again to set it record mode.
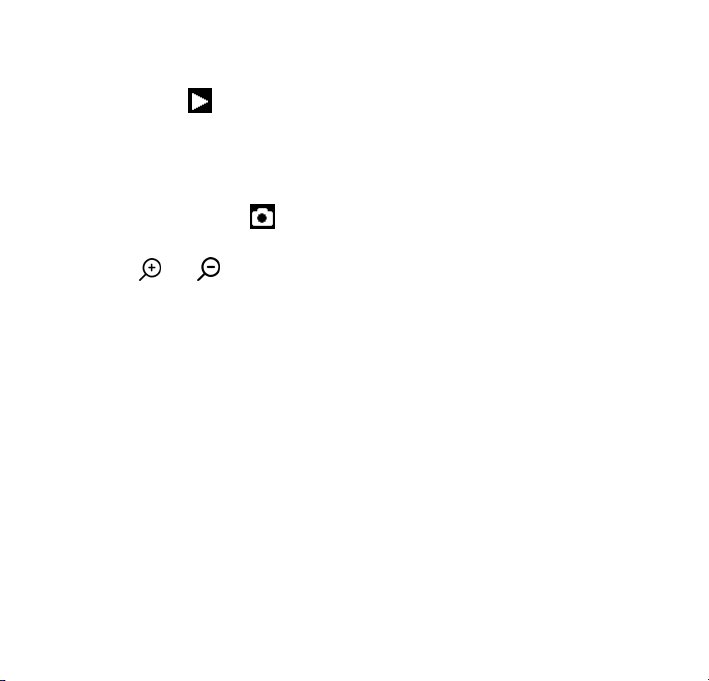
Taking still images
1: Turn on the digital camera and set the digital camera to default
capture mode, the icon appears on the LCD screen.
2: Zooming:
Press the
value of magnification level appears on the LCD monitor.
3: Hold the digital camera steady and then press the SHUTTER b utton
completely down to take a picture.
4: Press the MENU button to display the menu, including Scene,
Image Size, Anti-Shake, Face Detect, Smile Capture, Shooting,
Capture Setting, Image Setting.
or button to zoom in or zoom out the screen. the
Using the Self-timer
Use the self-timer to set a delay from the time the shutter button is
pressed to the time the image is shot.
1: Turn the power on, and set the digital camera to the Capture mode.
9

2: Press the LEFT/SELF-TIMER button to change the self-timer mode.
Each time the LEFT/SELF-TIMER button is pressed the self-timer icon
changes.
Off: Don’t use self-timer.
2 Seconds: The shutter release will delay for 2 seconds.
5 Seconds: The shutter release will delay for 5 seconds.
10 Seconds: The shutter release will delay for 10 seconds.
3: Press the SHUTTER button to take a picture.
4: After Self-timer begins, the self-timer LED will flash. one second for
a flash, till count down is over.
Using the Flash
The flash is not only for taking picture s when there is insufficient light,
but also for when the subject is in shade or with backlight conditions.
Pressing the RIGHT/FLASH button cycles your camera through the
various flash modes. The flash will not activate during continuous
shooting or movie recording.
1: Set the digital camera to the Capture mode.
2: Press the RIGHT/FLASH button to change the flash mode.
10
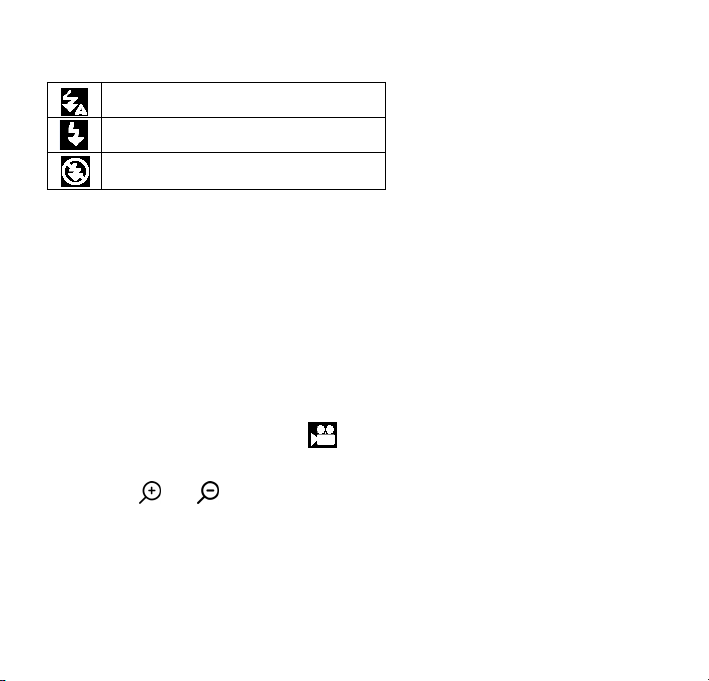
Each time the flash button is pressed, the flash icon changes.
Auto: Automatically turn on/of
Flash on: Force on the flash
Flash off: Force off the flash
3: Press the SHUTTER button to take a picture.
Note:
When the battery power level is low, the flash strobe does not work.
press the RIGHT/FLASH button, the message shows“Low battery”on
the LCD screen.
Recording a video clip
1: Turn on the digital camera, press the MODE button to set the
digital camera to video record mode.
2: Zooming:
Press the
or button to zoom in or zoom out the screen. The
value of magnification level appears on the LCD monitor.
3: Press the SHUTTER button to start recording.
4: Press the SHUTTER again to end the recording. If the memory is
full the video camera will stop recording automatically.
11

5: Press the MENU button to display the menu, including Size, Image
Setting.
• On the upper of the LCD monitor displays the recorded time.
• Don’t remove the card when video recording, Or, it may cause the
digital camera can not work normally.
Recording audio
1: Turn on the ca mcorder and s et the camera to audio record mode
().
2: Press the SHUTTER button to start recording.
3: Press the SHUTTER button again to end the recording. If the
memory is full the camera will stop recording automatically.
4. Playback
Playback still image
1: Press the PLAYBACK button to playback mode.
The latest recorded file appears on the LCD screen. If there are no
images stored, a message [No File Exist] appears.
2: Press the LEFT or RIGHT buttons to preview the previous or next
12

image.
3: Press the OK button to play slide show.
4: Zooming:
Press the
the picture is enlarged press the UP, DOWN, LEFT, RIGHT button to
browse the details of the image.
5: Press the OK button to resume the normal mode.
or button to zoom in or zoom out the image. When
Playing back movie clips
1: Set the digital camera to playback mode.
2: Press the LEFT or RIGHT buttons to select the movie clips you
want to playback.
3: Press the OK button to start playing and press it again to pauseˈ
press UP button to end the playing.
Playing back audio files
1: Press the PLAYBACK button to set the digital camera to playback
mode.
2: Press the LEFT or RIGHT buttons to select the audio file you want
13

to Playback.
3: Press the SHUTTER button to start playing, press the OK button to
pause and press it again to continue, press the UP button to end the
playing.
Viewing Thumbnails
Press the DOWN button in playback mode to view the file in
thumbnails mode. Use the LEFT/RIGHT/ UP/DOWN buttons to select
a file. Press the OK button to view the file in full screen.
5. Making connections
Connecting the Digital camera to a PC
There are two ways to download files from the digital camera's internal
memory or memory card to a computer:
z By inserting the memory card into a card reader
z By connecting the camera to a computer using the supplied USB
cable.
14

Using a Card Reader
1: Eject the memory card from the digital camera
and insert it into a card reader that is connected to
acomputer.
2: Open [My Computer] or [Windows Explorer] and
double-click the removable disk icon that represents the memory card.
3: Copy images from the card into a directory of your choice on the
computer’s hard disk.
Connecting the Digital camera to a PC with the USB Cable
1: Connect the supplied USB cable to the computer's USB port and
turn on the digital camera. A USB icon appears on the screen when
connection to the computer has been successfully completed.
2: Open [My Computer] or [Windows Explorer]. A "Removable Disk"
appears in the drive list. Double-click the "Removable Disk" icon to
view its contents. Files stored on the camera are located in the folder
named "DCIM".
3: Copy the photos or files to your computer.
15

6. Technical Specifications
Sensor 8.0 Mega Pixels CMOS
Display 2.8" TFT Color LCD
Aperture F/2.8ˈf=6mm
Shutter Shutter: 1/2~1/2000sec.
Resolution Still Image:
[21M*]: 5616X3744; [16M*]: 4608X3456;
[12M*]: 4000x3000; [8M]: 3264x2448;
[5M]: 2592x1944; [3M]: 2048x1536;
[1.2M]: 1280x960;
Video: FHD:1920x1080@20fps*; HD:1280x720;
D1:720x480; VGA:640x480; QVGA:320x240
*interpolated
Auto Power
Off
Sensitivity ISO Auto/100/200/400
White balance Auto/Daylight/Cloudy/Incandescent/Fluorescent
Scene [Auto]/[Night Portrait]/[Night Scenery]/[Portrait]/
[Off ]/[1Minute]/[2 Minutes]/[3 Minutes]/
[4 Minutes]/[5 Minutes]/[10 Minutes]
[Scenery][Sport]/[Party]/[Beach]/[High
16

Sensitivity]/[Underwater]
Exposure
-3EV to +3EV in 1step
control
Continue shot YES
Self-timer 2 /5 /10 sec.
Storage External memory: TF card
Power Supply Li-ion battery
Ambient
temperature
Operating: 0° C to 40° C
Storage:-20to60°C
Dimension 115x73x27 (mm)
Weight Camera Body w/o battery: Approx. 125g
17

Disposal
Dispose of packaging: For disposal, separate packaging
into different types. Cardboard and board must be disposed
of as paper and foil must be recycled.
Disposal of Waste Electrical and Electronic Equipment
and/or Battery by users in private households in the
European Union.
This symbol on the product or on the packaging indicates that
this cannot be disposed of as a household waste. You must
dispose of your waste equipment and/or battery by handling it
over to the applicable take-back scheme for the recycling of
electrical and electronic equipment and/or battery. For more
information about recycling of this equipment and/or battery,
please contact your city office, the shop where you purchased
the equipment or your household waste disposal service. The
recycling of materials will help to conserve natural resources
and ensure that it is recycled in a manner that protects human
health and environment.
18

Batterywarnin
g
Never dismantle, crush, or pierce the battery, or allow the
battery to short-circuit. Do not expose battery being placed in
high temperature environment, if battery leaks or bulges, stop
continue to use.
• Keep the battery out of reach of children.
• Batteries may explode if exposed to naked fire. Never
dispose of batteries in a fire.
• Disposed of used batteries observing local regulations.
• Before disposing the device, please remove the battery.
19

Conformit
y
The Rollei GmbH & Co. KG herewith declare, that the Rollei
Sportsline 60 Plus complies with the directive 2014/30/EU:
x 2011/65/EC RoHs Directive
x 2014/30/EU EMC Directive
The complete text of the EU Declaration of Conformity can be
downloaded at the following Internet address:
www.rollei.com/EGK/sl60plus
20

Rollei Sportsline 60 Plus
Bedienungsanleitung
21

Vielen Dank, dass Sie sich für unser Produkt entschieden haben.
Bitte lesen Sie für einen richtigen Gebrauch der Digitalkamera
die Gebrauchsanweisung sorgfältig durch. Bewahren Sie die
Anleitung an einem sicheren Ort nach dem Lesen auf, so dass
Sie sie später heranziehen können.
Vorsichtsmaßnahmen
Bevor Sie die Digitalkamera verwenden, vergewissern Sie sich bitte,
dass Sie die nachfolgend beschriebenen Sicherheitshinweise gelesen
und verstanden haben.
z Versuchen Sie nicht, das Gehäuse der Digitalkamera zu öffnen oder
diese Digitalkamera auf irgendeine Art und Weise zu manipulieren.
Wartung und Reparatur dürfen nur von autorisierten
Service-Providern durchgeführt werden.
z Verwenden Sie nur das empfohlene Zubehör. Die Verwendung von
Stromquellen, die nicht ausdrücklich für dieses Gerät empfohlen
werden, können zu Überhitzung, Verformung des Geräts, Brand,
Stromschlag oder anderen Gefahren führen.
22

1. Teile der Digitalkamera
1: Auslöse-Taste
2: Ein-/Aus-Taste
3: Blitzlicht
4: Objektiv
5: Lautsprecher
6: LED Selbstauslöser
7: LCD-Bildschirm
8: Menü-Ta ste
9: Modus-Taste
10: LED Ladeanzeige
11: Cursor nach Oben/Zoom-In-Taste
12: Cursor nach Rechts/Blitzeinstellung
13: OK-Taste
14: Cursor nach Unten/Zoom-Out-Taste
15: Cursor nach Links/
Selbstauslöser-Taste
16: Wiedergabe-Taste
17: Löschen-Taste
18: SD-Karten/USB/Batteriefach
19: Batteriefachsicherung
23

2. Vorbereitung für den Einsatz
Akku installieren
1: Schieben Sie die Verriegelung (1) zur Seite, um das Akkufach zu
öffnen.
2: Legen Sie die Batterie gemäß der positiven (+) und negativen (-)
Polarität entsprechend der Anzeige im Batteriefach ein.
3: Nachdem die Batterie richtig eingelegt ist, sch ließen Sie den
24

Akkufachdeckel wieder und achten Sie dabei auf ein eindeutiges
Klickgeräusch. Überprüfen Sie vor der Nutzung der Kamera im oder
unter Wasser ob der Akkufachdeckel ordnungsgemäß geschlossen
ist.
Batterie laden
Bitte laden Sie den Akku, wenn die Anzeige das Symbol
zeigt.
1. Schalten Sie die Digitalkamera aus.
2. Verbinden sie die Kamera an den Computer via USB - Kabel.
3. Der Ladevorgang beginnt, wenn die Ladeanzeige-LED grün
leuchtet. Die Ladeanzeige geht auf AUS, wenn der Ladevorgang
abgeschlossen ist.
4.
Trennen Sie das USB-Kabel.
Speicherkarte einsetzen
1. Schalten Sie die Digitalkamera aus.
2. Schieben Sie die Verriegelung (1), um das Akkufach zu öffnen.
Nun sehen Sie das Speicherkartenfach.
25

3. Schieben Sie die Speicherkarte mit dem Etikett zum
LCD-Bildschirm in den Kartenschlitz. Prüfen Sie die richtige
Richtung, bevor Sie die Karte einschieben.
z Zum Herausnehmen der Sp eicherkarte öffnen Sie zuerst die
Akkufachabdeckung und drücken dann leicht auf den Rand der
Karte.
Speicherkarte formatieren
Beim Erstgebrauch dieser Digitalkamera ist es wichtig, die
Speicherkarte zu formatieren. Alle Daten einschließlich geschützter
Dateien werden gelöscht. Stellen Sie sicher, wichtige Dateien vor dem
Formatieren auf Ihrem Computer zu speichern.
1: Schalten Sie die Kamera ein und öffnen Sie das Einstellungsmenü.
2: Wählen Sie die Option "Formatieren" im Einstellungsmenü und
26

bestätigen Sie die Auswahl mit der OK-Taste.
3: Wählen Sie OK und bestätigen Sie die Auswahl mit der OK-Taste.
4: Wählen Sie "JA" und bestätigen Sie Ihre Auswahl mit der OK-Taste.
Sprache einstellen
Wenn Sie die Digitalkamera nach dem Kauf das erste Mal verwenden,
stellen Sie sicher, eine Sprache auszuwählen. Stellen Sie zudem
Datum und Uhrzeit ein, bevor Sie die Digitalkamera verwe nden.
1: Schalten Sie die Kamera ein und öffnen Sie das Einstellungsmenü.
2: Wählen Sie die Option "Sprache" und bestätigen Sie Ihre Auswahl
mit der OK-Taste.
3: Wählen Sie Ihre Sprache an und bestätigen Sie Ihre Auswahl mit
der OK-Taste.
Datum und Uhrzeit einstellen
1: Schalten Sie die Kamera ein, drücken Sie auf die Taste MENÜ, um
in das Menü zu gelangen.
2: Drücken Sie auf die Taste Links oder Rechts, um das Menü
[Aufnahmeeinstellungen] aufzurufen.
27
 Loading...