

Page 1
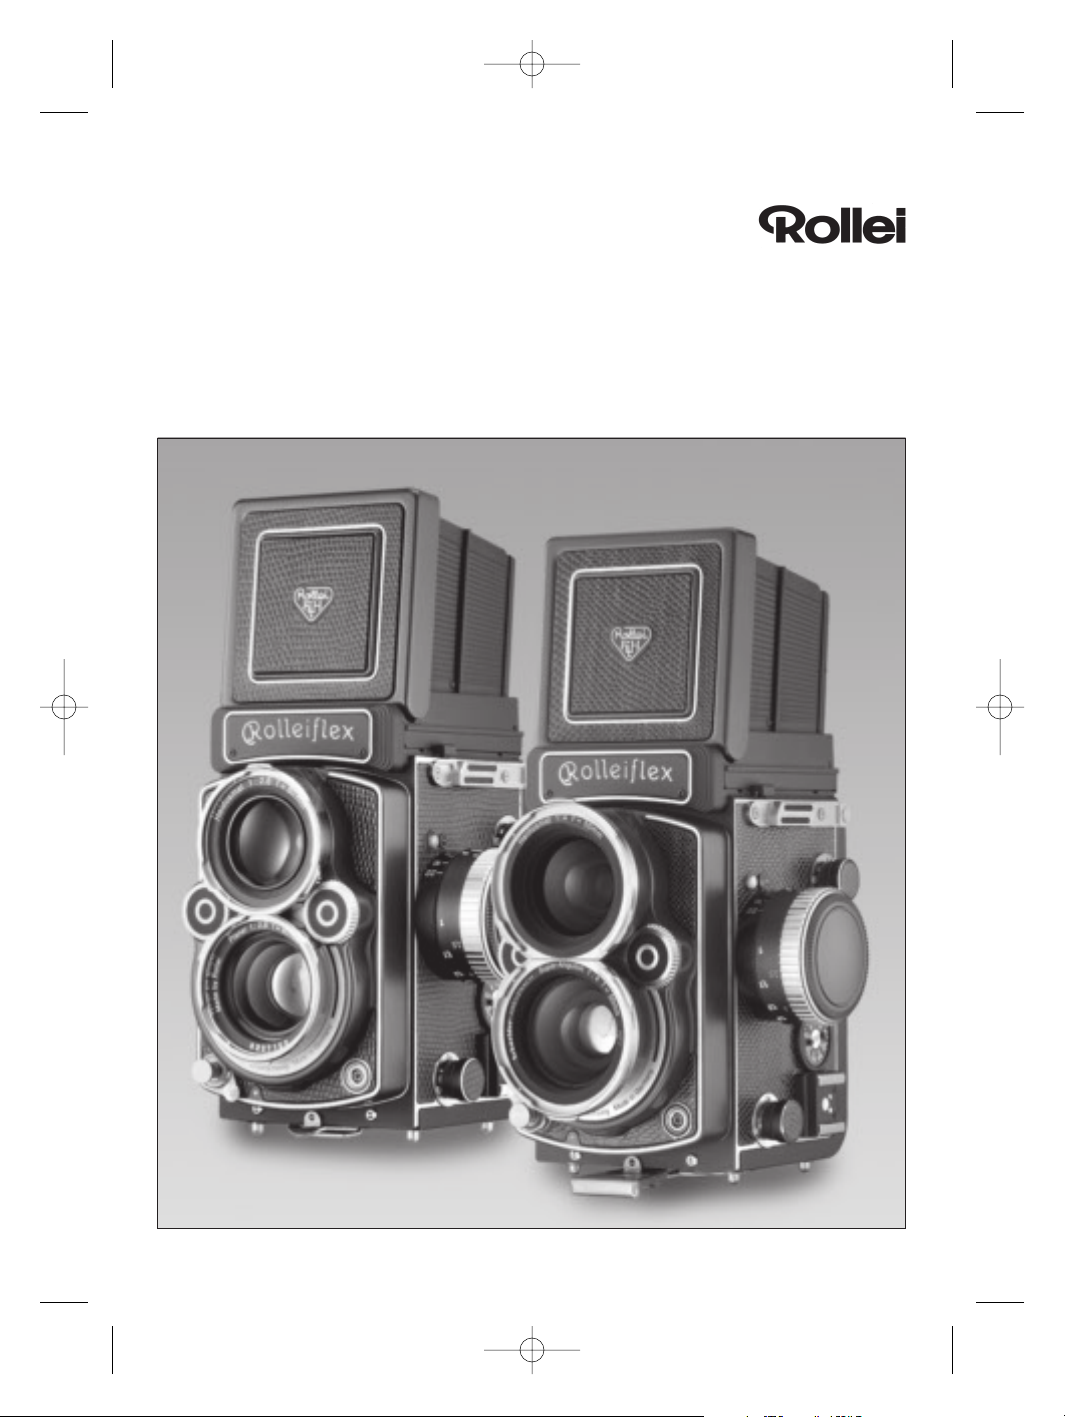
Rolleiflex 2,8 FX
Rolleiflex 4,0 FW
Hinweise zum Gebrauch
User’s manual
18029_deutsch-englisch 14.03.2003 13:53 Uhr Seite 1
Page 2

Einzelteile und Funktionen Seite 4
Zur Einführung Seite 5
Handhabung und Gebrauch Seite 6
Objektivdeckel entfernen Seite 6
Tragriemen anbringen Seite 6
Einsetzen und Wechseln der Batterie Seite 6
Batteriecheck Seite 6
Lichtschacht öffnen Seite 7
Belichtung messen Seite 7
Abgleich von Zeit und Blende Seite 8
Film einlegen Seite 8
Filmempfindlichkeit einstellen Seite 10
Filmmerkfach Seite 10
Fokussieren Seite 10
Bildausschnitt wählen Seite 10
Auslösen und Belichten Seite 11
Filmtransport und Verschlussaufzug Seite 11
Mehrfachbelichtung Seite 12
Film entnehmen Seite 12
Lichtschacht schließen Seite 13
Lichtschacht abnehmen Seite 13
Lupenwechsel für Brillenträger Seite 13
Einstellscheibe wechseln Seite 13
Blitzbetrieb Seite 14
2 Rolleiflex 2,8 FX / 4,0 FW
Wichtiges Zubehör Seite 15
Wechselsucheraufsätze Seite 15
Weichledertasche Seite 15
Pistolenhandgriff Seite 15
Blitzadapter SCA 356 Seite 15
Hell-Einstellscheibe mit zentralem Messraster
und Messkeil Seite 15
High-D-Screen Seite 16
Mattglasscheibe Seite 16
Hell-Einstellscheibe Seite 16
Hell-Einstellscheibe mit Messraster Seite 16
Abhilfe bei Bedienungsfehlern Seite 16
Pflege der Kamera Seite 18
Technische Daten Seite 18
Schärfentiefe-Tabelle Seite 37
Inhalt
18029_deutsch-englisch 14.03.2003 13:53 Uhr Seite 2
Page 3
112132
3
4567891011
37
36
35
34
33
32
31
30
29 28 27 26 25 24 23
14
15
16
17
18
19
20
21
22
18029_deutsch-englisch 14.03.2003 13:54 Uhr Seite 3
Page 4

1 Standard-Faltlichtschacht
2 Sucherlupe, auswechselbar
3 Halterung für Sucherlupe
4 Lichtschachtdeckel, klappbar
5 Klappe für Rahmensucher
6 Einstellscheibe
7 LED-Anzeige für Belichtungsabgleich
8 Bildfenster für Blende und Verschlusszeit
9 Sucherobjektiv Heidosmat mit Doppelbajonett
10 Blendeneinstellrad
11 Zeiteinstellrad
12 Aufnahmeobjektiv mit Doppelbajonett
13 X-Synchronbuchse für Normstecker
14 Diopter für Rahmensucher (nur 2,8 FX)
15 Halter für Tragriemen links
16 Spulenknopf für Leerspule
17 Tastknopf für Batteriecheck
18 LED-Anzeige für Batteriecheck
19 Filmmerkfach
20 Stellscheibe für Filmempfindlichkeit
21 Kamera-Rückwand
22 Blitzschuh mit X-Synchronkontakt (a)
und Kontakte für Systemblitzgerät (b)
4 Rolleiflex 2,8 FX / 4,0 FW
23 Stativgewinde 1/4"
24 Sicherungsschieber für Rückwand
25 Rückwandriegel
26 Spulenknopf für Filmspule
27 Batteriefachdeckel
(unter großer Rändelschraube verdeckt)
28 Schärfentiefeskala mit Entfernungsindex
29 Einstellrad mit Entfernungsskala
in „m“ und „feet“
30 Auslöser mit Gewinde für Drahtauslöser
31 Sicherungshebel für Auslöser
32 Kurbel für Filmtransport und Verschlussaufzug
33 Ring zum Abschalten des Filmtransportes
für Mehrfachbelichtungen
34 Bildzählwerk
35 Halter für Tragriemen rechts
36 Entriegeltasten für Faltlichtschacht
oder Prismensucher
37 Klapprahmen für Einstellscheibe
Einzelteile
und Funktionen
18029_deutsch-englisch 14.03.2003 13:54 Uhr Seite 4
Page 5

Wir gratulieren zum Kauf dieser hochwertigen
Rolleiflex.
Bei der Rolleiflex TLR handelt es sich um eine zweiäugige
Spiegelreflexkamera mit TTL-Belichtungsmessung und
TTL-Blitzautomatik.
Um alle Möglichkeiten der Kamera voll nutzen zu
können und Bedienungsfehler zu vermeiden, bitten wir
Sie, diese Gebrauchsanleitung sorgfältig zu lesen. Sie ist
wie folgt aufgebaut: Zunächst werden alle
Einzelteile und Funktionen vorgestellt. Alles Wissenswerte über die Kamera wird anschließend ausführlich
beschrieben und illustriert, und zwar in der
praktischen Reihenfolge der notwendigen Handgriffe
vom Gebrauchsfertigmachen der Kamera bis zur
Entnahme des belichteten Filmes.
Bei eventuellen Bedienungsfehlern – wie sie in der
Eile der Aufnahme oder nach längeren Aufnahmepausen auch dem Routinier schon einmal passieren – hilft
eine Fehlersuchtabelle, um die mögliche Ursache und
deren Abhilfe schnell herauszufinden.
In Text und Bild angeführte Einzelteilnummern
benennen stets das gleiche Teil und entstammen der
Bildklapptafel, die man beim Lesen der Anleitung am
besten aufgeschlagen lässt.
Rolleiflex 2,8 FX / 4,0 FW
5
Zur Einführung
18029_deutsch-englisch 14.03.2003 13:54 Uhr Seite 5
Page 6
Handhabung und
Gebrauch
Objektivdeckel entfernen
Unteren Deckel am Griff fassen, auf das Oberteil klappen und nach einer Linksdrehung aus dem
Bajonett nehmen.
Zum Aufsetzen den zusammengeklappten Deckel in
das Bajonett des Sucherobjektivs einsetzen, bis zum
Anschlag nach rechts drehen und herabklappen.
Tragriemen anbringen
Selbstverriegelnde Greifer am Riemenende in den Halter
15 und 35 stecken und einschnappen lassen.
Zum Lösen des Riemens Greifklauen zusammendrücken und Riemen aus dem Halter ziehen.
6 Rolleiflex 2,8 FX / 4,0 FW
Einsetzen und Wechseln der Batterie
Die Energieversorgung für die TTL-Belichtungs- und
Blitzinnenmessung übernimmt eine 6-V-Lithium-Batterie.
Einstellrad 29 bis zum 1-m-Anschlag drehen. Batteriefachdeckel 27 (verdeckt unter großer Rändelschraube)
im Einstellrad gegen den Uhrzeigersinn mit einer Münze
abschrauben, bis das Batteriefach freigegeben wird. Batterie mit der +-Seite nach unten einlegen und Deckel
wieder einschrauben. Bitte verwenden Sie nur Batterien
mit sichtbar über dem Gehäuseniveau liegendem Minuspol.
Batteriecheck
Tastknopf 17 kurz eindrücken, bei aufleuchtender LEDAnzeige 18 hat die Batterie genug Spannung. Batterie
nicht zu oft und zu lange prüfen, um unnötigen Energieverbrauch zu vermeiden.
35
15
27
29
17
18
18029_deutsch-englisch 14.03.2003 13:54 Uhr Seite 6
Page 7
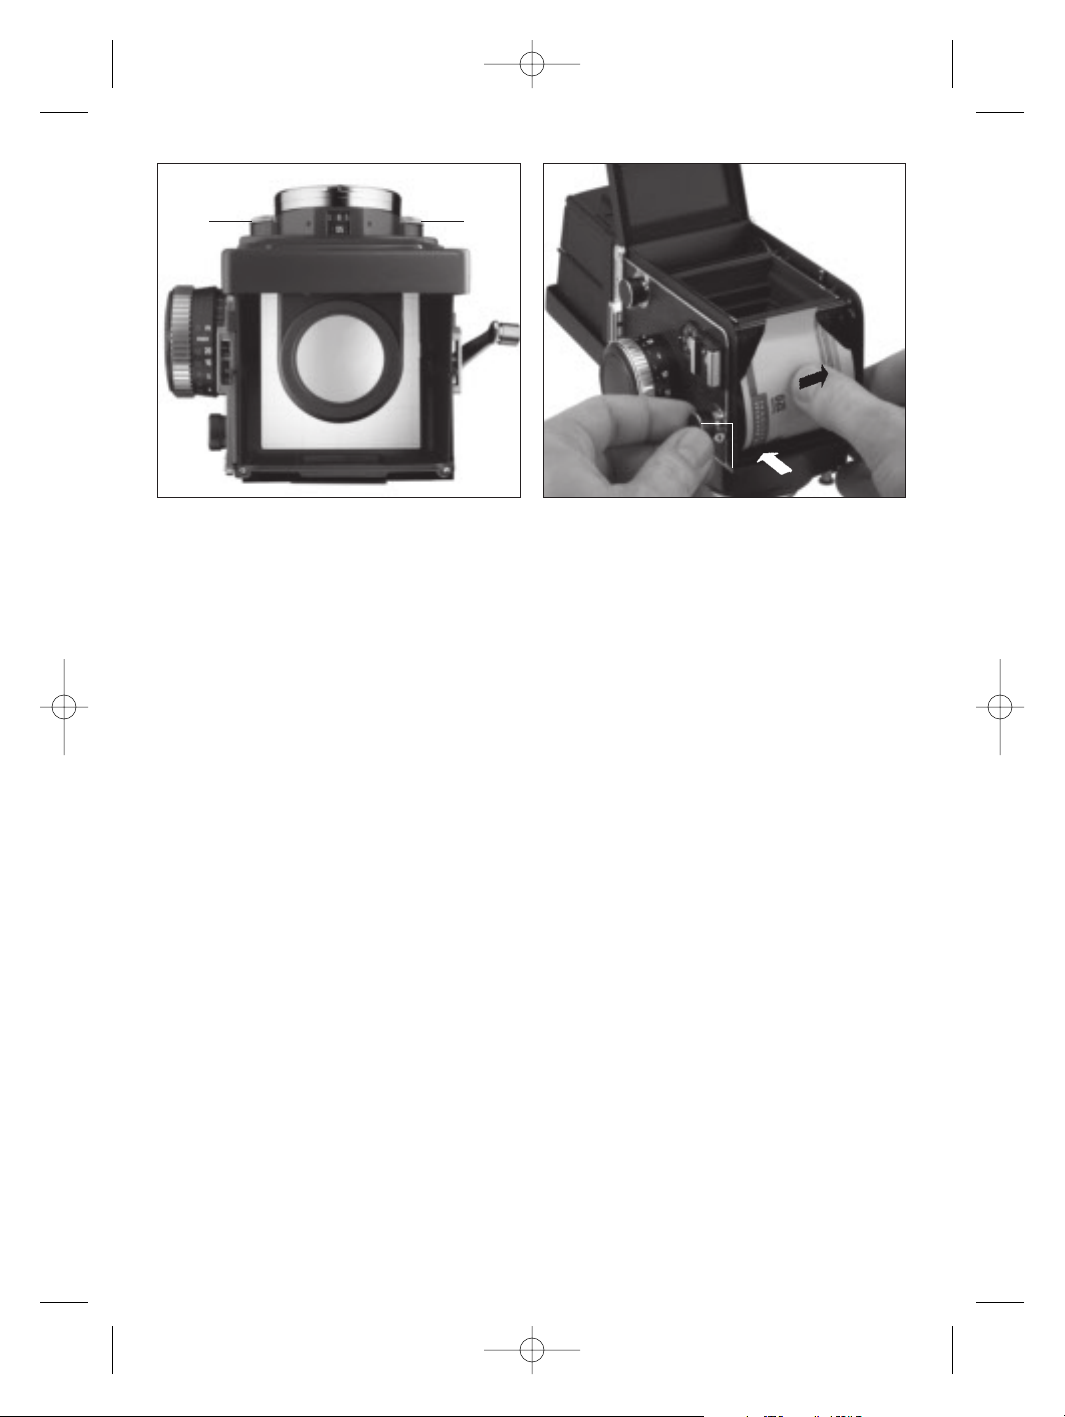
Lichtschacht öffnen
Lichtschachtdeckel hinten anheben und nach oben
schwenken.
Zum Hochstellen der Sucherlupe Rahmensucherklappe 5 etwas nach innen drücken, bis Lupenhalterung hochfedert.
Rahmensucher zum Visieren in Augenhöhe (nur
Rolleiflex 2,8 FX): Klappe 5 bis zum Einrasten nach
unten drücken.
Einblick dann durch Diopter 14 (Fokussieren in dieser
Stellung über die Entferungsskala).
Belichtung messen
Durch Antippen des entsicherten Auslösers 30 wird der
Belichtungsmesser für ca. 30 Sekunden eingeschaltet.
Das Aktivieren des Belichtungsmessers kann beliebig
wiederholt werden. Eine der 5 LED`s im Sucher leuchtet
auf. Sie haben folgende Bedeutung:
(A) rot links: (E) rot rechts:
mindestens um mindestens um
1 Lichtwert 1 Lichtwert
unterbelichtet überbelichtet
(C) grün Mitte:
richtige Belichtung
(B) gelb links: (D) gelb rechts:
ca.
1
/2 Lichtwert ca. 1/2 Lichtwert
unterbelichtet überbelichtet
Hinweis: Durch ihre Messcharakteristik ist die
Rolleiflex selbst schwierigsten Aufnahmesituationen
gewachsen, wie sie besonders kontrastreiche Motive
darstellen. Beim Belichtungsabgleich stets die bildwichtige Partie in das Messfeld legen (siehe Zeichnung)
und danach den gewünschten Bildausschnitt bestimmen.
Rolleiflex 2,8 FX / 4,0 FW
7
14
5
18029_deutsch-englisch 14.03.2003 13:54 Uhr Seite 7
Page 8
Abgleich von Zeit und Blende
Vorwahl der Belichtungszeit: Stellrad 11 drehen und
Zeitwert einrasten. Zwischenwerte sind nicht verwendbar.
1
/500 bis 1 s, B = Zeitbelichtungen von beliebiger
Dauer, der Belichtungsmesser lässt sich hierbei auf eine
Belichtungszeit von 2 s abgleichen. Zeitenwahl bei Blitzlicht: Seite 14.
Abgleich mit der Blende: Blendenrad 10 drehen, bis
grüne LED leuchtet. Volle und halbe Blendenstufen
rasten ein. Ein gezieltes Abgleichen auf „gelb“ ermöglicht Über- oder Unterbelichtung um ca.
1
/2 Lichtwert.
Kann nicht abgeglichen werden: andere Zeit wählen
und Blende erneut abgleichen.
Hinweis: Der Abgleich ist stets mit ausgeklappter
Sucherlupe durchzuführen, um Streulicht im Sucher und
somit Fehlmessungen zu vermeiden.
Filterfaktoren aufgesetzter Filter müssen durch Verringern der Filmempfindlichkeit berücksichtigt werden.
Soll das Filter in den Abgleich mit einbezogen werden,
so muss das Filter während des Messens auf das Sucherbajonett gesetzt werden.
8 Rolleiflex 2,8 FX / 4,0 FW
Film einlegen
Rückwand öffnen: Sicherungsschieber 24 am
Kameraboden zur Seite drehen, Rückwand entriegeln
und öffnen.
Film einspulen: Am unteren Spulenraum Spulenknopf 26 bis zum Anschlag herausziehen und
festhalten. Rollfilm nach Abtrennen des Klebestreifens –
mit der rechten Seite zuerst – so einsetzen, dass die
bedruckte Papierseite nach außen liegt. Spulenknopf 26
voll zurückfedern lassen.
10 11
26
18029_deutsch-englisch 14.03.2003 13:54 Uhr Seite 8
Page 9
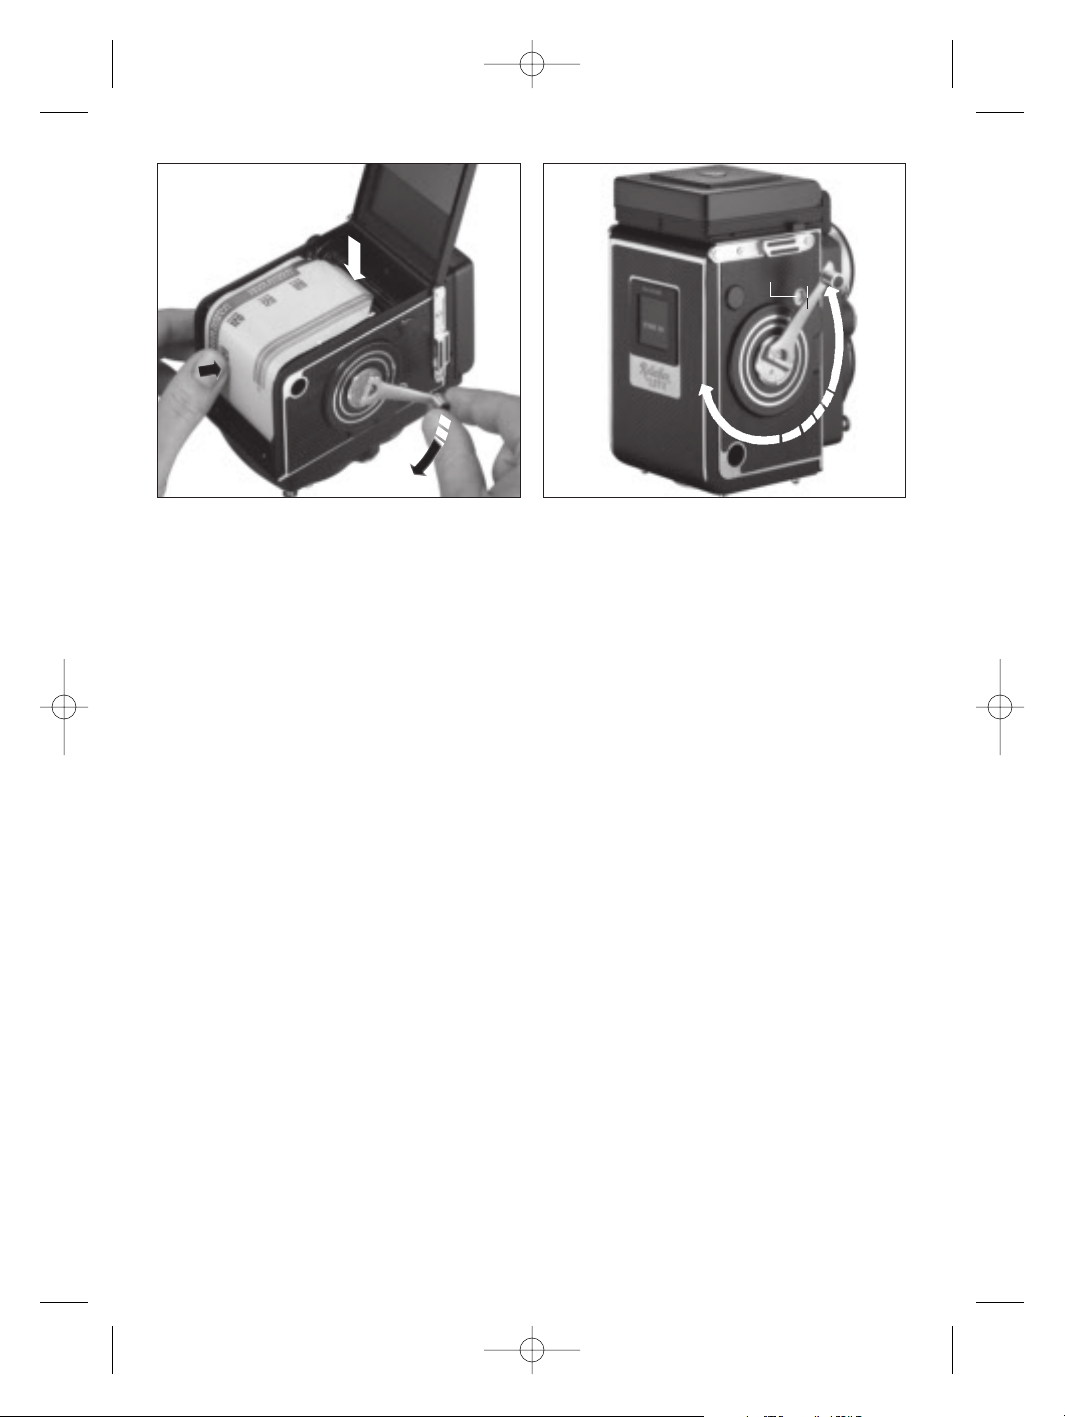
Anfang des Schutzpapiers in den langen Schlitz der
Leerspule (mit Kurbel 32 entsprechend einstellen)
tief einstecken. Film mit der Kurbel straff aufspulen
(untere Spule mit dem Daumen bremsen), bis die Pfeilmarkierung auf dem Schutzpapier mit dem roten Index
am Kamerakörper zur Deckung gebracht wird.
Rückwand schließen: Riegel 25 vor den Haltedorn
klappen und mit Sicherungsschieber 24 sichern.
Hinweis: Film immer im eigenen Körperschatten
einlegen, nie in voller Sonne.
Filmtransport auf Bild Nr. 1: Kurbel 32 zügig bis zum
Anschlag drehen und in Gegenrichtung zurück bis zur
Ausgangsstellung. Die Kurbel ist jetzt in ihrer
Ausgangsstellung blockiert. Das Bildzählwerk 34 zeigt
das 1. Bild an, der Verschluss ist gespannt, der Film ist
bereit zur ersten Aufnahme.
Rolleiflex 2,8 FX / 4,0 FW
9
34
32
18029_deutsch-englisch 14.03.2003 13:55 Uhr Seite 9
Page 10
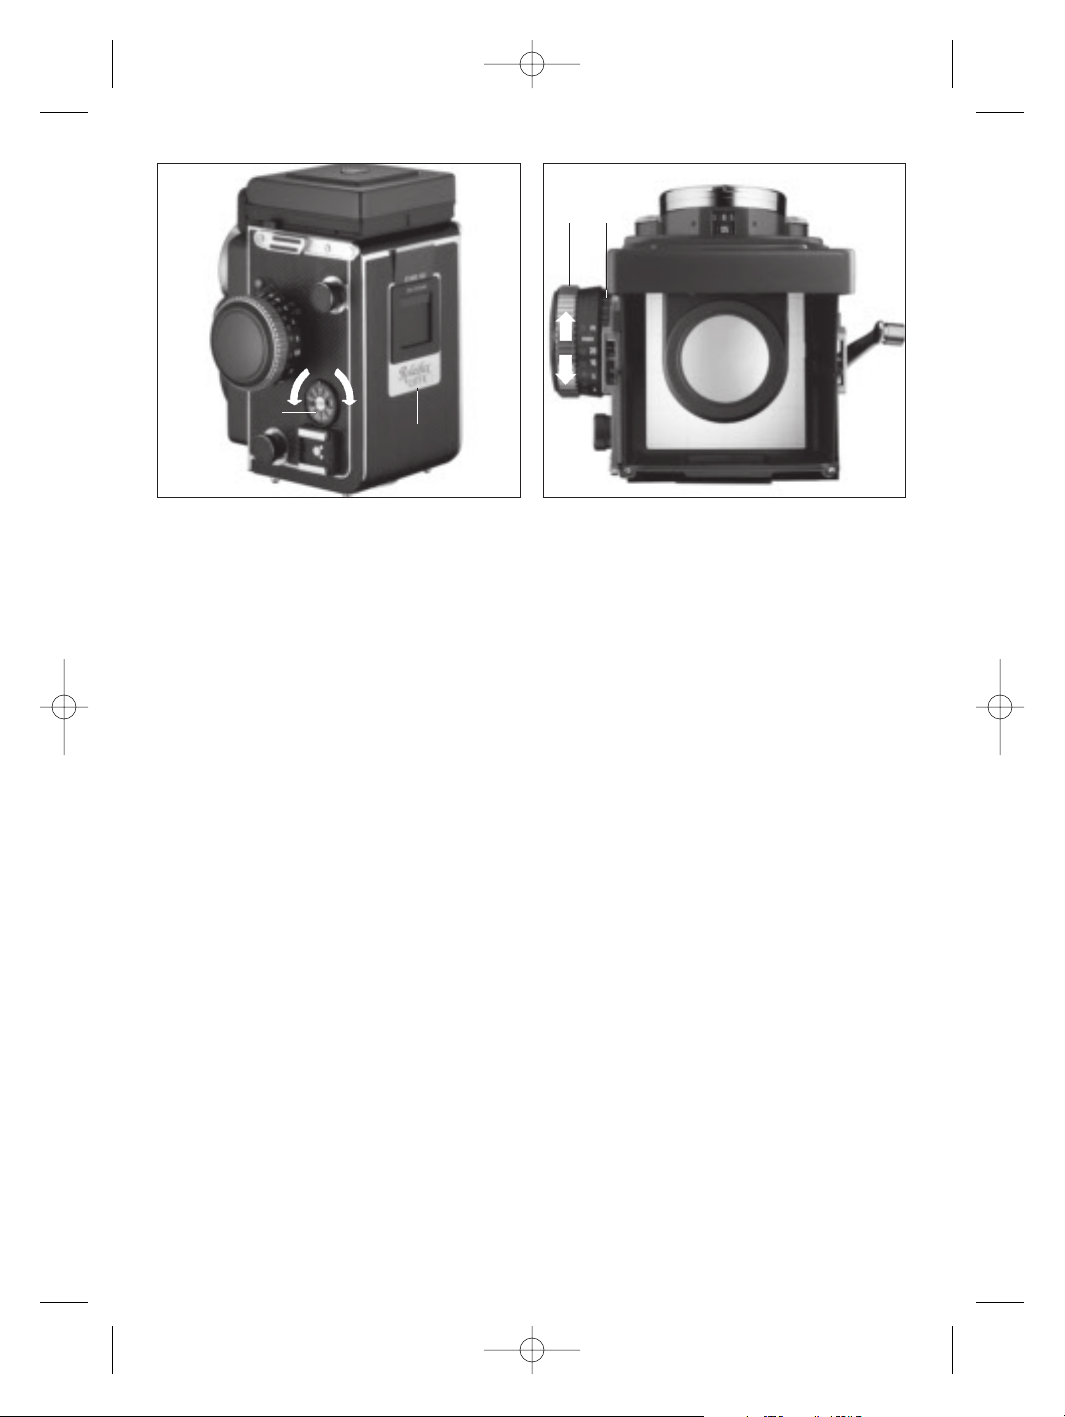
Filmempfindlichkeit einstellen
Stellscheibe 20 auf den ISO-Wert des eingelegten Films
einrasten. Die Einstellung der Filmempfindlichkeit reicht
von ISO 25/15° bis ISO 6400/39°, womit praktisch alle
Filmemulsionen des Weltmarktes abgedeckt sind.
Zur gewollten Unter- oder Überbelichtung Filmemp-
findlichkeit entsprechend verstellen.
Filmmerkfach
Um die verwendete Filmsorte zu kennzeichnen: Lasche
der Filmpackung abreißen und von oben in das Filmmerkfach 19 einschieben. Diese „Originalanzeige“
schließt durch Farbe und Beschriftung jeden Irrtum aus.
10 Rolleiflex 2,8 FX / 4,0 FW
Fokussieren
Lichtschacht öffnen, je nach Bedarf Sucherlupe 2 hochklappen. Bildschärfe durch Drehen am Stellrad 29 einstellen.Gemessene Entfernung in m ist am Index ablesbar. Der Schärfentiefe-Bereich kann über die Blendenzahlen beiderseits vom Entfernungsindex 28 ermittelt
werden.
Die Standard-Einstellscheibe 6 bietet drei verschiedene Einstellhilfen: den zentralen Schnittbildentfernungsmesser, den Mikroprismenring und die Fresnel-Mattscheibe selbst. Diese Standard-Einstellscheibe stellt für viele Anwendungen das Optimum
dar – für spezielle Aufnahmegebiete gibt es im Zubehörprogramm weitere Wechsel-Einstellscheiben.
Bildausschnitt wählen
Das quadratische Liniennetz der Standard-Einstellscheibe
hilft beim vertikalen oder horizontalen Ausrichten der
Kamera. Die Linien haben 10 mm Abstand, kleinere Bildausschnitte lassen sich im 4,5 x 6-cm-Hoch- oder Querformat und auch im 4 x 4-cm-Format durch Linienschnittpunkte festlegen und markieren.
Zum Visieren in Augenhöhe Rahmensucherklappe 5
ganz nach innen drücken und einrasten lassen – Einblick dann durch Diopter 14 (nur Rolleiflex 2,8 FX).
Als Alternative zum Standard-Faltlichtschacht gibt es als
Zubehör zwei Prismensucher mit 45°- oder 90°-Einblick.
20
19
29 28
2
6
18029_deutsch-englisch 14.03.2003 13:55 Uhr Seite 10
Page 11

Auslösen und Belichten
Auslöser entsichern: Sicherungshebel 31 am Auslöser 30
von „gesichert“ auf „entsichert“ (grüner Punkt) umlegen. Für erschütterungsfreies Belichten ist der Auslöser
mit einem Gewinde für Drahtauslöseranschluss ausgestattet.
Langzeitaufnahmen („B“, länger als 1 sec):
Auslöser für die Dauer der Belichtung niederdrücken.
Erst beim Loslassen schließt sich der Verschluss.
Bei extremen Langzeitaufnahmen Auslöser niederdrücken und durch „Sichern“ arretieren. Belichtung
durch „Entsichern“ beenden (Vorsicht vor
Erschütterung! Vor Beginn und Ende der Belichtung das
Objektiv mit der Hand frei verdecken).
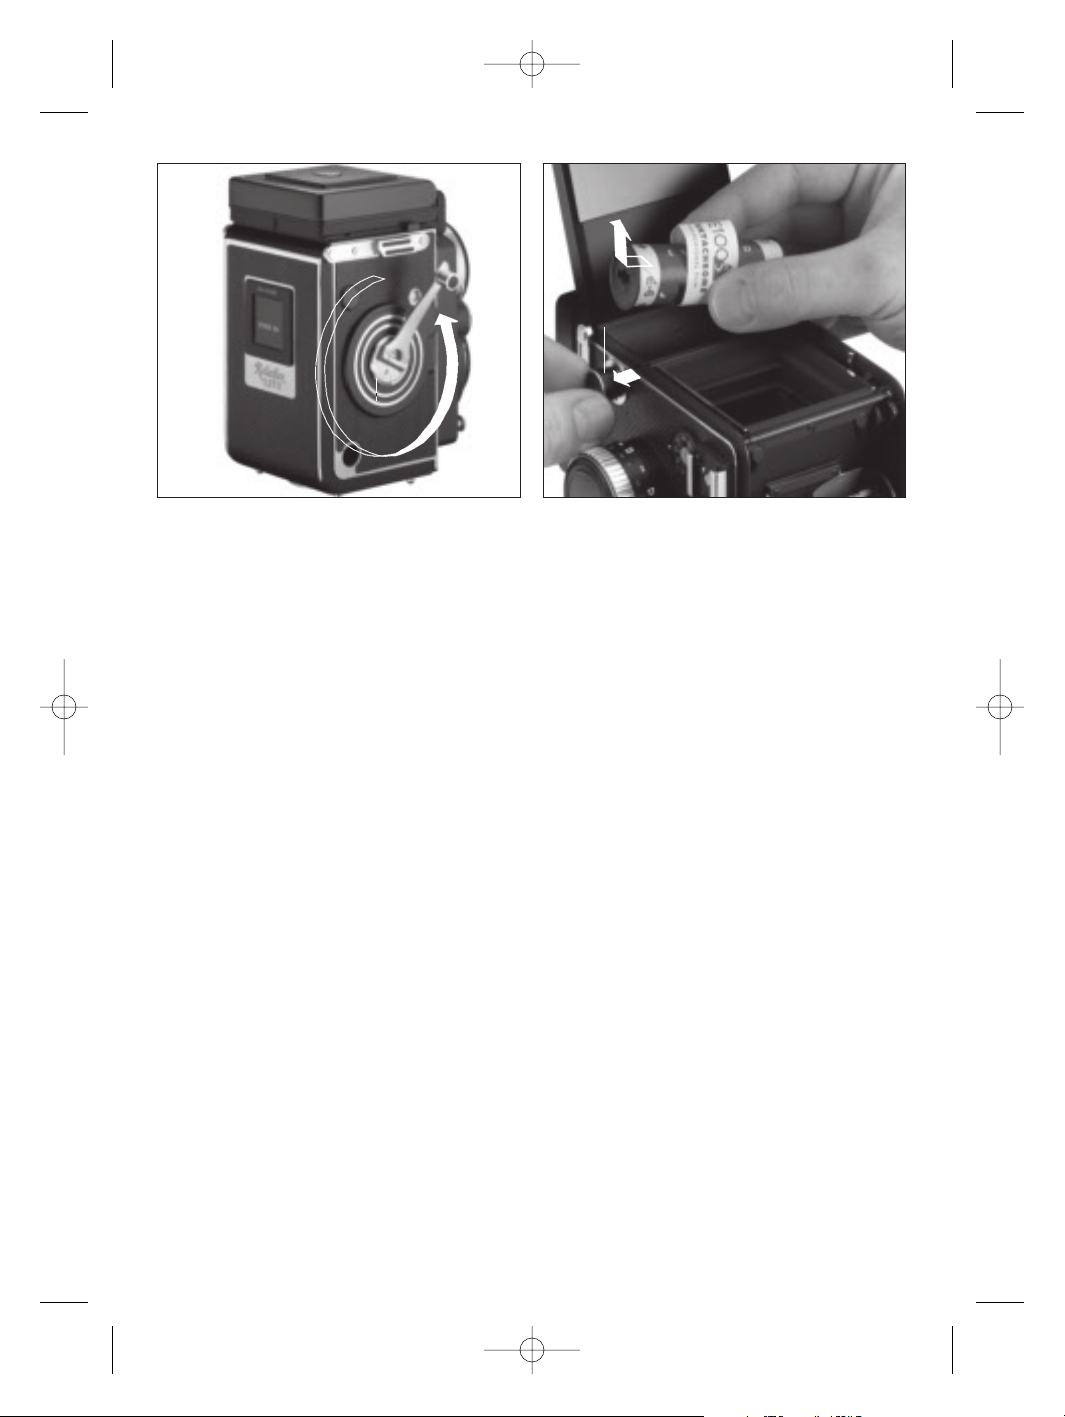
Filmtransport und Verschlussaufzug
Nach der Aufnahme: Kurbel 32 herausklappen, im Uhrzeigersinn bis zum Anschlag drehen und wieder zurück
zur Ausgangsstellung.
Damit ist auch der Verschluss wieder gespannt und
die Kamera ist betriebsbereit. Erst nach dem Auslösen
kann die Kurbel erneut bedient werden. Doppelbelichtung und Leerfelder sind ausgeschlossen. (Ausnahme:
Mehrfachbelichtung, → Seite 12).
Rolleiflex 2,8 FX / 4,0 FW
11
31
30
32
18029_deutsch-englisch 14.03.2003 13:55 Uhr Seite 11
Page 12
Mehrfachbelichtung
Für Trick- und Kombinationsaufnahmen lässt sich die
Doppelbelichtungssperre abschalten (nur bei eingelegtem Film möglich): Nach der Aufnahme den gezahnten
Ring 33 neben dem Kurbelgelenk in Pfeilrichtung drehen, danach die Kurbel mit einer vollen Linksdrehung bis
zum Anschlag führen. Damit ist der Verschluss ohne
Filmtransport für eine weitere Belichtung gespannt.
Nach jedem Auslösen lässt sich das beschriebene Verfahren wiederholen und derselbe Filmabschnitt beliebig oft
belichten.
12 Rolleiflex 2,8 FX / 4,0 FW
Film entnehmen
Nach der 12. Aufnahme lässt sich die Kurbel frei durchdrehen. Mit drei Umdrehungen das restliche Schutzpapier aufspulen. Rückwand möglichst im Schatten öffnen,
Spulenknopf 16 ziehen und den Film von links her entnehmen. Schutzpapier breit einfalten (zum bequemeren
Aufreißen beim Entwickeln) und festkleben. Den belichteten Film wieder lichtsicher aufbewahren.
33
16
18029_deutsch-englisch 14.03.2003 13:55 Uhr Seite 12
Page 13
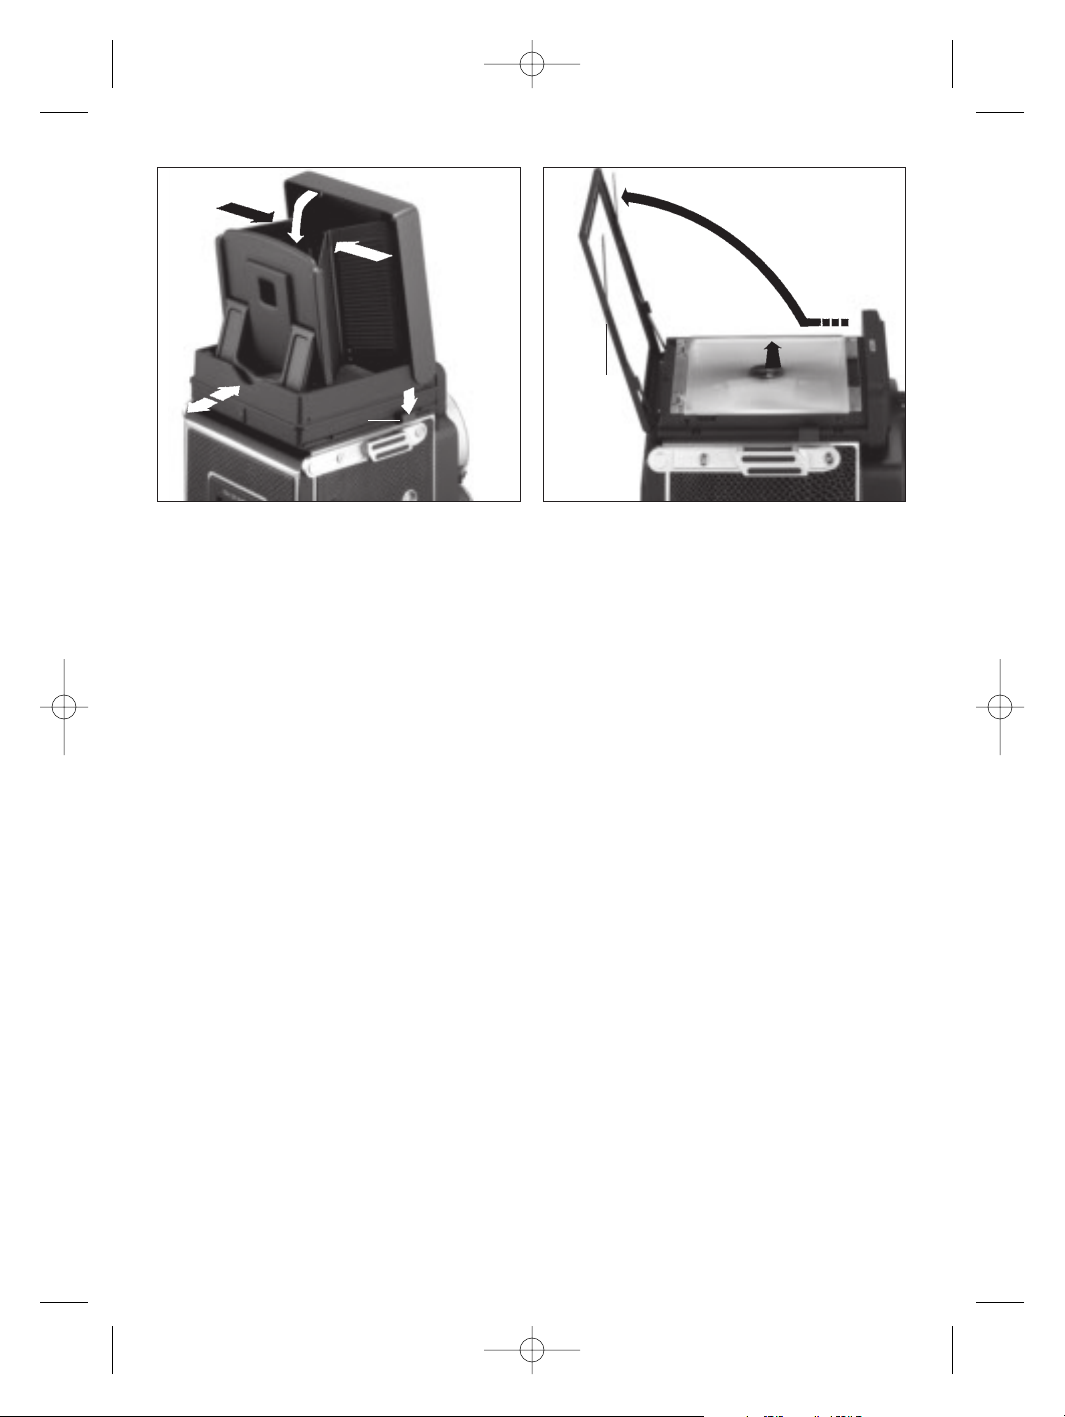
Lichtschacht schließen
Lupenhalter 3 zwischen Lupe und Lichtschachtdeckel
niederklappen. Beide Seitenteile nach innen drücken
und wieder freigeben, wodurch der Lichtschacht selbsttätig schließt. Falls mit Rahmensucher gearbeitet wurde:
Federnde Seitenteile eindrücken und Rahmensucherklappe hochfedern lassen. Erst danach Lichtschacht wie
oben beschrieben vollständig schließen.
Lichtschacht abnehmen
Zum Reinigen der Kamera oder zum Wechseln der
Suchersysteme ist der Standard-Lichtschacht leicht abzunehmen: Lichtschacht durch Drücken der beiden Tasten
36 entriegeln und nach hinten abnehmen. Beim Ansetzen Lichtschacht niederdrücken und bis zum Einrasten
der beiden Tasten 36 nach vorn schieben.
Lupenwechsel für Brillenträger
Zur Scharfeinstellung ohne Brille kann die Lupe des Faltlichtschachts ausgewechselt und dem fehlsichtigen
Auge innerhalb +3 und –3 Dioptrien angepasst werden.
Zum Auswechseln Lupe bei offenem Rahmensucher am
hinteren Fassungsrand nach vorn drücken und anheben.
Die auszuwechselnde Lupe sinngemäß im Lupenhalter
nach vorn schieben und festdrücken.
Einstellscheibe wechseln
Lichtschacht abnehmen. Einstellscheiben-Rahmen 37
seitlich fassen, etwas zurückziehen und hochklappen.
Einstellscheibe entnehmen. Beim Einlegen der Scheibe
auf genaue Lage zwischen oberer und unterer Leiste
und seitlichen Führungen achten. Auf richtige Lage der
mattierten Fläche achten (nach unten), bei Scheiben mit
Linse muss die Linse nach oben zeigen. Zum Schließen
Rahmen niederklappen und nach vorn schieben.
Rolleiflex 2,8 FX / 4,0 FW
13
36
3
37
18029_deutsch-englisch 20.03.2003 13:16 Uhr Seite 13
Page 14

Blitzbetrieb
Die Rolleiflex ist bei allen Verschlusszeiten bis
1
/500 sec. xsynchronisiert. Die Kamera bietet zwei Möglichkeiten
zum Anschluss von Blitzgeräten:
1. Um die Vorteile der TTL-Blitzmessung anwenden
zu können, werden zur Rolleiflex passende System-Blitzgeräte empfohlen. In Verbindung mit der Rolleiflex
erweisen sich Stabblitzgeräte als besonders vorteilhaft.
Der Rollei Blitzadapter SCA 356 ermöglicht das systemkonforme Blitzen mit allen Systemblitzgeräten namhafter Hersteller, die das SCA-300-System anbieten. Bei der
vollautomatischen TTL-Blitzmessung wird die Lichtmessung von einem in die Kamera eingebauten Sensor
übernommen, der das von der Filmoberfläche reflektierte Licht während der Aufnahme registriert. Die spezielle
Blitzsteuerelektronik dosiert dann die für das jeweilige
Motiv erforderliche Lichtmenge. Filterfaktoren aufgesetzter Filter werden dabei automatisch berücksichtigt.
14 Rolleiflex 2,8 FX / 4,0 FW
Der Systemadapter Rollei SCA 356 wird direkt mit der
Kamera über den Blitzschuh 22 mit X-Synchronkontakt
(a) und den Steuerkontakten (b) verbunden. Die Filmempfindlichkeitseinstellung erfolgt am Adapter. Die
Blitzbereitschafts- und Computerkontrollanzeige ist am
Blitzgerät zu sehen.
Soll die optimale Blende genutzt werden, so ist diese
wie folgt durch Probeblitzen festzustellen: versuchen
weiter abzublenden, solange die Belichtungskontrollanzeige aufleuchtet. Es empfiehlt sich, die
Probeblitze über die Mehrfachbelichtungs-Funktion
durchzuführen (nur 1 Bild Verlust!)
2. Normale manuelle oder Computerblitzgeräte können über den Kamerablitzschuh oder mit der X-Synchronbuchse 13 verbunden werden.
a
22
b
18029_deutsch-englisch 14.03.2003 13:55 Uhr Seite 14
Page 15

Wechselsucheraufsätze
Zwei austauschbare Sucheraufsätze sowie verschiedene
Hell-Einstellscheiben sichern für jede Aufgabenstellung
die ideale Motivsicht. Der Standard-Faltlichtschacht dient
der senkrechten Sucherbildbeobachtung und ist mit
einer austauschbaren Sucherlupe (+3 bis –3 Dioptrien,
3,1 fache Vergrößerung) ausgestattet. Prismensucher
mit 45° oder 90° Einblick liefern ein seitenrichtiges und
aufrecht stehendes Sucherbild.
Weichledertasche
für die Kamera mit Standard-Faltlichtschacht, aufgesetztem Filter und Gegenlichtblende. Zwei seitlich angebrachte Reißverschlüsse sorgen für schnelle Aufnahmebereitschaft. Während der Aufnahme bleibt die Tasche
an der Kamera.
Feste Lederbereitschaftstasche
Robuste Hartledertasche aus schwarzem Rindsleder mit
abnehmbarem Taschenvorderteil für die Kamera mit
Standard-Faltlichtschacht.
Bietet optimalen Schutz der Kamera und schnelle Aufnahmebereitschaft bei heruntergeklapptem Vorderteil.
Metallgegenlichtblende
Speziell der Brennweite des Objektives angepasste starre
Gegenlichtblende aus schwarz eloxiertem Aluminium.
Mit schwarzem Lederetui, geeignet zur Befestigung am
Kameratragriemen. Schützt zuverlässig vor kontrastminderndem, unkontrolliert einfallendem Seitenlicht (Streulicht).
Stativkopf Rolleifix
Sorgt für eine schnelle und bequeme Montage der
Rolleiflex auf dem Stativ. Die Kamera wird dazu lediglich
zwischen zwei Halteschienen eingeschoben und mit
einem Kipphebel gesichert. Das Rolleifix kann ständig
am Stativ verbleiben.
Pistolenhandgriff
Erleichtert und beschleunigt die Arbeit besonders in Verbindung mit dem 45°- oder 90°-Prismensucher.
Die rechte Hand hält die Kamera am Griff und löst die
Kamera aus. Die linke Hand bedient dabei das Einstellrad. Eine Lederhandschlaufe sichert Griff und Kamera.
Blitzadapter SCA 356
Der Rollei Blitzadapter SCA 356 ermöglicht systemkonformes Blitzen mit allen Systemblitzgeräten namhafter
Hersteller, die das SCA-300-System anbieten. Durch einfaches Aufstecken des Blitzgerätes mit dem SCA-Adapter in den Blitzschuh der Kamera wird die Systemverbindung hergestellt. Somit laufen die notwendigen Daten
für das systemkonforme Blitzen zusammen und garantieren optimale Blitzaufnahmen.
Rolleiflex 2,8 FX / 4,0 FW
15
Wichtiges Zubehör
18029_deutsch-englisch 14.03.2003 13:55 Uhr Seite 15
Page 16

Hell-Einstellscheibe mit zentralem Messraster
und Messkeil
Universal-Einstellscheibe mit Messkeil, Mikroraster, Fresnel-Mattscheibe, Messkeil für höchste Einstellgenauigkeit bei senkrechten Linien, Mikroraster mit Einstellkriterium „flimmerfreies Bild“, Mattscheibe mit
Mikrofeinstruktur zur Schärfenbeurteilung über das
gesamte Bildfeld.
Mattglasscheibe
Einstellscheibe aus feinmattiertem Glas für
genauestes Einstellen. Besonders geeignet für
Bildgestaltung, wenn Einstellhilfen stören können.
Hell-Einstellscheibe
Einstellscheibe mit Mikrofeinstruktur zur Schärfenbeurteilung über das gesamte Bildfeld, dabei ungestörte
Motivgestaltung.
High-D-Screen für exzellente Sucherbildhelligkeit
und exakte Scharfeinstellung
Superhelle Einstellscheibe mit Mikrostruktur-Oberfläche
für optimale Beurteilung von Schärfentiefe und Schärfenverlauf. Messkeil für höchste Einstellgenauigkeit bei
senkrechten Linien.
Hell-Einstellscheibe mit Messraster
Universal-Einstellscheibe für schnelle Aufnahmen mit
Mikroraster und Mattscheibe, ermöglicht auch bei
schlechten Lichtverhältnissen einwandfreie Scharfstellung. Einstellkriterium „flimmerfreies Bild“.
16 Rolleiflex 2,8 FX / 4,0 FW
Störung
Auslöser lässt sich nicht drücken
Belichtungsmesser zeigt nicht an
Nach dem Drücken der Batterieprüftaste leuchtet
grüne LED nicht
Belichtungsabgleich ist nicht möglich
Aufnahme ist fehlbelichtet
bei Blitzaufnahmen mit Systemadapter
18029_deutsch-englisch 14.03.2003 13:55 Uhr Seite 16
Page 17

Ursache Abhilfe
Auslöser ist gesichert Auslöser entsichern (drehen)
Verschluss ist nicht gespannt Pendelschwung der Kurbel durchführen
Kurbel steht in einer Zwischenstellung
und nicht in der gespannten Endlage
Einschaltzeit von ca. 30 s abgelaufen Auslöser erneut antippen
Batterie entladen Batterie auswechseln
Batterie falsch gepolt Batterie richtig gepolt einlegen
Ungünstige Filmwahl: Besser geeigneten Film verwenden
Hochempfindlicher Film bei hellem Licht
Niedrigempfindlicher Film bei schwachem Licht
Fehlmessung durch starke Störlichteinwirkung Sucherschacht gegen Störlicht abschirmen
über den Sucherschacht
Bildwichtige Teile lagen außerhalb des Messfeldes Messfeld des Belichtungsmessers beachten
Filmempfindlichkeit falsch eingestellt Filmempfindlichkeit richtig einstellen
Blitzgerät noch nicht betriebsbereit Bereitschaftsanzeige am Blitzgerät beachten
Blitzenergie zu gering bzw. Blende zu klein Belichtungskontrollanzeige am Blitzgerät nach der
Aufnahme beachten und evtl. mit größerer Blende
Aufnahme wiederholen
Filmempfindlichkeit falsch eingestellt Filmempfindlichkeit am Adapter richtig einstellen
Rolleiflex 2,8 FX / 4,0 FW
17
18029_deutsch-englisch 14.03.2003 13:55 Uhr Seite 17
Page 18

Pflege der Kamera
Die Rolleiflex beansprucht die gleiche Pflege wie jedes
hochwertige Gerät, von dem Zuverlässigkeit auf lange
Sicht erwartet wird.
Zum Reinigen bitte keine chemischen Lösungsmittel verwenden sondern die bewährten Methoden anwenden:
Entstauben mit weichem Haarpinsel oder Gummiblasebalg. Bei Bedarf Linsenaußenflächen reinigen,
anhauchen und mit Linsenputzpapier nachpolieren. Als
Antistaticschutz: anhauchen, Feuchtigkeit verdunsten
lassen.
Besondere Vorsicht beim Reinigen der Einstellscheibe:
Ober- und Unterseite sind rauh und dürfen nur mit weichem Pinsel oder Blasebalg behandelt werden. Vor Verschmutzung und Fingerspuren bewahren! Kamera vor
Dauereinwirkung schädlicher Dämpfe oder Feuchtigkeit
schützen. Die erhöhte Luftfeuchtigkeit in tropischen und
subtropischen Gebieten bedroht die Metallteile durch
Korrosion und die Glasflächen durch Fungusbelag.
Wenn irgend möglich, Kamera häufig in frischer Luft
und Sonne trocknen. Filmgleitflächen sauberhalten (vom
Film abgeriebene Gelantineteilchen sind Nährboden für
Pilze). Bei längerem Nichtgebrauch die Kamera in luftdichtem Behälter zusammen mit Silikagelpatrone aufbewahren. Kamera mit besonderer Sorgfalt vor Verschmutzung jeder Art schützen.
Der Service der Rollei Fototechnic GmbH betreut Ihre
Kamera gern und hilft bei allen Fragen der Fotografie
mit Rolleiflex-Kameras.
Bitte rufen Sie uns an:
Fachberatung: (0531) 68 00-2 77
Service: (0531) 68 00-3 33
18 Rolleiflex 2,8 FX / 4,0 FW
Kameratyp
Zweiäugige Spiegelreflexkamera mit TTL-Belichtungsmessung und TTL-Blitzautomatik
Aufnahmeformat
6 x 6 cm
Filmsorten
120er Rollfilm für 12 Aufnahmen 6 x 6 cm
Filmempfindlichkeit
An der Kamera von ISO 25/15° – ISO 6400/39°
einstellbar.
Belichtungsmessung
Mittenbetonte Integralmessung durch 2 Si-Fotoelemente. Anzeige im Sucher über 5 LED`s.
Messbereich
Lichtwert 3–18/3,2–100 000 asb/1–33 000 cd/m
2
bei ISO 100/21° Film mit Objektiv 2,8/80 mm
Technische Daten
Beratungs-Hotline
▼
Mo – Fr
8.00 bis 20.00 Uhr
Telefon
05 31- 6 80 02 77
18029_deutsch-englisch 14.03.2003 13:55 Uhr Seite 18
Page 19

Objektiv
Rolleiflex 2,8 FX: Planar 2,8/80 mm HFT, Bildwinkel 53°,
Bajonettgröße III, Entfernungsbereich ∞ - 1 m.
Rolleiflex 4,0 FW: Super-Angulon 4/50 mm HFT,
Bildwinkel 75°, Bajonettgröße IV,
Entfernungsbereich ∞ - 0,6 m.
Verschluss
Zentralverschluss (1–
1
/500 sec. und B) X-synchronisiert.
Blenden und Zeiten mit Belichtungsmesser
gekuppelt.
Suchersystem
Sucherobjektiv Heidosmat 2,8/80 mm bzw. 4/50 mm,
Faltlichtschacht serienmäßig, Parallaxenausgleich entsprechend eingestellter Entfernung. Wechselbar gegen
45°- bzw. 90°-Prismensucher. Wechselbare Einstellscheiben.
Blitzsynchronisation
1
/500 —1 sec. und B. Zubehörschuh mit SynchronMittenkontakt und Kontakten für TTL-Blitzautomatik in
Verbindung mit Systemblitzgeräten und Spezialadapter. X-Synchronbuchse für Stecker nach
DIN 19003.
Blitzautomatik
TTL-Blitzlichtmessung auf der Filmebene über zusätzliches Si-Fotoelement.
Filmtransport
Transportkurbel mit Verschlussaufzug gekuppelt. Automatischer Stopp bei Bild 1. Doppelbelichtungssperre,
abschaltbar, Filmzählwerk von 1 — 12. Springt beim
Filmwechsel automatisch in Nullstellung.
Anschlüsse
Drahtauslöser-Anschluss. Stativgewinde
1
/4“.
Abmessungen
Rolleiflex 2,8 FX:
H/B/T: 147 x 109 x 108 mm
Rolleiflex 4,0 FW:
H/B/T: 147 x 109 x 118 mm
Gewicht
Rolleiflex 2,8 FX: ca. 1245 g
Rolleiflex 4,0 FW: ca. 1275 g
(o. Batterie)
Rolleiflex 2,8 FX / 4,0 FW
19
18029_deutsch-englisch 14.03.2003 13:55 Uhr Seite 19
Page 20

18029_deutsch-englisch 14.03.2003 13:55 Uhr Seite 20
Page 21

Coponents and functions 22
Introduction 23
Handling and use 24
Removing of the lens cap 24
Fitting the carrying strap 24
Inserting and changing the battery 24
Battery check 24
Opening the viewfinder hood 25
Measuring the exposure 25
Matching speed and aperture 26
Inserting the film 26
Setting the film speed 28
Film memo-holder 28
Focusing 28
Selecting the frame 28
Releasing and exposing 29
Film transport and shutter tensioning 29
Multiple exposures 30
Removing the film 30
Closing the viewfinder hood 31
Detaching the viewfinder hood 31
Changing the magnifier for spectacle-wearers 31
Changing the focusing screen 31
Flash operation 32
Most important accessories 33
Interchangeable viewfinders 33
Soft leather carrying bag 33
Pistol handgrip 33
Flash adapter SCA 356 33
Bright focusing screen with
central microprism ring and split-image wedge 33
High-D-Screen 33
Ground glass screen 33
Bright focusing screen 33
Bright focusing screen with microprism ring 33
Remedy for handling faults 34
Care of the camera 35
Technical data 36
Depth-of-field table m 37
Rolleiflex 2.8 FX / 4.0 FW
21
Contents
18029_deutsch-englisch 14.03.2003 13:55 Uhr Seite 21
Page 22

01 Standard viewfinder hood
02 Magnifier, interchangeable
03 Holder for magnifier
04 Viewfinder hood cover, folding
05 Flap for frame finder
06 Focusing screen
07 LED indicator for exposures balance
08 Indicator window for aperture and shutter speed
09 Viewfinder lens Heidosmat with double bayonet
10 Aperture wheel
11 Speed selector wheel
12 Lens with double bayonet
13 X-synchronizing flash socket for standard plug
14 Diopter for frame finder (2.8 FX only)
15 Holder for carrying strap, left
16 Spool knob for empty spool
17 Push button for battery check
18 Battery-check LED
19 Film memo-holder
20 Control disk for film speed
21 Camera back cover
22 Hot shoe with X-synchronizing contact (a)
and contacts for system flash unit (b)
22 Rolleiflex 2.8 FX / 4.0 FW
23 Tripod bush1/4”
24 Safety clip for back cover
25 Back cover lock lever
26 Film-spool knob
27 Lid for battery compartment
28 Scale for depth-of-field with distance index
29 Focusing knob with distance scale
in “m” and “feet”
30 Release with thread for cable release
31 Safety lever for release
32 Crank for film transport and shutter tension
33 Release ring avoiding film transport
for multiple exposures
34 Film frame counter
35 Holder for carrying strap, right
36 Unlocking buttons for viewfinder hood
or prism viewfinder
37 Hinged frame for focusing screen
Components
and functions
18029_deutsch-englisch 14.03.2003 13:55 Uhr Seite 22
Page 23

Congratulations on your new Rolleiflex TLR camera.
Your Rolleiflex is a twin lens medium format camera
with TTL metering.
To utilize entirely all possibilities of the camera and
to avoid any handling faults, you are recommended to
read through this manual carefully. It is subdivided as
follows: Next, all components and functions are
presented. All the important information about the
camera is following described and illustrated in detail
and in the useful sequence of necessary
manipulations – from setting the camera ready for use
up to the removal of the exposed film.
In case of any handling faults – which even may happen to the experienced photographer when taking pictures in a hurry or after a long period of not using the
camera – a trouble-shooting guide will help to find out
quickly the possible cause and its remedy.
Component numbers mentioned in text and
illustration always refer to the same component and are
first given in the picture gatefold which is best left
unfolded when reading the instructions.
Rolleiflex
2.8 FX
/ 4.0 FW
23
Introduction
18029_deutsch-englisch 14.03.2003 13:55 Uhr Seite 23
Page 24

Handling and use
Removing the lens cap
Lift the lower cap by the tab and fold it against the
upper cap. Remove the cap from the bayonet by
turning it counter-clockwise.
For attachment fit the folded cap into the viewfinder lens bayonet, turn it clockwise to lock and fold
down the lower cap.
Attaching the carrying strap
Insert the self-locking grippers at the ends of the strap
into holders 15 and 35 so that they snap in place.
To release the strap, press the two claws together
and pull the strap out of the holders.
24 Rolleiflex 2.8 FX / 4.0 FW
Inserting and changing the battery
The power for TTL-exposure and flash metering is
supplied by a battery. A 6-V-lithium battery is required.
Turn focusing knob 29 to the ”1 m” stop. Unscrew the
battery compartment lid 27 in the focusing knob
counter-clockwise by means of a coin till the battery
compartment is released. Insert battery with the plus
sign down and rescrew the lid. Please only use batteries
with a minus pole significantly over the battery level.
Battery check
Press push button 17 briefly: if the LED indicator 18
lights up the battery voltage is adequate. To avoid unnecessary loss of the power supply do not test the battery
too often or for too long.
27
29
17
18
35
15
18029_deutsch-englisch 14.03.2003 13:55 Uhr Seite 24
Page 25

Opening the viewfinder hood
Lift rear edge of the hood cover and swing upwards. To
raise up the magnifier, press the frame finder flap 5
slightly inwards until the magnifier holder springs up.
Frame finder for eye-level viewing (Rolleiflex 2.8 FX
only): Press down flap 5 until it snaps into position. Viewing takes place through diopter 14 (in this position
focusing via the distance scale).
Measuring the exposure
By touching lightly the freed release 30 the exposure
meter is switched on for about 30 seconds. Activating
the exposure meter can be repeated whenever needed.
One of the 5 LED`s in the viewfinder will light up. They
have the following significance:
(A) red left: (E) red right:
at least 1 exposure at least 1 exposure
value under-exposed value over-exposed
(C) green centre:
correct exposure
(B) yellow left: (D) yellow right:
about
1
/2 exposure about 1/2 exposure
value under-exposed value over-exposed
Note: The measurement characteristics of the
Rolleiflex make this camera ideal for even the most
demanding photographic situation, such as exposures
involving particularly hight contrast
subjects. For exposure compensation, always keep the
most important subject detail within the
measurement field (see illustration) and then
determine the required frame area.
Rolleiflex 2.8 FX / 4.0 FW
25
Zone covered
by the exposure metering
14
5
18029_deutsch-englisch 14.03.2003 13:55 Uhr Seite 25
Page 26

Matching speed and aperture
Preselection of exposure time: Turn the selector wheel
11 to set the shutter speed. Intermediate settings are
not applicable.
1
/500 to 1 s, B = time exposure of any
desired duration, the exposure meter can be matched to
an exposure time up to 2 s. For choice of exposure time
using flash: see page 32.
Matching with aperture: Turn aperture wheel 10
until green LED lights up. It clicks into position on full
and half aperture stops. Specified matching on
"yellow" allows over- and under-exposing by about
1
/2 exposure value.
If correct matching cannot be obtained: select another shutter speed and match aperture again.
Note: Speed and aperture should always be matched
with the magnifier folded out, so as to avoid stray light
and hence false readings.
Filter factors of any fitted filter must be taken into
consideration by reducing the film speed. If the filter
should be included for matching it has to be fitted to
the viewfinder lens bayonet during measurement.
26 Rolleiflex 2.8 FX / 4.0 FW
Inserting the film
Opening the back cover: Turn the safety clip 24 at the
camera bottom, unlock and open the back cover.
Insert the film: Pull out film spool knob 26 of the
lower spool chamber to stop and hold tight. Insert rollfilm after removing the glued strip – right side first –so,
that the backing paper is on the outside. Allow spool
know 26 to spring back fully in its position.
10 11
26
18029_deutsch-englisch 14.03.2003 13:55 Uhr Seite 26
Page 27

Push the paper leader deeply into the long slot of the
empty spool (user the crank 32 for correct
positioning). Tighten the film by turning the crank
(lower spool must be braked with the thumb) until the
arrow sign on the backing paper is in coincidence with
the red index on the camera body.
Closing the back cover: Fold lock lever 25 to the hol-
ding bolt and secure with safety clip 24.
Note: Film must ever be inserted by utilizing the
shadow of the own body, never in full sunlight.
Advancing the film to No. 1: Turn crank 32
continuously to its stop and in opposite direction until it
stops again. The crank is now locked in its starting position. The film frame counter 34 indicates No. 1, the
shutter is cocked, the film is ready for the first exposure.
Rolleiflex 2.8 FX / 4.0 FW
27
34
32
18029_deutsch-englisch 14.03.2003 13:56 Uhr Seite 27
Page 28

Setting the film speed
Click control disk 20 into place on ISO-value of the inserted film. The range of film speed setting is from ISO
25/15° to ISO 6400/39° which covers practically all film
emulsions available on the world market.
If under- or over-exposing is desired, the film speed
must be varied accordingly.
Film memo-holder
To identify the type of film being used: Tear off the tab
of the film pack and insert into the memo-holder 19
from above. Colour and lettering of this "original"
prevent any error.
28 Rolleiflex 2.8 FX / 4.0 FW
Focusing
Open the viewfinder hood, fold up the magnifier 2 if
needed. For focusing turn the focusing knob 29.
Measured distance is readable at the "m" index. The
range of depth-of-field can be determined via the stop
numbers on both sides of the distance index 28.
The standard focusing screen 6 offers three different
focusing features: the central split-image wedge, the
microprism ring the Fresnel ground glass screen itself.
For many applications the standard focusing screen
represents the optimum whereas special
photography areas need additional inter-changeable
focusing screens available in the accessories’ range.
Selecting the frame
The square grid on the standard focusing screen assists
the vertical and horizontal alignment of the camera. The
lines of the grid are 10 mm apart.
Smaller images in 4.5 x 6 cm vertical or horizontal format as well as in 4 x 4 cm format can be framed by
using the intersections of the grid lines.
For eye-level viewing, press the frame finder flap 5
totally inwards until it clicks into place – view through
the diopter 14 (Rolleiflex 2.8 FX only).
Alternatively to the standard viewfinder hood two prism
viewfinder with 45° or 90° eyepiece are available as
accessories.
20
19
29 28
2
6
18029_deutsch-englisch 14.03.2003 13:56 Uhr Seite 28
Page 29

Releasing and exposing
Unlock release: Throw safety lever 31 at release 30 from
"locked" to "unlocked" (green dot). To ensure shakeless
exposure, the release is provided with a cable release
socket.
Long time exposures ("B", over 1 sec): Press
release and hold for time of exposure. The shutter will
not close till you let go.
For extreme long time exposures press release and
"lock" with safety lever. Terminate exposure by
"unlocking". (Caution: Do not shake the camera!
Without touching the camera, shield the lens with your
hand when opening and closing the shutter.)
Film transport and shutter tensioning
After shooting: Unfold the crank 32, turn it clockwise
until lock and back again to its starting position.
The shutter is now cocked again and the camera is
ready for operation. Only after release the crank can be
operated again. Double exposures and blank frames are
excluded.
(Exception: Double exposures, see page 12.)
Rolleiflex 2.8 FX / 4.0 FW
29
31
30
32
18029_deutsch-englisch 14.03.2003 13:56 Uhr Seite 29
Page 30

Multiple exposures
For trick- or combined exposures the double
exposures prevention mechanism can be switched off
(possible only with inserted film): After exposure turn
notched release ring 33 next to the crank´s hinge in
direction of arrow and then turn crank through one
complete revolution counter-clockwise until stop. This
operation cocks the shutter for another exposure
without film transport. After each exposure the described procedure can be repeated and the same frame can
be exposed as many as requested.
30 Rolleiflex 2.8 FX / 4.0 FW
Removing the film
After the 12th exposure the crank can be turned
freely. Wind up the remaining backing paper by three
full revolutions. Open back cover in shadow conditions if
ever possible. Pull spool knob 16 and remove film from
the left. Fold backing paper widely (for more convenient
tearing when developing) and stick fast. Keep the exposed film light-protected.
33
16
18029_deutsch-englisch 14.03.2003 13:56 Uhr Seite 30
Page 31

Closing the viewfinder hood
Fold down magnifier holder 3 between magnifier and
viewfinder hood cover. Press both side sections inwards
and release again so that the hood shuts automatically.
If the frame finder had been used: Press in springy side
sections and allow flap to spring up. Now close the
viewfinder hood fully as described above.
Detaching the viewfinder hood
The standard viewfinder hood is easily detached for
cleaning the camera or changing the viewfinder system:
Unlock the hood by pressing both buttons 36 and remove it backwards. For setting on press the hood down
and slide it towards the lens till both buttons 36 lock
into place.
Changing the magnifier for spectacle-wearers
For focusing without spectacles the magnifier of the
viewfinder hood can be interchanged by magnifiers with
± 3 diopters correction. For changing press the magnifier with open frame finder forwards at its back rim and
lift up. Push the replacement magnifier forwards into
holder accordingly and press home.
Changing the focusing screen
Remove the viewfinder hood. Take hinged frame for
focusing screen 37 on both the sides, pull backwards
slightly and lift up. Take out the focusing screen. When
inserting pay attention to the exact position of the
screen between upper and lower strip and lateral
guides. Take also care that the matt side of the screen
faces towards the camera. Screens with lens have to be
inserted with the lens on the upper side. For closing fold
down the hinged frame and push forward.
Rolleiflex 2.8 FX / 4.0 FW
31
36
3
37
18029_deutsch-englisch 20.03.2003 13:16 Uhr Seite 31
Page 32

Flash operation
The Rolleiflex is X-synchronized for all shutter speeds up
to
1
/500 sec. The camera offers two
possibilities of flash connection:
1. To utilize the advantages of the TTL flash
metering, the use of Rolleiflex-compatible flash systems
is recommended. In conjunction with the Rolleiflex
torch flash devices are particularly recommendable. The
Rollei flash adapter SCA 356 offers the system conformity to all flash systems of well-known manufacturers supplying the SCA 300 system. With fully automatic TTL
flash metering the light measurement is realized by a
sensor installed in the camera which registers the light
reflected from the film surface during the exposure. The
special flash control electronics then regulates the
quantity of light required for the specific subject. Filter
factors of any attached filters will be taken into consideration automatically.
32 Rolleiflex 2.8 FX / 4.0 FW
The system adapter Rollei SCA 356 is connected directly
with the camera via the X-synchronizing contact (a) and
the control contacts (b) of the hot shoe 22. Film speed
setting is done on the adapter. The "flash ready" and
computer control indication can be watched on the
flash unit.
Trial-flashing serves for utilizing the optimum
aperture as follows: keep trying stop down as long as
the exposure control indicator is illuminated. It is recommended to carry out the trial flashes using the multiple
exposure function (only 1 frame is lost!).
2. Ordinary manual or computer flash units can be
connected via the camera’s hot shoe or the
X-sychronizing socket 13.
a
22
b
18029_deutsch-englisch 14.03.2003 13:56 Uhr Seite 32
Page 33

Interchangeable viewfinders
Two interchangeable viewfinders, as well as different
bright focusing screens, ensure the ideal subject image is
obtained for any task. The standard viewfinder hood
serves for the vertical viewing and is fitted with an interchangeable magnifier (± 3 diopters, 3.1x magnification).
The prism viewfinder with 45° or 90° eyepiece gives a
right-reading and upright finder image.
Soft leather carrying bag
for the camera with standard viewing hood, attached filter and lens hood. Two zippers applied to each side of
the bag serve for rapid ready for operation. During the
exposure the bag remains at the camera.
Hard carrying case
Rugged hard case of black cowhide with detachable
front, for the camera with standard folding finderhood.
Offers optimum protection for the camera and instant
readiness with the front swung down.
Metal lens hood
Rigid lens hood of black anodized aluminum, matched
with lens focal length. With black leather case, suitable
for attaching to camera strap. Effectively keeps out
uncontrolled, contrast-degrading side light (flare).
Tripod head Rolleifix
Offers fast and convenient assembly of the Rolleiflex on
the tripod. The camera only has to be slipped-in between
two holding guides and to be secured by a rocking lever.
The Rolleifix can permanently remain at the tripod.
Pistol handgrip
makes work easier and faster particular in connection
with the 45° or 90° prism viewfinder. The right hand
holds the camera at the grip and releases the shutter.
The left hand operates the focusing knob. A leather
loop secures grip and camera.
Flash adapter SCA 356
The Rollei flash adapter SCA 356 offers the system conformity to all flash systems of well-known
manufacturers supplying the SCA 300 system. System
connection is established by simply mounting the flash
unit with the SCA adapter in the camera´s hot shoe.
This guarantees correct data input for system-conform
flashing and perfect flash exposures.
Bright focusing screen with central microprism ring
and split-image wedge
with split-image wedge, microprism ring, Fresnel ground
glass screen, split-image wedge for most exact focusing
on vertical lines, the microprism with adjusting criterion
"flicker-free image". Ground glass screen with microstructure for sharp focusing over the whole image area.
High-D-Screen for excellent viewfinder image and
accurate focusing
Super-bright focusing screen with micro structure surface for optimum assessment of depth of field and focusing. Split-image wedge for maximum focusing on vertical lines.
Ground glass screen
For most exact focusing. Particularly useful for
creative photography where focusing aids may obstruct.
Bright focusing screen
with microfine structure for full-image area focusing and
unobstructed composition.
Bright focusing screen with microprism ring
for rapid shooting with microprism ring and ground
glass screen allows exact focusing even under poor light
conditions. Adjusting criterion “flicker-free-image”.
Rolleiflex 2.8 FX / 4.0 FW
33
Most important accessories
18029_deutsch-englisch 14.03.2003 13:56 Uhr Seite 33
Page 34

Problem Cause
Release cannot be pressed Release is locked
Shutter is not locked
Crank is in an intermediate
position, not in the cocked end position
Exposure meter does not indicate 30 sec. "switched on" period has elapsed
Green LED does not light up when battery test button Battery discharged
is pressed
Battery polarity wrong
Exposure balance is not possible Unsuitable choice of film: high speed film in bright
light slow film in weak light
Picture is poorly exposed Fault measurement due to strong stray light via the
viewfinder hood
Important parts of the picture lay outside the
measuring field
Wrong set of film speed
When using flash with system adapter Flash unit not ready
Flash energy to low respectively aperture too small
Wrong set of film speed
34 Rolleiflex 2.8 FX / 4.0 FW
Remedy for handling faults
18029_deutsch-englisch 14.03.2003 13:56 Uhr Seite 34
Page 35

Remedy
Unlock to release (turn)
Swing the crank pendulous
Touch release button again
Change battery
Insert battery correctly
Use a more suitable film
Cover viewfinder hood against stray light
Refer to the measuring field of the exposure meter
Set the correct film speed
Pay attention to the "flash ready" indicator
Pay attention to exposure indicator at the flash after
exposure and if necessary repeat exposure with
larger aperture
Set the correct film speed on the adapter
Care of the camera
The Rolleiflex requires the same care as any valuable
piece of equipment that is expected to be reliable over a
long period.
To clean, please avoid chemical solvents; instead use the
following well-proven methods:
Remove dust with a soft camel-hairbrush or air blower. If requested clean the outer surface, breathe upon
and polish them with lens cleaning paper. For protection
against static, breathe upon them and allow the moisture to evaporate. Take special care in cleaning the focusing screen: Upper and lower side are rough, they must
only be treated with a soft brush or air blower. Protect
from dirt and finger marks!
Protect to camera from long-term harmful effects of
steam or dampness. High humidity in tropical or
subtropical region threatens metal parts by corrosion
and glass surfaces by fungus attack. Whenever possible,
dry the camera frequently in fresh air and sunshine.
Keep the film guide surfaces clean (particles of
gelatine rubbed of the film are a breeding ground for
fungus). When the camera is not be used over long periods, keep it in an airtight container with silica gel cartridges. Protect the camera with particular care from any
kind of dirt.
Rolleiflex 2.8 FX / 4.0 FW
35
18029_deutsch-englisch 14.03.2003 13:56 Uhr Seite 35
Page 36

Camera type
Double lens reflex camera with TTL exposure meter and
TTL flash automatic.
Picture format
6 x 6 cm
Film types
120-roll film for 12 pictures 6 x 6 cm
Film speed
Adjustable on the camera: ISO 25/15° to ISO 6400/39°
Exposure metering
Centre-weighted integral metering by means of 2 Siphoto elements. Indication in the viewfinder by 5 LED´s.
Measuring range
Light values 3–18/3.2–100,000 asb/
1–33,000 cd/m
2
using ISO 100/21° film with
lens f 2.8/80 mm.
Lens
Rolleiflex 2.8 FX: 80 mm Planar f/2.8, field of view 53°,
bayonet size III, focusing range ∞ - 1 m.
Rolleiflex 4.0 FW: 50 mm Super-Angulon f/4, field of
view 75°, bayonet size IV, focusing range ∞ - 0,6 m.
Shutter
Leaf shutter (1 –
1
/500 sec and B),
X-synchronized.
Stops and speeds coupled with exposure meter.
36 Rolleiflex 2.8 FX / 4.0 FW
Viewfinder system
Viewfinder lens Heidosmat 80 mm f/2.8 or 50 mm f/4.
Viewfinder hood standard. Compensation of parallax
corresponding to set distance. Interchangeable for 45°
or 90° prism viewfinder. Exchangeable focusing screens.
Flash synchronization
1
/500 – 1 sec and B. Accessory shoe with centre
synchronizing contact and contacts for TTL flash automatic in combination with system flash units and special
adapter. X-synchronizing socket for plugs according to
DIN 19003.
Flash automatic
TTL flash measurement on the film surface via
additional Si-photo element.
Film transport
Transport crank coupled with shutter tension.
Automatic stop at picture 1. Disconnectable double
exposures stop. Frame counter from 1 – 12. Returns
back to 0-position automatically when changing the
film.
Connections
Cable release connection. Tripod bush
1
/4".
Dimensions
Rolleiflex 2.8 FX: H/W/L: 147 x 109 x 108 mm
Rolleiflex 4.0 FW: H/W/L: 147 x 109 x 118 mm
Weight
Rolleiflex 2.8 FX: app. 1245 g
Rolleiflex 4.0 FW: app. 1275 g
Technical data
18029_deutsch-englisch 14.03.2003 13:56 Uhr Seite 36
Page 37

Rolleiflex 2.8 FX / 4.0 FW
37
Schärfentiefe-Tabelle Planar
Depth-of-field table 1:2.8/80 mm
z = 56µ
2,8 2,8 4 4 5,6 5,6 8 8 11 11 16 16 22 22
m feet
∞∞∞∞∞∞∞∞∞∞∞∞∞∞∞∞
↓↓↓↓↓↓↓↓↓↓↓↓↓↓
38,1 125 26,7 87.5 19,1 62.7 13,4 44 9,8 32.2 6,8 22.3 5 16.3
20 60 42 ∞ 80 ∞∞∞∞∞∞∞∞∞∞∞
↓↓↓↓↓↓↓↓↓↓↓↓↓↓
13,2 40.7 11,5 35.8 9,8 30.8 8,1 25.6 6,6 21.1 5,1 16.4 4 12.9
10 30 13,5 ∞ 15,9 ∞ 20,9 ∞ 39,4 ∞∞∞∞∞∞∞
↓↓↓↓↓↓↓↓↓↓↓↓↓↓
7,95 24.3 7,32 22.5 6,61 20.4 5,78 18 5 15.7 4,1 12.9 3,4 10.7
6207,09 ∞ 7,69 ∞ 8,67 ∞ 10,7 ∞ 15,4 ∞ 56,1 ∞∞∞
↓↓↓↓↓↓↓↓↓↓↓↓↓↓
5,21 17.3 4,93 16.4 4,6 15.3 4,19 13.9 3,77 12.5 3,24 10.7 2,77 9.16
4154,45 ∞ 4,67 ∞ 5,01 ∞ 5,62 ∞ 6,65 ∞ 9,63 ∞ 21,1 ∞
↓↓↓↓↓↓↓↓↓↓↓↓↓↓
3,64 13.5 3,5 12.9 3,34 12.2 3,12 11.3 2,88 10.4 2,57 9.13 2,27 7.99
3123,24 ∞ 3,35 ∞ 3,52 ∞ 3,81 ∞ 4,25 ∞ 5,26 ∞ 7,44 ∞
↓↓↓↓↓↓↓↓↓↓↓↓↓↓
2,8 11 2,72 10.6 2,62 10.2 2,48 9.55 2,34 8.88 2,13 7.96 1,92 7.09
2,5 10 2,66 10.8 2,74 ∞ 2,85 ∞ 3,03 ∞ 3,29 29.4 3,86 ∞ 4,9 ∞
↓↓↓↓↓↓↓↓↓↓↓↓↓↓
2,36 9.31 2,3 9.04 2,23 8.71 2,14 8.25 2,03 7.76 1,87 7.05 1,71 6.37
282,1 8.5 2,15 8.74 2,21 ∞ 2,32 ∞ 2,46 ∞ 2,76 ∞ 3,24 ∞
↓↓↓↓↓↓↓↓↓↓↓↓↓↓
1,91 7.56 1,87 7.38 1,83 7.16 1,76 6.9 1,69 6.52 1,58 6.02 1,47 5.53
1,7 7 1,77 7.38 1,8 7.55 1,85 ∞ 1,92 ∞ 2,02 ∞ 2,21 ∞ 2,49 ∞
↓↓↓↓↓↓↓↓↓↓↓↓↓↓
1,64 6.66 1,61 6.53 1,58 6.36 1,53 6.1 1,48 5.85 1,39 5.45 1,31 5.05
1,5 6 1,55 6.27 1,58 6.39 1,61 ∞ 1,66 ∞ 1,74 ∞ 1,87 ∞ 2,07 ∞
↓↓↓↓↓↓↓↓↓↓↓↓↓↓
1,45 5.76 1,43 5.66 1,41 5.53 1,37 5.4 1,33 5.15 1,26 4.85 1,19 4.53
1,3 5 1,34 5.18 1,36 5.26 1,38 5.37 1,42 ∞ 1,47 ∞ 1,56 ∞ 1,69 ∞
↓↓↓↓↓↓↓↓↓↓↓↓↓↓
1,26 4.83 1,25 4.77 1,23 4.68 1,2 4.6 1,17 4.41 1,12 4.19 1,07 3.96
1,2 4 1,23 4.11 1,25 4.16 1,27 4.23 1,3 4.33 1,34 ∞ 1,42 ∞ 1,52 ∞
↓↓↓↓↓↓↓↓↓↓↓↓↓↓
1,17 3.9 1,16 3.85 1,14 3.8 1,12 3.72 1,09 3.63 1,05 3.48 1 3.33
1,1 3,5 1,13 3.58 1,14 3.62 1,15 3.67 1,18 3.74 1,21 ∞ 1,27 ∞ 1,36 ∞
↓↓↓↓↓↓↓↓↓↓↓↓↓↓
1,07 3.42 1,06 3.39 1,05 3.35 1,03 3.29 1,01 3.22 0,97 3.11 0,93 2.99
18029_deutsch-englisch 14.03.2003 13:56 Uhr Seite 37
Page 38

38 Rolleiflex 2.8 FX / 4.0 FW
z = 56µ 4 4 5,6 5,6 8 8 11 11 16 16 22 22
m feet
∞∞∞∞∞∞∞∞∞∞∞∞∞∞
↓↓↓↓↓↓↓↓↓↓↓↓
12,2 40 8,71 28.6 6,13 20.1 4,48 14.7 3,1 10.2 2,28 7.48
10 30 54,5 118 ∞∞∞∞∞∞∞∞∞∞
↓↓↓↓↓↓↓↓↓↓↓↓
5,54 17.3 4,71 14.8 3,85 12.2 3,14 10 2,41 7.74 1,89 6.1
415 5,85 23.6 7,2 30.7 11 56.1 33,5 ∞∞∞∞∞
↓↓↓↓↓↓↓↓↓↓↓↓
3,05 11 2,79 10 2,47 8.76 2,16 7.58 1,8 6.23 1,5 5.15
2,5 10 3,09 13.1 3,42 15 4,07 19.1 5,35 29.4 11,4 315 ∞∞
↓↓↓↓↓↓↓↓↓↓↓↓
2,1 8.1 1,98 7.54 1,82 6.82 1,65 6.1 1,44 5.22 1,24 4.46
1,7 7 1,94 8.33 2,06 9.05 2,27 10.4 2,6 12.7 3,47 20.4 5,82 80.4
↓↓↓↓↓↓↓↓↓↓↓↓
1,51 6 1,45 5.74 1,37 5.31 1,27 4.89 1,15 4.3 1,03 3.77
1,3 5 1,43 5.61 1,49 5.9 1,59 6.43 1,74 7.22 2,08 9.09 2,7 13.3
↓↓↓↓↓↓↓↓↓↓↓↓
1,19 4.5 1,15 4.33 1,1 4.1 1,04 3.87 0,96 3.51 0,88 3.15
141,07 4.36 1,1 4.53 1,15 4.82 1,23 5.25 1,37 6.1 1,61 7.71
↓↓↓↓↓↓↓↓↓↓↓↓
0,94 3.67 0,92 3.58 0,88 3.44 0,85 3.25 0,79 3.02 0,74 2.76
0,8 3 0,84 3.15 0,86 3.21 0,89 3.35 0,93 3.51 1,01 3.87 1,12 4.4
↓↓↓↓↓↓↓↓↓↓↓↓
0,76 2.8 0,75 2.72 0,73 2.66 0,71 2.56 0,67 2.39 0,63 2.26
0,7 2.5 0,73 2.63 0,74 2.67 0,76 2.74 0,79 2.85 0,84 3.02 0,92 3.31
↓↓↓↓↓↓↓↓↓↓↓↓
0,67 2.42 0,66 2.38 0,65 2.31 0,63 2.24 0,6 2.17 0,57 2.06
0,6 2 0,62 2.06 0,63 2.1 0,64 2.16 0,66 2.2 0,7 2.33 0,74 2.49
↓↓↓↓↓↓↓↓↓↓↓↓
0,58 1.93 0,57 1.9 0,56 1.87 0,55 1.84 0,53 1.77 0,51 1.71
Schärfentiefe-Tabelle Super-Angulon
Depth-of-field table 1:4/50 mm
18029_deutsch-englisch 14.03.2003 13:56 Uhr Seite 38
Page 39

Rolleiflex 2.8 FX / 4.0 FW
39
18029_deutsch-englisch 14.03.2003 13:57 Uhr Seite 39
Planar 1 : 2,8 f = 80 mm HFT
100
80
60
40
20
Rel. Bel.stärke [%]
Verzeichnung [%]
20 40
2
1
0
-1
-2
20 40
100
60 80
u’/u’
max
60 80
u’/u’
max
*100 [%]
*100 [%]
100
100
Super-Angulon 1 : 4,0 f = 50 mm HFT
100
80
60
40
20
Rel. Bel.stärke [%]
20 40
60 80
u’/u’
2
1
0
-1
-2
Verzeichnung [%]
20 40
60 80
u’/u’
100
max
max
100
*100 [%]
100
*100 [%]
80
60
40
20
Modulation [%]
20 40
u’/u’
*100 [%] u’
max
60 80
max
= 39,5
100
80
60
40
20
Modulation [%]
20 40
u’/u’
max
*100 [%] u’
60 80
max
100
= 40,0
Page 40

40 Rolleiflex 2.8 FX / 4.0 FW
Notizen/Notice
18029_deutsch-englisch 14.03.2003 13:57 Uhr Seite 40
Page 41

Rolleiflex 2.8 FX / 4.0 FW
41
18029_deutsch-englisch 14.03.2003 13:57 Uhr Seite 41
Page 42

Rollei Fototechnic GmbH
P.O. Box 3245
D-38022 Braunschweig
www.rollei.de
certified in accordance
with DIN EN ISO 9001
D, E
RFT 17000.01.001 · Printed in Germany · Technische Änderungen vorbehalten · Technical modifications reserved
18029_deutsch-englisch 14.03.2003 13:57 Uhr Seite 42
 Loading...