

Page 1

www.AVOutlet.com 1-877-271-5398
Rollease DCRF and Li-ion Q2 (28mm)
Motorized Shade Mounting Instructions
Please read installation instructions and programming instructions
completely prior to proceeding with installation and programming. Failure
to do so can result in damage to the motor and/or the shade and void the
warranty.
Items & Tools Required
- Roller Shade
- Q2 (28mm) Motor with crown and drive pre-installed on motor
- Roller Shade Brackets
- Screws – Appropriate for brackets and mounting surface. (Provided
by installer -Not included)
- Tape Measure – Typically only needed for outside mount shades.
- Drill (Optional)
- Pencil
- Masking Tape (Might be needed)
- Level (Depending on installation type)
- 2 people for long or heavy shades.
Page 2
www.AVOutlet.com 1-877-271-5398
Installation and Preparation
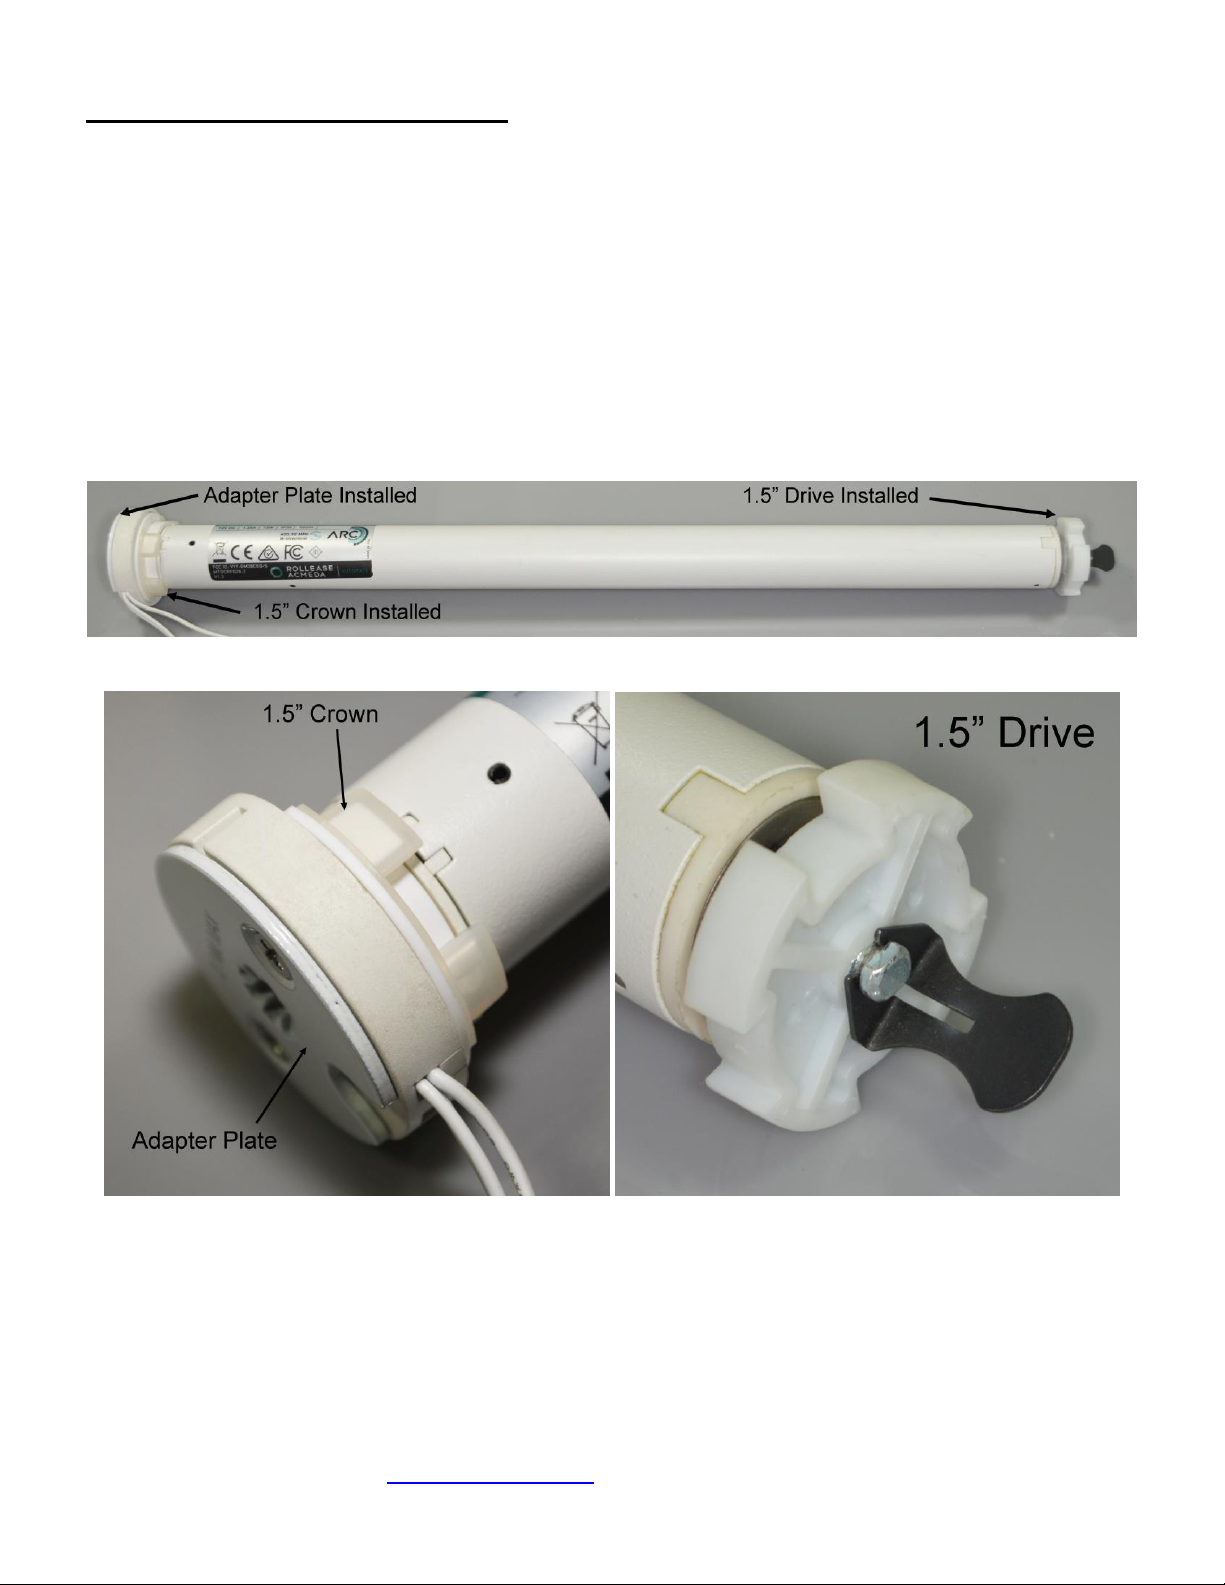
1) Inspect Motor
Shade motors are shipped outside of the tube to protect the motor from
damage. The Q2 (28mm) motor will have the crown and drive preinstalled
as shown. The Q2 (28mm) motor is supplied with either a 1.5” crown/drive
or 2” crown/drive depending on the size of the shade.
1.5” Rollease Q2 (28mm) Motor Set-up
Page 3
www.AVOutlet.com 1-877-271-5398
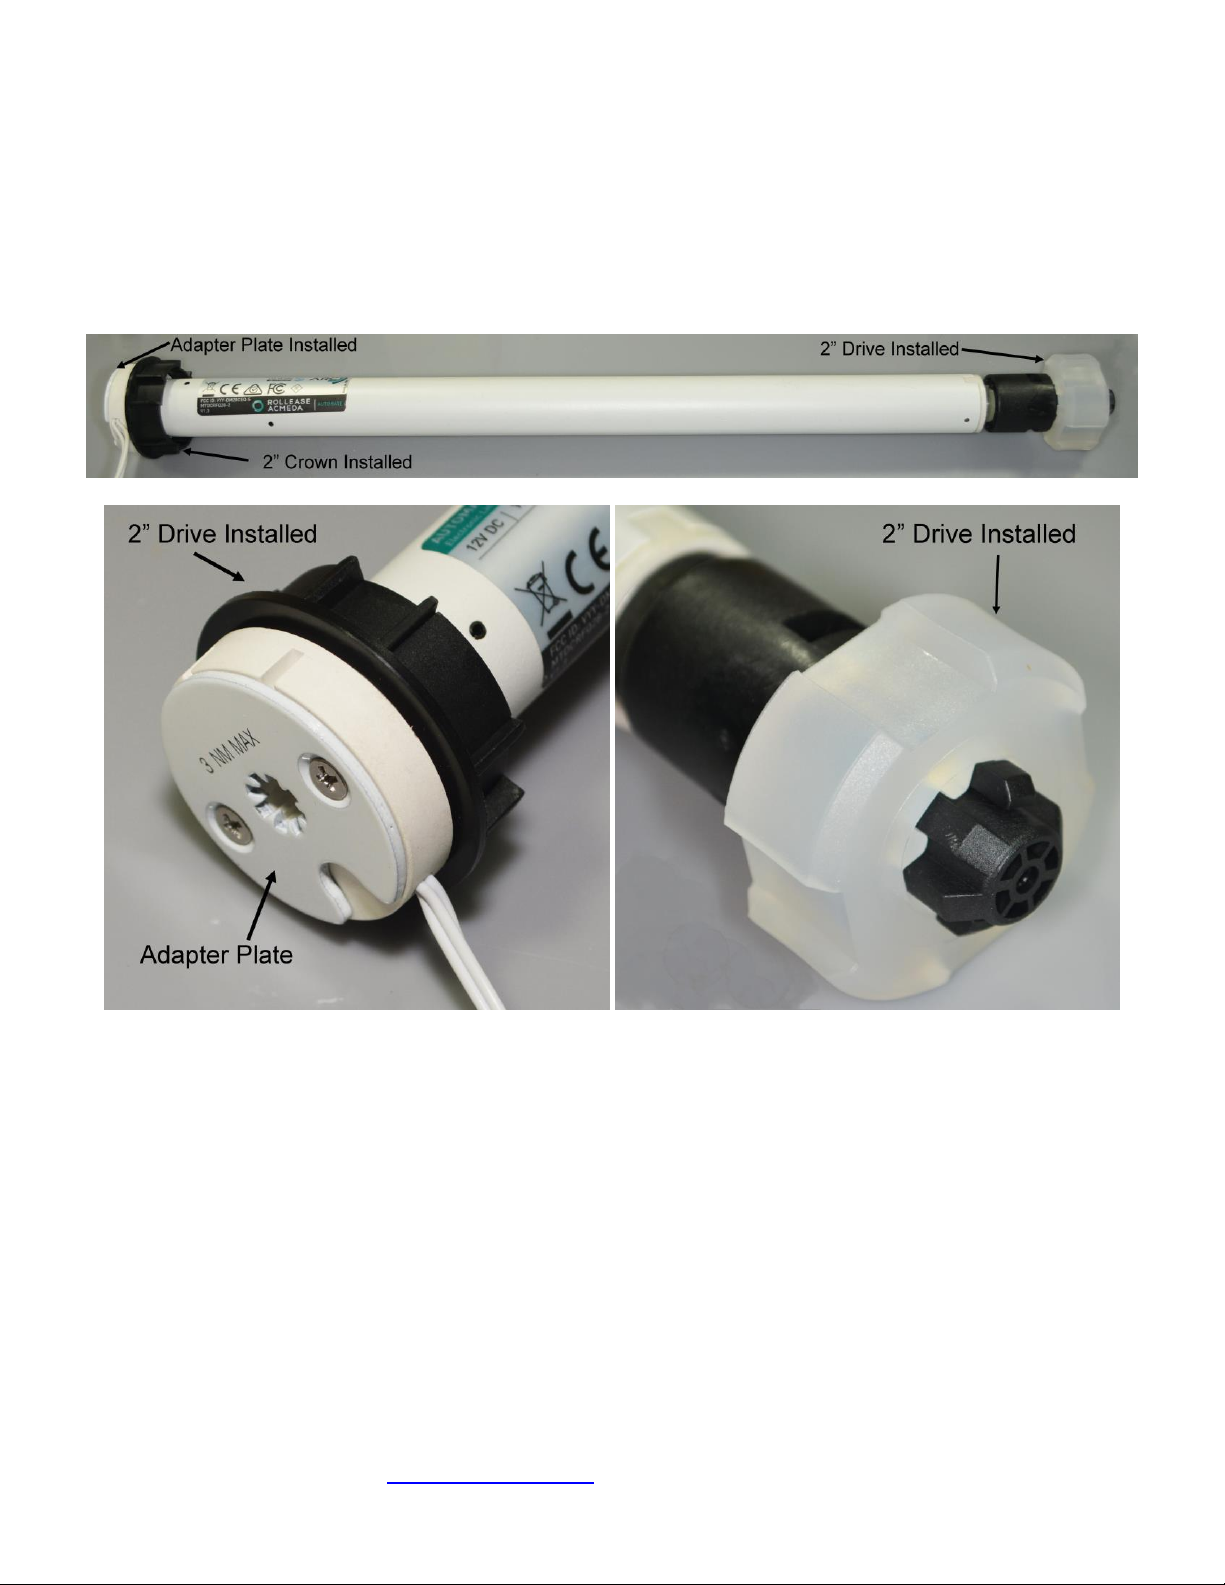
2” Rollease Q2 (28mm) Motor Set-up
The 2” version of the Q2 (28mm) motor uses two adapters for the motor
crown. The outer crown adapter might slide down during shipping. If this
happens, align keyway on the inside of the outer crown to the crown
adapter and slide it back on.
Page 4

www.AVOutlet.com 1-877-271-5398
2) Inspect Shade Tube
The shade tube will have internal ribs/keys that will match the motor
crown and drives.
Page 5

www.AVOutlet.com 1-877-271-5398
3) Install Motor
Align the crown and drive keyways to the internal ribs and slide the motor
into the tube. NOTE: The 1.5” drive have 2 sizes of keyways. Use the
keyway in each that closely matches the ribs in the tube.
Page 6

www.AVOutlet.com 1-877-271-5398
The motor needs to be fully seated in the tube as shown. Push the motor
into the tube until the flange of the crown is touching the tube.
Important!! - Always hold the motor so that the motor does not slide out
when transporting the assembly. The motors are not held in with screws
and can slide out.
Page 7

www.AVOutlet.com 1-877-271-5398
4) Evaluate Brackets
The supplied shade brackets have screw holes that allow for side-wall,
back-wall or ceiling mounting. The tab end bracket goes on the motor
side. The tab slides into the motor head. The notch and hook bracket end
goes on the idler end plug side. The tab end bracket will go on the side of
the shade that you specify as the drive side. Notice the hook end bracket
has 3 grooves and a hook. Use the notch that faces upward when
mounting your shades so the shade does not fall if the hook gets moved
out of place.
The fascia brackets (not shown) have similar features and are used to
hold both the shade and fascia.
Page 8

www.AVOutlet.com 1-877-271-5398
5) Determine Bracket Spacing
Shades ordered as Tip to Tip measurement (inside or outside mount) –
The outside edge of the brackets will be placed at the width that the
shade was ordered. If you ordered a shade that is 24 1/4” wide, the
outside edge of the brackets should be at 24 1/4”.
Shades ordered as Material Width measurement – Set the shade on a flat
surface and put the brackets on the shade assembly. Measure the overall
width from outside of the brackets to find the tip to tip measurement for
the bracket placement.
6) Evaluate Mounting Area
Use the appropriate screws for the weight of the shade and mounting
area. Most windows have a wood header and framing surrounding them
so using wood screws or drywall screws will suffice for most. Shades
being mounted into metal frames should be done with self-tapping sheet
metal screws. Shades mounted where only sheetrock is present should
use wall anchors that are appropriate for the weight of the shade.
Page 9

www.AVOutlet.com 1-877-271-5398
7) Mount Brackets
a) Mark the locations for your bracket locations with a pencil at the tip to
tip bracket spacing (previously discussed). Check that the marked area is
level using a bubble level or other appropriate method. Hold the outside
edge of the bracket at your pencil mark. You will have 2 slotted screw
holes in the brackets. Make centered lines both lengthwise and at the
middle of the slot in the screw locations. Be sure to put the marks at the
center of the slots so that you have room to adjust the brackets later.
b) Pre-drill your holes at the marked locations. This will prevent trim from
cracking and will allow the screws to be installed more easily.
c) Mount your brackets with the appropriate screws. Be sure to use the
correct bracket for each side of the shade (previously discussed). Do not
over tighten screws. This may result in the sheetrock being compressed
and the shade not fitting properly.
8) Install Shade - We recommend 2 people handling the shade during
installation.
Important!! - Always hold the motor so that the motor does not slide out
when transporting the assembly. The motors are not held in with screws
and can slide out.
a) Insert the motor head end of the shade assembly onto the tab of the
motor bracket.
b) Place the idler end plug into the opposite bracket and make sure you
use the V-Groove on the top of the bracket. If you use the other vgrooves, the shade may fall.
c) Flip the hook lever over on the end plug bracket to protect the shade
from being inadvertently knocked off the brackets.
Page 10

www.AVOutlet.com 1-877-271-5398
9) Level Shade
Use a bubble level to check your shade installation. A small amount of out
of level is typically OK but we prefer perfection. If the shade tube is out of
level the material can walk off the tube during rotation and get damaged.
As necessary shim or reposition brackets so the shade tube is level.
Double check the mounting bracket screws to ensure all are in place and
properly tightened.
Page 11

www.AVOutlet.com 1-877-271-5398
10) Program Shades – Keep reading here first!!
Connect power to your motor correctly. The Rollease Q2 (28mm)
DCRF motors require 12V DC power. Damage to the motor due to
improper power connection will void the warranty.
Please use the motor specific instructions provided with your motors. If
they were not included, please email us, call us or visit our website for the
specific motor instructions. The remote-control instructions can be used
for reference but are not as accurate as the motor instructions.
Important!! Be prepared to stop the shade during programming. Know
your motor and remote control before proceeding.
During the first operation and before setting the limits, we recommend
unrolling the shade (with the motor) down past the lower limit but not so
far that the tube is completely exposed. This is to ensure the material is
properly seated and aligned to the tube. The shade material is affixed to
the tube using double sided tape. Do not unroll the shade to the point
where it is stressing the tape. The programming step for the first limit will
activate the motor to move without stopping!! You will need to stop the
motor using the remote control or the shade and motor can get damaged.
Look for material walk-off. If the material walks off do not finish
programming the shade and skip to troubleshooting.
Page 12

www.AVOutlet.com 1-877-271-5398
Troubleshooting
Shade Material Walk-Off
Walk-off needs to be fixed so that the material does not roll into the end
components of the shade which can damage the material. A small amount
of walk-off is acceptable.
Before attempting to fix the walk-off you need to unroll the shade all the
way to the end where the material is applied to the tube and then roll it
back up to ensure the material is aligned to the tube.
Use the following procedure, if your shade walks off to one side. Causes
for material walk-off are out of level brackets, variations in material
thickness or the material can be slightly misaligned to the tube. Walk off is
repeatable and can be fixed.
a) Note the direction of the shade material walk off. (Left or Right)
b) Roll the shade all the way down.
c) Look for debris on the tube or on the material that may cause a material
thickness variation and remove as necessary. If the debris is found, try
rolling the shade up and down to see if the material walk-off is still
present.
d) If the material still walks-off, take a piece of masking tape (couple
inches in length) and apply it to the material at the tube (not on the tube)
of the unrolled shade on the end opposite the direction of the shade
material walk off.
- If the shade walks off to the right put the tape on the left.
- If the shade walks off to the left put the tape on the right.
Page 13

www.AVOutlet.com 1-877-271-5398
e) Test the shade again to see if the material still walks off. If the material
still walks off, apply another layer of masking tape on top of the previous
one(s). Several layers of masking tape may be required to fix the walk-off.
Tip!! The further you put the tape towards the end of the tube the more it
effects walk-off. Depending on how the material is walking off you can
also place tape at several locations on the material. The goal is to use as
little tape as possible. Adding a very thick layer of tape can cause the hem
bar to appear out of level when rolled up.
Note for Motorized Shades
The motors are not rated for continuous use. If you are working on this
procedure and having to bring the shade up/down many times the motor
may overheat and stop responding. The internal temperature sensors will
shut down the motor and you must wait until the motor cools before
proceeding. This is normal and does not hurt the motor.
 Loading...