

Page 1
MOTORIZED SHADES
V
i
s
t
a
Automate
™
Rechargeable Motorization
Programming Instructions
Page 2

TABLE OF CONTENTS
Motor Conguration Options .............................................................................................................3-4
Initial Set Up ....................................................................................................................................... 4-5
Locking/Unlocking A Remote ................................................................................................................ 5
Operation............................................................................................................................................... 6
Link/Unlink A Remote or Switch ...........................................................................................................7
Adjusting/Setting Limits ........................................................................................................................8
Favorite Position .....................................................................................................................................9
Adjusting Motor Speeds ....................................................................................................................... 10
Hide Unused Channels ........................................................................................................................ 10
Q3.0 & Q10.0 Open Roll Bracket Installation ....................................................................................11
SAFETY INSTRUCTIONS
WARNING: Important safety instructions to be read before installation.
Incorrect installation can lead to serious injury and will void manufacturer’s liability and warranty.
It is important for the safety of persons to follow the enclosed instructions.
Save these instructions for future reference.
CAUTION
• Do not expose to water, moisture, humid and damp environments or extreme temperatures.
• Do not allow children to play with this device.
• Use or modification outside the scope of this instruction manual will void warranty.
• Installation and programming to be performed by a suitably qualified installer.
• Frequently inspect for improper operation. Do not use if repair or adjustment is necessary.
• Keep clear when in operation.
2
Page 3
MOTOR CONFIGURATION OPTIONS
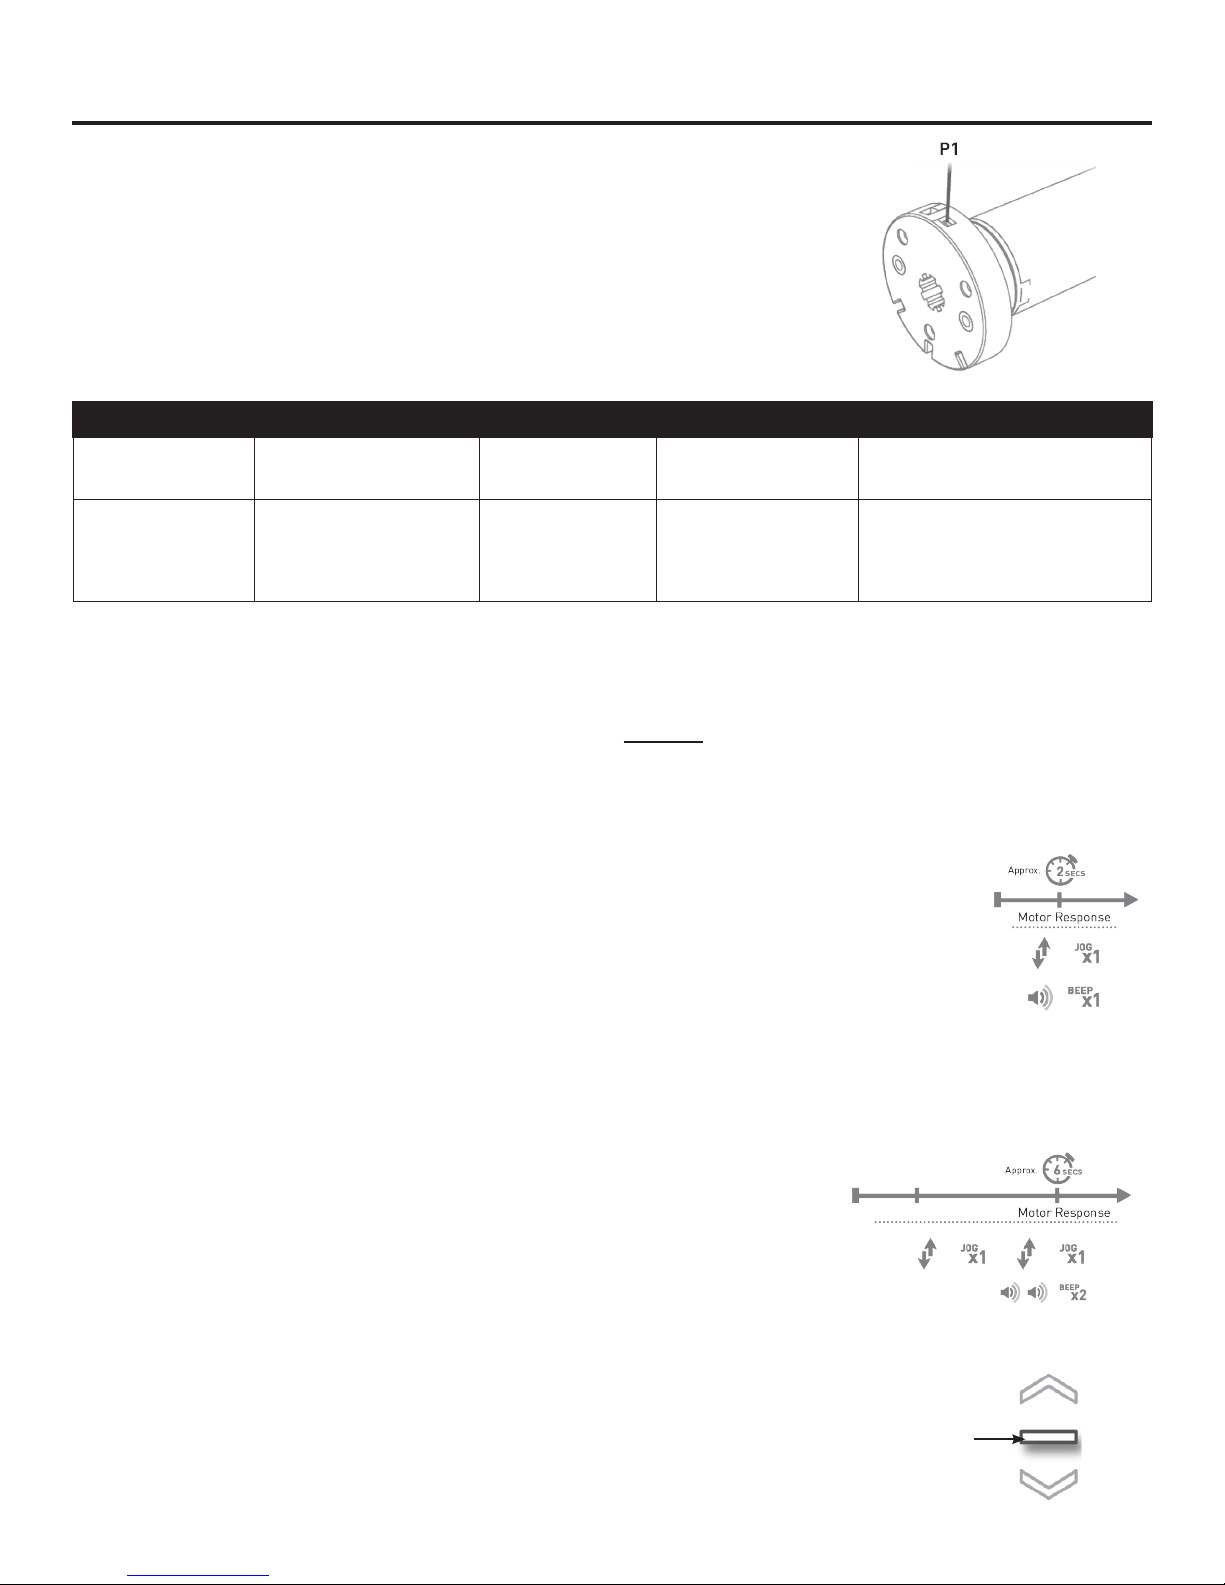
P1 BUTTON FUNCTION
e P1 button serves many purposes throughout programming.
Understanding all of its functions is key to setting up a shade for use.
ShORT PReSS
Pressing the P1 button has dierent outcomes depending on the state
of the motor.
State Function Achieved Visual Feedback Audible Feedback Function Described
if limits are
NOT set
if limits are set
Operational control
of motor, run to limit.
None No Action None No Action
Operational control of motor
Motor Runs None
Stop if running.
after pairing and limit setting
is completed rst time.
LONG PReSS
Holding the P1 button will achieve dierent outcomes depending on how long you hold the button.
NOTE: Shade will only give you conrmation beep(s) AFTER you release the P1 button. Button must be
released after desired amount of jogs.
ACTIVE PAIRING MODE
• Hold the P1 button until the shade jogs once (approx. 2 seconds), then release.
e shade will beep once, conrming you are in Pairing Mode.
is allows you to pair a shade with a remote/switch.
SLEEP MODE
• Hold the P1 button until the shade jogs a second time (approx. 6 seconds), then release.
e shade will beep twice, conrming you’ve put the shade in “Sleep Mode”.
is prevents the shade from being controlled by any remote.
WAke UP The ShAde
• To bring shade out of “Sleep Mode”, hold the P1 button (approx. 2 sec.)
the shade will jog once and beep one log beep. is conrms that
the shade is awake.
STOP
3
Page 4

REVERSE DIRECTION
• Hold the P1 button until the shade jogs a third time (approx. 10 seconds), then release.
e shade will beep 3 times, conrming you’ve reversed the direction of the roll.
• Use this only if the shade is moving in the opposite direction of the button you press.
RESET THE FACTORY SETTINGS
• Hold the P1 button until the shade jogs a fourth time (approx. 14 seconds.) e shade will
beep 4 times after the fourth jog, conrming you’ve reset the shade to factory settings.
• is will clear everything from the shade, including limits, and any programmed remotes or
switches. Proceed to INITIAL SETUP to program shade for usage.
INITIAL SET UP
IMPORTANT: Please read through this section completely before beginning.
Once a shade has been reset to factory settings it will need to complete the initial setup. e initial setup
pairs a remote with your shade, sets upper and lower limits, and prepares the shade for use.
NOTE: Initial Setup cannot be performed with a wall switch. It must be done with either a single channel
or 15 channel remote.
I. PAIR SHADE WITH REMOTE
1. If using a 15 channel remote, select which channel you would like shade
programmed to. If using a single channel remote, proceed to step 2.
2. Hold the P1 button on the motor until the shade jogs once,
then release (approx. 2 seconds.) e shade will give one beep
after the button has been released. is conrms it’s ready to pair.
3. Hold the STOP button on the controller until the shade jogs 2 times,
then release (approx. 2 seconds.) e shade will give 3 beeps.
is conrms the remote has been paired with the shade.
STOP
II. CHECK MOTOR DIRECTION
1. Check the direction of the shade using the UP or DOWN buttons.
Shade will move in small steps unless button is held.
IMPORTANT: Limits are not set at this point. Damage to shade may
occur when operating motor prior to setting limits. Please pay attention.
4
UP
Down
Page 5

2. If shade is moving in correct direction proceed to next section,
SET LIMITS. If shade is moving in wrong direction, hold the UP and DOWN
buttons at the same time (approx. 2 seconds.) e shade will jog once, this conrms
the direction has been reversed.
NOTE: Reversing motor direction using this method is only possible during initial set up.
III. SETTING LIMITS
NOTE: e remote must be unlocked before setting limits. If remote is not responding,
please see LOCKING/UNLOCKING A REMOTE below.
SeTTING LOWeR LImIT
1. Move shade to the desired lower limit by using the UP or DOWN buttons.
Shade will move in short steps unless button is held.
2. Hold the DOWN and STOP buttons at the same time until the shade jogs 2 times
(approx. 5 seconds.) e shade will give 3 beeps, this conrms the lower limit is set.
SeTTING UPPeR LImIT
1. Move the shade to the desired upper limit by using the UP and DOWN buttons.
Shade will move in short steps unless button is held.
2. Hold the UP and STOP buttons at the same time until the shade jogs 2 times
(approx. 5 seconds.) e shade will give 3 beeps, this conrms the lower limit is set.
IV. LOCK THE REMOTE
Folow the instuctions below to lock the remote and complete the INITIAL SET UP.
LOCKING/UNLOCKING A REMOTE
is feature is intended to be used after all shade programming has been completed. Locking the remote
will prevent accidental or unintended changing of the limits.
Pressing the LOCK ( ) button on the back of the remote will display the current mode.
To lock and unlock the remote, hold the LOCK ( ) button for 5 seconds.
15 ChANNeL RemOTe
“U” on the display will turn to an “L” when the remote is locked.
“L” on the display will turn to a “U” when the remote is unlocked.
LOCK
SINGLe ChANNeL RemOTe
Blue LED light will be solid when the remote is locked.
Blue LED light will blink when the remote is unlocked.
Blue LED light
5
Page 6

OPERATION
CH
SINGLE CHANNEL REMOTE
Use the UP and DOWN buttons to raise and lower the shade
Use the STOP buttons to stop the shade anywhere along the travel.
Hold the STOP button for approx. 2 seconds to move the shade to the saved “Favorite” position.
UP
STOP
Down
15 CHANNEL REMOTE
To select which channel to operate, hold the CHANNEL button.
Once the number on the screen starts ashing, use the UP and DOWN buttons to select the desired channel.
NOTE: If no button is pressed within 4 seconds, the current channel will automatically be conrmed.
Selecting channel “0” will operate all channels.
Press the CHANNEL or STOP button to conrm the selection.
Use the UP and DOWN buttons to raise and lower the shade.
Use the STOP button to stop the shade anywhere along the travel.
e LEVELING CONTROL BAR (located to the left of the remote) can be used
to visualize and accurately set your preferred shade position. When used to control
a group of shades, they will all perfectly align to the same position.
Hold the STOP button for approx. 2 seconds to move the shade to the saved “Favorite” position.
WALL SWITCH
To select which channel(s) to operate, press the desired channel button(s).
• e blue LED will light up indicating the channel has been selected.
• To deselect a channel, press the channel button until the LED turns o.
NOTE: Wall switch requires that at least one channel be selected at all times.
First select an additional channel, then deselect channel that is no longer wanted.
Use the UP and DOWN buttons to raise and lower the shade.
Use the STOP button to stop the shade anywhere along the travel.
Hold the STOP button for approx. 2 seconds to move the shade to the saved “Favorite” position.
6
Page 7

LINK/UNLINK REMOTE OR SWITCH
CH
SINGLe ChANNeL/
WALL SWITCh
15 ChANNeL RemOTe
UP
STOP
Down
Channel
Channels
1 thru 5
Stop
Up and Down
LINK REMOTE, CHANNEL, OR SWITCH
When using the 15 channel remote or wall switch, multiple motors can be grouped onto channels for
coordinated control. Limit settings and favorite positions cannot be adjusted when motors are grouped together.
All shades linked to a remote or switch will also automatically be programmed to the “ALL” channel.
1. If using a 15 channel remote or wall switch, select which channel you would like the shade to be
programmed to using the CHANNEL button. If using a single channel remote, proceed to step 2.
2. Hold the P1 button on the motor until the shade jogs once, release the button after the jog.
e shade will beep once conrming it’s ready to pair.
3. After the shade beeps, press and hold the STOP button until the shade jogs twice. Release the
button during the jogs. e shade will beep 3 times conrming that the remote has been paired.
UNLINK REMOTE, CHANNEL, OR SWITCH
e process to unlink a shade from a remote, channel, or switch is the same process as linking a shade.
1. If using a 15 channel remote or wall switch, select the channel with the shade you wish to remove
using the CHANNEL button. If using a single channel remote, proceed to step 2.
2. Hold the P1 button on the motor until the shade jogs once, release the button after the jog.
e shade will beep once conrming it’s ready to be removed.
3. After the shade beeps, press and hold the STOP button until the shade jogs twice.
Release the button during the jogs. e shade will beep three times conrming that the shade
has been removed.
7
Page 8

ADJUSTING LIMITS
e upper and lower limits can be adjusted without having to factory reset the entire shade.
NOTE: Adjusting the limits can only be done with a single channel or 15 channel remote.
ey cannot be adjusted with the wall switch.
If using a 15 channel remote, select the channel for the shade that needs to be adjusted. If there is more
than one shade on the channel, move the desired shade to its own channel before adjusting limits.
Follow the steps in the LINK REMOTE, CHANNEL, OR SWITCH, on page 7, to link the shade to a
new channel. Once completed, the shade can be unlinked from the new channel. Follow the steps in the
UNLINK REMOTE, CHANNEL, OR SWITCH, on page 7, to unlink the shade from the channel.
NOTE: e remote must be unlocked for the limits to be adjusted. If the remote is locked,
please see LOCKING/UNLOCKING A REMOTE on page 5.
ADJUSTING UPPER LIMIT
1. Hold the UP and STOP buttons at the same time until the shade jogs once
(approx. 5 seconds.) e shade will beep once, this conrms the upper limit is
ready to be adjusted.
2. Move the shade to the desired upper limit by using the UP or DOWN buttons.
Shade will move in short steps unless button is held.
3. Hold the UP and STOP buttons at the same time until the shade jogs 2 times
(approx. 5 seconds.) e shade will beep three times, this conrms the upper
limit is set.
ADJUSTING LOWER LIMIT
1. Hold the DOWN and STOP buttons at the same time until the shade jogs once
(approx. 5 seconds.) e shade will beep once, this conrms the lower limit is
ready to be adjusted.
2. Move the shade to the desired lower limit by using the UP or DOWN buttons.
Shade will move in short steps unless button is held.
3. Hold the DOWN and STOP buttons at the same time until the shade jogs 2 times
(approx. 5 seconds.) e shade will beep three times, this conrms the lower
limit is set.
8
Page 9

FAVORITE POSITION
CH
If using a 15 channel remote or wall switch; if the desired shade shares a channel with other shades, it is
recommended that it be moved to a new channel to program a Favorite position.
Follow the steps in the LINK REMOTE, CHANNEL, OR SWITCH, on page 7, to link the shade to a
new channel. Once completed, the shade can be unlinked from the new channel. Follow the steps in the
UNLINK REMOTE, CHANNEL, OR SWITCH, on page 7, to unlink the shade from the channel
P2 BUTTON ON The BACk
Of The RemOTe OR SWITCh
OR
SINGLe ChANNeL/
15 ChANNeL RemOTe
UP
STOP
Down
Channel
WALL SWITCh
Channels
1 thru 5
Stop
Up and Down
SETTING A FAVORITE POSITION
1. Use the UP and STOP buttons to move the shade to the desired “Favorite” position.
2. Press the P2 button. e shade will jog once followed by a beep.
3. Press the STOP button. e shade will jog once followed by a beep.
4. After the beep, press the STOP button a second time. e shade will jog 2 times then beep 3 times.
is conrms that the “Favorite” position has been set.
USING A FAVORITE POSITION
Hold the STOP button for approx. 2 seconds to move the shade to the saved “Favorite” position.
DELETING A FAVORITE POSITION
1. Press the P2 button. e shade will jog once followed by a beep.
2. Press the STOP button. e shade will jog once followed by a beep.
3. After the beep, press the STOP button a second time. e shade will jog once followed by a
longer beep. is conrms that the “Favorite” position has been deleted.
9
Page 10

ADVANCED PROGRAMMING
ADJUSTING MOTOR SPEED
e speed at which the shade moves can be increased or decreased.
If the motor does not react to the speed adjustment, the maximum or minimum speed has already been reached.
NOTE: Adjusting motor speed can only be done with a single channel or 15 channel remote.
It cannot be adjusted/set with the wall switch.
INCReASING mOTOR SPeed
1. Press the P2 button on the back of the remote. e shade will jog once followed by a beep.
2. Press the UP button. e shade will jog once then been once.
3. After the beep, press the UP button again. e shade will jog twice then beep once.
is conrms the speed has been increased.
If the speed needs to be increased more, repeat the steps above.
deCReASING mOTOR SPeed
1. Press the P2 button on the back of the remote. e shade will jog once
followed by a beep.
2. Press the DOWN button. e shade will jog once then beep once.
3. After the beep, press the DOWN button again. e shade will jog twice then beep once.
is conrms the speed has been decreased.
If the speed needs to be decreased more, repeat the steps above.
UP
STOP
Down
HIDE UNUSED CHANNELS
e 15 channel remote can be programmed to have anywhere from 1 to 15 channels visible.
e inactive channels will not be visible while scrolling through channel selection.
NOTE: If a channel is removed while a shade is still linked to it, that shade will still operate when “0” is
selected. If the channel is brought back, then the shade will still be linked to that channel.
1. Hold the STOP and CHANNEL buttons at the same time. e number “15” will ash on the
screen, and both directional indicators will appear.
NOTE: e CHANNEL button must be held during this entire process.
2. While holding the CHANNEL button, use the UP and DOWN buttons to select the desired
number of visible channels.
3. Still holding the CHANNEL button, press the STOP button to conrm the amount of
channels. Once the STOP button is pressed, both directional indicators will disappear, and
both buttons can be released.
e new channel total will ash for a few seconds. Once the ashing stops the remote is ready to use.
Follow these same steps to make removed channels visible again.
10
 Loading...