

Page 1
Automate Pulse
Set-Up Instructions
ABOUT THE “AUTOMATE SHADES” SKILL
The Automate Pulse app allows for control of your motorized window treatments through your smartphone/tablet
THE APP ALLOWS FOR:
Individual and group control
Scene control
Timer functionality
Compatible with Amazon Alexa devices
GETTING STARTED:
In order to control your motorized window treatments through The Automate Pulse app, you will need to have:
Downloaded the free app via the Apple App Store (available under iPhone apps) or the Google Play Store.
Purchased one or more Wi-Fi Bridges depending on size of the space.
WI-FI BRIDGE TECHNICAL SPECIFICATIONS:
Radio Frequency range: ~60 feet (no obstructions)
Radio Frequency: 433 MHz
Wi-Fi: 2.4 GHz
Power: 120V AC
For Indoor Use Only
SETUP BEST PRACTICES:
Bridge must be within signal range of both the motorized window treatments and the Wi-Fi router.
Wi-Fi network must be visible.
Environments with multiple WAPs (wireless access points) may need to temporarily disable all but one.
Security settings may need to be temporarily disabled.
CAPABILITIES:
Motors per Bridge: 30
Locations per account: 5
Wi-Fi Bridges per location: 5
Rooms per Location: 20
Scenes per Location: 20
Timers per Location: 20
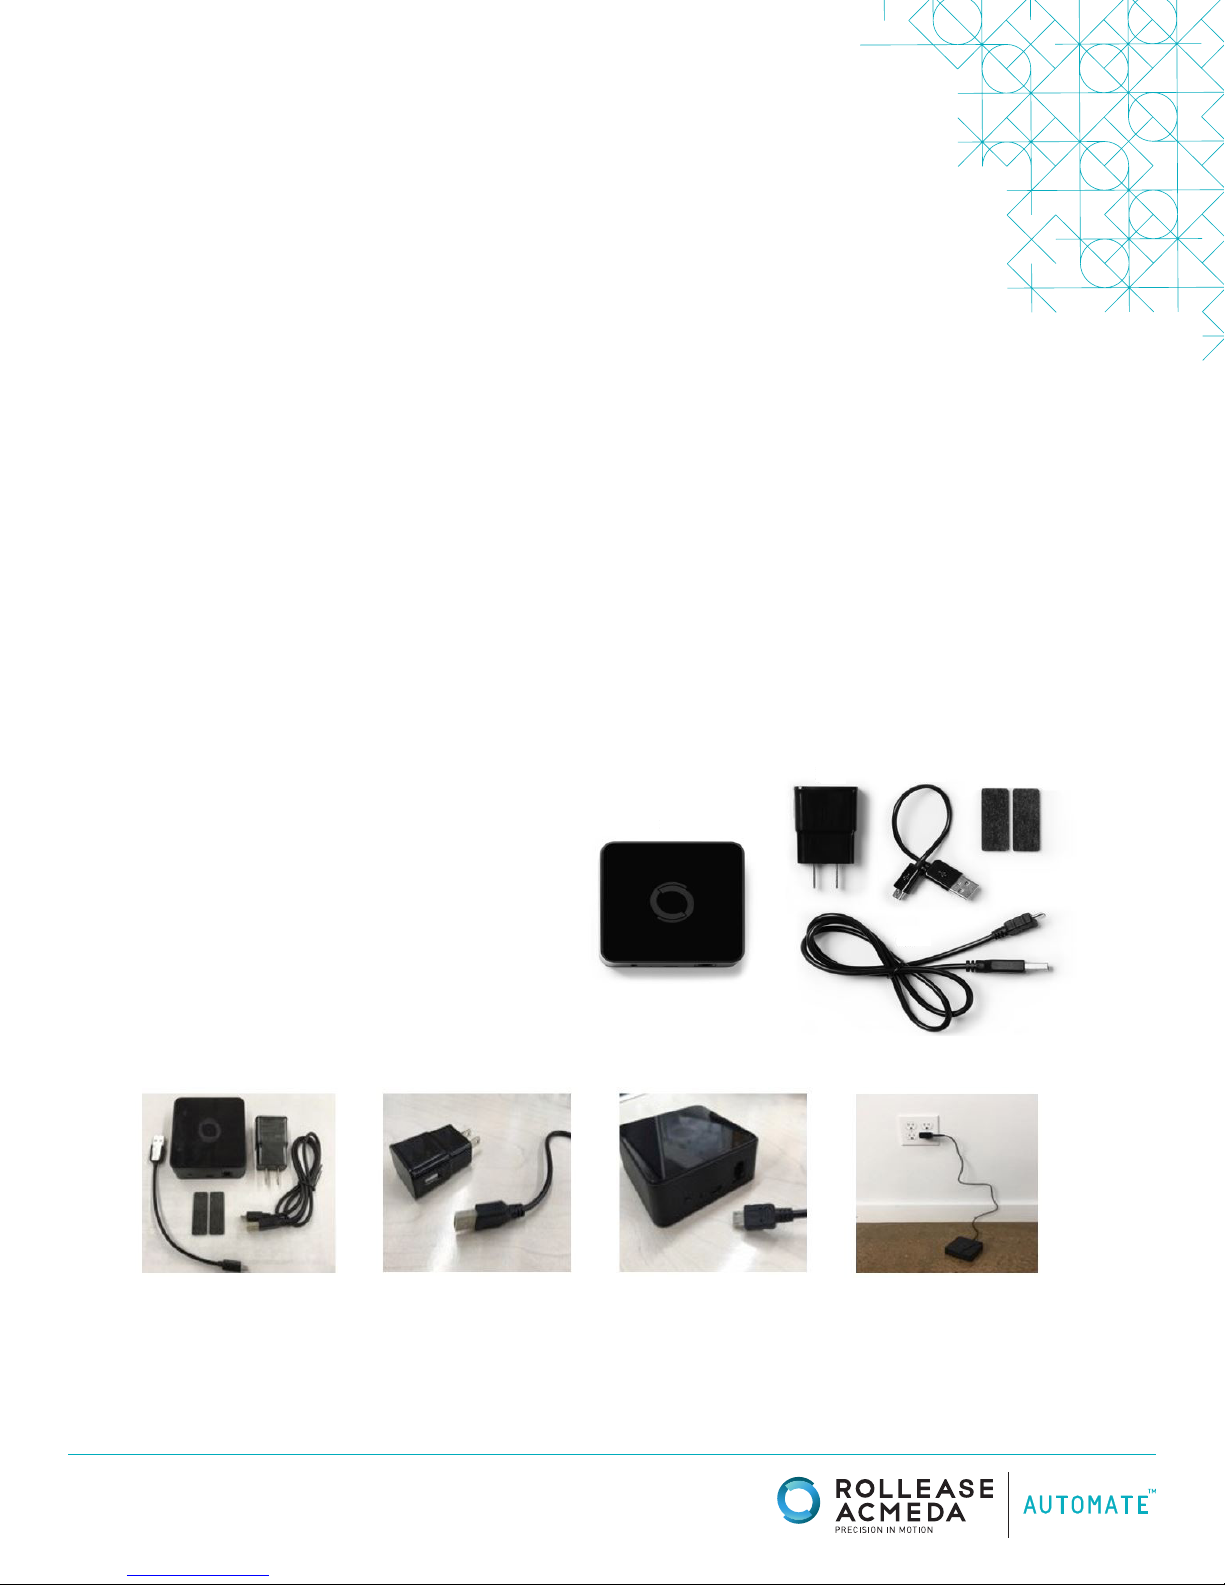
WHAT’S IN THE BOX?
1x Automate Pulse Bridge (a)
1x 6” Short Power Cord (b)
1x 12” Long Power Cord (c)
1x Outlet Power Plug (d)
2x Antiskid Pads (e)
A
D
C
B
E
UNPACKING THE WI-FI BRIDGE
1. Unpack the Wi-Fi Bridge. 2. Insert USB end of the
power cord (long or short)
into the outlet power plug.
rolleaseacmeda.com
© 2017 Rollease Acmeda Group
3. Insert the micro USB
end of the power cord (long
or short) into the Wi-Fi
Bridge.
4. Place the bridge in a
centrally located position
in your home and plug in
to outlet. (You may need to
experiment with different
locations to be able to
reach the desired shades).
Page 2
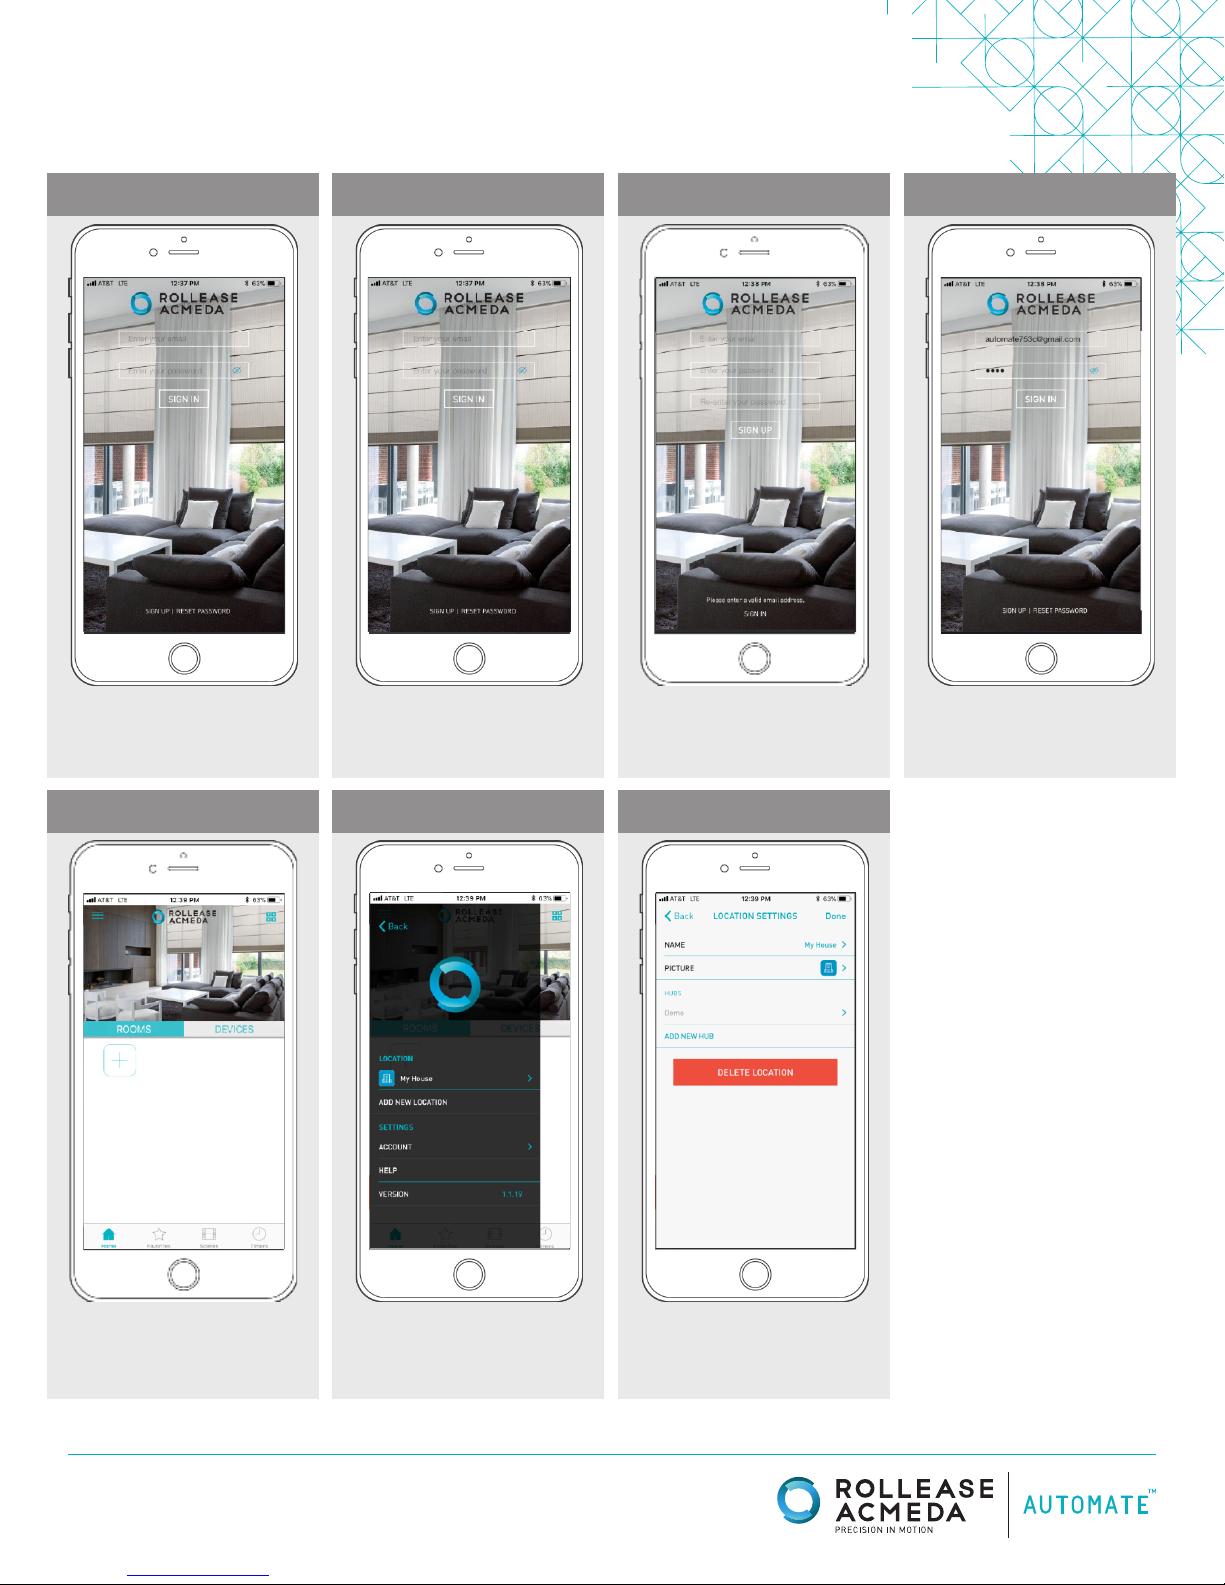
SETTING UP THE APP
STEP 1
Open The Automate Pulse
mobile application.
STEP 2
If required, create a new
account. Select Sign Up on the
bottom left corner of the screen.
STEP 3
SIGN IN with your
account information.
Creating an account will
require an email address and a
password.
STEP 4
SIGN IN with your account
information.
STEP 5
Link the application to the new
Wi-Fi Bridge. Select the menu
button in the upper left corner
of the home screen (3 lines).
STEP 6
Select the default “Home”
option under LOCATION to open
Location Settings.
STEP 7
Select “ADD NEW HUB” to enter
the pairing process.
rolleaseacmeda.com
© 2017 Rollease Acmeda Group
Page 3
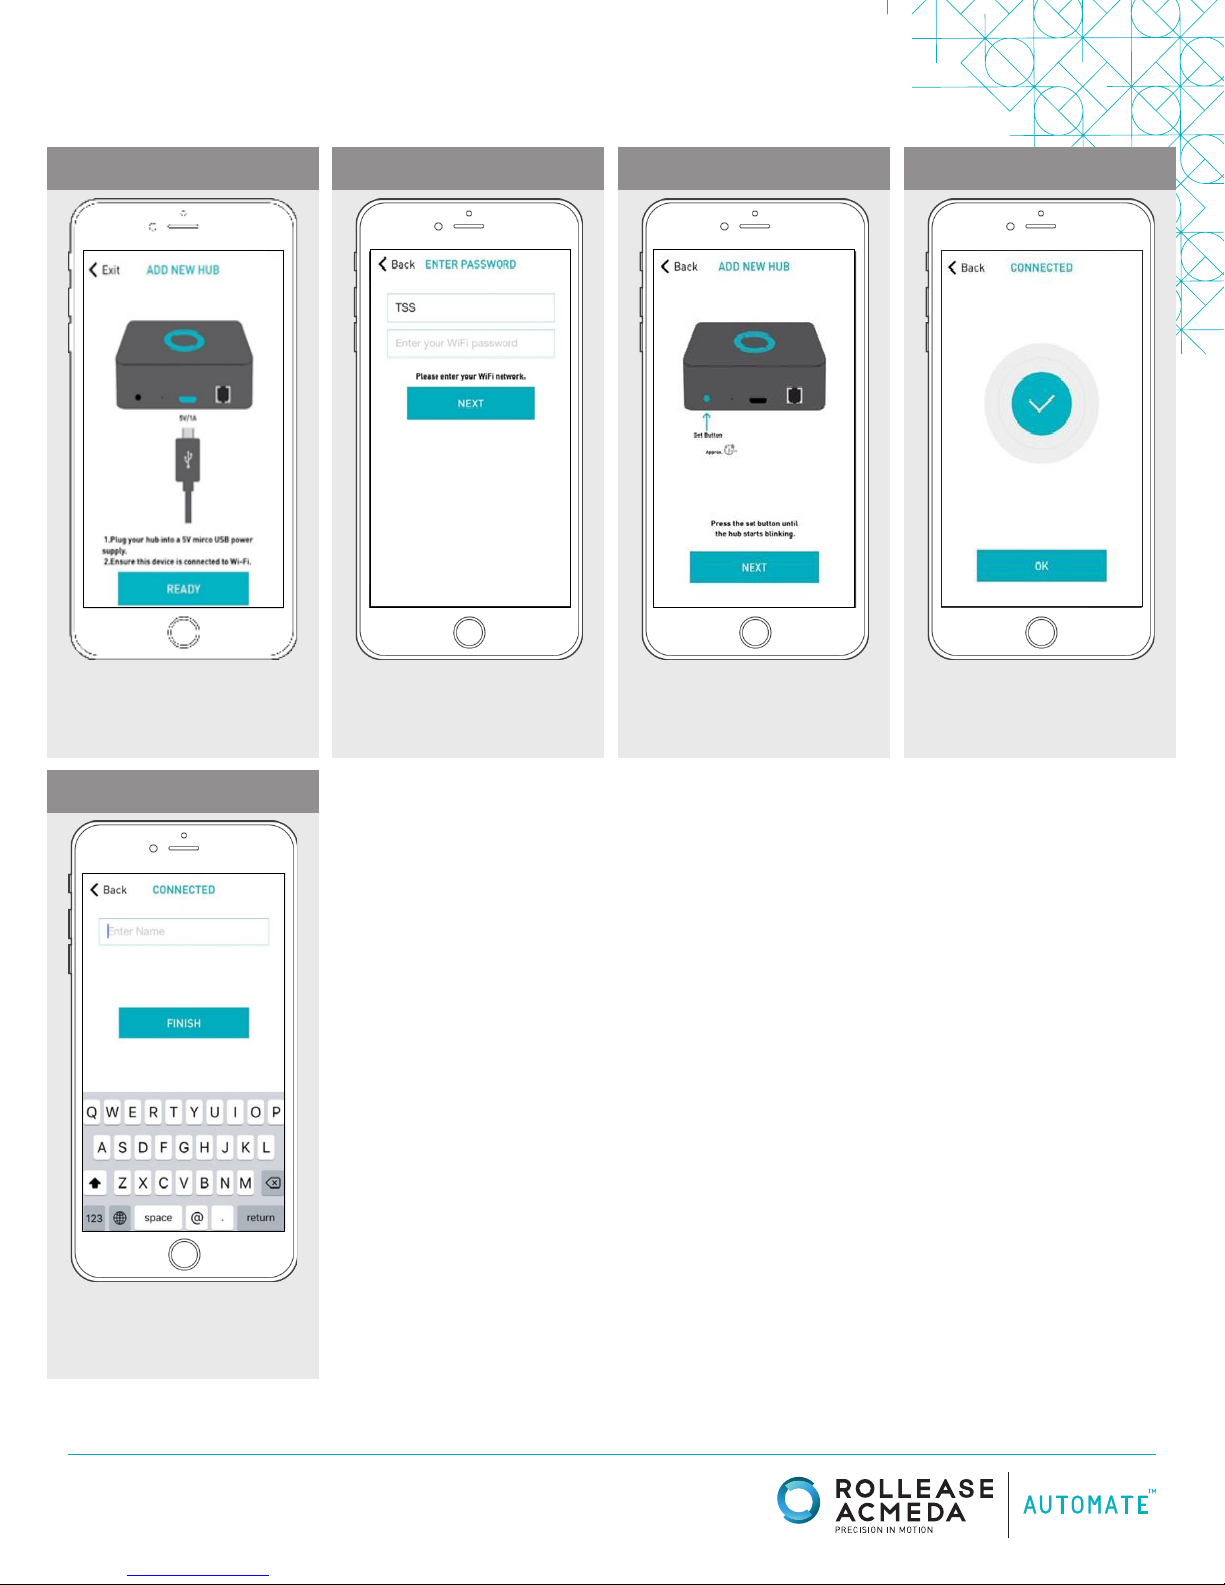
PAIRING THE APP & WI-FI BRIDGE
PAIRING THE APP & WI-FI BRIDGE
STEP 9
Follow on screen instructions to
pair the new Wi-Fi Bridge to the
application Ensure Wi-Fi Bridge
is plugged in. Select “Next”.
STEP 10 STEP 11 STEP 12
All of the shades and scenes
configured in your Automate
Pulse app will now appear in the
Devices section of the Alexa app.
Hold the Wi-Fi Bridge set button
for 2 seconds. The bridge will
start blinking blue to signify it
is ready to pair to the network.
The Wi-Fi Bridge will attempt to
pair to your Wi-Fi network for 60
seconds. Select “Set Hub” after
success.
STEP 13
Name your Wi-Fi Bridge to
complete the Wi-Fi connection
process.
rolleaseacmeda.com
© 2017 Rollease Acmeda Group
Page 4

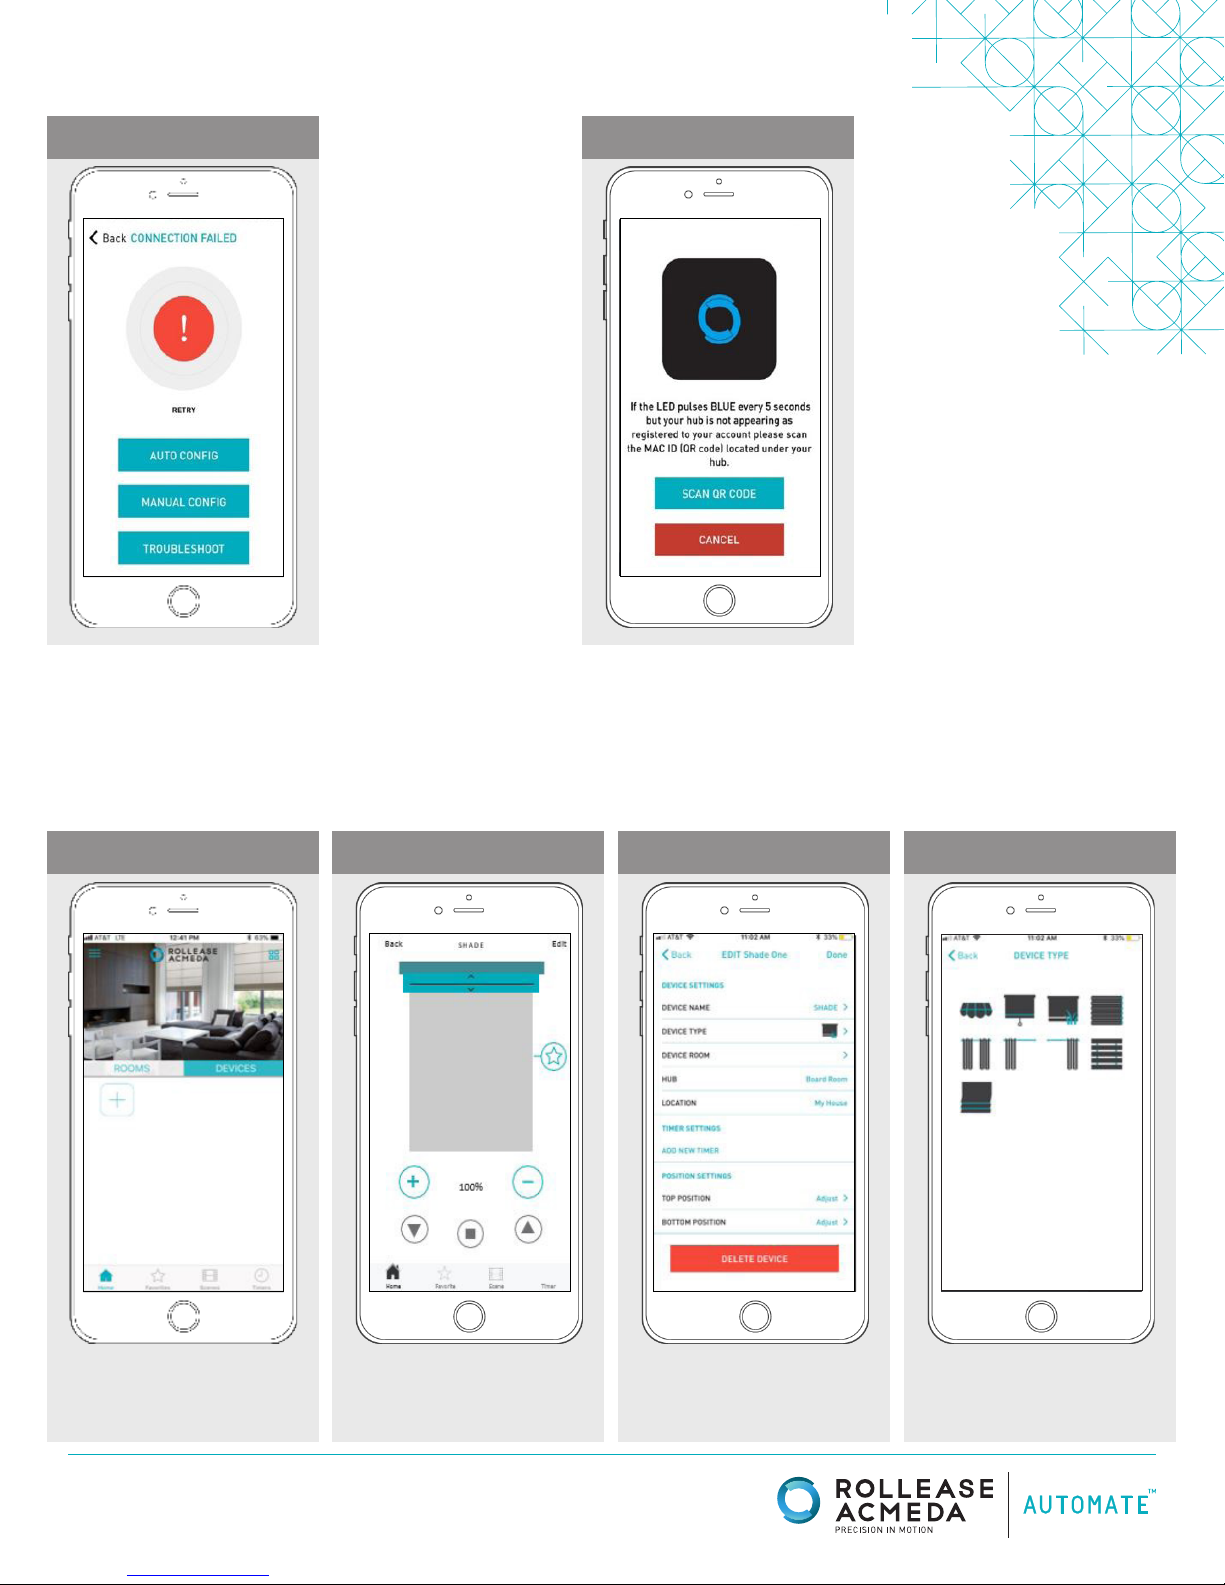
PAIRING TROUBLESHOOTING
STEP 14
In the event you receive the “Connection Failed” screen, we suggest you
reattempt the pairing sequence by selecting “Auto Configuration”. This
will redirect you to complete the above process again. If then unsuccessful
again you may choose the second connection path by selecting “Manual
Configuration”. See Manual Configuration steps below.
There are a number of factors that will
influence the network pairing process.
Some networks require more time to
make the initial communication links
with the application servers.
MANUAL CONFIGURATION
STEP 15 STEP 16 STEP 17 STEP 18
Using a paper clip, press and hold the
recessed button on the Wi-Fi Bridge until
the Bridge blinks blue 3 times. Press next
when the Bridge begins blinking red.
Using your home button exit the Automate
Pulse app and enter your Wi-Fi settings.
Select the XPG-GAgent-XXXX network and
enter the default password 123456789.
Return to the Automate Pulse app.
You will be prompted to enter
the password for your Wi-Fi
network. Enter your Wi-Fi
password. Click next.
Your Bridge should connect to your Wi-Fi
network and direct you to the Connected
screen. Press OK. Name your Bridge
and click finish to complete the Wi-Fi
connection process.
rolleaseacmeda.com
© 2017 Rollease Acmeda Group
Page 5

MANUAL CONFIGURATION
STEP 19 STEP 20 STEP 21 STEP 22
In the event that after the manual config
process completes you are directed to the
Connection Failed screen again. Confirm
your Bridge
This will allow you to manually connect the
Wi-Fi Bridge to your App. Press “Scan QR
Code” You must allow The Automate Pulse
app rights to use your smartphone/ tablet
camera when prompted.
On the bottom of your Wi-Fi Bridge there
will either be a Number/ Letter code
or a small QR code. Use the camera to
scan the QR code or manually type in the
Number/Letter code and press OK.
On the settings screen you will be
prompted to name your Wi-Fi Bridge.
Name your Bridge and press OK to
complete the Wi-Fi connection process.
HOW TO LINK EACH SHADE TO THE APP:
STEP 23 STEP 24 STEP 25 STEP 26
On the home screen select “Device” then
select the “Plus” icon to add a new shade
device.
Select from the list the hub to which you
wish to pair a shade and select “Next”.
rolleaseacmeda.com
© 2017 Rollease Acmeda Group
Make sure the shade device is
plugged in or ready to be paired
and select “Next”.
Choose your pairing method: “PAIR
USING HUB” or “COPY FROM REMOTE”.
Page 6
HOW TO LINK EACH SHADE TO THE APP:
STEP 27A STEP 27A
PAIR USING HUB
(Requires access to the motor head)
• Press and hold the “P1” button on the
motor head 2 seconds. The motor will
jog up and down once and you will hear
one audible beep
• Press “Pair” on the app screen “Next”.
COPY FROM REMOTE
(Only requires remote in hand)
• Make sure the remote is tuned to the
shade’s individual channel (not Ch 0).
• Remove the remote battery cover and
press the upper left P2 button next
to the battery. The motor will jog up and
PAIRING COMPLETE
Once the motors have paired, the application will take you directly to the shade properties screen to edit the
settings for your treatment.
HOW TO EDIT SETTING FOR EACH SHADE:
STEP 28 STEP 29 STEP 30 STEP 31
Select the device.
Select “Edit” in the upper right
corner.
rolleaseacmeda.com
© 2017 Rollease Acmeda Group
Modify Device Name to
customize your treatment
name.
Modify Device Type to the
representative icon of your product.
Page 7

SETTING & SCENE INSTRUCTIONS
STEP 32 STEP 33 STEP 34 STEP 35
Once all shades are linked
to the application. Click “ROOMS” tab.
Select the “Plus” icon to add a new room
designation, return to the home screen,
Select “Room”.
Name the room, pick the room icon
and click “Done”.
Select the newly created room and
select the “Plus” icon to add a linked
shade to the room.
Select “Add Existing Device” to select
treatments from the dropdown to
add to the room. (Choosing “Add New
Device” will revert back to the pairing a
new device sequence.)
SET-UP COMPLETE
Your mobile application setup and product pairing is now complete. Shades added to rooms can be controlled
simultaneously after selecting the desired room. See the following sections for instructions on creating scenes,
setting timers and troubleshooting pairing failures.
STEP 36 STEP 37
Once you have completed the pairing process for the Wi-Fi bridge and
linked all of your shades to the application, you can create scenes to
set a treatment or group of treatments to specific heights.
1. On the lower menu bar select the Scene icon. This will take you to
the scene homepage.
2. Select “Add New Scene” to begin programming your desired scene.
3. Input your scene name and select a scene picture.
4. You can choose custom heights (by %) or set open/closed for
all selected treatments. (If you select custom you must select a
treatment height for each selected treatment)
5. Select “Add New Device” to add your treatment to the scene being
created.
6. Set the treatment height percentage if necessary.
7. Select “Done” to finalize your scene.
You can activate your custom scene by navigating to the scene menu,
and pressing “GO” next to the desired scene name. If you wish to set a
programmed timer to activate your scene or individual shades, please
see the next section “Programming Timers”.
rolleaseacmeda.com
© 2017 Rollease Acmeda Group
Page 8
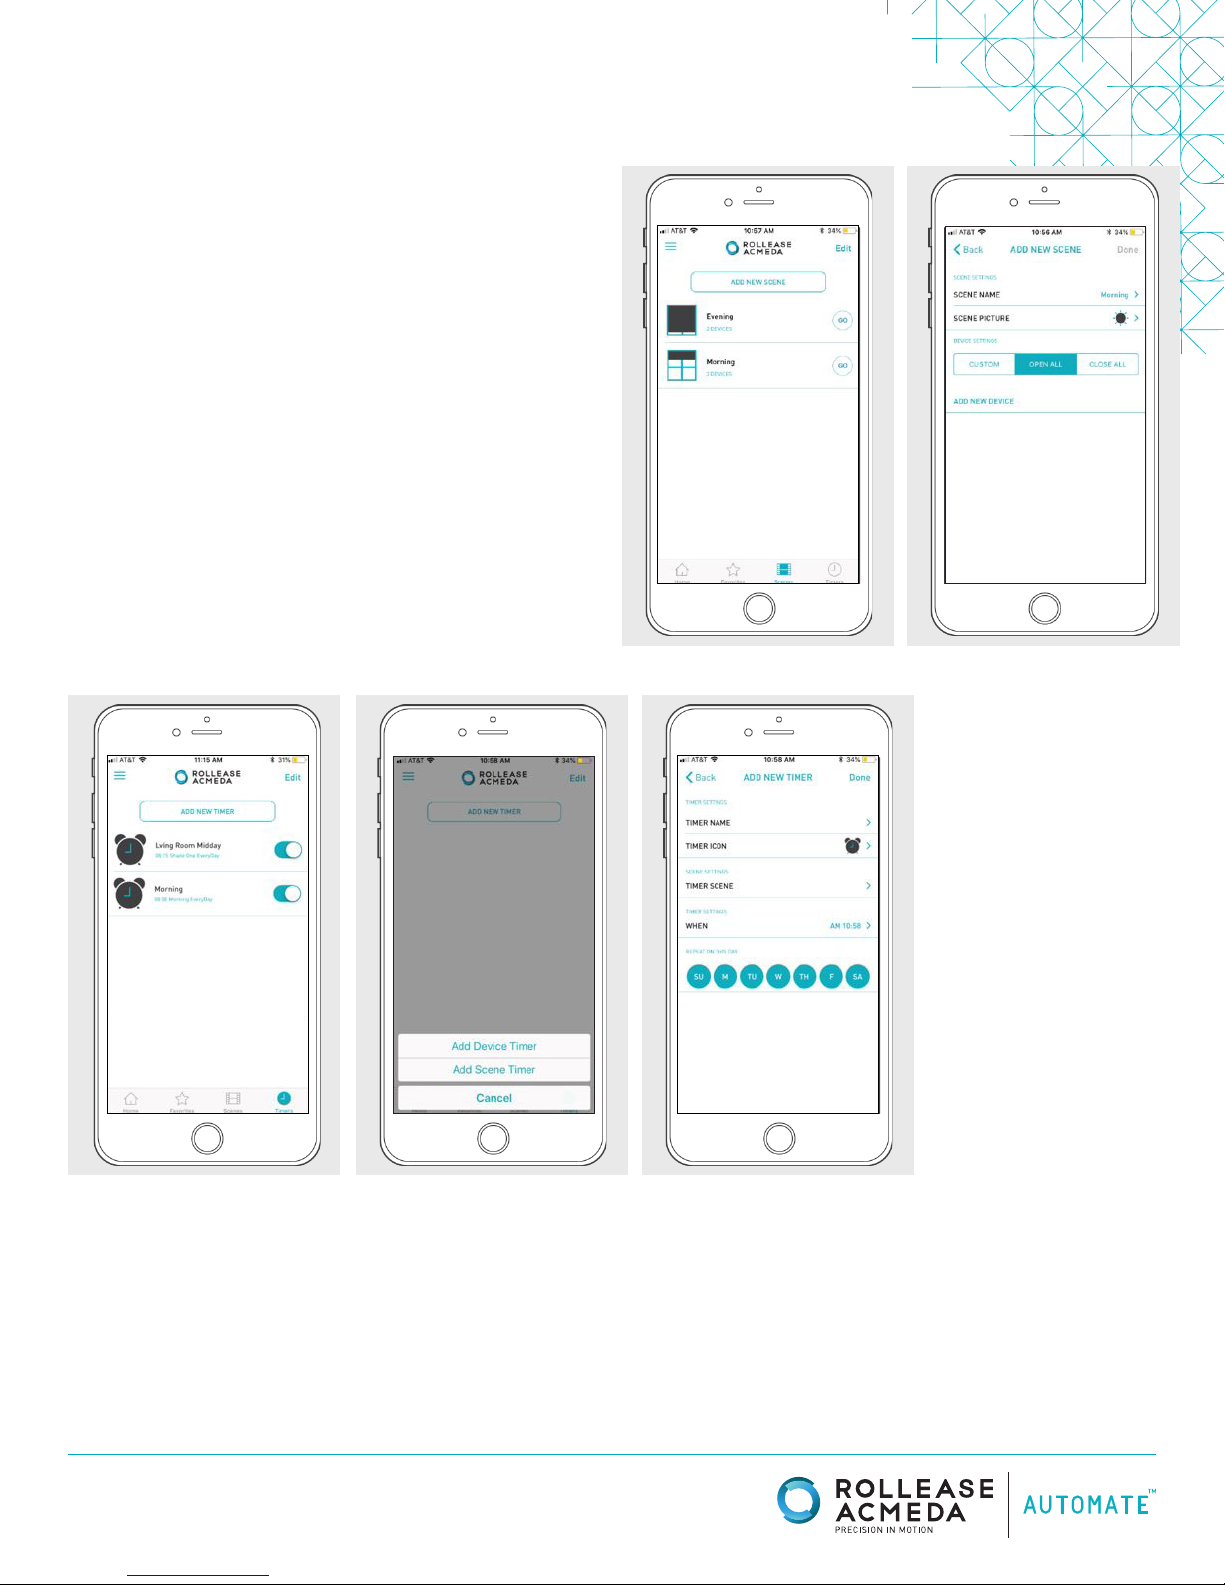
CREATING SCENES:
Once you have completed the pairing process for the Wi-Fi bridge and linked all of your shades to the
application, you can create scenes to set a treatment or group of treatments to specific heights.
1. On the lower menu bar select the Scene icon. This will take you to
the scene homepage.
2. Select “Add New Scene” to begin programming your desired scene.
3. Input your scene name and select a scene picture.
4. You can choose custom heights (by %) or set open/closed for
all selected treatments. (If you select custom you must select a
treatment height for each selected treatment)
5. Select “Add New Device” to add your treatment to the scene being
created.
6. Set the treatment height percentage if necessary.
7. Select “Done” to finalize your scene.
You can activate your custom scene by navigating to the scene menu,
and pressing “GO” next to the desired scene name. If you wish to set a
programmed timer to activate your scene or individual shades, please
see the next section “Programming Timers”.
PROGRAMMING TIMERS
You can program timers to trigger the specific operation of your shades and scenes at your desired times throughout the day.
1. On the lower menu bar select the Timer icon. This will take you to the Timer homepage.
2. Select “Add New Timer” to begin programming your desired timer.
3. Select either “Add Device Timer” or “Add Scene Timer”
4. Input your timer name and select a timer picture.
5. Add the devices or scenes you wish to operate.
6. Set the time you wish the timer to trigger shade control.
7. Select the days you wish the timer to operate. (Black dot signifies the timer will repeat on that day)
8. Select “Done” to finalize your timer.
You can turn your timer on or off to accommodate changes to your regular schedule. Slide the on/off selector on the Timer homepage next to
the desired timer to activate or deactivate the time based control.
rolleaseacmeda.com
© 2017 Rollease Acmeda Group
Page 9

LED INDICATION
COLOR RESPONSE STATUS
Flashes Twice Power On
Continuous Flashing Wi-Fi Bridge is in pairing mode
Flashes Three Times Wi-Fi Bridge has been reset for
manual configuration
ON App is connected to Wi-Fi Bridge
Continuous Flashing Blue to Purple Wi-Fi Bridge is connected to Wi-Fi
router (no cloud connection)
1 Flash Every 5 Seconds Wi-Fi Bridge is connected to cloud
server and is in stand-by mode
Continuous Flashing Wi-Fi Bridge is not connected to
Wi-Fi and is actively searching for a
Wi-Fi signal
Flashing Wi-Fi Bridge’s firmware is being
updated
TROUBLESHOOTING:
The following scenarios are common issues that may cause connectivity problems during the Wi-Fi bridge pairing process. If you cannot achieve success connecting the Wi-Fi
Bridge to your network, please reference the below most common pairing roadblocks.
I CANNOT CONNECT TO MY HIDDEN WI-FI NETWORK.
Rollease Acmeda Wi-Fi Bridge does not currently support pairing with hidden networks. To connect to a hidden network, you will need to unhide the network. Once the network
pairing process is complete you can re-hide the network and the Wi-Fi Bridge will work without issue.
I HAVE MULTIPLE ACCESS POINTS AND CANNOT COMPLETE THE PAIRING PROCESS.
If you have multiple wireless access points we recommend that you turn off all but one to complete the network pairing process. Once this is complete you can turn on all of the
wireless access points and the Wi-Fi Bridge will work without issue.
I CANNOT CONNECT TO MY 5GHZ WI-FI NETWORK.
Rollease Acmeda Wi-Fi Bridge does not currently support operation over a 5GHz network. It operates on a 2.4GHz network. Most routers are dual band and can support both
network configurations. Please make sure that the 2.4GHz band is turned on in your wireless router’s settings.
NETWORK SECURITY SETTINGS ARE INTERFERING WITH THE SETUP PROCESS.
Some companies or large corporate offices have network security settings more advanced than the typical homeowner. If you are setting up in this environment please consult
your network administrator. It may be necessary to enable device-to-device communication. One solution is to use a device with a mobile data connection available in the background to complete the set-up process.
MY WI-FI BRIDGE IS NOT CONSISTENTLY WORKING.
There are many things that can interfere with the radio communication that the Wi-Fi Bridge uses. Try positioning the Wi-Fi Bridge in a different location and/or closer to the
shade to improve performance. Due to varying levels of interference it may be necessary to purchase additional
Wi-Fi bridges to extend the coverage throughout your location.
For further assistance, contact your retailer, visit our website at www.rolleaseacmeda.com or email us at; automate@rolleaseacmeda.com
rolleaseacmeda.com
© 2017 Rollease Acmeda Group
 Loading...