

Page 1

1
User Manual
V2.3.0
May 2015!
Page 2

2
ROLI Ltd.
2 Glebe Road, London E8 4BD UK. Tel. +44 020 7812 9985
Email support@roli.com
Web https://www.roli.com
This device complies with Part 15 of the FCC Rules. Operation is subject to the
following two conditions: (1) This device may not cause harmful interference,
and (2) this device must accept any interference received, including interference
that may cause undesired operation.
This device also meets relevant EU regulations regarding electromagnetic
interference and electrical safety.
Compliance to these standards is based on proper installation, using electrically
grounded connections where applicable, and well-maintained cabling.
Do not expose Seaboard to liquids, except in very small quantities when
cleaning, as directed in Section 4 of this manual.
Do not expose Seaboard to extremes of temperature. Do not attempt to
disassemble Seaboard, except under direct instruction by ROLI staff. Refer all
servicing to qualified service personnel.
ROLI Ltd., and the Seaboard GRAND, conform to the European Union’s Directive
2002/95/EC on Restrictions of Hazardous Substances (RoHS) and the
requirements of the European Union’s Directive 2002/96/EC on Waste Electrical
and Electronic Equipment (WEEE).
ROLI and Seaboard are registered trademarks of ROLI Ltd.
All other trademarks are the property of their respective owners. Copyright ©
2014 ROLI Ltd. All rights reserved.!
Page 3

3
About
This user manual is a complete guide for using the Seaboard GRAND. For
Seaboard GRAND Limited First Edition stand assembly instructions see the Quick
Start Guide. The most current version of the User Manual is also available at
www.roli.com/seaboarders. If you are prompted for a password, please enter
TouchSound.
Table of Contents
1. Product Overview 4 ......................................................................
1.1 Connections and Specifications 4 .......................................................
1.2 The Seaboard GRAND 6 ........................................................................
1.3 The User Dial 7 .......................................................................................
2. Software 9 .....................................................................................
2.1 Installation 9 ............................................................................................
2.2 ROLI Dashboard 11 ..................................................................................
2.3 Synth Squad Player 20 .............................................................................
2.4 Synth Squad For Seaboard 27 ...............................................................
2.5 Using Virtual Instruments 27 ..................................................................
2.6 PolyThru 28 .................................................................................................
3. Playing the Seaboard 29 ................................................................
3.1 Keywaves 29 ..............................................................................................
3.2 Techniques 30 ..........................................................................................
4. Updates and Maintenance 35 ........................................................
4.1 Seaboard Updates 35 .............................................................................
4.2 Cautions and Care 37 .............................................................................
5. Troubleshooting and Support 38 ...................................................
5.1 Troubleshooting 38 ..................................................................................
5.2 Support 40 ................................................................................................
Page 4
4
1. Product Overview
1.1 Connections and Specifications
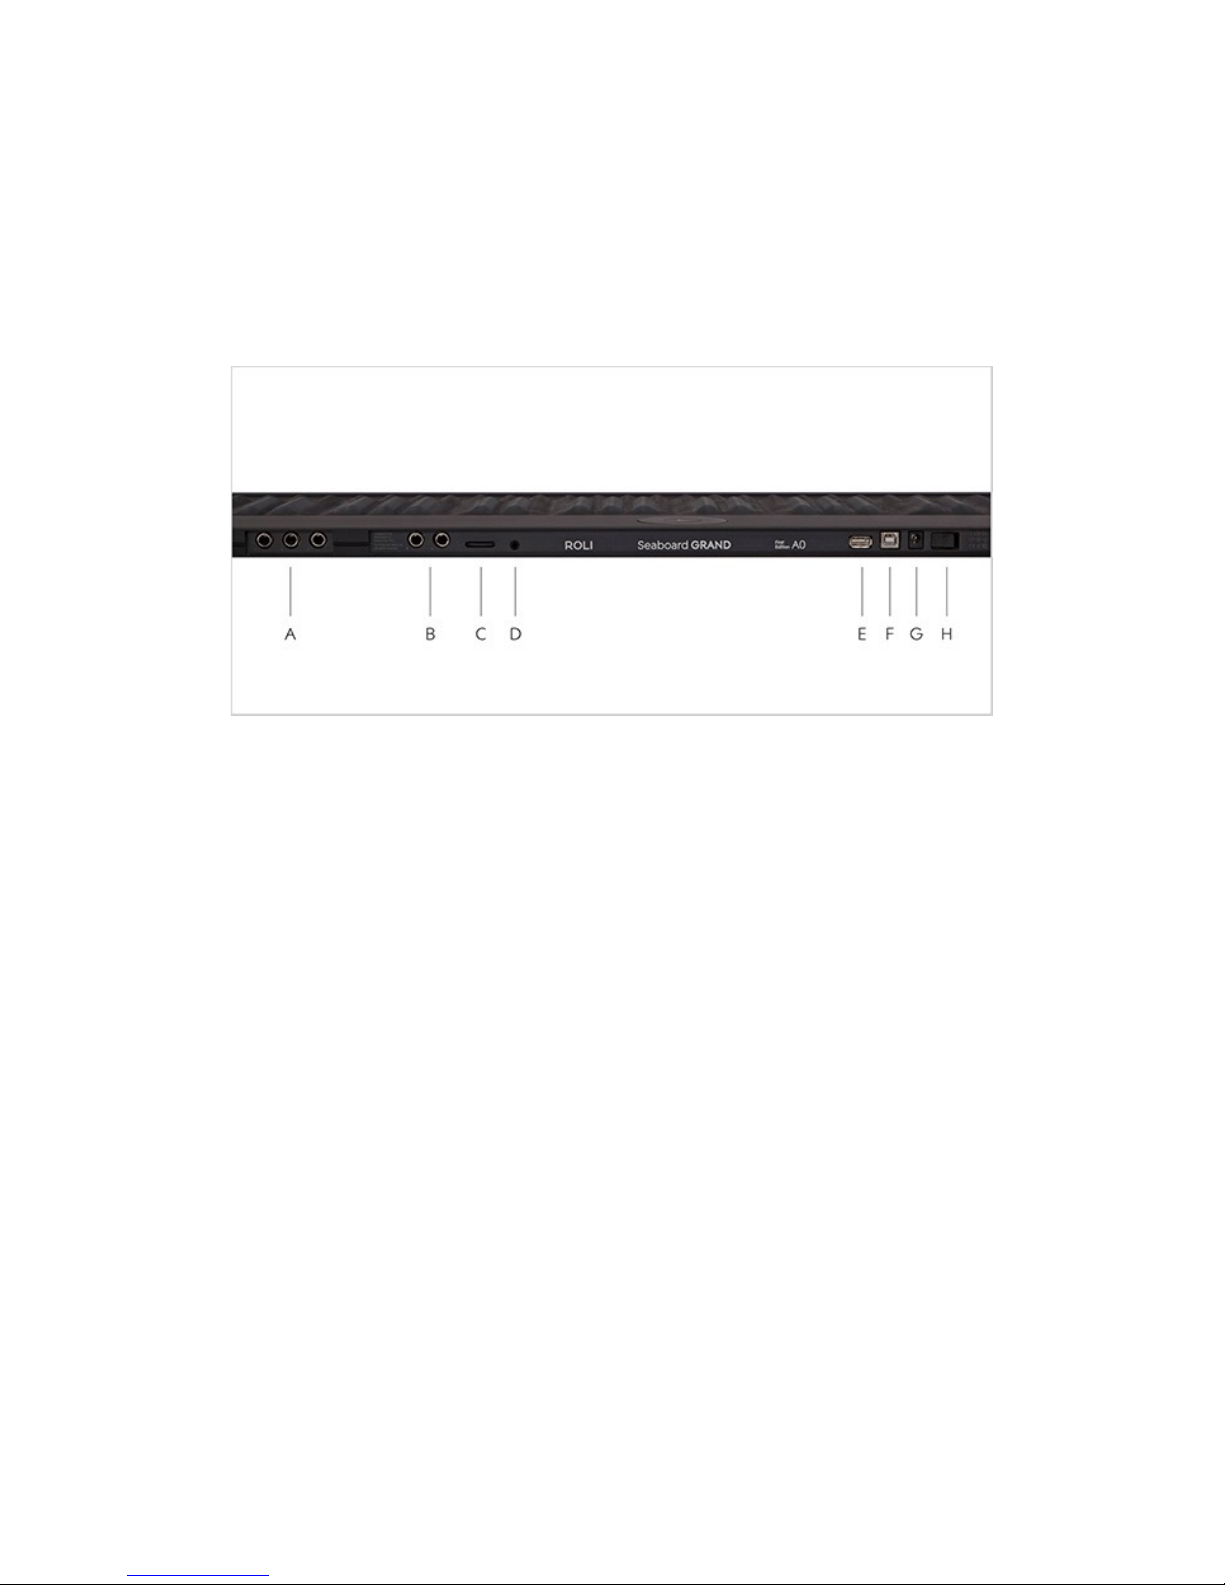
Connections
The following list of connections is from left to right on the rear panel.
A. Pedal Jacks 1, 2 and 3 – User definable: connect a passive sustain pedal,
foot switch or expression pedal (please note that the Seaboard GRAND
Studio does not have a third pedal jack)
B. Balanced Audio Out Right/Left – Connect standard TRS balanced 1/4”
audio cables*
C. Volume fader – Adjust the output volume*
D. Headphone Output – Connect a 3.5mm (1/8th”) headphone plug for
headphone monitoring of audio output*
E. USB Type A – not supported
F. USB Type B – Connect the Seaboard to a computer
G. Power Input – Connect the included power supply (must be connected at
all times of operation)
H. Power switch – Toggle power on/off
*not currently enabled
Page 5

5
Seaboard GRAND Product Specifications
Seaboard GRAND Limited First Edition
•
Dimensions: 51.7” x 13.3” x 1.0” (1313 x 338 x 25.7 mm)
•
Weight: 22 lb (10 kg)
Seaboard GRAND Stage
•
Dimensions: 36.9” x 13.3” x 1.0” (937 x 338 x 25.7 mm)
•
Weight: 15.4 lb (7 kg)
Seaboard GRAND Studio
•
Dimensions: 23.9” x 13.3” x 1.0” (608 x 338 x 25.7 mm)
•
Weight: 11 lb (5 kg)
Seaboard GRAND Case Specifications
Seaboard GRAND Limited First Edition
•
Dimensions of case: 58.6” x 19.7” x 4.3” (1412 x 500 x 110 mm)
•
Weight of case when packed: 28 lb. (13 kg) without stand; 53 lb. (25 kg)
with stand
Seaboard GRAND Stage
•
Dimensions of case: 47.9” x 19.6” x 3.9” (1216 x 498 x 98 mm)
•
Weight of case when packed: 24 lb. (11 kg)
Seaboard GRAND Studio
•
Dimensions of case: 34.9” x 19.6” x 3.9” (887 x 498 x 98 mm)
•
Weight of case when packed: 18 lb. (8 kg)
System Requirements:
•
Mac OS X 10.7+
•
RAM: Minimum 4 GB, recommended 8GB
•
Processor: 2.5GHz i5 or faster!
Page 6

6
1.2 The Seaboard GRAND
The Seaboard is a new musical instrument that reimagines the piano keyboard
as a soft, continuous surface. In developing this new approach to musical
interaction ROLI has brought together years of innovation on several fronts. The
Seaboard’s polyphonic pitch bend, vibrato and per-note dynamic changes are all
available at your fingertips, marrying the intuitiveness of acoustic instruments
with the versatility of digital technology.
The Seaboard interfaces with a computer via a USB connection. It functions as a
MIDI controller, and the dedicated ROLI Dashboard allows customisation of
performance settings. It is fully compatible with FXpansion’s Synth Squad
software sound engine, and works well with a host of other software synths as
well. In the future we will also release an onboard sound engine for the
Seaboard GRAND, which will be made available to all Seaboard owners through
a firmware upgrade.
Note: The Seaboard is NOT currently USB powered and must be used with
the provided power supply at all times.!
Page 7
7
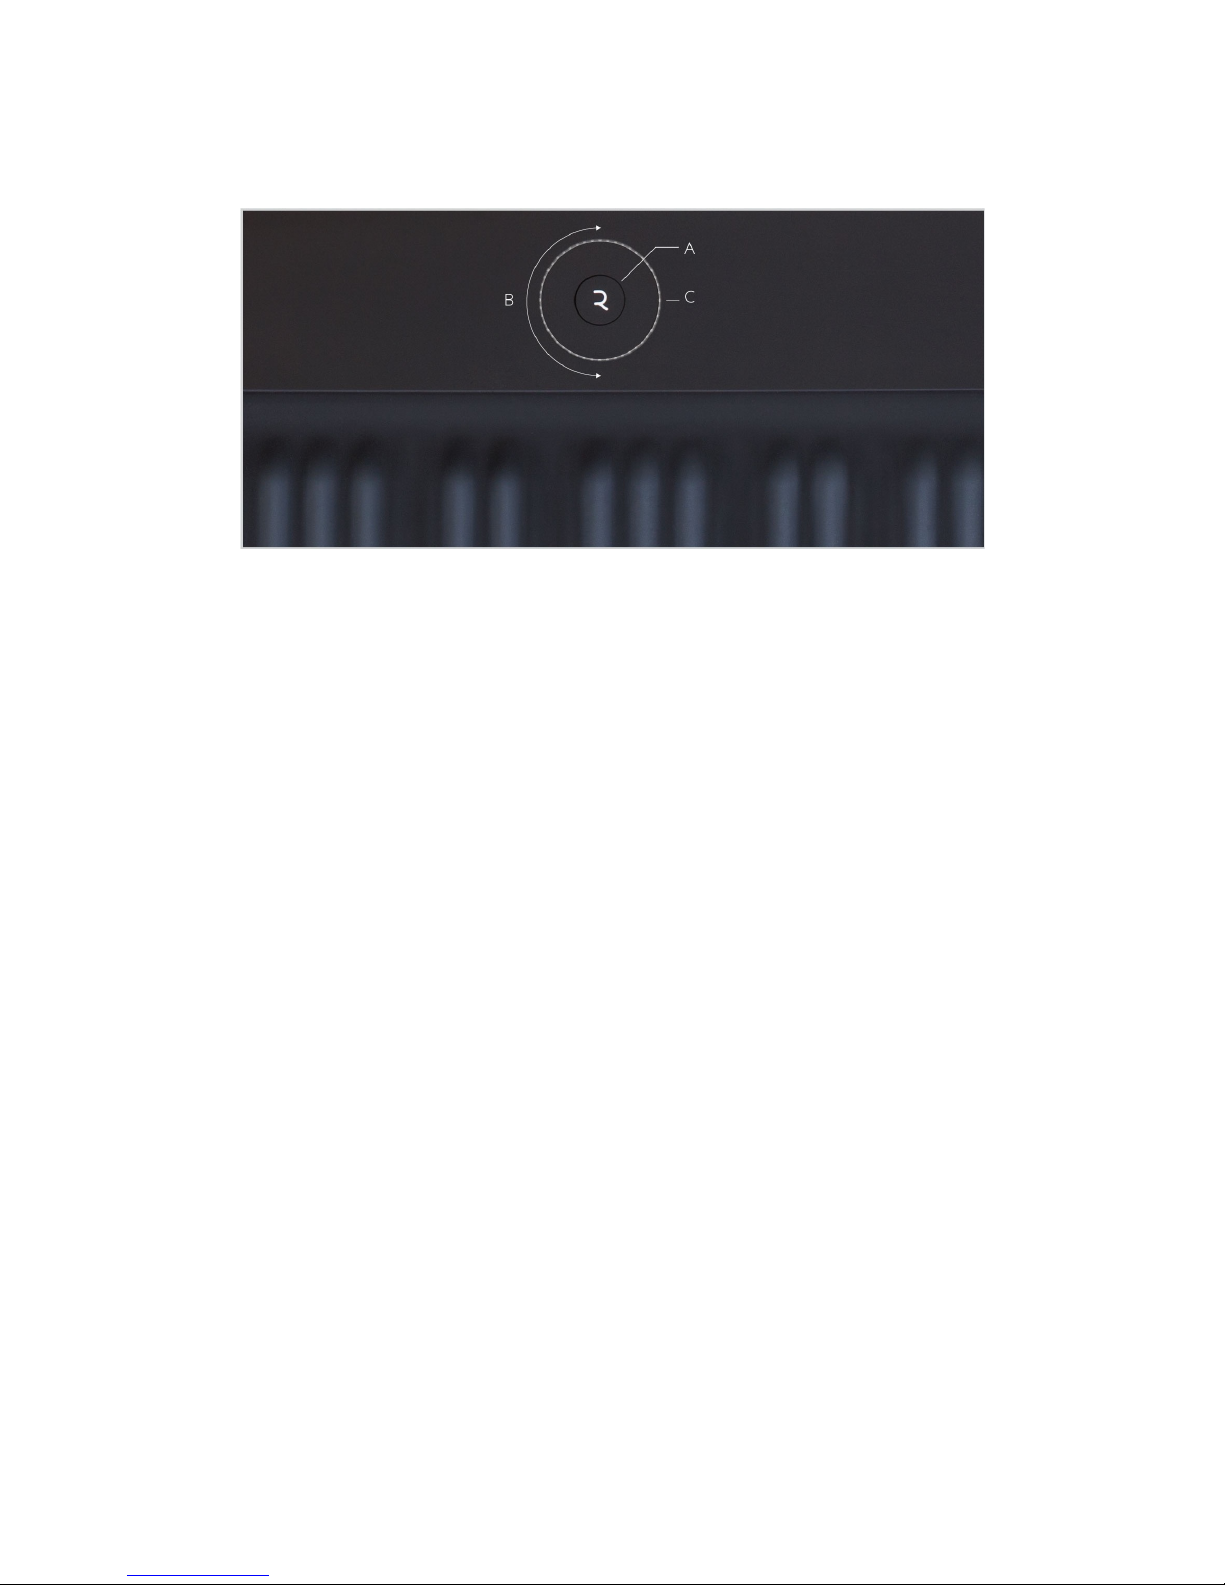
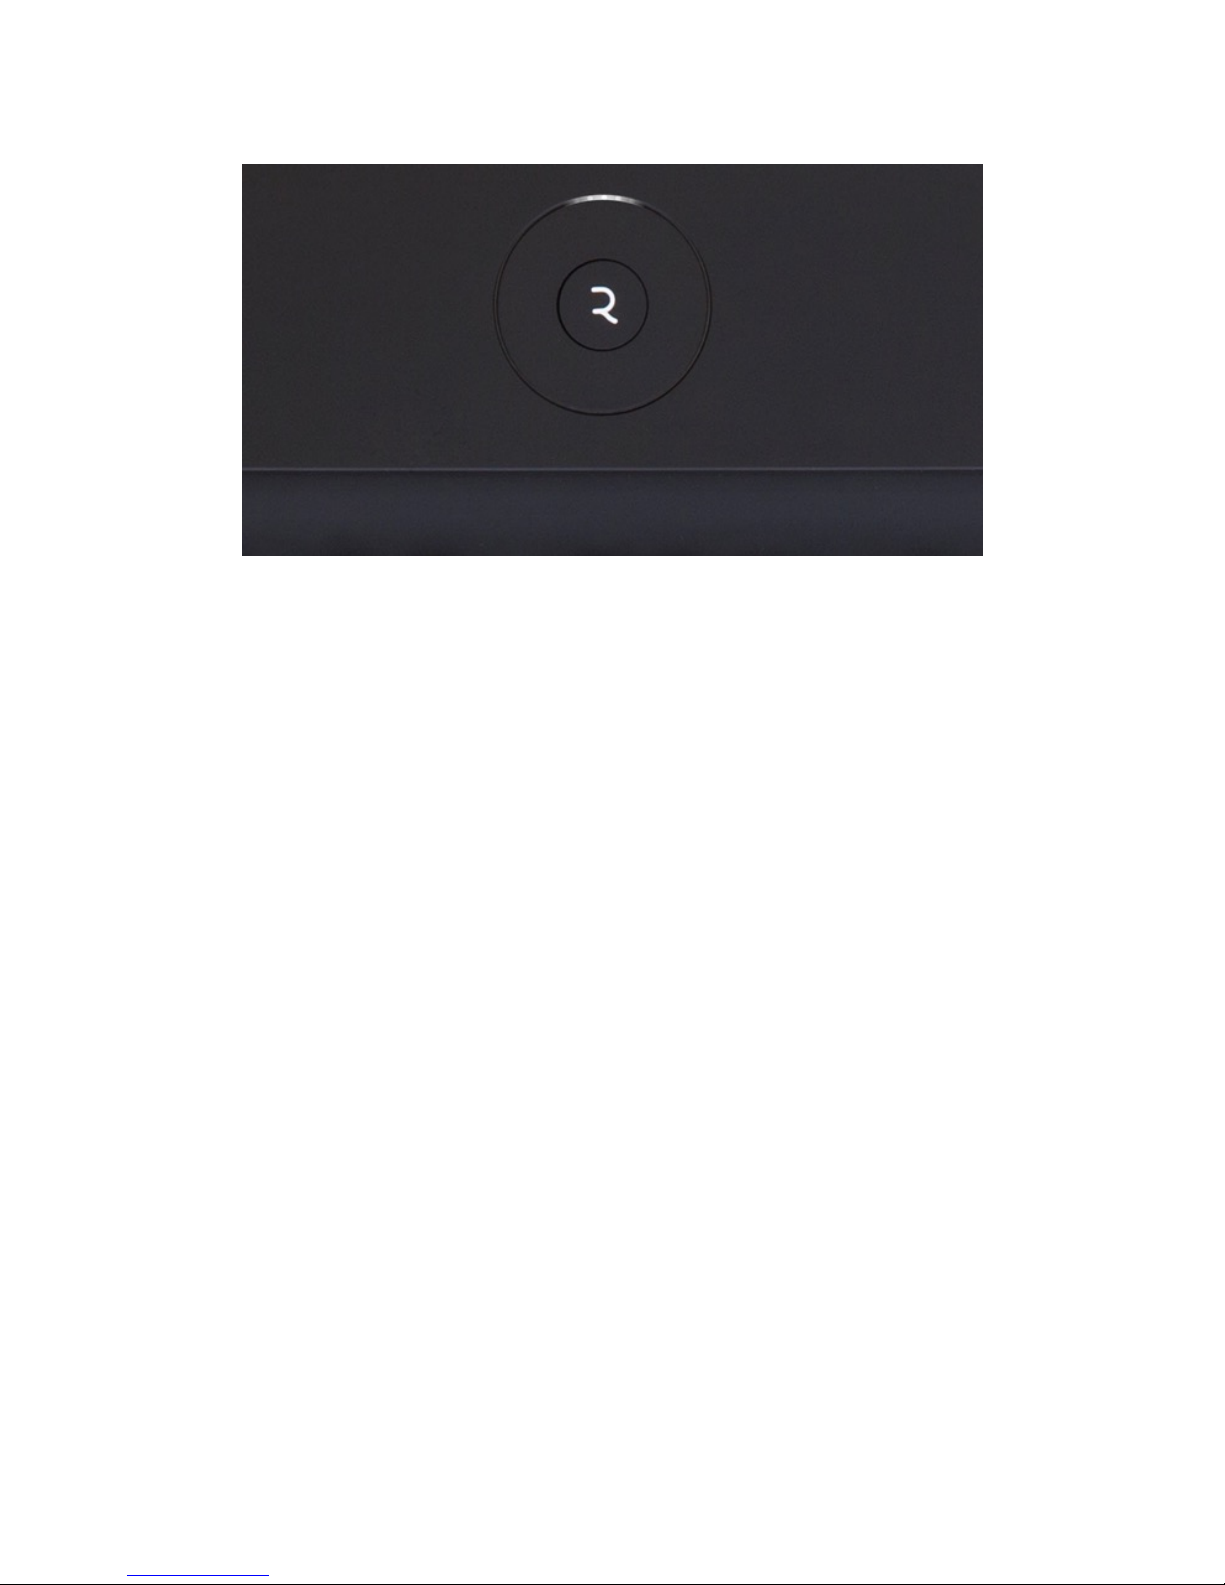
1.3 The User Dial
The User Dial is located on the top panel of the Seaboard. You can use it to
navigate between presets of Synth Squad and other virtual instruments There
are 3 elements to the User Dial: the Center Button, the Control Ring and the
Light Ring.
How it works:
A. Press the Center Button to advance through each of Synth Squad Player’s
four preset banks (doing so will send a Program Change MIDI message
that will increase the previous Program Change value by 12).
B. Turn the Control Ring to navigate through presets in either direction
(doing so will send a Program Change MIDI message that is 1 higher or
lower than the previous message).
C. The Light Ring indicates the Seaboard’s activity (powering on, updating)
as well as current preset locations and transpose positions.!
Page 8
8
Octave Shift
The Octave Shift mode transposes the Seaboard’s playing pitch up or down.
Hold down the Center Button until the Light Ring displays a wide band of light
across the top center. Turn the Control Ring counter-clockwise to shift the pitch
an octave down. Turn it clockwise to shift it up. The transpose range is two
octaves and normal playing position is when the LEDs are centered. Press the
Center Button to exit Octave Shift mode.!
Page 9
9
2. Software
2.1 Installation
In addition to Dashboard, the Seaboard's installer package bundles a special
edition of FXpansion’s Synth Squad which is optimised for use with the
Seaboard, a light-weight Player edition of Synth Squad to get you started
quickly, and also PolyThru, a tool for connecting your Seaboard to any software
instrument.
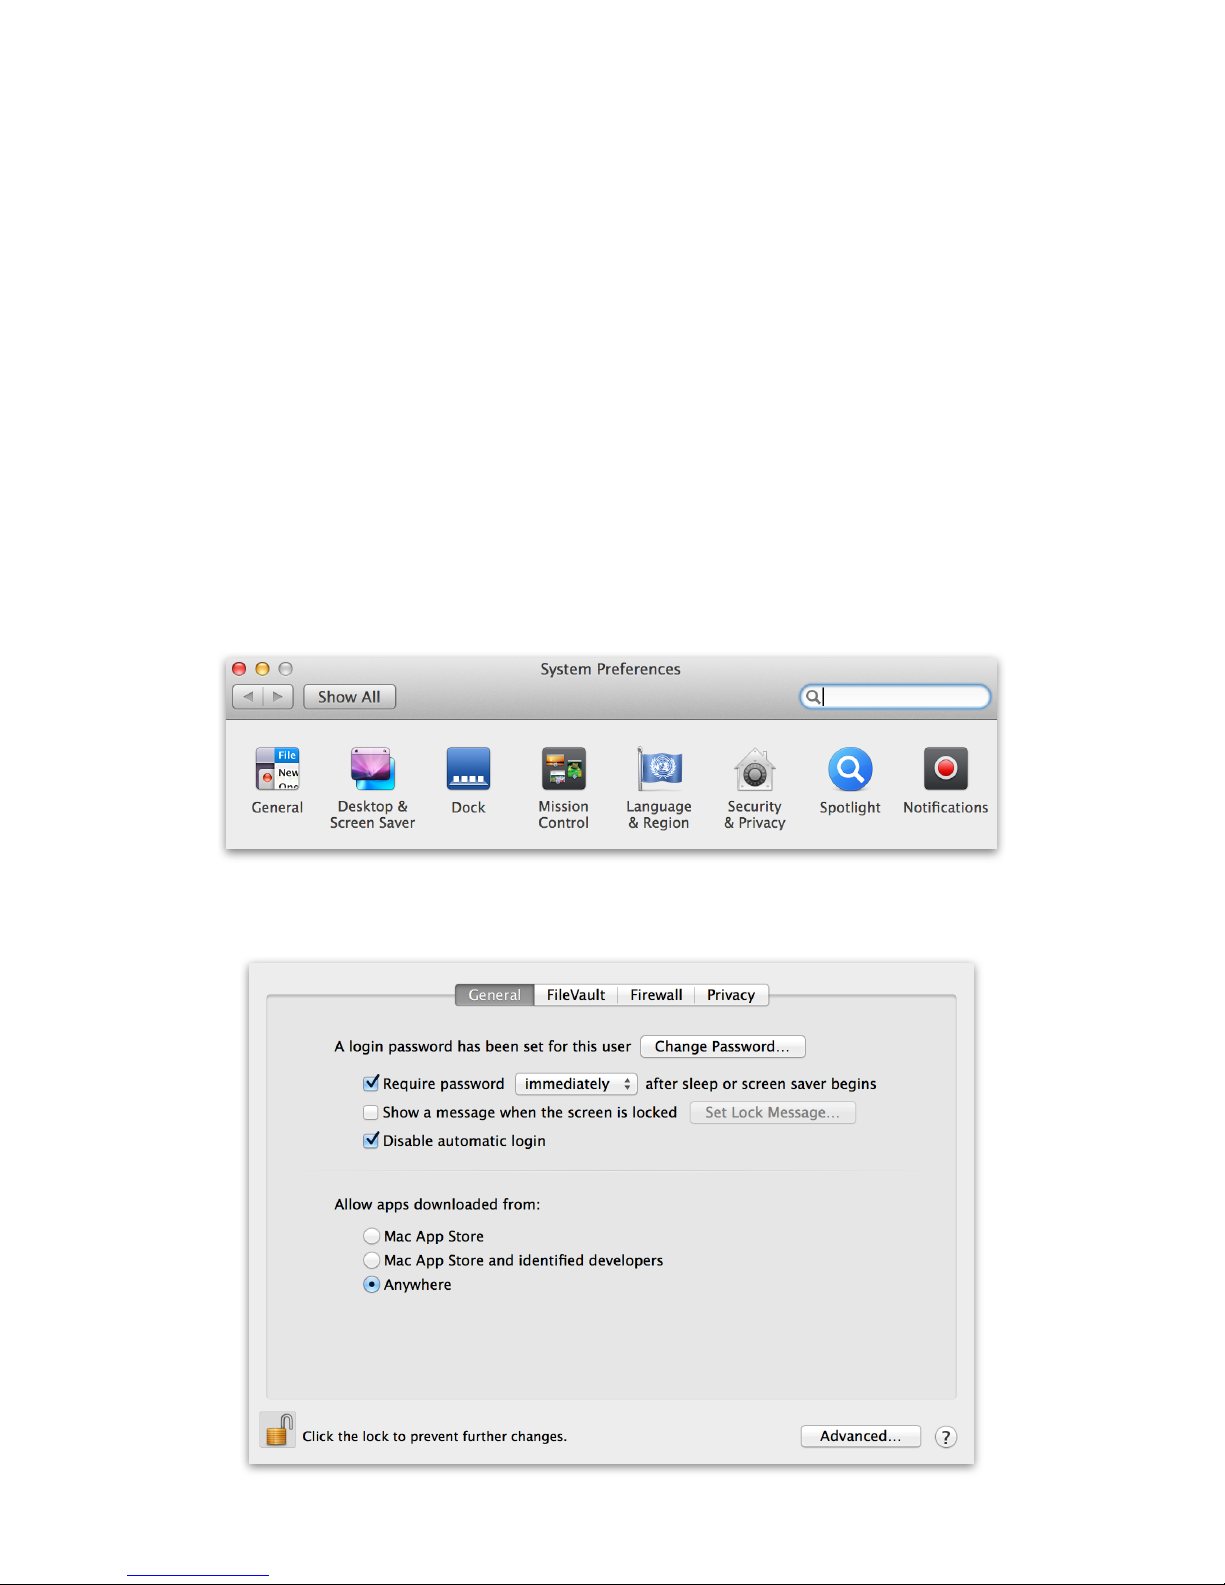
Gatekeeper
Before running the installer, please make sure that your Mac has Gatekeeper
disabled, so that our installer can run. To do this, do to System Preferences and
click 'Security & Privacy', found on the top row.
In the window that appears, select the 'Anywhere' option in the 'General' tab.!
Page 10
10
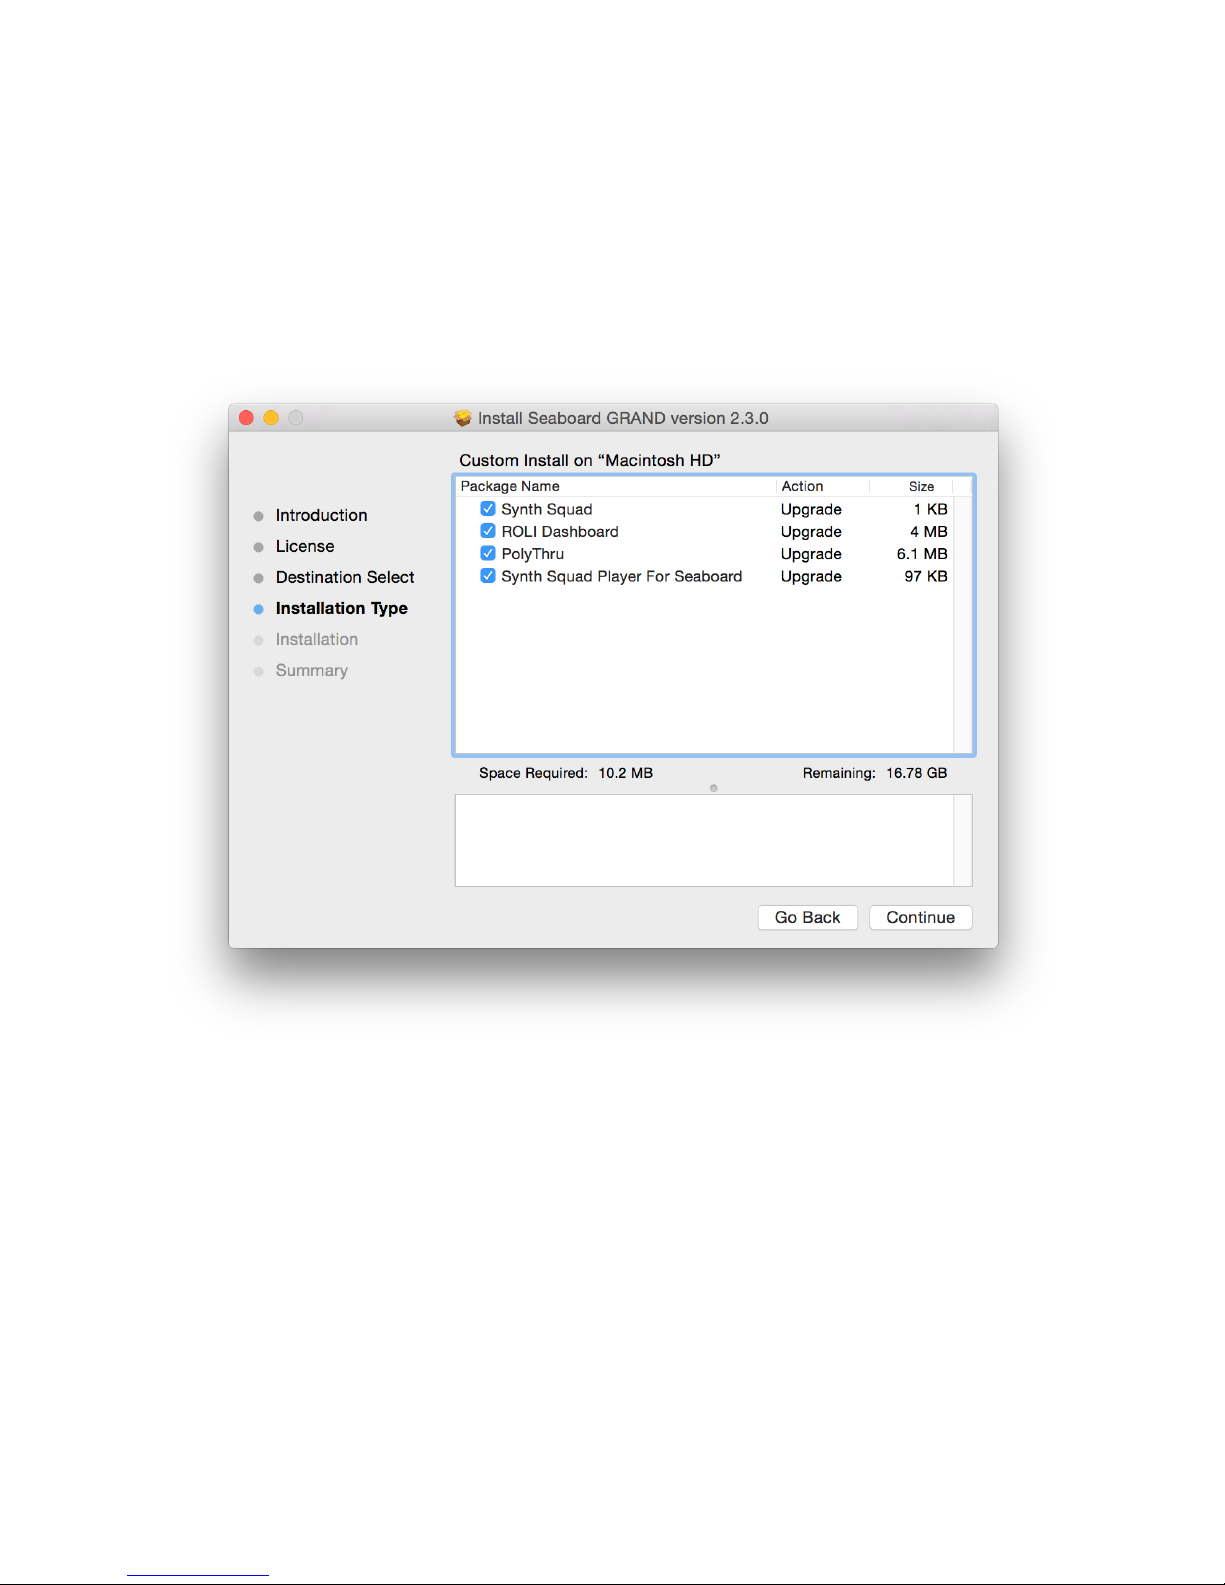
Installer
Once you have Gatekeeper disabled you can run through the installer. During
the installation:
•
In the Installation Type window, please de-select any packages of software
you don't want to install - we recommend you install all four packages for
the optimal experience with your Seaboard.
•
During the installation of Synth Squad for Seaboard, you will need to accept
FXpansion's License Agreement.
•
When asked if you would like to check for updates online at the end of the
installation, make sure you click No - otherwise you will be taken to the
FXpansion website and prompted to download a non-Seaboard-compatible
version of the software.
•
After you have run through the installer, Dashboard and the standalone
versions of Synth Squad and PolyThru can be found in your Applications
folder.
Page 11

11
2.2 ROLI Dashboard
The ROLI Dashboard is designed for customising performance settings as well
as keeping the Seaboard's firmware up to date through automatic updates.
Getting Started
To begin, please make sure that the power supply is connected to the Seaboard.
Connect the USB cable to your computer, turn the Seaboard's power switch to
the on position and launch Dashboard.
Note Independence
Each note played on the Seaboard has independent pressure, pitch bend and
velocity control. This independence is made possible by real-time MIDI channel
allocation. With every new note, data is sent to the next available MIDI channel.
However, polyphonic pitch bend and aftertouch may not always be desired so
Dashboard has options to accommodate many different performance scenarios.
Page 12
12
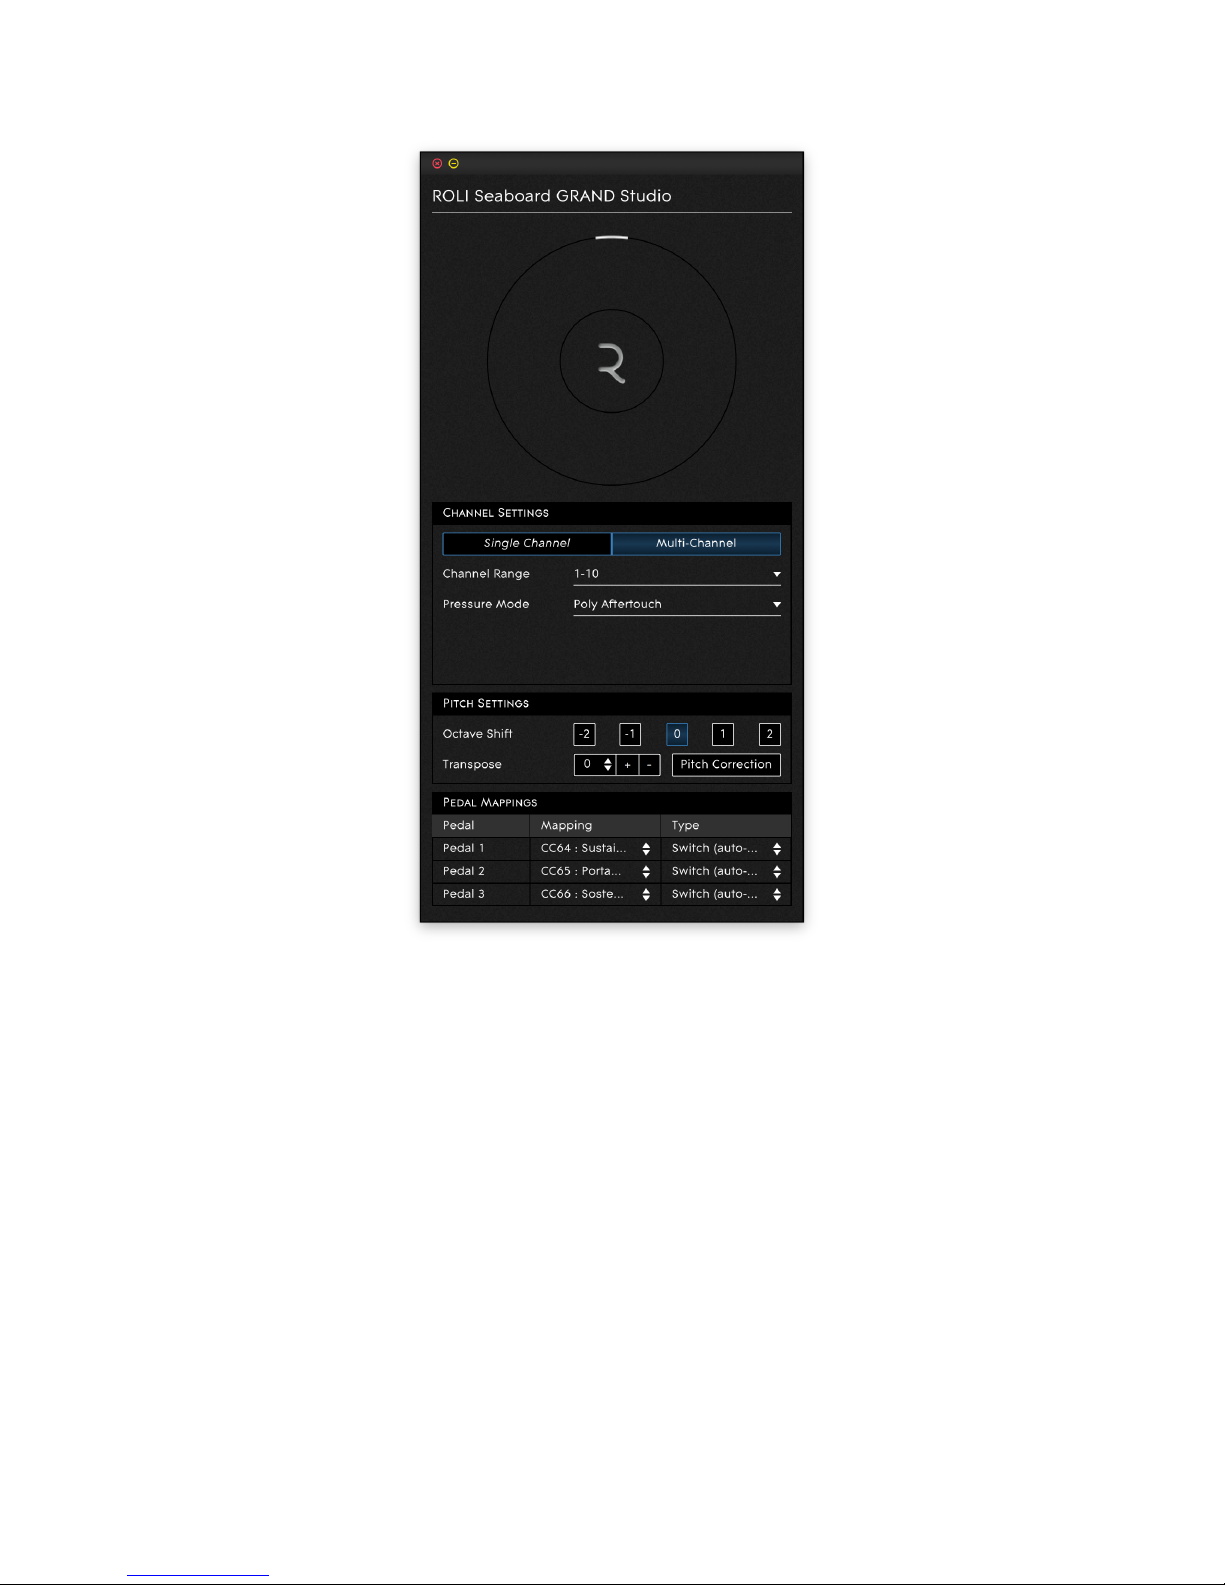
Main Menu
The main menu of Dashboard has three sections: Channel Settings, Pitch
Settings and Pedal Mappings.!
Page 13

13
Channel Settings
Select a mode by clicking on it. The mode selected will always be highlighted in
blue to indicate that it is active.
Single Channel Mode
Single Channel mode causes the Seaboard to send all its data to one MIDI
channel, just like a standard MIDI controller keyboard. You can select which
channel, using the Channel Number drop- down menu.
Single Channel mode is limited in that it does not support independent pitch
bend of individual notes. When performing pitch bend in Single Channel mode,
all notes playing at the same time are affected identically. The Pitch Bend
Tracking options (see below) can modify how pitch bend values are applied.!
Page 14

14
Pressure Mode
Pressure Mode will determine how changes in playing pressure are transformed
into MIDI data. The options are Poly Aftertouch and Channel Pressure. Select
Channel Pressure to affect all notes at once. Select Poly Aftertouch to give
independent pressure control over individual notes.
Historically, very few controller keyboards have been capable of producing
polyphonic aftertouch. This means that not every synthesizer, virtual instrument
or DAW is designed to work with it.!
Page 15

15
Pitch Bend Tracking
Use the Pitch Bend Tracking options to determine which note will have priority
during performance when in Single Channel mode.
Last Note Played uses the pitch bend value of the most recent note and
applies it to all notes. Highest Note Played uses the pitch bend of the highest
note and finally Lowest Note Played uses the lowest note.
Disabled will remove pitch bend functionality taking away any interpolation
between keywaves. Slide your finger on the ribbon and notice the intervals
between keywaves are limited to a semitone.
Pressure Tracking
When using Channel Pressure in Single Channel mode, you have the option to
set its tracking method independently from pitch bend. The options are same as
the pitch bend tracking, and control which note's pressure values are translated
into Channel Pressure MIDI messages. Note that this option is not available
when using Polyphonic Aftertouch.
Page 16

16
Multi Channel Mode
In Multi-Channel mode, the Seaboard will send its data to multiple MIDI
channels, with every note assigned to a different MIDI channel. This allows the
user to control the pitch-bend polyphonically.
Channel Range allows the user to control the number of channels used: the
greater the range, the greater the pitch bend and aftertouch polyphony. In
general a higher range is preferable; however, when using complicated MIDI
set-ups or when computing power is limited, you may find that your virtual
instruments are only able to respond to a smaller range of channels, and will
need to limit the number of MIDI channels that the Seaboard occupies to match.
Pressure Mode
Pressure Mode will determine how changes in playing pressure are represented
as MIDI messages. The options are Poly Aftertouch and Channel Pressure.
Note that since in Multi- Channel mode each note is on a different channel, both
options allow individual pressure control of each note.!
Page 17

17
Pitch Settings
Octave Shift
This feature is an alternative to the User Dial transposition method. It allows for a
maximum transposition of two octaves in either direction.
Transpose
This feature transposes the range of the Seaboard lower or higher, in semitone
increments.
Pitch Correction
The Pitch Correction feature compensates for playing inaccuracies by continually
adjusting the pitch of each note towards a zero-pitch-bend state. When Pitch
Correction is enabled vibrato and fast glissandi are still possible; however
sustained notes will slide back into tune if they are out, making slow vibrato less
pronounced and slow glissandi less smooth. This makes Pitch Correction
especially suited to playing chords, or when first getting started with the
Seaboard; however advanced users may want to disable it to maximise their
expressive control.!
Page 18

18
Pedal Mappings
The pedal inputs on the back panel of the Seaboard are configurable to work
with both switch and continuous expression pedals. Click in the Mapping or
Type fields to change settings. By default the pedal configuration is:
•
Pedal 1 - CC64 Sustain
•
Pedal 2 - CC67 Soft pedal
•
Pedal 3* - CC66 Sostenuto
*Not available on Seaboard GRAND Studio.
The Seaboard treats a pedal mapped to CC64 (sustain) slightly differently from
other pedals. When this pedal is pressed, the Seaboard holds the peak
continuous pressure values of any notes that are sounding and filters out any
values lower than this. Musically, this is what a player would expect, as it means
that releasing a note while the sustain pedal is depressed will not alter the
sound of the note. It is important to understand this ‘peak hold’ behaviour in
case remapping the pedals for other purposes is desired.!
Page 19

19
Type
There are two broad categories of electronic piano pedals: switch-type and
continuous. Switch-type pedals are sensitive only in two states, pressed and
released. These are most often used to mimic the pedals of an acoustic piano.
Continuous (or expression) pedals can measure the pedal’s angle of travel as it
moves from fully pressed to fully released.
Within these categories, pedal manufacturers have settled on different wiring
conventions. The Seaboard attempts to be compatible with most of these
conventions.
•
Switch (Auto-Detect) – Switch pedals have two kinds of polarity setting,
press open and press close. Selecting auto-detect forces the Seaboard to
identify your type of pedal automatically. For auto-detection to work
correctly, the pedal must be plugged in but not pressed down as the
Seaboard is powered on. Otherwise, Auto-Detect does not function
properly.
•
Switch (Press Close) – Pushing the pedal down connects the switch. Most
sustain pedals are wired in this way.
•
Switch (Press Open) – Pushing the pedal down disconnects the switch.
•
Continuous (Type 1) – A continuous expression pedal that is wired wiperto-ring.
•
Continuous (Type 2) – A continuous expression pedal that is wired wiperto-tip. Even if you do not know how your pedal is wired, you may
experiment safely with any of these settings to find which one works
properly.
Recommended Expression Pedals:
Roland RPU-3 Pedal Unit, Roland DP10 Sustain Pedal, Yamaha FC- 7 Expression
Pedal, Mgear SP-2 Sustain Pedal!
Page 20

20
2.3 Synth Squad Player
Overview
Synth Squad Player for Seaboard is a lightweight edition of FXpansion’s Synth
Squad software that is designed specifically for getting started quickly with the
Seaboard. The Player has 48 custom-made presets which can be modified via 8
Macro controls. Synth Squad will work as a stand-alone virtual instrument or as a
plug-in in a DAW - it comes in VST, Audio Unit, AAX and RTAS formats. Saving
adjustments to presets in stand- alone mode is not supported. To save
modifications of a sound insert Synth Squad as an virtual instrument in a DAW
and use the DAW's preset management functions to build a library of custom
Synth Squad sounds. For more advanced customisation, use the full Synth
Squad for Seaboard (see below).
Note that for the Player to work well with the Seaboard it must be able to receive
MIDI messages on multiple channels. Not all DAWs allow this by default - it may
be necessary to create extra MIDI channels for proper routing. Please see the
DAW's user manual for proper setup.
Stand-Alone Operation
Make sure the Seaboard is on, set to Multi-Channel mode, and connected to
your computer via USB and then launch Synth Squad Player from the
Applications folder of your computer.!
Page 21

21
Audio Preferences
Choose the desired audio outputs. These can be either the built- in core audio
outputs or outputs from a connected audio interface. The default buffer setting
is 256. If you experience crackles in the audio try setting the buffer to a higher
value.
Because of its extensive sound engine Synth Squad is quite CPU intensive so in
general the buffer size should be set no lower than 256 and the sample rate
should be set to 44100. These settings should give a low latency, high quality
playing experience; however it does depend on the computer in use. If the
audio output of Synth Squad begins to break up the buffer needs to be set
higher.!
Page 22

22
MIDI Preferences
The Seaboard should be selected as a MIDI input device by default. If Synth
Squad is not responding to the Seaboard make sure it has not been unselected.
Page 23

23
Presets
Synth Squad's preset structure can be navigated with the User Dial. The presets
are divided into four banks of twelve: A01-12, B01-12, C01-12, D01-12. Pressing
the Center Button will advance to the next bank in a clockwise direction.
However, use the Control Ring to navigate through presets in either direction.
Each full revolution of the Control Ring advances to the next bank.
Try starting at the A01 position and moving the Control Ring through all 12
presets in bank A. Notice that there are two LED positions. The brighter LED
marks the Bank position and a cluster of two small LEDs mark the preset position.
Note that there are 11 categories of sounds and each bank contains a variety of
each category. The categories include: Bass, Lead, Pluck, Split, Pad, Bow, Keys,
Synth, Reed, Brass and Percussion.
•
A01 - KEYS - Dynamic EP
•
A02 - BASS - Fretless Pop
•
A03 - PLUCK - Hybrid Jazz
•
A04 - REED - Bamboo Flute
•
A05 - BOW - Deep Chamber
•
A06 - PAD - Lush and Creamy
•
A07 - SYNTH - Bellatrix Loop
•
A08 - SYNTH - Dirt Ribbon
•
A09 - SYNTH - Space Brass
•
A10 - BRASS - Officium
•
A11 - KEYS - Jazz Club
•
A12 - LEAD - 3 Oscillators
Page 24

24
•
B01 - PLUCK - Steel Pluck
•
B02 - PAD - Sea of Platinum
•
B03 - KEYS - Solid Tines
•
B04 - BASS - Analog Pluck
•
B05 - LEAD - Classic Analog
•
B06 - PAD - Calm
•
B07 - SPLIT - Daduk + Pad
•
B08 - REED - Small Mountain Flute
•
B09 - SYNTH - Lush Comping
•
B10 - SYNTH - Cinematic Layers
•
B11 - REED - Clariwood
•
B12 - PLUCK - Jazz Guitar
•
C01 - SPLIT - Bass + Keys
•
C02 - KEYS- Organ and Pressure
•
C03 - LEAD - Summertime
•
C04 - BASS - Legato Fade
•
C05 - KEYS - Clav
•
C06 - SYNTH - Analog Power
•
C07 - BOW - Attack Strings
•
C08 - PLUCK - Nylon Rattle
•
C09 - REED - Bass Clarinet
•
C10 - PAD - Amber Pad
•
C11 - SYNTH - Comp Layers
•
C12 - REED - Sahara Reed
•
D01 - PLUCK - Electric Sitar
•
D02 - REED - Hollow Flute
•
D03 - KEYS - Hybrid Orkyes
•
D04 - BASS - Jazz D. Bass
•
D05 - SYNTH - Power Poly
•
D06 - SPLIT - Bass + Drive Lead
•
D07 - SPLIT - Shinning Diamond
•
D08 - SPLIT - Funk Bass + Lead
•
D09 - SYNTH - 303 Machine
•
D10 - SYNTH - Chrome Movement
•
D11 - PERC - Ripple Pressure
•
D12 - PERC - Mad Pots!
Page 25

25
Editing Synth Squad Sounds with Macros
The eight Macro knobs control different sound parameters within the Synth
Squad sound engine. Control them with a mouse, or with a standard MIDI
controller using the MIDI Learn function. Since each preset has different sounds
attributes (e.g. decay, chorus, tone, etc) the Macro parameters are always
unique and change from preset to preset.
Using MIDI Learn
Use the following procedure to assign MIDI controls on a standard MIDI
controller to Synth Squad's Macro knobs:!
Page 26

26
1. Click the MIDI Learn button. This enables the MIDI assign mode (the Synth
Squad interface will turn green).
2. Click the knob you wish to assign with the mouse. Then turn a knob or fader
on your controller. When MIDI assignment is confirmed, the knob will turn
blue.
3. Repeat Step 2 for each knob you wish to assign. Note that assigning the
same MIDI controller to multiple Macro knobs is possible.
4. When all assignments are complete, click MIDI learn again to exit the mode.
Synth Squad's interface will revert to its standard color.
MIDI Reset
In the unlikely event of a stuck note, click this button to reset MIDI.!
Page 27

27
2.4 Synth Squad For Seaboard
While the Synth Squad Player is a quick and easy way of accessing great sounds
with the Seaboard, its capacity for custom sound creation and tweaking is
limited. Therefore we have partnered with FXpansion to give Seaboard users the
full Synth Squad sound design package, including the Cypher, Strobe and
Amber synths, and the Fusor environment for building layered sounds from
these synths. Synth Squad has been customised to ensure full compatibility with
the Seaboard through appropriate MIDI channel assignments. For information on
how to get started with Synth Squad for Seaboard, please see the Synth Squad
for Seaboard Quickstart Guide at www.roli.com/seaboarders.
2.5 Using Virtual Instruments
The Seaboard can be used as a MIDI controller for many virtual instruments.
Some are better suited than others due to lack of polyphonic pitch bend and
aftertouch compatibility. For synths that do not suport polyphonic pitch bend by
default PolyThru is the recommended tool for enabling this functionality (see
below). If you would like to use the Seaboard with a virtual instrument and not
use polyphonic pitch bend at all, you can do so by putting the Seaboard into
Single Channel mode, and routing the Seaboard's MIDI input to the instrument
using the DAW of your choice.
Kontakt and Omnisphere
Kontakt is unusual in that it supports multi-instance functionality. This means
that within Kontakt itself a sound or instrument can be duplicated and assigned
to different channels enabling polyphonic pitch bend and aftertouch. For more
on how to set up multiple instances, please see the Kontakt manual.
Another exception is Omnisphere. It supports polyphonic pitch bend via only
one instance. Copying one voice to all 8 voices is handled internally, within
Omnisphere itself. To use the Seaboard with Omnisphere, use Multi-Channel
mode and set the Channel Range to 1 - 8. For more on how to set up multiple
voices, please see the Omnisphere manual.!
Page 28

28
Pitch Bend Settings
For optimal pitch bend response, whatever your virtual instrument, always set its
pitch bend range range to +12 and -12 (i.e. one octave). Otherwise pitch bend
will not function as intended.
2.6 PolyThru
PolyThru is a new app developed by ROLI that lets your existing software synths
support polyphonic pitch bend. While it is still in development, we have made
the Beta version available to all Seaboard GRAND customers. It comes in
standalone, VSTi and AU formats, and is installed as part of the ROLI Dashboard
installation package. For information on how to get started with PolyThru, please
see the PolyThru Manual at www.roli.com/seaboarders.!
Page 29

29
3. Playing the Seaboard
3.1 Keywaves
A keywave is an elastic, multi-dimensional tactile interface that allows for
nuanced expression of parameters such as pitch, volume and timbre in one
continuous gesture. The layout of the keywaves is identical to the traditional
keyboard. They provide essential visual and tactile feedback which make
adapting existing keyboard skills quite natural. Because the keywaves have
continuous control across both pitch and pressure axes, playing in tune can be
challenging. However, with a little practice, great intonation is achievable.
When first playing the Seaboard’s keywaves, aim for the apex of the desired key
in order to achieve the correct pitch. Striking a key off-center will cause the note
to be slightly flat or sharp.!
Page 30

30
3.2 Techniques
Playing with Pitch Bend
Vibrato
As a note is being played, create vibrato by moving the hand left to right
causing the fingertip to rock side to side. This technique is similar to executing
vibrato on a string instrument. Varying the speed of the hand will change the
intensity of the vibrato.!
Page 31

31
Pitch Bend Gestures
The Seaboard interprets the playing of two adjacent notes in succession (C → C
♯ ), as pitch bend. This is achieved via a smooth legato gesture, varying the
pressure during the duration of the gesture. It’s possible to extend the pitch
bend even further by continuing the legato gesture chromatically (e.g.
simultaneously C → C♯ → D → D♯)
In order for this gesture to work, it is imperative that each pair of adjacent notes
are held down one after another without releasing and in the direction of the
desired pitch bend.
Tip: It's not necessary to hold the previous note down once the pitch has arrived
at the new note.
Semitones
Currently the Seaboard cannot play two adjacent semitones simultaneously such
as C and C#. They will only bend or jump from one to other depending on how
they are played and the pitch bend settings in Dashboard.
Page 32

32
Ribbon Glissando
The pitch ribbons at the top and the bottom of the keywaves are designed for
seamless glissando. You can base your playing entirely on the ribbon if you
want, or you can use it for glissandos simply by dragging your finger left and
right.
Tip: After playing a note on the keywave, drag the same finger onto the ribbon
for glissando. An alternative technique is to transfer pressure from the finger on
the keywave to the thumb placed immediately beneath on the ribbon. From
there slide up or down to achieve glissando.
Page 33

33
Playing with Velocity
The Seaboard detects the velocity of each keywave you play. Striking hard will
increase the amplitude while striking soft will decrease it. Remember that the
pitch ribbons responds will respond to velocity. Try integrating velocity into pitch
bend gestures for more expressive sound.!
Page 34

34
Playing with Pressure
The Seaboard’s ability to respond to continuous pressure is a powerful feature.
Unlike traditional keyboard aftertouch, the continuous pressure control begins as
soon as you touch the key. This results in a bigger physical range and a
considerably higher digital resolution.
For example, if pressure is mapped to filter cutoff, pressing into the keywave will
continuously control that parameter from the moment it's depressed rather than
only taking effect at the very bottom of the range.
Tip: The sensor technology is sensitive. Play the Seaboard as lightly as possible
at first and then experiment with different levels of pressure depth.!
Page 35

35
4. Updates and Maintenance
4.1 Seaboard Updates
Automatic Dashboard and Firmware Updates:
There are two elements of the Seaboard that need updating: Dashboard and the
Seaboard's Firmware.
ROLI is always working to improve performance and features for the Seaboard. If
an update becomes available a push notification will appear when Dashboard
is opened to alert the user of an available update. All updates require an
internet connection.
When a notification is received:
•
Choose Later and Dashboard sends a notification every time Dashboard is
re- launched.
•
Select Skip and DB avoids sending a notification until the next revision is
released.
•
Select Install and Restart to initiate the update. Agree to the license terms.
The software update completes in a few moments. The firmware takes 4-5
minutes.
Page 36

36
Manual Dashboard and Firmware Updates:
Use the Check for Update at anytime to update Dashboard or the Seaboard
Firmware manually.
If an update is available a dialogue appears. Click Install and Restart. Agree to
the license terms. The software update completes in a few moments. The
firmware takes 4-5 minutes. Be careful not to disconnect the Seaboard during
updating.!
Page 37

37
4.2 Cautions and Care
•
As noted in the warranty, the Seaboard’s case is not an Airline Transport
Association [ATA] specification flight case, and it should not be treated as
such.
•
When in use, the Seaboard should always be connected to its power
supply.
•
Cleaning the Seaboard is simple. We recommend using a mild non-alcohol
based wipe on all metal surfaces. Keywaves should be cleaned without
using liquids. Gentle friction is enough. If dust or lint accumulates, use a lint
roller and gently apply it across the keywaves.
•
Store the Seaboard at approximately 20°C/70°F. The keywaves are sensitive
to extreme temperatures. Avoid leaving the Seaboard in direct sunlight.!
Page 38

38
5. Troubleshooting and Support
5.1 Troubleshooting
Seaboard is not powering on
•
The Light Ring always illuminates in some manner if the Seaboard is on. No
light means no power.
•
Check the power switch on the back and make sure it is in the ON position.
•
Check for the green LED on the power supply (if fitted). If it is not lit, check
the main cable and the main connection (power outlet).
•
The firmware might be corrupted. Turn the power on while holding down
the Center Button. If the Light Ring starts to twinkle, it is a firmware problem.
Leave the Seaboard powered on for about three minutes, and it will
automatically correct itself.
Seaboard is not connecting to Dashboard
•
The USB cable may not be completely plugged in. Unplug and reseat both
ends and try reconnecting.
•
Make sure the power supply provided is being used.
•
If it is not plugged in, connect it, turn off the Seaboard and turn it back on.
If the Light Ring on the User Dial is animating in a clockwise direction, the
Seaboard is updating. This process should take a few minutes to complete.
Once the Seaboard is finished updating, the Light Ring should return to a
static position.
When I bend a note, all the other notes bend with it
•
Dashboard is in Single Channel mode, or not enough MIDI channels have
been enabled.
•
If using Synth Squad Player, Change to Multi Channel mode within
Dashboard and increase the number of channels to at least 8.!
Page 39

39
Pedals are not functioning properly
•
If the pedal is in ‘Auto Detect’ mode and is sometimes inverted (so ‘up’ is
‘down’ and vice versa), make sure that it is not held down while turning on
the Seaboard.
•
Hold down the Center Button for about a second, until the Seaboard is in
‘octave shift’ mode (identifiable by the wide bar of LEDs lighting in the 12
o’clock position). Three LEDs at the bottom of the Light Ring indicate
whether the Seaboard is reading each pedal. They glow as a pedal
depression is recognized.
•
If they do not, experiment with the ‘Type’ settings in the Pedal Mappings
section in Dashboard.
•
If the LEDs are behaving normally, check the Pedal Mappings section and
make sure the pedal is assigned properly. For example, if sustain is desired,
select ‘Sustain (cc64).’
My Seaboard is out of tune!
•
Check the octave/transposition setting in Dashboard. Make sure they are
not offset by a semitone. Note that the transposition settings reset when
the Seaboard’s power is cycled.
•
If using a third-party virtual instrument, make sure the pitch bend range is
set to +/- 12 semitones.
The User Dial is not advancing my presets
•
Make sure that the User Dial is in the correct mode (it might be in octaveshift mode, for example).
•
If the Light Ring is showing an unfamiliar pattern, a quick tap on the button
will reset it to the preset selector.
I can't play two semitones simultaneously
•
The Seaboard will interpret two adjacent semitones played simultaneously
such as C and C#, as a single note. This allows you fine control of pitch
bend between semitones, by adjusting the relative pressure of two finger
presses. However it does mean that sounding chromatically consecutive
notes together is not possible.!
Page 40

40
5.2 Support
We want you to have the best experience possible with the Seaboard. If you are
having trouble, please get in touch with our team.
Use the Dashboard Help menu to:
•
Report an issue
•
Get the latest user manual
•
Go to the support section of the ROLI website
Note all of these options require an internet connection.
 Loading...