

Page 1
Lightpad Block Creator Manual
1 Introduction - Lightpad Block
Welcome to the Creator Manual for the Lightpad Block. We think of the people
who buy and use ROLI’s products as creators more than customers. Our
products are designed to extend the joy of music creation to everyone — and
thereby empower people as the creators they are. Everyone who buys and
uses BLOCKS is investing in this vision of creativity and therefore is also a co-
creator of ROLI.
1 Introduction - Lightpad Block
2 Glossary of selected BLOCKS terms
3 Start
3.1 Charge Your Lightpad Block
3.2 What is BLOCKS?
3.3 What’s in the Box?
3.4 System Requirements
3.5 Product Registration and Setup
4 Learn
4.1 Learning How to Play the Lightpad
Block
4.2 Five Dimensions of Touch or 5D Touch
4.3 Playing Techniques
5 Create
5.1 Perform: Instrument View
5.2 Solo Instruments
5.3 Multi Instruments
Page 2

BLOCKS is the most accessible and versatile music creation system ever made.
It is a modular music studio that lets anyone make music whether they’re a
professional musician or a total beginner. Each individual Block is powerful and
intuitive, offering unique capabilities that let people make music in simple but
far-reaching ways. The Blocks connect together to create customizable kits that
suit any budget, skill level, and musical style. With a click of magnetic
connectors, music-makers can build their own instruments as they go.
You’re starting with the Lightpad Block, the center of the BLOCKS system.You
may already be shaping music on its tactile, glowing surface. This
comprehensive Creator Manual explains the details of your Lightpad Block to
ensure that you get the most out of it.
We have included a short list of terms specific to BLOCKS at the beginning of
this manual. We will refer to these terms throughout this Creator Manual.
Please note that this is a digital manual updated regularly to reflect software
updates and other improvements. This Manual is current up to NOISE v2.1.3.
Support and Feedback
We want you to have the best experience possible with our products and
would love to hear your feedback. Should you have any questions, experience
any problems, or just want to say hello, please don’t hesitate to get in touch.
The easiest way to reach us is to send a support inquiry from the NOISE app or
from support.roli.com. We will respond as quickly as possible.
2 Glossary of selected BLOCKS terms
5.3.1 Drum Kits vs Groove Kits
5.4 Produce: Song View
5.5 Playing a Loop
5.6 Creating a New Project
5.7 Recording Loops
6 Share and Discover
6.1 What is NOISE.fm?
6.2 Share
6.3 Discover
7 Lightpad Block Appendix
Page 3

BLOCKS
A modular music studio built of individual Blocks, each with specific
capabilities, that connect together physically through BLOCKS DNA connectors
and wirelessly through Bluetooth.
Block(s)
The individual hardware components of the BLOCKS system including the
Lightpad Block, Live Block, Loop Block, Seaboard Block, Touch Block, and
Developer Kit Control Block.
BLOCKS Dashboard
A desktop application for modifying and customising the internal settings of
Blocks, making it easy to use BLOCKS with third-party digital audio
workstations and synthesizers.
BLOCKS DNA Connectors
Six-pin connectors that magnetically connect multiple Blocks and also transmit
power and data between the Blocks. Each Control Block has six DNA
Connectors.
Control Block
Any one of several different Blocks with ten buttons and a row of LEDs,
designed to control NOISE functions. Control Blocks include the Live Block,
Loop Block, Touch Block, and Developer Kit Control Block. Control Blocks can
also send MIDI messages to third-party applications.
Equator Player
Based onEquator– ROLI’s custom-built, multi-dimensional sound engine and
software synthesizer –Equator Playeris a Windows and MacOS app included
Page 4

with the Lightpad Block and Seaboard Block. Equator Player takes advantage of
the Seaboard Block’s 5 dimensions of touch, maximizing your ability to express
yourself using just the motions of your fingers on your Seaboard Block’s
keywaves and Lightpad Block’s playing surface. It features a simplified user
interface that allows you to easily modify the most important characteristics of
a preset. If you’d like to create your own sounds and have full control
ofEquator you mayupgrade to the full version of Equator.
The Five Dimensions of Touch (5D Touch)
The feature of real-time control and modulation of sound through the basic
movements ofStrike, Press, Glide, Slide, and Lift.
Strike:The velocity and force with which a finger makes contact with
theLightpad surface or keywave surface.
Press:The pressure and continuous touch applied to theLightpad surface
or keywave surfaceafter the initialStrike.
Glide:Horizontal left and right movements onLightpadsurface or keywave
surface
.
Slide:Vertical movements up and down theLightpad surface or keywave
surface.
Lift:The release velocity or speed of liftoff fromLightpad surface or
keywave surface.
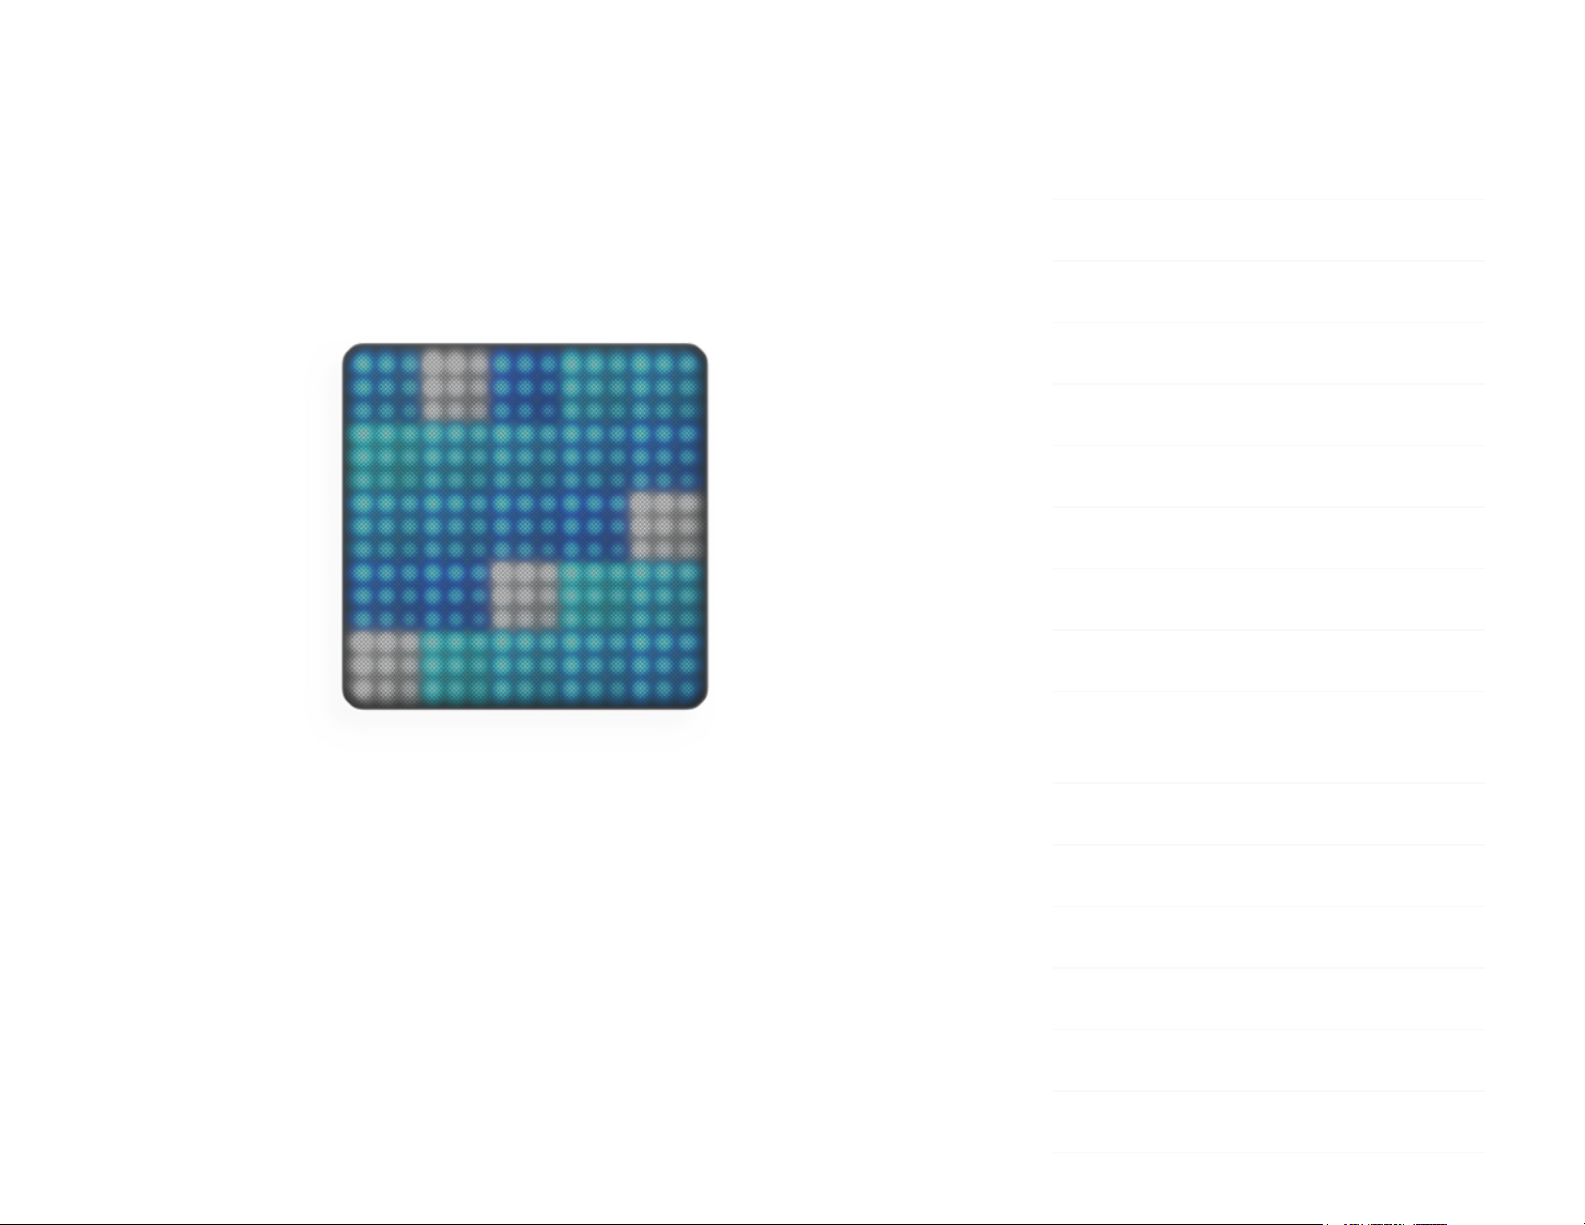
Grid
A fixed configuration of pads on the NOISE interface and the Lightpad Block
surface. Possible grid layouts include 2×2, 4×4, and 5×5. In each grid layout,
the number of pads is the same on the X and Y axis.
Keywave
Page 5

A wavelike element of the keywave surface of Seaboards that corresponds to a
single key on a standard keyboard. Each of the Five Dimensions of Touch can
be accessed on a single keywave.
Keywave surface
The entire playing Seaboard surface including all keywaves and the ribbons
above and below them. The keywave surface corresponds to a keyboard.
Lightpad Block
A Master Block and the central Block in the BLOCKS system. The Lightpad Block
features an illuminated tactile surface that enables creators to shape sound
through Five Dimensions of Touch: Strike, Glide, Slide, Press, and Lift. When
paired with NOISE it builds sequencing, looping, finger drumming and
expressive control into one intuitive device. It can also be used with BLOCKS
Dashboard to expressively control digital audio workstations and software and
hardware synthesizers.
Lightpad Surface
The 15×15 LED matrix made up of individual cells (225) and covered with laser-
etched silicone which makes up the surface of the Lightpad Block and enables
users to play multidimensional or 5D Touch performances.
Live Block
A Control Block that provides quick access to music performance functions, so
creators can be more expressive in real time. The Block’s 10 buttons include
controls for switching scales and octaves, playing chords and arpeggios, and
sustaining notes in NOISE.The Live Block can also be used with BLOCKS
Page 6

Dashboard to transmit MIDI CC messages in order to control digital audio
workstations and software synthesizers.
Loop Block
A Control Block that provides quick access to music production functions so
creators can easily layer sounds into a song in NOISE.The Block’s 10 buttons
include controls for setting a tempo, recording loops, and quantizing loops so
they snap in time with the tempo. The Loop Blockcan also be used with
BLOCKS Dashboard to send MMC messages to control the trasport functions of
digital audio workstations, and it can also transmit MIDI CC messages in order
to control digital audio workstations and software synthesizers.
Master Block
Master Blocks – including the Lightpad Block and Seaboard Block – are the
central Blocks of the BLOCKS system. To use BLOCKS you need at least one
Master Block. Additional Blocks, including Control Blocks, connect via DNA to
the Master Block.
MPE
Multidimensional Polyphonic Expression (MPE) is a protocol for using standard
MIDI messages to communicate with and enable the operation of
multidimensional instruments such as the Seaboard and BLOCKS. MPE enables
independent, per-note control of multiple sound parameters such as pitch and
timbre.
NOISE
A free modular music app that lets anyone create beats, melodies and songs
using simple, easy-to-learn gestures on the touch screens of mobile devices.
Page 7

The app’s expressive power can be expanded with BLOCKS. It is at the heart of
the BLOCKS system.
Pad
A square that corresponds to a note in the grid layout of the Lightpad Block
and NOISE.
Seaboard Block
The Seaboard Block pairs the powerfully expressive keywave surface of the
Seaboard GRAND and Seaboard RISE with the portability and modularity of
BLOCKS. It is a Master Block and includes 24 keywaves as well as lower and
upper octave switches. Multiple Seaboard Blocks can connect together to
create an extended playing surface.
Touch Block
A Control Block that adjusts the responsiveness of the Seaboard Block’s and
Lightpad Block’s 5D Touch when used with NOISE or desktop applications. The
Touch Block’s 10 buttons control the sensitivity of Strike, Glide, Slide, Press,
and Lift, lock Strike or Glide, or put the Seaboard Block into “piano mode,” by
turning off Glide.The Touch Blockcan also be used with BLOCKS Dashboard to
transmit MIDI CC messages in order to control digital audio workstations and
software synthesizers.
USB-C
The type of USB connector used to connect and charge the Lightpad Block and
Seaboard Block. There is a female connector on the block itself, and a male
connector on the included USB-C-to-USB-A cable.
Page 8
3 Start
3.1 Charge Your Lightpad Block
You should charge your Lightpad Block as the first step before proceeding.
When connected to a suitable power source, the Lightpad Block can charge
additional Blocks that are connected to its DNA connectors.
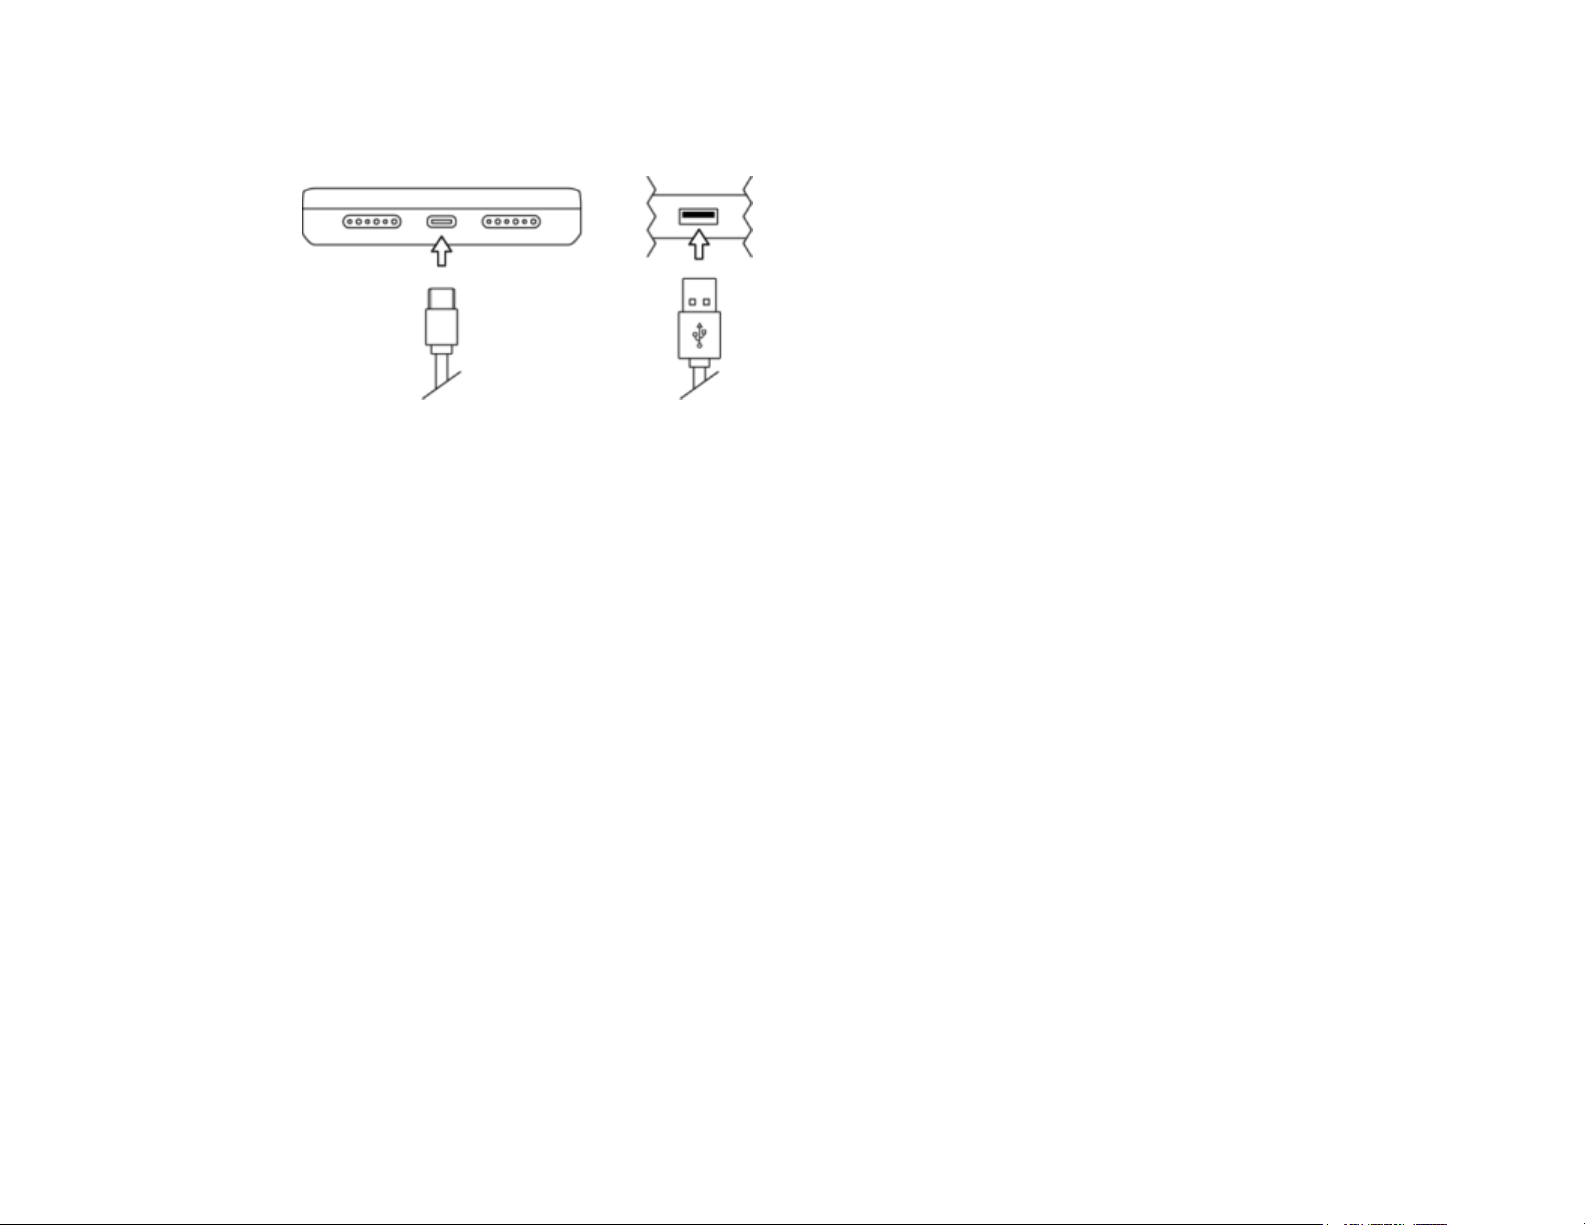
Plug the included USB “C” cable into the Lightpad Block and plug the other
end of the cable into a USB 3 charger or a computer with a USB 3 port. The
Lightpad Block requires 5 watts of power to run and charge the battery
efficiently. Adding more Blocks via the DNA connectors will increase the
demand for power so we recommend using a higher output charger such as an
iPad charger (10-12 watts) or a higher output USB 3 charger.
Please note that when charging via a computer that you must use the ROLI
supplied USB cable to connect to the host computer. When using a laptop
computer please make sure that itis plugged into a wall outlet and has its
sleep feature disabled. This configuration will charge one Lightpad Block and
one Live Block or Loop Block, but not all three unless they are powered off.
Page 9

Note: Please do not use an iPhone charger to charge BLOCKS as it is not a
compatible charger.
3.2 What is BLOCKS?
BLOCKS is a modular music platform that opens new possibilities for musical
expression. BLOCKS starts with the Lightpad Block, a playable surface. Other
Blocks such as the Live Block and Loop Block connect to the Lightpad Block
and allow easier, faster control of music performance and production. The
modular system is powered by NOISE, a free iOS app that functions as the
software engine for the BLOCKS system. NOISE and BLOCKS connect wirelessly
over Bluetooth.
3.3 What’s in the Box?
Lightpad Block
USB-C cable
Quick start guide
Warranty Information
3.4 System Requirements
NOISE
NOISE, the free iOS app, is the software engine of BLOCKS. It is apowerful
standalone instrument for iPhones and iPads and responds to 3D Touch
technology on newer iOS devices. It also pairs with BLOCKS hardware via MIDI-
Page 10

over-Bluetooth and becomes the software synthesizer and sound engine for
BLOCKS. NOISE and BLOCKS are integrally connected, and together they make
a modular, mobile music platform.
Visit the Apple App Store and download NOISE on your iPhone or iPad.
iOS Device
NOISE requires iOS 9.0 or higher and can take advantage of Apple’s 3D touch
capabilities on the iPhone 6s or higher and the iPad Pro. 3D Touch capabilities
are not required as the Lightpad Block offers 5D Touch. The following iOS
devices have been tested and are supported.
iPhone 6 or higher
iPhone SE
iPad Mini 4 or higher
iPad Air 2
iPad Pro (9.7 and 12.9 inches)
MIDI-over-Bluetooth
BLOCKS supports MIDI-over-Bluetooth and connects to any compatible MIDI-
over-Bluetooth enabled iOS or OSX device and app. The Lightpad Block must
be in pairing mode to do this.
3.5 Product Registration and Setup
Registering on NOISE.fm makes it possible to store and retrieve your projects
and other NOISE app data in the cloud. You can also easily share data with
Page 11

other users and browse additional content all on NOISE.fm (more on this later
in this manual).
Download NOISE from the Apple App Store
Turn on Bluetooth on the iOS device
Launch NOISE
Within NOISE sign in to register with an existing ROLI ID
-OR-
Create a new ROLI ID on NOISE.fm or My ROLI
Enter your first and last name
Enter a valid email address
Enter a password (must be alphanumeric and contain at least one
capital letter and number)
Register BLOCKS (See next segment)
-OR-
Play with NOISE (Skip to “Learn”)
Connecting and RegisteringBlocks
Now that you have registered an account and chosen to register Blocks please
follow the prompts on screen and outlined below.
Switch your Blocks on. If you are registering additional Blocks you may turn
them all on to register them simultaneously.
Page 12

You do not need to connect additional Blocks via Bluetooth as long as you
have a Lightpad Block connected via Bluetooth. Additional Blocks connect
directly to your Lightpad Blocks via the DNA connectors.
Open NOISE, press the Settings cog in the top-right corner of NOISE and
select ‘Connect BLOCKS’.
Choose theLightpad Block from the Bluetooth MIDI Devices screen to
complete MIDI-over-Bluetooth pairing. Your Lightpad Block will be listed as
‘Lightpad Block XXXX’ withthe X’s representing the last 4 digits of the
serial number which is located on the underside of the Block.
Connect any additional Blocks that you have purchased to the DNA ports of
the Lightpad Block to register them now.
Once your Blocks are connected, select “Register Block.”
Your Blocks will now beregistered to your account on NOISE.fm.
If you are prompted to update the firmware, you should do so now.
You are now connected and ready to make music.
If you are using Blocks with third-party applications rather than with NOISE, you
may also register your Blocks on My ROLI. Once you’ve created a MyROLI
account, click “Register a Product.” Enter the serial number found on the
bottom of your Block for both the“Product Registration Code” and“Serial
Number”fields, and then click “Register.”
Updating Firmware
You may be prompted to update the firmware during this setup. This is highly
recommended. It’s important that you update to the latest firmware as periodic
updates improve functionality and introduce new features.
To update the firmware for your Lightpad Block, launch NOISE and connect
your Block. In NOISE, click the Settings icon in the upper-right corner, and then
Page 13

click “Firmware.” NOISE will look for BLOCKS updates. If there are new
firmware updates, you may select “Click to Update.” The update will take a few
minutes to process. When the update is finished, your Block will restart. After
your Block restarts, reconnect it to NOISE by clicking “OK” and then clicking on
the name of your Block.
Lightpad Blocks need at least 30% battery remaining in order to update the
firmware. If you are not able to update your Block’s firmware, make sure it is
charged and try again.
Re-Connecting to NOISE
To re-connect your Blocks to NOISE after the initial setup please follow the
steps below:
Turn Bluetooth ‘ON’ on your iOS device.
Turn on the Lightpad Block by pressing the power button.
The Lightpad Block will power up in Bluetooth pairing mode as long as it is
not connected by cable to a computer. This is indicated by a blue light on
the power button and an expanding blue ring displayed on the Lightpad
Surface. If there is no blue light then please press the power button once
to enter pairing mode.
Launch NOISE on your iOS device.
Press the Bluetooth icon in NOISE and select ‘Lightpad Block XXX’ from the
list of Bluetooth MIDI Devices to pair app and hardware.
4 Learn
Page 14

4.1 Learning How to Play the Lightpad
Block
Once connected to NOISE, you can play the Lightpad Block and hear NOISE
responding to 5D Touch. The surface of the Lightpad Block mirrors the NOISE
display and can be used to play NOISE.
Each NOISE preset features a grid layout, colour palette, and demo phrase
associated with it. The demo phrase is a musical demonstration of what can be
achieved with BLOCKS. It can be accessed by pressing the ‘Learn’ icon for each
preset to see and hear the phrase being performed.
As the phrase plays back, the notes which are being performed appear
simultaneously on both NOISE and the Lightpad Block. The corresponding
pads illuminate and each of the notes are displayed as a circle of light that
expands and contracts respectively as more or less Press is applied. Glide and
Slide articulations are simultaneously displayed as light trails.
4.2 Five Dimensions of Touch or 5D Touch
The Lightpad Block is a multidimensional instrument that lets you modulate
sound through Five Dimensions of Touch. NOISE is optimised to respond to
these dimensions of touch. Through simple movements and gestures, you can
shape sound easily and discover new modes of expression. The icons below
depict the Five Dimensions of Touch on the Lightpad Block. The Five
Dimensions of Touch are:
Page 15

Strike: The velocity and force with which a finger makes contact with the
Lightpad Surface. This dimension of touch corresponds to MIDI velocity on a
standard keyboard.
Press: The pressure applied to the Lightpad Surface after the initial Strike. The
Lightpad Block responds to each moment of continuous touch, transmitting
minute variations of pressure to sound. This continuous pressure-sensitivity
allows for swells, fades, and other detailed expressions.
Glide: Horizontal left and right movements on the Lightpad Block surface.
Glide movements bend and adjust pitch as naturally as on a string instrument,
allowing effects such as vibrato and glissando, all on a polyphonic basis. Glide
is typically assigned to pitch.
Slide: Vertical movements up and down the Lightpad Block surface. For
example, an upward movement can open a filter that turns an organ sound into
a brassy sound, while a downward movement can close the filter. Your initial
point of contact with the surface, no matter where this point is, becomes the
basis for sound modulation on the Y axis above and below that point.
Page 16

Lift: The release velocity or speed of liftoff from the Lightpad Block. Many
presets in NOISE respond to Lift.
4.3 Playing Techniques
Strike and hold: Strike the Lightpad Surface and hold for a duration without
adding any additional movement.
Glide vibrato: Pressing into the Lightpad Surface and holding the point of your
finger there, wiggle your finger from side to side. The pitch-bend effect of
vibrato will widen the wider the arc of movement away from the stationary
finger.
Glide glissando: Strike and hold a note on the Lightpad Surface. Whilst still
holding the note, move your finger sideways to hear the note bend in pitch.
Continuous press modulation: While sustaining a note, increase and decrease
downward pressure on the Lightpad Surface to modulate the note.
5 Create
5.1 Perform: Instrument View
Page 17

There are two main views in NOISE:Instrument View and Song View. You can
navigate between these two views by swiping between them. From Instrument
View, swipe down to enter theSong View. Notice that as you do this the
Lightpad Block mirrors the NOISE display. Now swipe back up to Instrument
View.
This section focuses on the Instrument View, which is one of two main views
in NOISE and features two types of Instruments: Multi Instruments and Solo
Instruments. In NOISE there is one Multi Instrument slot and three Solo
Instrument slots which can be selected by touching the icons at the bottom of
the Instrument View. The bottom left-most icon indicates a Multi Instrument
and the three that follow indicate a Solo Instrument.
5.2 Solo Instruments
Page 18

Solo Instruments, which are indicated by an empty square icon (can be any
colour) contain a single instrument which can be arranged melodically or
harmonically across the individual pads of the Lightpad Block. The lowest pitch
and root note of the scale is on the bottom left pad. The notes ascend in pitch,
row by row from bottom left to top right. The root note in the first and second
octaves are indicated in white on the bottom left pad, direct centre pad, and
top right pad. They are arranged according to the selected scale (more on this
below).
Solo Instruments contain their own unique features such as Scale, Arp, Chord,
Octave, and Sustain. On the iPad these features are visible from the Instrument
View. On the iPhone they can be accessed by grabbing the ( )iconin the
Instrument View and swiping to the left. Now you can access Click, Octave,
and Sustain. Swipe to the left again to access Scale, Chord, and Arp.
Click
Click lets you control the tempo of the instrument (Groove or Arp) and turn the
Click “ON” or “OFF”. When it is set to “ON” it will play whenever the Play/Pause
icon is touched. If you turn it “OFF” you will still hear the click for the 1 bar
count-in during recording.
Page 19

Octave
Transpose up or down across a 6-octave range with the Octave Button.
Sustain
Press the sustain button to hold notes.
Scale
Scale allows you to determine the Key and Scale for the Solo Instruments and
willaffect all three Solo Instrument slots simultaneously. There are 19 different
scales to choose from including the modes.
Hide Notes Toggle (Scale)
When set to OFF, the ‘Hide notes’ toggle will darken all of the notes
that are not part of the selected scale with the exception of when
“Chromatic” is the selected scale. Hidden notes are still playable on
the Lightpad Block and NOISE.
Page 20

Chord
Chord can be turned ‘ON’ or ‘OFF’ and makes it possible to play entire chords
with one finger or pad. You may select from 14 different chord types. If Arp is
switched “ON”, Chord will directly determine the notes being played by the
arpeggiator. This makes it possible to generate some very complex melodies
with just one finger.
Arp
The Solo Instruments feature an arpeggiator per instrument slot. The
arpeggiator can be turned ‘ON’ or ‘OFF’ with the Arp toggle and is tempo
synced to other Solo Instruments’ arpeggiators and any playing clips.
Pattern
Choose from Up, Down, Up Down, Down Up, Up Up Down, Down Down
Up, and Random arpeggiator patterns.
Gate
Gate controls the duration of the notes, from short blips up to the
entire duration of the note value, determined with the Time parameter.
Time
Page 21

Time controls the note value for the notes being played by the
arpeggiator.
Octave
Octave determines the range of pitches played by the arpeggiator
from 1 to 4 octaves.
5.3 Multi Instruments
Multi Instruments, which are indicated by an icon containing a 2X2 grid of
small squares (can be any colour) contain multiple sounds arranged across the
individual pads of the Lightpad Block. Multi Instruments are made up of 4 or 16
individual sounds which are indicated by the number of illuminated pads. Multi
Instruments can be made up of individual drum sounds, samples, synthesis
elements or a combination of both and respond to 5D Touch.
5.3.1 Drum Kits vs Groove Kits
There are two types of Multi Instruments: Drum Kits and Groove Kits. A Drum
Kit is a Multi Instrument made up of multiple sounds which all respond to 5D
Touch and has “Drum Kit” as part of the title of the preset.
A Groove Kit is an interactive Multi Instrument that has “Groove Kit” in the
preset title and is made up of multiple sounds that each have an interactive,
tempo-synced musical pattern associated with them. For example, in the
Page 22

preset “Hip Hop Groove Kit”, Strike the second pad from the left in the bottom
row and lightly hold to hear a synthetic snare on beats 2 and 4. Now use the
Press, Glide, and Slide dimensions to hear both the groove and sound
simultaneously evolve to be more complex and include fills.
Grab the ( )icon and swipe to the left to access the “Click”. Press the Click
icon to turn the click “ON” or “OFF” and change the tempo of the Groove Kit.
5.4 Produce: Song View
The Song View is the second main view in NOISE. Access it by swiping down
from the top of the Instrument View in NOISE. Here you can select a loop slot
to record to and arrange your loops into songs. There are four icons across the
top of the screen, Play/Pause, Click, Snap, and Volume.
Page 23

Play/Pause
Press Play/Pause to begin or stop playback of all selected loops.
Click
Press Click to control the tempo of the project and to turn the Click “ON” or
“OFF”. When it is set to “ON” it will play whenever the Play/Pause icon is
touched. If you turn it “OFF” you will still hear the click for the 1 bar count-in
during recording.
Snap
Snap tightens up or “quantizes” your performances so they are perfectly in
time.
Volume
Touch and drag the Volume Button directly up or down to raise or lower the
volume of project.
Page 24

In Song View the Instruments are arranged in 4 rows from top to bottom
starting with one Multi Instrument on top and three Solo Instruments below.
There are 12 available loop slots per instrument. On the iPad you can see all 12
loop slots on one screen.
On the iPhone you can view 4 loop slots per page and use the slot selection
icon ( )at the bottom of the screen to navigate to the corresponding page.
5.5 Playing a Loop
While in the Song View there are several pre-recorded loops in NOISE for you
to experiment with. Touch the top left loop. You will hear a groove begin to
play which will repeat every four bars until you touch another loop in the same
instrument, and then the second loop will begin playing when the first reaches
the end of four bars. You can do this for all four of the instruments
simultaneously. Each instrument can play one loop at a time.
Loops can also be started by pressing the buttonand then touching the
specific loop or loops you wish start playback on. You can experiment with
combinations of different loops playing back together.
5.6 Creating a New Project
You can begin recording over the existing project or you can create a new one.
To create a new one, press the arrow at the top left of the Song View. This will
take you to NOISE.fm. Touch the “Create New project” icon to create a new
Page 25

project. Enter a name for the project and touch “OK”. You now have a new
empty project that you can use to record your own loops.
5.7 Recording Loops
From the Instrument View select the Multi Instrument icon at the bottom
of the screen. Now use the arrows on either side of the Multi Instrument preset
name to select “Dance Groove Kit”. Strike and hold different combinations of
pads until you find a combination that produces a groove that you would like
to record.
Record A Beat
Swipe down from the top of the screen to the Song View and select
the top left empty loop slot. This will allow you to record a beat to start
with. Swipe up from the bottom of the screen to go back to the
Instrument view. Touch the Record button and a 1 bar count-in
will begin playing. At the end of the count-in begin playing your
groove for 4 bars. The pattern you just created will continue to loop.
Swipe down to the Song View and press the Play/Pausebutton to
stop.
Record A Bassline
Swipe back up to instrument view and select the first Solo Instrument
. Use the preset arrows to select “Classic Acid Bass”. Grab the ( )
icon and swipe twice to the left to access Scale, Chord, and Arp. For a
quick and easy bass line set the Scale to “Major” and set the Hide
Page 26

Notes toggle to “OFF”. Press the “X” at the top right-hand corner of the
screen to exit back to Instrument View. Press the Chord Button and
turn it on. Select “Octave” and then “X” to exit. Now press the Arp
Button. Turn it “ON”, set Pattern to “Up”, Gate to 80%, Time to 1/16,
and Octave to “2”. Press “X” to exit. Now when you play one of the
pads on the Lightpad Block you will hear a steady and instant bass
line.
Swipe back down to Song View and touch the left-most loop slot in the
2nd row from the top on the Lightpad Block (Instrument 2). This slot is
now record enabled. Touch it again to return to Instrument View. Press
the Record Button and begin recording after the 1 bar count-in. Strike
and hold a note for 1 bar before changing to a new note. Continue for
4 bars. Now you have recorded an animated bass line just by playing 4
notes.
Add Some Chords
Select the next Solo Instrument and switch the preset to “Digital Glass
Synth”. Turn on Chord and set it to “5th”. Select the first loop slot in
this instrument and press record. After the count in play the same
notes and durations as you did for the bassline.
Add A Melody
Select the last instrument and switch to the preset “Moraz Lead”. Add
an Arp if you wish or just experiment with the 5 Dimensions of Touch.
Select the bottom left loop slot on the Lightpad Block and press it
again to return to Instrument View. Press record and play, adding lots
of 5D Touch. NOISE will record all of your movements.
Page 27

6 Share and Discover
6.1 What is NOISE.fm?
NOISE.fm is a social platform for sharing and collaborating on music made with
NOISE and BLOCKS. It’s directly accessible from within NOISE and also by
visiting www.noise.fm.
6.2 Share
To share a NOISE project on NOISE.fm, click the back arrow from the Song or
Instrument View, which will display your projects. Next click the share icon next
to the project you’d like to share. This will share your project to NOISE.fm and
allow other NOISE.fm creators to use and remix your work. Your project will be
licensed under a Creative Commons license.
6.3 Discover
When you visit NOISE.fm and click “Explore” you can listen to and comment on
projects from other NOISE creators. You can follow creators to get a
personalised feed of updates, and you can share projects you’ve published or
discovered to social media including Facebook and Twitter.
7 Lightpad Block Appendix
Page 28

Power / Bluetooth Button
The power button is located on the front panel of the Lightpad Block. Press this
button to turn it on, press and hold for approximately 3 seconds to turn the
Lightpad Block off. While on, pressing this button repeatedly toggles between
Bluetooth pairing mode on and off.
The Lightpad Surface
The Lightpad surface features a 15 x 15 LED matrix comprised of individual
cells (225) and covered with laser etched silicone which enables users to
create multidimensional or 5D Touch performances.
The Lightpad Surface is made of silicone which is purposely engineered to
withstand repetitive pressure inputs from fingers and hands while providing
passive haptic feedback to the input gestures. The surface has been specially
treated to provide soft touch and reduce surface friction for lateral gestures.
Mode Button
The Mode button is on the left side panel of the Lightpad Block and cycles the
Instruments. The secondary use for the Mode button is to cycle through the
various configurations of the 15×15 LED grid when connected to 3rd party
software applications.
DNA Connectors
The Lightpad Block features 8 DNA connectors. These six-pin connectors
magnetically connect multiple Blocks and also transmit power and data
between the Blocks.
USB-C Port
Page 29

The Lightpad Block features a USB-C connector for charging the device and for
a MIDI-over-USB connection between BLOCKS and a computer. More
information about the battery and charging the Lightpad Block are listed
below.
Battery Indicator
The Power LED on the Power / Bluetooth button also indicates the current
battery status of the Lightpad Block and when the Lightpad Block is being
charged. The Power LED will display green when fully charged, yellow when
partially charged and red when the charge is below 20%.
Additional Battery Info
The Lightpad Block features a 2000mAh Li-po (Lithium polymer) battery with a
nominal discharge voltage of 3.7 volts. Protection is provided for overvoltage,
overcharge, over discharge, and short circuit. The battery is capable of
powering the Lightpad Block for over four hours when fully charged. Using USB
3 charger, the battery will charge nominally within four hours. If additional
Blocks are connected the charging time will increase accordingly, as the
current is shared between all connected Blocks.
The battery will retain over 80% of its capacity for over 300 charge cycles. A
charge cycle is defined as a complete discharge from 100% to 0%, and
subsequent recharge back to 100%. For example, charging a device going from
50% charge up to 100% and back twice would be equivalent to one charge
cycle.
Charging Times
BLOCKS Watts Time to charge
Lightpad Block 5W——-12W 4 hours ————— 3 hours
Page 30

Lightpad Block
+ Live Block
10W——-12W 4 hours ————— 3 hours
Lightpad Block
+ Live Block
+ Loop Block
10W——-12W 4 hours ————— 4 hours
Additional Information
Battery Life
4 hours when in use; 6 months when turned off
(on firmware 0.2.0+)
Bluetooth Range 15 meters
Bluetooth Latency 30 ms touch to sound
USB Latency 10 ms touch to sound
LEDs
225 on surface,
2 indicator LEDs on power button & mode button
Mass 250g
Dimensions 94mm x 94mm x 20mm
Ports USB-C port (MIDI out and power)
Connectivity Full MIDI compatibility over USB and Bluetooth LE
DNA Connectors 8
Buttons Mode / Power & Bluetooth
Included in package
Lightpad, USB-C to USB-A Cable,
Quickstart Guide, Warranty Information
Cleaning the Lightpad Block
Basic care and attention will protect your Lightpad Block and help it stay in
optimal condition. Keep it away from direct sunlight, sharp objects or edges,
corrosive solvents, liquids, and especially oils – including greasy fingers after
Page 31

eating food. The Lightpad Surface is designed for finger and hand
pressure/impact, but NOT for hard objects, such as drum sticks.
To clean the Lightpad Surface you may use damp, bleach-free and oil-free
cleansing wipes. Do not use any abrasive cleansing agents on the Lightpad
Block.
 Loading...