

Roland Corporation SD-90 Quick Start
Getting Started
Thank you, and congratulations on your choice of the Edirol SD-90.
Before using this unit, carefully read the sections entitled: “IMPORTANT
SAFETY INSTRUCTIONS” (Owner’s manual p. 2), “USING THE UNIT
SAFELY” (Owner’s manual p. 2, 3), and “IMPORTANT NOTES” (Owner’s
manual p. 4, 5). These sections provide important information concerning the
proper operation of the unit. Additionally, in order to feel assured that you
have gained a good grasp of every feature provided by your new unit, Owner’s
manual should be read in its entirety. The manual should be saved and kept on
hand as a convenient reference.
Copyright © 2001 ROLAND CORPORATION
All rights reserved. No part of this publication may be reproduced in any form
without the written permission of ROLAND CORPORATION.

What is USB?
USB stands for Universal Serial Bus. It is a new interface used to connect various peripheral devices
to a computer.s
USB allows more than one peripheral device to be connected via a single USB cable, and also allows
data to be transmitted more rapidly than conventional serial ports.
Peripherals can also be connected or disconnected with the power turned on, and the computer will
automatically recognize the peripheral that has been plugged in. (Some peripherals may require
settings or other operations to be performed.)
About SCMS
SCMS (Serial Copy Management System) is a function that protects the rights of the copyright
owner by prohibiting second-generation or later copying via a digital connection to a consumer
digital audio device such as a DAT recorder or MD recorder. When a recording is made via a digital
connection on a digital recorder that has this function, SCMS data will be recorded along with the
digital audio signal. A digital audio signal containing this SCMS data cannot be recorded again via
a digital connection.
SCMS on the SD-90
On the SD-90, SCMS will affect operation only for digital signals input from an external device. If
a digital audio signal containing SCMS data is input from a MD or other media that was digitally
copied from a commercial music CD, the SD-90 will operate as follows.
When inputting from the SD-90’s digital input connector:
• The SD-90 cannot record this signal on your computer.
• Nor will the sound be output from the analog output (master output jacks, headphone
jack) or digital output connector.
When inputting from the SD-90’s analog inputs (line in jacks):
• Recording can be performed as usual.
A note regarding copyright
* Unauthorized recording, public performance, broadcast, sale, or distribution of a work (CD recording, video,
broadcast, etc.) whose copyright is owned by a third party is forbidden by law. Any infringement on the rights
of a third party you may commit using the SD-90 is solely your own responsibility, and no responsibility
shall be born by the manufacturer of the SD-90. Unauthorized duplication, even for purposes of personal use,
of a copyrighted work belonging to a third party by circumventing technical means of protection such as
SCMS constitutes infringement of the copyright of that third party, and is forbidden by law.
2
Contents
Check the contents of the package........................................4
Connections with audio equipment.......................................6
Getting Connected and Installing Drivers (Windows)..........7
What is a driver? ..................................................................................................................7
Installing the driver and settings.......................................................................................7
Check whether there is sound..........................................................................................22
Getting Connected and Installing Drivers (Macintosh)......24
What is a driver? ................................................................................................................24
Installing the driver and settings.....................................................................................24
Troubleshooting.....................................................................34
Problems related to the USB driver.................................................................................34
Problems when using the SD-90......................................................................................39
Deleting the driver.............................................................................................................47
INDEX......................................................................................49
203
* GS ( ) is a registered trademark of Roland Corporation.
add
* XGlite ( ) is a registered trademark of YAMAHA Corporation.
205
* Microsoft and Windows are registered trademarks of Microsoft Corporation.
206c
* Windows® 98 is known officially as: “Microsoft® Windows® 98 operating system.”
add
* Windows® Me is known officially as: “Microsoft® Windows® Millennium Edition operating system.”
206f
* Windows® 2000 is known officially as: “Microsoft® Windows® 2000 operating system.”
207
* Apple, Macintosh and MacOS are registered trademarks of Apple Computer, Inc.
207
* OMS is a registered trademark of Opcode Systems, Inc.
220
* All product names mentioned in this document are trademarks or registered trademarks of their respective
owners.
3
Check the contents of the package
The following items are included in the SD-90 package. After opening the
package, check to see whether any items are missing. If any items are missing,
please contact the dealer from whom you purchased the SD-90.
* The SD-90 package does not include an external amp or speakers, headphones, or
audio cables. You will need to provide these separately.
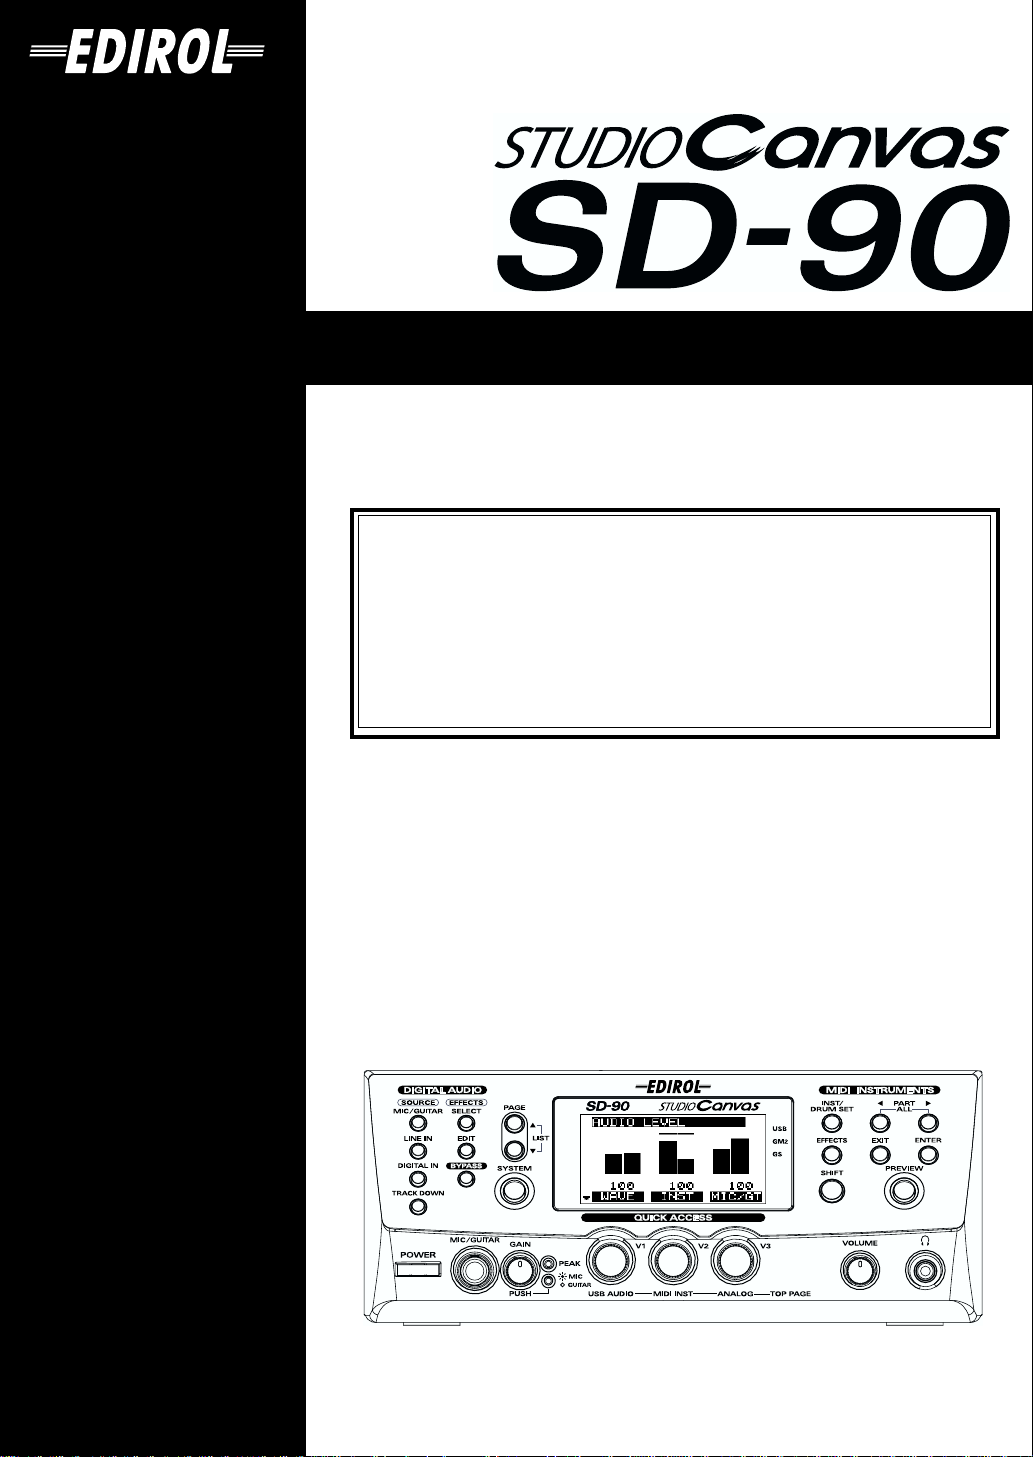
fig.sd-90_panel
❏
SD-90
This is a
unit with digital input/
output jacks and USB audio
interface.
It supports
GS format
specification for Roland
sound generators), and the
XGlite
Yamaha Corporation.
Studio Canvas
General MIDI 2
(the universal
promoted by
,
You may want to mark the
relevant check box as you
confirm the presence of
each item.
For details on General
MIDI 2, GS format, and
XGlite, please refer to the
SD-90 owner’s manual.
fig.0-3
❏
AC cord
This is the only AC cord you should use with
the SD-90.
Do not use any AC cord other than the
supplied one, since doing so may cause
malfunction.
fig.0-5
❏
CD-ROM
This contains drivers used by the SD-90, and demo songs.
fig.0-6a
DO NOT play a CD-ROM disc on a conventional audio CD player.
The resulting sound may be of a level that could cause permanent
hearing loss. Damage to speakers or other system components may
result.
fig.0-7
❏
USB cable
This connects the SD-90 to your computer.
Avoid touching or
scratching the shiny
underside (encoded
surface) of the disc.
Damaged or dirty CDROM discs may not be
read properly. Keep your
discs clean using a
commercially available CD
cleaner.
4
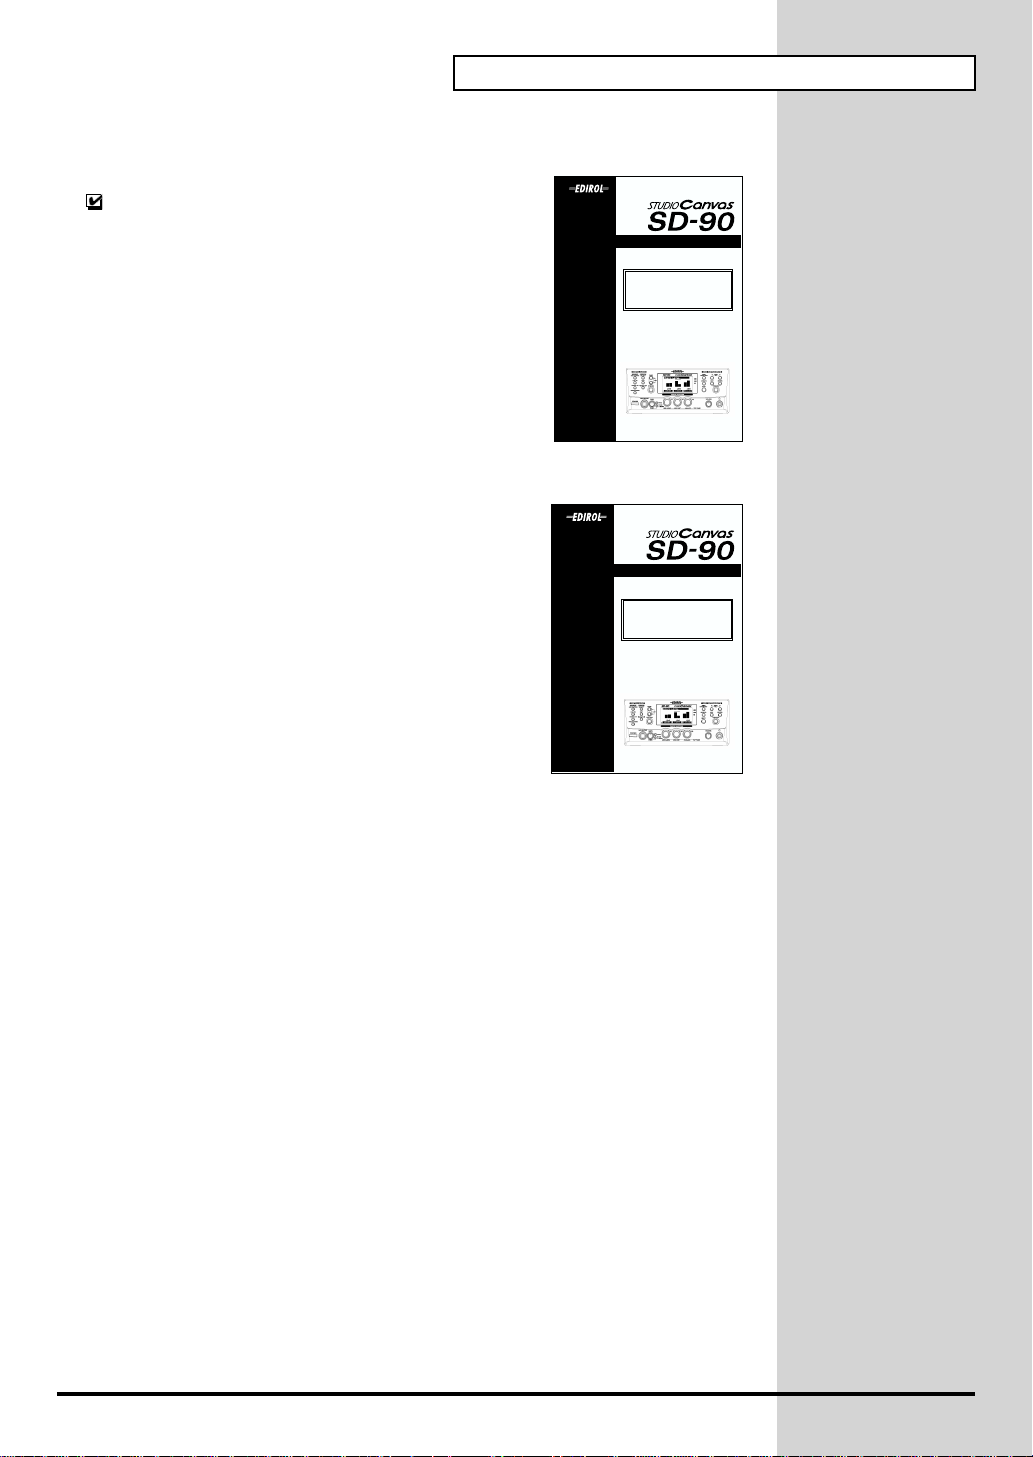
fig.0-10e_30
Getting Started
This is the manual you are holding. Please read
this first.
This manual explains how to install the drivers
and make the settings required in order to use the
SD-90. Starting at the beginning, please read the
sections that are relevant to your system.
fig.0-14e_30
❏
Owner’s Manual
This is the owner’s manual for the SD-90.
Read this to gain in-depth information
concerning the use of the SD-90, and the
numerous functions it offers.
Getting Started
Thank you, and congratulations on your choice of the Edirol SD-90
Before using this unit, carefully read the sections entitled: “IMPORTANT
SAFETY INSTRUCTIONS” (Owner’s manual p. 2), “USING THE UNIT
SAFELY” (Owner’s manual p. 2, 3), and “IMPORTANT NOTES” (Owner’s
manual p. 4, 5). These sections provide important information concerning the
proper operation of the unit. Additionally, in order to feel assured that you
have gained a good grasp of every feature provided by your new unit, Owner’s
manual should be read in its entirety. The manual should be saved and kept on
hand as a convenient reference.
Copyright © 2001 ROLAND CORPORATION
All rights reserved. No part of this publication may be reproduced in any form
without the written permission of ROLAND CORPORATION.
Owner's Manual
Thank you, and congratulations on your choice of the Edirol SD-90
Before using this unit, carefully read the sections entitled: “IMPORTANT
SAFETY INSTRUCTIONS” (Owner’s manual p. 2), “USING THE UNIT
SAFELY” (Owner’s manual p. 2, 3), and “IMPORTANT NOTES” (Owner’s
manual p. 4, 5). These sections provide important information concerning the
proper operation of the unit. Additionally, in order to feel assured that you
have gained a good grasp of every feature provided by your new unit, Owner’s
manual should be read in its entirety. The manual should be saved and kept on
hand as a convenient reference.
Check the contents of the package
Copyright © 2001 ROLAND CORPORATION
All rights reserved. No part of this publication may be reproduced in any form
without the written permission of ROLAND CORPORATION.
5
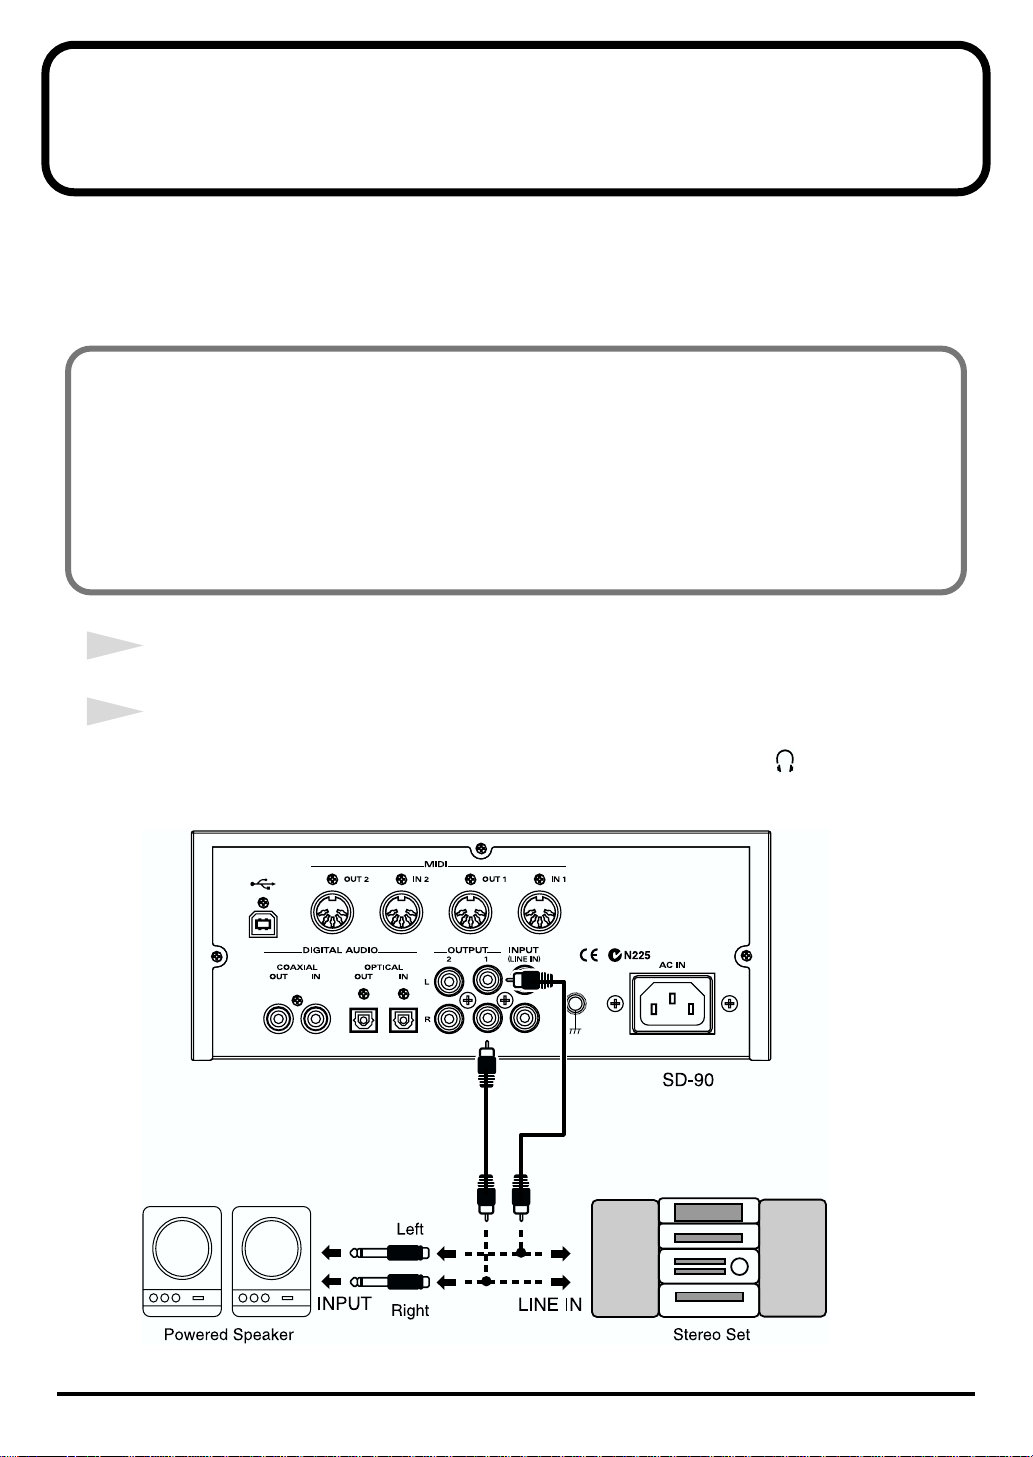
Connections with audio equipment
Connect the audio outputs (analog) of the SD-90 to your audio playback equipment. You will need
the following items.
• SD-90
• Audio cables (RCA phono - RCA phono)
• Audio playback equipment such as an amp and speakers, or a stereo system
* Before making connections to other equipment, you must turn down the volume of all equipment to avoid
malfunctions or speaker damage.
* To avoid short circuits or broken connections, grasp the plug when disconnecting a cable.
* Use the included cables to make connections. If you are using a connection cable made by another
manufacturer, please note the following.
• Some connection cables contain a resistor. Do not use a cable with a built-in resistor to connect
with the SD-90. Doing so may make the sound extremely weak, or inaudible. For details on your
cable, please contact its manufacturer.
1
Lower the volume of your audio playback equipment.
2
Connect the SD-90’s
equipment. If you are using headphones, connect them to the
front panel of the SD-90.
fig.8-1e
OUTPUT1 (audio output 1) jacks
to the input jacks of your audio playback
headphone jack
located on the
6
Getting Connected and Installing Drivers (Windows)
If you are using a Macintosh computer, please proceed to
Drivers (Macintosh)
The following items are required for connections and installation. Remove them from the SD-90
package, and have them ready.
• SD-90
• AC cord
• USB cable
• CD-ROM
(p. 24).
Getting Connected and Installing
What is a driver?
fig.05-1e_50
A “driver” is software that
transfers data between the SD-90
and application software running
on your computer, when your
computer and the SD-90 are
connected by a USB cable. The
driver sends data from your
application to the SD-90, and from
the SD-90 to your application.
Installing the driver and settings
The installation procedure will differ depending on your system.
Please proceed to one of the following sections, depending on the system you use.
• Windows 2000 users .................................. (p. 7)
• Windows Me/98 users.............................. (p. 16)
■
Windows 2000 users
WDM driver and MME driver
The CD-ROM contains two types of driver for Windows 2000.
Before you install the driver, select the driver that will be appropriate for the application you want
to use.
WDM driver
You should use this driver if you have specified WDM driver mode for SONAR or a similar
application. This will provide the highest-quality audio performance.
* It is not possible to use 24-bit audio with applications that do not have a WDM driver mode, such as Cool
Edit or Media Player.
7

Getting Connected and Installing Drivers (Windows)
MME driver
This driver allows you to use 24-bit audio even from applications that do not have a WDM driver
mode, such as Cool Edit.
* It is not possible to use the MME driver from WDM driver mode of an application such as SONAR.
It is not possible to install both the WDM driver and the MME driver. You must select one
beforehand, and install only that driver. If after installing one of these drivers you decide to change
drivers, you must first delete the already-installed driver and then install the new driver.
(->Deleting the driver (p. 47))
8
Installing the driver
The WDM driver and the MME driver can be installed using the same
procedure.
1
With the SD-90 disconnected, start up Windows.
Disconnect all USB cables except for a USB keyboard and USB mouse (if
used).
2
Log on to Windows as a
Administrator).
3
Open the
Click the Windows
Settings | Control Panel
fig.05-2e_30
4
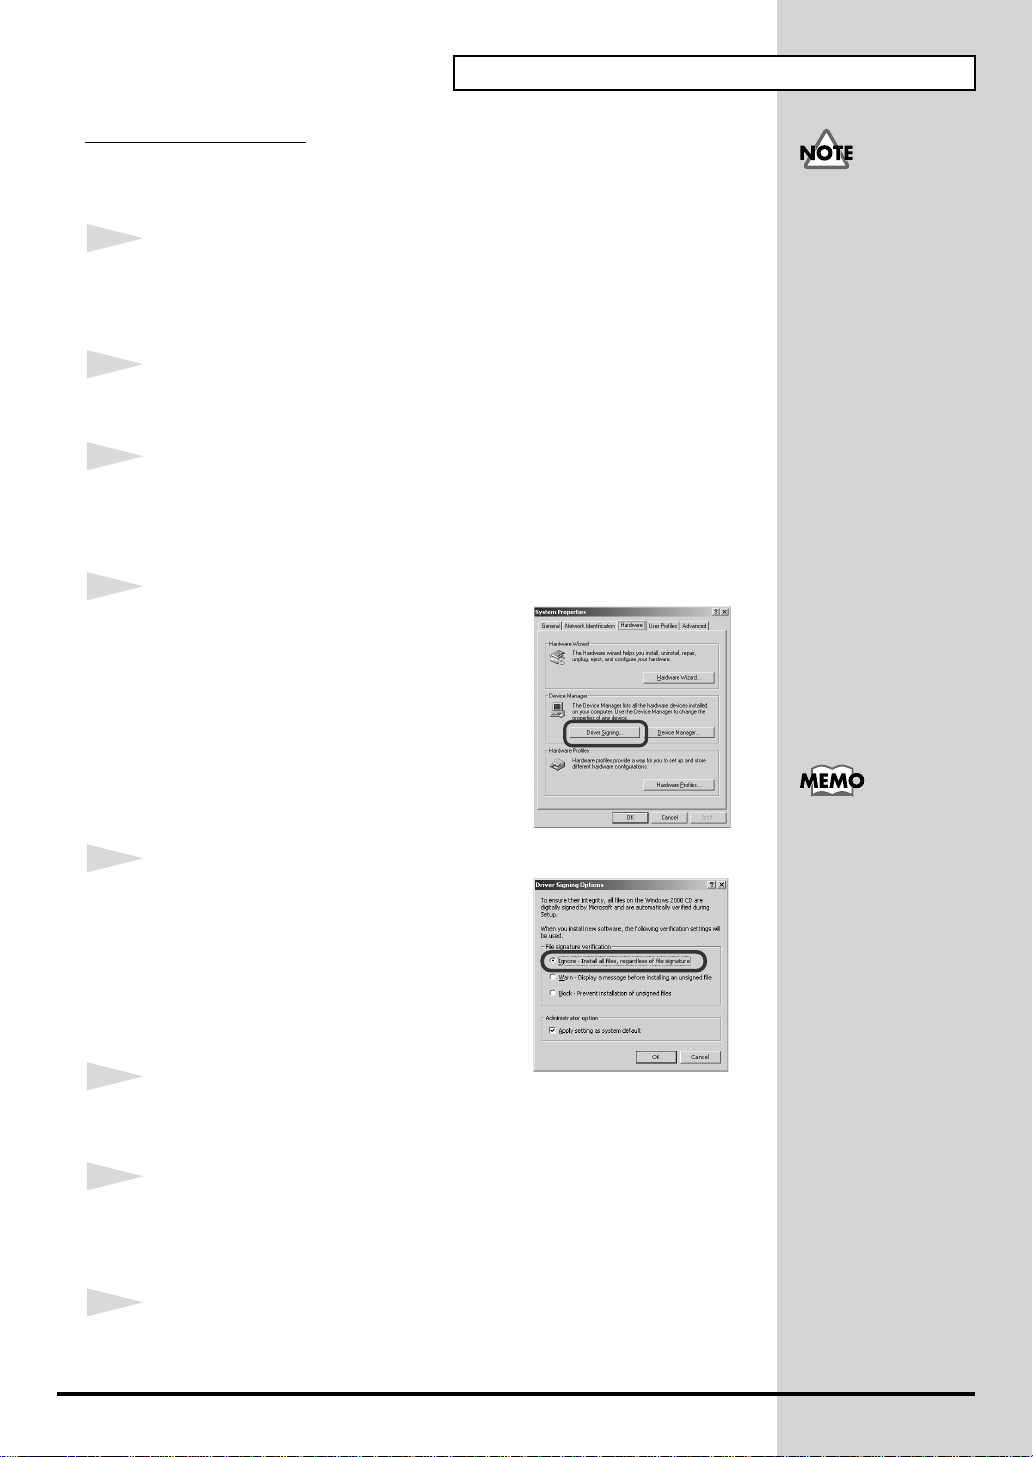
Open the
box.
System Properties
Driver Signature Options
user with administrative privileges
dialog box.
Start
button, and from the menu that appears, select
. In
Control Panel
, double-click the
dialog
Getting Connected and Installing Drivers (Windows)
If you have already
connected the SD-90 to
your computer and the
“Add new hardware
wizard” is displayed, find
the Readme_e.htm file in
the Driver\Win2000\WDM
or Driver\Win2000\MME
(such as
System
icon.
folder of the CD-ROM, and
under “Troubleshooting,”
read the section entitled
“You attempted to install
using the above
procedure, but were not
able to.”
Click the
Signing]
fig.05-3e_30
5
Make sure that “
is set to “
If it is set to “
If it is not set to “
current setting (“
change the setting to “
6
Close the
Click
7
Exit all currently running software (applications).
Also close any open windows. If you are using virus checking or similar
software, be sure to exit it as well.
Hardware
.
File signature verification
Ignore
.”
Ignore
Ignore
Warn
System Properties
[OK]
.
tab, and then click
”, simply click
”, make a note of the
” or “
Ignore
[OK]
Block
”). Then
” and click
dialog box.
[Driver
”
.
[OK]
.
If you changed “File
signature verification” in
step 5, you must restore the
previous setting after you
have installed the driver.
(->If you changed “File
signature verification” (p.
12))
8
Prepare the CD-ROM.
Insert the CD-ROM into the CD-ROM drive of your computer.
9
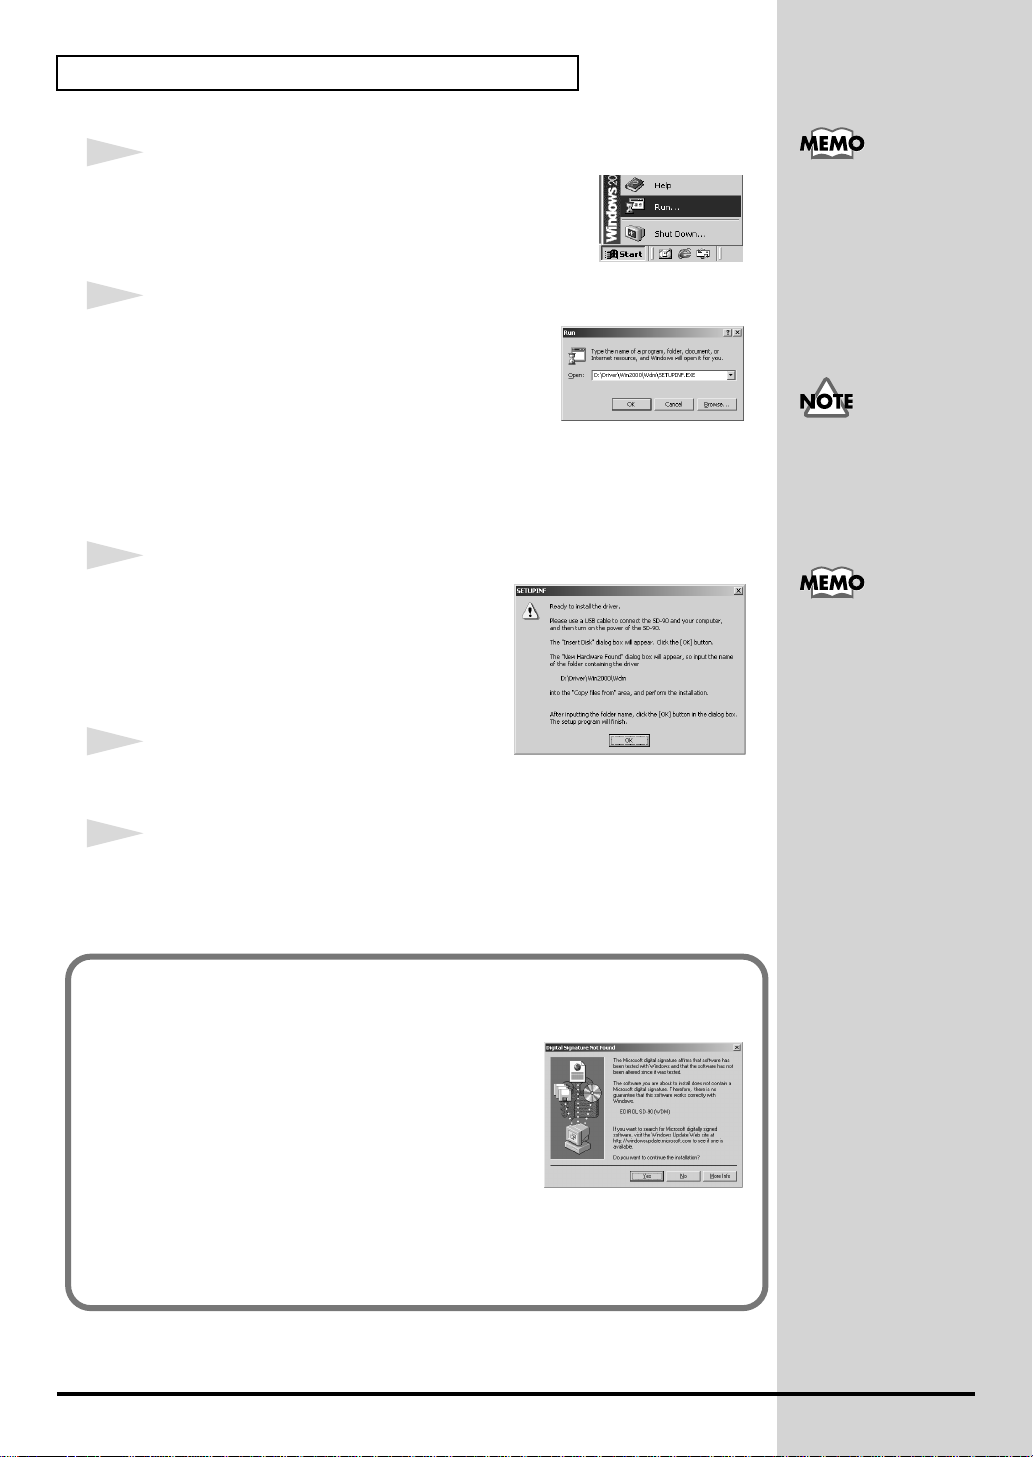
Getting Connected and Installing Drivers (Windows)
b
fig.05-4e_30
9
Open the “
Click the Windows
From the menu that appears, select “
fig.05-5e_30
10
In the dialog box that appears, input the following
into the “
Run...
” dialog box.
Open
” field, and click
Start
button.
If installing the WDM driver
D:\Driver\Win2000\WDM\Setupinf.exe
If installing the MME driver
D:\Driver\Win2000\MME\Setupinf.exe
fig.05-6e_30
11
The
SETUPINF
dialog box will appear.
[OK]
Run...
.
In this manual, the location
of folders and files is given
”
in terms of the file path,
using \ as the delimiter.
For example,
WDM\Setupinf.exe
indicates the Setupinf.exe
file found in the WDM
folder
The drive name “D:” may
e different for your
system. Specify the drive
name of your CD-ROM
drive.
You are now ready to install the driver.
Drag the title bar to move the
dialog box into the upper part of the screen.
* Do not click
12
With the power turned off, use a USB cable
to connect the SD-90 to your computer.
13
Set the SD-90’s mode select switch to the ON position.
Connect the AC cord to the SD-90’s AC IN, and connect the plug of the AC
cord to an electrical outlet.
If in step 5 the “File signature verification” setting was not set to “Ignore”,
a “Digital signature not found” dialog box will appear.
fig.05-7e_30
[OK]
at this time.
SETUPINF
If “File signature verification” is set to “Warn,”
1. Click [Yes].
2. Continue the installation.
If “File signature verification” is set to “Block”
1. Click [OK].
2. When the “New hardware detection wizard” appears, click [Finish].
3. Perform the installation as described in the “Troubleshooting” section on
Device Manager shows “?”, “!”, or “USB Composite Device” (p. 37).
If a message of
“The driver is already
installed” appears, you
can connect the SD-90 to
your computer and use it.
10
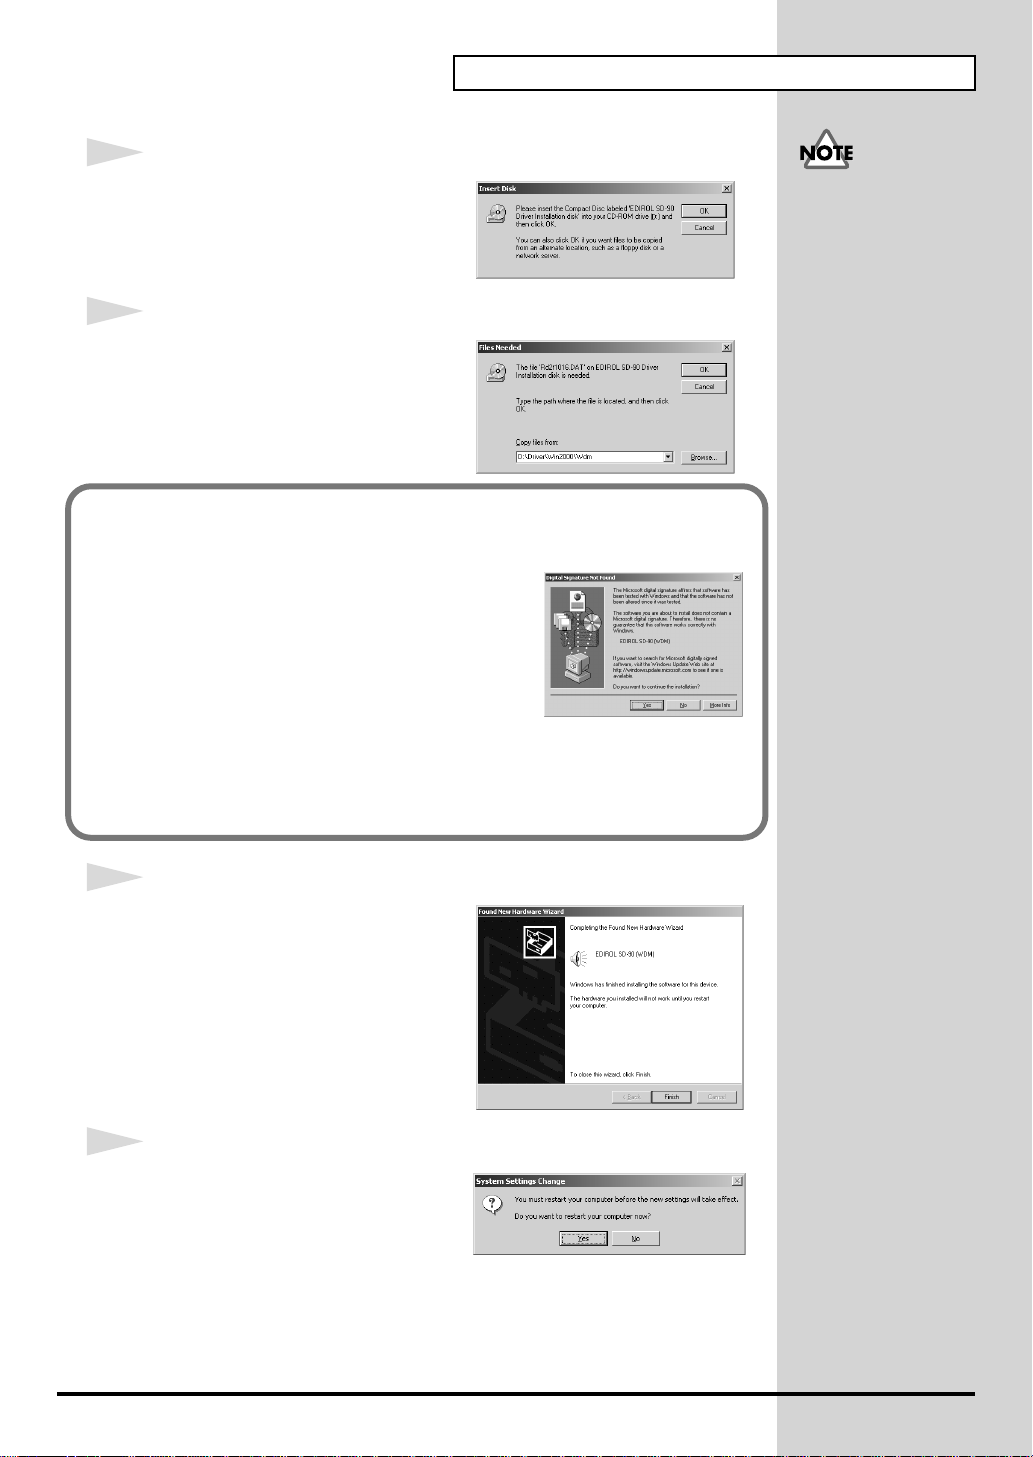
fig.05-8e_30
b
14
The Insert disk dialog box will appear.
Click [OK].
fig.05-9e_30
15
The Files Needed dialog box will
appear.
In the Copy files from field, type the
folder name that is shown in the
Setupinf dialog box, and click [OK].
If in step 5 the “File signature verification” setting was not set to “Ignore”,
a “Digital signature not found” dialog box will appear.
fig.05-7e_30
If “File signature verification” is set to “Warn,”
1. Click [Yes].
2. Continue the installation.
Getting Connected and Installing Drivers (Windows)
If the Insert disk dialog
ox does not appear,
please read The The
“Insert Disk” dialog box
does not appear (p. 37)
If “File signature verification” is set to “Block”
1. Click [OK].
2. When the “New hardware detection wizard” appears, click [Finish].
3. Perform the installation as described in the “Troubleshooting” section on
Device Manager shows “?”, “!”, or “USB Composite Device” (p. 37).
fig.05-10e_30
16
The “Found New Hardware Wizard”
may be displayed.
Verify that “EDIROL SD-90 (WDM)” or
“EDIROL SD-90 (MME)” is displayed,
and click [Finish].
If the “Find new hardware wizard”
dialog box is not displayed, proceed to
step 17.
fig.05-11e_30
17
Restart Windows.
The System Settings Change dialog
box may appear. Click [Yes]. Windows
will restart automatically.
If the System Settings Change dialog
box does not appear, restart Windows from the Start menu.
11
Getting Connected and Installing Drivers (Windows)
If you changed “File signature verification”
If you changed the “File signature verification” setting in step 5, restore the
original setting after Windows restarts.
1. After Windows restarts, log in to Windows as a user with
administrative privileges, (such as Administrator).
2. In the Windows desktop, right-click the My Computer icon, and from
the menu that appears, select Properties. The System Properties
dialog box will appear.
3. Click the Hardware tab, and then click [Driver signature]. The Driver
signature options dialog box will appear.
4. Return the “File signature verification” setting to the original setting
(either “Warn” or “Block”), and click [OK].
5. Click [OK]. The System properties dialog box will close.
Next, specify the audio and MIDI input and output destinations.
(-> Audio and MIDI input and output destinations (p. 13)
12
Audio and MIDI input and output destinations
In order to perform the following steps, you must log on and make settings
as the same user who will be actually using the SD-90 (a user with
administrative privileges, such as Administrator).
fig.017-01e_30
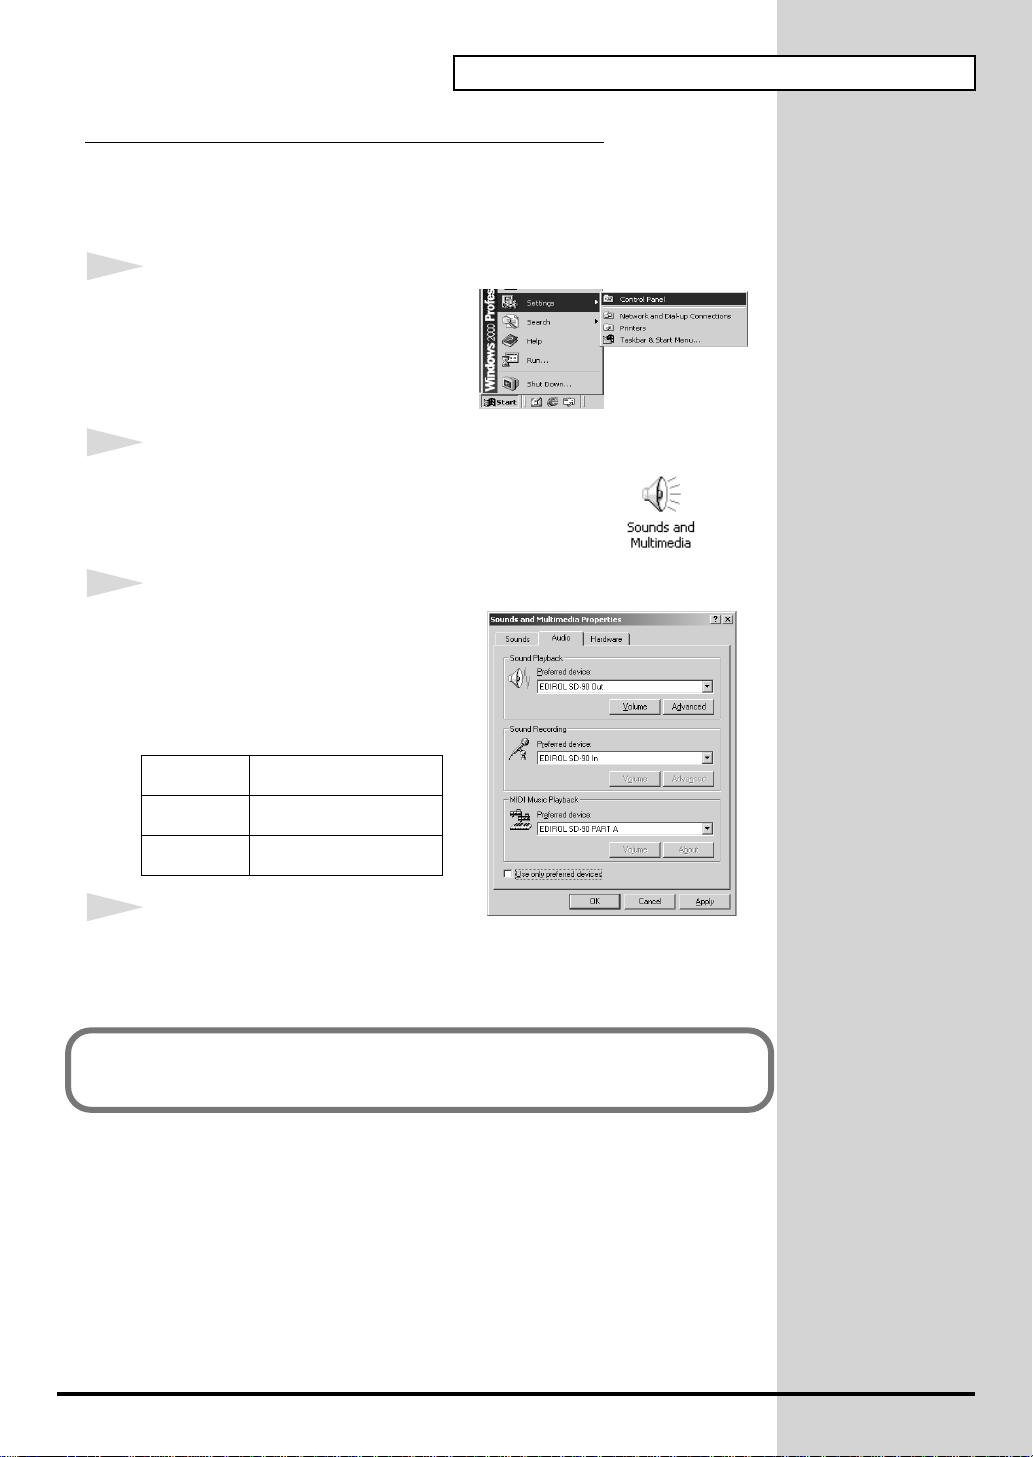
1
Open Control Panel.
Click the Windows Start button, and
select Settings - Control Panel.
fig.017-02e
2
Open the Sounds and Multimedia Properties dialog
box.
Double-click the Sounds and Multimedia icon.
fig.12-20ae
3
Specify the “Preferred device.” Click
the Audio tab. Click the Sound
playback field, Sound Recording field,
and MIDI Music Playback field, and
make the following selections from the
list that appears.
Sound
Playback
Sound
Recording
MIDI Music
Playback
EDIROL SD-90 Out
EDIROL SD-90 In
EDIROL SD-90 PART A
Getting Connected and Installing Drivers (Windows)
4
Close the Sound and Multimedia
Properties dialog box.
Click [OK].
Next, you need to specify the hard disk transfer mode.
(-> Specifying the hard disk transfer mode (p. 14)
13

Getting Connected and Installing Drivers (Windows)
Specifying the hard disk transfer mode
1
Click the Windows Start button, and from the menu that appears, choose
Settings | Control Panel. The Control Panel will appear.
2
Double-click the System icon. The System Properties dialog box will
appear.
3
Click the Hardware tab.
4
Click Device Manager located at the right of the Device Manager field.
fig.5-05e
5
In the list that appears, double-click IDE
ATA/ATAPI controller.
6
Double-click Primary IDE Channel.
The Primary IDE Channel Properties
dialog box will appear.
7
Click the Advanced Settings tab.
fig.5-06e
8
Check whether the Current Transfer
Mode for Device 0 and Device 1 is
UltraDMA mode (or DMA mode).
If the current transfer mode is
UltraDMA mode (or DMA mode),
proceed to step 10.
If it is PIO mode, select DMA if available
from the pulldown menu of Transfer
Modes.
9
Click [OK]. If a dialog box appears, recommending that you restart your
computer, click [Yes]. The computer will restart automatically.
10
Click the button of the Device Manager.
14
11
In the System Properties dialog box, click [Close] (or [OK]). The System
Properties dialog box will close.
Next, you need to check whether the connections, driver installation, and
settings were made correctly.
(->Check whether there is sound (p. 22)
Getting Connected and Installing Drivers (Windows)
If the current transfer
mode was already set to
UltraDMA mode in step 8,
click [OK] in step 11.
15
Getting Connected and Installing Drivers (Windows)
b
b
■ Windows Me/98 users
Installing the driver
1
With the SD-90 disconnected, start up Windows.
Disconnect all USB cables other than those for a USB keyboard or USB mouse.
2
Exit all currently running software (applications).
Also, close any open windows. If you are using a virus checker or similar
software, be sure to exit this as well.
3
Prepare the CD-ROM.
Insert the CD-ROM into the CD-ROM drive of your computer.
fig.05-12e_30
4
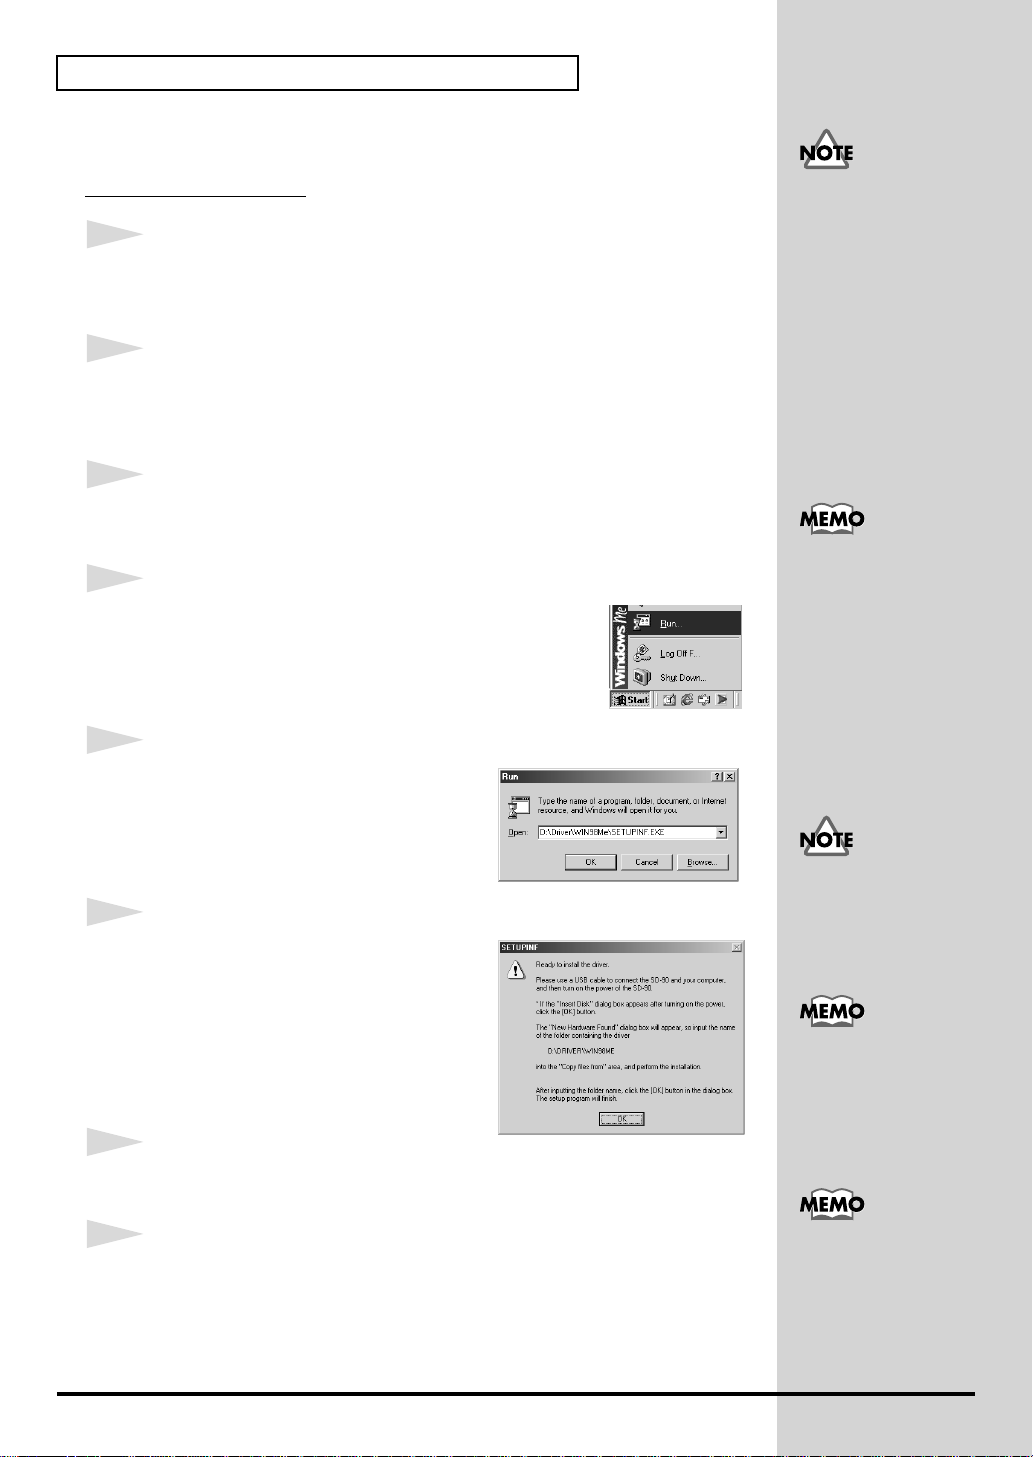
Open the Run... dialog box.
Click the Windows Start button. From the menu that
appears, select Run....
fig.05-13e_30
5
In the “Open” field of the dialog box that
appears, type
“D:\Driver\Win98Me\Setupinf.exe” and
click [OK].
fig.05-14e_30
6
Open the SETUPINF dialog box.
You are now ready to install the driver.
Drag the title bar to move the SETUPINF
dialog box into the upper part of the
screen.
* Do not click [OK] at this time.
7
With the power turned off, use a USB cable to connect the SD-90 to your
computer.
If the SD-90 is already
connected to your computer
and a message of “Add New
Hardware Wizard” is
displayed, go to the CD-
ROM folder named
Driver\Win98Me, open the
file Readme_e.htm, and
read the “Troubleshooting”
section entitled “You
attempted to install using
the above procedure, but
were notable to.”
In this manual, the location
of folders and files is given
in terms of the file path,
using \ as the delimiter.
For example,
Win98Me\Setupinf.exe
indicates that the
Setupinf.exe file is located
in the Win98Me folder.
The drive name “D:” may
e different depending on
your system. Type the
name of your CD-ROM
drive.
If a message of
“The driver is already
installed” appears, you
can connect the SD-90 to
your computer and use it.
8
Turn on the power of the SD-90.
Connect the AC cord to the SD-90’s AC IN jack, and insert the AC cord’s plug
into an AC power outlet. Then, turn on the power of the SD-90.
16
This unit is equipped with
a protection circuit. A brief
interval (a few seconds)
after power up is required
efore the unit will operate
normally.
 Loading...