

Roland Corporation RMP-5 Owner's Manual

Owner’s Manual
201a
Before using this unit, carefully read the sections entitled: “USING THE UNIT SAFELY” and
“IMPORTANT NOTES” (p. 2; p. 4). These sections provide important information
concerning the proper operation of the unit. Additionally, in order to feel assured that you
have gained a good grasp of every feature provided by your new unit, Owner’s manual
should be read in its entirety. The manual should be saved and kept on hand as a
convenient reference.
Main Features
• 54 high quality sounds, including 14 snare sounds.
• Mesh heads are quiet and provide natural feel and response.
• Enjoy practicing and monitor your progress.
• Thanks to battery-powered operation, you can practice anywhere.
• Easy-to-read, large LCD display.
Metronome
• The metronome’s moving needle and built-in LEDs provide visual tempo indications.
• 24 rhythm types and 24 different kinds of beats, including compound times.
• 22 different patterns, including Samba Kick and Jazz Ride.
Rhythm Coach Features
• TIME CHECK: Allows visual confirmation of timing accuracy in real time.
• STROKE BALANCE: Simultaneously checks playing dynamics and timing
• ACCURACY SCORE: Confirms timing accuracy with an actual “score.”
• QUIET COUNT: For developing perfect tempo
• AUTO UP/DOWN: For developing stamina and endurance
• RHYTHMIC NOTES: Progressive changes in rhythmic note values
Expandability
• Connecting optional Kick and Cymbal triggers to the EXT TRIG input enables you to practice
with a basic drum kit.
• MIX IN allows practice with an external audio source — (CD, MD, MP3 etc.)
202
Copyright © 2005 ROLAND CORPORATION
All rights reserved. No part of this publication may be reproduced in any form without the written
permission of ROLAND CORPORATION.
USING THE UNIT SAFELY
Used for instructions intended to alert
the user to the risk of death or severe
injury should the unit be used
improperly.
Used for instructions intended to alert
the user to the risk of injury or material
damage should the unit be used
improperly.
* Material damage refers to damage or
other adverse effects caused with
respect to the home and all its
furnishings, as well to domestic
animals or pets.
001
• Before using this unit, make sure to read the instructions below, and the Owner’s Manual.
........................................................................................................................
002c
• Do not open (or modify in any way) the unit or its AC
adaptor.
........................................................................................................................
003
• Do not attempt to repair the unit, or replace parts within
it (except when this manual provides specific instructions directing you to do so). Refer all servicing to your
retailer, the nearest Roland Service Center, or an authorized Roland distributor, as listed on the “Information”
page.
........................................................................................................................
004
• Never use or store the unit in places that are:
• Subject to temperature extremes (e.g., direct sunlight
in an enclosed vehicle, near a heating duct, on top of
heat-generating equipment); or are
• Damp (e.g., baths, washrooms, on wet floors); or are
• Humid; or are
• Exposed to rain; or are
• Dusty; or are
• Subject to high levels of vibration.
........................................................................................................................
005
• This unit should be used only with the stand that is
recommended by Roland (PDS-2).
........................................................................................................................
006
• When using the unit with the stand recommended by
Roland (PDS-2), the stand must be carefully placed so it
is level and sure to remain stable. If not using a stand,
you still need to make sure that any location you choose
for placing the unit provides a level surface that will
properly support the unit, and keep it from wobbling.
........................................................................................................................
008b
• Use only the specified AC adaptor (BOSS PSA series),
and make sure the line voltage at the installation
matches the input voltage specified on the AC adaptor’s
body. Other AC adaptors may use a different polarity,
or be designed for a different voltage, so their use could
result in damage, malfunction, or electric shock.
........................................................................................................................
The symbol alerts the user to important instructions
or warnings.The specific meaning of the symbol is
determined by the design contained within the
triangle. In the case of the symbol at left, it is used for
general cautions, warnings, or alerts to danger.
The symbol alerts the user to items that must never
be carried out (are forbidden). The specific thing that
must not be done is indicated by the design contained
within the circle. In the case of the symbol at left, it
means that the unit must never be disassembled.
The ● symbol alerts the user to things that must be
carried out. The specific thing that must be done is
indicated by the design contained within the circle. In
the case of the symbol at left, it means that the powercord plug must be unplugged from the outlet.
009
• Do not excessively twist or bend the power cord, nor
place heavy objects on it. Doing so can damage the cord,
producing severed elements and short circuits.
Damaged cords are fire and shock hazards!
........................................................................................................................
010
• This unit, either alone or in combination with an
amplifier and headphones or speakers, may be capable
of producing sound levels that could cause permanent
hearing loss. Do not operate for a long period of time at
a high volume level, or at a level that is uncomfortable.
If you experience any hearing loss or ringing in the ears,
you should immediately stop using the unit, and consult
an audiologist.
........................................................................................................................
011
• Do not allow any objects (e.g., flammable material,
coins, pins); or liquids of any kind (water, soft drinks,
etc.) to penetrate the unit.
........................................................................................................................
012c
• Immediately turn the power off, remove the AC adaptor
from the outlet, and request servicing by your retailer,
the nearest Roland Service Center, or an authorized
Roland distributor, as listed on the “Information” page
when:
• The AC adaptor or the power-supply cord has been
damaged; or
• If smoke or unusual odor occurs
• Objects have fallen into, or liquid has been spilled
onto the unit; or
• The unit has been exposed to rain (or otherwise has
become wet); or
• The unit does not appear to operate normally or
exhibits a marked change in performance.
........................................................................................................................
013
• In households with small children, an adult should
provide supervision until the child is capable of
following all the rules essential for the safe operation of
the unit.
........................................................................................................................
014
• Protect the unit from strong impact.
(Do not drop it!)
........................................................................................................................
2
015
• Do not force the unit’s power-supply cord to share an
outlet with an unreasonable number of other devices. Be
especially careful when using extension cords—the total
power used by all devices you have connected to the
extension cord’s outlet must never exceed the power
rating (watts/amperes) for the extension cord. Excessive
loads can cause the insulation on the cord to heat up and
eventually melt through.
........................................................................................................................
016
• Before using the unit in a foreign country, consult with
your retailer, the nearest Roland Service Center, or an
authorized Roland distributor, as listed on the “Information” page.
........................................................................................................................
019
• Batteries must never be recharged, heated, taken apart,
or thrown into fire or water.
........................................................................................................................
101b
• The unit and the AC adaptor should be located so their
location or position does not interfere with their proper
ventilation.
........................................................................................................................
101c
• This is for use only with Roland stand PDS-2. Use with
other stands is capable of resulting in instability causing
possible injury.
........................................................................................................................
102d
• Always grasp only the output plug or the body of the
AC adaptor when plugging into, or unplugging from,
this unit or an outlet.
........................................................................................................................
103b
• At regular intervals, you should unplug the AC adaptor
and clean it by using a dry cloth to wipe all dust and
other accumulations away from its prongs. Also,
disconnect the power plug from the power outlet
whenever the unit is to remain unused for an extended
period of time. Any accumulation of dust between the
power plug and the power outlet can result in poor
insulation and lead to fire.
........................................................................................................................
104
• Try to prevent cords and cables from becoming
entangled. Also, all cords and cables should be placed
so they are out of the reach of children.
........................................................................................................................
106
• Never climb on top of, nor place heavy objects on the
unit.
........................................................................................................................
107d
• Never handle the AC adaptor body, or its output plugs,
with wet hands when plugging into, or unplugging
from, an outlet or this unit.
........................................................................................................................
108b
• Before moving the unit, disconnect the AC adaptor and
all cords coming from external devices.
110b
• Whenever you suspect the possibility of lightning in
your area, disconnect the AC adaptor from the outlet.
........................................................................................................................
111: Selection
• If used improperly, batteries may explode or leak and
cause damage or injury. In the interest of safety, please
read and observe the following precautions (p. 7).
1
• Carefully follow the installation instructions for
batteries, and make sure you observe the correct
polarity.
3
• Remove the battery whenever it is to remain unused
for an extended period of time.
5
• If a battery has leaked, use a soft piece of cloth or
paper towel to wipe all remnants of the discharge
from the battery compartment. Then install new
battery. To avoid inflammation of the skin, make
sure that none of the battery discharge gets onto your
hands or skin. Exercise the utmost caution so that
none of the discharge gets near your eyes. Immediately rinse the affected area with running water if
any of the discharge has entered the eyes.
6
• Never keep batteries together with metallic objects
such as ballpoint pens, necklaces, hairpins, etc.
........................................................................................................................
112
• Used batteries must be disposed of in compliance with
whatever regulations for their safe disposal that may be
observed in the region in which you live.
........................................................................................................................
(Add)
• When using brushes, be sure to use nylon brushes.
Using metal brushes will not only scratch the head, but
can also be hazardous, since the tip of the brush may
catch in the mesh of the net.
........................................................................................................................
........................................................................................................................
109b
• Before cleaning the unit, turn off the power and unplug
the AC adaptor from the outlet (p. 7, p. 9).
........................................................................................................................
3

IMPORTANT NOTES
291a
In addition to the items listed under “USING THE UNIT SAFELY” on pages 2–3, please read and observe the following:
Power Supply: Use of Batteries
301
• Do not connect this unit to same electrical outlet that is being
used by an electrical appliance that is controlled by an inverter
(such as a refrigerator, washing machine, microwave oven, or air
conditioner), or that contains a motor. Depending on the way in
which the electrical appliance is used, power supply noise may
cause this unit to malfunction or may produce audible noise. If it
is not practical to use a separate electrical outlet, connect a power
supply noise filter between this unit and the electrical outlet.
302
• The AC adaptor will begin to generate heat after long hours of
consecutive use. This is normal, and is not a cause for concern.
303a
• The use of an AC adaptor is recommended as the unit’s power
consumption is relatively high. Should you prefer to use
batteries, please use the alkaline type.
304a
• When installing or replacing batteries, always turn off the power
on this unit and disconnect any other devices you may have
connected. This way, you can prevent malfunction and/or
damage to speakers or other devices.
306b
• A battery is supplied with the unit. The life of this battery may be
limited, however, since its primary purpose was to enable testing.
307
• Before connecting this unit to other devices, turn off the power to
all units. This will help prevent malfunctions and/or damage to
speakers or other devices.
Placement
351
• Using the unit near power amplifiers (or other equipment
containing large power transformers) may induce hum. To
alleviate the problem, change the orientation of this unit; or move
it farther away from the source of interference.
352a
• This device may interfere with radio and television reception. Do
not use this device in the vicinity of such receivers.
352b
• Noise may be produced if wireless communications devices, such
as cell phones, are operated in the vicinity of this unit. Such noise
could occur when receiving or initiating a call, or while
conversing. Should you experience such problems, you should
relocate such wireless devices so they are at a greater distance
from this unit, or switch them off.
354a
• Do not expose the unit to direct sunlight, place it near devices
that radiate heat, leave it inside an enclosed vehicle, or otherwise
subject it to temperature extremes. Excessive heat can deform or
discolor the unit.
355b
• When moved from one location to another where the temper-
ature and/or humidity is very different, water droplets (condensation) may form inside the unit. Damage or malfunction may
result if you attempt to use the unit in this condition. Therefore,
before using the unit, you must allow it to stand for several
hours, until the condensation has completely evaporated.
Maintenance
401a
• For everyday cleaning wipe the unit with a soft, dry cloth or one that
has been slightly dampened with water. To remove stubborn dirt,
use a cloth impregnated with a mild, non-abrasive detergent. Afterwards, be sure to wipe the unit thoroughly with a soft, dry cloth.
402
• Never use benzine, thinners, alcohol or solvents of any kind, to
avoid the possibility of discoloration and/or deformation.
Repairs and Data
452
• Please be aware that all data contained in the unit’s memory may be
lost when the unit is sent for repairs. Important data should always
be written down on paper (when possible). During repairs, due care
is taken to avoid the loss of data. However, in certain cases (such as
when circuitry related to memory itself is out of order), we regret that
it may not be possible to restore the data, and Roland assumes no
liability concerning such loss of data.
Additional Precautions
551
• Please be aware that the contents of memory can be irretrievably lost
as a result of a malfunction, or the improper operation of the unit. To
protect yourself against the risk of loosing important data, we
recommend you to write it down.
552
• Unfortunately, it may be impossible to restore the contents of data
that was stored in the unit’s memory once it has been lost. Roland
Corporation assumes no liability concerning such loss of data.
553
• Use a reasonable amount of care when using the unit’s buttons,
sliders, or other controls; and when using its jacks and
connectors. Rough handling can lead to malfunctions.
554
• Never strike or apply strong pressure to the display.
556
• When connecting / disconnecting all cables, grasp the connector
itself—never pull on the cable. This way you will avoid causing
shorts, or damage to the cable’s internal elements.
558a
• To avoid disturbing your neighbors, try to keep the unit’s volume
at reasonable levels. You may prefer to use headphones, so you
do not need to be concerned about those around you (especially
when it is late at night).
558d
• This instrument is designed to minimize the extraneous sounds
produced when it’s played. However, since sound vibrations can
be transmitted through floors and walls to a greater degree than
expected, take care not to allow these sounds to become a
nuisance to neighbors, especially when performing at night and
when using headphones.
559a
• When you need to transport the unit, package it in the box
(including padding) that it came in, if possible. Otherwise, you
will need to use equivalent packaging materials.
562
• Use a cable from Roland to make the connection. If using some
other make of connection cable, please note the following precautions.
• Some connection cables contain resistors. Do not use cables
that incorporate resistors for connecting to this unit. The use
of such cables can cause the sound level to be extremely low,
or impossible to hear. For information on cable specifications,
contact the manufacturer of the cable.
4

Contents
USING THE UNIT SAFELY......................................................................2
IMPORTANT NOTES ...............................................................................4
Contents ..................................................................................................5
Panel Descriptions..................................................................................6
Getting Ready..........................................................................................7
Loading the Battery......................................................................................................................... 7
Connecting the AC Adaptor.......................................................................................................... 7
Adjusting the Head Tension.......................................................................................................... 7
Mounting the RMP-5 on the Stand (PDS-2: Sold Separately)...................................................8
Turning the Power On and Off ................................................................................................................ 9
About the Display ...................................................................................................................................... 9
Practice ..................................................................................................10
Changing the Sounds Assigned to the Pad ..........................................................................................10
Sound List....................................................................................................................................... 10
Using the Metronome .............................................................................................................................. 11
Changing the Metronome Settings.............................................................................................11
Using Tap Tempo to Set the Metronome................................................................................... 12
Using the Rhythm Coach Mode ............................................................................................................. 13
TIME CHECK ................................................................................................................................14
ACCURACY SCORE .................................................................................................................... 14
QUIET COUNT .............................................................................................................................15
AUTO UP/DOWN .......................................................................................................................15
RHYTHMIC NOTES..................................................................................................................... 16
STROKE BALANCE ..................................................................................................................... 16
Advanced Use................................................................................................................................ 17
Setting the Timer ...................................................................................................................................... 18
Using the RMP-5 with Additional Pads ...............................................19
Setup Examples......................................................................................................................................... 19
Connecting a Cymbal Pad ........................................................................................................... 19
Connecting a Kick Trigger Pad ...................................................................................................19
Connecting Other Pads............................................................................................................................ 20
Connecting the Pads ..................................................................................................................... 20
Connecting Pads Capable of Playing Rim Shots ...................................................................... 22
Parameter List................................................................................................................................ 23
Appendices............................................................................................26
Adjusting the Pad Sensitivity .................................................................................................................26
Restoring the Factory Settings ................................................................................................................ 26
If an Error Message Appears ..................................................................................................................26
Replacing the Head .................................................................................................................................. 27
Specifications............................................................................................................................................. 28
Sample Practice Patterns.....................................................................29
INDEX .....................................................................................................34
5

Panel Descriptions
5
4
2
1
3
fig.Panel
1
2
3
8
1.
Mini speaker
Only the metronome sound is played from here (not the sounds
from the pad).
2.
[METRONOME] button
Use this to select pad sounds and for metronome settings.
When the button is held down, the tap icon ( ) blinks in the
display, you can tap the pad to set the metronome tempo (p. 12).
3.
[START/STOP] button
Starts and stops the metronome.
4.
VOLUME knob
Adjusts the sound level from the OUTPUT jack.
* The volume of the mini speaker is adjusted with CLICK VOLUME
(p. 11).
5.
[COACH] button
Selects the Rhythm Coach mode.
When this button is held down, the timer icon ( ) lights in the
display, and the RMP-5 switches to Timer mode (p. 18).
6.
VALUE [+]/[-] button
Use these buttons to change the values of each parameter.
To increase the value rapidly, hold down [+] and press [-]. To
decrease the value rapidly, hold down [-] and press [+].
7.
BEAT indicator
Flashes in quarter note timing.
Red indicator flashes on accent beats.
8.
Head
9.
Sensor
10.
Tuning bolts
Adjusts the head tension.
7
9
Side Panel
fig.Side
926a
4
5
6
10
1.
MIX IN jack
For connecting an external audio source (CD, MD, etc.) for
playing along.
Adjust the volume using the controls on the connected device.
* Do not use a plug converter/adapter. Due to its weight, the plug may
fall out of the jack during performance.
* When connection cables with resistors are used, the volume level of
equipment connected to this inputs may be low. If this happens, use
connection cables that do not contain resistors, such as those from the
Roland PCS series.
2.
EXT TRIG IN jack
Connect other pads here.
An optional PCS-31L cable allows you to use cymbal pads and
kick trigger pads. For more detailed information, refer to
the RMP-5 with Additional Pads”
3.
OUTPUT jack
For headphones, amp, or audio system.
* The RMP-5 outputs sounds in monaural.
* Do not use a plug converter/adapter. Due to its weight, the plug may
fall out of the jack during performance.
4.
AC Adaptor jack
Connect the AC adaptor (optional) here.
5.
POWER switch
Turns the power on/off.
(p. 19).
“Using
6
Getting Ready
Use only the BOSS PSA-series
AC adaptor. Other adaptors
may cause malfunction or
damage to the RMP-5 and
must never be used.
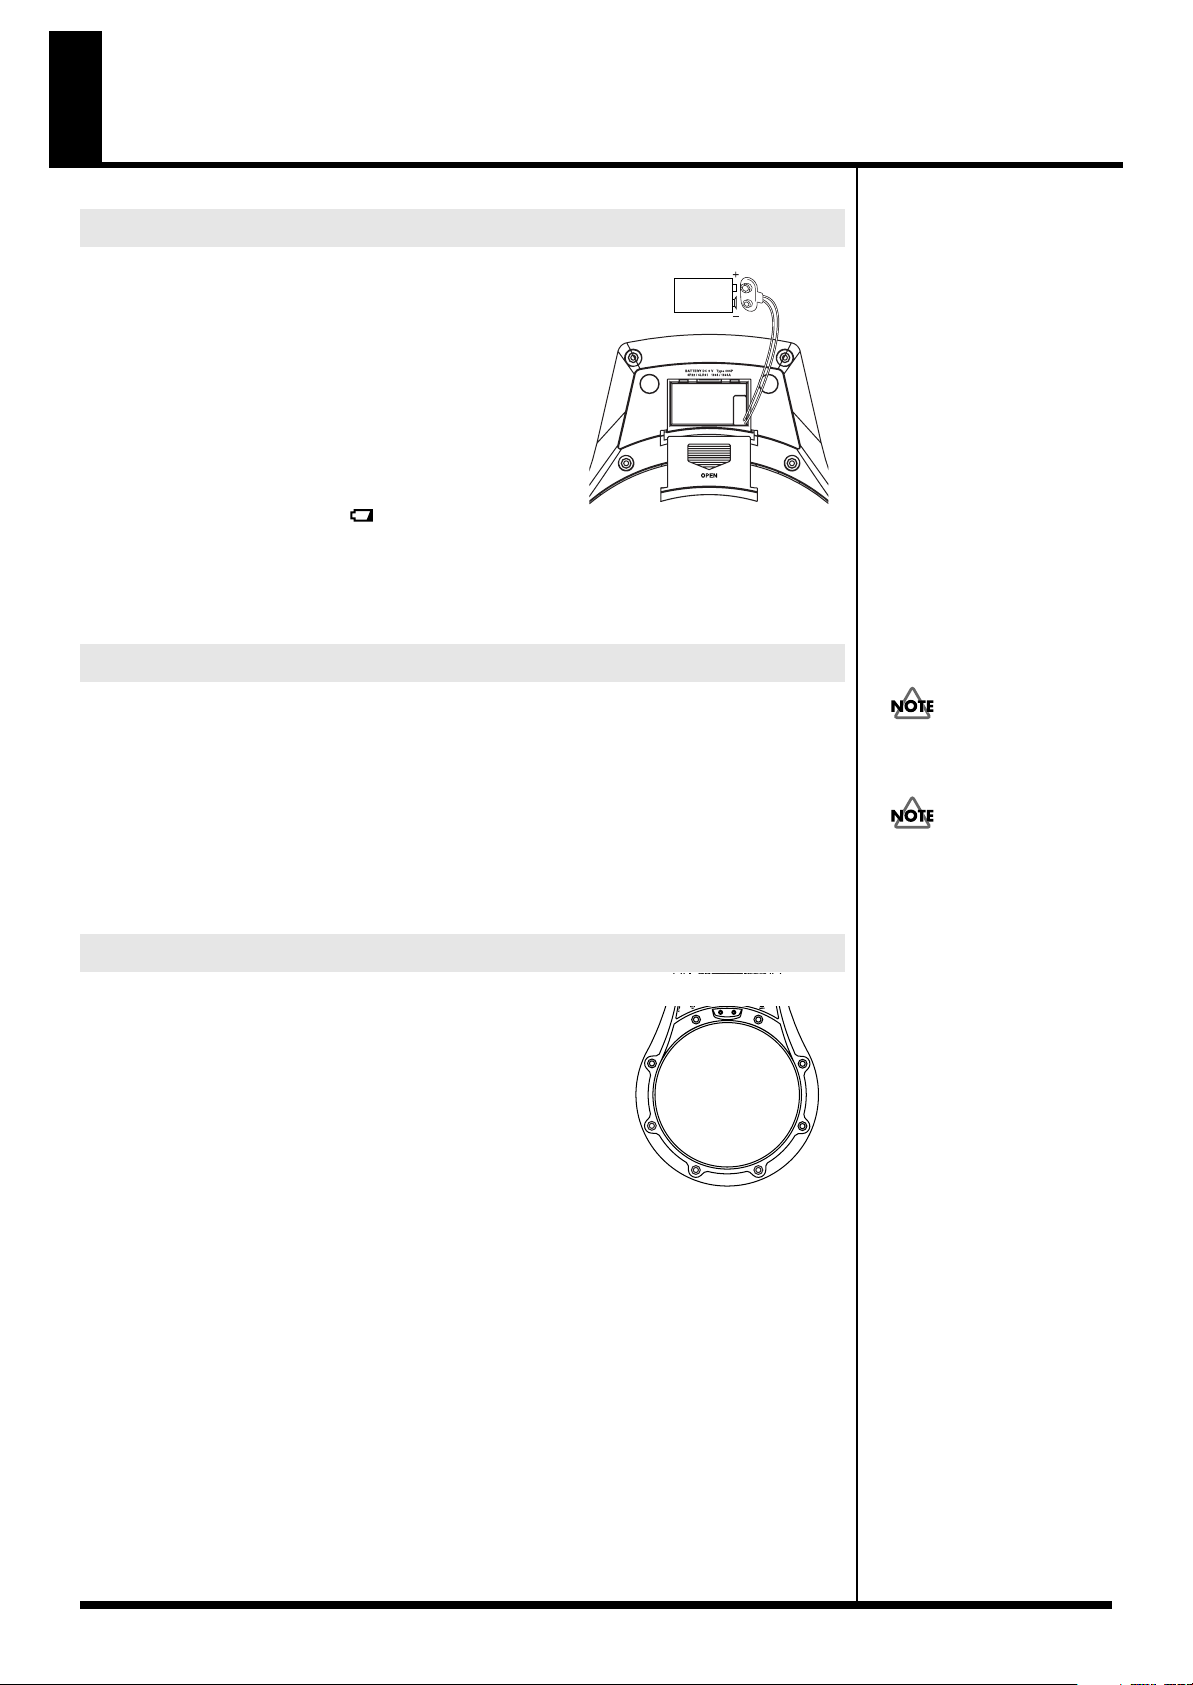
Loading the Battery
fig.BattCase.e_50
1.
Press down and slide off the lid of the battery
compartment (located on the bottom of the unit).
2.
Connect the snap cord to the battery, and place it inside
the battery compartment.
* Verify the battery’s polarity (+ versus -).
3.
Securely close the battery cover.
* Do not let the snap cord get caught in the battery compartment lid.
When to Change the Battery
The Battery LOW indicator ( ) at the lower right of the
display begins to flash when the battery power drops.
Insufficient battery power lowers the volume level of the mini speaker and causes unstable
operation. Replace the battery as soon as possible.
* We recommend replacement with alkaline batteries.
Connecting the AC Adaptor
A BOSS PSA series AC adaptor (sold separately) can be used to power the RMP-5.
9V
Battery
Battery
Snap
Turn off the power before
connecting the AC adaptor.
Adjusting the Head Tension
fig.Bolt
BEFORE playing the RMP-5, you must tune the head to your
preferred playing tension. The head is NOT tuned before shipping.
Always tighten the tuning bolts in the order shown in the figure.
* Failure to adjust the tension may result in damage to the head.
* Head tension may change with extended use. Make adjustments as needed.
1
8
63
45
7
2
7
Getting Ready
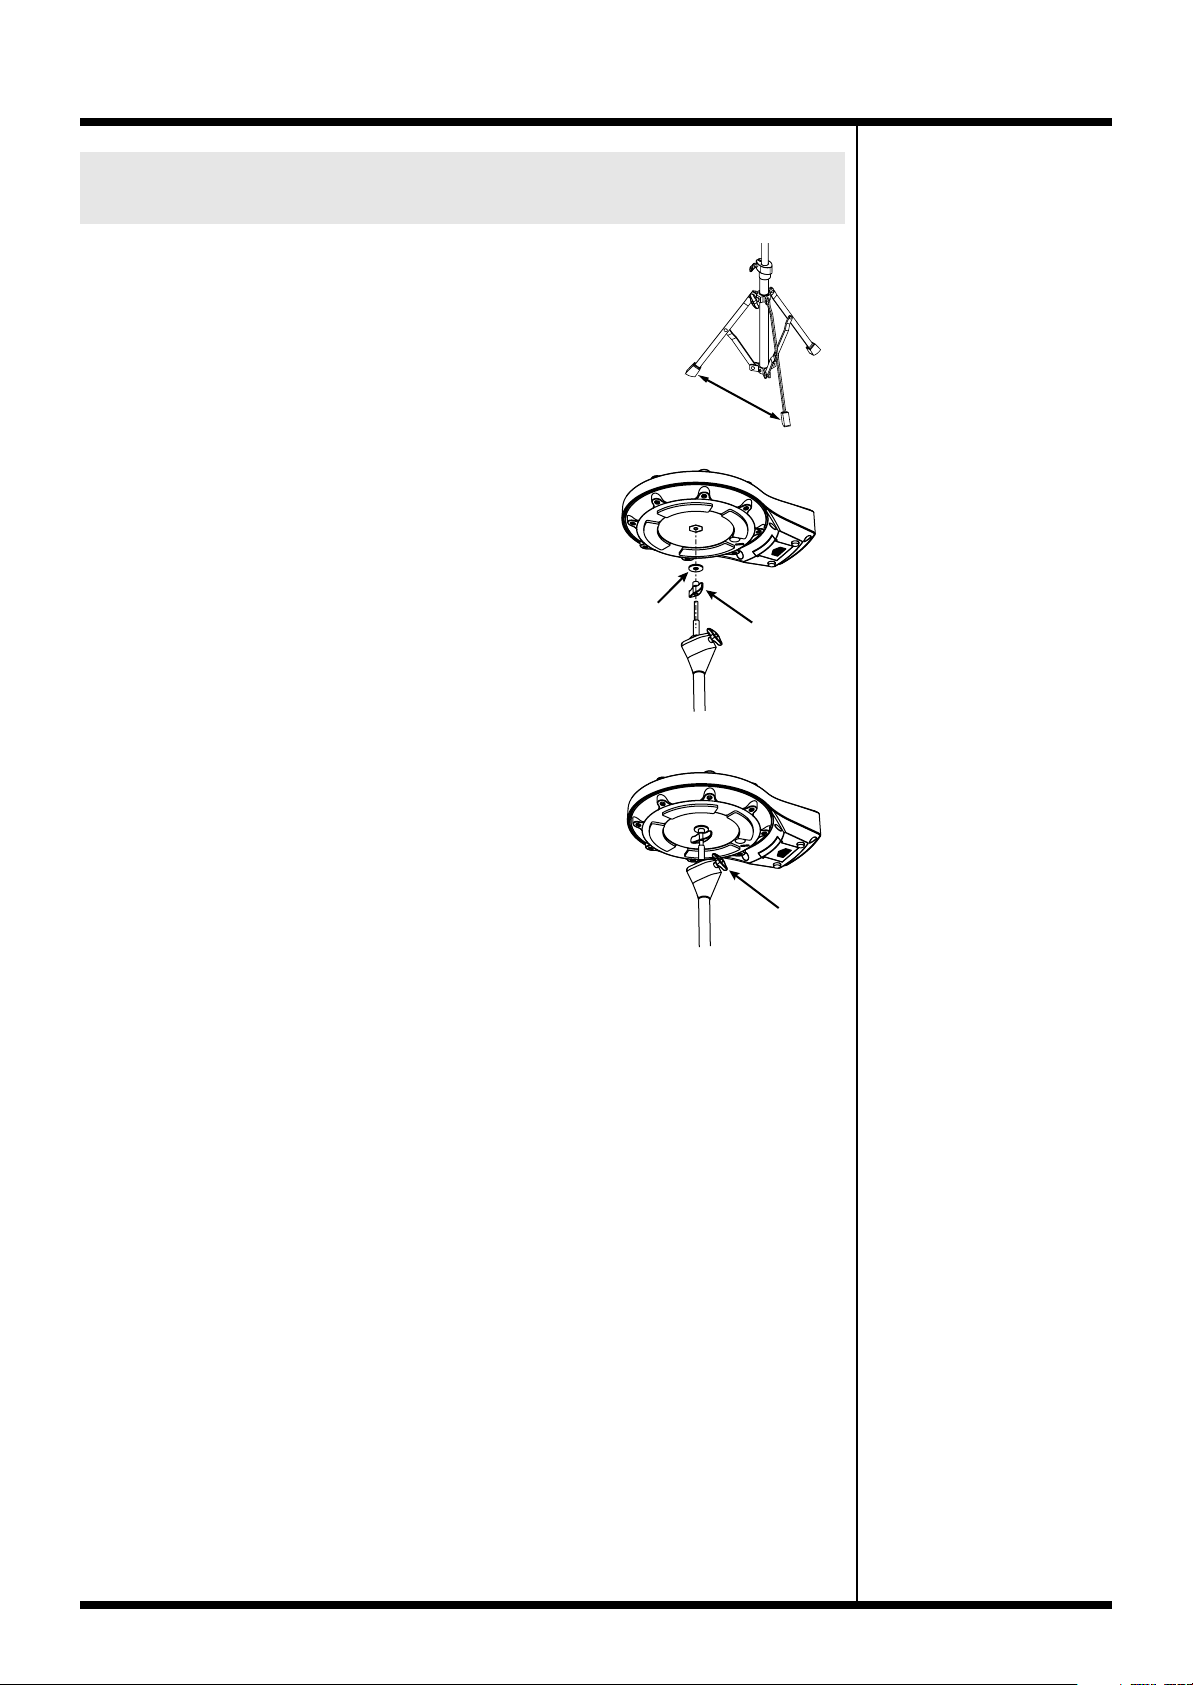
Mounting the RMP-5 on the Stand (PDS-2: Sold Separately)
1.
First, open the tripod so the legs are spaced at least 50 cm
(20") apart.
2.
Attach the wing screw and washer in the order shown
in the figure.
3.
Attach the pad.
Turn the pad until the screw is just about all the way in;
then stop, and tighten the wing screw from underneath the
stand.
* Do not forcefully try to turn the pad after the screw is already all
the way in. Doing so may damage the stand’s screw.
50 cm (20")
or greater
Washer
Wing screw
Pad attachment
screw size: M8
4.
Adjust the angle of the pad.
Precautions When Folding the Tripod
When folding the PDS-2’s tripod legs to store the unit, be cautious not to get your fingers pinched
while handling the stand.
8
Turning the Power On and Off
941
* Once the connections have been completed, turn on power to your audio devices in the order specified.
Turning on devices in the wrong order may cause malfunction and/or damage to speakers and other devices.
1.
Turn the VOLUME knob to the minimum level (completely to the left).
2.
Turn on the POWER switch.
942
* This unit is equipped with a protection circuit. A brief interval (a few seconds) after power up is required
before the unit will operate normally.
3.
While striking the head, gradually turn the VOLUME knob to adjust the volume level.
When Using with the Amp/Audio System
921
* To prevent malfunction and/or damage to speakers or other devices, always turn down the volume, and turn
off the power on all devices before making any connections.
1.
Turn down the volume control on each of the devices in your system.
2.
Turn on the power of the RMP-5.
3.
Turn on the connected amp or audio system, and adjust the volume to the desired level.
When Turning Off the Power
Before switching off the power, lower the volume on each of the devices in your system and then
turn off the devices in the reverse order to which they were switched on.
Getting Ready
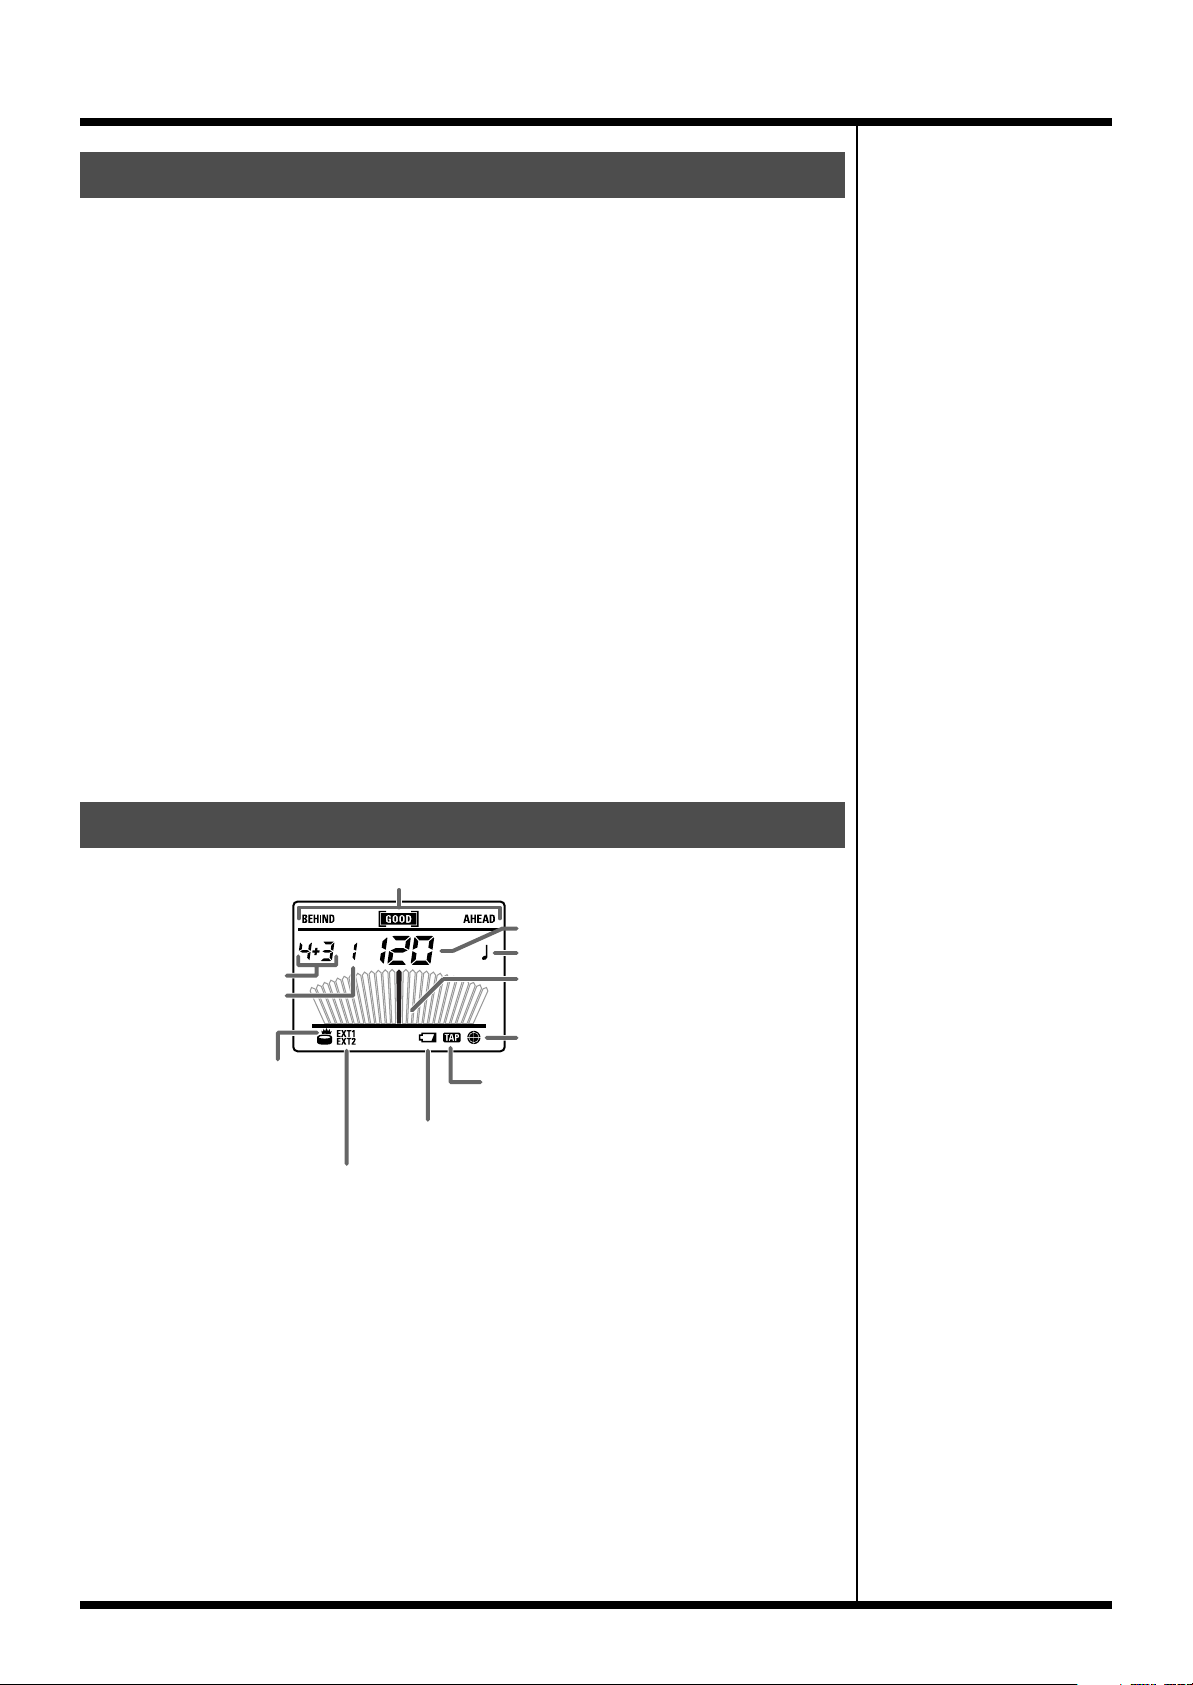
About the Display
fig.Display.e
Time Check (p.13)
Beat
Count
Trigger Indicator
Appears when the pad is struck.
EXT1, EXT2 indicators
Lights when the pad connected to the EXT TRIG IN jack is struck.
Tempo/Value
Rhythm Type
Metronome Needle
Timer icon
Indicates the timer’s elapsed time (p.18).
Tap icon
Flashes when Tap Tempo is set (p.12).
Battery LOW Indicator
Flashes when the battery power drops.
9
Practice
Changing the Sounds Assigned to the Pad
Changing these settings allows you to play a variety of different sounds.
1.
Press the [METRONOME] button a number of times to select “ ” (PAD SOUND).
fig.pad-sound
2.
Press the [+] or [-] button to select the sound.
Sound List
Displayed
Sn1
Sn2 Snare 2 Brass EH3 Elec. Hi-Hat Close/Open tr3 Triangle Mute/Open
Sn3 Snare 3 Bright rd1 Ride Cymbal Bow Cb1 Cowbell Open
Sn4 Snare 4 Funk rd2 Ride Cymbal Bow/Bell Cb2 Cowbell Mute
Sn5 Snare 5 Piccolo SPL Splash Cb3 Cowbell Mute/Open
Sn6 Snare 6 Marching t01 Tom Hi tbr Tambourine
Pbd Practice Board t02 Tom Lo Sha Shaker
ES1 Elec. Snare 1 tb1 Timbale Hi bL1 Wood Block Hi
ES2 Elec. Snare 2 tb2 Timbale Lo bL2 Wood Block Lo
K01 Kick 1 Rock *3 tb3 Timbale Paila bL3 Wood Block Lo/Hi
K02 Kick 2 Hard *3 Sd1 Surdo Open CLA Claves
K03 Kick 3 Jazz *3 Sd2 Surdo Mute CrS Snare Cross Stick *1
EK1 Elec. Kick 1 *3 Sd3 Surdo Mute/Open *2 S6r Snare 6 Marching Rim *1
EK2 Elec. Kick 2 *3 CAI Caixa Sh1
HH1 Hi-Hat Close AG1 Agogo Hi Sh2
HH2 Hi-Hat Open AG2 Agogo Lo Sh3
HH3 Hi-Hat Close/Open AG3 Agogo Lo/Hi Sh4
EH1 Elec. Hi-Hat Close tr1 Triangle Open Sh5
Sound Name
Snare 1 Vintage EH2 Elec. Hi-Hat Open tr2 Triangle Mute
*1 Sounds suitable for use when a rim-shot-capable pad is connected and used in combination with the RMP-5 (p. 22).
*2 The “open” sound is easily produced by striking the pad with a stick and the “mute” sound is easily produced by striking with the
palm of your hand.
*3 Kick pad sounds. Use these sounds when you have a KD-8/85/120 connected to the RMP-5.
This allows you to practice using both hands and your foot with the kick pad and RMP-5 (p. 19).
Displayed
Sound Name
Displayed
Sound Name
Snare 1 head sound only
Snare 2 head sound only
Snare 3 head sound only
Snare 4 head sound only
Snare 5 head sound only
*1
*1
*1
*1
*1
10

Using the Metronome
b
The metronome alternately starts and stops each time you press the [START/STOP] button.
Changing the Metronome Settings
You can change the metronome tempo, beat, rhythm type, sound, and volume.
1.
Press the [METRONOME] button a few times to select the desired parameter.
The numbers shown at the left of the display indicate the parameters that are changed.
Parameter
TEMPO
CLICK SOUND
(Type of metronome sound)
RHYTHM
(Rhythm type)
Value
20–300
C01: Traditional Metronome
C02: Simple Electric
C03: Electric Beep
C04: Cowbell
C05: Claves
C06: Sticks
C07: Voice Count
C08: Hand Clap
* Selecting Ptn enables selection of patterns P01–P22 for the RHYTHM
(Rhythm type) parameter. Using Ptn, you can easily select a metronome
backing style for your workout.
When C01–C15 is selected for CLICK SOUND:
, , , , , , , , , , , ,
, , , , , , , ,
3-2 son clave ( ),
C09: Finger Snap
C10: Hi-Hat Close
C11: Hi-Hat Pedal
C12: Ride Cymbal
C13: Triangle
C14: Agogo
C15: Tambourine
Ptn *
Practice
Adjusting the settings while the
metronome is on helps you
monitor the resulting change.
Hold down the
[METRONOME] button and
press the [-] button to have
selections come up in the
reverse order.
CLICK SOUND
A beep tone is played when
nothing is connected to the
OUTPUT jack. You can select
eep sound from 1–2.
2-3 son clave ( ),
3-2 rumba clave ( ),
2-3 rumba clave ( )
When Ptn is selected for CLICK SOUND:
P01: Triangle 16th *
P02: Agogo 16th *
P03: Drum Simple 8 Beat
P04: Drum Simple 16 Beat
P05: Drum Shuffle
P06: Drum Disco
P07: Jazz Legato Hi-Hat
P08: Jazz Legato Ride
P09: Jazz Count Hi-Hat
P10: Samba Kick
P11: Samba Surdo
Patterns indicated with an asterisk (*) can be created with a combination
of the CLICK SOUND and RHYTHM.
BEAT 0–9, 2+3, 3+2, 3+4, 4+3, 4+5, 5+4, 5+6, 6+5, 6+7, 7+6, 7+8, 8+7, 8+9, 9+8
CLICK VOLUME
(Metronome
volume)
2.
Press the [+] or [-] button to set the values for each parameter.
3.
Press the [START/STOP] button to turn the metronome on and off.
0 (Off)–15 (Max.)
P12: Simple Surdo
P13: Wood Block & Shaker
P14: Agogo Triplet *
P15: 2-3 Son Clave *
P16: 3-2 Rumba Clave *
P17: Hi-Hat Open Close 1
P18: Hi-Hat Open Close 2
P19: Hi-Hat Open Close 3
P20: Hi-Hat Open Close 4
P21: Hi-Hat Open Close 5
P22: Rock Fill
CLICK VOLUME
Adjusts the volume of the
metronome sound that is heard
when nothing is connected to
the OUTPUT jack. You can
select beep volume from 0–3.
11
 Loading...