

Roland Corporation R-09 Owner's Manual
Owner’s Manual
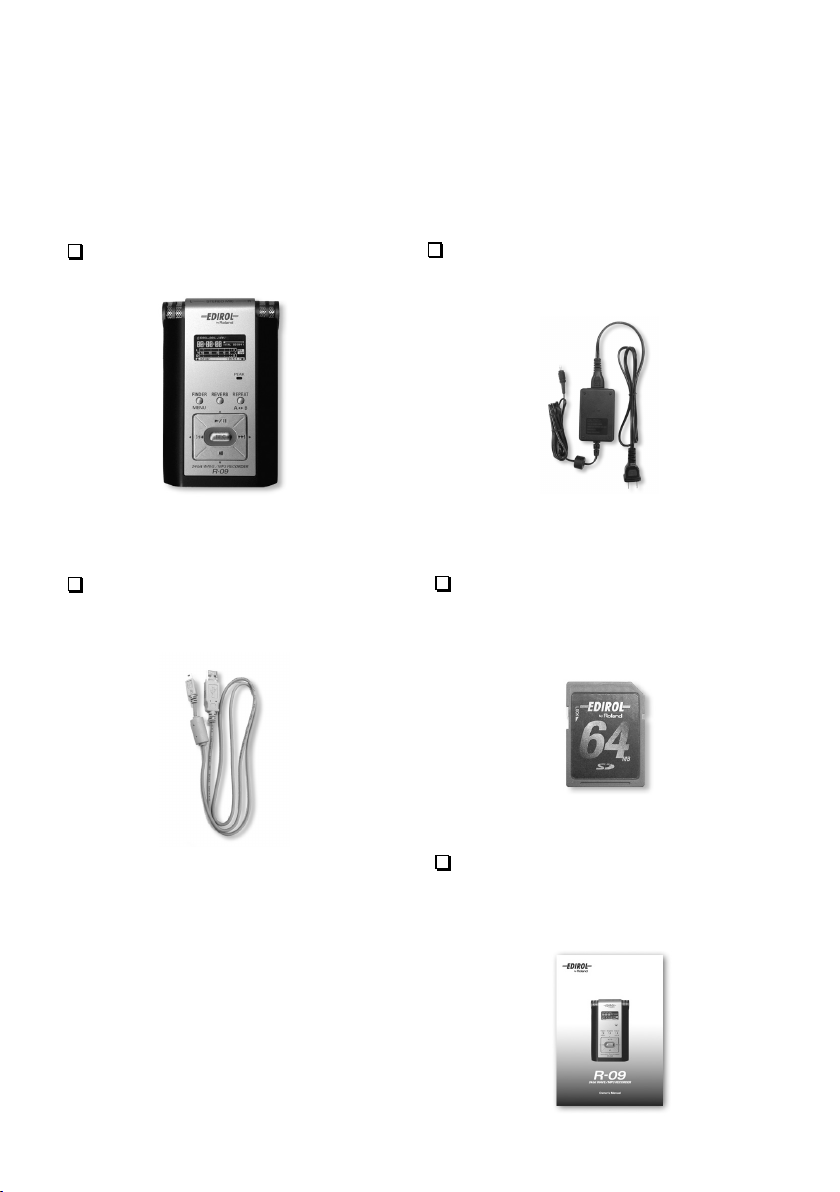
Checking the package contents
The R-09 comes with the following items. After opening the package, please check all items. If any
items are missing, please contact the retailer from whom this product was purchased.
* In the interest of product improvement, the appearance of this unit and/or the supplied accessories are subject to
change without prior notice.
R-09
USB cable (mini-B cable; 1 meter)
This cable connects the R-09 to the USB
terminal on the PC.
AC adaptor
This AC adaptor is specifically designed
for the R-09. Please use only the included
AC adaptor.
* For use in your country, a different AC adaptor
and plug may have been supplied.
SD Memory card
This memory card is needed to record or
play back sound on the R-09.
Owner's manual
This document is the owner's manual. Please
keep it on hand for easy reference.
Contents
Names of Things and What They Do 4
R-09 screens and basic operations 11
Using the R-09 14
Turning power on/off .....................................14
Preparing the memory card .............................17
Setting time and date......................................21
Recording......................................................23
Playing back..................................................24
Deleting ........................................................25
Recording 26
Configuring recording.....................................26
Recording instruments and voice ......................29
Using the internal microphones ...............29
Using external microphones....................33
Recording from cassettes or CDs ......................39
Playing back 42
Basic connections...........................................42
Playing back songs.........................................43
Rewinding and Fast Forwarding..............45
Repeated playback of a selected section..46
Repeating a song..................................48
Shuffle play ..........................................50
Playing back in order ............................52
Applying reverb effects during playback ...........54
Song types that can be played.........................55
Downloading songs to a PC 56
Connecting to the PC ......................................56
Loading songs................................................57
Disconnecting the PC ......................................59
Manipulating songs and folders 62
Displaying the <Finder screen>........................62
Selecting (Select) ............................................63
Displaying song or folder information (Information) ... 64
Deleting (Delete).............................................65
Changing the name (Rename)..........................66
Moving songs (Move) .....................................67
Copying (Copy) .............................................69
Creating folders (Make Folder).........................70
R-09 Configuration Settings 72
Displaying the <Menu screen>.........................72
Setting the sampling frequency when recording ........73
Setting the recording mode .............................74
Setting the song playback mode ......................75
Setting whether to use repeat playback or not....76
Adjusting the display brightness .......................77
Setting the time until the screen is darkened when no
operations are performed for a set period of time .....78
Setting the time until the power turns off when no
operations are performed for a set amount of time ....79
Setting the battery type ...................................80
Setting whether to monitor sound while recording ......81
Setting whether to use a plug-in powered
microphone or not ......................................... 82
Setting the date and time ................................83
Displaying SD memory card information ...........84
Formatting SD memory cards...........................85
Initializing the R-09 ........................................85
Message list 86
Troubleshooting 88
Index 93
Specifications 97
USING THE UNIT SAFELY 99
IMPORTANT NOTES 101
Before using this unit, carefully read the sections
entitled: “USING THE UNIT SAFELY” (p. 99) and
“IMPORTANT NOTES” (p. 101). These sections
provide important information concerning the proper
operation of the unit. Additionally, in order to feel
assured that you have gained a good grasp of every
feature provided by your new unit, This Owner’s
manual should be read in its entirety. The manual
should be saved and kept on hand as a convenient
reference.
Copyright © 2006 ROLAND CORPORATION
All rights reserved. No part of this publication may be
reproduced in any form without the written permission
of ROLAND CORPORATION.
3
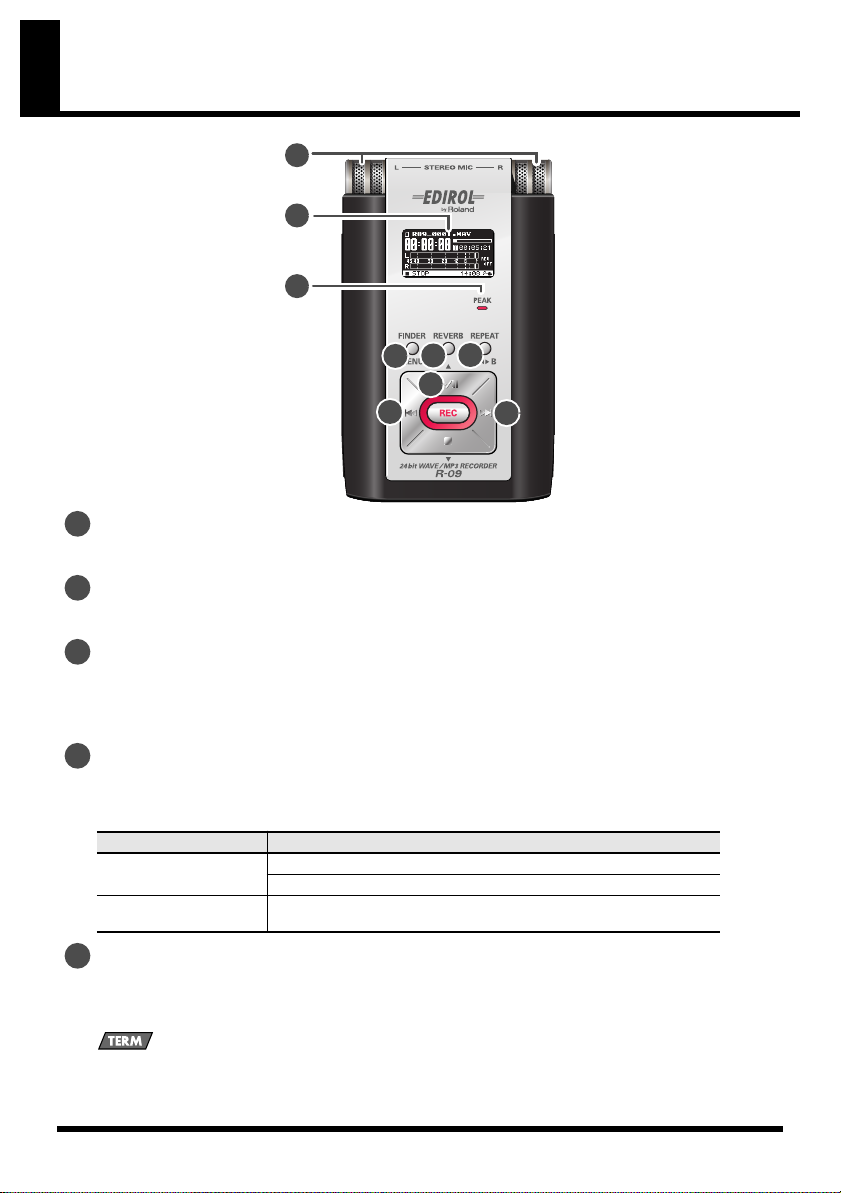
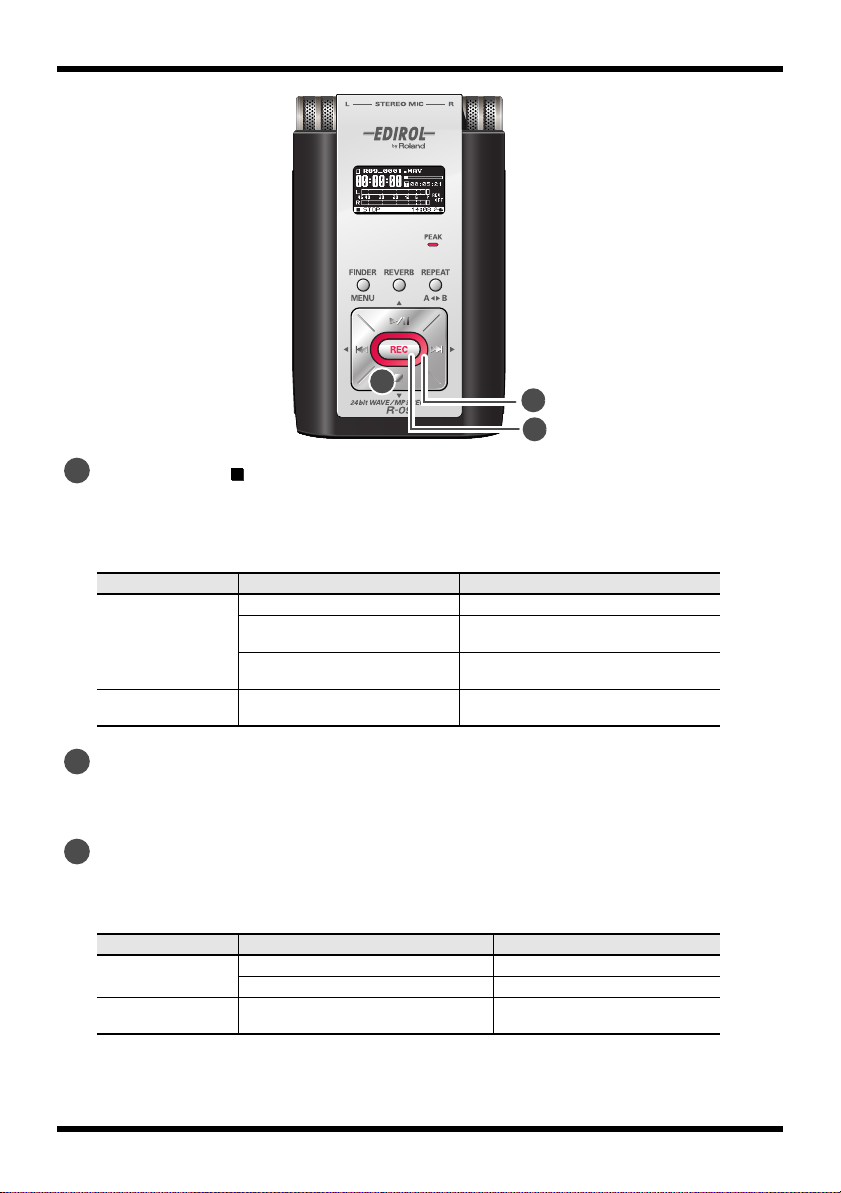
Names of things and what they do
fig.names1.eps_60
1
2
3
6
5
4
7
8
1
Internal MIC
These stereo microphones are built into the R-09. ➜“Using the internal microphones” (p. 29)
2
Display
The display shows information about the R-09.➜“Information shown in the display” (p. 12)
3
PEAK indicator
This indicator lights up when the input or output volume is too high. If the [PEAK Indicator] is lit
while recording, the recording will be distorted. Decrease the volume with the [(-) Input Level
Button]. ➜“Adjusting recording levels” (p. 37)
9
4
FINDER/MENU button
The FINDER/MENU button is used to change screens or to EXIT (cancel operations or
return to previous screen). ➜“Basic operations” (p. 13)
Current Screen
<Main Screen> (p. 11)
<Finder Screen> (p. 11)
<Menu Screen> (p. 11)
5
REVERB button
Changes to <Finder Screen>
Changes to <Menu Screen> when button is held down
Cancels operation or returns to previous screen or <Main Screen>
Operation
The REVERB button turns the reverb feature on/off and changes the reverb type.
➜
“Applying reverb effects during playback” (p. 54)
REVERB
REVERB is an effect that can be used to, for example, make it seem as if the sound were being played in
a large hall. Four types of reverb are available: hall1, hall2, room, or plate. ➜“Reverb type” (p. 54)
4

Names of things and what they do
6
REPEAT button
The REPEAT button allows the region between two points (between A - B) to be played back
repeatedly.
Assign marker A and marker B in the song, and the region between marker A and marker B will
be repeated.
Pressing the button once assigns marker A. Pressing the button again assigns marker B.
➜
“Repeated playback of a selected section” (p. 46)
7
PLAY/PAUSE button ( )
The PLAY/PAUSE button starts playback. It can also pause playback or recording.
It is also used to move the cursor up in the display or to change the value of a selected item.
➜
“Basic operations” (p. 13)
Current Screen Status Operation
Stopped Plays back
<Main Screen>
<Finder Screen>
<Menu Screen>
8
RWD button ( )
Playing Pauses playback
Recording standby (REC button blinking) Starts recording
Recording (REC button lights up) Pauses recording
—
Moves cursor up
Changes the value
The RWD button selects the beginning of the song or the previous song. If it is held down,
the song rewinds while the button is pressed.
It can be used during playback or while stopped.
It is also used to move the cursor to the left in the display or to change the value of a
selected item. ➜“Basic operations” (p. 13)
Current Screen
<Main Screen>
<Finder Screen>
<Menu Screen>
9
FWD button ( )
During a song Moves to beginning of song
Beginning of a song Moves to previous song
During a song, at the beginning of a
song, or while stopped
Current Status Operation
Rewinds while button is pressed
—
Moves cursor to the left
Changes the value
The FWD button selects the next song. If it is held down, the song fast forwards while the
button is pressed.
It can be used during playback or while stopped.
It also functions as the right arrow for the cursor (moves the cursor to the right) and
changes the value of a selected item. ➜“Basic operations” (p. 13)
Current Screen Current Status Operation
During a song Moves to next song
<Main Screen>
<Finder Screen>
<Menu Screen>
Beginning of a song Moves to next song
During a song, at the beginning
of a song, or while stopped
—
Fast forwards while button is pressed
Moves cursor to the right
Changes the value
5
Names of things and what they do
ig.names1-1.eps_60
10
STOP button ( )
10
11
12
The STOP button stops playback or recording.
It is also used to move the cursor down in the display or to change the value of a selected
item. ➜“Basic operations” (p. 13)
Current Screen
<Main Screen>
<Finder Screen>
<Menu Screen>
11
REC indicator
Playing Stops playback
Recording standby
(REC button blinks)
Recording
(REC button lights up)
Status Operation
Releases from recording-standby mode
Stops recording
—
Moves cursor down
Changes the value
The REC indicator is lit red during recording.
It blinks while in recording-standby mode (REC PAUSE).
12
REC button
The REC button is used to enter recording-standby mode or to start recording.
It is also used to enter selected items. ➜“Basic operations” (p. 13)
Current Screen
<Main Screen>
<Finder Screen>
<Menu Screen>
Stopped Puts into recording-standby mode
Recording standby (REC button blinks) Starts recording
Status Operation
— Enter
6
Names of things and what they do
ig.names2.eps_60
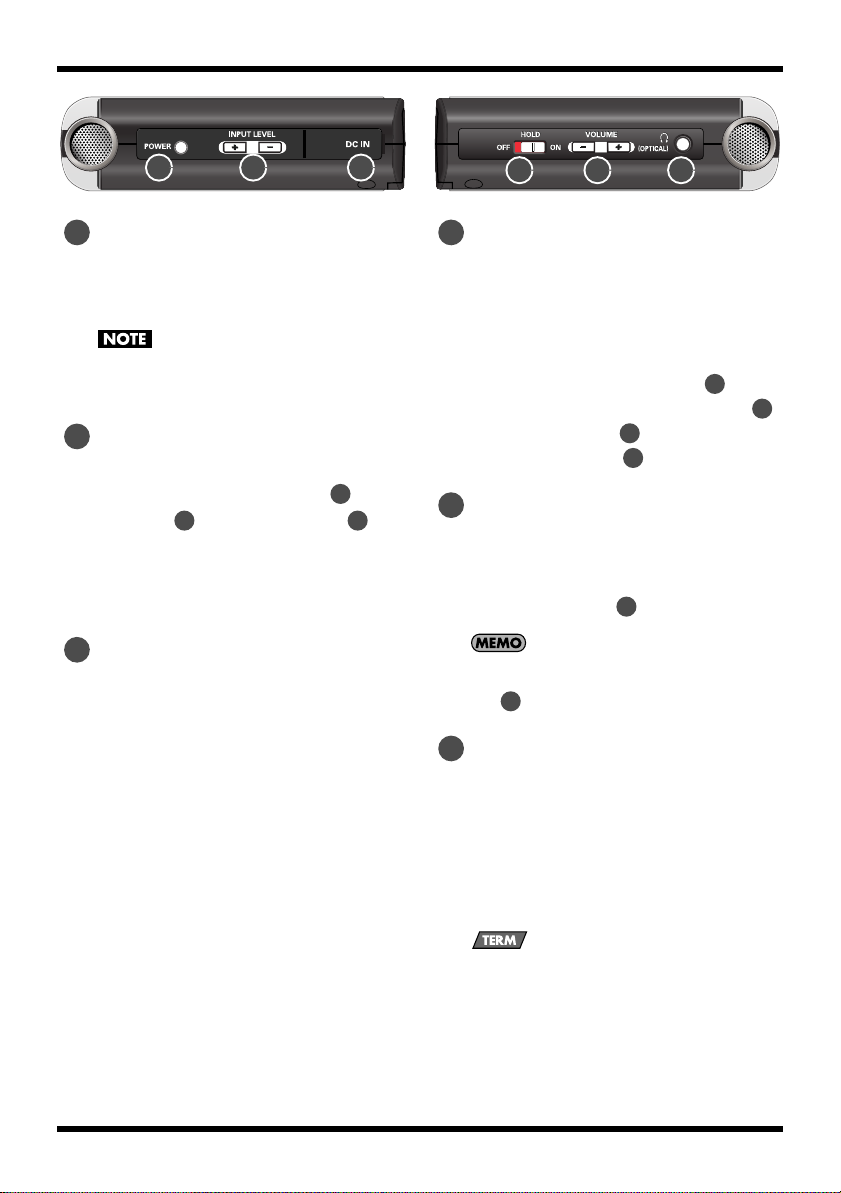
13
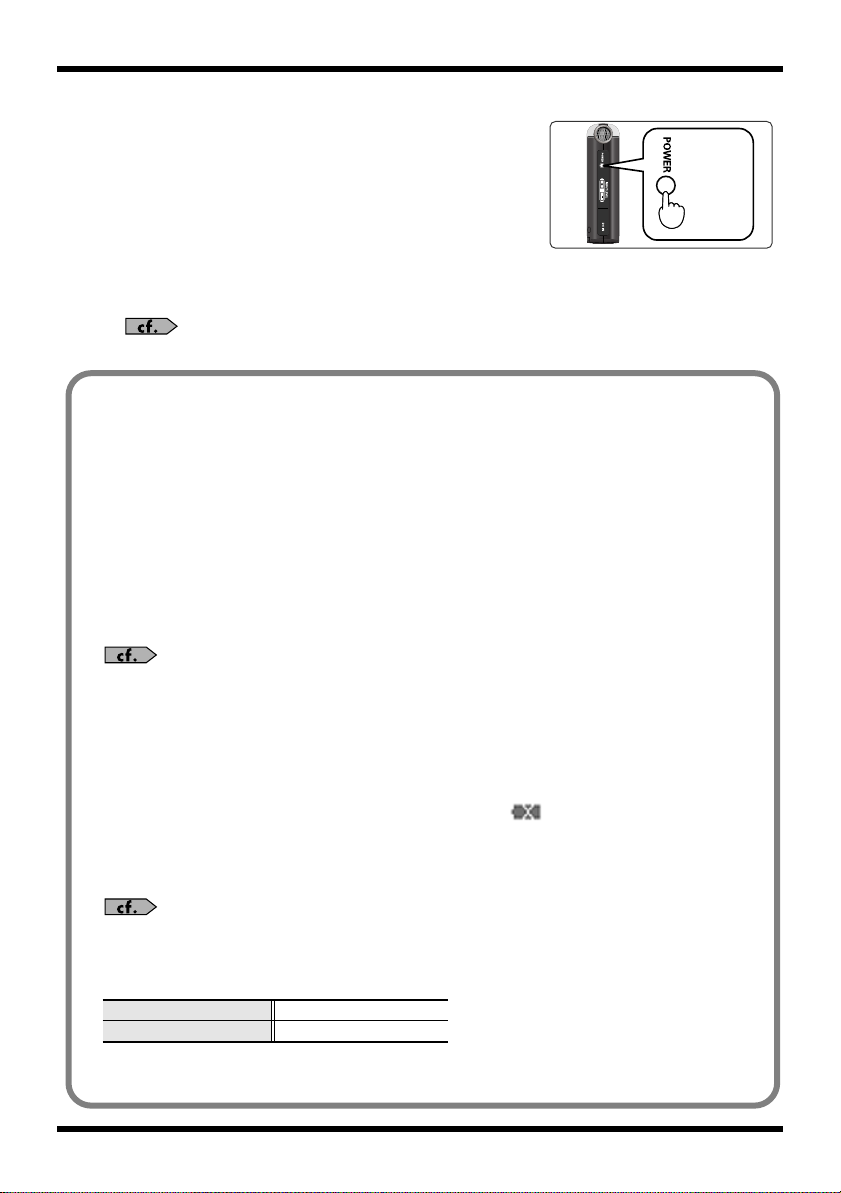
POWER switch
Holding down the POWER switch turns
power on or off.
➜
“Turning power on/off” (p. 14)
Never switch off the power during playback/
recording, while connected to the PC via USB, or
while “Now Processing!” appears in the display.
14
(+) and (-) INPUT LEVEL buttons
The INPUT LEVEL buttons adjust the level of
the sound from the [Internal MIC ], [MIC
Input Jack ], and [LINE IN Jack ].
19
Pressing the (+) input level button increases
the input sound level. Pressing the (-) input
level button decreases the input sound level.
➜
“Adjusting recording levels” (p. 37)
15
AC ADAPTOR jack
This is the power jack.
Connect the included AC adaptor to this
jack.
➜
“Using the AC adaptor” (p. 14)
ig.names3.eps_60
151413
16
HOLD switch
181716
Set the HOLD switch to the ON position so
only the following buttons can be used and
to help prevent accidental operations.
Buttons remaining operable when the HOLD
switch is set to ON:
• [AUTO GAIN CONTROL Switch ]
• [EXTERNAL MICROPHONE TYPE Switch ]
• [LOW CUT Switch ]
• [MIC GAIN Switch ]
1
20
17
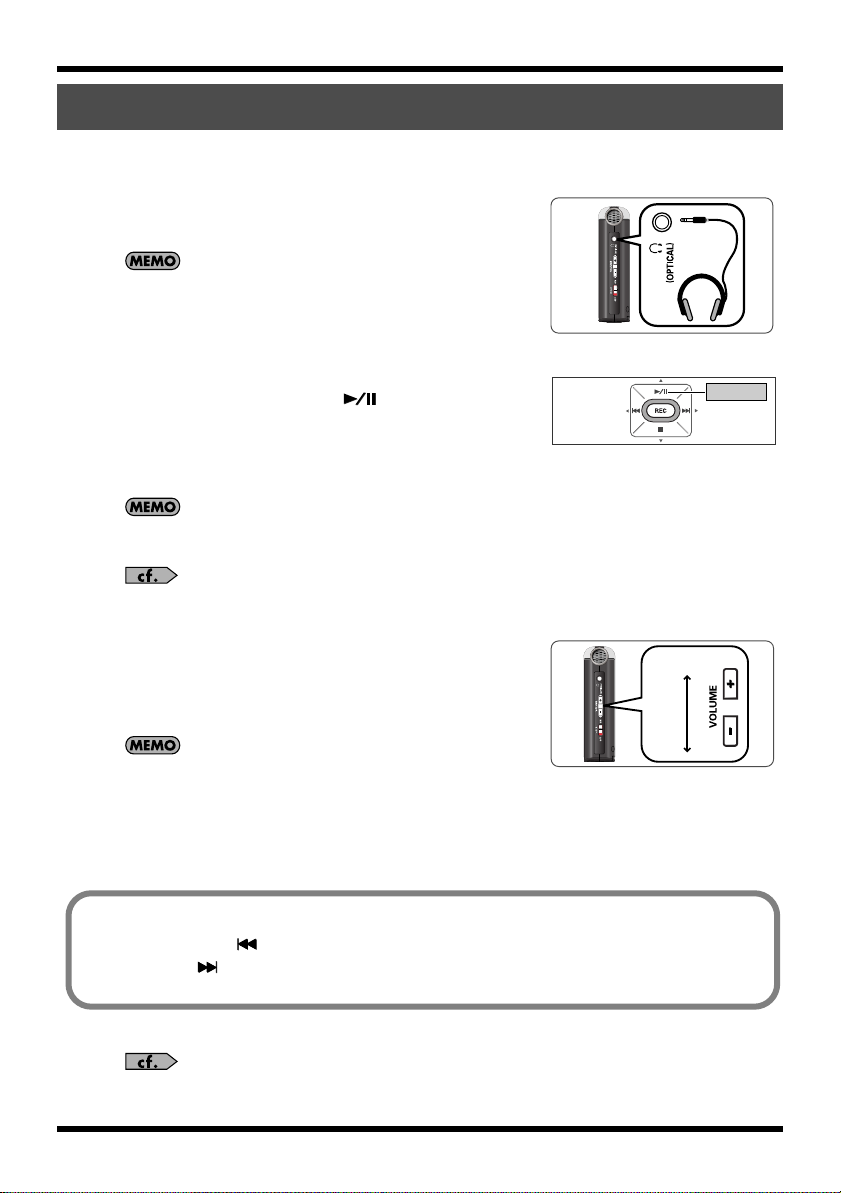
(+) and (-) HEADPHONE VOLUME
buttons
23
24
21
22
These buttons adjust the output sound level
when headphones are connected to the
[HEADPHONE jack ].
The volume cannot be adjusted for sound output via
a digital cable connected to the [HEADPHONE
18
jack ] (digital output).
18
HEADPHONE jack
18
(digital output connector)
This jack is used as both the HEADPHONE
jack and the digital output connector.
To listen with headphones, connect
headphones. To have digital output, connect
an optical digital cable (round mini-type).
➜
“Playing back” (p. 42)
Optical
Digital jack to connect optical cables.
7
Names of things and what they do
fig.names4.eps_60
2019
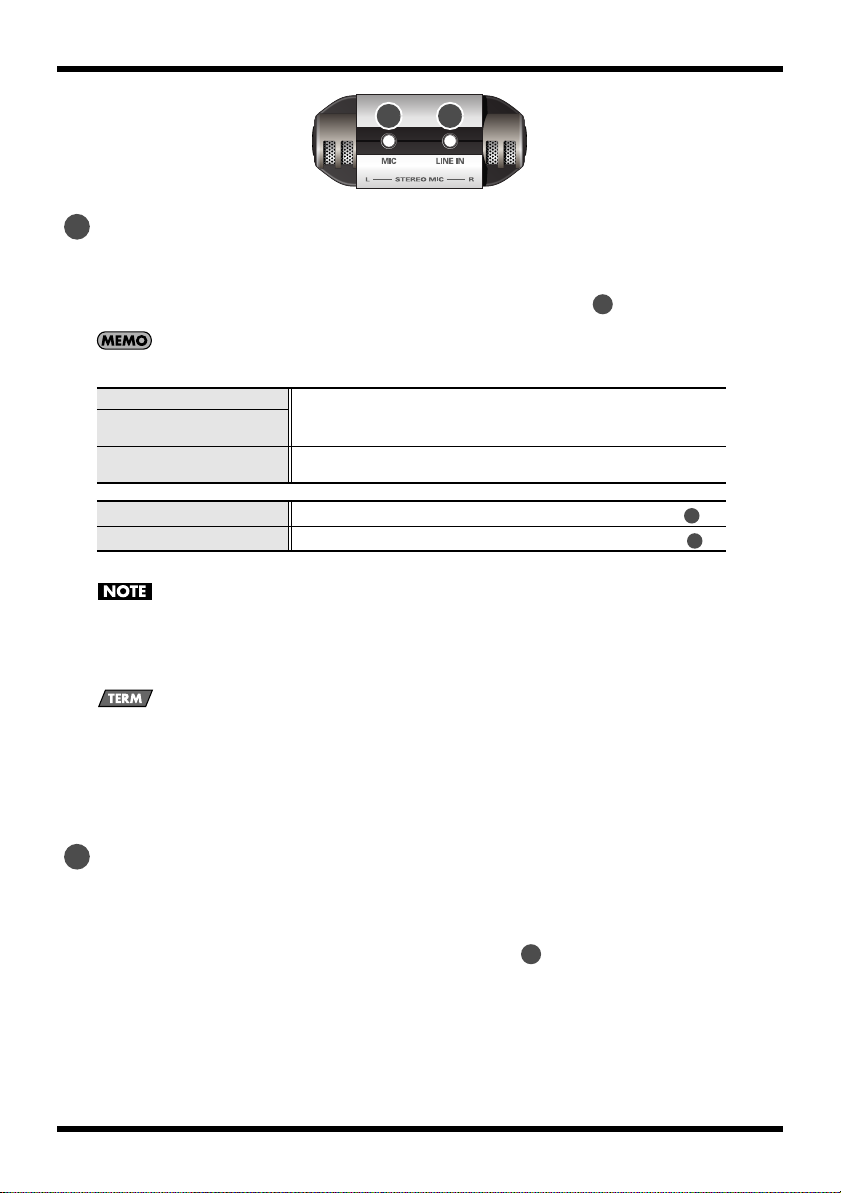
19
MICROPHONE INPUT jack
The MIC input jack is used to connect an external microphone.
➜
“Using external microphones” (p. 33)
The volume can be adjusted using the [(+) and (-) INPUT LEVEL buttons ].
When connecting an external microphone, please choose the setting according to the microphone type.
14
Dynamic microphone
Battery-powered condenser
microphone
Plug-in powered condenser
microphones
Stereo microphone
Monaural microphone
• When connecting a dynamic microphone or a battery-powered microphone, be sure to use the <Menu
Screen> to set the unit so plug-in power is not supplied to the microphone.
The microphone may be damaged if used with the improper setting.
• If a cable is connected to the [LINE IN Jack], then no sound is input via the [MIC Input Jack].
Use the <Menu Screen> to switch OFF power for a plug-in powered
microphone (p. 82).
Use the <Menu Screen> to switch ON power for a plug-in powered
microphone (p. 82).
Set to stereo with the [EXTERNAL MICROPHONE TYPE Switch ].
Set to monaural with the [EXTERNAL MICROPHONE TYPE Switch ].
22
22
Dynamic microphone
The durable dynamic microphone is suitable for vocal or instrumental recordings. It does not require a power
supply.
Condenser microphone
The sensitive condenser microphone is suitable for recording quiet sounds, such as live instrumentals or meetings.
It requires a power supply from either batteries or plug-in power.
20
LINE IN jack
When inputting audio signals from audio equipment or digital instruments, use a cable
with a stereo-mini plug to connect the R-09 to the device.
➜
“Recording from cassettes or CDs” (p. 39)
Volume is adjusted with the [(+) and (-) INPUT LEVEL buttons ].
14
8
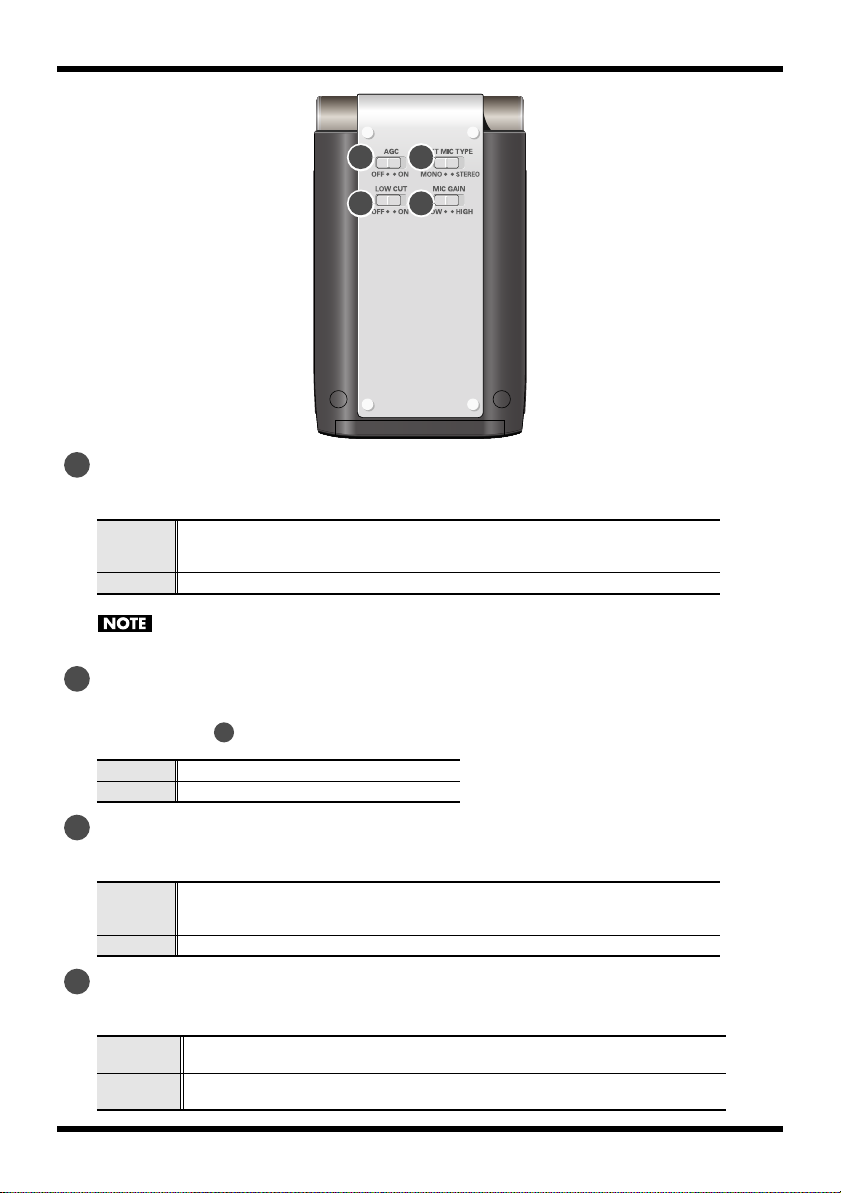
fig.names5.eps_60
Names of things and what they do
22
24
21
AUTO GAIN CONTROL switch
21
23
This switch turns AUTO GAIN CONTROL on or off. It is usually set to off.
ON
OFF
The switch cannot be used for the line input.
22
EXTERNAL MICROPHONE TYPE switch
Evens out the overall level of the signal during recording by increasing the level of
sounds that are weak, while attenuating those that are loud. Turn this switch on to
record voices of people both near and far during meetings.
Records input sounds without changing them.
This switch is used to set the microphone type to match the microphone connected to the
[MIC Input Jack ].
19
MONO
STEREO
23
LOW CUT switch
Monaural microphone is connected.
Stereo microphone is connected.
This switch turns LOW CUT on or off. It is usually set to off.
ON
OFF
24
MICROPHONE GAIN switch
Records while cutting the lower range portion of the input signal. Turn on when breath
noise (the sound of breathing while recording a voice) or wind noise (when recording
outside) may be a problem.
Records without cutting the lower range.
This switch changes the sensitivity with respect to the input from the microphone.
LOW
HIGH
Lowers the microphone sensitivity. Set to LOW when inputting loud sounds such as
band performances.
Increases the microphone sensitivity. Set to HIGH when inputting softer sounds such as
meetings.
9
Names of things and what they do
fig.names6.eps_60
25
28
26
27
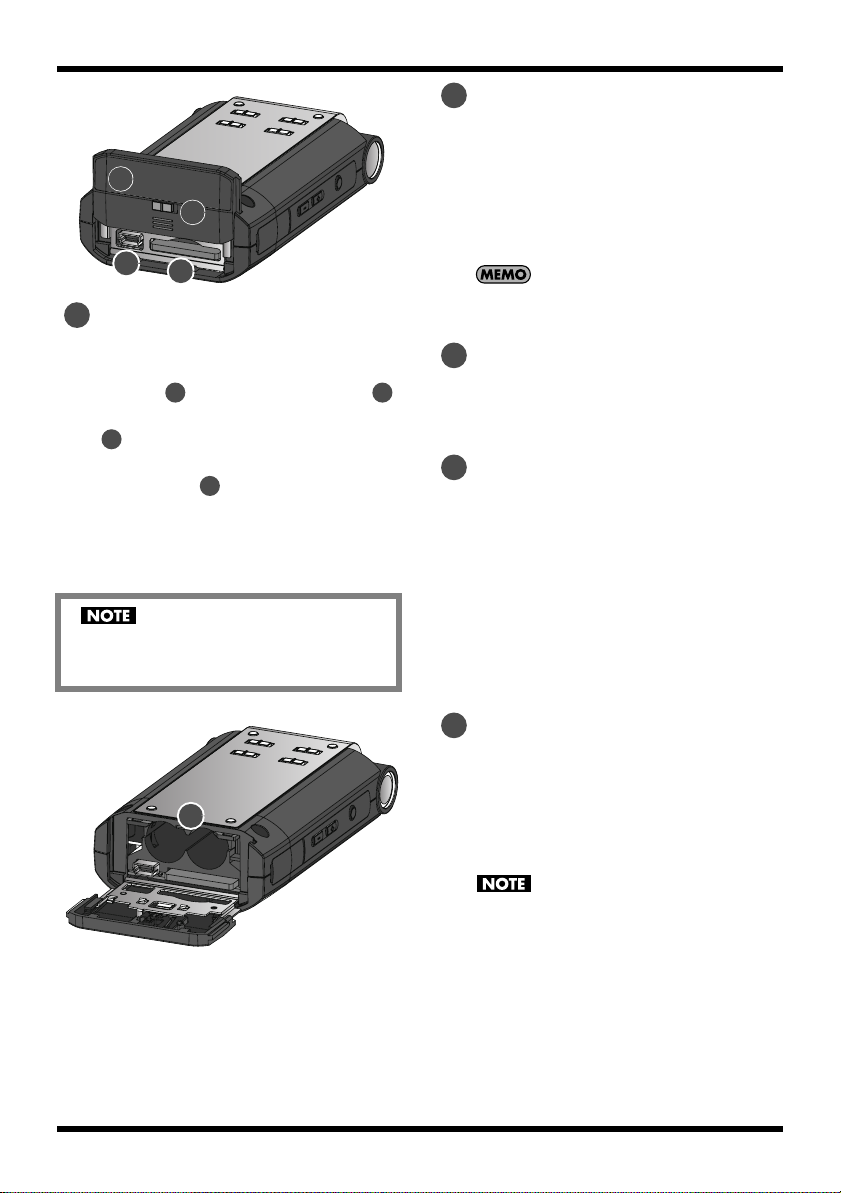
25
Bottom cover
The bottom cover slides to two positions.
When the cover is opened, the [USB
Terminal ] and [Memory Card Slot ]
26
are visible first. With the [Bottom Cover Lock
28
] slid to the release position, open the
cover further to reveal the [Battery
Compartment ].
➜
“Preparing the memory card” (p. 17)
➜
“Using batteries” (p. 15)
When opening the cover, be sure to follow the
procedure in “Using batteries” (p. 15).
Forcing the cover open may damage the unit.
29
26
USB terminal
This connector is used to connect to a PC via
the included USB cable. Songs recorded on
the R-09 can be transferred to the PC, and
WAV or MP3 files can be copied from the
PC to the R-09 to be played.
➜
“Preparing the memory card” (p. 17)
Since USB 2.0 (HI-SPEED USB) is supported, songs
can be transferred quickly.
27
Memory card slot
27
This slot accepts SD memory cards.
➜
“SD Memory Card” (p. 20)
28
Bottom cover lock
This lock protects against batteries falling
out if the bottom cover is opened by
mistake.
fig.names7.eps_60
10
29
29
Battery compartment
Batteries are inserted here when operating
on battery power.
There is no need to insert batteries when
using the AC adaptor.
➜
“Using batteries” (p. 15)
Be sure to turn the R-09 off before unplugging the
AC adapter.
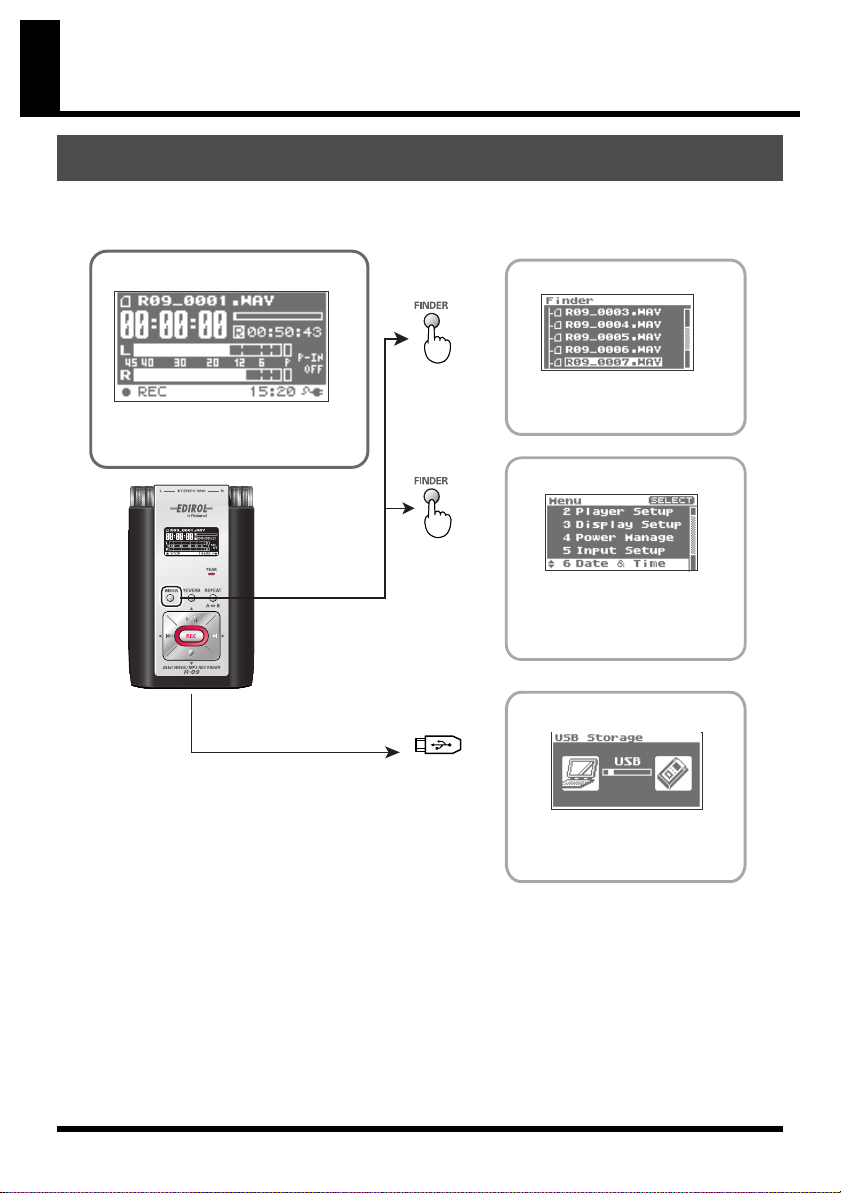
R-09 screens and basic operations
The R-09 screen
The <Main Screen> is shown when power to the R-09 is turned on.
The <Finder Screen> and <Menu Screen> can be opened from the <Main Screen>.
fig.mode-e.eps_78
<Main Screen>
This startup screen is shown after
power is turned on.
Songs can be recorded or played.
Hold down
USB connection
<Finder Screen>
This screen shows a song list and
allows names to be edited and
songs to be deleted or copied.
<Menu Screen>
You can do things such as set the
date and time, adjust the recording
sound quality, adjust the brightness
of the display, and perform
initializations.
<USB Screen>
This screen is displayed when a PC
is connected via USB. Songs can
be copied (moved) between the R09 and PC.
11
R-09 screens and basic operations
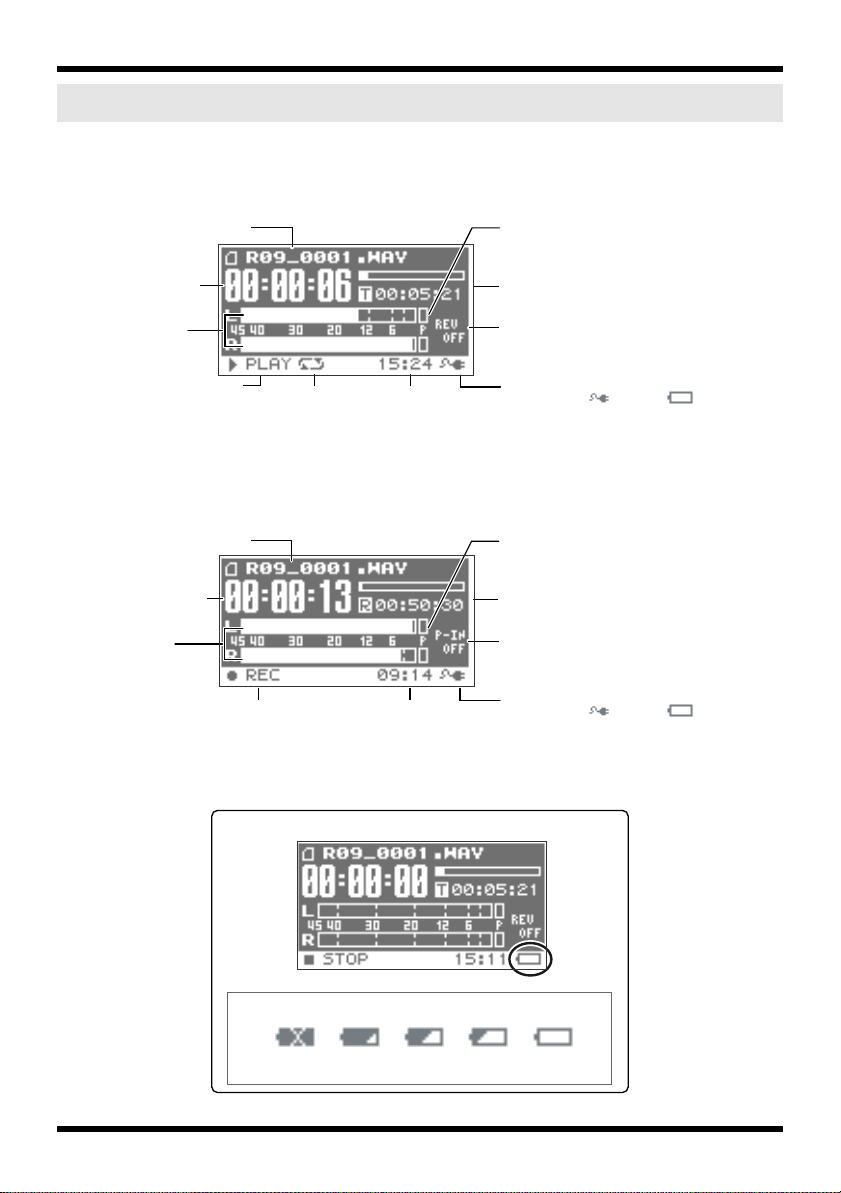
Information shown in the display
This section describes the main icons and information shown in the <Main Screen>.
fig.joho-e.eps_60
<Play/Stop>
Playback time
Output level
Playback/Stop status
(PLAY/STOP)
Recording time
Input level
(REC/STANDBY)
fig.powersource-e.eps_60
Song name
Song name
Repeat status
Current time
(ON/OFF)
<Record>
Current timeRecord/Recording standby status
<Remaining battery power indication>
Peak
Song length
Reverb status
(OFF/HALL1/HALL2/ROOM/PLATE)
Power supply status
(AC adaptor /battery )
Peak
Remaining recording time
on memory card
Plug-in power status
(ON/OFF)
Power supply to the MIC input jack
(AC adaptor /battery )
12
Little power
remaining
Please insert
new batteries.
Full power
Batteries have
full power.

Basic operations
Recording and playback
fig.sousa-1-e.eps_70
R-09 screens and basic operations
Playback/Pause
Rewind/Previous song
(start of song)
Selecting and entering
fig.sousa-1-e.eps_70
Cancel operation,
Return to previous screen
Change the value (-)
Move cursor to the left
fig.sousa-3-e.eps_70
<When editing the internal clock date and time or name only>
Cancel operation,
Return to previous screen
Stop
<Normal>
Move cursor up
Move cursor down
Fast Forward/
Next song
Record/
Recording Standby
Change the value (+)
Move cursor to the right
Enter
Delete characterInsert character
Move cursor to the left
Change character
Change character
Move cursor to the right
Enter
13
Using the R-09
Hold down
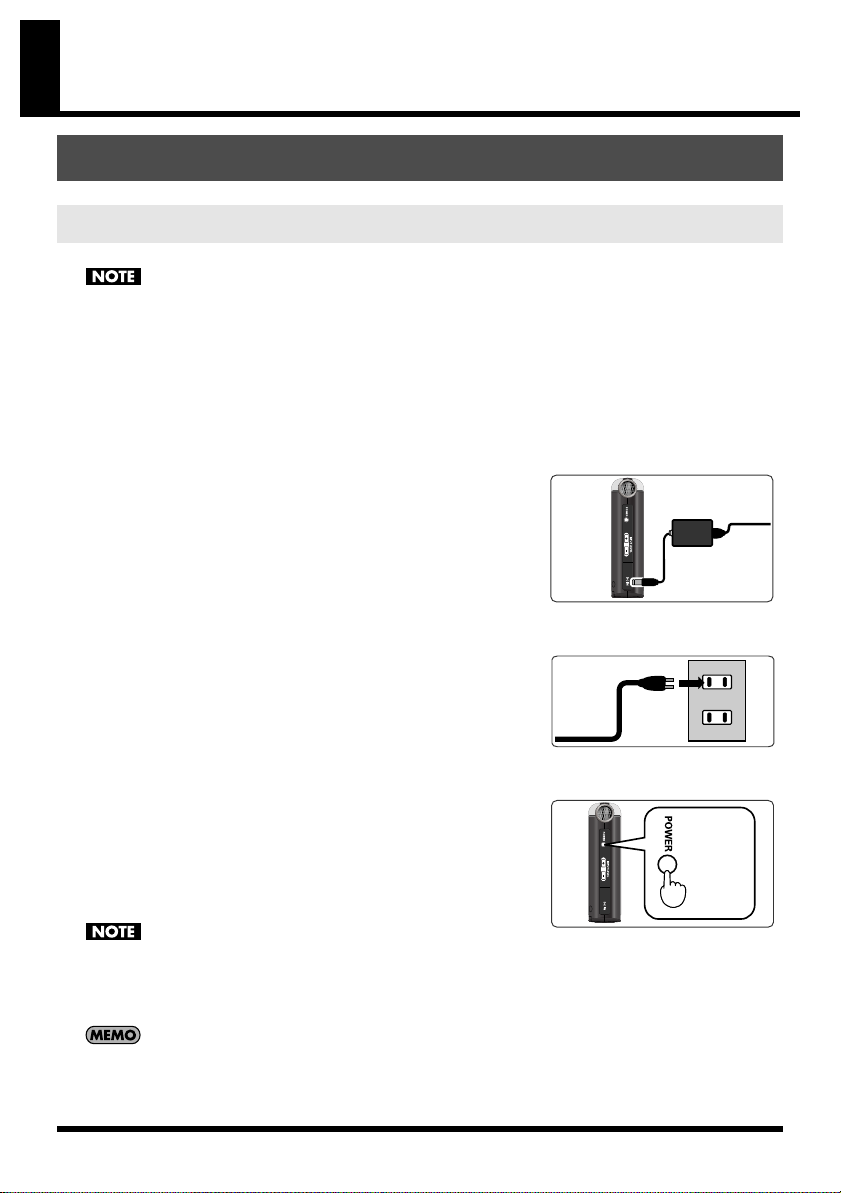
Turning power on/off
Using the AC adaptor
Be sure to use the AC adaptor when connecting to a PC.
If the batteries become exhausted while copying a song, the song may be corrupted.
1.
Check that power is turned off.
If the power is on, turn it off. Press and hold the [POWER
fig.ac-eps_80
fig.connect-eps_80
switch] on the R-09 to turn power on or off.
2.
Plug the DC plug of the AC adaptor into the
[AC Adapter Jack] on the R-09.
3.
Plug the AC adaptor into an electrical
power outlet.
fig.power-onoff-e.eps_80
4.
Turn power on.
Pressing and holding down the [POWER switch] turns on
the power and shows an R-09 image in the display.
To turn off power, press and hold down the [POWER
switch].
• Be sure to use the AC adaptor supplied with this product.
• If the [HOLD Switch] is in the on position, no operations can be
performed.
Be sure to slide it to the off position. (➜ p. 7)
If the AC adaptor is connected while power is on, the power supply is
drawn from the AC adaptor.
14

Using batteries
2. 3.
3.
Be sure to use the AC adaptor when connecting to a PC.
Pressing and holding down the [POWER switch] turns on the power and shows an R-09 image in the display.
Batteries that can be used
• AA alkaline batteries (LR6)
• AA nickel metal hydride batteries (HR15/51)
The R-09 cannot recharge nickel metal hydride batteries. Please use a separately purchased battery charger.
1.
Check that the power is turned off.
If the power is on, turn it off. Press and hold the [POWER switch] on the R-09 to turn
power on or off.
Open the [Bottom Cover] on the bottom of the unit.
2.
fig.battery-2-1-e.eps_60
1. Turn the R-09 over.
2. Slide the [Bottom Cover] up.
3. Slide the [Bottom Cover Lock] and hold it there while
sliding the [Bottom Cover] up.
The cover will stop when the [USB Terminal] and [Memory
Slot] can be seen. Slide the [Bottom Cover Lock] to the
right, and while holding it there slide the [Bottom Cover]
further up.
fig.battery-2-2.eps_60
* Forcing the cover open may damage the unit.
4. Fold the [Bottom Cover] down.
The [Battery Compartment] should be visible.
Using the R-09
fig.battery-2-2.eps_60
fig.battery-4.eps_60
Insert the batteries.
3.
Insert two AA batteries into the [Battery Compartment].
Be sure the positive and negative terminals are oriented
correctly.
Close the bottom cover.
4.
15
Using the R-09
Hold down
fig.power-onoff-e.eps_80
5.
Turn power on.
Press and hold down the [POWER switch] to turn on the
power.
6.
Set the battery type.
Select the battery type (alkaline batteries or nickel metal
hydride batteries) on the <Menu Screen>.
“Setting the battery type (Battery)” (p. 80)
Cautions when using batteries with the R-09
• Do not mix new and used batteries or different types of batteries.
• When not using the R-09 for an extended time, it is recommend that the batteries be
removed to prevent leakage.
• When connecting to a PC via a USB cable, always use the AC adaptor to prevent
power failures during connection.
Power saving feature
The R-09 is equipped with a power saving feature designed to prevent the unnecessary
consumption of power. If no operation is performed for a set amount of time, the display
will be darkened or the power will be shut off according to the settings for the power
saving feature.
Setting the power saving feature
• “Setting the time until the screen is darkened when no operations are performed for a set period of
time (Display Timer)” (p. 78)
• “Setting the time until the power turns off when no operations are performed for a set amount of
time (Auto Power Off)” (p. 79)
Remaining battery power indication
When the battery power becomes low, a low battery icon is shown in the lower
right of the display. Please replace the batteries as soon as possible.
If batteries with low power are used, the “Battery Low” message is displayed and all R09 functions will eventually stop.
“Message list” (p. 86)
Battery life
When using alkaline batteries
Continuous playback approximately 5.5 hours
Continuous recording approximately 4 hours
* The battery life indicated above is approximate. Battery life will vary depending on the
environment in which you are using the R-09 and your method of use.
16
Preparing the memory card
2.
Back side
The R-09 uses an SD memory card.
Inserting
Insert the supplied SD memory card.
■
Inserting
Check that the power is turned off.
1.
If the power is on, turn it off. Press and hold the [POWER
switch] on the R-09 to turn power on or off.
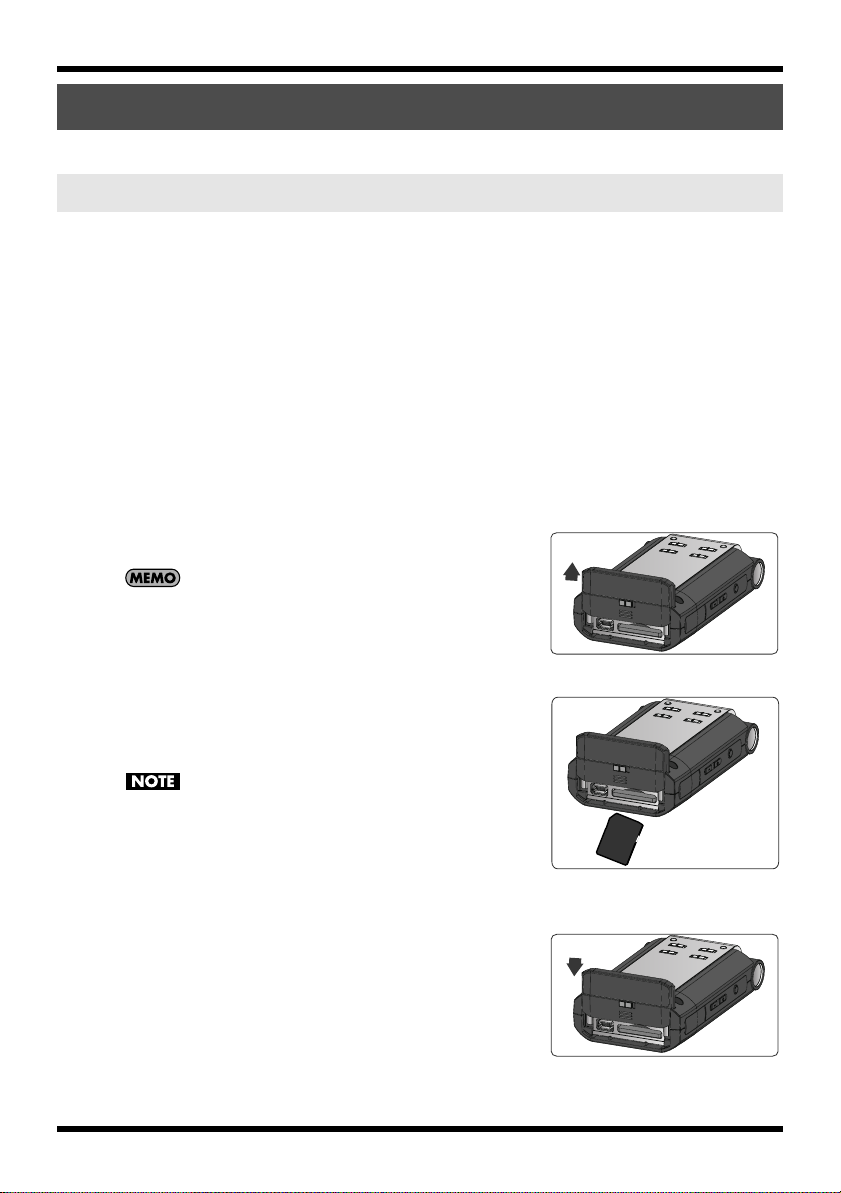
2.
Open the [Bottom Cover] on the bottom of
the unit.
fig.sdin-2.eps_60
1. Turn the R-09 over.
2. Slide the [Bottom Cover] up.
The cover will stop when the [USB Terminal] and [Memory Slot]
can be seen.
* Forcing the cover open may damage the unit.
fig.sdin-3-e.eps_60
Using the R-09
fig.battery-4.eps_60
3.
Insert the memory card.
Insert the memory card.
• When inserting the memory card, make sure the reverse side of
the card is facing up and insert the card slowly. If the card is
forcibly inserted incorrectly, the R-09 or the memory card may
be damaged. Please exercise caution.
• Carefully insert the memory card all the way in—until it is firmly
in place.
4.
Close the [Bottom Cover].
17
Using the R-09
Hold down
fig.power-onoff-e.eps_80
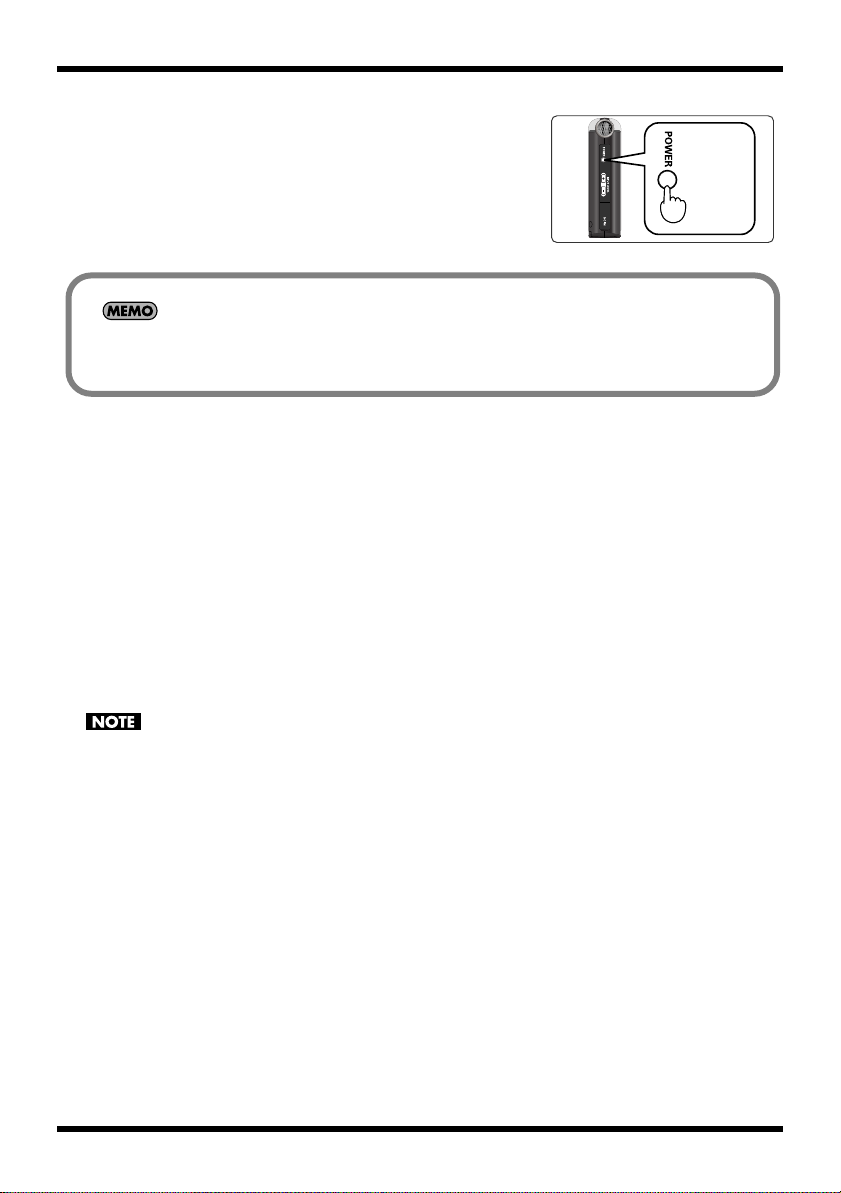
5.
Turn power on.
Press and hold down the [POWER switch] to turn on the
power.
When using a memory card with the R-09 for the first time, the memory card must be formatted.
Please format the memory card following the procedure in “Formatting” (p. 19).
“SD Unformatted” is shown when an unformatted memory card is inserted into the R-09.
■
Removing
1.
Turn off power to the R-09.
Open the [Bottom Cover].
2.
3.
Lightly push the memory card inward, then release it.
Remove the memory card after it pops out toward you.
Never insert or remove a memory card while this unit’s power is on. Doing so may corrupt the data on the
memory card.
18
Formatting
Hold down
Show
<Menu Screen>
Move the
cursor
up or down
Enter
Move the
cursor
up or down
Enter
A memory card must be formatted when using it with the R-09 for the first time.
Be sure to format the memory card on the R-09. Cards formatted on devices other than the R-09 may not
operate properly on the R-09.
Formatting
Formatting refers to initializing a memory card according to a specified data storage format.
If a memory card with recordings is formatted, all the recorded songs are deleted.
Check that the memory card is inserted.
1.
Check that the memory card to be formatted is inserted in the [Memory Card Slot] on the R-09.
Using the R-09
fig.open-set-e.eps_80
fig.sdutl-e.eps_80
fig.format-e.eps_80
“Inserting” (p. 17)
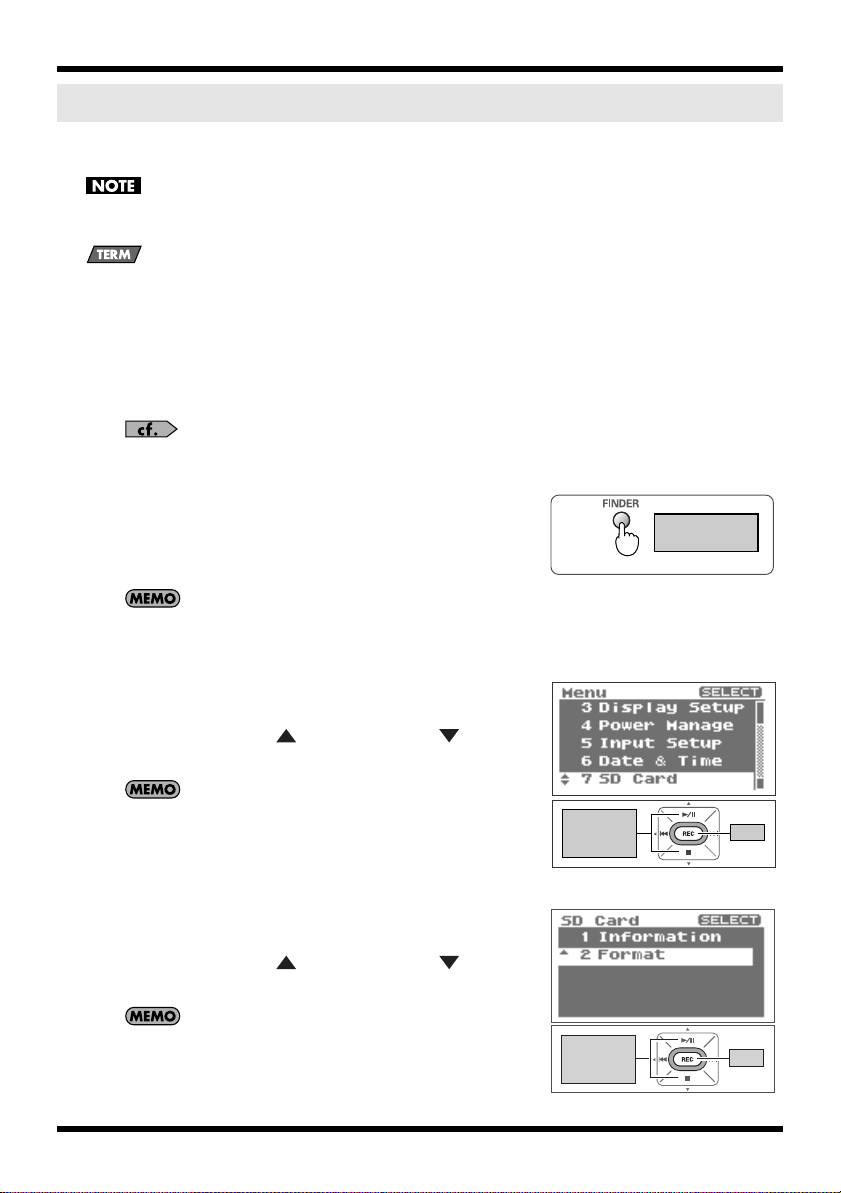
2.
Show the <Menu Screen>.
Press and hold down the [FINDER/MENU Button] to show
the <Menu Screen>.
To cancel the operation, press the [FINDER/MENU Button].
You’re returned to the previous screen.
3.
Select “SD Card.”
Use the [PLAY Button ] and [STOP Button ] to select
“SD Card,” then press the [REC Button].
To cancel the operation, press the [FINDER/MENU Button].
You’re returned to the previous screen.
Select “Format.”
4.
Use the [PLAY Button ] and [STOP Button ] to select
“Format,” then press the [REC Button].
To cancel, press the [FINDER/MENU Button]. You’re returned to
the previous screen.
19
Using the R-09
Enter
Move cursor
to the left
or right
Press twice
Show
<Main Screen>
fig.format-sure-e.eps_80
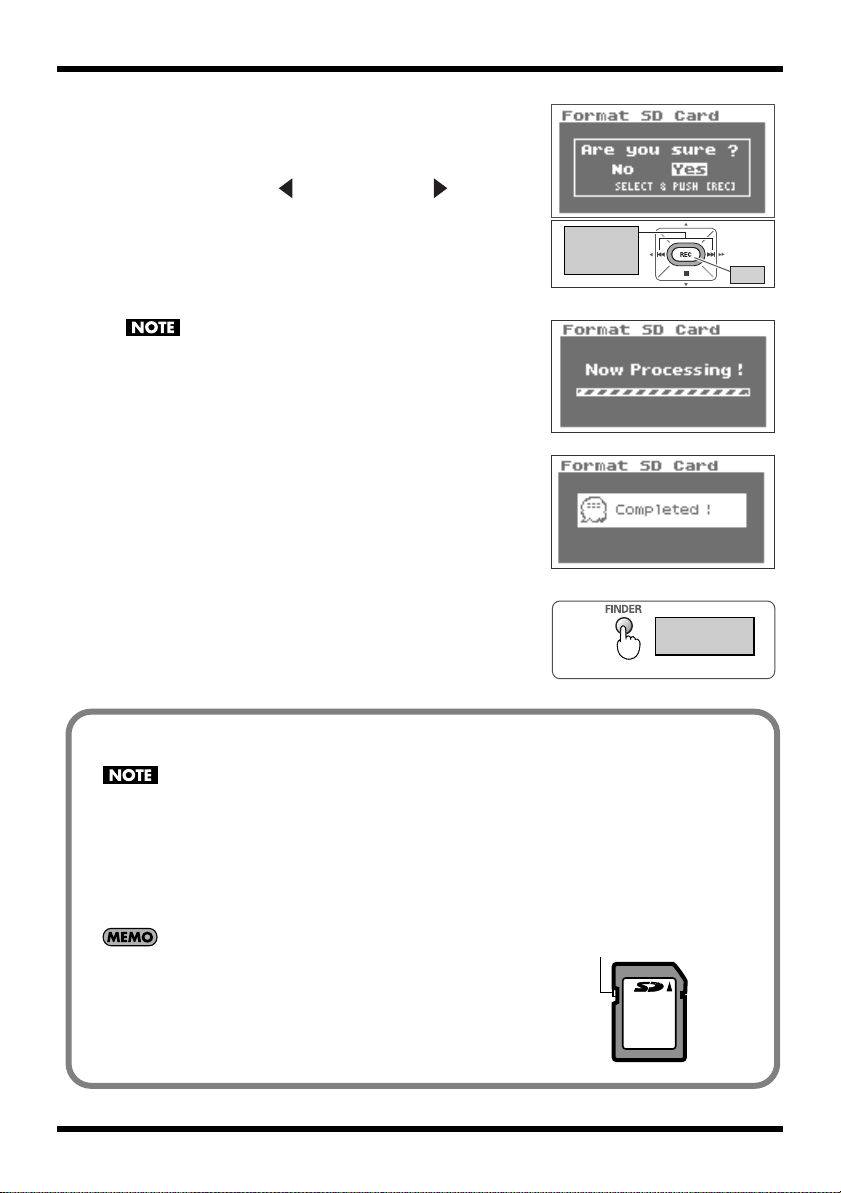
5.
Select “Yes.”
A confirmation screen is shown.
Use the [RWD Button ] and [FWD Button ] to select
“Yes,” then press the [REC Button].
fig.process.eps_80
Do not remove the memory card during formatting.
The storage area on the memory card may become damaged.
fig.completed.eps_80
When “Completed!” is shown, formatting has completed.
fig.open-basic2-e.eps_80
fig.sdcard2-e.eps_80
20
6.
Return to <Main Screen>.
Press the [FINDER/MENU Button] twice to return to the
<Main Screen>.
SD Memory Card
• The R-09 supports SD memory cards of 64 MB to 2 GB.
• Some memory card types or memory cards from some manufacturers may not record or play back
properly on the R-09.
• Never insert or remove a memory card while this unit’s power is on. Doing so may corrupt the
data on the memory card.
• Carefully insert the memory card all the way in—until it is firmly in place. Do not force the card
into the slot.
The memory card write protect feature (LOCK)
The contents of the memory card can be protected by write protecting it.
To write protect a card, slide the write protect switch on the side of the
memory card to the “LOCK” position. Unlock write protect to delete data
on the card.
Write protect switch
Setting time and date
Hold down
Show
<Menu Screen>
Move the
cursor
up or down
Enter
When turning on power, please follow the procedure below to set the internal clock.
The time and date set here are used as information (time stamp) for the recorded songs.
fig.open-set-e.eps_80
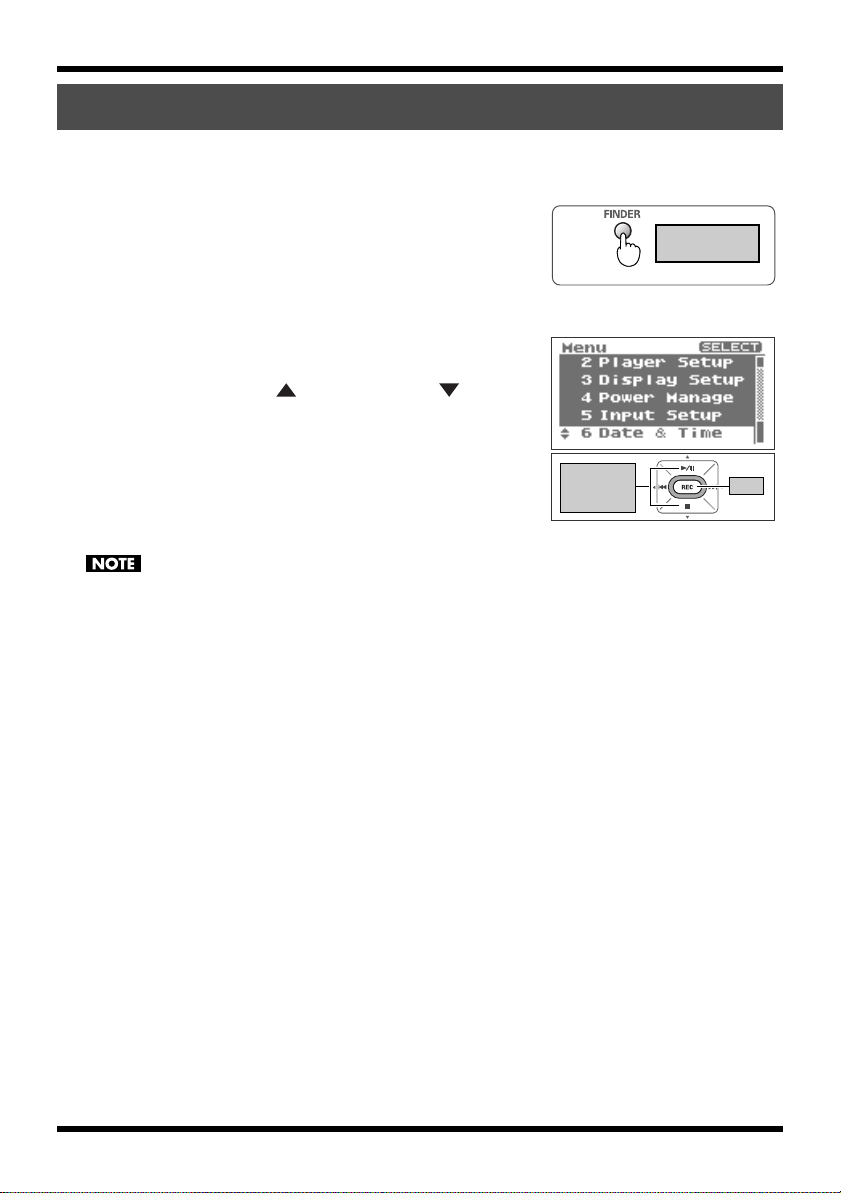
1.
Show the <Menu Screen>.
Press and hold down the [FINDER/MENU Button] to show
fig.datetime-e.eps_80
the <Menu Screen>.
Select “Date & Time.”
2.
Use the [PLAY Button ] and [STOP Button ] to select
“Date & Time,” then press the [REC Button].
When the power is on, the internal clock draws power from the AC
adaptor or the batteries. When the power is off, the internal clock will run
temporarily on the power stored in the main unit. However, if the power is
off for several days, the internal clock settings return to the original
settings (initial status). When power is turned on in initial status, the
message “Clock Initialized” is shown.
If “Clock Initialized” is shown, please reset the date and time.
Using the R-09
21
Using the R-09
Move cursor
to the left
or right
Change
the value
Enter
Show
<Main Screen>
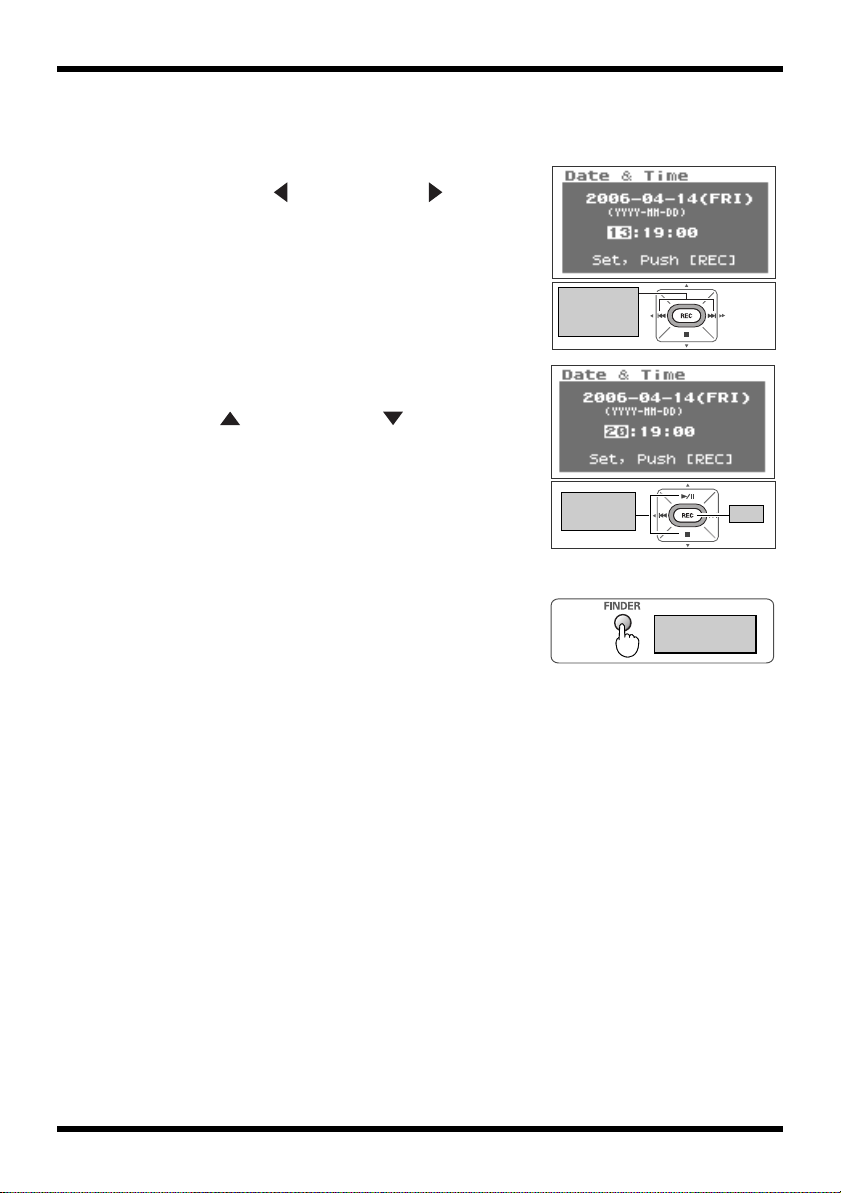
Edit the time and date.
3.
fig.edit-datetime-e.eps_80
1. Move the cursor.
Use the [RWD Button ] and [FWD Button ] to move
the cursor to the right or left.
fig.edit-datetime-2-e.eps_80
2. Edit the date and time.
Move the cursor over the character to change, use the
[PLAY Button ] and [STOP Button ] to change the
date and time, then press the [REC Button] to enter the
changes.
fig.open-main-e.eps_80
22
4.
Return to <Main Screen>.
Press the [FINDER/MENU Button].
Recording
Recording
standby
Starts
recording
Stops
recording
Recording with the [Internal MIC].
When using the [Internal MIC], do not connect anything to the [MIC Input Jack] or [LINE IN Jack]. If a
microphone or cable is connected to the [MIC Input Jack] or [LINE IN Jack], input from these jacks take
precedence, and input from the [Internal MIC] is disabled.
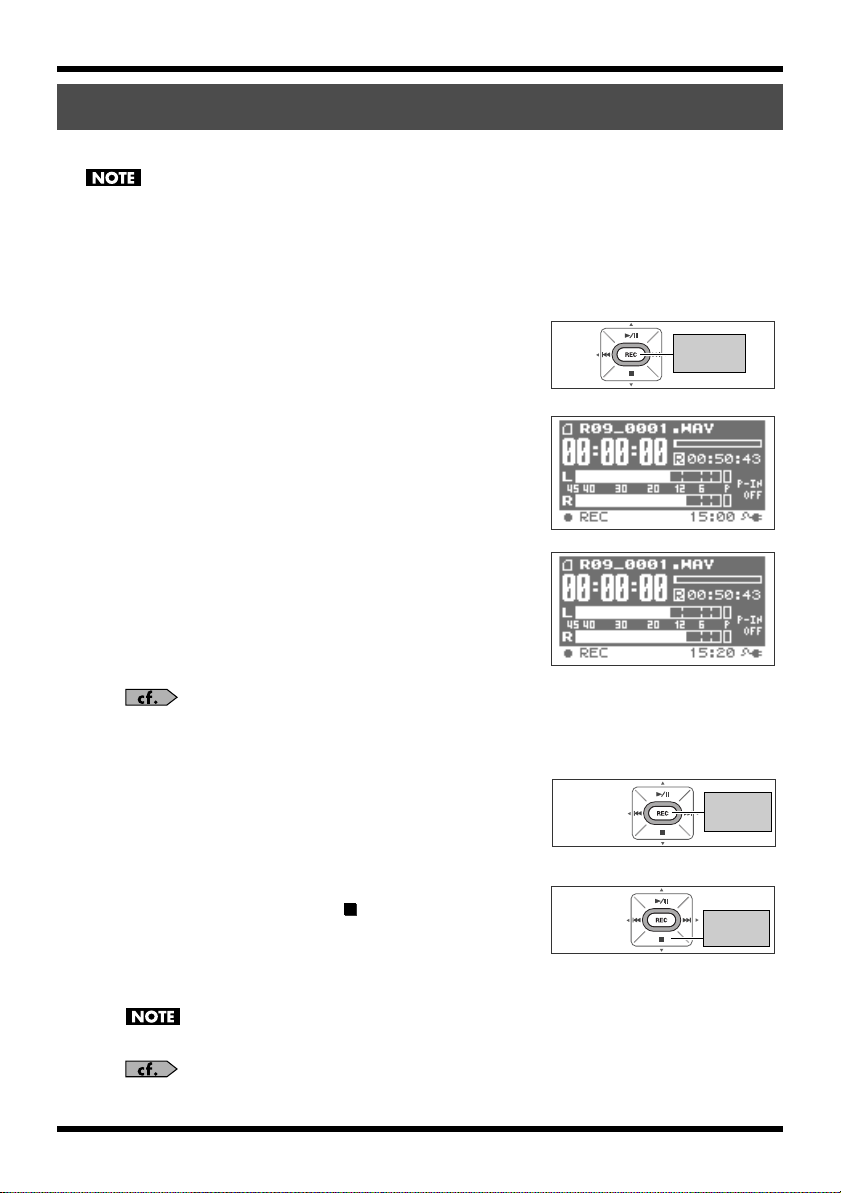
1.
Adjust the input level.
fig.rec-st-e.eps_80
1. Enter the recording-standby mode.
Press the [REC Button] while the <Main Screen> is
showing. The [REC Indicator] blinks. The unit is in
fig.inputlevel-test.eps_80
fig.inputlevel-set.eps_80
recording-standby mode.
2. Play the song to record into the microphone.
The level meter indicates the loudness of the input to R-09.
3. While the sound is being output, press the [(+) (-)
Input Level Button] to adjust the volume gradually.
Adjust so that the level meter moves as far to the right as
possible without the [PEAK Indicator] turning on.
If the [PEAK Indicator] stays lit, then the input level is too
high, and the recorded sound becomes distorted.
Using the R-09
See “Adjusting recording levels” (p. 37) for details on adjusting
fig.rec-start-e.eps_80
fig.rec-stop-e.eps_80
the input level.
Press the [REC Button] to begin recording.
2.
The [REC Indicator] lights up.
Press the [STOP Button ] to stop
3.
recording.
The [REC Indicator] goes out, and the recorded song is
shown in the display.
Power cannot be turned off during recording.
See “Configuring recording” (p. 26) for details on recording
settings.
23
Using the R-09
Play
Low
Volume
High
Playing back
Listen to the recorded voice.
fig.phones.eps_80
1.
Connect a playback device.
The R-09 does not have speakers. To listen to the playback,
headphones or speakers must be provided separately.
fig.play-start-e.eps_80
2.
Press the [PLAY Button ] to begin
playback.
When the [PLAY Button] is pressed, the song shown in the
display begins to play.
When “No Song” is shown in the display, there is no song that
the R-09 can play.
fig.outputlevel-e.eps_80
“Manipulating songs and folders” (p. 62)
Adjust the volume.
3.
Use [(+) and (-) HEADPHONE VOLUME buttons] to set the
volume to a comfortable level.
The volume cannot be adjusted for sound output via a digital
cable connected to the [HEADPHONE jack] (digital output).
Rewind/Fast Forward
If the [RWD Button ] is held down during playback, the recording rewinds. If the
[FWD Button ] is held down during playback, the recording fast forwards. Once
these buttons are released, playback starts again.
See “Playing back” (p. 42) for details on playback.
24
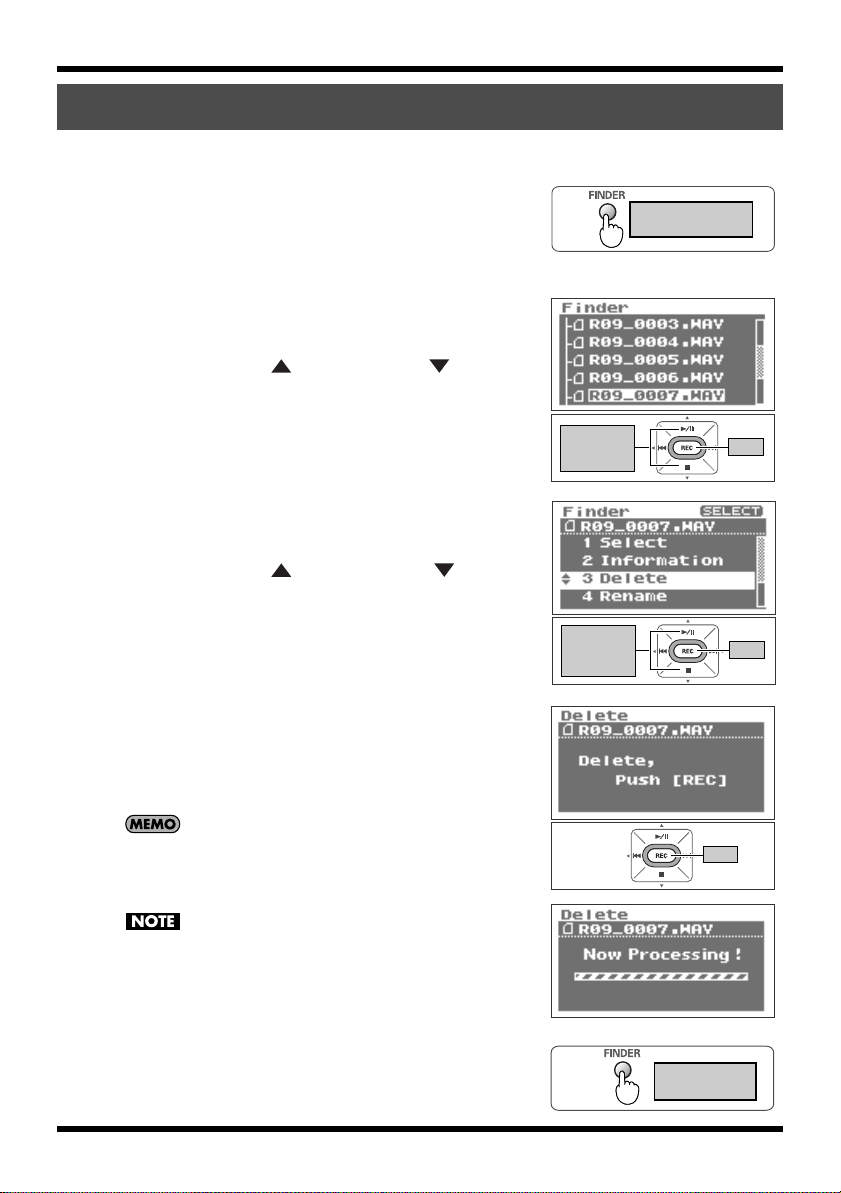
Deleting
Show
<Finder Screen>
Move the
cursor
up or down
Enter
Move the
cursor
up or down
Enter
Enter
Show
<Main Screen>
Delete the recorded voice.
fig.open-finder-e.eps_80
Show the <Finder Screen>.
1.
Press and hold down the [FINDER/MENU Button] to show
fig.song-select-e.eps_80
fig.delete-e.eps_80
the <Finder Screen>.
Select the song.
2.
Use the [PLAY Button ] and [STOP Button ] to select
the song to delete, then press the [REC Button].
3.
Select “Delete.”
Use the [PLAY Button ] and [STOP Button ] to select
“Delete,” then press the [REC Button].
Using the R-09
fig.delete-sure-e.eps_80
fig.process-del.eps_80
fig.open-main-e.eps_80
Press the [REC Button] to delete the song.
4.
A confirmation screen is shown. Press the [REC Button] to
delete the song.
To cancel, press the [FINDER/MENU Button] before pressing the
[REC Button].
Do not turn off power while deleting.
5.
Return to <Main Screen>.
Press the [FINDER/MENU Button].
25
Recording
Configuring recording
You can set the sound quality to use when recording.
Improving the sound quality increases the song size and decreases the recording time.
When making a final recording of a performance, it is best to use WAV 16 bit or 24 bit to
give priority to sound quality.
When making an audio CD, set the sampling frequency to 44.1 kHz and the recording mode to WAV 16
bit.
Test recordings and records of meetings do not usually require sound quality as good as
that. For longer recordings that give priority to song size, use MP3 128 kbps at 44.1 kHz.
Decide whether the sound quality or the recording time is to be given precedence, and
make the settings accordingly.
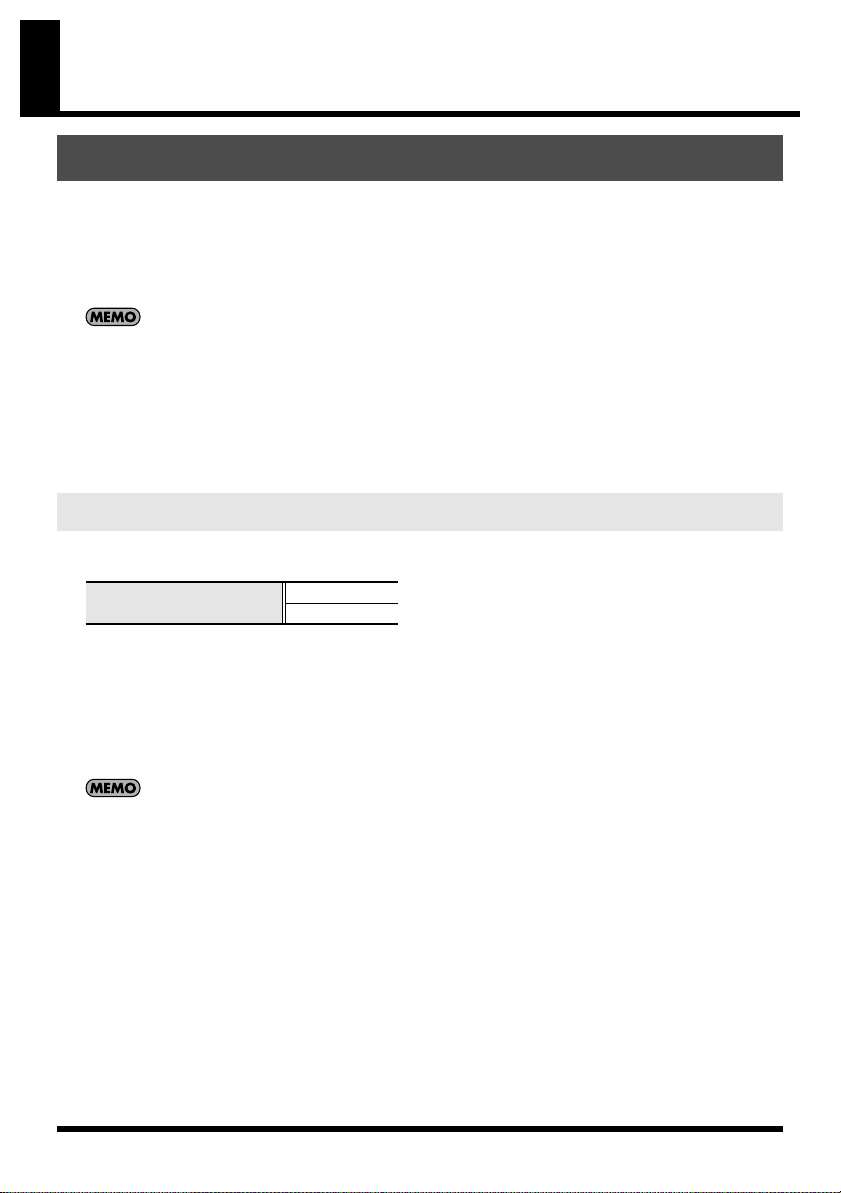
Sampling frequency
(Default value is bold)
Sampling frequency values
The larger value provides better sound quality.
When making a digital recording, the sound level is measured periodically, and that level is
made into a digital signal. The sampling frequency is a value that defines the time interval
and is expressed in kHz. A high sampling frequency is needed to faithfully reproduce high
sounds.
44.1 kHz
48 kHz
• Higher sampling frequencies result in larger song sizes and shorter recording times.
• When using the recording as an audio track for a video, we recommend setting the frequency to 48 kHz.
• The sampling frequency of a recorded song cannot be changed on the R-09.
26
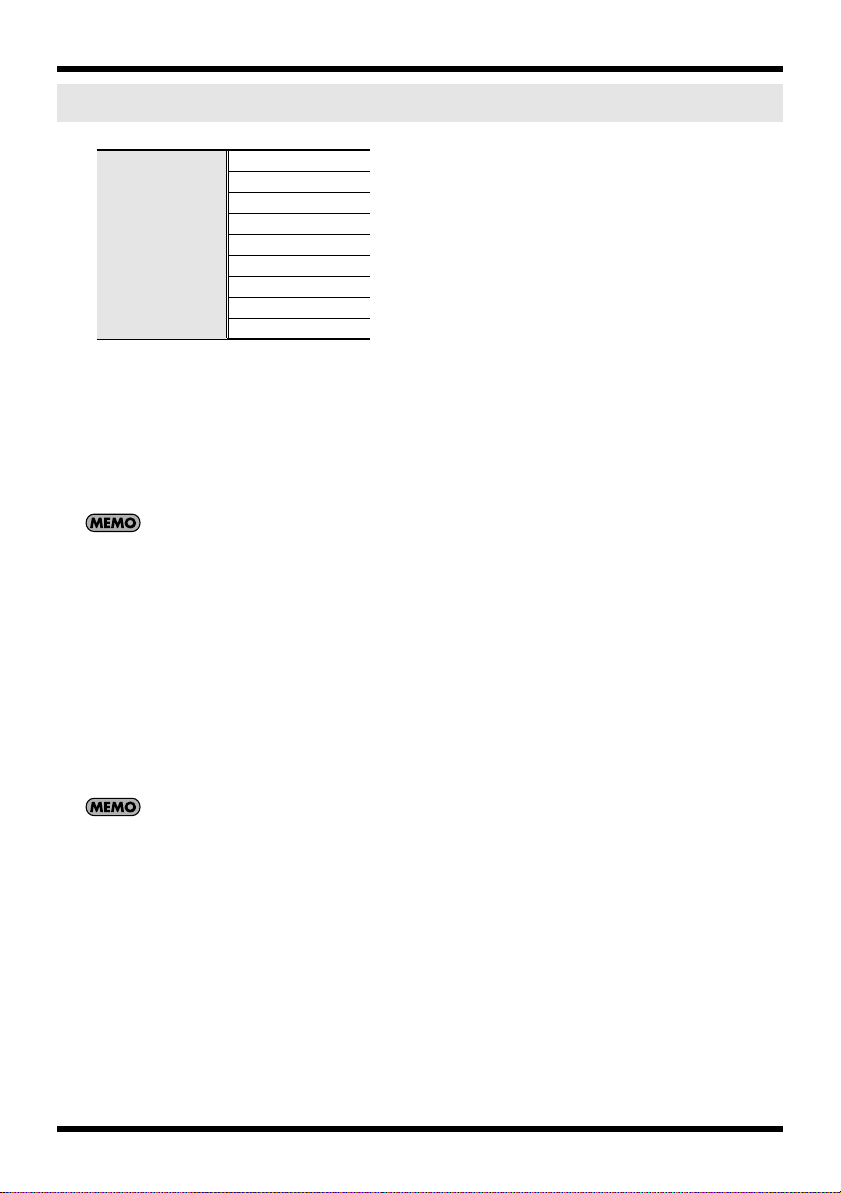
Recording mode
MP3 64 kbps
MP3 96 kbps
MP3 128 kbps
MP3 160 kbps
Recording mode
■
WAV versus MP3
WAV songs (*.WAV) store all sound information without compression; MP3 songs (*.MP3)
store songs using compression. Consequently, WAV songs have a better sound quality
recording than MP3 songs. On the other hand, MP3 reduce data volume by removing
frequencies that are hard for the human ear to hear.
When recording with MP3, the song size is smaller than the WAV setting recording, and a longer
recording can be made.
■
bps and bit
The higher the value, the better the sound quality.
The MP3 bps is the bit rate unit (bits per second).
The bit rate indicates data transfer rates in number of bits sent per second.
The WAV bit is used to represent the size of a sample.
The sample size indicates the amount of precision used in capturing subtle changes in the
sound. Larger sampling size values allow for more details of the sound to be expressed, and
result in sound that is smoother and more natural.
MP3 192 kbps
MP3 256 kbps
MP3 320 kbps
WAV 16 bit
WAV 24 bit
Recording
• Higher bps and bit values result in larger song sizes and shorter recording times.
• Software such as Windows Media Player cannot play back 24 bit WAV files.
27
Recording
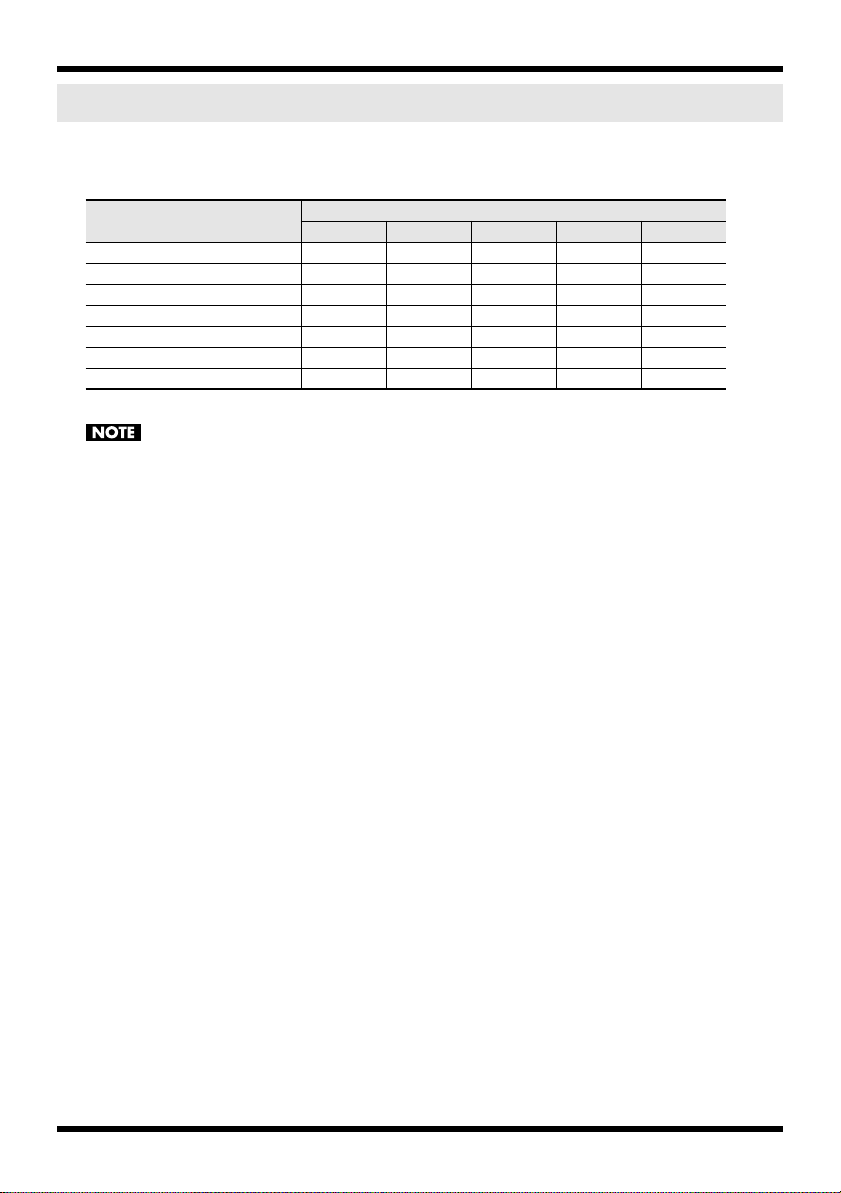
Estimated recording times
The approximate recording time for memory cards is shown below.
Recording time (estimate) Unit: minutes
Setting
WAV (16 bit/44.1 kHz) 5 11 44 88 180
WAV (16 bit/48 kHz) 5 10 40 81 166
WAV (24 bit/44.1 kHz) 3 7 29 59 120
WAV (24 bit/48 kHz) 3 7 27 54 110
MP3 128 kbps 62 126 490 980 1,993
MP3 256 kbps 31 63 245 490 996
MP3 320 kbps 25 50 196 392 797
The above recording times are estimates. The times may change depending on the card specifications.
Furthermore, the actual recording time is shorter when there are multiple files.
64 MB 128 MB 512 MB 1 GB 2 GB
Memory card size
28
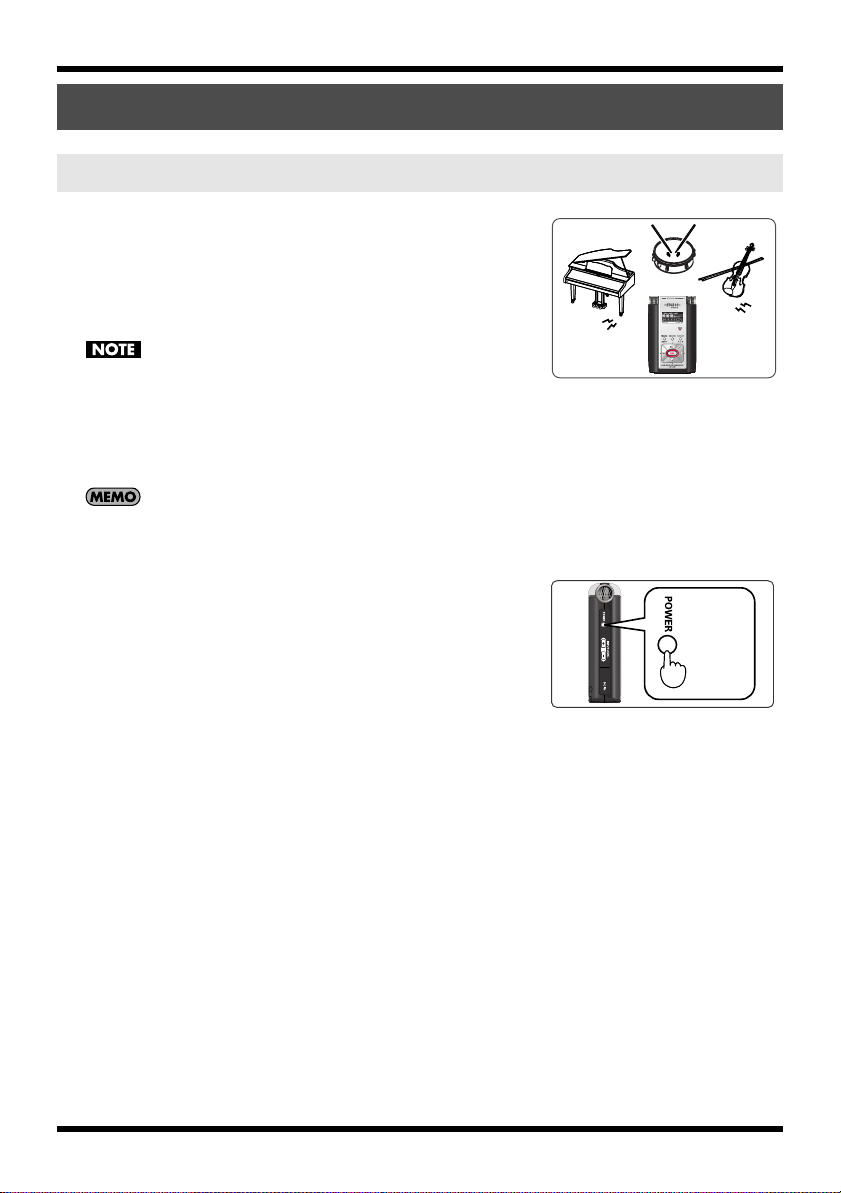
Recording instruments and voice
L
R
Hold down
Using the internal microphones
fig.mic-LR.eps_80
The internal microphone is a stereo microphone.
The sound picked up by the microphone on the right side of the
R-09 is recorded on the right channel (R), while the sound that
the microphone on the left captures is recorded on the left
channel (L).
• To prevent feedback when recording with a microphone, do not use
speakers.
• If a microphone or other device is connected to the [LINE IN Jack] or
[MIC Input Jack], the [Internal Mic] cannot be used. When using the
[Internal MIC], do not connect anything to the [MIC Jack] or [LINE IN
Jack].
Set monitoring on when recording to monitor the sound while recording.
➜
“Setting whether to monitor sound while recording” (p. 81)
fig.power-onoff-e.eps_80
1.
Turn on power to the R-09.
Turn on power to the R-09. See “Turning power on/off” (p.
14)
Recording
29
Recording
Hold down
Show
<Menu Screen>
Move the
cursor
up or down
Enter
Changes
the value
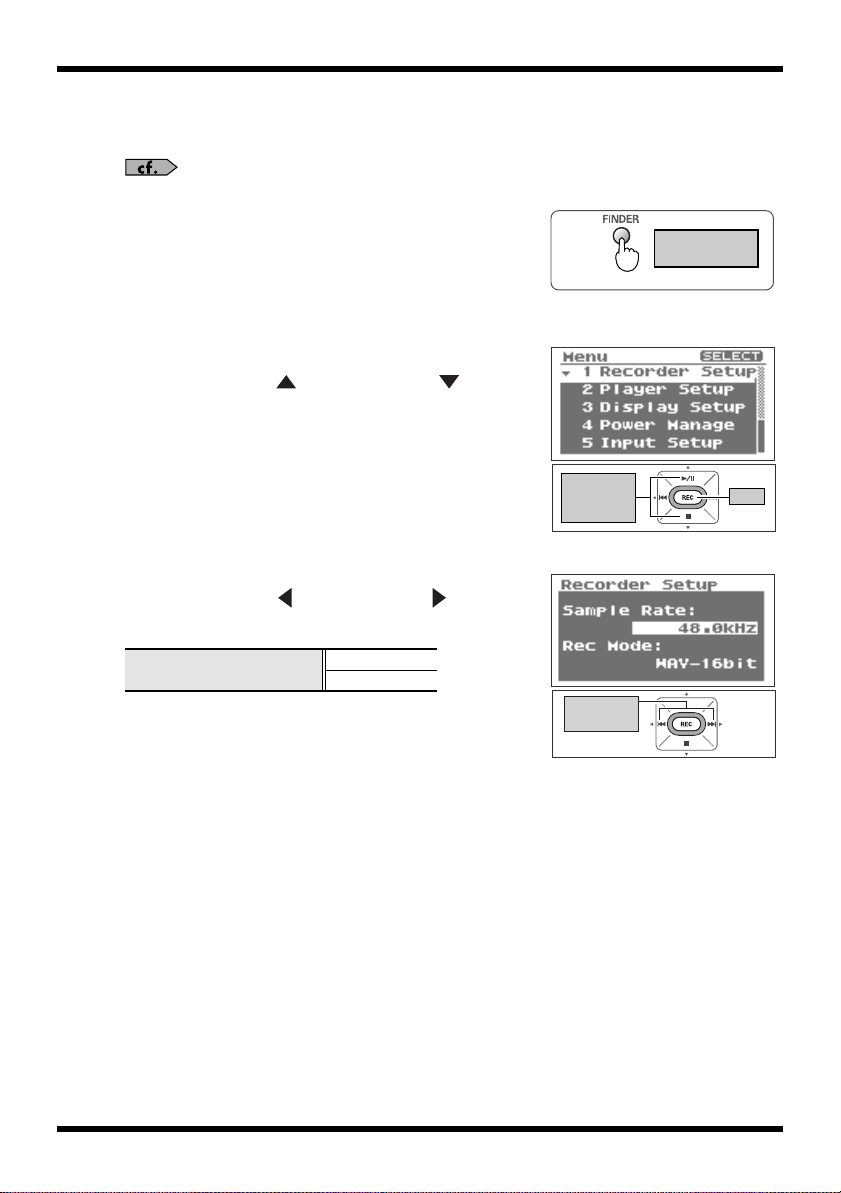
2.
Set the sampling frequency.
fig.open-set-e.eps_80
“Configuring recording” (p. 26)
1. Show the <Menu Screen>.
Press and hold down the [FINDER/MENU Button] to show
the <Menu Screen>.
fig.recoedersetting-e.eps_80
2. Select “Recorder Setup.”
Use the [PLAY Button ] and [STOP Button ] to select
“Recorder Setup,” then press the [REC Button].
fig.setsamplingrate-e.eps_80
3. Select the sampling frequency (Sample Rate).
Use the [RWD Button ] and [FWD Button ] to change
the Sample Rate value.
Sampling frequency values
44.1 kHz
48 kHz
30
 Loading...