

Roland Corporation MTLC-16 Owner's Manual
MTLC-16
®ÂØÒňÎ
®
Music Tutor Lab Controller
Owner’s Manual
and User’s Guide
Copyright © 2001 ROLAND CORPORATION
All rights reserved. No part of this publication may be reproduced in any form without
the written permission of ROLAND CORPORATION.

Educator’s Foreword
1
Welcome to the Roland family! We want to thank you for making the Roland MTLC-16 Lab Communication Console a
vital part of your classroom environment.
As educators in the 21st-century, we are faced with ever-growing competition for our students’ time and focus.
Listening to CDs and MP3s, watching movies and videos, and interacting with computers and the Internet, are all
examples of activities that are replacing the time students used to spend learning musical instruments. Because today’s
children are exposed to technology on a daily basis, they accept it as part of the natural landscape. They pursue information in an interactive manner, and they tend to reject old-style broadcast learning. As a result, we as music educators
must utilize technology so that teaching is more effective and learning is more fun.
Listening to CDs and MP3s is aurally stimulating. Watching movies and videos is visually stimulating. Interacting with
computers and the internet is mentally stimulating. This is why so many music teachers find it difficult to get students
excited about learning a musical instrument—especially in a traditional manner. If you could simultaneously listen to
the music of Mozart, follow the score, and share the experience with friends, why would you want to practice solo
scales and chords? The “interactive-generation” finds multimedia experiences more fulfilling.
Thanks to the MTLC-16, learning a musical instrument does not have to be boring—it can actually be fun! The MTLC16 is a lab communication console that combines aural and visual reinforcement of musical concepts with the Music
Tutor Philosophy. This includes performance-quality stereo sounds, as well as the ability to interact with musical notation (both intuitively and creatively), seamless integration of musical examples from SMFs or any audio source, and the
ability to visualize transposed scores and create altered arrangements. While this technology is state-of-the-art, it is
very easy to use—absolutely intuitive! Learning and playing take precedence over memorizing features and, as a result,
the MTLC-16 is virtually transparent to the teacher and student.
This is why the Roland MTLC-16 Lab Communication Console is a perfect group piano teaching tool. With it, the focus
is on learning and playing, incorporating technology in a way that is effective and enjoyable. Product features may be
important to a roomful of engineers, but we as music educators need practical tools. The Roland MTLC-16 Lab
Communication Console makes music learning aurally, visually, and mentally stimulating—like listening to CDs and
MP3s, watching movies and videos, or interacting with computers and the Internet. This is why both teachers and students embrace it as a perfect group piano teaching tool.

2
MTLC-16 Features
What Is It?
The MTLC-16 is an integrated stereo hardware/software lab teaching system that includes animated music notation, an
electronic gradebook, and drag ‘n’ drop classroom management tools. It consists of several integrated components.
The MTLC-16 is a “break-out” product for group piano teaching. It features stereo sound, computerized record-keeping, and most important—visual display of all music lessons and literature. The MTLC-16 provides research-class technology to tutor music reading skills. Improved reading skills—long an elusive goal—are not only possible, but readily
attainable for all students, especially those needing remediation.
This technology-enhanced learning can continue beyond the classroom door. The visual core of the MTLC-16 is available for student purchase. Imagine the progress possible when students have this visual tutor guiding them wherever
they practice. Check with your local Roland dealer or your college/university bookstore.
Stereo Music Lab Communication Console
• Communicate with up to 16 students in stereo, expandable to 32 students
• Set-up easily using supplied connectors, cables, and headsets
• Drill students alone, in groups, or in pairs
• Create up to four separate student groups
• Record student performances to an optional cassette or CD player/recorder
Virtual Lab Controller and Classroom Manager
• Control all MTLC-16 functions from a PC
• Use preset or user-created classroom configurations
• Monitor classroom rosters and grades via computer
• Instantly recall student groupings and communication settings
Visual Music Tutor
• Enhance group lessons with SMF disk playback and visual notation display
• Provide interactive music tutorials
• Record, printout and assess student performances
Virtual Sound Canvas, a GS software synthesizer
• Provide orchestrated accompaniments from 902 instrument sounds (including 26 drum kits)
• Upgrade the built-in wave-table synthesizer so SMF arrangements sound more musical on your PC
Comprehensive Group Teaching Tool
• Begin group teaching immediately by following the “Survivor’s Guide to the MTLC-16”
• Understand and apply several innovative group teaching technologies by reading the comprehensive
owner’s manual
• Learn more about group teaching through the Annotated Bibliography of Group Teaching
Expandable Music Lab Controller
• Communicate with up 32 students in stereo by combining two MTLC-16 lab controllers
• Reinforce musical concepts by adding an overhead TV-monitor (S-Video), a flat-panel LCD,
or a gas-plasma screen
• Capture student or teacher performances via MIDI by adding a USB-equipped MIDI interface
• Experience hands-free teaching by adding a wireless mouse and/or headset

MTLC-16 Features
3
What Is Included?
The MTLC-16 Music Tutor Lab Controller is accompanied by a complete package of hardware, software, cables, and
headphone/microphones, and comprehensive print materials—everything you need, whether you are a veteran group
piano pedagogue, or a college/university teaching assistant conducting your very first class. Particularly important are
the print materials, written by experienced keyboard educators. Included are the Owner’s Manual with step-by-step
instructions, an annotated bibliography of books and articles on group keyboard teaching, and a “Survivor’s Guide” to
help master the few technology components.
Hardware Qty.
MTLC-16 Lab Communication Console .........................................................................................................(1)
MTLC-16 AC Adapter .......................................................................................................................................(1)
MTLC-1 Student Communication Boxes........................................................................................................(16)
RJ-45 Cables .......................................................................................................................................................(16)
Stereo headsets with built-in Microphone ....................................................................................................(17)
1/4” to 1/4” Stereo Audio Cable .....................................................................................................................(1)
9-Pin Din Serial Computer Connector ............................................................................................................(1)
Software Qty.
Installation CD ....................................................................................................................................................(1)
including:
Virtual MTLC-16 Lab Communication Package
V-MT1 Visual Music Tutor
VSC-88H Virtual Sound Canvas, v. 3.01
Printed Materials Qty.
MTLC-16 Lab Communication Console Owner’s Manual ..........................................................................(1)
V-MT1 Visual Music Tutor Owner’s Manual..................................................................................................(1)
VSC-88H Visual Sound Canvas Owner’s Manual ........................................................................................(1)
MTLC-16 QuickStart “Survivor’s Guide” ......................................................................................................(1)
Current Software Catalog..................................................................................................................................(1)

MTLC-16 Features
4
What Are the Options?
There are several options to optimize your teaching lab. You may use standard recording technologies like cassette and
CD-players, or add a hard-disk recorder for even more advanced functions.
However, while the Monitor section below lists options, please consider the visual monitors carefully—since students
will be following these visual displays very closely in each class. Whether you select an S-video TV monitor, sleek LCD
panels, a large gas plasma display, or an “In Focus” projector, size and image quality are extremely important—you
may want to splurge a bit. Also listed as an option, the USB-to-MIDI interface, is another must-have. This connector utilizes the graphic displays in the “Rehearsal Window,” as well as enabling in-class recording. The USB has rapidly
become the standard interface; it is both inexpensive and easily installed.
External Audio Player/Recorder
Cassette Player/Recorder
CD Player/Recorder
Hard-Disk Player/Recorder.
Visual Monitor(s)
TV(s) (S-Video)
PC VGA Monitor(s)
LCD Panel(s)
Gas Plasma Screen(s)
Audio Monitor(s)
Speaker(s) (preferably wall mounted)
Amplifier(s) (one per speaker)
USB MIDI Interface
MIDI Sport 2x2 (www.midiman.com)

Contents
5
Educator’s Foreword .....................................................................................1
MTLC-16 Features..........................................................................................2
What Is It?....................................................................................................................................................................2
What Is Included?.......................................................................................................................................................3
What Are the Options? ..............................................................................................................................................4
Table of Contents...........................................................................................5
Names of Things and What They Do..............................................................6
Music Lab Installation Guide..........................................................................8
Music Lab Installation ...............................................................................................................................................8
MTLC-16 Installation ................................................................................................................................................9
Test Components .....................................................................................................................................................10
Chapter 1–The Visual Music Tutor Advantage...............................................12
Developing Solid Reading Skills............................................................................................................................12
Putting the Visual Tutor to Work ...........................................................................................................................12
Making Reading More Successful–A Few Tips....................................................................................................13
PREVIEW playing .........................................................................................................................................13
SLOW playing................................................................................................................................................13
OUTLINE playing—selectively reading the entire score while the SMF is playing............................13
SHADOW playing—“air play” reading of the piece while the SMF is playing...................................13
PARALLEL SIGHTREADING methods—The Best Readers are Frequent Readers............................14
Chapter 2–Surviving Your First Class ............................................................15
Survival Checklist–Before the Class ......................................................................................................................15
The Class....................................................................................................................................................................16
Chapter 3–Operating the MTLC-16 ...............................................................19
Chapter 4–Operating the Virtual MTLC-16....................................................27
Virtual Lab Control ..................................................................................................................................................27
Classroom Management..........................................................................................................................................30
Gradebook .................................................................................................................................................................31
Hardware Detection.................................................................................................................................................32
Chapter 5–Operating the V-MT1 (Visual Music Tutor)....................................33
Annotated Group Teaching Bibliography .....................................................36
Articles .......................................................................................................................................................................36
Books ..........................................................................................................................................................................38
Dissertations and Theses.........................................................................................................................................41
Additional References..............................................................................................................................................42
Appendix....................................................................................................43
Installing the USB MIDISport Interface ................................................................................................................43
Warranty ....................................................................................................................................................................45
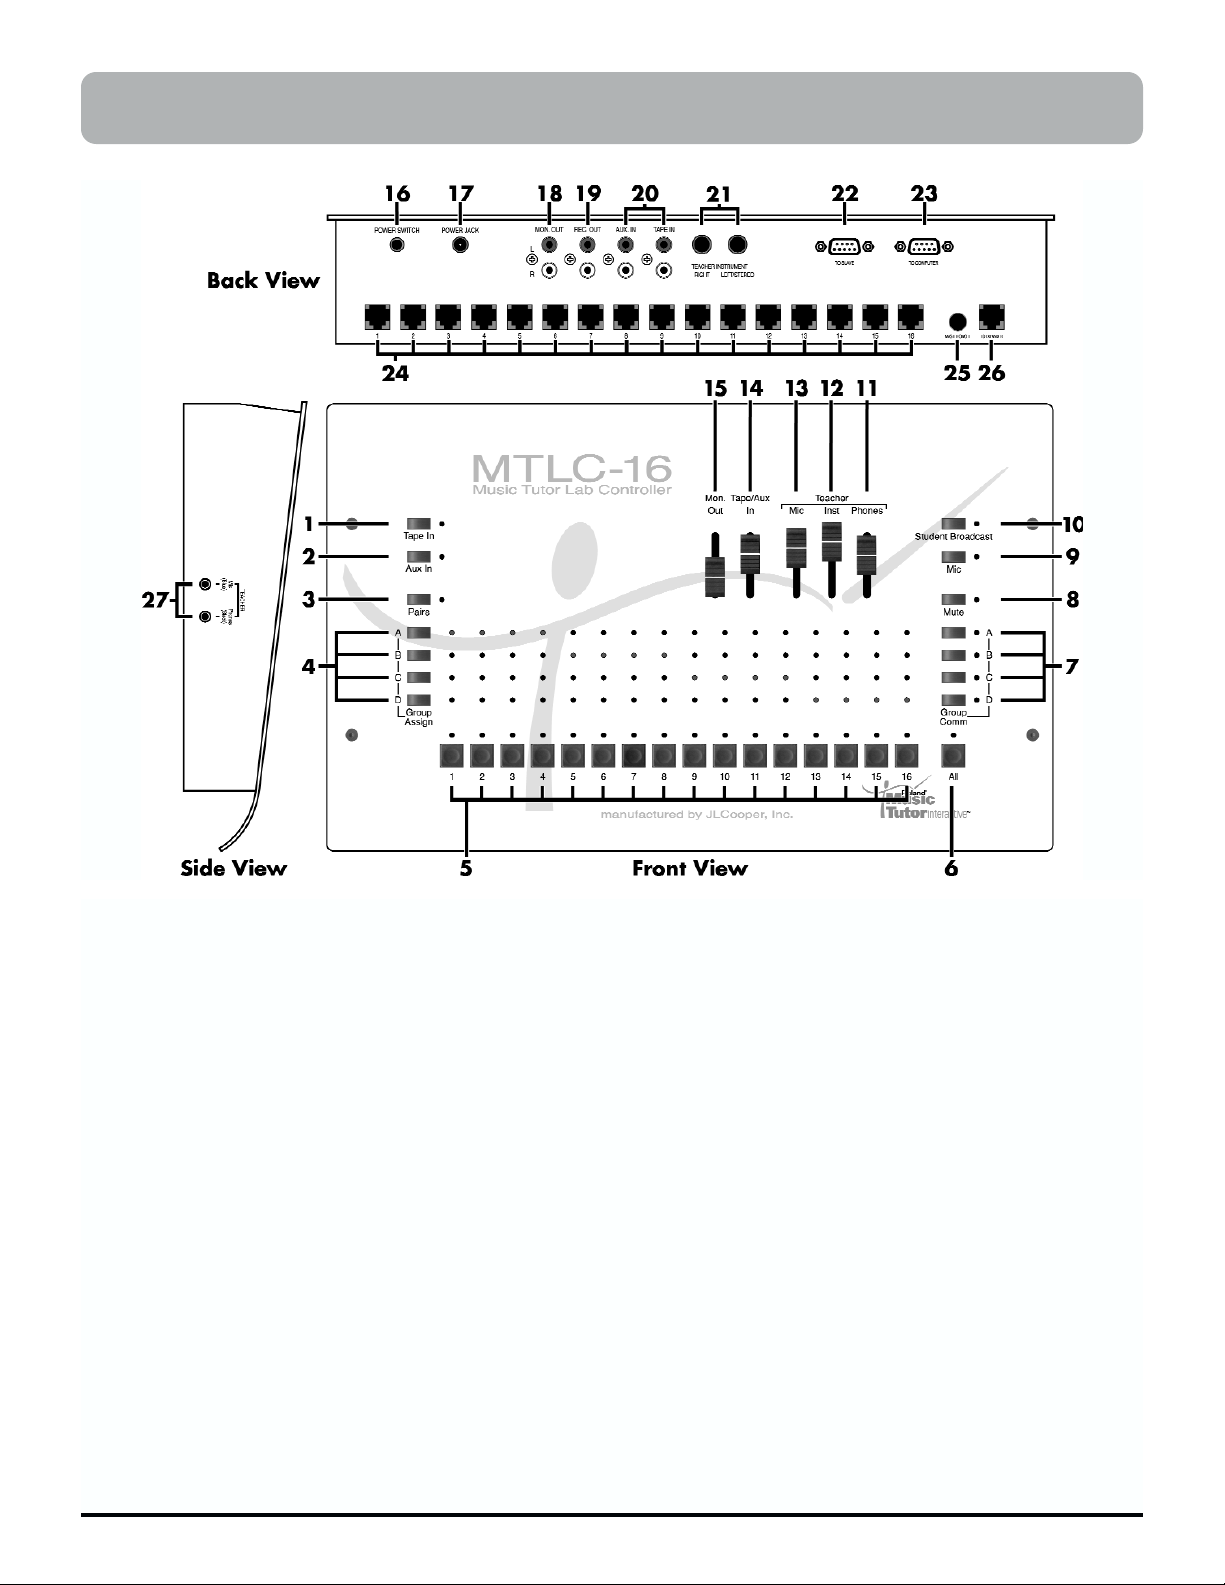
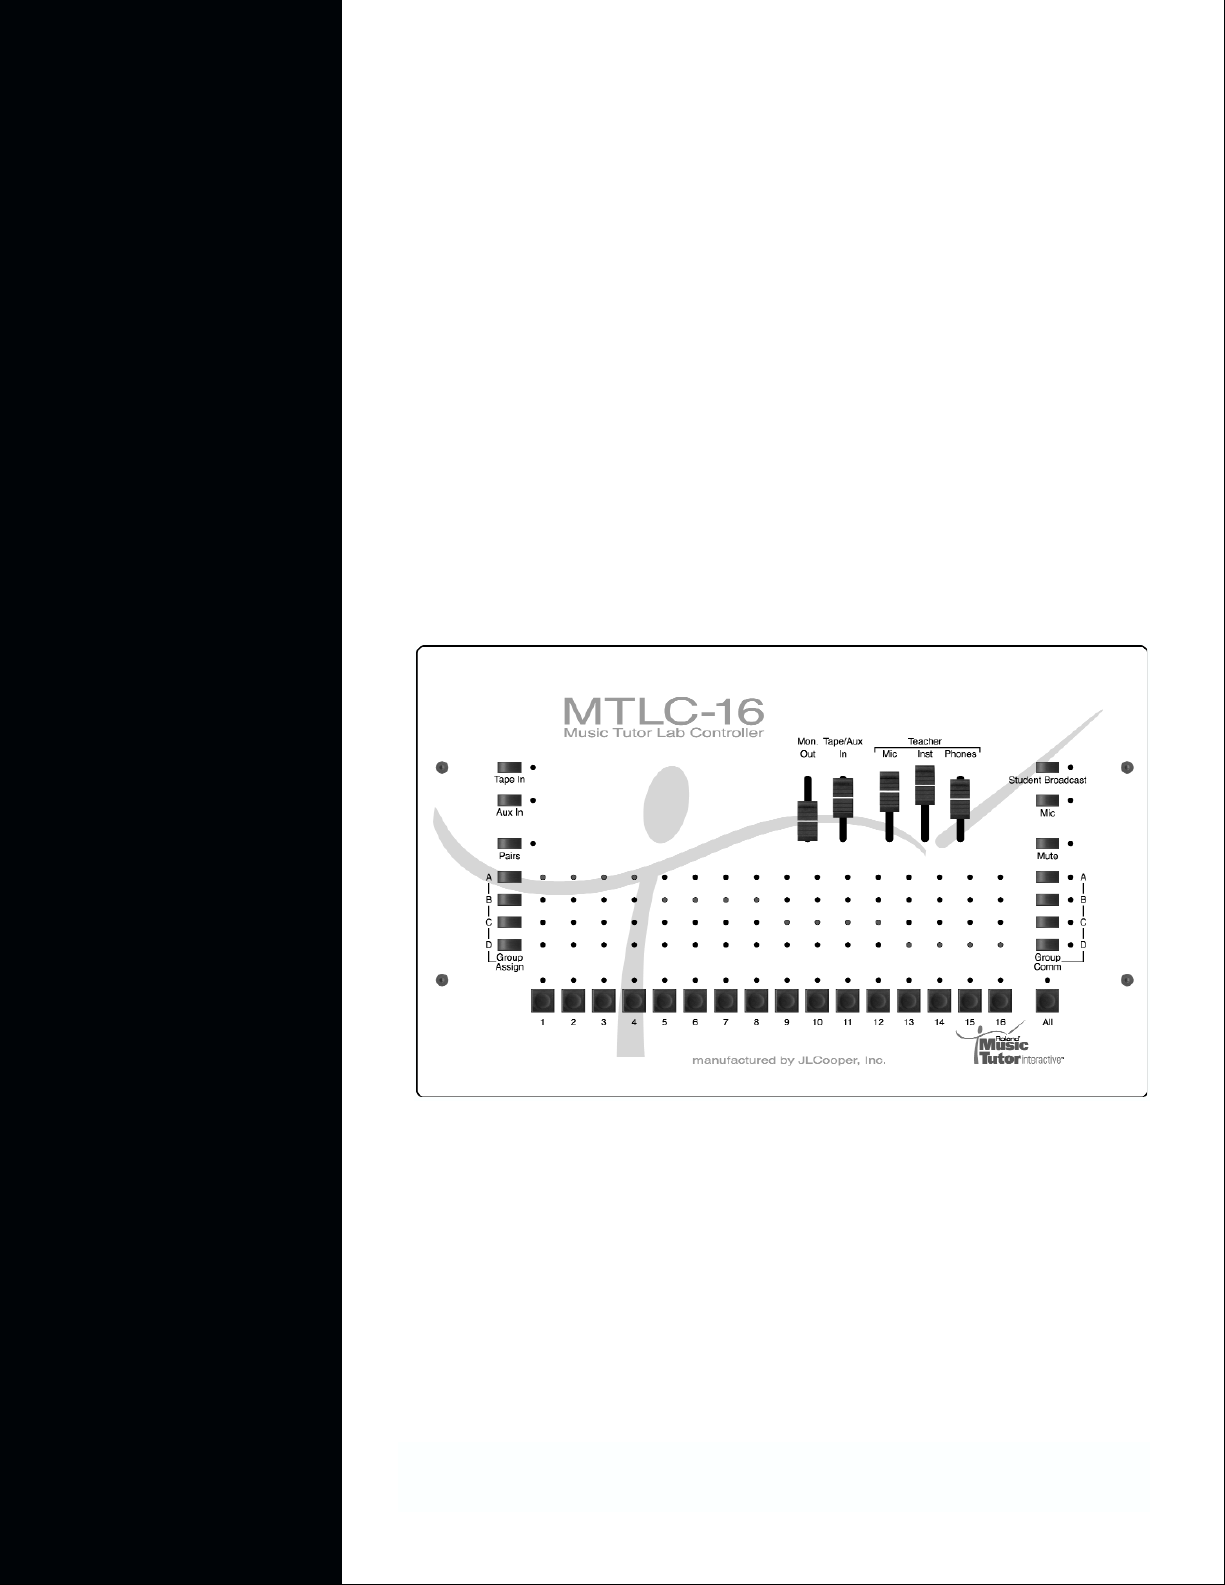
1 [Tape In] Button
Broadcasts audio from any external audio source (e.g.
tape player, CD player, or rhythm machine) to all headphones. When this button is engaged, each student can
listen to and play along with the audio material. Pressing
this button cancels the “Aux In” button (page 24).
2 [Aux In] Button
Broadcasts audio from any external audio source (e.g.
tape player, CD player, or rhythm machine) to all headphones. When this button is engaged, each student can
listen to and play along with the audio material. Pressing
this button cancels the “Tape In” button (page 24).
3 [Pairs] Button
Connects adjacent students (i.e. Student “1” with Student
“2”, Student “3” with Student “4”, etc.) for duet-style
practicing. When this button is engaged, adjacent students can listen to, talk to, and play along with their partner (page 22).
4 [Group Assign A, B, C, D] Buttons
Connect selected students for group-style practicing.
When one of these buttons (i.e. A, B, C, or D) is held down
and student number buttons are engaged, the selected
students can listen to, talk to, and play for (or along with)
the other selected students (page 21).
5 Student [1-16] Buttons
Establish two-way communication between teacher and
student(s). When one (or several) of these buttons is
engaged, the selected student(s) can listen to, talk to, and
play for (or along with) the teacher. The “Mic” button
must be engaged to activate the teacher’s microphone
(page 20).
6 [All] Button
Establishes one-way communication between teacher and
students. When this button is engaged, all students can
listen to and play for (or along with) the teacher. Students
will not hear other students keyboards and microphones.
The “Mic” button must be engaged to activate the teacher
microphone (page 23).
7 [Group Comm A, B, C, D] Buttons
Establish two-way communication between teacher and
students in a selected group. When one (or several) of
these buttons is engaged, the selected student group(s)
can listen to, talk to, and play for (or along with) the
teacher. The “Mic” button must be engaged to activate the
Names of Things and What They Do
6

teacher’s microphone (page 21).
8 [Mute] Button
Silences all student instruments. When this button is
engaged, students can only listen to the teacher’s instrument and microphone, or external audio material via
“Tape In” or “Aux In” (page 25).
9 [Mic] Button
Activates the teacher’s microphone. When this button is
engaged, the selected student(s) or group(s) can listen to
the teacher’s microphone (page 20).
10 [Student Broadcast] Button
Broadcasts two-way communication between teacher and
selected student(s) to all headphones. When this button is
engaged, selected student(s) can listen to, talk to, and play
for (or along with) the teacher while the remaining students listen (page 23).
11 [Phones] Slider
Adjusts the teacher’s headphones level. Slide the slider
towards the top of the MTLC-16 to increase the level and
slide the slider towards the bottom of the MTLC-16 to
decrease the level (page 19).
12 [Inst] Slider
Adjusts the teacher’s instrument level. Slide the slider
towards the top of the MTLC-16 to increase the level and
slide the slider towards the bottom of the MTLC-16 to
decrease the level (page 19).
13 [Mic] Slider
Adjusts the teacher’s microphone level. Slide the slider
towards the top of the MTLC-16 to increase the level and
slide the slider towards the bottom of the MTLC-16 to
decrease the level (page 19).
14 [Tape In/Aux In] Slider
Adjusts the “Tape In” and “Aux In” levels. Slide the slider towards the top of the MTLC-16 to increase the level
and slide the slider towards the bottom of the MTLC-16 to
decrease the level (page 24).
15 [Mon. Out] Slider
Adjusts the MTLC-16’s monitor output level. Slide the
slider towards the top of the MTLC-16 to increase the
level and slide the slider towards the bottom of the
MTLC-16 to decrease the level. This slider is only active
when an external recording device and/or an external
speaker system is connected to the MTLC-16 via the “Rec.
Out” and “Mon. Out” jacks respectively (page 25-26).
16 [Power Switch]
Turns the MTLC-16 on and off.
17 [Power Jack]
Connects the MTLC-16 to the supplied AC power adapter.
18 [Mon. Out] Jacks
Connect the MTLC-16 to an external speaker system (e.g.
stereo power-amp with speakers) (page 10).
19 [Rec. Out] Jacks
Connect the MTLC-16 to an external stereo recording
device (e.g. tape recorder, CD recorder, or hard disk
recorder) (page 10).
20 [Aux. In]/[Tape In] Jacks
Connect the MTLC-16 to external stereo audio sources
(e.g. tape player, CD player, or rhythm machine) (page
10).
21 [Teacher Instrument] Jacks
Connect the MTLC-16 to the teacher’s instrument. (page
9).
22 [To Slave] Connector
Connects the MTLC-16 (“Master”) to another MTLC-16
(“Slave”) for a total of 32 student stations (page 10).
23 [To Computer] Connector
Connects the MTLC-16 to a computer. When a computer
is connected to the “To Computer” connector, all of the
MTLC-16’s buttons can be controlled via computer (page
10).
24 Student Instrument [1-16] Connectors
Connect the MTLC-16 to all student stations via RJ-45
cables and MTLC-1 Student Connector Boxes (page 9).
25 [Master On/Off] Switch
Toggles between “Master” and “Slave” status. When this
button is engaged, the MTLC-16 functions as the “Master”
communication console. When this button is not
engaged, the MTLC-16 functions as the “Slave” communication console (page 10).
26 [To Expander] Connector
Connects the MTLC-16 to another MTLC-16 for a total of
32 student stations (page 10).
27 [Teacher] Headset Jacks
Connect the teacher’s headset microphone (blue plug) and
teacher’s headset stereo phones (black plug).
Names of Things and What They Do
7

Music Lab Installation
Room Preparation
When preparing a music teaching lab, there are many factors to consider. For example, the size and shape of the room,
the availability of lighting and power outlets, as well as a room’s ventilation and temperature control need to be
addressed. Please consider the following physical and electrical requirements before installing your music teaching lab.
Physical Space Requirements
•
Make sure there is sufficient space for all musical instruments, hardware, benches, and students. Full-size, freestanding keyboards (88-keys) require 22 square feet (including a bench and space for the student.) “Slab” keyboards (less than 88 keys) may require much less space.
•
Create an effective floor plan that ensures a clear “line-of-sight” from all student keyboards to the teacher. While
this is not always possible due to the constraints of a given room, it is a good ideal.
•
Include a large desk or table next to the teacher keyboard if possible. This provides the teacher easy access to the
communication console and/or the computer.
•
Be sure that there is adequate space behind the teacher station. This allows the teacher to move easily from the
teacher station to the student stations.
•
Shade music lab windows to regulate sunlight. Avoid bright or direct sunlight in the lab, because heat generated
by sunlight can overheat the Communication Console. Room temperature should not exceed 85 degrees during
normal use. The ideal physical space will allow for regulated temperature and humidity.
•
Use anti-static, or static-resistant, carpet on the floors whenever possible to lower the noise-level in your lab.
Electrical Requirements
•
Once the floor plan is defined, determine the number of electrical outlets and power strips needed to supply
power to all devices. Isolate the MTLC-16 Communication Console from devices such as computers or lights by
plugging the devices into separate 120v wall plug receptacles. Plugging computers or rheostatic lights into the
same receptacle as the MTLC-16 could cause disturbing noise and hum during operation. Use only the supplied
A/C power adapter; using other A/C adapters can damage the unit and void the warranty.
•
Use surge protectors on all electronic equipment in the music lab. This includes the MTLC-16 Lab Controller, the
teacher’s instrument and computer, the student keyboards, and all external audio devices. Check the voltage and
amperage requirements for the equipment being installed and consult with building engineering staff regarding
the level of required electrical service needed.
•
Set the main power switch of the Music Tutor Lab Controller to the “Off” or “Out” position before connecting the
A/C power adapter to a 120v wall plug receptacle. Use only the A/C power adapter supplied with the Music
Tutor Lab Controller; using other A/C adapters can damage the unit and void the warranty.
•
For further protection against electrical surge damage, disconnect all A/C power adapters from the wall plug
receptacle during school vacations or summer breaks.
Equipment Checklist
The MTLC-16 includes all of the components needed to connect up to (16) student instruments and (1) teacher instrument. It also includes all of the software needed to control the communication console via computer, to provide visualized learning tools, and to keep track of class rosters and grades. Before installing the MTLC-16, be sure you have the
following components:
Hardware
Music Lab Installation Guide
8

Music Lab Installation Guide
9
MTLC-16 Lab Communication Console .........................................................................................................(1)
MTLC-16 AC Adapter .......................................................................................................................................(1)
MTLC-1 Student Communication Boxes........................................................................................................(16)
RJ-45 Telephone-Type Connectors...................................................................................................................(16)
Headsets with built-in Microphone ................................................................................................................(17)
1/4” to 1/4” stereo audio cable .......................................................................................................................(1)
9-Pin Din Serial Computer Connector ............................................................................................................(1)
Software
Installation CD ....................................................................................................................................................(1)
including:
VMTLC-16 Virtual Music Tutor Lab Controller software
V-MT1 Visual Music Tutor software
VSC-88H Virtual Sound Canvas software
Printed Materials
MTLC-16 Music Tutor Lab Controller Owner’s Manual ..............................................................................(1)
V-MT1 Visual Music Tutor Owner’s Manual .................................................................................................(1)
VSC-88H Visual Sound Canvas Owner’s Manual ........................................................................................(1)
MTLC-16 QuickStart or “Survivor’s Guide” ..................................................................................................(1)
Current Software Catalog .................................................................................................................................(1)
MTLC-16 Installation
Set Up the Music Lab
•
Place the teacher’s instrument in the front and center of the lab.
•
Place the Music Tutor Lab Controller(s) (MTLC-16), computer (if used), and external playback/recording devices
(if used) on a table next to the teacher’s instrument.
•
Place student instruments in rows facing the teacher’s instrument (row configuration is optional). Allow extra
space behind each instrument for instructional purposes.
•
Place audio monitor(s) (if used) to the side of the teacher’s instrument facing the student instruments.
•
Place the visual monitor(s) (if used) on a podium or wall mount near the teacher’s station facing the student
instruments.
•
Connect all devices to an AC power strip as described in “Electrical Requirements” above.
Connect Cables
•
Place one student communication box on each student instrument and insert the attached 1/4” plug into the headphone jack of each student instrument as you proceed with the installation.
•
Number the student communication boxes (MTLC-1) “1” – ”16.”
•
Connect each student communication box to the corresponding numbered outputs on the MTLC-16 using the supplied RJ-45 cables.
•
Connect the headphone jack on the teacher’s instrument to the “Teacher Instrument Left/Stereo” jack on the
MTLC-16 using the supplied TRS (tip-ring-sleeve) cable.

Music Lab Installation Guide
•
Set the “Master On/Off” button on the MTLC-16 to the “On” (“Master”) position.
•
Connect the optional computer to the “To Computer” jack on the MTLC-16 using the supplied 9-pin serial cable. If
sound from the computer (i.e. SMF playback) needs to be broadcast to the class, connect the computer’s headphone output to the “Aux. In” jack on the MTLC-16 using the appropriate cable (e.g. 1/8” to RCA cable.)
•
Connect the 9-pin “To Computer” jack on the optional second MTLC-16 to the 9-pin “To Slave” jack on the first
MTLC-16. Set the “Master On/Off” button on the second MTLC-16 to the “Off” (“Slave”) position. Connect the
“To Expander” jack on the second MTLC-16 to the “To Expander” jack on the first MTLC-16 using a supplied
RJ-45 cable.
•
Connect the “Output L/R” jacks on the optional external playback/recording device to the “Tape In” jacks on the
MTLC-16. Connect the “Input L/R” jacks on the playback/recording device to the “Rec. Out” jacks on the MTLC-
16.
•
Connect the Left and Right inputs on the optional external audio monitors to the “Mon. Out” jacks on the MTLC-
16.
•
Connect the optional audio monitor(s) to the “Mon. Out” jacks on the MTLC-16 using the appropriate cable(s) (e.g.
RCA to 1/4”.)
•
Connect the optional visual monitor(s) to the monitor out jack on the computer using the cable(s) suggested in the
computer and/or monitor’s manual.
•
Connect a headset to each student communication box, as well as to the MTLC-16 (the jacks are on the left side of
the MTLC-16.) Make sure both the “Mic” and “Phones” plugs are inserted.
Install Software
•
Power up your Windows®computer; if it is already powered up, please make certain to close all programs, so
none are running during the install procedure.
•
Disable your computer's virus-protection software
•
Insert the self-installing MTLC-16 CD-ROM into the tray of your computer's CD-ROM drive
•
Wait until the auto-run program begins to run; it will bring you to the Installation Wizard.
•
Follow the prompts; at the end of the process, you will be asked to restart the computer.
•
Restart the computer; it is now ready to be used with your MTLC-16 Music Tutor Lab Controller
At this point, you may want create shortcuts on your desktop, so you can quickly open the programs. It is recommended that you create a shortcut for the MTLC-16 program wherever it is most convenient for you: the Start Menu, the Task
Bar, or the Desktop itself. You will not need one for either the Visual Music Tutor (V-MT1) or the Virtual Sound Canvas
(VSC-88), because these programs are automatically activated from within the MTLC-16 controller software.
Test Components
After all music lab equipment is placed, the cables are connected, and the software is installed, test each music lab component using the following procedure.
Power Up All Music Lab Components
• Student Instruments
• Teacher’s Instrument
10

Music Lab Installation Guide
11
• External Playback/Recording Device(s)
• Visual Monitor(s)
• Computer
• MTLC-16
• Audio Monitor(s)
Test the Teacher’s Station
A) Set the output level on the teacher’s instrument to maximum (this gives the best signal-to-noise response.)
B) Set the “Mic”, “Inst”, and “Phones” sliders on the MTLC-16 to their maximum setting.
C) Put on the teacher’s headset and play a few notes on the teacher’s instrument. You should hear what you are
playing. If you do not hear anything, check the teacher’s instrument and teacher’s headset connections.
D) Press the “Mic” button on the MTLC-16 and say something. You should hear what you are saying. If you do
not hear anything, check the teacher’s headset connections.
Test Student Stations
A) Press the “All” button on the MTLC-16.
B) Play a few notes on the teacher’s instrument while an assistant listens at student station #1. The assistant
should hear what you are playing. If the assistant does not hear anything, check the student communication
box to MTLC-16 “1” connections.
C) Have an assistant adjust the output level on student instrument #1 to maximum (this gives the best signal-to-
noise response.)
D) Have the assistant play a few notes on student instrument #1. The assistant should hear what he or she is
playing. If the assistant does not hear anything, check the student instrument to student communication box
connections.
E) Have the assistant say something. The assistant should hear what he or she is saying.
F) Make adjustments in headphone and microphone levels with the level-control knobs on the side of the student
communication box. All communication boxes should be adjusted to equal audio levels.
G) Repeat steps B – F above for each remaining student station.
Secure Equipment and Cables
If all of the components are functioning properly, finalize the placement of all equipment.
•
Attach each student communication box to the furniture or student keyboard, near the headphone jack on the
instrument, using screws or velcro.
•
Secure all power outlets and power cords.
•
Secure all communication cables by either tying them together or placing them in wiring channels to avoid hazards in the classroom setting.
•
Care should be taken to make sure that all cords and cables be secured in a neat and orderly fashion to avoid tripping over them and pulling them out of their sockets, which can cause damage.

Developing Solid Reading Skills
To pass a school’s piano proficiency exam, one typically needs to play the Star-Spangled Banner, demonstrate basic harmonization and improvisation skills, and perform two-handed keyboard pieces. All these tasks require two basic skills:
READING and RESPONDING accurately, in time.
It is suggested that development of eye-hand coordination is the critical skill in basic keyboard reading, and today has
been made achievable like never before. At a student’s first glance at a music score, the eyes can and should be guided—visually tutored—to follow the score and the fingers be trained to rhythmically, accurately respond. Whether the
music score is treble or bass staff only, the full grand staff or a lead sheet, it is the eyes that should lead. This guiding
and pacing of the eyes will almost “force” the timely visual recognition of notes and patterns. Then fingers will be
coaxed to follow accurately and in time.
Two computer-age developments are now applied exclusively in Roland’s new MTLC-16 to achieve this improved
music reading, from the first lesson onward to the development of good reading habits. Both developments are commonplace computer technologies: the Standard MIDI File (SMF) and a Visual Music Tutor. The first, an SMF or digital
music recording, allows the student to pace the reading/learning at any suitable tempo. The second, the V-MT, extends
that flexibility by displaying the digital music so the eyes are compelled to follow along, again at the computer-guided
tempo. This practical monitoring of eye-hand coordination eliminates common reading problems, instilling proficient,
accurate reading.
A failsafe visual tutor is important, since the challenge for a keyboard student, whether, private or group, is a complex,
recurring four-step process. First the EYE must sense the pattern; second, the BRAIN must make sense of it; third, the
FINGERS must respond—and fourth, must do so IN TIME.
Research into the eye movements of keyboard players has detected many ways to monitor and train the eyes: a tachistoscope, a moving mask, a pointed finger, and others. The goal of each is to “nudge” the eyes along. Smooth, regulated
movements are the goal, pacing the eye movement from left to right, measure-by-measure, “scrolling” downward one
staff at a time. Fluent sightreaders typically avoid uncontrolled eye movements, particularly movements shifting backward, and concentrate on looking ahead.
Putting the Visual Tutor to Work
From the first glance of the music, the SMF and Visual Tutor work together to guide the eyes, whether a concept piece,
exercise or tune. The process in short: 1) Play the SMF slowly enough so the student can follow, the first time without
accompaniment tracks. 2) As skill improves, play the SMF with rhythm. 3) Finally, with increased skill and accuracy, the
student adds the orchestra. Of course, the student could be following along in the score, but following the on-screen
notation adds two important elements: a bouncing ball and colored note heads to attract and guide the eye, and automatic “page turns” to allow the students to read ahead.
This visual eye training displays an entire score and is available with the Notation Screen (function key F2), Rehearsal
Screen (F3) or Tone/Mixer Panel (F4). This visual coaching is also suitable when practicing with Markers A & B. A practice loop can help a student painstakingly polish a segment, over and over. The visual reinforcement helps focus both
the reading task, as well as the finger pattern.
There are several options that help visually reinforce the SMF being heard through the MTLC-16. The actual note display is re-sizable so the class can focus on the segment being read. Another option notates all sharps and flats in color—
a practical reminder of those easily-overlooked first sharps and flats that occur in keys of G and F major. All in all, the
flexible visual guide in Roland’s Music Tutor is a landmark in developing strong reading skills in a group keyboard
instruction.
Chap. 1–The Visual Music Tutor Advantage
12

The Visual Music Tutor Advantage
13
Making Reading More Successful—A Few Tips
It is beyond the scope of this brief text to outline everything involved in developing sightreading technique, but here
are a few pointers that can be practically implemented in every MTLC-equipped piano lab, as well as being used in
every computer- or disk-assisted rehearsal session.
PREVIEW playing
If you look before you leap, you will not be surprised. A mental “read-through” will locate familiar and troublesome parts that can be understood before actually trying to get the fingers moving accurately and in time. Just one
brief “look through.” This “look through” is enhanced further if the SMF is playing along.
SLOW playing
Merely playing a piece, either hands separately or together, at a reduced tempo will prepare the students for the
real playing. This is as critical as a preview. However, the writer’s experience as a teacher and as a student indicates that both the PREVIEW and SLOW run-throughs will most likely be ignored. As teachers, we must remember that the learners want only one thing—they want to PLAY! So, we may want to assume that students will
ignore the first two steps. With that in mind, let’s play!
OUTLINE playing—selectively reading the entire score while the SMF is playing
The SMF provides the rhythmic and musical propulsion; the student is visually “forced” to play selected notes (a
sketch or outline of the piece) in a visually guided rhythm
• Play only FIRST BEAT of each measure
•
Play only FIRST AND THIRD BEATS of each measure (either duple or triple meter)
• Play ALL BEATS
•
Play ALL NOTES, including subdivisions
• At the end of this short process, students or entire class have been visually guided through four separate play-
throughs
SHADOW playing—“air play” reading of the piece while the SMF is playing
Again, the SMF provides the propulsion while an “imaginary” perfect performance takes place—no wrong notes
are possible.
•
Move the fingers on top of keys without actually depressing any keys.
• “Play” along with these activities:
a) sing the note names,
b) sing the finger numbers, and
c) name each interval and direction
• Now, when the actual playing begins, the eyes have already read the score several times, and the fingers are
“itching” to play

The Visual Music Tutor Advantage
14
PARALLEL SIGHTREADING methods—The Best Readers are Frequent Readers
Good reading habits will be strengthened further by using the following two strategies: 1) insisting that the class
methods and materials have correlating disks, and 2) have students read through other parallel methods with
visual/SMF guidance.
Possible parallel methods/materials could be:
1) If the class text is Alfred's Piano Course for Adults, then one might use the chapters in PDM: Piano for the
Developing Musician that use parallel concepts. So, when the class was learning the dotted quarter-eighth pattern in
the text, supplementary—and parallel—reading materials from another book would not only reinforce the concepts, but provide fresh new examples for reading.
2) For younger classes using Alfred's Group Piano Method, parallel reading materials would be those from Bastien
Piano Basics, Hal Leonard Student Piano Method, Noona's Comprehensive Piano Method, or any other disk-based
method. Again, the emphasis is simple: the more one reads, the better one reads!
• By insisting that the class method is accompanied by SMFs, every student has an individual, visual guide to
help develop good reading. In addition, the Visual Tutor serves as a teaching assistant for the teacher.
• A parallel reading method is an important adjunct; however, one must keep in mind that these “read
throughs” are not aiming for perfection but, rather, the visual/tactile process. Either the OUTLINE or SHADOW options are suitable.
• Provide students with a list of supplementary book/disk publications that they can read through, emphasiz-
ing popular or standard tunes
• Use other tutorial SMF disks for reading practice, especially the correlating POPULAR MUSIC materials from
FJH Piano Adventure series, the Alfred Basic Piano Course, or the Hal Leonard Student Piano Method. In addi-
tion, both the Looney Tunes and the Performance Plus series from Warner Bros. provide interesting, enjoyable
and challenging reading materials. Best of all, students will enjoy reading through these tunes; they'll probably forget they are learning.
• Finally, there are two more SMF series, the first with accompanying books, the second without books. By using
these SMFs with the Visual Music Tutor, students will be compelled to read along with professionally-recorded MIDI files. In addition, the subtle propulsion of the SMF playback provides pressure to "keep up with the
ensemble," further strengthening keyboard reading skills.
 Loading...