

Roland Corporation MT-90U Owner's Manual

Owner’s Manual
Thank you, and congratulations on your choice of the Roland MT-90U.
Before using this unit, carefully read the sections entitled: “USING THE UNIT SAFELY” and
“IMPORTANT NOTES” (p. 2; p. 4). These sections provide important information
concerning the proper operation of the unit. Additionally, in order to feel assured that
you have gained a good grasp of every feature provided by your new unit, Owner’s
manual should be read in its entirety. The manual should be saved and kept on hand as
a convenient reference.
Copyright © 2008 ROLAND CORPORATION
All rights reserved. No part of this publication may be reproduced in any form without
the written permission of ROLAND CORPORATION.
USING THE UNIT SAFELY
Used for instructions intended to alert the
user to the risk of death or severe injury
should the unit be used improperly.
Used for instructions intended to alert the
user to the risk of injury or material
damage should the unit be used
improperly.
* Material damage refers to damage or
other adverse effects caused with
respect to the home and all its
furnishings, as well to domestic animals
or pets.
002c
Do not open (or modify in any
•
way) the unit or its AC
adaptor.
......................................................................
003
•
Do not attempt to repair the
unit, or replace parts within it
(except when this manual
provides specific instructions
directing you to do so). Refer
all servicing to your retailer,
the nearest Roland Service
Center, or an authorized
Roland distributor, as listed on
the “Information” page.
......................................................................
004
•
Never use or store the unit in
places that are:
• Subject to temperature
extremes (e.g., direct
sunlight in an enclosed
vehicle, near a heating
duct, on top of heat-generating equipment); or are
• Damp (e.g., baths,
washrooms, on wet floors);
or are
• Humid; or are
• Exposed to rain; or are
• Dusty; or are
• Subject to high levels of
vibration.
......................................................................
007
Make sure you always have
•
the unit placed so it is level
and sure to remain stable.
Never place it on stands that
could wobble, or on inclined
surfaces.
The symbol alerts the user to important instructions or
warnings. The specific meaning of the symbol is
determined by the design contained within the triangle.
In the case of the symbol at left, it is used for general
cautions, warnings, or alerts to danger.
The symbol alerts the user to actions that must
never be carried out. The specific thing that must not be
done is indicated by the design contained within the
circle. In the case of the symbol at left, it means that the
unit must never be disassembled.
The symbol alerts the user to actions that must be
carried out. The specific action that must be done is
indicated by the design contained within the circle. In
the case of the symbol at left, it means that the powercord plug must be unplugged from the outlet.
008c
Be sure to use only the AC
•
adaptor supplied with the
unit. Also, make sure the line
voltage at the installation
matches the input voltage
specified on the AC adaptor’s
body. Other AC adaptors
may use a different polarity,
or be designed for a different
voltage, so their use could
result in damage, malfunction,
or electric shock.
.....................................................................
008e
•
Use only the attached powersupply cord. Also, the
supplied power cord must not
be used with any other
device.
.....................................................................
009
•
Do not excessively twist or
bend the power cord, nor
place heavy objects on it.
Doing so can damage the
cord, producing severed
elements and short circuits.
Damaged cords are fire and
shock hazards!
.....................................................................
010
This unit, either alone or in
•
combination with an amplifier
and headphones or speakers,
may be capable of producing
sound levels that could cause
permanent hearing loss. Do
not operate for a long period
of time at a high volume level,
or at a level that is uncomfortable. If you experience
any hearing loss or ringing in
the ears, you should immediately stop using the unit, and
consult an audiologist.
011
Do not allow any objects
•
(e.g., flammable material,
coins, pins); or liquids of any
kind (water, soft drinks, etc.)
to penetrate the unit.
.....................................................................
012b
Immediately turn the power
•
off, remove the AC adaptor
from the outlet, and request
servicing by your retailer, the
nearest Roland Service
Center, or an authorized
Roland distributor, as listed
on the “Information” page
when:
• The AC adaptor, the
power-supply cord, or the
plug has been damaged;
or
• If smoke or unusual odor
occurs
• Objects have fallen into, or
liquid has been spilled onto
the unit; or
• The unit has been exposed
to rain (or otherwise has
become wet); or
• The unit does not appear to
operate normally or
exhibits a marked change
in performance.
.....................................................................
013
In households with small
•
children, an adult should
provide supervision until the
child is capable of following
all the rules essential for the
safe operation of the unit.
2
USING THE UNIT SAFELY
014
Protect the unit from strong
•
impact.
(Do not drop it!)
......................................................................
015
•
Do not force the unit’s powersupply cord to share an outlet
with an unreasonable number
of other devices. Be especially
careful when using extension
cords—the total power used
by all devices you have
connected to the extension
cord’s outlet must never
exceed the power rating
(watts/amperes) for the
extension cord. Excessive
loads can cause the insulation
on the cord to heat up and
eventually melt through.
......................................................................
016
•
Before using the unit in a
foreign country, consult with
your retailer, the nearest
Roland Service Center, or an
authorized Roland distributor,
as listed on the “Information”
page.
......................................................................
020
• Keep lithium batteries out of
reach of small children. If a
child has accidentally
swallowed a battery, see a
doctor immediately.
......................................................................
021
• Lithium batteries must never
be recharged, heated, taken
apart, or thrown into a fire or
water.
......................................................................
023
•
DO NOT play a CD-ROM
disc on a conventional audio
CD player. The resulting
sound may be of a level that
could cause permanent
hearing loss. Damage to
speakers or other system
components may result.
......................................................................
027
• Never expose Lithium Battery
to excessive heat such as
sunshine, fire or the like.
101b
The unit and the AC adaptor
•
should be located so their
location or position does not
interfere with their proper
ventilation.
.....................................................................
102c
Always grasp only the plug
•
on the AC adaptor cord when
plugging into, or unplugging
from, an outlet or this unit.
.....................................................................
103b
•
At regular intervals, you
should unplug the AC adaptor
and clean it by using a dry
cloth to wipe all dust and
other accumulations away
from its prongs. Also,
disconnect the power plug
from the power outlet
whenever the unit is to remain
unused for an extended
period of time. Any accumulation of dust between the
power plug and the power
outlet can result in poor
insulation and lead to fire.
.....................................................................
104
•
Try to prevent cords and
cables from becoming
entangled. Also, all cords
and cables should be placed
so they are out of the reach of
children.
.....................................................................
106
•
Never climb on top of, nor
place heavy objects on the
unit.
.....................................................................
107c
Never handle the AC adaptor
•
or its plugs with wet hands
when plugging into, or
unplugging from, an outlet or
this unit.
.....................................................................
108b
•
Before moving the unit,
disconnect the AC adaptor
and all cords coming from
external devices.
.....................................................................
109b
• Before cleaning the unit, turn
off the power and unplug the
AC adaptor from the outlet (p.
12).
110b
Whenever you suspect the
•
possibility of lightning in your
area, disconnect the AC
adaptor from the outlet.
.....................................................................
111
•
If used improperly, batteries
may explode or leak and
cause damage or injury. In
the interest of safety, please
read and observe the
following precautions (p. 16).
• Carefully follow the instal-
lation instructions for
batteries, and make sure
you observe the correct
polarity.
• Remove the batteries
whenever the unit is to
remain unused for an
extended period of time.
• Never keep batteries
together with metallic
objects such as ballpoint
pens, necklaces, hairpins,
etc.
.....................................................................
112
•
Used batteries must be
disposed of in compliance
with whatever regulations for
their safe disposal that may be
observed in the region in which you
live.
.....................................................................
113
•
Use only the specified type
(model no. CR2025) of
lithium battery (p. 16). Be
sure to insert it as directed (to
ensure correct polarity).
.....................................................................
114
•
Used lithium batteries must be
disposed of in compliance
with whatever regulations for
their safe disposal that may
be observed in the region in
which you live.
.....................................................................
118a
•
Should you remove the
grounding terminal screw,
lithium battery and battery
case, keep them in a safe
place out of children’s reach,
so there is no chance of them
being swallowed accidentally.
3

Important Notes
Power Supply: Use of Batteries
301
• Do not connect this unit to same electrical outlet that is
being used by an electrical appliance that is controlled by
an inverter (such as a refrigerator, washing machine,
microwave oven, or air conditioner), or that contains a
motor. Depending on the way in which the electrical
appliance is used, power supply noise may cause this unit
to malfunction or may produce audible noise. If it is not
practical to use a separate electrical outlet, connect a
power supply noise filter between this unit and the
electrical outlet.
302
• The AC adaptor will begin to generate heat after long
hours of consecutive use. This is normal, and is not a cause
for concern.
307
• Before connecting this unit to other devices, turn off the
power to all units. This will help prevent malfunctions and/
or damage to speakers or other devices.
Placement
351
• Using the unit near power amplifiers (or other equipment
containing large power transformers) may induce hum. To
alleviate the problem, change the orientation of this unit;
or move it farther away from the source of interference.
352a
• This device may interfere with radio and television
reception. Do not use this device in the vicinity of such
receivers.
352b
• Noise may be produced if wireless communications
devices, such as cell phones, are operated in the vicinity of
this unit. Such noise could occur when receiving or initiating a call, or while conversing. Should you experience
such problems, you should relocate such wireless devices
so they are at a greater distance from this unit, or switch
them off.
354a
• Do not expose the unit to direct sunlight, place it near
devices that radiate heat, leave it inside an enclosed
vehicle, or otherwise subject it to temperature extremes.
Excessive heat can deform or discolor the unit.
355b
• When moved from one location to another where the
temperature and/or humidity is very different, water
droplets (condensation) may form inside the unit. Damage
or malfunction may result if you attempt to use the unit in
this condition. Therefore, before using the unit, you must
allow it to stand for several hours, until the condensation
has completely evaporated.
360
• Depending on the material and temperature of the surface
on which you place the unit, its rubber feet may discolor or
mar the surface.
You can place a piece of felt or cloth under the rubber feet
to prevent this from happening. If you do so, please make
sure that the unit will not slip or move accidentally.
Maintenance
401a
• For everyday cleaning wipe the unit with a soft, dry cloth
or one that has been slightly dampened with water. To
remove stubborn dirt, use a cloth impregnated with a mild,
non-abrasive detergent. Afterwards, be sure to wipe the
unit thoroughly with a soft, dry cloth.
402
• Never use benzine, thinners, alcohol or solvents of any
kind, to avoid the possibility of discoloration and/or deformation.
Additional Precautions
553
• Use a reasonable amount of care when using the unit’s
buttons, sliders, or other controls; and when using its jacks
and connectors. Rough handling can lead to malfunctions.
554
• Never strike or apply strong pressure to the display.
556
• When connecting / disconnecting all cables, grasp the
connector itself—never pull on the cable. This way you will
avoid causing shorts, or damage to the cable’s internal
elements.
558a
• To avoid disturbing your neighbors, try to keep the unit’s
volume at reasonable levels. You may prefer to use
headphones, so you do not need to be concerned about
those around you (especially when it is late at night).
559a
• When you need to transport the unit, package it in the box
(including padding) that it came in, if possible. Otherwise,
you will need to use equivalent packaging materials.
4
Important Notes
Handling Floppy Disks
651
• Floppy disks contain a plastic disk with a thin coating of
magnetic storage medium. Microscopic precision is
required to enable storage of large amounts of data on
such a small surface area. To preserve their integrity,
please observe the following when handling Floppy disks:
• Never touch the magnetic medium inside the disk.
• Do not use or store Floppy disks in dirty or dusty areas.
• Do not subject Floppy disks to temperature extremes
(e.g., direct sunlight in an enclosed vehicle). Recommended temperature range: 10 to 50˚C (50 to 122˚F).
• Do not expose Floppy disks to strong magnetic fields,
such as those generated by loudspeakers.
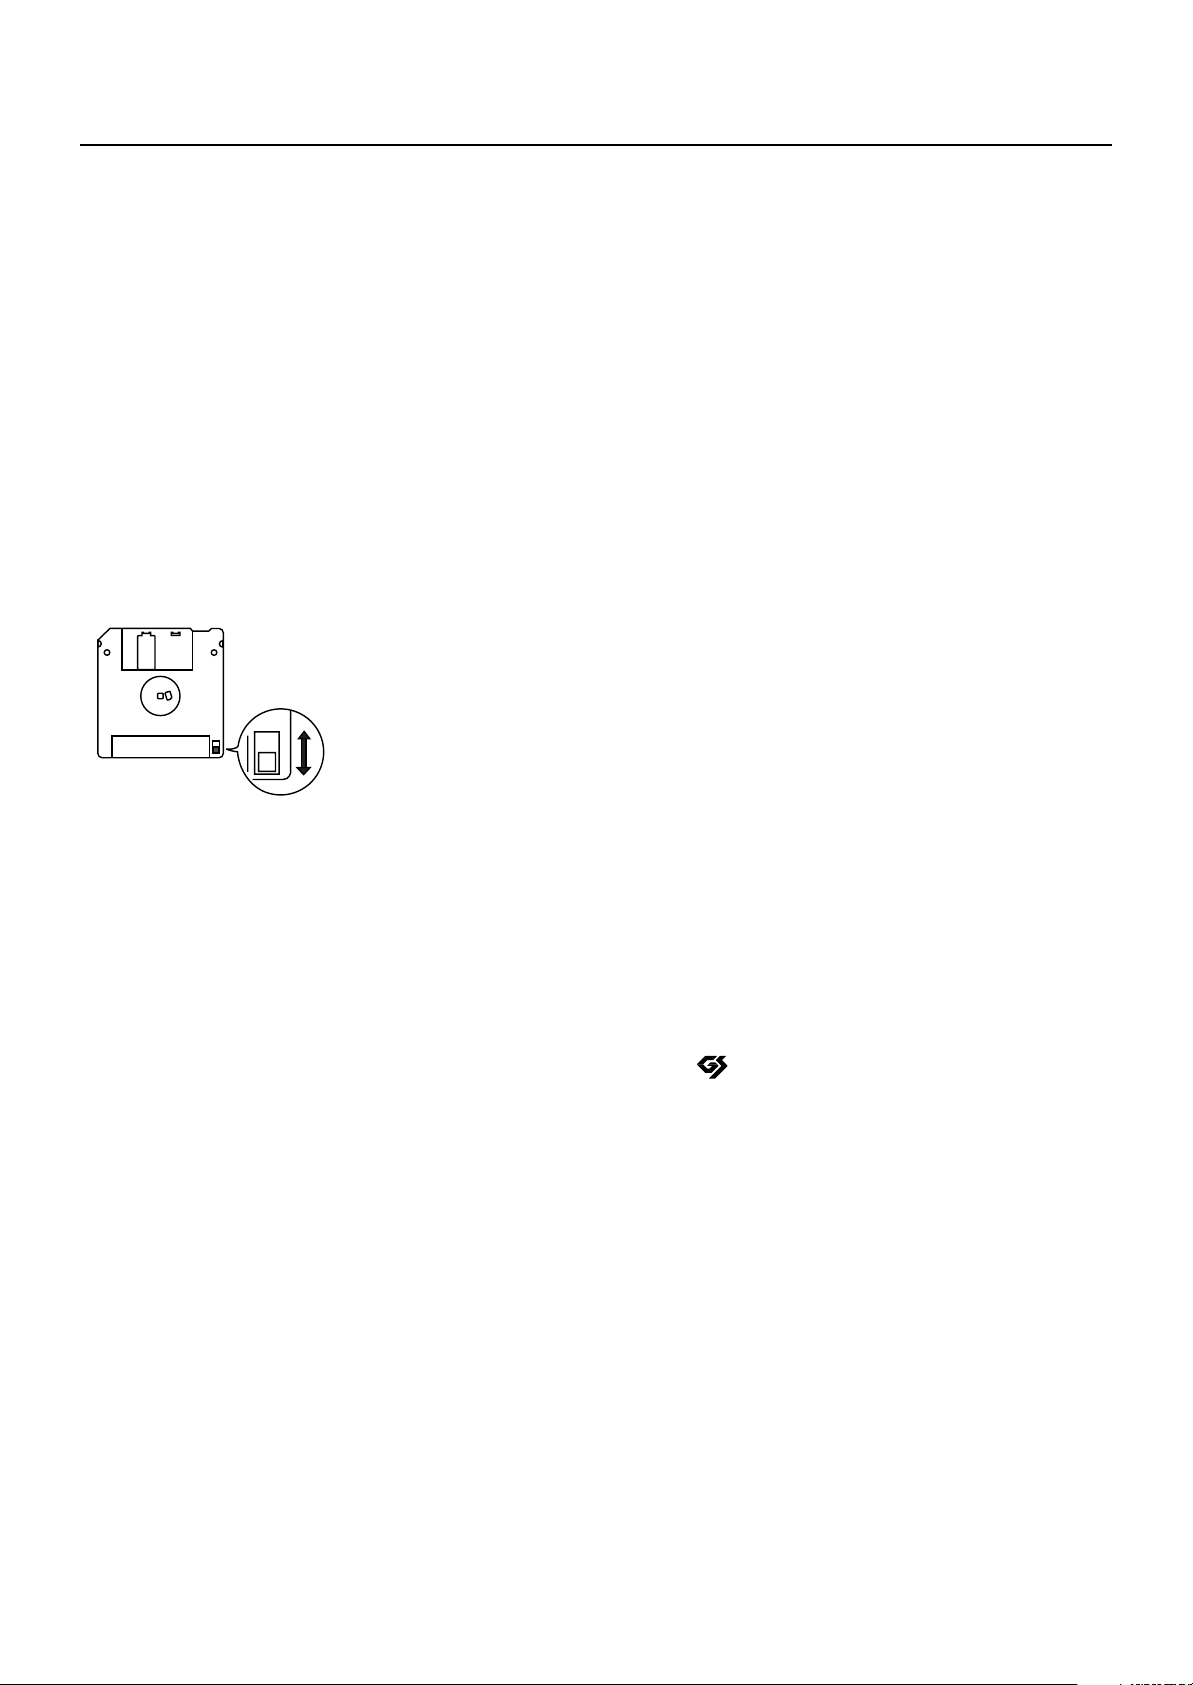
652
• Floppy disks have a “write protect” tab which can protect
the disk from accidental erasure. It is recommended that
the tab be kept in the PROTECT position, and moved to the
WRITE position only when you wish to write new data onto
the disk.
fig.DiskProtect.e.eps
Rear side of the disk
Write
(can write new data onto disk)
Handling CD-ROMs
801
• Avoid touching or scratching the shiny underside (encoded
surface) of the disc. Damaged or dirty CD-ROM discs may
not be read properly. Keep your discs clean using a
commercially available CD cleaner.
Write Protect Tab
653
Protect
(prevents writing to disk)
• The identification label should be firmly affixed to the disk.
Should the label come loose while the disk is in the drive, it
may be difficult to remove the disk.
654
• Store all disks in a safe place to avoid damaging them,
and to protect them from dust, dirt, and other hazards. By
using a dirty or dust-ridden disk, you risk damaging the
disk, as well as causing the disk drive to malfunction.
Using USB Memory
704
• Carefully insert the USB memory all the way in—until it is
firmly in place.
705
• Never touch the terminals of the USB Memory. Also, avoid
getting the terminals dirty.
708
• USB Memory are constructed using precision components;
handle the cards carefully, paying particular note to the
following.
• To prevent damage to the cards from static electricity, be
sure to discharge any static electricity from your own body
before handling the cards.
• Do not touch or allow metal to come into contact with the
contact portion of the cards.
• Do not bend, drop, or subject cards to strong shock or vi-
bration.
• Do not keep cards in direct sunlight, in closed vehicles, or
other such locations (storage temperature: -25 to 85˚ C).
• Do not allow cards to become wet.
• Do not disassemble or modify the cards.
203
* GS ( ) is a registered trademark of Roland Corporation.
204
* Microsoft and Windows are registered trademarks of Microsoft
Corporation.
206j
* Windows® is known officially as: “Microsoft® Windows®
operating system.”
207
* Apple and Macintosh are registered trademarks of Apple, Inc.
209
* Mac OS is a trademark of Apple Inc.
220
* All product names mentioned in this document are trademarks or
registered trademarks of their respective owners.
238
* MPEG Layer-3 audio compression technology is licensed from
Fraunhofer IIS Corporation and THOMSON Multimedia
Corporation.
5

Contents
USING THE UNIT SAFELY............................................................................... 2
Important Notes............................................................................................ 4
Panel Descriptions......................................................................................... 8
Front Panel................................................................................................................................... 8
Rear Panel ...................................................................................................................................9
Remote Control...........................................................................................................................10
Screen....................................................................................................................................... 11
Basic Screen ...................................................................................................................11
Marker Screen ................................................................................................................11
16 Track Screen ..............................................................................................................11
Settings Screen................................................................................................................ 11
Folder Screen.................................................................................................................. 11
MT-90U Basic Operation............................................................................. 12
Setting Up.................................................................................................................................. 12
Connecting the AC Adaptor .................................................................................................12
Turning the Power On and Off ..............................................................................................13
Adjusting the Volume ........................................................................................................... 14
Connecting Headphones ...................................................................................................... 14
Adjusting the Display Brightness............................................................................................ 15
Connecting the Microphone.................................................................................................. 15
Using the Remote Control ..................................................................................................... 16
Tuning with the MT-90U ....................................................................................................... 17
Listening to Music .......................................................................................................................19
Connecting the USB Memory ................................................................................................ 19
Playing Songs .....................................................................................................................20
Repeating One Song ...........................................................................................................22
Repeating All Songs (All Song Play).......................................................................................23
Changing the Tempo................................................................................................................... 24
Changing the Tempo by Beat................................................................................................ 24
Changing the Tempo by Tapping (Tap Tempo)........................................................................ 25
Using the Metronome .................................................................................................................. 26
Changing the Tempo of the Metronome .................................................................................26
Changing the Volume of the Metronome ................................................................................27
Changing the Metronome’s Time Signature............................................................................. 27
Practicing with a Song (Track Buttons) ...........................................................................................28
Counting in to a Song ................................................................................................................. 29
Marking a Section to Repeat for Practice .......................................................................................30
Playing a Marked Section.....................................................................................................31
Erasing a Marker ................................................................................................................31
Repeating a Marked Section.................................................................................................32
Moving a Mark...................................................................................................................33
Removing Tempo Changes for Practice.......................................................................................... 35
Changing the Key (Transposition) .................................................................................................36
Changing Reverb Effects.............................................................................................................. 37
Changing Playback Sound Quality (Sound Control) ........................................................................38
Listening to Specific Instrument Parts.............................................................................................. 39
Playing Only One Part (Solo) ................................................................................................ 39
Turning Off Specific Parts (Mute) ...........................................................................................40
Displaying the Tone Names of Parts....................................................................................... 41
6

Playing Audio Files .....................................................................................................................42
Playing Audio Files from USB Memory ................................................................................... 43
Playing a Music CD from the CD Drive (Sold Separately) .........................................................43
Singing Karaoke with Audio Files or a Music CD (Center Cancel) .............................................44
Changing the Key (Playback Transpose).................................................................................44
Changing the Tempo (Time Stretch)........................................................................................45
Creating a List of Your Favorite Songs (Song List)............................................................................ 46
Other Functions .......................................................................................... 47
Changing the Metronome Settings ................................................................................................47
Changing Count Settings ............................................................................................................. 48
Marking the Middle of a Measure ................................................................................................49
Changing Lyric Display Settings.................................................................................................... 49
Canceling Lyric Display ............................................................................................................... 50
Playing Songs in Random Order...................................................................................................50
Assigning Parts to Track Buttons (Track Assign) ...............................................................................51
Adjusting the Volume of Audio Files .............................................................................................. 51
Changing USB Memory Settings ................................................................................................... 52
Changing USB Driver Settings ...................................................................................................... 52
Returning to the Factory Default Settings (Factory Reset) ................................................................... 53
Operating the Pedal Switch (Sold Separately) ................................................................................53
Connecting a MIDI Device ........................................................................................................... 54
Connecting an External Audio Device ...........................................................................................54
Connecting and Using a Digital Piano................................................................................54
Connecting a Floppy Disk Drive (Sold Separately)...........................................................................55
Copying Data from a Floppy Disk to USB Memory...............................................................55
Connecting a CD Drive (Sold Separately) ......................................................................................56
About Music Files........................................................................................ 57
The MT-90U Allows You To Use the Following Music Files................................................................57
Formatting the USB Memory.........................................................................................................58
Copying Music Files from a Computer to USB Memory....................................................................58
Troubleshooting.......................................................................................... 59
Errors and Other Displays ........................................................................... 60
Demo Song List........................................................................................... 61
MIDI Implementation Chart.......................................................................... 62
Main Specifications..................................................................................... 63
Index ......................................................................................................... 65
7
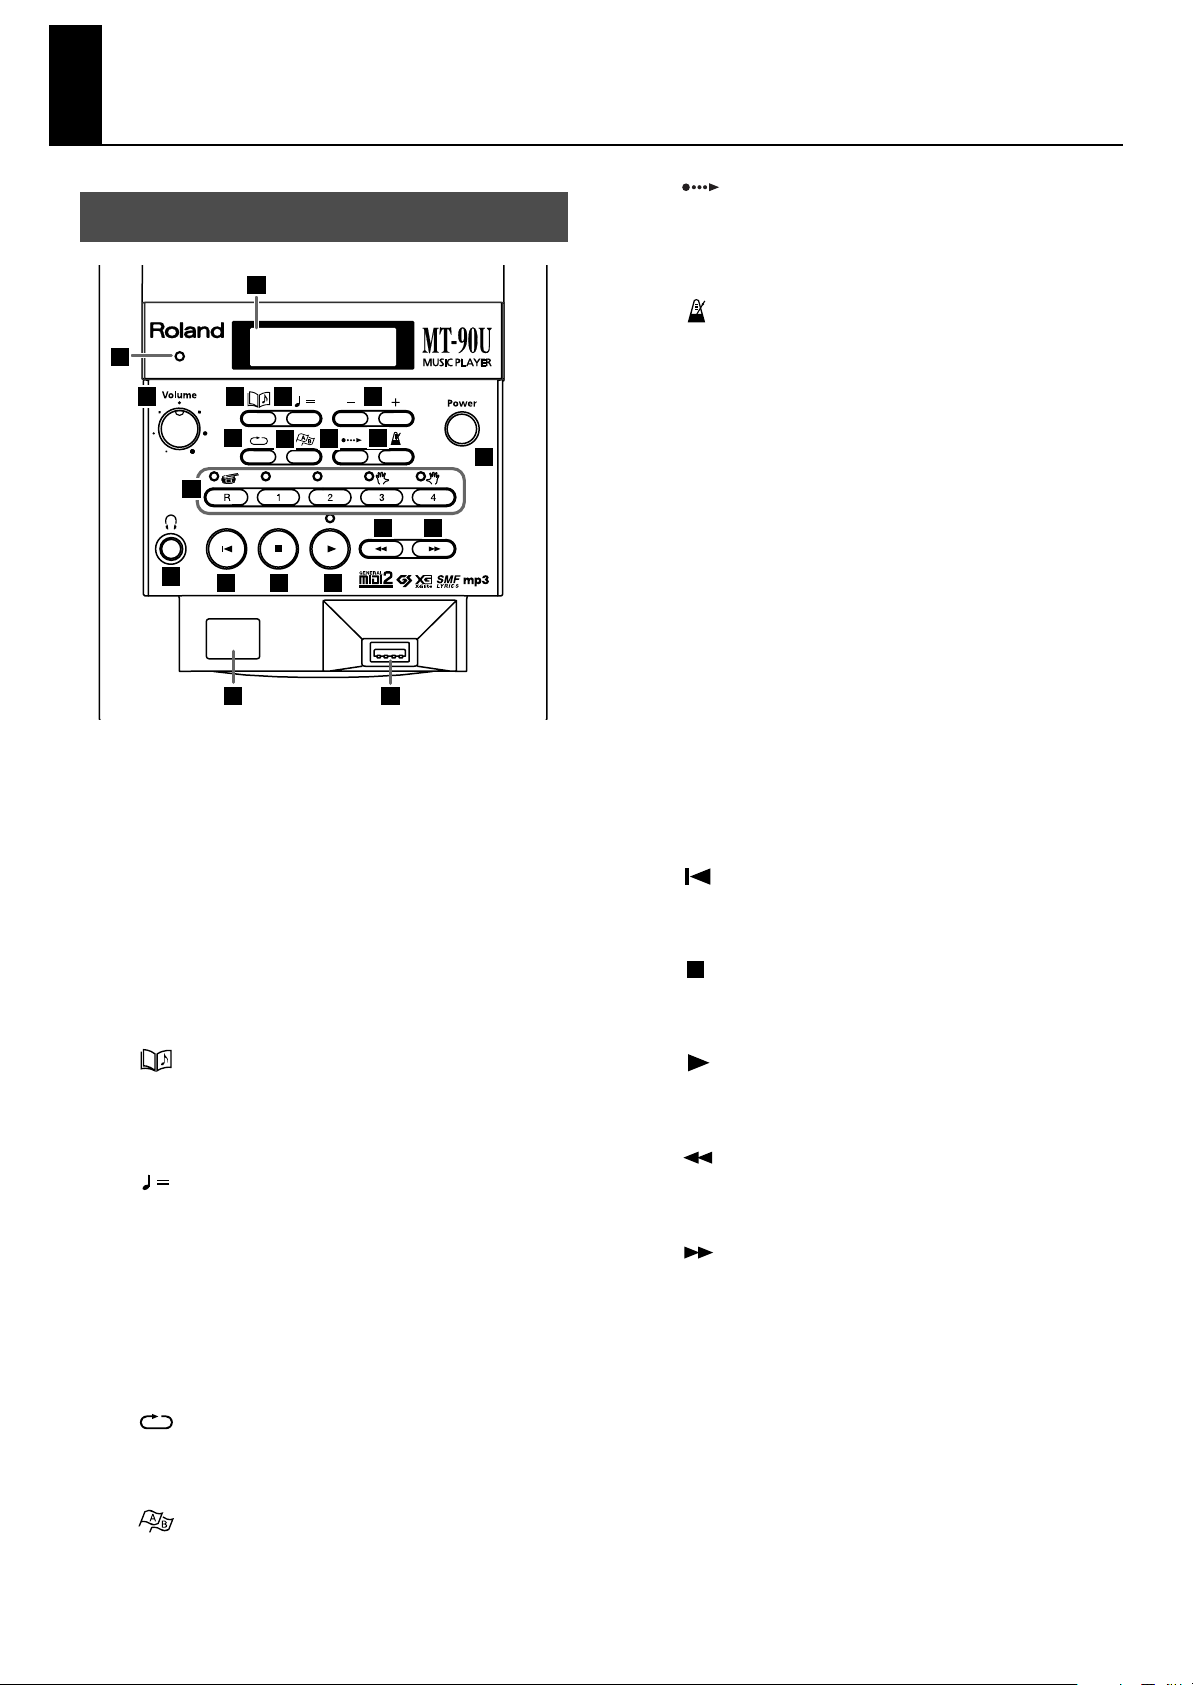
Panel Descriptions
Front Panel
<fig.frontpanel.eps>
1
2
5
12
4
7
14 15
19
6
10
9
8
17 18
16
20
3
13
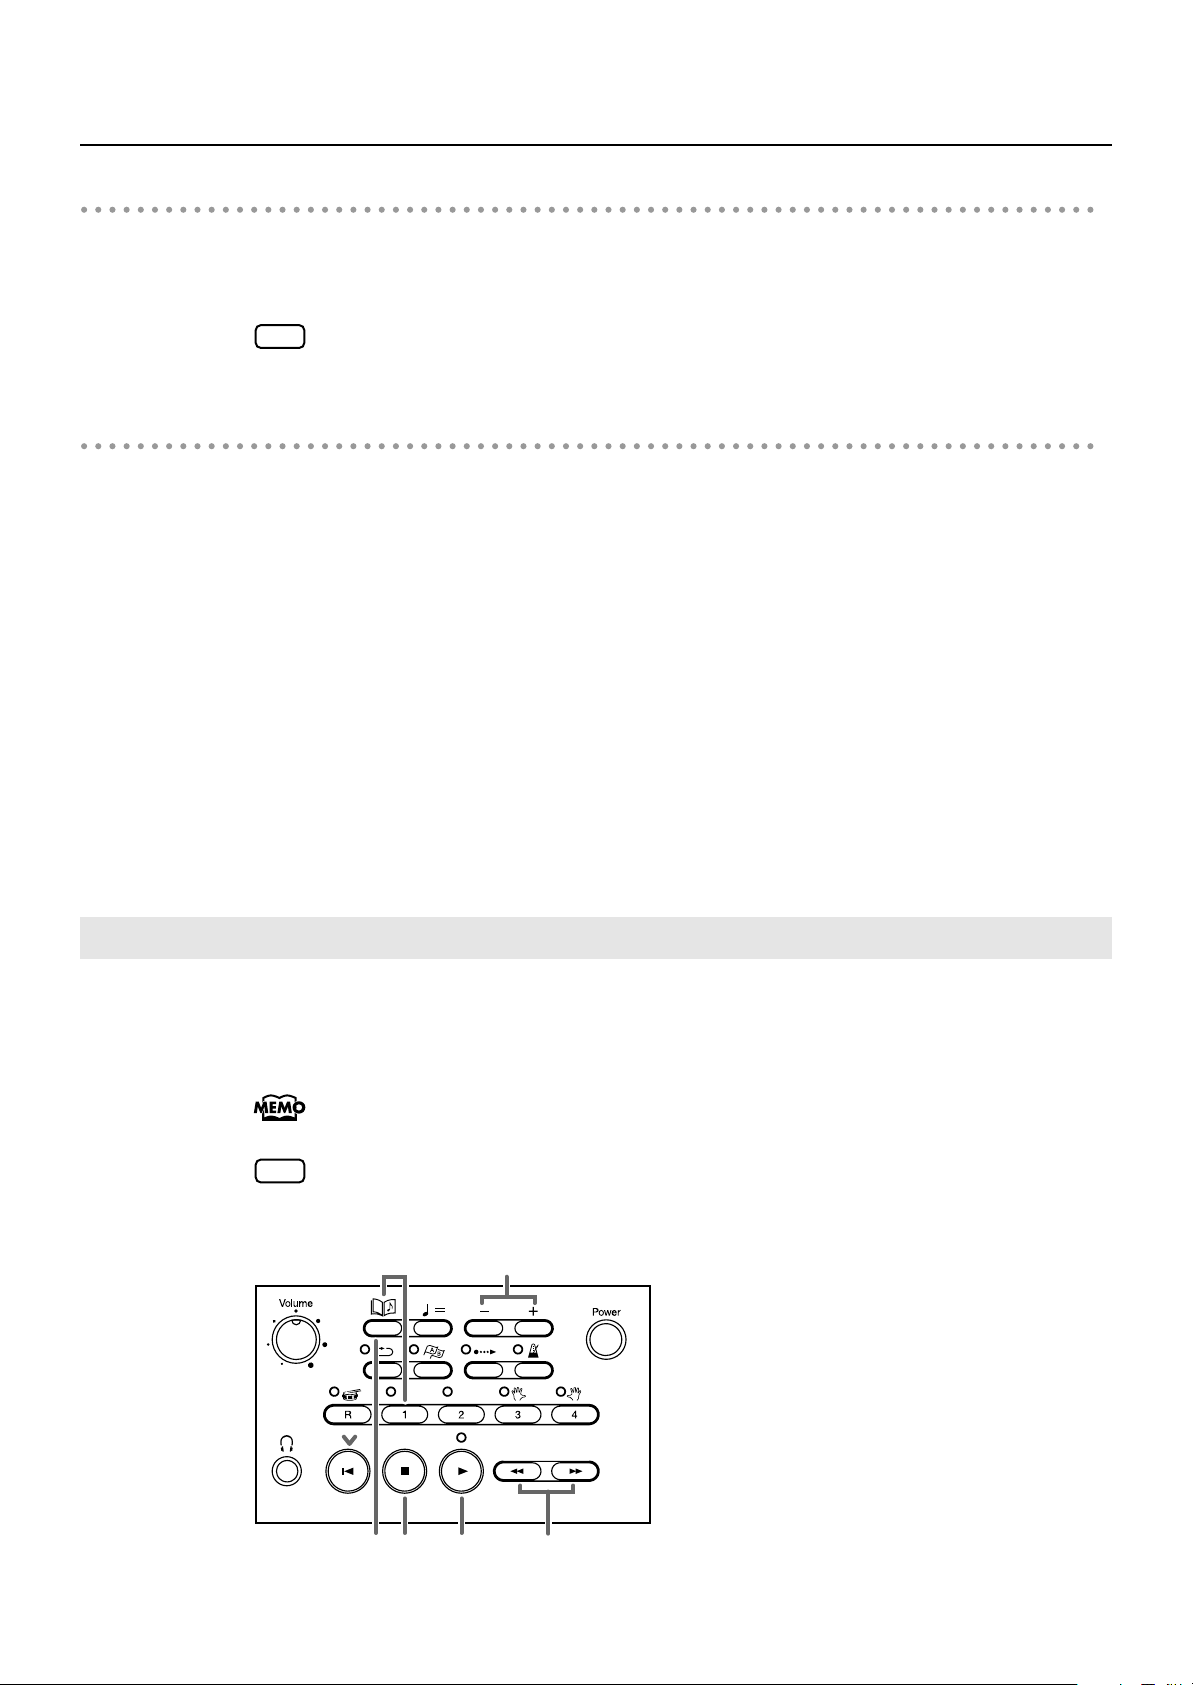
(Count In)] Button
[
9.
Press to play a count sound before a song starts or with
the end of a song’s intro (p. 29).
[ (Metronome)] Button
10.
Turns on the built-in metronome (p. 26).
11.
Power Button
Turn the power on and off (p. 13).
11
12.
Track Buttons
The five buttons below are called the Track buttons. Use
these buttons to select and play a song’s performance
parts (tracks) (p. 28).
[R] Button
[1] Button
[2] Button
[3] Button
[4] Button
1.
Display
Displays information relating to the operations you
perform (p. 11).
2.
Beat Indicator
Flashes in time with the beat of the song or metronome.
3.
[Volume] Knob
Adjust the volume level (p. 14).
4.
5.
6.
(Song)] Button
[
Press to select a song (p. 19), or to return to the basic
screen (p. 11).
(Tempo)] Button
[
Press this button to adjust the tempo (p. 24).
[+ (Inc)] [- (Dec)] Buttons
Adjust the value of selected items.
Pressing both buttons at the same time returns the setting
to its default value.
13.
Headphones Jack
Allows you to connect headphones (sold separately) (p. 14).
14.
[
(Reset)] Button
Returns you to the beginning of a song.
[
15.
16.
17.
18.
19.
(Stop)] Button
Press to stop song playback.
[ (Play)] Button
Press to start song playback.
(Bwd)] Button
[
Press to rewind a song.
[
(Fwd)] Button
Press to fast forward a song.
Remote Sensor
This area receives signals from the remote control (p. 16).
7.
[ (Repeat)] Button
Press to repeat a specified song or section (p. 22, p.32).
8.
(Mark)] Button
[
Press to place a marker in a song (p. 31) and to access
the marker screen (p. 11).
8
20.
USB Connector
Allows you to connect the USB memory, floppy disk
drive, or CD-ROM drive (p. 19).
(USB memory, floppy disk drive, and CD drive options
are sold separately.)
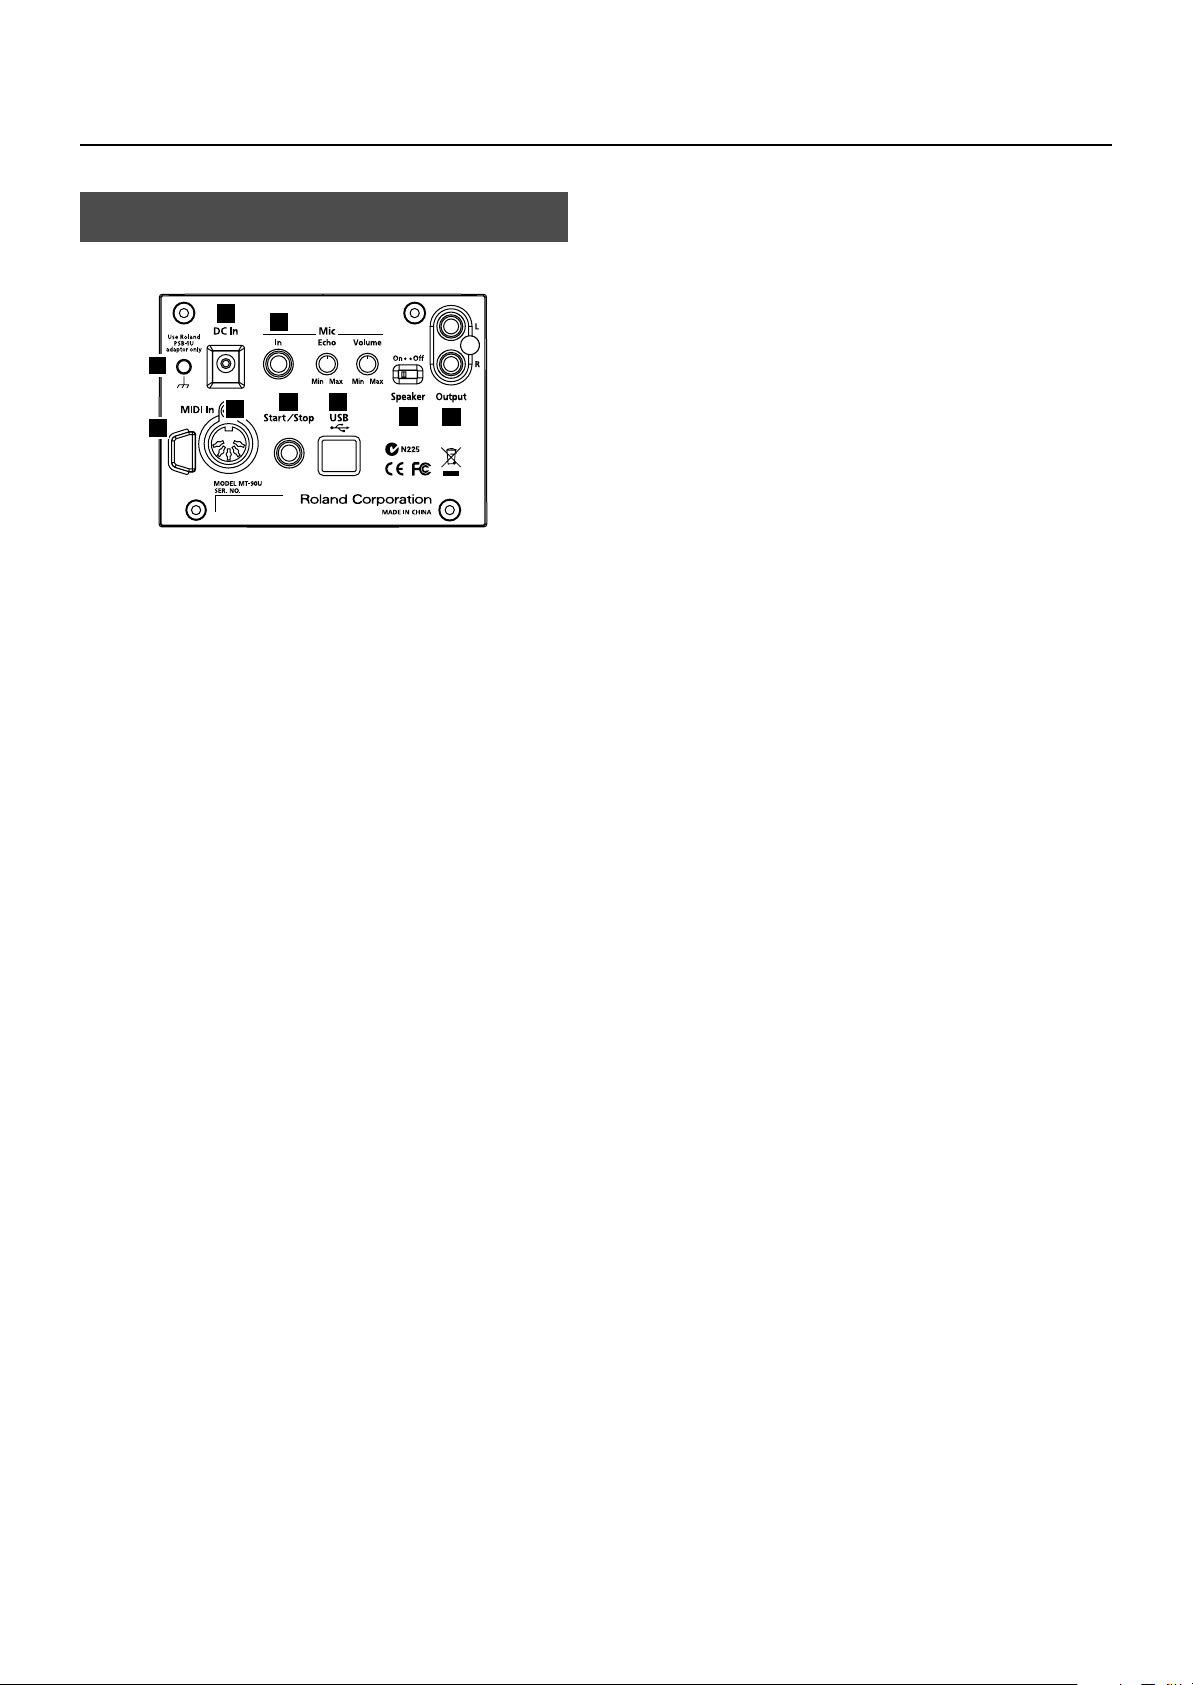
Rear Panel
<fig.rearpanel.eps>
1
2
9
8
7
5
DC In Jack
1.
Connect the supplied AC adaptor here (p. 12).
2.
Mic
Mic In Jack
Connect a microphone here (sold separately) (p. 15).
Mic Echo Knob
Adjusts the echo effect applied to the microphone (p. 15) .
Mic Volume Knob
Adjusts the microphone volume (p. 15).
3.
Speaker Switch
Turn the MT-90U speakers on and off.
6
3
Panel Descriptions
8.
USB Connector
Allows you to connect the MT-90U to a computer using a
USB cable. Once connected, you can receive MIDI data
through your computer.
9.
Grounding Terminal
Depending on the circumstances of a particular setup,
you may experience a discomforting sensation, or
4
perceive that the surface feels gritty to the touch when
you touch this device, microphones connected to it, or
the metal portions of other objects, such as guitars. This
is due to an infinitesimal electrical charge, which is
absolutely harmless.
However, if you are concerned about this, connect the
ground terminal (see figure) to an external ground.
When the unit is grounded, a slight hum may occur,
depending on the particulars of your installation. If you
are unsure of the connection method, contact your
nearest Roland Service Center, or an authorized Roland
distributor, as listed on the “Information” page.
Do not connect the MT-90U near:
• Water pipes (may result in shock or electrocution)
• Gas pipes (may result in fire or explosion)
• Telephone-line ground or lightning rod (may be
dangerous in the event of lightning)
4.
Output L/R Jacks
Here is where you can connect an external instrument,
such as an electric piano, using an audio cable (sold
separately) (p. 54).
5.
Cord Hook
Wrap the AC adaptor cord around this hook. By doing
so, you can avoid placing undue stress on the DC In jack
and prevent the loss of power should you accidentally
pull on the AC adaptor’s cord.
6.
MIDI In Connector
Here is where you can connect an external MIDI device
using a MIDI cable (sold separately) (p. 54).
7.
Start/Stop Jack
Connect the pedal switch (sold separately). Once
connected, you can start and stop song playback using
the pedal (p. 53).
9
Panel Descriptions
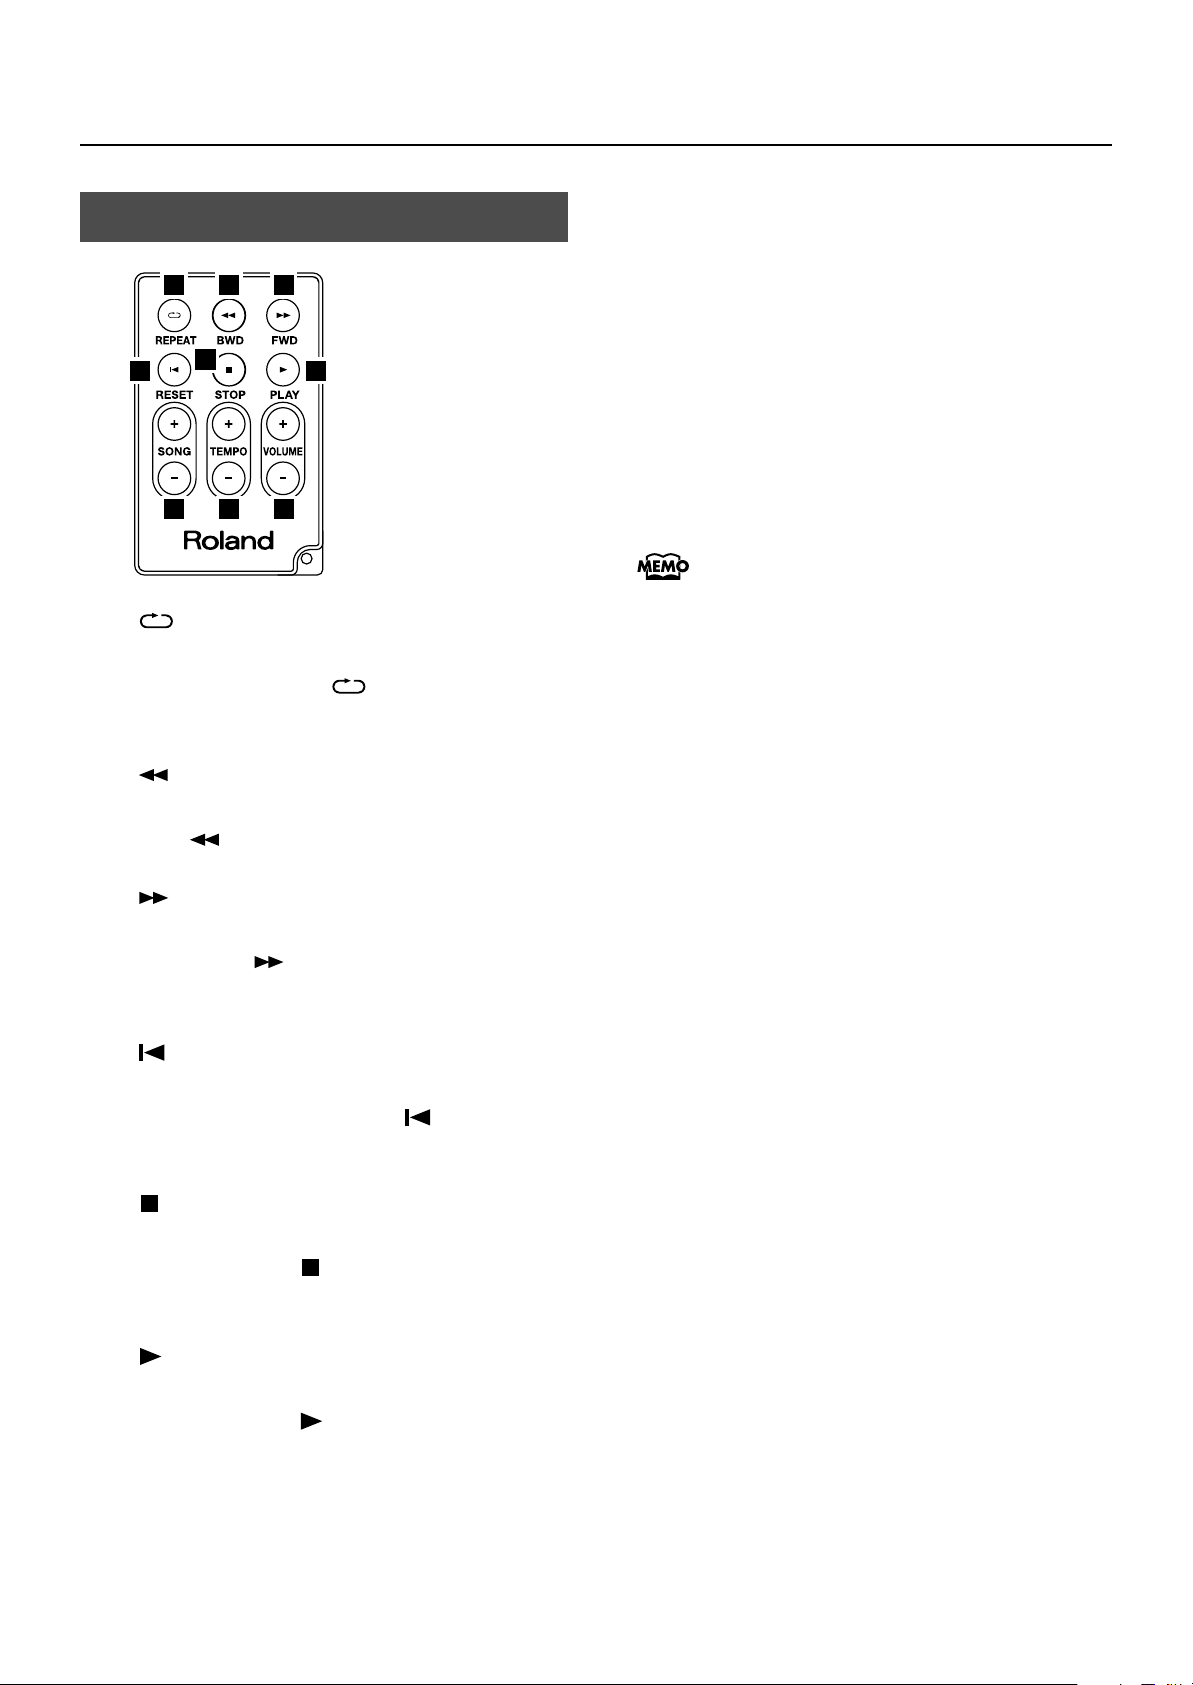
Remote Control
<fig.00=rmtctrl.eps>
1 2
4
[
1.
Repeats a specified song or section. This button performs
the same function as the [ (Repeat)] button on the
MT-90U’s front panel.
5
7 8
(REPEAT)] Button
3
6
9
7.
SONG [+] [-] Buttons
Press to select a song.
8.
TEMPO [+] [-] Buttons
Adjust the song tempo. Pressing the [+] button speeds up
the tempo. Pressing the [-] button slows down the tempo.
9.
VOLUME [+] [-] Buttons
Adjust the volume. Pressing the [+] button raises the
volume. Pressing the [-] button lowers the volume.
When you adjust the volume with the remote, the
volume changes without affecting the position of
knob on the MT-90U’s front panel. When you
adjust the volume again using the front panel
knob, volume adjustments made with the remote
become ineffective and the volume returns to the
actual level indicated by the knob.
[
2.
3.
4.
5.
(BWD)] Button
Rewinds a song. This button performs the same function
as the [
[
Fast forwards a song. This button performs the same
function as the [
panel.
[
Returns you to the beginning of a song. This button
performs the same function as the [
on the MT-90U’s front panel.
[
(STOP)] Button
Press to stop song playback. This button performs the
same function as the [
front panel.
(Bwd)] button on the MT-90U’s front panel.
(FWD)] Button
(Fwd)] button on the MT-90U’s front
(RESET)] Button
(Reset)] button
(Stop)] button on the MT-90U’s
6.
(PLAY)] Button
[
Press to start song playback. This button performs the
same function as the [
front panel.
(Play)] button on the MT-90U’s
10
Panel Descriptions
Measure No.
Marker A
Marker B
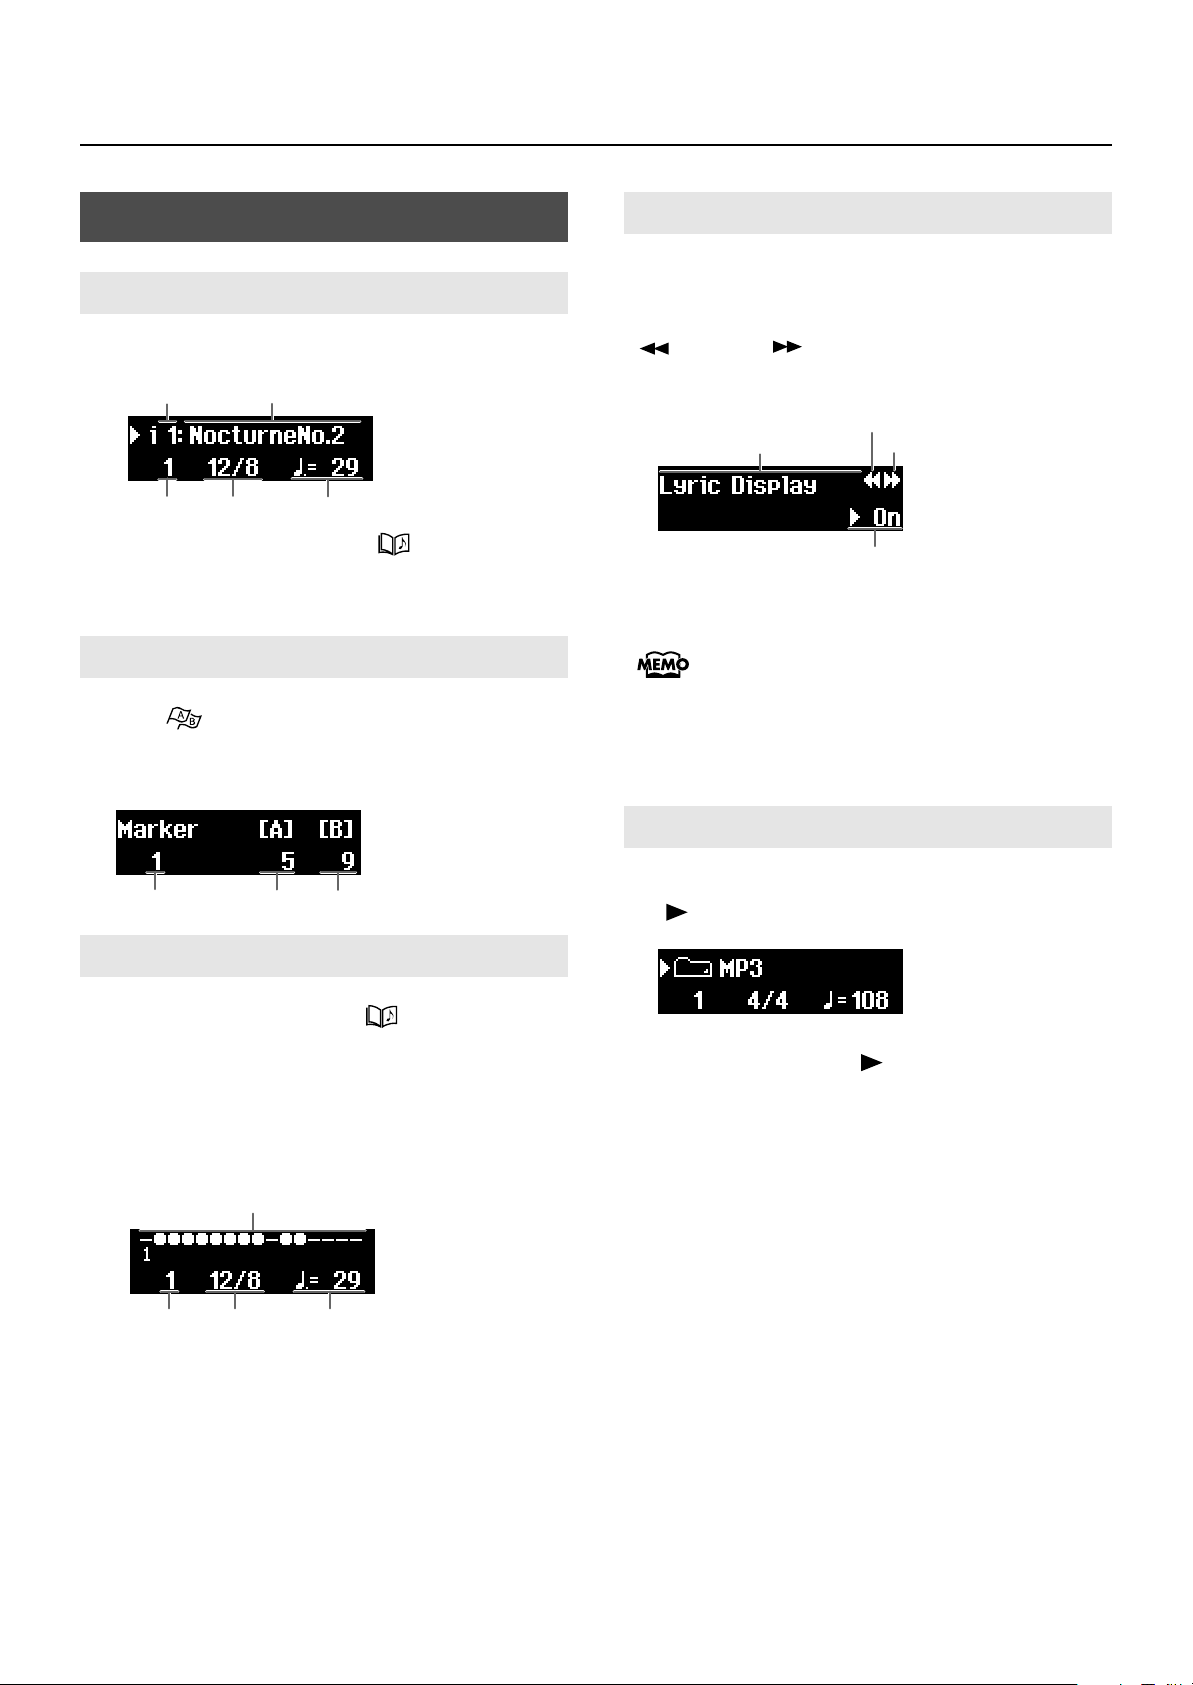
Screen
Basic Screen
When you turn the power on, the following screen appears.
<Fig1.eps>
Song Number
Measure No.
When in other screens, pressing the [ (Song)] button one
or more times takes you back to the basic screen, after you’ve
navigated to other screens.
Marker Screen
Press the [ (Mark)] button and the marker screen
appears. This screen is where settings for makers are mode (p.
30).
<Fig2.eps>
Song Title
Time Signature
Tempo
Settings Screen
A variety of settings can be made in this screen (p. 47). When
the setting contains multiple items that you can change, arrows
appear in the upper right-hand corner of the screen. Press the
[
(Bwd)] or [
then use the [+] or [-] button to change its value.
<Fig4.eps>
Item
If a number preceded by the word “Error”
appears, such as [Error : 00], see “Errors and
Other Displays” (p. 60).
Please note that this manual explains various
functions using screen depictions. However, the
unit’s factory default settings, including tone
names, and the settings appearing in the screens
depicted in this manual may differ.
(Fwd)] button to select an item, and
Previous Item
Next Item
Setting Value
16 Track Screen
Press button [2] while pressing the [ (Song)] button, and
the 16 track screen appears (p. 39).
You can work on each part of the song individually from this
screen.
Settings made in this screen become ineffective when you
return to the basic screen.
<Fig4.eps>
Track Playback Status
Measure No.
Time Signature Tempo
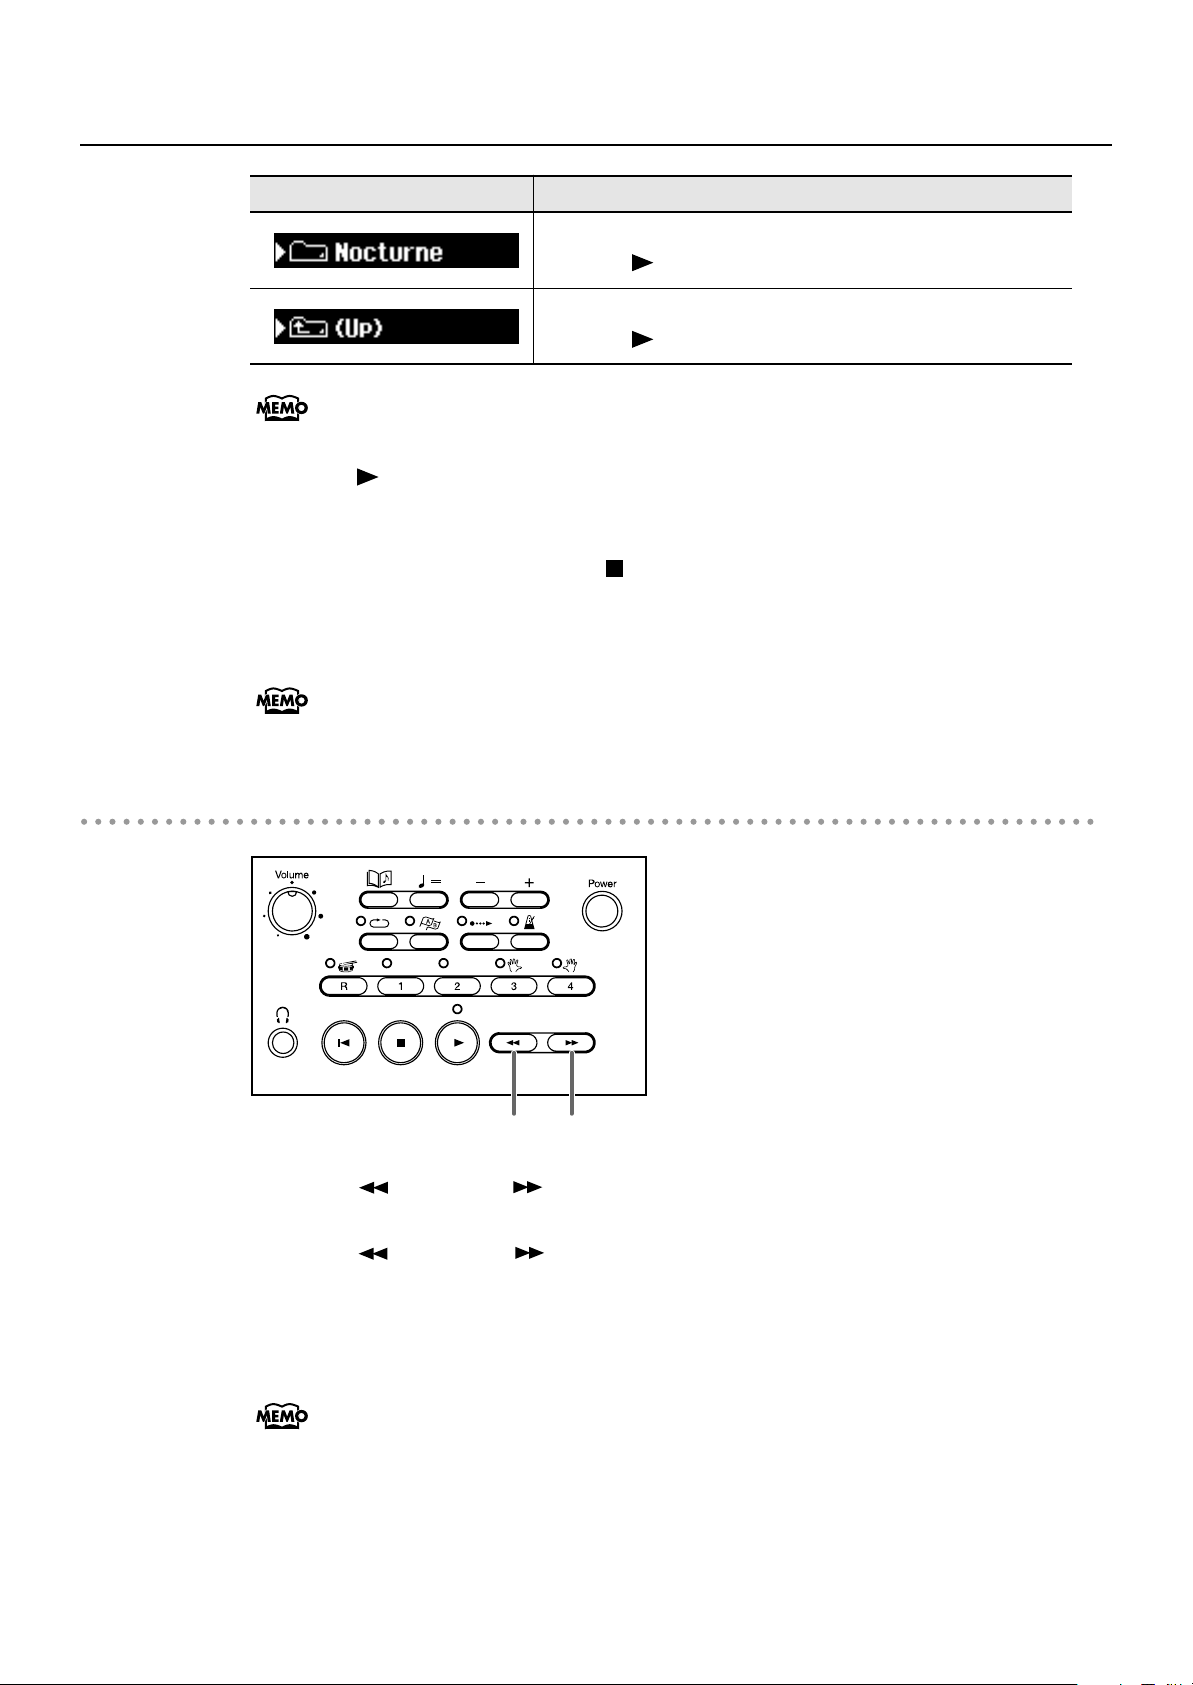
Folder Screen
Select a folder and the following screen appears (p. 20). Press
the [
<Fig36.eps>
To move up one folder level, press and hold [-] until “Up”
appears, and then press the [ (Play)] button.
(Play)] button to go inside the folder.
11
MT-90U Basic Operation
Setting Up
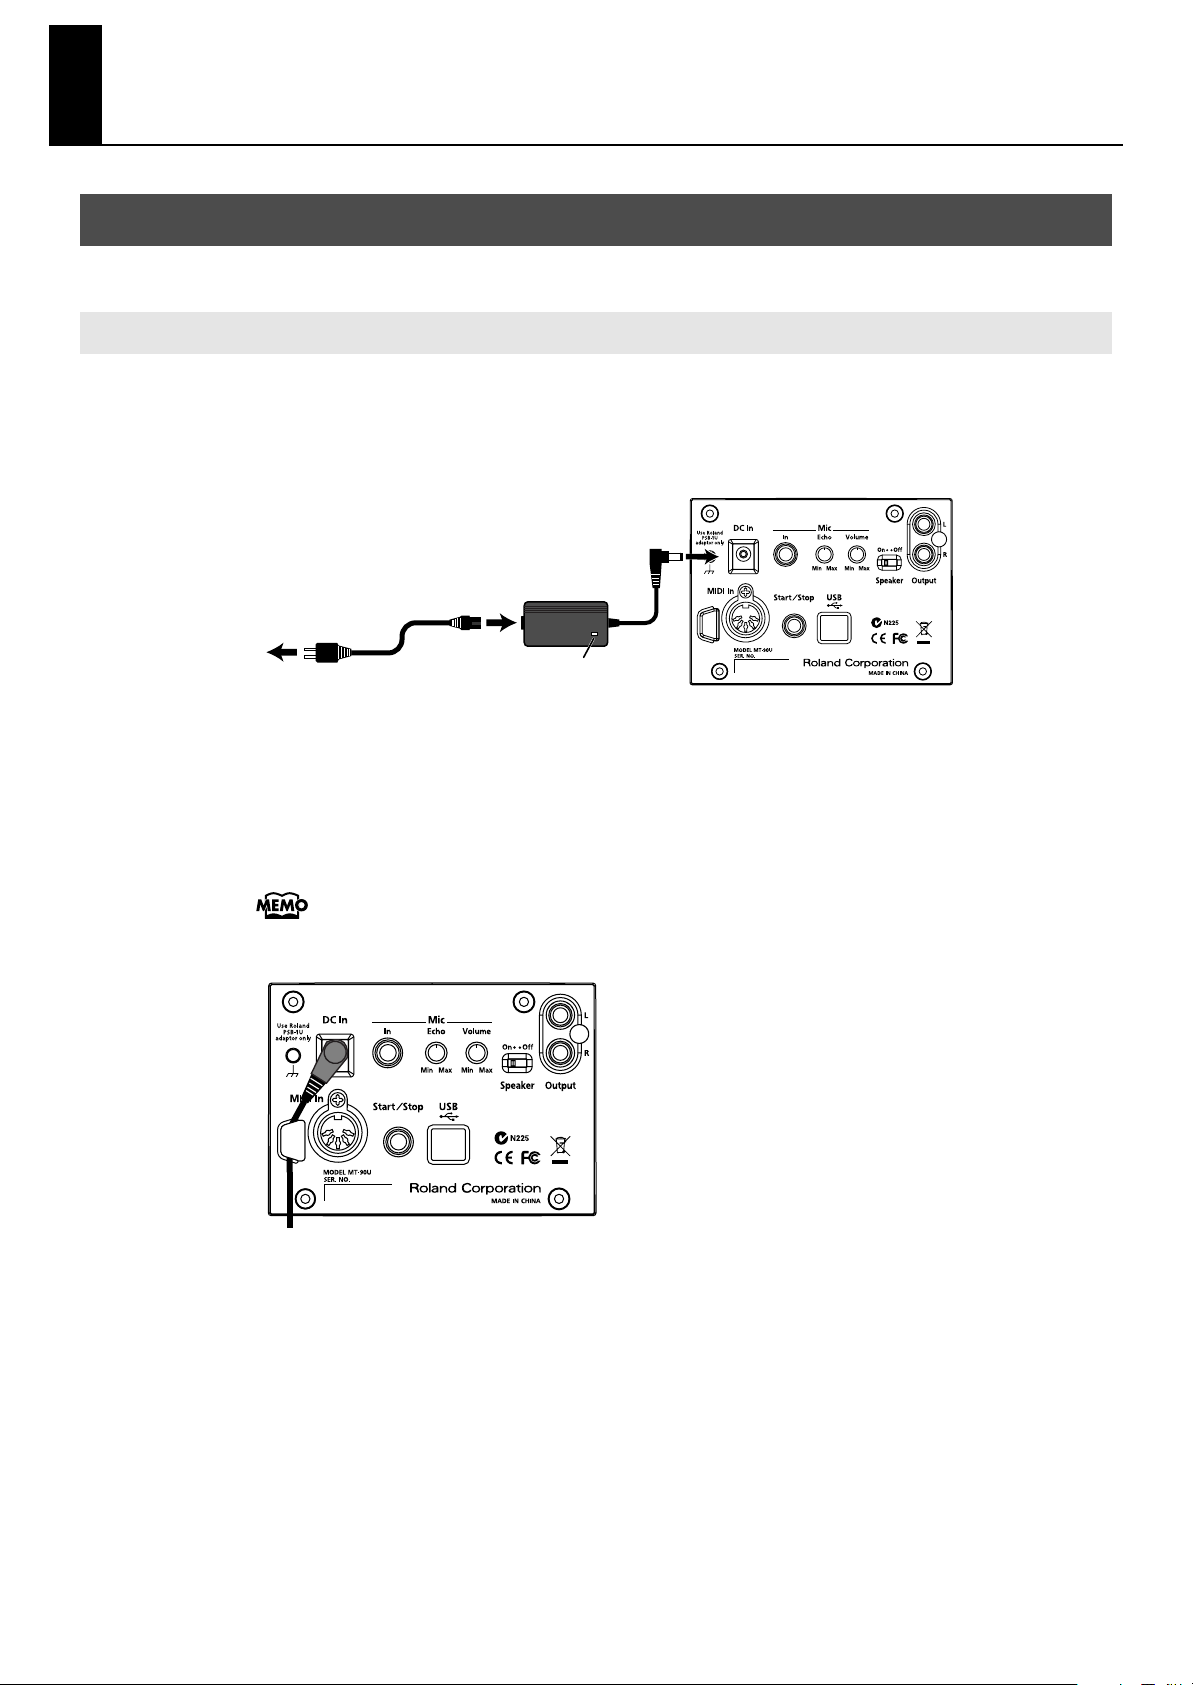
Connecting the AC Adaptor
1.
Connect the supplied AC adaptor and power cord.
2.
Connect the AC adaptor to the DC In jack on the MT-90U’s rear panel.
<fig.00-01.eps>
AC Adaptor
Power Cord
To Power Outlet
Place the AC adaptor so the side with the indicator (see illustration) faces upwards and the side with textual
information faces downwards.
* The indicator will light up when you plug the AC adaptor into an AC outlet.
Secure the power cord with the cord hook as shown below.
3.
.
To prevent the inadvertent disruption of power to your unit (should the plug be pulled
out accidentally), and to avoid applying undue stress to the AC adaptor jack, anchor
the power cord using the cord hook, as shown in the illustration.
<fig.00-01-2.eps>
Power
Indicator
12
Plug the power cord into a power outlet.
4.
Be sure to use the AC adaptor and power cord supplied with the MT-90U.
Turning the Power On and Off
Power
Once the connections have been completed (p. 12), turn on power to your various
devices in the order specified. By turning on devices in the wrong order, you risk causing
malfunction and/or damage to speakers and other devices.
Turning the power on
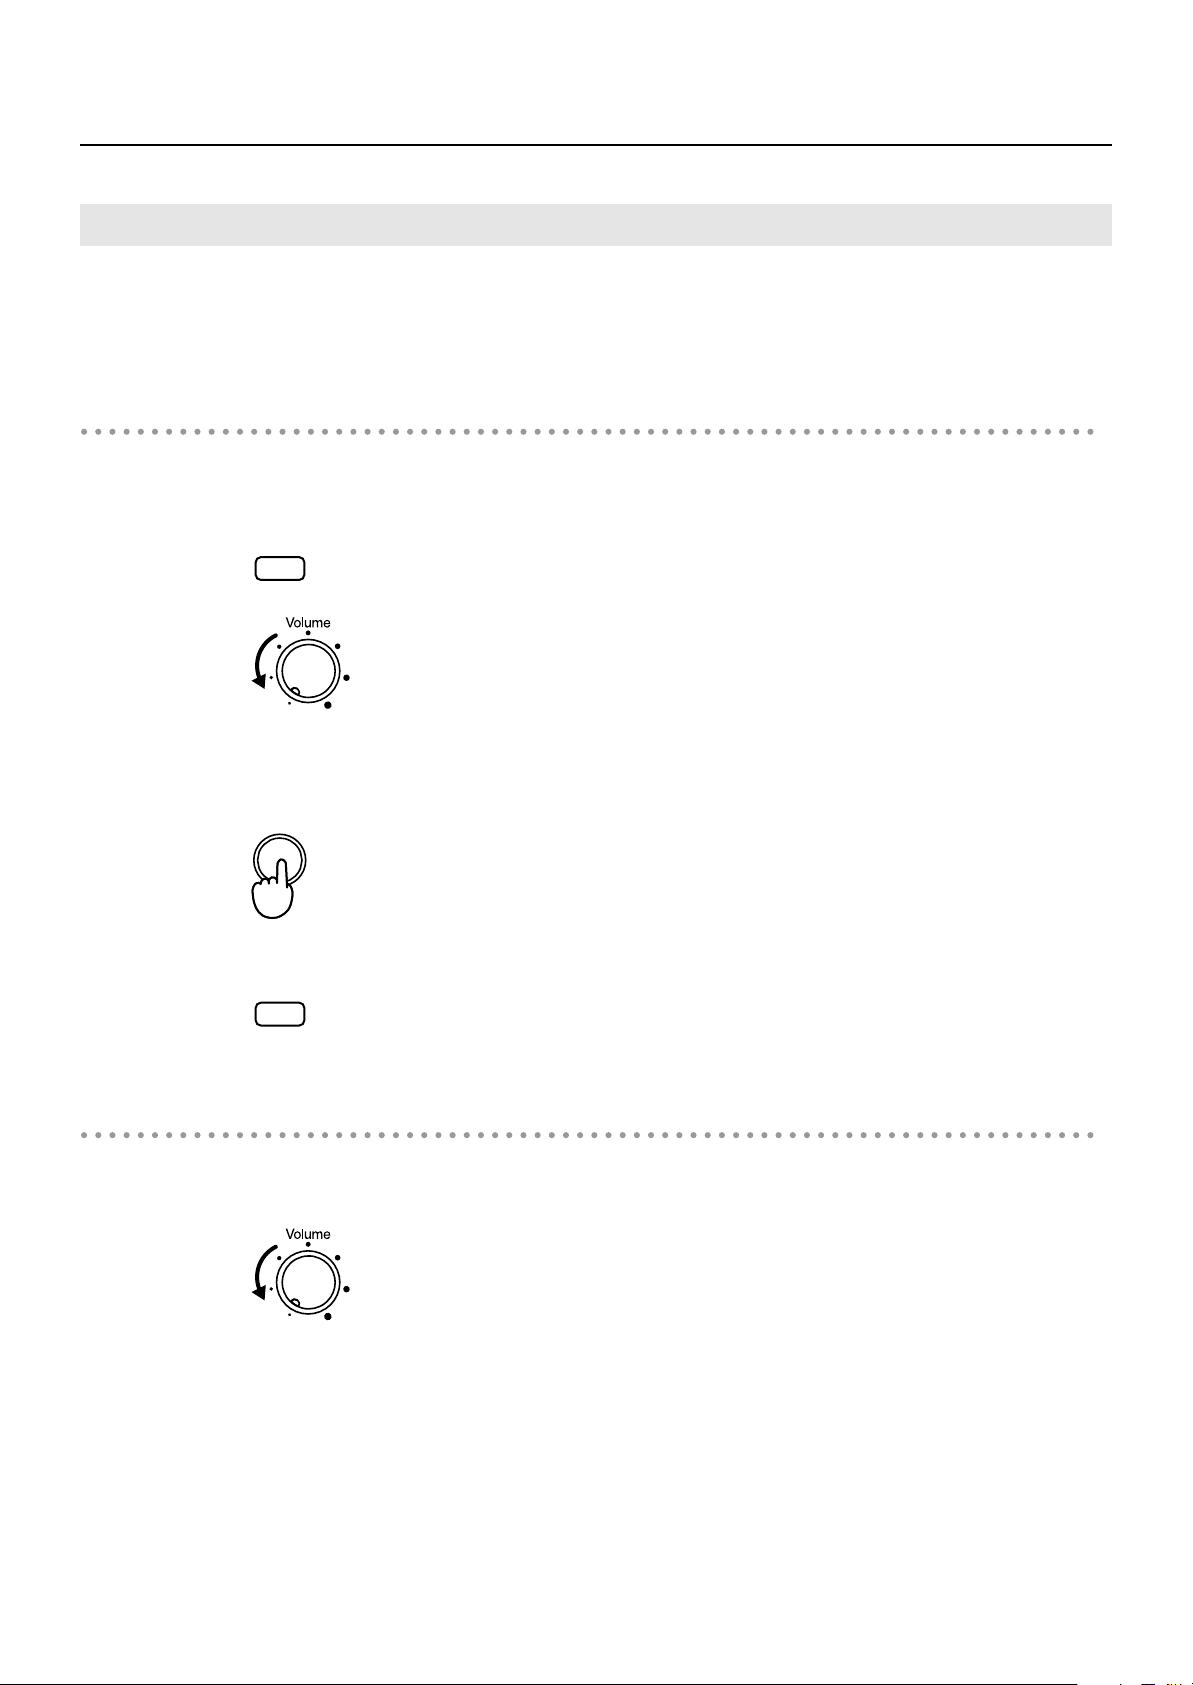
Set the volume to its lowest level by turning the [Volume] knob all the way to the left.
1.
Turn down the volume and then turn on the power.
MT-90U Basic Operation
Even when the volume is turned down completely, you will hear a sound when the
power is turned on. This is not a problem.
<fig.00-02.eps>
To protect the circuits, the MT-90U does not operate for a short time after the power is
turned on. This unit is equipped with a protection circuit. A brief interval (a few seconds)
after power up is required before the MT-90U will operate normally.
Press the [Power] button to turn on the power.
2.
<fig.00-03.eps>
Adjust the volume to an appropriate level after turning on the power.
NOTE
NOTE
Turning the power off
Set the volume to its lowest level by turning the [Volume] knob all the way to the left.
1.
<fig.00-02.eps>
2.
Press the [Power] button to turn off the power.
If you are not going to use the MT-90U for a while, remember to disconnect the USB
device (memory, floppy disk or CD drive) to prevent it from being bumped or damaged
during transport.
13
MT-90U Basic Operation
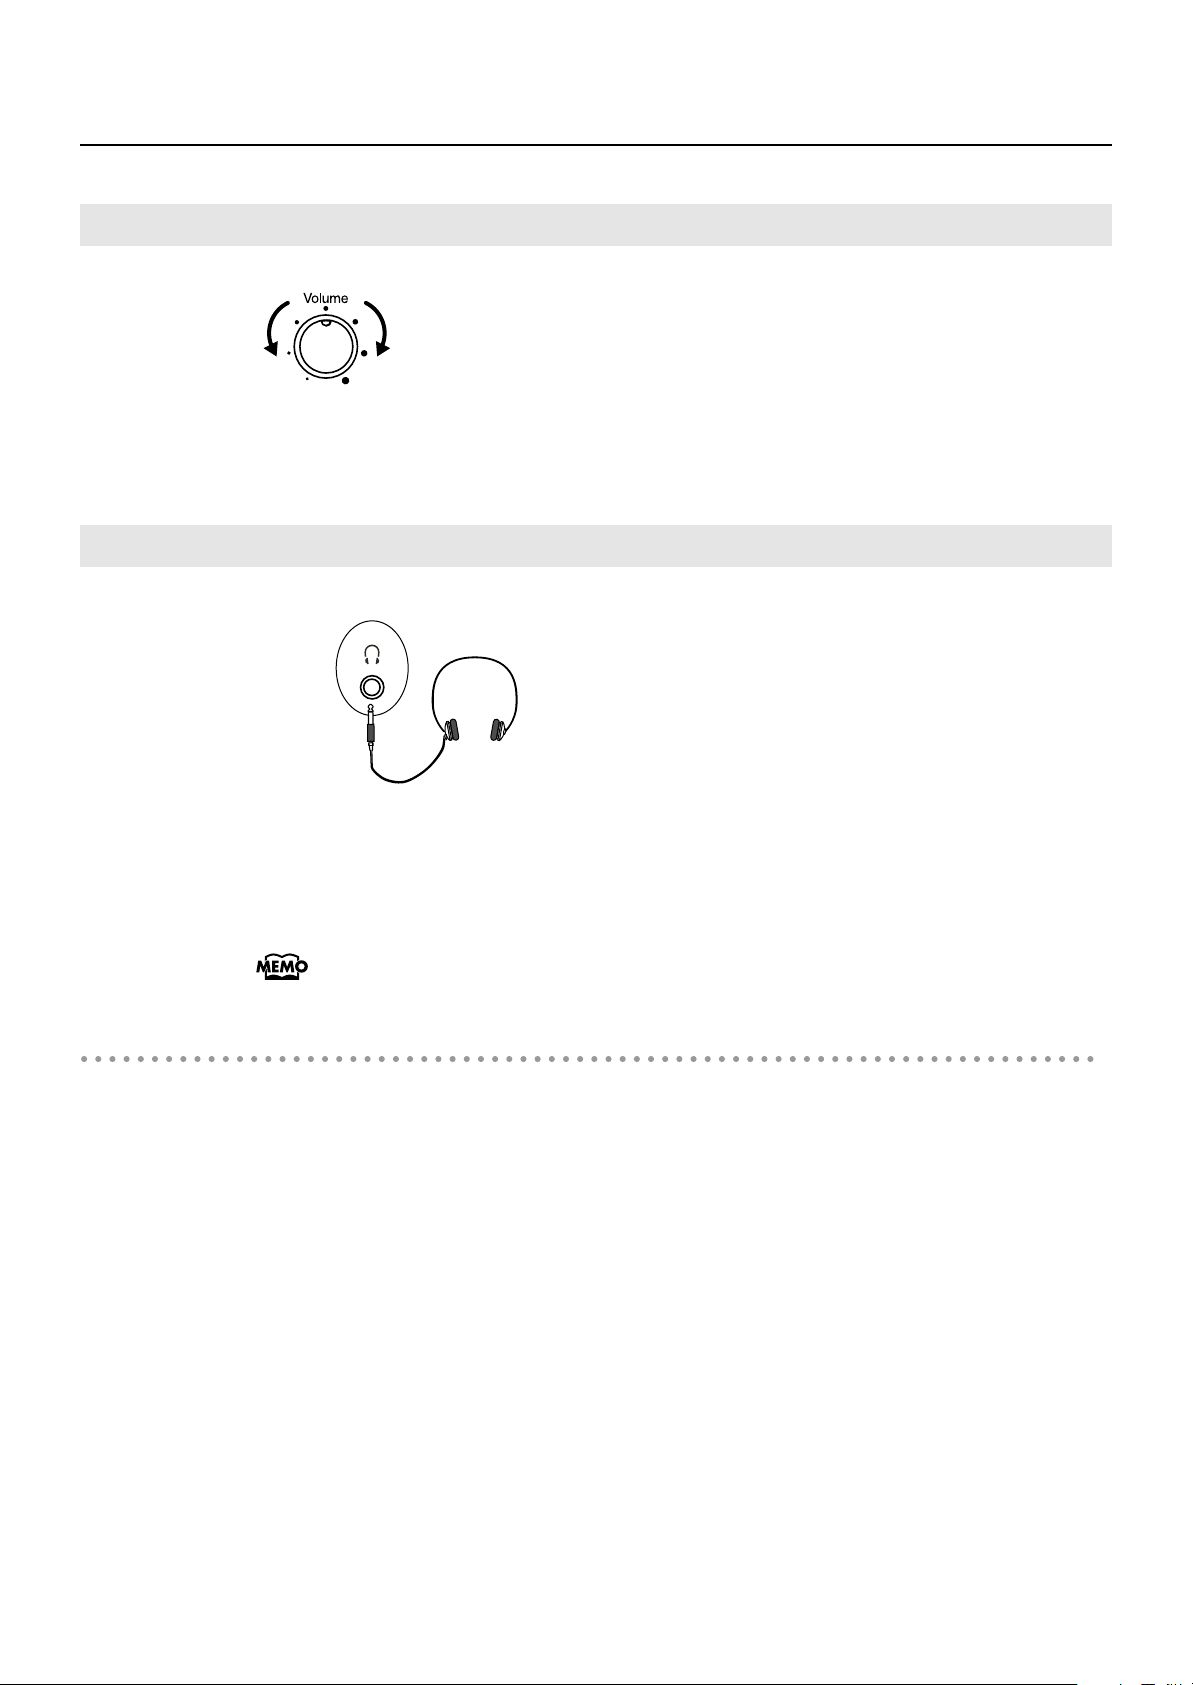
Adjusting the Volume
<fig.00-06.e.eps>
Low High
1.
Use the [Volume] knob to adjust the volume.
Turn the knob to the right to raise the volume. Turn the knob to the left to lower the volume.
Connecting Headphones
<fig.00-07.eps>
Front Panel
Connect headphones to the headphones jack.
1.
When headphones are connected, the speakers do not produce sound. Sound only
comes through the headphones. Adjust the headphone volume using the volume knob on
the MT-90U.
Use stereo headphones for the best sound.
Some notes on using headphones
• Make sure you handle the headphones, headphone cord, and jack appropriately to avoid
cord damage.
• When you connect your headphones, they can be damaged if the volume is set too high on
the device. Be sure to connect your headphones after turning the volume all the way down.
• Too much input into the headphones not only causes sound distortion and pain in your ears,
but also puts extra stress on the headphones. Be sure to use your headphones at an
appropriate volume.
14
Adjusting the Display Brightness
MaxMin MaxMin
VolumeEchoIn
Mic
Rear Panel
MT-90U Basic Operation
Press button [4] while pressing the [
1.
Press the [
2.
3.
Press the [+] or [-] button to adjust the brightness.
Raising the value increases the brightness of the display.
Lowering the setting value decreases the display’s brightness.
4.
Press the [
making settings.
(Bwd)] or [ (Fwd)] button until “LCD Contrast” appears.
(Song)] button to return to the basic screen when you have finished
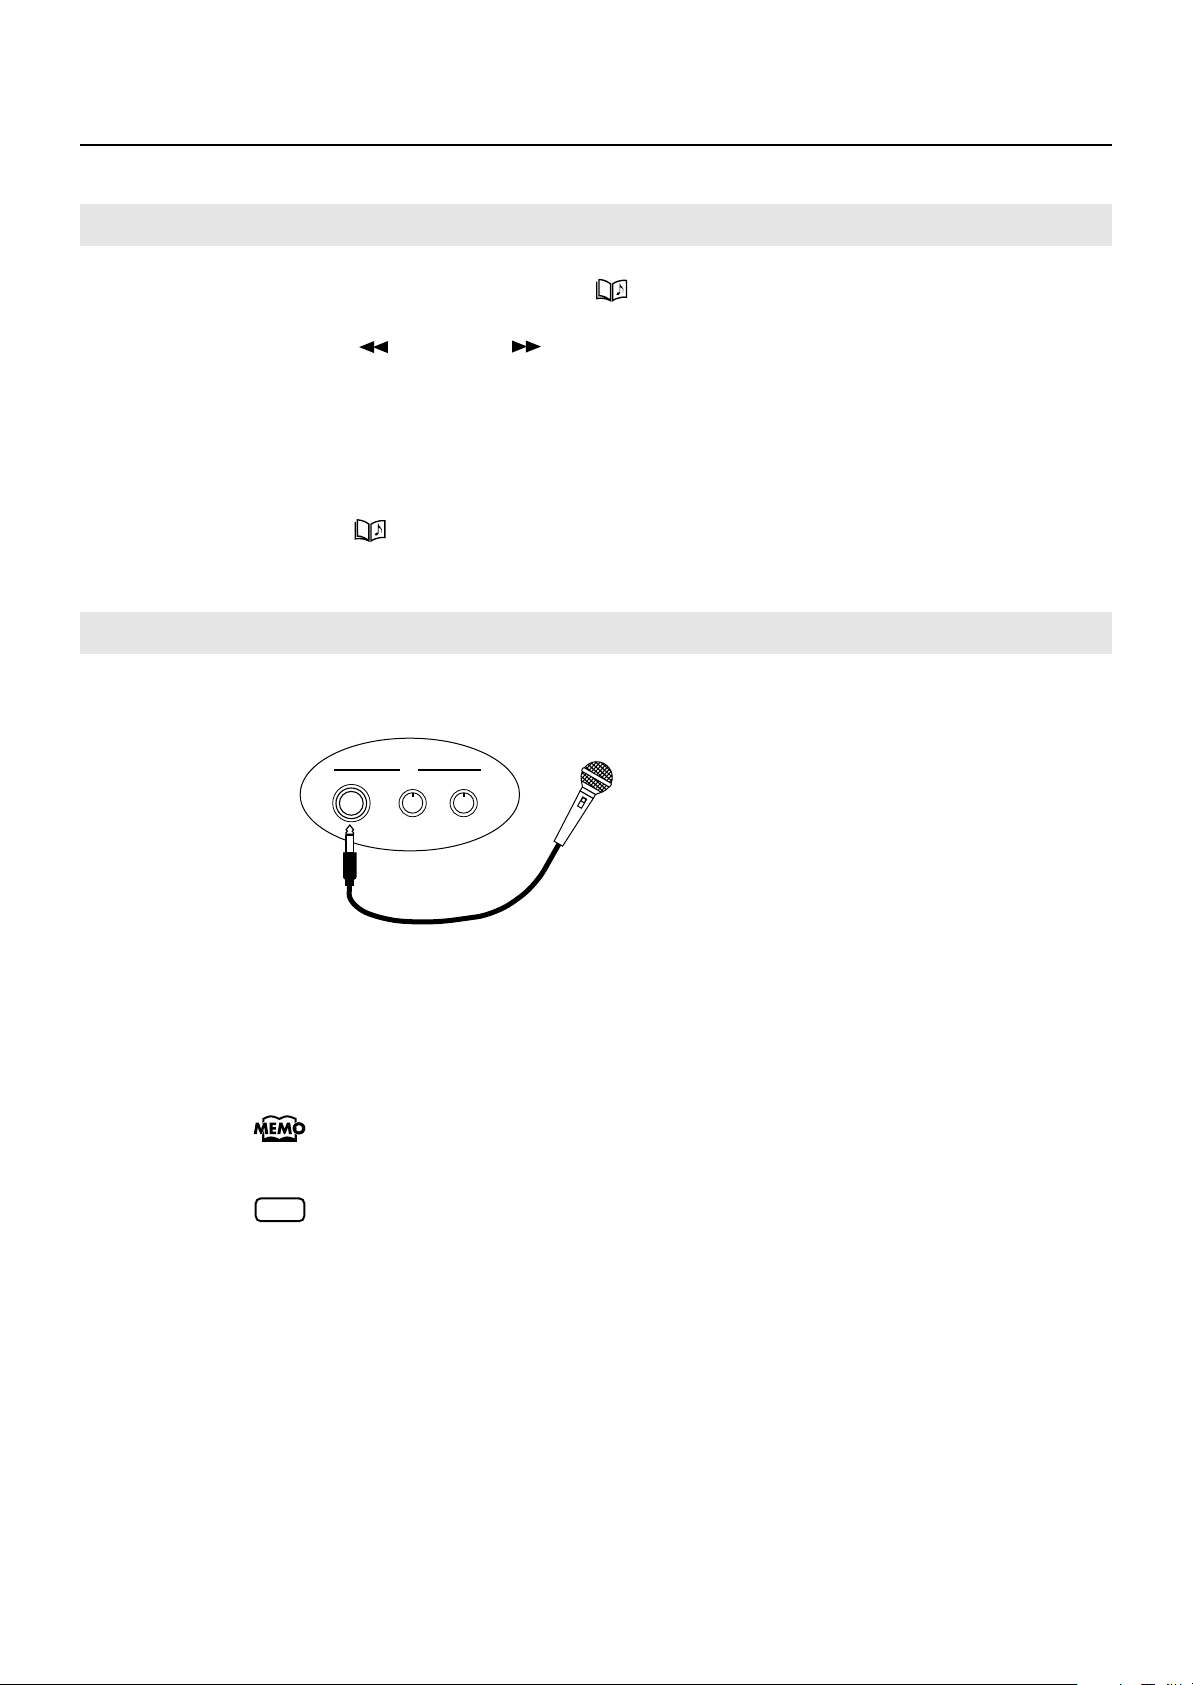
Connecting the Microphone
You can connect a microphone to the MT-90U and sing karaoke.
<fig.00-08.eps>
(Song)] button.
1.
2.
3.
Connect a microphone to the Mic In jack on the rear panel.
Adjust the volume using the [Mic Volume] knob.
Adjust the echo effect for the microphone using the [Mic Echo] knob.
You cannot use the Volume knob on the front panel to adjust the microphone volume.
NOTE
You can use a microphone, such as the Roland DR-30 or 50 (sold separately). For
details about purchasing one of these models, visit your nearest Roland dealer.
15
MT-90U Basic Operation
Back of
Remote Control
Transparent Film
Some notes on using a microphone
• Be aware of others and lower the volume when using the microphone late at night or early in
the morning.
• Lower the volume before connecting the microphone to the MT-90U the speakers will produce
a loud noise when the microphone is connected if the volume is high.
• Depending on the position of the microphone and speakers, feedback (a screeching noise)
can occur. If feedback occurs, try the following remedies:
• Change the microphone direction.
• Move the microphone further away from the speaker.
• Lower the microphone volume.
Using the Remote Control
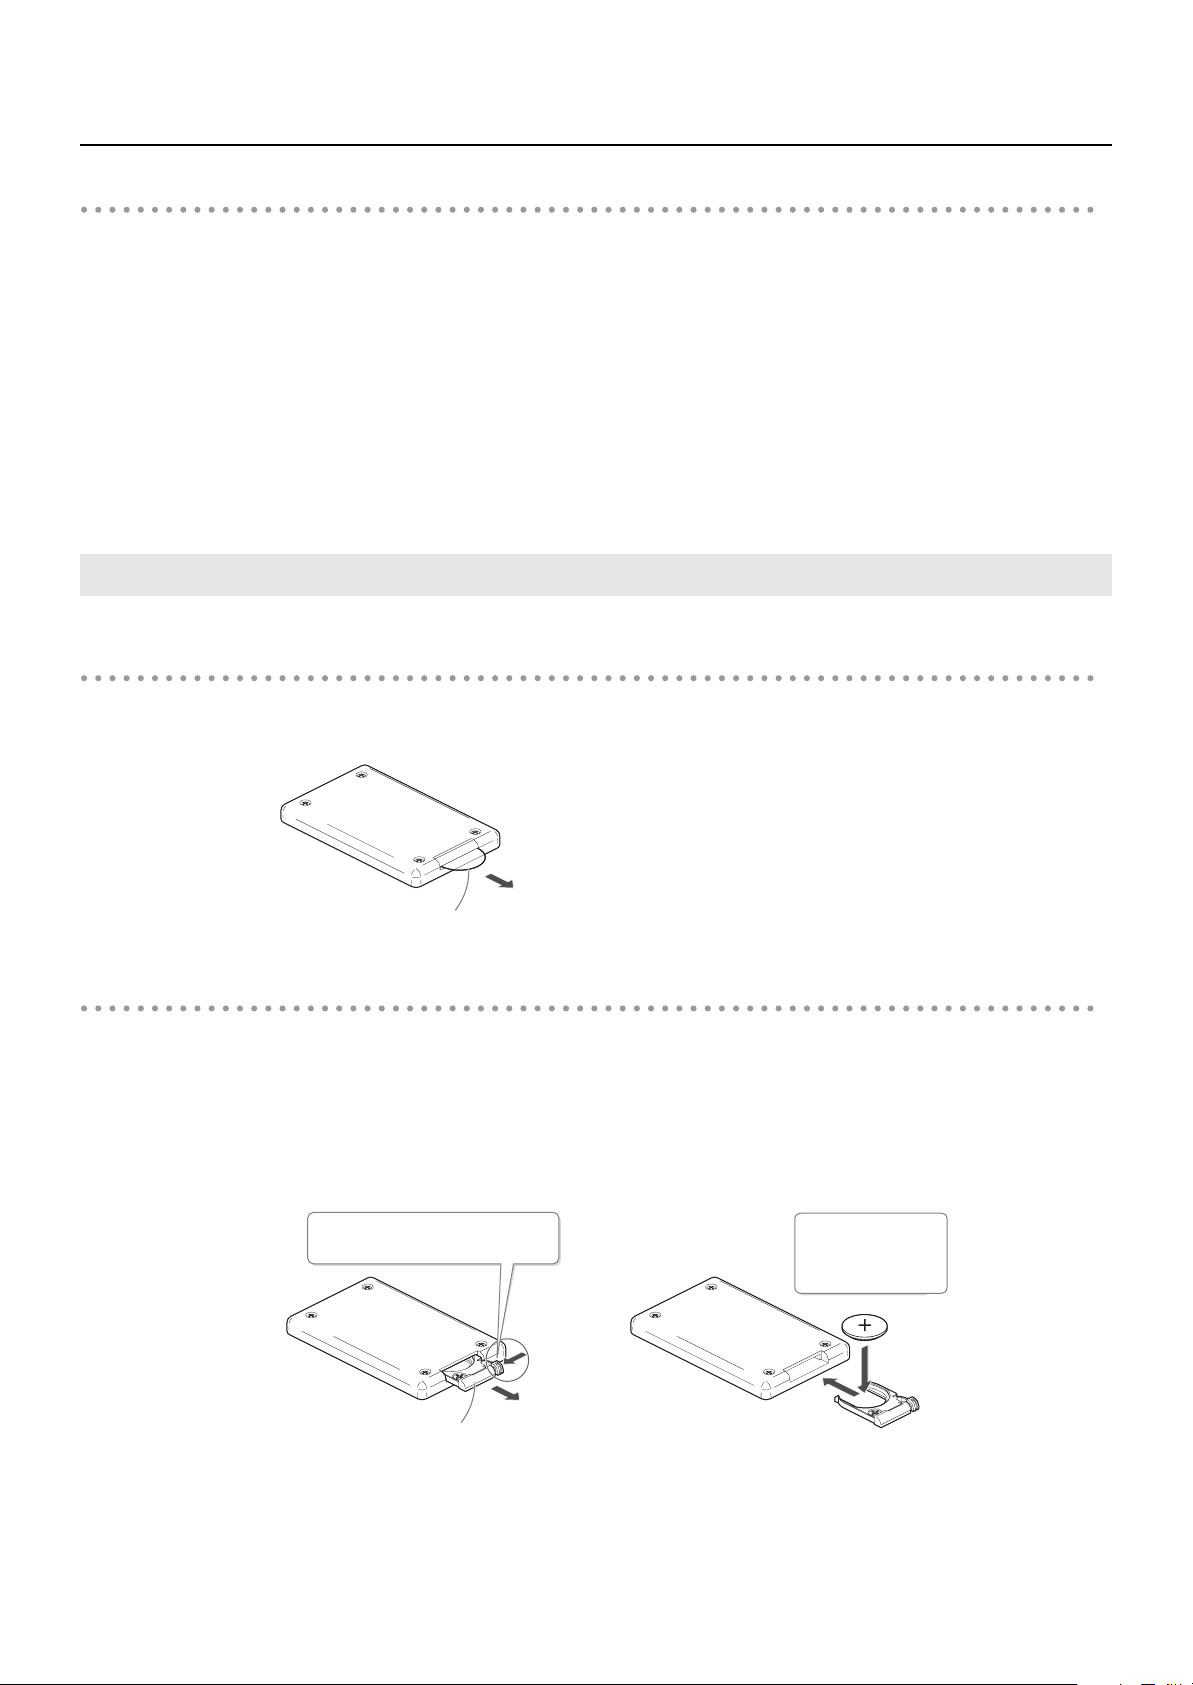
Preparing the remote control
Remove the transparent film inserted in the battery holder.
1.
<fig.remote00.eps>
Changing the remote control’s battery
1.
While pressing the small lever in the direction of the arrow (shown below), pull the
battery holder out.
Place the new battery in the holder with the positive side facing up, and then replace the
2.
holder.
<fig.remote01.eps>
Push the lever in and
pull the battery holder out.
1
Use a
Lithium Battery
(CR2025)
2
16
Back of
Remote Control
Battery Holder
When using the remote control
1.
To use the remote control, point the remote control toward the MT-90U’s sensor and
operate it within the specified operating range.
MT-90U Basic Operation
NOTE
The operating range is about 4 meters away from and 30 degrees to the right
and left of the sensor.
Some notes on using the remote control
• The remote control does not function when two or more buttons are pressed at the same time.
• Even within the sensor range, the remote control may not function if something is obstructing
the sensor path, or if the remote is held at an awkward angle.
• Using the remote near other devices that use infrared rays, or using a remote other than the
one supplied with the MT-90U can cause malfunction.
• Battery life varies depending on how the remote is used. When the battery wears down, the
sensor range decreases. The battery should be replaced when this happens.
• If you are not going to use the remote control for a long period of time, take the battery out
and store it somewhere for use later.
• Shining a bright light, such as a spot light, on the remote sensor can decrease the sensor’s
responsiveness.
• Use only the specified type (model no. CR2025) of lithium battery. Be sure to insert it as
directed (to ensure correct polarity).
Tuning with the MT-90U
Match the pitches of the instruments you are using to a standard pitch with the MT-90U
for a beautiful, resonant sound. Matching instruments to a standard pitch is called
“tuning.”
What is standard pitch?
The middle A note (440Hz), also known as “concert A,” is the standard tuning pitch.
NOTE
<fig.01-09.eps>
You cannot use an audio file as the MT-90U’s standard pitch.
0
1
3
6
5
4
2
17
MT-90U Basic Operation
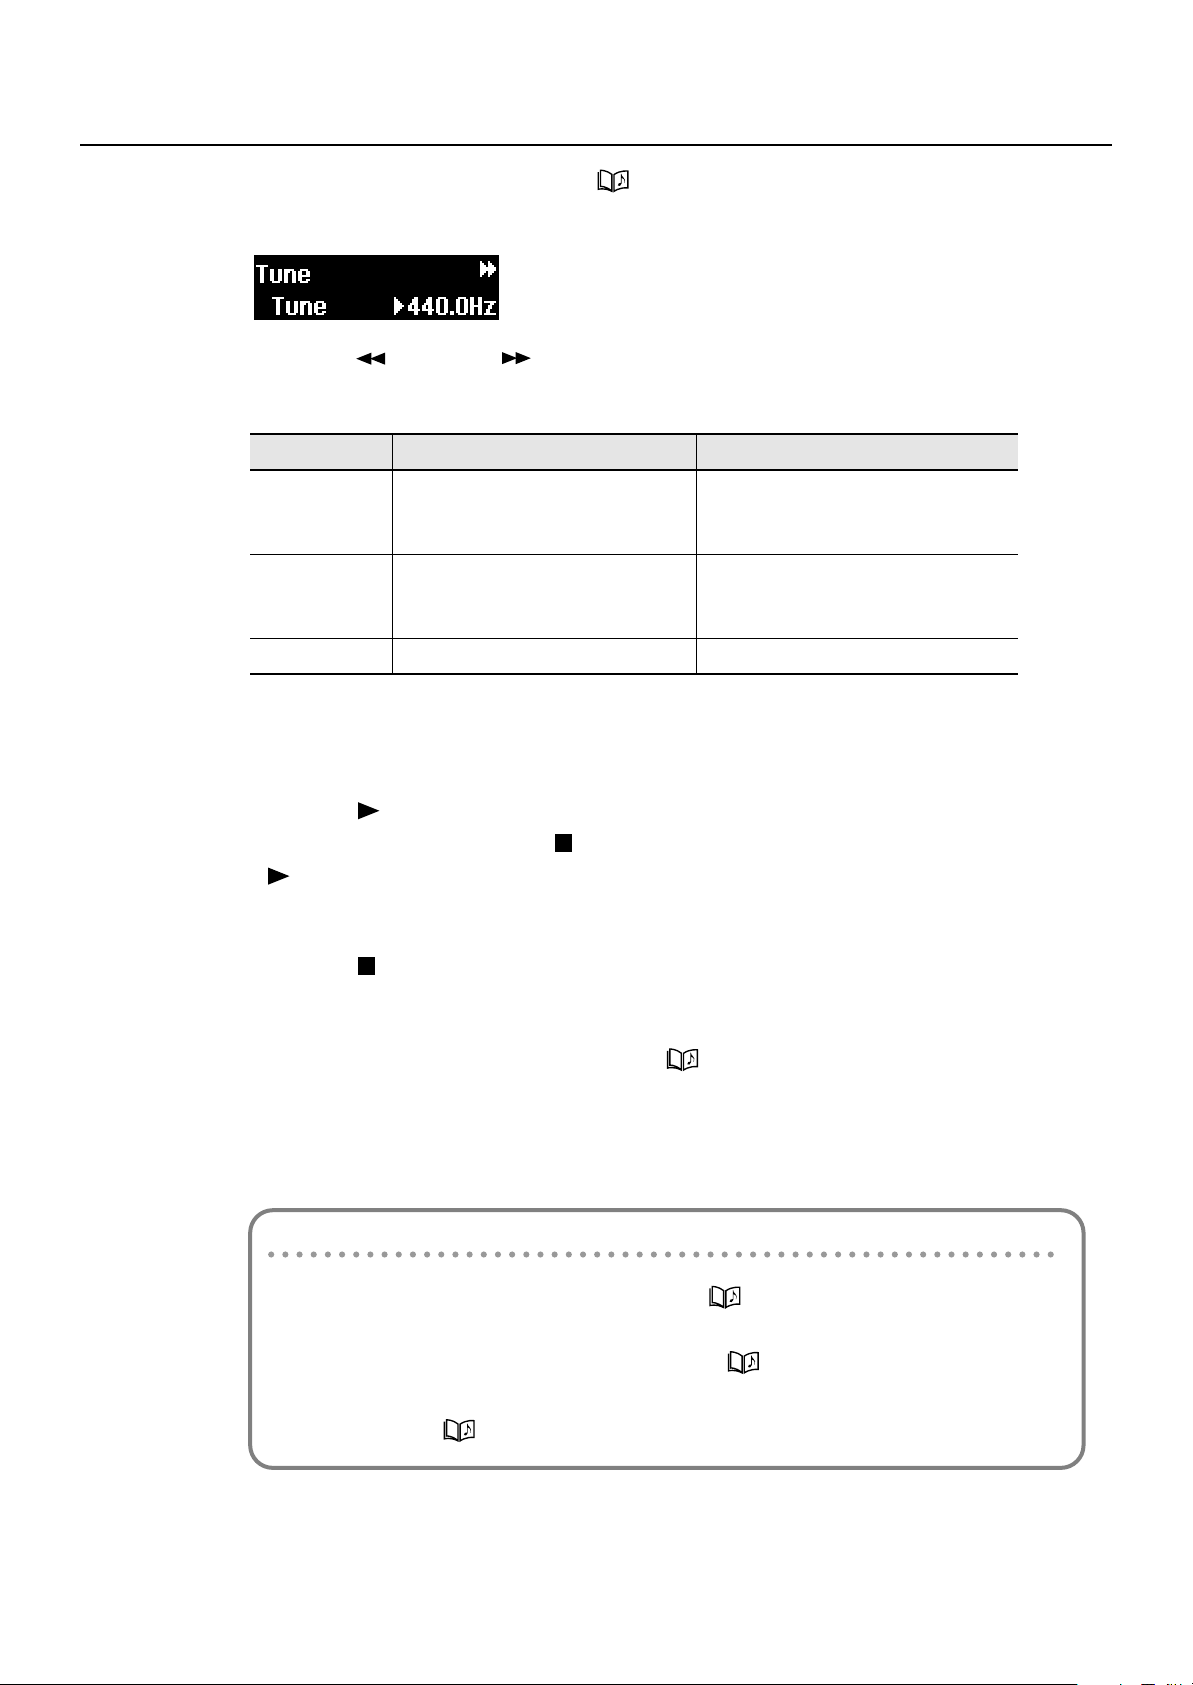
1.
Press button [1] while pressing the [ (Song)] button.
The tuning screen appears, as shown below.
<Fig6.eps>
Press the [
2.
The item’s name appears on the left side of the lower line on the display.
Setting
Tune
Key
Sound
Press the [+] or [-] button to change the setting’s value.
3.
Pressing both buttons at the same time returns the setting to its original value.
4.
Press the [
If a song is playing, press the [
[
(Play)] button to start playing the tuning pitch.
Play the same note on your instrument and match its pitch to the MT-90U’s pitch.
(Bwd)] or [ (Fwd)] button to select the item to be set.
Description Value
415.3 Hz – 466.2 Hz
Select the standard pitch
Select the note to use for tuning
Select the tuning sound
(Play)] button to start playing the tuning pitch.
(Stop)] button to stop the song, and then press the
Pitch is set to 440.0 Hz when you turn
the power on.
A3 – A5
Note is set to A4 when you turn the
power on.
Sine, Oboe
Press the [
5.
The tuning pitch stops.
When you have finished tuning, press the [
6.
The basic screen appears.
These settings will remain stored even while the power is turned off. To return to the
default settings, see “Returning to the Factory Default Settings (Factory Reset)” (p. 53).
Shortcut: changing the tuning pitch
(Stop)] button to stop playing the tuning pitch.
(Song)] button.
1. Press the [+] or [-] button while pressing the [ (Song)] button.
The tuning screen appears.
The tuning screen appears as long as the [ (Song)] button is pressed.
Press the [-] button to lower the pitch. Press the [+] button to raise the pitch.
Release the [ (Song)] button and the basic screen reappears.
18
Listening to Music
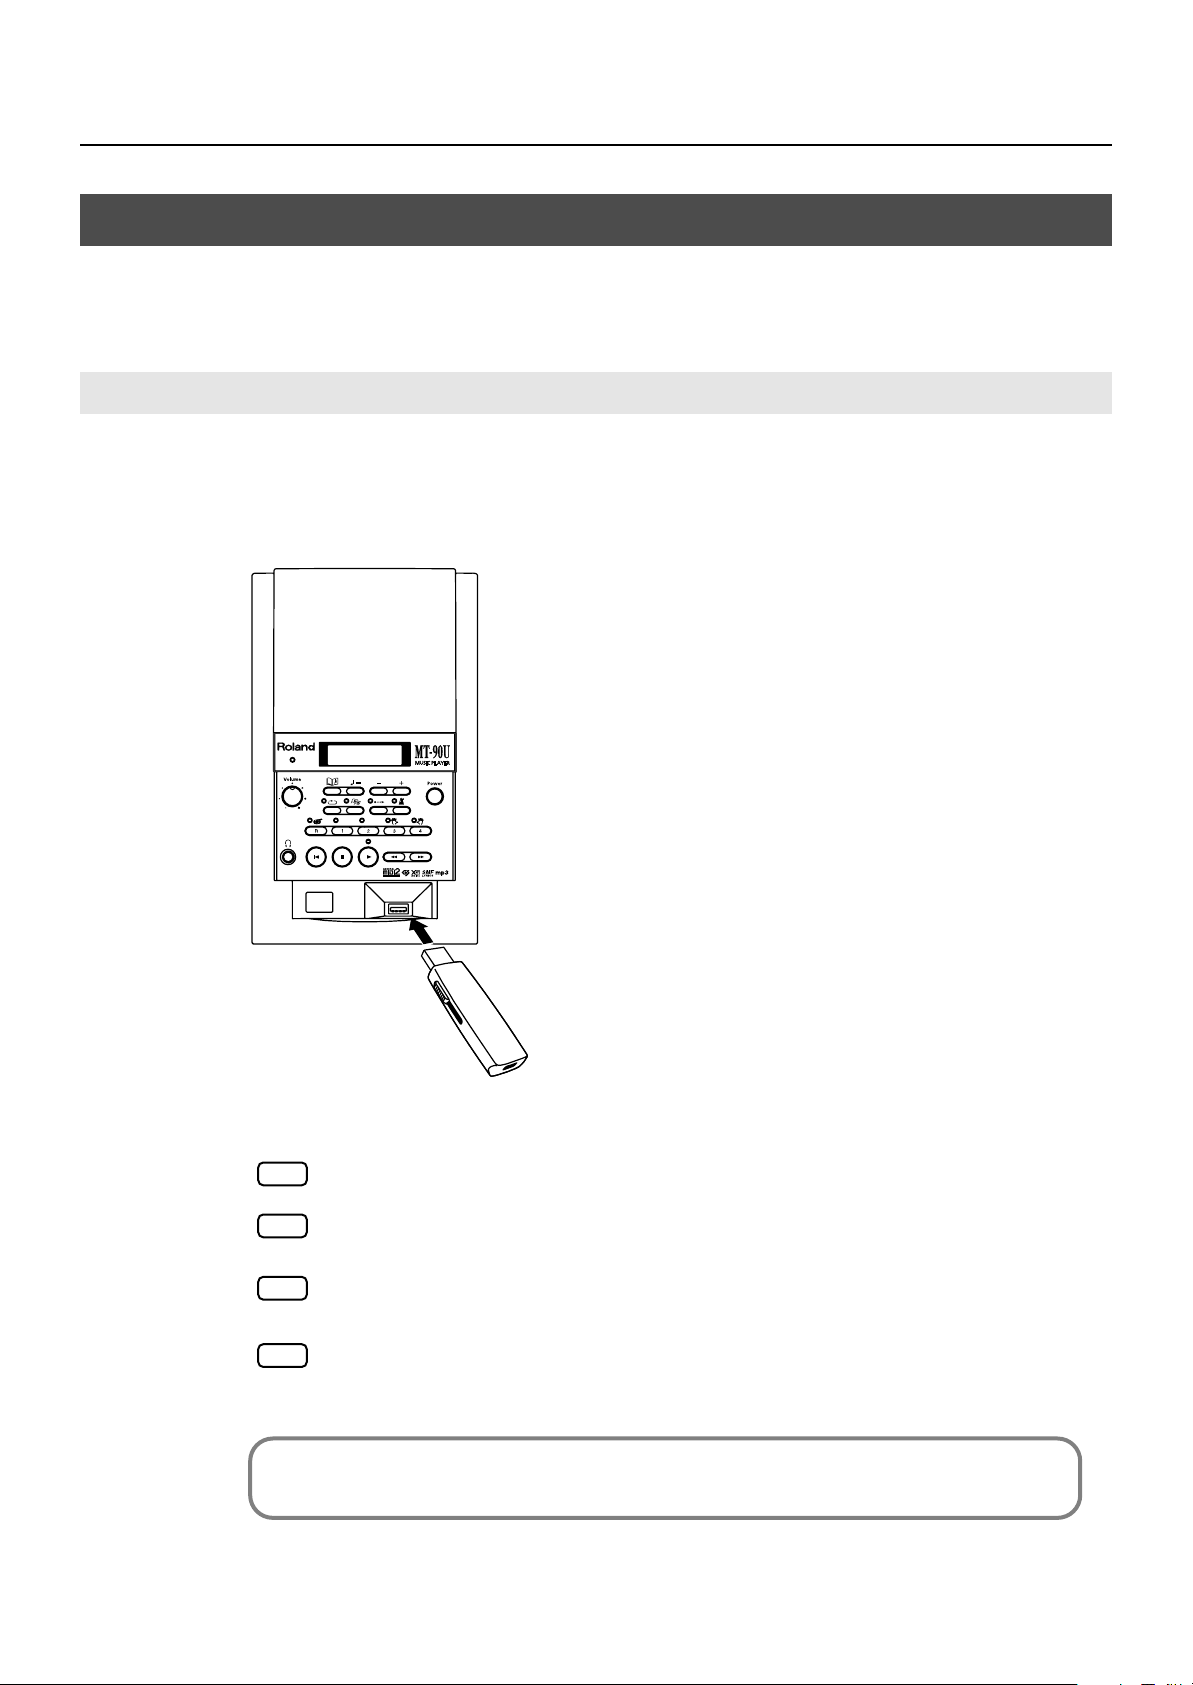
The following explains how to connect a USB memory to the USB connector on the front
panel and listen to saved standard MIDI files (SMF music files) on the MT-90U.
Connecting the USB Memory
Turn the power off (p. 13).
1.
2.
Connect the USB memory to the USB connector on the front panel as shown.
<fig.connectUSB.eps>
MT-90U Basic Operation
3.
Turn the power on (p. 13).
NOTE
NOTE
NOTE
NOTE
When using a USB cable for transferring music files, use the shortest cable possible.
Never insert or remove the USB memory while this MT-90U’s power is on. Doing so
may corrupt the unit’s data or the data on the USB Memory.
Carefully insert the USB memory all the way in--until it is firmly in place.
If you move the MT-90U while the USB memory is still connected, the MT-90U and the
USB memory may both be damaged. Make sure you always remove the USB memory
before you move the MT-90U.
The MT-90U has 14 demo songs. Even without USB memory, you can still play
music files.
19
MT-90U Basic Operation
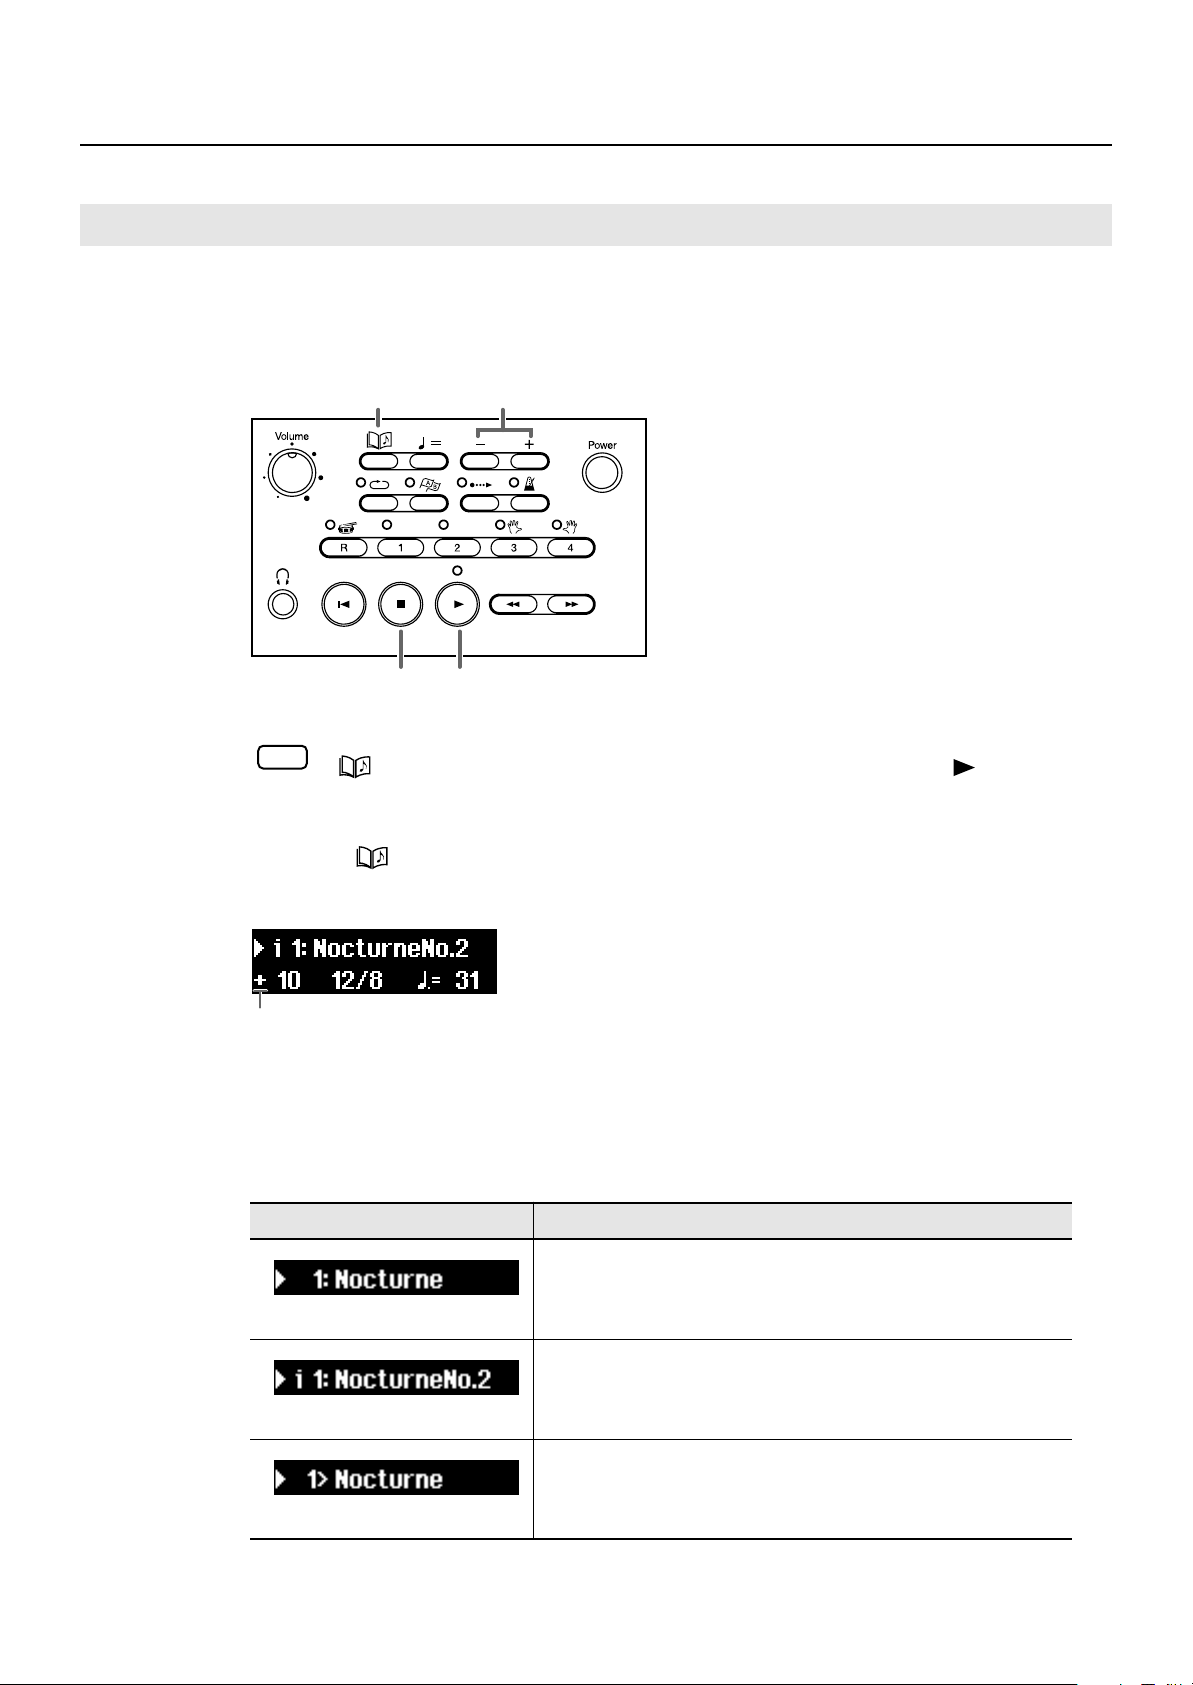
Playing Songs
Playing a song on the MT-90U is called “playback.” Some basic playback operations
include rewinding and fast forwarding a song, as well as repeating one song or all the
songs in the USB memory or folder.
<fig.01-03.eps>
12
34
<Fig7.eps>
To hide lyrics while playing a music file that contains lyric information, press the
1.
NOTE
Press the [
[ (Song)] button. When you want to see the lyrics again, press the [ (Play)]
button.
(Song)] button.
The song name and number appear in the upper line of the basic screen.
”+” Indicates that the song is
stopped in the measure
2.
Press the [+] or [-] button to select a song.
Depending on the connected device or type of song, the song number and title display
changes.
Display
Song from an external source (e.g. USB memory)
(song number: title)
Description
20
Internal demo song (p. 61)
(“i” appears before song number)
Song from the Song List (p. 46)
(song number > title)
MT-90U Basic Operation
Display
When the song has a pick up measure (notes start before the first full measure), “PU”
appears in the display and then the measure numbers appear.
3.
Press the [ (Play)] button.
Folder
Press the [ (Play)] button to enter the folder.
Up one folder
Press the [ (Play)] button to move up one folder.
Description
The song starts playing. The song automatically plays until the end and then stops.
4.
To stop playing the song, press the [
(Stop)] button.
When the song is stopped, a [+] appears next to the measure number at which it is
stopped.
If you connect a pedal switch (Roland DP-2, sold separately) to the Start/Stop connector
on the rear panel, you can start and stop playing a song by simply pressing the pedal
(p. 53).
Rewinding and fast forwarding a song
<fig.01-05.eps>
Backward
1.
Press the [
(Bwd)] or [ (Fwd)] button to move to the sections and measures of
music you want to hear.
Press the [
(Bwd)] or [ (Fwd)] button once and the song moves backward or
forward one measure at a time.
Press and hold the buttons to rewind or fast forward through a song. You can also rewind
or fast forward a song while it is playing.
Forward
When a song starts to play, the measure number on the display flashes. This flashing
indicates that the MT-90U is reading the data from the USB memory. While the number
is flashing, you cannot rewind or fast forward. Wait a short while and then try again.
21
MT-90U Basic Operation
123, 5
4
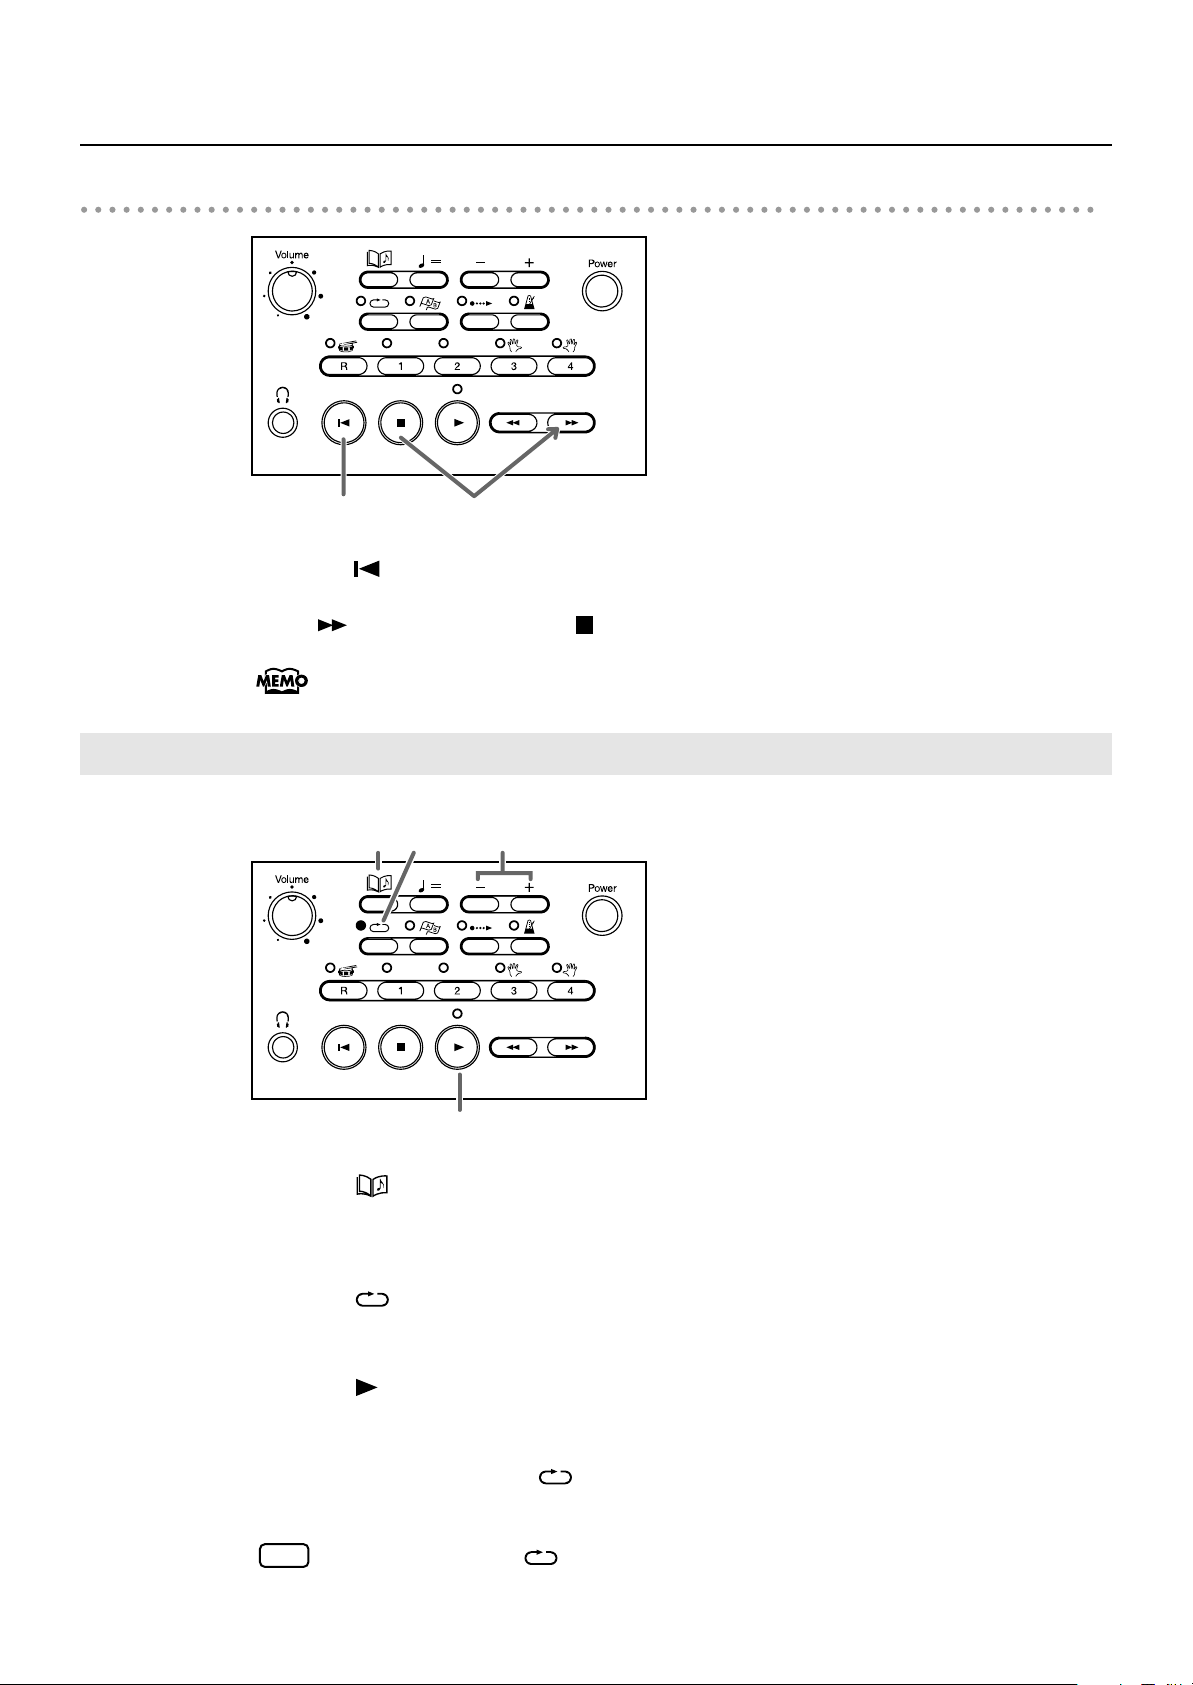
Moving to the beginning or end of a song
<fig.01-06.eps>
Return to the beginning Go to the end
1.
Press the [
2.
Press [
Repeating One Song
<fig.01-07.eps>
(Reset)] button to return to the beginning of a song.
(Fwd)] while pressing [ (Stop)] to move to the end of a song.
When playing an MP3 file, it may take some time to fast forward a song.
This is not a problem.
22
1.
Press the [
Press the [+] or [-] button to select a song.
2.
3.
Press the [
The indicator is lit and the selected song is set to repeat.
4.
5.
Press the [
The song begins playing and repeats at the end.
To turn off Repeat, press the [
The indicator turns off and repeat is cancelled.
NOTE
When you press the [ (Repeat)] button the sound stops briefly.
(Song)] button.
(Repeat)] button.
(Play)] button.
(Repeat)] button again.
 Loading...