

Roland Corporation MC-307 Quick Start

Thank you, and congratulations
on your choice of the Roland
MC-307 Groove Box. The MC307 is a further evolution of
earlier groove boxes, making it
even more usable than ever,
providing enhanced realtime
operability, and boasting new
functionality optimized for DJ
play. Unlimited possibilities can
be achieved even by simply
editing the preset patterns,
making the MC-307 the ideal
piece of groove gear for creating
dance music.
The MC-307 comes with two
manuals: "Quick Start" and
"Owner’s Manual." This "Quick
Start" manual will help you to
quickly learn basic operation of
the MC-307.
QUICK START
Contents
Making the Connections ....................................................................... 2
Turning the Power On and Off.............................................................. 3
Using the MC-307................................................................................... 4
Listening to Various Patterns............................................................... 6
Playing Back Patterns Continuously..............................................6
Adding Variations to Pattern Playback................................................ 8
Using Mute Function......................................................................8
Changing to Another Patch.......................................................... 10
Functions for DJ Performance ........................................................... 12
Adding Variations to Sound Using Knobs....................................12
Cutting Sound of a Specified Band (Isolator)............................... 14
Delay (Echo) and Reverb Effects ................................................ 16
Combining a Turntable and BPM................................................. 17
Phrase Adding Function ..................................................................... 18
Using a Single Keyboard Pad to Sound Phrases
(Real-time Phrase Sequencing).............. 18
Using the Arpeggiator.................................................................. 19
Making Original Patterns..................................................................... 20
Creating Drum Part Play..............................................................20
Creating Bass Part Play............................................................... 26
Saving Created Patterns ..................................................................... 30
Before using this unit, carefully read the sections entitled:
“USING THE UNIT SAFELY”
and “IMPORTANT NOTES”
(REFERRENCE MANUAL p. 2;
p. 8). These sections provide
important information concerning the proper operation
of the unit. Additionally, in order to feel assured that you
have gained a good grasp of
every feature provided by
your new unit, REFERRENCE
MANUALshould be read in its
entirety. The manual should
be saved and kept on hand as
a convenient reference.
Copyright © 1999 ROLAND CORPORATION
All rights reserved. No part of this publication may be reproduced in any form without the written
permission of ROLAND CORPORATION.

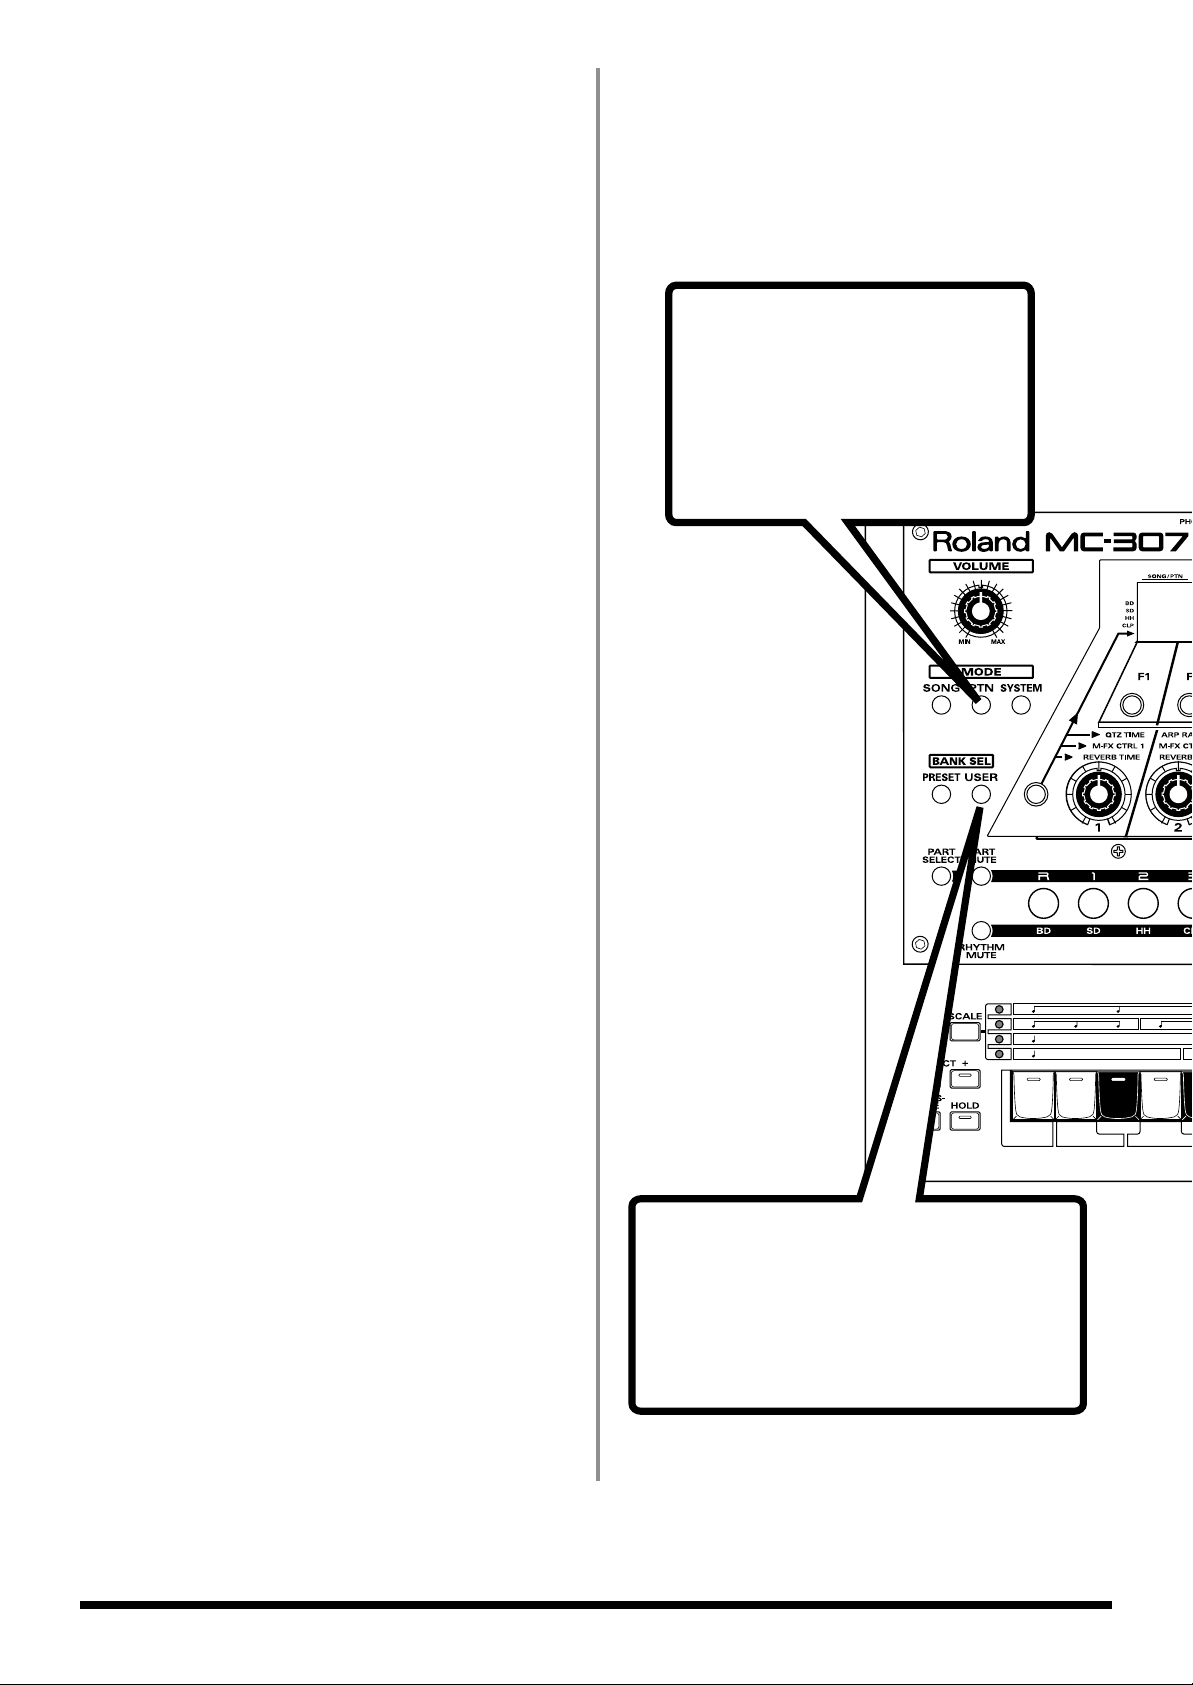
Making the Connections
The following describes how to get connected up for a typical setup.
If you intend to connect other external instruments, refer to the Owner’s
Manual (P.133).
* To prevent malfunction and/or damage to speakers or other devices, always turn down the
volume, and turn off the power on all devices before making any connections.
* Be sure to use the supplied AC adapter. Otherwise, malfunction may result.
Wind the cable around
the hook to prevent
accidental disconnection.
Audio Cable
Pin Jack (For connecting to audio equipment)
Phone Jack (For connecting to keyboard Amp.)
Included AC adapter
(to the AC outlet)
Keyboard amp, Audio set
* To prevent the inadvertent disruption of power to your unit (should the plug be
pulled out accidentally), and to avoid applying undue stress to the AC adaptor jack,
anchor the power cord using the cord hook, as shown in the illustration.
Stereo headphones
2

Turning the Power On and Off
Turning the Power On
Once the connections have been completed (p. 2), turn on power to your various
devices in the order specified. By turning on devices in the wrong order, you risk
causing malfunction and/or damage to speakers and other devices.
* This unit is equipped with a protection circuit. A brief interval (a few seconds) after
power up is required before the unit will operate normally.
1
2
3
4
5
Make sure that the volume control Knob of the MC-307 and of
your amp system are turned to the minimum position.
Press the power switch on the MC-307’s rear panel to turn it
on.
Turn on the power of the amp that the MC-307 is connected to.
Put your amp’s volume at an appropriate level.
Press whatever keyboard pads you like, so you hear sound,
while you adjust the volume using the volume control knob on
the MC-307.
Turning the power off
Be sure to turn the power off in the proper order.
1
2
3
Turn down the volume control Knob on the MC-307, your
amp, and any other equipment so they are all at the minimum
position.
Turn off the power on the amp to which the MC-307 is
connected.
Then, turn off the power of the MC-307.
3
Using
Page6
the MC-307
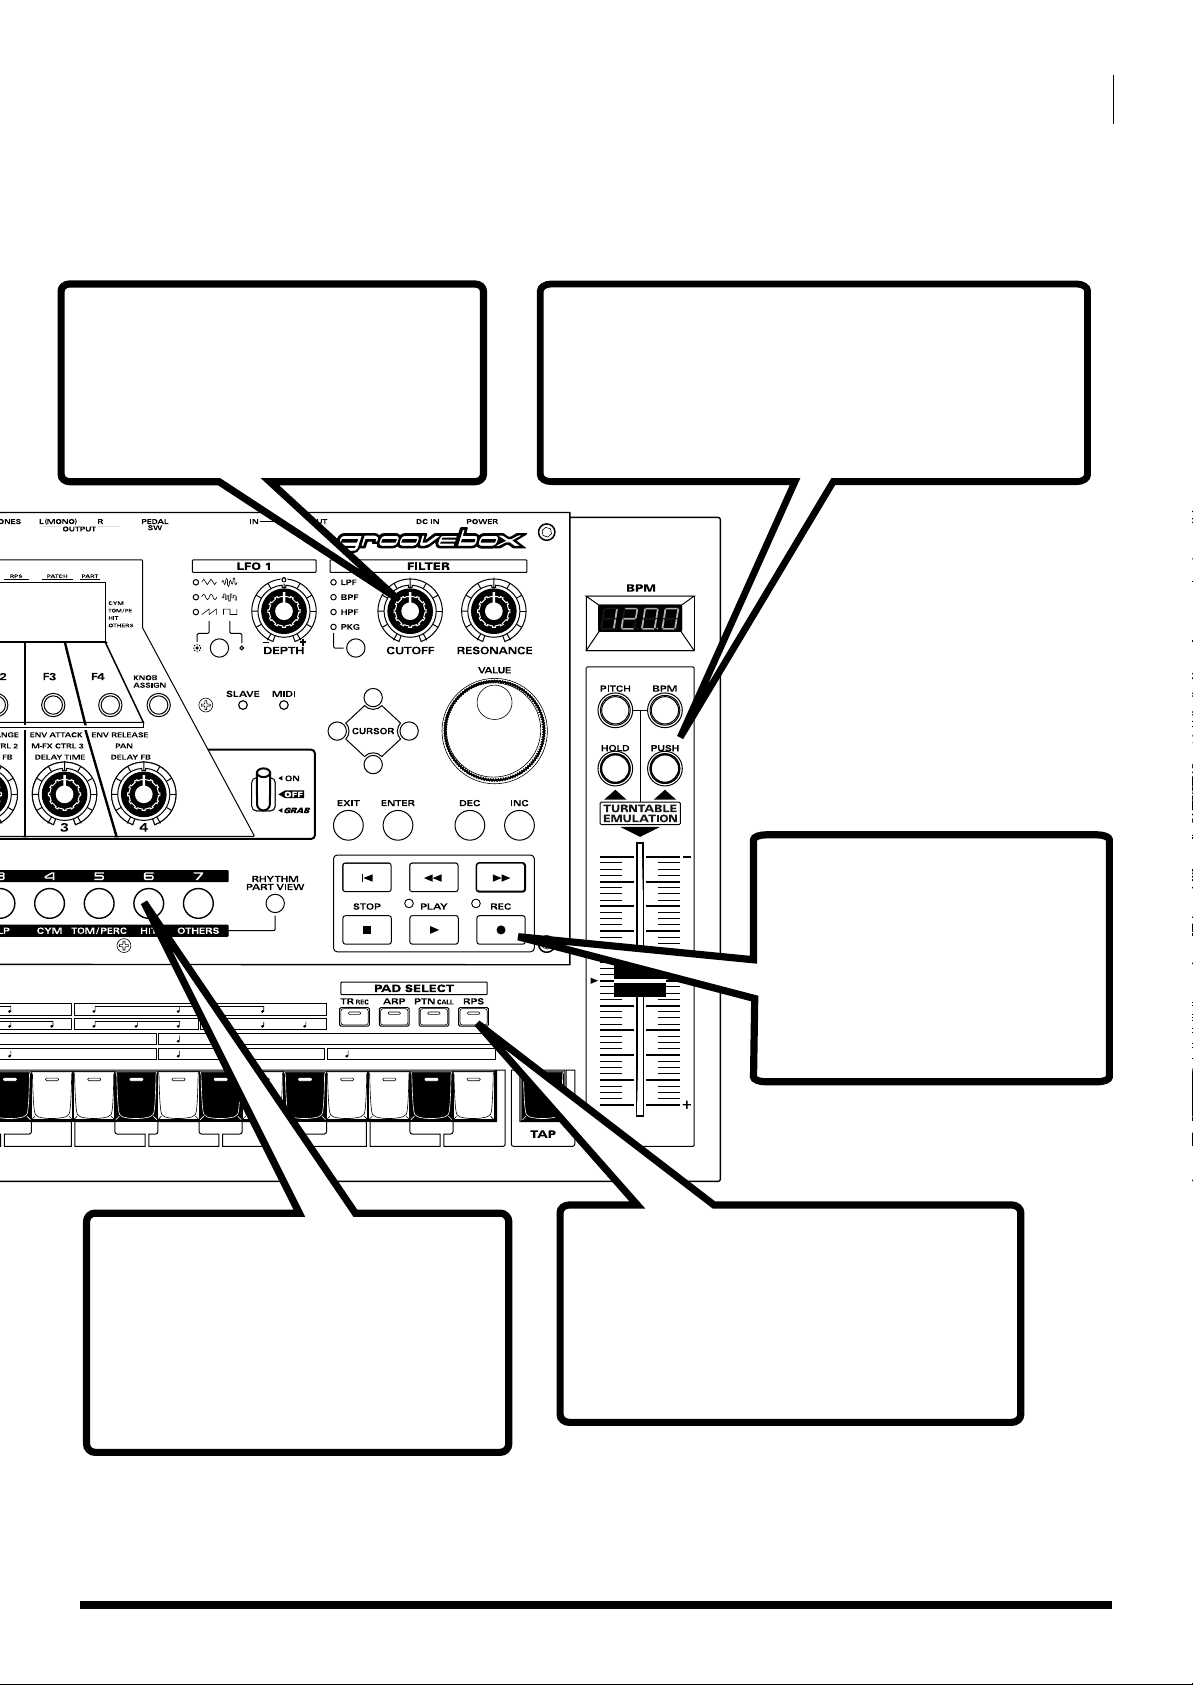
The MC-307 is a player-oriented version
of the groovebox. It features functions that
support real-time operation, and DJ-play.
This manual explains the major functions
of the MC-307.
See the appropriate pages for how to operate.
Wide range of
preset patterns
240 patterns are pre-installed,
covering almost all kinds of
dance music. Also, 200 original
patterns can be additionally stored.
4
Variety of patches
In addition to the 512 patches used
in the MC-505, 288 new dedicated
patches have been added to the MC-307.
Patches for any kind of situation are available.
Page10
Page12 Page17
Page20
Various knobs capable
of real-time operation
These enable real-time tone changing
for use as one type of musical expression.
Dedicated "BPM display" and
"TURNTABLE EMULATION"
A display for indicating solely the tempo is provided.
This enables easy operation, similar to manually
finding the start of a track using a turntable.
Two types of
"Part mute button"
for adding variation to
pattern play
Starting with the piano solo, and then
adding bass and rhythm, musical
compositions can be handled in real time.
Page8
recording functions
Offers both "Real-time recording,"
which records play on the keyboard
pad as is, and "Tr-Rec" which
Records Using Simple Button
Operations.
"RPS" and "Arpeggiator"
for stronger sounds
Attractive live performance is possible
by adding phrases in real time.
Page18, 19
5
Listening to Various Patterns
A pattern consists of 1 to 32 measures of play that include patches and
rhythm sets of up to 8 parts.
The MC-307 is provided with 240 preset patterns. In addition to these, an
area for up to 200 user-created patterns is also available.
The procedure for playing back a preset pattern is explained here.
Playing Back Patterns Continuously
The procedure for playing back various patterns while maintaining the
tempo of the first pattern is explained here.
This method is useful for live performances.
For the procedure for
creating a user pattern, see
20page.
1
1
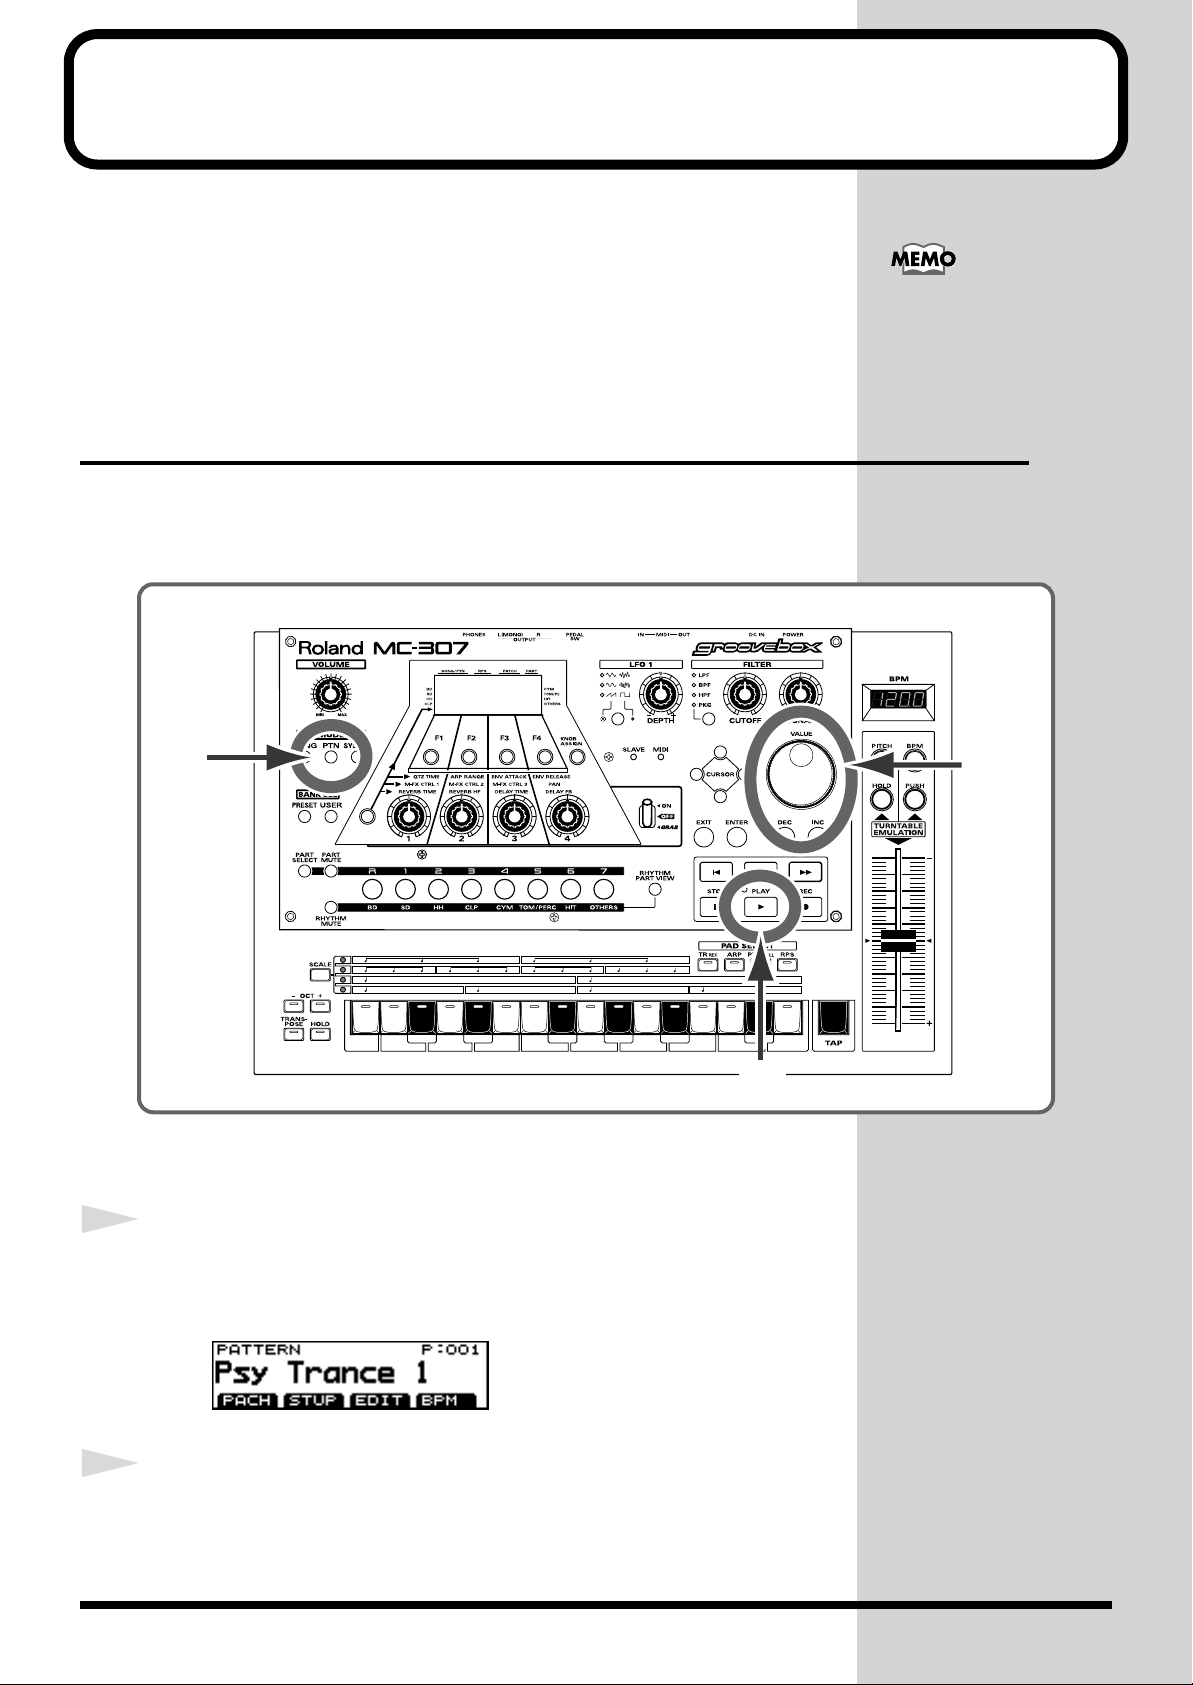
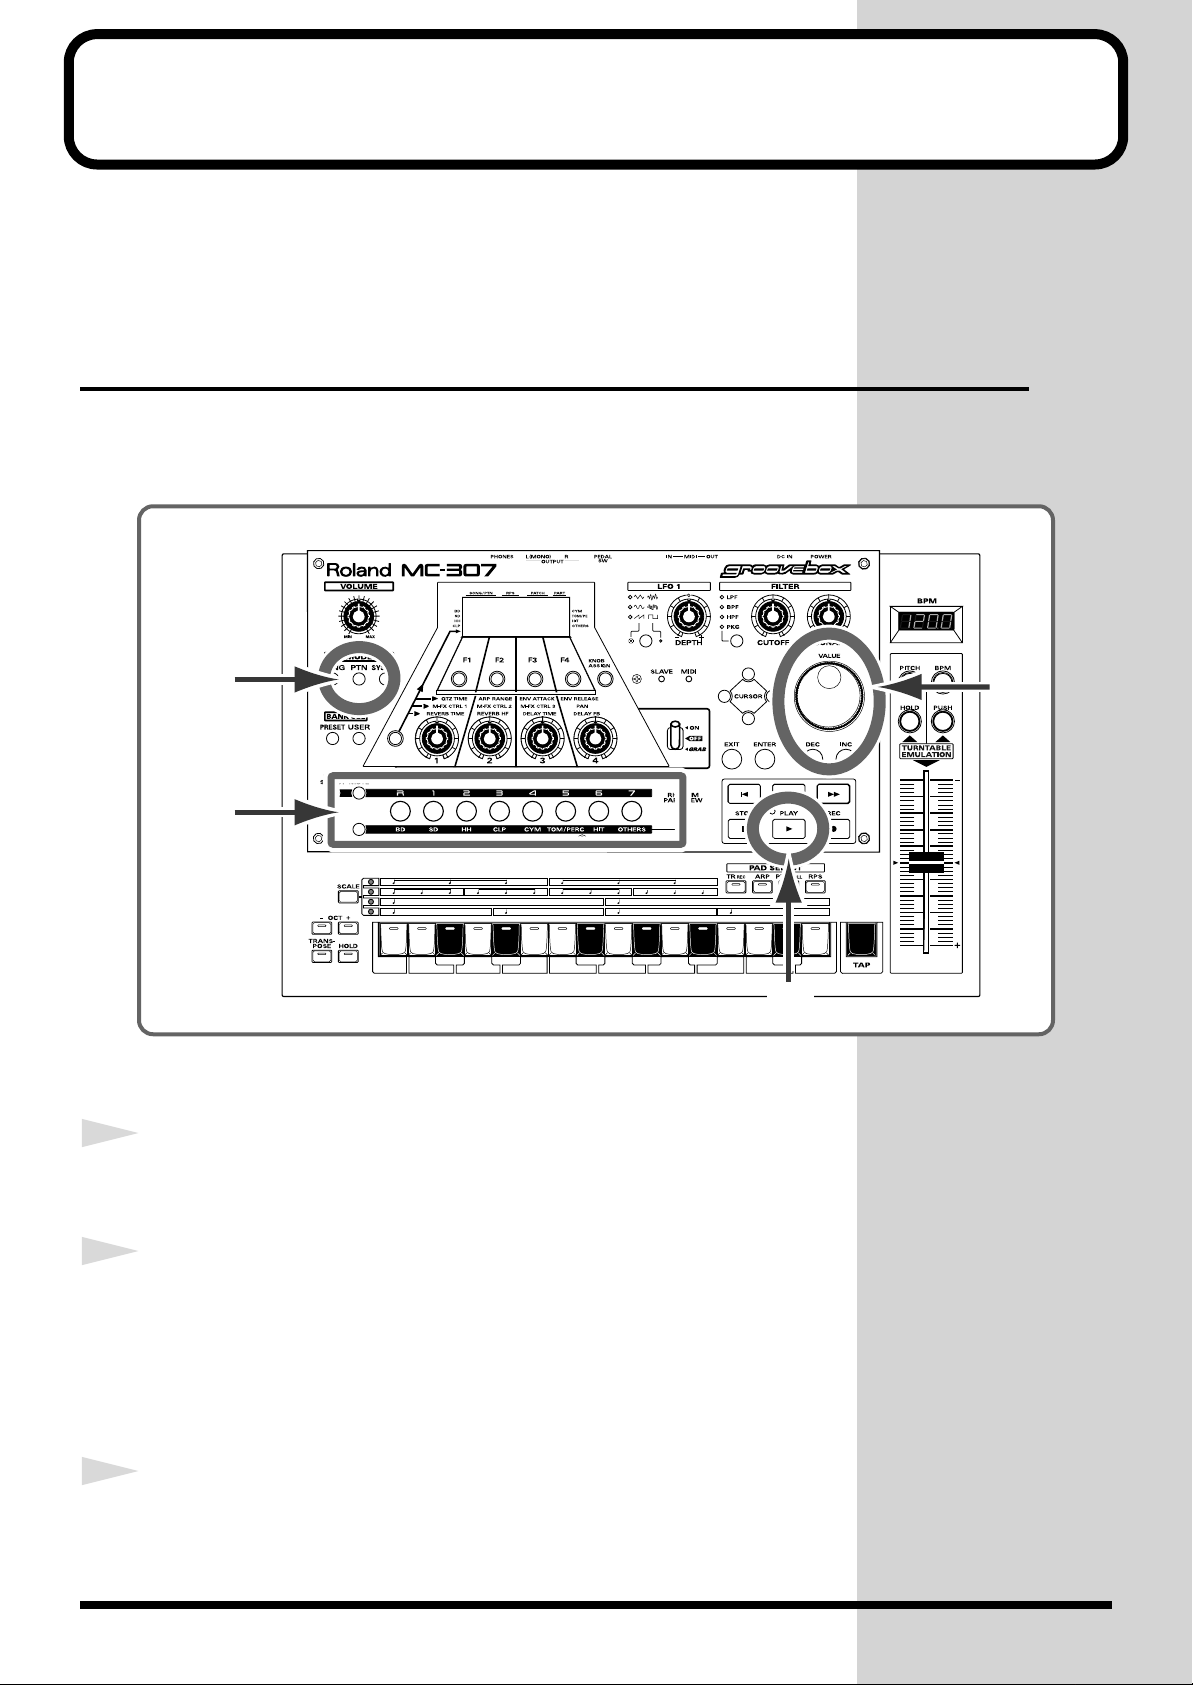
Procedure
Press the [PTN] button.
The screen for playing back patterns appears.
3
2
6
2
Press the [PLAY] button.
The pattern is played.
Listening to Various Patterns
b
3
4
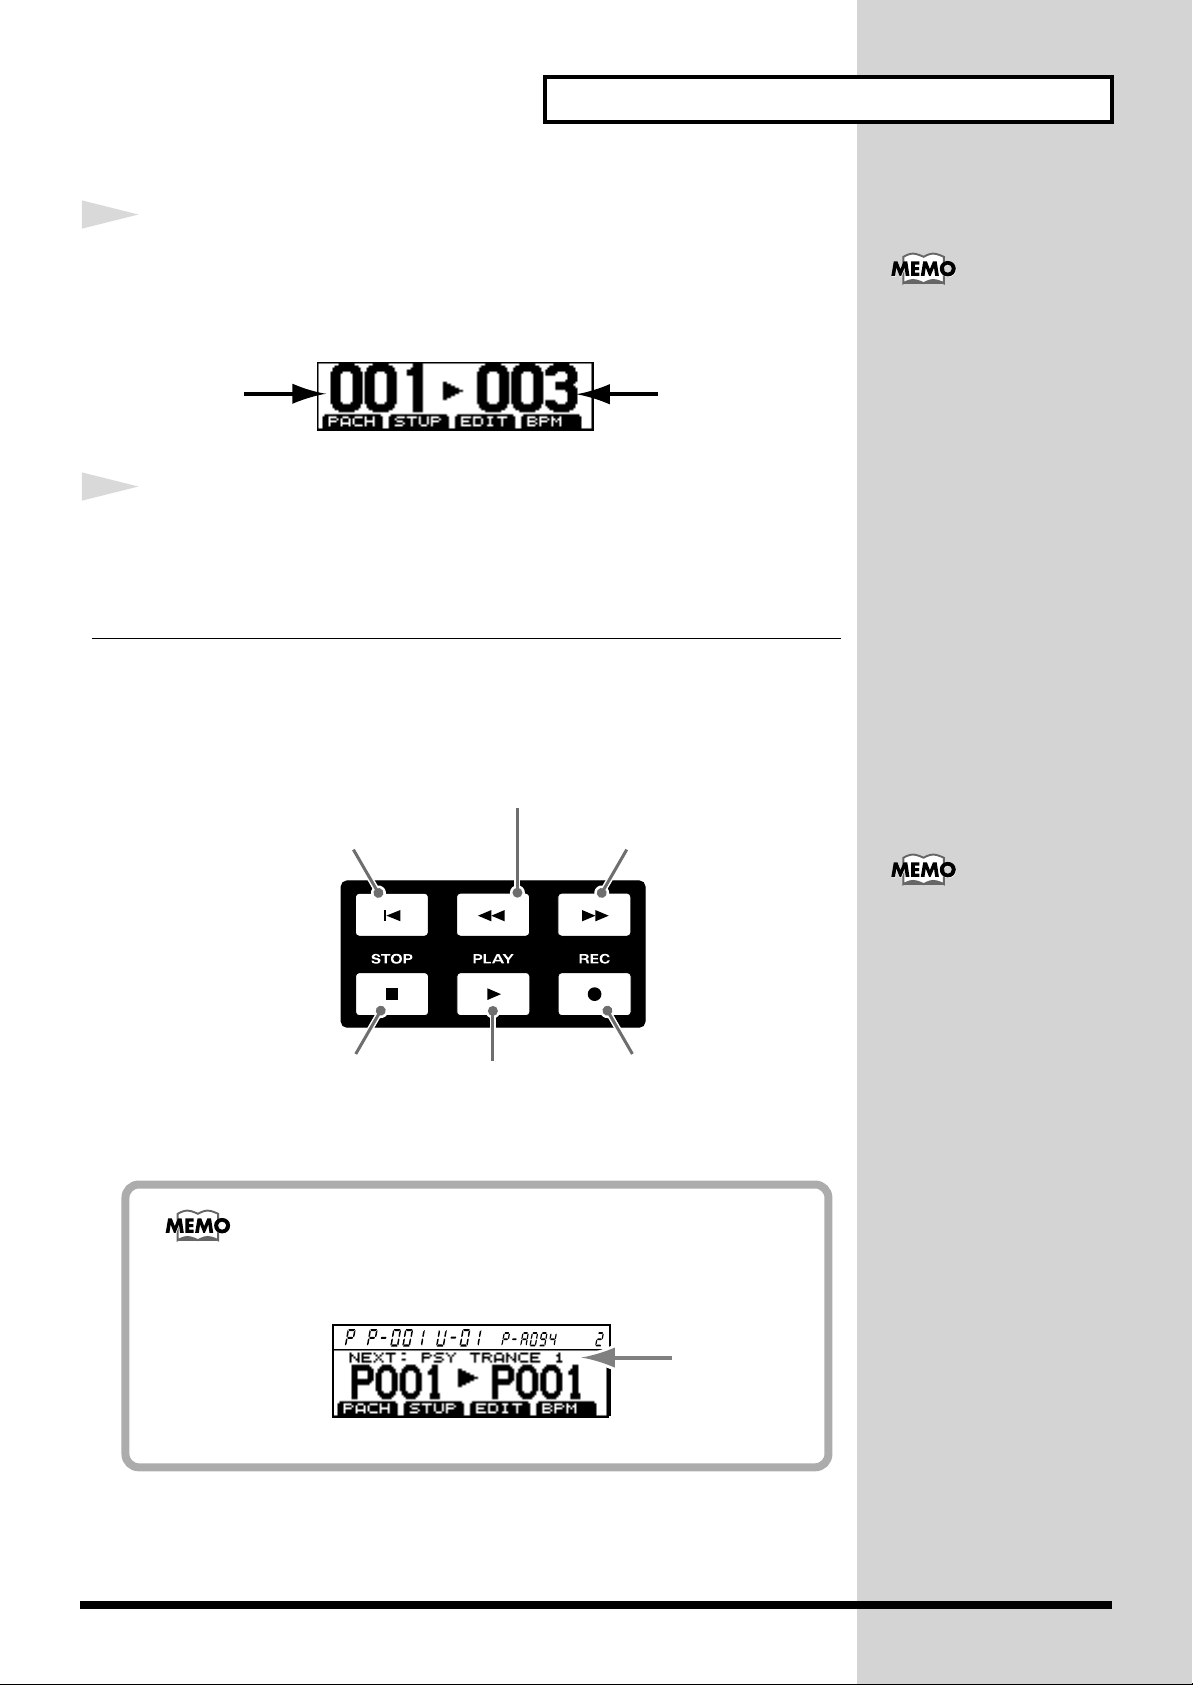
Using the [VALUE] dial or the [INC]/[DEC] buttons, select the
pattern to be played back.
Current Pattern
Number
Next Pattern
Number
After a while, playback is switched to the selected pattern.
In this way, various patterns can be played back successively without
stopping.
Playback-related operations are performed using the buttons shown in the
figure below.
Return to the previous measure.
The preset patterns are
classified as follows:
P: 001 - 090 Techno
P: 091 - 142 House
P: 143 - 179 Hip Hop
P: 180 - 203 Drum’n’Bass
P: 204 - 210 BreakBeats
P: 211 - 220 Jazz,Lounge
P: 221 - 225 Reggae
P: 226 - 240 Latin
During playback, you can
press the [CURSOR (left,
right)] buttons to
successively select the first
number of each genre.
Returns to the beginning of the pattern.
Starts playback.
Pressing the [PTN] button that appears in the screen in Step 3 allows you to
switch to the screen that also shows the name of the selected Pattern.
Proceeds to the next measure.
Used in recording. (P.20)Stops playback.
Next Pattern
Name
You can also have it so
Patterns play back at the
tempo set for each of them
every time there is a switch
to playback of a succeeding
Pattern.
- Stopping playback,
selecting a pattern, then
starting playback again
- Pressing the CURSOR
uttons (right or left)
during playback
7
Adding Variations to Pattern Playback
The MC-307 is capable of adding variations to a pattern while playing it
back. While general sequencers are designed to play back pre-created music
only, the MC-307 is capable of adding variations to music in real time. This
is especially useful for dance music.
Using Mute Function
Use the mute function to add variations to sound play. Mute is one of the
most basic functions. It is also one of the essential techniques needed to
master the MC-307. Try playing a pattern in intro style.
1
2
1
3,5,
6,7,
8
Procedure
Press the [PTN] button.
The pattern playback screen appears.
Using the [VALUE] dial or the [INC]/[DEC] buttons, select
2
4
8
3
pattern P: 003.
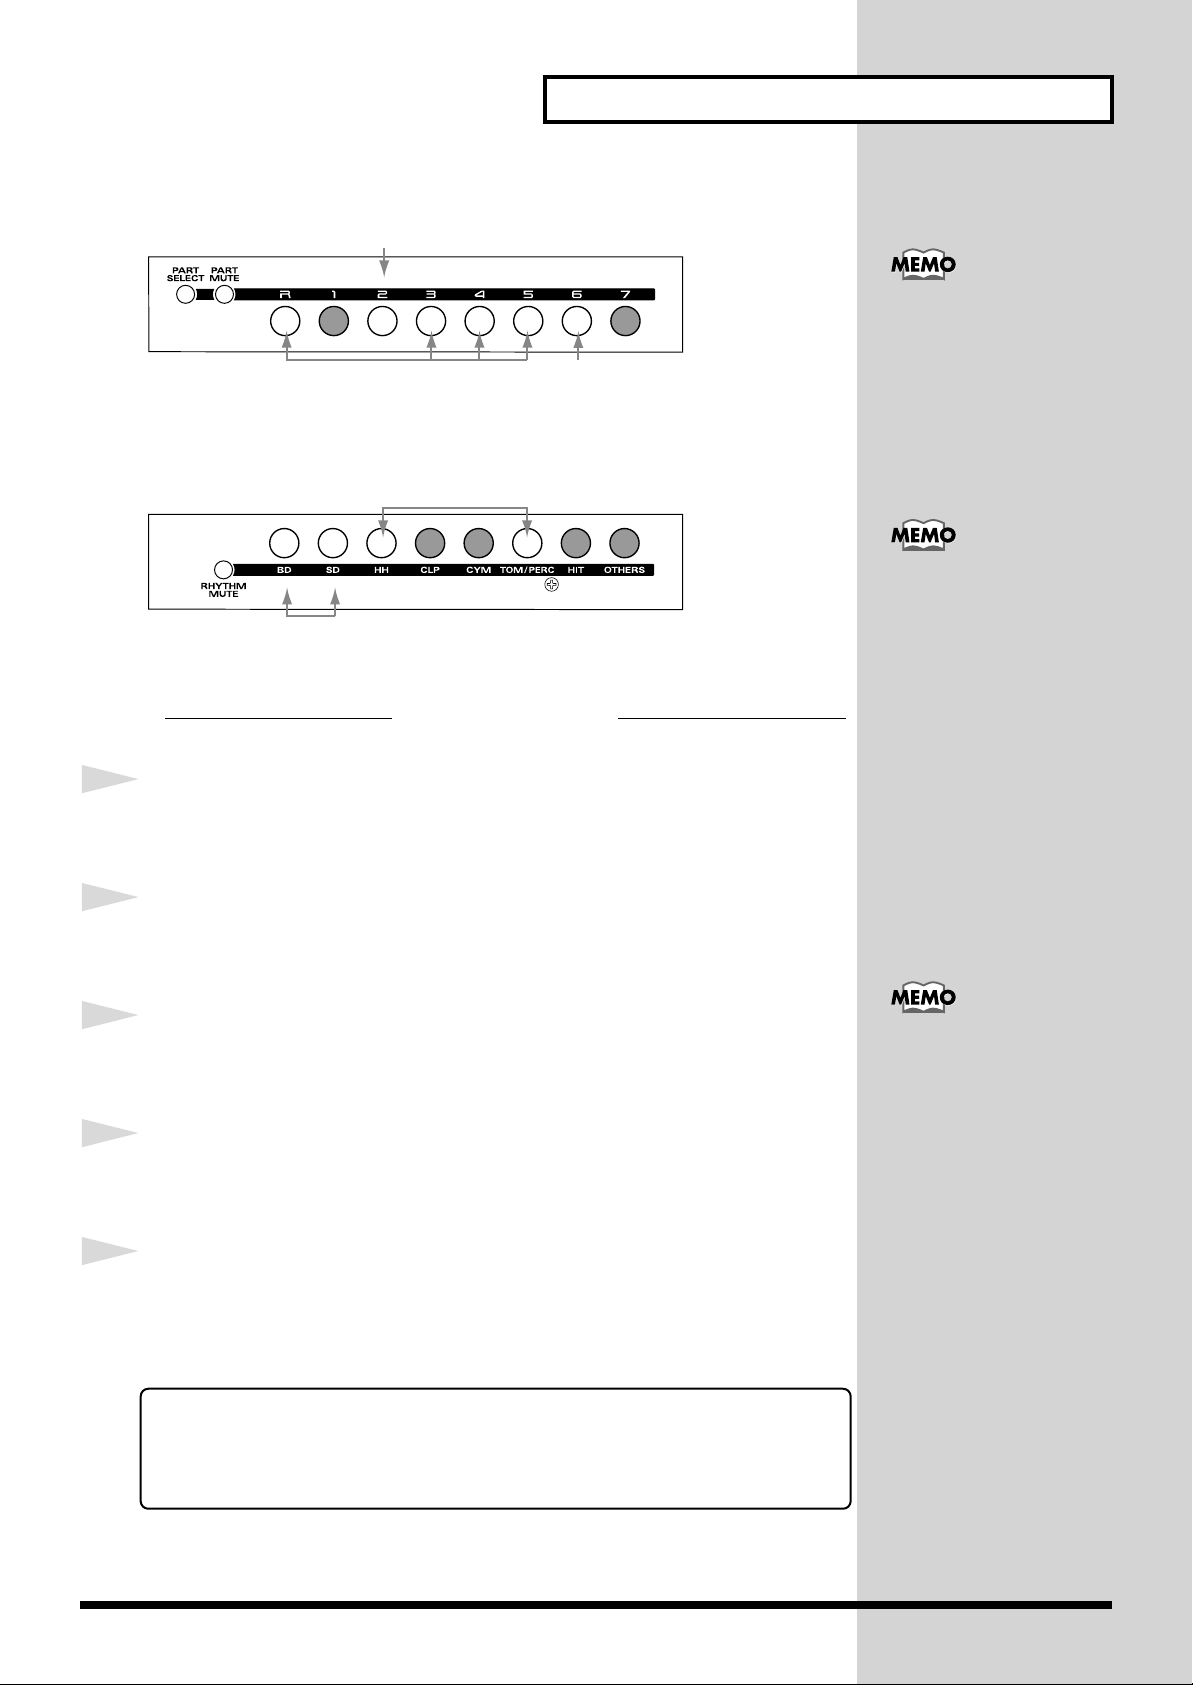
Set the part buttons [R] and [1] to [7] as shown in the figure on the following
page.
Press the [PART MUTE] button, then press the part buttons [R]
and [1] to [7] to set as follows.
Adding Variations to Pattern Playback
b
Press it, and its indicator will start blinking
lit
Press the [RHYTHM MUTE] button, then press the part buttons [R] and [1]
to [7] (BD, SD.... OTHER) to set as follows.
Blinking
lit
Each part is equivalent to a
single player in a band or
orchestra. Parts 1 to 7 are
for playing chromatic
instruments such as piano
and bass, while part R is for
percussion instruments
such as drum.
The part buttons indicate
the following:
Press it, and its indicator will start blinking
Perform actual play.
4
5
6
7
8
Press the [PLAY] button.
The pattern is played back in intro style.
Press the [PART MUTE] button.
Then part muting can be operated.
After playback of several measures, press Part Button [2].
Bass starts to sound.
Press the [RHYTHM MUTE] button.
Now, rhythm muting can be operated.
After playback of several more measures, press [BD] button
(Part Button [R]).
Bass drum is added for more dynamism.
The above is a simple example. More complicated muting techniques, using
a variety of timings, could be used to create an entire song.
Try muting at various timings using other patterns.
Lit: Playback data exists,
Blinking:Muted,
Extinguished: No playback
data exists
The status, whether it is lit
or blinking, can be
switched by pressing the
part button.
With rhythm set muting,
the individual percussion
instruments making up
part R can be muted. Mute
uttons are classified as
follows:
BD: Bass Drum
SD: Snare Drum
HH: Hi-Hat
CLP: Hand Clap
CYM: Cymbal
TOM/PERC: TomTom/
Percussion
HIT: HIT/One Shot Sound
OTHERS: Others
9
Adding Variations to Pattern Playback
Changing to Another Patch
By changing the patch (or rhythm set) used in the pattern, a completely
different pattern sound can be made. First, see how the pattern sound
changes by changing to various patches.
For example, try changing the rhythm set here. By changing the patch while
playing the pattern, the difference in sound between patches can be clearly
heard.
6
1
2
1
4
5
3
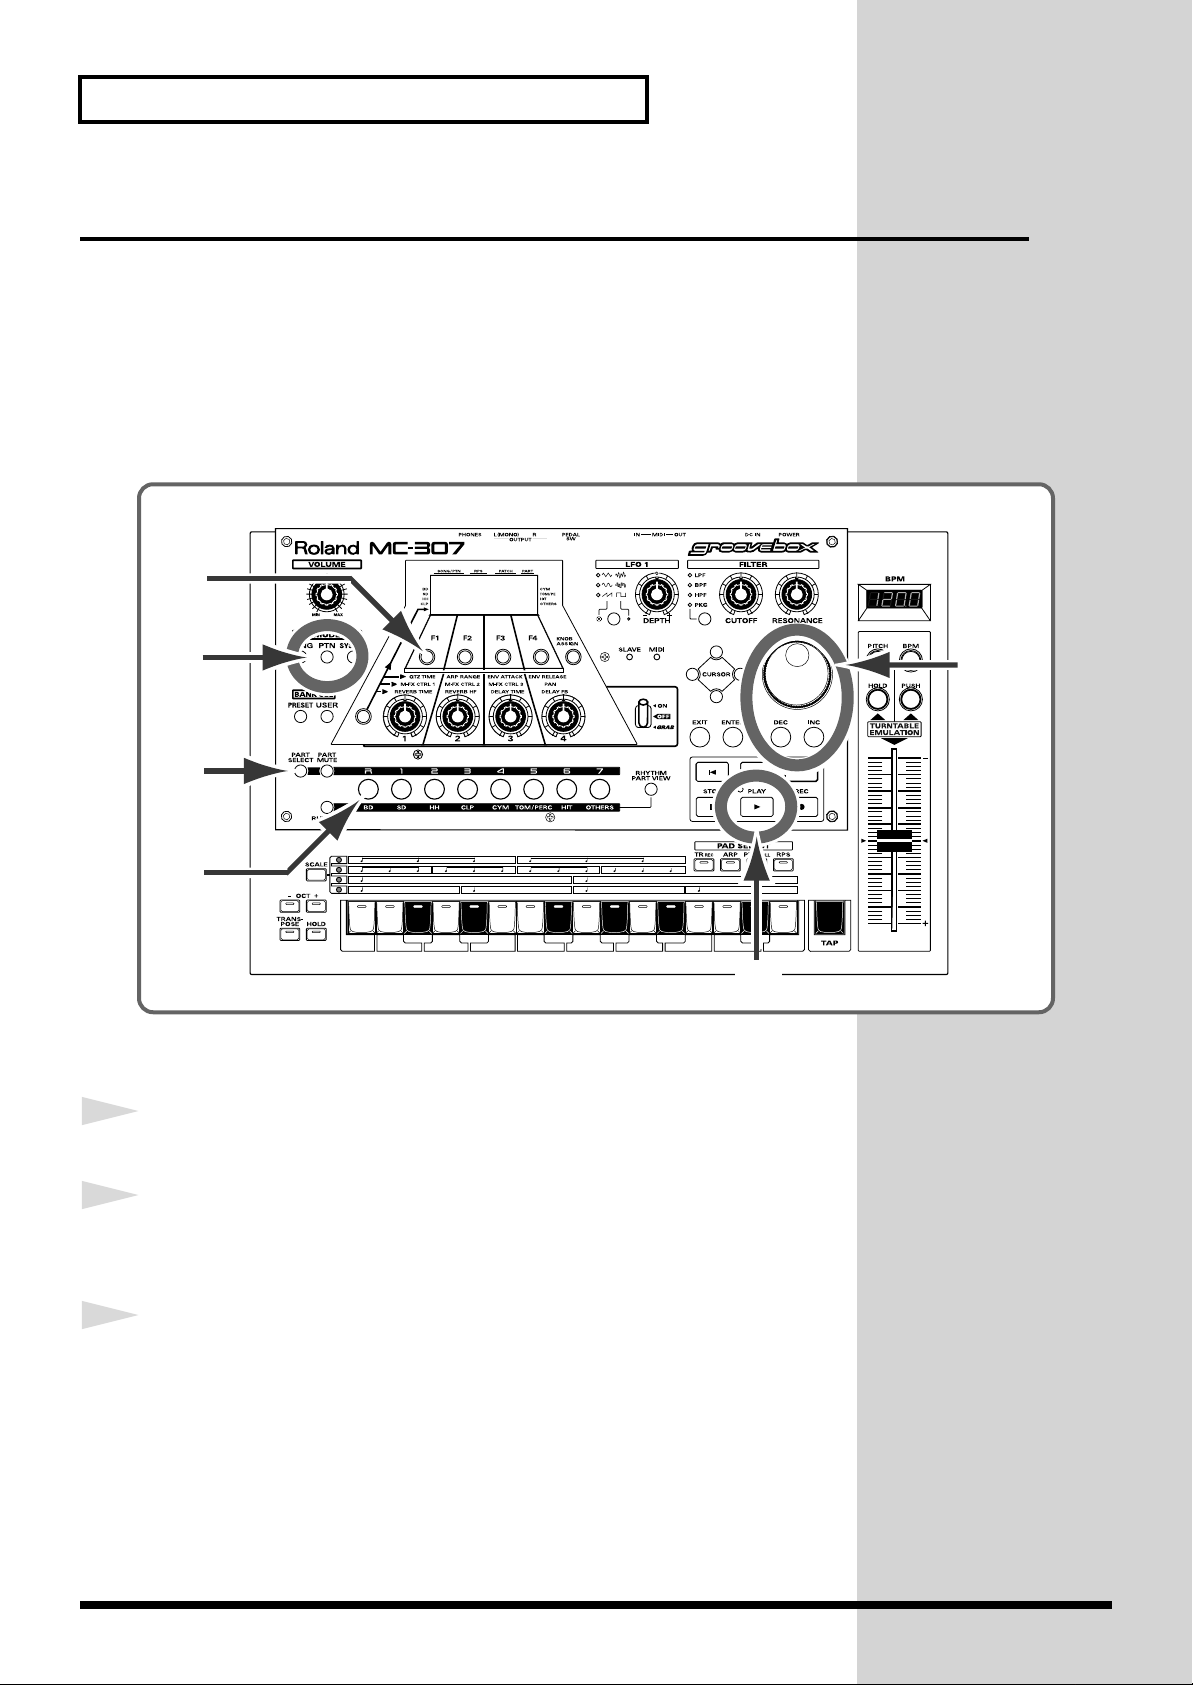
Procedure
Press the [PTN] button.
Using the [VALUE] dial or the [INC]/[DEC] buttons, select
2,7
3
10
pattern P: 003.
Press the [PLAY] button.
Pattern playback starts.
 Loading...