

Roland Corporation KR-107 Owner's Manual

Owner’s Manual
Before using this unit, carefully read the sections entitled: “IMPORTANT SAFETY
INSTRUCTIONS” (p. 2), “USING THE UNIT SAFELY” (p. 3, 4, 5), and “IMPORTANT NOTES”
(p. 6, 7, 8). These sections provide important information concerning the proper operation
of the unit. Additionally, in order to feel assured that you have gained a good grasp of
every feature provided by your new unit, Owner’s Manual should be read in its entirety.
The manual should be saved and kept on hand as a convenient reference
202
Copyright © 2005 ROLAND CORPORATION
All rights reserved. No part of this publication may be reproduced in any form without
the written permission of ROLAND CORPORATION.
This product complies with the requirements of European Directives EMC 89/336/EEC and LVD 73/23/EEC.
For EU Countries
For Canada
This Class B digital apparatus meets all requirements of the Canadian Interference-Causing Equipment Regulations.
Cet appareil numérique de la classe B respecte toutes les exigences du Règlement sur le matériel brouilleur du Canada.
NOTICE
AVIS
For the USA
FEDERAL COMMUNICATIONS COMMISSION
RADIO FREQUENCY INTERFERENCE STATEMENT
This equipment has been tested and found to comply with the limits for a Class B digital device, pursuant to Part 15 of the
FCC Rules. These limits are designed to provide reasonable protection against harmful interference in a residential
installation. This equipment generates, uses, and can radiate radio frequency energy and, if not installed and used in
accordance with the instructions, may cause harmful interference to radio communications. However, there is no guarantee
that interference will not occur in a particular installation. If this equipment does cause harmful interference to radio or
television reception, which can be determined by turning the equipment off and on, the user is encouraged to try to correct the
interference by one or more of the following measures:
– Reorient or relocate the receiving antenna.
– Increase the separation between the equipment and receiver.
– Connect the equipment into an outlet on a circuit different from that to which the receiver is connected.
– Consult the dealer or an experienced radio/TV technician for help.
This device complies with Part 15 of the FCC Rules. Operation is subject to the following two conditions:
(1) This device may not cause harmful interference, and
(2) This device must accept any interference received, including interference that may cause undesired operation.
Unauthorized changes or modification to this system can void the users authority to operate this equipment.
This equipment requires shielded interface cables in order to meet FCC class B Limit.
CAUTION
RISK OF ELECTRIC SHOCK
DO NOT OPEN
ATTENTION: RISQUE DE CHOC ELECTRIQUE NE PAS OUVRIR
CAUTION: TO REDUCE THE RISK OF ELECTRIC SHOCK,
DO NOT REMOVE COVER (OR BACK).
NO USER-SERVICEABLE PARTS INSIDE.
REFER SERVICING TO QUALIFIED SERVICE PERSONNEL.
The lightning flash with arrowhead symbol, within an
equilateral triangle, is intended to alert the user to the
presence of uninsulated “dangerous voltage” within the
product’s enclosure that may be of sufficient magnitude to
constitute a risk of electric shock to persons.
The exclamation point within an equilateral triangle is
intended to alert the user to the presence of important
operating and maintenance (servicing) instructions in the
literature accompanying the product.
INSTRUCTIONS PERTAINING TO A RISK OF FIRE, ELECTRIC SHOCK, OR INJURY TO PERSONS.
IMPORTANT SAFETY INSTRUCTIONS
SAVE THESE INSTRUCTIONS
WARNING - When using electric products, basic precautions should always be followed, including the following:
1. Read these instructions.
2. Keep these instructions.
3. Heed all warnings.
4. Follow all instructions.
5. Do not use this apparatus near water.
6. Clean only with a dry cloth.
7. Do not block any of the ventilation openings. Install in
accordance with the manufacturers instructions.
8. Do not install near any heat sources such as radiators,
heat registers, stoves, or other apparatus (including
amplifiers) that produce heat.
9. Do not defeat the safety purpose of the polarized or
grounding-type plug. A polarized plug has two blades with
one wider than the other. A grounding type plug has two
blades and a third grounding prong. The wide blade or the
third prong are provided for your safety. If the provided plug
does not fit into your outlet, consult an electrician for
replacement of the obsolete outlet.
10. Protect the power cord from being walked on or pinched
particularly at plugs, convenience receptacles, and the
point where they exit from the apparatus.
11. Only use attachments/accessories specified by the
manufacturer.
12. Use only with the cart, stand, tripod, bracket,
or table specified by the manufacturer, or
sold with the apparatus. When a cart is used,
use caution when moving the cart/apparatus
combination to avoid injury from tip-over.
13. Unplug this apparatus during lightning storms or when
unused for long periods of time.
14. Refer all servicing to qualified service personnel. Servicing
is required when the apparatus has been damaged in any
way, such as power-supply cord or plug is damaged, liquid
has been spilled or objects have fallen into the apparatus,
the apparatus has been exposed to rain or moisture, does
not operate normally, or has been dropped.
IMPORTANT: THE WIRES IN THIS MAINS LEAD ARE COLOURED IN ACCORDANCE WITH THE FOLLOWING CODE.
BLUE:
BROWN:
As the colours of the wires in the mains lead of this apparatus may not correspond with the coloured markings identifying
the terminals in your plug, proceed as follows:
The wire which is coloured BLUE must be connected to the terminal which is marked with the letter N or coloured BLACK.
The wire which is coloured BROWN must be connected to the terminal which is marked with the letter L or coloured RED.
Under no circumstances must either of the above wires be connected to the earth terminal of a three pin plug.
NEUTRAL
LIVE
For the U.K.
WARNING: To reduce the risk of fire or electric shock, do not expose this apparatus to rain or moisture.
2
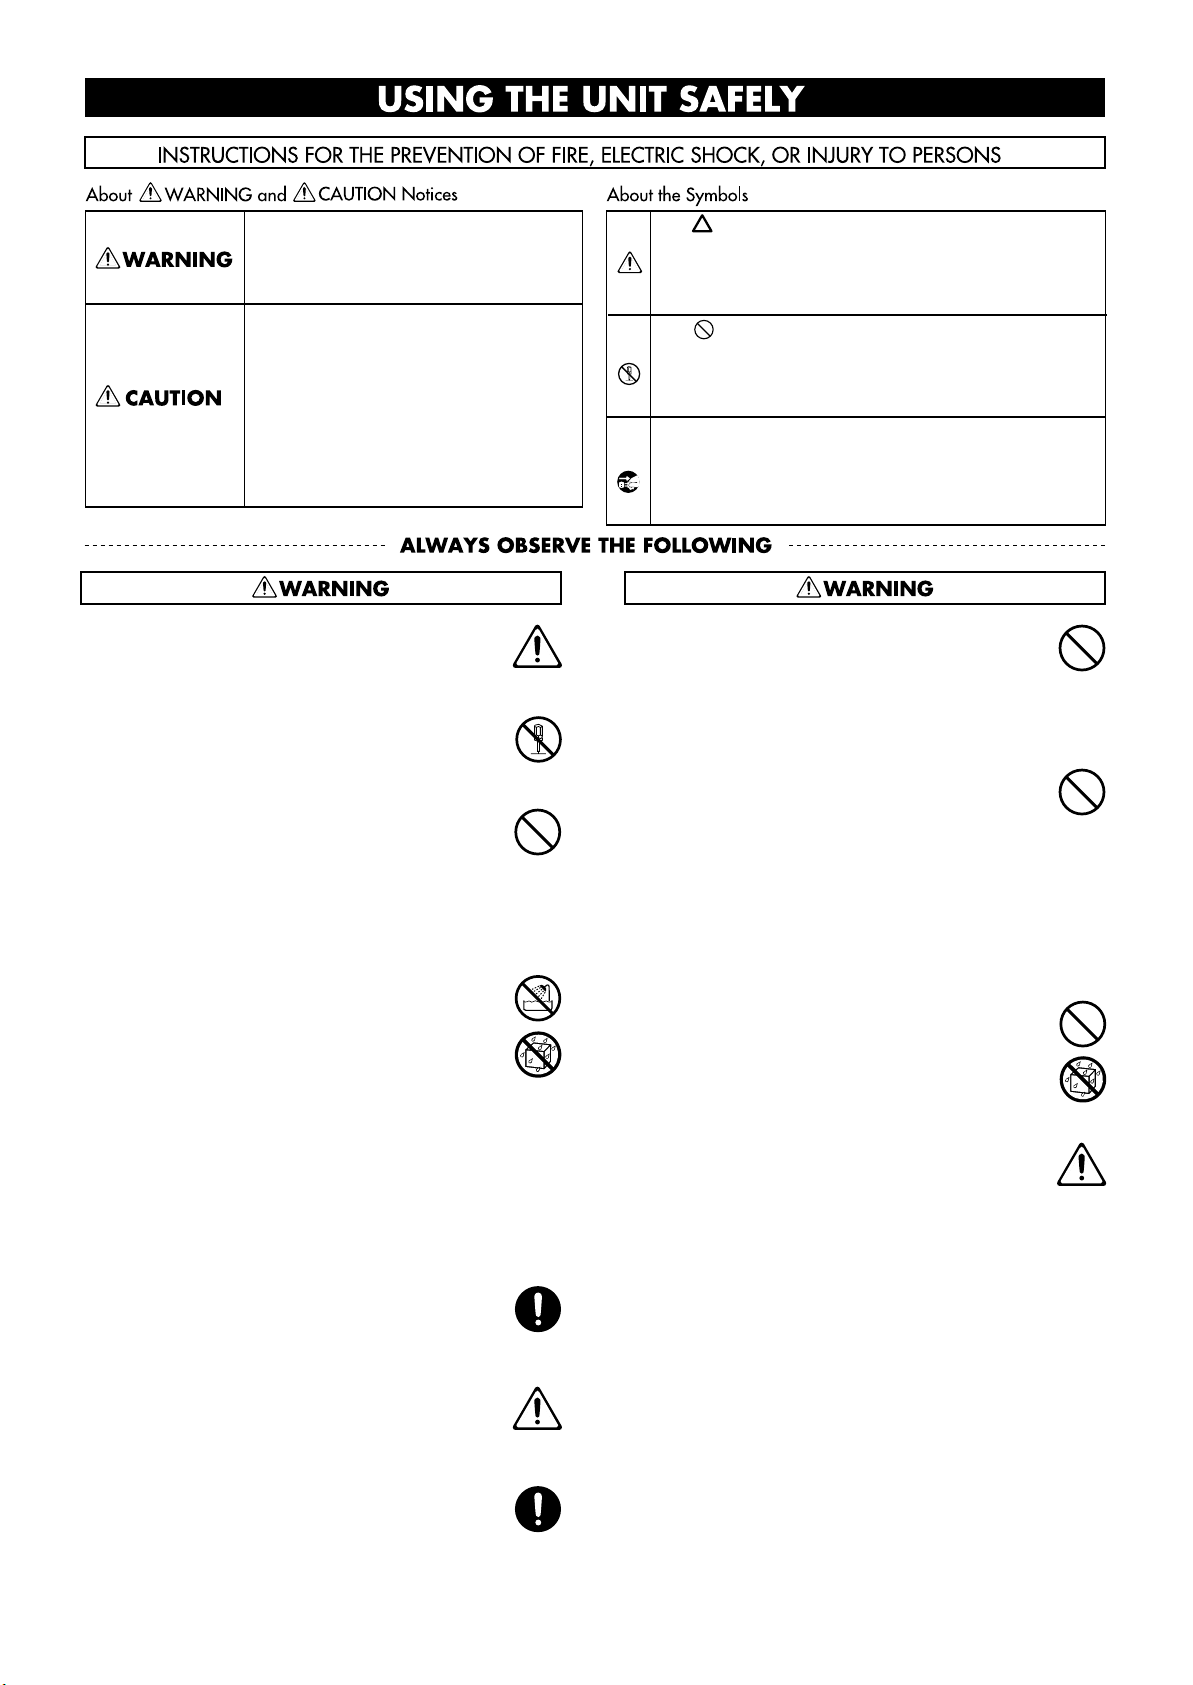
USING THE UNIT SAFELY
Used for instructions intended to alert
the user to the risk of death or severe
injury should the unit be used
improperly.
Used for instructions intended to alert
the user to the risk of injury or material
damage should the unit be used
improperly.
* Material damage refers to damage or
other adverse effects caused with
respect to the home and all its
furnishings, as well to domestic
animals or pets.
001
• Before using this unit, make sure to read the
instructions below, and the Owner’s Manual.
..........................................................................................................
002a
• Do not open or perform any internal modifications on the unit.
..........................................................................................................
003
• Do not attempt to repair the unit, or replace parts
within it (except when this manual provides
specific instructions directing you to do so). Refer
all servicing to your retailer, the nearest Roland
Service Center, or an authorized Roland
distributor, as listed on the “Information” page.
..........................................................................................................
004
• Never use or store the unit in places that are:
• Subject to temperature extremes (e.g., direct
sunlight in an enclosed vehicle, near a heating
duct, on top of heat-generating equipment); or
are
• Damp (e.g., baths, washrooms, on wet floors);
or are
• Humid; or are
• Exposed to rain; or are
• Dusty; or are
• Subject to high levels of vibration.
..........................................................................................................
007
• Make sure you always have the unit placed so it is
level and sure to remain stable. Never place it on
stands that could wobble, or on inclined surfaces.
..........................................................................................................
008a
• The unit should be connected to a power supply
only of the type described in the operating
instructions, or as marked on the rear of unit.
..........................................................................................................
008e
• Use only the attached power-supply cord. Also,
the supplied power cord must not be used with
any other device.
..........................................................................................................
The symbol alerts the user to important instructions
or warnings.The specific meaning of the symbol is
determined by the design contained within the
triangle. In the case of the symbol at left, it is used for
general cautions, warnings, or alerts to danger.
The symbol alerts the user to items that must never
be carried out (are forbidden). The specific thing that
must not be done is indicated by the design contained
within the circle. In the case of the symbol at left, it
means that the unit must never be disassembled.
The ● symbol alerts the user to things that must be
carried out. The specific thing that must be done is
indicated by the design contained within the circle. In
the case of the symbol at left, it means that the powercord plug must be unplugged from the outlet.
009
• Do not excessively twist or bend the power cord,
nor place heavy objects on it. Doing so can
damage the cord, producing severed elements
and short circuits. Damaged cords are fire and
shock hazards!
..........................................................................................................
010
• This unit, either alone or in combination with an
amplifier and headphones or speakers, may be
capable of producing sound levels that could
cause permanent hearing loss. Do not operate for
a long period of time at a high volume level, or at
a level that is uncomfortable. If you experience
any hearing loss or ringing in the ears, you should
immediately stop using the unit, and consult an
audiologist.
..........................................................................................................
011
• Do not allow any objects (e.g., flammable
material, coins, pins); or liquids of any kind
(water, soft drinks, etc.) to penetrate the unit.
..........................................................................................................
012a
• Immediately turn the power off, remove the
power cord from the outlet, and request servicing
by your retailer, the nearest Roland Service
Center, or an authorized Roland distributor, as
listed on the “Information” page when:
• The power-supply cord, or the plug has been
damaged; or
• If smoke or unusual odor occurs
• Objects have fallen into, or liquid has been
spilled onto the unit; or
• The unit has been exposed to rain (or otherwise
has become wet); or
• The unit does not appear to operate normally
or exhibits a marked change in performance.
..........................................................................................................
3
013
• In households with small children, an adult
should provide supervision until the child is
capable of following all the rules essential for the
safe operation of the unit.
..........................................................................................................
014
• Protect the unit from strong impact.
(Do not drop it!)
..........................................................................................................
015
• Do not force the unit’s power-supply cord to
share an outlet with an unreasonable number of
other devices. Be especially careful when using
extension cords—the total power used by all
devices you have connected to the extension
cord’s outlet must never exceed the power rating
(watts/amperes) for the extension cord. Excessive
loads can cause the insulation on the cord to heat
up and eventually melt through.
..........................................................................................................
016
• Before using the unit in a foreign country, consult
with your retailer, the nearest Roland Service
Center, or an authorized Roland distributor, as
listed on the “Information” page.
..........................................................................................................
019
• Batteries must never be recharged, heated, taken
apart, or thrown into fire or water.
..........................................................................................................
023
• DO NOT play a CD-ROM disc on a conventional
audio CD player. The resulting sound may be of a
level that could cause permanent hearing loss.
Damage to speakers or other system components
may result.
..........................................................................................................
026
• Do not put anything that contains water (e.g.,
flower vases) on this unit. Also, avoid the use of
insecticides, perfumes, alcohol, nail polish, spray
cans, etc., near the unit. Swiftly wipe away any
liquid that spills on the unit using a dry, soft
cloth.
..........................................................................................................
101a
• The unit should be located so that its location or
position does not interfere with its proper ventilation.
..........................................................................................................
102b
• Always grasp only the plug on the power-supply
cord when plugging into, or unplugging from, an
outlet or this unit.
..........................................................................................................
103a
• At regular intervals, you should unplug the
power plug and clean it by using a dry cloth to
wipe all dust and other accumulations away from
its prongs. Also, disconnect the power plug from
the power outlet whenever the unit is to remain
unused for an extended period of time. Any
accumulation of dust between the power plug
and the power outlet can result in poor insulation
and lead to fire.
..........................................................................................................
104
• Try to prevent cords and cables from becoming
entangled. Also, all cords and cables should be
placed so they are out of the reach of children.
..........................................................................................................
106
• Never climb on top of, nor place heavy objects on
the unit.
..........................................................................................................
107b
• Never handle the power cord or its plugs with
wet hands when plugging into, or unplugging
from, an outlet or this unit.
..........................................................................................................
108d: Selection
• If you need to move the instrument, take note of
the precautions listed below. At least two persons
are required to safely lift and move the unit. It
should be handled carefully, all the while keeping
it level. Make sure to have a firm grip, to protect
yourself from injury and the instrument from
damage.
1
• Check to make sure the screw securing the unit
to the stand have not become loose. Fasten
them again securely whenever you notice any
loosening.
2
• Disconnect the power cord.
3
• Disconnect all cords coming from external
devices.
4
• Raise the adjusters on the stand (p. 19).
5
• Close the lid.
7
• Fold down the music rest.
..........................................................................................................
109a
• Before cleaning the unit, turn off the power and
unplug the power cord from the outlet (p. 18).
4
..........................................................................................................
110a
• Whenever you suspect the possibility of lightning
in your area, pull the plug on the power cord out
of the outlet.
..........................................................................................................
111: Selection
• If used improperly, batteries may explode or leak
and cause damage or injury. In the interest of
safety, please read and observe the following
precautions (p. 18).
1
• Carefully follow the installation instructions
for batteries, and make sure you observe the
correct polarity.
2
• Avoid using new batteries together with used
ones. In addition, avoid mixing different types
of batteries.
3
• Remove the batteries whenever the unit is to
remain unused for an extended period of time.
5
• If a battery has leaked, use a soft piece of cloth
or paper towel to wipe all remnants of the
discharge from the battery compartment. Then
install new batteries. To avoid inflammation of
the skin, make sure that none of the battery
discharge gets onto your hands or skin.
Exercise the utmost caution so that none of the
discharge gets near your eyes. Immediately
rinse the affected area with running water if
any of the discharge has entered the eyes.
6
• Never keep batteries together with metallic
objects such as ballpoint pens, necklaces,
hairpins, etc.
..........................................................................................................
112
• Used batteries must be disposed of in compliance
with whatever regulations for their safe disposal
that may be observed in the region in which you
live.
• The power-supply cord, or the plug has been
damaged; or
• If smoke or unusual odor occurs
• Objects have fallen into, or liquid has been
spilled onto the unit; or
• The unit has been exposed to rain (or otherwise
has become wet); or
• The unit does not appear to operate normally
or exhibits a marked change in performance.
..........................................................................................................
116
• Be careful when opening/closing the lid so you
do not get your fingers pinched (p. 18). Adult
supervision is recommended whenever small
children use the unit.
..........................................................................................................
118c
• Always keep the following parts including with
the KR107 and small components that may be
removed out of the reach of small children to
avoid accidental ingestion of these parts.
Included Parts
• External memory anti-theft lock securing screw
Removable parts
• Screws fastening the stand
• Screws fastening music rest
• the thumbscrew fastening the headphone hook
..........................................................................................................
5

IMPORTANT NOTES
291b
In addition to the items listed under “IMPORTANT SAFETY INSTRUCTIONS” and “USING THE UNIT SAFELY” on pages 2 and 3,
please read and observe the following:
Power Supply
301
• Do not connect this unit to same electrical outlet that is being
used by an electrical appliance that is controlled by an inverter
(such as a refrigerator, washing machine, microwave oven, or air
conditioner), or that contains a motor. Depending on the way in
which the electrical appliance is used, power supply noise may
cause this unit to malfunction or may produce audible noise. If it
is not practical to use a separate electrical outlet, connect a power
supply noise filter between this unit and the electrical outlet.
306b
• Batteries are supplied with the unit. The life of these batteries
may be limited, however, since their primary purpose was to
enable testing.
307
• Before connecting this unit to other devices, turn off the power to
all units. This will help prevent malfunctions and/or damage to
speakers or other devices.
308
• Although the LCD and LEDs are switched off when the POWER
switch is switched off, this does not mean that the unit has been
completely disconnected from the source of power. If you need to
turn off the power completely, first turn off the POWER switch,
then unplug the power cord from the power outlet. For this
reason, the outlet into which you choose to connect the power
cord’s plug should be one that is within easy reach and readily
accessible.
Placement
351
• Using the unit near power amplifiers (or other equipment
containing large power transformers) may induce hum. To
alleviate the problem, change the orientation of this unit; or move
it farther away from the source of interference.
352a
• This device may interfere with radio and television reception. Do
not use this device in the vicinity of such receivers.
352b
• Noise may be produced if wireless communications devices, such
as cell phones, are operated in the vicinity of this unit. Such noise
could occur when receiving or initiating a call, or while
conversing. Should you experience such problems, you should
relocate such wireless devices so they are at a greater distance
from this unit, or switch them off.
354b
• Do not expose the unit to direct sunlight, place it near devices
that radiate heat, leave it inside an enclosed vehicle, or otherwise
subject it to temperature extremes. Also, do not allow lighting
devices that normally are used while their light source is very
close to the unit (such as a piano light), or powerful spotlights to
shine upon the same area of the unit for extended periods of time.
Excessive heat can deform or discolor the unit.
355b
• When moved from one location to another where the temper-
ature and/or humidity is very different, water droplets (condensation) may form inside the unit. Damage or malfunction may
result if you attempt to use the unit in this condition. Therefore,
before using the unit, you must allow it to stand for several
hours, until the condensation has completely evaporated.
356
• Do not allow rubber, vinyl, or similar materials to remain on the
unit for long periods of time. Such objects can discolor or
otherwise harmfully affect the finish.
358
• Do not allow objects to remain on top of the keyboard. This can
be the cause of malfunction, such as keys ceasing to produce
sound.
359
• Do not paste stickers, decals, or the like to this instrument.
Peeling such matter off the instrument may damage the exterior
finish.
Maintenance
401b
• To clean the unit, use a dry, soft cloth; or one that is slightly
dampened. Try to wipe the entire surface using an equal amount
of strength, moving the cloth along with the grain of the wood.
Rubbing too hard in the same area can damage the finish.
402
• Never use benzine, thinners, alcohol or solvents of any kind, to
avoid the possibility of discoloration and/or deformation.
403
• The pedals of this unit are made of brass.
Brass eventually darkens as the result of the natural oxidization
process. If the brass becomes tarnished, polish it using commercially available metal polisher.
Repairs and Data
452
• Please be aware that all data contained in the unit’s memory may
be lost when the unit is sent for repairs. Important data should
always be backed up on an external memory, or written down on
paper (when possible). During repairs, due care is taken to avoid
the loss of data. However, in certain cases (such as when circuitry
related to memory itself is out of order), we regret that it may not
be possible to restore the data, and Roland assumes no liability
concerning such loss of data.
Additional Precautions
551
• Please be aware that the contents of memory can be irretrievably
lost as a result of a malfunction, or the improper operation of the
unit. To protect yourself against the risk of loosing important
data, we recommend that you periodically save a backup copy of
important data you have stored in the unit’s memory on an
external memory.
552
• Unfortunately, it may be impossible to restore the contents of
data that was stored on an external memory once it has been lost.
Roland Corporation assumes no liability concerning such loss of
data.
553
• Use a reasonable amount of care when using the unit’s buttons,
sliders, or other controls; and when using its jacks and
connectors. Rough handling can lead to malfunctions.
554
• Never strike or apply strong pressure to the display.
556
• When connecting / disconnecting all cables, grasp the connector
itself—never pull on the cable. This way you will avoid causing
shorts, or damage to the cable’s internal elements.
557
• A small amount of heat will radiate from the unit during normal
operation.
558a
• To avoid disturbing your neighbors, try to keep the unit’s volume
at reasonable levels. You may prefer to use headphones, so you
do not need to be concerned about those around you (especially
when it is late at night).
559b
• When you need to transport the unit, pack it in shock-absorbent
material. Transporting the unit without doing so can cause it to
become scratched or damaged, and could lead to malfunction.
6
560
• Do not apply undue force to the music rest while it is in use.
561
• Use only the specified expression pedal (EV-7/5; sold separately).
By connecting any other expression pedals, you risk causing
malfunction and/or damage to the unit.
562
• Use a cable from Roland to make the connection. If using some
other make of connection cable, please note the following precautions.
• Some connection cables contain resistors. Do not use cables
that incorporate resistors for connecting to this unit. The use
of such cables can cause the sound level to be extremely low,
or impossible to hear. For information on cable specifications,
contact the manufacturer of the cable.
565
• Before opening or closing the keyboard lid, always make sure
that no pets or other small animals are located on top of the
instrument (in particular, they should be kept away from the
keyboard and its lid). Otherwise, due to the structural design of
this instrument, small pets or other animals could end up getting
trapped inside it. If such a situation is encountered, you must
immediately switch off the power and disconnect the power cord
from the outlet. You should then consult with the retailer from
whom the instrument was purchased, or contact the nearest
Roland Service Center.
Handling Floppy Disks
(Using Optional Floppy Disk Drive)
651
• Floppy disks contain a plastic disk with a thin coating of
magnetic storage medium. Microscopic precision is required to
enable storage of large amounts of data on such a small surface
area. To preserve their integrity, please observe the following
when handling floppy disks:
• Never touch the magnetic medium inside the disk.
• Do not use or store floppy disks in dirty or dusty areas.
• Do not subject floppy disks to temperature extremes (e.g.,
direct sunlight in an enclosed vehicle). Recommended
temperature range: 10 to 50˚C (50 to 122˚F).
• Do not expose floppy disks to strong magnetic fields, such as
those generated by loudspeakers.
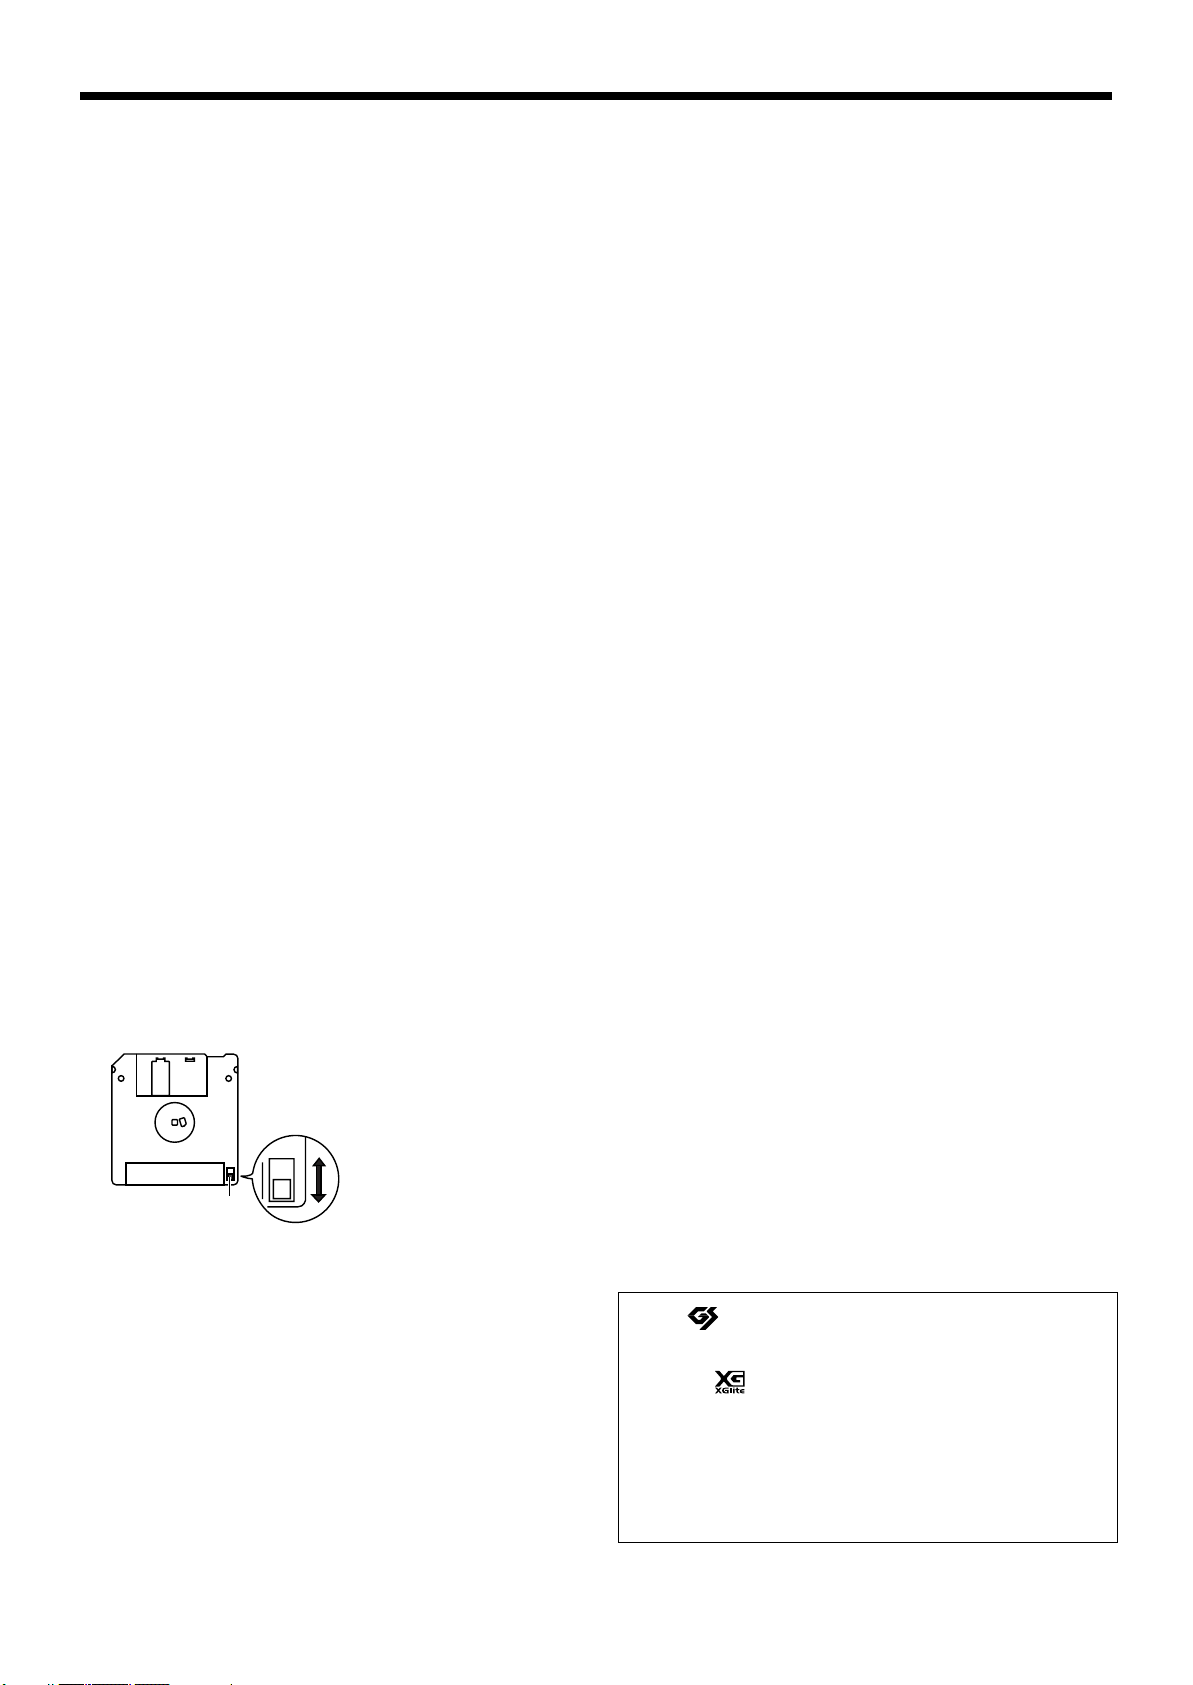
652
• Floppy disks have a “write protect” tab which can protect the
disk from accidental erasure. It is recommended that the tab be
kept in the PROTECT position, and moved to the WRITE position
only when you wish to write new data onto the disk.
fig.DiskProtect.e
Rear side of the disk
Write
(can write new data onto disk)
Handling CD-ROMs
801
• Avoid touching or scratching the shiny underside (encoded
surface) of the disc. Damaged or dirty CD-ROM discs may not be
read properly. Keep your discs clean using a commercially
available CD cleaner.
Before Using External
Memory
Using External Memory
705
• Never touch the terminals of the External memory. Also,
avoid getting the terminals dirty.
708
• External memories are constructed using precision
components; handle the cards carefully, paying particular
note to the following.
• To prevent damage to the cards from static electricity,
be sure to discharge any static electricity from your
own body before handling the cards.
• Do not touch or allow metal to come into contact with
the contact portion of the cards.
• Do not bend, drop, or subject cards to strong shock or
vibration.
• Do not keep cards in direct sunlight, in closed vehicles,
or other such locations (storage temperature: 0 to 50˚
C).
• Do not allow cards to become wet.
• Do not disassemble or modify the cards.
704 (revise)
• When connecting external memory, make sure to press it
until it is fully inserted.
• Insert the external memory in the External Memory port
evenly and without undue force. Forcing the external
memory may damage the External Memory port.
• Do not insert any object other than the external memory
(e.g., wires, coins, other types of disks, etc.) in the External
Memory port. This may damage the External Memory
port.
• Do not subject the External Memory port cover or
connected External memory to excessive stress.
• Close the external memory cover when using the External
memory for extended periods
Write Protect Tab
653
• The identification label should be firmly affixed to the disk.
Should the label come loose while the disk is in the drive, it may
be difficult to remove the disk.
654
• Store all disks in a safe place to avoid damaging them, and to
protect them from dust, dirt, and other hazards. By using a dirty
or dust-ridden disk, you risk damaging the disk, as well as
causing the disk drive to malfunction.
655
• Disks containing performance data for this unit should always be
locked (have their write protect tab slid to the “Protect” position)
before you insert them into the drive on some other unit (except
the PR-300, or a product in the HP-G, HPi, MT, KR, or Atelier
families), or into a computer’s drive. Otherwise (if the write
protect tab remains in the “Write” position), when you perform
any disk operations using the other device’s disk drive (such as
checking the contents of the disk, or loading data), you risk
rendering the disk unreadable by this unit’s disk drive.
Protect
(prevents writing to disk)
203
* GS ( ) is a registered trademark of Roland Corpo-
ration.
* XG lite ( ) is a registered trademark of Yamaha Corpo-
ration.
207
* Apple and Macintosh are registered trademarks of Apple
Computer, Inc.
220
* All product names mentioned in this document are trade-
marks or registered trademarks of their respective owners.
7

Introduction
Thank you, and congratulations on your choice of the Roland KR Intelligent Piano.
While the KR Intelligent Piano certainly allows you to achieve authentic piano performances, it also
features easy-to-use Automatic Accompaniment and numerous other useful functions. In order to
enjoy reliable performance of your new keyboard for many years to come, please take the time to read
through this manual in its entirety.
Main Features
❍
Lusciously Resounding, Richly Expressive Piano Sound
The KR107 reproduces the rich tones of a high-quality grand piano, from the sounds of the hammers
as they strike the strings to the sounds made as the keys are released. 128-voice polyphony ensures
full responsiveness, even with heavy use of the pedals.
What’s more, The “Piano Designer” feature allows you to create your own favorite piano tones.
❍
True Grand Piano Feel
The KR107 features Roland’s Progressive Hammer Action keyboard, which reproduces the feel of a
grand piano, with a firm, weighty touch in the lower registers and a lighter response in the upper
registers. This keyboard also faithfully reproduces the distinctive “click” that’s produced when a
grand piano’s keys are played (Escapement function).
In addition to the ability of adjusting the key weight, a “Hammer Response” function, which
reproduces the subtle action of the hammers, is also incorporated, so there are two key-touch controls
that come into play when determining the precise character of the keyboard. Additionally, the
instrument’s pedals are firm and responsive, lending your performances fuller and more detailed
expressiveness.
❍
Accomplish Tasks Easily with the Main Buttons
Almost all of the KR’s common functions, including playing back songs, displaying notations,
running the automatic accompaniment, selecting tones, and so on can be accomplished using the Main
buttons to the left of the screen.
❍
A Wealth of Practice Features to Foster Musical Growth
Use the “Visual Lesson” feature for enjoyable practice and steady improvement.
You can use this function to score the results of your performances and find out which notes have been
played differently than those indicated in the notation.
The KR also scrolls the notation automatically as you play, making your practices even more
convenient.
❍
Connector Allows Enlarged Display of Notation and Lyrics
The KR107 is equipped with a connector for use with televisions and other external displays.
Connecting a large screen to the KR107 allows you to display a greater number of measures at the
same time.
❍
Easy-To-Use “Music Assistant” Automatic Accompaniment
Feature
You can select from an amazing 500 settings to get automatic accompaniment that perfectly matches
the song you are playing.
Each song’s Music Assistant settings are shown in a manner that is easy to grasp, so playing along
with the changes in the accompaniment is a snap.
For easy enjoyment of Music Assistant, the KR107 also includes songs that you can perform while
reading the chord charts.
8

❍
Color Display for Easy Operation
The KR107 features a color screen touch panel with rich graphics to make viewing easier. Operations
can be carried out easily, just by touching the screen.
❍
Utilizes External Memory–the New Media
You can save song data created on the KR107 to External memory (sold separately). Extremely
portable, high-capacity external memory also connects easily to computers, allowing song data to be
transferred easily. Taking further advantage of the high-capacity memory, you can also play back
audio files with the KR107.
How To Use This Manual
Introduction
The KR Owner’s Manual consists of three volumes,
Install Guide
Please start out by reading “Before You Start Playing” (p. 17) in the
This explains how to connect the KR’s power cord and how to turn on the instrument’s power.
After turning on the KR’s power, please continue by reading
By trying out the various procedures while reading the
the KR and make use of its major functions (especially procedures that involve use of the “main
buttons”).
The
Owner’s Manual
applications (for example, using the KR as an accompanist and creating songs), that will help you
master the KR’s many performance functions.
When connecting a computer to the USB port, be sure to read the
the procedure for installing the driver needed to connect via USB.
.
describes procedures, from basic operation to procedures for special
* For more on system requirements, refer to the “USB Installation Guide.” However, note that the
KR107 is not compatible with Mac OS 9.
■
Conventions Used in This Manual
This manual uses the following conventions in the interest of simpler, more concise instructions.
• Button names are enclosed in square brackets “[ ]”, as in One Touch Program [Piano]
button.
Quick Start, Owner’s Manual,
Owner’s Manual
Quick Start
Quick Start
USB Install Guide
.
, you can easily learn how to play
and the
USB
(this volume).
. This describes
• For easier readability, some screens and colors used here may differ in part from actual
screens and colors.
• On screen text is enclosed in angled brackets “< >”, as in <Exit>.
• The act of lightly contacting the Touch Screen with your finger is called “touching.”
• An asterisk (*) or a at the beginning of a paragraph indicates a note or
NOTE
precaution. These should not be ignored.
• (p. **) refers to pages within the manual.
9

Contents
USING THE UNIT SAFELY ................................................. 3
IMPORTANT NOTES............................................................ 6
Introduction.................................................8
Main Features.......................................................................... 8
How To Use This Manual ..................................................... 9
Conventions Used in This Manual ................................. 9
Panel Descriptions ...................................14
Performance Pads............................................................ 14
Record/Playback............................................................. 15
Rear Panel.............................................................................. 16
Bottom Panel ......................................................................... 16
Bottom Panel (Front Left)............................................... 16
Bottom Panel (Front Right) ............................................ 16
Before You Start Playing .........................17
Connect the Pedal Cable...................................................... 17
Connect the Speaker Cable ................................................. 17
Connect the Power Cord ..................................................... 17
Setting Up the Music Rest ................................................... 17
Folding Down the Music Rest ....................................... 17
Using the Music Holders................................................ 17
Removing the Music Rest............................................... 18
Installing Batteries in the Remote Control........................ 18
Opening/Closing the Lid.................................................... 18
Turning the Power On and Off .......................................... 18
About the Pedals .................................................................. 19
Adjusting the Sound’s Volume and Brilliance................. 19
Connecting Headphones..................................................... 19
Using the Headphone Hook.......................................... 20
Connecting a Microphone................................................... 20
About the Touch Screen ...................................................... 20
Adjusting the Contrast of the Screen............................ 20
Main Screens .........................................................................21
Piano Screen ..................................................................... 21
Basic Screen ...................................................................... 21
Using the Main Icons ...................................................... 21
The [Option] Button and The [Exit] Button................. 21
The Scroll Bar and The Page Icon ................................. 21
Chapter 1 Performance ........................... 22
Playing the Keyboard Like a Piano
(One-Touch Piano) ...............................................................22
Performing with a Variety of Tones (Tone Buttons) ....... 23
Playing Percussion Instruments or Sound Effects...... 24
Using Keywords to Search for Tones
(Tone Search).................................................................... 25
Performing with Multiple Sounds Layered Together
(Layer) .................................................................................... 26
Playing Different Tones with the Left and Right Hands
(Split) ...................................................................................... 27
Shifting the Keyboard Pitch in Octave Steps
(Octave Shift).................................................................... 28
Adding Reverberation to the Sound (Reverb) ................. 29
Adding Three-Dimensional Breadth to the Sounds You
Play (Advanced 3D) ............................................................. 31
Adding Liveliness to the Sound (Dynamic Emphasis)... 33
Adjusting the Sound to Achieve the Preferred Tone
Quality (Equalizer)............................................................... 34
Applying Effects to the Sound (Effects) ............................ 36
Adding Effects to Mic Vocals (Vocal Effect)..................... 37
Enjoying Karaoke Performances with Music Files..... 43
Using the Metronome .......................................................... 44
Using the Metronome ..................................................... 44
Changing the Metronome Settings ............................... 45
Chapter 2 Automatic Accompaniment... 47
Music Styles and Automatic Accompaniment................. 47
Performing Using Automatic Accompaniment
(One-Touch Arranger) ......................................................... 48
About Chords................................................................... 49
Playing Chords with Simple Fingering
(Chord Intelligence) ........................................................49
Viewing Chord Fingerings (Chord Finder)................. 50
Selecting Music Styles (Music Style Buttons)................... 51
Using Keywords to Search for Music Styles
(Style Search).................................................................... 52
Selecting Music Styles on External Memories............. 53
Playing Only Music Style Rhythm Patterns ..................... 54
Adjusting the Accompaniment Tempo............................. 54
Starting and Stopping the Accompaniment ..................... 55
Having the Accompaniment Start Simultaneously
When You Play the Keyboard (Sync Start).................. 55
Stopping Automatic Accompaniment.......................... 56
Having a Count Sound Play at the End of the Intro
(Countdown).................................................................... 57
10

Contents
Modifying an Accompaniment .......................................... 58
Changing the Accompaniment Pattern
(Fill In Buttons) ................................................................ 58
Changing Accompaniment Patterns in the Screen..... 59
Changing the Instrumental Makeup of Music Styles
(Style Orchestrator) ......................................................... 59
Adding Harmony to the Right-Hand Part
(Melody Intelligence)........................................................... 60
Playing Sounds in the Left Hand During a Performance
(Lower Tone)......................................................................... 61
Playing the Piano with Accompaniment Added
(Piano Style Arranger) ......................................................... 62
Adjusting the Volume Balance for Each Part
(Balance)................................................................................. 63
Changing the Volume Balance Between the
Accompaniment and the Keyboard
(Balance Knob)................................................................. 63
Adjusting the Volume Balance for Each Performance
Part (Part Balance)........................................................... 63
Chapter 3 Song Playback ........................65
Playing a Song ...................................................................... 65
Using Keywords to Search for Songs
(Song Search).................................................................... 68
Registering the Songs You Like (Favorites)...................... 69
Removing Songs From Favorites .................................. 70
Using the Remote Control................................................... 71
How to Use the Remote Control ................................... 71
About the Remote Control............................................. 72
Placing a Marker within a Song ....................................85
Playback from a Marker Location................................. 86
Erasing a Marker .............................................................86
Moving a Marker.............................................................86
Playing Back the Same Passage Over and Over .........87
Transposing Keyboard Sounds and Songs Played Back
(Transpose)............................................................................ 88
Chapter 5 Recording and Saving the
Performance ............................................. 90
Recording a New Song (New Song) .................................. 91
Recording With Accompaniment ...................................... 93
Recording Along with a Song............................................. 95
Recording While Selecting the Track Buttons
(Redoing Recordings) ..........................................................96
Erasing Recorded Performances ........................................97
Erasing the Performance on Specific Tracks ............... 97
Changing How Recording Stops........................................ 97
Recording Songs Starting with Pickups............................ 98
Using External Memories....................................................99
Connecting and Ejecting an External Memory ...........99
Formatting Media (Format) .........................................100
Saving Songs .......................................................................102
Deleting Saved Songs......................................................... 105
Copying Songs on External Memories to Favorites ...... 106
Copying Songs Saved in Favorites to External
Memories ........................................................................ 107
Chapter 4 Practice Functions..................74
Displaying the Notation ...................................................... 74
Touching Notes to Confirm the Sounds
(Touch the Notes) ............................................................ 75
Scrolling the Notation Along with the Performances
(AutoSync DigiScore) ..................................................... 75
Making Detailed Settings for
the Notation Display....................................................... 76
Saving Notations as Image Data ................................... 79
Adjusting the Tempo ........................................................... 81
Setting the Tempo by Pressing the Button in Time
(Tap Tempo)..................................................................... 81
Playing Back at a Fixed Tempo (Tempo Mute)........... 82
Match the Tempo Before You Begin Playing
(Count In) .............................................................................. 83
Muting Some Parts Before Playing (Track Buttons)........ 84
Setting Markers for Repeated Practice (Marker) ............. 85
Chapter 6 User Program Registration.. 108
Saving Performance Settings (User Program)................ 108
Calling Up Saved User Programs ....................................109
Changing the Way User Programs Are
Called Up........................................................................109
Saving the User Program Sets .......................................... 109
Loading Saved User Program Sets.............................. 110
Deleting Saved User Program Sets ..................................111
Copying Sets of User Programs on External Memories
to the User Memory ...........................................................111
Coping Sets of User Programs Stored in the User
Memory to External Memories.................................... 112
Using the Pedal to Switch User Programs...................... 112
Selecting the Pedal Used for Switching Settings
(Pedal Shift) .................................................................... 112
Sequential Loading of User Program Sets Stored
(Load Next)..................................................................... 112
11

Contents
Simultaneously Switching User Program and Transmitting
PC Numbers........................................................................ 113
Chapter 7 Creating and Editing Songs.114
Multitrack Recording with 16 Parts
(16-Track Sequencer).......................................................... 114
The 16-Track Sequencer Screen................................... 114
Modifying the Settings of Each Part ........................... 115
Getting the Most Suitable Part Tones for
the Musical Genre (Tone Set)....................................... 116
Recording a Performance............................................. 116
Changing the Recording Method (Rec Mode) ...............117
Recording While Erasing the Previous Recording
(Replace Recording)...................................................... 118
Layering a Recording Over Previously Recorded
Sounds (Mix Recording)............................................... 118
Repeated Recording at the Same Location
(Loop Recording)........................................................... 118
Re-Recording Part of Your Performance
(Punch-in Recording).................................................... 119
Composing an Accompaniment By Entering Chords
(Chord Sequencer).............................................................. 121
Inputting Chords without Playing the Keyboard .... 122
Editing Songs ......................................................................122
Basic Operation of the Editing Functions .................. 122
Undoing Edits (Undo) ..................................................123
Copying Measures (Copy) ........................................... 123
Correcting Timing Discrepancies (Quantize)............ 124
Deleting Measures (Delete).......................................... 124
Inserting Blank Measures (Insert)............................... 125
Transposing Individual Parts (Transpose) ................ 125
Making Measures Blank (Erase).................................. 126
Exchanging Parts (Part Exchange).............................. 126
Correcting Notes One by One (Note Edit)................. 127
Modifying the Tone Changes in a Song (PC Edit).... 127
Changing the Beat in the Middle of a Song
(Beat Map) ........................................................................... 128
Changing the Tempo of Recorded Songs ....................... 128
Changing the Tempo Within the Song............................ 128
Adjusting the Tempo While Listening to a Song...... 128
Adjusting the Tempo at a Particular Measure .......... 129
Chapter 8 Creating Music Styles...........130
Creating Original Styles (User Styles)............................. 130
Creating New Styles by Combining Internal Music
Styles (Style Composer)................................................ 130
Creating a Style from a Song You Composed
Yourself (Style Converter)............................................ 132
Saving a User Style.............................................................135
Deleting Saved User Styles ..........................................136
Copying Styles on External Memories to
the User Memory................................................................137
Copying Styles Saved in the User Memory
to External Memories.................................................... 137
Chapter 9 Various Settings ................... 138
Changing the Settings for One-Touch Arranger............ 138
Procedure........................................................................ 138
Adjusting the Keyboard Touch (Key Touch) ............138
Changing Music Styles Without Changing
the Tone or Tempo (One Touch Setting).................... 139
Changing the Keyboard’s Split Point
(Split Point)..................................................................... 139
Changing How Chords Are Played and Specified
(Arranger Config)..........................................................139
Placing a Marker in the Middle of a Measure................ 141
Changing the Settings for the Count ............................... 141
Other Settings...................................................................... 142
Procedure........................................................................ 142
Changing the Tuning (Tuning) ................................... 143
Assigning Functions to Pedals and Performance Pads
(Pedal Setting/User Functions)................................... 144
Changing the Bend Range (Pedal Setting)................. 146
Changing Standard Pitch (Master Tune) ................... 146
Changing the Language (Language) .......................... 147
Selecting Images To Be Shown on the KR and
External Displays
(User Image Display) .................................................... 147
Changing the Screen Message When the Power Is
Turned On (Opening Message)................................... 148
Remembering the Settings Even When the Power is
Turned Off (Memory Backup)..................................... 148
Restoring the Factory Settings (Factory Reset) ......... 149
Changing the Functions of the Remote Control’s
Buttons ............................................................................ 149
Switching the Remote Sensor On and Off
(iR function).................................................................... 150
Calibrating the Touch Screen (Touch Screen) ........... 150
Selecting the Part to Which the Effect is Added
(EffectsPart) ......................................................................... 151
Formatting the User Memory........................................... 152
Automatically Starting the Quick Tour........................... 152
Adjusting the Piano Designer Resonance....................... 153
12

Contents
Disabling Functions Other Than Piano Performance
(Panel Lock)......................................................................... 153
Detailed Song Playback Settings...................................... 154
Changing the Tone Settings When Playing Back Songs
(Play Mode).................................................................... 154
Viewing Song Information (Information)................. 154
Hiding the Lyrics (Lyrics) ............................................ 154
Changing the Parts Assigned to the Track Buttons
During SMF Playback (Track Assign)........................ 155
Chapter 10 Connecting
External Devices.....................................156
Connecting an External Display or Television............... 156
Connecting an External Display.................................. 156
Connecting a Television ............................................... 157
Changing the Settings for Showing Images with
the External Display and the Television
(External Display).......................................................... 158
Explanation of Each Items............................................ 158
Connecting Video Equipment (V-LINK) ........................159
Using the V-LINK function.......................................... 159
Connecting MIDI Devices ................................................. 160
Connectors...................................................................... 160
Making the Connections .............................................. 160
Performing in Ensemble with MIDI Instruments
(MIDI Ensemble) ................................................................ 161
MIDI Settings ......................................................................161
Selecting the Transmit Channel (Tx Channel) .......... 162
Disconnecting the Internal Sound Generator and
Keyboard (Local Control)............................................. 162
Sending Tone Change Messages (Program Change/
Bank Select MSB/Bank Select LSB) ............................ 163
Sending Recorded Performance Data to a MIDI Device
(Composer MIDI Out) ....................................................... 163
Connecting to Audio Equipment..................................... 163
Connectors...................................................................... 163
Making the Connections .............................................. 164
Connecting a Computer ....................................................165
Connect to the MIDI Connectors ................................ 165
Connect to the USB Connector.................................... 165
Making the Settings for the USB Driver..................... 166
Troubleshooting.................................................................. 167
Appendices............................................. 167
Error Messages.................................................................... 171
Tone List .............................................................................. 172
Drum Set List ...................................................................... 174
SFX Set............................................................................. 177
Effects List ........................................................................... 178
Music Style List................................................................... 179
Chord List............................................................................ 180
Internal Song List ............................................................... 182
Parameters Stored to Internal Memory........................... 184
Music Files That the KR Can Use.....................................185
The KR allows you to use the following music files 185
About the KR Sound Generator .................................. 185
Main Specifications ............................................................187
Index........................................................ 189
13
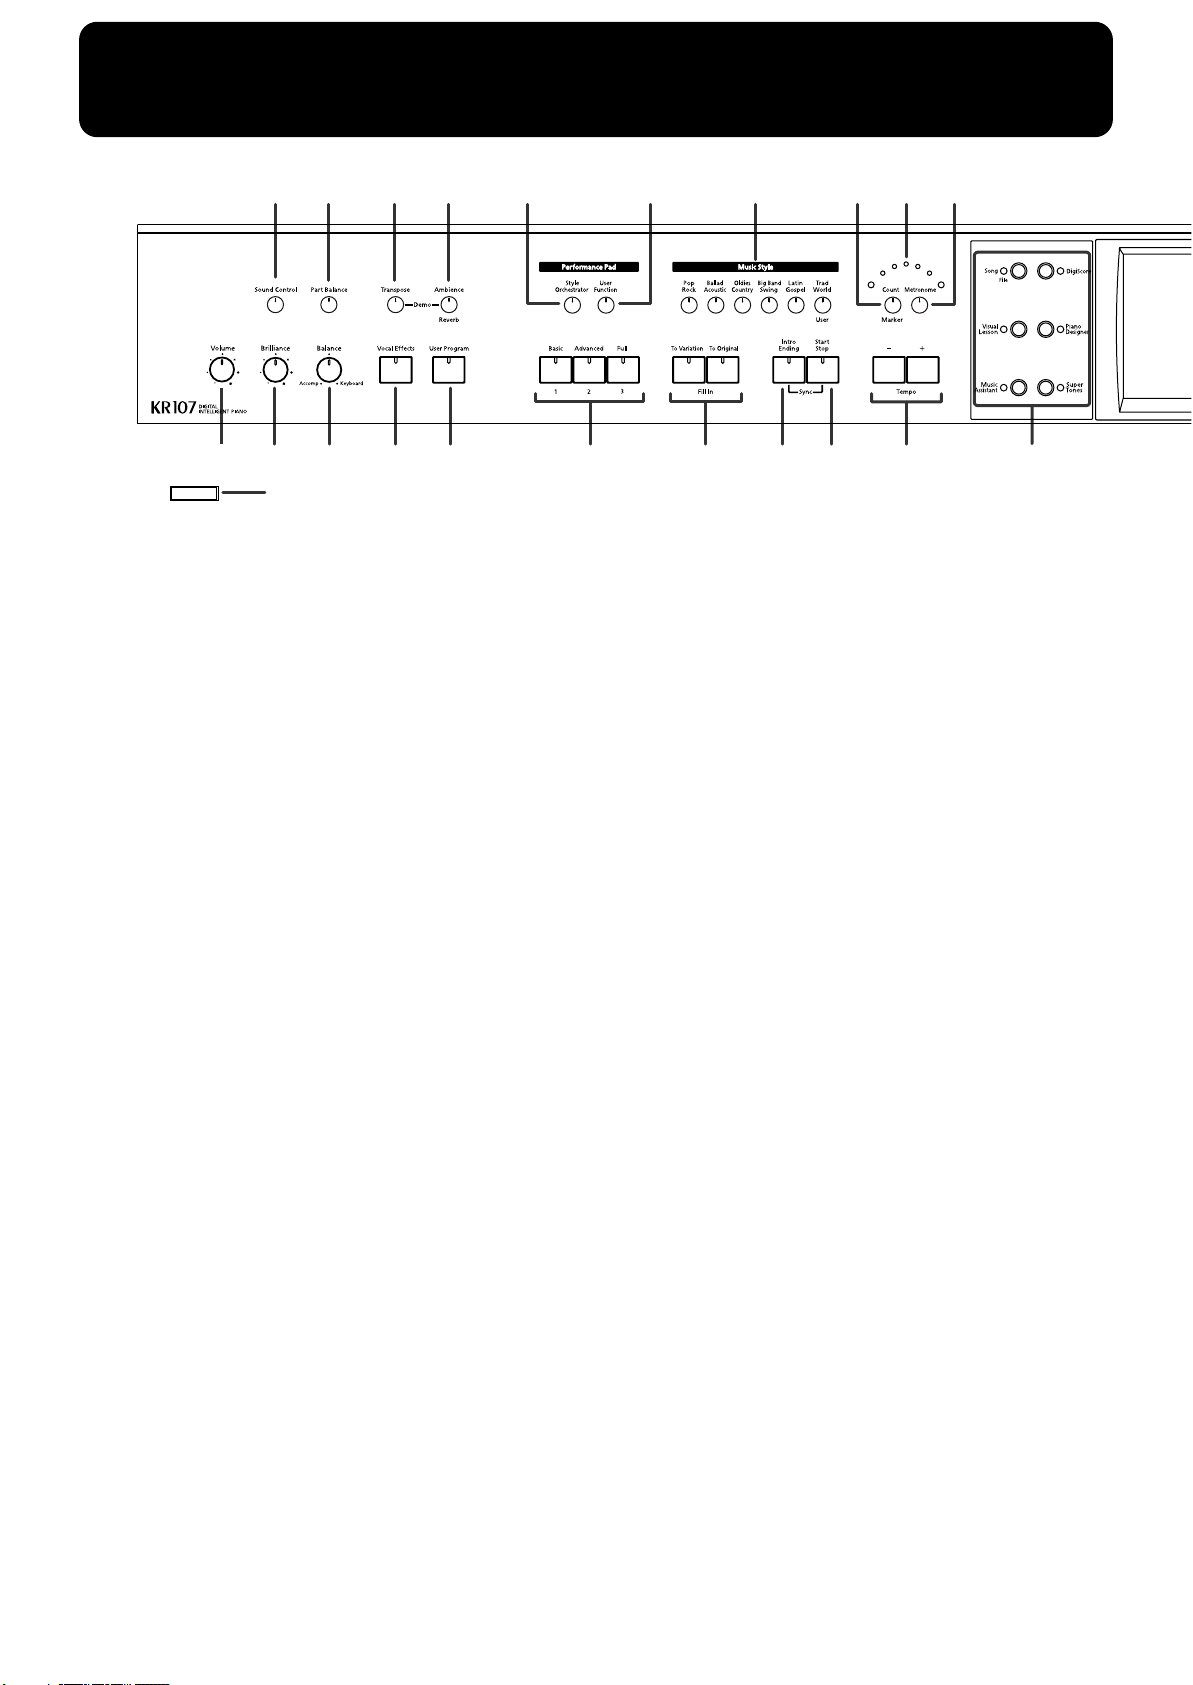
Panel Descriptions
3
5 7 9 1411 12 18 2019
2 4 6 8 10 2216 1713
Power
1
1.
[Power] switch
Pressed to switch the power on and off (p. 18).
[Volume] knob
2.
Adjusts the overall volume (p. 19).
3.
[Sound Control] button
Add liveliness to the sound to give it superb clarity and
distinctness.
[Brilliance] knob
4.
Adjusts the brightness of the sound (p. 19).
5.
[Part Balance] button
This adjusts the relative volume levels of each of the
performance parts (p. 63).
6.
[Balance] knob
Changes the volume balance for sounds played with the
keyboard and for songs and accompaniments (p. 63).
[Transpose] button
7.
Transposes the pitch of the keyboard or the song being
played (p. 88).
8.
[Vocal Effect] Button
Applies a variety of effects to vocals from the
microphone (p. 36).
9.
[Ambience/Reverb] button
Adds reverberation to the sound (p. 29).
Adds three-dimensional breadth to the sound (p. 31).
10.
[User Program] button
Stores the selected functions and states of the buttons (p.
108).
Performance Pads
[Style Orchestrator] button
11.
This is used to change the arrangement type for
automatic accompaniment with the Performance Pads
(p. 58).
15 21
13.
[1]–[3] buttons
The operation of each is changed depending on the
buttons numbered 11-12.
14.
Music Style buttons
Selects a Music Style for automatic accompaniment (p.
51).
Pressing the [User] button selects a User Style that
you’ve made yourself or a Music Style on external
memory (p. 53).
15.
Fill In buttons
Inserts a fill-in in an automatic accompaniment and
changes the accompaniment pattern (p. 58).
[To Variation] button
[To Original] button
16.
[Intro/Ending] button
Play an intro or ending during automatic
accompaniment (p. 55).
17.
[Start/Stop] button
Starts and stops automatic accompaniment (p. 55).
18.
[Count/Marker] button
You can change the count settings (p. 57, p. 83).
These allow you to add and move markers in the
notation as well as repeat playback of song segments
simply and easily (p. 85).
19.
Beat Indicator
This lights up in correspondence with the beat of the
selected song or accompaniment.
20.
[Metronome] button
Activates the built-in metronome (p. 44).
21.
Tempo [-] [+] buttons
Adjusts the tempo.
Press the [-] and [+] buttons at the same time to return to
the original tempo.
12.
[User Function] button
This is used to assign a variety of functions to the
Performance Pads (p. 144).
14
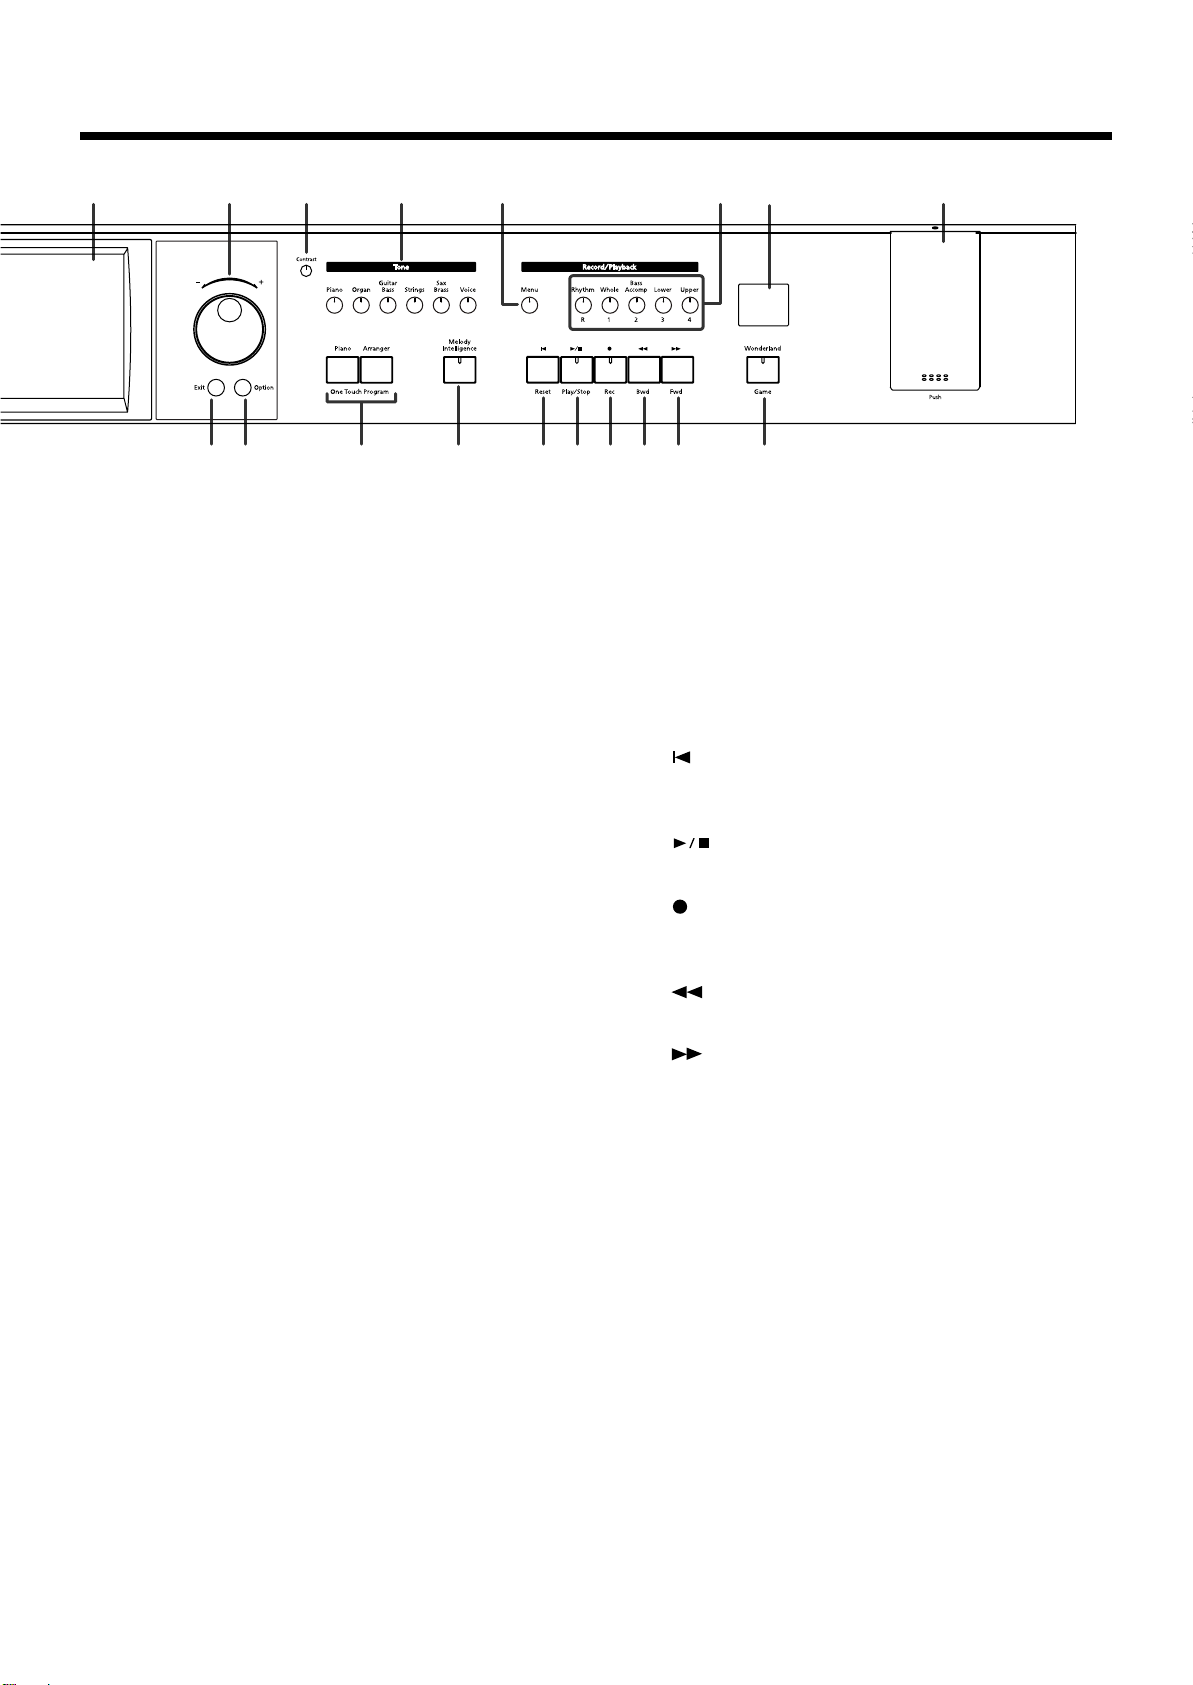
2827 40383223 24 31
Panel Descriptions
2526 29
30 33 34 35 36 37 39
22. Main Buttons
See the Quick Start
→
[Song/File] button
Use this button to select internal songs or songs from
external memories (p. 65).
[DigiScore] button
Displays notations (p. 74).
[Visual Lesson] button
You can use the practice function.
[Piano Designer] button (p. 153
[Music Assistant] button (p. 153
[Super Tones] button
23.
Touch Screen
This lets you perform a variety of operations just by
touching the screen (p. 20).
24.
Dial
Use this to change on-screen values.
25.
[Exit] button
Returns you to the previous screen.
26.
[Option] button
Displays a screen for advance function settings.
Contrast knob
27.
Adjusts the contrast of the screen (p. 20).
28.
[Tone] buttons
Select the Tones that will be played from the keyboard
(p. 23).
29.
One Touch Program button
[Piano] button
Makes the optimal settings for a piano performance (p.
22).
[Arranger] button
Makes the optimal settings for playing with automatic
accompaniment (p. 48).
)
)
Record/Playback
[Menu] button
31.
You can select functions for playing back, recording or
editing a song (p. 97,p. 114, p. 130, p. 154).
32.
Track buttons
Used to play back or record each track of a song (p. 84, p.
96).
33.
[ (Reset)] button
Resets the song playback-start location to the beginning
of the song.
34.
[ (Play/Stop)] button
Starts and stops playback or recording a song.
[ (Rec)] button
35.
When pressed, this button places the instrument in
recording standby (p. 91, p. 114).
36.
[ (Bwd)] button
Rewinds the song.
[ (Fwd)] button
37.
Fast-forwards the song.
38.
Infrared Receiver
Point the remote control at this sensor when using the
remote control to operate the KR107 (p. 72).
39.
[Wonderland/Game] button
Here you can learn about instruments while having fun.
→
See the Quick Start
External Memory port
40.
Connects an external memory to play (
99).
* Be sure to close the cover of the External Memory port after
connecting USB memory to the External Memory port.
p. 65
) and save songs (
p.
30.
[Melody Intelligence] button
Adds harmony to the sounds played with the keyboard
(p. 60).
15
Panel Descriptions
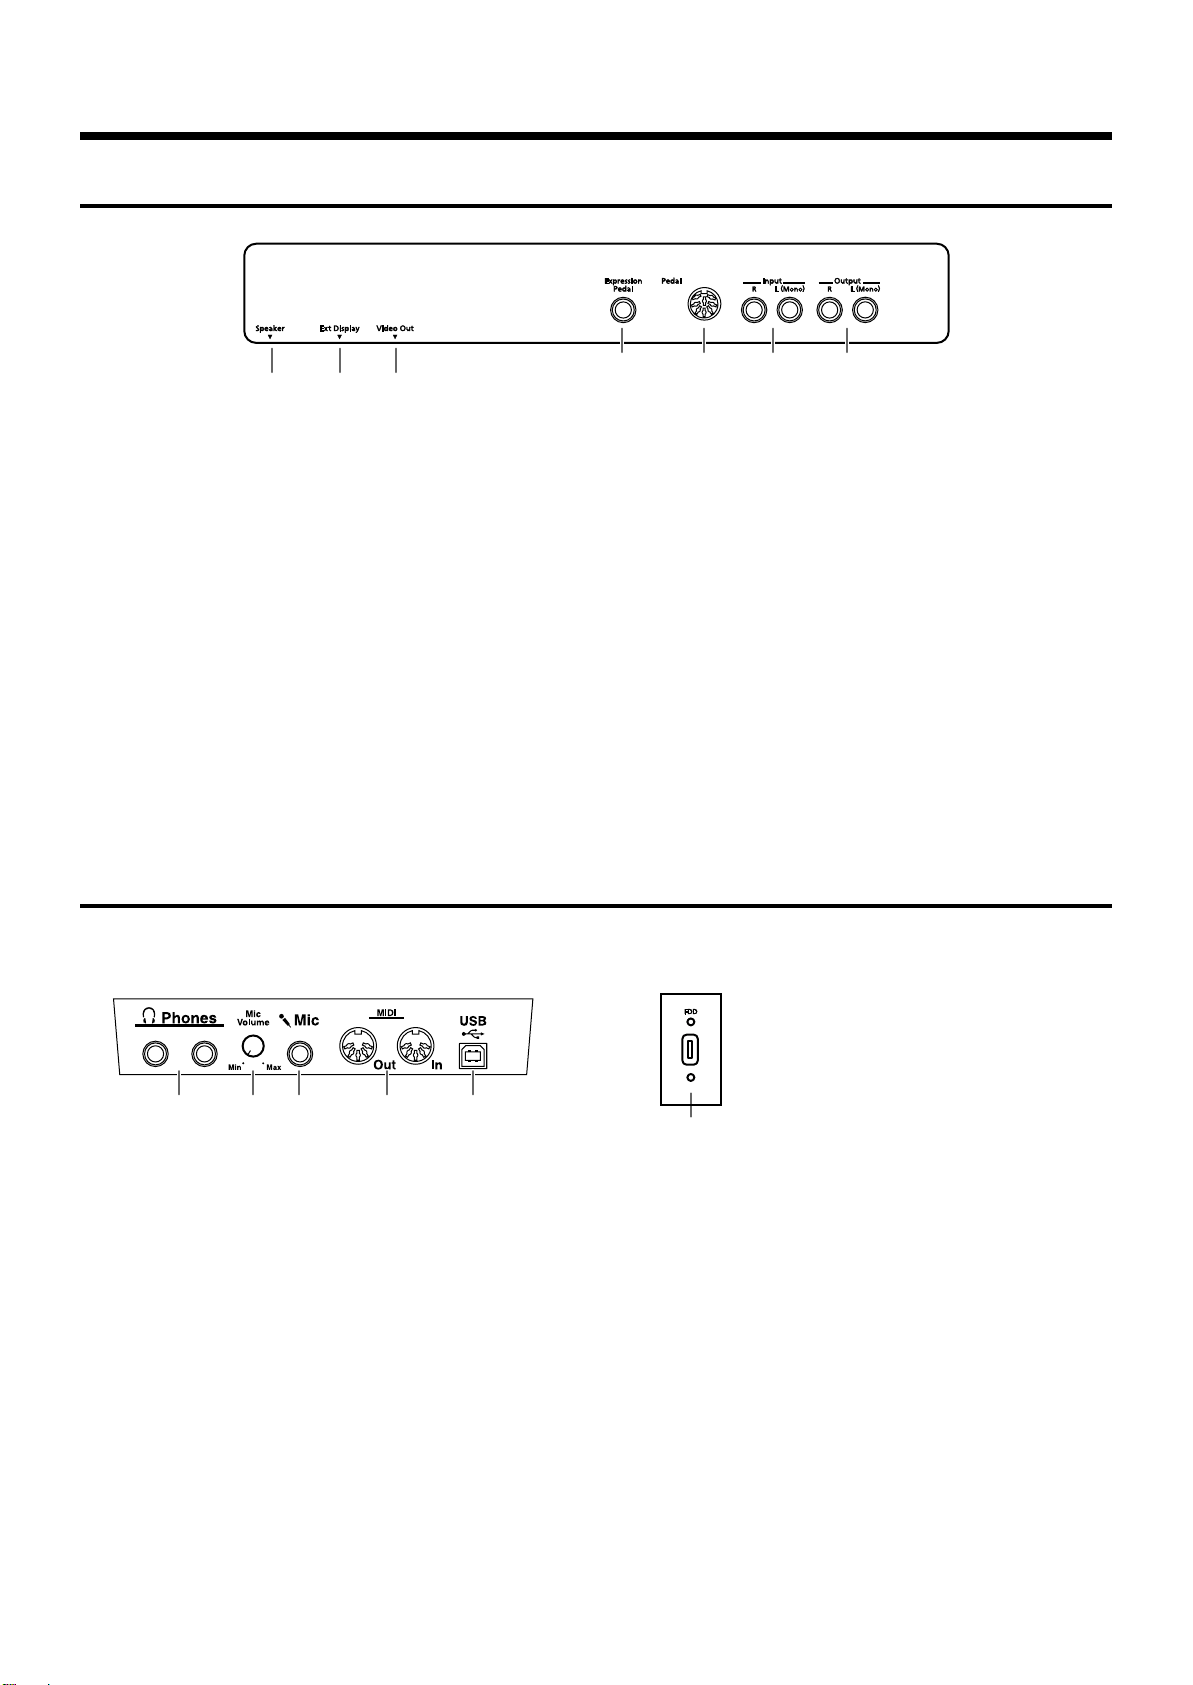
Rear Panel
fig.panelRear
1 2 3
1.
Speaker jack
Connect the speaker cable of the stand (p. 17).
Ext Display connector
2.
Connect an external display. You can put notations on
the screen and display lyrics (p. 156).
This cannot be used simultaneously with the Video Out
jack.
3.
Video Out jack
Connect a television here. This allows you to display the
notations and lyrics on the connected television set (p.
157).
This cannot be used simultaneously with the Ext Display
connector.
Bottom Panel
Bottom Panel (Front Left)
fig.panelbottom
4 5 6 7
4.
Expression pedal jack
You can connect an expression pedal to the KR (p. 156).
Pedal connector
5.
Connect the pedal cable of the stand to this connector (p.
17).
6.
Input jacks
These jacks can be connected to another sound
generating device or an audio device, so that the sound
of that device will be output from the KR’s speakers (p.
163).
7.
Output jacks
These jacks can be connected to your audio system to
enjoy more powerful sound. They can also be connected
Bottom Panel (Front Right)
fig.panelUSB
1 2 3 4 5
1.
Phones jacks
A set of headphones can be connected here (p. 19).
2.
Mic Volume knob
Adjusts the volume level for the microphone (p. 20).
Mic In jack
3.
Used for connecting microphones (p. 20).
4.
MIDI Out/In connectors
These can be connected to an external MIDI device to
exchange performance data (p. 160).
5.
USB connector
You can connect a computer and exchange performance
data between the instrument and the computer (p. 165).
16
6
6.
Floppy disk drive connector
Connects an optional floppy disk drive to play and save
songs.
* Use floppy disk drive available from Roland.
Before You Start Playing
KR107 Rear
Speaker cable
Speaker connector
Clip portion
Start Playing
Before You
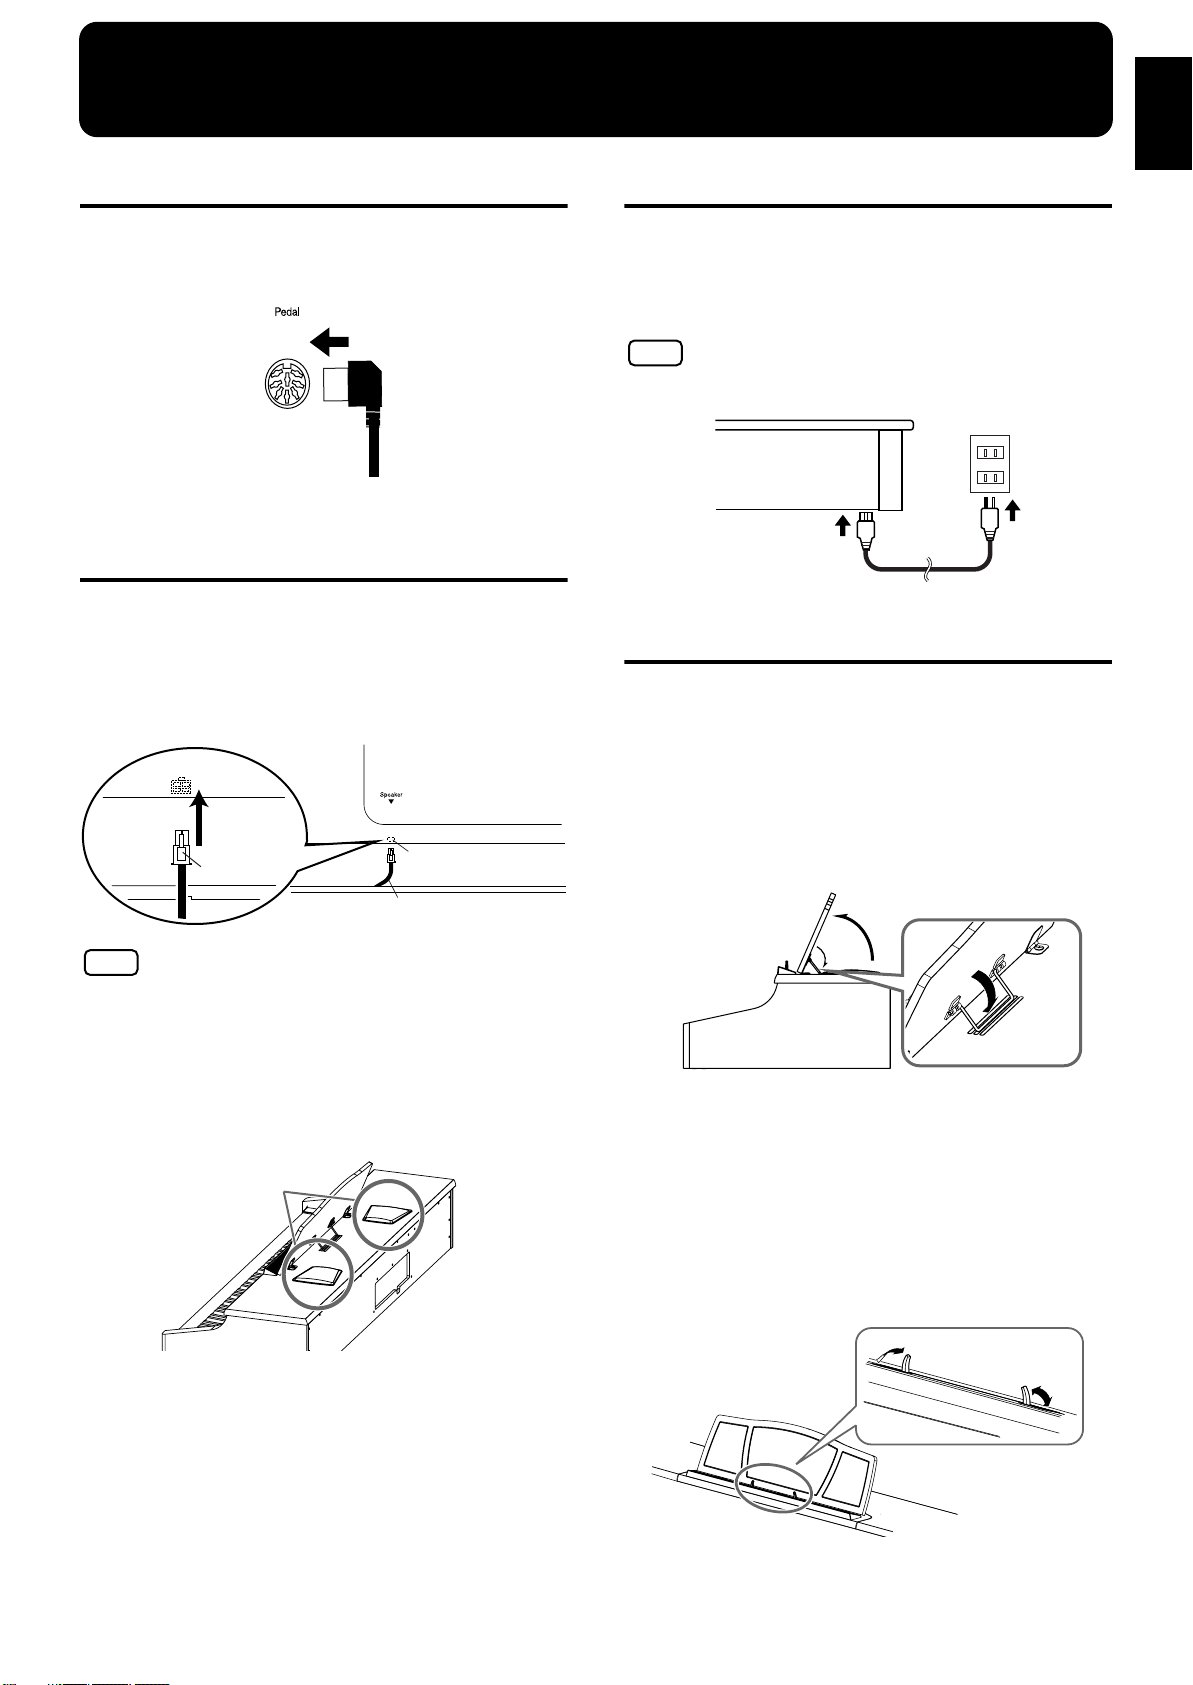
Connect the Pedal Cable
Insert the pedal cable into the Pedal connector on the
rear panel of the KR107.
fig.00-01
Connect the Speaker Cable
As shown in the diagram, connect the speaker cable
leading from the speaker box of the stand to the speaker
connector located on the rear bottom panel of the KR107.
Push the speaker cable in until it clicks into position.
Connect the Power Cord
Insert the included power cord into the AC inlet on the
bottom panel of the KR107, and then plug it into an
electrical outlet.
NOTE
Be sure to use the supplied power cord.
fig.00-02
Setting Up the Music Rest
1.
Grasping the music rest with both hands, lift it toward
you until its in the upright position.
2.
Use the support on the back of the music rest to keep
the stand in place.
NOTE
Do not place containers holding liquids (such as flower vases),
insecticide, perfume, alcohol, or similar substances on top of this
piano.
The speakers of this piano are mounted beneath the upper surface,
and face upwards. Malfunctions or accidents may occur if liquids
contact any part of the speakers.
Speakers
The angle of the music rest can be set to any of three
positions.
fig.mu_stand
1
2
■
Folding Down the Music Rest
1.
Raise the support located on the back of the music rest,
then gently fold down the music rest.
■
Using the Music Holders
You can use the holders to hold pages in place.
When not using the holders, leave them folded down.
fig.mu_stand4
17
Before You Start Playing
NOTE
Remote
Control’s
Cover
Remote Control’s (Rear)
Before You
Start Playing
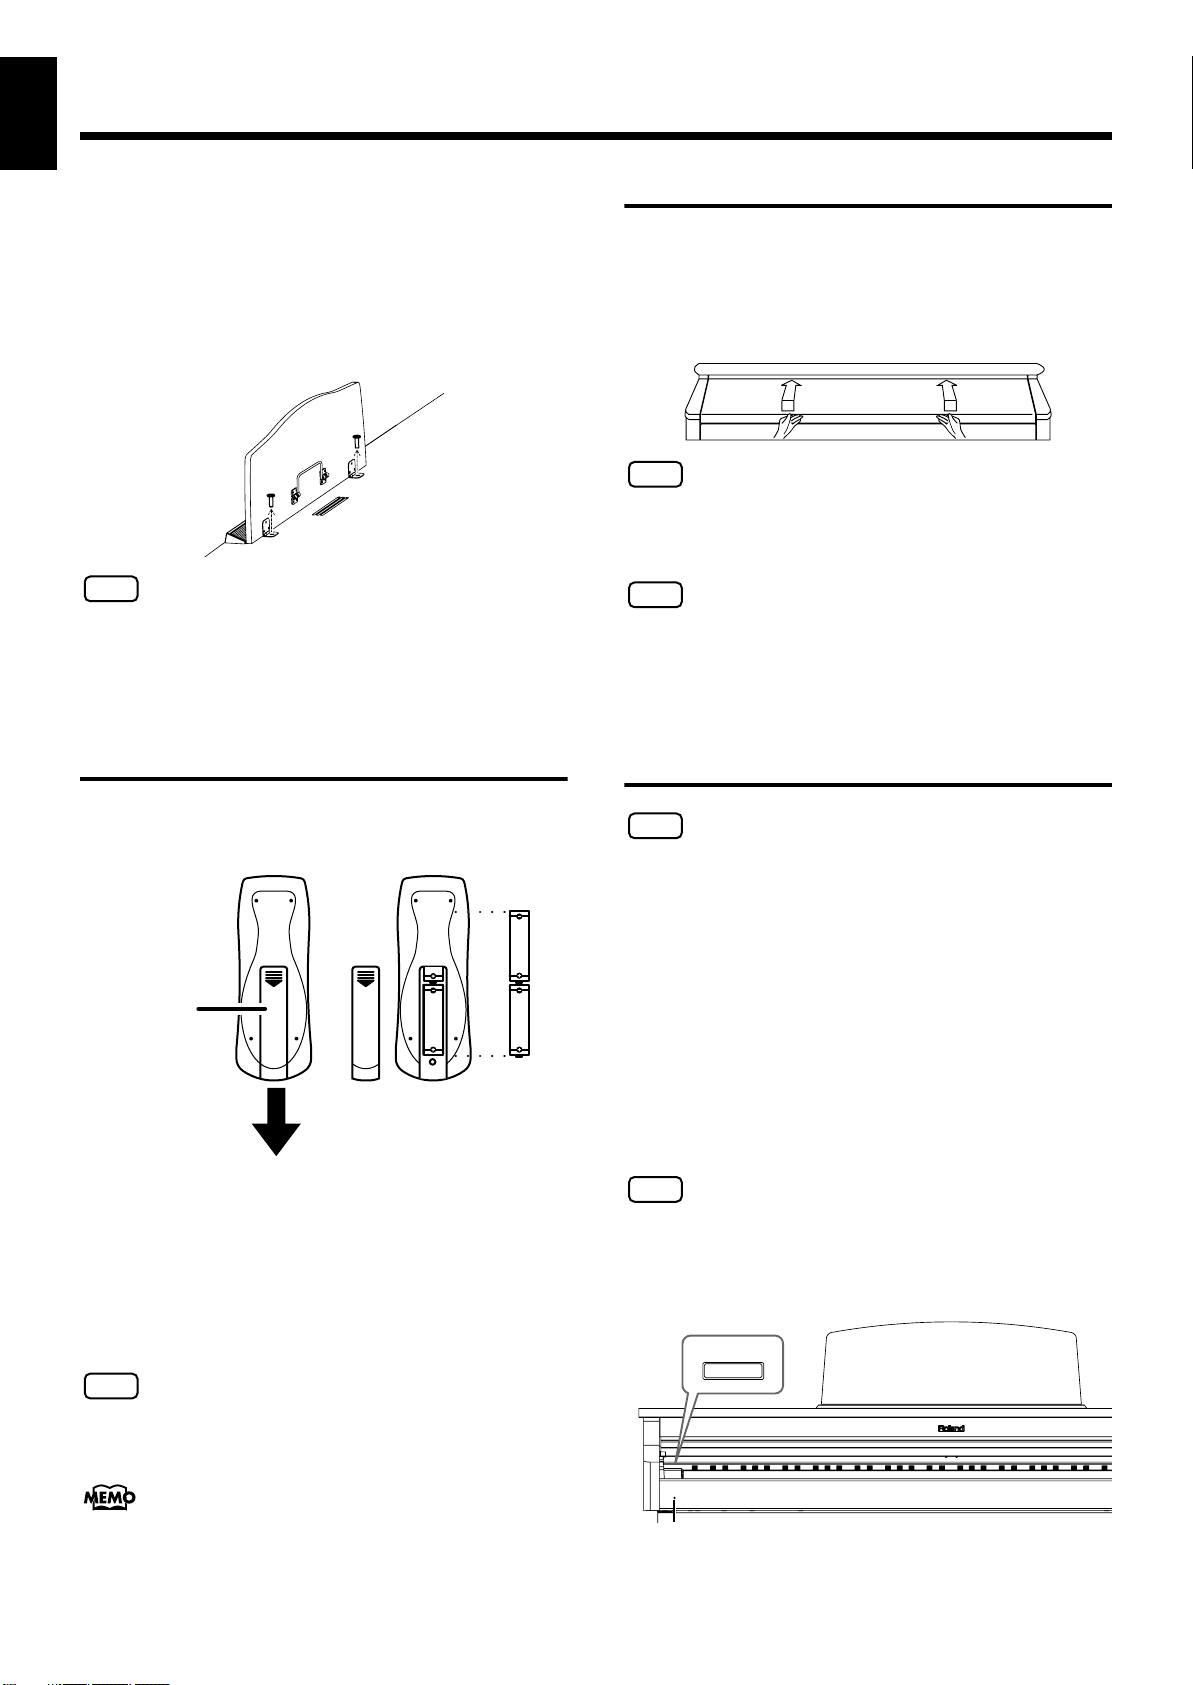
■
Removing the Music Rest
You can remove the music rest from the piano.
This allows you to place a notebook computer on the piano.
Position the music rest so it’s upright, then remove the
two screws, as shown.
You can remove the screws using a coin.
fig.mu_stand3
NOTE
Be careful not to lose the screws that you removed from the music
rest, or put them where they might be swallowed by small children.
Opening/Closing the Lid
To open the lid, use both hands to lift it lightly, and
slide it away from yourself.
To close the lid, pull it gently toward yourself, and
lower it softly after it has been fully extended.
fig.00-05
NOTE
When opening and closing the lid, be careful not to let your fingers
get caught. If small children will be using the KR107, adult
supervision should be provided.
NOTE
If you need to move the piano, make sure the lid is closed first to
prevent accidents.
Installing Batteries in the Remote Control
Install the batteries provided in the remote control.
fig.Remote Control-1.j
Open the battery cover on the back of the remote
1.
control.
2.
Insert the supplied AA batteries, as shown in the figure
of remote control.
Close the battery cover.
3.
NOTE
Be careful to observe the correct polarity (+, - direction) when
installing the batteries.
Turning the Power On and Off
Turn on power to your various devices in the order specified. By
turning on devices in the wrong order, you risk causing malfunction
and/or damage to speakers and other devices.
941
To turn the power on, turn the [Volume] knob all the
way down, and then press the [Power] switch.
The power will turn on, and the Power indicator at the
left front of the KR107 will light.
After a few seconds, you will be able to play the
keyboard to produce sound.
Use the [Volume] knob to adjust the volume.
NOTE
This unit is equipped with a protection circuit. A brief interval (a few
seconds) after power up is required before the unit will operate
normally.
942
fig.00-06.e
Power
For more information on the remote control button functions, refer
to “Using the Remote Control” (p. 71).
18
Power Indicator

Before You Start Playing
Start Playing
Before You
To turn the power off, turn the [Volume] knob all the
way to the left, and press the [Power] switch.
The Power indicator at the left front of the KR107 will go
dark, and the power will be turned off.
945
• If you need to turn off the power completely, first turn off the
POWER switch, then unplug the power cord from the power
outlet. Refer to
Power Supply
(p. 6).
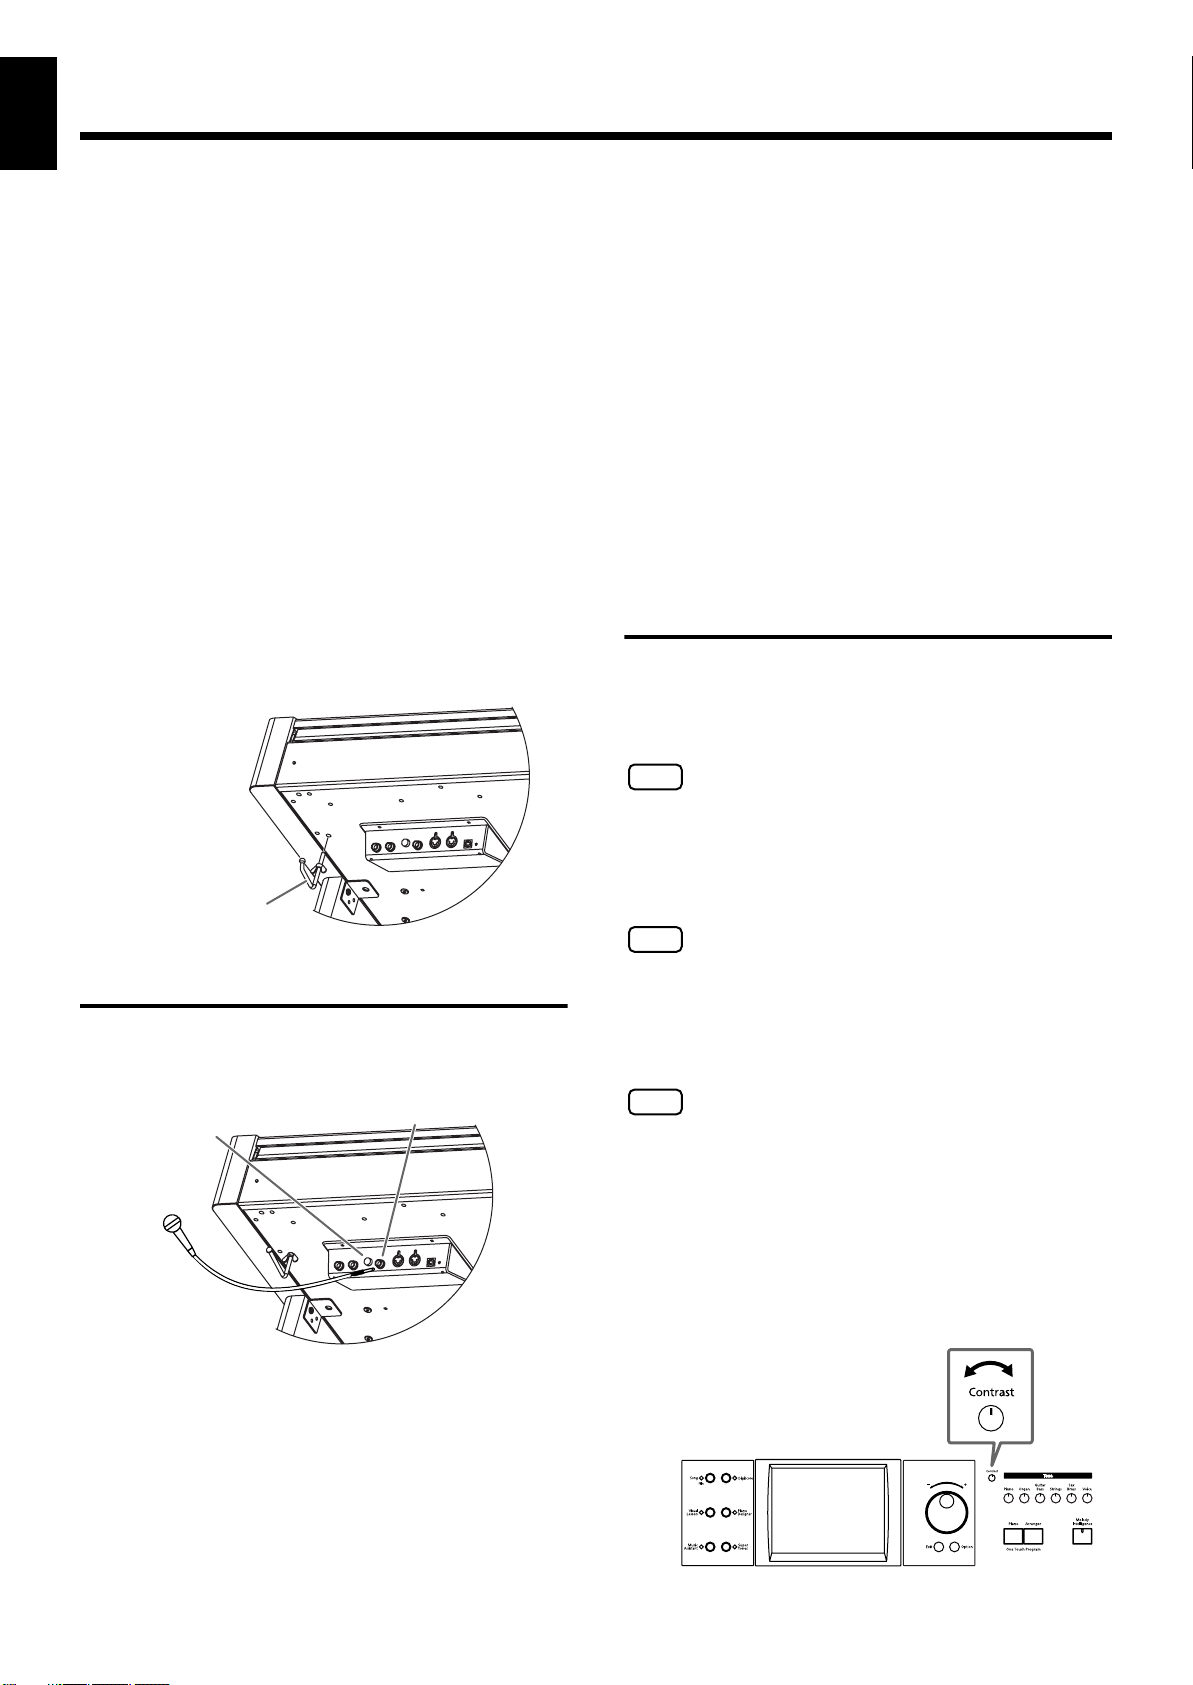
About the Pedals
The pedals have the following functions, and are used
mainly for piano performance.
fig.00-08.e
Soft Pedal
Sostenuto Pedal
Damper pedal (right pedal)
While this pedal is pressed, notes will be sustained even after
you take your fingers off the keys.
The length of the sustain changes subtly according to the
extent to which the pedal is depressed.
On an acoustic piano, holding down the damper pedal will
allow the remaining strings to resonate in sympathy with the
sounds that you played from the keyboard, adding a rich
resonance.
The KR107 simulates this damper resonance.
Damper Pedal
when placing the instrument on carpet, adjust this so
that the pedals firmly contact the floor.
fig.00-09.j
Adjuster
Adjusting the Sound’s Volume and Brilliance
Turn the [Volume] knob to adjust the overall volume.
Turn the [Brilliance] knob to adjust the brightness of
the sound.
fig.00-07.e
Connecting Headphones
The KR107 has two jacks for plugging in headphones. This
allows two people to listen through headphones
simultaneously, making it very useful for lessons and when
performing piano pieces for four hands. Additionally, this
allows you to play without having to worry about bothering
others around you, even at night.
You can change the amount of resonance applied with the damper
pedal. Please refer to “[Piano Designer] button” in the Quick Manual.
Sostenuto pedal (center pedal)
This pedal sustains only the sounds of the keys that were
already played when you pressed the pedal.
Soft pedal (left pedal)
When you hold down this pedal and play the keyboard, the
sound will have a softer tone.
The softness of the sound changes subtly depending on the
extent to which the pedal is depressed.
About the Adjuster
When you move the KR107 or if you feel that the pedals are
unstable, adjust the adjuster located below the pedals as
follows.
❍
Rotate the adjuster to lower it so that it is in firm contact
with the floor. If there is a gap between the pedals and
the floor, the pedals may be damaged. In particular
Plug the headphones into the Phones jack located at the
bottom left of the piano.
Connecting headphones will automatically mute the
sound from the internal speakers.
The headphone volume is adjusted by the [Volume]
knob of the KR107.
fig.00-04.e
Phones jack x 2
NOTE
Use Stereo headphones.
19
Before You Start Playing
Thumbscrew
Before You
Start Playing
Some Notes on Using Headphones
• To prevent damage to the cord, handle the headphones
only by the headset or the plug.
• Connecting the headphones when the volume of
connected equipment is turned up may result in damage
to the headphones. Lower the volume on the KR107
before plugging in the headphones.
• Listening at excessively high volume levels will not only
damage the headphones, but may also cause hearing
loss. Use the headphones at a moderate volume level.
■
Using the Headphone Hook
Whenever you are not using the headphones, you can hang them on
the headphone hook at the lower left of the KR107.
Attaching the Headphone Hook
Press and twist the headphone hook included with the KR107 into
the hole in the bottom of the KR107 (refer to the figure below).
Turn the headphone hook thumbscrew to secure the headphone
hook.
Some Notes on Using a Microphone
• Be careful of high volume levels when using microphone
late at night or early in the morning.
• When connecting a microphone to the KR107, be sure to
lower the volume. If the volume control is too high when
the microphone is plugged in, noise may be produced by
the speakers.
• Howling could be produced depending on the location
of microphones relative to speakers. This can be
remedied by:
1. Changing the orientation of the microphone(s).
2. Relocating microphone(s) at a greater distance from
speakers.
3. Lowering volume levels.
983
About the Touch Screen
The KR makes use of a touch screen.
This lets you carry out a wide variety of actions just by
touching the screen lightly.
Connecting a Microphone
You can connect a microphone into the Mic In jack, and enjoy
karaoke with the KR107.
fig.00-10
Mic Volume knob
Mic In jack
NOTE
The touch screen is operated by touching it lightly with your finger.
Pressing hard, or using a hard object can damage the touch screen.
Be careful not to press too hard, and be sure to use only your fingers
to operate the touch screen.
NOTE
The positioning of the touch screen may become displaced due to
changes in the surrounding environment and over time. If this
happens, follow the steps in “Calibrating the Touch Screen (Touch
Screen)” (p. 150) to correct the pointer position.
NOTE
Do not place items on the touch screen.
■
Adjusting the Contrast of the Screen
To adjust the contrast of the screen, turn the Contrast
knob located at the right side of the screen.
1.
Connect a microphone (sold separately) to the Mic In
jack on the lower-left area of the instrument.
Rotate the [Mic Volume] knob on left side of the Mic In
2.
jack to adjust the volume level for the microphone.
20

Before You Start Playing
Tempo
Song name or
Music Style name
Beat Measure
These information are
displayed, when you use the
automatic accompaniment.
The Tone names are
selected appear.
Start Playing
Before You
Main Screens
■
Piano Screen
Immediately after the power is turned on, the Piano screen
like the one below is displayed. For details, refer to p. 22.
■
Basic Screen
The following screen is called Basic screen.
When you select an internal song or music
files that includes the lyrics data, this icon
appears in the Piano screen or Basic screen.
Touch this to display the lyrics.
NOTE
The explanations in this manual include illustrations that depict
what should typically be shown by the display. Note, however, that
your unit may incorporate a newer, enhanced version of the system
(e.g., includes newer sounds), so what you actually see in the display
may not always match what appears in the manual.
985
■
The [Option] Button and The [Exit] Button
You can usually display this screen by pressing [Exit] button
several times.
Follow either of the procedures described below to display it.
• Press the One Touch Program [Arranger] button.
The Basic screen appears and the settings are made for
automatic accompaniment.
• Press the One Touch Program [Piano] button, then press
one of the Tone buttons, then press the [Exit] button.
■
Using the Main Icons
You can many other screens besides the Basic screen to do
things. The on-screen graphics that appear three dimensional
work like buttons. These are called “Icons.”
The main icons you can use on these screens are as follows.
The [Option] Button
This displays a screen for advance function settings.
The screen that opens differs depending on the screen that
was displayed when the button was pressed.
The [Exit] Button
Touch to cancel the settings currently being made and close
the screen displayed. Normally, pressing the [Exit] button
one or more times returns you to the Basic screen.
■
The Scroll Bar and The Page Icon
The Song and Tone selection screens feature a scroll bar at
the right of the screen list, with page icons at the top and
bottom of the scroll bar.
Page icon
Scroll bar
Page icon
Some screens consist on two or more pages.
You can display the next page or the previous
page of the screen by touching these icons.
Touch the scroll bar and drag up and down to scroll through
the list.
Touch the page icons < > < > to change pages.
21

Chapter 1 Performance
b
Since this instrument faithfully
reproduces real acoustic piano
action and response, keys
played in the top one-and-one-
half-octave range continue to
resonate, regardless of the
damper pedal action, and the
tone in this range is audibly
different. The Key Transpose
setting (p. 88) can also be used
to change the range that is
unaffected by the damper
pedal.
Playing the Keyboard Like a Piano (One-Touch Piano)
You can create the optimal settings for a piano performance with the press of a single
button.
fig.panel1-1
Chapter 1
Press the One Touch Program [Piano] button.
1.
A “Piano screen” like the one shown below will appear.
fig.d-piano.eps_60
When you press the One Touch Program [Piano] button, the KR will switch to the
following settings, regardless of the current panel settings.
• If the keyboard has been split into upper and lower sections (p. 27), the
keyboard returns to a single section.
• The pedals return to their usual functions (p. 19).
• The Grand Piano sound is automatically selected.
• The effect is automatically set to “Damper Resonance” (p. 36).
22
You can change the piano
performance settings by
touching the [Piano Designer]
utton. For more details, refer
to “[Piano Designer] Button”
in the Quick Start.
When you select an internal
song or music file that includes
the lyrics data, < >
appears in the Piano screen or
Basic screen. Touch this to
display the lyrics.
< > appears in the Piano
screen or Basic screen when
headphones are connected.
You can add three-
dimensional breadth to the
sound from the headphones
(p. 31).
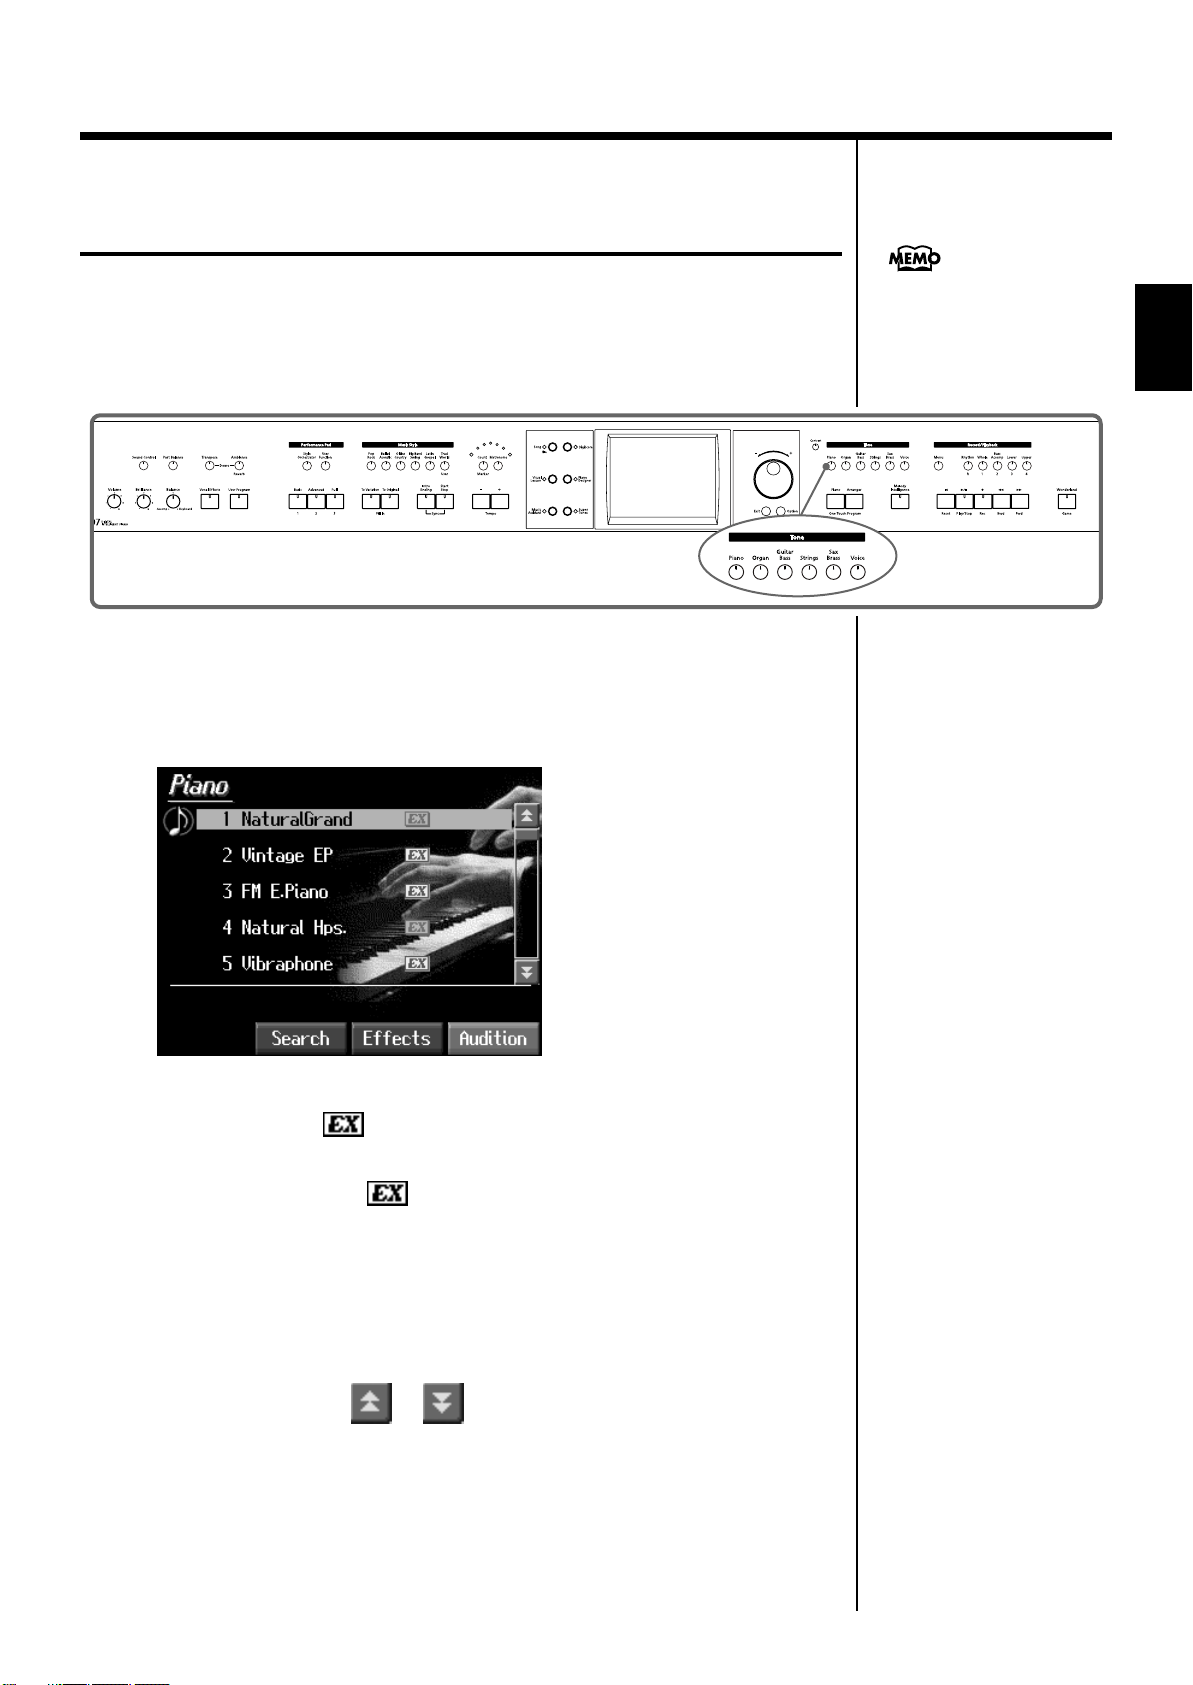
Performing with a Variety of Tones (Tone Buttons)
Chapter 1 Performance
The KR comes with a many built-in instrument sounds and effects. This lets you
enjoy perform in a wide range of musical styles.
The built-in sounds are called “Tones.” The sounds are organized into six tone
groups, which are assigned to the Tone buttons.
fig.panel1-2
Press any one of the Tone buttons to select a tone group.
1.
You’ll see that button’s indicator light up.
The screen displays the tone names included in the tone group you’ve selected.
fig.d-tonesel.eps_60
For more about the names of
Tones, take a look at the “Tone
List” (p. 172).
Chapter 1
This screen is called the “Tone selection screen.”
Tones indicated by is called an “EX voice.” These voices are especially
recommended.
Tones indicated by a red mark produce the “Key Off Sound.”
What “Key Off Sound” does is recreate the tonal changes produced when the fingers
are released from the keys.
Tones indicated by “GS” is GS tones.
Touch and drag up and down in the scroll bar to scroll through the screen and
display other tones.
Touch the page icons < > < > to change pages.
You can touch <Audition> for an audio demonstration of a particular tone.
You can touch <Effects> to add effect sounds to a variety of tones (p. 36).
You can do searches for tones according to search parameters or by name by
touching <Search> (p. 25).
23

Chapter 1 Performance
Touch a tone name to select the tone.
2.
You’ll hear the tone you’ve selected when you play the keyboard.
You can use the dial to scroll through the screen as you switch the Tones to be
played.
Press the [Exit] button.
3.
Chapter 1
■
This returns you to the Basic screen or the previous screen.
Playing Percussion Instruments or Sound Effects
You can use the keyboard to play percussion sounds or effects like sirens and animal
sounds.
fig.panel1-2
1.
Press the [Super Tones] button and watch the indicator light up.
Touch < > < > several times to display the “Drums” screen or the
2.
“SFX (SOUND EFFECT)” screen.
fig.d-drum.eps_60
Drum screen SFX screen
Each note of the keyboard will play a different sound.
You can also have play sounds by touching the screen.
You can select other drum tones by pressing the < > or < > buttons.
3.
Press the [Exit] button several times.
This returns you to the Basic screen or the previous screen.
The combination of sounds
assigned to the keyboard
varies according to the drum
set. Take a look at the “Drum
Set List” (p. 174) and “SFX Set”
(p. 177).
24

■
In condition search, tones
satisfying all of the selected
search criteria are sought.
Using Keywords to Search for Tones (Tone Search)
You can search for tones that match the conditions you set for instrument or musical
style. You can also search the tones using the first character of the tone name.
Chapter 1 Performance
Press any Tone button.
1.
The tone selection screen appears.
2.
Touch <Search>.
The following “Tone search screen” appears.
fig.d-tonesrch1.eps_60
Condition Search screen Name Search screen
Touch here to switch these screens.
Searching by Conditions
Touch <Category> or <Genre>, then use the dial to select the search
3.
Chapter 1
conditions.
4.
Touch <Search>.
The search results appear in the display.
Touch the tone name to select the tone.
Press the [Exit] button to return to the tone selection screen.
Searching by Tone Name
3
Touch <By Name>.
Touch <By Key> to go to the condition search screen.
Decide which character is to be used for the search.
4.
The selected character appears in the middle of the screen.
Enter the character you’re searching for. For example, touching <ABC> in succession
cycles you through the available choices in that character group (“A”→”B”→”C”...).
Touching <A-0> selects the type of character. Each time you touch <A-0>, the
character switches between alphabets and numerals.
Touch <Search>.
5.
The search results appear in the display.
Touch the tone name to select the Tone.
Press the [Exit] button several times to return to the Basic screen or the previous
screen.
25
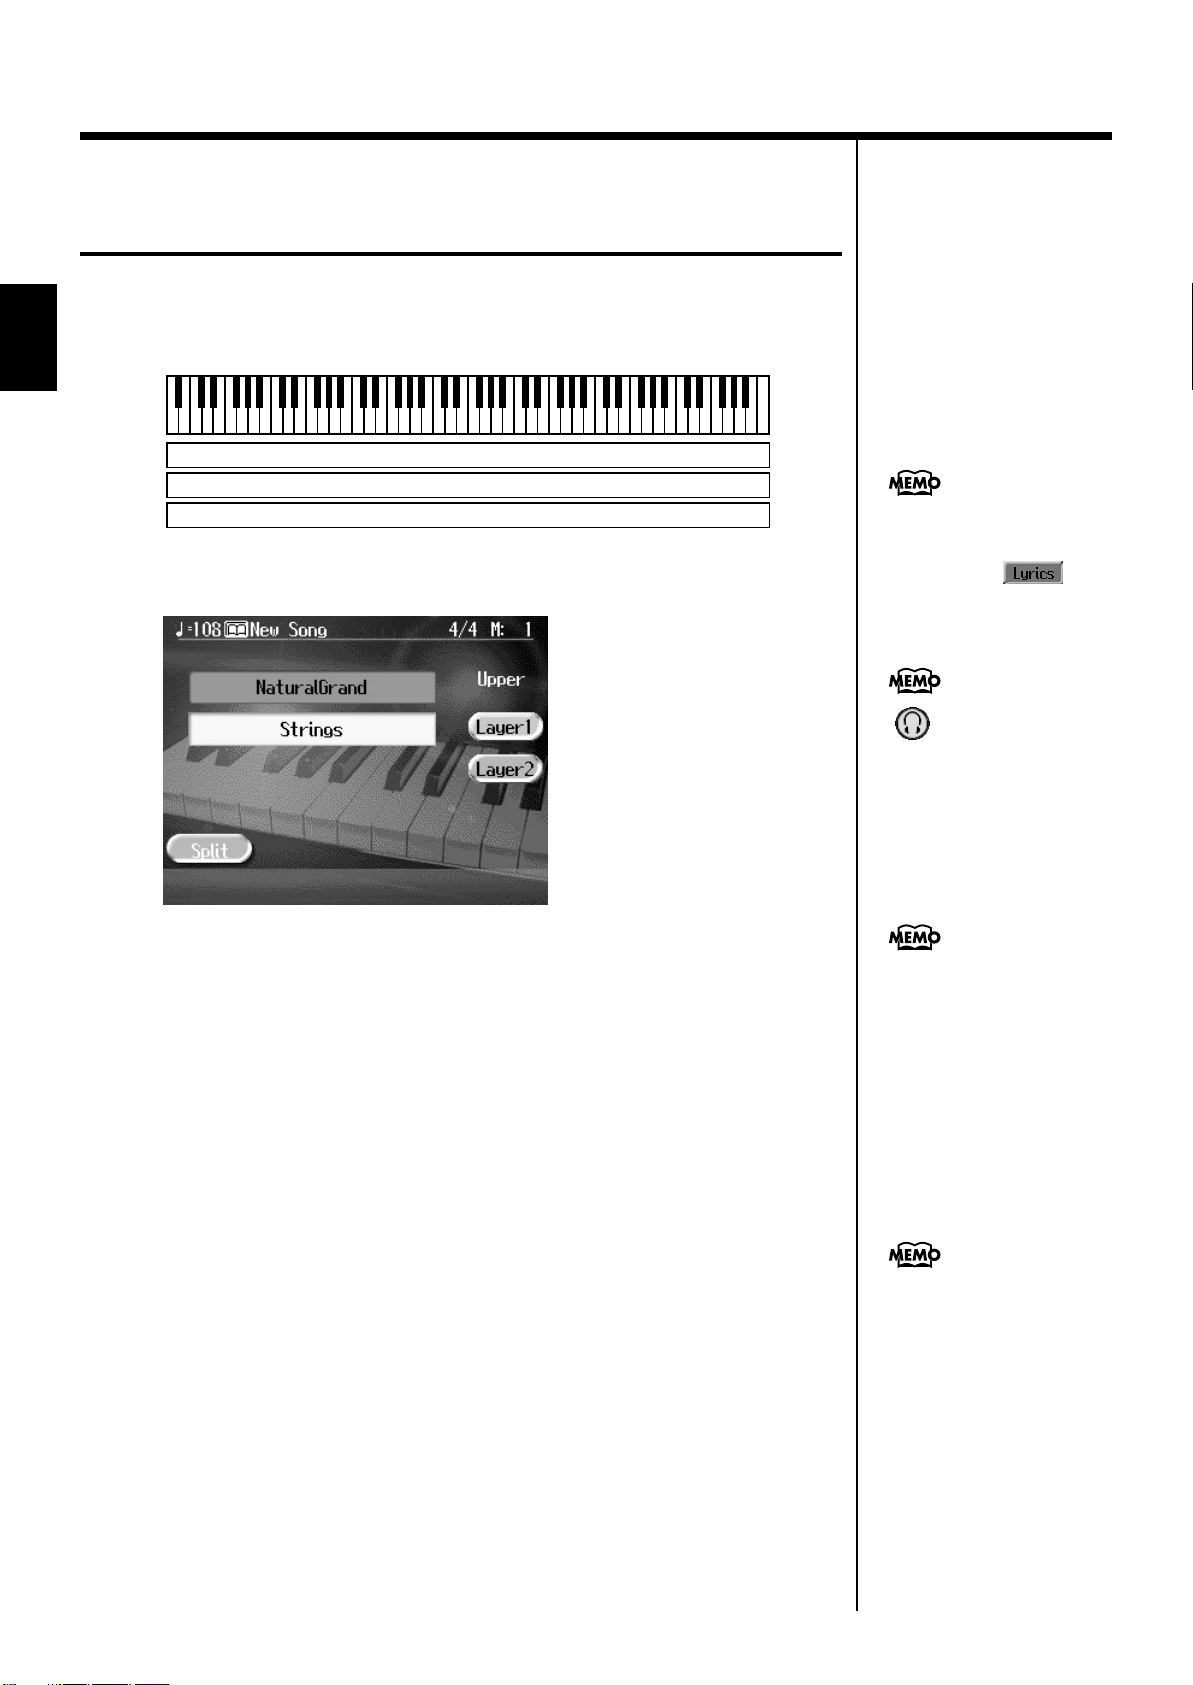
Chapter 1 Performance
When you select an internal
song or music file that includes
the lyrics data, < >
appears in the Basic screen.
Touch this to display the lyrics.
< > appears in the Piano
screen or Basic screen when
headphones are connected.
You can add three-
dimensional breadth to the
sound from the headphones
(p. 31).
Performing with Multiple Sounds Layered Together (Layer)
Two tones sounding together when you press a single key is referred to as a “layer
performance.”
For instance, it’s possible to play the Tones for both Piano and Strings simultaneously.
Chapter 1
fig.layer.e
1.
Touch <Layer 1>.
fig.d-layer.eps_60
Grand Piano 1
Strings 1
Strings 2
The tone that was sounding before you switched to layer performance, plus the tone
indicated in the lower part of the display, are now played together.
Here, the tone appearing in the upper part of the display is called the “upper tone,”
and the tone appearing in the lower part of the display is called the “layer tone.”
In the same manner, you can touch <Layer 2> to layer further sounds.
Changing the Tones
Touch the name of the tone to be changed.
2.
Touch here to highlight the tone name.
Press a Tone button to select the new tone (p. 23).
3.
When you have selected the tone, press the [Exit] button.
4.
The display returns to the Basic screen.
Cancelling the Layer
5.
Touch <Layer 1>.
Touch <Layer 2> to have <Layer 2> play as well.
The <Layer 1> and <Layer 2> icons are dimmed, and the Layer performance is
cancelled.
Now when you play the keys, only the tone indicated on the screen is sounded.
26
When you touch Octave
<-><+> on the tone selection
screen, the pitch of the
keyboard’s sound is changed
in octave units. To learn more,
see “Shifting the Keyboard
Pitch in Octave Steps (Octave
Shift)” (p. 28).
You can change the balance of
the right-hand and Layer Tone
volume. For instructions, see
“Adjusting the Volume
Balance for Each Performance
Part (Part Balance)” (p. 63).
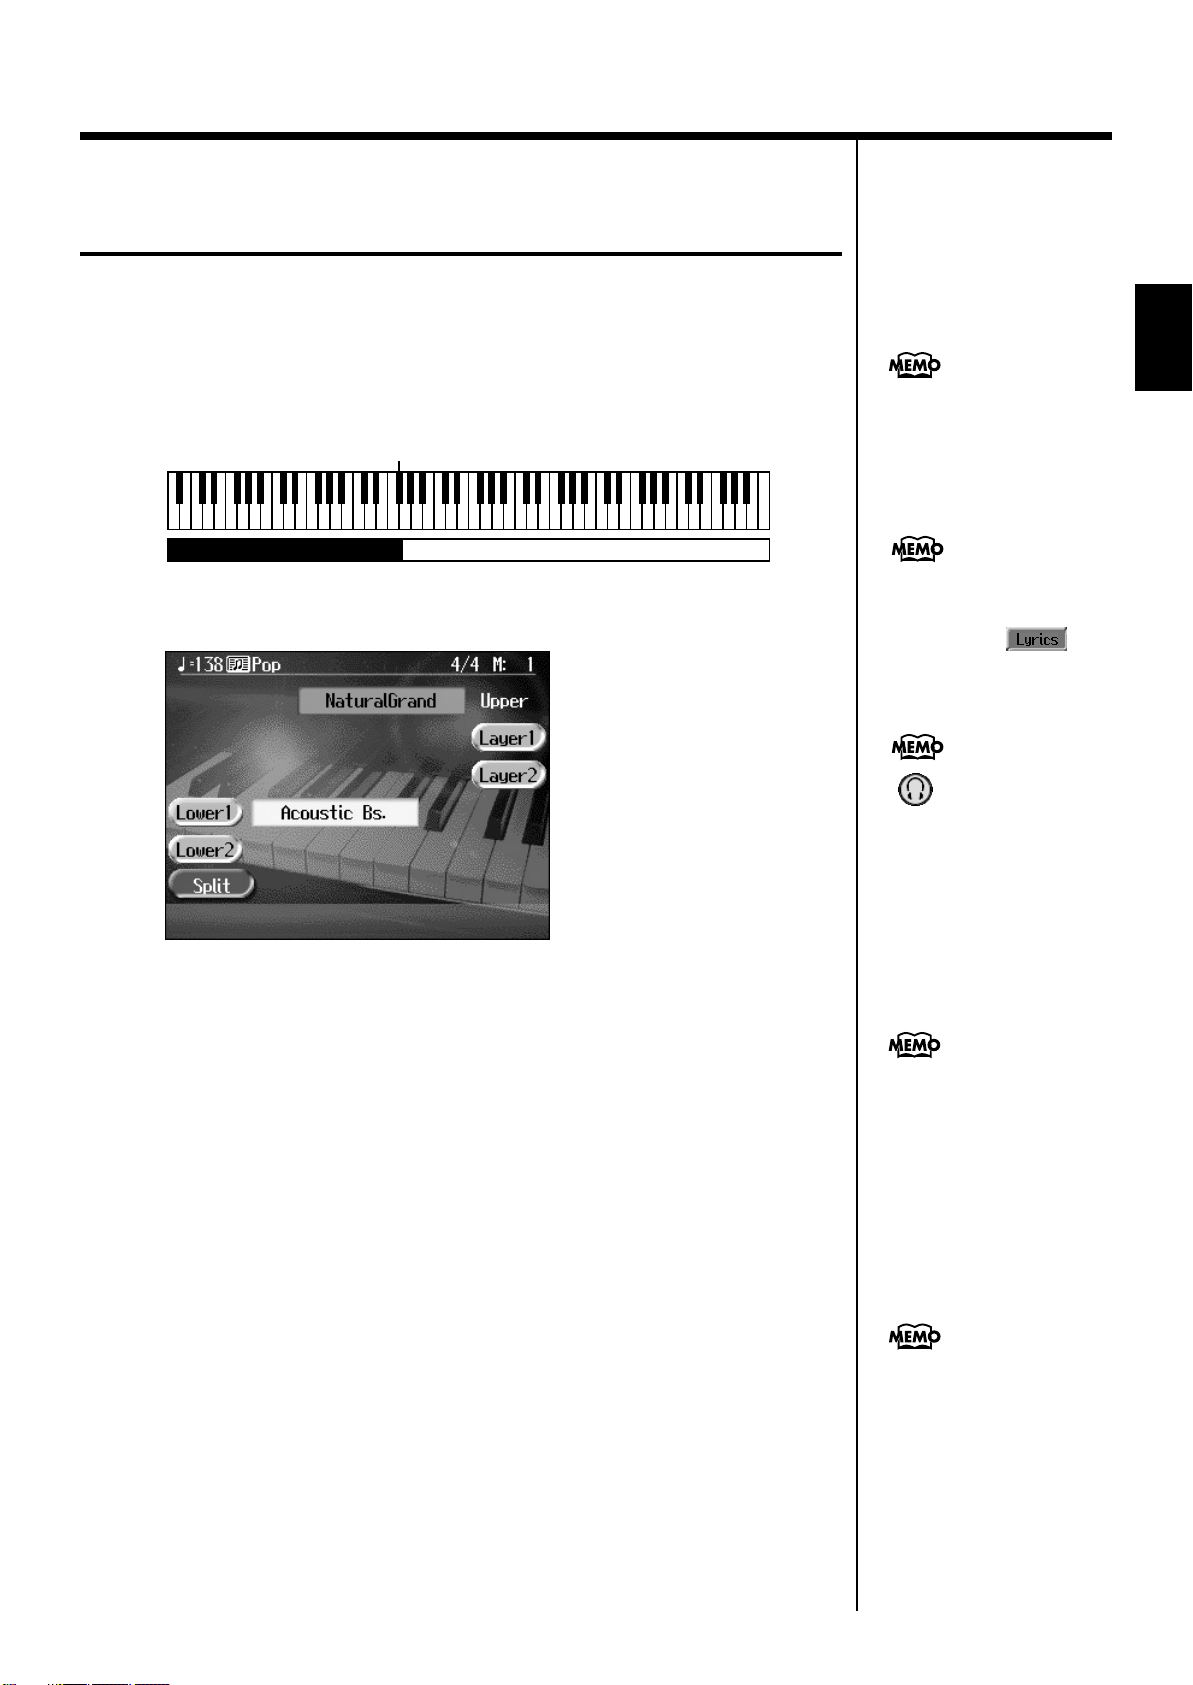
Playing Different Tones with the Left
When you select an internal
song or music file that includes
the lyrics data, < >
appears in the Basic screen.
Touch this to display the lyrics.
< > appears in the Piano
screen or Basic screen when
headphones are connected.
You can add three-
dimensional breadth to the
sound from the headphones
(p. 31).
b
and Right Hands (Split)
Chapter 1 Performance
Dividing the keyboard into right-hand and left-hand areas, then playing different
sounds in each section is called “split performance.” The boundary key is called the
“split point.”
The split point key is included in the left-hand keyboard area. Each time power to
the keyboard is turned on, the split point is reset to “F#3.”
fig.split.e
Split Point
Grand Piano 1Acoustic Bass
1.
At the Basic screen, touch <Split>.
fig.d-split.eps_60
Chapter 1
You can change the split point;
refer to “Changing the
Keyboard’s Split Point (Split
Point)” (p. 139).
The tone sounding prior to the split performance is played in the right-hand section
of the keyboard, and the tone indicated at the left of the screen is played in the left-
hand section of the keyboard.
Here, the tone appearing at the right part of the display is called the “upper tone,”
and the tone appearing at the left part of the display is called the “lower tone.”
You can turn the tones on and off by touching <Lower 1> or <Lower 2>.
Changing the Tones
Touch the name of the tone to be changed.
2.
Press a Tone button to select the tone (p. 23).
3.
When you have selected the tone, press the [Exit] button.
4.
The display returns to the Basic screen.
Cancelling the Split
5.
Touch <Split>.
The <Split> icons are dimmed, and the Split performance is cancelled.
When you play the keys, only the tone indicated on the screen is sounded.
When you touch Octave
<-> <+> in the tone selection
screen, the pitch of the
keyboard’s sound is changed
in octave units. To learn more,
see “Shifting the Keyboard
Pitch in Octave Steps (Octave
Shift)” (p. 28).
You can change the volume
alance between the upper and
lower parts of the keyboard;
refer to “Adjusting the Volume
Balance for Each Performance
Part (Part Balance)” (p. 63).
27

Chapter 1 Performance
Turning On Layer and Split Performance Simultaneously
Turning on either Layer Performance or Split Performance allows you to divide the
keyboard into a upper and a lower part and play with twoTones layered in the lower
part, and three Tones layered in the upper part.
fig.d-layersplit.eps_60
Chapter 1
■
Shifting the Keyboard Pitch in Octave Steps (Octave Shift)
When using layer performance (p. 26) or split performance (p. 27), you can change
the pitch of the keyboard’s sound in octave units. This function is called “Octave
Shift.”
For example, when playing a Layer performance, if you change the pitch of one of
the tones and then layer it, it changes the impression created with the tone.
When the keyboard has been
divided into upper and lower
sections, the damper pedal is
applied to only the upper
section. If you want to add
lingering reverberations to the
notes of the lower section, see
“Assigning Functions to
Pedals and Performance Pads
(Pedal Setting/User
Functions)” (p. 144).
1.
On the Basic screen, touch <Layer1> or <Split>.
The KR switches to layer performance or split performance.
2.
To apply Octave Shift, touch the name of the tone you’ve selected.
3.
Press the Tone button to display the Tone selection screen.
fig.d-octshift.eps_60
4.
Touch Octave <-> or <+> in the lower part of the screen to adjust the
pitch of the sound.
Each time you touch <+>, the pitch is raised one octave.
Each time you touch <->, the pitch is lowered one octave.
The sound can be changed from two octaves lower than the original sound (-2) to
two octaves above the original (+2).
Press the [Exit] button to return to the Basic screen or the previous screen.
28
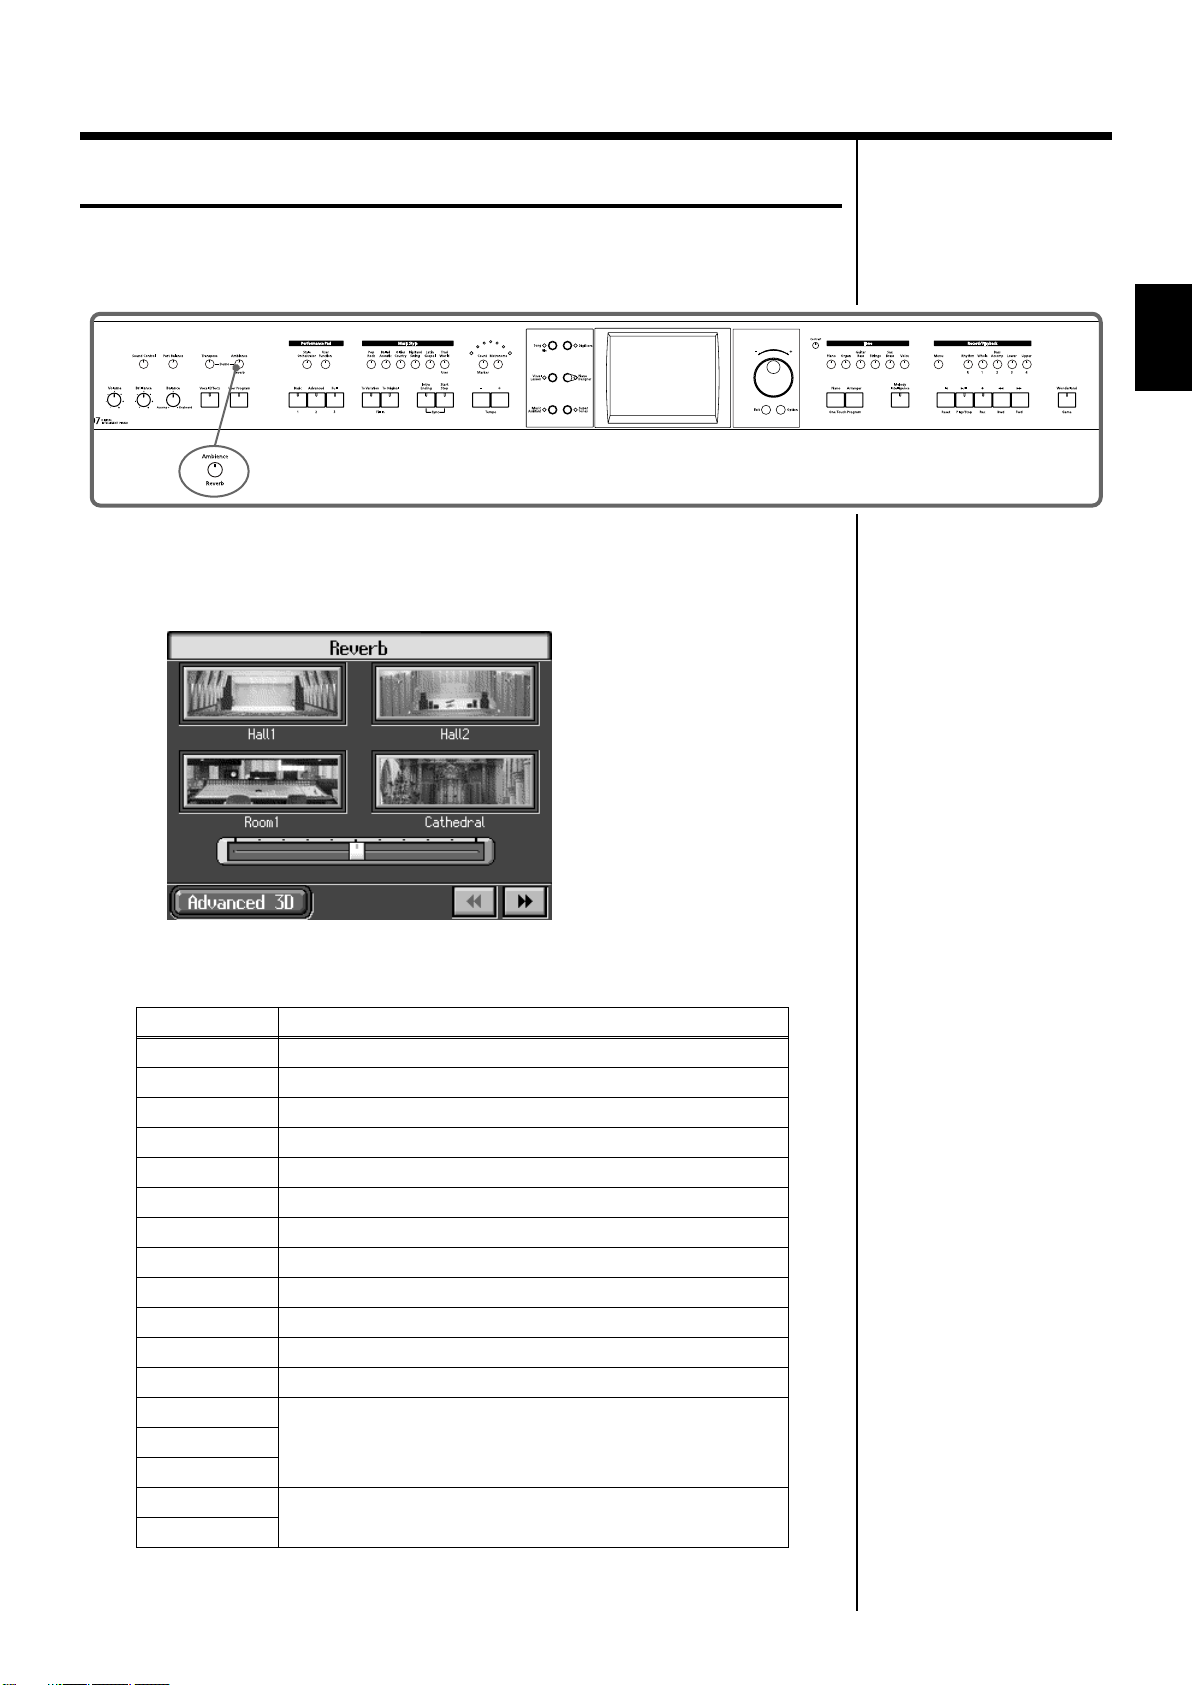
Adding Reverberation to the Sound (Reverb)
Apply a reverb effect to the notes you play with the KR.
Chapter 1 Performance
Reverb makes it sound as if you are playing in a concert hall.
fig.panel1-3
Press the [Ambience/Reverb] button and watch the its indicator light up.
1.
A “Reverb screen” like the one shown below appears.
fig.d-reverb.eps_60
Chapter 1
Touch an icon to select the performance space.
2.
;
Display
Hall1
Hall2
Room1
Cathedral
Ground
Room2
Lounge
Studio
Gymnasium
Hall3
Dome
Cave
GS Room1
GS Room2
GS Room3
GS Hall1
GS Hall2
Hall with bright reverberation
Hall with warm reverberation
Room reverberation
High-ceilinged cathedral
Wide open space with no reverberations
Small room
Larger room
A recording studio
In a gymnasium
Large concert hall reverberation
A domed ballpark
Adds the extended reverberations found inside a cave
Reproduces an indoor-type reverb.
Provides a clear, expansive reverberation.
Reproduces the reverberation found in a hall. Gives
reverberation with a greater sense of depth than GS Room.
Explanation
29

Chapter 1 Performance
b
Chapter 1
Display
GS Plate
GS Delay
GS Pan Delay
Touch the slider beneath the icons to adjust the effect selected.
3.
Touch and slide the knob on the screen to the right for a deeper reverb, and to the
left for less.
You can also move the slider with the dial.
When you press the [Exit] button, the reverb effect is activated, and you return to the
previous screen.
Reproduces a plate echo (reverberation created using the
vibrations of a metal plate).
A delayed sound that is added to the original, similar to the
reflected sounds of mountain echoes.
The reflected sounds are panned (shifted) laterally.
Explanation
Cancelling the Effect
4.
Press the [Ambience/Reverb] button, and watch the indicator light go
out.
The reverb effect is eliminated.
No effect is applied when the
slider is moved all the way to
the left. In this case, the
utton’s indicator won’t light
up when you press the
[Ambience/Reverb] button.
30
 Loading...