

Page 1
QUICK START
Thank you, and congratulations on your choice of the Roland V-Synth.
Before using this unit, carefully read the sections entitled: “IMPORTANT SAFETY
INSTRUCTIONS” (Owner’s Manual p. 2), “USING THE UNIT SAFELY” (Owner’s
Manual p. 3), and “IMPORTANT NOTES” (Owner’s Manual p. 4). These sections
provide important information concerning the proper operation of the unit.
Additionally, in order to feel assured that you have gained a good grasp of every
feature provided by your new unit, the Quick Start, Owner’s Manual, and Sound
List should be read in their entirety. These manuals should be saved and kept on
hand as a convenient reference.
How to Read This Manual
The V-Synth comes with three manuals: Quick Start, Owner’s Manual, and Sound List.
The manual you’re reading now, Quick Start, offers a basic introduction to the V-Synth, and
provides simple, easy-to-understand explanations, allowing the beginner to quickly
experience many of the V-Synth’s exciting features. As you read the Quick Start, we
recommend actually performing the described operations on your V-Synth. This’ll help you
understand most of what you need to know for basic operations. For feature details, and for
explanations of advanced uses, read the separate Owner’s Manual.
Copyright © 2002 ROLAND CORPORATION
All rights reserved. No part of this publication may be reproduced in any form without
the written permission of ROLAND CORPORATION.
Page 2

Contents
Getting Ready.............................................................................................................3
Connecting an Amp and Speaker System...............................................................................................3
Turning On the Power............................................................................................................................... 4
Listen to the Demo Song...........................................................................................6
Try Out the Sounds....................................................................................................8
Selecting Patches and Playing Sounds.................................................................................................... 8
Selecting Favorite Patches (Patch Palette).............................................................................................10
Playing Different Sounds in Separate Areas of the Keyboard (Split Patch)....................................10
Try Out the Various Performance Features...........................................................11
Adjusting the Display Contrast (LCD Contrast)........................................................................ 5
Selecting Patches from the List......................................................................................................9
Manipulating Sounds with the Time Trip Pad .................................................................................... 11
Moving Your Hand Above the D Beam Controller to Apply Effects...............................................12
Using Knobs to Modify the Sound in Realtime (Assignable Controller)......................................... 14
Playing Arpeggios (Arpeggiator)...........................................................................................................15
Other Performance Features...................................................................................................................17
Velocity/Aftertouch ..................................................................................................................... 17
Pitch Bend/Modulation Lever.................................................................................................... 17
Transpose .......................................................................................................................................17
Octave Shift.................................................................................................................................... 18
Hold Pedal......................................................................................................................................18
Control Pedal.................................................................................................................................18
Creating a Patch.......................................................................................................19
Initializing Patch Settings........................................................................................................................ 19
Selecting a Structure Type....................................................................................................................... 20
Switching Each Section On/Off............................................................................................................. 21
Setting Up the Oscillators (OSC1/2)......................................................................................................22
Selecting a Wave............................................................................................................................22
Modifying the Volume and Sound............................................................................................. 23
Mixing/Modulating Two Sounds (Mod)..............................................................................................24
Selecting a Modulator Type......................................................................................................... 24
Applying COSM Modeling to Oscillators (COSM1/2).......................................................................24
Selecting a COSM Type................................................................................................................ 24
Modifying the Sound.................................................................................................................... 25
Shaping a Sound’s Volume Over Time (TVA)..................................................................................... 26
Adding the V-Synth Effects ....................................................................................................................27
Saving Patches You’ve Created.............................................................................................................. 28
Naming Patches (PATCH Name)...............................................................................................28
Saving Patches (PATCH Write) .................................................................................................. 30
Turning Off the Power ................................................................................................................. 31
2
Page 3
Getting Ready
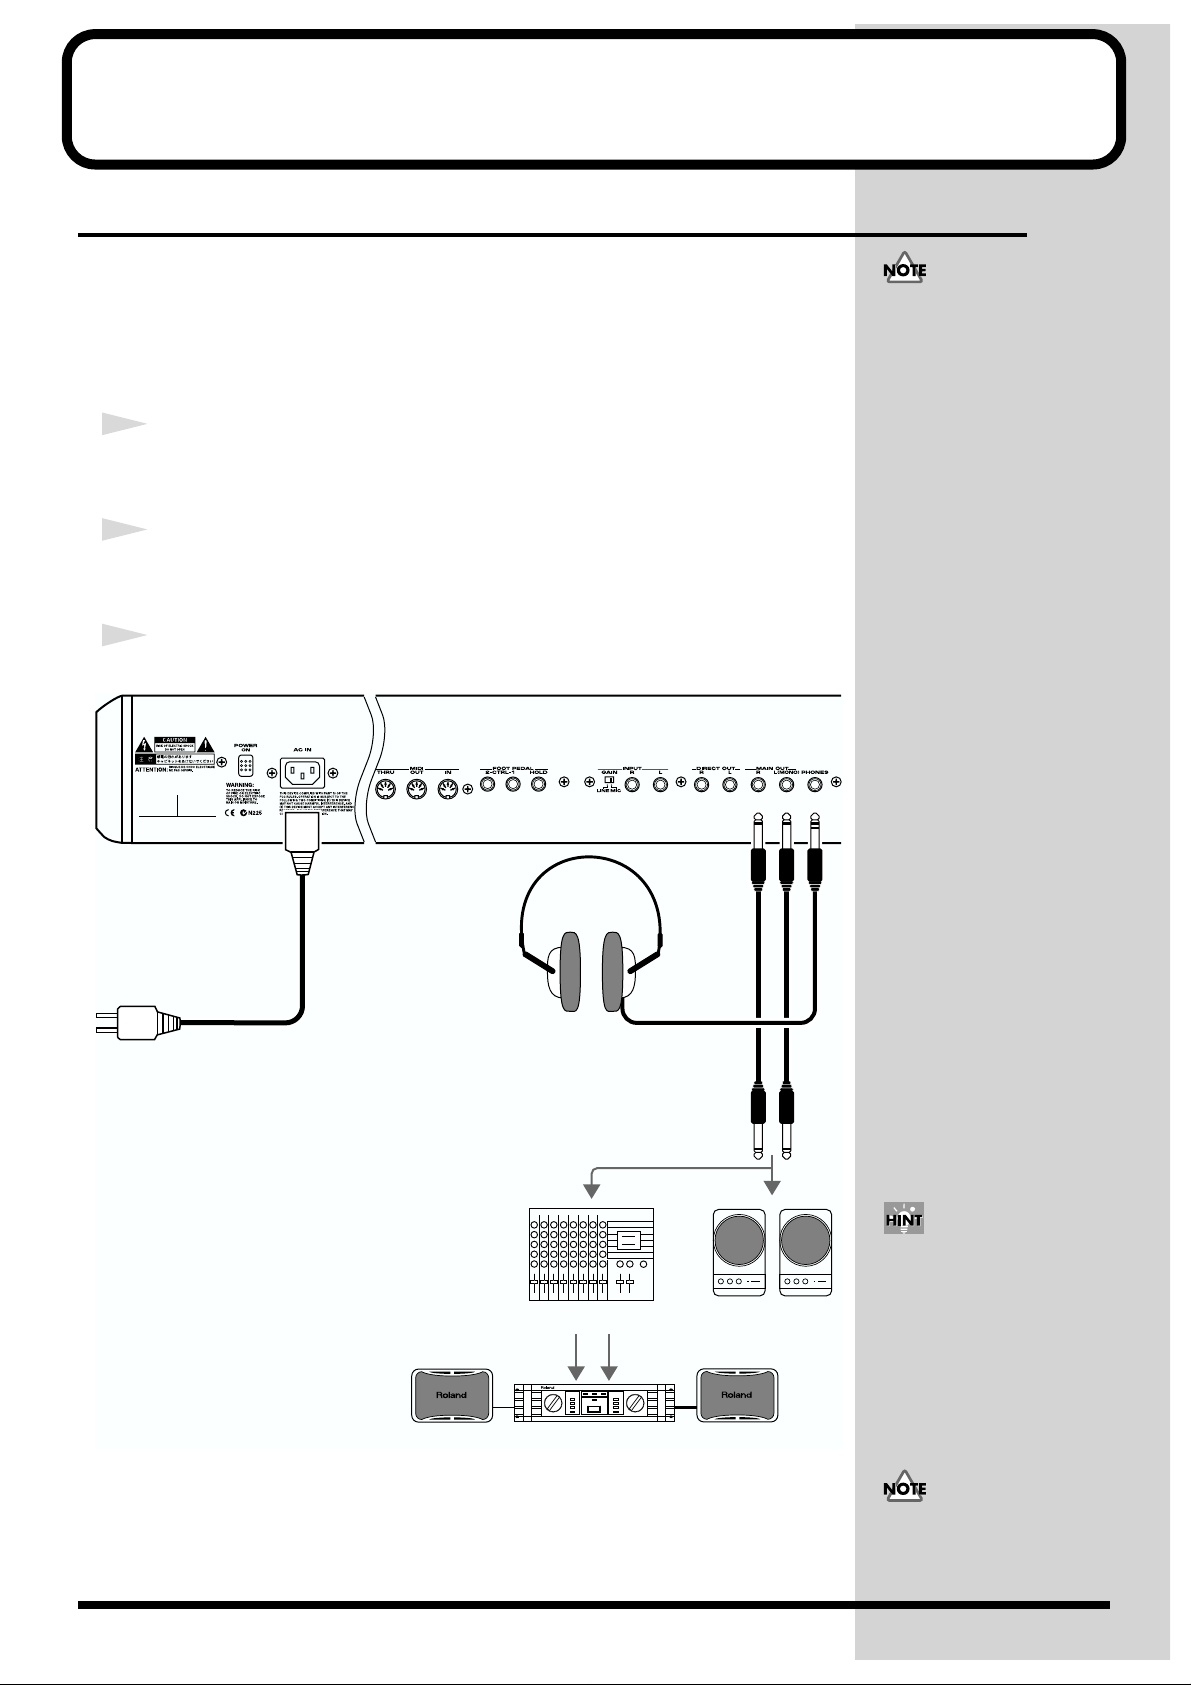
Connecting an Amp and Speaker System
Since the V-Synth contains no amplifier or speakers, you’ll need to connect it to
audio equipment such as a keyboard amplifier, monitor speaker system or home
stereo, or use headphones to hear its sound.
Here we will explain example connections that use mainly the MAIN OUT jacks.
1
Before hooking anything up, make sure that the power on all of your
gear is turned OFF.
2
Connect one end of the supplied power cable to the V-Synth, and the
other end to a power outlet.
To prevent malfunction and/
or damage to speakers or other
devices, always turn down the
volume, and turn off the
power on all devices before
making any connections.
3
Connect the V-Synth to your amp/speaker system.
fig.Q-01.e
to Power outlet
Stereo headphones
Mixer etc.
Power amp
Use audio cables to connect audio equipment such as an amp or speakers. If you’re
using headphones, plug them into the PHONES jack.
Monitor speakers
(powered)
In order to fully experience the
V-Synth’s sound, we
recommend using a stereo
amp/speaker system. If you’re
using a mono system,
however, make your
connections to the V-Synth’s
MAIN OUT jack L (MONO).
Audio cables are not included
with the V-Synth. You’ll need
to provide them.
3
Page 4
b
Do not touch!
Getting Ready
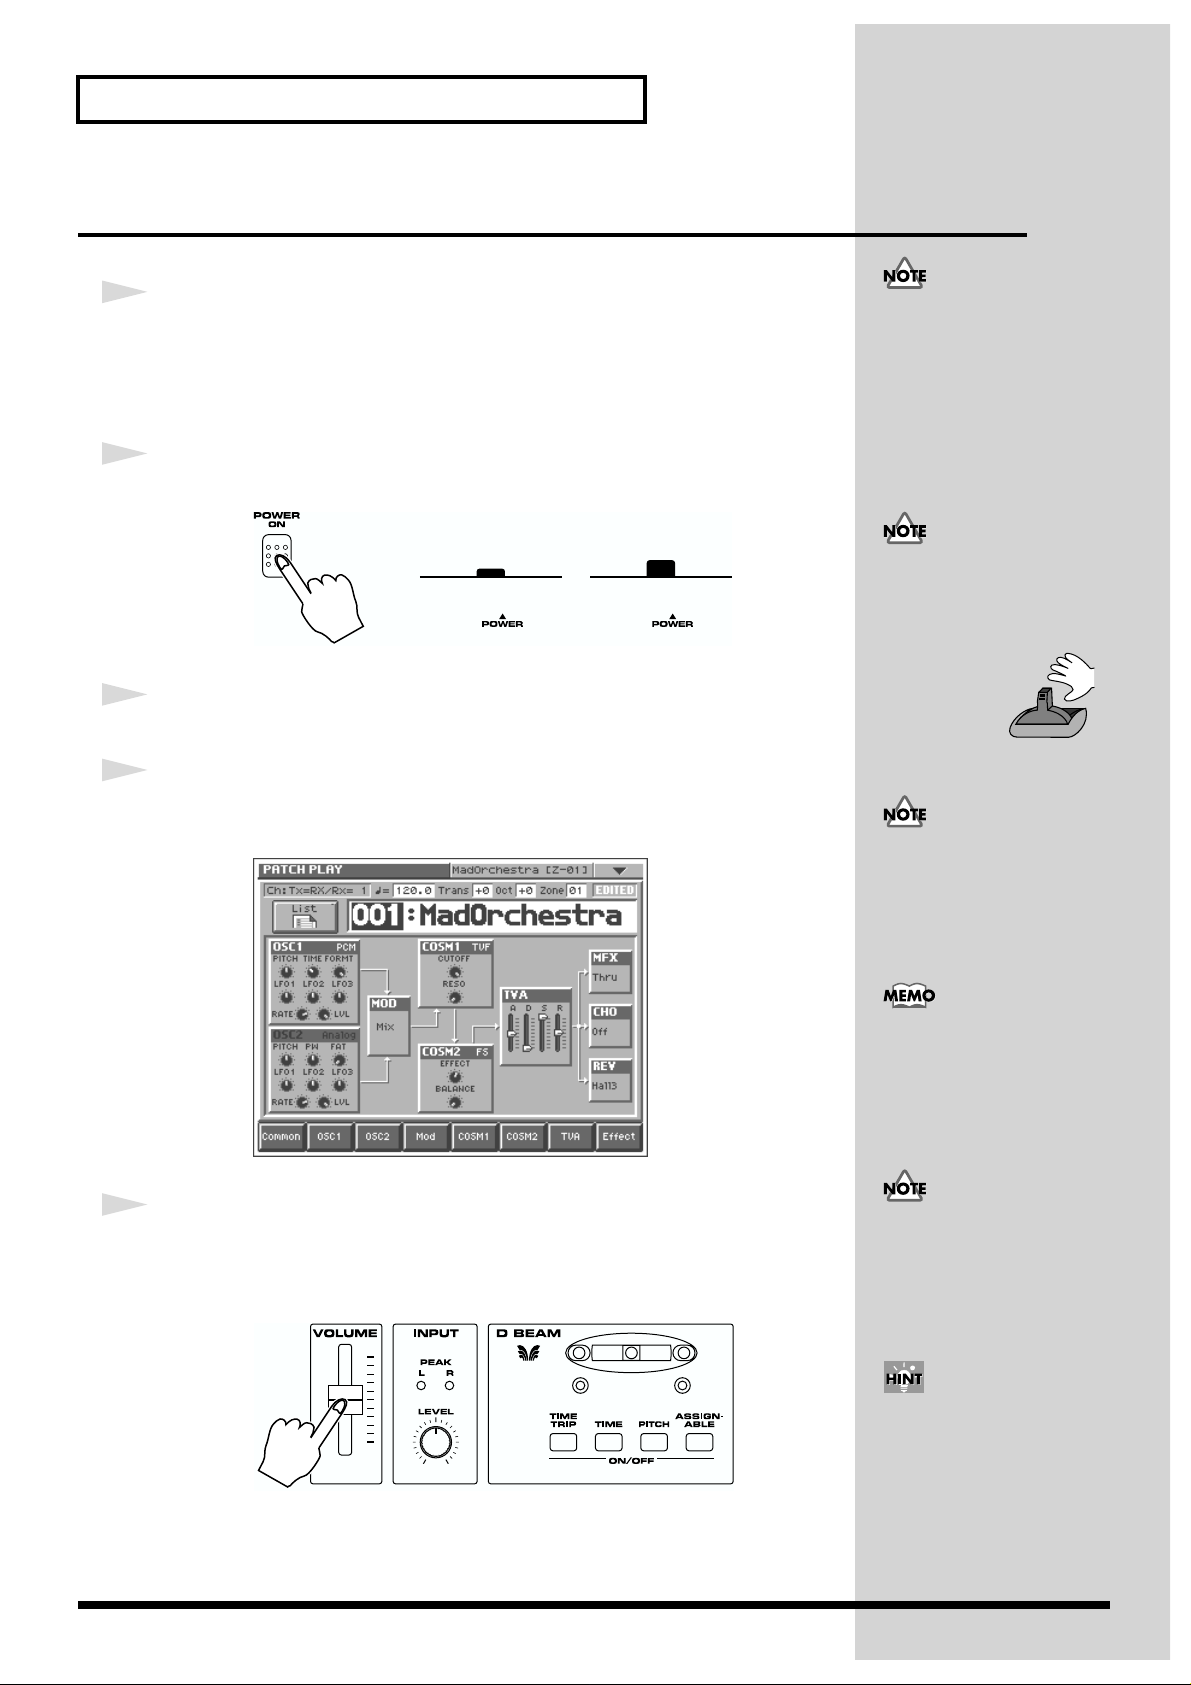
Turning On the Power
1
Before turning on the V-Synth’s power, consider these two questions:
• Are all peripheral devices connected correctly?
• Have the volume controls of the V-Synth and all connected audio devices been
turned to their lowest settings?
2
Turn on the POWER switch located on the rear panel of the V-Synth.
fig.Q-02.e
ON OFF
3
Turn on the power for any connected amplifiers or speakers.
4
Wait for the V-Synth to start up. When it has started up normally, a
screen like the following will appear.
fig.Q-02a_60
Once the connections have
een completed (p. 3), turn on
power to your various devices
in the order specified. By
turning on devices in the
wrong order, you risk causing
malfunctions and/or damage
to speakers and other devices.
To ensure proper operation of
the pitch bend lever, make
sure not to touch the lever
when turning the V-Synth’s
power on.
This unit is equipped with a
protection circuit. A brief
interval (a few seconds) after
power up is required before
the unit will operate normally.
While the V-Synth is starting
up, the display will indicate
“Processing...”
5
Set the volume for your connected amplifier and speakers. While
playing the V-Synth keyboard, gradually raise the V-Synth’s volume
slider to the desired listening level.
fig.Q-03
Be careful not to set your
listening volume too high to
avoid damage to your amp/
speaker system or your
hearing.
In order to obtain the best
audio quality from the VSynth, we recommend that
you set the V-Synth’s volume
to the maximum position, and
adjust the volume
appropriately on your amp or
speaker system.
4
Page 5
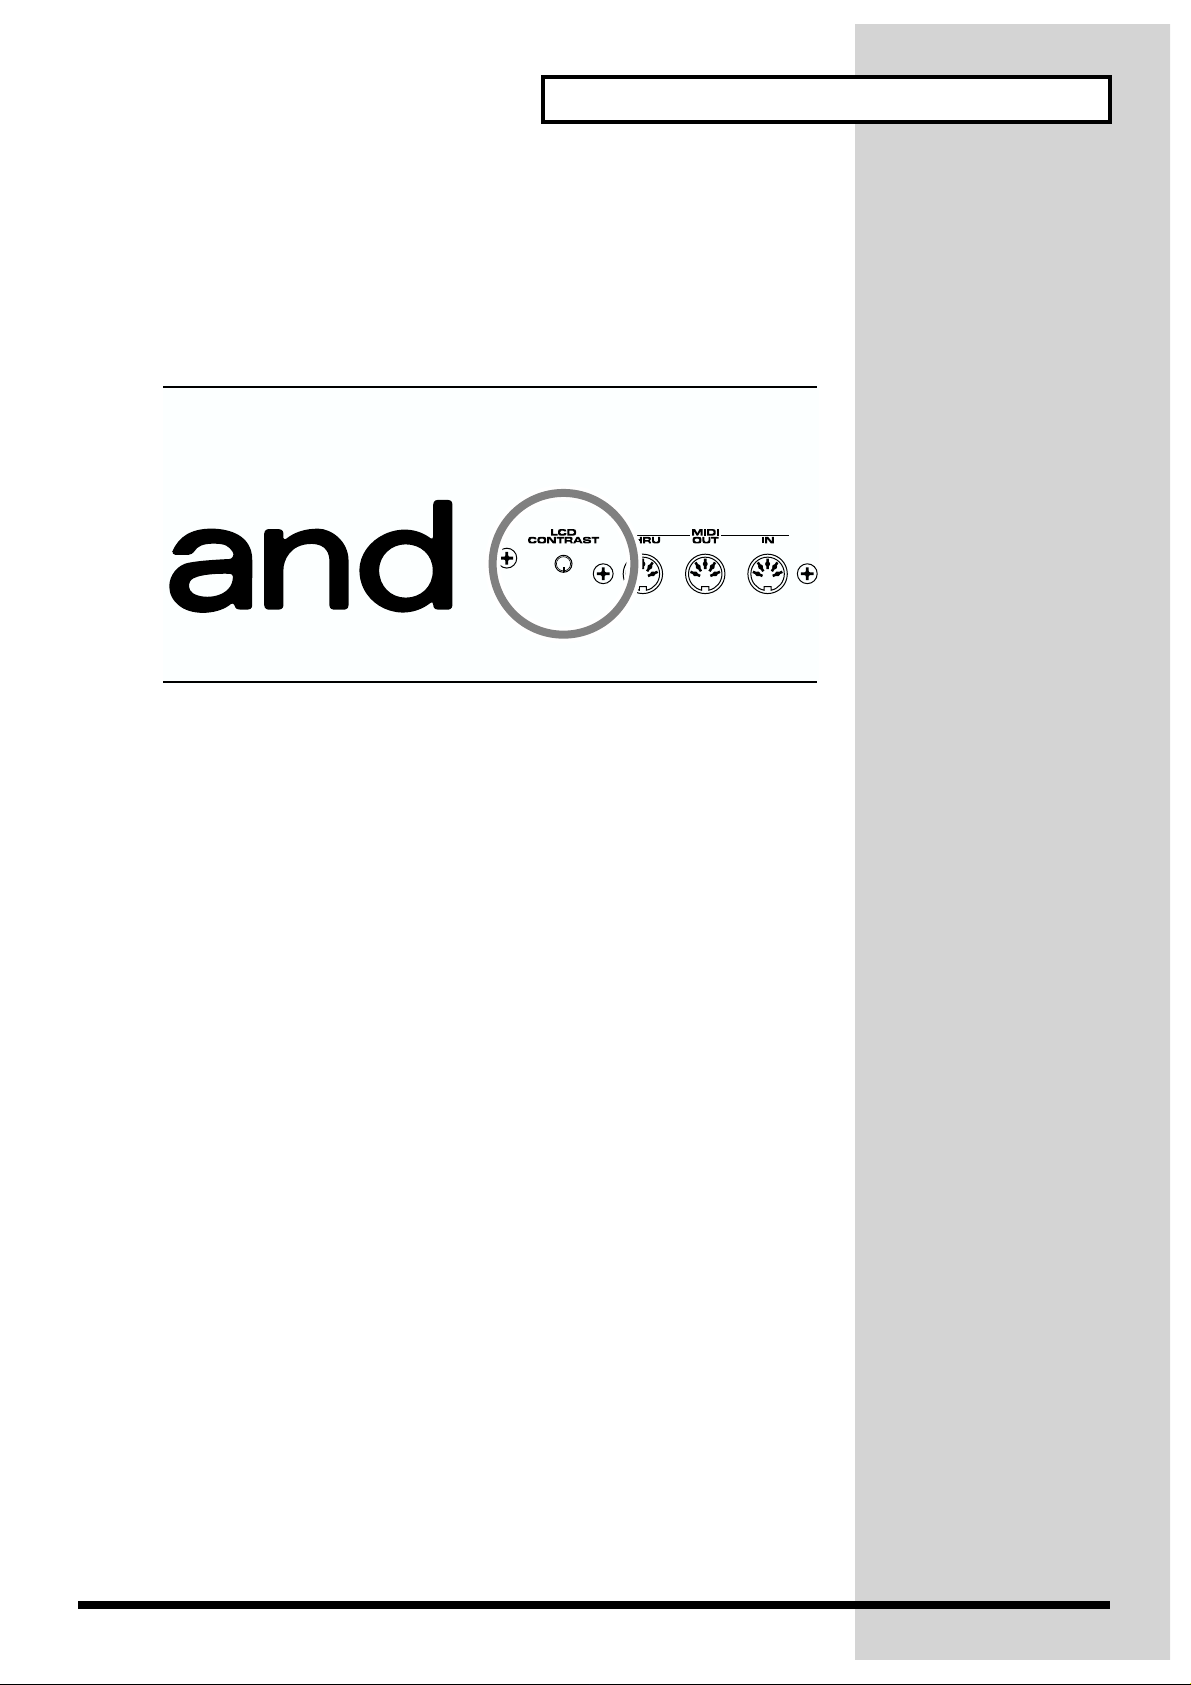
Adjusting the Display Contrast (LCD Contrast)
The characters in the display may be difficult to view immediately after turning on
the V-Synth’s power or after extended use. Your viewing angle or the current
lighting conditions can also affect the appearance of the display. In such situations,
you can turn the LCD CONTRAST knob (located on the rear panel) to adjust the
contrast of the display.
fig.Q-04
Getting Ready
5
Page 6
b
Listen to the Demo Song
The V-Synth contains demonstration (“demo”) songs that you can listen to using the
V-Synth’s Demo Play feature. The demos will introduce you to the V-Synth’s
exceptional sounds and effects.
1
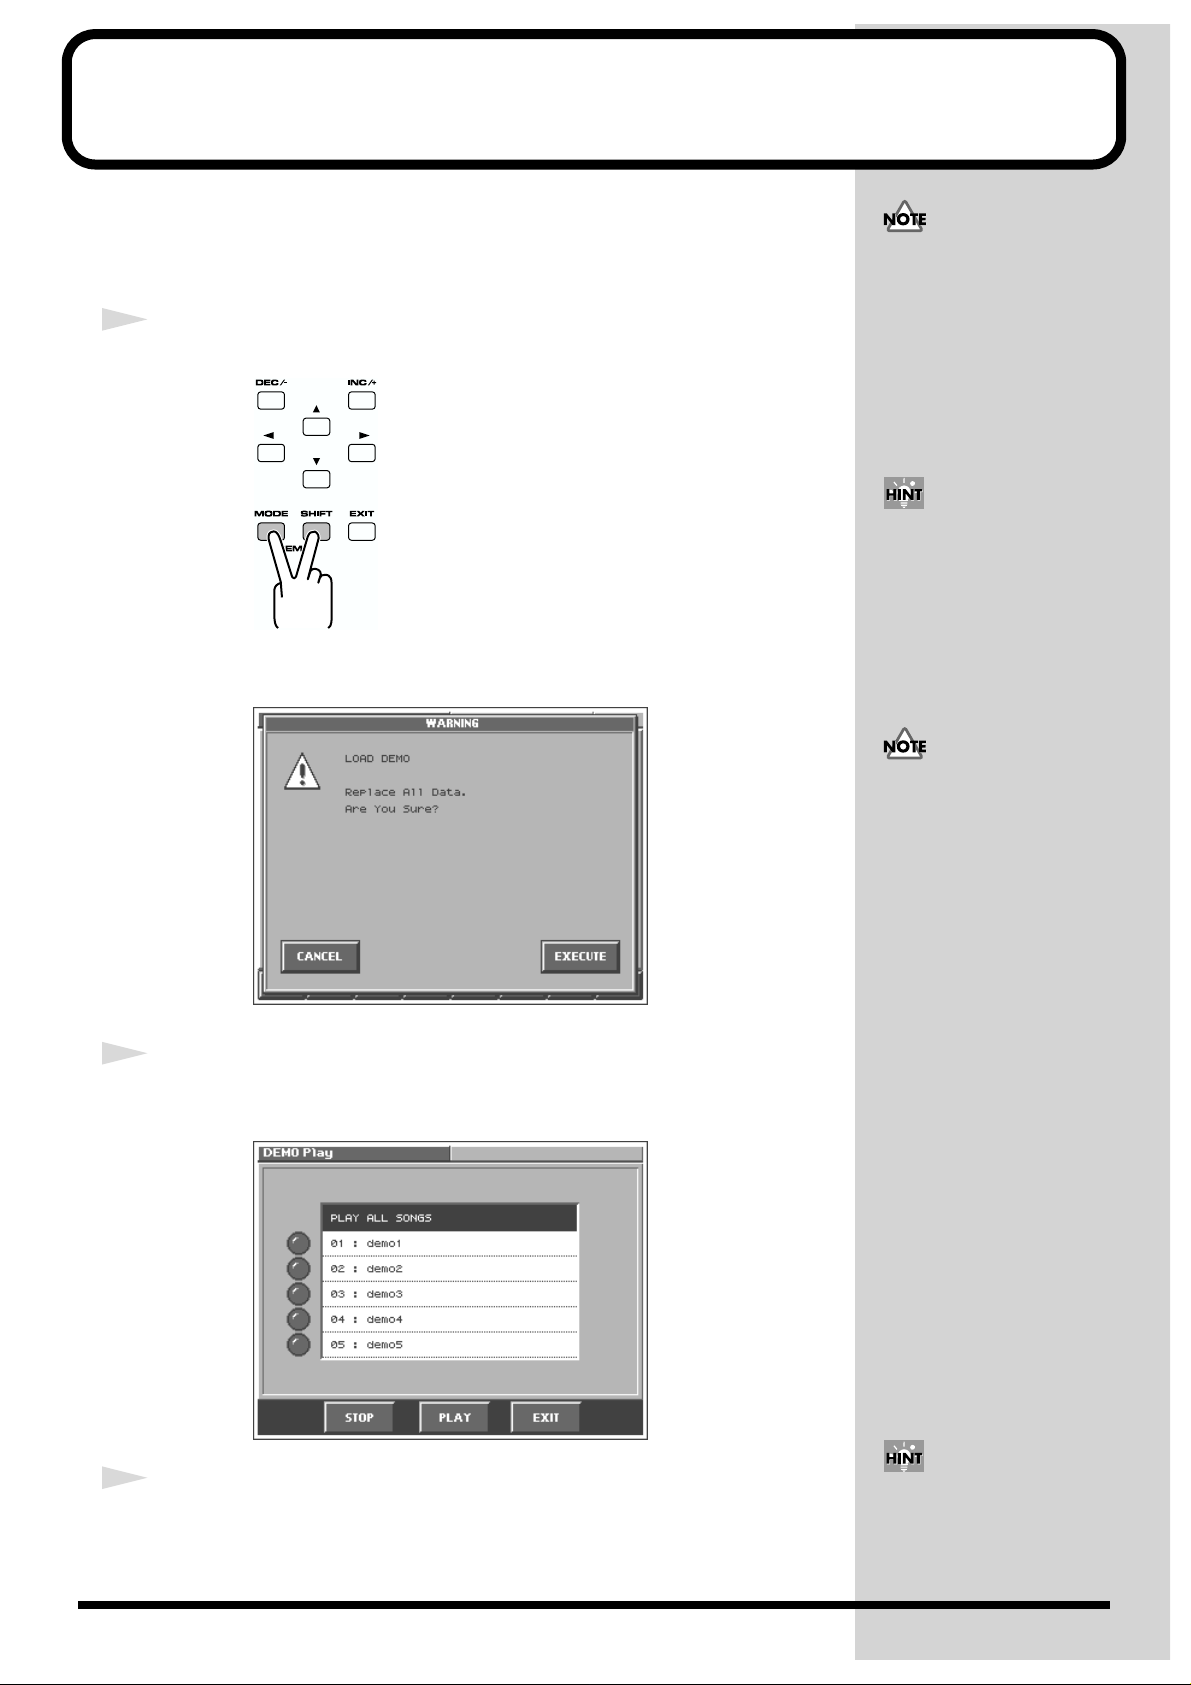
Hold down [SHIFT] and press [MODE].
fig.Q-05
All rights reserved.
Unauthorized use of this
material for purposes other
than private, personal
enjoyment is a violation of
applicable laws.
You can also enter Demo Play
mode by pressing [MODE] and
then touching <DEMO> in the
V-SYNTH MODE MENU
window that appears.
A window like the following appears.
fig.Q-05a_60
2
Touch <EXECUTE> to load the demo song data.
The DEMO Play screen will appear, and you will enter Demo Play mode.
fig.Q-05b_60
If you enter Demo Play mode
without saving any edited data
you have remaining in the VSynth’s work area, all of this
data will be lost. If you want to
keep your data, you must save
it to internal memory or on a
PC card, or transmit it to an
external MIDI device (Owner’s
Manual; p. 85, P.97).
3
Touch the song that you wish to hear.
If you touch <PLAY ALL
SONGS >, the songs will
playback successively,
eginning from the first.
6
Page 7
4
Touch <PLAY> to start demo song playback.
After a demo song has played all the way to the end, the unit automatically returns
to the start of the song and playback is repeated. To interrupt playback, touch
<STOP>.
5
To exit Demo Play mode, touch <EXIT>.
A window like the following appears.
fig.Q-05c_60
Listen to the Demo Song
When the demo plays, it sends
out no MIDI data from the VSynth’s MIDI OUT connector.
6
Touch <EXECUTE>, and you’ll be returned to the PATCH PLAY
screen.
7
Page 8
Try Out the Sounds
Selecting Patches and Playing Sounds
The V-Synth comes with a wide range of onboard sounds, including single tones
called patches . Let’s select a few patches to get an idea of the variety of sounds
available with the V-Synth.
1
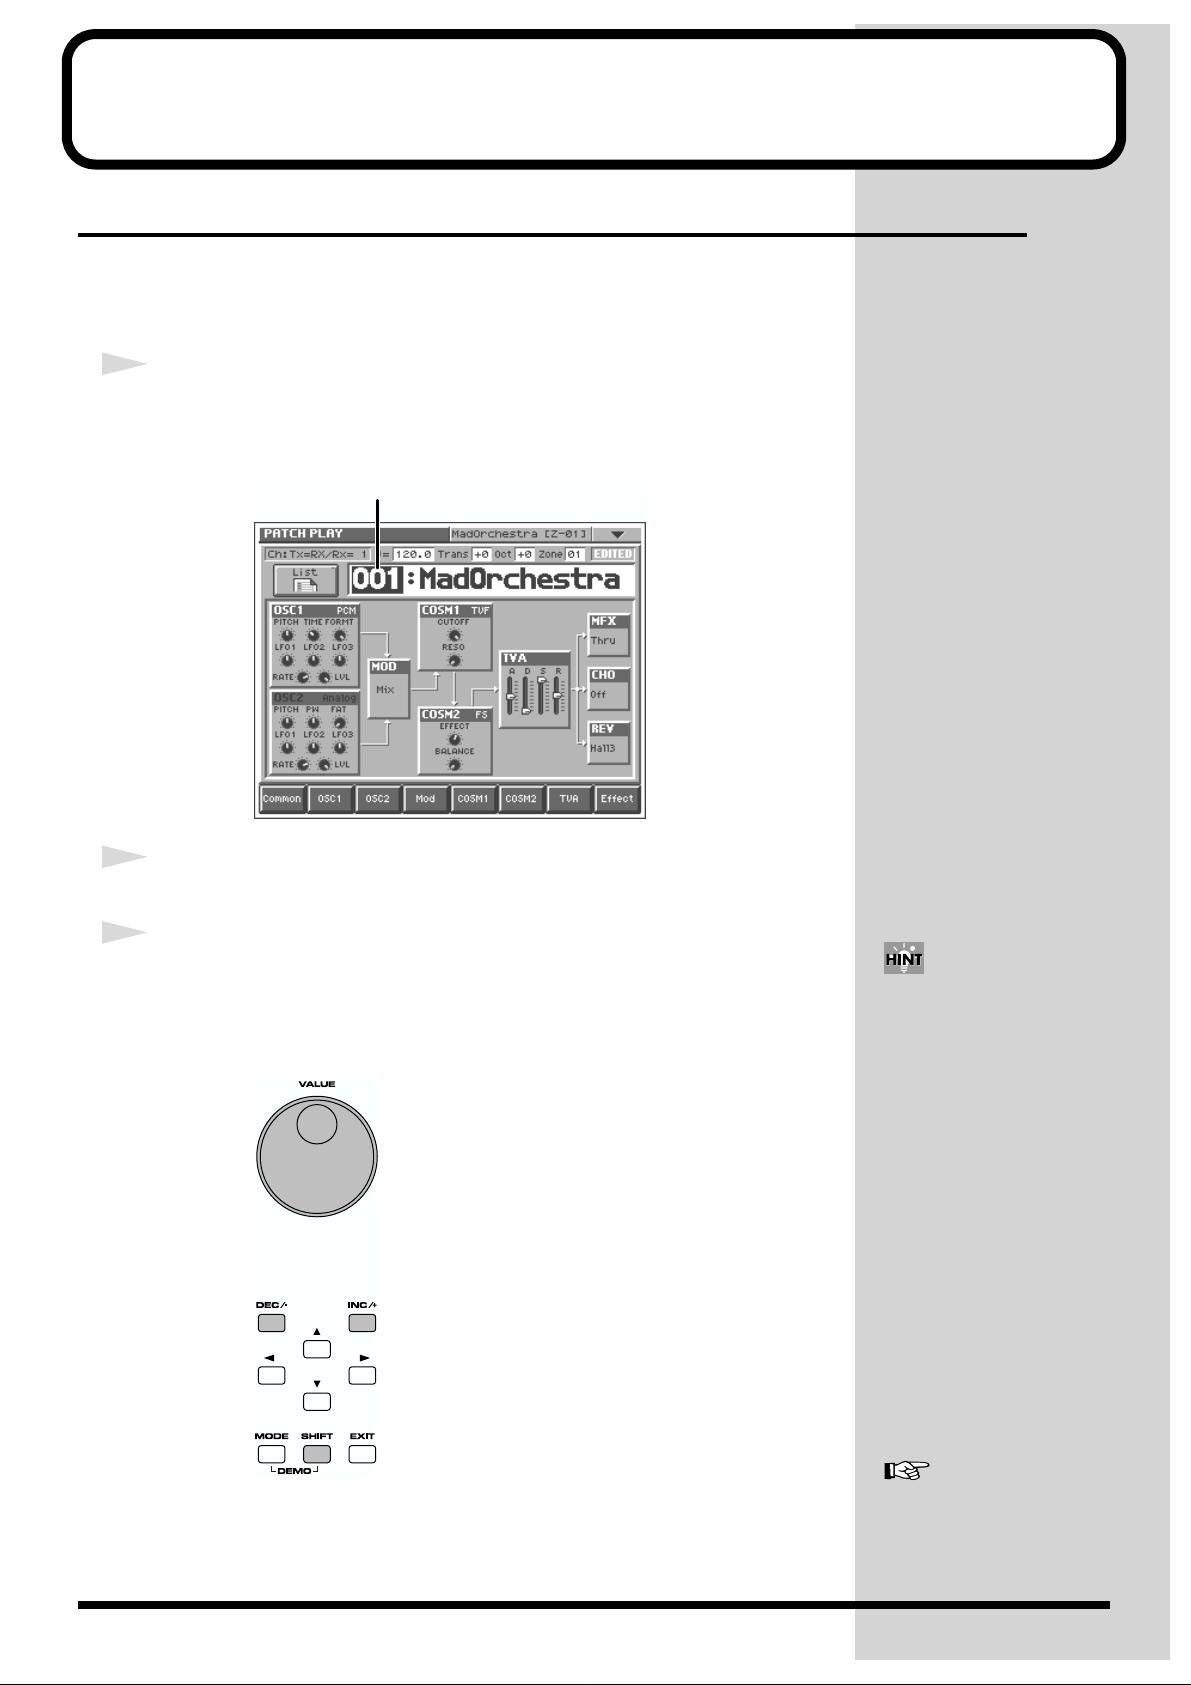
Make sure the PATCH PLAY screen is displayed.
If the PATCH PLAY screen—shown below—is not displayed, press [EXIT] once or
twice until the PATCH PLAY screen appears.
fig.Q-06.e
Patch number
2
Play the keyboard to hear what the selected patch sounds like.
3
To change to a different patch, touch the patch number to highlight it,
and then turn the VALUE dial or press [INC/+] [DEC/-]. At this time you
can switch more rapidly by holding down [SHIFT] while you perform
these operations.
fig.Q-06a
Alternately, you can touch the
patch number and drag your
finger up and down—or right
and left—to change patches.
8
For details on the factory-set
patches in the V-Synth’s
memory, refer to “Sound List”
(separate booklet).
Page 9
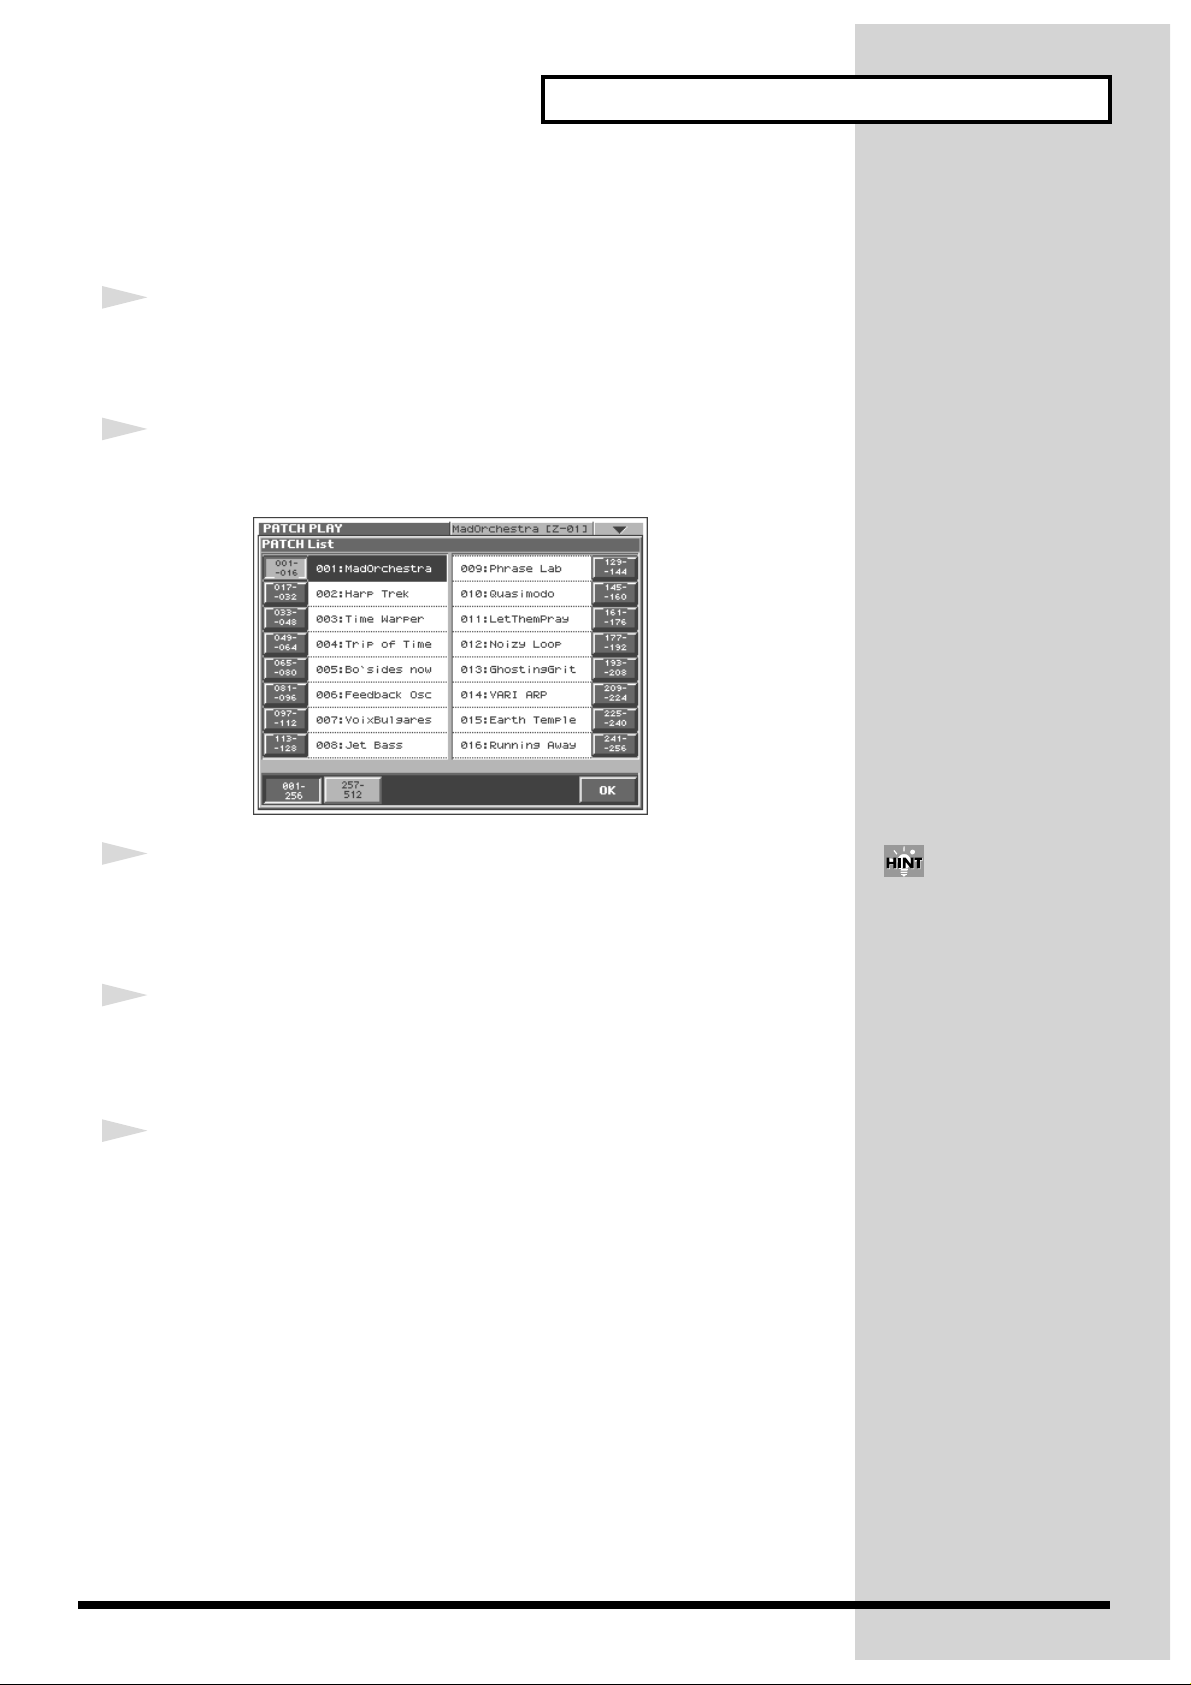
Selecting Patches from the List
You can easily find the desired patch by selecting it from the patch list.
1
Make sure the PATCH PLAY screen is displayed.
If the PATCH PLAY screen—shown below—is not displayed, press [EXIT] once or
twice until the PATCH PLAY screen appears.
2
Touch <List> in the upper left area of the display.
The PATCH List window appears.
fig.Q-06b_60
Try Out the Sounds
3
Select a patch from the list.
Either turn the VALUE dial or use [INC/+] [DEC/-] to select a patch. You can also
select a patch by touching it on the display.
4
To view other patches, touch <017-032>–<241-256>, located at either
side of the screen. To view higher-numbered patches, touch <257512>, located at the bottom of the screen.
5
Touch <OK>.
The patch is selected and the PATCH List window closes.
If you select a patch in the list
and play the keyboard, the
selected patch will sound. This
is a useful way to audition the
sound of a patch.
9
Page 10
Try Out the Sounds
Selecting Favorite Patches (Patch Palette)
If your favorite, frequently used patches are registered in the Patch Palette, you can
select them instantly by simply pressing NUMBER [1]–[8].
fig.Q-06c
1
Make sure the PATCH PLAY screen is displayed.
2
Press NUMBER [1]–[8] to select a patch.
3
To switch between patch palette banks, hold down [BANK] and press
NUMBER [1]–[8].
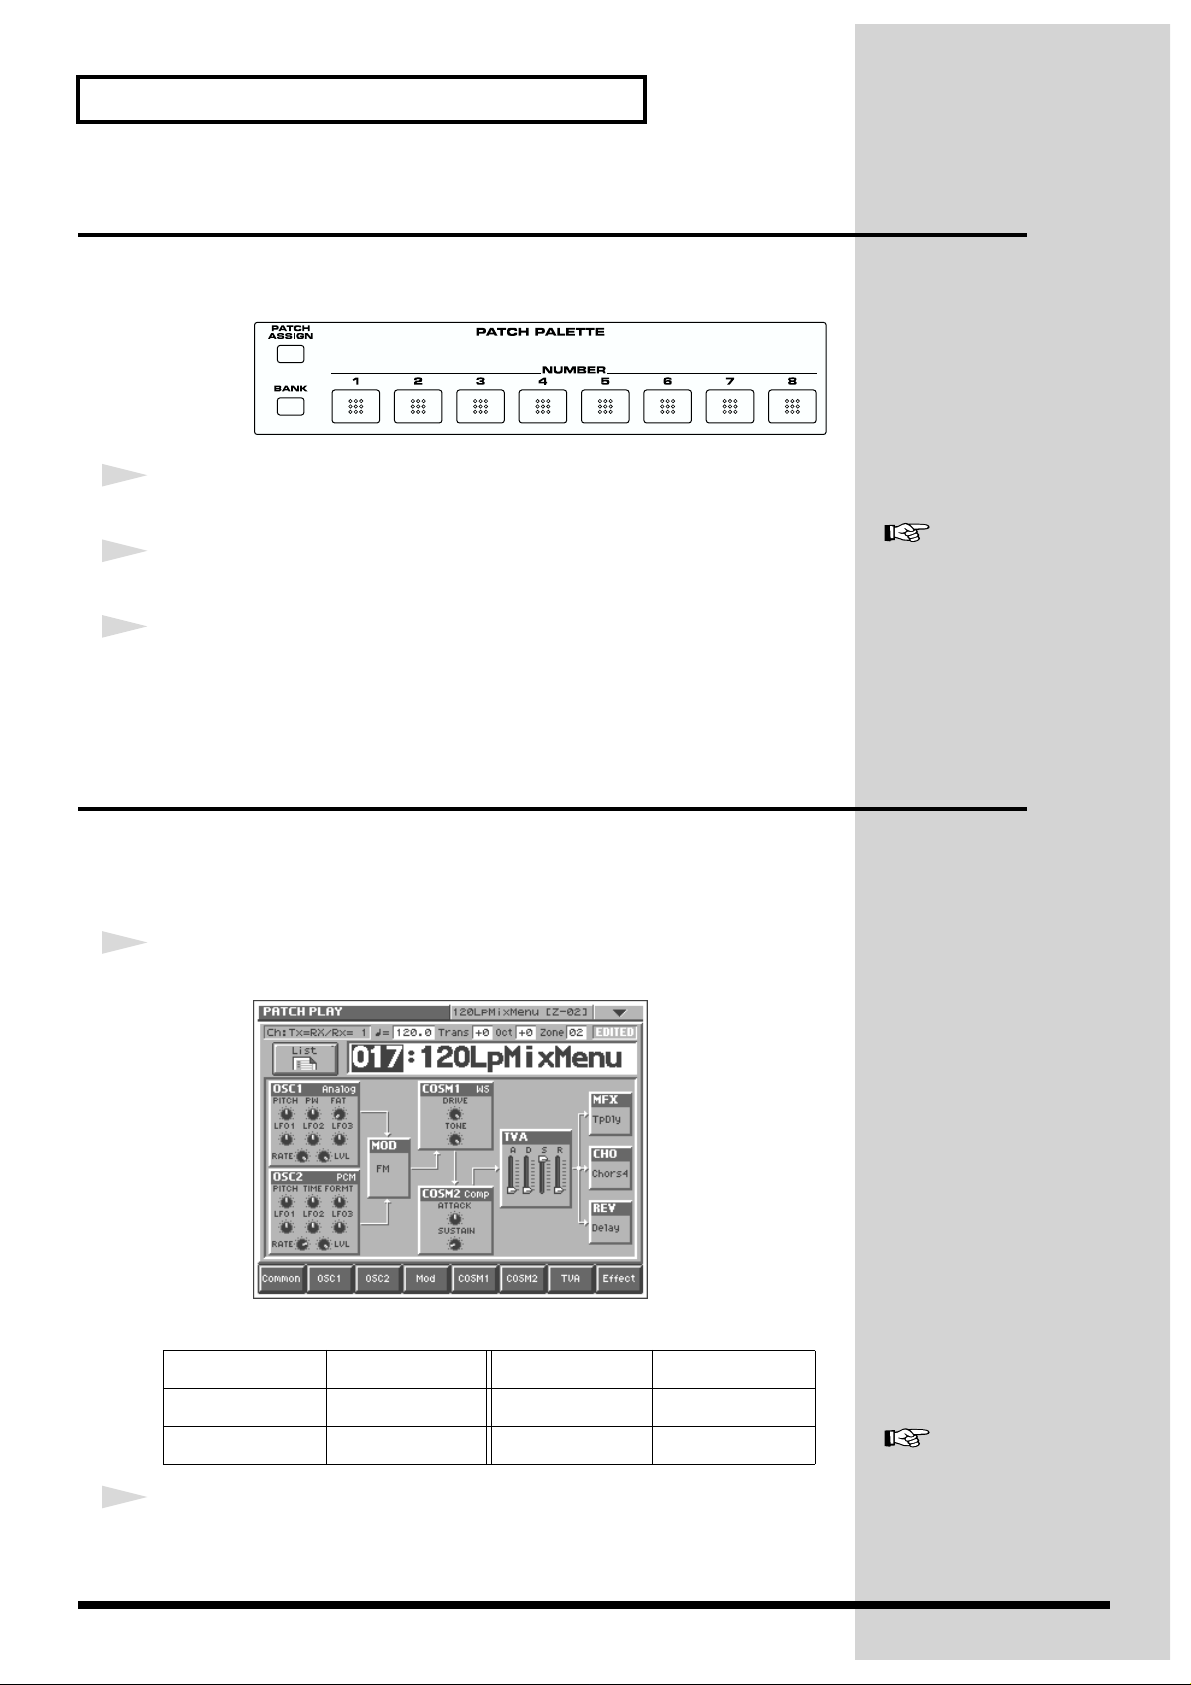
Playing Different Sounds in Separate Areas of the Keyboard (Split Patch)
Patches in which different sounds play in different zones of the keyboard are called
split patches .
Let’s select Patch “017 120LpMixMenu,” a split patch.
1
Select Split Patch “017 120LpMixMenu” (p. 8).
fig.Q-07_60
For instructions on how to
register a favorite sound in the
patch palette, refer to
“Registering a Favorite
Patch (Patch Palette)”
(Owner’s Manual; p. 35).
10
In this patch, the key range settings are:
Zone 1 C-1–C4 Zone 4 F4
Zone 2 C#4–D4 Zone 5 F#4–G4
Zone 3 D#4–E4 Zone 6 G#4–G9
2
Play the keyboard and listen to the sound.
You can hear that different sounds are played in each zone (keyboard area).
For details on creating a split
patch, refer to “Splitting the
Keyboard to Play Different
Sounds (Split)” (Owner’s
Manual; p. 52).
Page 11

Try Out the Various Performance Features
The V-Synth is equipped with a variety of powerful performance features that can
raise your musical expressiveness to new levels. These include the Time Trip Pad,
the D Beam controller, and the Arpeggiator. Take a moment to try out some of the
V-Synth’s performance features.
Manipulating Sounds with the Time Trip Pad
You can apply a variety of effects to the sound simply by touching your fingertip to
the Time Trip Pad located at the left side of the front panel.
Let’s select Patch “023 TimeTripRun,” a patch that makes use of the Time Trip Pad,
and try it out.
1
Select Patch “023 TimeTripRun” (p. 8).
fig.Q-08_60
This patch lets you hear how the Time Trip effect can change the sound.
2
While playing the keyboard, move your finger in a circle on the Time
Trip pad.
The playback speed of the sound will speed up if you move your finger rapidly in a
clockwise direction, and will slow down if you move your finger more slowly. If you
move your finger in a counter-clockwise direction, the sound will play backward. If
you stop moving your finger, the sound will stop at that location.
fig.Q-09
What is the Time Trip
function?
One of the advantages of variphrase is that the playback
location and speed of the wave
can be changed in real time.
The Time Trip function takes
advantage of this ability to
manually control the playback
location and speed of the
wave. In patches that use variphrase, switch the Time Trip
Pad function to “TIME TRIP”
to use this function. While
playing the keyboard, touch
the Time Trip pad and the
currently sounding wave will
stop at the current playback
location. Then as you move
your finger from that point in a
circle, the wave playback will
advance in the direction of
conventional playback
(clockwise), or the reverse
(counterclockwise). Unlike
“scratching” on a turntable,
this lets you control the
playback without affecting the
pitch, so you can play the
sound at the pitch you specify
from the keyboard.
You can use the D Beam
controller to produce similar
results.
For details regarding
VariPhrase, refer to “What is
VariPhrase?” (Owner’s
Manual; p. 11).
11
Page 12

Try Out the Various Performance Features
b
3
While playing the keyboard, lightly touch your fingertip at the
circumference of the Time Trip Pad, and move your finger toward the
center.
Notice how the sound changes.
fig.Q-09a
Time Trip Pad settings are
saved with each patch. This
means that you can create the
est Time Trip Pad settings for
each patch.
For details on using the Time
Trip Pad, refer to
an Effect by Touching Your
Finger to the Pad (Time Trip
Pad)”
(Owner’s Manual; p. 28).
“Applying
Moving Your Hand Above the D Beam Controller to Apply Effects
You can apply various effects to the currently selected patch by simply moving your
hand over the pair of D Beam controllers at the left side of the display.
Let’s select Patch “007 VoixBulgares,” a patch that makes use of the D Beam
controllers, and try it out.
1
Select Patch “007 VoixBulgares” (p. 8).
fig.Q-10_60
The D Beam controller can be
used simply by waving your
hand over it. It can be used to
apply various effects,
depending on the function that
is assigned to it.
The D BEAM [ASSIGNABLE] indicator lights, and the D Beam controllers turn on.
12
Page 13

Try Out the Various Performance Features
b
fig.Q-11.e
Left Right
In this patch, the D Beam controllers are assigned to control the following
parameters.
Left: Vocal pitch
Right: Vocal character (formant)
2
Move your hand up and down slowly over each D Beam controller as
you play the keyboard.
fig.Q-12
The D BEAM indicator lights
when the D Beam controller is
responding. The D BEAM
indicator doesn’t light if you’re
outside the valid range of the
D Beam controller.
Bring your hand down above the left D Beam controller, and the pitch (vocal pitch)
of the oscillator 1 goes down. Bring your hand down above the right D Beam
controller, and the formant (vocal character) of the oscillator 2 changes. Moving your
hand over both the left and right D Beam controllers affects the pitch and formant
simultaneously.
3
To turn off the D Beam controllers, press the button whose indicator
is lit—[ASSIGNABLE] in this case—so its indicator turns off.
4
To change the behavior of the D Beam controllers, press the button
whose indicator isn’t lit—in this case, a button other than
[ASSIGNABLE]—so the indicator of that button lights.
In addition to ASSIGNABLE (an effect that can be specified for each patch), the D
Beam can operate in any of the following modes.
[TIME TRIP]: Time Trip mode
[TIME]: Time Control mode
[PITCH]: Pitch Control mode
D Beam controller settings are
saved with each patch. This
means that you can create the
est D Beam settings for each
patch.
For details on using the D
Beam controller, refer to
“Applying an Effect by
Passing Your Hand Over the
D Beam (D Beam
Controller)” (Owner’s
Manual; p. 29).
13
Page 14

Try Out the Various Performance Features
Using Knobs to Modify the Sound in Realtime (Assignable Controller)
By turning the ASSIGNABLE CONTROL knobs while you play, you can control the
various functions that’ve been assigned to them.
Let’s select Patch “027 Synapse 1” and try out the assignable controllers.
1
Select Patch “027 Synapse 1” (p. 8).
fig.Q-13_60
In this patch, the assignable controllers affect the following parameters.
[C1]: Formant/Pitch
[C2]: Time
2
While playing the keyboard, play with the ASSIGNABLE CONTROL
knobs. For example, try turning [C1].
fig.Q-14
Turn [C1] toward the right, and hear how the tone changes and the pitch rises.
The assignable controller
settings are saved with each
patch. This means that you can
create the best assignable
controller settings for each
patch.
14
For details on using the
assignable controllers, refer to
“Applying an Effect by
Turning a Knob (Assignable
Controller)” (Owner’s
Manual; p. 30).
Page 15

Try Out the Various Performance Features
Playing Arpeggios (Arpeggiator)
The V-Synth provides an automatic arpeggio function (Arpeggiator). When you turn
on the arpeggiator and play the keyboard, arpeggios are produced automatically.
For example, if you press the keys of a C major chord, the V-Synth arpeggiates the
chord as C → E → G → C → E → G...
fig.Q-15
C4E4G4
E4 G4
C4
Let’s select Patch “002 Harp Trek,” a patch that makes effective use of the
Arpeggiator, and try the feature out.
1
Select Patch “002 Harp Trek” (p. 8).
fig.Q-16_60
The arpeggiator will turn on, and the ARPEGGIO [ON/OFF] indicator will light.
Since this patch is set to Arpeggiator Hold, the [HOLD] indicator will also light.
2
Play the keyboard.
The V-Synth arpeggiates what you’ve played. The arpeggio continues sounding
even after you take your hand off the keyboard—this demonstrates the
Arpeggiator’s Hold feature.
C4
E4 G4
C4
E4
3
To change the playback tempo of the arpeggiator, turn ARPEGGIO
[TEMPO].
Turning the knob toward the right makes the tempo faster, and turning it toward the
left makes the tempo slower.
fig.Q-16a
15
Page 16

Try Out the Various Performance Features
b
4
To finish listening to the arpeggio, press ARPEGGIO [ON/OFF] again
so its indicator turns off.
fig.Q-17
Arpeggiator settings can be
saved with each patch. This
means that you can create the
est arpeggio settings for each
patch.
For details on using the
Arpeggiator, refer to “Playing
Arpeggios (Arpeggiator)”
(Owner’s Manual; p. 24).
16
Page 17

Other Performance Features
Other performance functions include the following. Select various patches, and try
out these functions.
Velocity/Aftertouch
The force with which you play the keyboard, or the “velocity” with which you play,
can affect the volume or timbre of a sound. Aftertouch—downward pressure you
apply to a key after playing a note—can also affect the sound.
fig.Q-18
Pitch Bend/Modulation Lever
While playing the keyboard, move the lever to the left to lower the pitch of the
currently selected patch, or to the right to raise its pitch. This is known as pitch bend.
You can also apply vibrato and so on by gently pushing the lever away from you.
This is known as modulation.
If you push the lever away from you and at the same time move it to the right or left,
you can apply both effects at once.
fig.Q-19.e
Try Out the Various Performance Features
Transpose
To modify the pitch range of the keyboard in semitone steps (-5– +6 semitones), press
[TRANSPOSE] so its indicator lights. Set the desired amount of transposition by
holding down [TRANSPOSE] and pressing [+OCT] or [-OCT].
fig.Q-21
ModulationPitch Bend
For details, refer to
“Transposing the Keyboard
in Semitone Steps
(Transpose)” (Owner’s
Manual; p. 22).
17
Page 18

Try Out the Various Performance Features
Octave Shift
Pressing [+OCT] or [-OCT] transposes the pitch of the keyboard in 1 octave units
(-3– +3 octaves).
fig.Q-20
Hold Pedal
If an optional pedal switch (DP series) is connected to the rear panel HOLD PEDAL
jack, you can press the pedal switch to cause notes to sustain or “hold” even after
their keys have been released.
fig.Q-22
For details, refer to
“Transposing the Keyboard
in Octave Units (Octave
Shift)” (Owner’s Manual; p.
23).
Control Pedal
If an optional expression pedal (EV-5, etc.) is connected to the rear panel CTRL 1 or
the CTRL 2 PEDAL jack, you can use the pedal to control the volume or timbre of
sounds you play.
fig.Q-23
Roland
Use only the specified
expression pedal (EV-5; sold
separately). By connecting any
other expression pedals, you
risk causing malfunctions
and/or damage to the unit.
You can set how the sound of
each patch changes when you
press an expression pedal. For
details, refer to “Pedal 1, 2
Assign” (Owner’s Manual; p.
79).
18
Page 19

Creating a Patch
This chapter explains the steps for creating a patch on the V-Synth. To create sounds,
you will mainly use the buttons and knobs that are in the right half of the panel.
Initializing Patch Settings
First we will return the settings of the currently selected patch to a standard set of
values.
1
Make sure that the PATCH PLAY screen is displayed.
2
Touch <▼> in the upper right of the screen.
A pulldown menu appears.
fig.Q-24_60
3
Touch <PATCH Name> in the pulldown menu.
A window like the following appears.
fig.Q-25_60
4
Touch <EXECUTE>.
The initialization will be carried out, and you’ll be returned to the PATCH PLAY
screen.
19
Page 20

Creating a Patch
Selecting a Structure Type
The sounds of the V-Synth are produced by six elements (sections). Here’s how to
select the Structure Type, which determines how these elements are combined.
Section name Function
OSC1, OSC2 This section generates the sound on which a
patch is based. The sound is produced either by
built-in preset waves or sampled waves, or by
calculating an analog modeling waveform. An
external audio input source can also be used.
MOD This section mixes and modulates the two audio
signals.
COSM1, COSM2 This section applies a wide variety of processing
including filtering. This differs from the effects
in that effects are applied to the final mix of the
sound, COSM is applied to each individual note.
TVA This section creates time-variant changes in vol-
ume, and sets the pan position.
1
Press STRUCTURE [1]–[3] to select a structure type.
Structure Type Description
This is the most conventional structure on the VSynth. The sounds from OSC1 and OSC2 are
mixed by MOD, processed by COSM1 to shape
their tonal character (e.g., using SBF), and then
sent through COSM2 for additional tonal refinement (e.g., using TVF).
This structure connects OSC1 and OSC2 asymmetrically. This is effective when using a modulation that has the modulator set to anything
other than “MIX.” Typically, you will use OSC1
and COSM1 to create the basic sound, then select
the OSC2 sound and MOD settings to add variation, and finally select TVF in COSM2 to adjust
the tone.
In this structure, OSC1 is paired with COSM1,
and OSC2 is paired with COSM2. You can use a
controller such as the Time Trip Pad to morph
between the sound created by OSC1 and COSM1
and the sound created by OSC2 and COSM2.
When you select a structure
type, its buttons light on the VSynth’s front panel.
20
Page 21

Switching Each Section On/Off
After deciding on the structure type to use, you can switch each section within that
structure on or off as desired.
1
Within the currently selected structure, turn the buttons of each
section on (indicator lit) or off (indicator not lit), depending on
whether or not you want to use that section.
fig.Q-26
For example if “OSC1” and “OSC2” are both off, there will be no sound-producing
section, and no sound will be output.
The on/off setting of each section is also shown in the PATCH PLAY screen. Section
names shown in white characters are on, and those displayed in black characters are
off.
fig.Q-27.e
Creating a Patch
On
Off
21
Page 22

Creating a Patch
Setting Up the Oscillators (OSC1/2)
The oscillator sections produce the original sound, either by playing back an internal
PCM wave or a sampled wave, or by generating an analog modeling wave.
Selecting a Wave
1
Make sure that the PATCH PLAY screen is displayed.
2
In the lower part of the screen, touch <OSC1> (or <OSC2>).
A screen like the following appears. If a different screen appears, touch the <OSC
Type> tab at the left side of the screen.
fig.Q-28_60
fig.Q-29_60
Analog oscillator
PCM oscillator
22
3
Touch either <ANALOG> or <PCM> to select the type of oscillator.
4
In the Waveform area, select the wave you wish to use.
Make your selection while playing the keyboard to hear the sounds.
Page 23

Modifying the Volume and Sound
1
While playing the keyboard, turn the following knobs to adjust the
character of the sound.
fig.Q-30
Knob
Creating a Patch
Depending on the encoding
type of the PCM wave,
Formant may have no effect.
For details, refer to “Selecting
the Encoding Type” (Owner’s
Manual; p. 70).
Functions when
using the PCM oscillator
Functions when
using the analog
oscillator
2
Turn [LEVEL] to adjust the volume.
fig.Q-31
Modifies the pitch. TIME: Modifies
the playback
speed.
PW: Modifies the
pulse width.
FORMANT: Modifies the formant
(vocal character).
FAT: Modifies the
richness of the
sound.
Depending on the type of the
analog wave, PW or FAT may
have no effect. For details,
refer to “Modifying
Waveforms (OSC1/OSC2)”
(Owner’s Manual; p. 42).
For more about the oscillator
settings, refer to “Modifying
Waveforms (OSC1/OSC2)”
(Owner’s Manual; p. 42).
23
Page 24

Creating a Patch
Mixing/Modulating Two Sounds (Mod)
The Modulator mixes and modulates the two audio signals.
Selecting a Modulator Type
1
In the lower part of the screen, touch <Mod>.
A screen like the following appears.
fig.Q-32_60
2
In the Modulator Type area, select the modulator type you wish to use.
Modulator Type Description
MIX Add OSC1 and OSC2.
RING Use OSC2 to apply ring modulation to OSC1.
FM Use OSC2 to apply FM (frequency modulation) to OSC1.
ENV RING Use the envelope of OSC2 to control the volume of OSC1.
OSC SYNC Synchronize the output waveform of OSC1 to the output
waveform of OSC2.
Applying COSM Modeling to Oscillators (COSM1/2)
The COSM sections modify the sound in various ways, including filtering the sound.
COSM differs from the Effects section in that while Effects are applied to the final
mix of the sound, COSM is applied individually to each note.
OSC SYNC is valid only when
OSC2 is an analog oscillator.
For more about the modulator
settings, refer to “Mixing/
Modulating Two Sounds
(Mod)” (Owner’s Manual; p.
46).
Selecting a COSM Type
1
In the lower part of the screen, touch <COSM1> (or <COSM2>).
24
Page 25

A screen like the following appears.
fig.Q-32a_60
2
Press the desired COSM type button to select the form of COSM.
Make your selection while playing the keyboard to hear the sounds.
Modifying the Sound
Creating a Patch
1
While playing the keyboard, turn the following knobs to modify the
sound.
fig.Q-33
Knob SBF TVF others
WIDTH: If the SBF
(Side Band Filter) is
selected, this knob
adjusts the width of
the filter.
DETUNE: If the SBF
(Side Band Filter) is
selected, this knob
adjusts the detuning.
CUTOFF: If TVF is
selected, this knob
adjusts the cutoff frequency.
RESO: If TVF is selected, this knob adjusts the resonance.
P1: This knob offers
realtime control of selected parameters in
other COSM types.
P2: This knob offers
realtime control of selected parameters in
other COSM types.
For more about COSM
settings, refer to “Applying
Various Effects to Each Note
You Play (COSM1/COSM2)”
(Owner’s Manual; p. 46).
25
Page 26

Creating a Patch
Shaping a Sound’s Volume Over Time (TVA)
You can adjust the way in which the patch’s volume changes over time, or modify
the attack or decay of the sound.
1
In the lower part of the screen, touch <TVA>.
A screen like the following appears.
fig.Q-34_60
2
Use the TVA sliders located in the lower right of the panel to adjust
the shape of each note’s volume.
“ENVELOPE” in the lower right of the screen shows a graphical representation of
the envelope produced by the current settings.
fig.Q-34a
Slider Function
[A] Attack Time
Sets the time required for the volume of each note to reach its peak. This
time increases as you raise the slider.
[D] Decay Time
Determines the time it takes for the note’s volume to drop from its peak
to its sustain level. If the sustain level is at its maximum, this has no effect.
26
[S] Sustain Level
Determines the level at which the volume is maintained after the peak
has been reached. As long as you continue to press a key on the keyboard,
its note keeps sounding at this level.
[R] Release Time
Sets the time it takes for a note’s volume to reach zero after you release
your finger from a key on a keyboard.
Page 27

For example, if you shorten a note’s attack time and lengthen its release time, the
note’s volume may be shaped like a note on a piano. If the sustain level is at
maximum, it may sound like an organ, and if the attack time is long, it may sound
like a string section.
Adding the V-Synth Effects
Since the V-Synth effects have such a profound impact on its sounds, turn them on
to listen to the sound itself so you can better evaluate the changes you’re making.
Actually, sometimes just changing effects settings can give you the sound you want.
Three separate effects are always available in the V-Synth. You can independently
edit each effect’s settings.
Creating a Patch
For details about volume
settings, refer to “Adjusting
the Volume and Pan (TVA)”
(Owner’s Manual; p. 47).
MFX
(Multi-Effects)
Chorus Chorus adds a sense of depth and spaciousness to
Reverb Reverb adds ambience that emulates the sound of vari-
The V-Synth contains 41 different multi-effects, including distortion and a rotary-speaker simulation.
patches.
ous physical spaces, such as concert halls or auditoriums.
For details about effect
settings, refer to “Setting
Effects for a Patch (Effect)”
(Owner’s Manual; p. 50).
27
Page 28

Creating a Patch
Saving Patches You’ve Created
When you edit the settings of a patch, the PATCH PLAY screen displays <EDITED>
to remind you that the patch’s settings have been modified. If <EDITED> is
displayed, you will lose your edited patch settings if you switch to another patch or
turn off the power. If you want to keep a patch whose settings you have edited,
assign a name to the patch and then perform the Save operation.
fig.Q-36
Naming Patches (PATCH Name)
Before you save your patch, give it a new name as follows.
1
Make sure that the patch you want to name is selected.
2
Touch <▼> in the upper right of the screen.
A pulldown menu appears.
fig.Q-37_60
28
Page 29

3
Touch <PATCH Name> in the pulldown menu.
The PATCH Name window appears.
fig.Q-38_60
4
Enter a name into the text box by touching the desired characters. For
this example, let’s enter “My Patch1” as the currently selected patch’s
name.
Creating a Patch
4-1. Touch <Clear> to erase all characters from the text box.
4-2. Touch <SHIFT> to turn it on, and then touch <M> to enter a capital
“M.”
4-3. Touch <SHIFT> to turn it off, and then touch <y> to enter a lower-
case “y.”
4-4. Touch <→> to move the cursor one character to the right.
4-5. Touch <SHIFT> to turn it on, and then touch <P> to enter “P.”
4-6. Touch <SHIFT> to turn it off, and then successively touch
<a><t><c><h><1>.
7
When you’ve finished entering the name, touch <OK> to close the
PATCH Name window.
29
Page 30

Creating a Patch
Saving Patches (PATCH Write)
After you have assigned a name to the patch, save it in patch number 512.
1
Make sure that the patch you want to save is selected.
2
Touch <▼> in the upper left area of the display.
A pulldown menu appears.
fig.Q-38a_60
3
Touch <PATCH Write> in the pulldown menu.
The PATCH Write window appears.
fig.Q-39_60
4
To select the memory location in which the patch is to be saved, turn
the VALUE dial to select 512.
5
Touch <Execute>.
When shipped from the
factory, the V-Synth already
contains a collection of
patches. When you save your
own patches, you replace the
factory patches. If you wish to
restore the original patches,
use the Factory Reset operation
(Owner’s Manual; p. 98).
30
Page 31

Turning Off the Power
1
Before you turn off the power, consider these two questions:
• Have the volume controls for the V-Synth and all connected audio devices been
turned to their lowest settings?
• Have you saved your V-Synth sounds or other data you’ve created? (p. 30)
2
Turn off the power for all connected audio devices.
3
Turn off the POWER switch located on the rear panel of the V-Synth.
fig.Q-02.e
Creating a Patch
ON OFF
31
Page 32

03126801 ’02-12-A3-11N
 Loading...