

Page 1
Screen reference
This chapter provides screen-by-screen explanations of all the functions available in VProducer.
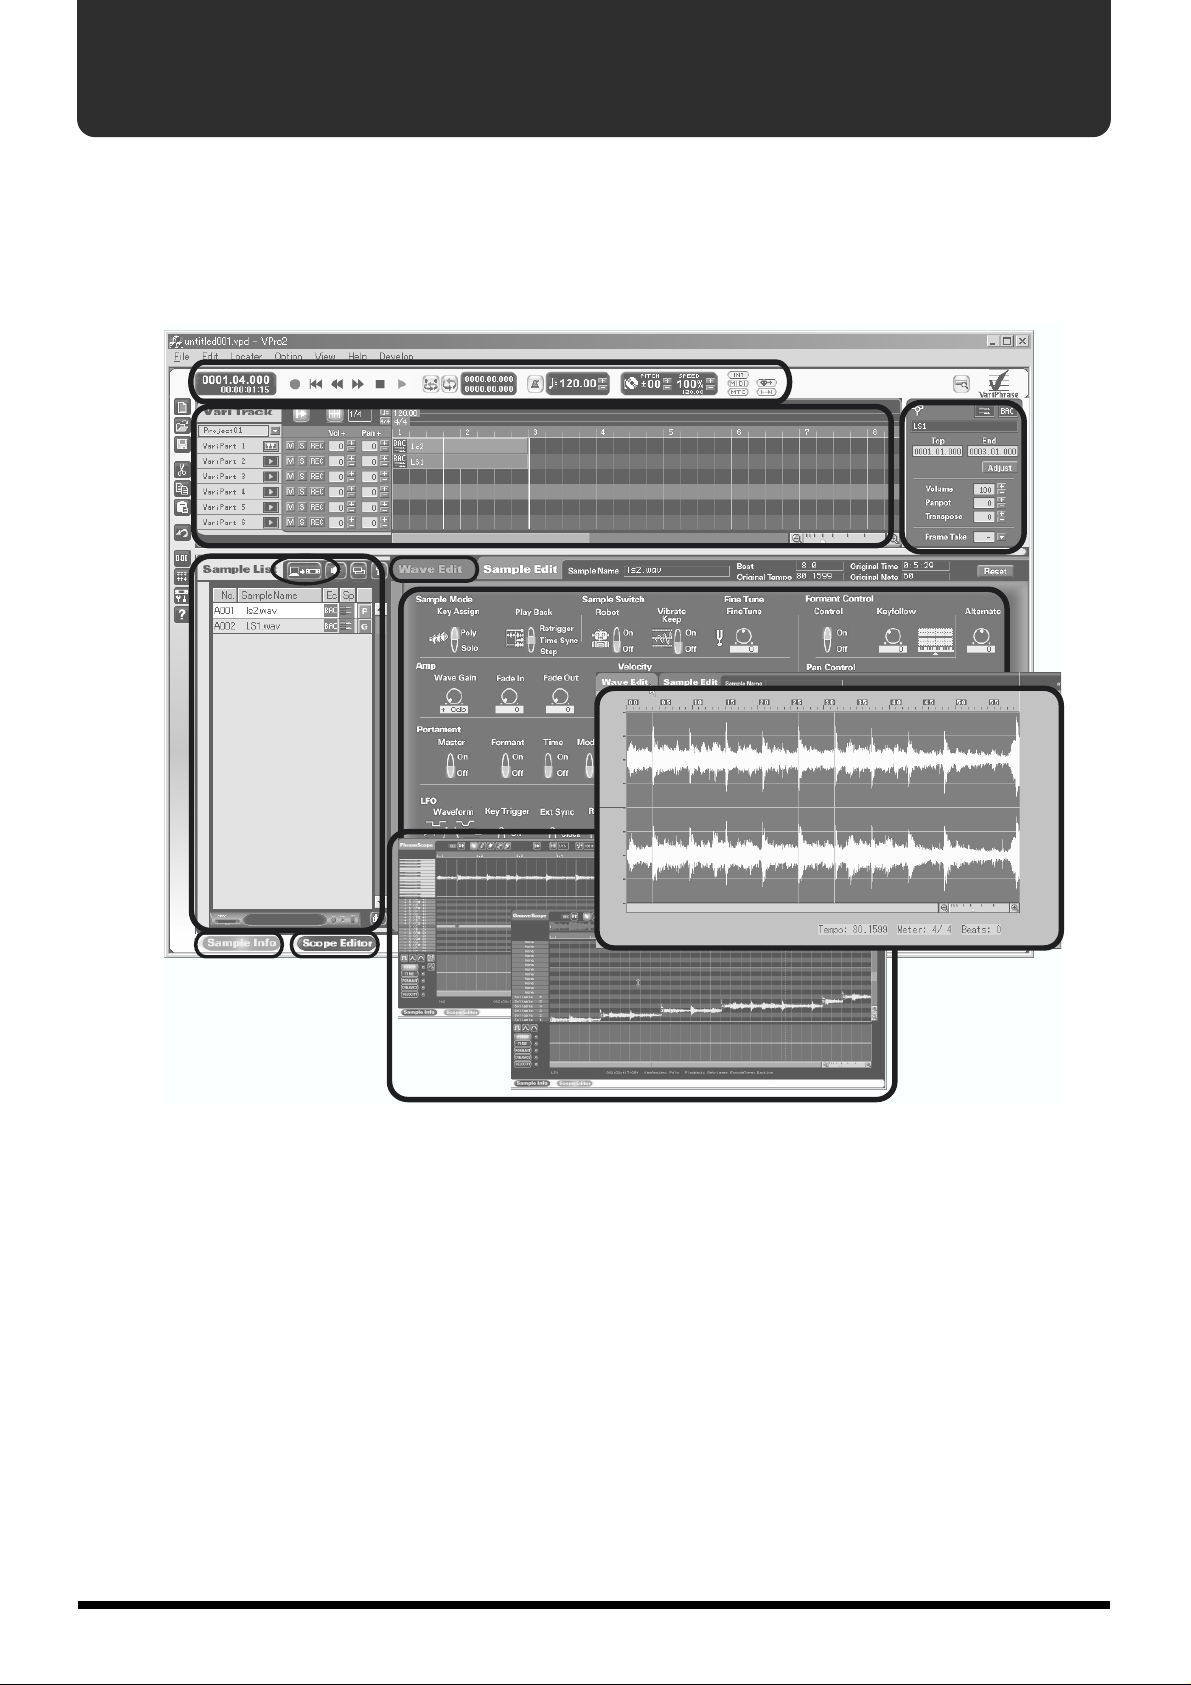
V-Producer screen
fig.01-all
A
E
b'
B
d
C
F
D
b
g
G
A. Locator (p. 29)
The locator contains functions for controlling the playback of V-Producer, such as song play/
stop.
B. Sample List (p. 3)
Sample List displays a list of the samples that are loaded into the VariOS. To load a sample into
the VariOS, press the [b’] (Load Wave Files) button (p. 5) and load a wave file (.wav or aiff) from
your computer. At this time the wave file will automatically be converted (encoded) into a
format that allows VariPhrase processing to be used.
The samples shown in the sample list can be played directly from your MIDI keyboard. You can
also drag and drop them to arrange them in the Vari Track.
To display the Sample List, click the [b] (Sample Info) button located at the bottom of the screen.
C. Sample Edit (p. 15)
Sample Edit lets you set various parameters for the samples in the sample list. These settings
determine how the sample will sound.
To display Sample Edit, click the [b] (Sample Info) button located at the bottom of the screen.
1
Page 2
2
Screen reference
D. Wave Edit (p. 7)
Wave Edit lets you re-encode samples from the sample list (e.g., to change their encoding type
or modify the tempo data).
To display Wave Edit, click the [b] (Sample Info) button located at the bottom of the screen, and
then click the [d] (Wave Edit) tab.
E. Vari Track (p. 33)
Vari Track is the basic screen you will use when creating a song. Drag and drop samples from
the sample list to arrange them into a song. Samples that are placed in this way are called
“frames.”
F. Frame Properties (p. 46)
Frame Properties lets you modify the settings (volume, pitch, location, etc.) of a frame in the
Vari Track.
G. Scope Editor (p. 63)
Scope Editor is where you edit playback data for the frames that are placed in the Vari Track.
Here you can edit Pitch, Time, Formant, volume (Dynamics), and notes.
To display the Scope Editor, click the [g] (Scope Editor) button located at the bottom of the
screen, or double-click a frame that has been placed in the Vari Track.
The Scope Editor provides two methods of editing.
• If you want to freely modify the melody by editing the notes of a phrase:
Phrase Scope
[Edits apply to] ..........Green frames that were placed with the sample list Keyboard Map (p. 4)
set to [P].
• If you want to divide a phrase into events and change the playback order:
Groove Scope
[Edits apply to] .......... Purple frames that were placed with the sample list Keyboard Map (p. 4)
set to [G].
Page 3

3
Sample List
●
●
●
●
Screen reference
fig.01-02_50
The Sample List provides a list of all the samples that are loaded
into the VariOS. The samples displayed here can be dragged and
dropped into the Vari Track.
To display the Sample List screen, click the [Sample Info]
button ( ) located at the bottom of the screen.
Display area
This area displays information about the samples loaded into V-Producer.
fig.01-03
No.: the number of the sample within the VariOS
SampleName: the name of the sample
Sample encoding type (shown by an icon)
* For details on the encoding type, refer to “Load Wave Files (Load wave files button)” (p. 5).
To sort the samples, click the title row for the desired field. Click once again
to sort in reverse order.
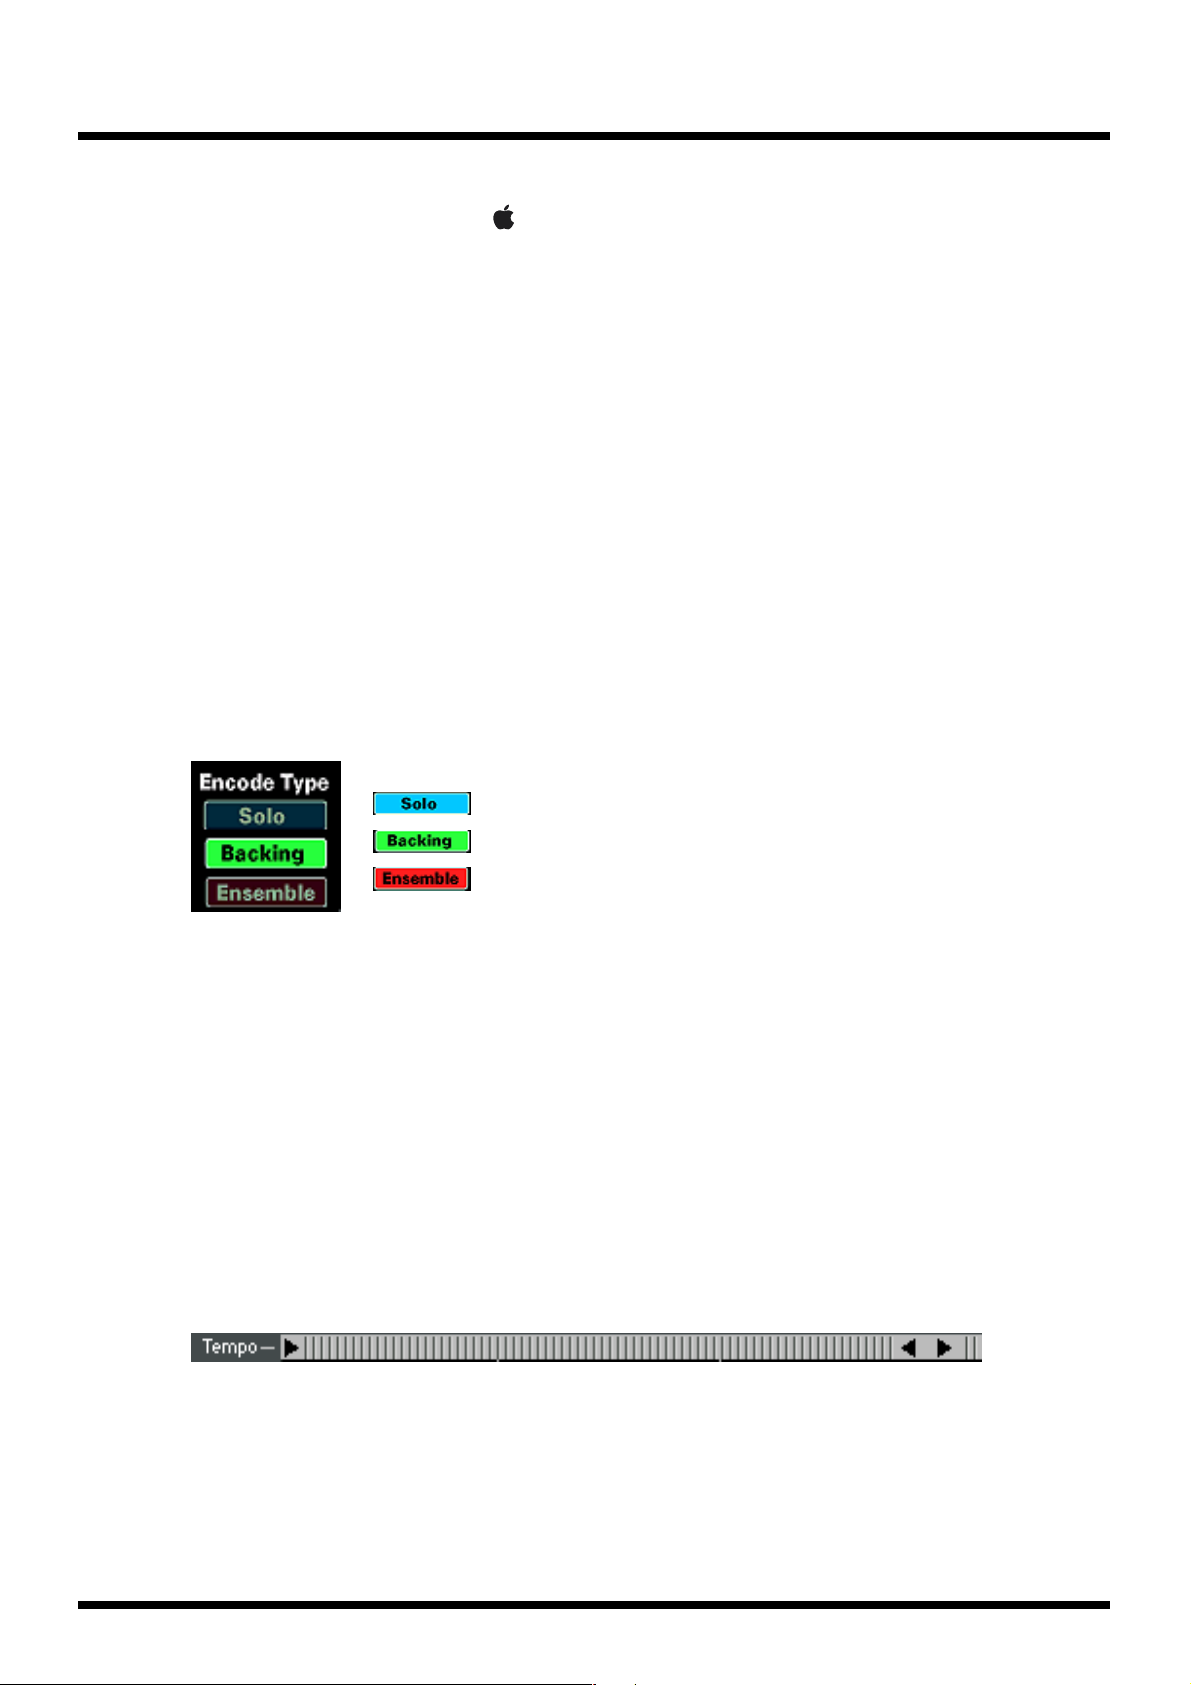
(SOLO) Solo encoding
(BACKING) Backing encoding
(ENSEMBLE) Ensemble encoding
Stereo/mono indication
Stereo sample
Mono sample
Page 4
Screen reference
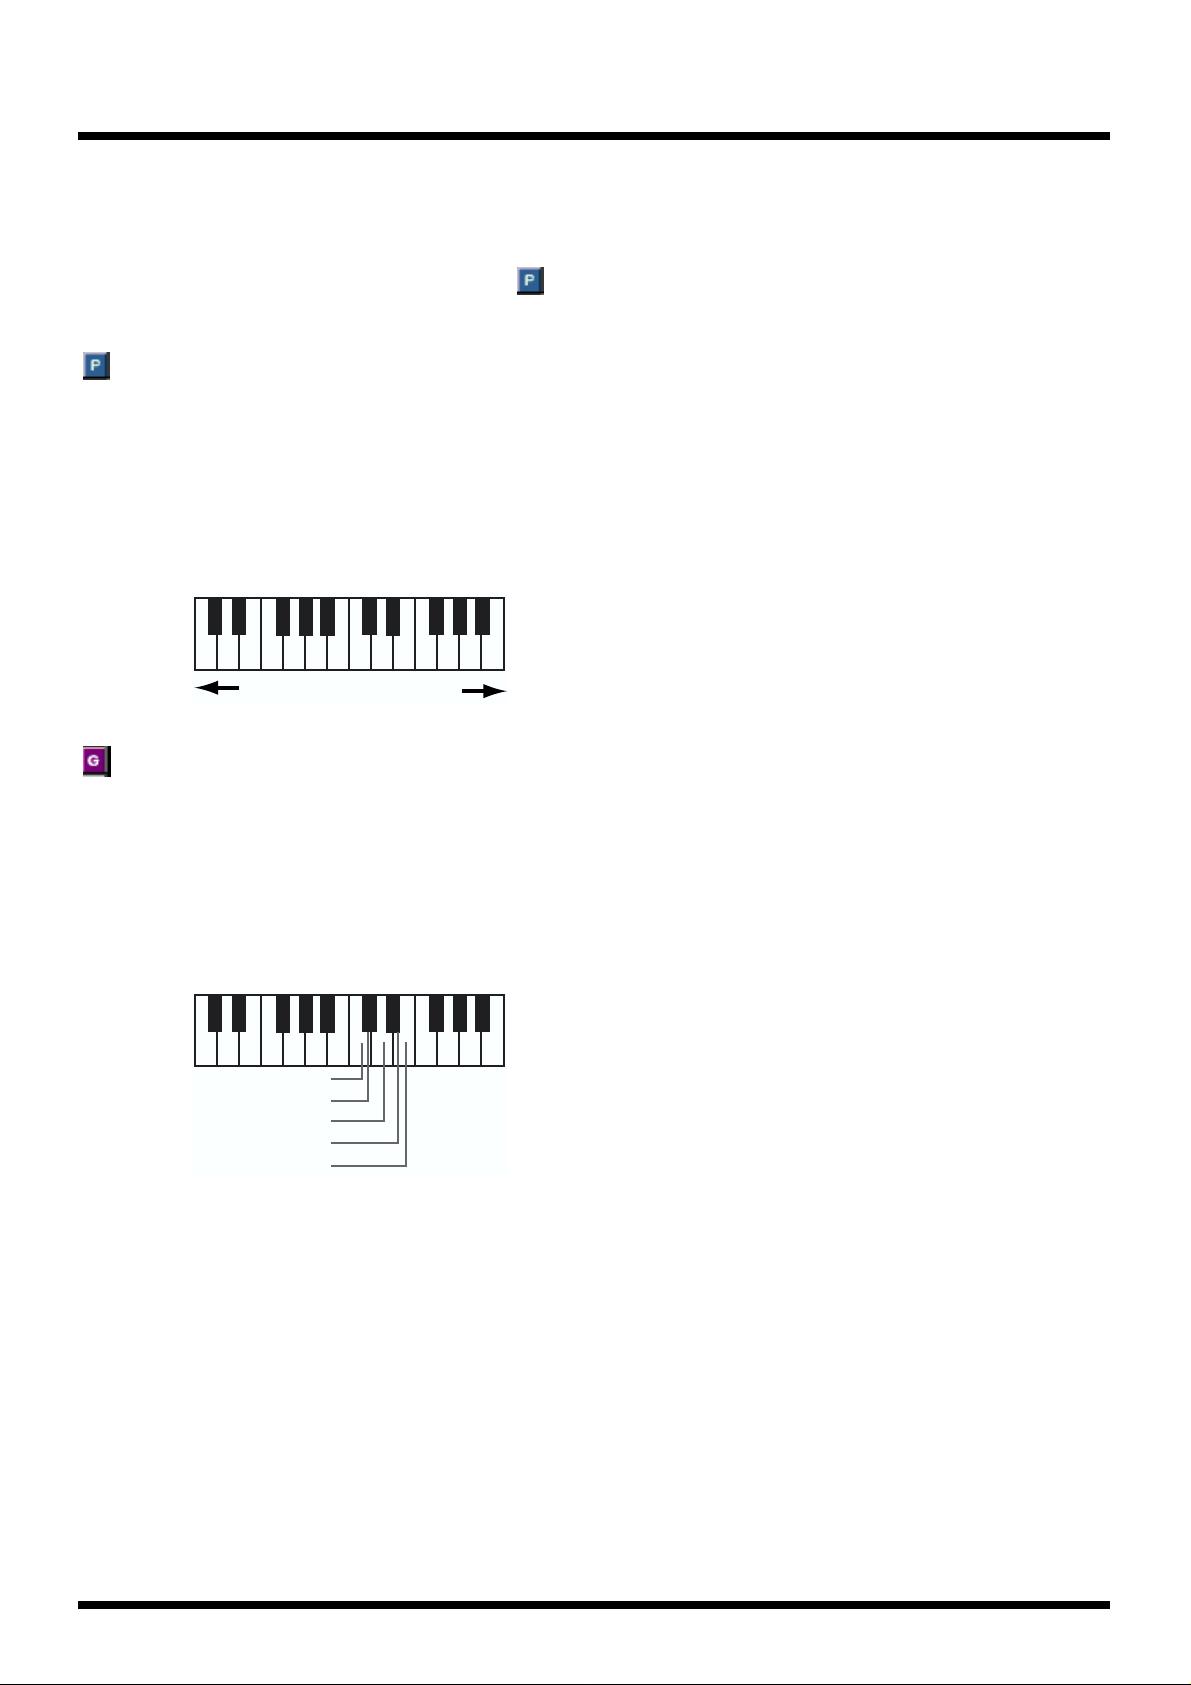
Viewing and switching the keyboard map
“Keyboard Map” is a parameter that specifies how a sample loaded by V-Producer will be
sounded when it is triggered via MIDI. You can select one of the following two modes.
To switch between modes, press the button that is shown at the far right of each sample in
the sample list.
(Phrase Map)
The sample will be sounded at the pitch corresponding to the note number. When you edit a
sample for which this mode is specified, the Phrase Scope will automatically be used for editing
(p. 64).
Samples set to this mode will be displayed as green frames on the Vari Track.
[Example: If the sample is of a voice saying “Here comes VariPhrase,” the pitch will vary
according to the key you play.]
fig.keymap
4
●
"Here comes VariPhrase"
(Groove Map)
The sample will be divided at event locations, and each slice of the waveform will be assigned
to its own note number (in semitone steps from C3). When you edit a sample for which this
mode is specified, the Groove Scope will automatically be used for editing (p. 75).
Samples set to this mode will be displayed as purple frames on the Vari Track.
[Example: If the sample is of a voice saying “Here comes VariPhrase,” each slice of the
waveform will be played by different semitones starting at C3.]
fig.keymap2
"Here"
"comes"
"V a"
"ri"
"Phrase"
Use your MIDI keyboard to try out each map, and listen to the difference
Page 5
5
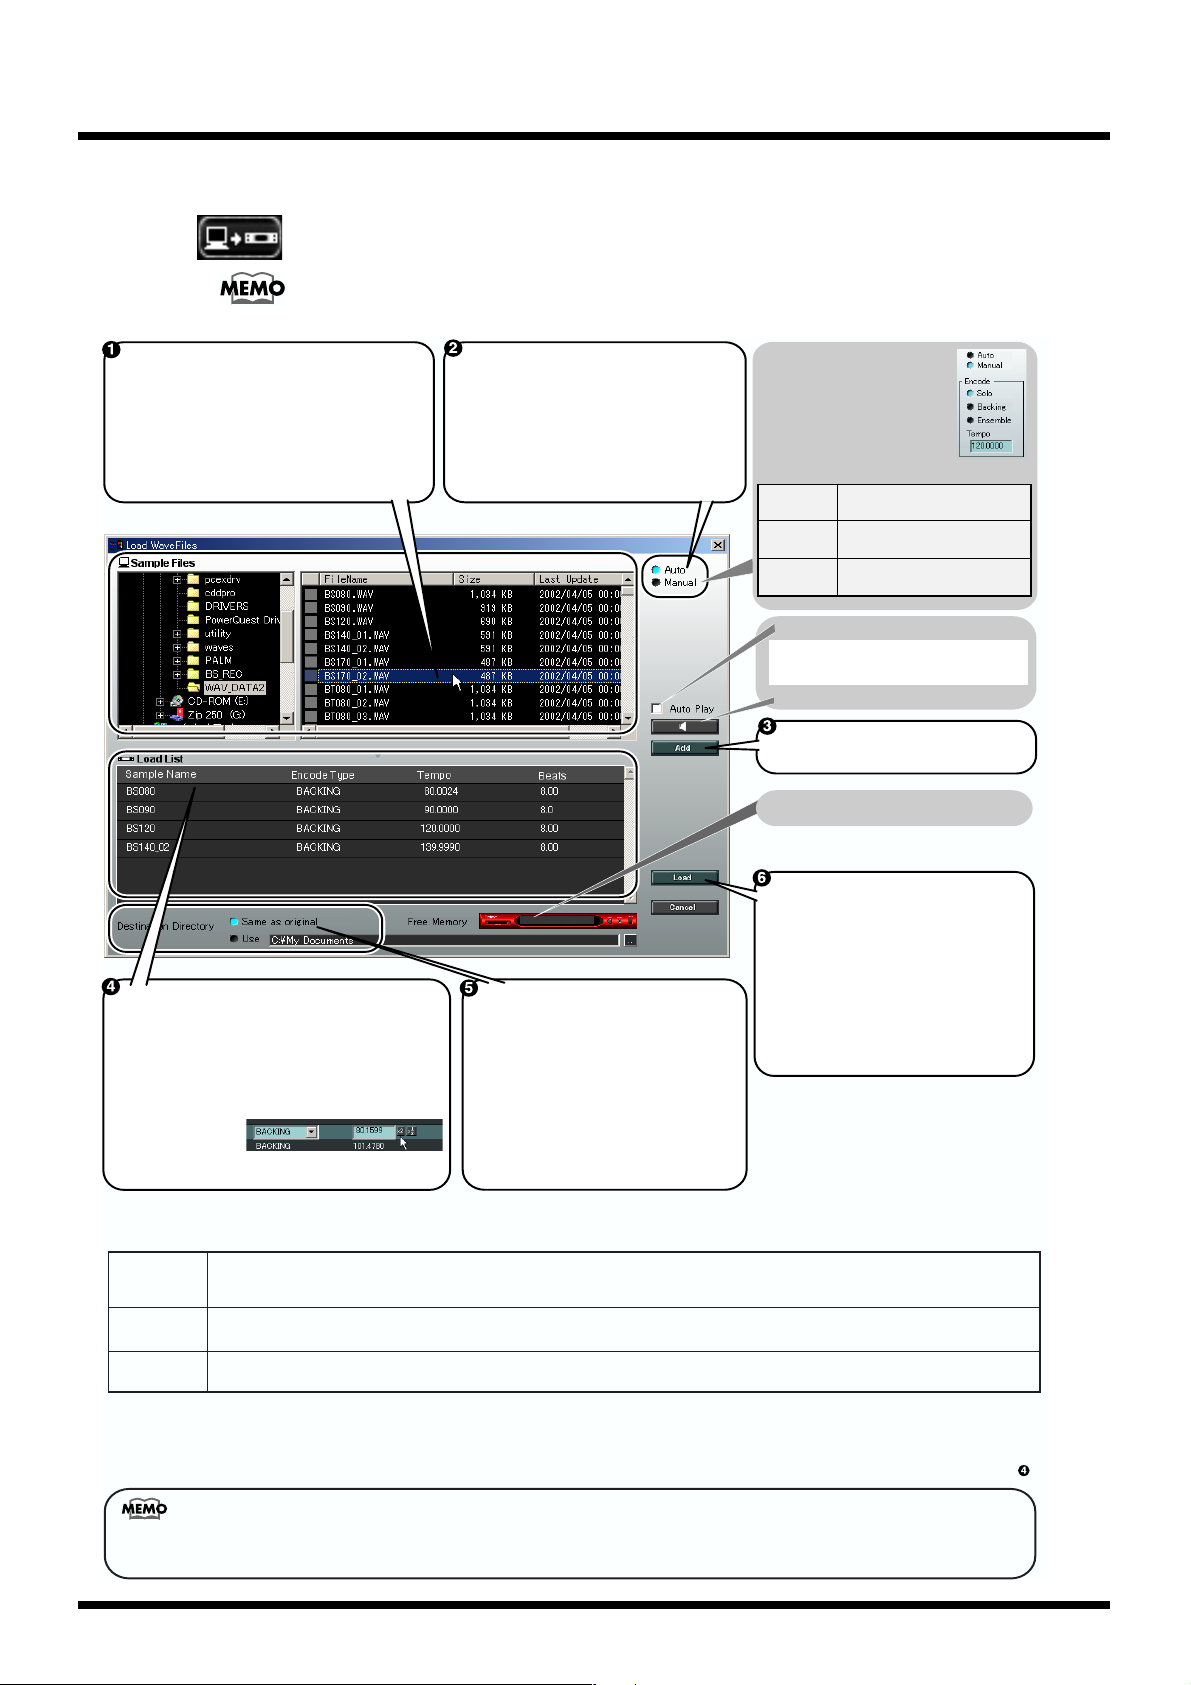
Load Wave Files (Load wave files button)
Here’s how you can load wave files from the hard disk of your computer and send them to
the VariOS. When you execute this command, the Load Wave Files dialog box will appear.
V-Producer is able to load wave files in Wave file format (.WAV), AIFF file format
(.AIF), or VariPhrase format (.VPW).
fig.02-04Loadwavefile
Screen reference
This area shows the wave files that are on your
computer. The wave files within the folder you
selected at the left will be listed at the right.
- Conventional wave files (.wav, .aiff)
- VariPhrase format files (.vpw)
In the list at the right, click the wave file that you
want to load into the VariOS.
* By clicking the headings above the list you can
sort the list in various ways.
This area lists the samples that will be loaded into
the VariOS. The file name, encoding type, tempo,
and number of measures are displayed.
- To delete a sample from the list, right-click the
sample (in Mac OS, [Control]-click) and choose
"Delete." (Pressing the [Delete] key will also delete
the sample.)
- You can change the Encode Type and Tempo of
the sample you selected by clicking it.
* Samples that
have already been
encoded are displayed in light blue. In this case you
will not be able to change the Encode Type or Tempo.
*1 What is encoding?
To make it possible for you to make realtime changes in the pitch, time, and formant of the samples used by
the VariOS, the wave data must be "encoded." There are three encoding types.
Specify the type of conversion (encoding *1)
that will be used for loading into the VariOS.
Normally, you will use the "Auto" setting.
In "Auto" mode, the encoding type will be set
to "Backing," and the tempo will be calculated
automatically (*2). (You can change these
settings in step 4.)
These settings are not needed for files that
are already encoded (.vpw).
Specify the location of the VariPhrase
format file that will be created by encoding.
- Same as original
The VariPhrase format file will be saved in the
same folder as the original wave file.
- Use
The VariPhrase format file will be saved in the
location you specify.
* If the original sample is on a non-rewritable
medium such as CD-ROM, the VariPhrase file
will automatically be saved in the specified "Use"
location.
* Next time you select files for loading into the
VariOS, you can specify the .vpw file that was
saved here, so the encoding process can be
omitted.
If you want to manually specify
the encoding type and tempo,
select "Manual."
The options shown at the right
will appear. This is convenient
when you are loading two or
more items of wave data of a
specific tempo.
* Set the encoding type as follows.
SOLO
BACKING
EMSEMBLE
Load the wave files of the Load List into
the VariOS.
* Loading will be halted when the memory
of the VariOS becomes full.
* Loading will perform the following
processes automatically:
- Encode wave files
- Save the encoded wave files
- Send the samples to the VariOS
If you click [Cancel], the content you
specified will be discarded and the dialog
box will close.
Single-note vocal or instrumental
phrase (sax, trumpet, etc.)
Phrases with a clear attack, such
as rhythm loops or guitar chording
Sustained phrases such as choir
or strings
Auditions the selected wave file.
The sound will be heard from the sound card
*
of your computer. (Sound will not be
produced from the VariOS.)
Auditions the selected Wav file.
Adds the selected Wav file to the
"Load List" below.
Displays the amount of memory used
within the VariOS.
This encoding type is suitable for monophonic vocals or instruments (sax, trumpet, flute, etc.). If you use this encoding type, you
SOLO
BACKING
EMSEMBLE
* If you encode using BACKING or ENSEMBLE, you will not be able to control the formant or use the robot voice function.
*2 About tempo
"Auto" mode will automatically calculate the tempo of loop audio materials.
Audio material that has been trimmed for looping and has a 4/4 time signature will be automatically calculated in a tempo range of 80--160. If the
automatically set tempo of the sample is double or half what it should be, you can adjust it using the Tempo [x 2] or [x 1/2] button of the "Load List" ( ).
The sample tempo (original tempo) you specify here is the basic tempo used
to synchronize the sample to the master tempo of V-Producer. You must set
this to the correct tempo. Otherwise, the length of the note will not be correct.
will be able to control the formants and use the robot voice function (refer to "Sample Edit"). Even if you encode using SOLO,
you will still be able to play polyphonically.
This encoding type is suitable for decay-type instruments. In particular it is suitable for phrases that contain instruments with a
clear attack (rhythm loops, drums, percussion, guitar chording).
This encoding type is suitable for sustained-type instruments. It is particularly suitable for sounds that contain gradual changes
in tone (such as choir or strings). This encoding type handles the broadest range of sounds.
Original tempo
[Example: if the original tempo of the sample is =100]
If the master tempo is set to
back at double the speed at which it was sampled.
If the master tempo is set to
at half the speed at which it was sampled.
=200, the sample will play
=50, the sample will play back
Page 6
Screen reference
Preview (preview button)
fig.01-12
Auditions the selected sample.
Press the [P] key of your computer keyboard to audition the sample.
If a MIDI keyboard is connected, you can play it to sound the sample.
* One free part in the Vari Track (p. 33) is required in order to audition the sample. If you have used all
six parts of the Vari Track, you will not be able to audition samples from the sample list while the song
is playing. The part being previewed will be indicated as in the Vari Track indicator.
Copy Sample (copy a sample)
fig.01-13
Copies the selected sample within the VariOS. The Save dialog box will appear. Specify a
location on your computer in which to save the copied sample.
* Copying is not possible if the VariOS's memory is full.
6
Delete Sample (delete a sample)
fig.01-14
Select a sample and then click this button to delete the sample from the VariOS.
* If the sample has already been placed in the Vari Track, the following message will appear: “Since
this sample is being used in the Vari Track, it cannot be deleted. This sample on the
Vari Track will be selected, so press the [Delete] key to delete it.” After this message is
displayed, press the [Delete] key to delete the selected sample from the Vari Track, and then click the
[Delete Sample] button once again.
If you select [Delete All Unused Samples] from the Option menu, all samples
not used in any part of the Vari Track will be deleted in one operation.
Search (search button)
fig.01-15
If you leave this button on, the corresponding sample will be highlighted when you click
a sample that has been placed in the Vari Track.
VariOS Memory (VariOS memory display)
fig.01-16
Memory currently
being used
Unused memory
This indicates the usage status of the memory within the VariOS.
Page 7
Wave Edit
fig.01-20_50
7
Screen reference
Rewind
Stop
Click the [Sample Info] button ( ) located at the bottom of the screen, and
then click the [Wave Edit] tab ( ) to access this screen.
In this screen you can edit the following parameters of samples sent to the VariOS.
• Encoding type
• Original tempo
• Event location
• Sample information
To edit these parameters, click the [Edit] button ( ) to enter Edit mode.
* For details on the encoding type, read “Load Wave Files (Load wave files button)” (p. 5)
fig.01-23
Moves the cursor location to the beginning of the waveform.
fig.01-24
Stops playback of the waveform.
Play
fig.01-25
Plays the waveform starting from the cursor location.
* Waveform playback in the Wave Edit screen will be heard from the sound card of your computer (not
from the VariOS).
Page 8
Screen reference
Slice preview
Loop
Sample Name
fig.01-28
Indicates the name of the sample
8
fig.waveedit
When you click a slice (a portion of the waveform separated by events), that slice will be
selected and preview-played. By dragging the mouse to left or right across the waveform
display area, you can select multiple slices and preview-play them.
fig.01-27
If you want playback to occur repeatedly, turn looping on.
Ruler
fig.01-29
Indicates the beats. You can click this area to specify the playback position of the waveform.
Waveform display area
fig.01-30
Displays the waveform.
You can click the waveform to specify the playback location.
Event locations are shown as vertical blue lines.
Zoom tool
fig.01-31
Expands or contracts the waveform display.
Encoding type
fig.01-32
Indicates the encoding type of the sample.
(Solo):Solo encoding
(Backing):Backing encoding
(Ensemble):Ensemble encoding
*For details on the encoding type, refer to Load Wave Files (Load wave files
Page 9
button) (p. 5).
Original Tempo
fig.01-33
Indicates the original tempo of the sample.
The original tempo is the reference tempo of the sample, which is used to synchronize to the
master tempo.
[Example: if the original tempo of the sample is =100]
If the master tempo is set to =200, the sample will play back at double the speed at which it
was sampled.
If the master tempo is set to =50, the sample will play back at half the speed at which it was
sampled.
9
Screen reference
Edit button
fig.01-34
To edit the following parameters, click the [Edit] button to enter Edit mode.
• Encoding type
• Original tempo
• Event location
• Sample information
* For details on the encoding type, read “Load Wave Files (Load wave files button)” (p. 5).
When you click the [Edit] button, a screen like the following will appear.
fig.01-35_50
* After you enter Edit mode, pressing the [Save] button will save the sample and re-send it to the
VariOS.
Page 10
Screen reference
Waveform editing
In edit mode, you can right-click ( in Macintosh, control-click) the waveform display area to
access a menu for editing the waveform.
Trim
Leave the selected region of the waveform, and delete the rest of it.
Cut
Delete the selected region of the waveform.
Normalize
Boost the volume of the selected region of the waveform so that the loudest volume reaches the
maximum amplitude.
DC Cut
Cut any direct-current component of the selected region of the waveform.
10
Invert
Invert the polarity of the selected region of the waveform.
Setting the encoding type
fig.01-42
Press a button in the diagram to specify the encoding type.
* For details on the encoding type, read
Setting the original tempo
The sample tempo (original tempo) you specify here is the basic tempo used to synchronize the
sample to the master tempo of V-Producer. You must set this to the correct tempo. Otherwise,
the length of the note will not be correct.
[Example: if the original tempo of the sample is =100]
If the master tempo is set to =200, the sample will play back at double the speed at which it
was sampled.
If the master tempo is set to =50, the sample will play back at half the speed at which it was
sampled.
You can set the original tempo in the following two ways.
:Solo encoding
:Backing encoding
:Ensemble encoding
“Load Wave Files (Load wave files button)”
(p. 5).
● Use the tempo slider to adjust the tempo
fig.01-36
Drag this slider to left or right to adjust the tempo.
Page 11
● Enter the tempo numerically
fig.01-40
Adjust the tempo by entering a new value in either the “Tempo” or “Beats” field.
To edit numerically, double-click the value and edit it in the dialog box that appears.
: Doubles the value
: Halves the value
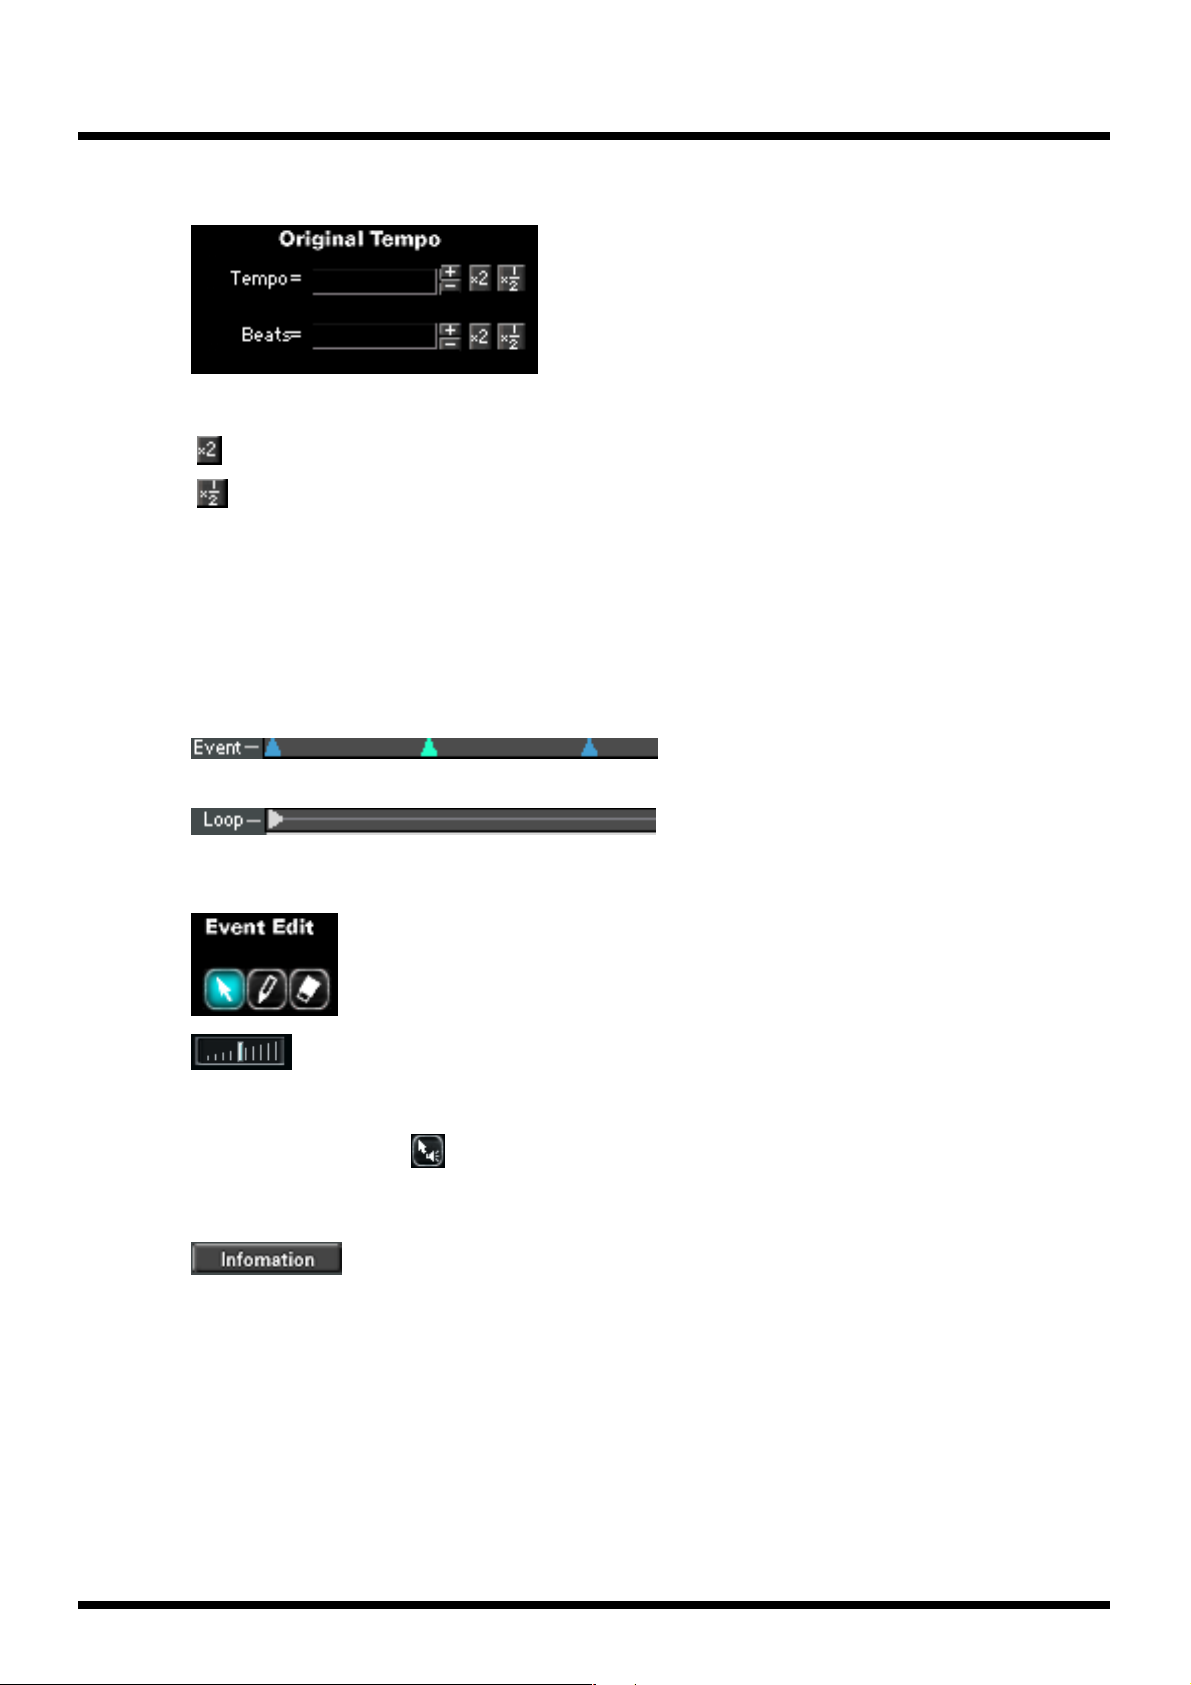
Event settings
Events demarcate the notes that you edit in the Scope Editor screens (p. 63). In the Groove Scope
(p. 75), you can slice the sample at the locations of the events you specify here, and reassemble
the slices as desired.
Initially, V-Producer will automatically place events in the sample, but you are free to add,
delete, or adjust the location of the events.
fig.01-37
Screen reference
Indicates the events.
fig.01-39
Indicates the loop region.
You can use the following event editing tools.
fig.01-41
Arrow : Drag an event to move it
Pen : Click to add an event
Eraser : Click to delete an event
fig.waveedit2
Slider (Depth): Moving the slider will cause an event to be automatically
assigned wherever a strong attack (a point where the
volume changes suddenly) is detected.
* Try using the play step button to play individual slices (waveform divided by events).
Editing the sample information
fig.01-46
Edits the sample information.
11
Page 12
Screen reference
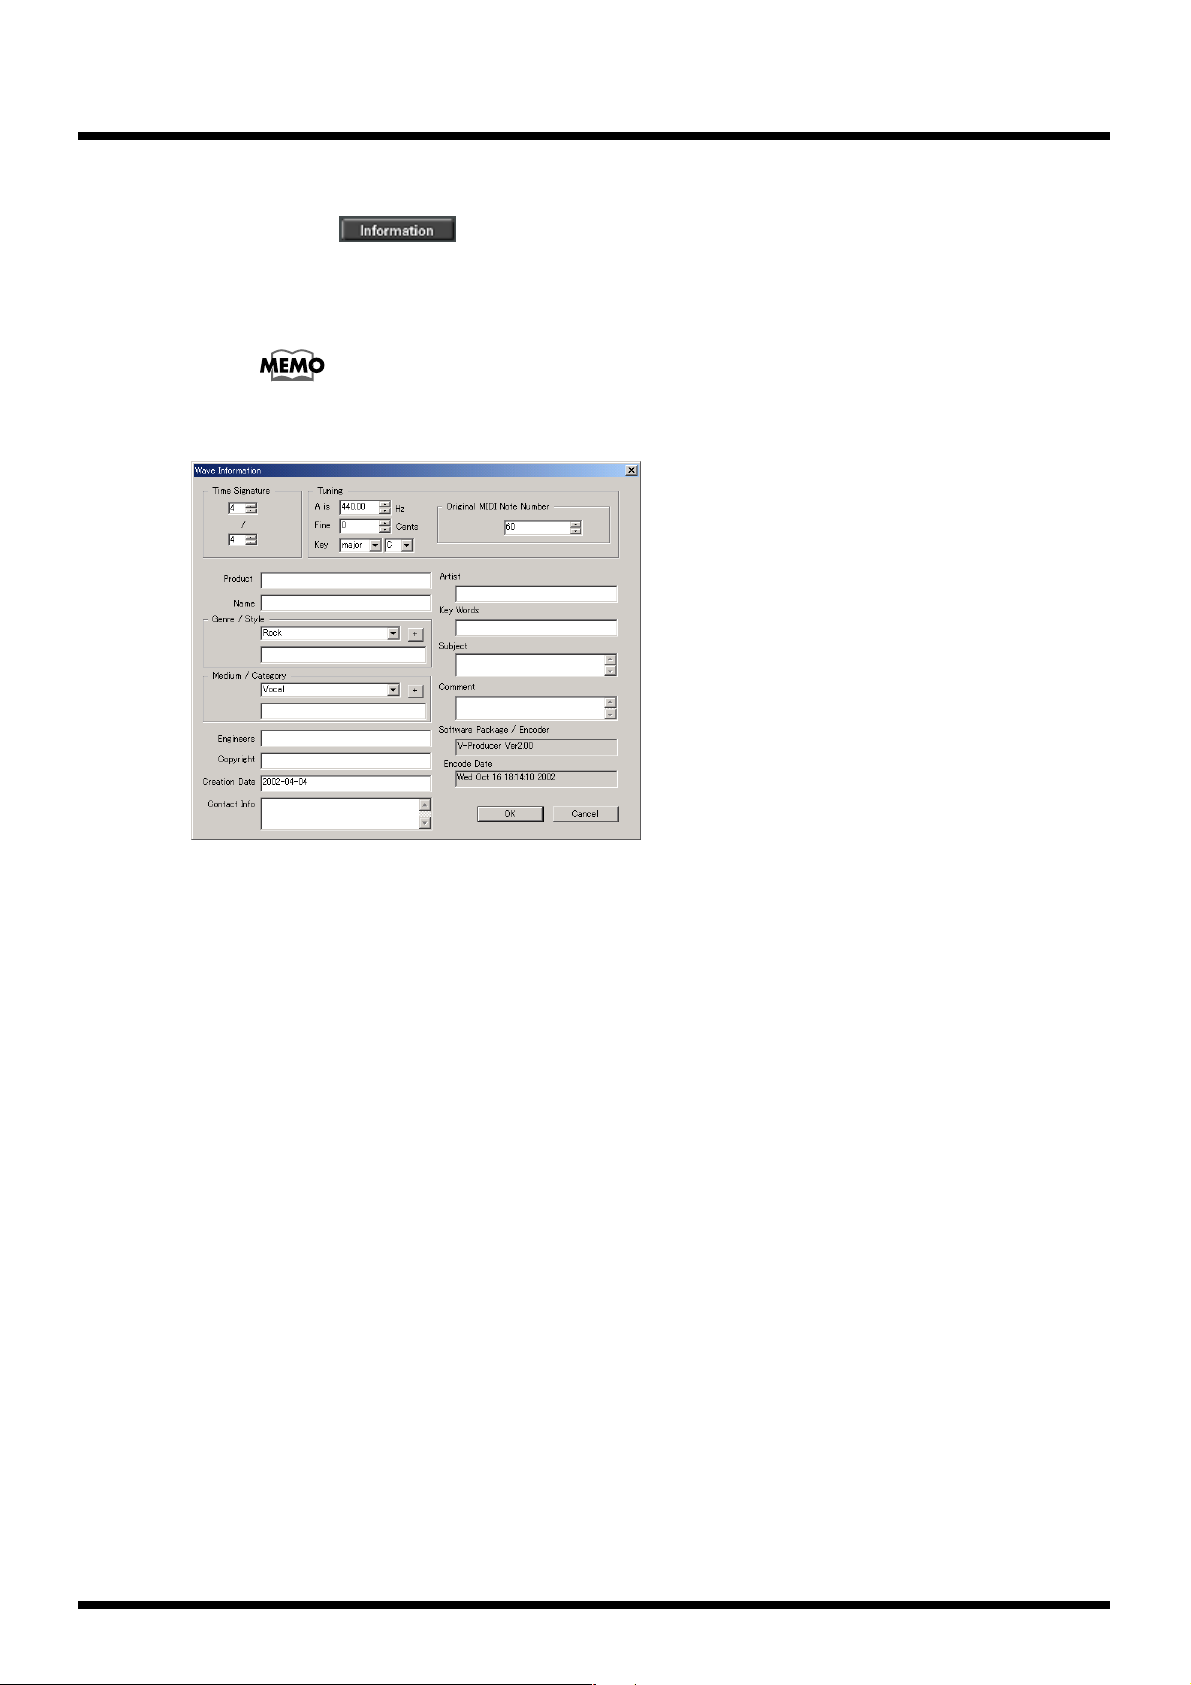
Wave Information
When you click the “Wave Information” dialog box will appear. Here you can
specify a variety of information, such as the time signature and copyright of the sample. The
copyright information is embedded within the file, and can also be viewed from other
waveform editing programs.
fig.waveinfo_50
Key, Genre/Style, and Medium/Category are not used in the current version
of the VariOS. These fields will be used in the future if phrase search
functionality is added.
Time Signature
Specifies the time signature of the phrase. The default is 4/4. You should always specify the
Time Signature.
Tuning
We recommend that set the Tuning field if you know the exact tuning of the phrase. Otherwise
you may leave this at the default setting.
A is
Enter the frequency (in Hz) that the A note had when you sampled the phrase. The default is
440.0 Hz, but if (for example) you know that when you sampled the phrase, it was 442.0 Hz, you
would set this field to 442.0. If this data has been input, phrases that were sampled at a different
“A” pitch will automatically be adjusted to match the master tuning of the VariOS.
Fine
Specify this if you need to make a fine adjustment for the value of “A is.” This value is in units
of 1/100 of a semitone (i.e., one cent).
Key
Enter the key of the phrase. Choose from the list of values shown in the pulldown menu. (The
VariOS does not use this information.)
12
Original MIDI Note Number
Enter the original note number of the phrase. If you do not set this field, the default value will
be C4=60.
Page 13

Screen reference
Product
If the sample is from a CD-ROM library, enter the title of the CD-ROM library.
Name
Enter the full name of the phrase.
Genre/Style
Enter the genre (or style) of phrase. Presets are provided for this item. Select from the menu and
click the “+” button to enter your choice. If you do not see the desired entry, you can enter it
manually. If you enter more than one, separate each entry with a semicolon (;) and a space.
Medium/Category
Enter the instrumentation of the phrase. Presets are also provided for this field, just as for
Genre/Style.
Engineers
Enter the name of the producer or engineer.
Copyright
Enter the copyright data.
Creation Date
Enter the date on which the original phrase data was created.
Contact Info
Enter contact information (address, phone, e-mail, website URL, etc.) for the supplier of the
phrase (e.g., third party).
Artist
Enter the name of the artist.
Key Words
Enter keywords related to the phrase. If you enter more than one, separate each entry with a
semicolon (;) and a space.
Subject
Enter the subject of the phrase. If the phrase is a song, you could enter the lyrics here.
Comment
Enter a comment about the phrase.
Software Package/Encoder
Enter the name of the software that encoded the phrase. V-Producer and the version number
will automatically be entered in this field. You cannot edit this item.
Encoding Date
Enter the date on which the phrase was encoded. This item is input automatically, and cannot
be edited.
13
Page 14

Screen reference
Saving a sample
fig.01-47
[Save] button: Saves the sample and re-sends it to the VariOS.
[Cancel] button: Discards the edits and exits Edit mode.
14
Page 15
Sample Edit
fig.01-50_50
Screen reference
In this screen you can edit various parameters for a sample that was sent to the VariOS.
When you edit a parameter in the Sample Edit screen, the setting will be reflected in all frames
that use that sample. You cannot edit sample parameters for an individual frame. If you want
to set sample parameters independently for each frame, copy the sample in the Sample List
screen, and use a separate sample for each frame.
To display the screen, click the [Sample Info] button ( ) located at the bottom of
the screen.
Sample Name
fig.01-52
Indicates the name of the sample.
Beat (number of beats)
fig.01-53
Indicates the number of beats, calculated according to the original tempo (see item below).
Original Tempo
fig.01-54
Indicates the original tempo.
For details on the original tempo and how to change it, refer to “Setting the original tempo”
(p. 10) in the Wave Edit screen.
15
Page 16
Screen reference
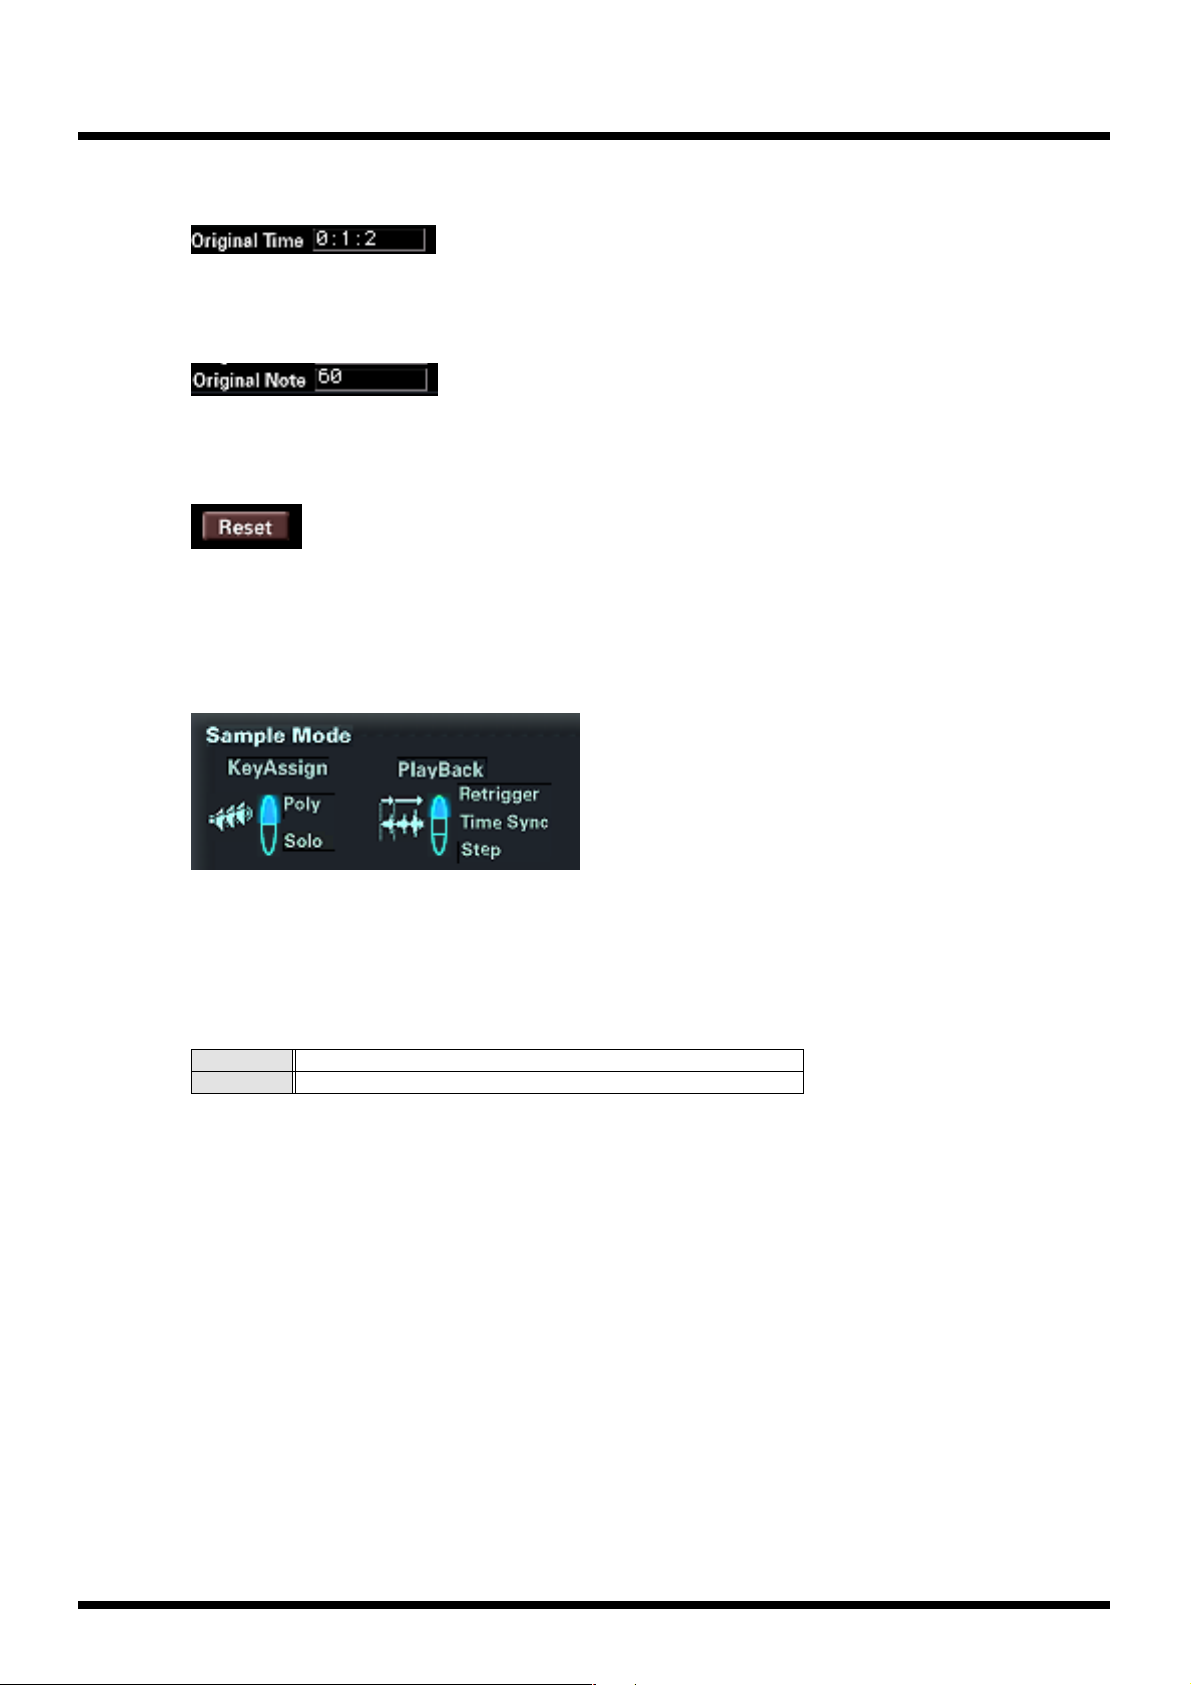
Original Time
fig.01-55
Indicates the original length of the sample (the length of time that was sampled).
Original Pitch
fig.01-56
Indicates the key at which the sample will sound at its original pitch.
Reset
fig.01-57
If you press this button, the values you edited in Sample Edit will return to their default settings.
Try pressing this button if you have been editing the parameters and can no longer hear any
sound, or if you experience similar problems.
Sample Mode
fig.01-58
Key Assign mode
The Key Assign mode selects whether the sample will be played polyphonically (POLY) or
monophonically (SOLO). If you want to play a monophonic instrument (such as sax or flute)
legato, it is effective to select SOLO.
Values
Poly: More than one note can be played simultaneously.
Solo: Only the last-played note will sound.
Default setting: Poly
16
Page 17
Screen reference
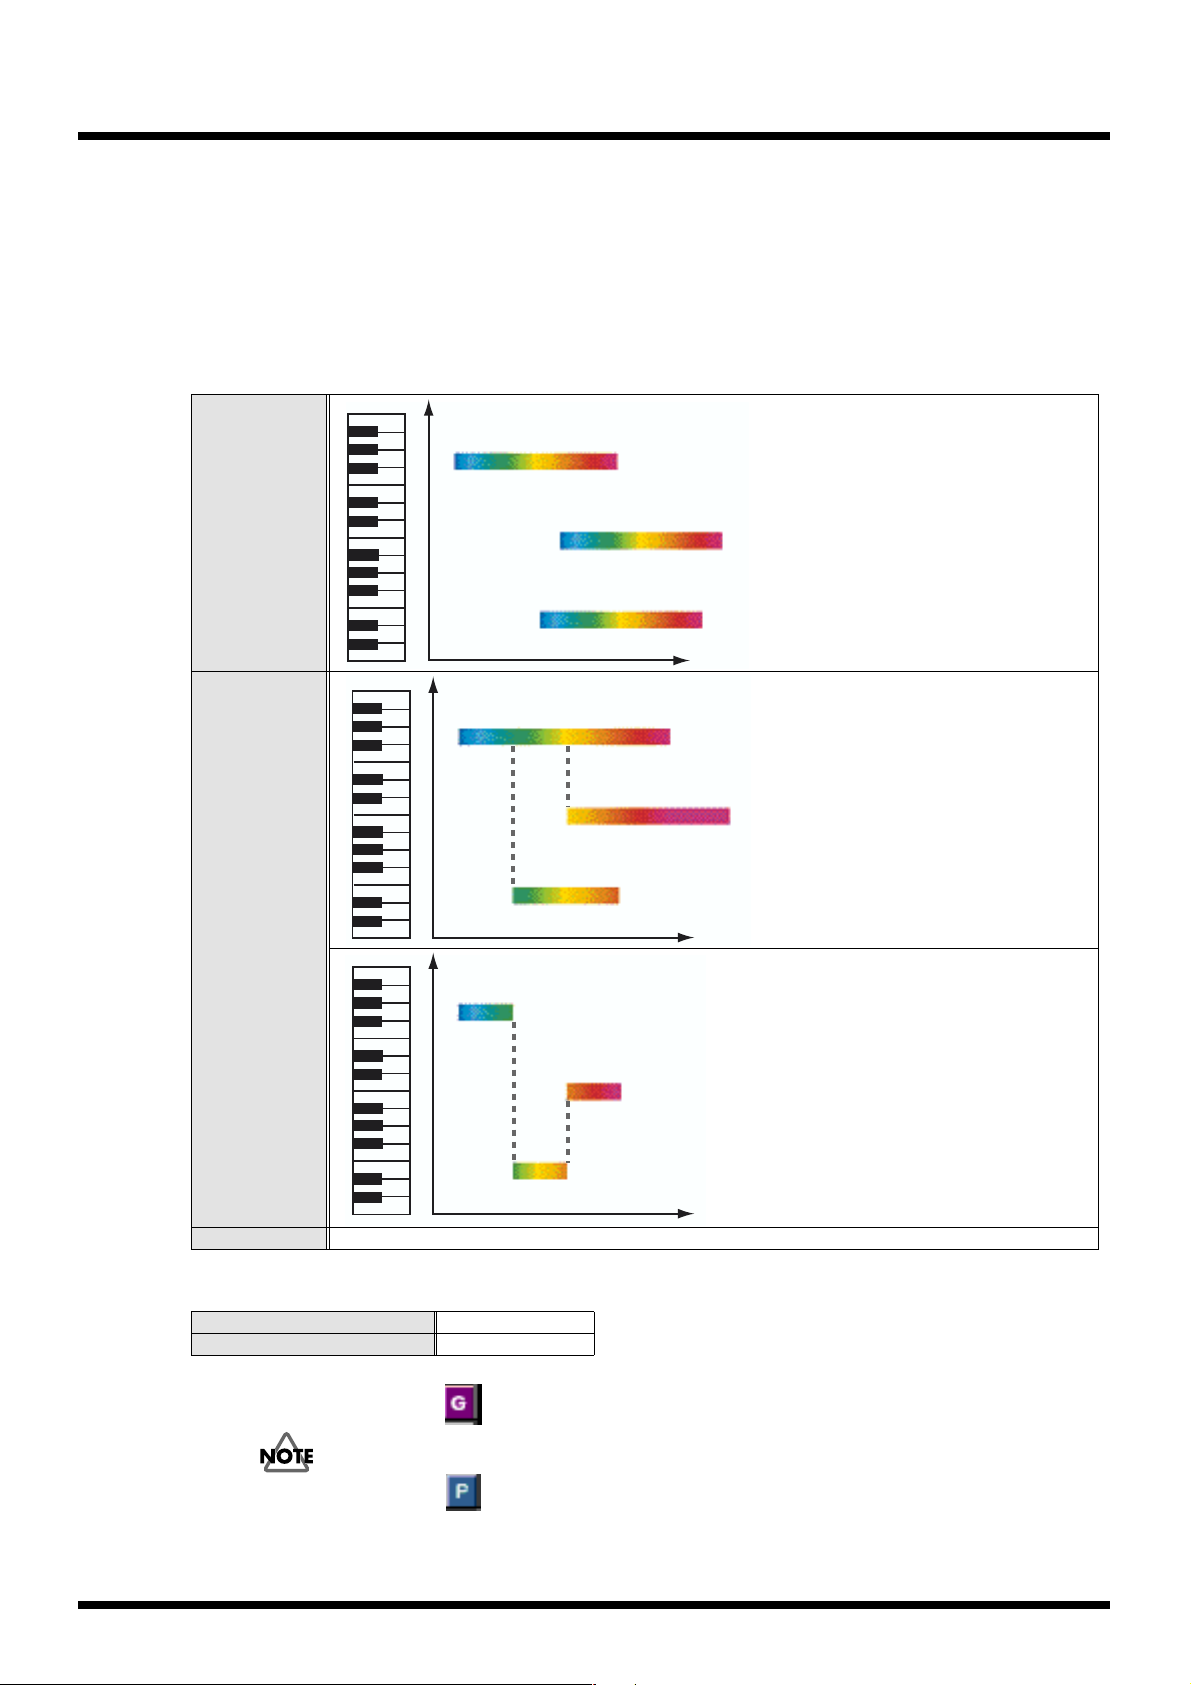
Playback mode
The Playback mode selects how the sample will be played. If you want to use legato (*) playing
to play a melody different than the original sample, choose “Time Sync.” If you want the sample
to play back from the beginning each time you press a key, choose “Retrigger.”
* “Legato” originally means to “play smoothly,” but here it refers to the technique of playing the next
key (note-on) before releasing the previous key (note-off) so that the sound is never halted.
Values:
"Here comes VariPhrase"
Each time you press a key, the sample
will play back from the beginning. This
will produce an effect like a musical
“round.”
Retrigger:
key OFFkey ON
"Here comes VariPhrase"
key OFFkey ON
"Here comes VariPhrase"
key OFFkey ON
"Here comes VariPhra"
key OFFkey ON
"VariPhrase"
key OFFkey ON
● Key Assign: Poly
When you play legato, the playback
point (of the newly played sounds) will
be synchronized to the sound that is
playing from the beginning. As shown in
the diagram, you can produce chords
"comes Vari"
key OFFkey ON
even in the middle of a phrase.
Time Sync:
"Here"
key ON
key OFF
"VariPhrase"
● Key Assign: Solo
If you set the Key Assign mode to SOLO
and play legato, the pitch will change
starting at the playback point of the previously played note. You can play your
key OFF
key ON
keyboard to produce a melody that is
completely different than the original
"comes"
key ON
key OFF
phrase.
Step: Each time you play a key, the sample will play to the next event (p. 11) and then stop.
Default setting:
In Phrase Scope mode Time Sync
In Groove Scope mode Retrigger
If you set a (Groove Map) sample to anything other than "Retrigger," the
sound will be interrupted and will not play back correctly.
If you set a (Phrase Map) sample to anything other than “Time Sync,”
you cannot play legato.
17
Page 18
Screen reference
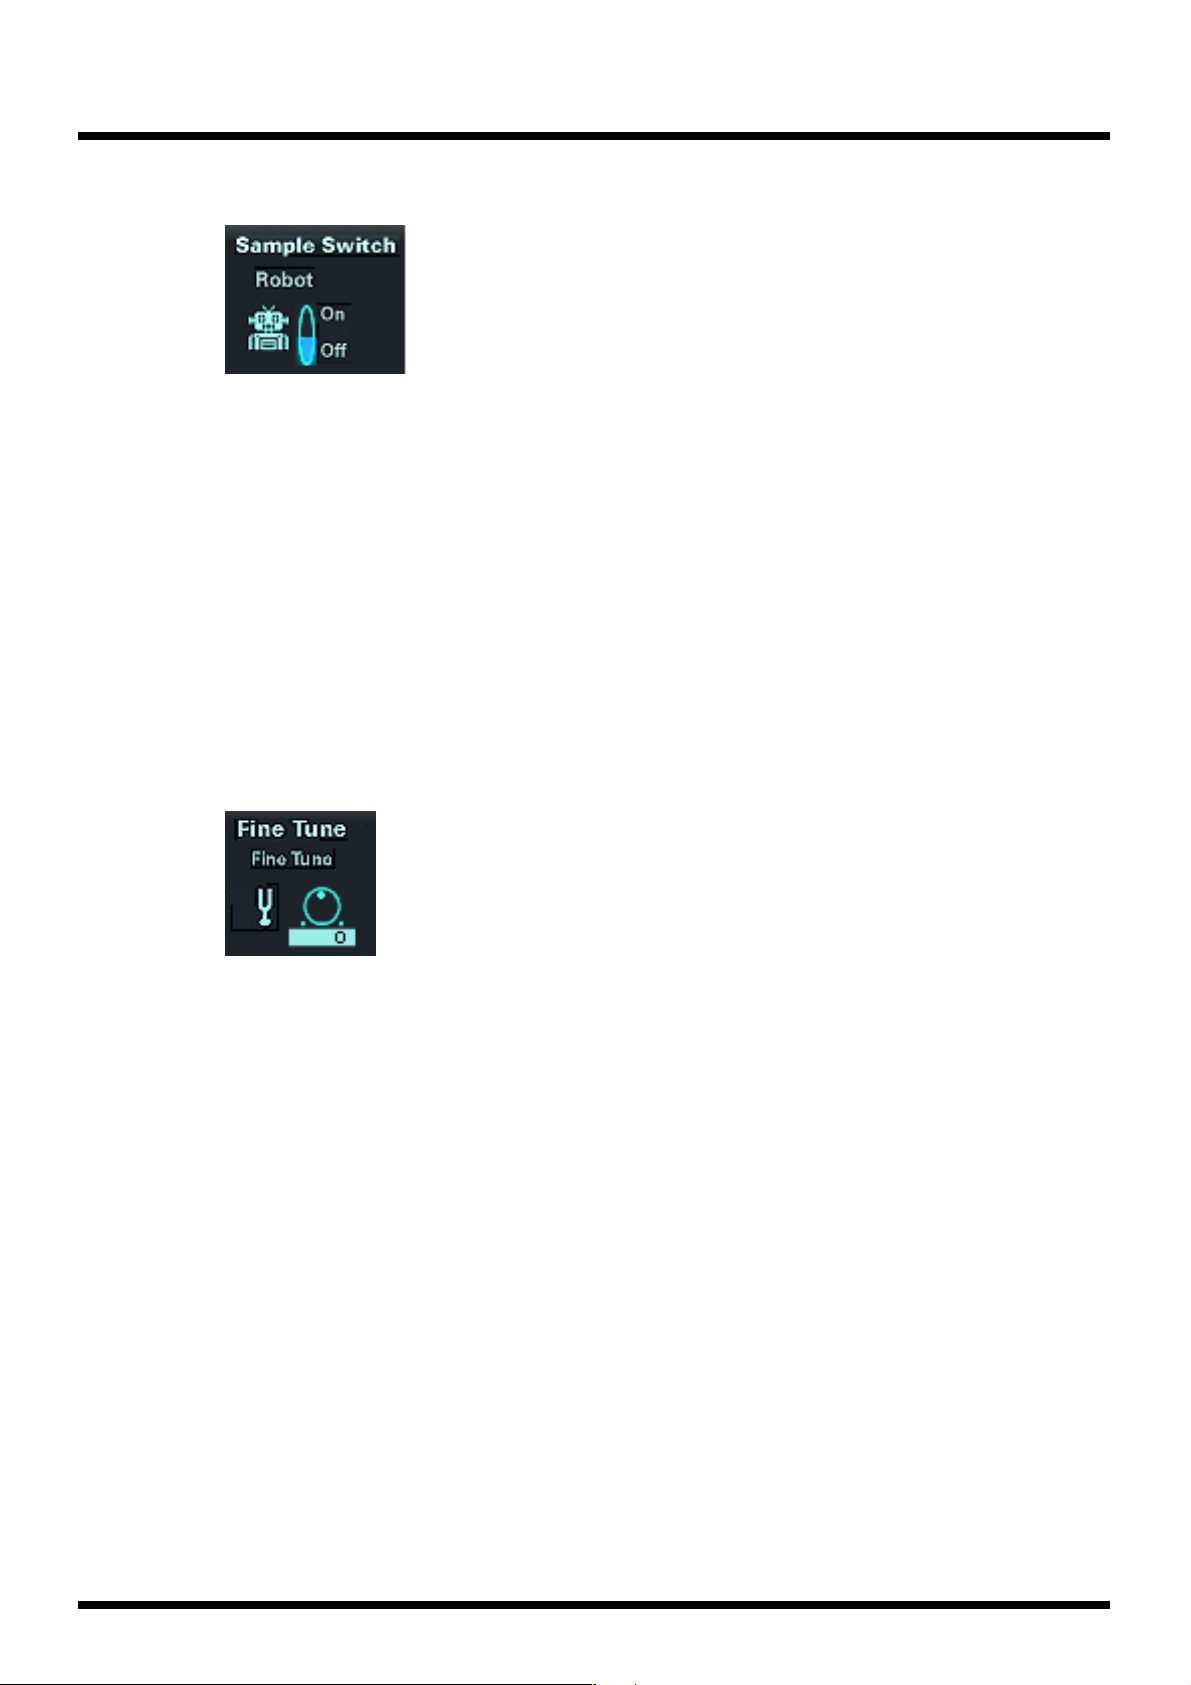
Sample Switch
fig.01-59
Robot (robot voice switch)
Turn this ON if you want to remove the sense of pitch from the sample (i.e., to ignore the
original pitch of the sample and sound it at the pitch that you play). In the case of a phrase
sample, you can use your keyboard to play a melody that is entirely different than the original
sample, in this way using a single sample to play a variety of melodies.
Available Settings: OFF, ON
Default value: OFF
* This setting is valid only for samples whose Encode Type (p. 8) is set to SOLO.
* If slight pitch changes in the original phrase are an important part of the performance expression, the
Robot Voice function may not produce satisfactory results. The results may also be unsatisfactory if
the key you play is far away from the pitch of the original phrase.
Fine Tune
fig.01-60
Fine tune adjusts the pitch in one-cent steps (1/100th of a semitone) over a range of 1/2
semitones upward or downward from the current pitch.
Available Settings: -50–+50
Default value: 0
* If the Robot Voice switch is on, Fine Tune has no effect.
18
Page 19
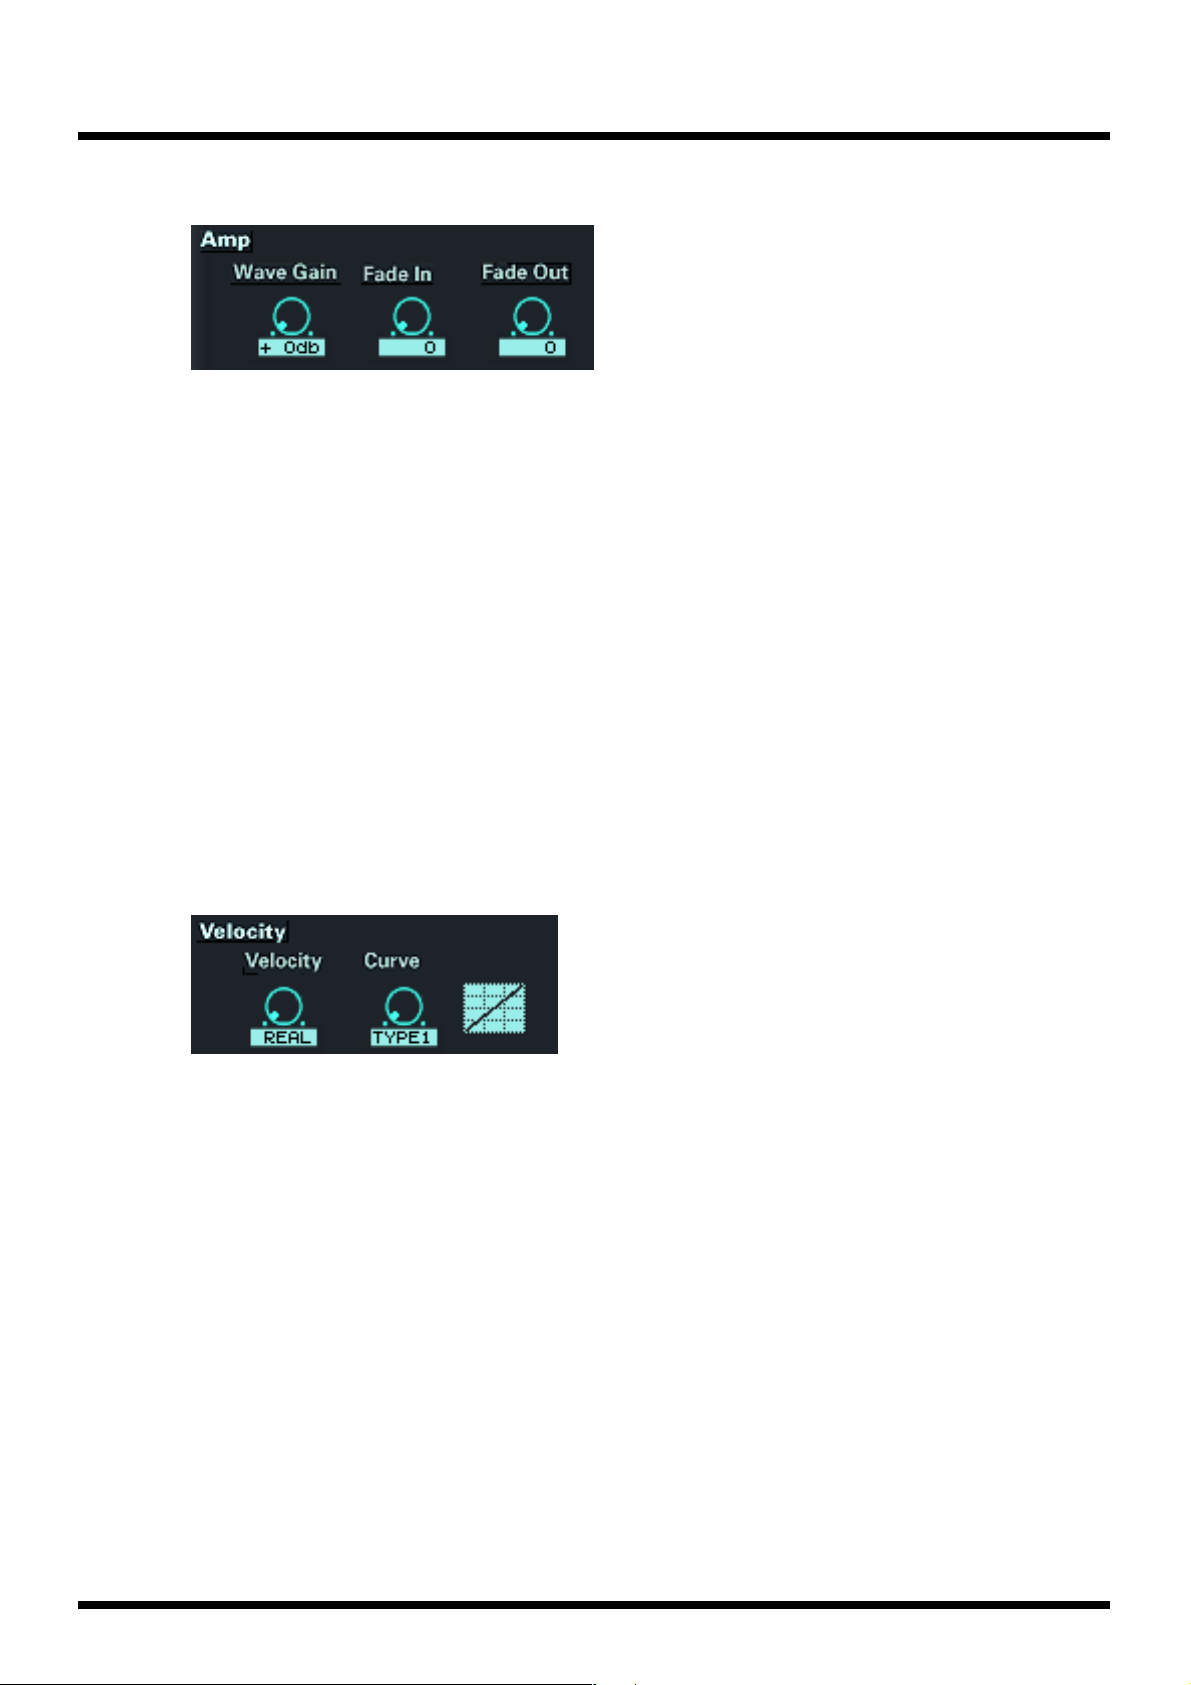
AMP
Screen reference
fig.01-61
Wave Gain
Specifies the gain (boost) of the waveform. A 6 dB (decibel) increase will double the gain.
Available Settings: 0–+18 [dB]
Default value: 0 [dB]
Fade In
Fade-in gradually increases the volume of the sample from the moment of note-on. Set the time
over which the volume will rise from zero up to the specified volume.
Available Settings: 0.00-2.00 [sec]
Default value: 0 [sec]
Fade Out
Velocity
fig.01-62
Velocity
Fade-out gradually decreases the volume of the sample from the moment of note-off. Set the
time over which the volume will decrease from the specified volume down to zero.
Available Settings: 0.00-6.00 [sec]
Default value: 0 [sec]
Determines the volume obtained in response to the force with which you play a key. If this is
set to REAL, the force with which you actually played the note will be used. A setting of 1–127
causes the note to sound at the specified velocity, regardless of how strongly you actually
played it.
Available Settings: REAL, 1-127
Default: REAL
Curve (Velocity curve)
Select one of seven curves to specify how differences in playing strength will affect the volume.
The modification curve is shown graphically at the right of the setting. The horizontal axis
indicates the playing strength, and the vertical axis indicates the volume. This setting is valid if
Velocity is set to REAL.
Available Settings: TYPE1–TYPE7
Default: TYPE1
19
Page 20
Screen reference
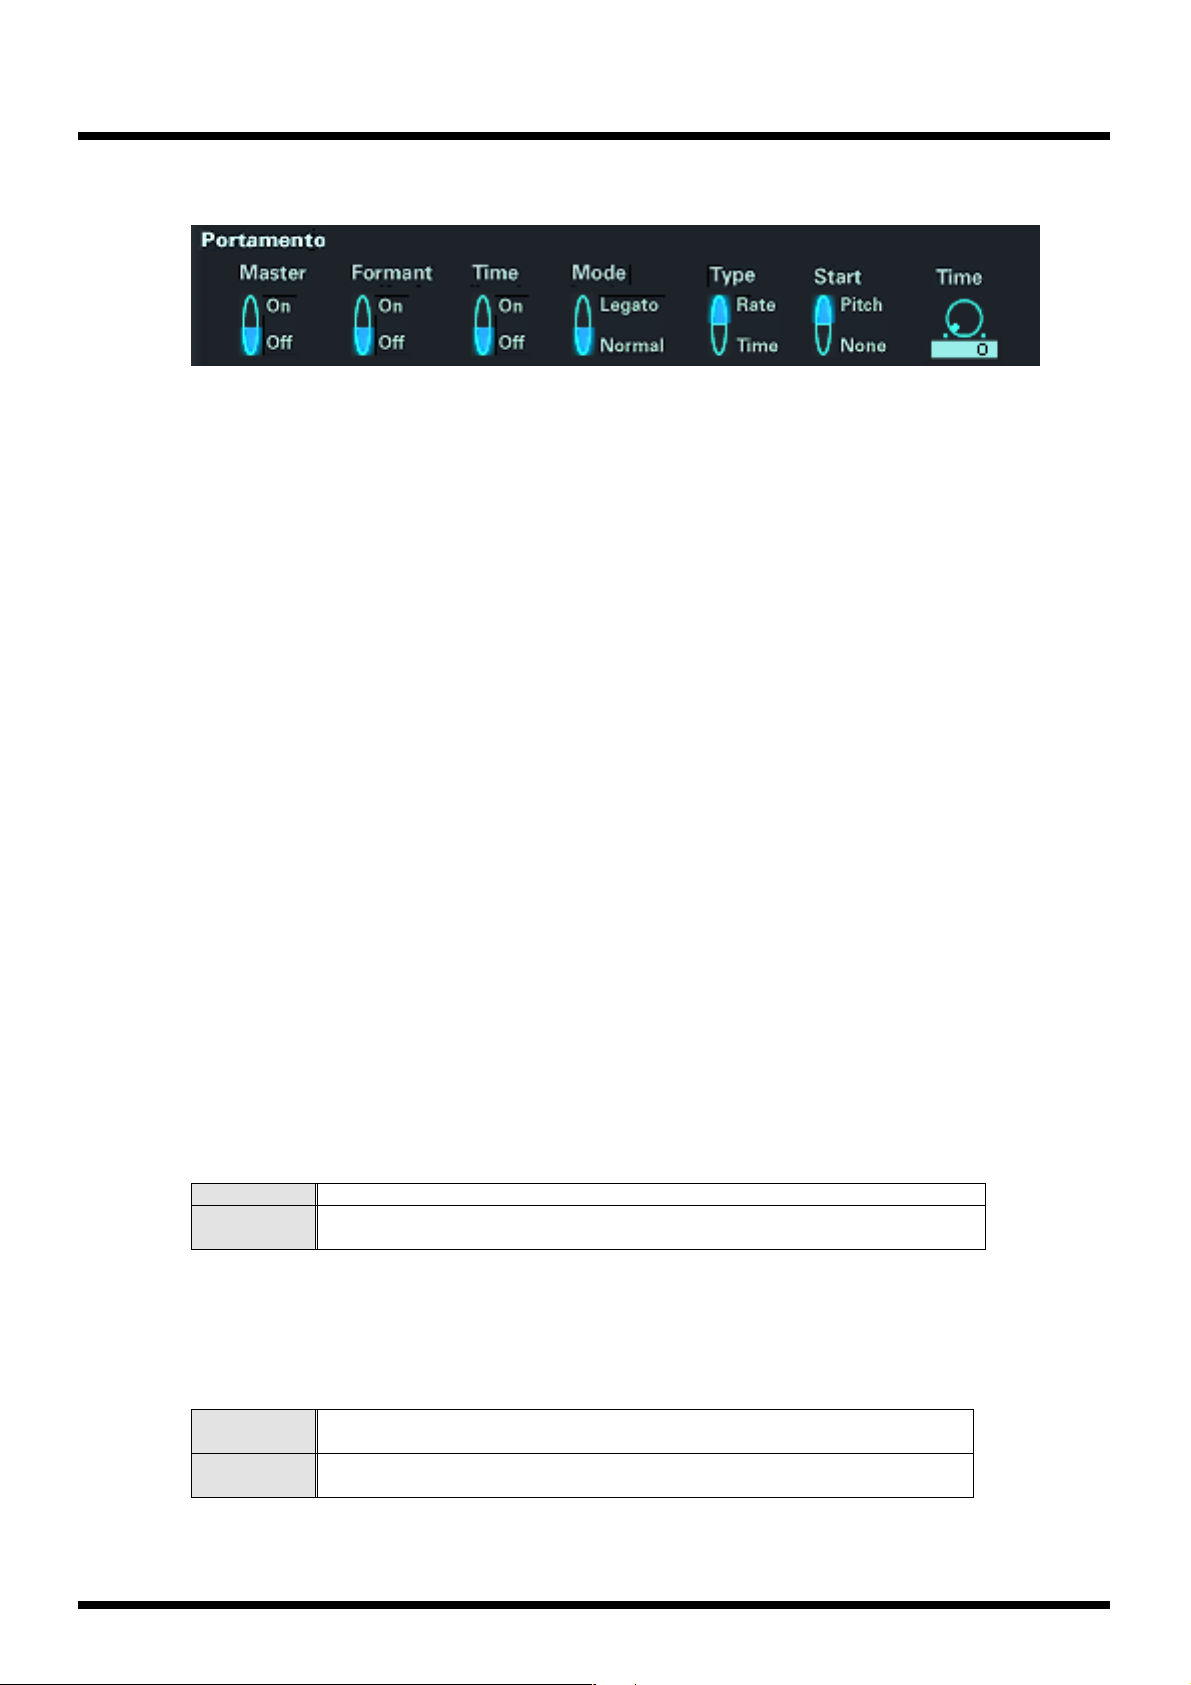
Portamento
fig.01-63
Portamento is an effect that smoothes the pitch change that occurs between one note and the
next. When Key Assign is SOLO, applying portamento can create an effect similar to a “slide”
played on a violin. You can also apply portamento even when Key Assign is polyphonic
(POLY).
Master (Portamento master switch)
Specifies whether portamento will be applied (ON) or not (OFF).
Available Settings: OFF, ON
Default:OFF
Formant (Portamento formant switch)
If Formant Key Follow (p. 25) and Portamento Time (p. 21) are set to a value other than “0,” you
can specify whether the differences in formant will change smoothly from one note to the next
(ON) or not (OFF). This is valid only for samples whose Encoding Type (p. 8) is SOLO.
Available Settings: OFF, ON
Default: OFF
* This function is valid if the Portamento Master Switch is “ON.”
Time (Portamento time switch)
If Time Key Follow (p. 28) and Portamento Time (p. 21) are set to a value other than “0,” you
can specify whether the playback speed will change smoothly from one note to the next (ON)
or will change immediately (OFF).
Available Settings: OFF, ON
Default: OFF
* This function is valid if the Portamento Master Switch is “ON.”
Mode (Portamento mode)
Specifies how portamento will be applied.
Available Settings:
NORMAL: Portamento will always be applied.
LEGATO:
Default: NORMAL
Portamento will be applied only when you play legato (playing the next note before releasing the previous note).
Type (Portamento type)
Specifies the type of portamento.
Available Settings:
RATE:
TIME:
Default: RATE
The time over which the pitch change occurs will vary in proportion to the distance between the pitches.
The pitch change will occur over a fixed time, regardless of the distance between
the pitches.
20
Page 21
Screen reference
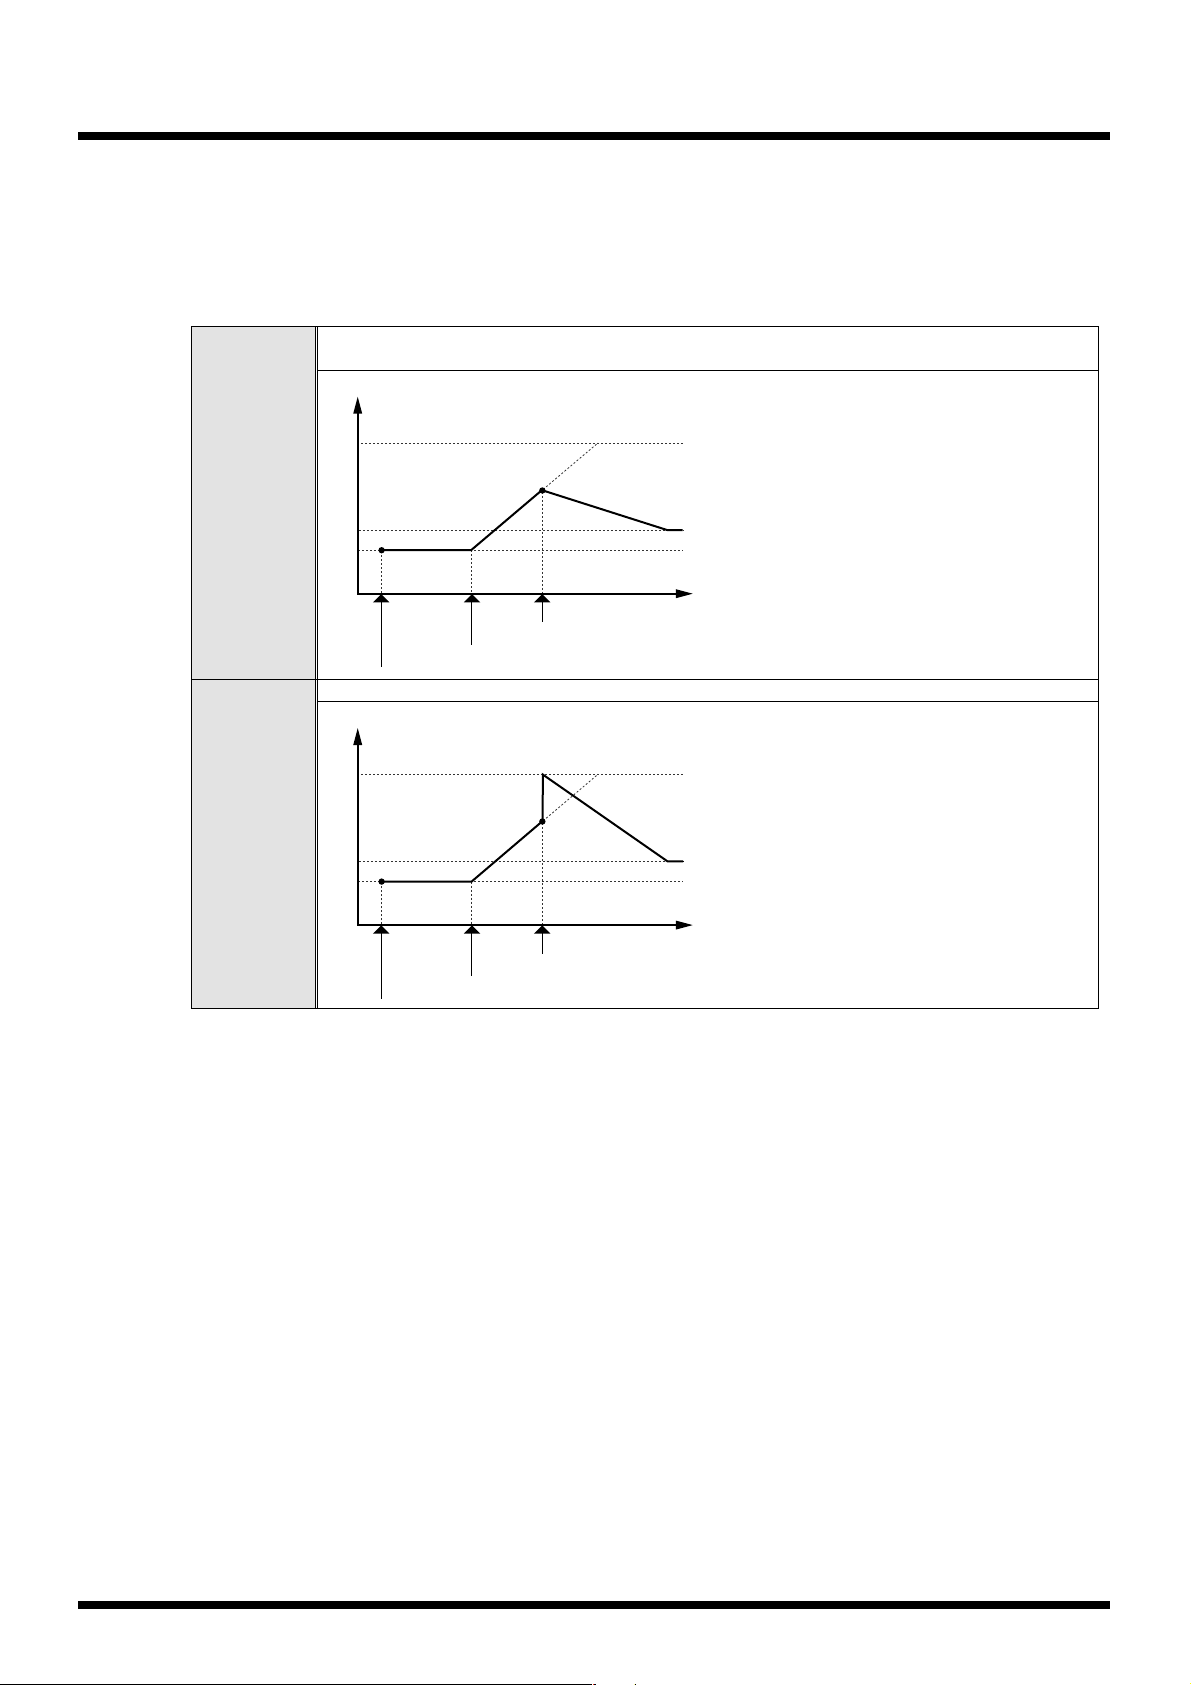
Start (Portamento start)
If you play another key while portamento is in the midst of a pitch transition, a separate pitch
transition will begin anew. This parameter specifies the pitch from which the new transition is
to begin.
Available Settings:
If you play another key while portamento is still in the middle of a pitch transition, the new portamento will start from the pitch that has been reached at that moment.
Pitch
C5
PITCH:
D4
C4
Time
Play the D4 key
Play the C5 key
Play the C4 key
The new portamento will begin from the pitch at which the former transition would have ended.
Pitch
C5
NOTE:
D4
C4
Time
Play the D4 key
Play the C5 key
Play the C4 key
Default: PITCH
Time (Portamento time)
Specifies the time over which the pitch will move to the next pitch.
Available Settings: 0–127
Default: 0
21
Page 22
Screen reference
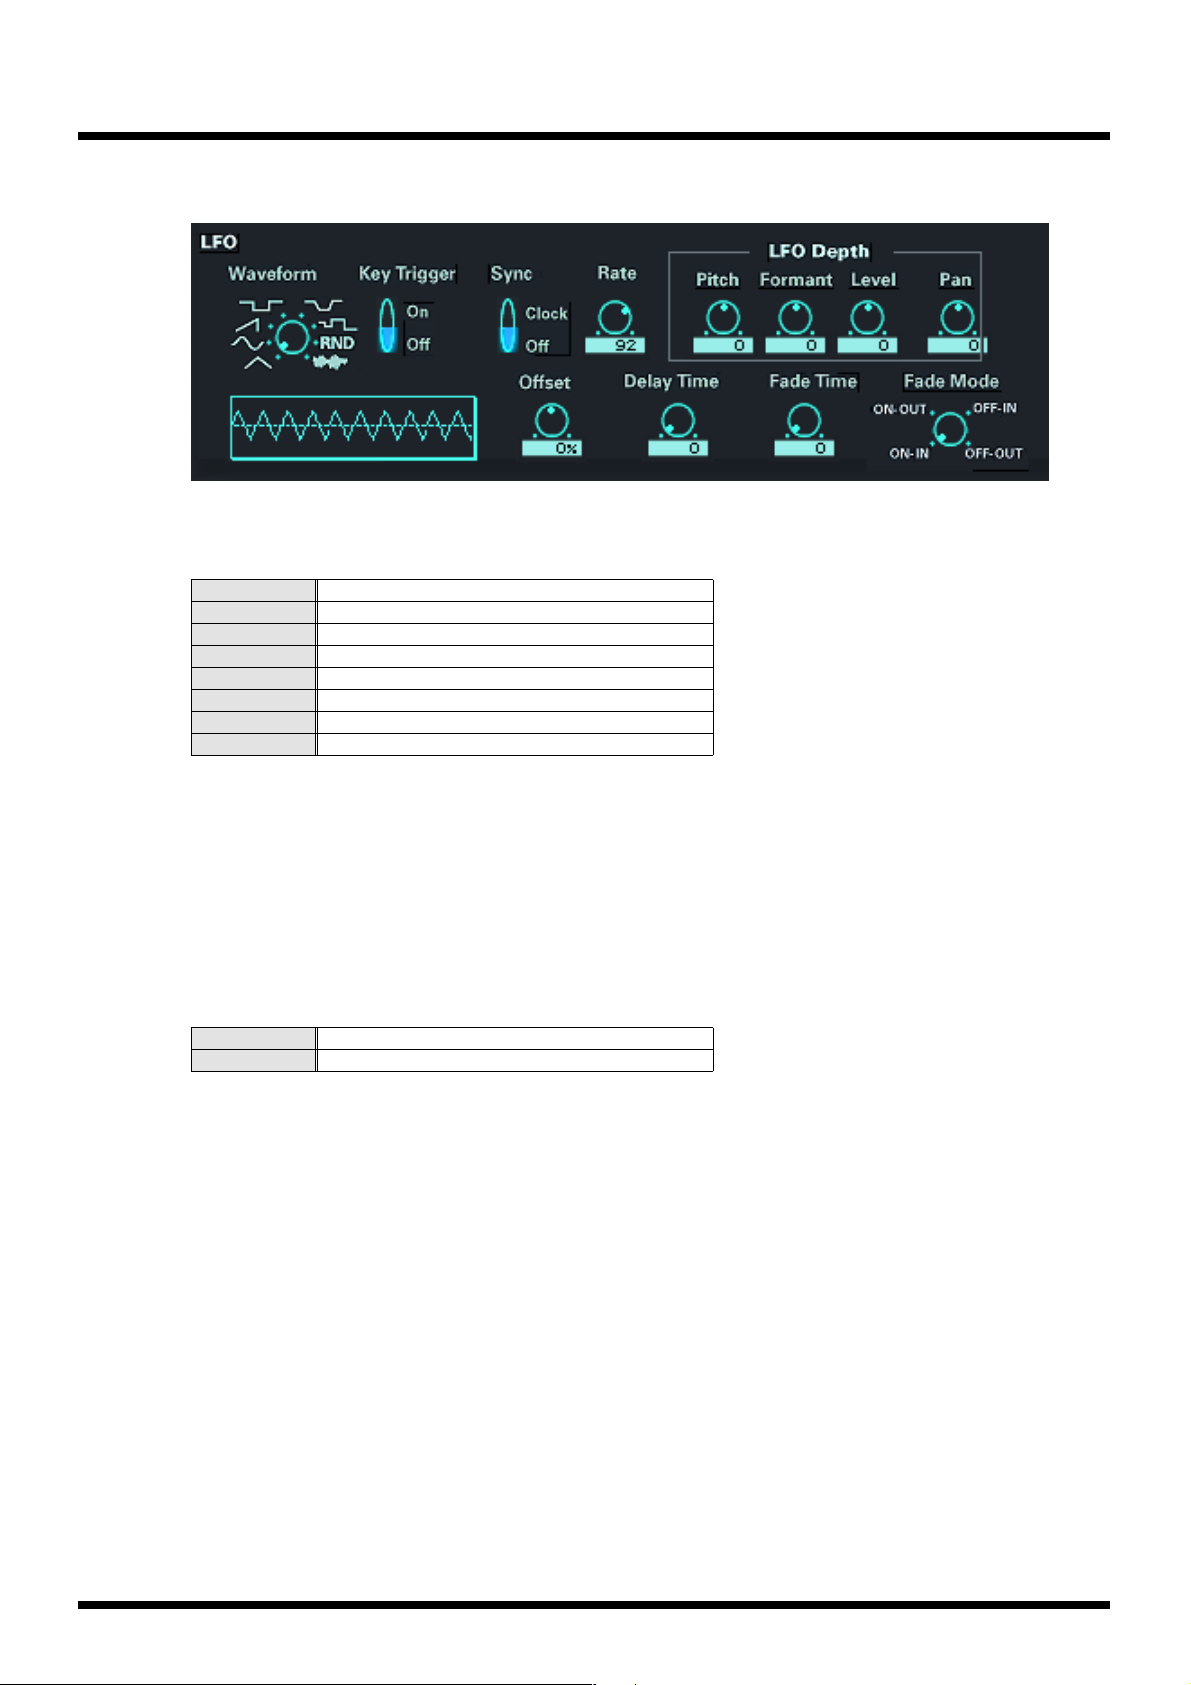
LFO
fig.01-64
Waveform (LFO waveform)
Specifies the waveform of the LFO.
Values (clockwise from left)
TRI: Triangle wave
SIN: Sine wave
SAW: Sawtooth wave
SQR: Square wave
TRP: Trapezoidal wave
S&H: Sample and hold wave
RND: Random wave
CHS: Chaos wave
Default: TRI
Key Trigger (LFO key trigger)
Specifies whether the LFO waveform will begin at the key-on timing (ON) or not (OFF).
Available Settings: OFF, ON
Default: OFF
Sync (LFO sync)
Specifies how the LFO will be synchronized.
Available Settings:
OFF Not synchronized.
Clock Synchronize to the V-Producer's tempo clock.
Default: OFF
Rate (LFO rate)
Specifies the speed of the LFO cycle.
If Sync is set to CLK, you can specify the LFO cycle in terms of a note value for the synchronized
tempo.
Example:If the tempo is 120 (120 quarter notes in one minute [60 seconds]), the length of
one LFO cycle will be as follows:
Values LFO rate
192 = (half note) 1 second (60 / 60 = 1 [seconds])
96 = (quarter note) 0.5 second (60 / 120 = 0.5 [seconds])
48 = (eighth note) 0.25 second (60 / 240 = 0.25 [seconds])
22
Available Settings: 0–127 (when Sync = OFF)
*If Waveform is set to CHS (chaos wave), this setting is ignored.
Default: 92
Offset (LFO offset)
Raises or lowers the LFO waveform relative to its central value (pitch or cutoff frequency).
Page 23
Screen reference
Positive (+) offsets will cause the waveform to vary above the central value, and negative (-)
offsets will cause the waveform to vary below the central value.
Available Settings: -100, -50, 0, +50, +100
Default: 0
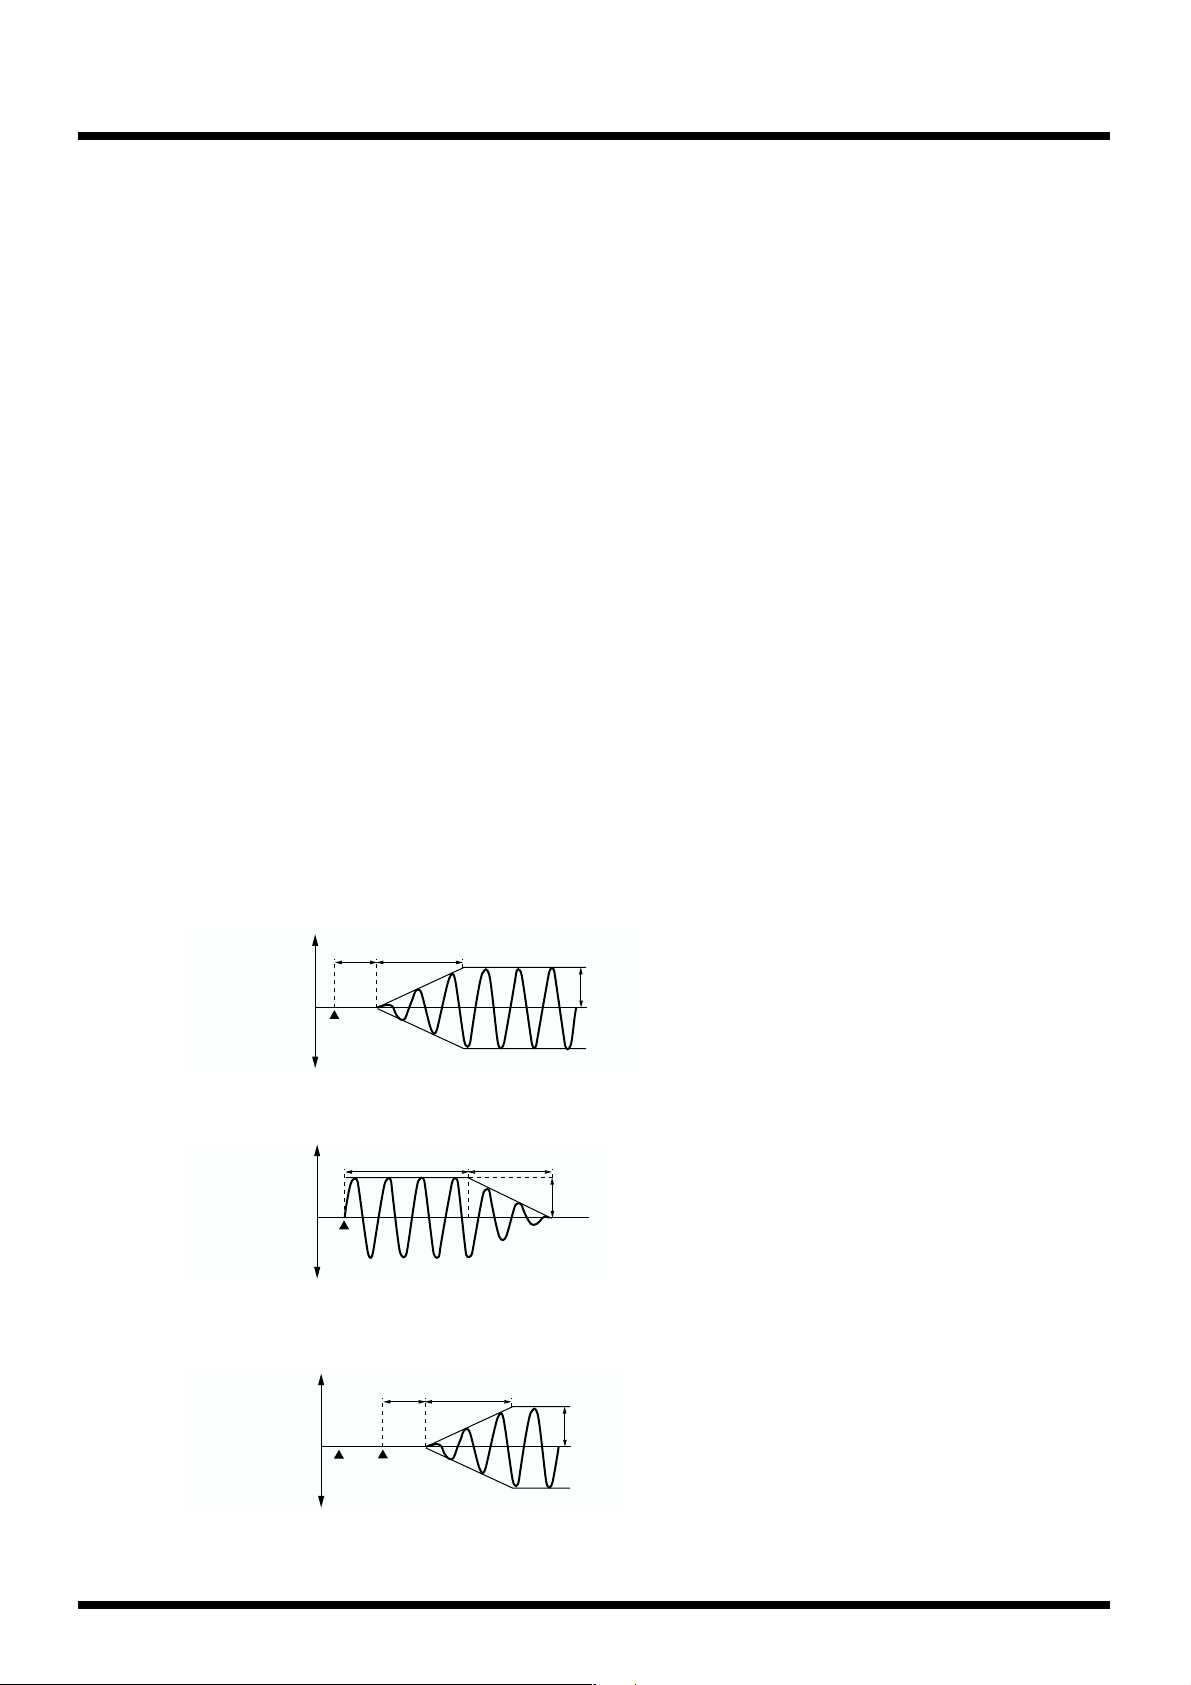
Delay Time (LFO delay time)
When the Fade Mode is ON-IN, this parameter specifies the time from when you press the key
until the LFO begins to be applied. (If it is ON-OUT, this parameter specifies the time that the
LFO will continue to be applied.)
When the Fade Mode is OFF-IN, this parameter specifies the time from when you release the
key until the LFO begins to be applied. (If it is OFF-OUT, this parameter specifies the duration
that the LFO will continue to be applied.)
Refer to the Fade Mode diagram.
Available Settings: 0–127
Default: 0
Fade Time (LFO fade time)
Specifies the time over which the LFO reaches the maximum (minimum) amplitude after the
Delay Time has elapsed.
Refer to the Fade Mode diagram.
Available Settings: 0–127
Default: 0
Fade Mode (LFO fade mode)
Specifies how the LFO will apply.
Available Settings:
ON-IN: The LFO will gradually be applied after you press the key.
fig.01-64a
Pan
Delay
Key pressed
Up (High)
Pitch
Cutoff frequency
Volume
Down (Low)
ON-OUT: The LFO will be applied when you press the key, and then will gradually diminish.
fig.01-64b
Up (High)
Cutoff frequency
Pitch
Volume
Pan
Down (Low)
Key
pressed
OFF-IN: The LFO will gradually be applied after you release the key.
fig.01-64c
Up (High)
Cutoff frequency
Pitch
Volume
Pan
Down (Low)
Key
pressed
time
Fade
time
Delay time
Delay
time
Key
released
Fade
time
Depth
Fade time
Depth
Depth
23
Page 24
Screen reference
OFF-OUT: The LFO will be applied from when you press the key until you release it, and will
gradually diminish after you release the key.
fig.01-64d
Cutoff frequency
Down (Low)
Default: ON-IN
* If using OFF-IN or OFF-OUT, you must set the amp fade-out to a value other than “0.”
LFO DEPTH
Positive (+) or negative (-) settings of a depth parameter will produce opposite phases of the
LFO waveform.
Pitch (Pitch LFO depth)
Specifies how deeply the LFO will affect the pitch.
Available Settings: -64–0–+63
Default: 0
Up (High)
Pitch
Volume
Pan
Key
pressed
Delay
Key
released
time
Fade
time
Depth
Formt (Formant LFO depth)
Specifies how deeply the LFO will affect the formant.
Available Settings: -64–0–+63
Default: 0
Level (Level LFO depth)
Specifies how deeply the LFO will affect the level .
Available Settings: -64–0–+63
Default: 0
Pan (Pan LFO depth)
Specifies how deeply the LFO will affect the pan.
Available Settings: L64–0–63R
Default: 0
24
Page 25
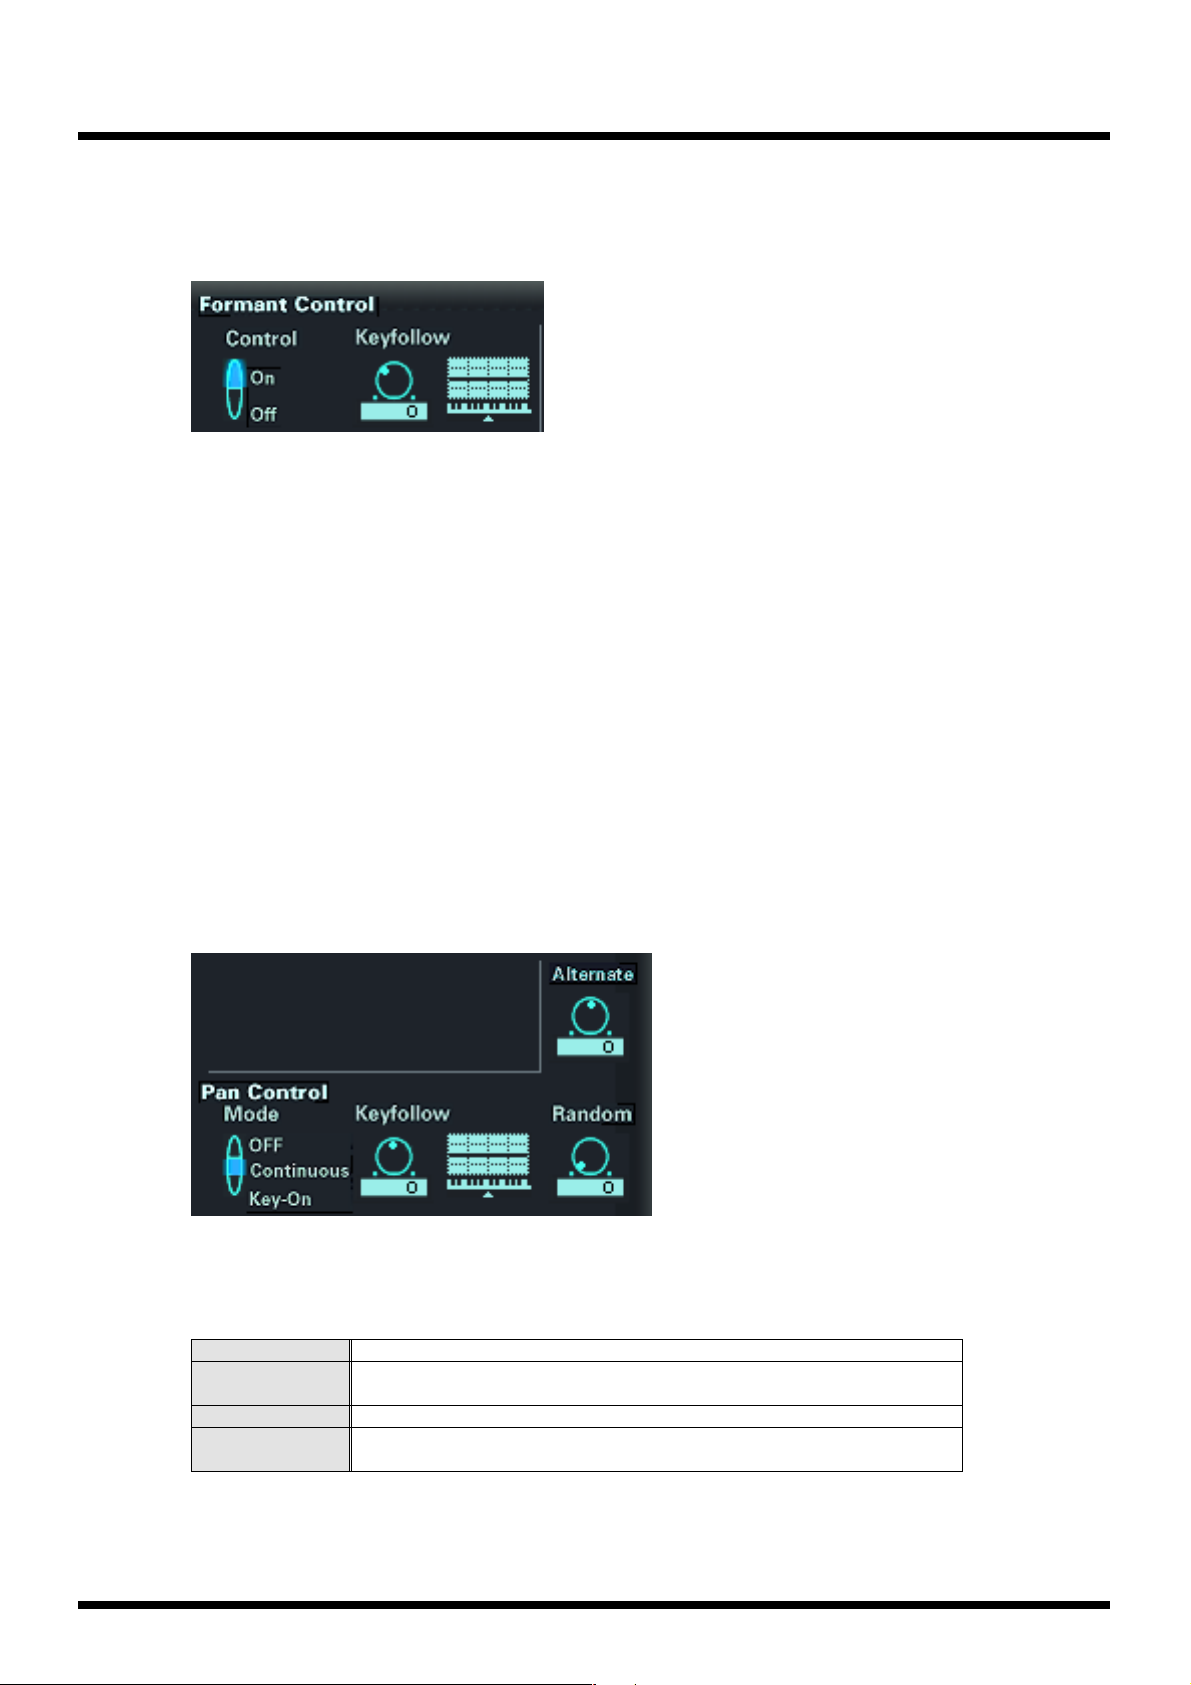
Formant Control
* Formant Control switch and Formant Key Follow are valid only for samples whose encoding type (p.
8) is SOLO.
fig.01-65
Control (Formant control switch)
This switch specifies whether control changes will vary the vocal character (formant). If you
want to turn a knob to vary the formant, set this parameter to ON.
Available Settings: OFF, ON
Default: ON
Keyfollow (Formant key follow)
Set this parameter when you want the vocal character (formant) to depend on the key you play.
With positive (+) settings, playing keys above the original pitch (p. 16) will produce a “ducklike voice,” as if the vocal cords were becoming smaller. With negative (-) settings, playing keys
above the original pitch will produce a “giant-like voice,” as if the vocal cords were becoming
larger. With a setting of +100, the change will occur in the same way as on a conventional
sampler.
Available Settings: -100, -70, -50, -30, -10, 0, +10, +20, +30, +40, +50, +70, +100, +120, +150, +200
Default: 0
Screen reference
Pan Control
fig.01-66
Control Mode (Pan control mode)
Selects how pan messages will be received.
Available Settings:
OFF: Not received.
CONTINUOUS:
KEY-ON: The location of the sound will be changed only when a key is played.
KEY-OFF:
Default: CONTINUOUS
Messages can be received at any time to smoothly change the location of
the sound.
If a message is received while a note is sounding, the pan will not change
until the next key is played.
25
Page 26

Screen reference
Random Pan (Random pan depth)
This setting is employed to cause the location of the sound to change randomly each time you
play a key. Higher settings will produce a greater range of change.
Available Settings: 0–63
Default: 0
Keyfollow (Pan key follow)
Specifies how the location of the sound will depend on the key you play. With positive (+)
settings, playing keys above the original pitch (p. 16) will move the sound further toward the
right. With negative (-) settings, playing keys above the original pitch will move the sound
further toward the left. Higher values produce a greater range of change.
Available Settings: -100, -70, -50, -40, -30, -20, -10, 0, +10, +20, +30, +40, +50, +70, +100
Default: 0
Alternate (Alternate pan depth)
Use this parameter to make the position alternate between left and right each time you play a
key. Higher settings produce a greater range of change. This value can be set in L and R
directions, and these will invert the order in which notes are panned to left and right.
Available Settings: L64–63R
Default: 0
Advanced mode
Trigger (Trigger mode)
fig.01-67
Specifies how the sample will be triggered when you press a key.
Available Settings:
GATE:
TRIGGER:
DRUM:
When using the TRIGGER setting, you may forget which keys have been pressed, so that samples continue
sounding. Or, if you are playing the VariOS from a sequencer, samples may continue sounding even after
the sequencer has stopped. If this occurs, execute the Panic function (p. 103). All notes will stop.
If you edit the Advanced Mode parameters, the Scope Editor (p. 63) will no
longer play the sample as you expect. Edit these parameters only for a
performance that you will be playing from a keyboard.
The sample will sound only while you continue holding down the key. In other words,
the sample will begin sounding when a note-on is received, and will stop sounding when
a note-off is received.
Each time you press the key, the sample will begin sounding or will stop. In other words,
the sample will begin sounding when a note-on is received, and will stop sounding when
the next note-on is received.
When you press the key, the sample will continue sounding. In other words, the sample
will begin sounding when a note-on is received. If you use this setting on decay-type
sounds (such as cymbals), you will not need to continue holding down the key.
26
Default: GATE
Page 27
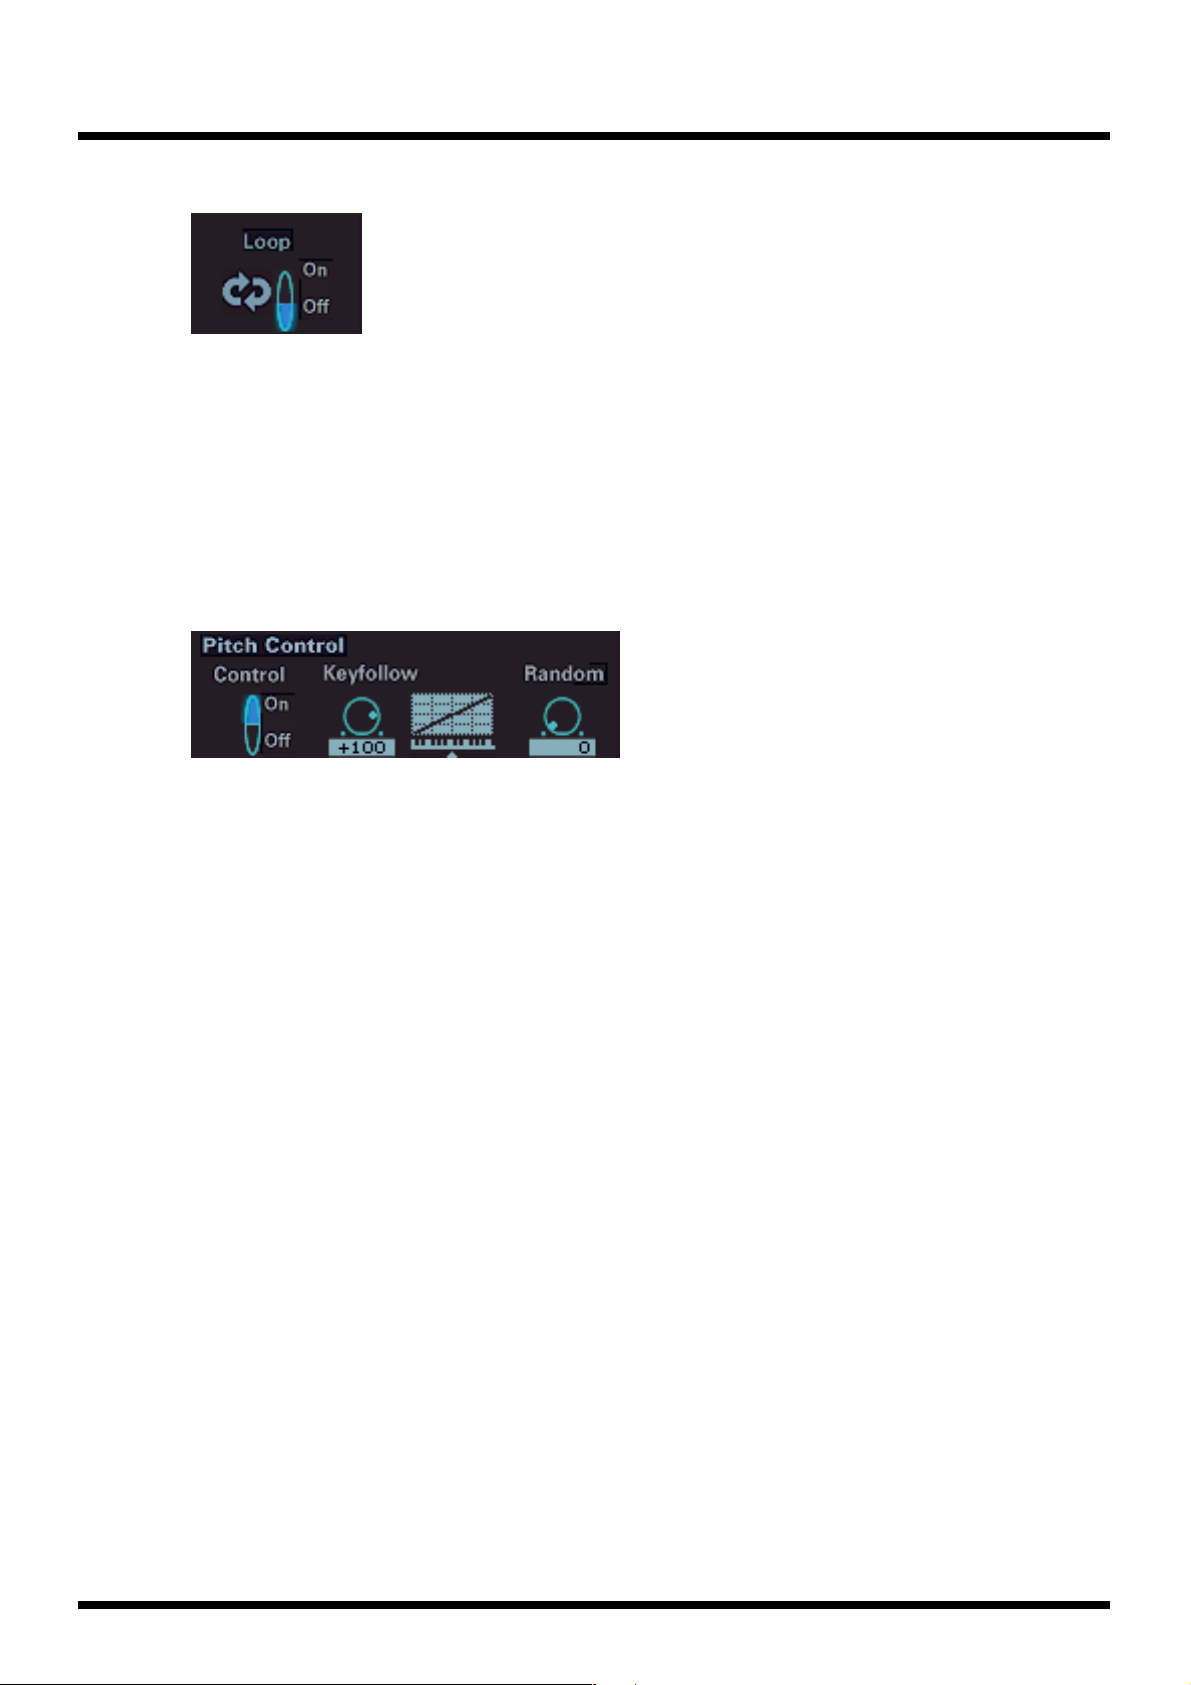
Loop (Loop switch)
fig.01-68
Turn this ON if you want a sample to play as a loop. The region enclosed by the Loop Start and
Loop End you specified in V-Producer’s Wave Edit screen will continue playing as a loop.
Available Settings: OFF, ON
Default: OFF
* If Trigger = Drum, the Loop setting will be ignored, and loop playback will not occur.
* If Trigger = Gate, loop playback will continue as long as the note remains on. If Trigger = Trigger, loop
playback will start at the first note-on, and end at the second note-on.
* If you want to edit the Loop Start and Loop End positions, refer to “Event settings” (p. 11).
Pitch Control
fig.01-69
Screen reference
Control (Pitch control switch)
This switch specifies whether control changes will affect the pitch. If you want to turn a knob to
vary the pitch, set this ON.
Available Settings: OFF, ON
Default: ON
Keyfollow (Pitch key follow)
Specifies the range of pitch change that will occur when you play one octave (12 keys) upward
on the keyboard. If you want the pitch to rise one octave as on a conventional keyboard, set this
parameter to +100. If you want the pitch to rise two octaves, set this to +200. Conversely, if you
want the pitch to fall as you play upward on the keyboard, set this parameter to a negative (-)
value. If you want the same pitch to be produced regardless of the key you play, set this to 0.
Available Settings: -100, -70, -50, -30, -10, 0, +10, +20, +30, +40, +50, +70, +100, +120, +150, +200
Default: +50
Rnd Pitch (Random pitch depth)
Determines the range within which the pitch can change randomly each time you play a key.
Set this to 0 if you don’t want the pitch to change randomly. This parameter is in units of one
cent (1/100th of a semitone).
Available Settings: 0, 1, 2, 3, 4, 5, 6, 7, 8, 9, 10, 20, 30, 40, 50, 60, 70, 80, 90, 100, 200, 300, 400,
500, 600, 700, 800, 900, 1000, 1100, 1200
Default: 0
27
Page 28

Screen reference
Time Control
fig.01-70
Control Sw (Time control switch
This switch specifies whether control changes will affect the playback speed (time). If you want
to turn a knob to control the time, set this parameter to ON.
Available Settings: OFF, ON
Default: ON
Human Feel
Use this parameter to create a sense of multiple singers when playing chords with a vocal
sample. This varies the playback speed (time) for each note-on, slightly shifting the playback
timing. Higher settings will produce a greater shift.
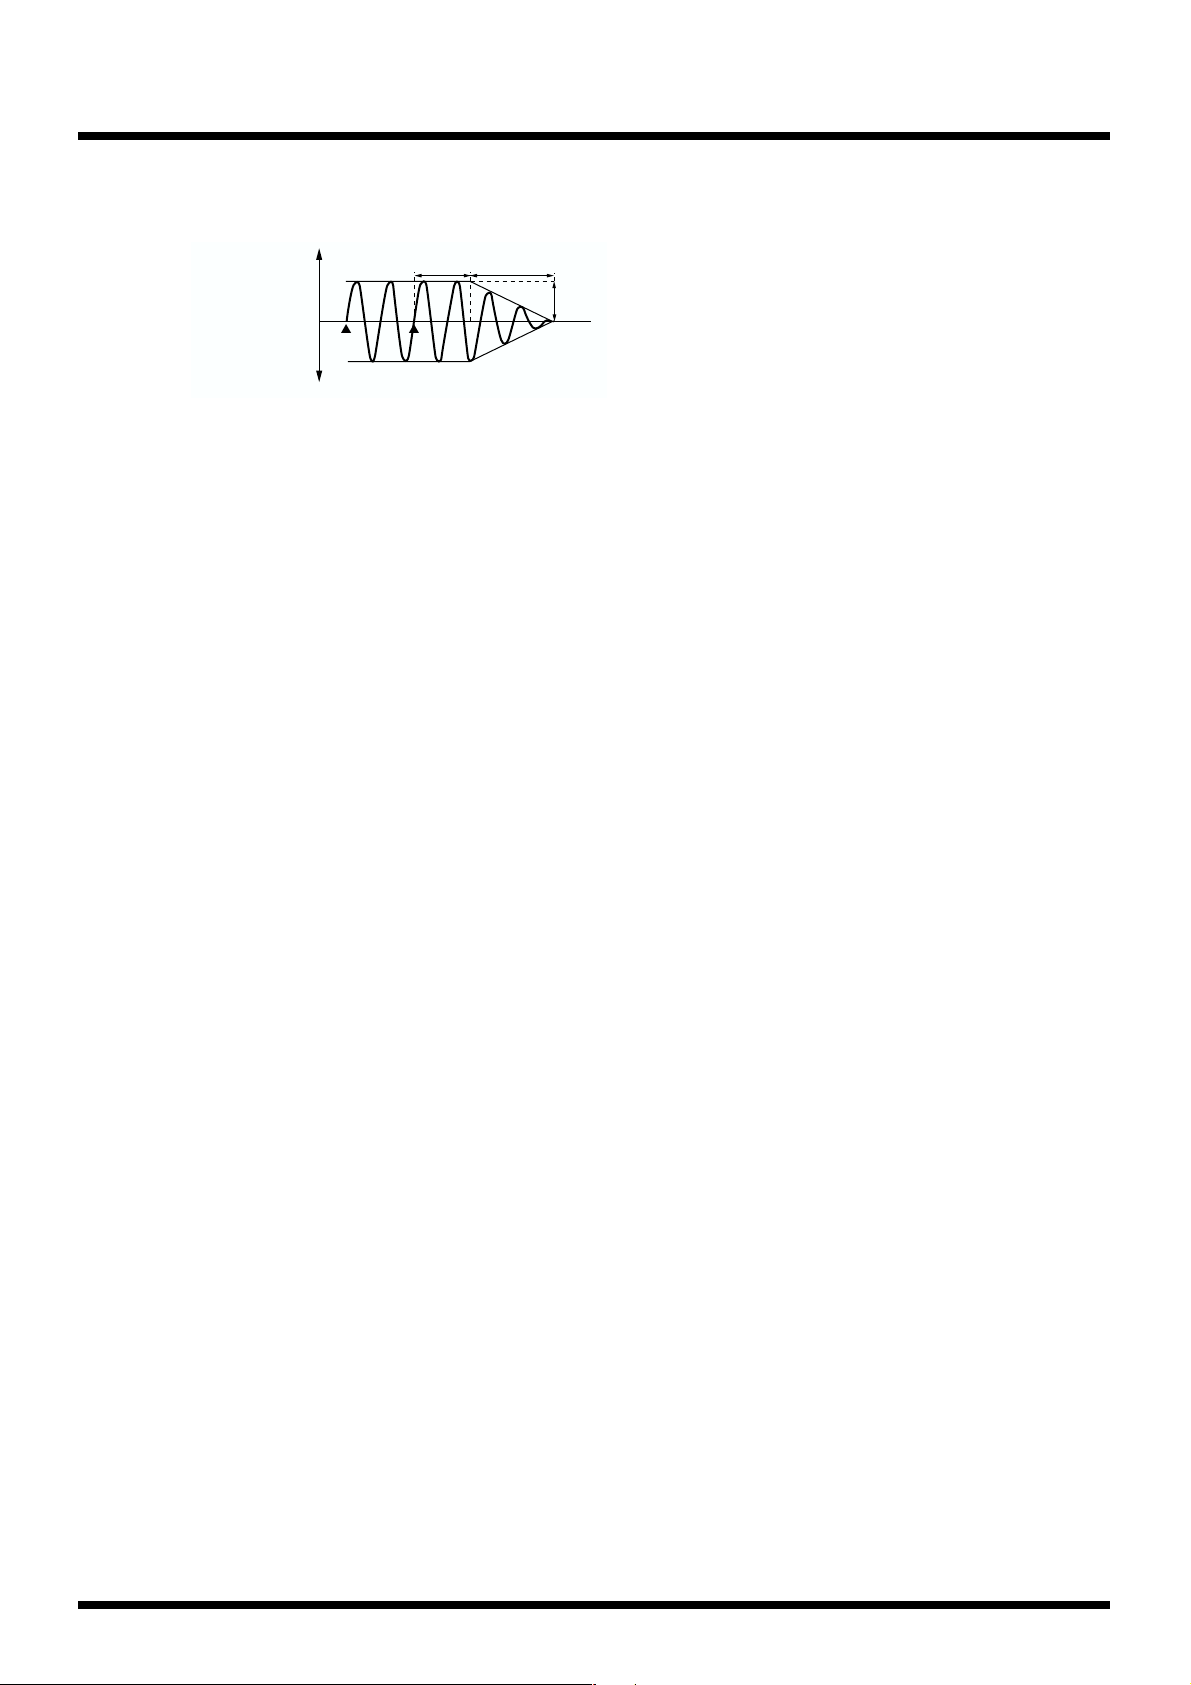
Available Settings: 0–18
Default: 0
* Tempo synchronization is not possible if you use the Human Feel parameter.
Keyfollow (Time key follow)
Set this parameter if you want the playback speed (time) to depend on the key you play. With
positive (+) settings, the playback will become faster as you play keys above the original note
(“Original MIDI Note Number” (p. 12)). With negative (-) settings, the playback will become
slower as you play keys above the original pitch. With a setting of +100, the change will occur
in the same way as on a conventional sampler.
Available Settings: -100, -70, -50, -30, -10, 0, +10, +20, +30, +40, +50, +60, +70, +80, +100, +120,
+150, +200
Default: 0
28
Page 29
Locator
The locator area contains various functions for controlling the playback of the VariOS.
fig.01-71_50
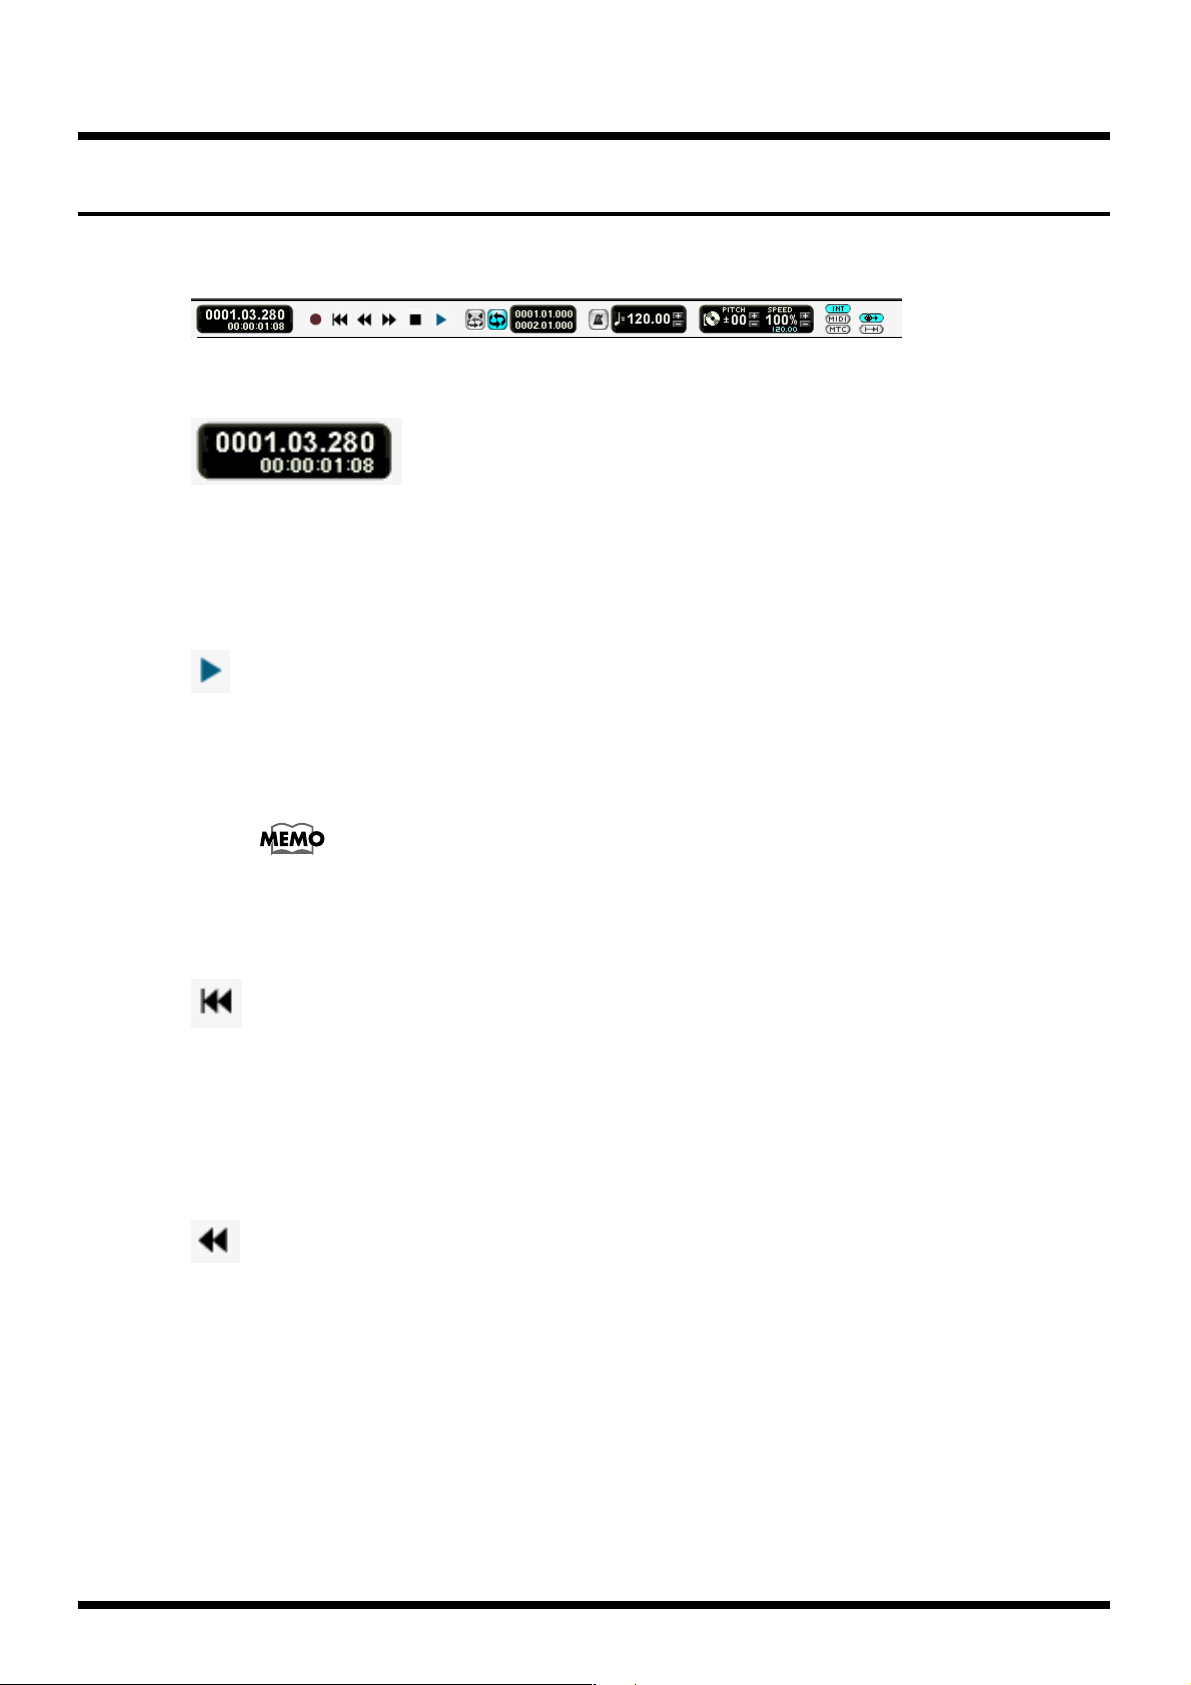
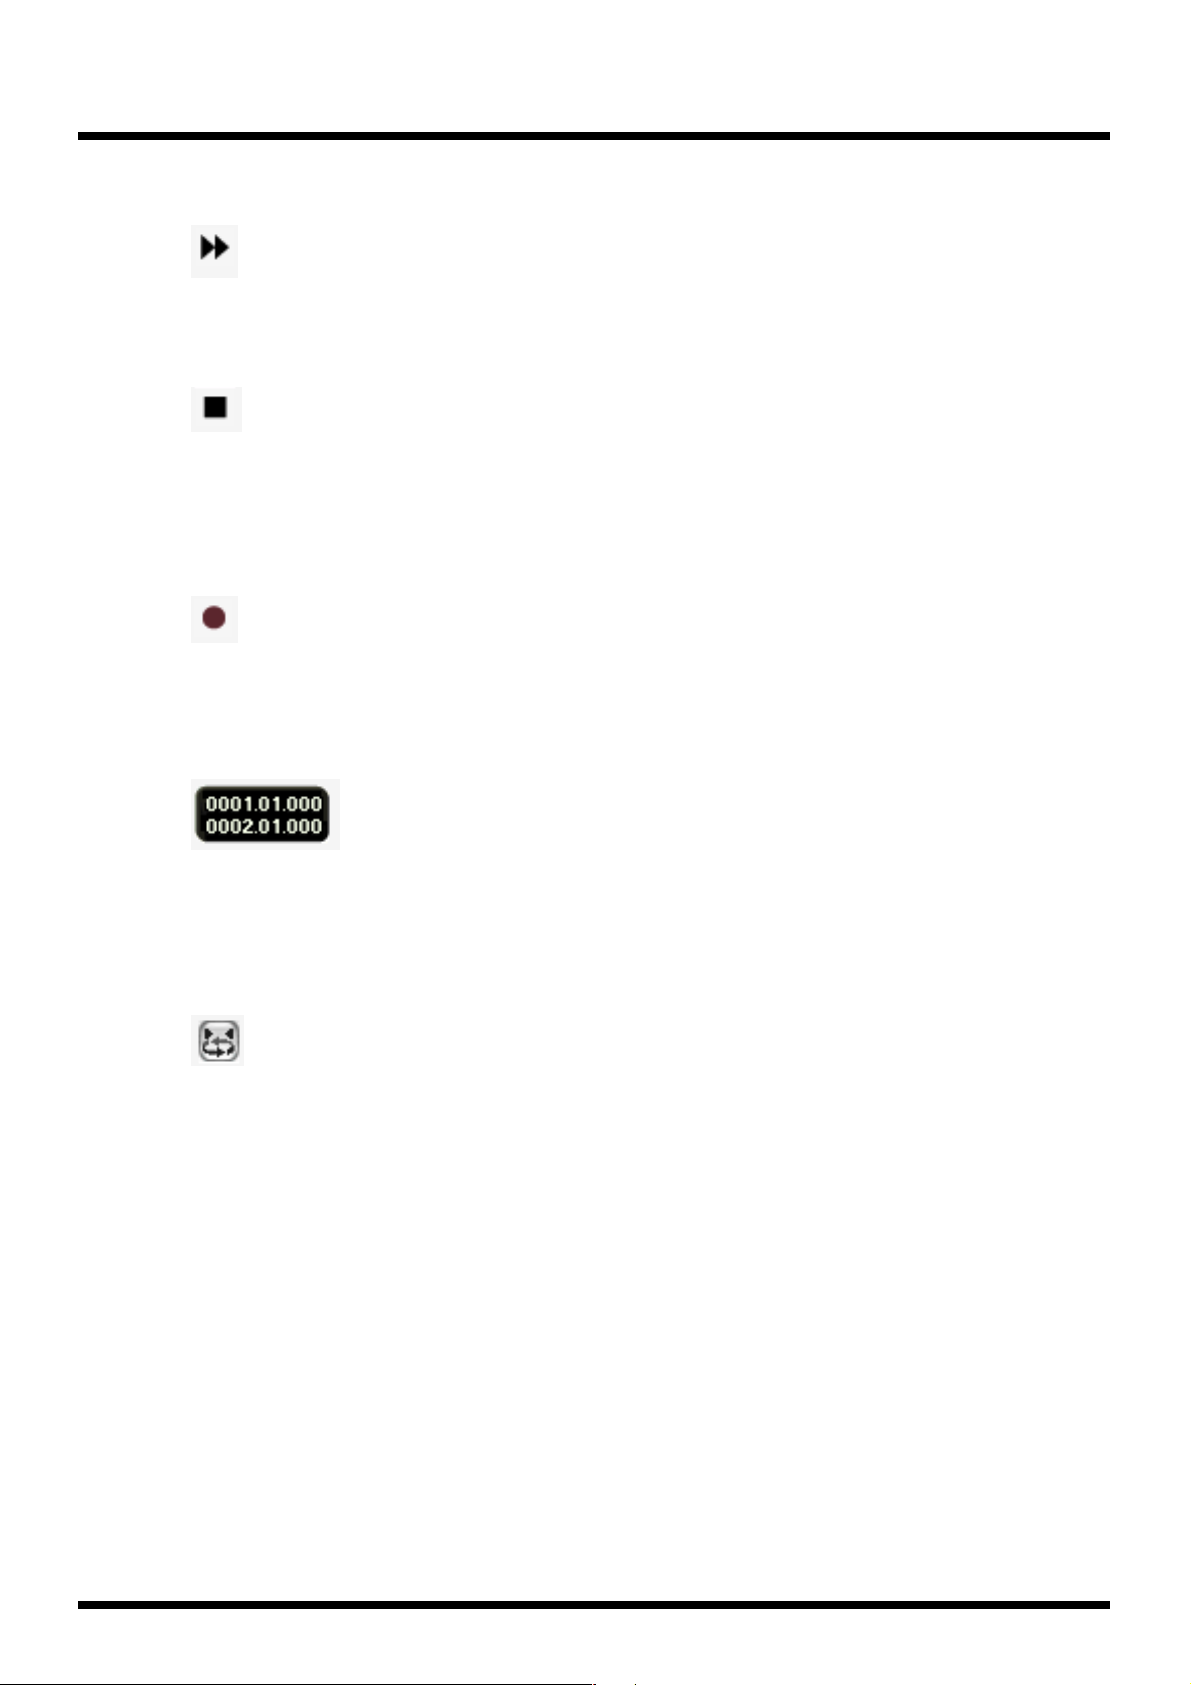
Time display
fig.01-72
Indicates the current time.
You can drag the mouse upward or downward to change the value.
If you double-click this, the Move Current Position (p. 96) dialog box will appear.
Play button
fig.01-73
Screen reference
Plays the song from the current time.
If you execute Play when the synchronization mode is “MIDI” or “MTC,” the button will blink,
and you will be in standby mode. This allows setup MIDI data to be transmitted before
playback begins, so that the performance will begin smoothly.
When using V-Producer as the synchronization slave, there is normally no
need for you to operate the play button. If playback begins late when starting
in synchronization, you can press the Play button to enter standby mode first.
Beginning of Song button
fig.01-74
Moves the current time to the beginning of the song.
If you click this button when the cursor is at the beginning of the song, the play button will
blink, and you will be in standby mode. This allows setup MIDI data to be transmitted before
playback begins, so that the performance will begin smoothly.
Rewind button
fig.01-75
Moves the current time one measure backward.
29
Page 30
Screen reference
Fast-forward button
fig.01-76
Moves the current time one measure forward.
Stop button
fig.01-77
Stops song playback.
When the Play button is in standby mode, clicking the Stop button will cancel standby mode.
Clicking the stop button twice will move the current time to the beginning of the song.
Record button
fig.01-78
Places you in recording-standby. If you then click the Play button, recording will begin.
If you press this button while the song is playing, recording will begin.
Loop points
fig.01-79
Display the loop points.
You can drag the mouse upward or downward to change the value.
If you double-click this, the Set Loop Position (p. 103) dialog box will appear.
Quick Loop position
fig.01-80
This lets you set the selected region in the Vari Track or scope edit to be the loop region. When
you select a frame and click the quick loop button in the toolbar, the loop region will be set as
the beginning and end of the frame. Alternatively, you can drag across the time ruler to select
a region, and click the quick loop button to specify that region as the loop region. The loop
markers appearing on the time ruler can be dragged to left or right to move the start point and
end point of the loop.
30
Page 31

Loop
fig.01-81
Switches loop mode on, allowing loop playback. (The region between the start and end loop
markers will play repeatedly.)
The loop markers will be displayed on the time ruler in Vari Track or scope edit.
Metronome
fig.01-82
Turn this on if you want to sound the metronome.
TEMPO (Tempo control)
fig.01-83
Screen reference
Adjusts the tempo that precedes the current cursor location.
You can adjust the value by dragging the mouse upward or downward.
If you double-click this, the Add Tempo (p. 94) dialog box will appear, allowing you to edit the
tempo immediately before the current cursor location.
PITCH, SPEED
fig.01-84
PITCH (Pitch transpose)
Temporarily transposes the pitch of the song in semitone steps (over a range of -1 octave – +1
octave).
You can adjust the value by dragging the mouse upward or downward.
This can be adjusted even while the song is playing.
Double-click this to return to the original pitch.
This will be automatically reset when you begin recording.
SPEED
Temporarily changes the playback speed of the song.
You can adjust the value by dragging the mouse upward or downward.
This can be adjusted even while the song is playing.
This speed setting lets you vary the tempo in a range of 0.5–2.0 times relative to the tempo of
the song.
You can adjust the value by dragging the mouse upward or downward.
Double-click this to return to the original pitch.
This will be automatically reset when you begin recording.
31
Page 32

Screen reference
INT button
fig.01-87a
Selects internal synchronization mode.
Use this when you want V-Producer to be the master.
In internal synchronization mode, you can use all the functions of the locator, such as using the
tempo control (p. 31) to change the tempo.
You can double-click this button to open the MIDI Sync dialog box (P.94).
MIDI button
fig.01-87b
Selects MIDI Sync mode. Use this when you want V-Producer to be a synchronization slave
using MIDI clock.
In MIDI Sync mode, pressing the Play button does not start playback—it puts you in standby
mode. Playback start and stop is controlled by the external MIDI device.
Also, the tempo setting of V-Producer will be ignored, and the tempo will be controlled by the
MIDI clock messages from the external MIDI device.
If you want to enable the tempo settings of V-Producer, click INT to return the setting to internal
synchronization mode.
You can double-click this button to open the MIDI Sync dialog box (p. 101).
MTC button
fig.01-87c
Selects MTC synchronization mode.
Use this mode when you want a video recorder or audio recorder to be the master, and VProducer to be a synchronization slave using time code.
In MTC synchronization mode, pressing the Play button does not start playback—it puts you
in standby mode. Playback start and stop is controlled by the external MIDI device.
The tempo will not synchronize in MTC synchronization mode, so the tempo of V-Producer can
be set as usual.
You can double-click this button to open the MIDI Sync dialog box (p. 101).
MIDI thru button
fig.01-88a
Turn this on if you want to play the VariOS from a MIDI keyboard connected to your computer.
If V-Producer is being used simultaneously with another MIDI sequencer, and the MIDI Thru
setting of your MIDI sequencer is also turned on, the VariOS will play duplicate notes. In such
cases, turn off the MIDI Thru button.
Pre-play button
fig.01-88b
32
When playing back from the middle of a song, controller data that occurs before the starting
location will be found and transmitted when you press the Play button. This ensures that the
various controllers will be set to the correct value regardless of the point from which you initiate
playback.
Page 33

Vari Track
Vari Track is the basic screen you will use when creating a song. Drag and drop samples from
the sample list to arrange them into a song.
fig.01-B01
Screen reference
Project
fig.01-B02
fig.01-B02b
V-Producer can maintain multiple sets of Vari Track data within a single song. This data is
called a “project.”
As shown below, you can use the pulldown menu to select, add, rename, or delete a project.
Only the current project is played
Project 1
Project 2
Project 3
Project 4
33
Page 34

Screen reference
Part
fig.01-B05
V-Producer has six parts in its Vari Track, and these parts correspond to the parts of the VariOS.
When you click a part (or an area of the Vari Track in which no frame has been placed), the part
you clicked will be highlighted, and will become the current part.
The status of each part is indicated as follows.
Playback: the part can be played back (normal state)
Muted: the part is muted (the [M] button is pressed, or another part is soloed [S])
Record: the indicator will be in this state when you press the [REC] button and
then press the [C] button
MIDI thru: the MIDI keyboard is being thru-ed. The part for which you press the
[REC] button will be in this state. (During playback, the frames placed in this part
will not sound.) If you have not pressed the [REC] button, MIDI thru will be assigned automatically. When stopped, part 1 will be selected as the MIDI thru part.
While playing, a part containing no frames will be selected as the MIDI thru part.
When you right-click ( In Macintosh, control-click) a part, the following menu will appear.
fig.01-B04
Part Property Opens the Part Property window (see following section)
Delete Frames Deletes all frames from the part
34
Page 35

Part Property
fig.01-B03
Screen reference
Name (Part name)
You can double-click this to edit the name of the part.
Reset button
Resets the part properties to their default values.
Voice Reserve
Specifies the number of voices that will be reserved for each part if the maximum polyphony of
the VariOS (14 voices) is exceeded.
Available Settings: 0–14
Default: 0
* It is not possible for the total values of all parts to exceed 14.
Pitch Sync
Specifies whether the master coarse tune and master fine tune (p. 47) of the VariOS performance
will be enabled for each part (ON) or disabled (OFF). For example, if you want to adjust the
tuning of the entire song, but do not want to change the pitch of the rhythm part, you can turn
pitch sync “OFF” for the rhythm part.
Available Settings: OFF, ON
Default: ON
35
Page 36

Screen reference
Coarse Tune
Adjusts the basic pitch of each part in semitone steps over a range of +/-1 octave.
Available Settings: -12–+12
Default: 0
Fine Tune
Relative to the Coarse Tune pitch setting, adjusts the pitch in one-cent steps over a range of half
a semitone upward or downward.
Available Settings: -5–+50
Default: 0
Octave Shift
Adjusts the pitch of each part in one-octave units.
Available Settings: -3–+3
Default: 0
M (Mute)
fig.01-B10
Mutes the part. To cancel muting, click the button once again.
S (Solo)
fig.01-B11
Plays only that part. To cancel solo, click the button once again.
REC (Record part)
fig.01-B12
Specifies the part to record.
The part for which you press this button will be the thru-destination for your MIDI keyboard.
Simply pressing this button will not start recording. Recording will begin when you press the
record button in the locator (p. 30).
* This will not light if no sample has been loaded.
Vol+ (Offset volume)
fig.01-B13
Use this to adjust the volume setting of each part. The value you specify here is added to the
volume value for each frame that you specified in the frame property area.
You can adjust this value by dragging the mouse upward or downward.
Available Settings: -63–+63
Default: 0
36
Page 37

Pan+ (Offset panpot)
fig.01-B14
Use this to adjust the panpot for each part. The value you specify here is added to the panpot
(location) of each frame. Negative (-) settings shift the panpot toward the left, while positive (+)
settings shift it toward the right.
You can adjust this value by dragging the mouse upward or downward.
Available Settings: -63––+63
Default: 0
Auto Scroll
fig.01-B15
Turn this on if you want the window to scroll along with the playback location of the song.
Grid
fig.01-B16
Screen reference
Turn this on if you want to adjust the grid location or select a region in grid units.
When dragging a frame to move it, it will move in steps of the grid width. For example, if a
frame has been intentionally placed one 16th note early, and the grid spacing is one measure,
the frame will move in one-measure steps while continuing to be one 16th note early.
To switch the display grid, drag the numerical value shown at the right of the grid button, and
choose from the pulldown menu that appears.
Values:
BAR 1 measure
1/2 Half note
1/4 Quarter note
1/8 Eighth note
1/8T Eighth note triplet
1/16 16th note
1/16T 16th note triplet
1/32 32nd note
1/32T 32nd note triplet
Default setting: 1/4
MARKER (Marker area)
fig.01-B18a
Indicates the markers within the song.
To add a marker at a desired location in a song, double-click this area to access the Add Marker
dialog box.
Markers you add can be edited or deleted in the marker list.
You can also right-click ( in Macintosh, control-click), and choose [Add Marker] or [Delete
Marker] to edit or delete markers.
37
Page 38

Screen reference
Marker List
Click the button to open the marker list window.
fig.01-E01
[Add]: Adds a new marker at the location specified in the Add Marker dialog box.
[Edit]: Edits the name of the marker selected in the marker list.
[Region]:
[Delete]: Deletes the marker selected in the marker list.
The markers you selected in the marker list while holding down the [Shift] key will be set as
the selected time region of the Vari Track.
TEMPO (Tempo area)
fig.01-B18b
Indicates the tempo of the song.
If you want to change the tempo during the song, double-click this area to access the Add
Tempo dialog box, and add the desired tempo data.
Tempo data you add can be edited or deleted in the Tempo List.
You can also edit/delete this data by right-clicking ( in Macintosh, control-clicking) and
choosing [Add Tempo] or [Delete Tempo].
Tempo List
Click the button to open the Tempo List window.
fig.01-E02
38
This displays all the tempo data in the song.
[Add]:
[Edit]:
[Delete]:
Adds a new tempo at the location specified in the Add Tempo dialog box.
Edits the tempo value selected in the Tempo List.
Deletes the tempo data selected in the Tempo List.
Page 39

Meter (Time signature area)
fig.01-B18c
Indicates the time signature of the song.
If you want to change the time signature during the song, double-click this area to access the
Add Meter dialog box, and add the desired tempo data.
Time signature data you add can be edited or deleted in the Meter List.
You can also edit/delete this data by right-clicking ( in Macintosh, control-clicking) and
choosing [Add Meter] or [Delete Meter].
Meter List (Time signature list)
Click the button to open the Meter List window.
fig.01-E03
Screen reference
This displays all the time signature data in the song.
[Add]:
[Edit]:
[Delete]:
Adds a new time signature at the location specified in the Add Meter dialog
box.
Edits the time signature selected in the Meter List.
Deletes the time signature selected in the Meter List.
Time ruler
fig.01-B19
This area shows the measure numbers and beats on a grid.
You can use the zoom tool (p. 81) in the lower right of the Vari Track to expand or shrink the
size of this display.
If you want the time ruler to display time units, right-click ( in Macintosh, control-click) the
ruler, and choose [Song Time] from the Time Ruler menu that appears. To return to the measure
number and beat display, choose [Meas/Beat].
If you drag the mouse across the time ruler to make a selection, the area you selected and the
frames it includes will be the subject of editing operations (such as copy).
Current time (current cursor location)
This vertical line moves in the main window as the playback location of the song changes.
To move the current time, click the desired point on the time ruler (or a location in the main
window where no frame has been placed).
39
Page 40

Screen reference
Zoom tool
fig.01-B20a
Expands or shrinks the display.
Shrinks the display.
Expands the display.
Move this left to shrink, or right to expand.
Frames
When you drag a sample from the sample list into the Vari Track, it becomes a “frame.”
By dragging a frame with the mouse, you can move it to the desired location on the Vari Track
sheet (p. 41).
By dragging either end of a frame to left or right, you can freely adjust the length of the frame.
* When dragging the left end of the frame to shorten it, you cannot shorten it further toward the right
than a location where note data exists in the frame.
If you double-click a frame, the Scope Editor (p. 63) will open, allowing you to edit the
performance data.
40
Page 41

Sheet
Screen reference
fig.01-B21
This is the area in which you can arrange frames.
When you right-click ( in Macintosh, control-click) on the sheet, the following menu will
appear.
Scope Editor Opens the selected frame in the Scope Editor (p. 63).
Cancels the preceding operation, and restores the data to its previous state.
Undo
Cut
Copy
Paste
Delete
Repeat (repeat copy) Repeatedly copies the selected frame. Execute this command with a frame selected.
* Some operations cannot be undone, and in this case, the [Undo] menu item will be
grayed and cannot be selected.
Deletes the selected frame and places the original data in the clipboard. You can select the Paste command to paste the data from the clipboard.
Places the selected frame in the clipboard. You can select the Paste command to
paste the data from the clipboard.
Pastes the data from the clipboard to the current time location (the vertical line; normally the location where you clicked the mouse).
Deletes the selected frame. Unlike the Cut command, the deleted data will not be
placed in the clipboard.
41
Page 42

Screen reference
Tool Bar
fig.01-B214
New
fig.01-C10
Creates a new song.
You will be asked “Do you want to clear samples in VariOS?” If you want to erase the samples
that are in the VariOS, select [Yes]. If you want to create a new song without erasing the samples
that are in the VariOS, select [No].
* If you click this menu item while editing a song, a dialog box will ask you whether you want to save
that song. Click [Yes] if you want to save it, or [No] if you do not.
Open Song
fig.01-C11
Loads a song.
At the same time, the samples used by the song will be sent to the VariOS.
V-Producer can load songs that are in V-Producer format (in Windows, these will
have a filename extension of .vpd).
MacOS
* If you click this menu item while editing a song, a dialog box will ask you whether you want to save
that song. Click [Yes] if you want to save it, or [No] if you do not.
If you are using Macintosh and want to load a Windows V-Producer file, choose “All
documents” in the “Display” field.
In some cases when you open a song, a dialog box of "[sample name] Load File
Name" may appear. This will appear if the user has moved a sample file that is used
by the song file, or if V-Producer does not know the location of the sample file.
Please specify the file location of the sample name shown in the dialog box.
42
Page 43

Save Song
fig.01-C12
Saves the song by overwriting the previous version.
The song will be saved in V-Producer format (in Windows, it will have a filename extension of
.vpd).
In V-Producer, the actual audio data used by a song (.vpw files) is handled separately from the
song file (.vpd file) that uses this audio data. The song file contains only references to these
audio files. This means that if you copy or back up only the song file to another computer, you
will be unable to play back the song.
If you select "Save song with the sample files" from Save As in File menu when saving, all
sample files (.vpw files) used by the song will be copied to the same folder as the song file. By
moving this entire folder, you can move your song to another computer or create a backup.
Screen reference
About the sample files (.vpw) used by the song
The settings file named “song name + PRM.ini” that is saved in the same folder as
the song file (.vpd) stores the location (absolute path) of the sample files (.vpw) used
in the song. For this reason, if you change the location of the samples used in the
song, V-Producer will lose track of the sample file locations. In this case, the next
time you open the song, the “[sample name] Load File Name” dialog box will
appear. Please specify the file location of the sample name shown in the dialog box.
Cut
Copy
Paste
Undo
fig.01-C13
Deletes the selected frame or note, and places the original data in the clipboard.
You can choose the Edit menu command Paste to paste the data from the clipboard.
fig.01-C14
Places the selected frame or note in the clipboard.
You can choose the Edit menu command Paste to paste the data from the
clipboard.
fig.01-C15
Pastes the data from the clipboard at the current time location (the vertical line;
normally the location where you clicked the mouse).
fig.01-C16
Cancels the preceding operation, and restores the data to its previous state.
* Some operations cannot be undone, and in this case, the [Undo] menu item will be
grayed and cannot be selected.
SMPTE Display
fig.01-C17
Displays the SMPTE display (p. 45).
43
Page 44

Screen reference
VariOS Mixer
fig.01-C18
Displays the VariOS mixer (p. 53).
VariOS Performance Editor
fig.01-C19
Displays the VariOS performance editor (p. 47).
VariOS Keyboard
fig.tbvk
Displays the VariOS Keyboard (p. 59).
Help
fig.01-C20
Opens V-Producer help (online PDF manual).
44
Page 45

SMPTE Display
fig.01-F01_50
The SMPTE display window shows the SMPTE time.
• While V-Producer is generating SMPTE time, the title bar will indicate [Generate Time].
• If SMPTE time is being received from an external device, the title bar will indicate [Read
Time].
Screen reference
45
Page 46

Screen reference
Frame Properties
fig.01-D01
You can click the button to show or hide this.
Frame Property lets you edit the settings for the selected frame (the frame enclosed in a red
border).
• Top: Location of the frame (beginning)
• End: Location of the frame (end)
• Adjust: Matches the length of frame to the length of the region for which that frame
actually sounds. The location at which a frame sounds is determined by the location of the
note data within the frame. If the two ends of the frame do not match the two ends of the
note data within the frame, executing Adjust will align the ends of the note to match the
frame. For example, if you want the left end of a phrase recorded in real time to match the
location at which the sound actually begins, or if you used the Phrase Scope to edit the time
and this causes the note to extend toward the back, you can use the Adjust button to match
the end of the frame with the end of the note so that the entire phrase will be played back.
• Volume: Adjusts the volume of the frame (0–127).
• Panpot: Adjusts the position of the frame (left L63–center 0 – right R63).
• Transpose: Transposes the pitch in semitone steps (-64–0–+63).
• Frame Take: Selects the take that was recorded in real time. If you loop-record in real time,
the first recorded pass will be take 1, the second will be take 2, and so on.
46
Page 47

VariOS Performance Editor
Here you can make various settings for the sound generator of the VariOS.
Use the tabs located above to switch between the screens (Tune, Knob Assign, Modulation,
Aftertouch, Pitch Bend).
The [Reset] button restores the values of the displayed screen to their default settings.
Tune
fig.01-G01_50
Screen reference
Here you can make settings related to the tuning of the VariOS.
Master Tune
Adjusts the tuning of the entire VariOS. The displayed value is the frequency of the A4 key.
Available Settings: 427.4–452.6 [Hz]
Default: 440.0 [Hz]
Master Coarse Tune
Coarse adjusts the basic pitch of the performance in semitone steps over a +/-1 octave range.
Available Settings: -12–+12
Default: 0
Master Fine Tune
Fine adjusts the pitch specified by Coarse in one-cent steps (1/100th of a semitone) over a range
of one-half semitone upward or downward.
Available Settings: -50–+50
Default: 0
47
Page 48

Screen reference
Knob Assign
fig.01-G02_50
Here you can specify the MIDI messages used to control PITCH, TIME, FORMANT, and
DYNAMICS in the scope editor (p. 63). Make these settings if you want to use external MIDI
controllers.
PITCH
Specifies the MIDI message that is to control PITCH.
Available Settings: Off, Bender, CC: (0–127)
Default: CC:16 (the c1 knob of the VariOS)
TIME
Specifies the MIDI message that is to control TIME.
Available Settings: Off, Bender, CC: (0–127)
Default: CC:17 (the c2 knob of the VariOS)
FORMANT
Specifies the MIDI message that is to control FORMANT.
Available Settings: Off, Bender, CC: (0–127)
Default: CC:18 (the c3 knob of the VariOS)
DYNAMICS
Specifies the MIDI message that is to control DYNAMICS.
Available Settings: Off, Bender, CC: (0–127)
Default: CC:11
Modulation
fig.01-G03_50
48
Here you can make modulation settings.
Page 49

Screen reference
Level (Level depth)
Specifies the range of volume change. In the case of a knob, positive (+) settings for this
parameter will cause the volume to increase when you turn the knob clockwise. With negative
(-) settings, the volume will decrease when you turn the knob clockwise.
Available Settings: -64–+63
Default: 0
LFO Rate (LFO rate depth)
Specifies the range of LFO rate (p. 22) change. In the case of a knob, positive (+) settings for this
parameter will cause the rate to speed up when you turn the knob clockwise. With negative (-)
settings, the rate will slow down when you turn the knob clockwise.
Available Settings: -64–+63
Default: 0
LFO Pitch (LFO pitch depth)
Specifies the range of change in the LFO applied to the pitch (Pitch LFO Depth; p. 24). In the
case of a knob, positive (+) settings for this parameter will cause the depth to change from the
current value toward the positive (+) direction when you turn the knob clockwise. With
negative (-) settings, the depth will change in the negative (-) direction when you turn the knob
clockwise. Positive (+) and negative (-) settings will invert the phase of the LFO. Larger settings
produce greater depth.
Available Settings: -64–+63
Default: 63
LFO Formant (LFO formant depth)
Specifies the range of change in the LFO applied to the formant (Formant LFO Depth; p. 24). In
the case of a knob, positive (+) settings for this parameter will cause the depth to change from
the current value toward the positive (+) direction when you turn the knob clockwise. With
negative (-) settings, the depth will change in the negative (-) direction when you turn the knob
clockwise. Positive (+) and negative (-) settings will invert the phase of the LFO. Larger settings
produce greater depth.
Available Settings: -64–+63
Default: 0
LFO Level (LFO level depth)
Specifies the range of change in the LFO applied to the volume (Level LFO Depth; p. 24). In the
case of a knob, positive (+) settings for this parameter will cause the level to change from the
current value toward the positive (+) direction when you turn the knob clockwise. With
negative (-) settings, the level will change in the negative (-) direction when you turn the knob
clockwise. Positive (+) and negative (-) settings will invert the phase of the LFO. Larger settings
produce greater depth.
Available Settings: -64–+63
Default: 0
LFO Pan (LFO pan depth)
Specifies the range of change in the LFO applied to the level (Pan LFO Depth; p. 24). In the case
of a knob, positive (+) settings for this parameter will cause the pan to change from the current
value toward the positive (+) direction when you turn the knob clockwise. With negative (-)
settings, the pan will change in the negative (-) direction when you turn the knob clockwise.
Positive (+) and negative (-) settings will invert the phase of the LFO. Larger settings produce
greater depth.
Available Settings: -64–+63
Default: 0
49
Page 50

Screen reference
Aftertouch
fig.01-G04_50
Here you can make aftertouch settings.
Level (Level depth)
Specifies the range of volume change. In the case of a knob, positive (+) settings for this
parameter will cause the volume to increase when you turn the knob clockwise. With negative
(-) settings, the volume will decrease when you turn the knob clockwise.
Available Settings: -64–+63
Default: 0
LFO Rate (LFO rate depth)
Specifies the range of LFO rate (p. 22) change. In the case of a knob, positive (+) settings for this
parameter will cause the rate to speed up when you turn the knob clockwise. With negative (-)
settings, the rate will slow down when you turn the knob clockwise.
Available Settings: -64–+63
Default: 0
LFO Pitch (LFO pitch depth)
Specifies the range of change in the LFO applied to the pitch (Pitch LFO Depth; p. 24). In the
case of a knob, positive (+) settings for this parameter will cause the depth to change from the
current value toward the positive (+) direction when you turn the knob clockwise. With
negative (-) settings, the depth will change in the negative (-) direction when you turn the knob
clockwise.
Available Settings: -64–+63
Default: 0
LFO Formant (LFO formant depth)
Specifies the range of change in the LFO applied to the formant (Formant LFO Depth; p. 24). In
the case of a knob, positive (+) settings for this parameter will cause the depth to change from
the current value toward the positive (+) direction when you turn the knob clockwise. With
negative (-) settings, the depth will change in the negative (-) direction when you turn the knob
clockwise.
Available Settings: -64–+63
Default: 0
50
LFO Level (LFO level depth)
Specifies the range of change in the LFO applied to the volume (Level LFO Depth; p. 24). In the
case of a knob, positive (+) settings for this parameter will cause the level to change from the
current value toward the positive (+) direction when you turn the knob clockwise. With
negative (-) settings, the level will change in the negative (-) direction when you turn the knob
clockwise.
Available Settings: -64–+63
Default: 0
Page 51

LFO Pan (LFO pan depth)
Specifies the range of change in the LFO applied to the level (Pan LFO Depth; p. 24). In the case
of a knob, positive (+) settings for this parameter will cause the pan to change from the current
value toward the positive (+) direction when you turn the knob clockwise. With negative (-)
settings, the pan will change in the negative (-) direction when you turn the knob clockwise.
Available Settings: -64–+63
Default: 0
Pitch Bend
fig.01-G05_50
Screen reference
Here you can make settings for the changes that occur when pitch bend messages are received.
Range Up (Bend range up)
Specifies the amount of upward pitch change that will occur when the pitch bend lever is
moved to the far right (or in the case of a wheel, all the way upward). With a setting of +12,
moving the pitch bend lever to the far right will raise the pitch one octave.
Available Settings: 0–+12
Default: 2
Range Down (Bend range down )
Specifies the amount of downward pitch change that will occur when the pitch bend lever is
moved to the far left (or in the case of a wheel, all the way down). With a setting of -48, moving
the pitch bend lever to the far left will lower the pitch four octaves.
Available Settings: -48–0
Default: -2
Level (Level depth)
Specifies the range of volume change. In the case of a knob, positive (+) settings for this
parameter will cause the volume to increase when you turn the knob clockwise. With negative
(-) settings, the volume will decrease when you turn the knob clockwise.
Available Settings: -64–+63
Default: 0
LFO Rate (LFO rate depth)
Specifies the range of LFO rate (p. 22) change. In the case of a knob, positive (+) settings for this
parameter will cause the rate to speed up when you turn the knob clockwise. With negative (-)
settings, the rate will slow down when you turn the knob clockwise.
Available Settings: -64–+63
Default: 0
51
Page 52

Screen reference
LFO Pitch (LFO pitch depth)
Specifies the range of change in the LFO applied to the pitch (Pitch LFO Depth; p. 24). In the
case of a knob, positive (+) settings for this parameter will cause the depth to change from the
current value toward the positive (+) direction when you turn the knob clockwise. With
negative (-) settings, the depth will change in the negative (-) direction when you turn the knob
clockwise.
Available Settings: -64–+63
Default: 0
LFO Formant (LFO formant depth)
Specifies the range of change in the LFO applied to the formant (Formant LFO Depth; p. 24). In
the case of a knob, positive (+) settings for this parameter will cause the depth to change from
the current value toward the positive (+) direction when you turn the knob clockwise. With
negative (-) settings, the depth will change in the negative (-) direction when you turn the knob
clockwise.
Available Settings: -64–+63
Default: 0
LFO Level (LFO level depth)
Specifies the range of change in the LFO applied to the volume (Level LFO Depth; p. 24). In the
case of a knob, positive (+) settings for this parameter will cause the level to change from the
current value toward the positive (+) direction when you turn the knob clockwise. With
negative (-) settings, the level will change in the negative (-) direction when you turn the knob
clockwise.
Available Settings: -64–+63
Default: 0
LFO Pan (LFO pan depth)
Specifies the range of change in the LFO applied to the level (Pan LFO Depth; p. 24). In the case
of a knob, positive (+) settings for this parameter will cause the pan to change from the current
value toward the positive (+) direction when you turn the knob clockwise. With negative (-)
settings, the pan will change in the negative (-) direction when you turn the knob clockwise.
Available Settings: -64–+63
Default: 0
52
Page 53

VariOS Mixer
Here you can adjust the level and pan of the VariOS’s six parts, and adjust the depth of each
effect. To open this window, click the mixer button in the toolbar.
fig.01-Mix01_55
Screen reference
For details on the signal flow and each effect, refer to “The effects of the
sound generator section” (p. 109).
EFFECTS
fig.01-Mix09_80
Each button opens the corresponding effect window (p. 55).
OUTPUT (Output assign)
fig.01-Mix02_80
These buttons specify the output destination of the direct (unprocessed) sound.
For details on the output destination, refer to the signal flow diagram in “The effects of the
sound generator section” (p. 109).
53
Page 54

Screen reference
M-FX (Multi-effect send level)
fig.01-Mix03_80
These knobs adjust the multi-effect depth.
These settings are valid only if the output assign is set to “M-FX.”
CHORUS (Chorus send level)
fig.01-Mix04_80
These knobs adjust the chorus depth.
These settings will be ignored if the output assign is set to “DIR.”
REVERB (Reverb send level)
fig.01-Mix05_80
These knobs adjust the reverb depth.
These settings will be ignored if the output assign is set to “DIR.”
PAN (Panpot)
fig.01-Mix06_80
These knobs adjust the pan of each part.
Sliders (level)
fig.01-Mix07_80
These sliders adjust the level of each part.
54
Page 55

Effect (Effect windows)
In these windows you can control the VariOS’s internal effects (multi-effects, chorus, reverb).
Click an effect button in the VariOS mixer window to open the corresponding effect window.
fig.01-Mix09_80
For details on the parameters of each effect, refer to “The effects of the sound generator
section” (p. 109).
Multi-effect
fig.01-Mix16_50
Screen reference
ON/OFF switch
fig.01-Mix11
Switches the multi-effect on/off.
Effect type select
fig.01-MIX06
Switches the type of multi-effect.
Effect type list
fig.01-MIX07
Displays a list of effect types.
55
Page 56

Screen reference
Multi-FX Out Assign (Multi-effect output assign)
fig.01-Mix12
Specifies the output destination of the sound that has passed through the multi-effect.
MAIN Output from the VariOS’s “MAIN OUT.”
DIR Output from the VariOS’s “DIRECT OUT.”
Master Level (Multi-effect master level)
fig.01-Mix13
Specifies the volume of the sound that has passed through the multi-effect.
Cho Send Level (Multi-effect chorus send level)
fig.01-Mix14
Specifies the depth of chorus for the sound that has passed through the mult-effect.
Rev Send Level (Multi-effect reverb send level)
fig.01-Mix15
Specifies the depth of reverb for the sound that has passed through the multi-effect.
56
Page 57

Chorus
fig.01-Mix17_50
fig.01-Mix11
fig.04-MIX06
Screen reference
ON/OFF switch
Switches the chorus on/off.
Effect type select
Switches the type of chorus.
Effect type list
fig.04-MIX07
Displays a list of effect types.
Master Level (Chorus master level)
fig.01-Mix13
Specifies the volume of the sound that has passed through the chorus.
Rev Send Level (Chorus reverb send level)
fig.01-Mix15
Specifies the depth of reverb for the sound that has passed through the chorus.
57
Page 58

Screen reference
Reverb
fig.01-Mix18_50
ON/OFF switch
fig.01-Mix11
Switches the reverb on/off.
Effect type select
fig.04-MIX06
Switches the type of reverb.
Effect type list
fig.04-MIX07
Displays a list of effect types.
Master Level (Reverb master level)
fig.01-Mix13
Specifies the volume of the sound that has passed through the reverb.
58
Page 59

VariOS Keyboard
This is a virtual keyboard that operates within V-Producer.
It can indicate the MIDI messages of the part(s) specified by the Part buttons, and can control
note-on/off and pitch/time/formant for the part being auditioned.
Note-on/off and pitch/time/formant data produced using the VariOS keyboard can be
recorded in V-Producer.
fig.toolbar
Click the VariOS keyboard button in the toolbar to open the keyboard.
Screen reference
fig.1
ScreenPITCH/TIME/FORMANT knobs
PITCH/TIME/FORMANT knobs Control the pitch/time/formant of the part being auditioned.
Screen
Part buttons
Velocity fader Adjusts the velocity of the notes.
Keyboard Click the keyboard to listen to the part being auditioned.
Shows the MIDI messages of the part being auditioned and the
part(s) specified by the MONITOR PART buttons.
Specify the part(s) whose MIDI messages will be displayed in the
screen.
Part buttons
Velocity
Velocity fader
Keyboard
59
Page 60

Screen reference
PITCH/TIME/FORMANT knobs
fig.knobs
You can drag these knobs to control the pitch/time/formant of
the part being auditioned. If the part selected by the part buttons
is playing, these knobs will move according to the pitch/time/
formant control data.
Screen
fig.screen-1
A.
Displays the MIDI messages of the part(s) specified by the part
buttons and the MIDI messages of the part being auditioned. If
you do not specify a part, only the MIDI messages of the
auditioned part will be displayed.
fig.screen-2
B.
When you double-click in the screen, a rectangular frame as
shown in the diagram will appear. By dragging the mouse
inside this frame, you can simultaneously control both pitch and
time. When you click the parameter name, the parameter
indication will change in the order of PITCH-TIME-FORMANT,
and the parameter to be controlled will be assigned to each axis.
It is possible to specify the same parameter for the X-axis and Yaxis, such as PITCH-PITCH or TIME-TIME. However in this
case, the X-axis movement will be ignored, and control will
occur only on the Y-axis.
Part buttons
Fader
fig.buttons
These buttons specify the part(s) whose MIDI messages will be
displayed in the screen.
When a button is turned on, it will turn light blue. If all buttons
are off, only the MIDI messages of the auditioned part will be
displayed in the screen.
fig.fader
This adjusts the velocity of the notes when you click the mouse
on the keyboard, or when using the keyboard of your computer
to audition sound. This fader will also move according to the
velocity from a MIDI keyboard connected to the VariOS’s MIDI
IN or the velocity of a playing part specified by the part buttons.
60
Page 61

Keyboard
You can click the keyboard area to audition the sound. At this time, the keys will light yellow
according to the note you clicked. The keys will also light yellow in response to note-on’s from
a MIDI keyboard connected to the VariOS’s MIDI IN, or note-on’s from a playing part specified
by the part buttons.
You can also do the following.
• Display the note name
• Use the keyboard of your keyboard to turn notes on/off.
Note name display
By pressing the [Shift]+[N] keys, you can switch the note names of the note-on keys between
displayed and hidden.
fig.3
Screen reference
By placing the mouse pointer on the keyboard and right-clicking ( in Macintosh, controlclicking), and choosing “View Note Name” from the menu that appears, you can show or hide
the note name display for the note-on keys.
fig.2
61
Page 62

Screen reference
Turning a note on/off from your computer keyboard
1. Press the [Shift]+[K] keys.
If you place the mouse pointer on the keyboard and right-click ( in Macintosh, controlclick), and choose “Change PC Keyboard” from the menu that appears, you will be able to turn
notes on/off from the keyboard of your computer.
fig.5
62
fig.trackkey
The keys of your computer keyboard will correspond to
notes as shown in the diagram..
You can use the up/down keys [ ][ ] to shift the
octave.
Once again, press the [Shift]+[K] keys. Alternatively,
right-click ( in Macintosh, control-click) and
uncheck “Change PC Keyboard” in the menu that
appears to exit this function.
Page 63

Scope Editor
The scope editor lets you edit the performance data within a frame. By using the scope editor
you can visually edit pitch, time, and formant data for any location within a phrase.
The scope editor will be either the Phrase Scope or the Groove Scope, depending on the
keyboard map (p. 4) setting in the sample list.
Since you can edit while listening to the playback loop, you can hear the results of your editing
while you work. In addition, it’s easy to restore a phrase to its previous state, so you can repeat
cycles of trial and error as many times as you like.
Phrase scope
The Phrase Scope will appear when you edit a frame that was pasted with the sample’s
“Keyboard Map” set to (Phrase Map). As its name suggests, the Phrase Scope interprets the
performance data within the frame as a phrase, and is used mainly to edit melodic elements of
the phrase. For example, in the case of a vocal sample, you can change the melody line or even
add harmony to turn the sound into a chord. This technique is particularly powerful when
applied to single-line samples such as vocals.
fig.phrase1
Screen reference
Groove scope
The Groove Scope will appear when you edit a frame that was pasted with the sample’s
“Keyboard Map” set to (Groove Map). The Groove Scope interprets the performance data
within the frame as a rhythm pattern, and is used mainly to edit rhythmic elements.
For example, in the case of a drum pattern sample, each slice (a waveform region divided by
events) will be a drum sound such as bass drum, snare, etc., and you can re-configure the drum
pattern by changing the time location of these slices.
This is particularly useful when used on rhythm part samples such as drum patterns.
fig.phrase2
63
Page 64

Screen reference
Phrase Scope
fig.01-H01_50
Ruler
Curve
select
Auto scrollTool buttonsModify record
Grid snap Quantize
Waveform
display area
Note display
area
Reset
curve
Controller
select
Curve view
Time zero input
Time keep
Information display area
fig.01-H02
Information about the sample is displayed here. From the left, this indicates the sample name,
cursor position (horizontal axis and vertical axis values), Key Assign (p. 16), Playback (p. 17),
and Encoding Type (p. 5).
Tools
fig.01-H07
Modify record button
fig.01-H07a
Sample data Zoom tool
Controller
display area
64
Switches to modify-record mode.
Modify Recording differs from conventional realtime recording in that when you loop-record,
the data will be added to the same take.
Use this when adding new data to the Vari Track. When loop-recording, the
Realtime Recording
first cycle is recorded on take 1, the second as take 2, and so on. Use the frame
property parameter Frame Take to select your favorite take.
Use this when realtime-editing the data within a frame. When loop-record-
Modify Recording
ing, the data recorded on each cycle is added to the same take. Events will
be added, and Pitch, Time, Formant, and Dynamics data will be overwritten
over the previously recorded data.
Simply pressing this button will not cause recording to start. Recording will
begin when you press the record button in the locator.
Page 65

Punch-in/out button
fig.01-H07b
When you press the punch-in/out button, the punch-in/out anchors will be displayed at the
beginning and end of the selected region in the time ruler of the scope editor screen. Recording
will apply to the region indicated by the punch-in/out anchors-anything you play outside this
region will not be recorded.
* The location of the punch-in/out anchors will move according to any increases or decreases due to
TIME editing.
Arrow button
fig.01-H07c
This has the following functions, depending on the window:
• Waveform display area: select a region
• Note display area: select a region and edit notes
• Controller display area: select a region and edit controller curves
Screen reference
When editing notes, you can use the following functions.
• Change the pitch: drag a note upward or downward
* If you want to limit the note to upward or downward movement, hold down the [Shift] key while you
drag the note.
If you have selected a region (by dragging left or right on a location other
than a note, or by shift-clicking a note), your editing will apply to all notes
included in that region. The notes to which editing will apply are displayed
in red.
• Moving the location of a note
Drag the note up, down, left, or right
• Changing the legato timing
Drag the connection between notes (dark blue) to left or right
• Changing the length
Drag both ends of the note to left or right
Pen button
fig.01-H07d
This is used to edit notes. Click the mouse on the location at which you want to add a note, and
drag to left or right to add a note of the desired length. Notes you add will be displayed in
purple.
65
Page 66

Screen reference
Eraser button
fig.01-H07e
This is used to edit notes and control data.
• Erasing a note
Click the note that you want to erase.
By dragging this across a region that contains notes, you can erase the notes in that region.
* Green notes (original notes) cannot be erased.
• Deleting control data (Pitch/Time/Formant/Dynamics)
If you drag over the controller display area, the control data in that region will be reset to the
initial value.
Alternatively, use the arrow cursor to select a region in the controller display area, and click it
with the eraser cursor to reset that region to the initial value.
If you click the Time Zero line (the dark blue line at the bottom of the controller display area
when Time is displayed), the Time Zero line will disappear.
If you select a region, all notes included in that region will be subject to
deletion. Notes subject to deletion will be displayed in red. However, notes
whose original color is green (original notes) cannot be deleted.
Erasing other control data
If you want to erase control data other than Pitch/Time/Formant/Dynamics
(e.g., Modulation or Pitch Bend) that was recorded in real time, use the arrow
cursor to select a region in the controller display area, right-click ( in
Macintosh, control-click) the region, and choose [Clear Other Controls] from
the menu that appears.
Scissors button
fig.01-H07f
This is used to edit notes. It lets you divide a note into two. For example, you can divide a note
at a location where you want to change the melody, and then move the second note upward or
downward to change the pitch at the desired time. To divide a note, click the location of the note
at which you want to divide it.
Bond button
fig.01-H07g
This is used to edit notes. It lets you re-join notes that were divided by the scissors button
described above. To join two notes, place them on the same horizontal level, and click the point
where they join (dark blue).
66
Page 67

Auto Scroll
fig.01-H07h
Turn this on if you want the window to scroll automatically to match the song playback
location.
Grid
fig.01-H07i
Turn this on if you want to place notes or select regions at intervals of the grid spacing.
When you drag a note to move it, the note will move in units of the grid. For example, if the grid
spacing is set to one measure, a note that was intentionally placed a 1/16th note ahead of the
bar line will move in steps of one measure, maintaining its position 1/16th note ahead of the bar
line.
To switch the display grid, drag the numerical value shown at the right of the grid button, and
choose from the pulldown menu that appears.
Screen reference
Values:
BAR 1 measure
1/2 Half note
1/4 Quarter note
1/8 Eighth note
1/8T Eighth note triplet
1/16 16th note
1/16T 16th note triplet
1/32 32nd note
1/32T 32nd note triplet
1/64 64th note
1/64T 64th note triplet
Default setting: 1/16
Quantize
fig.01-H07j
Quantize execute button
Quantize will be executed when you press this button.
Quantize is a function that adjusts the note locations to left or right so that the notes line up with
intervals of the displayed grid.
This will be carried out with respect to the notes that were selected by the arrow cursor.
Set the numeric value at the right of the quantize button to specify the quantization rate (the
amount of adjustment).
You can adjust the quantization rate in a range of 0%-100% by dragging the numeric value
upward or downward. With a setting of 100%, the note locations will be aligned precisely with
the grid intervals.
If notes are connected by legato, the first note will stick to the grid, and the
subsequent note(s) will move horizontally.
67
Page 68

Screen reference
Time ruler
fig.01-H03
This area shows a grid of measure numbers and beats.
You can expand or shrink the size of the display by using the zoom tool
() (p. 81) located in the lower right of the phrase scope.
To switch the grid that’s displayed, use the grid button ( ) (p. 67).
In the Phrase Scope you can use the following commands.
Select All
Selects the entire region.
➝ Shortcut: [Ctrl] + [A] / [ ] + [A]
Quick Loop position
Sets the selected region as the loop region.
If you want to set a specific region as the loop region, drag over the time ruler to select that
region, and then execute this Quick Loop command. You can drag the loop markers in the time
ruler to left or right to adjust the loop start point and end point.
➝ Short cut: [L]
68
Page 69

Waveform display area
fig.01-H04
This area displays the waveform of the sample, divided at the events within the sample.
Event
fig.01-H04a
Events
Screen reference
(blue)
The blue lines are called “events.”
If you play back from the middle of a phrase, the sound will begin from the location of the blue
line.
For details on editing (adding, deleting, moving) an event, refer to “Event settings” (p. 11).
Pitch indicator area
fig.01-H04b
• Samples encoded as SOLO type:
The waveform will be displayed at the position of the corresponding note.
* The pitch indicator for the waveform is only an approximation. For some samples, the note may not be
displayed correctly.
• When using the Phrase Scope to edit a note:
Each waveform will be displayed at the location of the corresponding pitch.
69
Page 70

Screen reference
Note display area
fig.01-H05
Here you can edit notes. Use the mouse to directly edit the note bars displayed in this area.
By editing notes, you can modify the melody of the phrase, or create chords.
Notes divided at event locations will be displayed in the editing area. (They will not be
displayed in frames that were created by realtime recording.)
Light blue notes: MIDI notes used to play the phrase are displayed in light blue.
Purple notes: Notes that were recorded in real time or newly added using the Pen button (p. 65)
will be displayed in purple.
* The default value of a note is the original pitch of the sample (the key that will play the sample at its
original pitch).
* If you want to edit legato notes in the Phrase Scope, set the playback mode of the sample to “TIME
SYNC” (p. 17) in the Sample Edit screen (p. 15). If you edit notes when the Playback mode is set to
“RETRIGGER,” editing a note will cause the beginning of the sample to play each time the pitch is
changed, and it will not play legato.
Note display area menu
You can right-click ( in Macintosh, control-click) on the note display area to access a menu
with the following functions.
Undo Cancels the change you last made in the phrase scope, returning the data to the previous state.
Tools Switches the tool in the phrase scope (arrow/pen/eraser/scissors/bond).
Cut Deletes the selected note and places the original data in the clipboard.
Copy Places the selected note in the clipboard.
Paste
Delete Deletes the selected note.
Pastes the data from the clipboard into the location of the playback cursor (the location where
you clicked the mouse on the ruler).
70
Page 71

Control display area
fig.01-H06
Here you can edit control data (Pitch, Time, Formant, and Dynamics parameters) and velocity.
The data is shown as a horizontal line (a graph for velocity), and can be directly edited using
the mouse.
PITCH button
fig.01-H06a
Edit the pitch (control change number 16).
Pitch will be shown as a green line in the control display area. You can use the mouse to edit it
freely.
Screen reference
PITCH View button
fig.01-H06b
Always show the pitch line in the control display area.
TIME button
fig.01-H06c
Edit the time (control change number 17).
Time will be shown as a light blue line in the control display area. You can use the mouse to edit
it freely.
TIME View button
fig.01-H06b
Always show the time line in the control display area.
Time KEEP button
fig.01-H06d
When editing the time in Curve Edit mode, you can use the Time Keep function. If the Time
Keep function is turned on, the curve will be adjusted when you edit the Time so that the length
of the selected region will stay the same. You can use this when you want to create a slight
change in the Time parameter, but want the overall length to remain unchanged.
Click the [Time Keep] button ( ) to switch the Time Keep function on/off.
* This is not valid for Time Zero input.
71
Page 72

Screen reference
TIME zero input button
fig.01-H06e
The cursor will become the TIME Zero Input tool, allowing you to input TIME Zero (a state in
which time stops).
To use this, drag the Time Zero input tool across the Time curve, moving the mouse toward the
right and then releasing it. When you input Zero Time, a Time Zero line (a dark blue line shown
at the bottom of the control area when displaying the Time parameter) will appear, and the
waveform display area will be striped.
If you want to cancel the Time Zero line, click it with the eraser tool.
FORMANT button
fig.01-H06f
If the sample is encoded as “SOLO,” this lets you edit the vocal character (formant: control
change number 18).
The formant will be shown as a red line in the control display area. You can use the mouse to
edit it freely.
* If the sample has been encoded using a type other than “SOLO,” the formant cannot be edited. Even
if you press the FORMANT button, the red line indicating the formant will not appear.
FORMANT View button
fig.01-H06b
Always show the formant line in the control display area.
DYNAMICS button
fig.01-H06g
Edit the volume (control change number 11: expression).
The dynamics will be shown as a yellow line in the control display area. You can use the mouse
to edit it freely.
DYNAMICS View button
fig.01-H06b
Always show the dynamics line in the control display area.
72
Page 73

VELOCITY button
fig.01-H06h
Edit the note velocity.
The velocity is shown as a blue graph in the control display area. You can use the mouse to edit
it freely. The velocity you are editing will be shown in red. If the velocity graphs overlap, click
a note to select the one whose velocity you want to edit.
In the Phrase Scope, there are adjacent legato notes at the same pitch, the
velocity of the second and subsequent notes will be ignored. You can edit the
velocity of the second and subsequent notes, but when two legato notes are
placed at the same pitch, the VariOS will sound them using the velocity of the
first note.
fig.03VeloE
Legato notes placed at
the same pitch
Velocity can be edited on the
screen, but the sound
generator will play the second
and subsequent notes at the
same velocity as the first note.
Screen reference
VELOCITY View button
fig.01-H06b
Always show the velocity graph in the control display area.
Curve edit buttons
fig.01-H06i
These buttons select the curve used to edit Time, Pitch, Formant, and Dynamics.
Select the region that you want to edit, and drag the mouse to edit the parameter directly. You
can select one of three curves by which the parameter will be changed. To select a curve, click
one of the buttons: flat, linear, or curve.
• Horizontal : Increase/decrease the parameter equally.
fig.01-H09
73
Page 74

Screen reference
• Linear : Increase/decrease the parameter in a straight line.
fig.01-H10
• Curve : Increase/decrease the parameter in a rounded line.
fig.01-H11
• Reset curve : Reset the curve in the selected region.
fig.01-H11a
Controller display area menu
Right-click ( in Macintosh, control-click) the controller display area to access a menu with
the following functions.
Flat
Linear
Rounded
Reset Curve Reset the curve in the selected region.
Clear Other Controls
Choose the arrow tool, and increase/decrease the parameter equally by
curve editing.
Choose the arrow tool, and increase/decrease the parameter linearly by
curve editing.
Choose the arrow tool, and increase/decrease the parameter in a rounded
line by curve editing.
Erase realtime-recorded control data (such as Modulation or Pitch Bend)
other than Pitch/Time/Formant/Dynamics in the selected region.
74
Page 75

Groove Scope
fig.01-I01_50
Ruler
Curve
select
Reset
Curve
Controller
select
Screen reference
Auto scrollTool buttons PreviewModify record
Grid snap Quantize
Original
waveform
display area
Slice (note)
display area
Controller
display area
Curve
View
Information display area
fig.01-I01a
This area displays information about the sample. From the left, this shows the sample name,
cursor location (horizontal axis and vertical axis values), Key Assign (p. 16), Playback (p. 17),
and Encoding Type (p. 5).
Tools
fig.01-I01b
Modify record button
fig.01-H07a
Switches to modify-record mode.
Modify Recording differs from conventional realtime recording in that when you loop-record,
the data will be added to the same take. For example, you would use Modify Recording if you
want to record the kick on the first cycle, snare on the second, and hi-hat on the third.
Sample information Zoom tool
Realtime Recording
Modify Recording
Simply pressing this button will not cause recording to start. Recording will
begin when you press the record button in the locator.
Use this when adding new data to the Vari Track. When loop-recording, the first cycle is recorded on take 1, the second as take 2, and so on. Use the frame property
parameter Frame Take to select your favorite take.
Use this when realtime-editing the data within a frame. When loop-recording, the
data recorded on each cycle is added to the same take. Events will be added, and
Pitch, Time, Formant, and Dynamics data will be overwritten over the previously
recorded data.
75
Page 76

Screen reference
Punch-in/out button
fig.01-H07b
When you press the punch-in/out button, the punch-in/out anchors will be displayed at the
beginning and end of the selected region in the time ruler of the scope editor screen. Recording
will apply to the region indicated by the punch-in/out anchors-anything you play outside this
region will not be recorded.
Arrow button
fig.01-H07c
This has the following functions in each window.
• Slice (note) display area: select a region and edit slices
• Control display area: select a region and edit controller curves
You can use the following functions for slice editing.
• Changing a slice: drag the slice upward or downward to change it (the display waveform
will change correspondingly).
* If you want to limit the change to upward/downward movement, hold down the [Shift] key of your
keyboard while you drag the slice.
If you select a region (by dragging left/right from a point other than a note,
or by holding down the [Shift] key and clicking a note), all slices included in
that region will be subject to editing. Slices subject to editing will be
displayed in red.
• Moving the timing of a slice
Drag the slice to left/right.
• Copying a slice
Hold down the [Ctrl] key ( on Macintosh, the [Option] key) of your keyboard and
drag the slice upward, downward, left, or right.
• Changing the length
Drag the ends of a slice to left or right.
Pen button
fig.01-H07d
This is used to edit slices. Click the mouse on the location at which you want to add a slice, and
drag to left or right to add a slice of the desired length.
76
Page 77

Eraser button
fig.01-H07e
This is used to edit slices and control data.
• Deleting a slice
Click the slice that you want to delete.
By dragging this across a region that contains slices, you can delete the slices in that region.
If you select a region, all slices included in that region will be subject to
deletion. Slices selected for editing are displayed in red.
• Erasing control data
When you drag in the controller display area, control data in that region will return to the
default value.
Alternatively, you can use the arrow cursor to select the controller display area, and then click
to reset that region to the default value.
Erasing other control data
If you want to erase control data other than Pitch/Time/Formant/Dynamics
(e.g., Modulation or Pitch Bend) that was recorded in real time, use the arrow
cursor to select a region in the controller display area, right-click ( in
Macintosh, control-click) the region, and choose [Clear Other Controls] from
the menu that appears.
Screen reference
Slice preview (click)
fig.01-I01c
By turning this on, you can audition the slice that you click.
Slice preview (roll over)
fig.01-I01d
You can turn this on to audition the slice over which the mouse cursor passes.
Auto Scroll
fig.01-H07h
Turn this on if you want the window to scroll according to the playback location of the song.
77
Page 78

Screen reference
Grid
fig.01-H07i
Turn this on if you want to place slices or select regions at intervals of the grid spacing.
When you drag a slice to move it, the slice will move in units of the grid. For example, if the grid
spacing is set to one measure, a slice that was intentionally placed a 1/16th slice ahead of the
bar line will move in steps of one measure, maintaining its position 1/16th slice ahead of the bar
line.
To switch the display grid, drag the numerical value shown at the right of the grid button, and
choose from the pulldown menu that appears.
Values:
BAR 1 measure
1/2 Half slice
1/4 Quarter slice
1/8 Eighth slice
1/8T Eighth slice triplet
1/16 16th slice
1/16T 16th slice triplet
1/32 32nd slice
1/32T 32nd slice triplet
1/64 64th slice
1/64T 64th slice triplet
Default setting: 1/16
Quantize
fig.01-H07j
Quantize will be executed when you press this button.
Quantize is a function that adjusts the slice locations to left or right so that the slices line up with
intervals of the displayed grid.
This will be carried out with respect to the notes that were selected by the arrow cursor.
Set the numeric value at the right of the quantize button to specify the quantization rate (the
amount of adjustment).
You can adjust the quantization rate in a range of 0%-100% by dragging the numeric value
upward or downward. With a setting of 100%, the slice locations will be aligned precisely with
the grid intervals.
78
Page 79

Time ruler
fig.01-H03
This area shows a grid of measure numbers and beats.
You can expand or shrink the size of the display by using the zoom tool
() (p. 81) located in the lower right of the phrase scope.
To switch the grid that’s displayed, use the grid button ( ) (p. 78).
In the Groove Scope you can use the following commands.
Select All
Selects the entire region.
➝ Shortcut: [Ctrl] + [A] / [ ] + [A]
Quick Loop position
Sets the selected region as the loop region.
If you want to set a specific region as the loop region, drag over the time ruler to select that
region, and then execute this Quick Loop command. You can drag the loop markers in the time
ruler to left or right to adjust the loop start point and end point.
➝ Short cut: [Q]
Screen reference
Original waveform display area
fig.01-I01e_70
This area displays the waveform of the sample, divided into slices at event locations within the
sample.
Slices are numbered sequentially, starting at the beginning.
If you hold down [Shift] and click a slice, the slice of the number you clicked will be added to
the original position of the slice display area.
Slice (note) display area
fig.01-I01f_70
Here you can edit slices (notes). Slices (waveforms) are displayed in stair-step fashion, and you
can edit them directly with the mouse. The vertical axis is the type of slice (in order from the
bottom), and the horizontal axis is the timing at which the slices will sound.
79
Page 80

Screen reference
Slice name display area
fig.01-I01g
The slice names are displayed here. You can also double-click this area to edit the name.
(Alternatively, right-click ( in Macintosh, control-click) the sample name, and choose “Slice
Name” from the menu that appears.)
By right-clicking ( in Macintosh, control-clicking) the slice name display area, you can
switch the display between slice names and note names.
If you want to use the Groove Scope to edit slices, set the Playback mode to
“Retrigger” (p. 17) in the Sample Edit window (p. 15). If the Playback mode is
set to anything other than “Retrigger,” playback will not occur correctly
when you edit a slice (e.g., the sound will be interrupted).
Scroll bar
fig.01-H04c
Changes the area that is shown.
80
Page 81

Screen reference
Zoom tool
fig.01-H08
These buttons let you expand or shrink the display vertically. To expand or shrink the
display smoothly, hold down the button between the magnifying glass buttons and drag
the mouse up or down.
fig.01-B20a
These buttons let you expand or shrink the display horizontally.
Shrinks the display.
Expands the display.
Move this left to shrink, or right to expand.
Slice display area menu
When you right-click ( in Macintosh, control-click) the slice (note) display area, a menu with
the following functions will appear.
Undo
Tools Switches the tool in the phrase scope (arrow/pen/eraser).
Cut Deletes the selected note and places the original data in the clipboard.
Copy Places the selected note in the clipboard.
Paste
Delete Deletes the selected note.
View
Slice No
Slice
Form
Cancels the change you last made in the phrase scope, returning the data to the previous
state.
Pastes the data from the clipboard into the location of the playback cursor (the location
where you clicked the mouse on the ruler).
Switches the slice number between hidden/visible.
Wave: Display slices as waveforms
Note: Display slices as notes
81
Page 82

Screen reference
Control display area
fig.01-I01h_70
Here you can edit control data (Pitch, Time, Formant and Dynamics parameters) and velocity.
The data is shown as a horizontal line (a graph for velocity), and can be directly edited using
the mouse.
PITCH button
fig.01-H06a
Edit the pitch (control change number 16).
Pitch will be shown as a green line in the control display area. You can use the mouse to edit it
freely.
PITCH View button
fig.01-H06b
Always show the pitch line in the control display area.
TIME button
fig.01-H06c
Edit the time (control change number 17).
Time will be shown as a light blue line in the control display area. You can use the mouse to edit
it freely.
TIME View button
fig.01-H06b
Always show the time line in the control display area.
* In the Groove Scope, editing the Time will not change the time axis as it does in the Phrase Scope.
* The Phrase Scope does not have a tool for inputting Time Zero, but Time will be zero if you move the
time curve to the bottom in the Groove Scope.
FORMANT button
fig.01-H06f
82
If the sample is encoded as “SOLO,” this lets you edit the vocal character (formant: control
change number 18).
The formant will be shown as a red line in the control display area. You can use the mouse to
edit it freely.
* If the sample has been encoded using a type other than “SOLO,” the formant cannot be edited. Even
if you press the FORMANT button, the red line indicating the formant will not appear.
Page 83

FORMANT View button
fig.01-H06b
Always show the formant line in the control display area.
DYNAMICS button
fig.01-H06g
Edit the volume (control change number 11: expression).
The dynamics will be shown as a yellow line in the control display area. You can use the mouse
to edit it freely.
DYNAMICS View button
fig.01-H06b
Always show the dynamics line in the control display area.
VELOCITY button
fig.01-H06h
Screen reference
Edit the slice velocity.
The velocity is shown as a blue graph in the control display area. You can use the mouse to edit
it freely. The velocity you are editing will be shown in red. If the velocity graphs overlap, click
a slice to select the one whose velocity you want to edit.
VELOCITY View button
fig.01-H06b
Always show the velocity graph in the control display area.
83
Page 84

Screen reference
Curve edit buttons
fig.01-H06i
These buttons select the curve used to edit Time, Pitch, Formant, and Dynamics.
Select the region that you want to edit, and drag the mouse to edit the parameter directly. You
can select one of three curves by which the parameter will be changed. To select a curve, click
one of the buttons: flat, linear, or curve.
• Horizontal : Increase/decrease the parameter equally.
fig.01-H09
• Linear : Increase/decrease the parameter in a straight line.
fig.01-H10
• Curve : Increase/decrease the parameter in a rounded line.
fig.01-H11
• Reset curve : Reset the curve in the selected region.
fig.01-H11a
Controller display area menu
Right-click ( in Macintosh, control-click) the controller display area to access a menu with
the following functions.
Flat Choose the arrow tool, and increase/decrease the parameter equally by curve editing.
Linear Choose the arrow tool, and increase/decrease the parameter linearly by curve editing.
Curve
Reset Curve Reset the curve in the selected region.
Clear Other Controls
Choose the arrow tool, and increase/decrease the parameter in a rounded line by
curve editing.
Erase realtime-recorded control data (such as Modulation or Pitch Bend) other than
Pitch/Time/Formant/Dynamics in the selected region.
84
Page 85

Menu reference
This chapter explains the functions of V-Producer for each menu.
File menu
fig.02-01
Creates a new song.
You will be asked “Delete samples from the VariOS (sound module)?” If you want to erase the
samples that are in the VariOS, select [Yes]. If you want to create a new song without erasing
the samples that are in the VariOS, select [No].
➔ Shortcut: [Ctrl] + [N] / [ ] + [N]
* If you click this menu item while editing a song, a dialog box will ask you whether you want to save
that song. Click [Yes] if you want to save it, or [No] if you do not.
85
Page 86

Menu reference
Open Song
fig.02-02
Loads a song.
At the same time, the samples used by the song will be sent to the VariOS.
V-Producer can load songs that are in V-Producer format (in Windows, these
will have a filename extension of .vpd).
➔ Shortcut: [Ctrl] + [O] / [ ] + [O]
MacOS
* If you click this menu item while editing a song, a dialog box will ask you whether you want to save
that song. Click [Yes] if you want to save it, or [No] if you do not.
If you are using Macintosh and want to load a Windows V-Producer file,
choose “All documents” in the “Display” field.
In some cases when you open a song, a dialog box of "[sample name] Load
File Name" may appear. This will appear if the user has moved a sample file
that is used by the song file, or if V-Producer does not know the location of
the sample file. Please specify the file location of the sample name shown in
the dialog box.
86
Page 87

Save Song
Saves the song by overwriting the previous version.
The song will be saved in V-Producer format (in Windows, it will have a filename extension of
.vpd).
➔ Shortcut: [Ctrl] + [S] / [ ] + [S]
In V-Producer, the actual audio data used by a song (.vpw files) is handled separately from the
song file (.vpd file) that uses this audio data. The song file contains only references to these
audio files. This means that if you copy or back up only the song file to another computer, you
will be unable to play back the song.
If you select "Save song with the sample files" when saving, all sample files (.vpw files) used by
the song will be copied to the same folder as the song file. By moving this entire folder, you can
move your song to another computer or create a backup.
Menu reference
About the sample files (.vpw) used by the song
The settings file named "song name + PRM.ini" that is saved in the same
folder as the song file (.vpd) stores the location (absolute path) of the sample
files (.vpw) used in the song. For this reason, if you change the location of the
samples used in the song, V-Producer will lose track of the sample file
locations. In this case, the next time you open the song, the "[sample name]
Load File Name" dialog box will appear. Please specify the file location of the
sample name shown in the dialog box.
Save As (Save with a different name)
Saves the song with a different name.
If you save with a different name, the original file will remain unchanged.
In V-Producer, the actual audio data used by a song (.vpw files) is handled separately from the
song file (.vpd file) that uses this audio data. The song file contains only references to these
audio files. This means that if you copy or back up only the song file to another computer, you
will be unable to play back the song.
If you select "Save song with the sample files" when saving, all sample files (.vpw files) used by
the song will be copied to the same folder as the song file. By moving this entire folder, you can
move your song to another computer or create a backup.
About the sample files (.vpw) used by the song
The settings file named "song name + PRM.ini" that is saved in the same
folder as the song file (.vpd) stores the location (absolute path) of the sample
files (.vpw) used in the song. For this reason, if you change the location of the
samples used in the song, V-Producer will lose track of the sample file
locations. In this case, the next time you open the song, the "[sample name]
Load File Name" dialog box will appear. Please specify the file location of the
sample name shown in the dialog box.
87
Page 88

Menu reference
Load Wave Files
Here’s how you can load wave files from the hard disk of your computer and send them to the
VariOS. When you execute this command, the Load Wave Files dialog box will appear.
➔ Shortcut: [Ctrl] + [1] / [ ] + [1]
fig.02-04Loadwavefile
This area shows the wave files that are on your
computer. The wave files within the folder you
selected at the left will be listed at the right.
- Conventional wave files (.wav, .aiff)
- VariPhrase format files (.vpw)
In the list at the right, click the wave file that you
want to load into the VariOS.
* By clicking the headings above the list you can
sort the list in various ways.
V-Producer is able to load wave files in Wave file format (.WAV), AIFF file
format (.AIF), or VariPhrase format (.VPW).
Specify the type of conversion (encoding *1)
that will be used for loading into the VariOS.
Normally, you will use the "Auto" setting.
In "Auto" mode, the encoding type will be set
to "Backing," and the tempo will be calculated
automatically (*2). (You can change these
settings in step 4.)
These settings are not needed for files that
are already encoded (.vpw).
If you want to manually specify
the encoding type and tempo,
select "Manual."
The options shown at the right
will appear. This is convenient
when you are loading two or
more items of wave data of a
specific tempo.
* Set the encoding type as follows.
SOLO
BACKING
EMSEMBLE
*
Single-note vocal or instrumental
phrase (sax, trumpet, etc.)
Phrases with a clear attack, such
as rhythm loops or guitar chording
Sustained phrases such as choir
or strings
Auditions the selected wave file.
The sound will be heard from the sound card
of your computer. (Sound will not be
produced from the VariOS.)
Auditions the selected Wav file.
Adds the selected Wav file to the
"Load List" below.
Displays the amount of memory used
within the VariOS.
Load the wave files of the Load List into
the VariOS.
* Loading will be halted when the memory
of the VariOS becomes full.
* Loading will perform the following
processes automatically:
This area lists the samples that will be loaded into
the VariOS. The file name, encoding type, tempo,
and number of measures are displayed.
- To delete a sample from the list, right-click the
sample (in Mac OS, [Control]-click) and choose
"Delete." (Pressing the [Delete] key will also delete
the sample.)
- You can change the Encode Type and Tempo of
the sample you selected by clicking it.
* Samples that
have already been
encoded are displayed in light blue. In this case you
will not be able to change the Encode Type or Tempo.
*1 What is encoding?
To make it possible for you to make realtime changes in the pitch, time, and formant of the samples used by
the VariOS, the wave data must be "encoded." There are three encoding types.
This encoding type is suitable for monophonic vocals or instruments (sax, trumpet, flute, etc.). If you use this encoding type, you
SOLO
BACKING
EMSEMBLE
* If you encode using BACKING or ENSEMBLE, you will not be able to control the formant or use the robot voice function.
*2 About tempo
"Auto" mode will automatically calculate the tempo of loop audio materials.
Audio material that has been trimmed for looping and has a 4/4 time signature will be automatically calculated in a tempo range of 80--160. If the
automatically set tempo of the sample is double or half what it should be, you can adjust it using the Tempo [x 2] or [x 1/2] button of the "Load List" ( ).
will be able to control the formants and use the robot voice function (refer to "Sample Edit"). Even if you encode using SOLO,
you will still be able to play polyphonically.
This encoding type is suitable for decay-type instruments. In particular it is suitable for phrases that contain instruments with a
clear attack (rhythm loops, drums, percussion, guitar chording).
This encoding type is suitable for sustained-type instruments. It is particularly suitable for sounds that contain gradual changes
in tone (such as choir or strings). This encoding type handles the broadest range of sounds.
Specify the location of the VariPhrase
format file that will be created by encoding.
- Same as original
The VariPhrase format file will be saved in the
same folder as the original wave file.
- Use
The VariPhrase format file will be saved in the
location you specify.
* If the original sample is on a non-rewritable
medium such as CD-ROM, the VariPhrase file
will automatically be saved in the specified "Use"
location.
* Next time you select files for loading into the
VariOS, you can specify the .vpw file that was
saved here, so the encoding process can be
omitted.
- Encode wave files
- Save the encoded wave files
- Send the samples to the VariOS
If you click [Cancel], the content you
specified will be discarded and the dialog
box will close.
88
Original tempo
The sample tempo (original tempo) you specify here is the basic tempo used
to synchronize the sample to the master tempo of V-Producer. You must set
this to the correct tempo. Otherwise, the length of the note will not be correct.
[Example: if the original tempo of the sample is =100]
If the master tempo is set to
back at double the speed at which it was sampled.
If the master tempo is set to
at half the speed at which it was sampled.
=200, the sample will play
=50, the sample will play back
Page 89

Export SMF
This command exports the song in SMF format.
If you save a song in SMF format, it can be loaded by other software.
*A song saved in SMF format cannot be reloaded into V-Producer.
* SMF format does not save VariOS settings. When saving data as an SMF, please save the VariOS
settings into the internal memory of the VariOS, or on a card (“User Guide: Operation guide, Sound
generator (VariOS)”). Before you use other software to play this SMF, you should reload these settings
back into the VariOS.
* If SMF data created by V-Producer is to be played by other software, you will need to send MIDI clock
messages from that software to the VariOS in order to synchronize the VariOS to the song tempo. As
the MIDI clock transmission port for your software, specify the MIDI port to which the VariOS is
connected. Also, set the VariOS’s tempo mode Clock Source setting to “MIDI.” (“User Guide:
Appendix: When data (SMF) created in V-Producer is played by other software”)
Menu reference
SMF (Standard MIDI File):
This is a standard format for MIDI files. There are numerous types of
sequencer software. Since each sequencer program provides different ways to
create and edit data, it is best to use the program that is most suited to your
needs. However, since each program uses its own format to store its data, this
data cannot be used directly by a different program. Thus, the SMF (Standard
MIDI File) format was developed in order to allow performance data to be
exchanged between different sequencer programs. SMF allows performance
data to be shared between different types of computers and sequencer
programs.
Export Wave File
This command exports a Wave format file according to the following options.
Since Wave files are a standard format, they can be read by nearly any other software.
Song Export the song as one Wave file.
Export each part of the song as a Wave file.
Multiple Part
When you save, the parts that are checked in the “Export Part” field will be output.
Each part will be saved in the folder you've specified, using this format: “specified
file name _ part number.”
The internal effects of the VariOS (items you set in the Mixer; p. 53) are not
reflected in the Wave file that is exported. The dry sound will be exported.
History function (Windows)
The four files most recently loaded by V-Producer are shown in the File menu.
MacOS
The Macintosh version does not have a History function.
89
Page 90

Menu reference
Song Info (Song information)
fig.02-05
The Song Info dialog box will appear, allowing you to input information such as the song name,
copyright, and composer.
Quit
Exits the V-Producer program.
If you click this menu item while editing a song, a dialog box will ask whether you want to save
that song. Click [Yes] to save, or [No] to exit without saving.
➔ Shortcut: [] + [Q]
90
Page 91

Edit menu
fig.02-06
Menu reference
Undo
Cut
Copy
Paste
Cancels the preceding operation, and restores the data to its previous state.
* Some operations cannot be undone, and in this case, the [Undo] menu item will be grayed and cannot
be selected.
➔ Shortcut: [Ctrl] + [Z] / [ ] + [Z]
Deletes the selected frame or note, and places the original data in the clipboard.
You can choose the Edit menu command Paste to paste the data from the clipboard.
➔ Shortcut: [Ctrl] + [X] / [ ] + [X]
Places the selected frame or note in the clipboard.
You can choose the Edit menu command Paste to paste the data from the clipboard.
➔ Shortcut: [Ctrl] + [C] / [ ] + [C]
Pastes the data from the clipboard at the current time location (the vertical line; normally the
location where you clicked the mouse).
➔ Shortcut: [Ctrl] + [V] / [ ] + [V]
91
Page 92

Menu reference
Delete
Deletes the selected frame or note.
Unlike the Cut command, the deleted data will not be placed in the clipboard.
➔ Shortcut: [Delete]
Repeat (Repeat copy)
fig.02-07
Repeatedly copies the frame selected in the Vari Track.
Select a frame before you execute this command. The “Repeat Copy” dialog box will appear,
allowing you to input the number of times that you want to copy the frame. The frame will be
copied the corresponding number of times, following the selected frame.
➔ Shortcut: [Ctrl] + [R] / [ ] + [R]
Quantize
Quantize is a function that moves the location of a note to left or right so that the note is aligned
closer to the grid interval you specified in Quantize Grid.
You can execute Quantize on a frame selected in the Vari Track, or on notes selected in the Scope
Editor.
* If you select a frame in the Vari Track, quantization will be applied to the notes within the frame, not
to the frame itself.
* When selecting frames in the Vari Track, it is not possible to apply quantization to two or more selected
frames.
➔ Shortcut: [Shift] + [Q]
Quantize Grid
Specifies the grid toward which the Quantize function will align the notes. The grid displayed
in the Step Editor will follow the value you specify here.
Select All
Selects the entire region.
➔ Shortcut: [Ctrl] + [A] / [ ] + [A]
Frame Transpose
fig.02-08
92
Transposes the pitch of all frames selected in the Vari Track, in semitone steps (-1–+1 octave).
Executing this command will increase or decrease the Transpose value of the frame properties.
Page 93

Marker
■ Add Marker
fig.02-09
■ Delete Marker
Menu reference
Markers allow you to name desired points in the song (e.g., “Intro” or “Song End”), and can be
used as points for song editing.
The Add Marker dialog box will appear, allowing you to add a marker at the current time.
Markers you add can be edited or deleted in the Marker List (p. 38). A marker you’ve added
(displayed in the marker area of the Vari Track) can also be edited or deleted by right-clicking
( in Macintosh, control-clicking) it and choosing “Add Marker” or “Delete Marker” from
the menu that appears.
Deletes the marker at the current time.
■ Quick Marker
This is an easy way to add a marker at the current time.
The marker name will be "M + number." Markers you add can be edited or deleted in the
Marker List (p. 38). A marker you've added (shown in the marker area of the Vari Track) can
also be edited or deleted by right-clicking ( in Macintosh, control-clicking) it and choosing
"Add Marker" or "Delete Marker" from the menu that appears.
➔ Shortcut: [M]
93
Page 94

Menu reference
Tempo
These commands let you edit the tempo data of the song.
■ Add Tempo
fig.02-10
The Add Tempo dialog box will appear, allowing you to add tempo data at the current time.
Use this when you want to change the tempo during the song.
The tempo data you add can be edited or deleted in the Tempo list (p. 38). Tempo data you’ve
added (displayed in the marker area of the Vari Track) can also be edited or deleted by rightclicking ( in Macintosh, control-clicking) it and choosing “Add Tempo” or “Delete Tempo”
from the menu that appears.
■ Delete Tempo
Deletes the tempo data at the current time location.
■ Add Tempo From Phrase Tempo
Inputs the original tempo of the selected frame into the current time location as the master
tempo.
Use this when you want to change the song tempo to the original tempo of the frame.
Meter (Time signature)
These commands let you edit the time signature data of the song.
fig.02-11
■ Add Meter (Add time signature)
The Add Meter dialog box will appear, allowing you to add time signature data at the current
time location. Use this when you want to change the time signature during the song.
The time signature data you add can be edited or deleted in the Meter list (p. 39). Time signature
data you’ve added (displayed in the meter area of the Vari Track) can also be edited or deleted
by right-clicking ( in Macintosh, control-clicking) it and choosing “Add Meter” or “Delete
Meter” from the menu that appears.
94
■ Del Meter (Delete time signature)
Deletes the time signature data from the current time location.
Page 95

fig.02-12
fig.02-13
fig.02-14
Menu reference
■ Insert Measure
Inserts the specified number of blank measures at the current time location.
■ Delete Measure
Deletes the specified number of measures that follow the current time location, and moves the
subsequent measures forward.
■ Fit Song Time
Displays the “Fit Song Time” dialog box. This function lets you input the desired length of the
song, after which it will re-calculate the tempo to make the song fit into the length you specify.
For example, you can use this to make a 30-second song occupy 40 seconds.
95
Page 96

Menu reference
Locator menu
fig.02-16
Play
Plays the song from the current time.
If you execute Play when the synchronization mode is “MIDI” or “MTC,” the button will blink,
and you will be in standby mode. This allows setup MIDI data to be transmitted before
playback begins, so that the performance will begin smoothly.
When using V-Producer as the synchronization slave, there is normally no
need for you to operate the play button. If playback begins late when starting
in synchronization, you can press the Play button to enter standby mode first.
➔ Shortcut: [SPACE]
Stop
Stops song playback.
When the Play button is in standby mode, clicking the Stop button will cancel standby mode.
➔ Shortcut: [SPACE]
Rewind
Moves the current time one measure backward.
➔ Shortcut: [Home]
REC Standby (Recording standby)
You will enter recording-standby mode. Recording will begin when you then press Play.
Alternatively, you can start recording by executing REC Standby during playback.
➔ Shortcut: [*]
Standby
This function transmits the setup MIDI data before starting playback. The play button will
blink, indicating that you are in standby mode.
If you press the play button in this state, playback will begin smoothly.
Move Current Position
Moves the current time (playback cursor) to the specified measure/beat/tick.
Alternatively, you can press the [...] button in the Move Position dialog box, and specify a time
or marker instead of the measure/beat/tick.
➔ Shortcut: [J]
96
Page 97

Prev Marker (To previous marker)
Moves the current time to the previous marker.
➔ Shortcut: [Ctrl] + [Page Up] / [ ] + [page up] (pg up)
Next Marker (To next marker)
Moves the current time to the next marker.
➔ Shortcut: [Ctrl] + [Page Down] / [ ] + [page down] (pg dn)
Menu reference
97
Page 98

Menu reference
Option menu
fig.02-17
MIDI/AUDIO Settings
On Mac OS, V-Producer supports two MIDI drivers: OMS and FreeMIDI.
If your system has both of these MIDI drivers, a screen will appear the first
time you start up V-Producer, allowing you to select either OMS or
FreeMIDI. You can also choose between OMS or FreeMIDI in this MIDI
Settings dialog box. (However, if no driver is installed in your system, you
will not be able to choose between OMS and FreeMIDI.) For details on
installing the OMS or FreeMIDI compatible drivers, refer to “About the
included MIDI drivers” in User Guide.
1. In the MIDI Device area, specify the MIDI port to which the VariOS is
connected. Normally, you will select VariOS MIDI, as shown in the diagram.
fig.02-midi01
If nothing is displayed in the port field, it is possible that the VariOS USB
MIDI driver was not installed correctly. Check the connection between the
VariOS and the computer, and install the USB MIDI driver using the
procedure described in “Installation” (User Guide).
98
MacOS
OS On the Macintosh, the name you assigned in step 8 of “OMS Settings”
(User Guide) will be displayed. Select the port that corresponds to the VariOS
sound generator port (Port 1).
Page 99

Menu reference
About the MIDI Clock field
The MIDI Clock field is an on/off setting for the MIDI Clock (F8) messages transmitted from the port
to the VariOS. The VariOS can receive MIDI Clock messages from V-Producer and synchronize to
the master tempo of V-Producer. Normally, you will leave this field checked.
On some MIDI interfaces, such as Mark Of The Unicorn Corporation’s MIDI Express, or Emagic
Corporation’s amt8, MIDI Clock messages input to one port are output from all ports. This means
that if you have specified one of these MIDI interfaces in the Sync Mode dialog box ([Option] - [MIDI
Sync]) as the MIDI Clock output destination, duplicate MIDI Clock (F8) messages will be sent to the
VariOS, causing the tempo to be doubled. In this case, uncheck the MIDI Clock box so that the
VariOS will play back at the correct master tempo.
2. If you are using a MIDI keyboard, set the [MIDI IN Port (Keyboard)] field to the
MIDI input port to which your MIDI keyboard is connected. If your MIDI
keyboard is connected to the VariOS, select “Roland VariOS External MIDI”
as shown in the diagram.
MacOS
fig.02-midi02
3. (Windows only)
The VariOS Drive field indicates the drive letter given the VariOS when it was
mounted on your computer. Press [Scan] to select the drive automatically.
fig.02-midi03
OS On the Macintosh, the name you assigned in step 8 of “OMS Settings”
(User Guide) will be displayed. Select the port that corresponds to the MIDI
connector on the rear panel of the VariOS (Port 2).
On Windows, the VariOS Drive may not be detected automatically for some
systems. In this case, open My Computer and check the drive name for
VariOS (e.g., F:), and then select this for the VariOS Drive field.
99
Page 100

Menu reference
4. In the Audio Device (Preview) field, select the audio device that you will use
for V-Producer’s preview function.
fig.02-midi04
MacOS
OS On the Macintosh version there is no Audio Device (Preview) field. The
internal sound functionality of the Mac will be selected.
The Preview function lets you use the audio device of your computer to
audition sample data stored on your computer without loading it into the
VariOS.
Audio device adjustments
Here you can make adjustments for the audio device in the Wave Edit screen (p. 7).
•Adjust slider
Adjusts the discrepancy between the Wave Edit screen display and when the audio is heard.
Play back a waveform in the Wave Edit screen. If the cursor (vertical line) is later than the actual
sound, move the slider toward the left. If the cursor (vertical line) is earlier than the actual sound,
move the slider toward the right.
•High CPU Load
Adjusts the CPU load.
If you check this, the CPU load will be heavier, but you will get a faster response when you click
the Wave Edit playback or stop button.
If you experience pops in the sound when you play something back in Wave Edit using USBconnected speakers, un-check this setting.
5. Click [OK].
If a message of “MIDI Offline!” appears, V-Producer and the VariOS are not communicating
correctly. Check the following points.
• Is the VariOS powered up?
• Is the VariOS connected correctly?
100
 Loading...