

Page 1
201a
Before using this unit, carefully read the sections entitled: “USING THE UNIT SAFELY” and “IMPORTANT
NOTES” (p. 2; p. 4). These sections provide important information concerning the proper operation of the unit.
Additionally, in order to feel assured that you have gained a good grasp of every feature provided by your new
unit, Owner’s Manual should be read in its entirety. The manual should be saved and kept on hand as a
convenient reference.
201a
この機器を正しくお使いいただくために、ご使用前に「安全上のご注意」(P.3)と「使用上のご注意」(P.4)をよく
お読みください。また、この機器の優れた機能を十分ご理解いただくためにも、この取扱説明書をよくお読みくださ
い。取扱説明書は必要なときにすぐに見ることができるよう、手元に置いてください。
Thank you, and congratulations on your choice of the SRX-12
“Classic EPs” Wave Expansion Board.
This expansion board contains high-quality electric piano and clavi
sounds that are indispensable for a wide range of musical styles,
including R&B, hip-hop, pop, and jazz.
It provides three classic models of 73-note and 64-note electric
pianos, multisampled at each key over four levels of velocity. It also
provides clavi sounds sampled at each of four different pickup
settings, with mute both on and off.
The built-in patches were carefully selected to take full advantage of
the expressive power of the high-quality waveforms.
In addition, installing the Fantom-X6/X7/X8 Audio Track
Expansion will add the two screens “Classic EP” and “Classic Clav”
to Piano mode (the system must be updated to version 2.10 or later),
letting you adjust the sound via a simple and intuitive graphic user
interface.
• Waveforms: 168
• Patches: 105 (Fantom-X series, Fantom-S series, JUNO-G)
50 (SRX-compatible models other than listed above)
* The parameters of each patch are optimally adjusted for the
corresponding model, so the resulting output sound may vary.
Fantom-X6/X7/X8 users
If you’re installing this expansion board in a Fantom-X6/X7/
X8, we recommend that you update your Fantom-X6/X7/X8
system to version 2.10 or later. For details, refer to “About the
SRX-12 dedicated piano mode” (P.8).
Fantom-S/S88 users
If you have a Fantom-S/S88 with a system version earlier than
what’s shown below, you must update its system program so
that it will be able to correctly read Fantom-S/S88-specific data
from the SRX-12. (p. 16)
• Update required for versions up to Ver. 1.05
このたびは、ウェーブ・エクスパンション・ボード SRX-12
「Classic EPs」をお買い上げいただき、まことにありがとうござい
ます。
このエクスパンション・ボードは、R&B、ヒップホップをはじめ、
ポップス、ジャズなどの様々な音楽ジャンルで必要不可欠となった
エレクトリック・ピアノ、クラビの高品位な音色を収録しています。
エレクトリック・ピアノは、73 鍵および 64 鍵の定番モデル 3 機種
を、4 段ベロシティー全鍵マルチ・サンプリングにより収録。クラ
ビは、4 種類すべてのピックアップ・セッティングを、ミュートの
オン/オフとともに完全網羅。
また、搭載されているパッチは高品位なウェーブフォームの表現力
を充分に活かした音色を厳選しています。
さらに、Fantom-X6/X7/X8 Audio Track Expansion に取り付ける
と(Ver. 2.10 以降へのシステム・アップデートが必要)、ピアノ・
モードに「Classic EP」 と「Classic Clav」の 2 つの画面が追加さ
れ、シンプルで直感的なグラフィック・ユーザー・インターフェー
スによる音色調節が可能となります。
ウェーブフォーム:168 種類
•
パッチ:105 種類
•
50 種類(上記以外の SRX 対応機種)
※ 各パッチは、対応機種ごとに最適なパラメーター設定を行って
いますので、それぞれ出音が異なることがあります。
(Fantom-X シリーズ、Fantom-S シリーズ、JUNO-G)
Fantom-X6/X7/X8 ユーザーの方へ
このエクスパンション・ボードを Fantom-X6/X7/X8 に取り付
けて使用する場合、Fantom-X6/X7/X8 のシステムを Ver.
2.10、もしくはそれ以降にアップデートすることをお勧めしま
す。詳しくは、「SRX-12 専用ピアノ・モードについて」
(P.12)を参照してください。
Fantom-S/S88 ユーザーの方へ
下記のシステム・バージョン以前の Fantom-S/S88 で、SRX12 から Fantom-S/S88 専用データを正しく読み出すために、
バージョン・アップしていただく必要があります。(P.16)
Ver.1.05 まではアップデートが必要
•
Copyright © 2006 ROLAND CORPORATION
202
All rights reserved. No part of this publication may be reproduced in any form without the written permission of ROLAND
CORPORATION.
2006 ローランド株式会社 本書の一部、もしくは全部を無断で複写・転載することを禁じます。
©
202
1
Page 2
USING THE UNIT SAFELY
Used for instructions intended to alert
the user to the risk of death or severe
injury should the unit be used
improperly.
Used for instructions intended to alert
the user to the risk of injury or material
damage should the unit be used
improperly.
* Material damage refers to damage or
other adverse effects caused with
respect to the home and all its
furnishings, as well to domestic
animals or pets.
001
• Before using this unit, make sure to read the
instructions below, and the Owner’s Manual.
..........................................................................................................
002a
• Do not open or perform any internal modifications on the unit.
..........................................................................................................
003
• Do not attempt to repair the unit, or replace parts
within it (except when this manual provides
specific instructions directing you to do so). Refer
all servicing to your retailer, the nearest Roland
Service Center, or an authorized Roland
distributor.
..........................................................................................................
004
• Never use or store the unit in places that are:
• Subject to temperature extremes (e.g., direct
sunlight in an enclosed vehicle, near a heating
duct, on top of heat-generating equipment); or
are
• Damp (e.g., baths, washrooms, on wet floors);
or are
• Humid; or are
• Exposed to rain; or are
• Dusty; or are
• Subject to high levels of vibration.
..........................................................................................................
011
• Do not allow any objects (e.g., flammable
material, coins, pins); or liquids of any kind
(water, soft drinks, etc.) to penetrate the unit.
..........................................................................................................
The symbol alerts the user to important instructions
or warnings.The specific meaning of the symbol is
determined by the design contained within the
triangle. In the case of the symbol at left, it is used for
general cautions, warnings, or alerts to danger.
The symbol alerts the user to items that must never
be carried out (are forbidden). The specific thing that
must not be done is indicated by the design contained
within the circle. In the case of the symbol at left, it
means that the unit must never be disassembled.
The ● symbol alerts the user to things that must be
carried out. The specific thing that must be done is
indicated by the design contained within the circle. In
the case of the symbol at left, it means that the powercord plug must be unplugged from the outlet.
013
• In households with small children, an adult
should provide supervision until the child is
capable of following all the rules essential for the
safe operation of the unit.
..........................................................................................................
014
• Protect the unit from strong impact.
(Do not drop it!)
..........................................................................................................
022c
• Before installing the SRX-12, you must first
always turn off the unit (Fantom series/XV
series/JUNO-G/MX-200/RD series with SRX
slots/MC-909/VR-760/G-70) and unplug its
power cord.
..........................................................................................................
023
• DO NOT play a CD-ROM disc on a conventional
audio CD player. The resulting sound may be of a
level that could cause permanent hearing loss.
Damage to speakers or other system components
may result.
..........................................................................................................
106
• Never climb on top of, nor place heavy objects on
the unit.
..........................................................................................................
115b
• Install the circuit board only into the specified
unit (Fantom series/XV series/JUNO-G/MX200/RD series with SRX slots/MC-909/VR-760/
G-70). Remove only the specified screws during
the installation.
..........................................................................................................
118a
• Should you remove screws, keep them in a safe
place out of children’s reach, so there is no chance
of them being swallowed accidentally.
..........................................................................................................
* In the interest of product improvement, the specifications and/or contents of this package are subject to change
without prior notice.
2
962b
Page 3
安全上のご注意
警告
注意
安全上のご注意
火災・感電・傷害を防止するには
注意の意味について警告と
取扱いを誤った場合に、使用者が
警告
注意
死亡または重傷を負う可能性が想
定される内容を表わしています。
取扱いを誤った場合に、使用者が
傷害を負う危険が想定される場合
および物的損害のみの発生が想定
される内容を表わしています。
※物的損害とは、家屋・家財およ
び家畜・ペットにかかわる拡大
損害を表わしています。
以下の指示を必ず守ってください
警告
001
● この機器を使用する前に、以下の指示と取扱説
明書をよく読んでください。
..............................................................................................................
002a
● この機器を分解したり、改造したりしな いでく
ださい。
..............................................................................................................
003
● 修理/部品の交換などで、取扱説明書に書かれ
ていないことは、絶対にしないでください。必
ずお買い上げ店またはローランド・サービスに
相談してください。
..............................................................................................................
004
● 次のような場所での使用や保存はしないでください。
○ 温度が極端に高い場所(直射日光の当たる場
所、暖房機器の近く、発熱する機器の上など)
○ 水気の近く(風呂場、洗面台、濡れた床など)
や湿度の高い場所
○ 雨に濡れる場所
○ ホコリの多い場所
○ 振動の多い場所
..............................................................................................................
011
● この機器に、異物(燃えやすいも の、硬貨、針
金など)や液体(水、ジュースなど)を絶 対に
入れないでください。
..............................................................................................................
図記号の例
は、注意(危険、警告を含む)を表わしていま
す。
具体的な注意内容は、 の中に描かれています。
左図の場合は、「一般的な注意、警告、危険」を
表わしています。
は、禁止(してはいけないこと)を表わしてい
ます。
具体的な禁止内容は、 の中に描かれています。
左図の場合は、「分解禁止」を表わしています。
●は、強制(必ずすること)を表わしています。
具体的な強制内容は、
左図の場合は、「電源プラグをコンセントから抜
くこと」を表わしています。
013
● お子様のいるご家庭で使用する場合、お子様の
取り扱いやいたずらに注意してください。必ず
大人のかたが、監視/指導してあげてください。
..............................................................................................................
014
● この機器を落としたり、この機器に強い衝撃を
与えないでください。
..............................................................................................................
022c
● SRX-12 を取り付ける前に、Fantom シリーズ、
XV シリーズ、JUNO-G、MX-200、SRX 対応の
RD シリーズ、MC-909、VR-760の電源を切っ
て電源プラグをコンセントから外してください。
..............................................................................................................
023
● CD-ROM を、一般のオーディオ CD プレーヤー
で再生しないで下さい。大音量によって耳を痛
めたり、スピーカーを破損する恐れがあります。
..............................................................................................................
106
● この機器の上に乗ったり、機器の上に重いもの
を置かないでください。
..............................................................................................................
115b
● 指定の機器(Fantom シリーズ、XV シリーズ、
JUNO-G、MX-200、SRX 対応の RD シリーズ、
MC-909、VR-760)だけに取り付け、取り付け
時には指定されたネジだけを外してください。
..............................................................................................................
118a
● 取り外したネジは、小さなお子様が誤って飲み
込んだりすることのないようお子様の手の届か
ないところへ保管してください。
●の中に描かれています。
※ 製品の仕様および内容は、改良のため予告なく変更することがあります。
962b
3
Page 4

IMPORTANT NOTES
When you purchase the SRX-12 expansion board from an
authorized Roland dealer, the included sounds and samples
are licensed, not sold, to you by Roland Corporation, for
commercial use in music production, public performance,
broadcast, etc.
You may use any of the included phrases and/or samples in
a commercial or non-commercial recording without paying
any additional license fees. However, you must strictly
adhere to the following crediting guidelines on any music
recording that utilize material from SRX-12.
Reproduction or duplication of this collection or any of the
sound recording contained in the SRX-12, either as they exist
on this expansion board or by any means of reformatting,
mixing, filtering, re-synthesizing, processing or otherwise
editing for use in another product or for re-sale, is strictly
prohibited without the express written consent of Roland. All
unauthorized giving, trading, lending, renting, re-issue, redistribution or re-sale of the sounds included in the SRX-12
are expressly prohibited.
In Plain English: Be creative in your application of the SRX12 sounds, and keep this library for your use only. DO NOT
COPY IT.
Roland constantly monitors other Soundware releases to
check for copyright infringements, and will prosecute all
piracy and copyright violations to the fullest extent of the
law.
THIS LIBRARY IS GUARANTEED TO BE 100%
COPYRIGHT CLEAN.
291a
In addition to the items listed under “USING THE UNIT
SAFELY” on page 2, please read and observe the following:
Handling CD-ROMs
801
* Avoid touching or scratching the shiny underside (encoded
surface) of the disc. Damaged or dirty CD-ROM discs may not
be read properly. Keep your discs clean using a commercially
available CD cleaner.
Handling the Board
901
To avoid the risk of damage to internal components that can
be caused by static electricity, please carefully observe the
following whenever you handle the board.
1
* Before you touch the board, always first grasp a metal object
(such as a water pipe), so you are sure that any static
electricity you might have been carrying has been discharged.
2
* When handling the board, grasp it only by its edges. Avoid
touching any of the electronic components or connectors.
5
* Save the bag in which the board was originally shipped, and
put the board back into it whenever you need to store or
transport it.
901 (F)
Veuillez suivre attentivement les instructions suivantes
quand vous manipulez la carte afin d’éviter tout risque
d’endommagement des pièces internes par l’électricité
statique.
1
* Toujours toucher un objet métallique relié à la terre (comme
un tuyau par exemple) avant de manipuler la carte pour vous
décharger de l’électricité statique que vous auriez pu
accumuler.
2
* Lorsque vous manipulez la carte, la tenir par les côtés. Évitez
de toucher aux composants ou aux connecteurs.
5
* Conservez le sachet d’origine dans lequel était la carte lors de
l’envoi et remettez la carte dedans si vous devez la ranger ou la
transporter.
使用上のご注意
お客様が SRX-12 エクスパンション・ボード(以下、「本製
品」といいます)をローランドの正規販売店からお買い上げ
になった時点で、本製品に含まれる音やサンプルは、ローラ
ンド株式会社から、お客様に対して、音楽制作、公共の場で
の演奏、放送などの商用目的のための使用を許諾したもので
あって、著作権を譲渡したものではありません。
お客様は、いかなる追加料金を支払うこともなく、本製品に
含まれるあらゆるフレーズやサンプルを、商用あるいは非商
用目的の録音に使用できます。ただし、お客様が本製品を使
用して音楽の録音を行う際は、以下のことにご注意ください。
本製品に含まれるいかなる録音物も、そのままの状態であ
れ、いかなる手段によって再構成、ミキシング、フィルター
加工、再合成、加工処理、その他の編集作業をした状態であ
れ、ローランドの書面による許可なく、他の製品に含めたり
再販売するために複製・複写することを禁止します。また、
本製品に含まれるいかなる音も、許可なく贈与、取引、貸
与、賃貸、再発行、再配布、再販売することを禁止します。
従って、本製品の音色は音楽制作の範囲でお使いいただくよ
うお願いします。そして、本製品のライブラリーはお客様ご
自身の個人的使用の目的の範囲でお使いください。本製品の
音色データの複製・複写は禁止します。
ローランドは、著作権侵害がないかどうか、常時他のサウン
ド・ライブラリーの発売を把握しており、著作権侵害に対し
ては法的手段を行使する場合があります。
なお、本製品のライブラリーは第三者の著作権を一切侵害し
ていないことを保証します。
291a
3 ページに記載されている「安全上のご注意」以外に、次の
ことに注意してください。
修理について
451a
※ お客様がこの機器を分解、改造された場合、以後の性能
について保証できなくなります。また、修理をお断りす
る場合もあります。
453a
※ 当社では、この製品の補修用性能部品(製品の機能を維
持するために必要な部品)を、製造打切後 6 年間保有し
ています。この部品保有期間を修理可能の期間とさせて
いただきます。なお、保有期間が経過した後も、故障箇
所によっては修理可能の場合がありますので、お買い上
げ店、または最寄りのローランド・サービスにご相談く
ださい。
CD-ROM の取り扱い
801
※ ディスクの裏面(信号面)に触れたり、傷をつけたりし
ないでください。データの読み出しがうまくいかないこ
とがあります。ディスクの汚れは、市販の CD 専用ク
リーナーでクリーニングしてください。
基板の取り扱い
901
この基板は、静電気により部品が破壊される恐れがありま
す。基板を取り扱うときは、次の点に注意してください。
1
※ 基板を持つときは、あらかじめ何らかの金属に触れて、
体や衣類にたまっている静電気を放電してください。
2
※ 基板を持つときは、基板の縁を持ち、部品やコネクター
の部分に直接手を触れないでください。
5
※ 基板を保管するとき、または輸送するときなどは、購入
時に基板が入っていた袋(導電袋)に入れてください。
4
Page 5
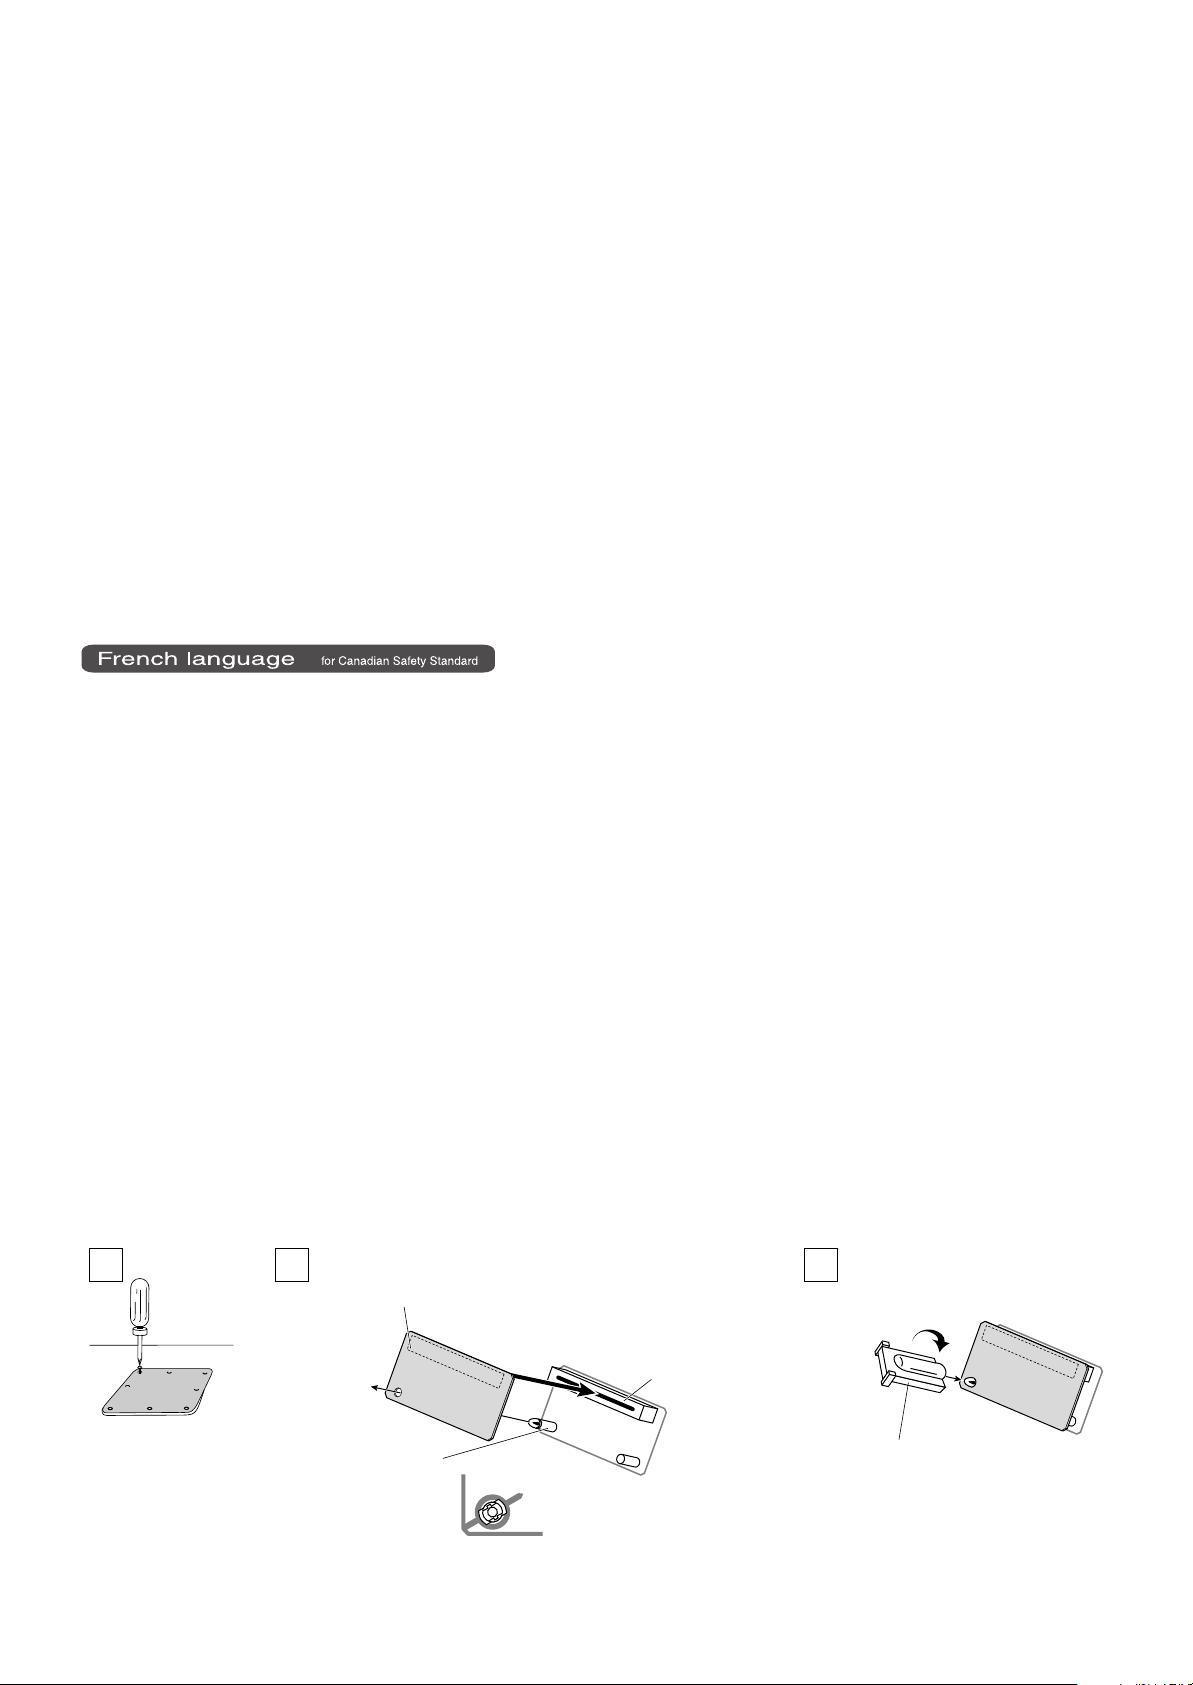
INSTALLING THE WAVE EXPANSION BOARD
* Turn off your instrument.
1.
Remove the cover located on the top (or rear) of your
instrument.
928
* When turning the unit upside-down, get a bunch of newspapers or
magazines, and place them under the four corners or at both ends to
prevent damage to the buttons and controls. Also, you should try to
orient the unit so no buttons or controls get damaged.
929
* When turning the unit upside-down, handle with care to avoid
dropping it, or allowing it to fall or tip over.
2.
Insert the Wave Expansion Board connector into a connector
for an SRX Series slot, while simultaneously inserting the
board holders into the holes in the Wave Expansion Board.
911
* Do not touch any of the printed circuit pathways or connection
terminals.
912
* Never use excessive force when installing a circuit board. If it doesn’t
fit properly on the first attempt, remove the board and try again.
3.
Use the supplied Installation Tool to turn the holders in the
LOCK direction, so the board will be fastened in place.
(To remove the Wave Expansion Board, turn the board holders
in the UNLOCK direction, and lift up the board.)
913
* When circuit board installation is complete, double-check your work.
4.
Using the screws removed in Step 1, refasten the cover in its
original position.
5.
Check if the Wave Expansion Board is correctly installed.
* If the “EXP” display cannot be selected (doesn’t appear) in the
Waveform Selection Screen (refer to the owner’s manual of the
instrument you use), remove the Wave Expansion Board and install it
properly.
* Éteindre l’instrument.
1.
Retirer le couvercle situé sur le dessus (ou á l’arrière) de
l’instrument.
2.
Inserer le connecteur de la carte dans un des creneaux pour
la serie SRX tout en enfoncant les supports a carte dans les
trous de celle-ci.
911(F)
* Ne pas toucher aux circuits imprimés ou aux connecteurs.
912(F)
* Ne jamais forcer lors de l’installation de la carte de circuits imprimés.
Si la carte s’ajuste mal au premier essai, enlevez la carte et
recommencez l’installation.
3.
Utiliser l’outil d’installation fourni pour tourner les clips de
retenue vers la position de blocage (LOCK) de façon á ce que
la carte soit retenue en place.
(Pour retirer la carte d’expansion Wave, tourner les clips de
retenue de la carte vers la position déblocage (UNLOCK) et
retirer la carte en la soulevant.)
913(F)
* Quand l’installation de la carte de circuits imprimés est terminée,
revérifiez si tout est bien installé.
4.
Remettre la plaque a sa place et la fixer a l’aide des vis
enlevees a l’etape 1.
5.
S’assurer que la carte d’expansion Wave est installée
correctement.
* S’il est impossible de sélectionner l’affichage “EXP” (il n’apparaît pas)
á l’écran de sélection Waveform (se reporter au guide du propriétaire
de l’instrument utilisé), retirer la carte d’expansion Wave et la
réinstaller correctement.
ウェーブ・エクスパンション・ボードの取り
付けかた
※ 使用機器の電源スイッチをオフにしてください。
1.
使用機器の上部、または背面にあるカバーをはずしま
す。
928
※ 本体を裏返す際は、ボタン、つまみなどを破損しないよ
うに、新聞や雑誌などを重ねて本体の四隅や両端に敷い
てください。また、その際、ボタン、つまみなどが破損
しないような位置に配置してください。
929
※ 本体を裏返す際は、落下や転倒を引き起こさないよう取
扱いにご注意ください。
2.
SRX シリーズ用のスロットのコネクターにウェーブ・エ
クスパンション・ボードのコネクターを差し込み、同時
に基板ホルダーをウェーブ・エクスパンション・ボード
の穴にはめ込みます。
911
※ 回路部やコネクター部には手を触れないでください。
912
※ 基板を無理に押し込まないでください。装着しにくい場
合、いったん基板を外してやり直してください。
3.
付属の固定用具で基板ホルダーを LOCK 方向に回し、
ウェーブ・エクスパンション・ボードを固定します。
(ウェーブ・エクスパンション・ボードを取り外すには、
基板ホルダーを UNLOCK 方向に回してから取り外しま
す。)
913
※ 取り付けを終えたら、正しく取り付けられていることを
再度確認してください。
手順 1 で外したネジで、カバーを元通りに取り付けます。
4.
ウェーブ・エクスパンション・ボードの取り付けが正し
5.
く行われたかを確認します。
※ ウェーブフォームの選択画面(使用機器の取扱説明書参
照)でEXPが選べない(表示されない)ときは、も
う一度ウェーブ・エクスパンション・ボードをつけ直し
てください。
Screwdriver
Tournevis
ドライバー
Wave Expansion Board (SRX series)
21 3
Carte d'extension Wave (serie SRX)
ウェーブ・エクスパンション・ボード(SRXシリーズ)
Connector
Connecteur
コネクター
Board holder
Support à carte
基板ホルダー
Position them as shown before you install the board.
Avant l’installation, orienter les supports à carte tel qu’indiqué sur le schéma.
取り付ける前に図のような向きに合わせます
LOCK
Installation tool
Outil d'installation
固定用具
5
Page 6

Patch List (1)
For Fantom-X series/Fantom-S series/JUNO-G
No. Name Voices Category
1 Pure EP1 1 EL.PIANO
2 Lo-Fi EP1 1 EL.PIANO
3 Pure EP2 1 EL.PIANO
4 Phaser EP1 1 EL.PIANO
5 Soft Wurly 1 EL.PIANO
6 Pure Wurly 1 EL.PIANO
7 Pure Clav DB 2 KEYBOARDS
8 Pure Clav CB 2 KEYBOARDS
9 PhaseClav CB 4 KEYBOARDS
10 Wah Clav CB 2 KEYBOARDS
11 Comp Clav CB 2 KEYBOARDS
12 PureClavMtCB 2 KEYBOARDS
13 St.Trem EP1 1 EL.PIANO
14 St.Trem EP2 1 EL.PIANO
15 Chorus Wurly 1 EL.PIANO
16 Chorus EP1 1 EL.PIANO
17 Chorus EP2 1 EL.PIANO
18 Dp-Cho EP1 1 EL.PIANO
19 Dp-Cho EP2 1 EL.PIANO
20 Soft EP1 1 EL.PIANO
21 Soft EP2 1 EL.PIANO
22 Phase Wurly 1 EL.PIANO
23 Hard EP1 1 EL.PIANO
24 Moving EP1 3 EL.PIANO
25 EP1 w/FM 3 EL.PIANO
26 EP1 w/VOX 3 EL.PIANO
27 EP1 w/STR 3 EL.PIANO
28 EP1 w/PAD 3 EL.PIANO
29 Flanger EP1 1 EL.PIANO
30 Flanger EP2 1 EL.PIANO
31 FlangerWurly 1 EL.PIANO
32 Melodic EP1 1 EL.PIANO
33 Amped EP1 1 EL.PIANO
34 Amped EP2 1 EL.PIANO
35 Lo-Fi EP2 1 EL.PIANO
No. Name Voices Category
36 Lo-Fi Wurly 1 EL.PIANO
37 ModDly EP1 1 EL.PIANO
38 ModDly EP2 1 EL.PIANO
39 Dual EP1 2 EL.PIANO
40 Dual Wurly 2 EL.PIANO
41 Enhance Clav 2 KEYBOARDS
42 Peaking Clav 2 KEYBOARDS
43 Dual Clav DB 4 KEYBOARDS
44 Dual Clav DA 4 KEYBOARDS
45 Dual Clav CB 4 KEYBOARDS
46 Dual Clav CA 4 KEYBOARDS
47 DualClavMtDB 4 KEYBOARDS
48 DualClavMtCB 4 KEYBOARDS
49 PhaseClav DB 4 KEYBOARDS
50 PhaseClvMtCB 4 KEYBOARDS
51 /EPtype1Cnd1 1 EL.PIANO
52 /EPtype1Cnd2 1 EL.PIANO
53 /EPtype1Cnd3 1 EL.PIANO
54 /EPtype1Cnd4 1 EL.PIANO
55 /EPtype1Cnd5 1 EL.PIANO
56 /EPtype2Cnd1 1 EL.PIANO
57 /EPtype2Cnd2 1 EL.PIANO
58 /EPtype2Cnd3 1 EL.PIANO
59 /EPtype2Cnd4 1 EL.PIANO
60 /EPtype2Cnd5 1 EL.PIANO
61 /EPtype3Cnd1 1 EL.PIANO
62 /EPtype3Cnd2 1 EL.PIANO
63 /EPtype3Cnd3 1 EL.PIANO
64 /EPtype3Cnd4 1 EL.PIANO
65 /EPtype3Cnd5 1 EL.PIANO
66 /Bite1 Pk1 4 KEYBOARDS
67 /Bite2 Pk1 4 KEYBOARDS
68 /Bite3 Pk1 4 KEYBOARDS
69 /Bite4 Pk1 4 KEYBOARDS
70 /Bite5 Pk1 4 KEYBOARDS
(BANK SELECT MSB: 93; LSB: 26)
No. Name Voices Category
71 /Bite1 Pk2 4 KEYBOARDS
72 /Bite2 Pk2 4 KEYBOARDS
73 /Bite3 Pk2 4 KEYBOARDS
74 /Bite4 Pk2 4 KEYBOARDS
75 /Bite5 Pk2 4 KEYBOARDS
76 /Bite1 Pk3 4 KEYBOARDS
77 /Bite2 Pk3 4 KEYBOARDS
78 /Bite3 Pk3 4 KEYBOARDS
79 /Bite4 Pk3 4 KEYBOARDS
80 /Bite5 Pk3 4 KEYBOARDS
81 /Bite1 Pk4 4 KEYBOARDS
82 /Bite2 Pk4 4 KEYBOARDS
83 /Bite3 Pk4 4 KEYBOARDS
84 /Bite4 Pk4 4 KEYBOARDS
85 /Bite5 Pk4 4 KEYBOARDS
86 /Bite1 Pk1Mt 4 KEYBOARDS
87 /Bite2 Pk1Mt 4 KEYBOARDS
88 /Bite3 Pk1Mt 4 KEYBOARDS
89 /Bite4 Pk1Mt 4 KEYBOARDS
90 /Bite5 Pk1Mt 4 KEYBOARDS
91 /Bite1 Pk2Mt 4 KEYBOARDS
92 /Bite2 Pk2Mt 4 KEYBOARDS
93 /Bite3 Pk2Mt 4 KEYBOARDS
94 /Bite4 Pk2Mt 4 KEYBOARDS
95 /Bite5 Pk2Mt 4 KEYBOARDS
96 /Bite1 Pk3Mt 4 KEYBOARDS
97 /Bite2 Pk3Mt 4 KEYBOARDS
98 /Bite3 Pk3Mt 4 KEYBOARDS
99 /Bite4 Pk3Mt 4 KEYBOARDS
100 /Bite5 Pk3Mt 4 KEYBOARDS
101 /Bite1 Pk4Mt 4 KEYBOARDS
102 /Bite2 Pk4Mt 4 KEYBOARDS
103 /Bite3 Pk4Mt 4 KEYBOARDS
104 /Bite4 Pk4Mt 4 KEYBOARDS
105 /Bite5 Pk4Mt 4 KEYBOARDS
For Fantom (FA-76)/XV series/MX-200 (BANK SELECT MSB: 93; LSB: 26)
No. Name Voices Category
1 Pure EP1 1 EL.PIANO
2 Lo-Fi EP1 1 EL.PIANO
3 Pure EP2 1 EL.PIANO
4 Phaser EP1 1 EL.PIANO
5 Soft Wurly 1 EL.PIANO
6 Pure Wurly 1 EL.PIANO
7 Pure Clav DB 2 KEYBOARDS
8 Pure Clav CB 2 KEYBOARDS
9 PhaseClav CB 4 KEYBOARDS
10 Wah Clav CB 2 KEYBOARDS
11 Comp Clav CB 2 KEYBOARDS
12 PureClavMtCB 2 KEYBOARDS
13 St.Trem EP1 1 EL.PIANO
14 St.Trem EP2 1 EL.PIANO
15 Chorus Wurly 1 EL.PIANO
16 Chorus EP1 1 EL.PIANO
17 Chorus EP2 1 EL.PIANO
When playing patches on the expansion board, we recommend that
you set all the EFFECTS ON/OFF settings on the Fantom series/XV
series to “ON.” If such settings are set to “OFF,” you may not obtain
the intended sound.
* Note that the Release Time has been set to a fairly long value for some
of the patches. As a result, if your sound generator has been set so
“Patch Remain” is “ON,” the release portion of a previously sounding
patch may continue to be heard even after switching to a new patch.
* Refer to the owner’s manual for your instrument for specific
instructions on how to play Patches on the expansion board.
No. Name Voices Category
18 Dp-Cho EP1 1 EL.PIANO
19 Dp-Cho EP2 1 EL.PIANO
20 Soft EP1 1 EL.PIANO
21 Soft EP2 1 EL.PIANO
22 Phase Wurly 1 EL.PIANO
23 Hard EP1 1 EL.PIANO
24 Moving EP1 3 EL.PIANO
25 EP1 w/FM 3 EL.PIANO
26 EP1 w/VOX 3 EL.PIANO
27 EP1 w/STR 3 EL.PIANO
28 EP1 w/PAD 3 EL.PIANO
29 Flanger EP1 1 EL.PIANO
30 Flanger EP2 1 EL.PIANO
31 FlangerWurly 1 EL.PIANO
32 Melodic EP1 1 EL.PIANO
33 Amped EP1 1 EL.PIANO
34 Amped EP2 1 EL.PIANO
エクスパンション・ボードのパッチを発音させるときは、Fantom
シリーズ /XV シリーズの EFFECTS ON/OFF の設定をすべて ON
にして使用することをお勧めいたします。OFF に設定した場合、意
図した音色にならないことがあります。
※ パッチの中にはリリース・タイムが長く設定してあるパッチも
ありますので、音源のパッチ・リメインが ON になっている
と音色を切り替えても前のパッチのリリースが残る場合があり
ます。
※ エクスパンション・ボードのパッチを発音させるときは、使用
機器の取扱説明書にしたがって、実行してください。
No. Name Voices Category
35 Lo-Fi EP2 1 EL.PIANO
36 Lo-Fi Wurly 1 EL.PIANO
37 ModDly EP1 1 EL.PIANO
38 ModDly EP2 1 EL.PIANO
39 Dual EP1 2 EL.PIANO
40 Dual Wurly 2 EL.PIANO
41 Enhance Clav 2 KEYBOARDS
42 Peaking Clav 2 KEYBOARDS
43 Dual Clav DB 4 KEYBOARDS
44 Dual Clav DA 4 KEYBOARDS
45 Dual Clav CB 4 KEYBOARDS
46 Dual Clav CA 4 KEYBOARDS
47 DualClavMtDB 4 KEYBOARDS
48 DualClavMtCB 4 KEYBOARDS
49 PhaseClav DB 4 KEYBOARDS
50 PhaseClvMtCB 4 KEYBOARDS
6
Page 7

Patch List (2)
For RD series (with SRX slots)/MC-909/VR-760/G-70
No. Name Voices Category
1 Pure EP1 1 EL.PIANO
2 Lo-Fi EP1 1 EL.PIANO
3 Pure EP2 1 EL.PIANO
4 Phaser EP1 1 EL.PIANO
5 Soft Wurly 1 EL.PIANO
6 Pure Wurly 1 EL.PIANO
7 Pure Clav DB 2 KEYBOARDS
8 Pure Clav CB 2 KEYBOARDS
9 PhaseClav CB 4 KEYBOARDS
10 Wah Clav CB 2 KEYBOARDS
11 Comp Clav CB 2 KEYBOARDS
12 PureClavMtCB 2 KEYBOARDS
13 St.Trem EP1 1 EL.PIANO
14 St.Trem EP2 1 EL.PIANO
15 Chorus Wurly 1 EL.PIANO
16 Chorus EP1 1 EL.PIANO
17 Chorus EP2 1 EL.PIANO
No. Name Voices Category
18 Dp-Cho EP1 1 EL.PIANO
19 Dp-Cho EP2 1 EL.PIANO
20 Soft EP1 1 EL.PIANO
21 Soft EP2 1 EL.PIANO
22 Phase Wurly 1 EL.PIANO
23 Hard EP1 1 EL.PIANO
24 3rd-StackEP1 2 EL.PIANO
25 3rd-StackWly 2 EL.PIANO
26 HarmStackEP1 2 EL.PIANO
27 Hybrid EP1 2 EL.PIANO
28 Hybrid Wurly 2 EL.PIANO
29 Flanger EP1 1 EL.PIANO
30 Flanger EP2 1 EL.PIANO
31 FlangerWurly 1 EL.PIANO
32 Melodic EP1 1 EL.PIANO
33 Amped EP1 1 EL.PIANO
34 Amped EP2 1 EL.PIANO
(BANK SELECT MSB: 93; LSB: 26)
No. Name Voices Category
35 Lo-Fi EP2 1 EL.PIANO
36 Lo-Fi Wurly 1 EL.PIANO
37 ModDly EP1 1 EL.PIANO
38 ModDly EP2 1 EL.PIANO
39 Dual EP1 2 EL.PIANO
40 Dual Wurly 2 EL.PIANO
41 Enhance Clav 2 KEYBOARDS
42 Peaking Clav 2 KEYBOARDS
43 Dual Clav DB 4 KEYBOARDS
44 Dual Clav DA 4 KEYBOARDS
45 Dual Clav CB 4 KEYBOARDS
46 Dual Clav CA 4 KEYBOARDS
47 DualClavMtDB 4 KEYBOARDS
48 DualClavMtCB 4 KEYBOARDS
49 PhaseClav DB 4 KEYBOARDS
50 PhaseClvMtCB 4 KEYBOARDS
No. Name
1 EPtype1 pp A
2 EPtype1 pp B
3 EPtype1 pp C
4 EPtype1 ppV1
5 EPtype1 ppV2
6 EPtype1 ppV3
7 EPtype1 ppV4
8 EPtype1 mp A
9 EPtype1 mp B
10 EPtype1 mp C
11 EPtype1 mpV1
12 EPtype1 mpV2
13 EPtype1 mpV3
14 EPtype1 mpV4
15 EPtype1 f A
16 EPtype1 f B
17 EPtype1 f C
18 EPtype1 f V1
19 EPtype1 f V2
20 EPtype1 f V3
21 EPtype1 f V4
22 EPtype1 ff A
23 EPtype1 ff B
24 EPtype1 ff C
25 EPtype1 ffV1
26 EPtype1 ffV2
27 EPtype1 ffV3
28 EPtype1 ffV4
No. Name
29 EPtype2 pp A
30 EPtype2 pp B
31 EPtype2 pp C
32 EPtype2 ppV1
33 EPtype2 ppV2
34 EPtype2 ppV3
35 EPtype2 ppV4
36 EPtype2 mp A
37 EPtype2 mp B
38 EPtype2 mp C
39 EPtype2 mpV1
40 EPtype2 mpV2
41 EPtype2 mpV3
42 EPtype2 mpV4
43 EPtype2 f A
44 EPtype2 f B
45 EPtype2 f C
46 EPtype2 f V1
47 EPtype2 f V2
48 EPtype2 f V3
49 EPtype2 f V4
50 EPtype2 ff A
51 EPtype2 ff B
52 EPtype2 ff C
53 EPtype2 ffV1
54 EPtype2 ffV2
55 EPtype2 ffV3
56 EPtype2 ffV4
Waveform List
No. Name
57 EPtype3 pp A
58 EPtype3 pp B
59 EPtype3 pp C
60 EPtype3 ppV1
61 EPtype3 ppV2
62 EPtype3 ppV3
63 EPtype3 ppV4
64 EPtype3 mp A
65 EPtype3 mp B
66 EPtype3 mp C
67 EPtype3 mpV1
68 EPtype3 mpV2
69 EPtype3 mpV3
70 EPtype3 mpV4
71 EPtype3 f A
72 EPtype3 f B
73 EPtype3 f C
74 EPtype3 f V1
75 EPtype3 f V2
76 EPtype3 f V3
77 EPtype3 f V4
78 EPtype3 ff A
79 EPtype3 ff B
80 EPtype3 ff C
81 EPtype3 ffV1
82 EPtype3 ffV2
83 EPtype3 ffV3
84 EPtype3 ffV4
No. Name
85 Clav CA mp A
86 Clav CA mp B
87 Clav CA mp C
88 Clav CA f A
89 Clav CA f B
90 Clav CA f C
91 Clav CA ff A
92 Clav CA ff B
93 Clav CA ff C
94 Clav CB mp A
95 Clav CB mp B
96 Clav CB mp C
97 Clav CB f A
98 Clav CB f B
99 Clav CB f C
100 Clav CB ff A
101 Clav CB ff B
102 Clav CB ff C
103 Clav DA mp A
104 Clav DA mp B
105 Clav DA mp C
106 Clav DA f A
107 Clav DA f B
108 Clav DA f C
109 Clav DA ff A
110 Clav DA ff B
111 Clav DA ff C
112 Clav DB mp A
No. Name
113 Clav DB mp B
114 Clav DB mp C
115 Clav DB f A
116 Clav DB f B
117 Clav DB f C
118 Clav DB ff A
119 Clav DB ff B
120 Clav DB ff C
121 ClvMtCA mp A
122 ClvMtCA mp B
123 ClvMtCA mp C
124 ClvMt CA f A
125 ClvMt CA f B
126 ClvMt CA f C
127 ClvMtCB mp A
128 ClvMtCB mp B
129 ClvMtCB mp C
130 ClvMt CB f A
131 ClvMt CB f B
132 ClvMt CB f C
133 ClvMtDA mp A
134 ClvMtDA mp B
135 ClvMtDA mp C
136 ClvMt DA f A
137 ClvMt DA f B
138 ClvMt DA f C
139 ClvMtDB mp A
140 ClvMtDB mp B
No. Name
141 ClvMtDB mp C
142 ClvMt DB f A
143 ClvMt DB f B
144 ClvMt DB f C
145 ClvMtRsCA pA
146 ClvMtRsCA pB
147 ClvMtRsCA pC
148 ClvMtRsCA fA
149 ClvMtRsCA fB
150 ClvMtRsCA fC
151 ClvMtRsCB pA
152 ClvMtRsCB pB
153 ClvMtRsCB pC
154 ClvMtRsCB fA
155 ClvMtRsCB fB
156 ClvMtRsCB fC
157 ClvMtRsDA pA
158 ClvMtRsDA pB
159 ClvMtRsDA pC
160 ClvMtRsDA fA
161 ClvMtRsDA fB
162 ClvMtRsDA fC
163 ClvMtRsDB pA
164 ClvMtRsDB pB
165 ClvMtRsDB pC
166 ClvMtRsDB fA
167 ClvMtRsDB fB
168 ClvMtRsDB fC
When you create a Patch using the waveforms stored in the
Expansion Board, observe the following points:
* If you make a Patch with a single voice and then later play it in a
chord, the sound may be distorted with certain settings for the Effects
and TVA. If this happens, adjust the level of the Effects and TVA.
このエクスパンション・ボードに収められているウェーブフォーム
を使ってパッチを作るときには、次の点に注意してください。
※ 単音でパッチを作ったとき、エフェクトや TVA の設定状態によっ
て、その音を和音で演奏すると音が歪む場合があります。このよ
うなときは、エフェクトや TVA のレベルを調整してください。
7
Page 8

About the SRX-12 dedicated piano mode (for Fantom-X6/X7/X8 users)
When you install the SRX-12 in the Fantom-X6/X7/X8, the two
screens “Classic EP” and “Classic Clav” will be added to Piano
mode, letting you adjust the sound using a simple and intuitive
classic user interface.
* If your Fantom-X6/X7/X8 has not been updated to version 2.1 or
later, you’ll need to update your Fantom-X6/X7/X8. For details on
how to update, refer to “Readme_E.pdf” in the “Fantom-X6/X7/X8
Audio Track Expansion System Update CD-ROM” included with
this product.
* If your Fantom-X6/X7/X8 is running Ver. 1.xx, it must be updated to
Audio Track Expansion Ver. 2.0 before using the included updater.
* The included updater is not necessary if your Fantom-X6/X7/X8 is
running Ver. 2.1 or later.
You will need the Adobe Reader in order to view
“Readme_E.pdf.” The latest version of Adobe Acrobat Reader
can be downloaded from the Adobe website.
http://www.adobe.com
(This URL may change without notice.)
To access the Classic EP screen
1.
Press [PIANO MODE] to access the Piano Mode screen.
2.
Press [F1] -> [F3 (SRX-12 EP)] -> [F8 (SELECT)].
The Piano Mode (Classic EP) screen will appear.
fig.ClassicEP_60
To access the Classic Clav screen
1.
Press [PIANO MODE] to access the Piano Mode screen.
2.
Press [F1] -> [F4 (SRX-12 Clav)] -> [F8 (SELECT)].
The Piano Mode (Classic Clav) screen will appear.
fig.ClassicClav_60
8
* When you’re in the Classic EP screen or Classic Clav screen, pressing
[F1 (Inst)] will take you to the Piano mode selection screen.
※ 日本語の説明は、「SRX-12 専用ピアノ・モードについて」(P.12)をご覧ください。
Page 9

About the SRX-12 dedicated piano mode (for Fantom-X6/X7/X8 users)
Classic EP screen
Using the presets
1.
In the Piano Mode (Classic EP) screen, press [F2] to access
the following screen.
fig.EP-Preset_60
[F3 (Type)]
This selects the type of electric piano.
Successive presses of the button cycle you through the types like this:
Type 1 → Type 2 → Type 3 → Type 1 → ...
[F4 (Cond/Trem)]
This modifies the Condition setting, and adjusts the tremolo (an
effect that cyclically varies the volume) and panning (an effect that
moves the position of the sound between left and right).
When you press this button, the following functions will be assigned
to realtime control knobs 1–3.
2.
Press [F3 (Preset 1)]–[F8 (Preset 6)] to select the desired
sound.
Changing the preset sounds
1.
Hold down [SHIFT] and press one of the [F3]–[F8] buttons.
The patch list will appear.
2.
Select a patch, and press the [F8 (SELECT)] button.
The selected patch will be assigned to the button ([F3]–[F8]) you
pressed in step 1.
* For details on how to select patches, refer to the Fantom-X6/X7/X8
owner’s manual.
Using the manual controls
1.
In the Piano Mode (Classic EP) screen, press [F2] to access
the following screen.
fig.EP-Manual_60
2.
Use [F3 (Type)]–[F8 (Speaker SIM)] and the REALTIME
CONTROL knobs to adjust the sound.
* You can use only one of the effects (chorus, phaser, equalizer, or
speaker simulator).
Knob
1
2 Tremolo Rate Adjusts the speed of tremolo/pan-
3 Tremolo Depth Adjusts the depth (width) of the
Function Explanation
Condition Selects the state of the electric piano
over a range of five stages.
If you turn the knob to the right
(Mint), you’ll get a clear tone
like that of an electric piano in
brand-new condition.
As you turn the knob toward
the left (Vint.), the pitch and
tone will change to a more vintage character.
ning. Turn the knob toward the
right to increase the speed.
tremolo/panning. Turn the knob
toward the right to make the tremolo/panning deeper (wider).
If you turn the knob while holding
down [SHIFT], there will be no
panning effect; the tremolo will be
monaural.
[F5 (Chorus)]
Switches the chorus on/off.
When you switch chorus on, the following functions will be assigned
to realtime control knobs 1–3.
Knob Function Range Explanation
1 Rate 0.05–10.00
(Hz)
2 Depth 0–127 Adjusts the modulation
3 Balance D100:0W–
D0:100W
Adjusts the modulation
speed of the chorus. Turn
the knob toward the right
for faster modulation.
depth of the chorus. Turn
the knob toward the right
for deeper modulation.
Adjusts the volume balance
between the original (dry)
sound (D) and the chorus
(wet) sound (W). Turn the
knob toward the right to increase the chorus sound. If
you turn the knob all the
way toward the left, you
will hear only the original
sound, and there will be no
chorus effect.
9
Page 10

About the SRX-12 dedicated piano mode (for Fantom-X6/X7/X8 users)
[F6 (Phaser)]
Switches the phaser on/off.
When you switch the phaser on, the following functions will be
assigned to realtime control knobs 1–4.
Knob
1
2 Rate 0.05–10.00
3 Depth 0–127 Adjusts the modulation
4 Reso-
Function Range Explanation
Manual 0–127 Adjusts the pitch at which
the phaser is applied. As
you turn the knob toward
the right, the phaser will be
applied to a higher pitch
range.
Adjusts the modulation
(Hz)
0–127 Adjusts the amount of reso-
nance
speed of the phaser. Turn
the knob toward the right
for faster modulation.
depth of the phaser. Turn
the knob toward the right
for deeper modulation.
nance. Turn the knob toward the right to increase
the resonance, producing a
more strongly distinctive
modulation.
[F7 (EQ)]
Switches the equalizer on/off.
When you switch the equalizer on, the following functions will be
assigned to realtime control knobs 1–4.
Knob Function Range Explanation
1 Low Gain -15– +15 (dB) Adjusts the amount
of boost/cut for the
low-frequency range.
2 Mid Gain -15– +15 (dB) Adjusts the amount
of boost/cut for the
mid-frequency range.
3 High
Gain
4 Level 0–127 Adjusts the output
-15– +15 (dB) Adjusts the amount
of boost/cut for the
high-frequency
range.
volume of the equalizer.
* If you turn the knob
all the way toward
the left, there will be
no sound.
[F8 (Speaker SIM)]
Switches the speaker simulator on/off.
When you switch the speaker simulator on, the following functions
will be assigned to realtime control knobs 1–4.
Knob
1
2 Mic Level 0–127 Adjusts the volume of the
3 Dir Level 0–127 Adjusts the volume of the
4 Level 0–127 Adjusts the output vol-
Specifications of each speaker type
The “Speakers” column indicates the diameter of each speaker unit
(in inches) and the number of units.
Type
SMALL 1
SMALL 2 Small open back 10" x 1 Dynamic
MIDDLE Open back 12" x 1 Dynamic
JC-120 Open back 12" x 2 Dynamic
BUILT-IN 1 Open back 12" x 2 Dynamic
BUILT-IN 2 Open back 12" x 2 Condenser
BUILT-IN 3 Open back 12" x 2 Condenser
BUILT-IN 4 Open back 12" x 2 Condenser
BUILT-IN 5 Open back 12" x 2 Condenser
BG STACK 1 Sealed 12" x 2 Condenser
BG STACK 2 Large sealed 12" x 2 Condenser
MS STACK 1 Large sealed 12" x 4 Condenser
MS STACK 2 Large sealed 12" x 4 Condenser
METAL
STACK
2-STACK Large double stack 12" x 4 Condenser
3-STACK Large triple stack 12" x 4 Condenser
Function Range Explanation
Speaker (see below) Selects the type of speaker.
mic that picks up the
sound from the speaker.
direct sound.
ume.
Cabinet Speakers Mic
Small open back 10" x 1 Dynamic
Large double stack 12" x 4 Condenser
Saving your settings
• The current settings will be preserved when you switch from
the Classic EP screen to another screen.
* The effect on/off status is preserved, but the knob settings of each effect
are not preserved.
• A sound you edit using the manual controls can be saved by
pressing [WRITE] and saving it as a Fantom-X6/X7/X8 user
patch. For details on how to save a sound, refer to the Fantom-
X6/X7/X8 owner’s manual.
10
Page 11

About the SRX-12 dedicated piano mode (for Fantom-X6/X7/X8 users)
Classic Clav screen
Using the presets
1.
In the Piano Mode (Classic Clav) screen, press [F2] to
access the following screen.
fig.Clav-Preset_60
2.
Press [F3 (Preset 1)]–[F8 (Preset 6)] to select the desired
sound.
Changing the preset sounds
1.
Hold down [SHIFT] and press one of the [F3]–[F8] buttons.
The patch list will appear.
2.
Select a patch, and press the [F8 (SELECT)] button.
The selected patch will be assigned to the button ([F3]–[F8]) you
pressed in step 1.
* For details on how to select patches, refer to the Fantom-X6/X7/X8
owner’s manual.
Using the manual controls
1.
In the Piano Mode (Classic Clav) screen, press [F2] to
access the following screen.
fig.Clav-Manual_60
[F3 (Bite/Pickup)]
This lets you switch between five popular processes (effects) used for
clavi, and lets you change the type of pickup.
When you press this button, the following functions will be assigned
to realtime control knobs 1 and 2.
Knob
1
2 Pickup
Function
Bite Selects the type of effect to use.
Explanation and range
Dry:
No effect will be applied.
Comp (Compressor):
Loud sounds will be compressed and
soft sounds will be boosted, thus making
the volume more consistent and creating
a sense of enhanced loudness.
Enhancer:
Boosts the harmonic content to add sparkle and clarity to the sound.
Auto Wah:
Varies the cutoff frequency of the filter
according to the volume, making loud
sounds brighter and soft sounds more
mellow.
Overdrive:
Distorts the sound, making it more powerful.
Switches between four types of pickup setting.
CA (Lower):
CB (Upper):
DA (Upper + Lower, out of phase):
Thin (light) sound that cuts the low-frequency range
DB (Upper + Lower, in phase):
The sound of two pickups heard together
Mild tone
Bright tone
Timbre
You can vary the tone by using the timbre switches that divide the
sound into four ranges.
[F4]–[F7] will turn each range on/off.
Each time you press a button, it will alternately turn on or off.
[F4 (Brilliant)]:
[F5 (Treble)]:
[F6 (Medium)]:
[F7 (Soft)]:
* If you turn all four of these off, you won’t hear any sound.
High-frequency range
High-mid frequency range
Low-mid frequency range
Low-frequency range
2.
Use [F3 (Bite/Pickup)]–[F8 (Mute)] and the REALTIME
CONTROL knobs to adjust the sound.
[F8 (Mute)]
Switches the mute on/off.
If you turn the mute on, you’ll get a sound with a shorter sustain and
an attenuated high-frequency range.
Saving your settings
• The current settings will be preserved when you switch from
the Classic Clav screen to another screen.
• A sound you edit using the manual controls can be saved by
pressing [WRITE] and saving it as a Fantom-X6/X7/X8 user
patch. For details on how to save a sound, refer to the Fantom-
X6/X7/X8 owner’s manual.
11
Page 12

SRX-12 専用ピアノ・モードについて
(Fantom-X6/X7/X8 をお使いのお客様へ)
SRX-12 を Fantom-X6/X7/X8 に取り付けると、ピアノ・モードに
「Classic EP」 と「Classic Clav」の 2 つの画面が追加され、シンプ
ルで直感的なグラフィック・ユーザー・インターフェースによる音
色調節が可能となります。
※ お使いの Fantom-X6/X7/X8 が Ver. 2.1 以降になっていない場
合、Fantom-X6/X7/X8 をアップデートする必要があります。
アップデート方法については、本製品に付属の「Fantom-X6/
X7/X8 Audio Track Expansion System Update CD-ROM」に
収録されている「ReadmeJ.pdf」を参照してください。
※ 付属 CD-ROM に収録されているシステム・アップデート・プ
ログラムは、Audio Track Expansion(Ver. 2.xx)専用です。
Ver. 1.xx のシステム・プログラムをご使用のお客様は、
Fantom-X6/X7/X8 を Audio Track Expansion(Ver. 2.00)に
アップグレードしてからご使用ください。
※ Ver. 2.1 以降のシステム・プログラムをご使用のお客様は、
Fantom-X6/X7/X8 を付属 CD-ROM でアップデートしていた
だく必要はありません。
「ReadmeJ.pdf」
Adobe の web サイトからダウンロードできます。
http://www.adobe.co.jp
(アドレスは予告なく変更になる場合があります。)
を読むためには Adobe Reader が必要です。
Classic EP 画面の表示方法
1.
[PIANO MODE]を押して、Piano Mode 画面を表示させます。
2.
[F1]→[F3(SRX-12 EP)]→[F8(SELECT)]と押します。
Piano Mode(Classic EP)画面になります。
fig.ClassicEP60
Classic Clav 画面の表示方法
1.
[PIANO MODE]を押して、Piano Mode 画面を表示させます。
2.
[F1]→[F4(SRX-12 Clav)]→[F8(SELECT)]と押します。
Piano Mode(Classic Clav)画面になります。
fig.ClassicClav60
12
※ Classic EP 画面または Classic Clav 画面で[F1(Inst)]を押
すと、ピアノ・モード画面の選択画面になります。
* This document is in Japanese. The contents are identical to “About the SRX-12 dedicated piano mode” (p. 8).
Page 13

SRX-12 専用ピアノ・モードについて (Fantom-X6/X7/X8 をお使いのお客様へ)
Classic EP 画面
プリセットの使いかた
1.
Piano Mode(Classic EP)画面で[F2]を押して、以下の画
面を表示させます。
fig.EP-Preset
2.
[F3(Preset 1)]〜[F8(Preset 6)]を押して、使う音色を
選びます。
マニュアルの使いかた
1.
Piano Mode(Classic EP)画面で[F2]を押して、以下の画
面を表示させます。
fig.EP-Manual
2.
[F3(Type)]〜[F8(Speaker SIM)]と、REALTIME
CONTROL つまみで音色を調節します。
※ エフェクト(コーラス、フェイザー、イコライザー、スピー
カー・シミュレーター)は、いずれか 1 つのみ使用できます。
プリセット音色の変更のしかた
1.
[SHIFT]を押しながら[F3]〜[F8]のいずれかを押します。
パッチ・リストが表示されます。
2.
パッチを選び、[F8(SELECT)]ボタンを押します。
手順 1 で押したボタン([F3]〜[F8])に、選んだパッチが
割り当てられます。
※ パッチの選びかたについては、Fantom-X6/X7/X8 の取扱説明
書を参照してください。
[F3(Type)]
エレクトリック・ピアノの種類を選びます。
ボタンを押すたび、Type 1 → T ype 2 → Type 3 → Type 1 → ... の
順で切り替わります。
[F4(Cond/Trem)]
コンディションの変更と、トレモロ(音量を周期的に変化させる効
果)およびパンニング(音の定位を左右に動かす効果)の設定をし
ます。
ボタンを押すと、リアルタイム・コントロールつまみ 1 〜 3 に以下
の機能が割り当てられます。
つまみ 機能 説明
1 Condition
(コンディション)
2 Tremolo Rate
(トレモロ・レイト)
3 Tremolo Depth
(トレモロ・デプス)
エレピの状態を 5 段階の中か
ら選びます。
つまみを右(Mint)に回す
と、良好なコンディション
のクリアな音色になります。
左(Vint.)に回すと、ピッ
チと音色が変化したヴィン
テージ風の音色になります。
トレモロ/パンニングの速さを
調節します。右に回すほど速く
なります。
トレモロ/パンニングの深さ
(広さ)を調節します。右に回
すほど深く(広く)なります。
[SHIFT]を押しながらつまみ
を回すと、パンニングの効果が
無くなり、モノラルのトレモロ
になります。
13
Page 14

SRX-12 専用ピアノ・モードについて (Fantom-X6/X7/X8 をお使いのお客様へ)
[F5(Chorus)]
コーラスをオン/オフします。
コーラスをオンにすると、リアルタイム・コントロールつまみ 1 〜
3 に以下の機能が割り当てられます。
つまみ 機能 設定値 説明
1 Rate 0.05 〜
10.00(Hz)
2 Depth 0〜127 コーラスの揺れの深さを
3 balance D100:0W 〜
D0:100W
コーラスの揺れの速さを
調節します。右に回すほ
ど速くなります。
調節します。右に回すほ
ど深くなります。
原音(D)とコーラス音
(W)の音量バランスを調
節します。右に回すほど
コーラス音が大きくなり
ます。左いっぱいに回す
と原音のみになり、コー
ラス効果が無くなります。
[F6(Phaser)]
フェイザーをオン/オフします。
フェイザーをオンにすると、リアルタイム・コントロールつまみ 1
〜 4 に以下の機能が割り当てられます。
つまみ 機能 設定値 説明
1 Manual 0〜127 フェイザーのかかる音域
を調節します。右に回す
ほどフェイザーが高い音
域にかかります。
2 Rate 0.05 〜
10.00(Hz)
3 Depth 0〜127 フェイザーのうねりの深
4 Resona
nce
0〜127 共振の程度を調節します。
フェイザーのうねりの速
さを調節します。右に回
すほど速くなります。
さを調節します。右に回
すほど深くなります。
右に回すほど共振し、ク
セの強いうねりになりま
す。
[F8(Speaker SIM)]
スピーカー・シミュレーターをオン/オフします。
スピーカー・シミュレーターをオンにすると、リアルタイム・コン
トロールつまみ 1 〜 4 に以下の機能が割り当てられます。
つまみ 機能 設定値 説明
1 Speaker (下記参照) スピーカーのタイプを選
びます。
2 Mic
Level
3 Dir Level 0〜127 ダイレクト音の音量を調
4 Level 0〜127 出力音量を調節します。
スピーカー各タイプの仕様
「スピーカー」の項は、スピーカーの径(インチ)と個数を示しています。
タイプ キャビネット スピーカー マイク
SMALL 1 小型背面開放型 10" × 1 ダイナミック
SMALL 2 小型背面開放型 10" × 1 ダイナミック
MIDDLE 背面開放型 12" × 1 ダイナミック
JC-120 背面開放型 12" × 2 ダイナミック
BUILT-IN 1 背面開放型 12" × 2 ダイナミック
BUILT-IN 2 背面開放型 12" × 2 コンデンサー
BUILT-IN 3 背面開放型 12" × 2 コンデンサー
BUILT-IN 4 背面開放型 12" × 2 コンデンサー
BUILT-IN 5 背面開放型 12" × 2 コンデンサー
BG STACK 1 密閉型 12" × 2 コンデンサー
BG STACK 2 大型密閉型 12" × 2 コンデンサー
MS STACK 1 大型密閉型 12" × 4 コンデンサー
MS STACK 2 大型密閉型 12" × 4 コンデンサー
METAL
STACK
2-STACK 大型 2 段重ね 12" × 4 コンデンサー
3-STACK 大型 3 段重ね 12" × 4 コンデンサー
0〜127 スピーカーの音を収録す
るマイクの音量を調節し
ます。
節します。
大型 2 段重ね 12" × 4 コンデンサー
[F7(EQ)]
イコライザーをオン/オフします。
イコライザーをオンにすると、リアルタイム・コントロールつまみ
1 〜 4 に以下の機能が割り当てられます。
つまみ 機能 設定値 説明
1 Low
Gain
2 Mid
Gain
3 High
Gain
4 Level 0〜127 イコライザーの出力音量
-15 〜 +15
(dB)
-15 〜 +15
(dB)
-15 〜 +15
(dB)
低域の増幅/減衰量を調
節します。
中域の増幅/減衰量を調
節します。
高域の増幅/減衰量を調
節します。
を調節します。
※ 左へいっぱいに回すと、
音が出なくなります。
14
設定の保存
•
Classic EP 画面から他の画面へ切り替えると、現在の設定が保
存されます。
※ エフェクトのオン/オフは保存されますが、各エフェクトのつ
まみの設定は保存されません。
•
マニュアルで設定した音色は、[WRITE]を押して FantomX6/X7/X8 のユーザー・パッチに保存することができます。
保存のしかたについて詳しくは、Fantom-X6/X7/X8 の取扱説
明書を参照してください。
Page 15

SRX-12 専用ピアノ・モードについて (Fantom-X6/X7/X8 をお使いのお客様へ)
Classic Clav 画面
プリセットの使いかた
1.
Piano Mode(Classic Clav)画面で[F2]を押して、以下の
画面を表示させます。
fig.Clav-Preset
2.
[F3(Preset 1)]〜[F8(Preset 6)]を押して、使う音色を
選びます。
プリセット音色の変更のしかた
1.
[SHIFT]を押しながら[F3]〜[F8]のいずれかを押します。
パッチ・リストが表示されます。
2.
パッチを選び、[F8(SELECT)]ボタンを押します。
手順 1 で押したボタン([F3]〜[F8])に、選んだパッチが
割り当てられます。
※ パッチの選びかたについては、Fantom-X6/X7/X8 の取扱説明
書を参照してください。
マニュアルの使いかた
1.
Piano Mode(Classic Clav)画面で[F2]を押して、以下の
画面を表示させます。
fig.ClassicClav
[F3(Bite/Pickup)]
クラビに定番のプロセス(エフェクト)5 種類と、ピックアップを
切り替えます。
ボタンを押すと、リアルタイム・コントロールつまみ 1、2 に以下
の機能が割り当てられます。
つまみ 機能 説明および設定値
1 Bite 使用するエフェクトを選びます。
Dry(ドライ):
エフェクトをかけません。
Comp(コンプレッサー):
大きなレベルの音を圧縮し、小さなレ
ベルの音を持ち上げて音量のばらつき
を抑えるとともに、音圧感を出します。
Enhancer(エンハンサー):
倍音成分を強調し、音にメリハリを付
け、抜けの良い音にします。
Auto Wah(オート・ワウ):
音量にしたがってフィルターのカット
オフ周波数を変化させ、大きな音は明
るく、小さな音は丸くします。
Overdrive(オーバードライブ):
音を歪ませてパワフルな音にします。
2 Pickup 4 種類のピックアップ・セッティングを切
り替えます。
CA(Lower):
マイルドな音
CB(Upper):
ブライトな音
DA(Upper + Lower、逆位相):
低域のカットされた薄い(軽い)音
DB(Upper + Lower、同位相):
2 つのピックアップを同時に鳴らした音
Timbre(ティンバー)
4 つの音域に分割したティンバー・スイッチを切り替えることで、
音色を変化させます。
[F4]〜[F7]が各音域のオン/オフになります。
各ボタンを押すたび、オン/オフが交互に切り替わります。
[F4(Brilliant)]:高音域
[F5(Treble)]:中高音域
[F6(Medium)]:中低音域
[F7(Soft)]:低音域
※ 4 つともオフにすると、音が鳴らなくなります。
2.
[F3(Bite/Pickup)]〜[F8(Mute)]と、REALTIME
CONTROL つまみで音色を調節します。
[F8(Mute)]
ミュートをオン/オフします。
ミュートをオンにすると、サスティンの短い、高域の抑えられた音
になります。
設定の保存
•
Classic Clav 画面から他の画面へ切り替えると、現在の設定が
保存されます。
• マニュアルで設定した音色を、[WRITE]を押して FantomX6/X7/X8 のユーザー・パッチに保存することができます。
保存のしかたについて詳しくは、Fantom-X6/X7/X8 の取扱説
明書を参照してください。
15
Page 16

Fantom-S/S88 users
If the instrument in which you want to install the SRX-12 is running system
program
version 1.05 or earlier
the SRX-12.
For instructions on checking the system program version for Fantom-S/S88, and
upgrading the software, please access the Roland website or contact the nearest
Roland Service Center.
, you must update the system before you can use
About the Included CD-ROM
The included CD-ROM features:
• Fantom-X6/X7/X8 Audio Track Expansion system program (Ver. 2.1)
For more detailed information on each file, refer to Readme_E.pdf on the CDROM.
* Take proper care of the included CD-ROM; it will not be reissued.
* The system programs on the included CD-ROM are the latest versions, as of
January, 2006. For information regarding newer versions than those on this disk,
you should contact the nearest Roland Service Center.
Fantom-S/S88 をお使いのお客様へ
SRX-12 は、お使いの本体システム・プログラムが Ver.1.05 以前の場合、アッ
プデートしてから使用していただく必要があります。
Fantom-S/S88 のシステム・プログラム・バ ージョンの確認方法、お よびバー
ジョン・アップ方法については、弊社ホームページ(http://www.roland.co.jp/)
をご覧いただくか、もよりのローランド・サービスにお問い合わせください。
付属 CD-ROM について
付属 CD-ROM には
•
Fantom-X6/X7/X8 Audio Track Expansion システム・プログラム(Ver. 2.1)
が収録されています。各ファイルの詳しい内容は、CD-ROM 内の ReadmeJ.pdf
を参照してください。
※ 付属 CD-ROM は再発行しませんので、大切にお使いください。
※ 付属 CD-ROM に収録の各システム・プログラムは、2006 年 1 月時点で
最新のものです。収録バージョンより新しいプログラムに関しては、もよ
りのローランド・サービスにお問い合わせください。
また、弊社ホームページ(http://www.roland.co.jp/)より、最新版プロ
グラムをダウンロードすることができます。
16
*04232245 -01 *
04232245 ’06-2-1N
 Loading...