

Page 1
Before using this unit, carefully read the sections entitled: “USING THE UNIT SAFELY” and “IMPORTANT
NOTES” (p. 2; p. 4). These sections provide important information concerning the proper operation of the unit.
Additionally, in order to feel assured that you have gained a good grasp of every feature provided by your new
unit, this manual should be read in its entirety. The manual should be saved and kept on hand as a convenient
reference.
201a
この機器を正しくお使いいただくために、ご使用前に「安全上のご注意」(P.3)と「使用上のご注意」(P.4)をよく
お読みください。また、この機器の優れた機能を十分ご理解いただくためにも、この取扱説明書をよくお読みくださ
い。取扱説明書は必要なときにすぐに見ることができるよう、手元に置いてください。
Thank you, and congratulations on your choice of the SRX-01
“Dynamic Drum Kits” Wave Expansion Board.
This expansion board contains numerous drum sounds that
can be used for a wide variety of musical styles, including
rock, pops, funk, ballad, jazz, and more.
The SRX-01 features a variety of waveforms, including fourlevel stereo sounds, snare drum and tom flams, buzz sounds,
and more. When combined into rhythm sets, these
waveforms provide you with richly expressive drum sounds
for your performances.
• Waveforms: 719
The waveforms on the SRX-01 were developed by the
renowned American company, Spectrasonics, whose work
has been featured on numerous high-quality CD-ROMs
designed for samplers.
• Rhythm Sets: 79
In addition to the 24 Drum Kits, the SRX-01 also features
numerous instrument-specific sets, including kick (11 kinds),
snare (28 kinds), tom (8 kinds), hi-hat (8 kinds), crash cymbal
(5 kinds), and ride cymbal (5 kinds) sounds.
• Patches: 41
The SRX-01 also offers “Menu” patches, which allow you to
quickly check out how the waveforms sound, since a
different one is assigned to each key.
このたびは、ウェーブ・エクスパンション・ボード SRX-01
「Dynamic Drum Kits」をお買い上げ頂まして、まことにあ
りがとうございます。
このエクスパンション・ボードは、幅広い音楽ジャンル
(Rock, Pops, Funk, Ballad, Jazz 等)に対応できるドラム音
色を数多く搭載しています。
ステレオ 4 段に対応した音色、スネア・ドラム/タムのフ
ラム奏法、バズ音のウェーブフォームなども搭載しており、
これらを組み合わせたリズム・セットで表現力豊かなドラム
音色を演奏することができます。
•
ウェーブフォーム:719 種類
本製品のウェーブフォームは、サンプラー用の高品位な CDROM を数多く制作している米国 Spectrasonics 社が開発し
たものを使用しています。
•
リズム・セット: 79 種類
24 種類のドラム・キット以外に、Kick(11 種類)、Snare
(28 種類)、Tom(8 種類)、Hi Hat(8 種類)、Crash
Cymbal(5 種類)、Ride Cymbal(5 種類)の各楽器ごとの
セットも用意しています。
パッチ: 41 種類
•
各ウェーブフォームの音色を確認しやすいように、各キーに
異なるウェーブフォームが割り当てられているメニュー・
パッチを搭載しています。
1
Page 2
USING THE UNIT SAFELY
Used for instructions intended to alert
the user to the risk of death or severe
injury should the unit be used
improperly.
Used for instructions intended to alert
the user to the risk of injury or material
damage should the unit be used
improperly.
* Material damage refers to damage or
other adverse effects caused with
respect to the home and all its
furnishings, as well to domestic
animals or pets.
001
• Before using this unit, make sure to read the
instructions below, and the Owner’s Manual.
..........................................................................................................
002a
• Do not open or perform any internal modifications on the unit.
..........................................................................................................
003
• Do not attempt to repair the unit, or replace parts
within it (except when this manual provides
specific instructions directing you to do so). Refer
all servicing to your retailer, the nearest Roland
Service Center, or an authorized Roland
distributor, as listed on the “Information” page.
..........................................................................................................
004
• Never use or store the unit in places that are:
• Subject to temperature extremes (e.g., direct
sunlight in an enclosed vehicle, near a heating
duct, on top of heat-generating equipment); or
are
• Damp (e.g., baths, washrooms, on wet floors);
or are
• Humid; or are
• Exposed to rain; or are
• Dusty; or are
• Subject to high levels of vibration.
..........................................................................................................
011
• Do not allow any objects (e.g., flammable material,
coins, pins); or liquids of any kind (water, soft
drinks, etc.) to penetrate the unit.
The symbol alerts the user to important instructions
or warnings.The specific meaning of the symbol is
determined by the design contained within the
triangle. In the case of the symbol at left, it is used for
general cautions, warnings, or alerts to danger.
The symbol alerts the user to items that must never
be carried out (are forbidden). The specific thing that
must not be done is indicated by the design contained
within the circle. In the case of the symbol at left, it
means that the unit must never be disassembled.
The ● symbol alerts the user to things that must be
carried out. The specific thing that must be done is
indicated by the design contained within the circle. In
the case of the symbol at left, it means that the powercord plug must be unplugged from the outlet.
013
• In households with small children, an adult
should provide supervision until the child is
capable of following all the rules essential for the
safe operation of the unit.
..........................................................................................................
014
• Protect the unit from strong impact.
(Do not drop it!)
..........................................................................................................
022c
• Before installing the SRX-01, you must first always
turn off the Fantom series/XV series/MX-200/RD
series with SRX slots/MC-909/VR-760/G-70 and
unplug its power cord.
..........................................................................................................
106
• Never climb on top of, nor place heavy objects on
the unit.
..........................................................................................................
115b
• Install the circuit board only into the specified unit
(Fantom series/XV series/MX-200/RD series with
SRX slots/MC-909/VR-760/G-70). Remove only
the specified screws during the installation.
..........................................................................................................
118a
• Should you remove screws, make sure to put them
in a safe place out of children’s reach, so there is
no chance of them being swallowed accidentally.
..........................................................................................................
..........................................................................................................
* In the interest of product improvement, the specifications and/or contents of this package are subject to change
without prior notice.
2
Page 3
安全上のご注意
警告
注意
安全上のご注意
火災・感電・傷害を防止するには
注意の意味について警告と
取扱いを誤った場合に、使用者が
警告
注意
死亡または重傷を負う可能性が想
定される内容を表わしています。
取扱いを誤った場合に、使用者が
傷害を負う危険が想定される場合
および物的損害のみの発生が想定
される内容を表わしています。
※物的損害とは、家屋・家財およ
び家畜・ペットにかかわる拡大
損害を表わしています。
以下の指示を必ず守ってください
警告
001
●この機器を使用する前に、以 下の指示と 取扱説
明書をよく読んでください。
..............................................................................................................
002a
●この機器を分解したり、改造 したりしな いでく
ださい。
図記号の例
は、注意(危険、警告を含む)を表わしていま
す。
具体的な注意内容は、 の中に描かれています。
左図の場合は、「一般的な注意、警告、危険」を
表わしています。
は、禁止(してはいけないこと)を表わしてい
ます。
具体的な禁止内容は、 の中に描かれています。
左図の場合は、「分解禁止」を表わしています。
●は、強制(必ずすること)を表わしています。
具体的な強制内容は、
左図の場合は、「電源プラグをコンセントから抜
くこと」を表わしています。
013
●お子様のいるご家庭で使 用する場合、お 子様の
取り扱いやいたずらに注意してください。必ず
大人のかたが、監視/指導してあげてください。
..............................................................................................................
014
●この機器を落としたり、この 機器に強い 衝撃を
与えないでください。
●の中に描かれています。
..............................................................................................................
003
●修理/部品の交換などで、取 扱説明書に 書かれ
ていないことは、絶対にしないでください。必
ずお買い上げ店またはローランド・サービスに
相談してください。
..............................................................................................................
004
●次のような場所での使用や保 存はしない でくだ
さい。
○ 温度が極端に高い場所(直射日光の当たる場
所、暖房機器の近く、発熱する機器の上など)
○ 水気の近く(風呂場、洗面台、濡れた床など)
や湿度の高い場所
○ 雨に濡れる場所
○ ホコリの多い場所
○ 振動の多い場所
..............................................................................................................
011
●この機器に、異物(燃えや すいも の、硬貨、針
金など)や液体(水、ジュースなど)を絶対に
入れないでください。
..............................................................................................................
..............................................................................................................
022c
● SRX-01 を取り付ける前に、Fantom シリーズ、
XV シリーズ、MX-200、SRX 対応の RD シリー
ズ、MC-909、VR-760 の電源を切って電源プラ
グをコンセントから外してください。
..............................................................................................................
106
●この機器の上に乗ったり、機 器の上に重 いもの
を置かないでください。
..............................................................................................................
115b
● 指定の機器(Fantom シリーズ、XV シリーズ、
MX-200、SRX 対応の RD シリーズ、MC-909、
VR-760)だけに取り付け、取り付け時には指定
されたネジだけを外してください。
..............................................................................................................
118a
●ネジを外した場合は、小さな お子様が誤 って飲
み込んだりすることのないようお子様の手の届
かないところへ保管してください。
..............................................................................................................
※ 製品の仕様および内容は、改良のため予告なく変更することがあります。
3
Page 4

IMPORTANT NOTES
When you purchase the SRX-01 expansion board from an
authorized Roland dealer, the included sounds and samples
are licensed, not sold, to you by Roland Corporation and
Spectrasonics, for commercial use in music production,
public performance, broadcast, etc.
You may use any of the included phrases and/or samples in
a commercial or non-commercial recording without paying
any additional license fees. However, you must strictly
adhere to the following crediting guidelines on any music
recording that utilize material from SRX-01.
Reproduction or duplication of this collection or any of the
sound recording contained in the SRX-01, either as they exist
on this expansion board or by any means of reformatting,
mixing, filtering, re-synthesizing, processing or otherwise
editing for use in another product or for re-sale, is strictly
prohibited without the express written consent of Roland. All
unauthorized giving, trading, lending, renting, re-issue, redistribution or re-sale of the sounds included in the SRX-01
are expressly prohibited.
In Plain English: Be creative in your application of the SRX01 sounds, and keep this library for your use only. DO NOT
COPY IT.
Roland constantly monitors other Soundware releases to
check for copyright infringements, and will prosecute all
piracy and copyright violations to the fullest extent of the law.
THIS LIBRARY IS GUARANTEED TO BE 100%
COPYRIGHT CLEAN.
291a
In addition to the items listed under “USING THE UNIT
SAFELY” on page 2, please read and observe the
following:
901
To avoid the risk of damage to internal components that can
be caused by static electricity, please carefully observe the
following whenever you handle the board.
1
* Before you touch the board, always first grasp a metal object
(such as a water pipe), so you are sure that any static
electricity you might have been carrying has been discharged.
2
* When handling the board, grasp it only by its edges. Avoid
touching any of the electronic components or connectors.
5
* Save the bag in which the board was originally shipped, and
put the board back into it whenever you need to store or
transport it.
901 (F)
Veuillez suivre attentivement les instructions suivantes
quand vous manipulez la carte afin d’éviter tout risque
d’endommagement des pièces internes par l’électricité
statique.
1
* Toujours toucher un objet métallique relié à la terre (comme
un tuyau par exemple) avant de manipuler la carte pour vous
décharger de l’électricité statique que vous auriez pu
accumuler.
2
* Lorsque vous manipulez la carte, la tenir par les côtés. Évitez
de toucher aux composants ou aux connecteurs.
5
* Conservez le sachet d’origine dans lequel était la carte lors de
l’envoi et remettez la carte dedans si vous devez la ranger ou la
transporter.
使用上のご注意
お客様が SRX-01 エクスパンション・ボード(以下、「本製
品」といいます)をローランドの正規販売店からお買い上げ
になった時点で、本製品に含まれる音やサンプルは、ローラ
ンド株式会社と Spectrasonics 社から、お客様に対して、
音楽制作、公共の場での演奏、放送などの商用目的のための
使用を許諾したものであって、著作権を譲渡したものではあ
りません。
お客様は、いかなる追加料金を支払うこともなく、本製品に
含まれるあらゆるフレーズやサンプルを、商用あるいは非商
用目的の録音に使用できます。ただし、お客様が本製品を使
用して音楽の録音を行う際は、以下のことにご注意くださ
い。
本製品に含まれるいかなる録音物も、そのままの状態であ
れ、いかなる手段によって再構成、ミキシング、フィルター
加工、再合成、加工処理、その他の編集作業をした状態であ
れ、ローランドの書面による許可なく、他の製品に含めたり
再販売するために複製・複写することを禁止します。また、
本製品に含まれるいかなる音も、許可なく贈与、取引、貸
与、賃貸、再発行、再配布、再販売することを禁止します。
従って、本製品の音色は音楽制作の範囲でお使いいただくよ
うお願いします。そして、本製品のライブラリーはお客様ご
自身の個人的使用の目的の範囲でお使いください。本製品の
音色データの複製・複写は禁止します。
ローランドは、著作権侵害がないかどうか、常時他のサウン
ド・ライブラリーの発売を把握しており、著作権侵害に対し
ては法的手段を行使する場合があります。
なお、本製品のライブラリーは第三者の著作権を一切侵害し
ていないことを保証します。
291a
3 ページに記載されている「安全上のご注意」以外に、次の
ことに注意してください。
修理について
451a
※ お客様がこの機器を分解、改造された場合、以後の性能
について保証できなくなります。また、修理をお断りす
る場合もあります。
453
※ 当社では、この製品の補修用性能部品(製品の機能を維
持するために必要な部品)を、製造打切後 6 年間保有し
ています。この部品保有期間を修理可能の期間とさせて
いただきます。なお、保有期間が経過した後も、故障箇
所によっては修理可能の場合がありますので、お買い上
げ店、または最寄りのローランド・サービスにご相談く
ださい。
基板の取り扱い
901
この基板は、静電気により部品が破壊される恐れがありま
す。基板を取り扱うときは、次の点に注意してください。
1
※ 基板を持つときは、あらかじめ何らかの金属に触れて、
体や衣類にたまっている静電気を放電してください。
2
※ 基板を持つときは、基板の縁を持ち、部品やコネクター
の部分に直接手を触れないでください。
5
※ 基板を保管するとき、または輸送するときなどは、購入
時に基板が入っていた袋(導電袋)に入れてください。
4
Page 5
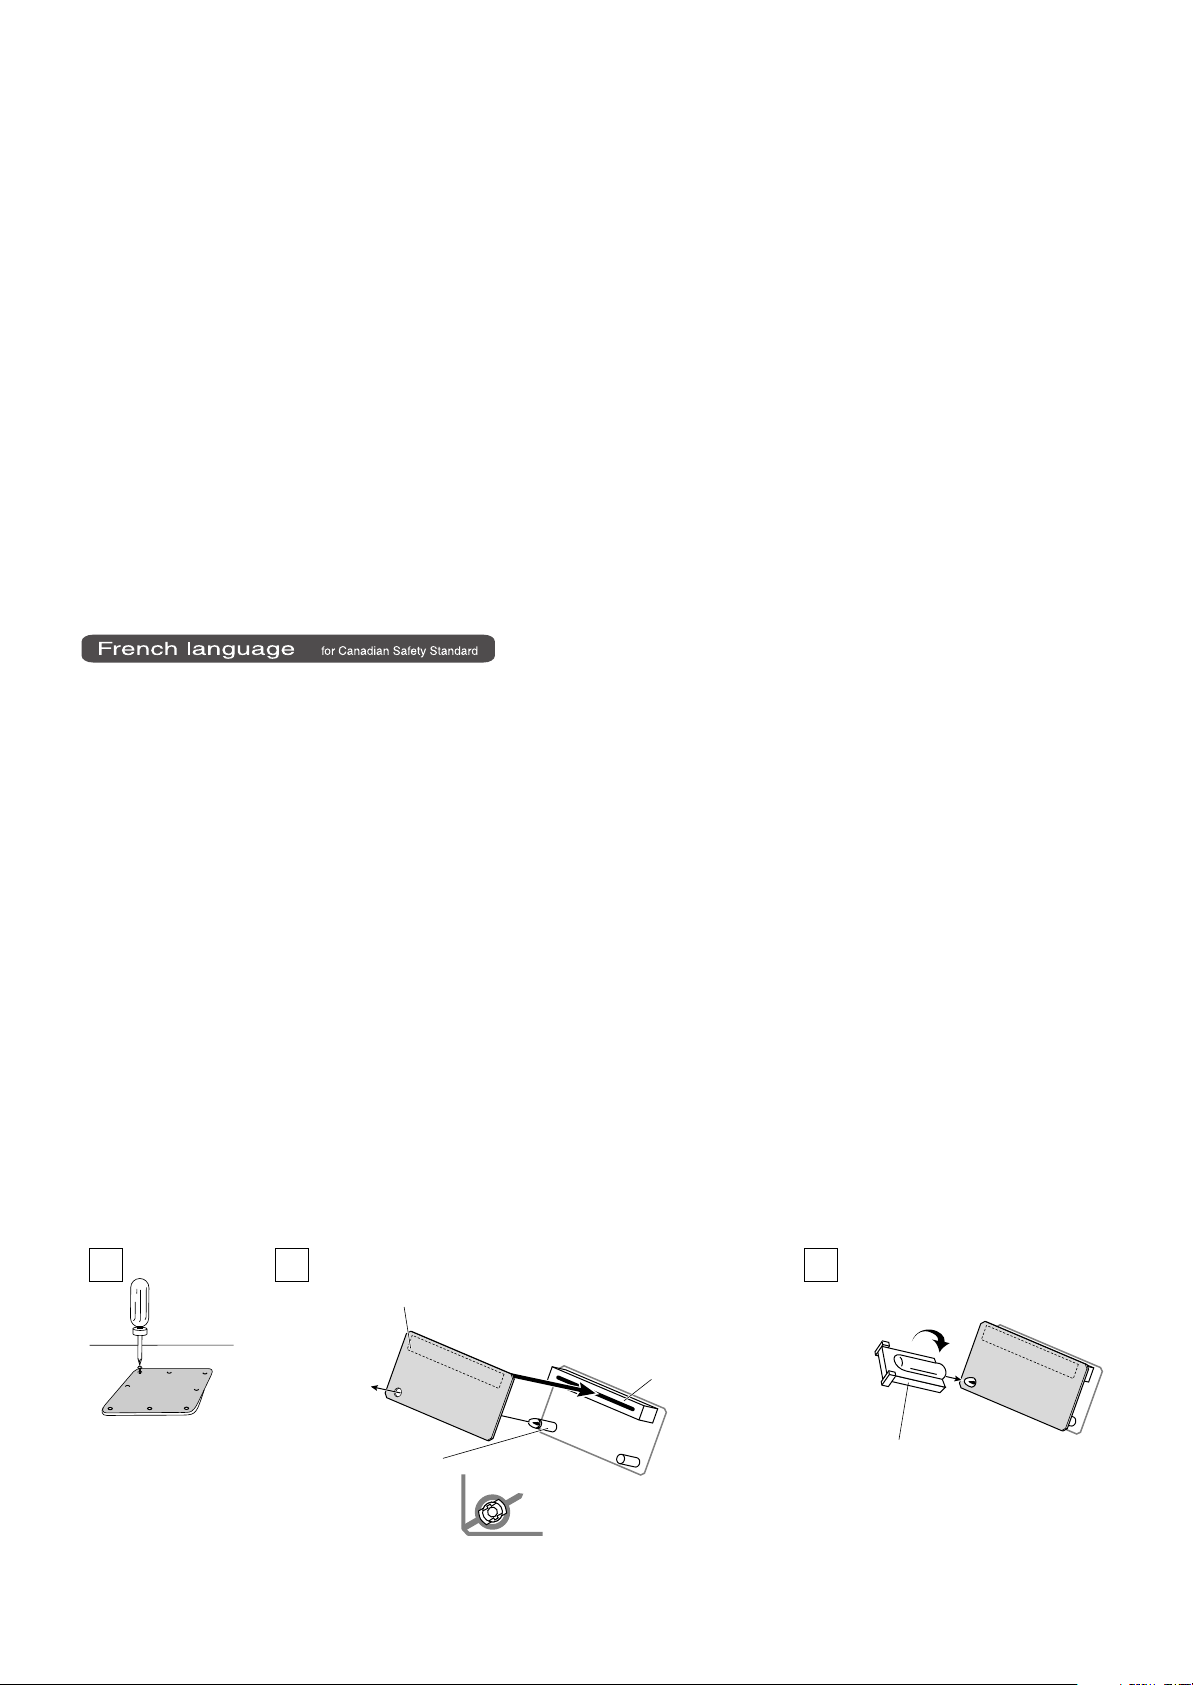
INSTALLING THE WAVE EXPANSION
BOARD
* Turn off your instrument.
1.
Remove the cover located on the top (or rear) of your
instrument.
2.
Insert the Wave Expansion Board connector into a connector
for an SRX Series slot, while simultaneously inserting the
board holders into the holes in the Wave Expansion Board.
* Do not touch any of the printed circuit pathways or connection
terminals.
* Never use excessive force when installing a circuit board. If it
doesn’t fit properly on the first attempt, remove the board and try
again.
3.
Use the supplied Installation Tool to turn the holders in the
LOCK direction, so the board will be fastened in place.
(To remove the Wave Expansion Board, turn the board holders
in the UNLOCK direction, and lift up the board.)
* When circuit board installation is complete, double-check your
work.
4.
Using the screws removed in Step 1, refasten the cover in its
original position.
5.
Check if the Wave Expansion Board is correctly installed.
* If the “EXP” display cannot be selected (doesn’t appear) in the
Waveform Selection Screen (refer to the owner’s manual of the
instrument you use), remove the Wave Expansion Board and
install it properly.
* Éteindre l'instrument.
1.
Retirer le couvercle situé sur le dessus (ou á l'arrière) de
l'instrument.
2.
Inserer le connecteur de la carte dans un des creneaux pour
la serie SRX tout en enfoncant les supports a carte dans les
trous de celle-ci.
* Ne pas toucher aux circuits imprimes ou aux connecteurs.
* Ne jamais forcer lors de l'installation de la carte de circuits
imprimes. Si la carte s'ajuste mal au premier essai, enlevez la
carte et recommencez l'installation.
3.
Utiliser l'outil d'installation fourni pour tourner les clips de
retenue vers la position de blocage (LOCK) de façon á ce que
la carte soit retenue en place.
(Pour retirer la carte d'expansion Wave, tourner les clips de
retenue de la carte vers la position déblocage (UNLOCK) et
retirer la carte en la soulevant.)
* Quand l'installation de la carte de circuits imprimes est terminee,
reverifiez si tout est bien installe.
4.
Remettre la plaque a sa place et la fixer a l'aide des vis
enlevees a l'etape 1.
5.
S'assurer que la carte d'expansion Wave est installée
correctement.
* S'il est impossible de sélectionner l'affichage “EXP” (il n'apparaît
pas) á l'écran de sélection Waveform (se reporter au guide du
propriétaire de l'instrument utilisé), retirer la carte d'expansion
Wave et la réinstaller correctement.
ウェーブ・エクスパンション・ボードの取り
付けかた
※ 使用機器の電源スイッチをオフにしてください。
1.
使用機器の上部、または背面にあるカバーをはずしま
す。
2.
SRX シリーズ用のスロットのコネクターにウェーブ・エ
クスパンション・ボードのコネクターを差し込み、同時
に基板ホルダーをウェーブ・エクスパンション・ボード
の穴にはめ込みます。
※ 回路部やコネクター部には手を触れないでください。
※ 基板を無理に押し込まないでください。装着しにくい場
合、いったん基板を外してやり直してください。
3.
付属の固定用具で基板ホルダーを LOCK 方向に回し、
ウェーブ・エクスパンション・ボードを固定します。
(ウェーブ・エクスパンション・ボードを取り外すには、
基板ホルダーを UNLOCK 方向に回してから取り外しま
す。)
※ 取り付けを終えたら、正しく取り付けられていることを
再度確認してください。
手順 1 で外したネジで、カバーを元通りに取り付けます。
4.
ウェーブ・エクスパンション・ボードの取り付けが正し
5.
く行われたかを確認します。
※ ウェーブフォームの選択画面(使用機器の取扱説明書参
照)でEXPが選べない(表示されない)ときは、も
う一度ウェーブ・エクスパンション・ボードをつけ直し
てください。
Screwdriver
Tournevis
ドライバー
Wave Expansion Board (SRX series)
21 3
Carte d'extension Wave (serie SRX)
ウェーブ・エクスパンション・ボード(SRXシリーズ)
Connector
Connecteur
コネクター
Board holder
Support à carte
基板ホルダー
Position them as shown before you install the board.
Avant l’installation, orienter les supports à carte tel qu’indiqué sur le schéma.
取り付ける前に図のような向きに合わせます
LOCK
Installation tool
Outil d'installation
固定用具
5
Page 6

(BANK SELECT MSB:92; LSB: 0)
Rhythm Set List
<Drum Kit>
No. Rhythm Name
1 Poppin KIT
2 StdRock1 KIT
3 TightRck1KIT
4 StudioJz KIT
5 Latin KIT
6 BigRock1 KIT
7 Pwr Blld KIT
8 TightRck2KIT
9 Dry Rock KIT
10 StdRock2 KIT
11 OhBabyRckKIT
12 StudioFatKIT
13 RoomBlld KIT
14 Big Blld KIT
15 BigRock2 KIT
16 All Beef KIT
17 Disco KIT
18 VintagFnkKIT
19 Phunque KIT
20 70JzFunk KIT
21 Jazz Mix KIT
22 DynBrush KIT
23 70'sBrushKIT
24 PwrBrush KIT
<Kick>
No. Rhythm Name
25 Latin Dry K
26 Cool Dry K
27 Disco/Funk K
28 Old Funk K
29 Power Rock K
30 StudioRock K
31 StreetRock K
32 Big Rock K
33 Wham Bam K
34 StandrdJaz K
35 Jazz Soul K
<Snare>
No. Rhythm Name
36 Old Funk Sn
37 70Phunque Sn
38 Latin Sn
39 HiPiccolo Sn
40 Tight Sn
41 Std Rock1 Sn
42 Std Rock2 Sn
43 OhBabyRck Sn
44 Poppin Sn
45 StudioFat Sn
46 JazzStick Sn
47 StudioJz Sn
48 Ballad Sn
49 PwrBallad Sn
50 All Beef Sn
51 Big Rock Sn
52 70's BrushSn
53 JazzBrush Sn
<Tom>
No. Rhythm Name
54 Latin Tom
55 Tight Tom
56 JzStick Tom
57 Old Funk Tom
58 Oh Baby Tom
59 PwrBalladTom
60 Big Rock Tom
61 OldBrush Tom
<Hi Hat>
No. Rhythm Name
62 Oh Baby Hat
63 JzStick Hat
64 Latin Hat
65 Disco Hat
66 Old Funk Hat
67 Street Hat
68 Big Rock Hat
69 OldBrush Hat
<Crash>
No. Rhythm Name
70 Stndrd Crash
71 Jazz Crash
72 Rock Crash
73 Ballad Crash
74 Brush Crash
<Ride>
No. Rhythm Name
75 Jazz Ride
76 Rock Ride
77 Ballad Ride
78 Latin Ride
79 Brush Ride
A note to customers using the MC-909
• If you are using system program version 1.13 or earlier
Only the waveforms can be used. The rhythm sets and
patches cannot be used.
• If you are using system program version 1.2 or later
In addition to the waveforms, you can also use the
rhythm sets from the special data specifically for the
MC-909. For details on the included content, refer to
“SRX Special Data List” on p. 7 of “MC-909 Version 1.2
Supplement: Additional Functions.”
* For details on how to check the system program, refer to p. 126
and p.130 of the MC-909 Owner’s Manual.
6
MC-909 をお使いの方へ
システム・プログラムが Ver1.13 以前の場合
•
ウェーブフォームのみが使用できます。リズム・セット
/パッチは使用できません。
システム・プログラムが Ver1.2 以降の場合
•
ウェーブフォームに加え、MC-909 専用スペシャル・
データのリズム・セットが使用可能です。収録内容につ
いては、MC-909 Version 1.2 追加機能マニュアルの
「SRX Special Data List」(P.7)を参照してください。
※ システム・プログラムの確認方法は、MC-909 取扱説明
書の P.124 と P.128 を参照してください。
Page 7

Rhythm Set Key Assign (1)
Note No.
28
29
31
33
35
36
C2
38
40
41
43
45
47
48
C3
50
52
53
55
57
59
60
C4
62
64
65
67
69
71
72
C5
74
76
77
79
81
83
84
C6
86
88
89
91
93
95
96
C7
98
30
32
34
37
39
42
44
46
49
51
54
56
58
61
63
66
68
70
73
75
78
80
82
85
87
90
92
94
97
99
Drum Kit
(No.1 - 24)
Kick 6
Kick 5
Snare Roll
Kick 4
Snare 1 Flam
Kick 3
HH 1 Pedal
Kick 2
Kick 1
Snare 1 Cross Stick
Snare 1 a
Snare 1 Buzz, Flam
Snare 1 b
Tom 1 Floor
HH 1 Close 1
Tom 1 Lo
HH 1 Close 2
Tom 1 Mid
HH 1 Open
Tom 1 Mid
Tom 1 Hi
Crash 1
Tom 1 Hi
Ride 1
Crash 2
Tom 1 Flam Floor
Crash 3
Tom 1 Flam Lo
Splash
Tom 1 Flam Mid
China
Tom 1 Flam Mid
Tom 1 Flam Hi
Crash 4
Tom 1 Flam Hi
Ride 2
Crash 5
Tom 2 Floor
HH 2 Close 1
Tom 2 Lo
HH 2 Close 2
Tom 2 Mid
HH 2 Open
Tom 2 Mid
Tom 2 Hi
Crash 6
Tom Hi
Ride 3
Crash 7
Tom 2 Flam Floor
HH 3 Close 1
Tom 2 Flam Lo
HH 3 Close 2
Tom 2 Flam Mid
HH 3 Open
Tom 2 Flam Mid
Tom 2 Flam Hi
Crash 8
Tom Flam Hi
Ride 4
Crash 9
Snare 2 a
Snare 2 Flam
Snare 2 b
Snare 3 Flam
Snare 3 a
Snare 3 Buzz
Snare 3 b
Metronome 2
R-8 Click
Metronome 1
Hand Clap
Kick
(No.25 - 35)
Kick 6
Kick 5
-Kick 4
-Kick 3
-Kick 2
Kick 1
--
--
--
--
--
--
--
--
--
--
--
--
--
--
--
--
--
--
--
--
--
--
--
--
--
--
--
--
--
--
--
--
--
--
--
--
--
--
--
--
--
--
--
--
--
--
--
--
--
--
--
--
--
--
--
--
--
--
--
--
--
--
--
Note No.
28
29
31
33
35
36
C2
38
40
41
43
45
47
48
C3
50
52
53
55
57
59
60
C4
62
64
65
67
69
71
72
C5
74
76
77
79
81
83
84
C6
86
88
89
91
93
95
96
C7
98
30
32
34
37
39
42
44
46
49
51
54
56
58
61
63
66
68
70
73
75
78
80
82
85
87
90
92
94
97
99
Snare
(No,36 - 53)
--
-Snare Roll
-Snare Flam
--
--
--
-Snare Cross Stick
Snare a
Snare Buzz, Flam
Snare b
--
--
--
--
--
--
--
--
--
--
--
--
--
--
--
--
--
--
--
--
--
--
--
--
--
--
--
--
--
--
--
--
--
--
--
--
--
--
--
--
--
--
--
--
--
--
--
--
--
--
--
--
--
--
--
--
--
--
--
Tom
(No.54 - 61)
--
--
--
--
--
--
--
--
--
--
--
--
-Tom Floor
-Tom Lo
-Tom Mid
-Tom Mid
Tom Hi
-Tom Hi
--
-Tom Flam Floor
-Tom Flam Lo
-Tom Flam Mid
-Tom Flam Mid
Tom Flam Hi
-Tom Flam Hi
--
--
--
--
--
--
--
--
--
--
--
--
--
--
--
--
--
--
--
--
--
--
--
--
--
--
--
--
--
--
--
--
--
--
--
--
--
This shows the Tone assigned to each key in a Rhythm Set.
The name of the Tone actually assigned can be checked right
in the display.
リズム・セットの各キーに割り当てられているトーンの種類
を表しています。実際に割り当てられているトーン・ネーム
は、実機のディスプレイで確認してください。
7
Page 8

Rhythm Set Key Assign (2)
Note No.
28
29
31
33
35
36
C2
38
40
41
43
45
47
48
C3
50
52
53
55
57
59
60
C4
62
64
65
67
69
71
72
C5
74
76
77
79
81
83
84
C6
86
88
89
91
93
95
96
C7
98
30
32
34
37
39
42
44
46
49
51
54
56
58
61
63
66
68
70
73
75
78
80
82
85
87
90
92
94
97
99
Hi-Hat
(No.62 - 69)
HH Pedal
HH Close 1
HH Close 2
HH Open
--
--
--
--
--
--
--
--
--
--
--
--
--
--
--
--
--
--
--
--
--
--
--
--
--
--
--
--
--
--
Crash
(No.70 -74)
--
--
--
--
--
--
--
--
--
--
--
--
--
--
--
--
--
--
--
--
-Crash 1
--
-Crash 2
-Crash 3
-Splash
-China
--
-Crash 4
--
-Crash 5
--
--
--
--
--
--
--
--
--
--
--
--
--
--
--
--
--
--
--
--
--
--
--
--
--
--
--
--
--
--
--
--
--
--
--
Note No.
28
29
31
33
35
36
C2
38
40
41
43
45
47
48
C3
50
52
53
55
57
59
60
C4
62
64
65
67
69
71
72
C5
74
76
77
79
81
83
84
C6
86
88
89
91
93
95
96
C7
98
30
32
34
37
39
42
44
46
49
51
54
56
58
61
63
66
68
70
73
75
78
80
82
85
87
90
92
94
97
99
Ride
(No.75 -79)
--
--
--
--
--
--
--
--
--
--
--
--
--
--
--
--
--
--
--
--
--
--
-Ride 1
--
--
--
--
--
--
--
--
--
--
-Ride 2
--
--
--
--
--
--
--
--
--
--
--
--
--
--
--
--
--
--
--
--
--
--
--
--
--
--
--
--
--
--
--
--
--
--
--
--
This shows the Tone assigned to each key in a Rhythm Set.
The name of the Tone actually assigned can be checked right
in the display.
8
リズム・セットの各キーに割り当てられているトーンの種類
を表しています。実際に割り当てられているトーン・ネーム
は、実機のディスプレイで確認してください。
-- -- -- -- -- --
-- -- -- -- -- -- --
--
--
-- -- -- -- -- -- -- -- -- -- -- -- -- -- -- -- -- -- -- -- -- -- --
Page 9

Patch List (Menu)
(BANK SELECT MSB:93; LSB: 0)
No. Patch Name Voice Category
1 Kick 1 Menu 1 DRUMS
2 Kick 2 Menu 2 DRUMS
3 Kick 3 Menu 2 DRUMS
4 Kick 4 Menu 1 DRUMS
5 OldFnkS Menu 1 DRUMS
6 Latin S Menu 1 DRUMS
7 HiPiccS Menu 2 DRUMS
8 Tight S Menu 2 DRUMS
9 StdRk1S Menu 2 DRUMS
10 StdRk2S Menu 2 DRUMS
11 OhBabyS Menu 2 DRUMS
12 PoppinS Menu 2 DRUMS
13 StdFatS Menu 2 DRUMS
14 JazStkS Menu 2 DRUMS
15 StdJazS Menu 2 DRUMS
16 BalladS Menu 2 DRUMS
17 PwrBldS Menu 2 DRUMS
18 AlBeefS Menu 2 DRUMS
19 BigRckS Menu 2 DRUMS
20 70BrshS Menu 1 DRUMS
(BANK SELECT MSB:93; LSB: 0)
No. Patch Name Voice Category
21 JzBrshS Menu 2 DRUMS
22 CrsStk Menu 2 DRUMS
23 Latin T Menu 2 DRUMS
24 Tight T Menu 2 DRUMS
25 JazStkT Menu 2 DRUMS
26 OldFnkT Menu 1 DRUMS
27 OhBabyT Menu 2 DRUMS
28 PwrBldT Menu 2 DRUMS
29 BigRckT Menu 2 DRUMS
30 OldBrsT Menu 1 DRUMS
31 OhBabyH Menu 1 DRUMS
32 JazStkH Menu 1 DRUMS
33 Latin H Menu 1 DRUMS
34 Disco H Menu 1 DRUMS
35 OldFnkH Menu 1 DRUMS
36 StreetH Menu 2 DRUMS
37 BigRckH Menu 2 DRUMS
38 OldBrsH Menu 1 DRUMS
39 Crash Menu 2 DRUMS
40 Ride Menu 2 DRUMS
41 OthrCym Menu 2 DRUMS
Patches use menu waveforms. With menu waveforms, a
different waveform is assigned to each key.
When playing patches on the expansion board, we
recommend that you set all the EFFECTS ON/OFF settings
on the Fantom series/XV series to “ON.” If such settings are
set to “OFF,” you may not obtain the intended sound.
* Note that the Release Time has been set to a fairly long value
for some of the patches. As a result, if your sound generator
has been set so “Patch Remain” is “ON,” the release portion of
a previously sounding patch may continue to be heard even
after switching to a new patch.
* Refer to the owner’s manual for your instrument for specific
instructions on how to play Patches on the expansion board.
パッチは、メニュー・ウェーブフォームを使用しています。
メニュー・ウェーブフォームとは、各キーに異なるウェーブ
フォームが割り当てられたものです。
エクスパンション・ボードのパッチを発音させるときは、
Fantom シリーズ /XV シリーズの EFFECTS ON/OFF の設
定をすべて ON にして使用することをお勧めいたします。
OFF に設定した場合、意図した音色にならないことがあり
ます。
※ パッチの中にはリリース・タイムが長く設定してある
パッチもありますので、音源のパッチ・リメインが
ON になっていると音色を切り替えても前のパッチの
リリースが残る場合があります。
※ エクスパンション・ボードのパッチを発音させるとき
は、使用機器の取扱説明書にしたがって、実行してくだ
さい。
9
Page 10

Patch Key Name List (1)
1 Kick 1 Menu
Key Wave Name
C4 Latin K sft
D4 Latin K med
E4 Latin K hrd
F4 ColDwnK sft
G4 ColDwnK med
A4 ColDwnK hrd
B4 70NtrlK sft
C5 70NtrlK hrd
D5 70PhnqK sft
E5 70PhnqK hrd
F5 Disco K sft
G5 Disco K hrd
A5 OldFnkK sft
B5 OldFnkK hrd
2 Kick 2 Menu *
Key Wave Name
C4 StudioK sft
D4 StudioK med
E4 StudioK hrd
F4 StdRckK sft
G4 StdRckK hrd
A4 StreetK sft
B4 StreetK hrd
C5 OhBabyK sft
D5 OhBabyK hrd
E5 PwrBldK sft
F5 PwrBldK med
G5 PwrBldK hrd
3 Kick 3 Menu *
Key Wave Name
C4 B.DeepK sft
D4 B.DeepK hrd
E4 BigRckK sft
F4 BigRckK hrd
G4 WhamBmK sft
A4 WhamBmK hrd
4 Kick 4 Menu
Key Wave Name
C4 StdJazK sft
D4 StdJazK hrd
E4 OldJazK sft
F4 OldJazK hrd
G4 RoomJzK sft
A4 RoomJzK hrd
B4 JzSoulK sft
C5 JzSoulK hrd
5 OldFnkS Menu
Key Wave Name
C4 OldFnkS sft
D4 OldFnkS hrd
E4 OldFnkS rim1
F4 OldFnkS rim2
G4 OldFnkS flm
A4 OldFnkS buz
B4 OldFnkS stk1
C5 OldFnkS stk2
6 Latin S Menu
Key Wave Name
C4 Latin S sft
D4 Latin S med
E4 Latin S hrd1
F4 Latin S hrd2
G4 Latin S rim1
A4 Latin S rim2
B4 Latin S flm
C5 Latin S buz
D5 Latin S stk1
E5 Latin S stk2
7 HiPiccS Menu *
Key Wave Name
C4 HiPiccSsft1
D4 HiPiccSsft2
E4 HiPiccShrd1
F4 HiPiccShrd2
G4 HiPiccSrim1
A4 HiPiccSrim2
B4 HiPiccSrim3
C5 HiPiccSrim4
D5 HiPiccSflm
E5 HiPiccSbuz1
F5 HiPiccSbuz2
G5 HiPiccSstk1
A5 HiPiccSstk2
8 Tight S Menu *
Key Wave Name
C4 Tight Ssft
D4 Tight Smed
E4 Tight Shrd1
F4 Tight Shrd2
G4 Tight Srim1
A4 Tight Srim2
B4 Tight Sflm1
C5 Tight Sflm2
9 StdRk1S Menu *
Key Wave Name
C4 StdRk1Ssft
D4 StdRk1Smed
E4 StdRk1Shrd1
F4 StdRk1Shrd2
G4 StdRk1Srim
A4 StdRk1Sflm
B4 StdRk1Sbuz1
C5 StdRk1Sbuz2
10 StdRk2S Menu *
Key Wave Name
C4 StdRk2Ssft
D4 StdRk2Smed
E4 StdRk2Shrd
F4 StdRk2Srim1
G4 StdRk2Srim2
A4 StdRk2Sflm
B4 StdRk2Sbuz1
C5 StdRk2Sbuz2
D5 StdRk2Sstk
11 OhBabyS Menu*
Key Wave Name
C4 OhBabySsft
D4 OhBabySmed1
E4 OhBabySmed2
F4 OhBabyShrd1
G4 OhBabyShrd2
A4 OhBabySrim
B4 OhBabySflm
C5 OhBabySbuz1
D5 OhBabySbuz2
E5 OhBabySstk1
F5 OhBabySstk2
12 PoppinS Menu *
Key Wave Name
C4 PoppinSsft
D4 PoppinSmed
E4 PoppinShrd
F4 PoppinSrim1
G4 PoppinSrim2
A4 PoppinSflm
B4 PoppinSbuz1
C5 PoppinSbuz2
D5 PoppinSstk1
E5 PoppinSstk2
13 StdFatS Menu *
Key Wave Name
C4 StdFatSsft
D4 StdFatSmed1
E4 StdFatSmed2
F4 StdFatShrd1
G4 StdFatShrd2
A4 StdFatSrim1
B4 StdFatSrim2
C5 StdFatSflm
D5 StdFatSbuz1
E5 StdFatSbuz2
F5 StdFatSstk1
G5 StdFatSstk2
14 JazStkS Menu *
Key Wave Name
C4 JazStkSsft
D4 JazStkSmed1
E4 JazStkSmed2
F4 JazStkShrd1
G4 JazStkShrd2
A4 JazStkSrim
B4 JazStkSflm
C5 JazStkSbuz1
D5 JazStkSbuz2
E5 JazStkSstk1
F5 JazStkSstk2
15 StdJazS Menu *
Key Wave Name
C4 StdJazSsft
D4 StdJazSmed1
E4 StdJazSmed2
F4 StdJazShrd
G4 StdJazSrim
A4 StdJazSflm
B4 StdJazSbuz1
C5 StdJazSbuz2
D5 StdJazSstk1
E5 StdJazSstk2
16 BalladS Menu *
Key Wave Name
C4 BalladSsft
D4 BalladSmed1
E4 BalladSmed2
F4 BalladShrd
G4 BalladSrim1
A4 BalladSrim2
B4 BalladSflm
C5 BalladSbuz1
D5 BalladSbuz2
E5 BalladSstk1
F5 BalladSstk2
17 PwrBldS Menu *
Key Wave Name
C4 PwrBldSsft1
D4 PwrBldSsft2
E4 PwrBldSmed1
F4 PwrBldSmed2
G4 PwrBldShrd1
A4 PwrBldShrd2
B4 PwrBldSflm
C5 PwrBldSbuz1
D5 PwrBldSbuz2
E5 PwrBldSstk1
F5 PwrBldSstk2
18 AlBeefS Menu *
Key Wave Name
C4 AlBeefSsft
D4 AlBeefShrd
E4 AlBeefSrim1
F4 AlBeefSrim2
G4 AlBeefSflm
A4 AlBeefSbuz1
B4 AlBeefSbuz2
C5 AlBeefSstk1
D5 AlBeefSstk2
19 BigRckS Menu *
Key Wave Name
C4 BigRckSsft
D4 BigRckSmed
E4 BigRckShrd
F4 BigRckSflm1
G4 BigRckSflm2
A4 BigRckSbuz
B4 BigRckSstk
20 70BrshS Menu
Key Wave Name
C4 70BrshS tap1
D4 70BrshS tap2
E4 70BrshS tap3
F4 70BrshS tap4
G4 70BrshSswsh1
A4 70BrshSswsh2
B4 70BrshSswsh3
C5 70BrshSsweep
21 JzBrshS Menu *
Key Wave Name
C4 JzBrshStap1
D4 JzBrshStap2
E4 JzBrshStap3
F4 JzBrshStap4
G4 JzBrshSsws1
A4 JzBrshSsws2
B4 JzBrshSsws3
C5 JzBrshSswep
* These use stereo waveforms.
10
* ステレオ・ウェーブフォームを使用しています。
Page 11

Patch Key Name List (2)
22 CrsStk Menu *
Key Wave Name
C4 70PhunqStk
D4 PwrAmb Stk1
E4 PwrAmb Stk2
23 Latin T Menu *
Key Wave Name
C4 Latin T1sft
D4 Latin T1med
E4 Latin T1hrd
F4 Latin T1flm
G4 Latin T2sft
A4 Latin T2med
B4 Latin T2hrd
C5 Latin T2flm
D5 Latin T3sft
E5 Latin T3med
F5 Latin T3hrd
G5 Latin T3flm
A5 Latin T4sft
B5 Latin T4med
C6 Latin T4hrd
D6 Latin T4flm
24 Tight T Menu *
Key Wave Name
C4 Tight T1sft
D4 Tight T1hrd
E4 Tight T1flm
F4 Tight T2sft
G4 Tight T2hrd
A4 Tight T2flm
B4 Tight T3sft
C5 Tight T3hrd
D5 Tight T3flm
E5 Tight T4sft
F5 Tight T4hrd
G5 Tight T4flm
25 JazStkT Menu *
Key Wave Name
C4 JazStkT1sft
D4 JazStkT1med
E4 JazStkT1hrd
F4 JazStkT1flm
G4 JazStkT2sft
A4 JazStkT2med
B4 JazStkT2hrd
C5 JazStkT2flm
D5 JazStkT3sft
E5 JazStkT3med
F5 JazStkT3hrd
G5 JazStkT3flm
26 OldFnkT Menu
Key Wave Name
C4 OldFnkT1sft
D4 OldFnkT1hrd
E4 OldFnkT2sft
F4 OldFnkT2hrd
G4 OldFnkT3sft
A4 OldFnkT3hrd
27 OhBabyT Menu*
Key Wave Name
C4 OhBabyT1sft
D4 OhBabyT1hrd
E4 OhBabyT1flm
F4 OhBabyT2sft
G4 OhBabyT2hrd
A4 OhBabyT2flm
B4 OhBabyT3sft
C5 OhBabyT3hrd
D5 OhBabyT3flm
E5 OhBabyT4sft
F5 OhBabyT4hrd
G5 OhBabyT4flm
28 PwrBldT Menu *
Key Wave Name
C4 PwrBldT1sft
D4 PwrBldT1hrd
E4 PwrBldT1flm
F4 PwrBldT2sft
G4 PwrBldT2hrd
A4 PwrBldT2flm
B4 PwrBldT3sft
C5 PwrBldT3hrd
D5 PwrBldT3flm
E5 PwrBldT4sft
F5 PwrBldT4hrd
G5 PwrBldT4flm
29 BigRckT Menu *
Key Wave Name
C4 BigRckT1sft
D4 BigRckT1med
E4 BigRckT1hrd
F4 BigRckT1flm
G4 BigRckT2sft
A4 BigRckT2med
B4 BigRckT2hrd
C5 BigRckT2flm
D5 BigRckT3sft
E5 BigRckT3med
F5 BigRckT3hrd
G5 BigRckT3flm
30 OldBrsT Menu
Key Wave Name
C4 OldBrsT1sft
D4 OldBrsT1med
E4 OldBrsT1hrd
F4 OldBrsT2sft
G4 OldBrsT2med
A4 OldBrsT2hrd
31 OhBabyH Menu
Key Wave Name
C4 OhBabyH cl1
D4 OhBabyH cl2
E4 OhBabyH cl3
F4 OhBabyH cl4
G4 OhBabyH cl5
A4 OhBabyH cl6
B4 OhBabyHhcl1
C5 OhBabyHhcl2
D5 OhBabyHhcl3
E5 OhBabyHhop
F5 OhBabyH op
G5 OhBabyHpdl1
A5 OhBabyHpdl2
32 JazStkH Menu
Key Wave Name
C4 JazStkH cl1
D4 JazStkH cl2
E4 JazStkHhcl1
F4 JazStkHhcl2
G4 JazStkHhop
A4 JazStkH op
B4 JazStkHpdl
33 Latin H Menu5
Key Wave Name
C4 Latin H cl1
D4 Latin H cl2
E4 Latin Hhcl
F4 Latin Hhop
G4 Latin H op
A4 Latin Hpdl
34 Disco H Menu
Key Wave Name
C4 Disco H cl1
D4 Disco H cl2
E4 Disco Hhcl
F4 Disco H op
G4 Disco Hpdl
35 OldFnkH Menu
Key Wave Name
C4 OldFnkH cl1
D4 OldFnkH cl2
E4 OldFnkHhcl
F4 OldFnkHhop
G4 OldFnkH op
A4 OldFnkHpdl
36 StreetH Menu *
Key Wave Name
C4 StreetH cl1
D4 StreetH cl2
E4 StreetHhcl
F4 StreetHhop
G4 StreetH op
A4 StreetHpdl
37 BigRckH Menu *
Key Wave Name
C4 BigRckH cl1
D4 BigRckH cl2
E4 BigRckHhcl
F4 BigRckHhop
G4 BigRckH op
38 OldBrsH Menu
Key Wave Name
C4 OldBrsH cl1
D4 OldBrsH cl2
E4 OldBrsH cl3
F4 OldBrsH cl4
G4 OldBrsHhop
A4 OldBrsH op
B4 OldBrsHpdl
39 Crash Menu *
Key Wave Name
C4 StreetCr
D4 BalladCrSft
E4 BalladCrHrd
F4 BigRckCrSft
G4 BigRckCrHrd
A4 JazStkCrSft
B4 JazStkCrHrd
C5 OldBrsh Cr
40 Ride Menu *
Key Wave Name
C4 Latin RdSft
D4 Latin RdMed
E4 Latin RdHrd
F4 Latin RdBel
G4 BalladRdSft
A4 BalladRdHrd
B4 BalladRdBel
C5 BigRckRdSft
D5 BigRckRdHrd
E5 BigRckRdBel
F5 JazStkRd
G5 JazStkRdBel
A5 SizzleRd
B5 SizzleRdBel
C6 OldBrsRd
D6 OldBrsRdBel
41 OthrCym Menu*
Key Wave Name
C4 Light Splsh
D4 BalladSplsh
E4 YoMamaChina
* These use stereo waveforms.
* ステレオ・ウェーブフォームを使用しています。
11
Page 12

Waveform List (1)
No. Name
1 Kick 1 Menu *
2 Kick 2 MenuL * **
3 Kick 2 MenuR * **
4 Kick 3 MenuL * **
5 Kick 3 MenuR * **
6 Kick 4 Menu *
7 Latin K sft
8 Latin K med
9 Latin K hrd
10 ColDwnK sft
11 ColDwnK med
12 ColDwnK hrd
13 70NtrlK sft
14 70NtrlK hrd
15 70PhnqK sft
16 70PhnqK hrd
17 Disco K sft
18 Disco K hrd
19 OldFnkK sft
20 OldFnkK hrd
21 StudioK sftL **
22 StudioK sftR **
23 StudioK medL **
24 StudioK medR **
25 StudioK hrdL **
26 StudioK hrdR **
27 StdRckK sftL **
28 StdRckK sftR **
29 StdRckK hrdL **
30 StdRckK hrdR **
31 StreetK sftL **
32 StreetK sftR **
33 StreetK hrdL **
34 StreetK hrdR **
35 OhBabyK sftL **
36 OhBabyK sftR **
37 OhBabyK hrdL **
38 OhBabyK hrdR **
39 PwrBldK sftL **
40 PwrBldK sftR **
41 PwrBldK medL **
42 PwrBldK medR **
43 PwrBldK hrdL **
44 PwrBldK hrdR **
45 B.DeepK sftL **
46 B.DeepK sftR **
47 B.DeepK hrdL **
48 B.DeepK hrdR **
49 BigRckK sftL **
50 BigRckK sftR **
No. Name
51 BigRckK hrdL **
52 BigRckK hrdR **
53 WhamBmK sftL **
54 WhamBmK sftR **
55 WhamBmK hrdL **
56 WhamBmK hrdR **
57 StdJazK sft
58 StdJazK hrd
59 OldJazK sft
60 OldJazK hrd
61 RoomJzK sft
62 RoomJzK hrd
63 JzSoulK sft
64 JzSoulK hrd
65 OldFnkSMenu *
66 Latin SMenu *
67 HiPiccSMenuL * **
68 HiPiccSMenuR * **
69 Tight SMenuL * **
70 Tight SMenuR * **
71 StdRk1SMenuL * **
72 StdRk1SMenuR * **
73 StdRk2SMenuL * **
74 StdRk2SMenuR * **
75 OhBabySMenuL * **
76 OhBabySMenuR * **
77 PoppinSMenuL * **
78 PoppinSMenuR * **
79 StdFatSMenuL * **
80 StdFatSMenuR * **
81 JazStkSMenuL * **
82 JazStkSMenuR * **
83 StdJazSMenuL * **
84 StdJazSMenuR * **
85 BalladSMenuL * **
86 BalladSMenuR * **
87 PwrBldSMenuL * **
88 PwrBldSMenuR * **
89 AlBeefSMenuL * **
90 AlBeefSMenuR * **
91 BigRckSMenuL * **
92 BigRckSMenuR * **
93 70BrshSMenu *
94 JzBrshSMenuL * **
95 JzBrshSMenuR * **
96 CrsStk MenuL * **
97 CrsStk MenuR * **
98 OldFnkS sft
99 OldFnkS hrd
100 OldFnkS rim1
No. Name
101 OldFnkS rim2
102 OldFnkS flm
103 OldFnkS buz
104 OldFnkS stk1
105 OldFnkS stk2
106 Latin S sft
107 Latin S med
108 Latin S hrd1
109 Latin S hrd2
110 Latin S rim1
111 Latin S rim2
112 Latin S flm
113 Latin S buz
114 Latin S stk1
115 Latin S stk2
116 HiPiccSsft1L **
117 HiPiccSsft1R **
118 HiPiccSsft2L **
119 HiPiccSsft2R **
120 HiPiccShrd1L **
121 HiPiccShrd1R **
122 HiPiccShrd2L **
123 HiPiccShrd2R **
124 HiPiccSrim1L **
125 HiPiccSrim1R **
126 HiPiccSrim2L **
127 HiPiccSrim2R **
128 HiPiccSrim3L **
129 HiPiccSrim3R **
130 HiPiccSrim4L **
131 HiPiccSrim4R **
132 HiPiccSflm L **
133 HiPiccSflm R **
134 HiPiccSbuz1L **
135 HiPiccSbuz1R **
136 HiPiccSbuz2L **
137 HiPiccSbuz2R **
138 HiPiccSstk1L **
139 HiPiccSstk1R **
140 HiPiccSstk2L **
141 HiPiccSstk2R **
142 Tight Ssft L **
143 Tight Ssft R **
144 Tight Smed L **
145 Tight Smed R **
146 Tight Shrd1L **
147 Tight Shrd1R **
148 Tight Shrd2L **
149 Tight Shrd2R **
150 Tight Srim1L **
No. Name
151 Tight Srim1R **
152 Tight Srim2L **
153 Tight Srim2R **
154 Tight Sflm1L **
155 Tight Sflm1R **
156 Tight Sflm2L **
157 Tight Sflm2R **
158 StdRk1Ssft L **
159 StdRk1Ssft R **
160 StdRk1Smed L **
161 StdRk1Smed R **
162 StdRk1Shrd1L **
163 StdRk1Shrd1R **
164 StdRk1Shrd2L **
165 StdRk1Shrd2R **
166 StdRk1Srim L **
167 StdRk1Srim R **
168 StdRk1Sflm L **
169 StdRk1Sflm R **
170 StdRk1Sbuz1L **
171 StdRk1Sbuz1R **
172 StdRk1Sbuz2L **
173 StdRk1Sbuz2R **
174 StdRk2Ssft L **
175 StdRk2Ssft R **
176 StdRk2Smed L **
177 StdRk2Smed R **
178 StdRk2Shrd L **
179 StdRk2Shrd R **
180 StdRk2Srim1L **
181 StdRk2Srim1R **
182 StdRk2Srim2L **
183 StdRk2Srim2R **
184 StdRk2Sflm L **
185 StdRk2Sflm R **
186 StdRk2Sbuz1L **
187 StdRk2Sbuz1R **
188 StdRk2Sbuz2L **
189 StdRk2Sbuz2R **
190 StdRk2Sstk L **
191 StdRk2Sstk R **
192 OhBabySsft L **
193 OhBabySsft R **
194 OhBabySmed1L **
195 OhBabySmed1R **
196 OhBabySmed2L **
197 OhBabySmed2R **
198 OhBabyShrd1L **
199 OhBabyShrd1R **
200 OhBabyShrd2L **
* These are menu waveforms. Include multiple waveforms
assigned to keys individually.
** These are stereo waveforms, offered in left-right pairs.
When you create a Patch using the waveforms stored in the
Expansion Board, observe the following points:
* If you make a Patch with a single voice and then later play it in
a chord, the sound may be distorted with certain settings for
the Effects and TVA. If this happens, adjust the level of the
Effects and TVA.
12
* メニュー・ウェーブフォームです。複数のウェーブ
フォームが、各キーに割り当てられています。
** L と R でペアになるステレオ・ウェーブフォームです。
このエクスパンション・ボードに収められているウェーブ
フォームを使ってパッチを作るときには、次の点に注意して
ください。
※ 単音でパッチを作ったとき、エフェクトや TVA の設定
状態によって、その音を和音で演奏すると音が歪む場合
があります。このようなときは、エフェクトや TVA の
レベルを調整してください。
Page 13

Waveform List (2)
No. Name
201 OhBabyShrd2R **
202 OhBabySrim L **
203 OhBabySrim R **
204 OhBabySflm L **
205 OhBabySflm R **
206 OhBabySbuz1L **
207 OhBabySbuz1R **
208 OhBabySbuz2L **
209 OhBabySbuz2R **
210 OhBabySstk1L **
211 OhBabySstk1R **
212 OhBabySstk2L **
213 OhBabySstk2R **
214 PoppinSsft L **
215 PoppinSsft R **
216 PoppinSmed L **
217 PoppinSmed R **
218 PoppinShrd L **
219 PoppinShrd R **
220 PoppinSrim1L **
221 PoppinSrim1R **
222 PoppinSrim2L **
223 PoppinSrim2R **
224 PoppinSflm L **
225 PoppinSflm R **
226 PoppinSbuz1L **
227 PoppinSbuz1R **
228 PoppinSbuz2L **
229 PoppinSbuz2R **
230 PoppinSstk1L **
231 PoppinSstk1R **
232 PoppinSstk2L **
233 PoppinSstk2R **
234 StdFatSsft L **
235 StdFatSsft R **
236 StdFatSmed1L **
237 StdFatSmed1R **
238 StdFatSmed2L **
239 StdFatSmed2R **
240 StdFatShrd1L **
241 StdFatShrd1R **
242 StdFatShrd2L **
243 StdFatShrd2R **
244 StdFatSrim1L **
245 StdFatSrim1R **
246 StdFatSrim2L **
247 StdFatSrim2R **
248 StdFatSflm L **
249 StdFatSflm R **
250 StdFatSbuz1L **
No. Name
251 StdFatSbuz1R **
252 StdFatSbuz2L **
253 StdFatSbuz2R **
254 StdFatSstk1L **
255 StdFatSstk1R **
256 StdFatSstk2L **
257 StdFatSstk2R **
258 JazStkSsft L **
259 JazStkSsft R **
260 JazStkSmed1L **
261 JazStkSmed1R **
262 JazStkSmed2L **
263 JazStkSmed2R **
264 JazStkShrd1L **
265 JazStkShrd1R **
266 JazStkShrd2L **
267 JazStkShrd2R **
268 JazStkSrim L **
269 JazStkSrim R **
270 JazStkSflm L **
271 JazStkSflm R **
272 JazStkSbuz1L **
273 JazStkSbuz1R **
274 JazStkSbuz2L **
275 JazStkSbuz2R **
276 JazStkSstk1L **
277 JazStkSstk1R **
278 JazStkSstk2L **
279 JazStkSstk2R **
280 StdJazSsft L **
281 StdJazSsft R **
282 StdJazSmed1L **
283 StdJazSmed1R **
284 StdJazSmed2L **
285 StdJazSmed2R **
286 StdJazShrd L **
287 StdJazShrd R **
288 StdJazSrim L **
289 StdJazSrim R **
290 StdJazSflm L **
291 StdJazSflm R **
292 StdJazSbuz1L **
293 StdJazSbuz1R **
294 StdJazSbuz2L **
295 StdJazSbuz2R **
296 StdJazSstk1L **
297 StdJazSstk1R **
298 StdJazSstk2L **
299 StdJazSstk2R **
300 BalladSsft L **
No. Name
301 BalladSsft R **
302 BalladSmed1L **
303 BalladSmed1R **
304 BalladSmed2L **
305 BalladSmed2R **
306 BalladShrd L **
307 BalladShrd R **
308 BalladSrim1L **
309 BalladSrim1R **
310 BalladSrim2L **
311 BalladSrim2R **
312 BalladSflm L **
313 BalladSflm R **
314 BalladSbuz1L **
315 BalladSbuz1R **
316 BalladSbuz2L **
317 BalladSbuz2R **
318 BalladSstk1L **
319 BalladSstk1R **
320 BalladSstk2L **
321 BalladSstk2R **
322 PwrBldSsft1L **
323 PwrBldSsft1R **
324 PwrBldSsft2L **
325 PwrBldSsft2R **
326 PwrBldSmed1L **
327 PwrBldSmed1R **
328 PwrBldSmed2L **
329 PwrBldSmed2R **
330 PwrBldShrd1L **
331 PwrBldShrd1R **
332 PwrBldShrd2L **
333 PwrBldShrd2R **
334 PwrBldSflm L **
335 PwrBldSflm R **
336 PwrBldSbuz1L **
337 PwrBldSbuz1R **
338 PwrBldSbuz2L **
339 PwrBldSbuz2R **
340 PwrBldSstk1L **
341 PwrBldSstk1R **
342 PwrBldSstk2L **
343 PwrBldSstk2R **
344 AlBeefSsft L **
345 AlBeefSsft R **
346 AlBeefShrd L **
347 AlBeefShrd R **
348 AlBeefSrim1L **
349 AlBeefSrim1R **
350 AlBeefSrim2L **
No. Name
351 AlBeefSrim2R **
352 AlBeefSflm L **
353 AlBeefSflm R **
354 AlBeefSbuz1L **
355 AlBeefSbuz1R **
356 AlBeefSbuz2L **
357 AlBeefSbuz2R **
358 AlBeefSstk1L **
359 AlBeefSstk1R **
360 AlBeefSstk2L **
361 AlBeefSstk2R **
362 BigRckSsft L **
363 BigRckSsft R **
364 BigRckSmed L **
365 BigRckSmed R **
366 BigRckShrd L **
367 BigRckShrd R **
368 BigRckSflm1L **
369 BigRckSflm1R **
370 BigRckSflm2L **
371 BigRckSflm2R **
372 BigRckSbuz L **
373 BigRckSbuz R **
374 BigRckSstk L **
375 BigRckSstk R **
376 70BrshS tap1
377 70BrshS tap2
378 70BrshS tap3
379 70BrshS tap4
380 70BrshSswsh1
381 70BrshSswsh2
382 70BrshSswsh3
383 70BrshSsweep
384 JzBrshStap1L **
385 JzBrshStap1R **
386 JzBrshStap2L **
387 JzBrshStap2R **
388 JzBrshStap3L **
389 JzBrshStap3R **
390 JzBrshStap4L **
391 JzBrshStap4R **
392 JzBrshSsws1L **
393 JzBrshSsws1R **
394 JzBrshSsws2L **
395 JzBrshSsws2R **
396 JzBrshSsws3L **
397 JzBrshSsws3R **
398 JzBrshSswepL **
399 JzBrshSswepR **
400 70PhunqStk L **
* These are menu waveforms. Include multiple waveforms
assigned to keys individually.
** These are stereo waveforms, offered in left-right pairs.
When you create a Patch using the waveforms stored in the
Expansion Board, observe the following points:
* If you make a Patch with a single voice and then later play it in
a chord, the sound may be distorted with certain settings for
the Effects and TVA. If this happens, adjust the level of the
Effects and TVA.
* メニュー・ウェーブフォームです。複数のウェーブ
フォームが、各キーに割り当てられています。
** L と R でペアになるステレオ・ウェーブフォームです。
このエクスパンション・ボードに収められているウェーブ
フォームを使ってパッチを作るときには、次の点に注意して
ください。
※ 単音でパッチを作ったとき、エフェクトや TVA の設定
状態によって、その音を和音で演奏すると音が歪む場合
があります。このようなときは、エフェクトや TVA の
レベルを調整してください。
13
Page 14

Waveform List (3)
No. Name
401 70PhunqStk R **
402 PwrAmb Stk1L **
403 PwrAmb Stk1R **
404 PwrAmb Stk2L **
405 PwrAmb Stk2R **
406 Latin TMenuL * **
407 Latin TMenuR * **
408 Tight TMenuL * **
409 Tight TMenuR * **
410 JazStkTMenuL * **
411 JazStkTMenuR * **
412 OldFnkTMenu *
413 OhBabyTMenuL * **
414 OhBabyTMenuR * **
415 PwrBldTMenuL * **
416 PwrBldTMenuR * **
417 BigRckTMenuL * **
418 BigRckTMenuR * **
419 OldBrsTMenu *
420 Latin T1sftL **
421 Latin T1sftR **
422 Latin T1medL **
423 Latin T1medR **
424 Latin T1hrdL **
425 Latin T1hrdR **
426 Latin T1flmL **
427 Latin T1flmR **
428 Latin T2sftL **
429 Latin T2sftR **
430 Latin T2medL **
431 Latin T2medR **
432 Latin T2hrdL **
433 Latin T2hrdR **
434 Latin T2flmL **
435 Latin T2flmR **
436 Latin T3sftL **
437 Latin T3sftR **
438 Latin T3medL **
439 Latin T3medR **
440 Latin T3hrdL **
441 Latin T3hrdR **
442 Latin T3flmL **
443 Latin T3flmR **
444 Latin T4sftL **
445 Latin T4sftR **
446 Latin T4medL **
447 Latin T4medR **
448 Latin T4hrdL **
449 Latin T4hrdR **
450 Latin T4flmL **
No. Name
451 Latin T4flmR **
452 Tight T1sftL **
453 Tight T1sftR **
454 Tight T1hrdL **
455 Tight T1hrdR **
456 Tight T1flmL **
457 Tight T1flmR **
458 Tight T2sftL **
459 Tight T2sftR **
460 Tight T2hrdL **
461 Tight T2hrdR **
462 Tight T2flmL **
463 Tight T2flmR **
464 Tight T3sftL **
465 Tight T3sftR **
466 Tight T3hrdL **
467 Tight T3hrdR **
468 Tight T3flmL **
469 Tight T3flmR **
470 Tight T4sftL **
471 Tight T4sftR **
472 Tight T4hrdL **
473 Tight T4hrdR **
474 Tight T4flmL **
475 Tight T4flmR **
476 JazStkT1sftL **
477 JazStkT1sftR **
478 JazStkT1medL **
479 JazStkT1medR **
480 JazStkT1hrdL **
481 JazStkT1hrdR **
482 JazStkT1flmL **
483 JazStkT1flmR **
484 JazStkT2sftL **
485 JazStkT2sftR **
486 JazStkT2medL **
487 JazStkT2medR **
488 JazStkT2hrdL **
489 JazStkT2hrdR **
490 JazStkT2flmL **
491 JazStkT2flmR **
492 JazStkT3sftL **
493 JazStkT3sftR **
494 JazStkT3medL **
495 JazStkT3medR **
496 JazStkT3hrdL **
497 JazStkT3hrdR **
498 JazStkT3flmL **
499 JazStkT3flmR **
500 OldFnkT1sft
No. Name
501 OldFnkT1hrd
502 OldFnkT2sft
503 OldFnkT2hrd
504 OldFnkT3sft
505 OldFnkT3hrd
506 OhBabyT1sftL **
507 OhBabyT1sftR **
508 OhBabyT1hrdL **
509 OhBabyT1hrdR **
510 OhBabyT1flmL **
511 OhBabyT1flmR **
512 OhBabyT2sftL **
513 OhBabyT2sftR **
514 OhBabyT2hrdL **
515 OhBabyT2hrdR **
516 OhBabyT2flmL **
517 OhBabyT2flmR **
518 OhBabyT3sftL **
519 OhBabyT3sftR **
520 OhBabyT3hrdL **
521 OhBabyT3hrdR **
522 OhBabyT3flmL **
523 OhBabyT3flmR **
524 OhBabyT4sftL **
525 OhBabyT4sftR **
526 OhBabyT4hrdL **
527 OhBabyT4hrdR **
528 OhBabyT4flmL **
529 OhBabyT4flmR **
530 PwrBldT1sftL **
531 PwrBldT1sftR **
532 PwrBldT1hrdL **
533 PwrBldT1hrdR **
534 PwrBldT1flmL **
535 PwrBldT1flmR **
536 PwrBldT2sftL **
537 PwrBldT2sftR **
538 PwrBldT2hrdL **
539 PwrBldT2hrdR **
540 PwrBldT2flmL **
541 PwrBldT2flmR **
542 PwrBldT3sftL **
543 PwrBldT3sftR **
544 PwrBldT3hrdL **
545 PwrBldT3hrdR **
546 PwrBldT3flmL **
547 PwrBldT3flmR **
548 PwrBldT4sftL **
549 PwrBldT4sftR **
550 PwrBldT4hrdL **
No. Name
551 PwrBldT4hrdR **
552 PwrBldT4flmL **
553 PwrBldT4flmR **
554 BigRckT1sftL **
555 BigRckT1sftR **
556 BigRckT1medL **
557 BigRckT1medR **
558 BigRckT1hrdL **
559 BigRckT1hrdR **
560 BigRckT1flmL **
561 BigRckT1flmR **
562 BigRckT2sftL **
563 BigRckT2sftR **
564 BigRckT2medL **
565 BigRckT2medR **
566 BigRckT2hrdL **
567 BigRckT2hrdR **
568 BigRckT2flmL **
569 BigRckT2flmR **
570 BigRckT3sftL **
571 BigRckT3sftR **
572 BigRckT3medL **
573 BigRckT3medR **
574 BigRckT3hrdL **
575 BigRckT3hrdR **
576 BigRckT3flmL **
577 BigRckT3flmR **
578 OldBrsT1sft
579 OldBrsT1med
580 OldBrsT1hrd
581 OldBrsT2sft
582 OldBrsT2med
583 OldBrsT2hrd
584 OhBabyHMenu *
585 JazStkHMenu *
586 Latin HMenu *
587 Disco HMenu *
588 OldFnkHMenu *
589 StreetHMenuL * **
590 StreetHMenuR * **
591 BigRckHMenuL * **
592 BigRckHMenuR * **
593 OldBrsHMenu *
594 OhBabyH cl1
595 OhBabyH cl2
596 OhBabyH cl3
597 OhBabyH cl4
598 OhBabyH cl5
599 OhBabyH cl6
600 OhBabyHhcl1
* These are menu waveforms. Include multiple waveforms
assigned to keys individually.
** These are stereo waveforms, offered in left-right pairs.
When you create a Patch using the waveforms stored in the
Expansion Board, observe the following points:
* If you make a Patch with a single voice and then later play it in
a chord, the sound may be distorted with certain settings for
the Effects and TVA. If this happens, adjust the level of the
Effects and TVA.
14
* メニュー・ウェーブフォームです。複数のウェーブ
フォームが、各キーに割り当てられています。
** L と R でペアになるステレオ・ウェーブフォームです。
このエクスパンション・ボードに収められているウェーブ
フォームを使ってパッチを作るときには、次の点に注意して
ください。
単音でパッチを作ったとき、エフェクトや TVA の設定
※
状態によって、その音を和音で演奏すると音が歪む場合
があります。このようなときは、エフェクトや TVA の
レベルを調整してください
Page 15

Waveform List (4)
No. Name
601 OhBabyHhcl2
602 OhBabyHhcl3
603 OhBabyHhop
604 OhBabyH op
605 OhBabyHpdl1
606 OhBabyHpdl2
607 JazStkH cl1
608 JazStkH cl2
609 JazStkHhcl1
610 JazStkHhcl2
611 JazStkHhop
612 JazStkH op
613 JazStkHpdl
614 Latin H cl1
615 Latin H cl2
616 Latin Hhcl
617 Latin Hhop
618 Latin H op
619 Latin Hpdl
620 Disco H cl1
621 Disco H cl2
622 Disco Hhcl
623 Disco H op
624 Disco Hpdl
625 OldFnkH cl1
626 OldFnkH cl2
627 OldFnkHhcl
628 OldFnkHhop
629 OldFnkH op
630 OldFnkHpdl
631 StreetH cl1L **
632 StreetH cl1R **
633 StreetH cl2L **
634 StreetH cl2R **
635 StreetHhcl L **
636 StreetHhcl R **
637 StreetHhop L **
638 StreetHhop R **
639 StreetH op L **
640 StreetH op R **
641 StreetHpdl L **
642 StreetHpdl R **
643 BigRckH cl1L **
644 BigRckH cl1R **
645 BigRckH cl2L **
646 BigRckH cl2R **
647 BigRckHhcl L **
648 BigRckHhcl R **
649 BigRckHhop L **
650 BigRckHhop R **
No. Name
651 BigRckH op L **
652 BigRckH op R **
653 OldBrsH cl1
654 OldBrsH cl2
655 OldBrsH cl3
656 OldBrsH cl4
657 OldBrsHhop
658 OldBrsH op
659 OldBrsHpdl
660 Crash MenuL * **
661 Crash MenuR * **
662 Ride MenuL * **
663 Ride MenuR * **
664 OthrCymMenuL * **
665 OthrCymMenuR * **
666 StreetCr L **
667 StreetCr R **
668 BalladCrSftL **
669 BalladCrSftR **
670 BalladCrHrdL **
671 BalladCrHrdR **
672 BigRckCrSftL **
673 BigRckCrSftR **
674 BigRckCrHrdL **
675 BigRckCrHrdR **
676 JazStkCrSftL **
677 JazStkCrSftR **
678 JazStkCrHrdL **
679 JazStkCrHrdR **
680 OldBrsh Cr L **
681 OldBrsh Cr R **
682 Latin RdSftL **
683 Latin RdSftR **
684 Latin RdMedL **
685 Latin RdMedR **
686 Latin RdHrdL **
687 Latin RdHrdR **
688 Latin RdBelL **
689 Latin RdBelR **
690 BalladRdSftL **
691 BalladRdSftR **
692 BalladRdHrdL **
693 BalladRdHrdR **
694 BalladRdBelL **
695 BalladRdBelR **
696 BigRckRdSftL **
697 BigRckRdSftR **
698 BigRckRdHrdL **
699 BigRckRdHrdR **
700 BigRckRdBelL **
No. Name
701 BigRckRdBelR **
702 JazStkRd L **
703 JazStkRd R **
704 JazStkRdBelL **
705 JazStkRdBelR **
706 SizzleRd L **
707 SizzleRd R **
708 SizzleRdBelL **
709 SizzleRdBelR **
710 OldBrsRd L **
711 OldBrsRd R **
712 OldBrsRdBelL **
713 OldBrsRdBelR **
714 Light SplshL **
715 Light SplshR **
716 BalladSplshL **
717 BalladSplshR **
718 YoMamaChinaL **
719 YoMamaChinaR **
* These are menu waveforms. Include multiple waveforms
assigned to keys individually.
** These are stereo waveforms, offered in left-right pairs.
When you create a Patch using the waveforms stored in the
Expansion Board, observe the following points:
* If you make a Patch with a single voice and then later play it in
a chord, the sound may be distorted with certain settings for
the Effects and TVA. If this happens, adjust the level of the
Effects and TVA.
* メニュー・ウェーブフォームです。複数のウェーブ
フォームが、各キーに割り当てられています。
** L と R でペアになるステレオ・ウェーブフォームです。
このエクスパンション・ボードに収められているウェーブ
フォームを使ってパッチを作るときには、次の点に注意して
ください。
単音でパッチを作ったとき、エフェクトや TVA の設定状態
によって、その音を和音で演奏すると音が歪む場合がありま
す。このようなときは、エフェクトや TVA のレベルを調整
してください
15
Page 16

ローランド製品保証書 [持込修理]
ご芳名
お
客
様
取扱販売店名・住所・
保
証
期
間
太枠内に記入のない場合は、必ず販売店発行の領収書またはそのお買い上げ年
月日・販売店等を証明するものを保証書に添付願います。記入もしくは添付の
無い場合は無効となりますのでご注意ください。
型名
〒
ご住所
お買い上げ日
年 月 日より
本体は一年間
ただし、ソフトウェア、
付属品、消耗部品は除く
SRX-01 “Dynamic Drum Kits”
様
●
本保証書は、本書記載内容で無料修理をさ
せていただくことをお約束するものです。
●保証期間中に故障が発生した場合は、製品
と本書をご持参ご提示の上、お買上げの販
売店にご依頼ください。
●ご転居・ご贈答品などの場合で、お買上げ
販売店に修理を依頼することができない場
合は、ローランドサービスステーションに
お問い合せください。
●本書は再発行いたしません。所定事項を記
入し、内容をよくお読みの上、大切に保存
してください。
本社〒530-0002大阪市北区曽根崎新地1-4-20桜橋IMビル11F
電話(06)6345-9800
保証規定
1. 保証期間内において、取扱説明書・本体貼付ラベルなど
の注意書に従った正常なご使用状態で発生した故障につ
いては、第3項に示す場合を除き、無料修理いたします。
2. 保証期間内に無料修理をお受けになる場合は、お買い上
げの販売店、又は最寄りのローランドサービスステーショ
ンにご依頼のうえ、修理の際に本書をご提示ください。
お客様のご事情により出張修理を依頼された場合、保証
期間中であっても出張料金を申し受けます。
3.保証期間内でも、次の場合には有料修理となります。
(イ)本書のご提示が無い場合。
(ロ)本書にお買い上げ年月日・販売店名の記入もしく
は証明できるものの添付が無い場合、またはその
字句を書き換えられた場合。
(ハ)ご使用上の誤り、又は当社の指定者以外の手によ
り修理・改造された場合。
(ニ)本製品に異常がなく、他の部分、他の機器に異常
があり、点検及び改善した場合。
(ホ)お買い上げ後の輸送、移動、落下等による故障や
損傷および使用中に生じたキズ・汚れなどの外観
上の変化。
(ヘ)地震、落雷、風水害、その他の天災地変、火災、
公害、ガス、異常電圧による故障や損傷。
(ト)消耗部品(例:電池など)の取り替えを要する場合、
および消耗部品の摩耗や劣化に起因する故障や損傷。
4. 本製品は日本国内でご使用いただくことを前提に製造・
販売しております。従って本製品の保証は、日本国外で
はお受けできませんので、ご了承ください。
This warranty is valid only in Japan.
修理メモ
※ 本保証書は以上の保証規定により無料修理をお約束する
ものです。従ってこの保証書によってお客様の法律上の
権利を制限するものではありません。
※ 本製品の補修用性能部品(製品の機能を維持するために
必要な部品)の最低保有期間は製造打切後6年です。こ
の部品保有期間を修理可能の期間とさせていただきます。
保有期間経過後も、故障内容によっては修理可能の場合
がありますので、ローランドサービスステーションまで
お問い合わせください。
※ 修理の際、交換した部品を再生、再利用、製品の品質向
上等の目的で回収させていただくことがありますので、
ご協力願います。
Copyright © 2000 ROLAND CORPORATION
All rights reserved. No part of this publication may be reproduced in any form without the written permission of ROLAND
CORPORATION.
©
2000 ローランド 本書の一部、もしくは全部を無断で複写・転載することを禁じます。
40344556 ’05-3-4N
16
 Loading...