

Page 1
Enjoy playing your acoustic guitar accompanied by a variety of rhythms
Owner’s Manual
Enjoy Sounds Like These . . . . . . . . . . . . . . . . . . . 2
Panel Descriptions . . . . . . . . . . . . . . . . . . . . . . . . 4
Installing Batteries . . . . . . . . . . . . . . . . . . . . . . . . 5
Playing Rhythms . . . . . . . . . . . . . . . . . . . . . . . . . . 6
Saving Favorite Settings (Favorite) . . . . . . . . . 8
Advanced Use (Performing) . . . . . . . . . . . . . . . 10
Before using this unit, carefully read “USING THE UNIT SAFELY” and “IMPORTANT NOTES” (the leaet “USING
THE UNIT SAFELY” and the Owner’s Manual (p. 22)). After reading, keep the document(s) where it will be
available for immediate reference.
© 2017 Roland Corporation
Advanced Use (Settings) . . . . . . . . . . . . . . . . . . 13
Appendices . . . . . . . . . . . . . . . . . . . . . . . . . . . . . .20
USING THE UNIT SAFELY . . . . . . . . . . . . . . . . . .22
IMPORTANT NOTES . . . . . . . . . . . . . . . . . . . . . . . 22
Page 2
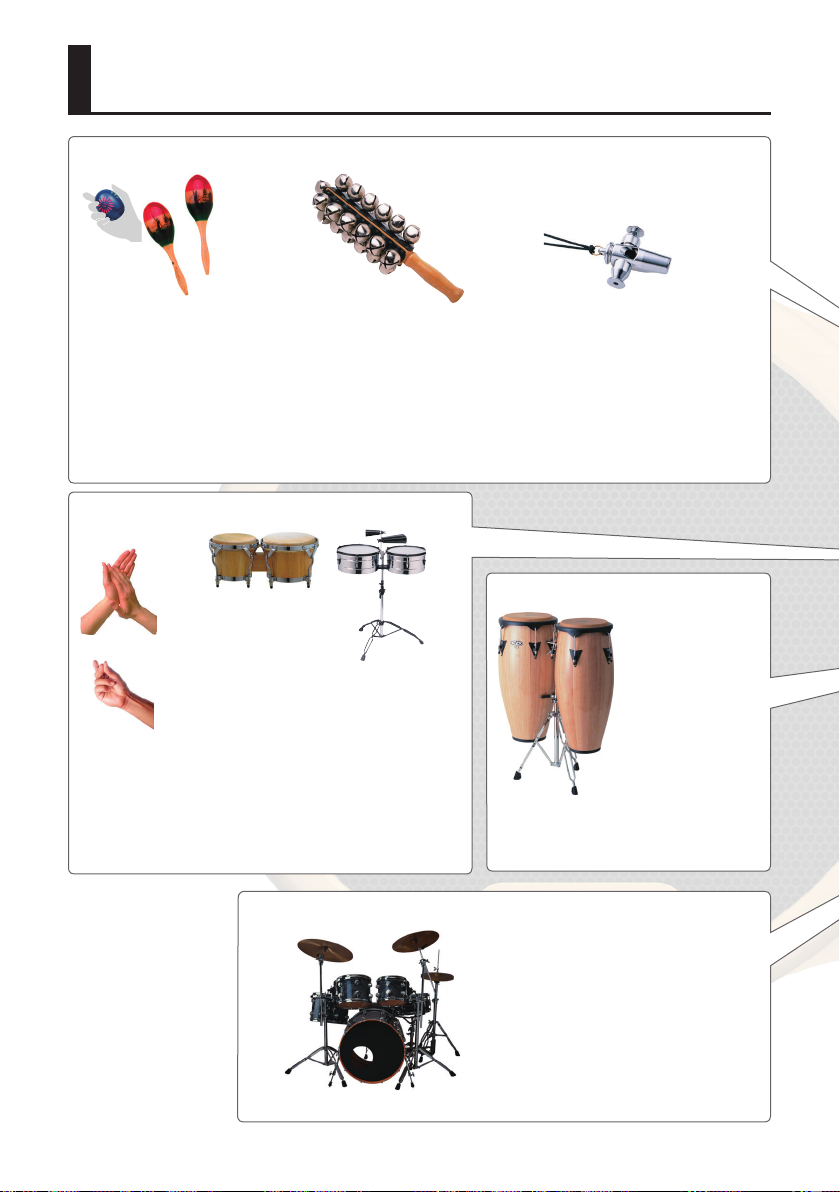
Enjoy Sounds Like These
Shaker, Maracas
Both contain tiny beads, and
produce sound when shaken.
Frequently used in Latin music.
Maracas are made using the
fruit of the maraca tree, which
is a type of palm. Maracas is the
plural form of “maraca.”
Hand-claps,
Finger-snaps
These are the
sounds of handclaps or ngersnaps.
Bongo
This is an ethnic
instrument
of Cuba that
connects two
drums of dierent
diameters.
The smaller drum
is called the
“macho” (male)
and the larger
the “hembra”
(female).
Bells
This instrument is shaken to
produce sound. Since there are
many objects called bells that
are not used as instruments,
these are also called “sleigh
bells.”
Paila
Conga This is a Cuban
This is the sound
(performance
technique) of
striking the body
of the timbales.
“Paila” is a term
for the body of a
timbale.
Whistle
This whistle (called an “apito”
in Portuguese) is used in samba
performance. By opening or
closing the holes at the two
sides of the instrument while
blowing, you can change the
pitch.
ethnic instrument
with a head (skin)
stretched over
a barrel-shaped
body. Originally,
its name diered
depending on
the size of the
head, but they are
collectively called
“congas.”
Drum set This is a set of multiple percussion
instruments that includes a snare
drum, bass drum, and cymbals.
The DR-01s contains standard, rock,
brush, and electro drum sets.
2
Page 3
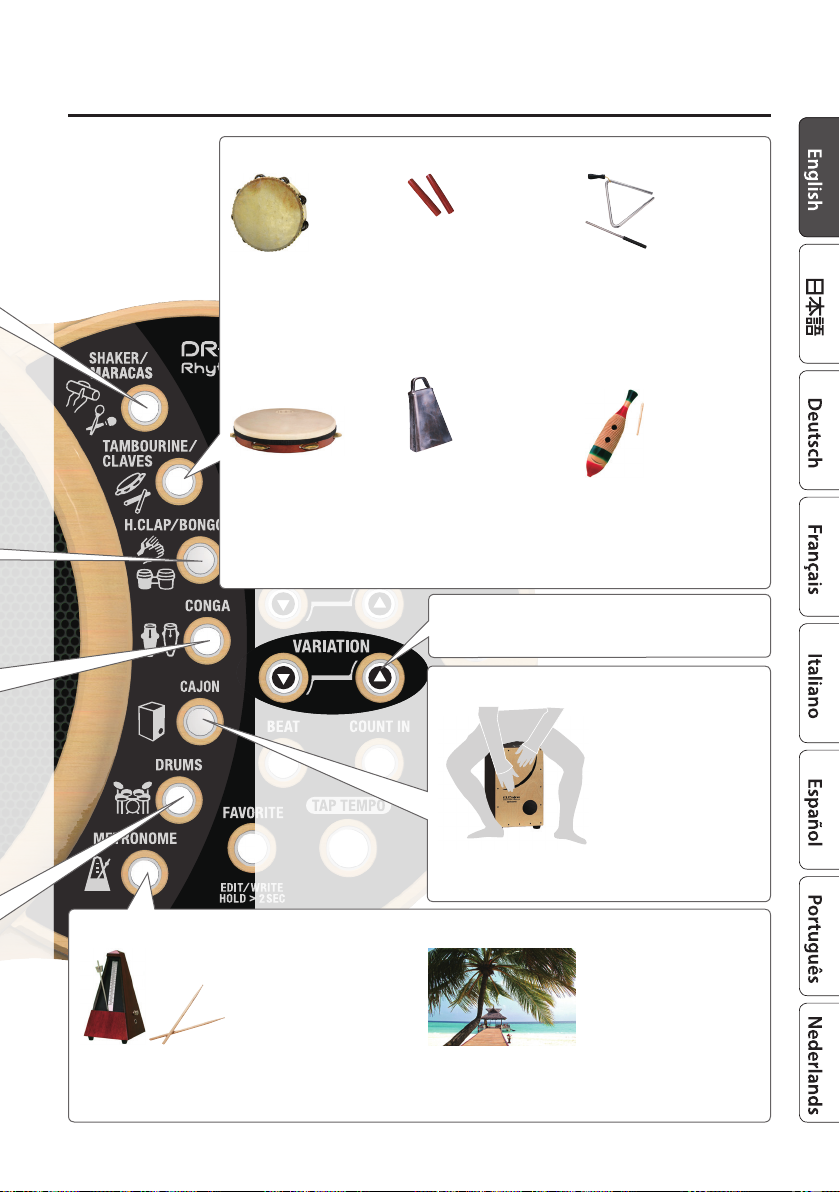
Enjoy Sounds Like These
Tambourine
This instrument
has multiple small
cymbals attached to a
round frame (body). It
produces sound when
struck or shaken.
Pandeiro
This is a Brazilian
percussion instrument
whose pitch can be
changed by varying the
tension of the skin while
you strike it.
Claves
This percussion
instrument consists
of two sticks that are
played by striking one
against the other.
Cowbell
This percussion
instrument is a bell
made to be attached to
the neck of a cow. It is
played by striking it with
a stick.
Use the VARIATION [I] [H] buttons to switch
rhythm patterns or instruments (p. 7).
Cajon This percussion
Triangle
This is suspended from
a string, and played by
striking it with a metal
rod.
Guiro
This instrument is carved
notches in body side. It
is played by rubbing it
with a stick.
instrument originated
in Peru; the player sits
on the box-shaped
body and plays it
by striking it on its
surface or edge.
Sometimes, snares
(strung wires) are
attached inside the
box.
Metronome
A metronome is a
musical tool that emits
sound at a xed tempo.
This metronome can
produce the sound
of a mechanical
metronome, as well
as electronic sounds
or the sounds of drum
sticks.
Sound eects
The sounds of surf,
birdsong, and rain are
provided.
3
Page 4
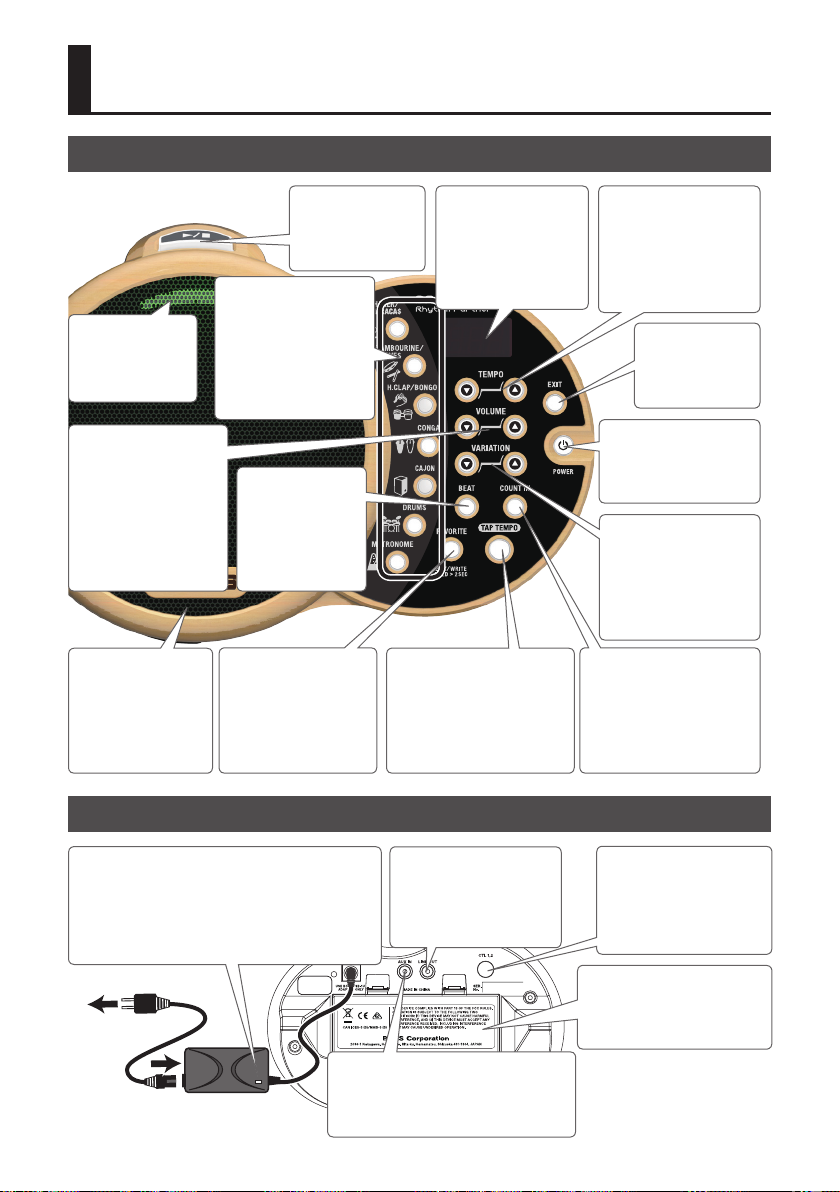
Panel Descriptions
Front Panel
Tempo LED
Blinks in time
with the beat.
VOLUME [I] [H]
button
Adjust the volume.
You can also
individually adjust
the volume of each
instrument (p. 6).
4 inches speaker
While compact,
this outputs clear
sound.
[s] button
Starts/stops the
rhythm (p. 6).
Instrument buttons
Select the
instrument
(percussion) that
plays the rhythm
(p. 2).
[BEAT] button
Switches the
time signature
of the rhythm
pattern (p. 7).
[FAVORITE] button
The current settings
can be saved in one
of 50 memories for
later recall (p. 8).
Display
Shows information
such as the
instrument or
tempo.
[TAP TEMPO] button
Sets the tempo of the
rhythm to the interval
at which you repeatedly
press this button (p. 6).
TEMPO [I] [H]
button
Adjust the tempo of
the rhythm pattern
that’s playing (p. 6).
[EXIT] button
Cancels an
operation.
[L] button
Turns the power on/
o (p. 6).
VARIATION [I] [H]
button
Switches the rhythm
pattern to play.
[COUNT IN] button
Sounds count when
the unit starts playing
a rhythm (p. 10).
Rear Panel
Place the AC adaptor so the side with the
indicator (see illustration) faces upwards
and the side with textual information faces
downwards. The indicator will light when
you plug the AC adaptor into an AC outlet.
To outlet
Power cord
4
LINE OUT jack
You can connect
an external speaker
(sold separately) here.
AUX IN jack
You can connect an audio player
(or smartphone) here.
CTL 1, 2 jack
You can connect
a footswitch
(sold separately) here.
Battery compartment
Install six AA alkaline
batteries.
Page 5
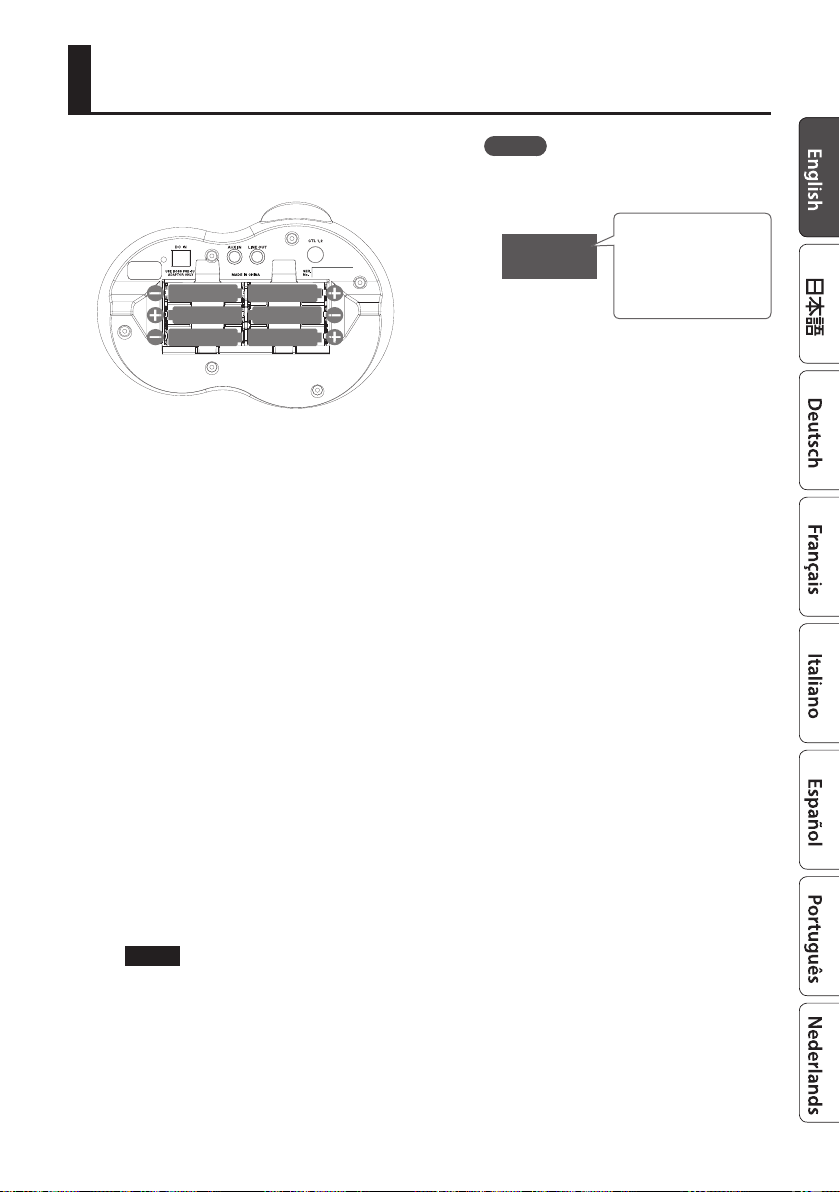
Installing Batteries
If you want to use the unit on batteries,
install six AA alkaline batteries, making sure
that each battery is oriented correctly.
* When turning the unit over, be careful so
as to protect the buttons and knobs from
damage. Also, handle the unit carefully;
do not drop it.
* If you handle batteries improperly, you
risk explosion and uid leakage. Make
sure that you carefully observe all of the
items related to batteries that are listed
in leaet “USING THE UNIT SAFELY”
and Owner’s manual (p. 22).
* The magnetism of the speaker might
make the batteries adhere to the
battery compartment, but this is not a
malfunction.
MEMO
If the following display appears, the
batteries have run low.
Battery low
bt
The indication disappears when
you press any of the buttons, but
reappears after a minute.
Either connect an AC adaptor, or
install fresh batteries.
indication
The batteries are
low.
* The power to this unit will be turned o automatically after a predetermined amount of
time has passed since it was last used for playing music, or its buttons or controls were
operated (Auto O function).
If you do not want the power to be turned o automatically, disengage the Auto O
function (p. 19).
NOTE
5 Any settings that you are in the process of editing will be lost when the power is turned
o. To avoid losing important settings, make a note of them beforehand.
5 To restore power, turn the power on again (p. 6).
5
Page 6

Playing Rhythms
Turning On the Power
1. Press the [L] button
The power turns on.
To turn o the power, press the [L] button
once again.
Selecting Instruments
1. Press an instrument button to
select a sound (p. 2).
The instrument button you pressed is lit.
2. Press the [s] button.
5 You can switch the measure
indication between displayed
and hidden by holding down the
[EXIT] button and pressing the
[COUNT IN] button.
Adjusting the Volume
1. Use the VOLUME [I] [H] buttons to
adjust the volume of the rhythm.
Volume
Indicates the volume
100
of the DR-01s.
Adjusting the Tempo
1. Use the VOLUME [I] [H] buttons to
adjust the tempo of the rhythm.
Tempo
Indicates the tempo
120
MEMO
You can set the tempo by pressing
the [TAP TEMPO] button multiple
times at the desired interval of timing.
of the rhythm.
The rhythm plays using the instrument you
selected.
Measure
Indicates the measure
2
MEMO
5 You can press multiple instrument
buttons. The rhythm plays with the
selected instruments layered.
of the rhythm.
6
Stopping the Rhythm
1. Press the [s] button.
The rhythm stops.
Page 7
Playing Rhythms
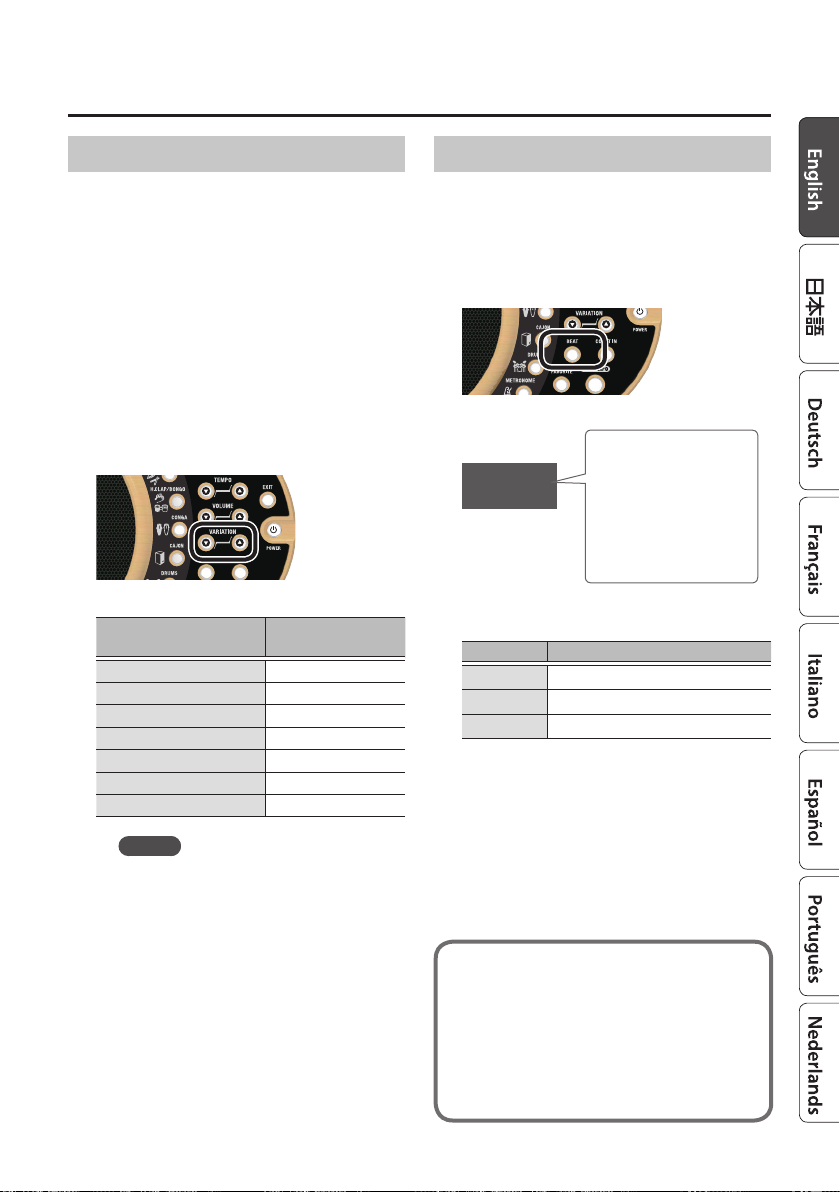
Selecting a Rhythm Pattern
Multiple rhythm patterns are included for each
instrument.
1. Select the instrument whose
rhythm pattern you want to switch.
Make an instrument button light. If you
press a lit instrument button, that button
goes dark (the instrument is not heard).
In this case, press the instrument button
once again to make it light (so that the
instrument is heard).
2. Press VARIATION [I] [H] buttons.
The rhythm pattern switches.
Instrument button
[SHAKER/MARACAS]
[TAMBOURINE/CLAVES]
[H.CLAP/BONGO]
[CONGA]
[CAJON]
[DRUMS]
[METRONOME]
Example display
for variation #01
X.01
t.01
b.01
G.01
c.01
d.01
e.01
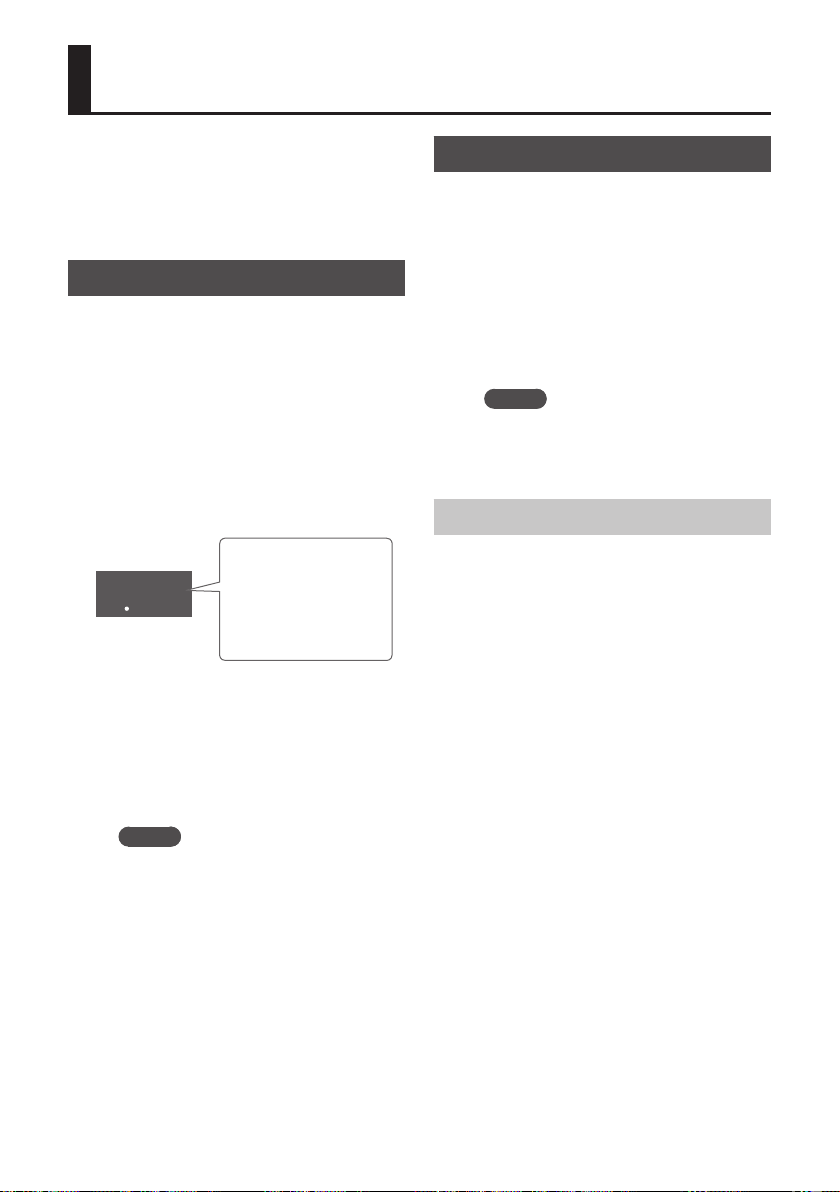
Changing the Time Signature
You can switch the time signature of the
rhythm pattern between 3/4, 4/4, and 6/8
time.
1. Press the [BEAT] button.
The current time signature is shown.
BEAT (time signature)
indication
4/4
The time signature changes each time you
press the [BEAT] button.
Indication Explanation
3/4
4/4
6/8
Indicates the time
signature of the
rhythm pattern.
(Example: 4/4 time)
3/4 time
4/4 time
6/8 time
MEMO
5 You can also switch rhythm patterns
by holding down an instrument
button and using the VARIATION [I]
[H] buttons.
5 For instrument buttons that contain
multiple instruments, you can hold
down the [EXIT] button and use the
VARIATION [I] [H] buttons to select
the rst number of each instrument.
Now you understand the basic
operation of the DR-01s.
More advanced uses are described on
the following pages.
&to the next page
7
Page 8
Saving Favorite Settings (Favorite)
The combination of instruments and the
rhythm pattern can be saved as one of 50
settings (the Favorite function).
Saved settings can be recalled whenever you
like.
Saving
1. Make sure that the [FAVORITE]
button is unlit.
2. Select the instruments and rhythm
pattern that you want to save.
3. Long-press the [FAVORITE] button
(two seconds or longer).
The VARIATION [I] [H] buttons blink, and
the save-destination favorite number
appears.
Favorite number
(blinking)
f01
4. Press VARIATION [I] [H] buttons.
Select the save-destination favorite number
(F.01–F.50).
5. Press the [FAVORITE] button.
The settings are saved in the favorite
number that you selected.
MEMO
The count-in (p. 10) on/o status
cannot be saved in a favorite.
When you save the
settings, the favorite
number is shown.
Recalling
1. Press the [FAVORITE] button.
The VARIATION [I] [H] buttons are lit, and
the favorite number is shown.
2. Press VARIATION [I] [H] buttons.
When you select a favorite number
(F.01–F.50), the saved settings are recalled.
When you press the [s] button, the
rhythm plays with the recalled settings.
MEMO
You can turn instruments on/o here.
If you want to change an instrument’s
variation, use the edit function (p. 9).
Exiting the Favorite Function
When you have nished recalling favorites,
press the [FAVORITE] button once again.
The VARIATION [I] [H] buttons go dark,
and the display returns to showing the
tempo.
8
Page 9

Editing a Saved Favorite
You can edit the settings of a saved favorite,
and then re-save it.
1. Press the [FAVORITE] button.
The VARIATION [I] [H] buttons are lit, and
the favorite number is shown.
2. Press VARIATION [I] [H] buttons.
Recall the favorite number (F.01–F.50) that
you want to edit. The saved settings are
recalled.
3. Long-press the [FAVORITE] button
(two seconds or longer).
The [FAVORITE] button blinks. Now you can
edit the favorite.
4. Edit the settings by switching
instruments or rhythm patterns.
5. Long-press the [FAVORITE] button
(two seconds or longer).
The VARIATION [I] [H] buttons blink, and
the save-destination favorite number
appears.
Saving Favorite Settings (Favorite)
Favorite number
(blinking)
f01
When you save the
settings, the favorite
number is shown.
6. Press VARIATION [I] [H] buttons.
Select the save-destination favorite number
(F.01–F.50).
7. Press the [FAVORITE] button.
The settings are saved in the favorite
number that you selected.
You return to the state of step 2.
MEMO
If you are nished using the favorite
function, press the [FAVORITE] button
once again.
9
Page 10

Advanced Use (Performing)
Here we explain convenient functions that you
can use while performing.
Adding a Count Before Rhythm
Starts
You can insert a count before the rhythm
starts.
1. Press the [COUNT IN] button.
The [COUNT IN] button is lit.
When you press the [s] button, a
one-measure count is sounded before the
rhythm plays.
Count-In
This indicates that
cin
MEMO
To turn o the count-in function,
press the [COUNT IN] button once
again.
count is playing.
Adjusting the Count-In Volume
1. Hold down the [COUNT IN] button,
and use the VOLUME [I] [H]
buttons.
The volume of the count-in changes.
Volume of count-in
u50
Changing the Type of Count-In
You can change the sound of the count-in, or
use an illuminated (silent) count.
1. Press the [COUNT IN] button.
The [COUNT IN] button is lit.
2. Hold down the [COUNT IN] button,
and use the VARIATION [I] [H]
buttons.
Select the type of count-in.
Indication Explanation
.01
.02 .09
.03 .10
.04
.05
.06 .13
.07
Count-in with drumsticks.
.08
Count-in with voice.
Count-in with hi-hat.
.11
Count-in with electronic
sound (beeps).
.12
Count-in by lighting the
tempo LED located above
the speaker.
In this case, no count-in
sound is heard.
Type of count-in
Indicates the type of
01
MEMO
c.07–c.13 are two-measure count-ins.
count-in.
10
Page 11

Advanced Use (Performing)
Fading-Out the Rhythm
You can gradually decrease (fade-out) the
volume of the rhythm, and then stop.
Here’s how you can use fade-out
Suddenly stopping the rhythm at the
end of a performance might create
an unnatural impression.
For example, it is eective to fadeout when you want to insert an
expressive break (rest).
1. Hold down the [EXIT] button, and
press the [s] button.
Fade-out length
Indicates the length
05
The value of the setting changes each time
you press the [s] button.
Indication Explanation
.00.
.02.
:
.40.
(seconds) taken by the
fade-out.
The rhythm does not fade-out.
The rhythm fades-out over the
specied number of seconds.
Doubling or Halving the Tempo
Here’s how to double or halve the tempo
setting.
1. Hold down the [EXIT] button, and
use the TEMPO [I] [H] buttons.
5 Hold down the [EXIT] button and press
the TEMPO [H] button to double the
tempo.
5 Hold down the [EXIT] button and press
the TEMPO [I] button to halve the
tempo.
MEMO
5 The tempo’s upper limit is 300, and
its lower limit is 40. If doubling or
halving the tempo would set the
tempo outside these limits, the
tempo is restricted to the upper limit
(300) or lower limit (40).
5 When you halve the tempo, the value
below the decimal point is rounded
down. For example, halving a tempo
of 151 changes it to 75.
2. Release the [EXIT] button.
3. Press the [s] button.
The rhythm plays.
4. Press the [s] button.
The rhythm fades-out and stops.
The display shows “F.o” during the fade-
out.
MEMO
If you press the [s] button once
again during the fade-out, the rhythm
stops immediately.
11
Page 12

Advanced Use (Performing)
Connecting an External Speaker
By connecting an external speaker
(sold separately), you can play the rhythm
more loudly.
* To prevent malfunction and equipment
failure, always turn down the volume,
and turn o all the units before making
any connections.
LINE OUT
DR-01s
AUX IN
etc.
External speaker
(sold separately)
Using the DR-01s as a Speaker
Sound from an external device can be played
back through the speaker of the DR-01s.
AUX IN
DR-01s
PHONES etc.
External device (Audio player,
Smartphone, etc.)
MEMO
Use the controls of the external
device to adjust the volume of its
sound.
12
MEMO
If a plug is inserted into the LINE OUT
jack of the DR-01s, no sound is output
from the speakers of the DR-01s.
Page 13

Advanced Use (Settings)
Adjusting the Volume of Each
Instrument
When multiple instruments are playing the
rhythm, you can adjust the volume of each
instrument.
1. Hold down the instrument button
whose volume you want to change,
and use the VOLUME [I] [H]
buttons.
Instrument Volume
The volume of the
u50
Adjust the volume of the instrument to set
its balance with the other instruments.
2. Release the instrument button.
MEMO
The volume of sound eects (surf,
birdsong, rain) does not change
immediately if you adjust it while
rhythm is playing. The volume change
is applied when you stop the rhythm.
instrument is shown.
Adjusting the Reverb Level
You can apply reverb (an eect simulating the
reverberation of a hall) to the rhythm.
You can adjust the amount of reverb.
1. Hold down the [EXIT] button, and
use the VOLUME [I] [H] buttons.
Reverb Level
The amount of reverb
r50
Adjust the reverb level.
Indication Explanation
r.00
r.10
:
100
2. Release the [EXIT] button.
is shown.
Reverb is not applied.
Reverb is applied.
13
Page 14

Advanced Use (Settings)
Using Pedals to Control the DR-01s
If footswitches (sold separately: FS-5U, FS-6, FS-7) are connected to the CTL 1, 2 jack, you can
control the DR-01s without removing your hands from your instrument.
You can assign various functions to pedals and use them to control the DR-01s, or use pedals to
play percussion sounds or to recall a pre-specied favorite.
Connecting Pedals
* To prevent malfunction and equipment failure, always turn down the volume, and turn o all
the units before making any connections.
When Connecting an
FS-5U
1/4” phone type ,
1/4” phone type
CTL 1
Polarity switch
When Connecting an
FS-6
Stereo 1/4” phone type
,
Stereo 1/4” phone type
CTL 2
CTL 1
Mode, Polarity switch Mode, Polarity switch
When Connecting Two
FS-5Us
Stereo 1/4” phone type
,
1/4” phone type x 2
CTL 2 CTL 1
When Connecting an
FS-7
Stereo 1/4” phone type
,
1/4” phone type x 2
CTL 2
CTL 1
14
Page 15

Advanced Use (Settings)
Assigning Functions to Pedals
Here we explain how to assign a function
or a percussion sound to CTL2 (pedal A) or
CTL1 (pedal B) of the FS-6 or FS-7 (each sold
separately).
1. With the DR-01s powered-o, hold
down the VARIATION [H] button
and press the [L] button.
The DR-01s powers-on in a special mode
that lets you assign the function.
CTL1 function assign
screen
ct1
Now you can assign a function to CTL1
(pedal B).
2. Press the button of the function
that you want to assign to CTL1.
The button that you press is assigned to
CTL1 (pedal B).
For example if you press the [s] button,
pressing pedal B performs the same
operation as pressing the [s] button.
Assigns a function to
CTL1.
Functions that can be controlled by a
pedal
The following functions can be assigned and
controlled by a pedal.
Function
TEMPO [H] T.UP
TEMPO [I] T.DN
VOLUME [H] VO.U
VOLUME [I] VO.D
VARIATION [H] VA.U
VARIATION [I] VA.D
[TAP TEMPO]
[SHAKER/MARACAS]
[TAMBOURINE/CLAVES]
[H.CLAP/BONGO]
[CONGA]
[CAJON]
[DRUMS]
[METRONOME]
[s] Str
(Cancel)
Indication
TAP
P.ON
OFF
Explanation
Control the tempo.
Control the volume.
Change the
variation.
Species the tap
tempo.
Turn the instrument
button on/o.
You can turn
multiple
instruments on/o
simultaneously.
Controls start/stop.
Cancels the
assignment.
To cancel, press the
[BEAT] button.
Example: Press the
[s] button
str
Rhythm start/stop is
assigned.
3. Press the [L] button.
Power-o the DR-01s.
The next time you turn on the power, you
can use the function that you assigned to
the pedal.
MEMO
5 If you press the
assignment to the pedal is canceled
(OFF indication).
5 The functions of the [COUNT IN]
button, [FAVORITE] button, [BEAT]
button, or [EXIT] button cannot be
assigned to a pedal.
[BEAT] button, the
15
Page 16

Advanced Use (Settings)
Assigning a function to CTL2
1. After step 1 of “Assigning
Functions to Pedals” (p. 15), press
the [EXIT] button.
CTL2 function assign
screen
ct2
Now you can assign a function to CTL2
(pedal A).
To select the pedal whose function you
want to assign, press the [EXIT] button to
alternate between the two pedals.
Assigns a function to
CTL2.
Assigning a Percussion Sound
1. After step 1 of “Assigning
Functions to Pedals” (p. 15), press
the [COUNT IN] button.
The VARIATION [I] [H] buttons are lit. Now
you can assign a percussion sound to the
pedal.
2. Use the VARIATION [I] [H] buttons
to select the percussion sound that
you want to play using CTL1.
Each time you press a VARIATION [I] [H]
button, a percussion sound is heard.
The sound that you select is assigned to
CTL1 (pedal B).
3. Press the [L] button.
Power-o the DR-01s.
The next time you turn on the power, you
can use the percussion sound that you
assigned to the pedal.
Percussion sounds that can be
assigned to a pedal
Indication Percussion sound
n.01
n.02
n.03
n.04
n.05
n.06
n.07
n.08
n.09
n.10
n.11
n.12
n.13
n.14
n.15
n.16
n.17
n.18
n.19
n.20
n.21
n.22
n.23
n.24
n.25
n.26
n.27
n.28
n.29
n.30
n.31
n.32
n.33
n.34
n.35
n.36
n.37
n.38
n.39
n.40
n.41
n.42
n.43
n.44
Shaker
Maracas
Sleighbells
Whistle 1
Whistle 2
Tambourine
Tambourine roll
Pandeiro 1
Pandeiro 2
Claves
Cowbell
Triangle 1
Triangle 2
Guiro 1
Guiro 2
Bongo Low
Bongo Slap
Clap
Finger snap
Flamenco clap
Conga open
Conga slap
Cajon foot
Cajon foot + Splash cymbal
Cajon slap
Splash cymbal
Drums solid kick
Drums solid kick + Thin crash
Drums studio kick
Drums studio kick + Thin crash
Drums hybrid kick
Drums stomp
Drums piccolo snare
Drums tight snare
Drums cross stick
Drums hi-hat close
Drums hi-hat pedal
Drums thin crash
Windchime
Gong
Vibraslap
Thunder
Wind
Bird
16
Page 17

Advanced Use (Settings)
Indication Percussion sound
n.45
n.46
n.47
n.48
n.49
n.50
n.51
n.52
n.53
n.54
n.55
Metronome
Stick
Voice one
Voice two
Voice three
Voice four
Metronome beep 1
Metronome beep 2
Metronome beep 3
Ending (Cajon)
Ending (Drums)
Assigning a Favorite Number
1. After step 1 of “Assigning
Functions to Pedals” (p. 15), press
the [FAVORITE] button.
The [FAVORITE] button and VARIATION [I]
[H] buttons are lit, and a favorite number is
displayed.
Favorite number
(blinking)
f01
2. Use the VARIATION [I] [H] buttons
to select the favorite number that
you want to recall using CTL1.
The selected favorite number (F.01–F.50) is
assigned to CTL1 (pedal B).
3. Press the [L] button.
Power-o the DR-01s.
The next time you turn on the power, you
can recall the favorite number that you
assigned to the pedal.
The favorite number
recalled by the pedal
is displayed.
Assigning a Break Function
The rhythm breaks (pauses) over the specied
number of measures.
1. After step 1 of “Assigning
Functions to Pedals” (p. 15), hold
down the [BEAT] button and press
the [COUNT IN] button.
The VARIATION [I] [H] buttons are lit, and a
break length is displayed.
Break length (number of
b01
2. Use the VARIATION [I] [H] buttons
to select the length that you want
to break.
Indication Explanation
b.01
:
b.08
3. Press the [L] button.
Power-o the DR-01s.
The next time you turn on the power,
you can use the break function that you
assigned to the pedal.
MEMO
5 The display shows “br” during the
break.
5 You can’t assign the break length for
CTL1 and CTL2 individually. If you
change the break length, the same
length is specied for both CTL1 and
CTL2.
measures)
The rhythm breaks over the
specied number of measures.
17
Page 18

Advanced Use (Settings)
Changing the Color of the Tempo
LED
You can change the color of the tempo LED to
suit your preference.
1. With the DR-01s powered-o, hold
down the [COUNT IN] button and
press the [L] button.
The DR-01s powers-on in a special mode
that lets you change the color of the tempo
LED.
Tempo LED color
Left: Color of the
r/g
2. Use the VARIATION [I] [H] buttons
to select the color of the strong
beat, and use the VOLUME [I] [H]
buttons to select the color of the
weak beats.
You can choose from the following colors.
Color Indication Color Indication
Red
r
Green
g
Blue
b
Yellow
y
strong beat (rst beat)
Right: Color of the
weak beats (second
and subsequent
beats)
Pink
Light blue
White
Unlit
(does not
illuminate)
p
c
w
n
MEMO
The tempo LED blinks while you make
this setting. At this time, you can use
the TEMPO [I] [H] buttons to change
the speed of blinking.
With the factory settings, this is set to
“r/g” (strong beat: red, weak beats:
green).
3. Press [L] button.
When you turn the power o and then on
again, the tempo LED blinks with the colors
you specify.
18
Page 19

Advanced Use (Settings)
Power-Conservation Setting
(Auto O)
The DR-01s automatically powers-o if a
specied time elapses without it being played
or operated (Auto O function).
You can prevent the power from automatically
turning o, such as when using it during a live
performance.
1. With the DR-01s powered-o, hold
down the TEMPO [H] button and
press the [L] button.
The DR-01s powers-on in a special mode
that lets you change the Auto O setting.
2. Press VARIATION [I] [H] buttons.
Specify the time after which the power
automatically turns o if the DR-01s has not
been played or operated.
Indication Explanation
off
1H
2H
3h
4h
The Auto O function is disabled
(the power does not turn o
automatically).
The power turns o after one
hour.
The power turns o after two
hours.
The power turns o after three
hours.
The power turns o after four
hours.
Restoring the Factory Settings
(Factory Reset)
Here’s how to restore all settings stored in the
DR-01s to their factory-set condition.
NOTE
When you execute the factory reset
operation, all data saved in the
DR-01s lost.
Make a note of any important settings
that you want to keep. (Use the
“Sound Memo” provided at the end
of this manual.)
1. With the DR-01s powered-o, hold
down the [FAVORITE] button and
press the [L] button.
Factory Reset
fr
2. Press the [FAVORITE] button.
The [FAVORITE] button blinks.
If you decide not to execute the factory
reset, press the [EXIT] button.
3. If you are sure that you want to
restore the DR-01s to its factory-set
state, press the [FAVORITE] button
once again.
The display shows “oFF.”
off
4. Press the [L] button.
Power-o the DR-01s.
19
Page 20

Appendices
Troubleshooting
Problem Items to check Action
Power won’t
turn on
No sound
Insucient
volume for
a device
connected to
the AUX IN jack
Can’t change
instrument
variations
Are the included AC adaptor
and power cord correctly
connected to an outlet and to
the DR-01s?
Are batteries installed?
Are you using alkaline batteries?
Is the volume adjusted
appropriately?
Could the volume setting of
each individual instrument be
set to “0”?
Could all of the instrument
buttons be o (unlit)?
Could a plug be inserted into
the LINE OUT jack?
Are you using alkaline batteries?
Could you be using a
connection cable that contains
a built-in resistor?
Could the [FAVORITE] button
be lit?
Check that the AC adaptor is connected correctly
(p. 4). Do not use any AC adaptor or power cord
other than the supplied items. Doing so will cause
malfunctions.
Taking care to observe the correct orientation of the
batteries, install six AA alkaline batteries (p. 5).
Do not use zinc-carbon batteries.
Raise the volume (p. 6).
Also make sure that the volume of each individual
instrument is raised (p. 13).
Make one or more instrument buttons light (p. 4, p. 6).
Remove the plug that is inserted in the LINE OUT jack
(p. 4, p. 12).
Install six new AA alkaline batteries (p. 5).
Do not use zinc-carbon batteries.
Do not use connection cables that contain a built-in
resistor.
You can’t change instrument variations while the
[FAVORITE] button is lit (the favorite function is on).
To change variations, perform either of the following
operations.
Press the [FAVORITE] button to make it go dark (the
favorite function turns o) (p. 8)
Long-press the [FAVORITE] button to edit the favorite
(p. 9)
20
Page 21

Appendices
Specications
BOSS Rhythm Partner DR-01s: Rhythm machine
Maximum
Polyphony
Tempo 40–300
Time Signature 3/4, 4/4, 6/8
Tones
Number of
Favorite
Rated Power
Output
Speaker 10 cm (4 inches)
Display 7 segments, 3 characters (LED)
DA Conversion 24 bits
Nominal Input
Level
Input Impedance AUX IN: 22 kΩ
Nominal Output
Level
Output
Impedance
Recommended
Load Impedance
24
Shaker
Maracas
Bell
Whistle
Tambourine
Pandeiro
Claves
Cowbell
Triangle
Guiro
Bongo
Hand clap
Paila
Conga
Cajon
Drums
Metronome
Sound eects
50
7 W
AUX IN: -20 dBu
LINE OUT: -10 dBu
LINE OUT: 1 kΩ
LINE OUT: 10 kΩ or greater
AUX IN jack
LINE OUT
Connectors
Power Supply
Current Draw 330 mA
Expected battery
life under
continuous use
Dimensions
Weight
Accessories
Options
(sold separately)
* This document explains the specications
of the product at the time that the
document was issued. For the latest
information, refer to the Roland website.
jack
CTL 1, 2 jack
DC IN jack
Alkaline battery (AA, LR6) x 6
(sold separately)
AC adaptor
Alkaline: Approx. 10 hours
* These gures will vary
depending on the actual
conditions of use.
210 (W) x 143 (D) x 127 (H) mm
8-5/16 (W) x 5-11/16 (D) x 5 (H)
inches
900 g
2 lbs
Owner’s manual
Leaet “USING THE UNIT
SAFELY”
AC adaptor
Footswitch: FS-5U
Dual Footswitch: FS-6, FS-7
Stereo miniature
phone type
Stereo miniature
phone type
1/4-inch TRS
phone type
21
Page 22

USING THE UNIT SAFELY
WARNING
Concerning the Auto O function
The power to this unit will be
turned o automatically after a
predetermined amount of time has
passed since it was last used for
playing music, or its buttons or controls were
operated (Auto O function). If you do not
want the power to be turned o automatically,
disengage the Auto O function (p. 19).
IMPORTANT NOTES
Power Supply: Use of Batteries
• If the batteries run extremely low, the sound
may distort, but this does not indicate a
malfunction. If this occurs, please replace
the batteries or use the included AC adaptor.
• If using batteries, we recommend that you
use alkaline batteries.
• Even if batteries are installed, the unit will
turn o if you connect or disconnect the
power cord from the AC outlet while the unit
is turned on, or if you connect or disconnect
the AC adaptor from the unit. At this time,
unsaved data might be lost. You must
turn o the power before you connect or
disconnect the power cord or AC adaptor.
Placement
• Depending on the material and temperature
of the surface on which you place the unit,
its rubber feet may discolor or mar the
surface.
• Do not place the unit near objects that are
aected by magnetism, such as a watch or a
magnetic card.
22
WARNING
Use only the supplied AC adaptor and the correct
voltage
Be sure to use only the AC adaptor
supplied with the unit. Also,
make sure the line voltage at the
installation matches the input
voltage specied on the AC adaptor’s body.
Other AC adaptors may use a dierent
polarity, or be designed for a dierent
voltage, so their use could result in damage,
malfunction, or electric shock.
Use only the supplied power cord
Use only the attached power cord.
Also, the supplied power cord must
not be used with any other device.
Repairs and Data
• Before sending the unit away for repairs, be
sure to write down the needed information.
Although we will do our utmost to preserve
the data stored in your unit when we carry
out repairs, in some cases, such as when
the memory section is physically damaged,
restoration of the stored content may be
impossible. Roland assumes no liability
concerning the restoration of any stored
content that has been lost.
Additional Precautions
• Any data stored within the unit can be lost
as the result of equipment failure, incorrect
operation, etc. To avoid losing important
settings, make a note of them beforehand.
• Roland assumes no liability concerning the
restoration of any stored content that has
been lost.
• Do not use connection cables that contain a
built-in resistor.
• The magnetism of the speaker might
make the batteries adhere to the battery
compartment, but this is not a malfunction.
Page 23

Intellectual Property Right
• It is forbidden by law to make an audio
recording, video recording, copy or
revision of a third party’s copyrighted work
(musical work, video work, broadcast, live
performance, or other work), whether
in whole or in part, and distribute, sell,
lease, perform or broadcast it without the
permission of the copyright owner.
• Do not use this product for purposes
that could infringe on a copyright
held by a third party. We assume no
responsibility whatsoever with regard to
any infringements of third-party copyrights
arising through your use of this product.
• The copyright of content in this product
(the sound waveform data, style data,
accompaniment patterns, phrase data, audio
loops and image data) is reserved by Roland
Corporation.
• Purchasers of this product are permitted
to utilize said content (except song data
such as Demo Songs) for the creating,
performing, recording and distributing
original musical works.
• Purchasers of this product are NOT
permitted to extract said content in
original or modied form, for the purpose
of distributing recorded medium of said
content or making them available on a
computer network.
• Roland and BOSS are either registered
trademarks or trademarks of Roland
Corporation in the United States and/or
other countries.
• Company names and product names
appearing in this document are registered
trademarks or trademarks of their respective
owners.
IMPORTANT NOTES
23
Page 24

 Loading...